Bubble ponytails have become one of those rare hairstyles that manage to be both playful and polished. There’s something undeniably satisfying about the way elastic bands cinch the hair into those neat, rounded sections that stack vertically down your back—each one a perfect puff of texture and volume. What started as a trend has become a legitimate styling technique that works across hair types, lengths, and occasions, from casual weekend hangouts to special events where you want something more interesting than a traditional sleek ponytail.
The beauty of bubble ponytails lies in their versatility. You can dress them up or down, wear them high or low, make them sleek or deliberately messy, and accessorize them in countless ways. They work on curly hair, straight hair, fine hair that needs volume tricks, and thick hair that benefits from structure. They can be done with just elastic bands in under ten minutes, or transformed into something intricate with braids, ribbons, and decorative clips. Whether you’re looking for an effortless everyday style or something that photographs beautifully, bubble ponytails offer serious range.
The real appeal comes down to this: they’re fun to create, they look intentional and put-together, and they stay secure throughout your day without feeling tight or damaging. Once you understand the basic technique and know a handful of variations, you can adapt the style to match whatever mood, outfit, or occasion calls for it. Here are twelve bubble ponytail styles that each bring something distinct to the table.
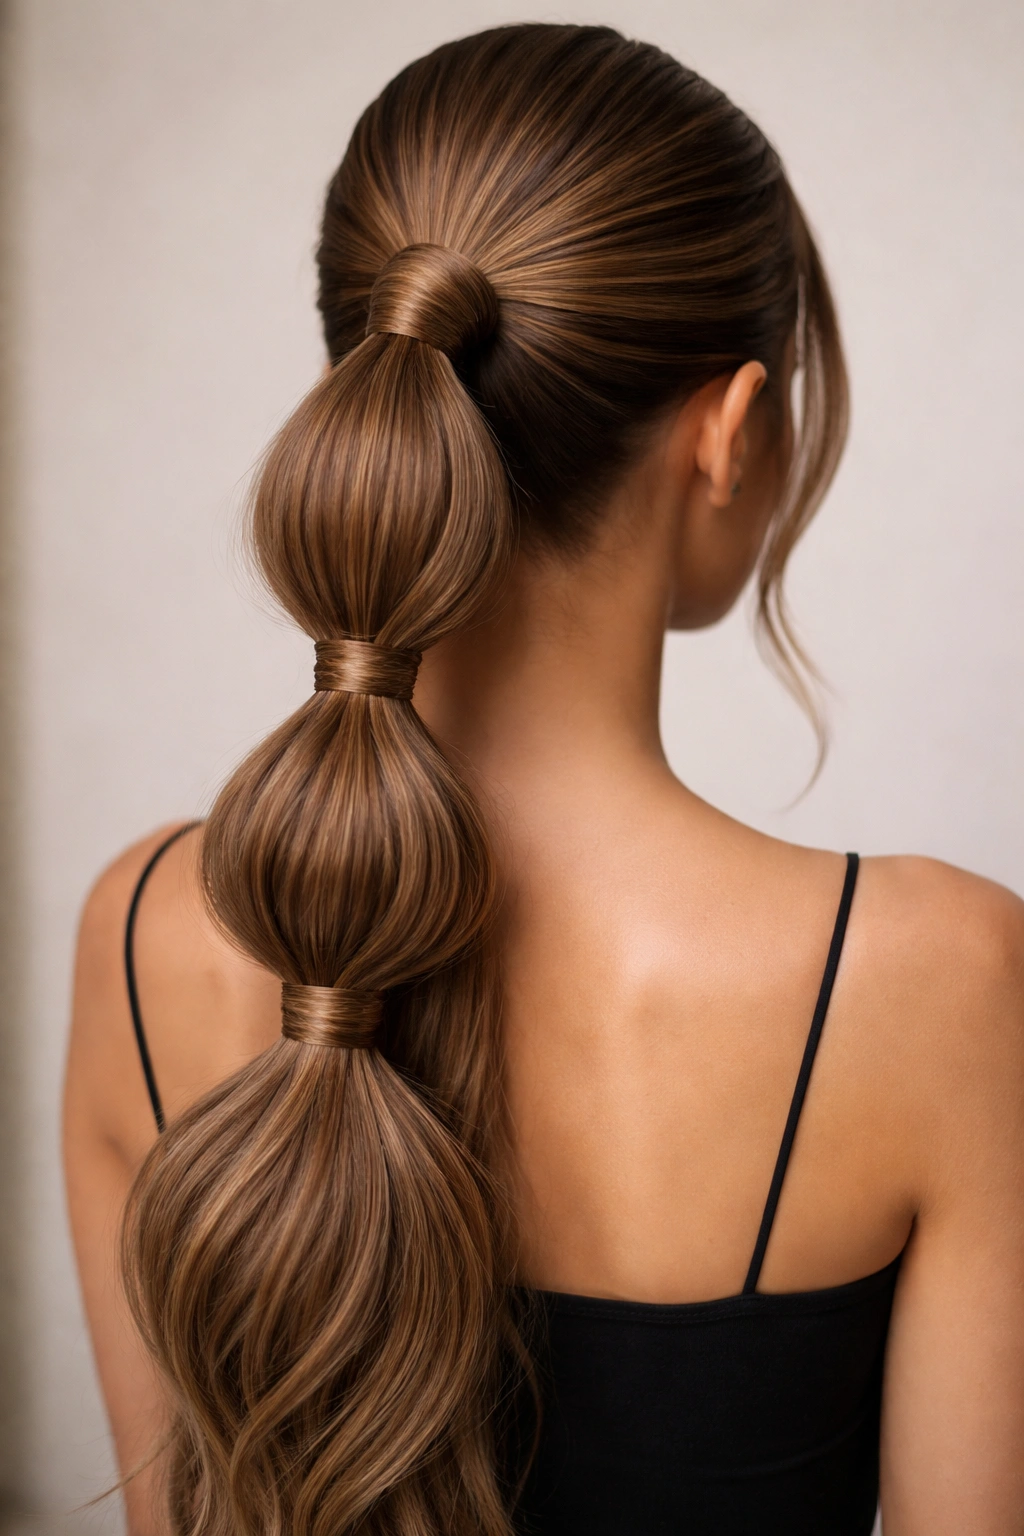
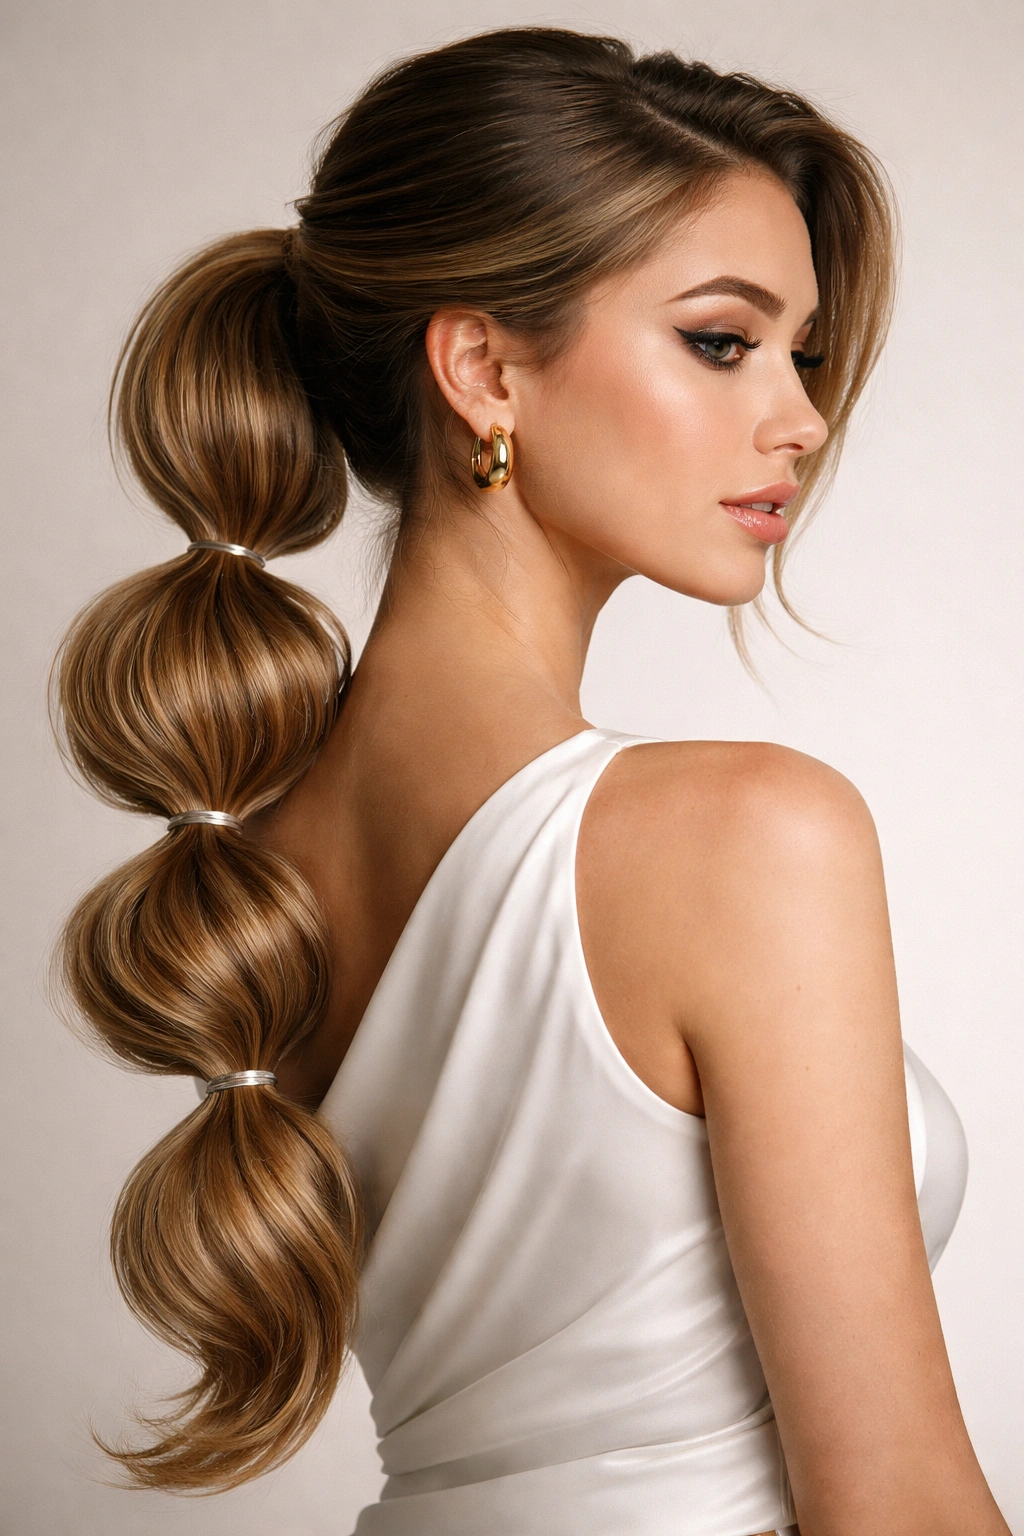
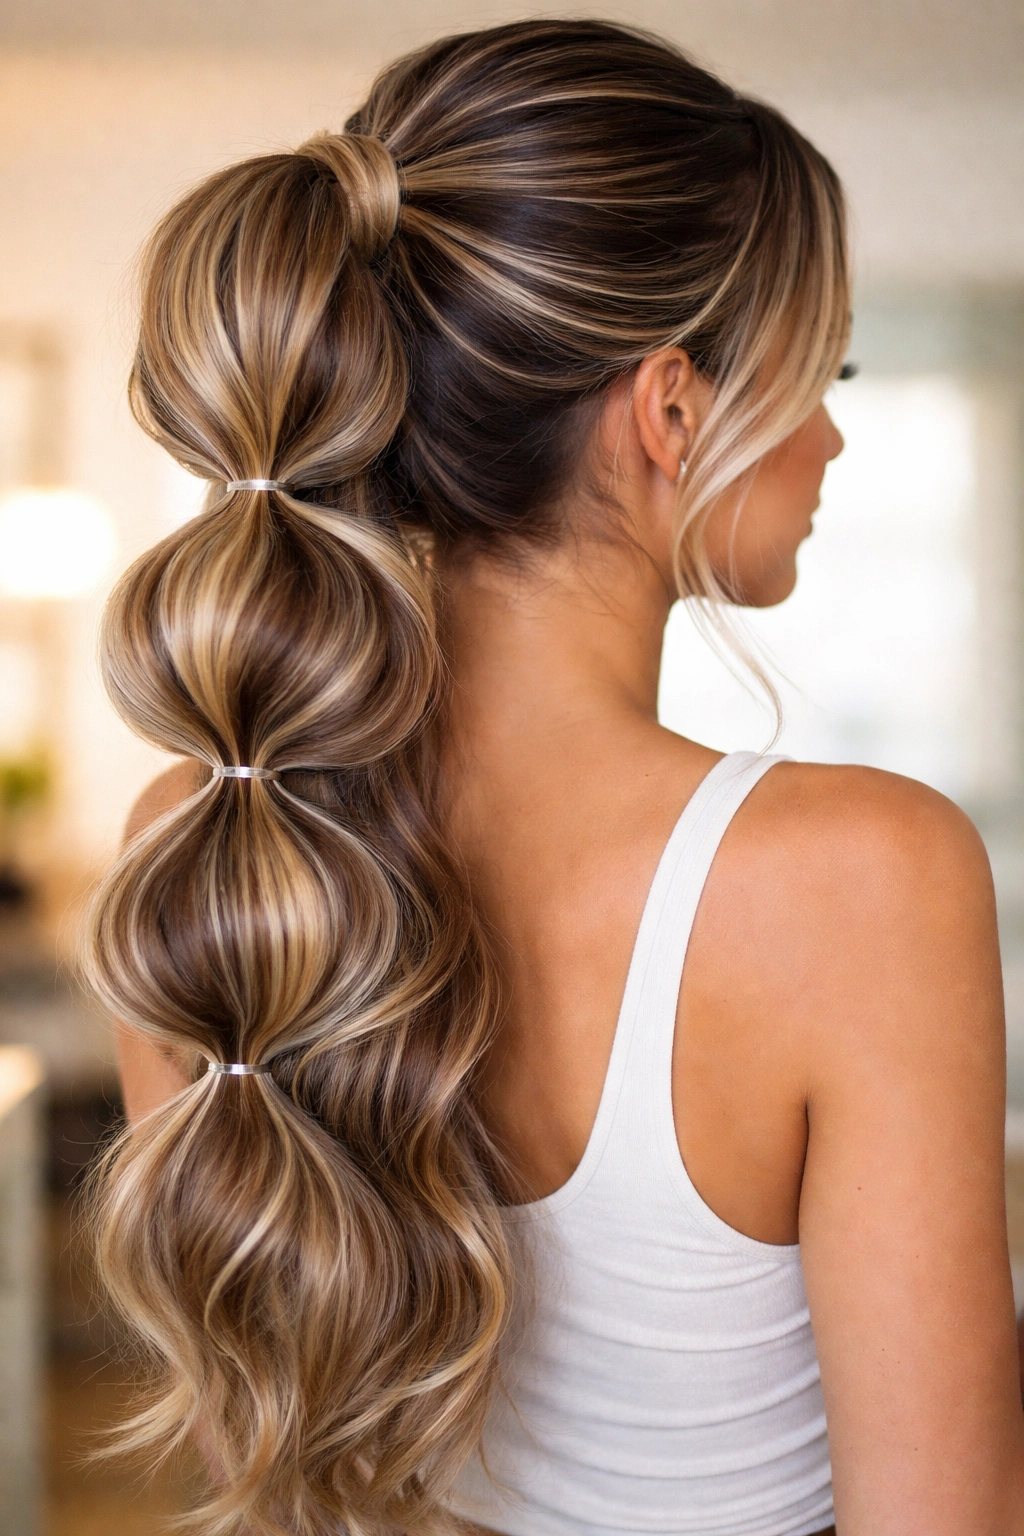
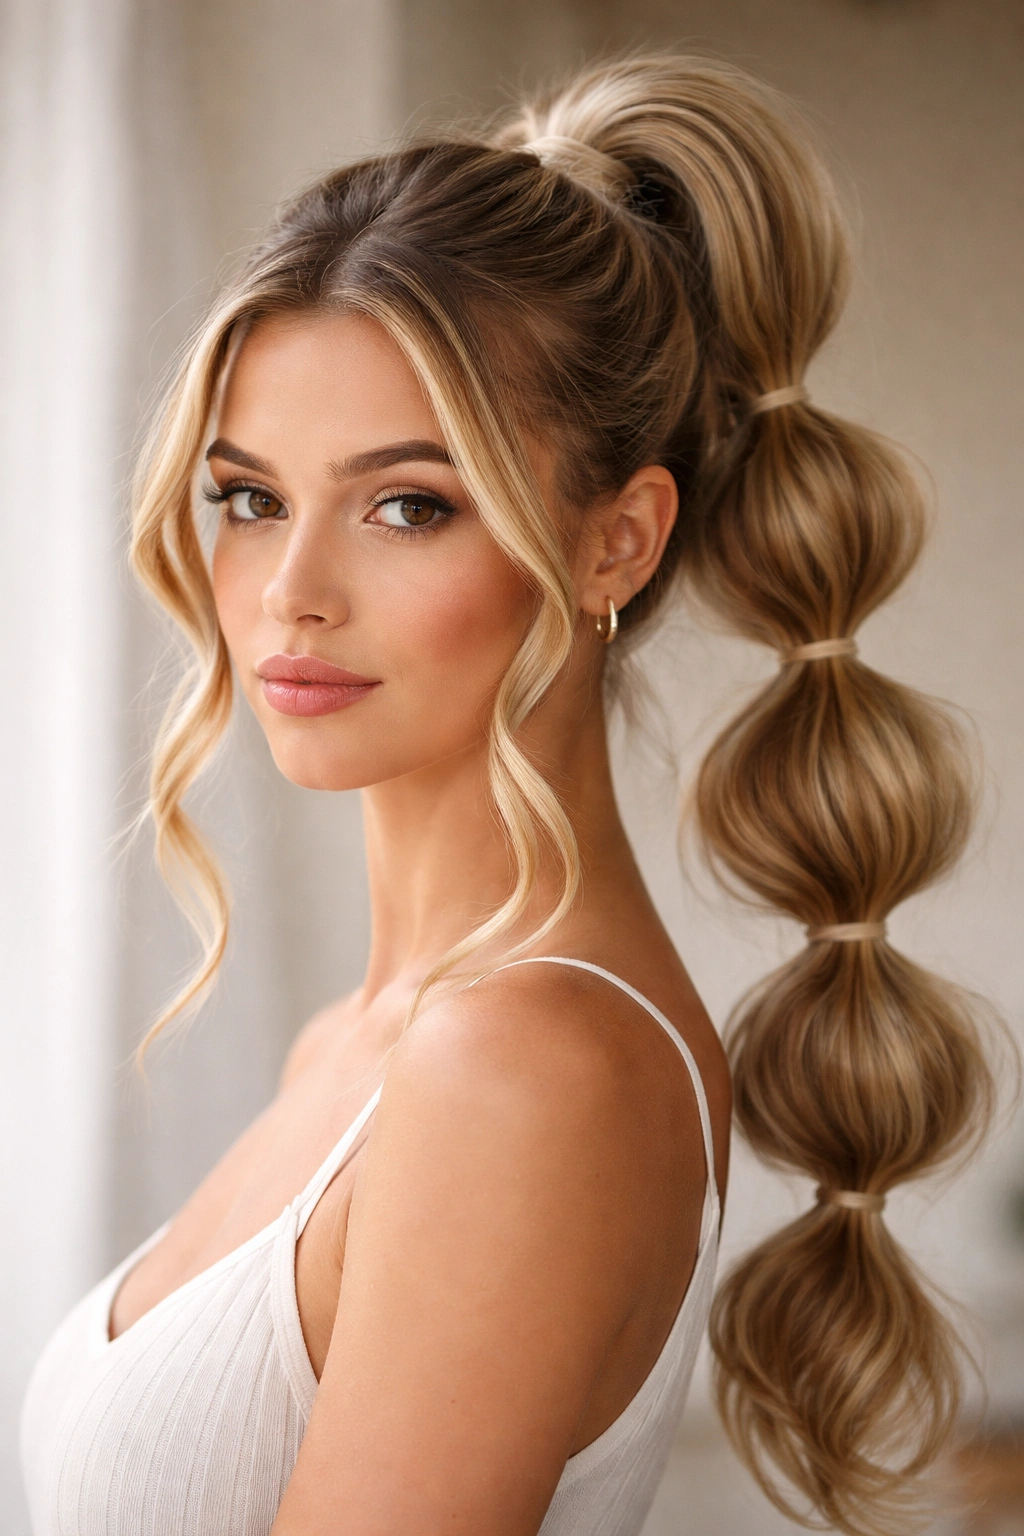
1. Classic High Bubble Ponytail
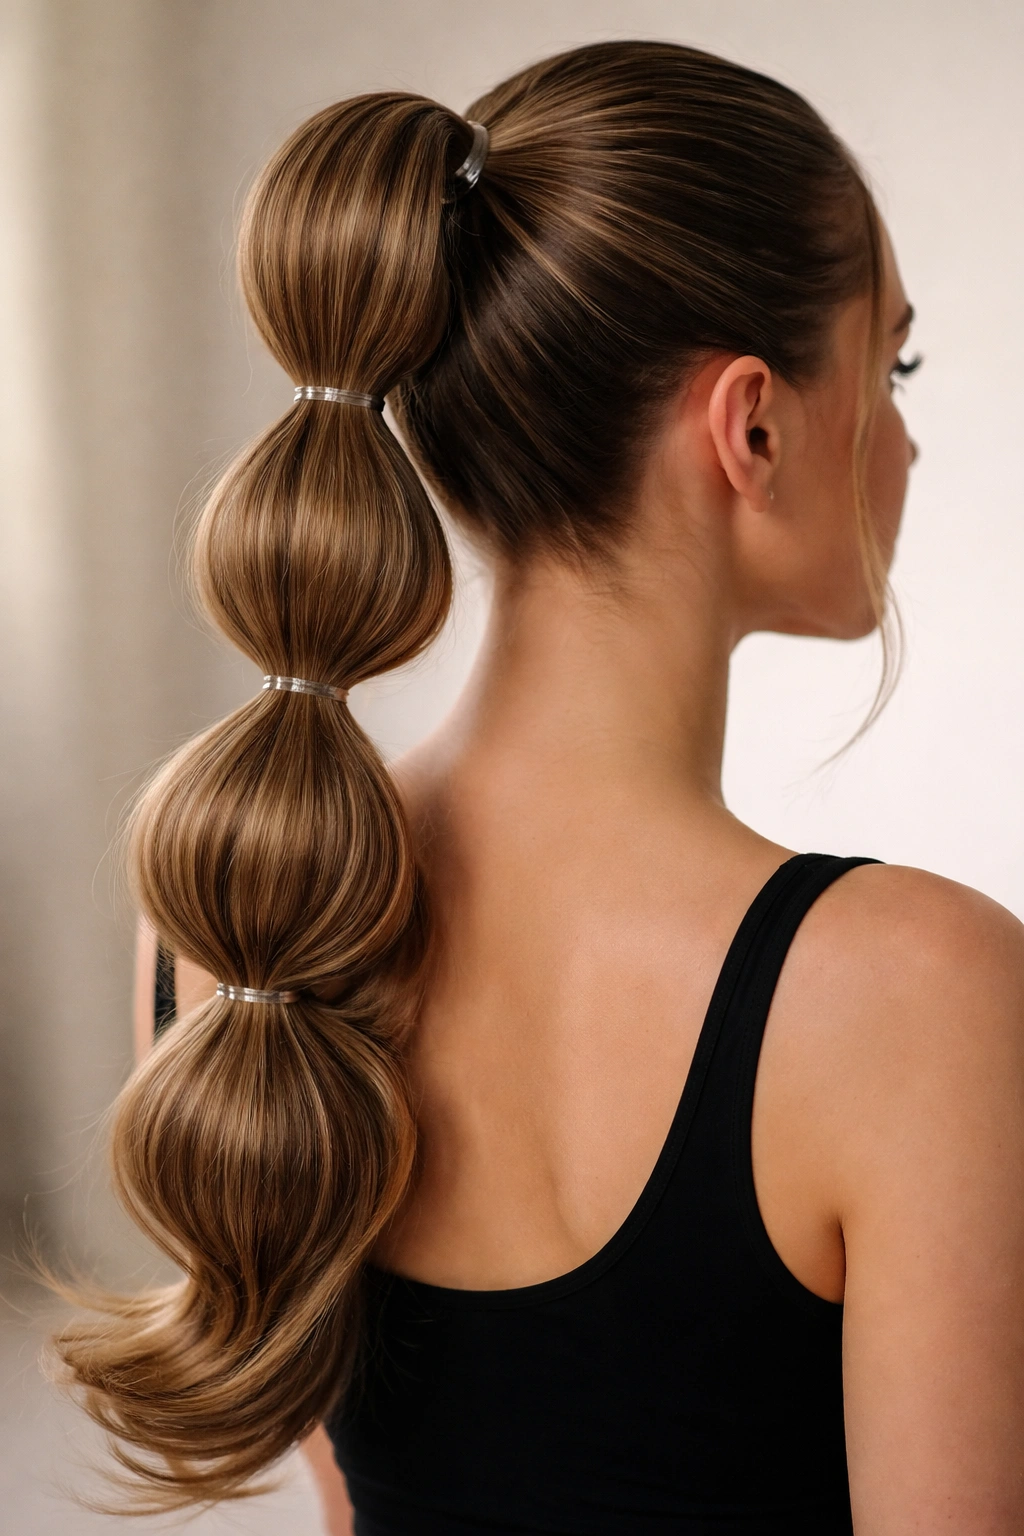
The foundation of every bubble ponytail starts here—a high ponytail punctuated with evenly spaced elastic bands that create perfectly rounded sections from crown to end. The appeal of the classic version is its clean geometry and the way it catches light off each bubble. This style reads as intentional and polished without requiring advanced braiding skills or complex technique.
Why It’s the Perfect Starting Point
The high placement creates an instant lift that flatters most face shapes and works equally well with formal outfits and casual weekend wear. The bubbles add volume and visual interest that a regular ponytail simply can’t achieve. The technique is straightforward enough for beginners but elegant enough for any occasion where you want something more refined than a basic hair tie.
How to Create the Classic Version
- Brush your hair back smoothly and gather it into a high ponytail at the crown, securing it with an elastic band
- Take a section of hair from the very top of your ponytail (about 1 to 1.5 inches thick) and pull it upward slightly, creating the first bubble
- Place a second elastic band around the hair just below where your first bubble naturally ends, working close to the base of that section
- Repeat this process down the entire length of your ponytail, spacing each elastic about the same distance apart for visual harmony
- Gently fluff each bubble outward and upward to create fullness and definition
Pro tip: If you want extra volume in each bubble, take a thin brush handle or the back end of a comb and tease the hair inside each section before securing it with the next elastic band. This adds dimension without looking overdone.
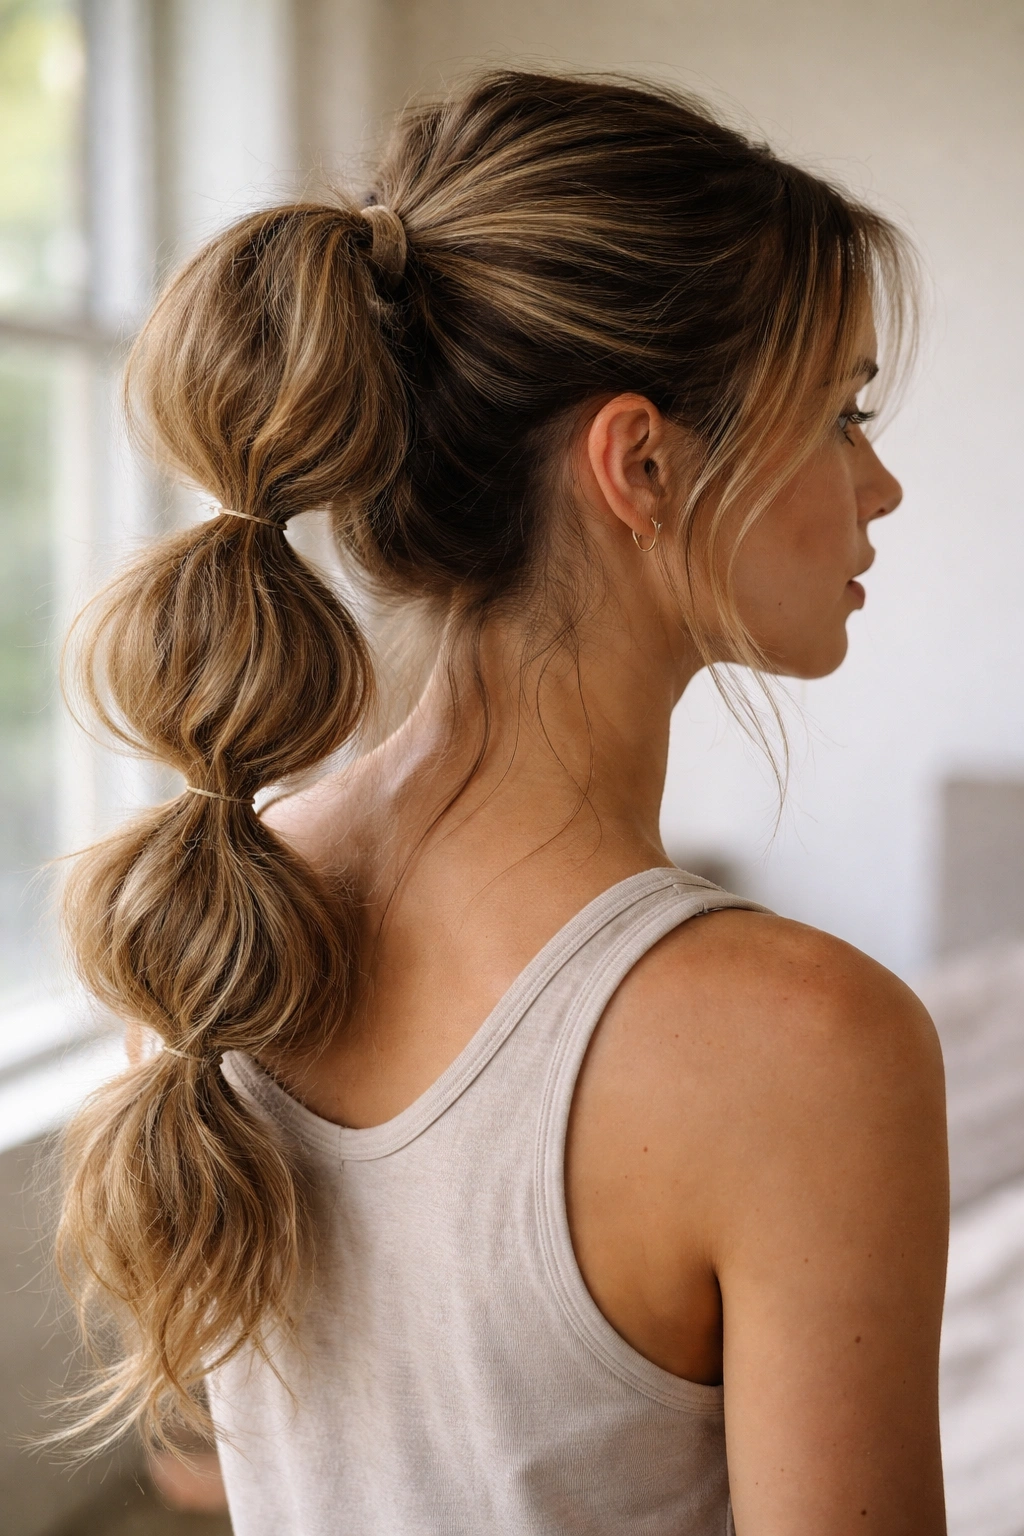
2. Low Bubble Ponytail with Texture
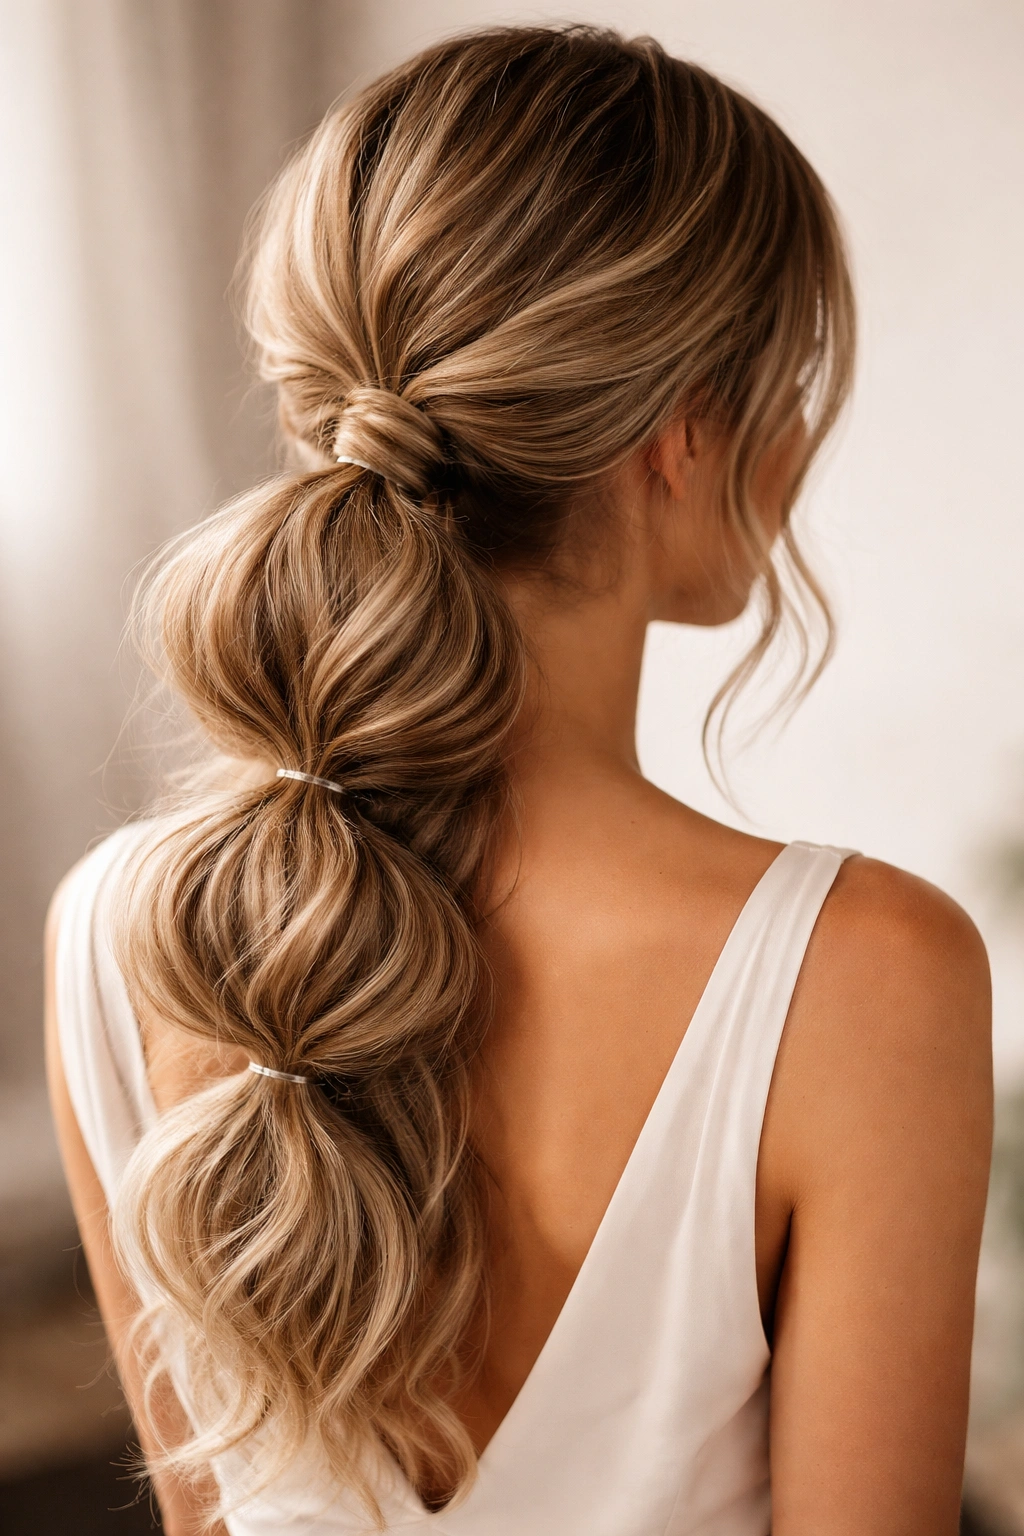
Moving the bubble ponytail down to the nape of your neck completely changes its energy. A low bubble ponytail feels softer and more romantic than its high counterpart, and when you add texture through waves or curls before you create the bubbles, it gains movement and dimension that photographs beautifully. This version hits that sweet spot between laid-back and intentional.
Why Texture Makes It Stand Out
Textured hair—whether from natural curls, waves created with a curling iron, or braids you’ve released—fills out the bubbles much more dramatically than straight hair does. Each section appears fuller, rounder, and more three-dimensional. The texture also softens the geometric precision of the bubbles, creating a more forgiving, romantic aesthetic that works for everything from date nights to casual brunches.
Creating Waves Before You Bubble
- Start with damp or lightly dampened hair and apply a heat protectant spray
- Use a 1-inch curling iron to curl random sections away from your face, working through your entire head
- Let the curls cool completely while still wrapped around the barrel, then gently release them
- Tousle the curls with your fingers and a light texturizing spray to create soft, piece-y waves
- Gather the textured hair into a low ponytail and create your bubbles, fluffing each section generously
Worth knowing: Textured styles hold their shape longer if you finish with a flexible-hold hairspray rather than a heavy one. Heavy products can weigh down the waves and make the bubbles look deflated by mid-day.
3. Wrapped Bubble Ponytail
This version takes the bubble ponytail and conceals the elastic bands by wrapping a section of hair around each one. The wrapping creates a polished, expensive-looking finish that elevates the entire style. You see the bubbles clearly, but the mechanics fade into the background, which is why this variation feels more refined than a standard bubble ponytail.
The Wrapping Technique That Elevates Everything
Instead of leaving elastic bands visible, you’re using a thin strand of hair from your own ponytail to cover each band. This requires just slightly more time than a regular bubble ponytail, but the visual payoff is significant. The wrapped version reads as intentional and well-executed in a way that suggests you spent considerably more time on it than you actually did.
Step-by-Step Wrapping Process
- Create your bubble ponytail first using thin elastic bands that match your hair color
- Before moving to the next section, take a small 1/4-inch strand of hair from inside the bubble you just created
- Wrap this strand around the elastic band that sits beneath the bubble, covering it completely
- Secure the wrapped strand with a tiny bobby pin hidden behind the bubble
- Move to the next bubble and repeat the process down your entire ponytail
Insider note: Match your elastic bands to your hair color or use clear elastics under each bubble, then wrap with your own hair. This creates seamless, barely-visible band placement that looks incredibly polished.
4. Half-Up Bubble Ponytail

The half-up bubble ponytail carves out a middle ground between a full ponytail and completely down hair. You’re securing only the top half of your hair into the bubble style while allowing the bottom half to flow freely. This version works beautifully when you want volume and structure at the crown but prefer to keep some hair loose and moving.
Why Half-Up Offers the Best of Both Worlds
This style gives you the styling interest and volume control of a bubble ponytail without the commitment of pulling all your hair up. It’s perfect for days when your hair is having decent texture or volume on its own. The half-up bubble also shows off longer lengths of hair more effectively, and it photograph beautifully from the front while having visible structure from the back.
Creating a Secure Half-Up Base
- Section off the hair from ear to ear across the crown of your head, leaving the bottom half completely down
- Brush the top section back smoothly, removing any bumps or flyaways
- Create a high, centered ponytail with just this top section, securing it tightly
- Create your bubbles down the length of this ponytail, spacing them evenly
- Gently tease or brush the loose bottom section of your hair outward to create softness around your shoulders
What to know: This works best if your loose hair has some texture or volume to it. If you’re starting with completely straight, flat hair on the bottom, consider adding some waves before you create the top half-up ponytail so everything feels cohesive.
5. Side-Swept Bubble Ponytail
Shifting your bubble ponytail to the side creates an entirely different silhouette. Instead of a centered crown point, the bubbles flow diagonally across your back, which is particularly flattering if you’re wearing your hair over one shoulder or if you want an asymmetrical, fashion-forward look. The side placement automatically feels more editorial and less everyday.
How Side Placement Changes the Entire Aesthetic
A side-swept bubble ponytail photographs differently because the bubbles create a diagonal line rather than a vertical one. This catches light differently and creates visual movement that a centered ponytail doesn’t achieve. It’s the kind of small shift that makes people notice you’ve done something interesting with your hair, even if they can’t immediately identify what it is.
The Side-Swept Setup
- Brush all your hair to one side, gathering it toward the back of one ear (typically toward whichever shoulder you favor)
- Secure the side ponytail with an elastic band, then create your bubbles as usual, working them down at the angle where your ponytail naturally falls
- The bubbles will automatically angle diagonally down your back when you’ve positioned the base correctly
- Consider adding a few face-framing pieces that fall on the opposite side for balance and softness
Pro tip: This works especially well if you have longer hair. The diagonal line feels more intentional and elegant on hair that has enough length to really show off the angled bubble pathway.
6. Braided Bubble Ponytail
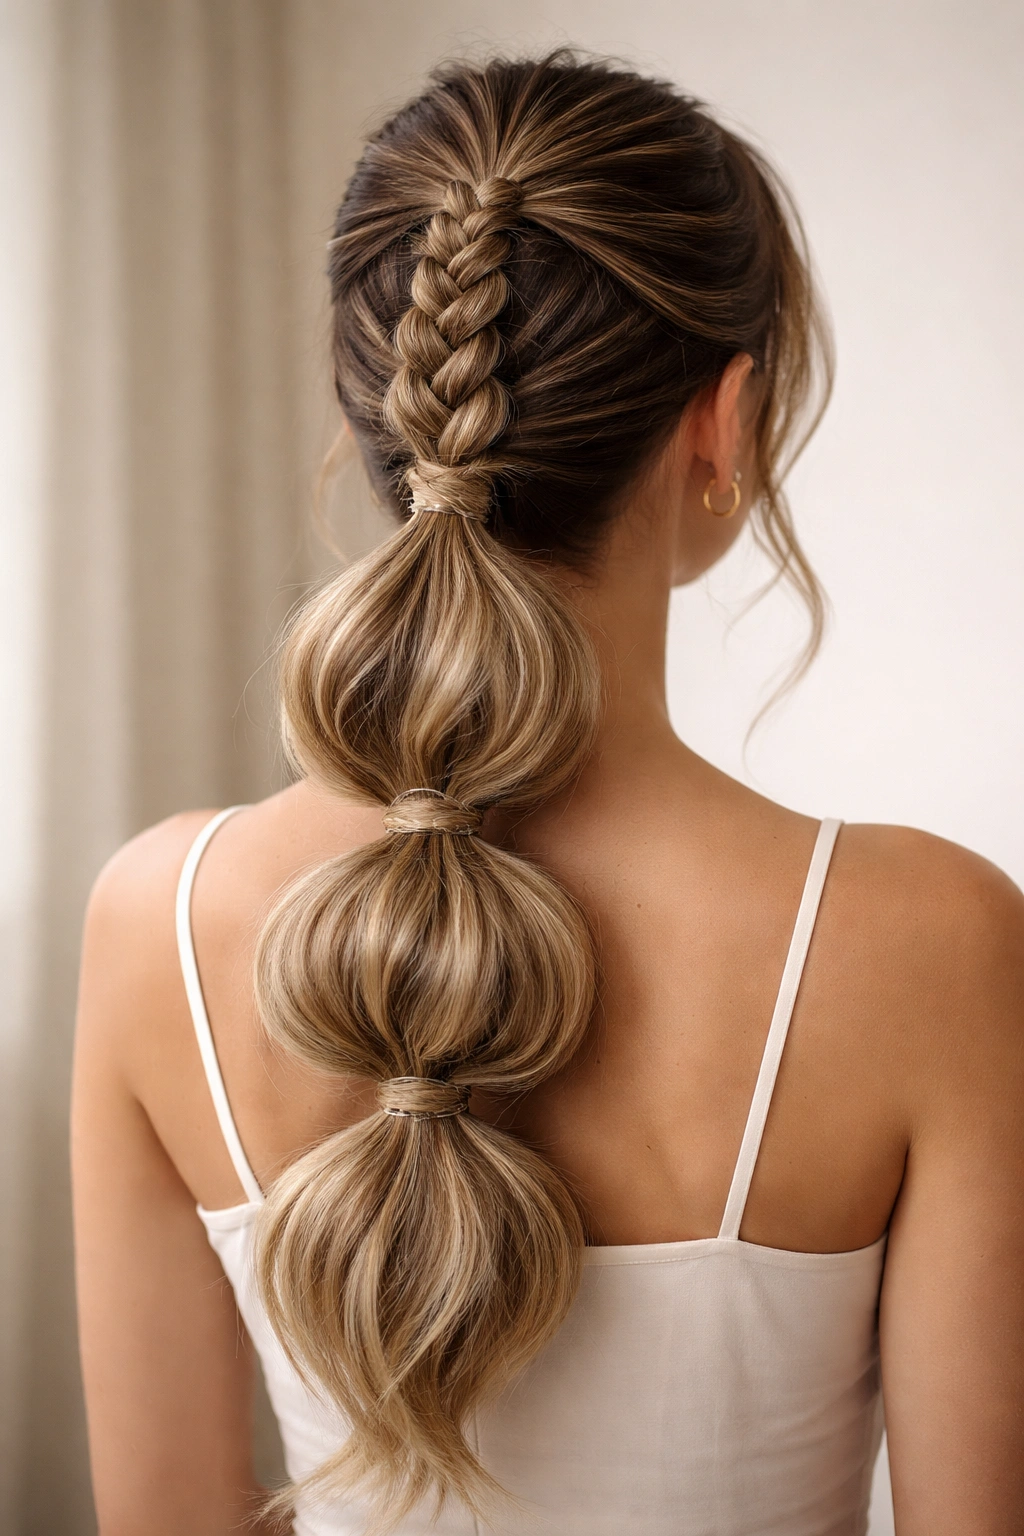
Combining braids with bubble ponytails creates textural complexity that pure bubbles can’t achieve on their own. You might braid the top section of your ponytail before creating the bubbles, or braid individual sections within each bubble, or even French braid your initial ponytail before sectioning it. Each approach adds a different kind of visual interest and dimension.
Why Braids Amplify the Bubble Effect
Braids naturally create three-dimensional texture that makes each bubble appear fuller and rounder. Braids also add a handmade, intentional quality that elevates the entire style. You’re moving beyond simple sectioning into actual hair architecture, which is why this version reads as more polished and skillfully executed.
Braiding Approaches Worth Trying
- Top braid: Create a small three-strand braid at the very top of your ponytail before you start creating bubbles, then bubble the rest normally
- Bubble braids: Create your bubbles normally, then gently braid each individual bubble section before securing the next elastic
- Hybrid approach: Create bubbles, then loosely twist or braid the sections between the elastics, tightening everything with a final hairspray
What to remember: Braiding adds texture and takes more time, so this version works best when you have at least 15 to 20 minutes to spend styling. It’s worth the time investment for special events where you want something genuinely impressive-looking.
7. Sleek Bubble Ponytail with Accessories
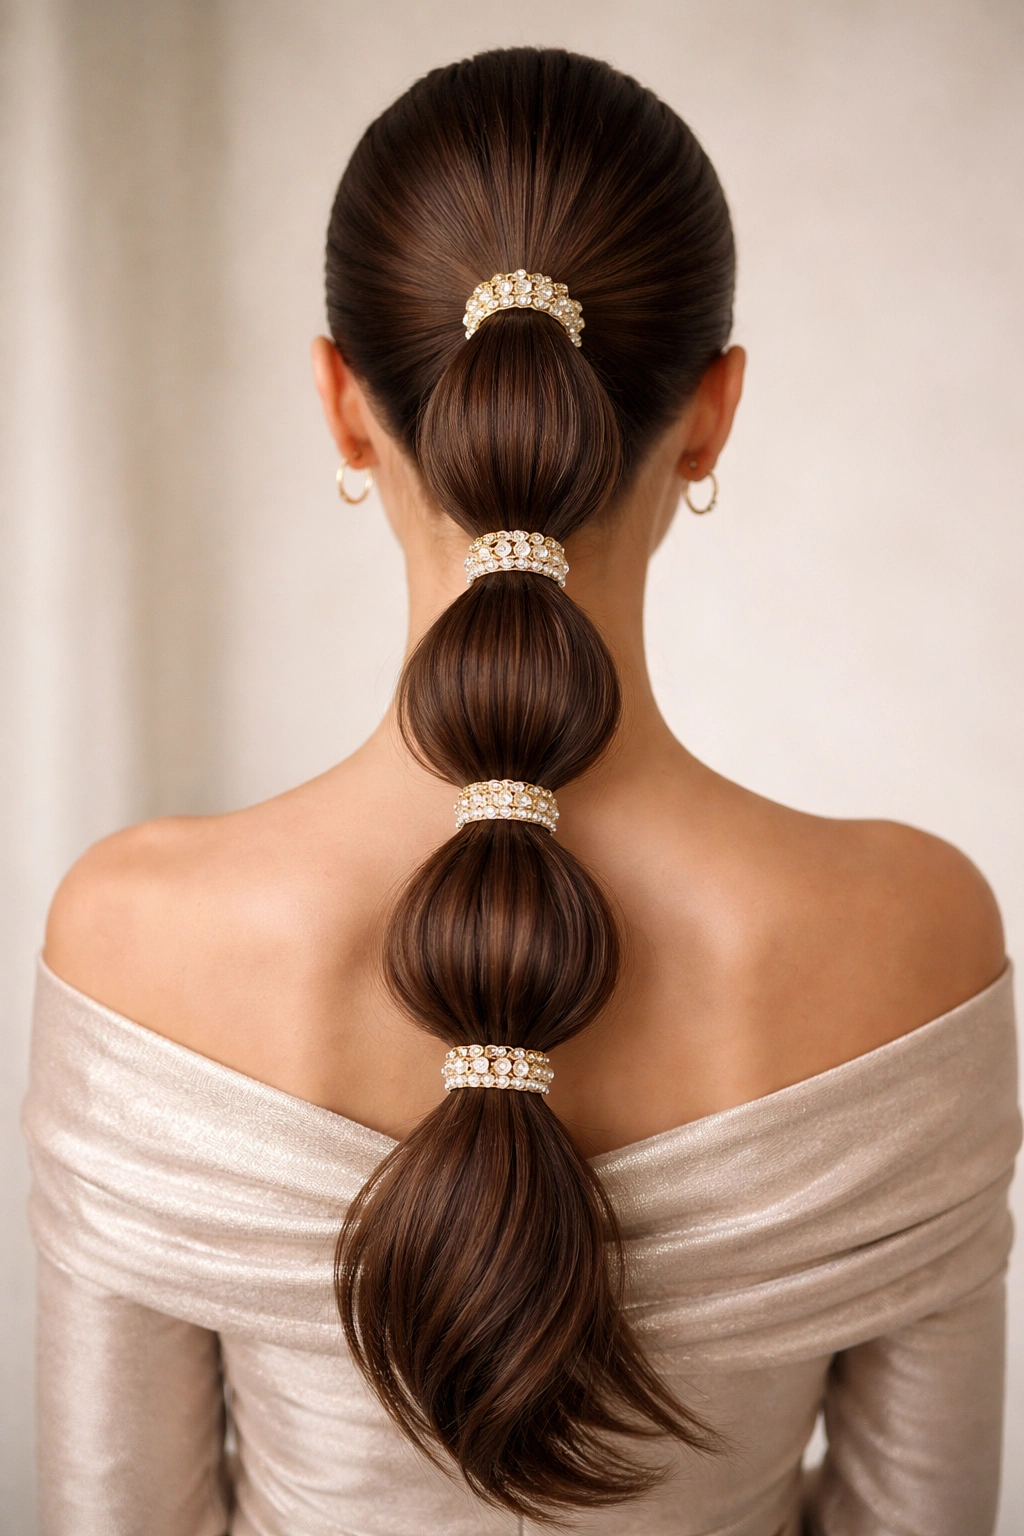
Taking a bubble ponytail from cute to glamorous is often as simple as adding the right accessories. Pearl clips, metallic hair pins, shimmering elastics, or decorative cuffs worn around each bubble section elevate the entire look. Accessories instantly shift a bubble ponytail from casual to dressed-up without requiring any change to the hair itself.
How Accessories Transform the Vibe
The same bubble ponytail looks completely different when you’ve added metallic gold clips compared to how it looks with pearl pins or when you’ve used iridescent elastics. Accessories draw attention and add a finished, intentional quality. They signal that you’ve thought about the complete look, not just the hair. This is the easiest way to adapt a bubble ponytail for different occasions or outfits.
Accessory Placement Options
- On each elastic band: Use decorative clips, cuffs, or jeweled hair pins clipped or pinned right over your elastic band
- Within the bubbles: Tuck small clips, pearls, or metallic accents into the hair of each bubble section
- Around the entire ponytail: Wrap a metallic cord, ribbon, or delicate chain loosely around the outside of each bubble
- At the top: Position larger statement clips or ornaments where your main ponytail elastic sits, drawing focus to that central point
Pro tip: Stick with one metal tone and one or two accessory styles to avoid looking over-decorated. A few well-placed, high-quality pieces read as intentional. Many small accessories can look chaotic.
8. Messy Bubble Ponytail
Not every bubble ponytail needs to be pristine. The deliberately messy version embraces texture, slightly undone edges, and a relaxed approach. You’re still creating the bubble structure, but you’re intentionally roughing up each section, leaving flyaways, and skipping the smoothing step. This version feels effortless and works perfectly for casual settings where polish feels out of place.
Why Messy Actually Requires Strategy
Here’s the secret: a good messy bubble ponytail actually takes thought. You need to understand what “messy” actually means visually. It’s not random or careless—it’s intentionally undone in a way that reads as confident and relaxed rather than uncombed. The difference is the intention behind it and how you create that texture.
Creating Intentional Messiness
- Start with texturized or curly hair, or create waves the night before so they’re slightly relaxed and piece-y
- Create your bubble ponytail but don’t brush or smooth the sections obsessively
- Leave a few face-framing pieces completely down and slightly undone-looking
- Gently pull and tease each bubble so it’s fuller and less geometrically perfect
- Use a texturizing spray or sea salt spray to enhance the undone quality
Worth knowing: The messy version actually holds up better throughout the day because the texture and intentional roughness means minor flyaways and loosening don’t look like your style is falling apart. It looks even better by evening than it did in the morning.
9. Bubble Ponytail with Colored Hair
If you have dyed hair, balayage, highlights, or any kind of color dimension, a bubble ponytail shows it off in a way that flat, straight hair never could. The sectioning and the way you manipulate the hair to create bubbles naturally separate strands and reveal color layers that might be hidden when your hair is smooth and slicked back. This version is specifically designed to maximize visual interest from color placement.
How Bubbles Highlight Your Color
When you create distinct sections with elastic bands and then fluff them outward, you’re exposing previously hidden interior strands. If you have highlights, balayage, or darker roots with lighter ends, bubble sections immediately show those contrasts. The technique works especially well if you have multi-tonal color, shadow roots, or any intentional dimension that deserves to be seen.
Maximizing Color Impact
- Avoid slicking your hair back too tightly—loosen sections slightly so dimension is visible
- Fluff each bubble generously, pulling strands outward to expose the interior hair and color layers
- Leave a few face-framing pieces down to showcase color at face level
- Consider adding warmer lighting or shooting in natural light if you’re photographing the style, since color reads best in good light
Insider note: If you’re thinking about getting colored hair specifically to work with bubble ponytails, dimensional color (balayage, highlights, shadow roots) reads better in this style than single-process color. The sectioning and fluffing naturally showcases dimensional color while single-tone color can look the same whether you’ve used the technique or not.
10. Bubble Ponytail with Ribbons
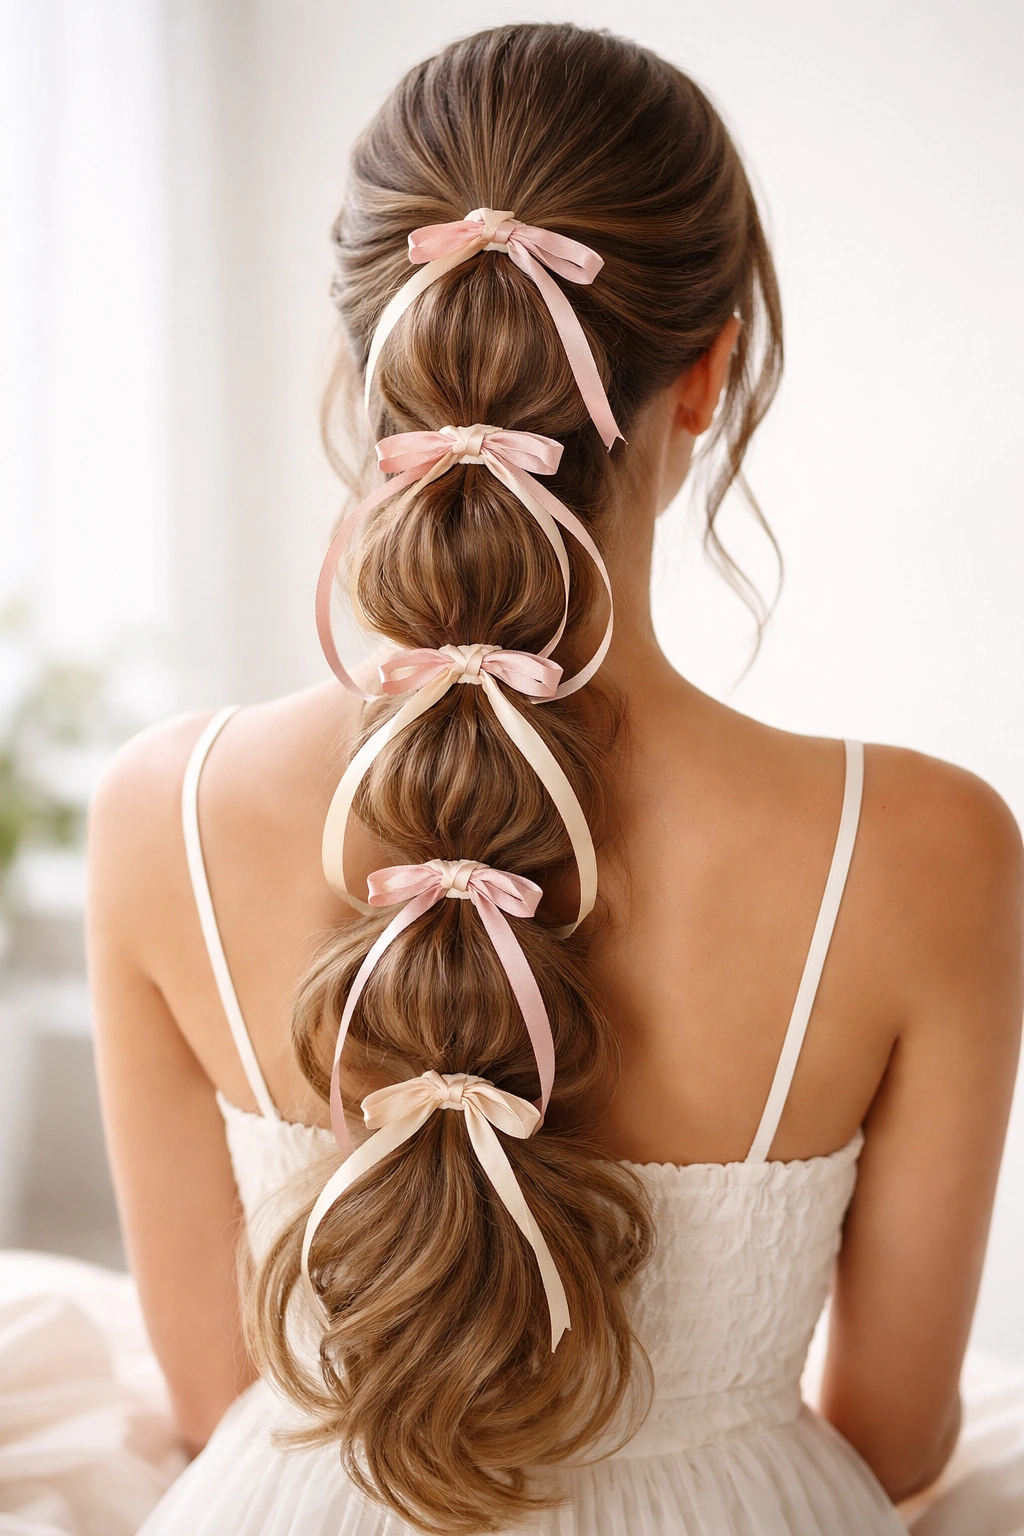
Weaving ribbons through your bubble ponytail adds a vintage, feminine quality that elevates the style instantly. You can weave ribbons down the center of each bubble, wrap ribbons around the elastic bands, or braid ribbons together with your own hair. The ribbon element transforms a bubble ponytail from modern-casual into something with a distinctly romantic or nostalgic feel.
Why Ribbons Work So Well with Bubbles
Ribbons add color, texture, and dimension simultaneously. They’re especially effective because the bubble structure gives the ribbon something to weave through and around. You can match ribbon colors to your outfit, use metallics for evening events, or choose pastels for softer, more romantic occasions. Ribbons are also incredibly easy to remove when you want to change your style.
Ribbon Integration Techniques
- Woven ribbons: Weave a thin ribbon down through the center of each bubble section, leaving loops of ribbon visible
- Wrapped elastics: Use ribbon instead of elastic bands entirely, or wrap ribbon around your elastic bands for a covered look
- Braided ribbons: Braid thin ribbons together with your own hair as you create the bubbles
- Tied bows: Create your bubbles normally, then tie small ribbon bows around the elastic bands or at the top of your ponytail
Pro tip: Use grosgrain ribbon or satin ribbon that holds its shape. Thin silk ribbons can slip and look messy by mid-day, while thicker ribbons sometimes overwhelm delicate bubble sections.
11. Double Bubble Ponytail
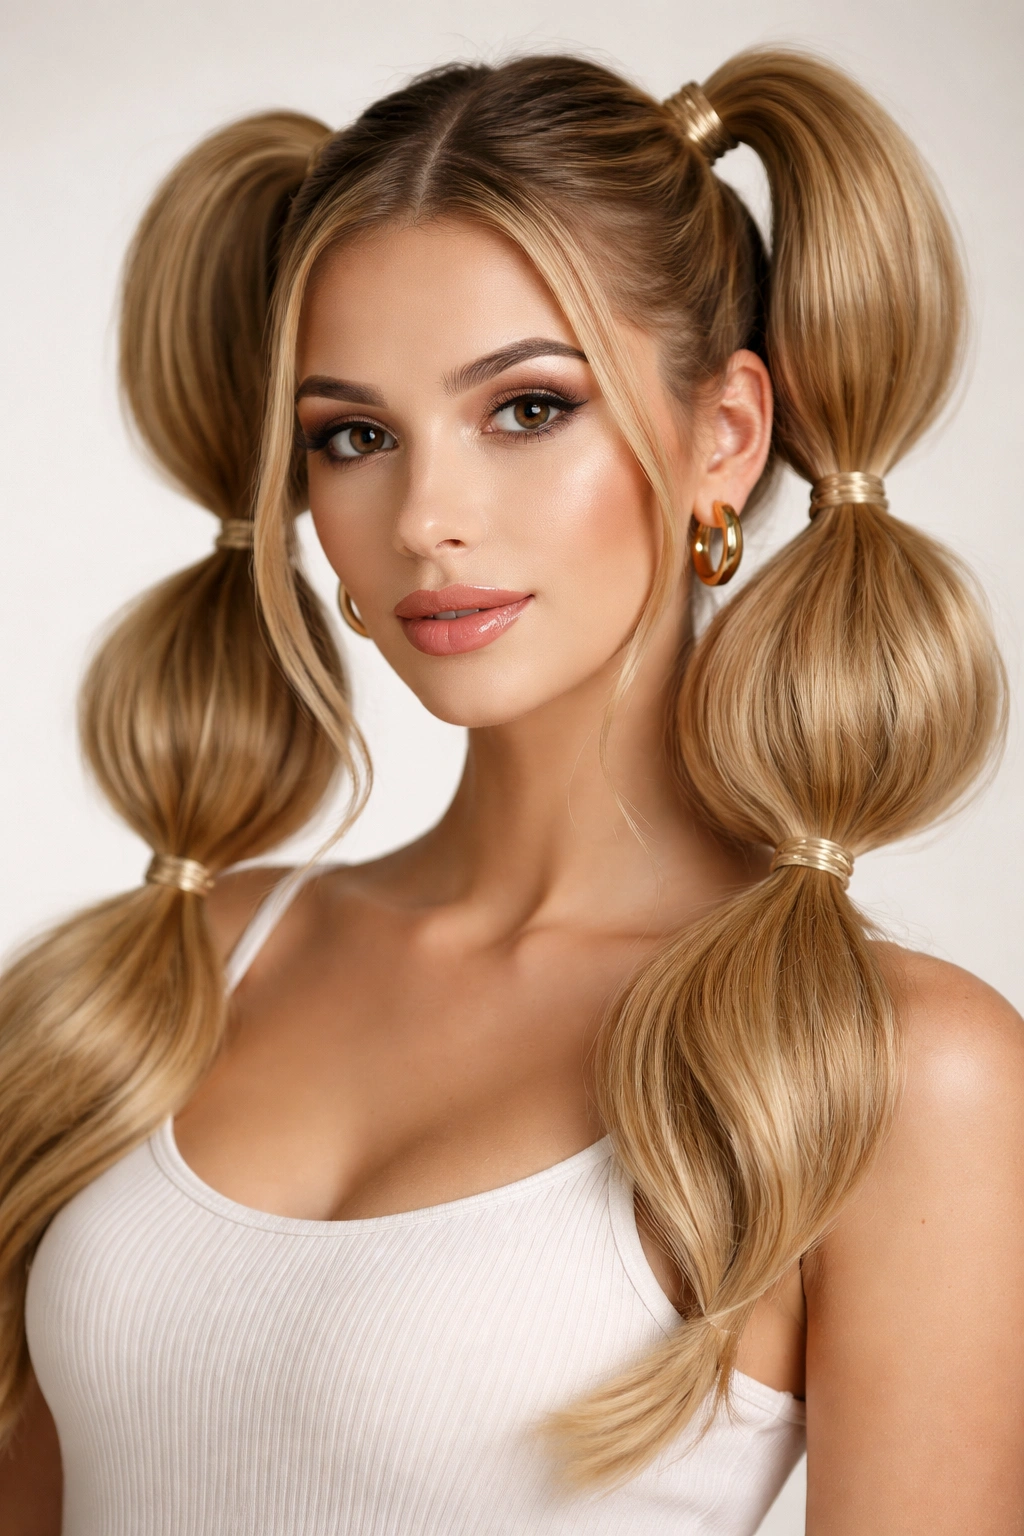
Instead of one ponytail with bubbles running down its length, you’re creating two separate bubble ponytails—one on each side of your head. This version is playful, youthful, and asymmetrical in a way that feels fashion-forward. It also distributes the hair more evenly across your head, which some people find more balanced and comfortable for all-day wear.
Why Two Ponytails Create Different Energy
A single high bubble ponytail reads as sleek and polished. Two bubble ponytails read as playful, creative, and less traditionally formal. The double version works beautifully for creative careers, casual settings, and anyone who wants their hairstyle to signal that they don’t take themselves too seriously. It’s also a great option if you have thinner hair—splitting it into two sections makes each bubble appear fuller.
Creating Even Double Bubbles
- Part your hair down the center from your forehead straight back to your nape
- Create a bubble ponytail from the hair on one side of the part, positioning it slightly behind your ear
- Create an identical bubble ponytail from the other side of the part, matching the height and number of bubbles on the first side
- Make sure both ponytails have the same number and spacing of bubbles so they appear intentionally balanced
- Fluff both sides equally so the bubbles look symmetrical
What to know: This works best if you have at least shoulder-length hair. Anything shorter tends to look a bit childish rather than fashionable with the double-bubble treatment.
12. Bubble Ponytail with Face-Framing Pieces
This final variation keeps most of your hair in a bubble ponytail while intentionally releasing a few sections around your face. The face-framing pieces can be curled, twisted, or braided, and they soften the overall style while drawing attention to your face. This is the most flattering bubble ponytail option for anyone who wants structure and style without the severe pulled-back look of a full ponytail.
Why Face-Framing Creates Flattering Balance
A completely pulled-back ponytail can feel too severe, especially if you’re wearing makeup or have a specific face shape you want to flatter. Face-framing pieces create softness and redirect focus to your features. They also give you options—you can experiment with curling, braiding, or twisting these pieces to add complexity and visual interest to your overall look.
Releasing and Styling Face-Framing Pieces
- Create your bubble ponytail as usual, but before you finish, release two small sections—one on each side of your face
- These sections should frame the area from your temple to your cheekbone
- Curl these released pieces with a curling iron, braid them loosely, or twist them gently for added texture
- Allow them to fall naturally alongside your face rather than pinning them behind your ears
- Make sure your main bubble ponytail is tight enough that it doesn’t continue releasing other sections throughout the day
Worth knowing: The length of your face-framing pieces matters. If they’re too short, they’ll look awkward. Aim for pieces that are at least cheekbone length so they integrate naturally with your face shape rather than sticking out visibly.
Final Thoughts
Bubble ponytails deserve their moment because they genuinely offer something that basic ponytails can’t: intentional structure that reads as polished and put-together, combined with the styling flexibility to work across occasions, hair types, and personal aesthetics. Whether you’re drawn to the sleek perfection of a wrapped version, the romantic softness of a braided style, or the playful energy of double bubbles, these twelve variations give you concrete options to work from.
The real power of bubble ponytails is that once you understand the basic technique—sectioning, securing with elastics, and fluffing—you can adapt it endlessly. You can dress it down with a messy texture and no accessories, or dress it up with ribbons and metallic clips. You can wear it high for boldness or low for subtlety. You can add braids, layer in color-dimension, or frame your face with soft pieces. That versatility is why bubble ponytails have transitioned from trend to technique. They’re a skill worth mastering because they’ll work across countless moments in your life.