A ponytail might sound like the simplest hairstyle option for a wedding—just pull your hair back and go. But that’s where most people get it wrong. The right ponytail for a wedding is a carefully considered style that balances sophistication with your personal look, complements your dress neckline, and stays flawlessly in place through the entire ceremony and reception. Whether you’re the bride seeking an elegant alternative to a traditional updo, a wedding guest wanting polished effortlessness, or in the wedding party needing a style that photographs beautifully from all angles, a thoughtfully chosen ponytail can be every bit as impactful as any elaborate hairpiece.
The beauty of a wedding ponytail lies in its versatility. You can dress it up with intricate braids, romantic waves, and delicate accessories, or keep it clean and architectural for a modern, minimalist aesthetic. A ponytail works with virtually every dress style, from strapless gowns that benefit from an exposed nape to high-necked dresses that pair beautifully with a sleek, polished tail. The key difference between an everyday ponytail and one worthy of your special day is in the details—the texture, the placement, the finish, and the styling techniques that transform a basic style into something genuinely striking.
Hair professionals who specialize in bridal styling know that the ponytail’s resurgence in wedding beauty isn’t accidental. It photographs exceptionally well, allows for visible neckline and shoulder details, and offers the practical advantage of keeping hair secure without requiring the extensive styling time a traditional updo might demand. Better yet, a ponytail suits a wider range of hair types and lengths than many other formal styles, making it accessible whether you have fine, thin hair or thick, textured waves.
Below are fifteen distinct ponytail styles, each designed specifically for the wedding context, complete with styling guidance, product recommendations, and the exact techniques that make each one work. Choose the style that aligns with your aesthetic, your hair type, your dress, and the overall vibe you want to project.
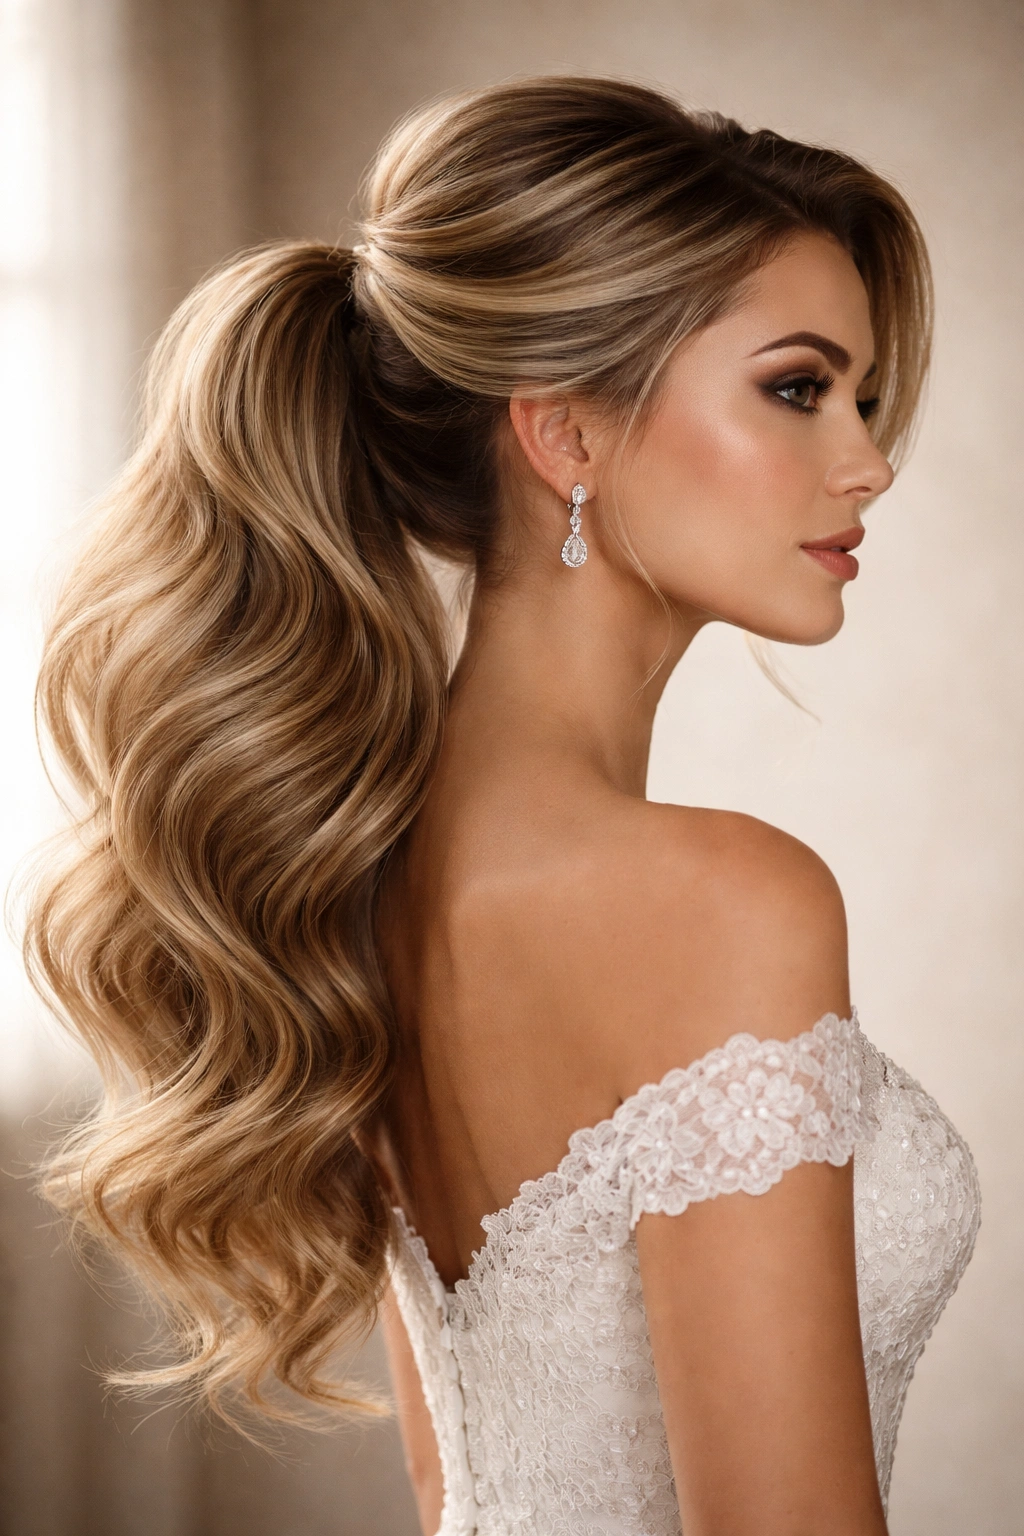
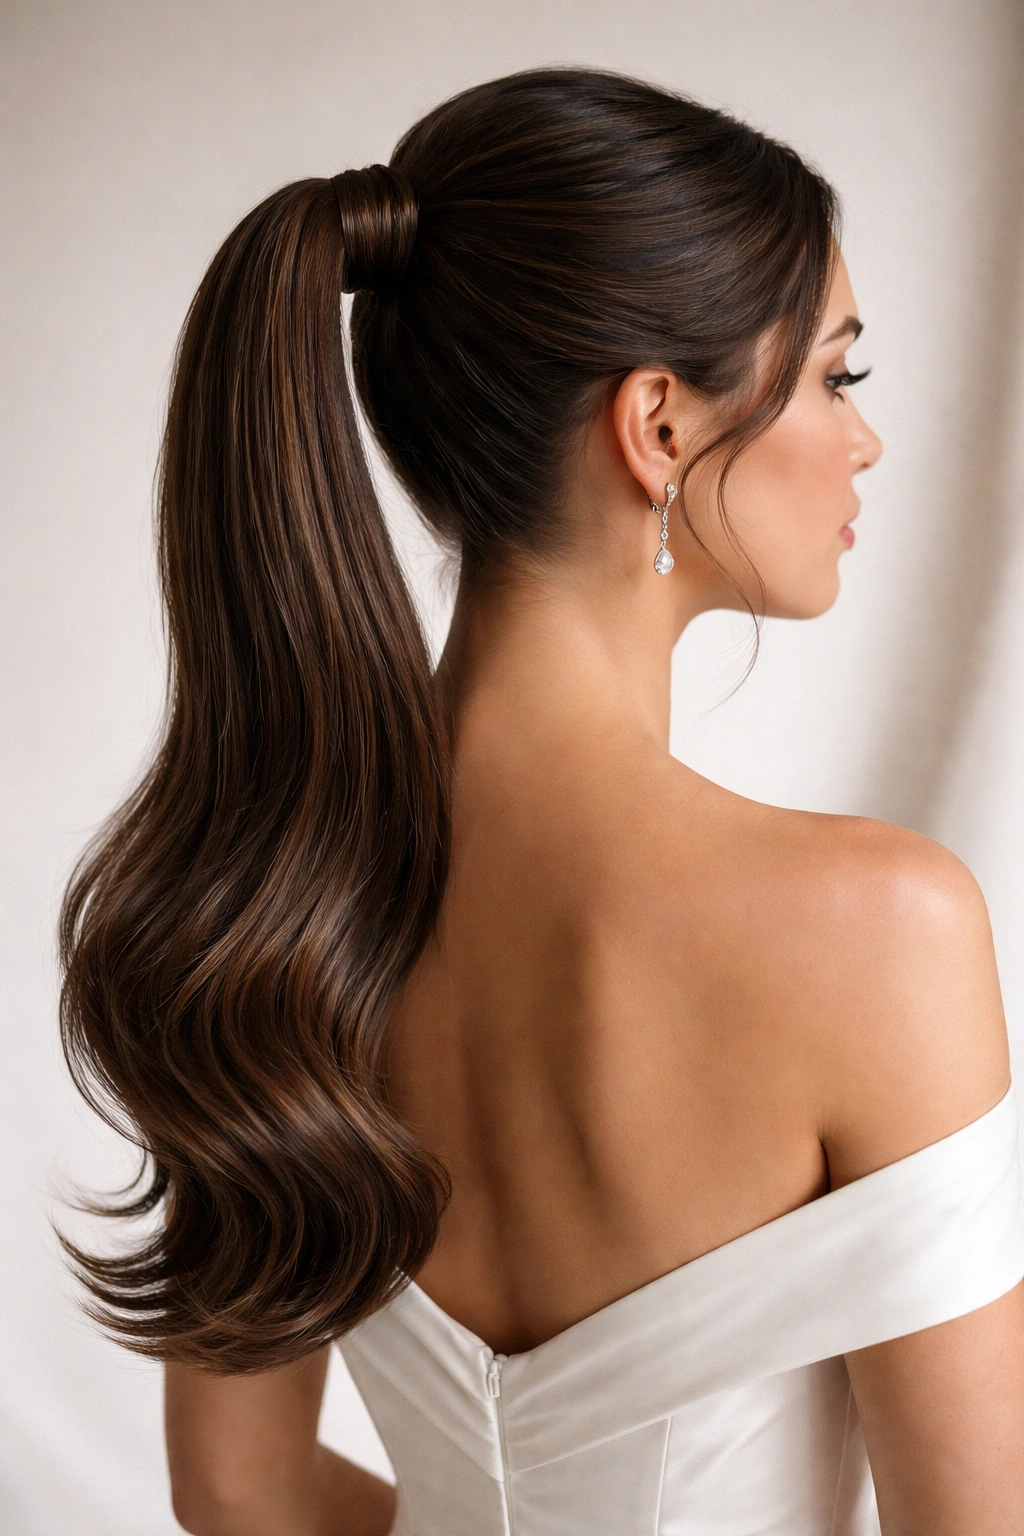
1. The Classic High Ponytail
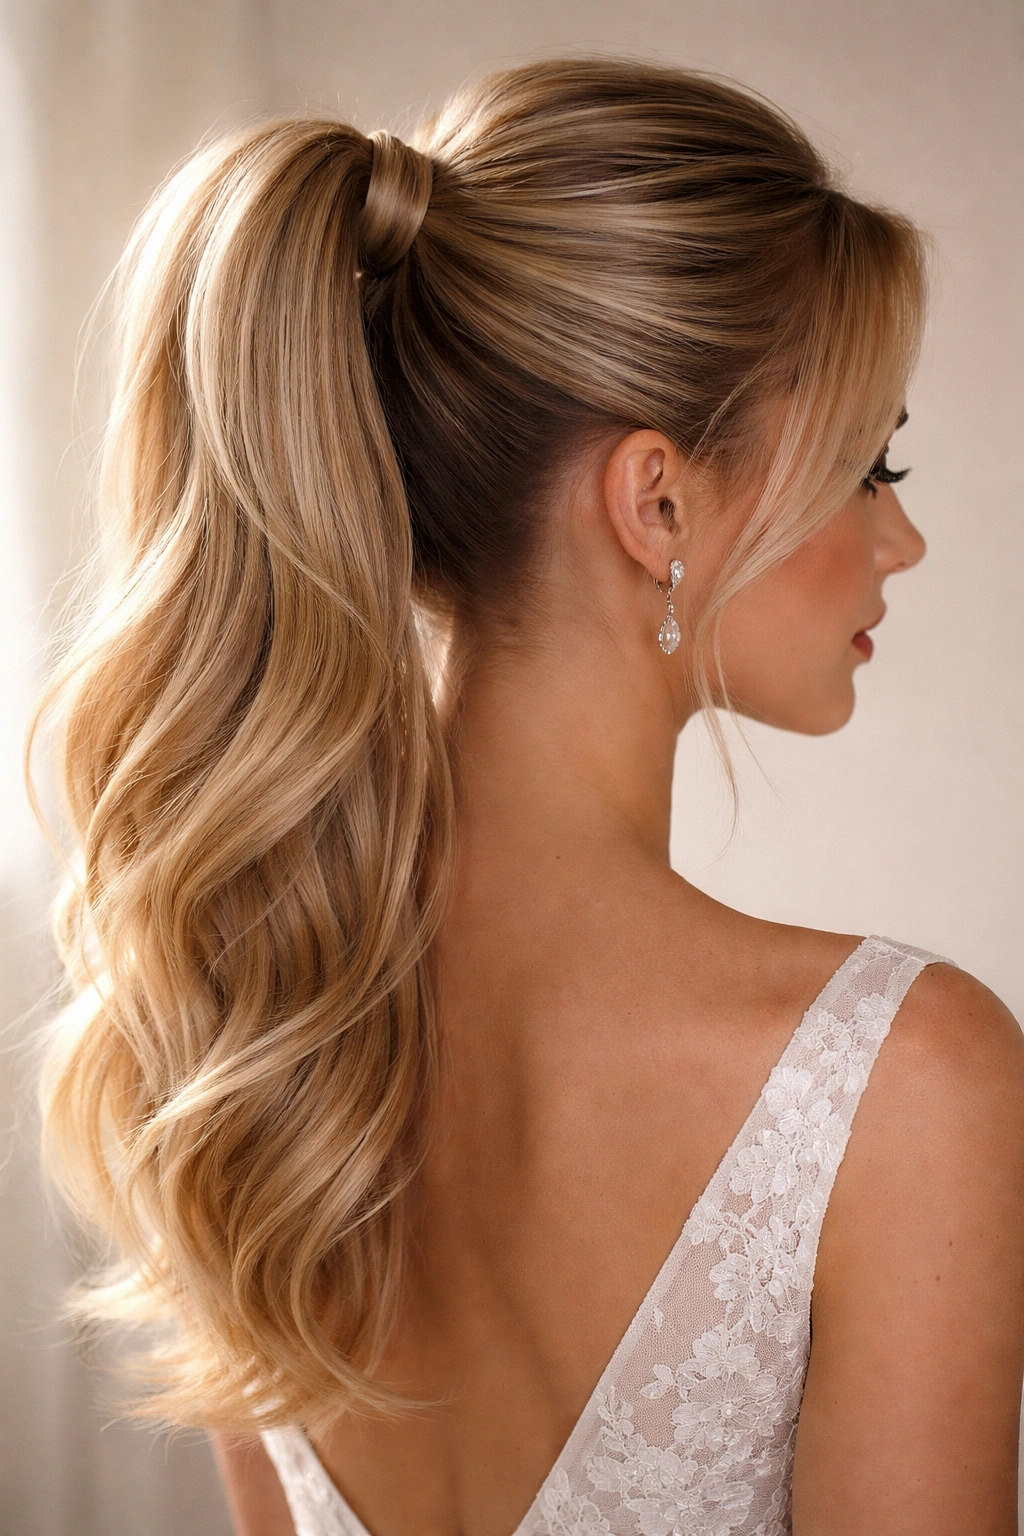
The high ponytail is the foundation style that works for nearly every wedding scenario—it’s timelessly elegant, exposes your face and neck beautifully, and suits both modern minimalist weddings and traditional formal affairs. The distinction between an everyday high ponytail and a wedding-worthy version is all about precision, polish, and the finish details that elevate it from casual to ceremonial.
Creating the Polished Foundation
Begin with hair that has texture and subtle body, which means applying a volumizing mousse or texturizing spray to damp roots before blow-drying. Blow-dry your hair in sections, lifting each section away from the scalp as you dry to create lasting volume at the crown—this prevents the flat, limp appearance that makes a high ponytail look severe rather than sophisticated. Use a round brush on the mid-lengths and ends to create a subtle bend and movement, even if your ponytail will be sleek. The underpinnings of a great high ponytail are actually quite textured; the sleekness comes from smoothing the surface later.
Once your hair is completely dry and has cooled, gather it into a high ponytail positioned at the crown, slightly toward the back of the head rather than directly on top (which can look pageant-style rather than elegant). Section off a small, thin piece from the ponytail base—this will become your wrap. Using a fine-tooth comb, smooth the surface of the gathered ponytail and the face-framing pieces. Mist lightly with hairspray before securing with a thin elastic band, then wrap the reserved section around the base to conceal the elastic. Secure that wrap piece with a bobby pin that matches your hair color.
The Finishing Details That Matter
The difference between a good wedding ponytail and a truly exceptional one lies in the finishing touches. After your ponytail is secured, take a straightening iron set to a medium heat (around 350°F / 175°C) and glide it down the ponytail shaft in sections, working in the direction of hair growth. This creates an ultra-polished, sleek surface without the greasy appearance that sometimes comes from serums. The straightening iron also helps seal the hair cuticles, which keeps the style looking fresher longer throughout the evening.
For texture and movement, consider curling the ponytail ends with a large barrel curling iron (1.25-1.5 inches) or wand, wrapping the hair around the barrel and releasing slowly to create loose, bouncy waves. Alternatively, if you want a completely straight look, skip the curling step. Add a light hairspray mist to hold everything in place, then position any hair accessories—a delicate clip, a jeweled hair comb, or silk ribbon woven through the tie—just below the elastic wrap to draw attention to your thoughtful styling.
Pro tip: If you have baby hairs or flyaways around your face, smooth them individually with a tiny brush and a dab of edge control product formulated specifically for edge work (not heavy pomade, which reads as greasy in wedding photos). This takes five extra minutes but noticeably elevates the overall polish.
2. The Sleek Low Ponytail with Volume
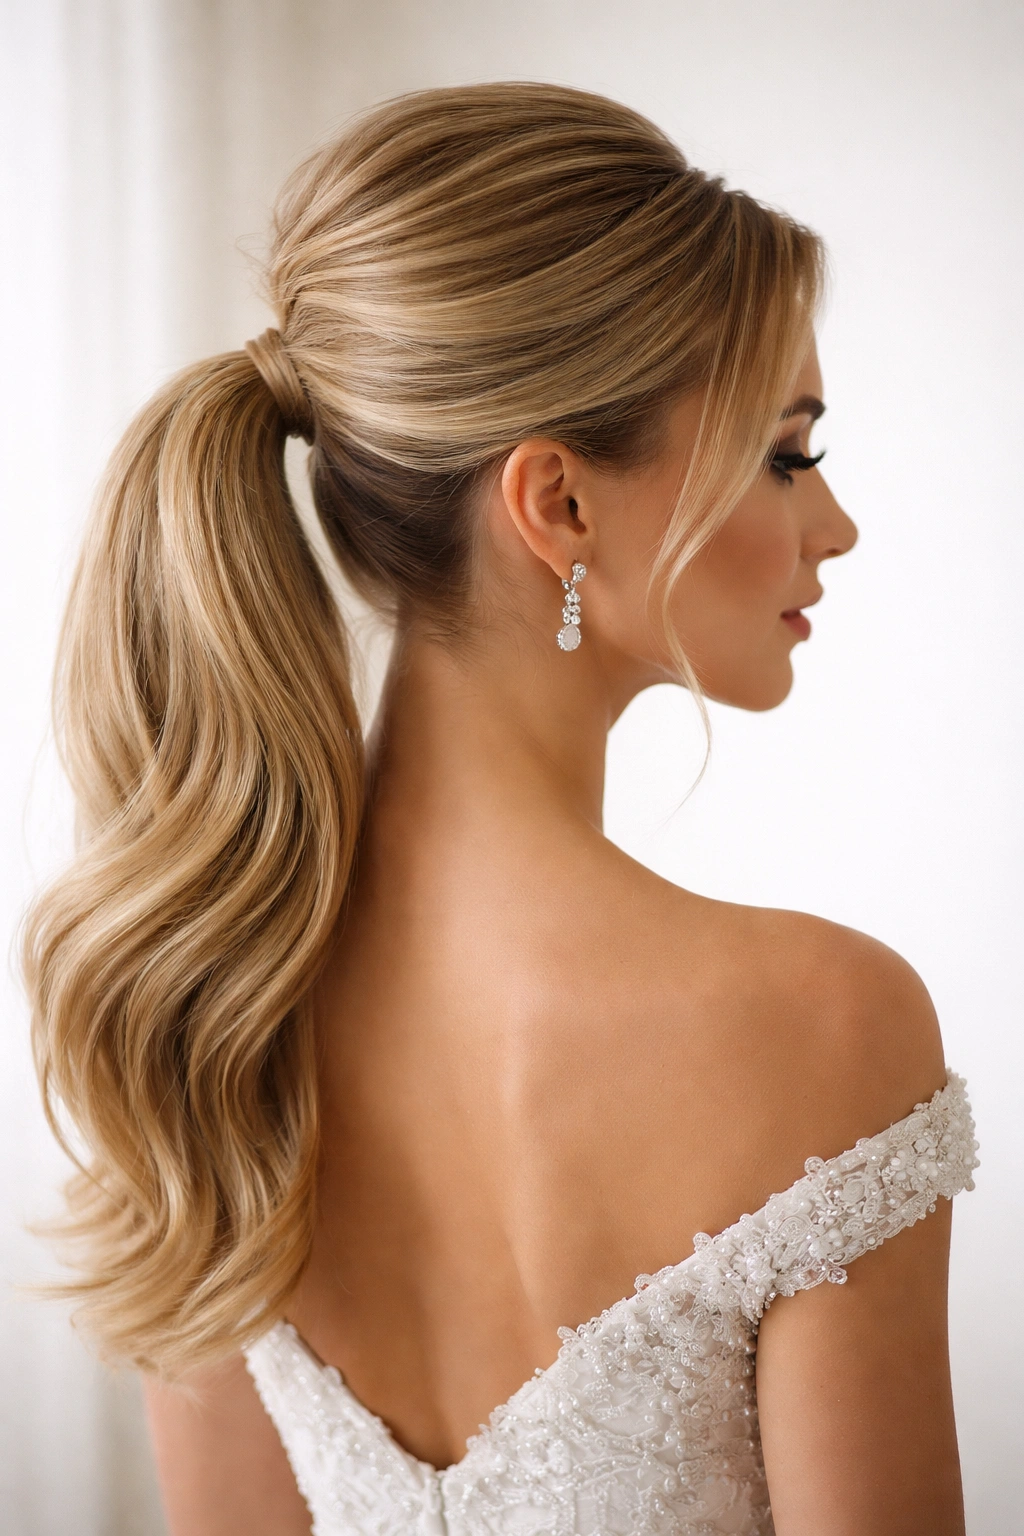
A low ponytail positioned at the nape of the neck offers an entirely different aesthetic—sophisticated, modern, and perfect for showcasing a strapless or sweetheart neckline while still feeling formal enough for a wedding. The styling secret is creating significant volume at the crown while keeping the gathered ponytail itself sleek and smooth, a contrast that makes the style visually interesting without appearing fussy.
Building Volume Without Bulk
This style absolutely demands backcombing or teasing at the crown to create lasting, substantial volume. After blow-drying your hair, section off the top third from ear to ear across the crown. Clip this section up temporarily. Using a fine-tooth teasing brush, backcomb small subsections of hair from underneath, working at the root and moving toward the mid-shaft. Don’t tease the very top layer—you want invisible volume underneath, with a smooth surface on top. Gently brush over the teased layer with your regular brush to smooth the surface while maintaining the volume underneath.
Release the clipped section and gently brush it over the teased foundation, creating an invisible cushion that holds shape all evening. Use a light texture spray or volumizing hairspray on the teased sections to add grip and lasting hold. The goal is volume that looks intentional but not artificial—a rounded crown that suggests effort without screaming that you’ve teased your hair.
Now gather the hair lower, at the nape of your neck, and secure it with an elastic. The contrast between the full crown and the slick, smooth gathered portion is what makes this style distinctive. Using a fine-tooth comb, smooth the entire ponytail surface, then use the straightening iron technique described above to create a polished, sleek finish on the tail itself.
Styling for Maximum Impact
Because this style emphasizes the back of your head and neck, the ponytail itself should be immaculate. If you want additional interest, create a small French braid from the elastic down to the ends of the ponytail—this adds texture and visual movement while maintaining the overall sleek aesthetic. Alternatively, curl the ends of the ponytail in soft, romantic waves that graze the base of your neck and shoulders. The combination of a structured, voluminous crown with a textured or curled tail is what elevates this from a simple low ponytail into a wedding-appropriate style.
This style pairs beautifully with delicate accessories like a jeweled hair comb positioned at the base of the ponytail, or a thin silk ribbon woven through the elastic tie and allowed to fall gracefully. Avoid chunky clips or heavy embellishments, which can weigh down the style.
Worth knowing: This style actually photographs better than you might expect during the ceremony, since people seated behind you can see the beautiful volume and detail work you’ve created at the crown. It’s an excellent choice if you want a style that shows off from multiple angles.
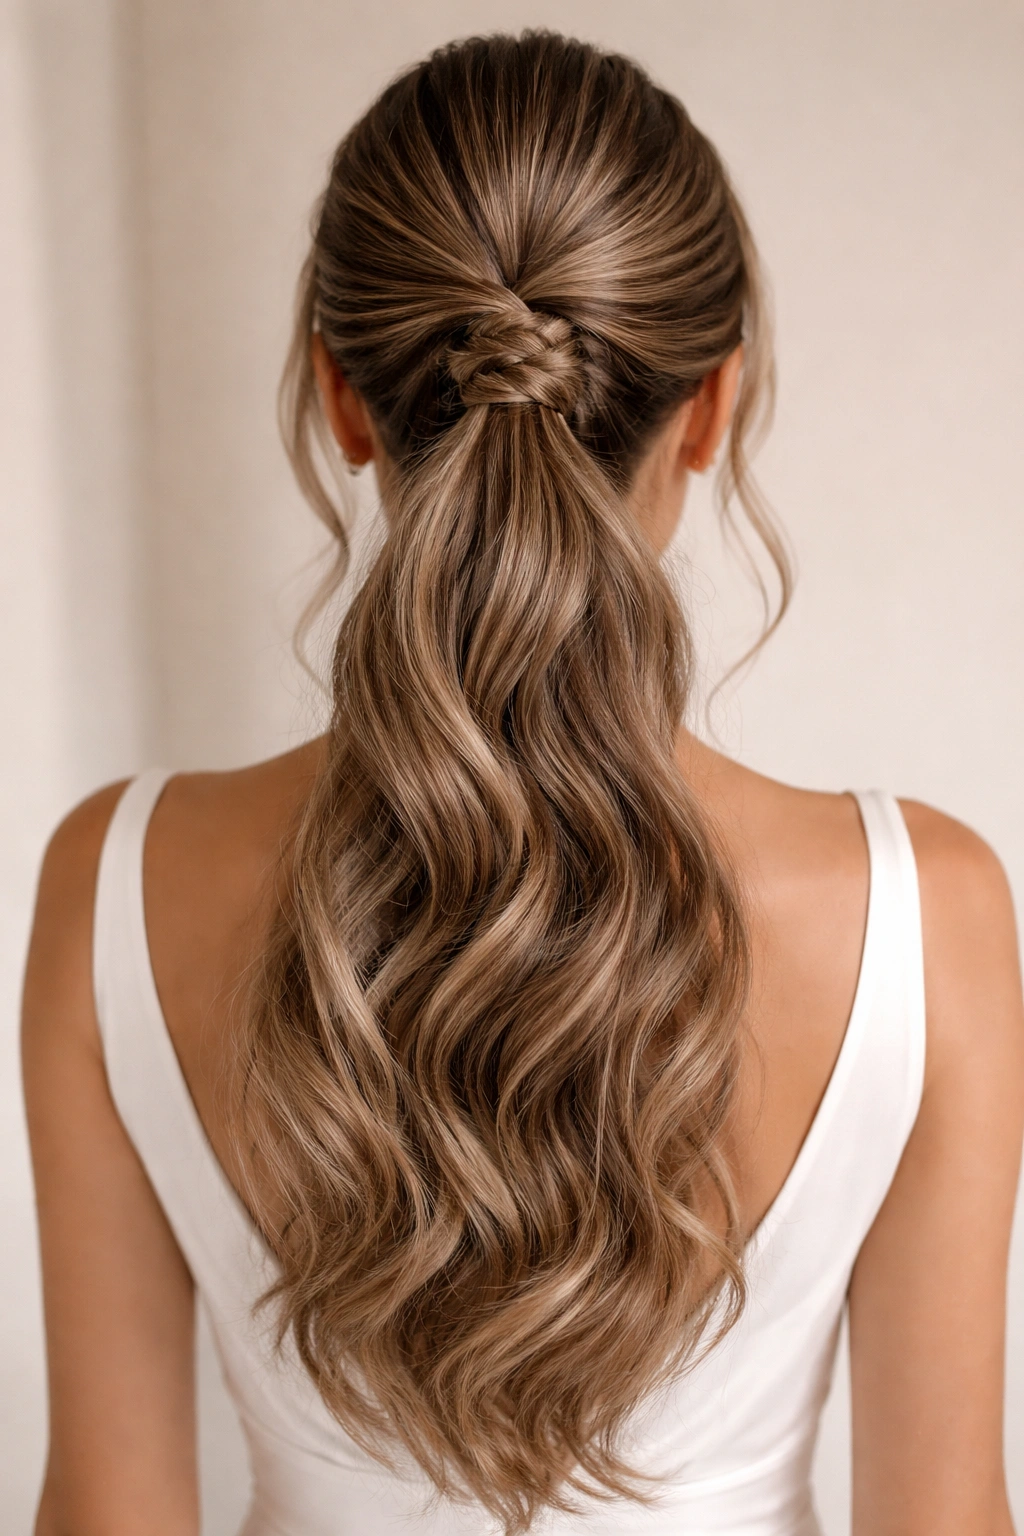
3. The Braided Wrap Ponytail
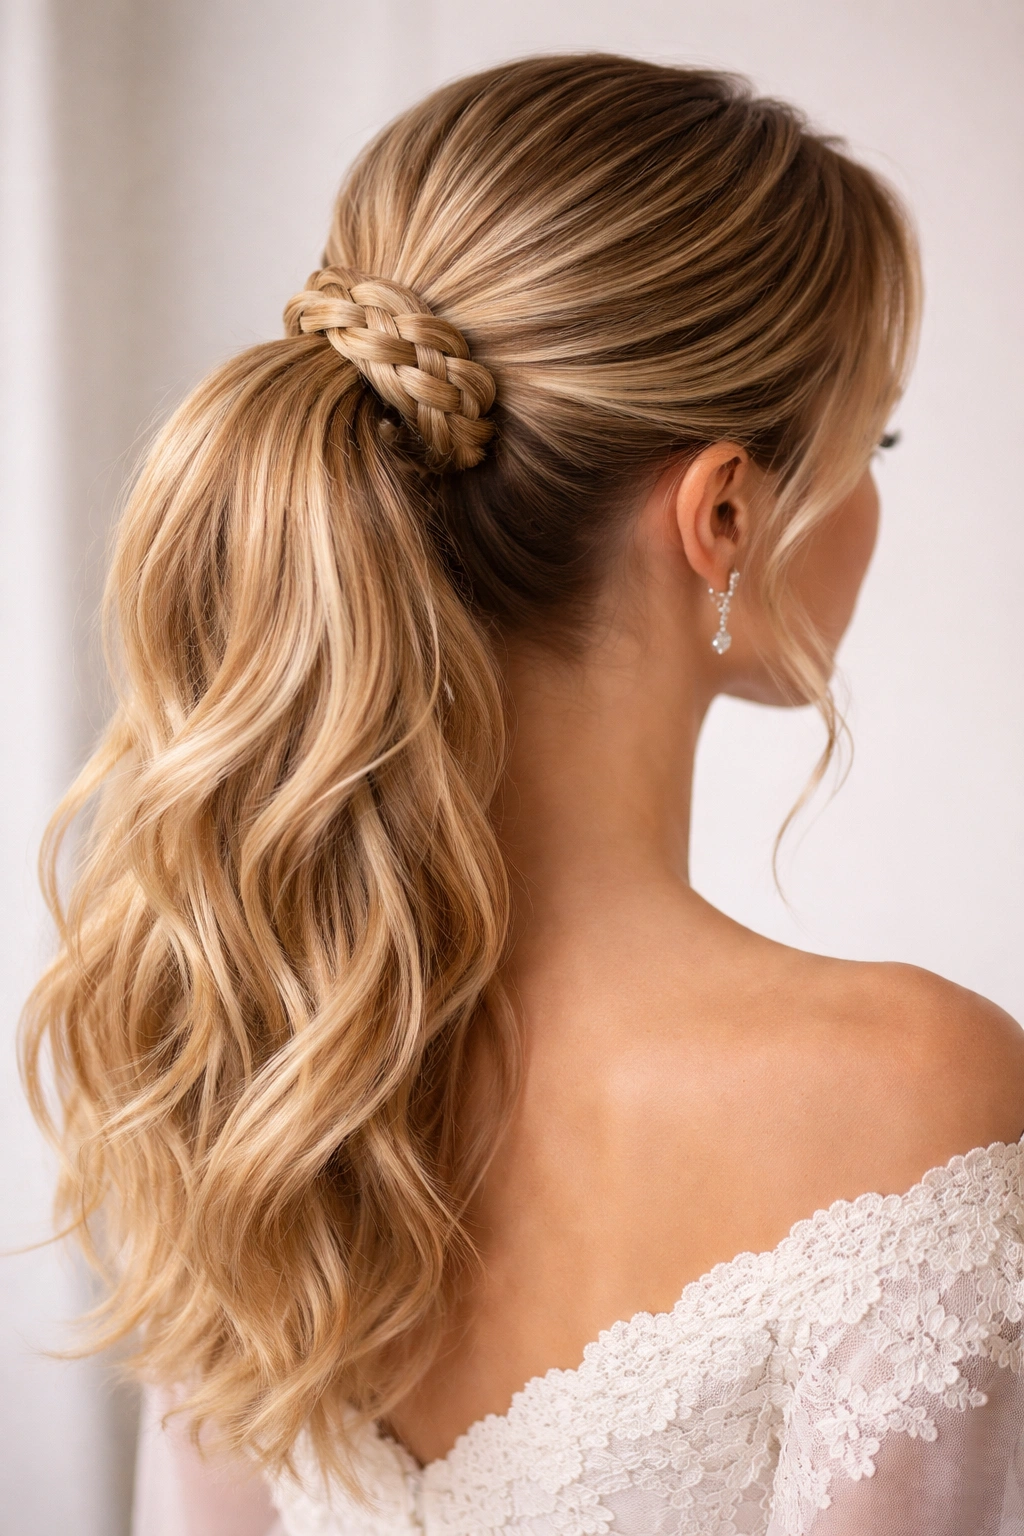
A three-strand braid wrapped around the base of a high or mid-height ponytail adds intricate texture and visual interest while maintaining the simple elegance of a ponytail structure. This style works especially well for guests and bridesmaids, as it looks intentional and beautifully detailed without requiring the volume or finishing work of more elaborate styles.
Creating the Braid Wrap
Start by gathering your hair into a ponytail positioned at your desired height—for this style, a mid-height ponytail (between your crown and the nape) often looks most balanced. Secure it with an elastic band. Now, take a thin section of hair from the ponytail itself—about an inch-thick piece—and begin braiding it. A three-strand braid is the most flattering; do not make it too tight, as tension will show in your hair and can cause discomfort over hours of wear.
Braid this section all the way down, creating approximately a 4-6 inch braid, then secure the end of the braid with a tiny elastic band that matches your hair color. Now wrap this braid around the base of the ponytail, circling it around the elastic band like a crown. Pin the end of the braid underneath with a bobby pin, hiding it completely so only the braid wrapping is visible. This creates the illusion that the braid is intricately woven, when in reality it’s simply wrapped around the elastic.
Adding Dimension with Texture
For maximum visual impact, do not create a completely sleek ponytail before wrapping the braid around it. Instead, gently tease or backcomb the gathered ponytail section to create subtle texture, then lightly smooth the surface. This gives the ponytail itself dimension and prevents it from looking flat, especially in photographs where a slick ponytail can sometimes appear one-dimensional.
After the braid is wrapped and secured, you can gently pull at the edges of the braid to loosen it slightly and create a softer, fuller appearance—this is called “pancaking” the braid. Work carefully, loosening one side, then the other, until the braid looks intentionally undone rather than perfectly tight. The balance between the braided detail work and the softer ponytail creates a style that feels both polished and romantic.
Quick styling note: If you have flyaway hairs or baby hairs around your face, gently smooth them with edge control, and use a thin bobby pin positioned horizontally just above your ear to anchor any pieces that tend to escape. This keeps the style looking fresh and controlled through multiple hours and multiple hugs from well-wishers.
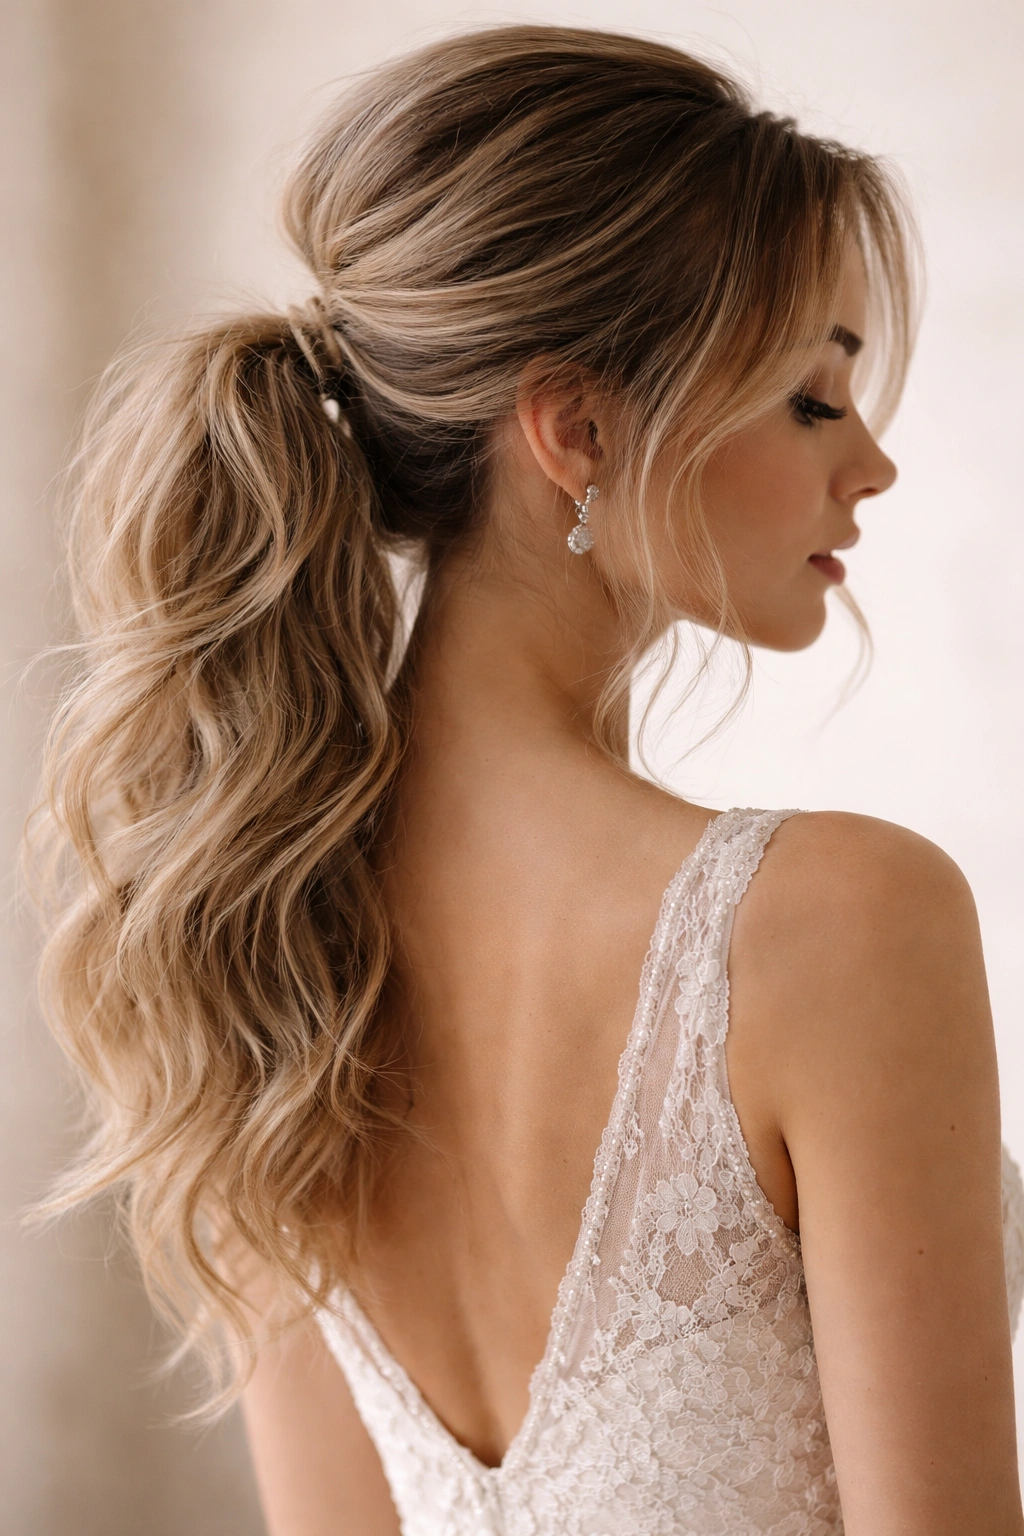
4. The Textured Romantic Ponytail
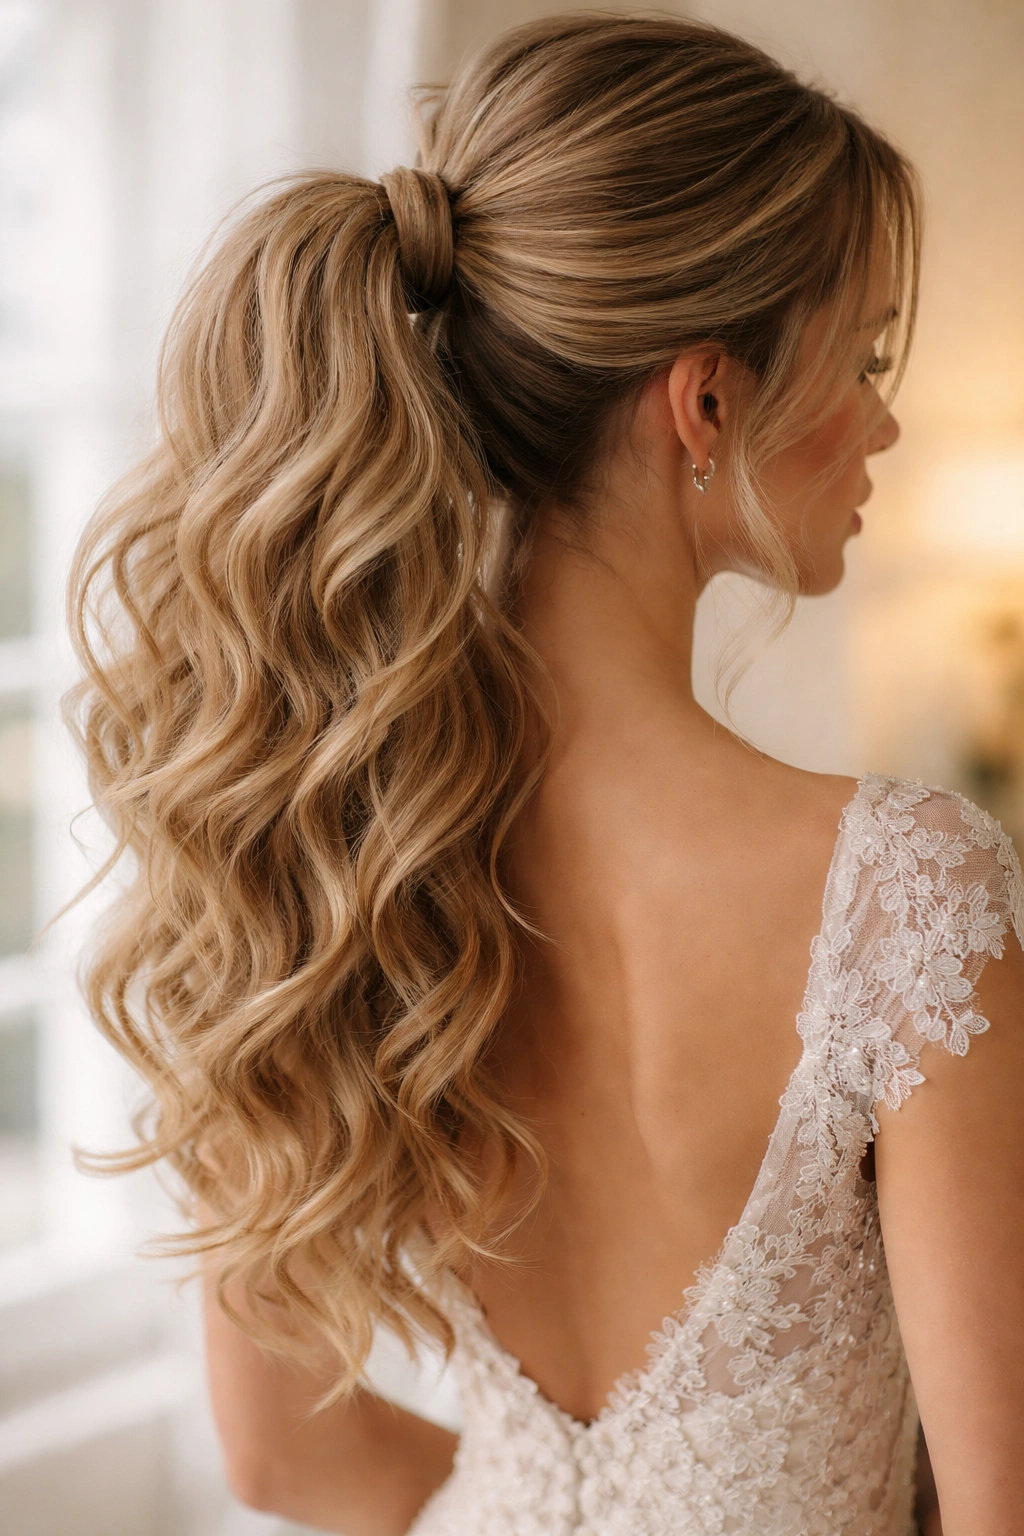
This style emphasizes movement, wave, and romantic texture throughout the entire ponytail—it’s the choice for brides and wedding guests who want an undeniably feminine, soft aesthetic rather than sleek modernity. The key is creating waves with real dimension and bounce, not just surface curls, and positioning them in a way that elongates the face and creates movement visible from the front as well as the back.
Creating Lasting Wave Structure
Begin by applying a volumizing mousse or texturizing spray to damp roots and mid-lengths, then blow-dry your hair in sections using a round brush to create natural bend and body. Once your hair is completely dry, create sections for curling—you want to work with sections no thicker than two inches, as thinner sections hold curl longer and with more definition.
Using a 1.25-inch barrel curling iron, wrap each section of hair around the iron, holding the iron at a 45-degree angle away from your head (rather than parallel to your head, which creates tighter spirals). Hold each section for 8-10 seconds, then release and allow the curl to cool in your hand for several seconds before letting it drop. Cooled curls hold significantly longer than warm ones, so patience here pays off. Curl your entire head in this manner, aiming for waves rather than tight ringlets.
Once all hair is curled and cooled, you’ll have pronounced waves and curl throughout. Gather these waves into a ponytail at your desired height—a mid-to-high position usually looks most balanced with this amount of texture. Use your fingers rather than a comb to gather the ponytail, which preserves the wave structure rather than combing it into submission. Secure with an elastic, then gently run your fingers through the ponytail to separate the waves and create a fuller, more textured appearance.
Enhancing the Romantic Aesthetic
Do not straighten or smooth the ponytail surface—that defeats the entire purpose of this style. Instead, lightly mist with hairspray, then consider adding ribbons, delicate pearl-adorned clips, or even small white or ivory flowers woven throughout the ponytail. These accessories complement the romantic texture and add wedding-appropriate femininity.
For bridesmaids with this style, consider a single delicate tendril of hair left out on each side of the face. Curl this tendril separately around a smaller barrel (0.75-1 inch) to create a more pronounced wave, and gently smooth it slightly with a straightening iron on the lowest setting (around 250°F / 120°C) to blend it with your face without destroying the curl entirely. These framing pieces soften the overall look and create an intentional, styled appearance rather than looking like hair you forgot to pin back.
Insider note: Textured ponytails look exponentially better photographed in motion or when you’re moving your head, as the waves and movement become visible. If you’re standing still facing the camera, the texture can look flat or undefined. Keep this in mind if you’ll be doing a first dance or walking through the reception—movement will show off your carefully created waves beautifully.
5. The Side-Swept Statement Ponytail
A dramatically side-swept ponytail gathered far to one side of the head creates an asymmetrical, modern aesthetic that’s both sophisticated and visually striking. This style works beautifully for the bride who wants something that photographs exceptionally well from the side or at an angle, and it suits elongated face shapes particularly well.
Positioning and Gathering for Maximum Impact
Determine which side of your head the ponytail will favor—typically the left side looks slightly more flattering for most people, though this is entirely personal preference. Begin by blow-drying your hair with a center part or slightly off-center part, using a round brush to create volume at the crown. Once your hair is dry, gently brush the hair from one side of your head to the opposite side, creating a sweeping movement that cascades across the back of your head.
Gather the ponytail at a point far to the side—if you’re sweeping to the right, position the ponytail on the far right side of your head, roughly where your ear is located. Pull it tightly enough to be secure, but with enough intentional looseness that it looks like a deliberate style choice rather than hair pulled back in a rushed manner. Secure with an elastic, then smooth the surface with a fine-tooth comb.
The beauty of this style lies in the exposed neck and shoulder on the side opposite the ponytail. This creates a long, elegant line and showcases the collarbone beautifully, particularly flattering with strapless or sweetheart necklines.
Adding Dimension with Texture and Accessories
To prevent this side-swept style from looking flat or severe, create subtle texture in the ponytail rather than going completely sleek. Curl the ponytail ends in loose waves using a large barrel curling iron, allowing the curls to cool before brushing them out into soft waves. This prevents the tail from looking like a solid rope of hair and instead creates movement and dimension visible from multiple angles.
Position an elegant accessory—a jeweled clip, a delicate hair comb, or even a small fascinator—at the base of the ponytail where it meets the scalp. This draws the eye to the detail work and adds sophistication. You can also weave a thin silk ribbon or a delicate braid through the top section of the ponytail, starting from the base of the tail and moving down a few inches, then releasing the ponytail to fall naturally.
This style suits a romantic destination wedding aesthetic exceptionally well, and the side-sweep creates beautiful visual interest in photographs, particularly candid shots where the angle catches the sweep of your hair across your neck and shoulder.
Worth knowing: If you have longer hair, this style can look particularly dramatic and romantic. If your hair is shorter (shoulder-length or just below), a side-swept ponytail can sometimes look slightly unbalanced. Work with a stylist beforehand to confirm this style flatters your hair length and face shape.
6. The Twisted Elegance Ponytail
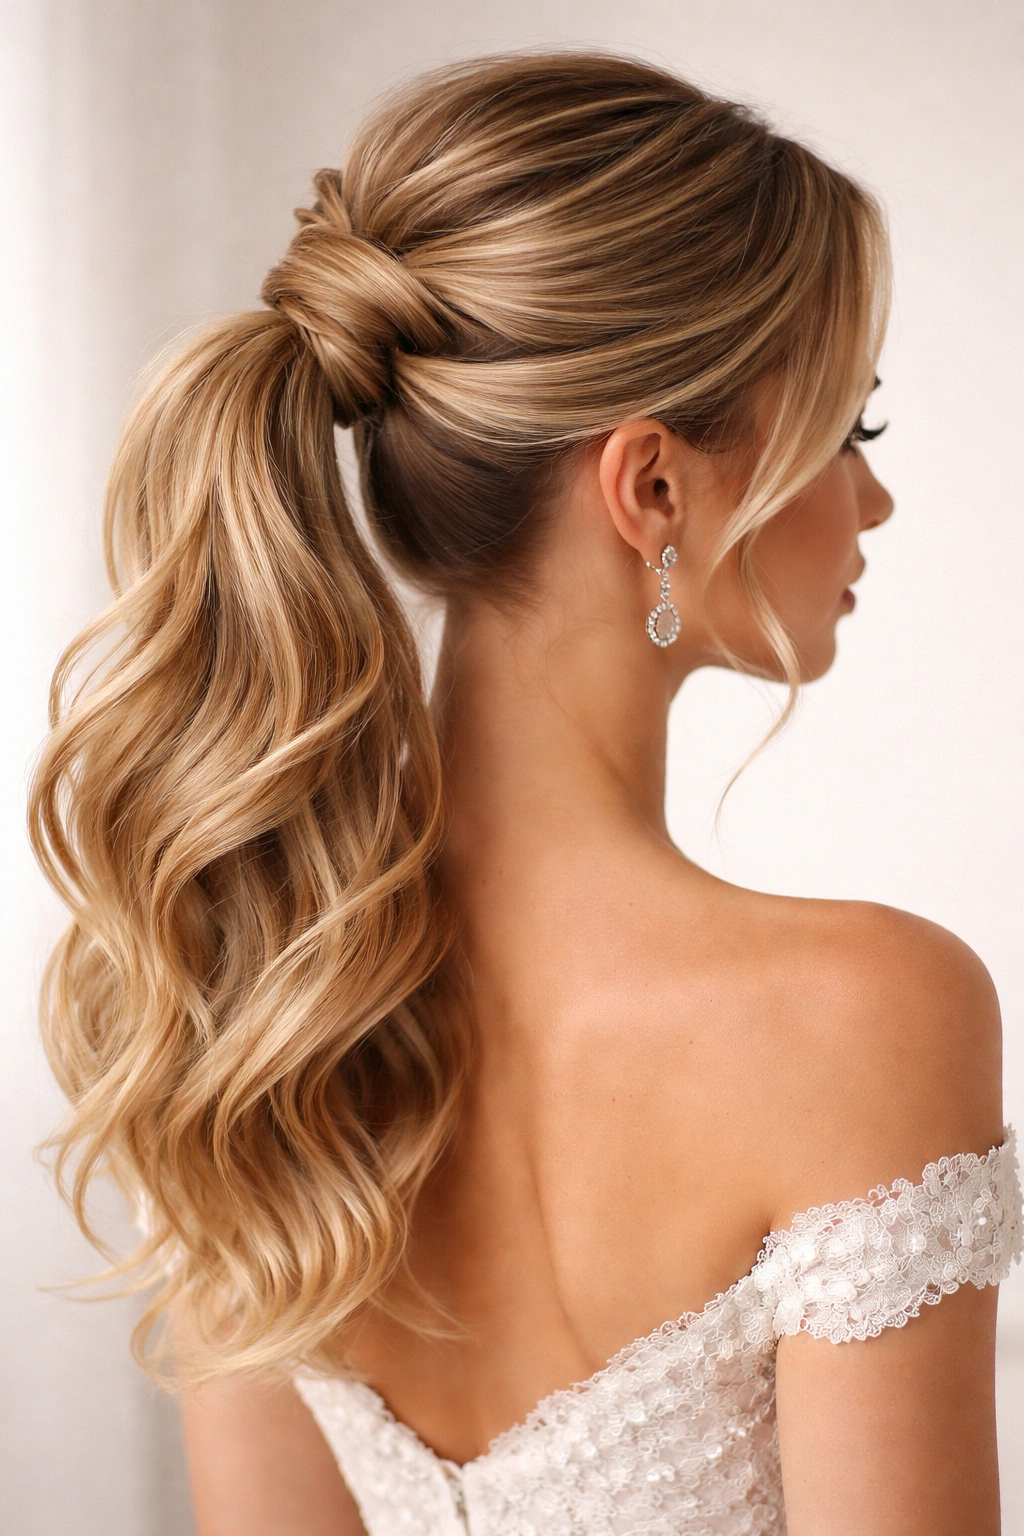
Twisted sections of hair wrapped around a central ponytail create refined texture and visual sophistication without the commitment of traditional braiding. This style has an architectural quality—it looks intentional and carefully considered—while still feeling softer and more forgiving than sleek options.
Building the Twisted Structure
After blow-drying your hair with volume at the crown, gather it into a ponytail at your preferred height—a high-to-mid position usually works best with this style. Rather than creating a simple, single ponytail, divide the gathered hair into 3-4 thick sections. Take the first section and twist it tightly around its own axis, creating a spiral of hair. Wrap this twisted section around the base of the entire ponytail, pinning the end with a bobby pin.
Repeat this process with the second section, twisting it and wrapping it around the base, then the third and fourth sections, each spiraling around and overlapping the previous ones. The result is a multi-layered twisted effect at the base of the ponytail, creating substantial visual interest and texture.
The sections of hair below the twisted base—your actual ponytail—should be smoothed and polished. Use your straightening iron to create a sleek surface, or curl the ends for softness, depending on your preferred aesthetic. The contrast between the intricate twisted detailing at the base and the smoother ponytail below is what makes this style visually compelling.
Refinement and Finishing
After the twists are in place and secured, gently pull at the edges of each twisted section to loosen it slightly and create a fuller, softer appearance—the opposite of pulling everything tightly. This creates the impression of carefully crafted texture rather than overly controlled precision. Mist everything lightly with hairspray to set the twists in place and prevent them from unraveling as you move throughout the day.
A single jeweled clip or hair comb positioned just below the twisted section, where it meets the main ponytail, adds elegance and draws attention to your detailed handiwork. Alternatively, a thin silk ribbon threaded through the twists and allowed to cascade down the ponytail adds movement and femininity.
This style is exceptionally forgiving for hair that tends to escape or frizz, because the twists actually help contain smaller strands and incorporate them into the overall look. It’s also excellent for second-day or partially air-dried hair, which often twists and sets more easily than freshly washed, slippery hair.
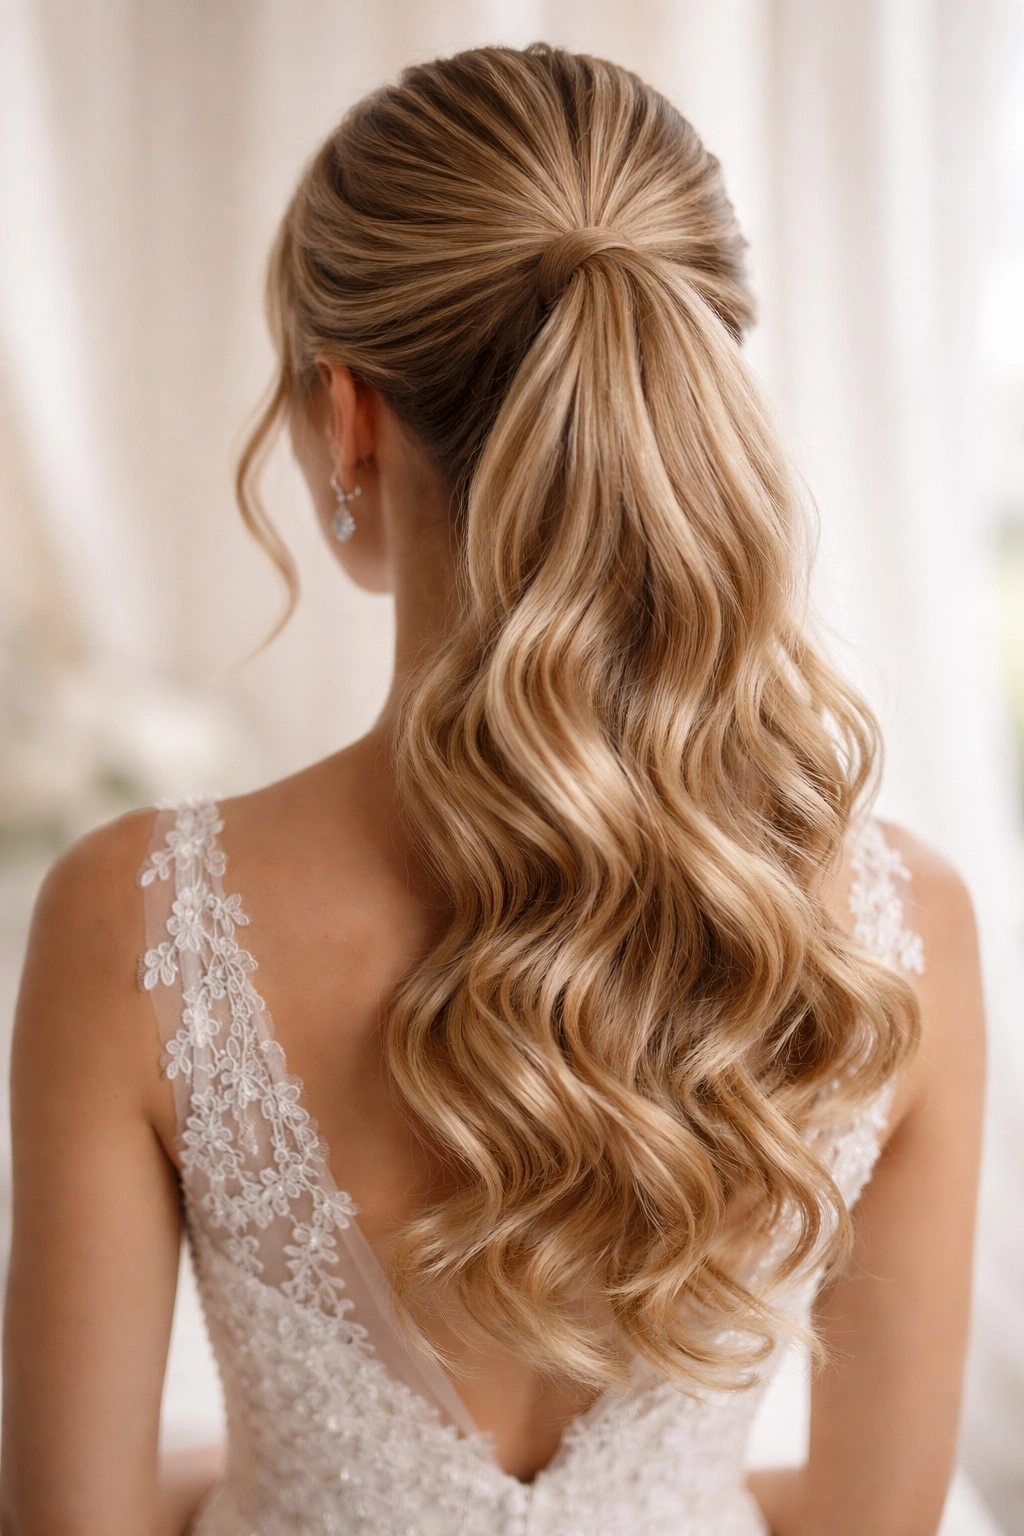
7. The Half-Up Half-Down Ponytail
For brides and guests who cannot commit fully to a ponytail but want more style than completely loose hair, a half-up half-down ponytail is the perfect compromise. The gathered top section sits formally in place while the bottom half flows freely, creating a balanced look that’s appropriate for a wedding while maintaining the romance and movement of down hair.
Creating the Structured Upper Section
Begin by blow-drying your entire head with volume and waves. You want substantial movement and texture throughout, since half your hair will be down. Once your hair is dry, identify the half-up section—typically everything from your temples back and up to your crown. Gently brush this section back and gather it at the crown, securing it with an elastic.
Rather than making this a simple elastic-and-done situation, immediately take a small section of the gathered hair and wrap it around the elastic to conceal it, pinning the wrapped section with a bobby pin. This finishing detail transforms the look from “I quickly gathered half my hair” to “this is an intentional, styled decision.” Run a fine-tooth comb through the gathered section to smooth it, then lightly mist with hairspray.
The bottom half of your hair—the portion that remains down—should have beautiful wave and texture. Curl or wave the ends of this section, creating movement that extends down your back and shoulders. The contrast between the polished, gathered upper section and the flowing, textured lower section is what makes this style visually interesting and distinctly bridal.
Adding Dimension and Interest
To prevent the half-up section from looking flat against the crown, gently backcomb or tease the gathered section at the roots before smoothing the surface. This creates a slight pouf at the crown that looks intentional and adds dimension.
Position a delicate hair accessory—a small jeweled comb, a decorative clip, or a thin metal hair barrette—where the upper gathered section meets your crown. This adds sophistication and draws attention to the styling detail. You can also consider a tiny braid woven through the gathered upper section, starting at one temple and moving back to the crown, then incorporating into the gathered section. This adds texture and makes the style feel more intentional.
Because this style involves having hair down in the back, consider the practicalities of your wedding day. If you’ll be moving around significantly—dancing, dining, outdoor activities—you might secure the down portion loosely with a second elastic at the back of your neck, creating the visual impression of mostly-down hair while keeping it practically contained. This elastic can be hidden by the ponytail, and you can release the lower section if you want to remove the ponytail partway through the evening.
Pro tip: This style looks exceptional photographed from behind, as you get the full visual impact of both the structured upper section and the flowing waves below. If you’ll be facing the camera primarily, confirm with your photographer that this style will be captured beautifully from your preferred angle.
8. The Bubble Ponytail
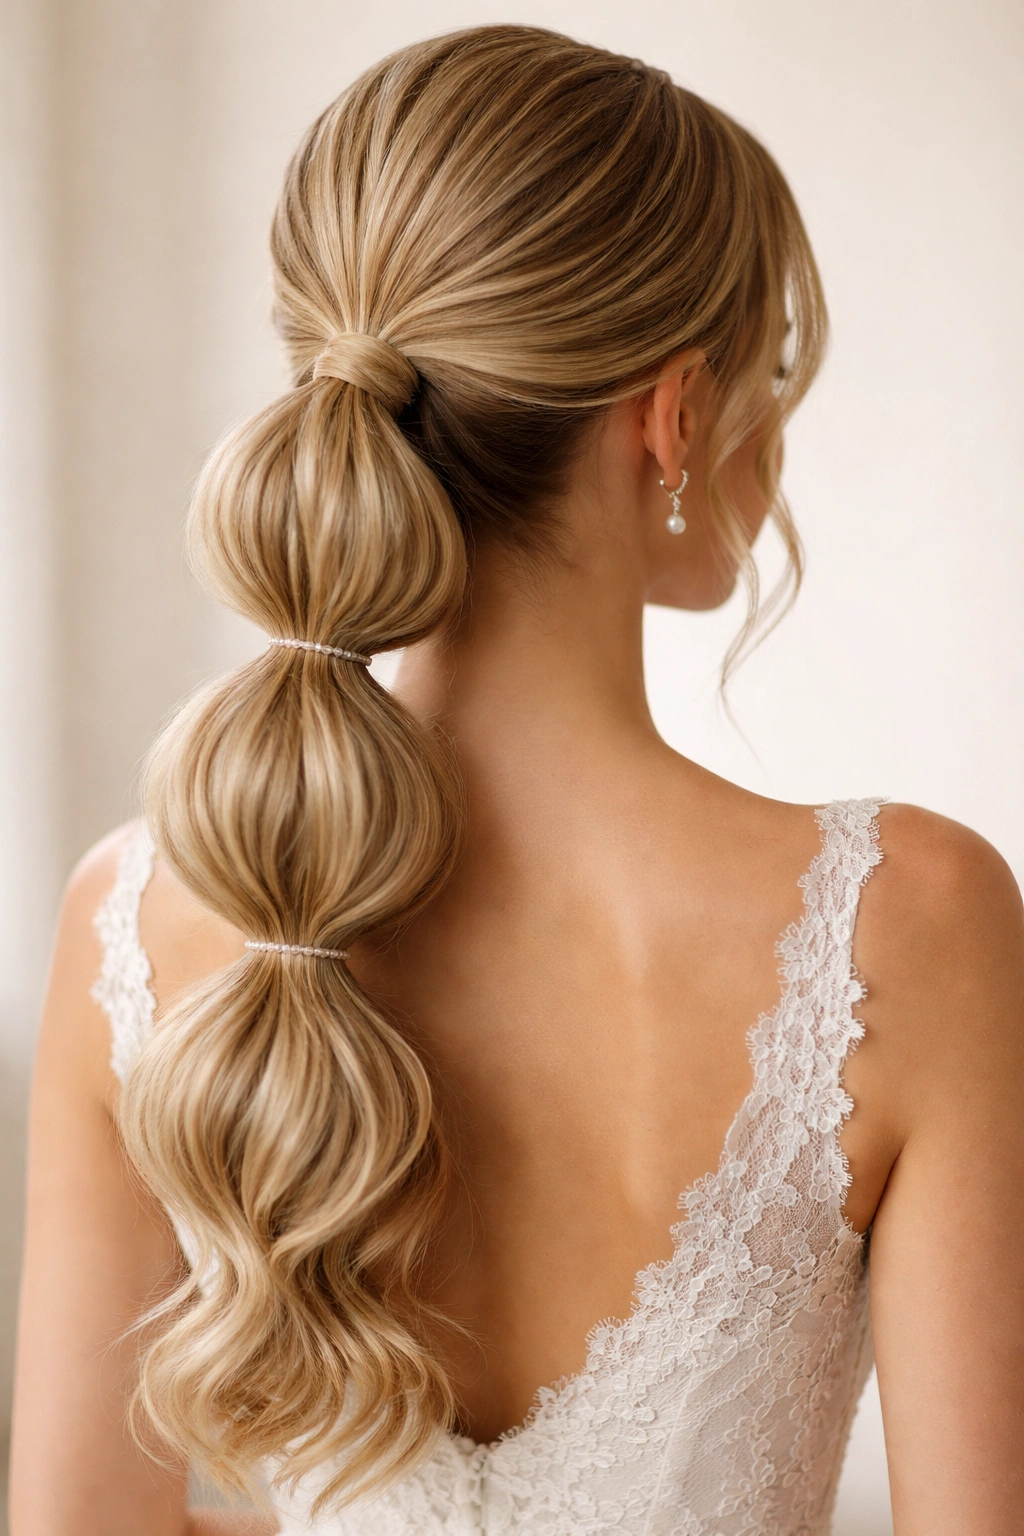
A bubble ponytail—a series of elastic-gathered sections moving down the length of the ponytail, creating a segmented, bubble-like appearance—is a modern, playful choice that’s still entirely wedding-appropriate when executed in refined fabrics and polished styling. This style works best for guests and bridesmaids rather than brides, as it reads younger and more contemporary.
Creating the Bubble Segments
Begin with a smoothly blow-dried ponytail gathered at your chosen height (a high or mid-height works best). Secure it with your first elastic. Now, measure down approximately 3-4 inches from the first elastic and use a second fine elastic to create another section, gathering the hair just below the first elastic. The hair in between these two elastics will start to pouf or “bubble.”
Gently pull the pouffed section upward and slightly outward with your fingers, creating a rounded bubble shape. The stretching should be subtle—you want the bubble to look intentional, not like your hair is escaping from the elastic. Pin any stray hairs with bobby pins if needed, keeping them hidden within the bubble.
Repeat this process down the entire length of the ponytail, creating 4-5 bubbles depending on your hair length. Each bubble should be roughly the same size for visual balance, though slight variations look more natural and less mechanical. The final section below the last elastic can be curled for softness or straightened for sleekness, depending on your style preference.
Styling and Embellishment
To make a bubble ponytail feel wedding-appropriate rather than simply trendy, use luxe hair elastics in metallic colors (rose gold, champagne, silver) or pearl-toned hair cuffs rather than standard black elastic bands. These small changes elevate the style dramatically and make it appropriate for a formal event.
Consider adding delicate accessories between each bubble—tiny pearls, small metallic charms, or even white or ivory ribbon tied in small bows. This adds femininity and sophistication while the bubble structure itself keeps the style interesting and modern. Alternatively, position a single standout piece—a jeweled hair clip or a small decorative comb—at the base of the ponytail, drawing attention to the beginning of the bubble structure.
Curl the tips of each bubble gently with a small barrel curling iron to soften the overall effect and add movement. This prevents the style from looking too architectural or mechanical, and the curled tips add a romantic quality that balances the modern bubble structure.
9. The Sleek Curved Ponytail
For a bride or guest wanting absolute polish and modernity, a sleek curved ponytail—one that curves gently along the side or back of the head rather than sitting centrally—combines minimalist aesthetic with sophisticated geometry. This style photographs beautifully and suits contemporary or modern wedding aesthetics perfectly.
Achieving Sleek Perfection
After blow-drying your hair straight using a brush, use a paddle brush to smooth your hair from root to tip in the direction it will be gathered. Use a medium heat straightening iron to create an ultra-polished surface—glide it down sections of hair slowly, paying particular attention to the front face-framing pieces that will be most visible.
Gather your hair into a ponytail positioned slightly to one side of the back of your head, rather than directly centered. This off-center positioning creates the curved, asymmetrical quality of the style. Use a fine elastic that matches your hair color, and wrap a thin section of hair around the base to conceal the elastic, pinning it carefully.
Run your fine-tooth comb through the gathered ponytail, smoothing any texture or flyaways. Use the straightening iron again on the entire ponytail length, working from root to tip in smooth, slow passes. The goal is a surface so smooth and polished that it catches light and appears almost luminous in photographs.
Adding Subtle Dimension
While this style is fundamentally sleek, complete absence of dimension can sometimes read as flat or harsh in photographs. Create very subtle waves in the ponytail by curling the ends of the ponytail loosely around a large barrel curling iron, then running the straightening iron down the waves at a lower temperature (around 250°F / 120°C) to blend them into the overall sleek surface. The result is smoothly polished hair with barely-visible soft waves at the ends—movement without texture.
A single sophisticated accessory—a delicate gold or silver cuff positioned just below the wrapped base, a jeweled barrette, or even a thin metallic ribbon threaded through the elastic—adds refinement without disrupting the sleek aesthetic. Less is more with this style; one standout piece matters more than multiple small embellishments.
This style is exceptionally forgiving for frizz and humidity issues, since the straightening iron creates a sealed cuticle that resists environmental moisture. It’s an excellent choice for outdoor weddings or locations with unpredictable weather.
Worth knowing: Sleek straight ponytails can sometimes emphasize a fuller face or longer face shape. Consult with your stylist beforehand to ensure this style flatters your specific face shape, or consider adding subtle face-framing pieces before gathering the ponytail to soften the effect.
10. The Messy Romantic Ponytail
The deliberately undone, messy romantic ponytail is paradoxically one of the most challenging styles to execute, because it requires careful, intentional styling to look effortlessly casual rather than accidentally disheveled. When done correctly, this style conveys romance, ease, and a “I woke up like this” confidence that’s appealing and wedding-appropriate.
Creating Intentional Texture and Looseness
This style absolutely requires heavily textured hair as its foundation. Use a texturizing spray on damp hair before blow-drying, or apply a sea salt spray to damp roots and mid-lengths to encourage wave formation. Blow-dry your hair with your fingers rather than a brush, encouraging waves and texture throughout.
Once your hair is dry, create loose waves throughout using a 1.5-inch or larger curling iron, curling entire sections loosely and releasing without smoothing. The goal is soft, undone waves, not tight ringlets. Allow these waves to cool completely. Now, gather your hair loosely into a ponytail at your preferred height—this is not a tight, secure gathering, but rather a gently bundled arrangement of hair.
Secure with an elastic, but leave wispy pieces intentionally loose around your face and neck. Use a fine-tooth comb to gently tease or backcomb the ponytail section, creating volume and texture rather than smoothness. This is the opposite of the sleek ponytail approach—you’re actively working toward a textured, full appearance.
The Careful Art of Seeming Careless
Gently release and fluff the ponytail, letting some of the gathered hair escape slightly. Pull a few individual waves out and position them around your face, securing them with bobby pins if necessary so they stay in the intentionally-loose position and don’t disappear back into the ponytail.
Position delicate accessories that play up the romantic undone quality—woven ribbon, baby’s breath or small filler flowers, a pearl-adorned hair stick, or delicate metal chains. Avoid anything that reads as controlled or structured; you want accessories that enhance the romantic, loose aesthetic.
The key to this style looking polished rather than unkempt is that every piece of looseness is actually pinned or secured in place, even though it appears free-flowing. This requires strategic bobby pin placement, often hidden within the ponytail and the loose waves themselves. A light mist of flexible-hold hairspray (not firm hold, which would make texture feel stiff) sets everything in place without compromising the soft, undone aesthetic.
This style pairs beautifully with vintage or bohemian wedding aesthetics, garden weddings, and outdoor celebrations. It also works exceptionally well for brides who want their hairstyle to feel aligned with a relaxed, casual dress code or ceremony setting.
11. The Braided Crown Ponytail
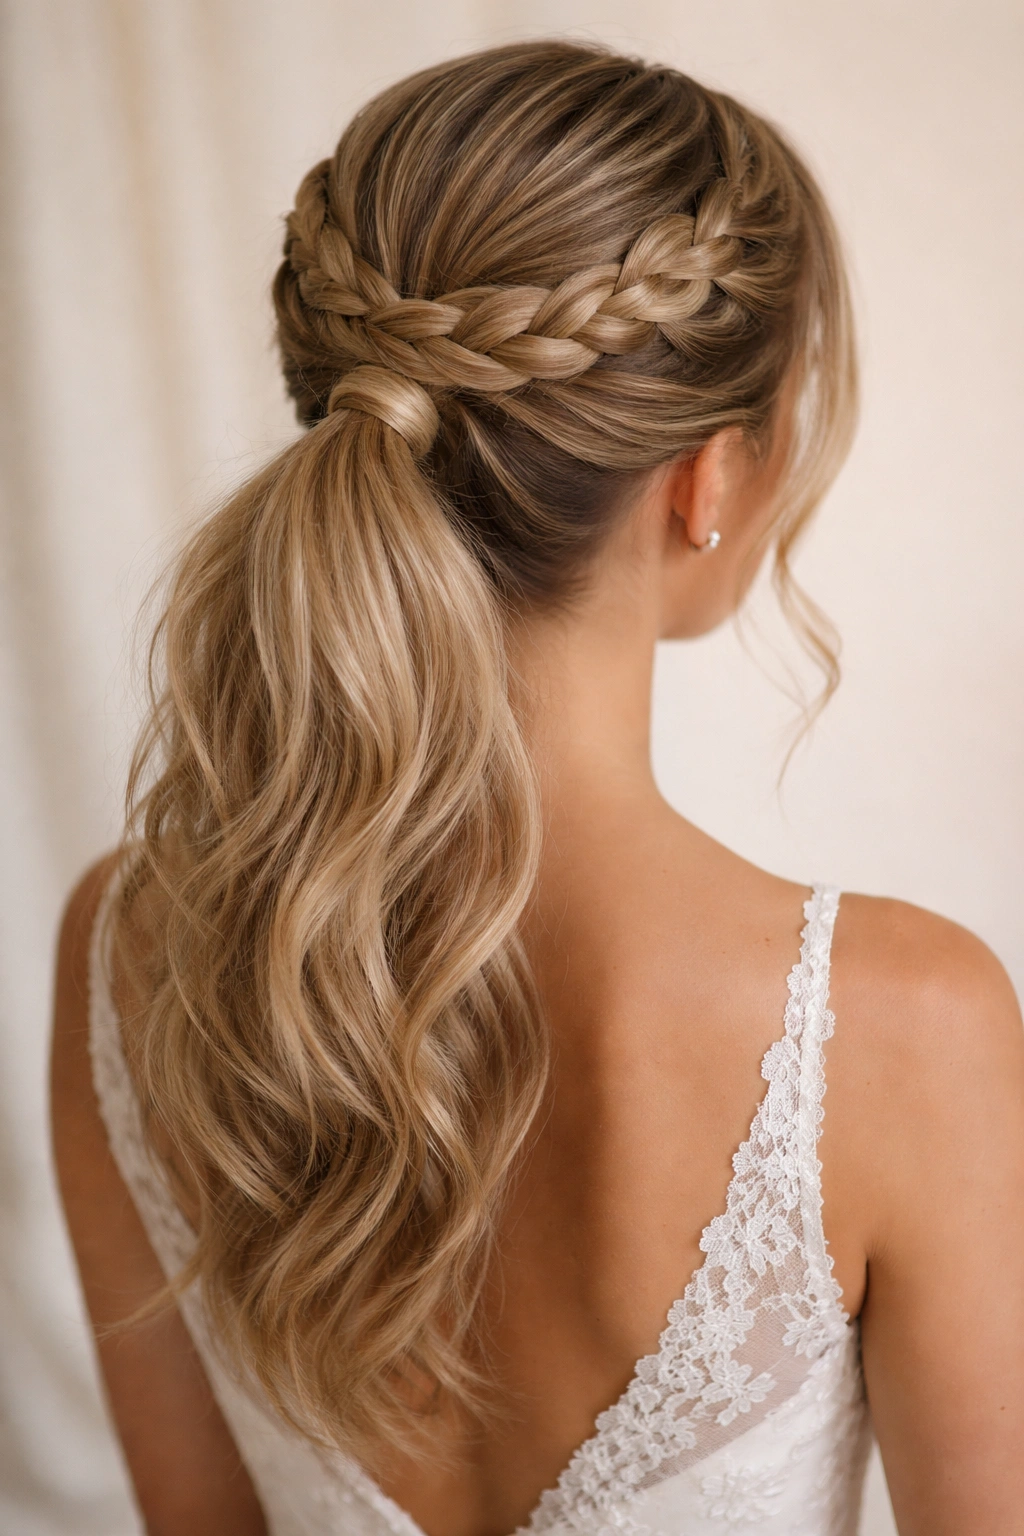
A Dutch or French braid that wraps around the crown of your head, incorporating into a ponytail at the back, creates an intricate, romantic style that’s unmistakably bridal. This style works for brides especially, as it suggests time, intention, and craftsmanship while still maintaining the practical benefits of a ponytail.
Building the Crown Braid
Begin with textured, wavy hair that will hold a braid without slipping. Start your Dutch or French braid at one temple, braiding from the front of your head toward the back in a curved path that follows your hairline. A Dutch braid (where you braid the sections underneath the main strands) creates a raised, prominent appearance that photographs beautifully, while a French braid (where you braid sections over the main strands) creates a more subtle, flattened appearance. Choose based on how much braid texture you want visible.
As you braid, incorporate hair from the crown and sides, gradually pulling hair from all directions into the braid as you move toward the back of your head. Your goal is to create a braid that wraps around the crown, eventually reaching the nape of your neck or the back of your head where you’ll transition into a gathered ponytail.
Once you’ve braided around the crown, release the remaining hair and gather it into a ponytail at your desired height. The braid now forms a beautiful frame around the top of your head, leading into the ponytail. Secure the braid’s end and the gathered ponytail with an elastic, then wrap a thin section of hair around both to conceal the elastic completely.
Finishing the Braid-to-Ponytail Transition
Gently pancake or loosen the braid by pulling at its edges to create a fuller, softer appearance. This takes the braid from looking overly tight and controlled to appearing intentionally textured and romantic. The loosened braid should have a three-dimensional, rounded appearance rather than lying flat against the scalp.
Smooth the gathered ponytail section below the braid, using your straightening iron to create a polished surface, or curl the ends for a romantic contrast between the textured braid and the smoother ponytail. Many brides choose to curl the ponytail ends when wearing this style, allowing the elaborate crown braid to stand as the statement detail while the rest of the hair has softer, flowing waves.
A single jeweled clip or delicate hair comb positioned where the braid meets the ponytail adds sophistication. Alternatively, thread a thin silk ribbon through the braid, allowing it to weave in and out and finish with a graceful bow or cascade at the base.
This style is particularly stunning photographed from behind or from an angled perspective, as the full detail of the crown braid becomes visible. Confirm with your photographer that your final look will be captured from the angles you prefer.
12. The Sleek Geometric Ponytail
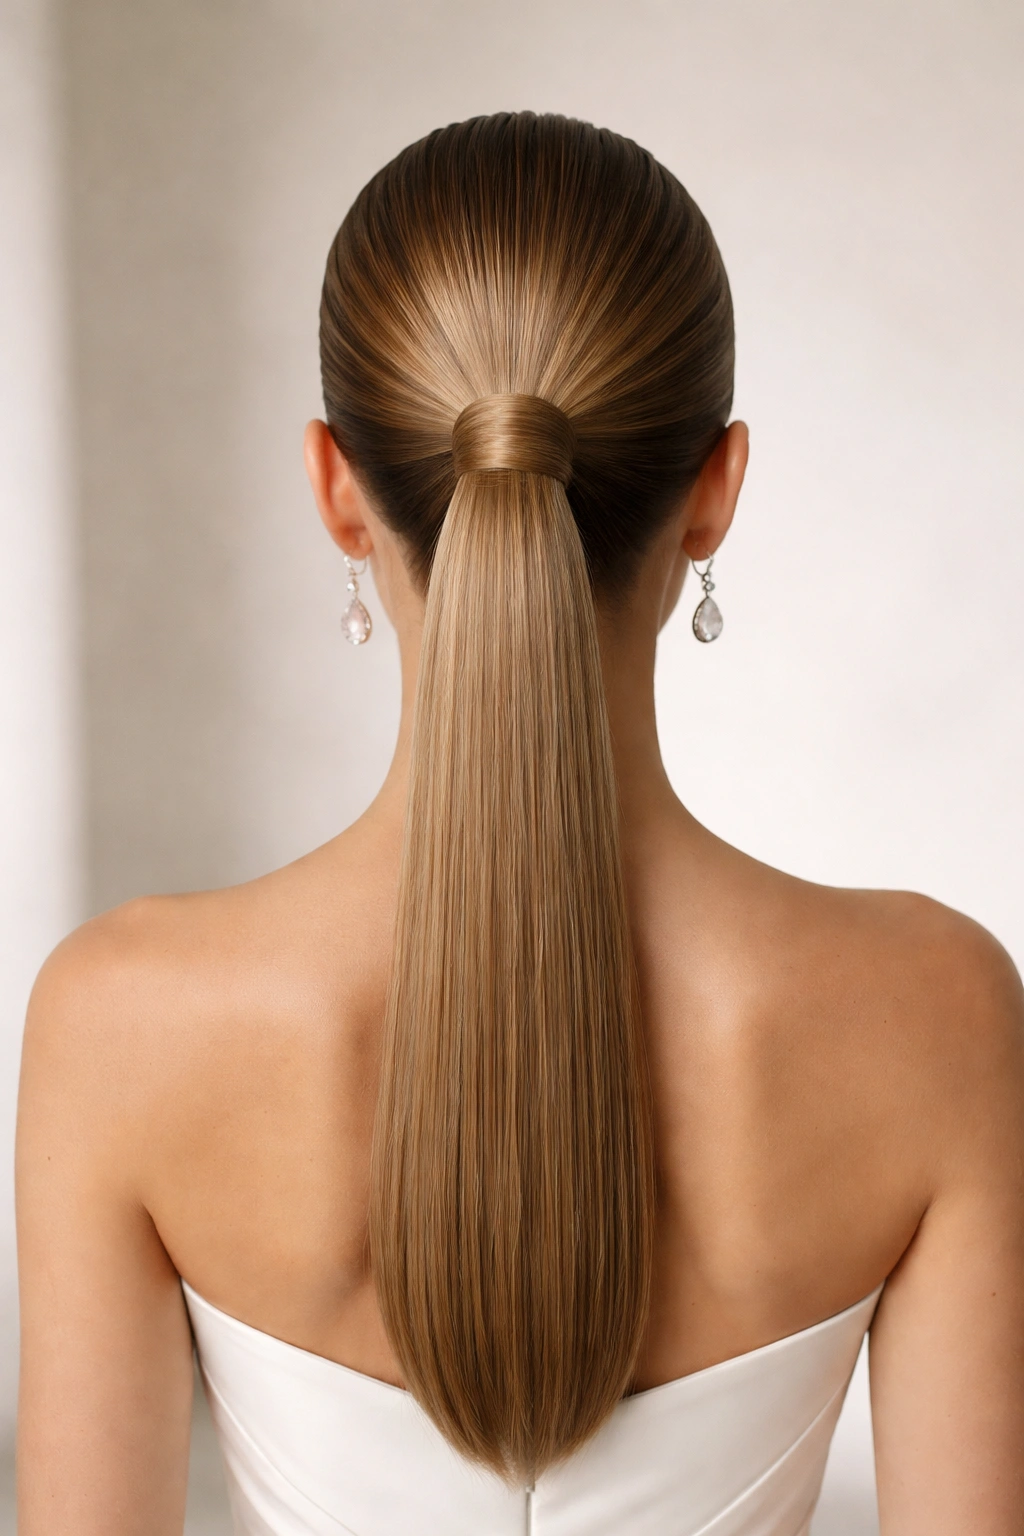
A sleek, straight ponytail with a clean geometric shape—sometimes created with the help of hair crimp tools or geometric clips—appeals to brides and guests who prefer minimalist, artistic aesthetics. This style is distinctly modern and works beautifully for contemporary weddings or venues with architectural interest.
Creating Clean Lines and Shape
Blow-dry your hair completely straight using a paddle brush, then use a straightening iron on medium heat to create ultra-smooth surfaces. Unlike the curved ponytail, this style is centered directly at the back of the head, creating symmetrical visual balance.
Gather your hair tightly into a ponytail positioned at your chosen height, securing with an elastic that matches your hair color precisely. Wrap a thin section of hair around the base to conceal the elastic, pinning carefully so no elastic shows from any angle. Smooth the entire ponytail surface with your straightening iron, working in downward passes to create a shaft of hair that appears as one unified, sleek form.
If you want to enhance the geometric quality, consider using a hair crimp tool on the lower half of the ponytail. A hair crimp creates a textured, pleated appearance that adds visual interest while maintaining the overall sleek, structured aesthetic. Alternatively, use the straightening iron to create subtle, perfectly parallel waves that look intentional and sculptural rather than loose and romantic.
Adding Modern Accessories
Choose accessories in metallic finishes, geometric shapes, or architectural designs—think chunky gold cuffs, rectangular metal hair clips, or modern sculptural combs. These elevate the minimalist aesthetic and reinforce the artistic, contemporary quality of the style.
Avoid ribbons, flowers, pearls, or any accessories that read as traditional or romantic, as they clash with the modern geometric intent. A single standout architectural piece positioned at the base of the ponytail will suffice. Sometimes no accessory at all is the right choice for this style, allowing the ponytail’s shape and sleekness to be the only embellishment.
This style photographs beautifully from a distance, as the clean lines and geometric shape create visual impact. The simplicity also means the style photographs well regardless of angle, since there are no elaborate details that need to be positioned at a specific camera angle to be appreciated.
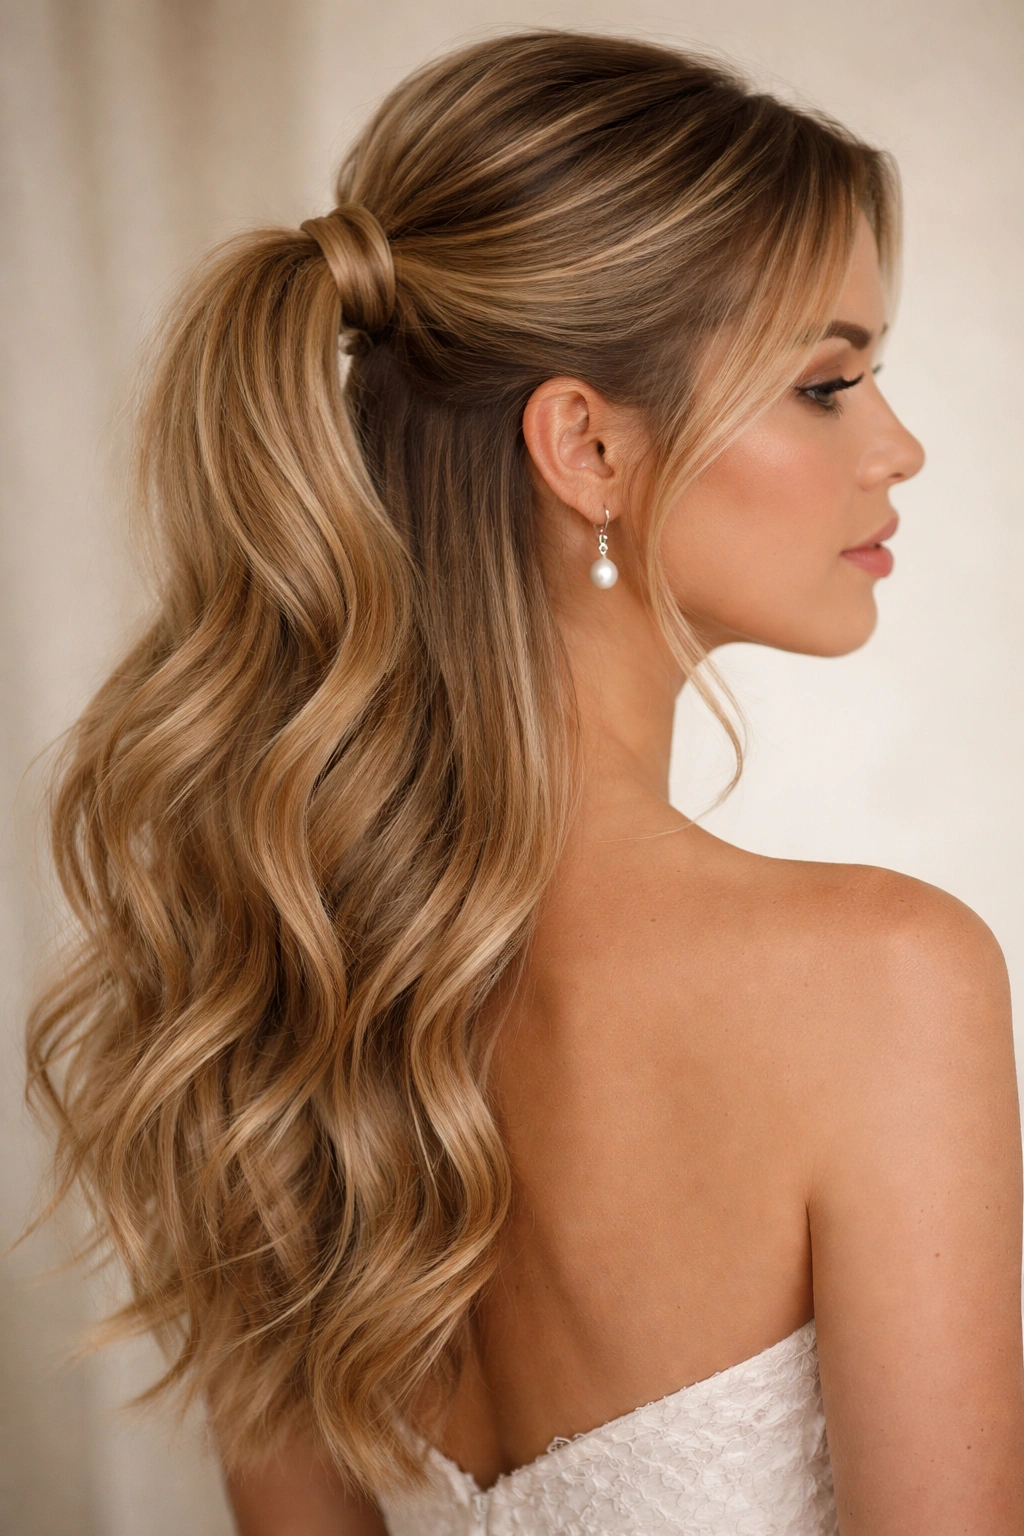
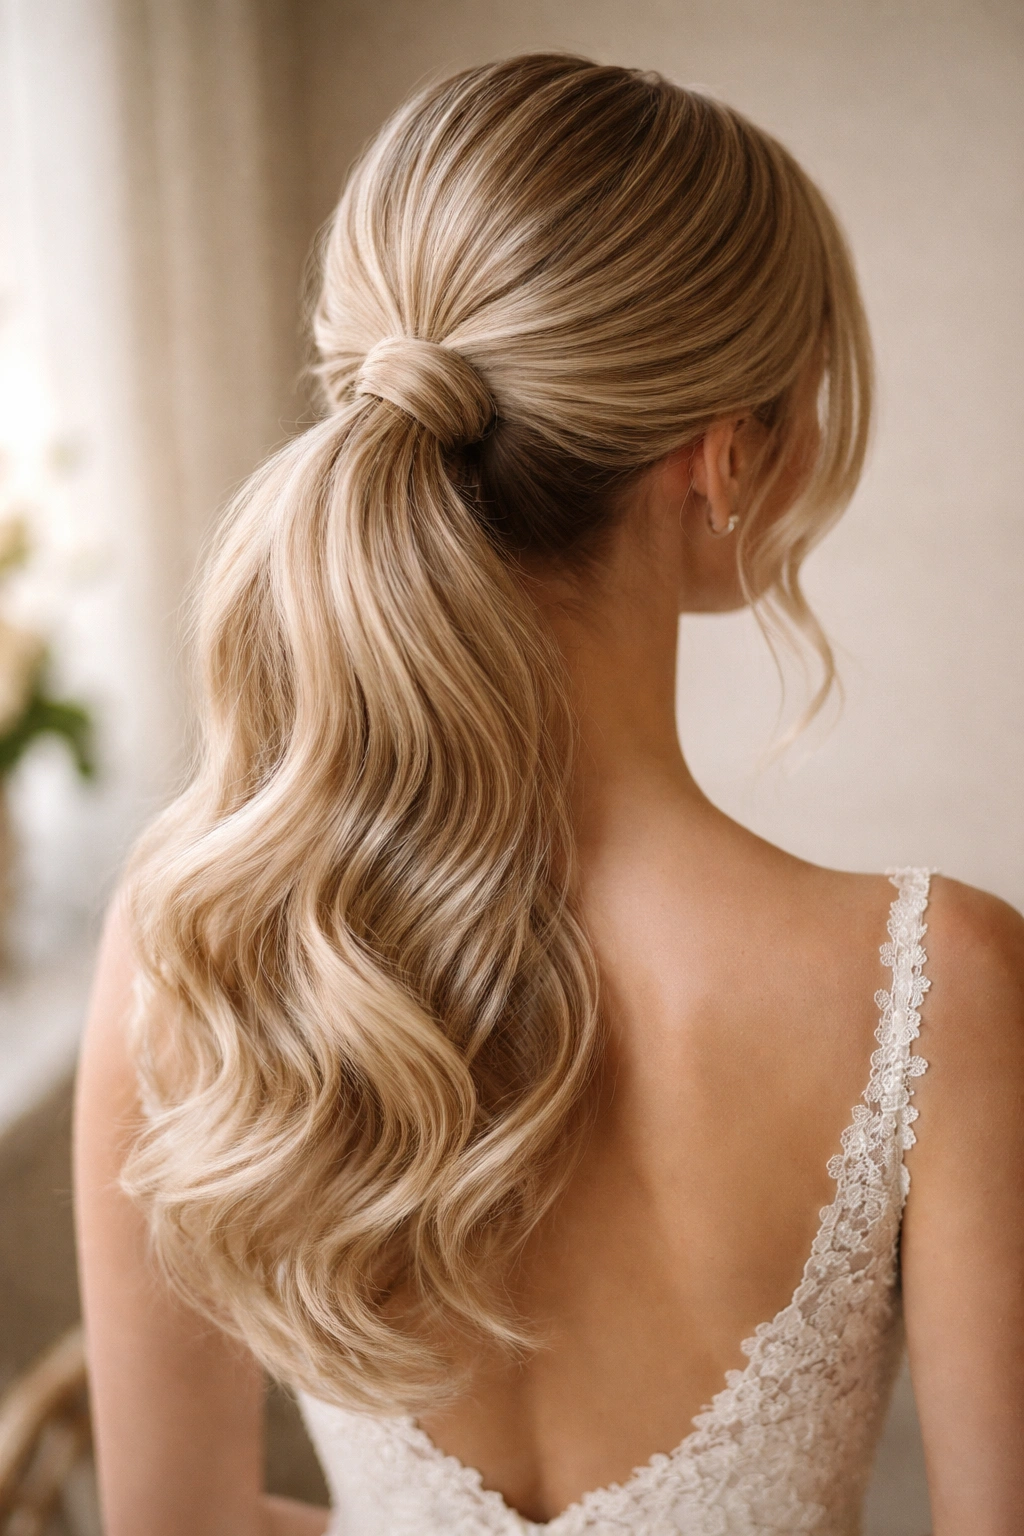
13. The Softly Curled Ponytail
A ponytail with romantically curled ends, where the entire ponytail is curled in large waves that gently cascade down your back, combines the formality of a gathered ponytail with the romance and movement of completely loose waves. This style is especially flattering for brides and works with nearly every dress style and wedding aesthetic.
Creating Bouncy, Lasting Curls
After blow-drying your hair with volume at the crown, gather it into a ponytail at your chosen height. Rather than smoothing the gathered section, gently tease it at the base where it meets your scalp, creating subtle volume. Smooth the surface gently, leaving the internal texture intact.
Using a 1.5-inch barrel curling iron, curl the entire length of the ponytail. Work in sections, wrapping each subsection around the barrel and holding for 10-12 seconds, then releasing and allowing to cool in your hand before releasing entirely. Cooled curls hold significantly longer and with more definition, so patience is key. Curl the entire ponytail in this manner, working down to the very ends.
Once all sections are curled and cooled, you’ll have springy, voluminous waves throughout the ponytail. Use a wide-tooth comb or your fingers to gently separate the waves, creating fullness and movement. Avoid using a brush on curls immediately after creating them, as this disrupts the curl pattern; wait until the curls have set for at least 15 minutes before brushing through them with a wide-tooth comb.
Adding Dimension and Accessories
Lightly mist with flexible-hold hairspray to set the curls without making them feel stiff or crunchy. The hairspray should feel invisible when you run your fingers through the hair; if it feels hard or sticky, you’ve used too much.
This style pairs beautifully with delicate pearl accessories, silk ribbons woven through the elastic, or small white flowers positioned throughout the ponytail. The curls themselves are the star here, so keep accessories relatively minimal so the beautiful wave and movement remain visually prominent.
This style maintains its appeal even after several hours of wear, particularly if you use quality styling products and allow curls to cool completely before handling them. It’s an excellent choice for brides who want to feel beautiful and romantic throughout a long day of celebration.
Insider note: Soft curls in a ponytail are exceptionally flattering photographed in movement—in your first dance, walking through the reception, or turning to greet guests. If movement will be part of your day, this style shows off your styling beautifully. For a stationary first look or ceremony, the curls may relax slightly, so refresh them lightly with a curling iron 30 minutes before photos if you want maximum curl definition.
14. The Accessorized Pearl Ponytail
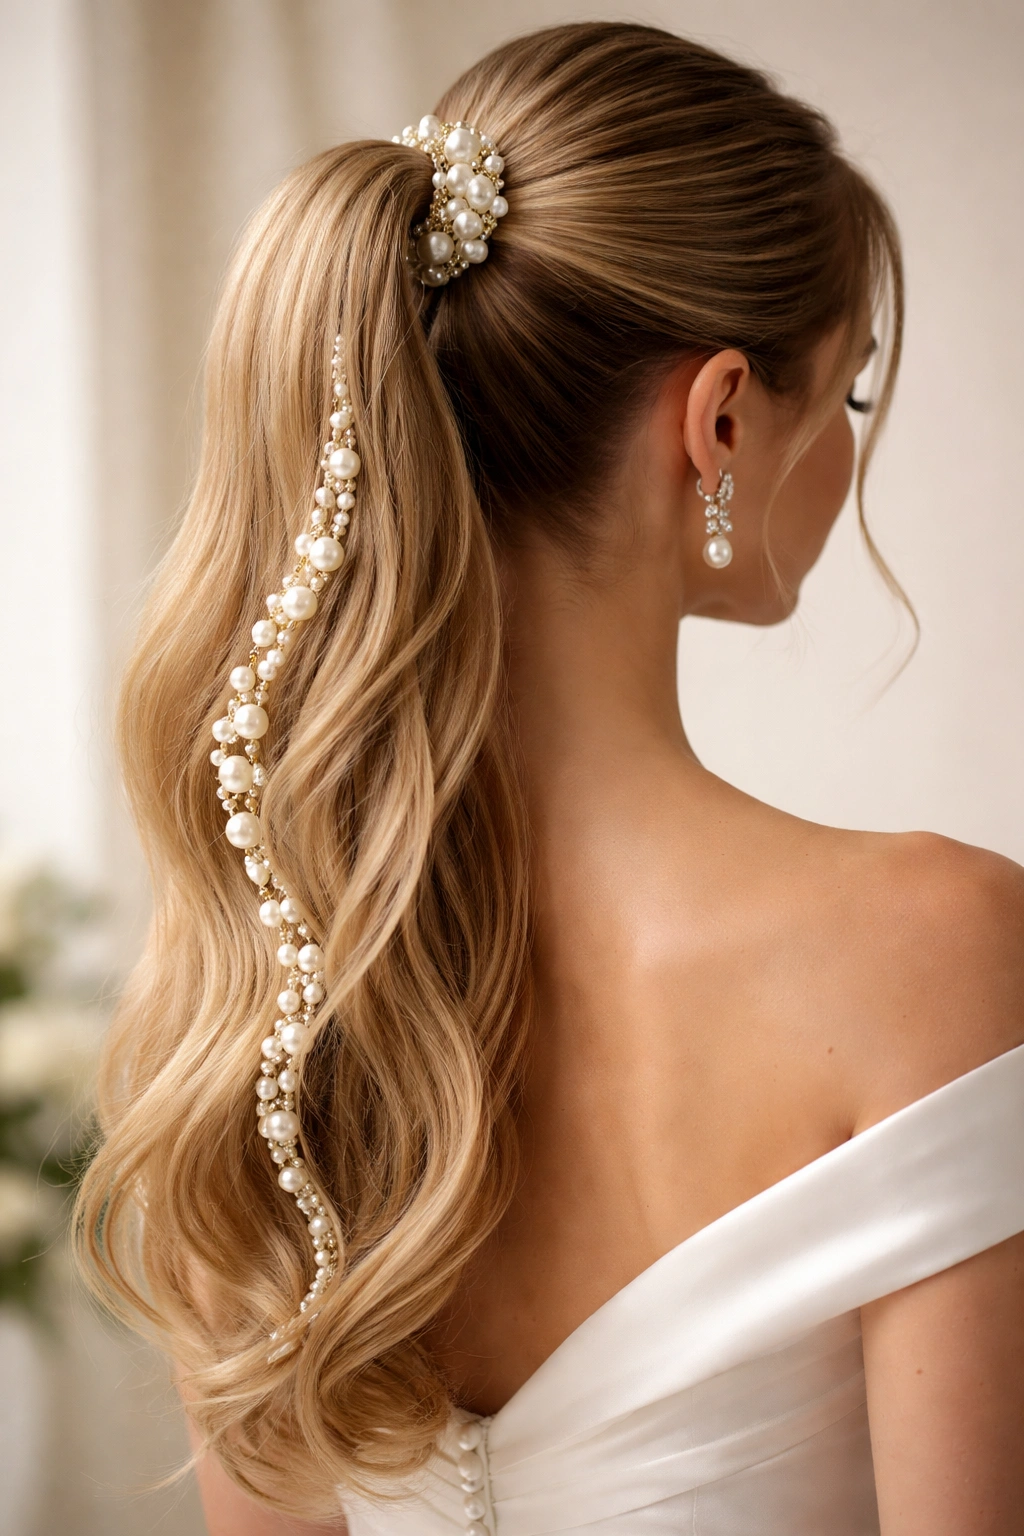
While not technically a distinct style, adding meaningful accessories—particularly pearl-adorned clips, pearls woven throughout, or vintage hair ornaments—elevates any ponytail into a wedding-specific, bride-worthy look. This approach works for any ponytail foundation, but pairs especially beautifully with sleek, polished styles.
Choosing and Positioning Accessories Strategically
Select accessories that coordinate with your overall bridal aesthetic and any jewelry you’ll be wearing. Pearl is almost universally flattering and appropriate for formal occasions; metallic elements like gold or silver work with virtually any color palette. Avoid plastic or obviously costume-y pieces, which read as inexpensive regardless of actual cost.
Common positioning includes placing a single statement piece—a decorative comb, a jeweled clip, or a vintage barrette—just below the hair elastic at the base of the ponytail. This draws attention to the detail work and frames the gathered section beautifully. Alternatively, if your ponytail includes braids or twists, position smaller accessories throughout these detailed sections, creating visual interest and balance.
For a more subtle approach, weave pearl beads or delicate chains through the hair elastic, allowing them to fall gracefully down the back of the ponytail. This adds sparkle and femininity while remaining understated and elegant. You can also weave ribbon—silk, velvet, or metallic—through the ponytail, incorporating it into the style from the base down a few inches, then releasing the hair to flow naturally.
Practical Considerations for Long-Day Wear
Ensure any accessory is securely fastened with bobby pins or a specialized clip that won’t shift during hours of wear, movement, or embracing guests. Test the security by moving your head vigorously; the accessory should not slide or shift. Heavy or bulky accessories can become uncomfortable over hours of wear, so if you’re wearing something substantial, ensure you’ve worn it for an extended period beforehand to confirm comfort.
Some brides choose multiple smaller accessories positioned throughout the ponytail rather than one statement piece. This distributes weight more evenly and creates a more intentional, balanced appearance. Pearls scattered throughout a ponytail, for instance, create subtle sparkle without drawing too much emphasis to a single location.
The right accessories transform a basic ponytail into something distinctly bridal and intentional, signaling that this hairstyle was carefully considered and coordinated rather than hastily assembled.
15. The Multitextured Ponytail
The most sophisticated ponytail combines multiple texture techniques—braids, twists, waves, and smooth sections—creating a visually complex, multi-dimensional style that works beautifully for brides wanting something both intricate and still practical. This style requires professional execution for the best results, but the payoff is a hairstyle that photographs beautifully from every angle.
Building Textured Layers
Begin with a voluminous crown created through teasing and backcombing, then gather hair into a ponytail incorporating multiple texture techniques. The base of the ponytail might include twisted or braided sections; the middle section could be smooth and polished; the lower portion could feature soft waves. The contrast between different textures creates visual interest and makes the style feel intentional and artistic.
Create this by sectioning the gathered ponytail into 3-4 portions. The first portion becomes a three-strand or Dutch braid, loosely pancaked for softness. The second section is straightened and polished. The third section is curled in soft waves. The final section, if your ponytail is particularly long, might be teased or textured differently from the rest.
This combination of techniques prevents the ponytail from reading as one-dimensional and creates a style that photographs beautifully at every distance and angle. The contrast keeps visual interest throughout the entire length rather than relying on a single detail or texture.
Styling Integrity and Longevity
Because this style incorporates multiple styling techniques, ensure each section is set properly before moving to the next. Allow curls to cool before moving on to straightening sections. Braid tight enough that it won’t unravel over hours, but loose enough that it doesn’t feel overly controlled. Use appropriate hold products for each section—a flexible-hold hairspray for waves, a firmer hold for braids, and perhaps a light edge control around the crown and face.
Position accessories thoughtfully to enhance different sections. A delicate comb where smooth section meets braided section, a ribbon woven through the textured portion, pearls scattered throughout. The accessories should draw attention to the transitions between different textures, highlighting the intentional design of the style.
This style requires professional styling expertise, so book a trusted stylist well in advance and attend a trial run to ensure the style achieves your vision. The multitextured approach is worth the investment for a bride wanting a distinctive, photography-ready hairstyle that showcases careful artistry.
Final Thoughts
The right ponytail for your wedding isn’t about choosing the most elaborate or the most trendy option—it’s about selecting a style that makes you feel confident, comfortable, and genuinely beautiful. A classic high ponytail executed with pristine polish outshines an overly complicated style that doesn’t align with your aesthetic or makes you feel like you’re constantly thinking about your hair throughout the day.
Before committing to any of these styles, schedule a hair trial with your stylist, ideally wearing your wedding dress or something in a similar color and neckline. Seeing the style with your actual dress, your makeup, and any jewelry you’ll wear helps confirm whether it’s truly the right choice. Bring photos of the styles that appeal to you, and discuss practical details like how the style will hold throughout your day, what products and techniques your stylist recommends, and whether any adjustments might make the style work better for your specific hair type and texture.
Remember that your hair should enhance your overall appearance and the significance of the day, not become a source of stress or distraction. A hairstyle you feel genuinely beautiful wearing, that photographs well, and that feels secure and comfortable as you move through your wedding day is the right choice for you.