Braided ponytails are one of the most practical and adorable hairstyles for kids—they keep hair off the face during play, last through school days and sports without falling apart, and look polished enough for photos and special occasions. Whether your child has fine, silky hair or thick, curly texture, there’s a braided ponytail style that works. The beauty of these styles is that most of them take just 10 to 15 minutes once you get the technique down, and they hold strong from morning through dinner time.
The challenge is knowing which styles actually work for your kid’s specific hair type, age, and lifestyle. Some braids are simple enough for kids to learn themselves, while others need a more skilled hand. Some work best on thicker hair, while others are designed specifically for finer textures. This guide covers 12 distinct braided ponytail styles, each with practical tips for making it work, variations to try, and honest guidance about what hair type each style suits best.
Beyond just looking pretty, braided ponytails serve a real purpose in a kid’s daily routine. They keep hair secure during soccer practice, swimming lessons, and playground adventures. They work beautifully for school picture day, birthday parties, and family events. And if you’re a parent who’s tired of dealing with tangled hair at the end of the day, braids are genuinely transformative—they protect the ends and reduce breakage significantly.
Let’s walk through each style so you can find the ones that’ll actually work for your kid’s hair and lifestyle.
1. Classic Three-Strand Braided Ponytail
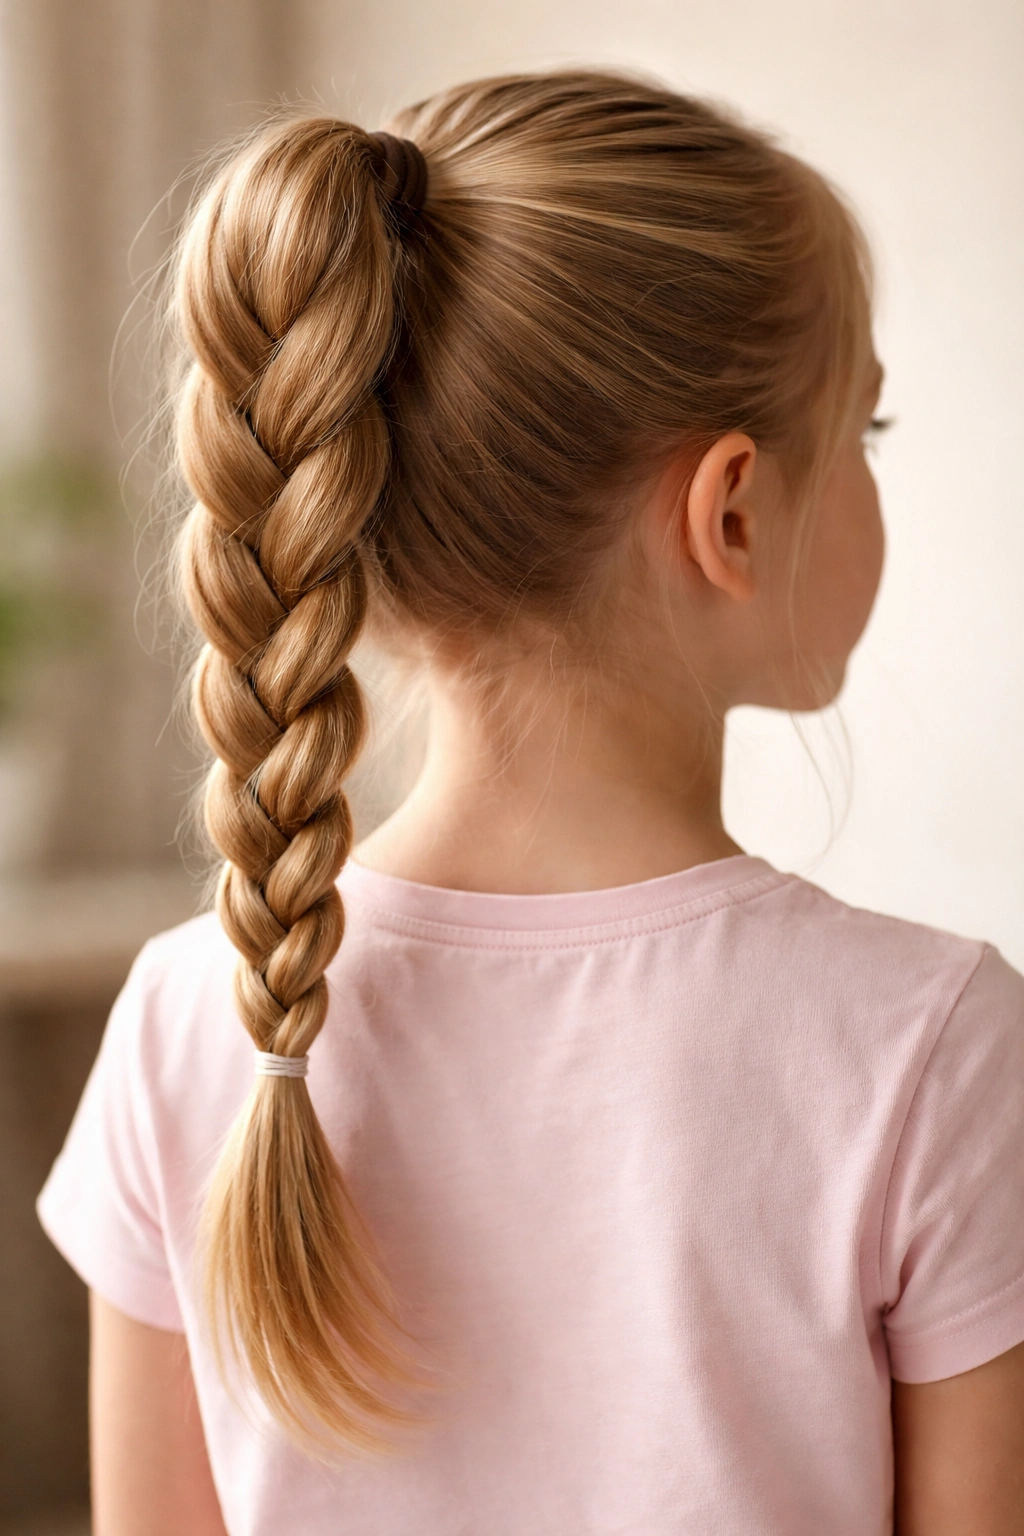
This is the foundation style that leads into everything else. Start with a regular high or mid-height ponytail secured with an elastic, then divide it into three equal sections. Cross the right section over the middle, then the left over the middle, repeating until you reach the end. Secure the braid with a small elastic.
Why It Works for Kids
The three-strand braid is intuitive and symmetrical, which means even kids with limited braiding experience can learn it. It’s sturdy enough to handle active play and doesn’t require any special technique—just consistent, even tension on all three strands. Once a child learns this basic braid, they can create countless variations and styles themselves.
Best Hair Types and Tips
- Fine or thin hair: Use a lower ponytail to make the braid look fuller. Tease the ponytail slightly at the base before braiding for more volume.
- Thick or curly hair: This style shines with textured hair because the braid naturally grabs and holds strands. You don’t need as much elastics.
- Best for: Girls ages 5 and up who are learning to braid, or as a base for adding embellishments like ribbons or hair clips.
Pro tip: If the braid looks loose or scraggly, lightly mist it with water before securing, which helps strands grip better and creates a neater finished look.
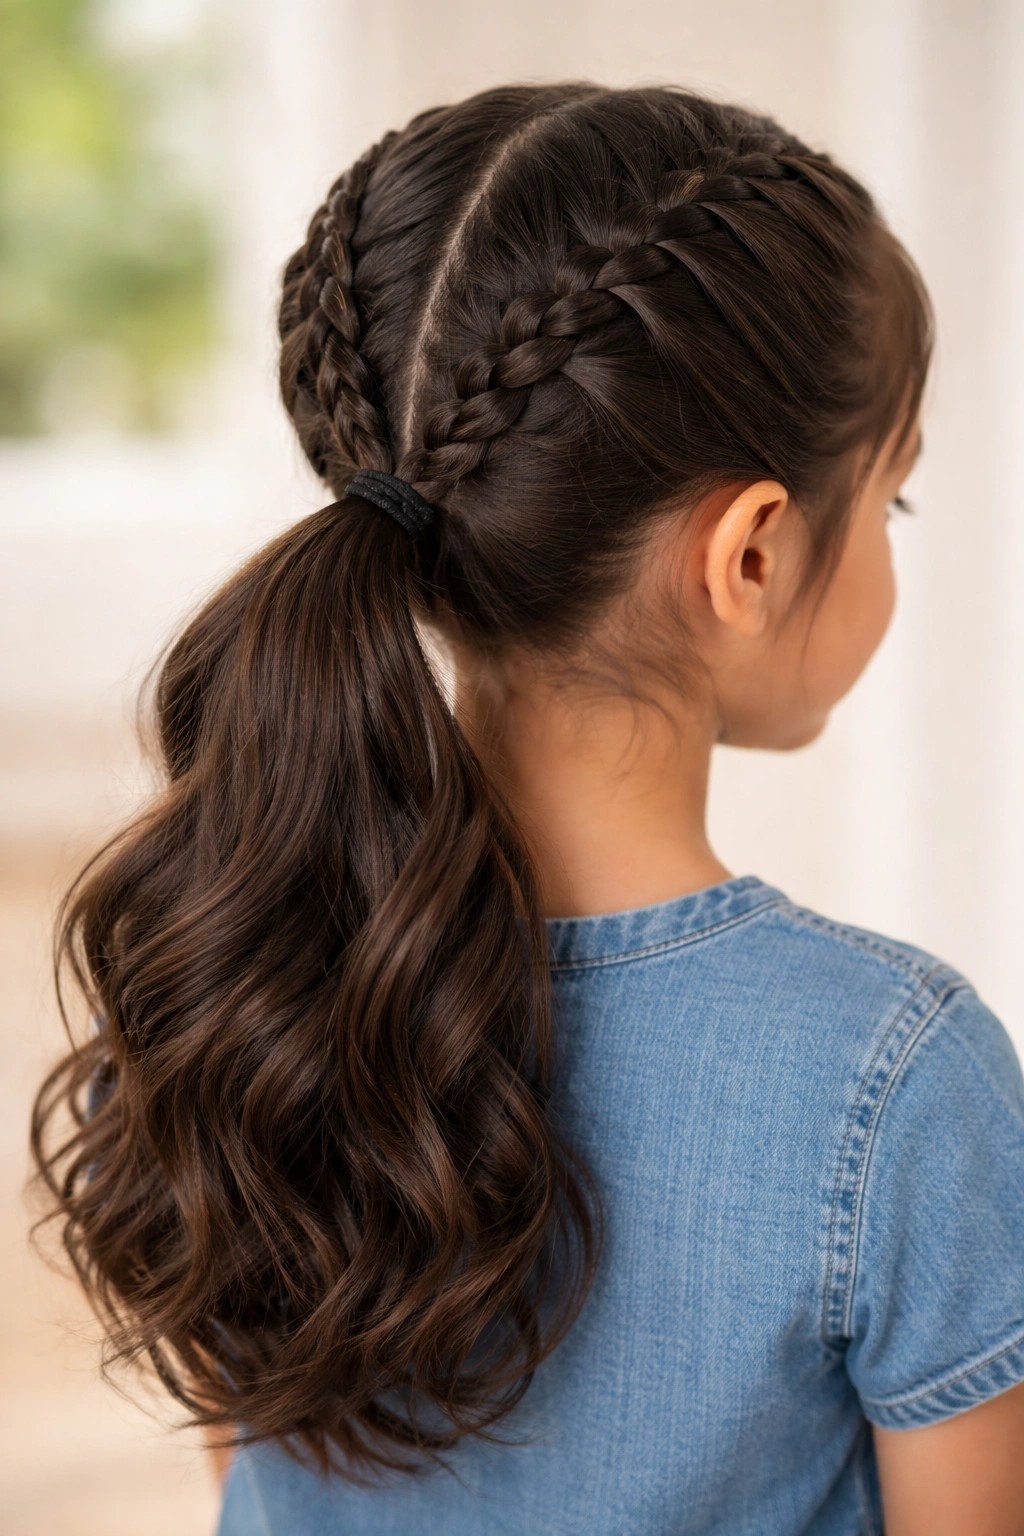
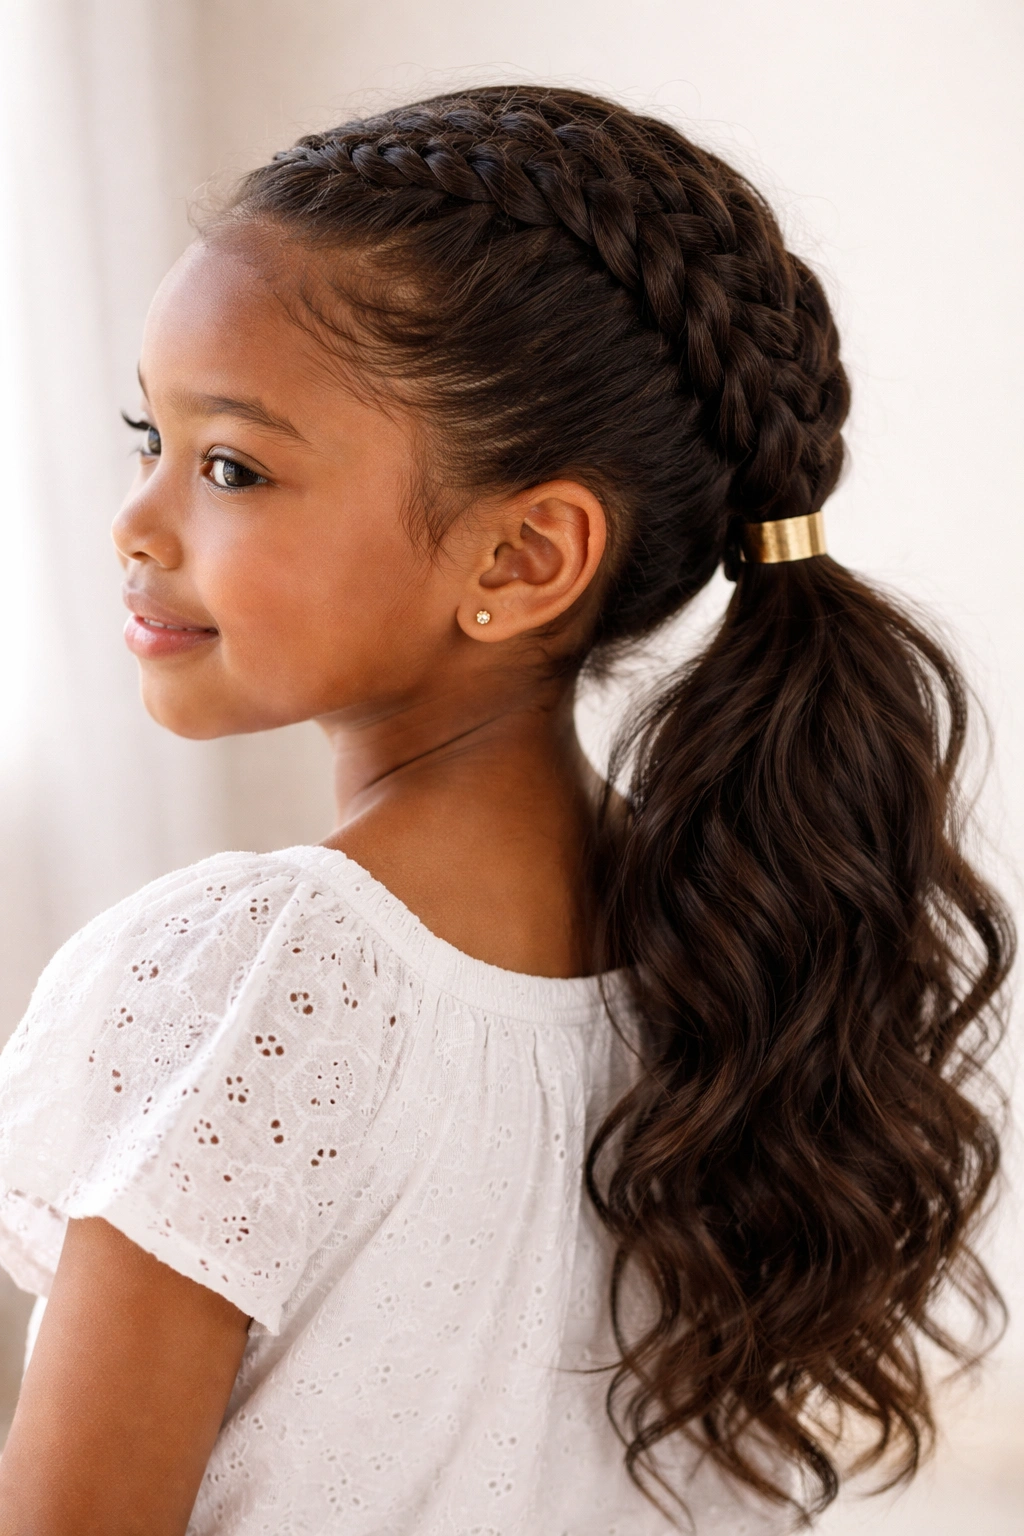
2. Dutch Braid Ponytail
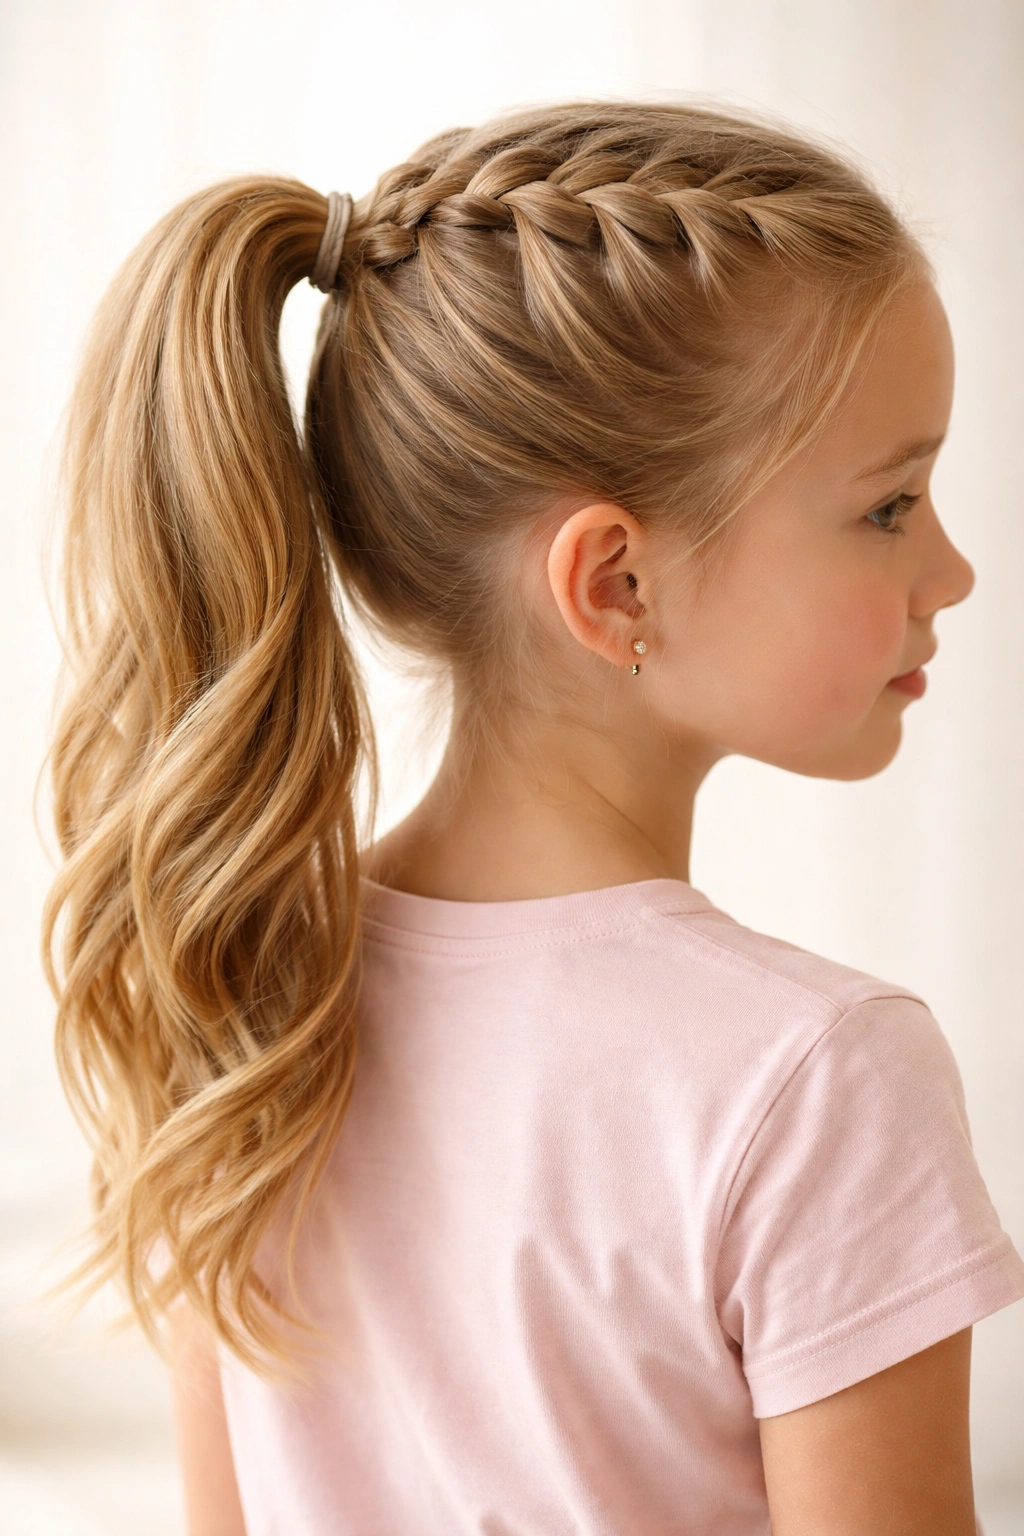
A Dutch braid is an inverted French braid—instead of crossing strands over the middle, you cross them under. The result is a braid that sits on top of the surface and creates a 3D, raised effect. Create a Dutch braid starting at the crown, feeding in hair as you go down toward where you want the ponytail to begin, then finish by securing everything into a ponytail.
Why It Works for Kids
Dutch braids are visually striking and feel special compared to a regular three-strand braid, but the actual technique is only slightly different. Kids often prefer this style because it looks more complex and sophisticated than it actually is—boosting their confidence when they’ve created it themselves.
Best Hair Types and Tips
- Medium to thick hair: Dutch braids really stand out and hold their shape on fuller hair.
- Straight to wavy hair: Works beautifully on these textures. Curly hair can work too, but individual strands might pop out of the underhand pattern more easily.
- Best for: Casual school days, outdoor play, and events where you want a hairstyle that photographs well.
Insider note: Start the Dutch braid slightly off-center rather than dead center down the head—it creates a more interesting, less symmetrical look that feels less formal.
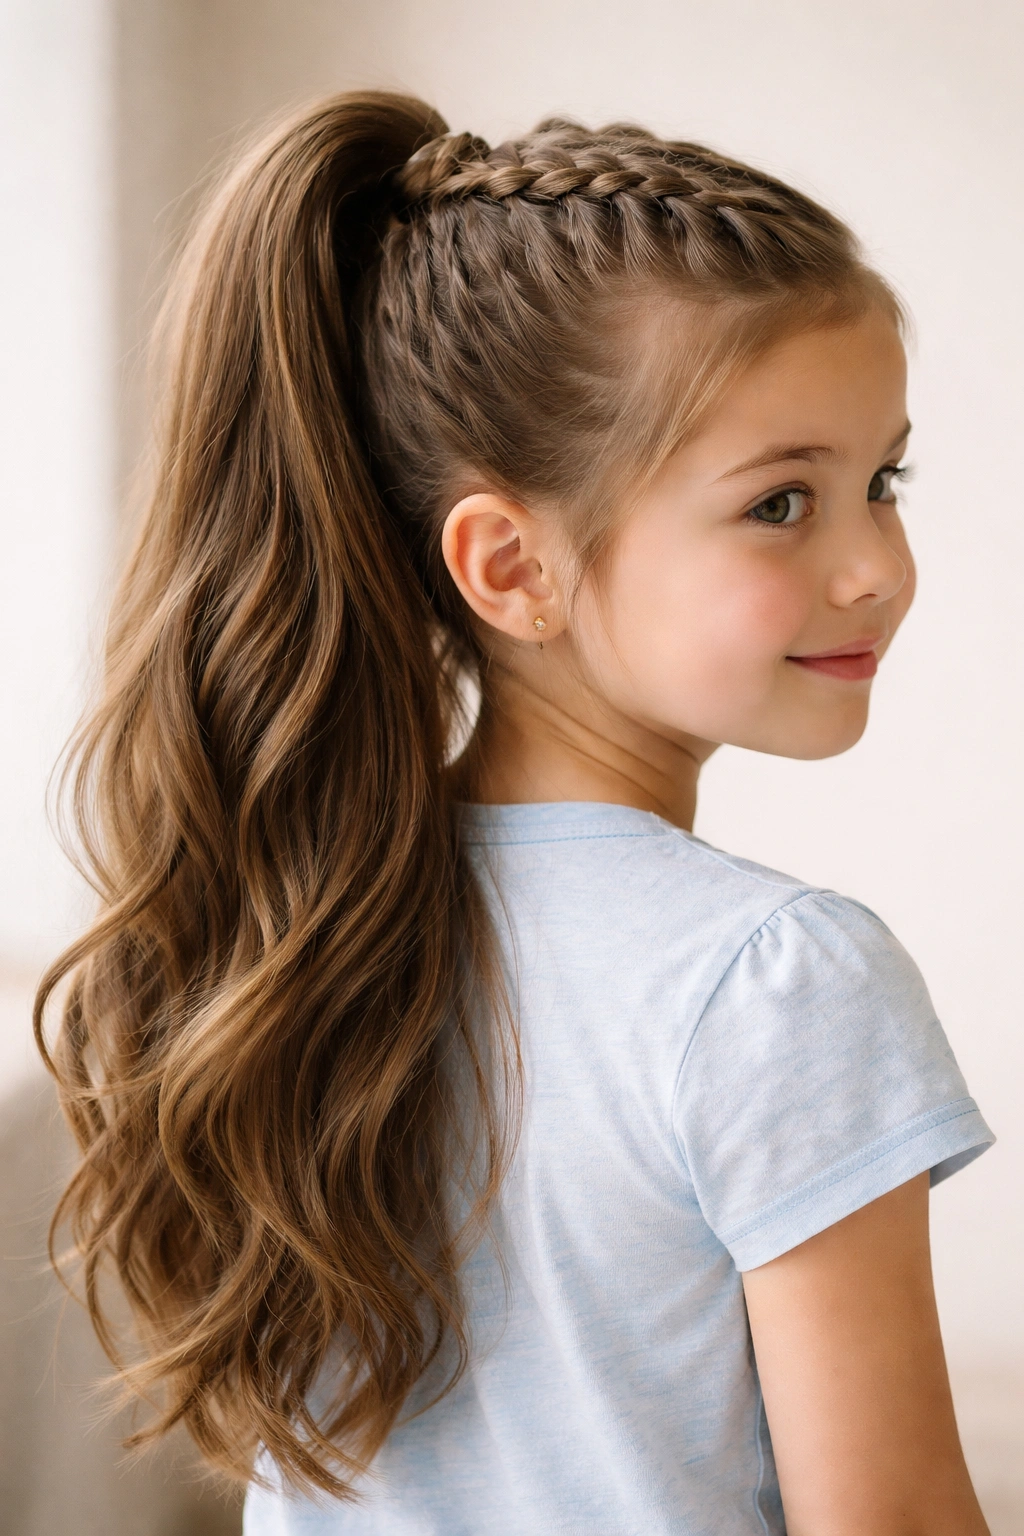
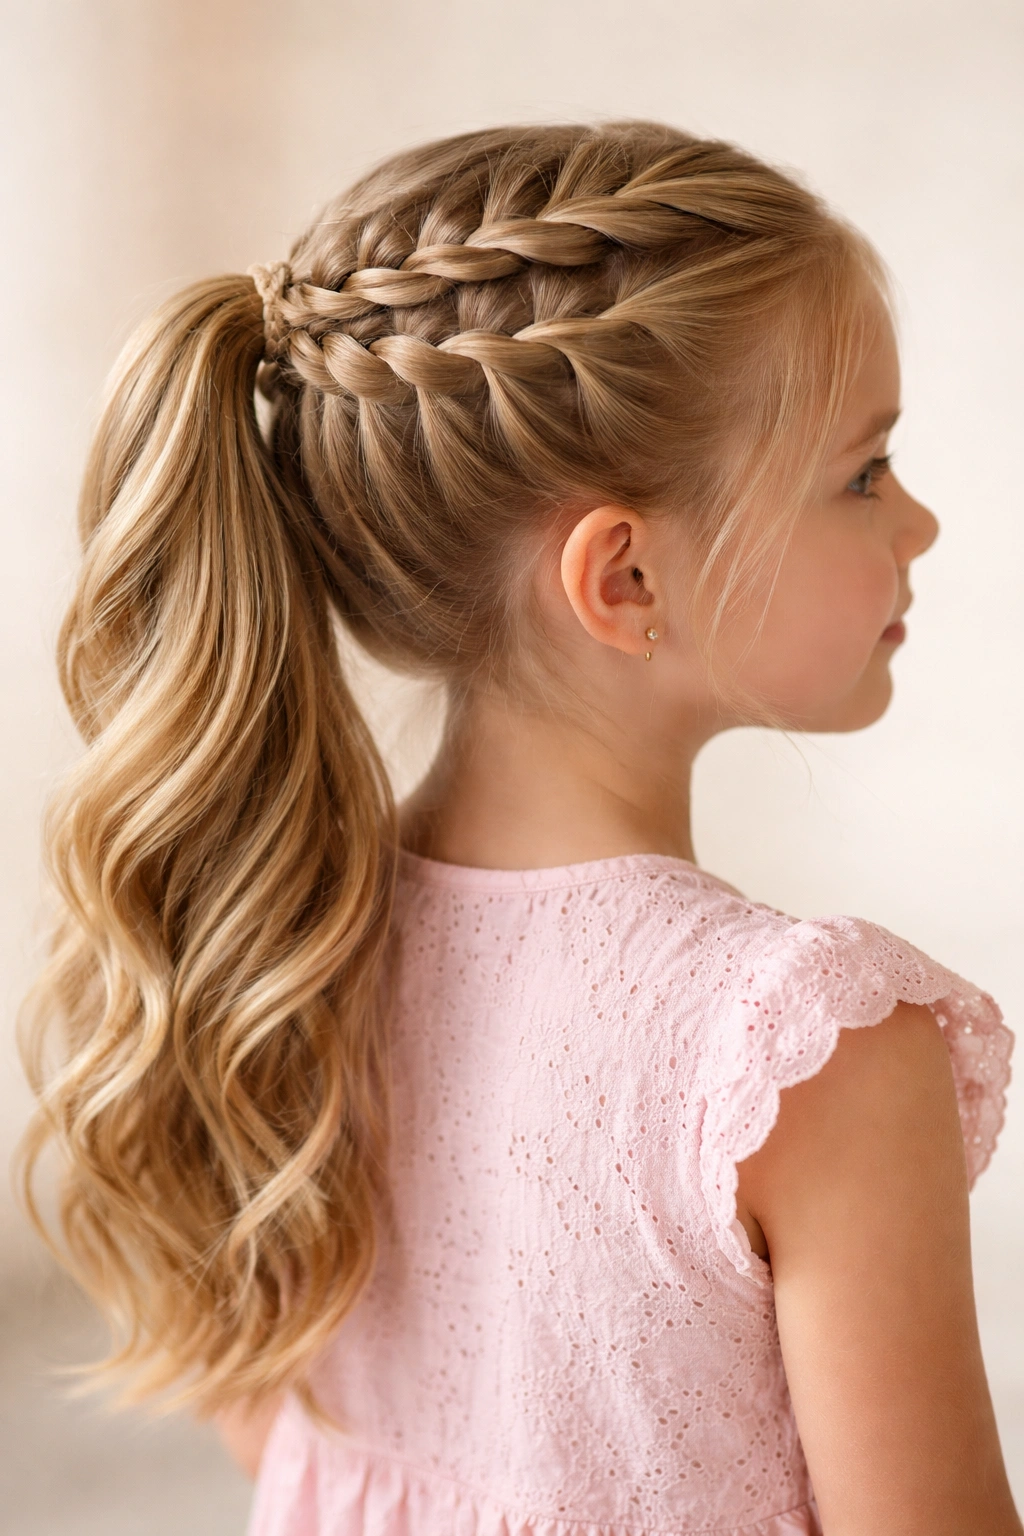
3. French Braid Ponytail
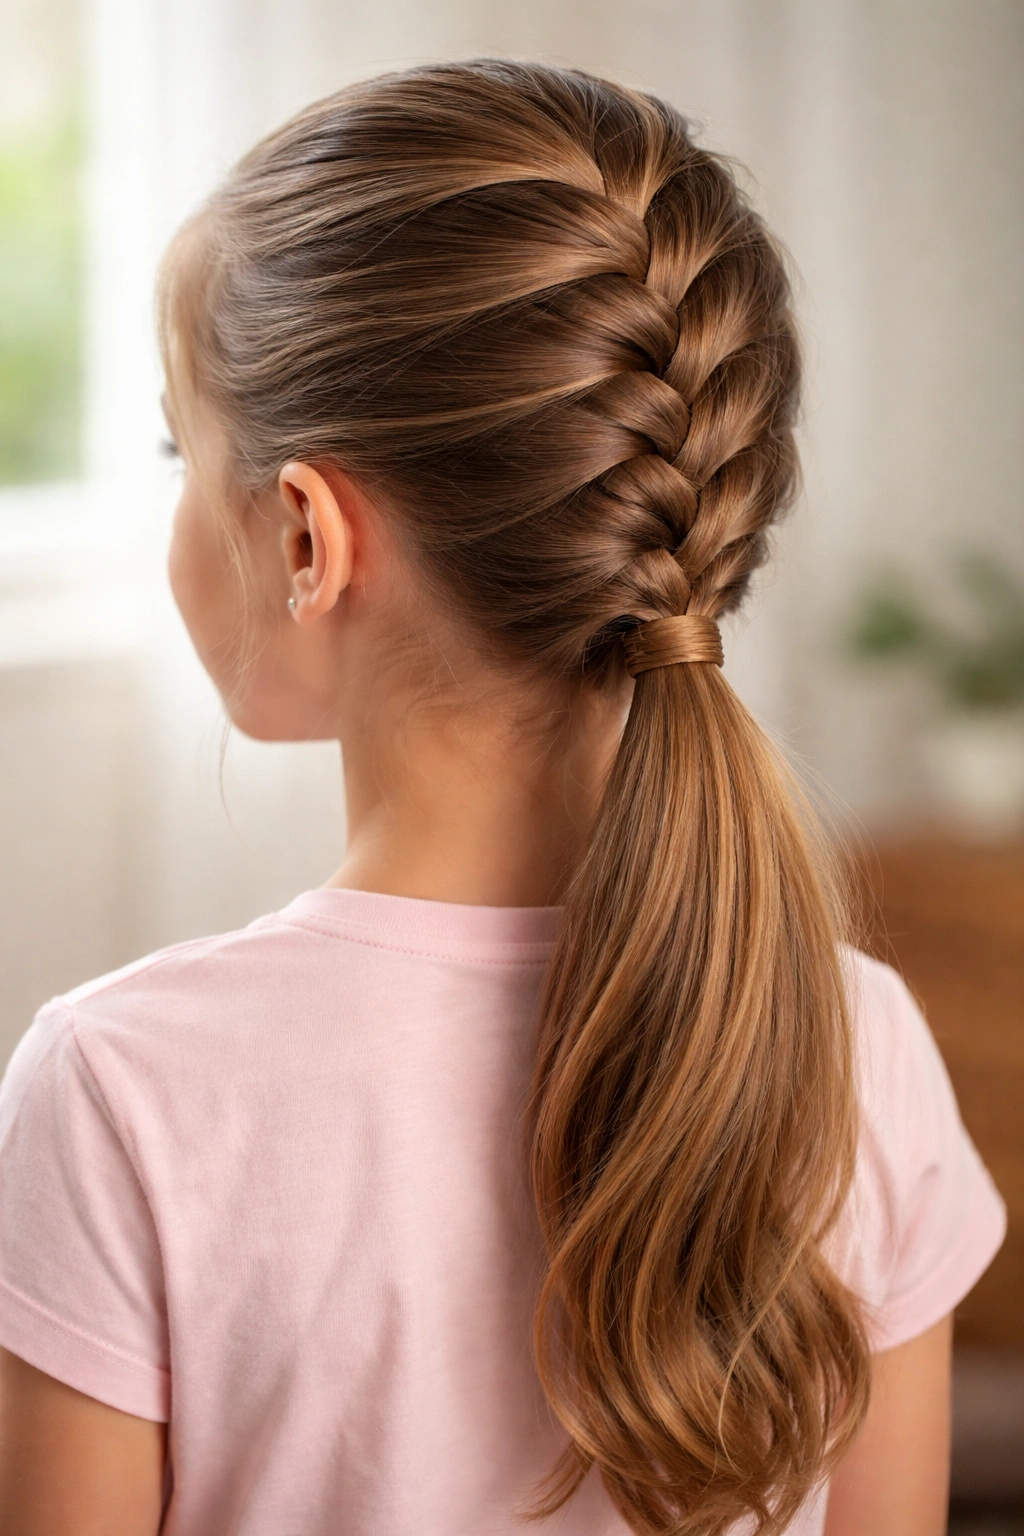
This is the braiding technique many people learned first. Start at the crown with three small sections of hair. Cross the right section over the middle, then the left over the middle. As you continue, add new hair from the sides into each section before crossing over. Braid down the back of the head, feeding in hair all the way, then secure the remaining length into a ponytail at the base of the skull.
Why It Works for Kids
French braids distribute hair evenly from crown to tip, which keeps flyaways controlled and creates a smooth, polished look that lasts all day. They’re less likely to slip than a regular three-strand braid because the technique incorporates more hair as it goes.
Best Hair Types and Tips
- All hair types: This is genuinely one of the most versatile braiding techniques—it works on fine, thick, straight, wavy, and curly hair.
- Thin hair: You can adjust how much hair you add into each section to make the braid look fuller.
- Best for: School, sports days, vacation travel, or anytime you need a hairstyle that will stay put from morning to evening.
Important note: Make sure you’re feeding hair in evenly from both sides as you braid down. Uneven sections lead to a wonky-looking braid and loose strands popping out throughout the day.
4. Side Ponytail with Braid
Gather hair into a low ponytail positioned toward one side of the head—not at the back, but toward the ear on one side. This creates an off-center, asymmetrical look. Once the ponytail is secured, braid the length and finish with another elastic.
Why It Works for Kids
Side ponytails feel fun and different without actually being any harder than a regular ponytail. They’re especially flattering because they frame the face and work well for both long and medium-length hair. This style is great for kids who find centered styles boring but still want something practical.
Best Hair Types and Tips
- Medium to long hair: You need enough length for the side placement to look intentional rather than accidental. Shorter hair can work, but the braid becomes very short.
- All textures: Works equally well on straight, wavy, and curly hair.
- Best for: Casual wear, creative expression, and kids who like asymmetrical styles.
Worth knowing: If you want the side braid to feel more secure and balanced, add a second braid on the opposite side of the head, creating two side braids that meet at the back. Secure them together with one elastic at the base.
5. Two-Braid Ponytail
Instead of one central braid, create two braids on either side of the head, starting near the temple on each side and working back toward where you want the ponytail base to be. Secure both braids separately first, then pull both braids back and gather them together with your hair into one ponytail at the back.
Why It Works for Kids
Two-braid ponytails are practical for kids with very thick hair (which can be heavy in a single braid) or for creating extra visual interest. The style keeps hair even more secured than a single braid and creates a gorgeous, dimensional look—especially if the braids are slightly loose and textured.
Best Hair Types and Tips
- Thick, long hair: This style is ideal for heavy hair that might otherwise feel uncomfortable in a tight single braid.
- Fine hair: Works, but use higher, tighter braids so the thinner strands have more grip.
- Best for: Active kids, thick-haired children, and special occasions where you want a more intricate-looking style.
Quick facts about two-braid styling:
- Start the braids as high as your child’s part for a balanced look
- Keep the braids tight near the scalp if using fine hair
- Leave the bottom few inches of each braid loose and slightly separated before combining them into the final ponytail for extra volume
- Add ribbon, string, or beads woven into each braid for visual interest
6. Fishtail Braided Ponytail
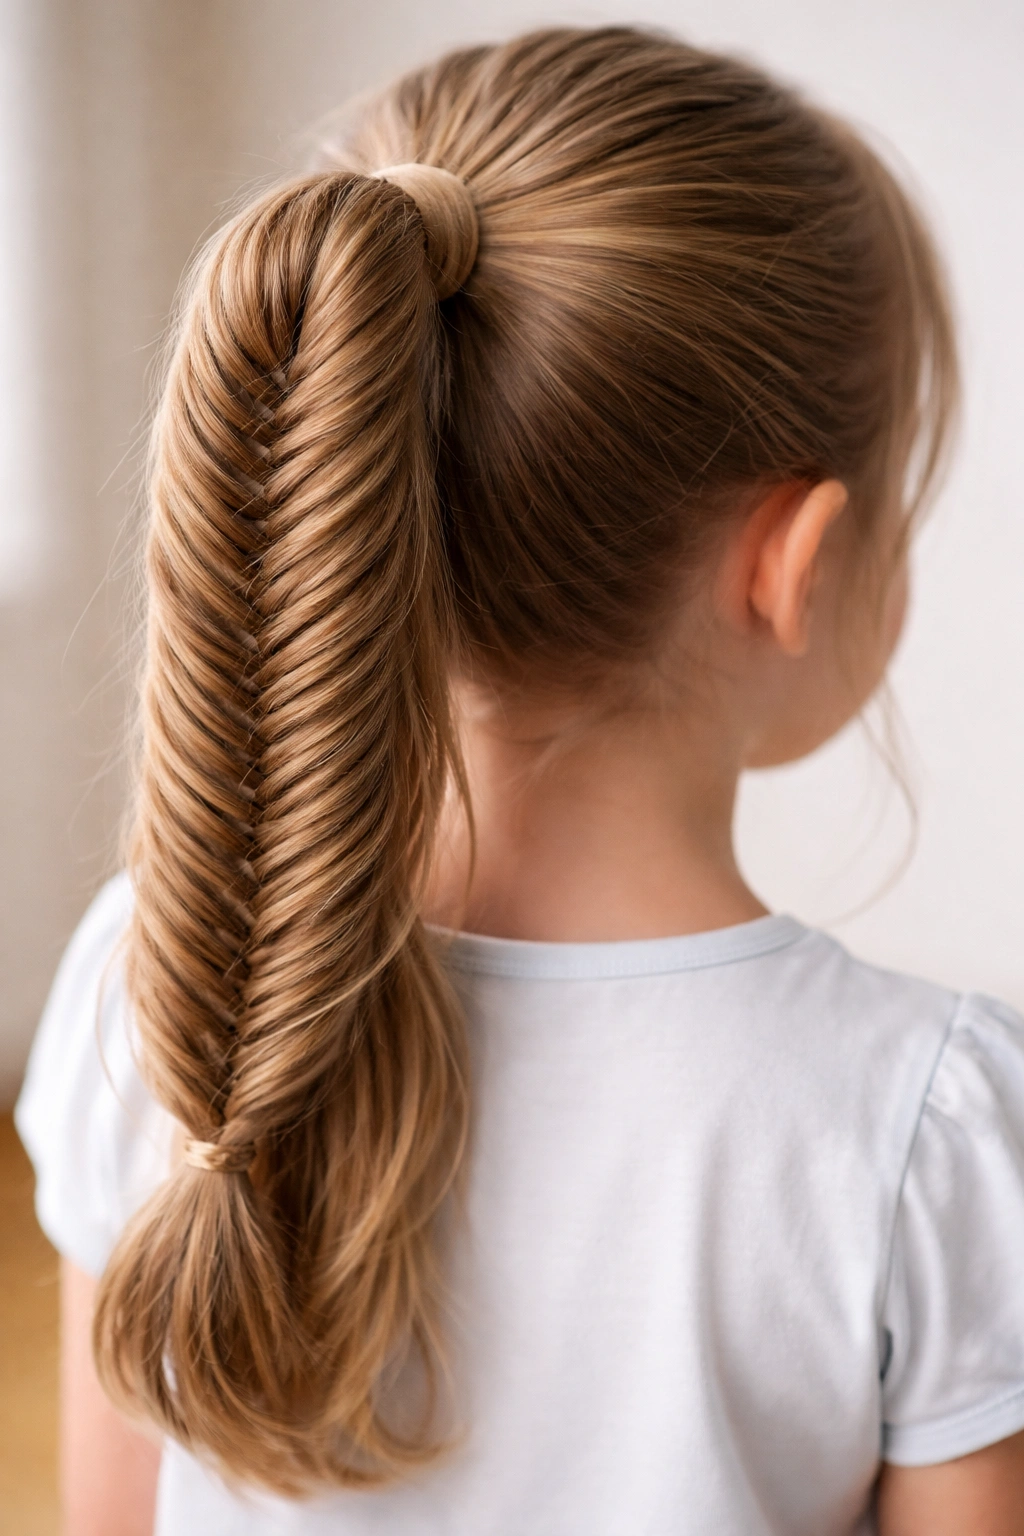
A fishtail braid uses only two sections instead of three, creating an intricate, woven appearance that looks far more complex than it actually is. Divide your ponytail into two sections. Take a small strand from the outside of the left section, cross it over, and add it to the right section. Repeat on the right side, taking a small strand from the outside and crossing it over to the left. Continue alternating, keeping tension even.
Why It Works for Kids
Fishtail braids have a delicate, fancy appearance that makes kids feel special. The technique is actually easier than a three-strand braid once you understand the alternating pattern, which means kids often catch on to it quickly. Fishtail braids also work beautifully on wavy and curly hair because the pattern is forgiving of texture.
Best Hair Types and Tips
- Wavy and curly hair: Fishtail braids look absolutely gorgeous on textured hair because the woven pattern creates natural-looking dimension.
- Fine hair: Works perfectly—the interlocking pattern grips finer strands more securely than thicker braids might.
- Best for: Kids learning different braiding techniques, special events, and curly-haired kids who want a style that flatters their texture.
Pro tip: If a fishtail braid looks too tight or perfect, gently pull on the sides of the braid—not the strands themselves, but the woven edges—to create a fuller, more relaxed appearance. This is called “pancaking” the braid and transforms a neat fishtail into a gorgeously undone-looking one.
7. Bubble Braid Ponytail
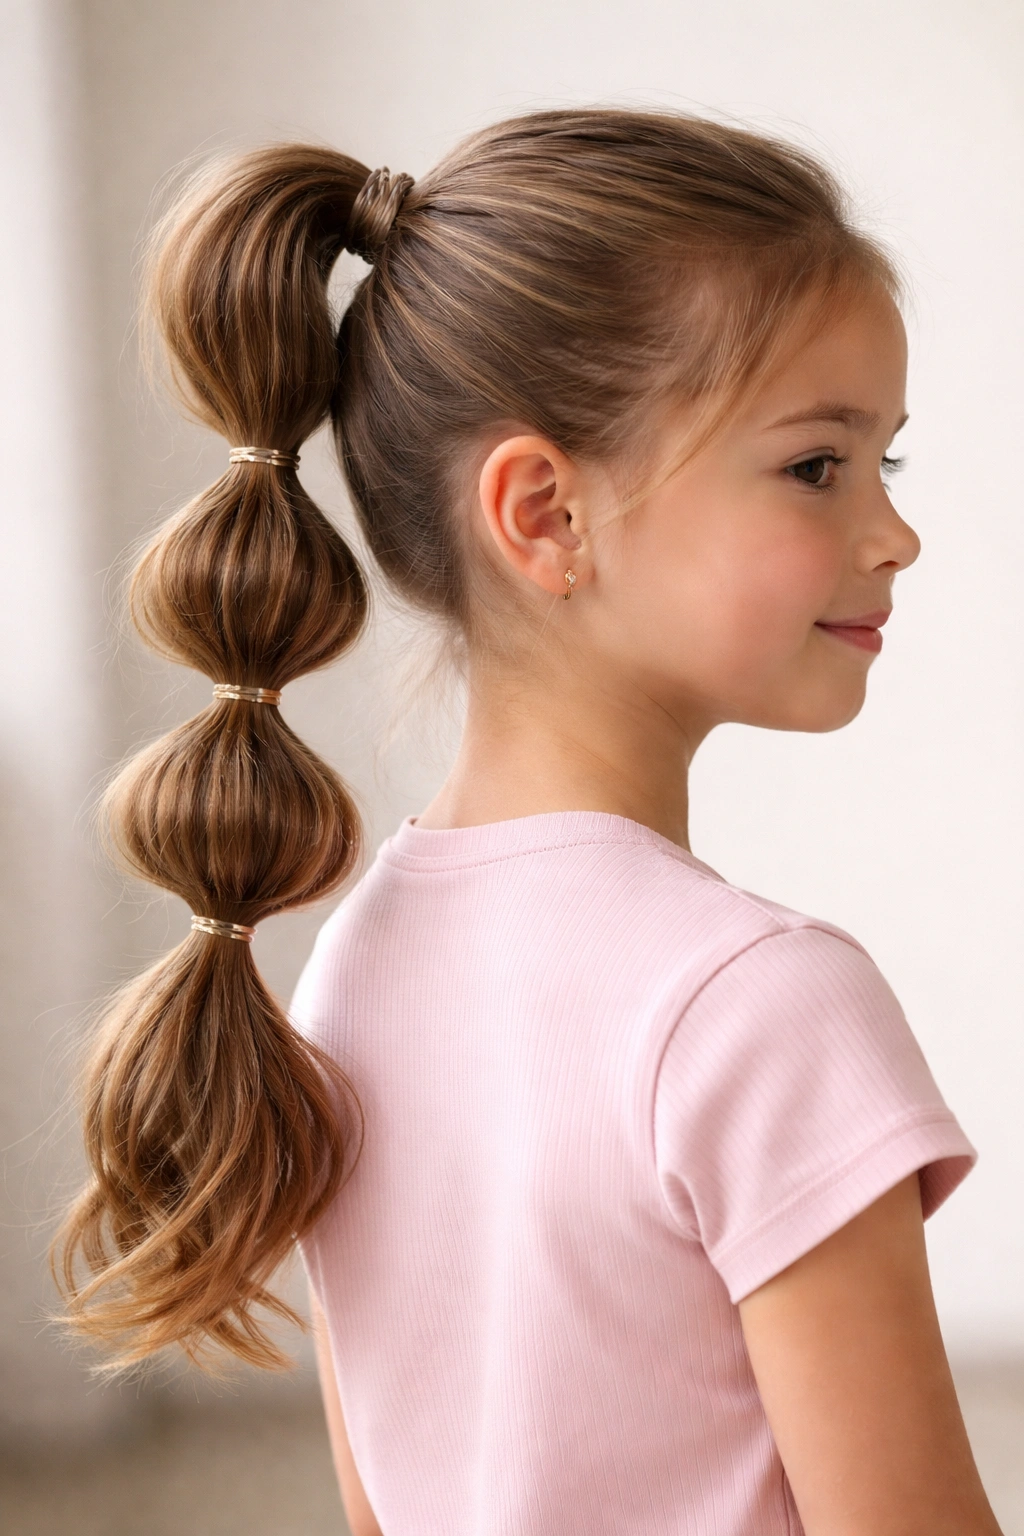
Create a high ponytail with an elastic. About an inch below the elastic, add another elastic tightly around the ponytail. Gently tease the hair between the two elastics upward and outward to create a “bubble” shape—the hair should puff out like a balloon between the elastics. Repeat this process down the entire length of the ponytail, adding elastics every inch or so and teasing the sections into bubble shapes.
Why It Works for Kids
Bubble braids are visually playful and fun, which appeals to kids who want their hairstyles to feel creative. They’re actually quite sturdy because the multiple elastics lock the hair in place at several points, making them ideal for very active children. The puffy, textured look is forgiving—it doesn’t show tangles or flyaways the way sleek styles do.
Best Hair Types and Tips
- Medium to thick hair: The bubbles look fuller and more defined on these hair types.
- Fine hair: Can work, but use smaller bubbles (less space between elastics) so they look proportional.
- Curly hair: Bubble braids look especially playful on curls because the puffiness complements the texture naturally.
- Best for: Play dates, birthday parties, photos, and kids who love playful, unconventional styles.
What you need to know:
- Smaller elastics designed for kids work best—adult elastics are often too bulky
- Space the elastics about 1 to 1.5 inches apart for proportional bubbles
- The more elastics you use, the longer the style takes, but the more secure it becomes
- This style works best on freshly washed, slightly damp hair
8. Twisted Ponytail
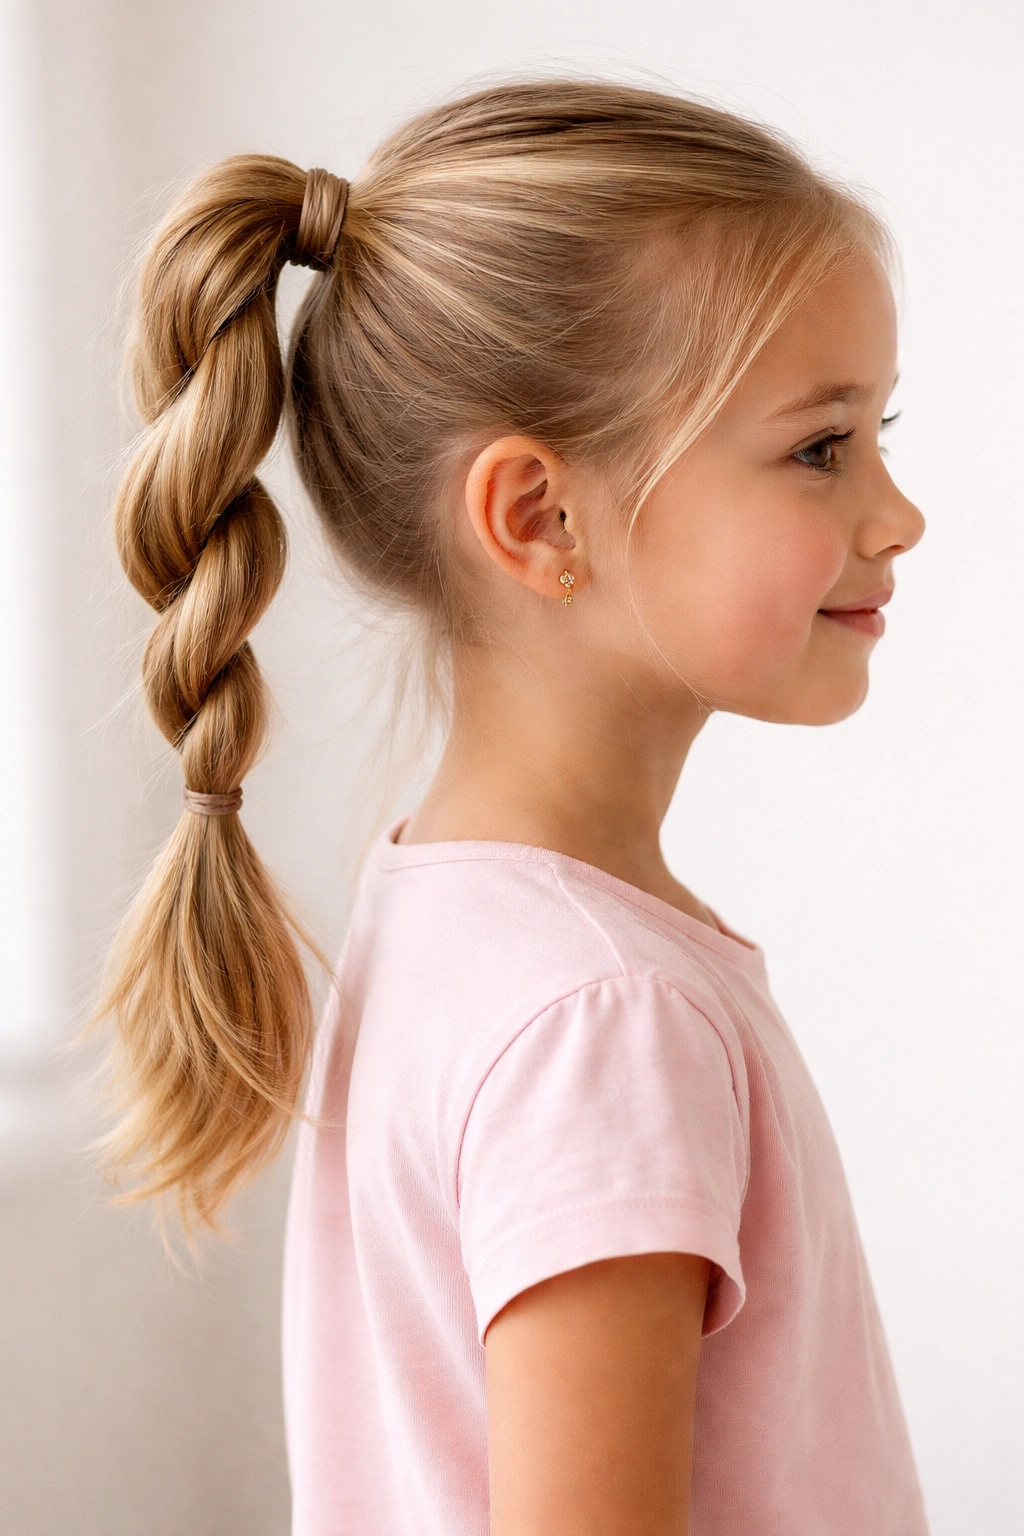
Pull hair into a high or mid-height ponytail. Rather than braiding, divide the ponytail into two sections. Twist one section tightly, then twist the other section in the same direction. Now twist the two twisted sections together in the opposite direction—this creates a rope-like, spiraled effect. Secure the end with an elastic.
Why It Works for Kids
Twisted ponytails require zero braiding skill—if your child can twist, they can master this style. It looks intricate and textured but takes less time and coordination than braiding. The twist pattern also creates natural grip, so the style holds well without needing extra-tight elastics, which is gentler on the scalp.
Best Hair Types and Tips
- All hair types: This technique works universally because it’s based on tension and rotation, not specific strand placement.
- Fine hair: Twisted styles actually grip better on fine hair than braids sometimes do.
- Best for: Kids new to styling their own hair, days when you’re running late, and building confidence before moving to braiding.
Worth knowing: The direction you twist matters. If you twist the two final sections in the opposite direction from how you twisted the individual sections, you get a tighter, more defined rope. If you twist them in the same direction, you get a softer, more casual spiral.
9. Half-Up, Half-Down Braided Ponytail
Instead of gathering all the hair into a full ponytail, pull only the top half of the hair back into a high ponytail or braid it, while leaving the bottom half down and loose. Braid the top section, then secure it with an elastic. The bottom half remains down, creating a style that shows off length while keeping hair partially controlled.
Why It Works for Kids
Half-up styles feel less formal and more wearable for everyday than full ponytails, which appeals to kids who want their hair “down” but still need it controlled. This style is practical for kids with longer hair because it removes hair from the face and neck without the heat or the “all pulled back” feeling of a full style.
Best Hair Types and Tips
- Medium to long hair: You need at least shoulder-length hair for this style to work and look intentional.
- All textures: Works beautifully on straight, wavy, and curly hair.
- Best for: School days, casual outings, and kids transitioning from full protective styles to looser styling.
Pro styling tips:
- Create texture in the down portion by waving it with a curling iron or braiding it loosely the night before
- Braid only the top section tightly so it contrasts with the loose bottom half
- Use decorative clips or bobby pins to secure the braid for a more polished look
- Layer the half-up section with a small section of hair from the underside for a fuller appearance
10. Goddess Braid Ponytail
A goddess braid is a thicker, looser version of a standard braid—often created by braiding loosely, then gently pulling the strands apart to create a fuller appearance. Create a goddess braid starting from one side of the head, working diagonally toward the opposite side and down the back toward where you want the ponytail to sit. Secure the braid, then gather it with the remaining hair into a low ponytail at the base of the neck.
Why It Works for Kids
Goddess braids have an effortlessly glamorous, undone quality that feels special without looking stiff or overly formal. The loose, textured appearance is forgiving of imperfect braiding technique and actually looks better slightly messy. This style works wonderfully for kids with wavy or curly hair because the texture adds to the intentional, relaxed vibe.
Best Hair Types and Tips
- Wavy, curly, and textured hair: This style absolutely shines on non-straight hair because the waves and curls enhance the goddess aesthetic.
- Straight, fine hair: Can work, but create texture first by curling the hair or braiding it loosely the night before.
- Best for: Special occasions, school events, and kids who love a romantic, relaxed aesthetic.
The key to a great goddess braid:
- Don’t make it too tight—goddess braids should feel loose and relaxed
- After braiding, gently pull on the sides of each loop in the braid to create fullness
- Combine the braid with textured, not-quite-straight hair for the best effect
- Keep the ponytail low and loose to match the relaxed vibe of the braid
11. Waterfall Braid Ponytail
A waterfall braid is a French braid variation where you drop strands as you braid, creating a cascading effect. Start a French braid at the temple, but instead of incorporating a strand into the braid after crossing it over, let that strand fall and drop down. Pick up a new strand from below to replace it. This creates the illusion of “water” falling down the side of the head. Braid the waterfall across to the opposite side of the head, then secure all the remaining hair into a ponytail.
Why It Works for Kids
Waterfall braids look incredibly intricate and artistic, creating a “wow” effect when people see them. Despite their complex appearance, they’re actually manageable once you understand the drop pattern. Kids love them because they feel special and fancy without being uncomfortably tight.
Best Hair Types and Tips
- Medium to long hair: You need length for the waterfall strands to have visual impact.
- Straight to wavy hair: Works best on these textures because the dropped strands are visible and create clean lines.
- Thick hair: The braid holds shape beautifully on thick hair.
- Best for: School photo day, birthday parties, and kids who want a show-stopping style.
How to nail a waterfall braid:
- Practice on damp hair first—it’s easier to see what you’re doing
- Keep the main braid tight while letting the waterfall strands be slightly looser
- Ensure all waterfall strands are roughly the same thickness for a balanced look
- Braid the waterfall on one side only, or create symmetrical waterfall braids on both sides meeting at the back
12. Milkmaid Braid Ponytail
A milkmaid braid—also called a halo braid—is created by making two Dutch or French braids that start on opposite sides of the head and wrap around the back like a crown, meeting at the opposite side where the braids are secured together into a ponytail. The braids frame the face and head, creating a romantic, classic aesthetic.
Why It Works for Kids
Milkmaid braids are pure magic for kids because they feel like wearing a crown or halo. The style keeps all hair off the face and neck, making it practical for active kids while feeling dressy enough for special occasions. It photographs beautifully and works on virtually all hair types.
Best Hair Types and Tips
- All hair types and lengths: As long as hair reaches the shoulders, you can create a milkmaid braid. Longer hair makes the braids more dramatic, but shoulder-length works.
- Fine hair: Start both braids slightly off-center on each side to create fullness.
- Curly or textured hair: This style is absolutely stunning on texture because the braids add definition and dimension.
- Best for: Special occasions, holidays, birthday parties, school pictures, and everyday wear if your child loves the aesthetic.
Milkmaid braid success tips:
- Make one braid on each side of the head, starting at the temples or slightly behind the ears
- Braid down and back toward the opposite side of the head, following the natural curve of the skull
- When both braids reach the back, secure them together with elastics to create the ponytail base
- For extra security with active kids, use bobby pins to secure where the braids meet the base ponytail
- Gently pull the braids after securing to create a fuller, more romantic look
Final Thoughts

Braided ponytails are far more versatile than they might seem at first. Whether your child needs a quick everyday style, a protective hairstyle that lasts through sports and play, or something special for an event, there’s a braided ponytail here that fits the need. The most important thing is choosing a style that works with your child’s hair type and that you—or your child—can realistically execute in the morning.
Start with the styles that feel most manageable in your routine. The classic three-strand braid or twisted ponytail might be your foundation, and from there you can experiment with more complex techniques like waterfall braids or fishtail styles. Most kids pick up new braiding skills quickly, especially if you practice on a doll head or let them practice on you first. Once a child learns even two or three braiding techniques, they can mix and match variations throughout the week, keeping their hair interesting without needing an entirely new skill set.
The best braided ponytail is ultimately the one that makes your kid feel confident, comfortable, and ready to tackle their day—whether that’s sitting at a desk, running around the playground, or appearing in a family photo. Experiment, be patient with imperfection, and remember that slightly messy, relaxed braids often look more interesting and wearable than perfect ones anyway.