Wavy hair has its own mind—and that’s exactly what makes it so beautiful. But when you’re trying to pull it up into a bun that actually stays and looks intentional rather than like you just rolled out of bed, things get tricky. Low buns are the sweet spot for wavy texture because they work with your natural wave pattern instead of fighting it, and they’re polished enough for work but relaxed enough for everyday life.
The key to a great low bun with wavy hair is understanding that you don’t need the hair to be perfectly smooth or tight. Your waves are an asset here—they add dimension, hold the shape better, and create that effortless, textured vibe that people spend money at salons trying to replicate. Whether you’re starting with second-day hair, fresh waves from a curling iron, or your natural texture, there’s a low bun technique that’ll work.
What makes a low bun truly work for wavy hair is the placement, the technique you use to gather and secure it, and how you’re styling the pieces around your face. Some styles embrace the waves fully and let them create a loose, undone look. Others add twist, braid, or wrap elements that make the bun feel more intentional and polished. Some work best with a messy, piecey approach, while others benefit from smoother sections at the crown that transition into texture lower down.
Let me walk you through 15 different low bun styles that’ll actually flatter your wavy hair and stay put all day.
1. The Textured Wrap-Around Low Bun
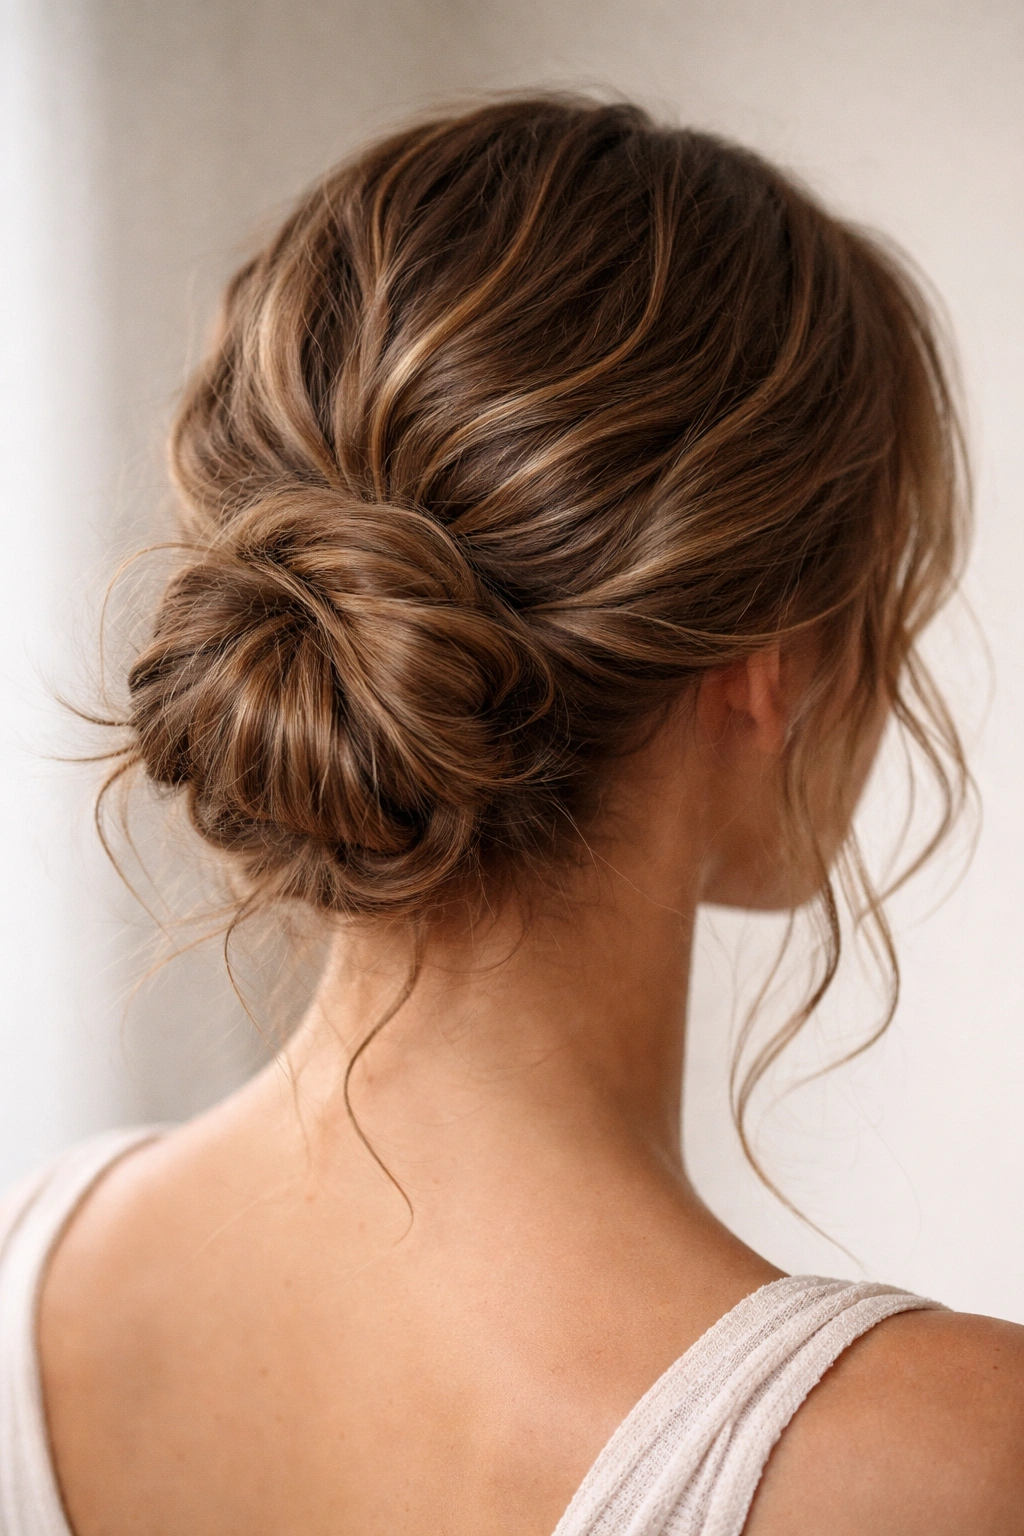
This is the bun that looks effortlessly chic because it is effortless. You’re gathering your hair low at the back of your neck, twisting it loosely, and then wrapping it around itself to create a bun that deliberately shows off your waves rather than trying to hide them.
Why This Works for Wavy Hair
The loose twist means your waves stay visible throughout the bun, creating natural dimension and texture. You’re not pulling hair so tight that the waves flatten out, which means the finished look has movement and personality. It also stays secure without needing a ton of bobby pins—the twist does most of the holding work.
How to Create This Style
- Gather hair into a low ponytail at the nape of your neck, leaving it slightly loose rather than pulling tight
- Twist the ponytail loosely—don’t make it a tight rope, just a casual spiral
- Wrap the twist around the base of the ponytail to create the bun shape
- Secure with bobby pins tucked under the wrapped section
- Pull a few face-framing pieces gently to soften the look
- Mist with texture spray to set and add grip throughout the bun
Pro tip: Let your ponytail sit for 30 seconds before twisting it. This gives the waves time to settle and actually makes the twist hold better without needing to be super tight.
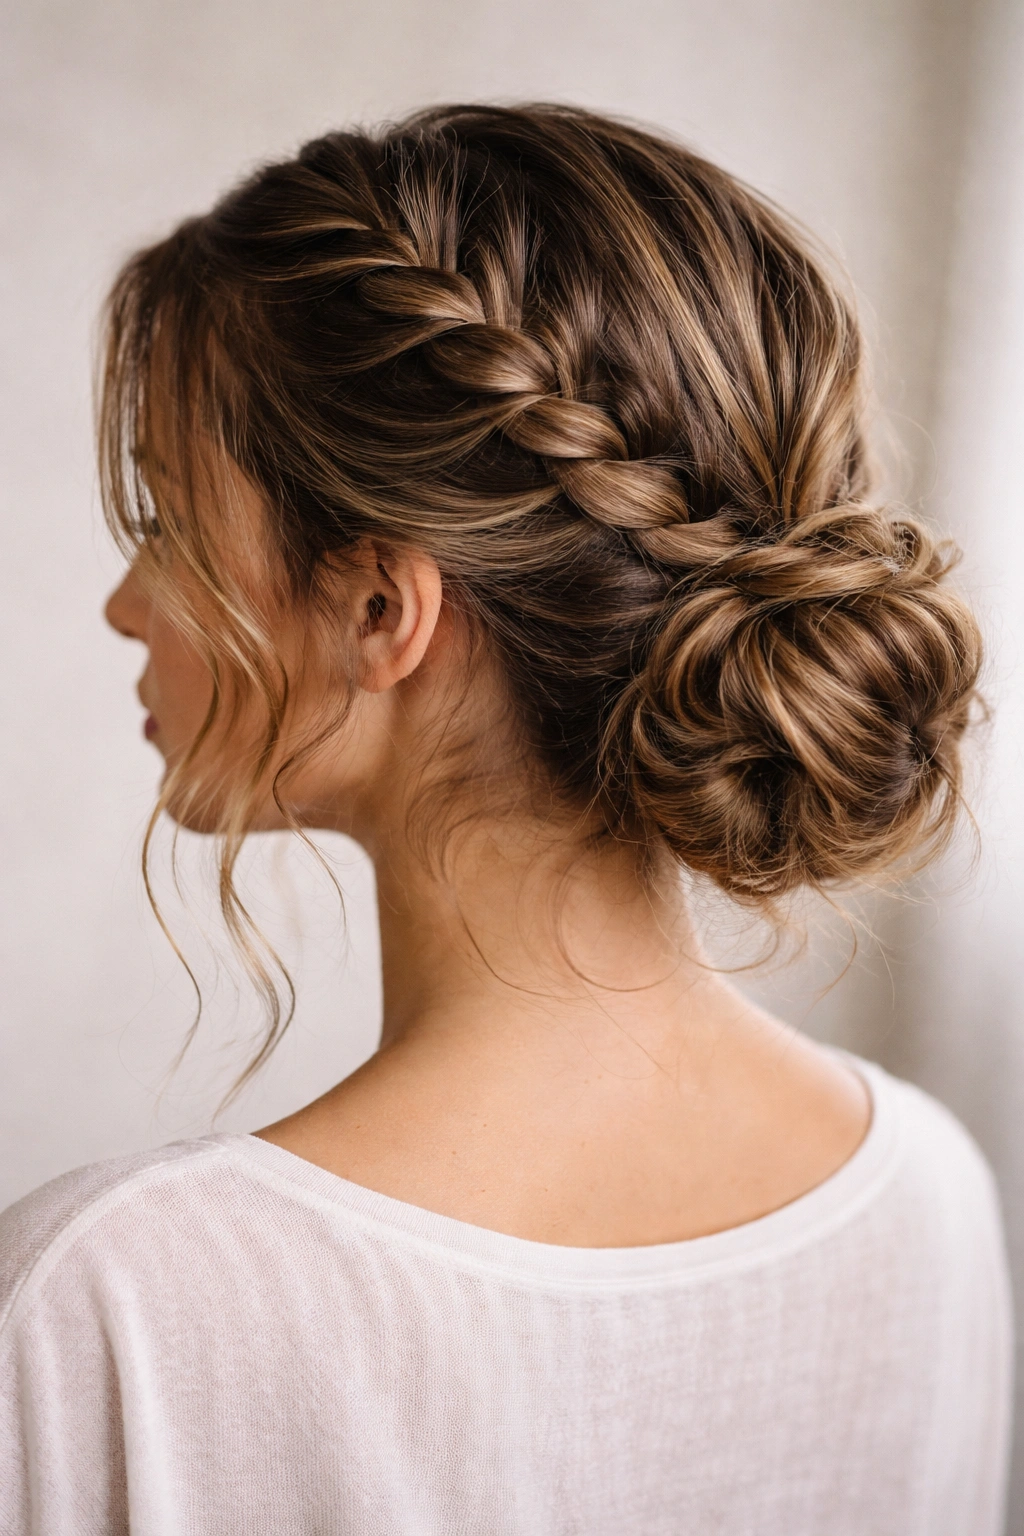
2. The Braided Low Bun

Adding a braid transforms a basic low bun into something that looks salon-polished while still embracing your wavy texture. You’re creating structure through the braid while letting the waves keep their natural shape.
Building Visual Interest Through Braiding
A braid down the back of your head gives you a defined focal point and adds sophistication to the style. The braid doesn’t need to be tight or perfect—slightly loose braids actually look better with wavy hair because they blend with your natural texture and look intentional rather than overly done.
The Step-by-Step Process
- Flip your head forward so your hair hangs down in front of you
- Create a braid starting at the crown and braiding down toward the nape of your neck
- Keep the braid loose and slightly undone—this is what makes it look current and chic
- Gather the end of the braid plus any remaining loose hair into a low ponytail
- Wrap that around into a bun and secure with pins
- Gently pull at the braid sections to make them look fuller and less structured
Pro tip: Spritz your hair with sea salt spray before braiding. This gives you more grip and makes the braid hold its shape better throughout the day, even with wavy texture.
3. The Half-Up, Half-Down Low Bun
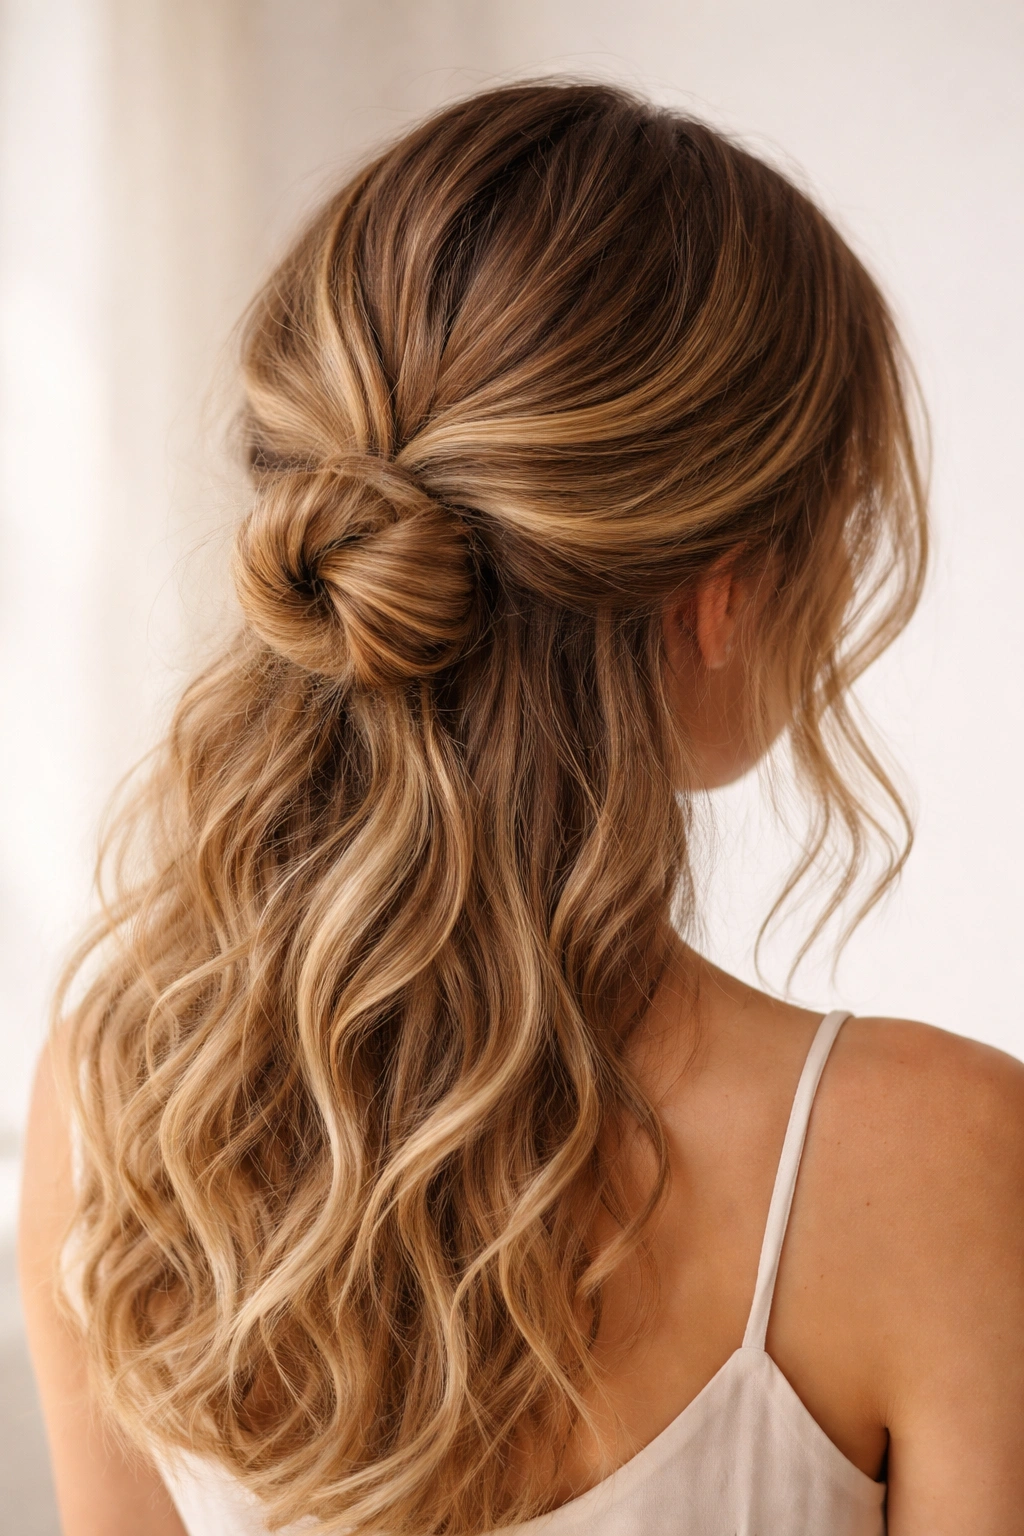
This hybrid style is perfect when you want the polished effect of a bun without committing your entire head of hair to it. You’re creating a low bun from just the bottom half of your hair while leaving the top section down and wavy.
Why Half-Up Works for Waves
Half-up styles let your wavy hair frame your face and shoulders while keeping hair away from your neck and off your shoulders if you want. It’s the perfect compromise between a full updo and wearing your hair completely down. The waves below the bun are free to do their thing.
Creating the Half-Up Bun Look
- Section off the top half of your hair and clip it out of the way
- Gather the bottom half into a low bun at the nape of your neck
- Secure the bun completely with bobby pins
- Release the top section and style it however you like—leave it straight, add waves, pull it slightly back
- Use a light hairspray on the top section so it doesn’t collapse into the bun throughout the day
Worth knowing: This style works best when you have at least shoulder-length hair. The longer your hair, the fuller and more impressive the bottom bun will look.
4. The Side-Swept Low Bun
Instead of gathering hair at the center back of your neck, you’re sweeping everything to one side and creating a low bun that sits slightly off-center. This creates an asymmetrical, modern look that’s super flattering on most face shapes.
The Visual Magic of Off-Center Placement
Side-swept buns automatically look more intentional and sophisticated than centered ones. They also tend to feel less formal and more relaxed, which pairs perfectly with the natural texture of wavy hair. The sweep of hair across the back of your head creates elegant lines.
How to Execute the Side Sweep
- Brush all your hair to one side—left or right, whichever you prefer
- Gather it at the opposite side of your neck (if you’re sweeping right, gather below your left ear)
- Twist or braid the gathered section loosely
- Wrap it into a bun shape and secure with bobby pins
- Leave a few strands out around your face on both sides for a softer look
- Pin the bun slightly lower than a traditional centered bun for maximum drama
Pro tip: This style looks amazing with a center part. The part draws the eye to the off-center bun and creates better overall balance.
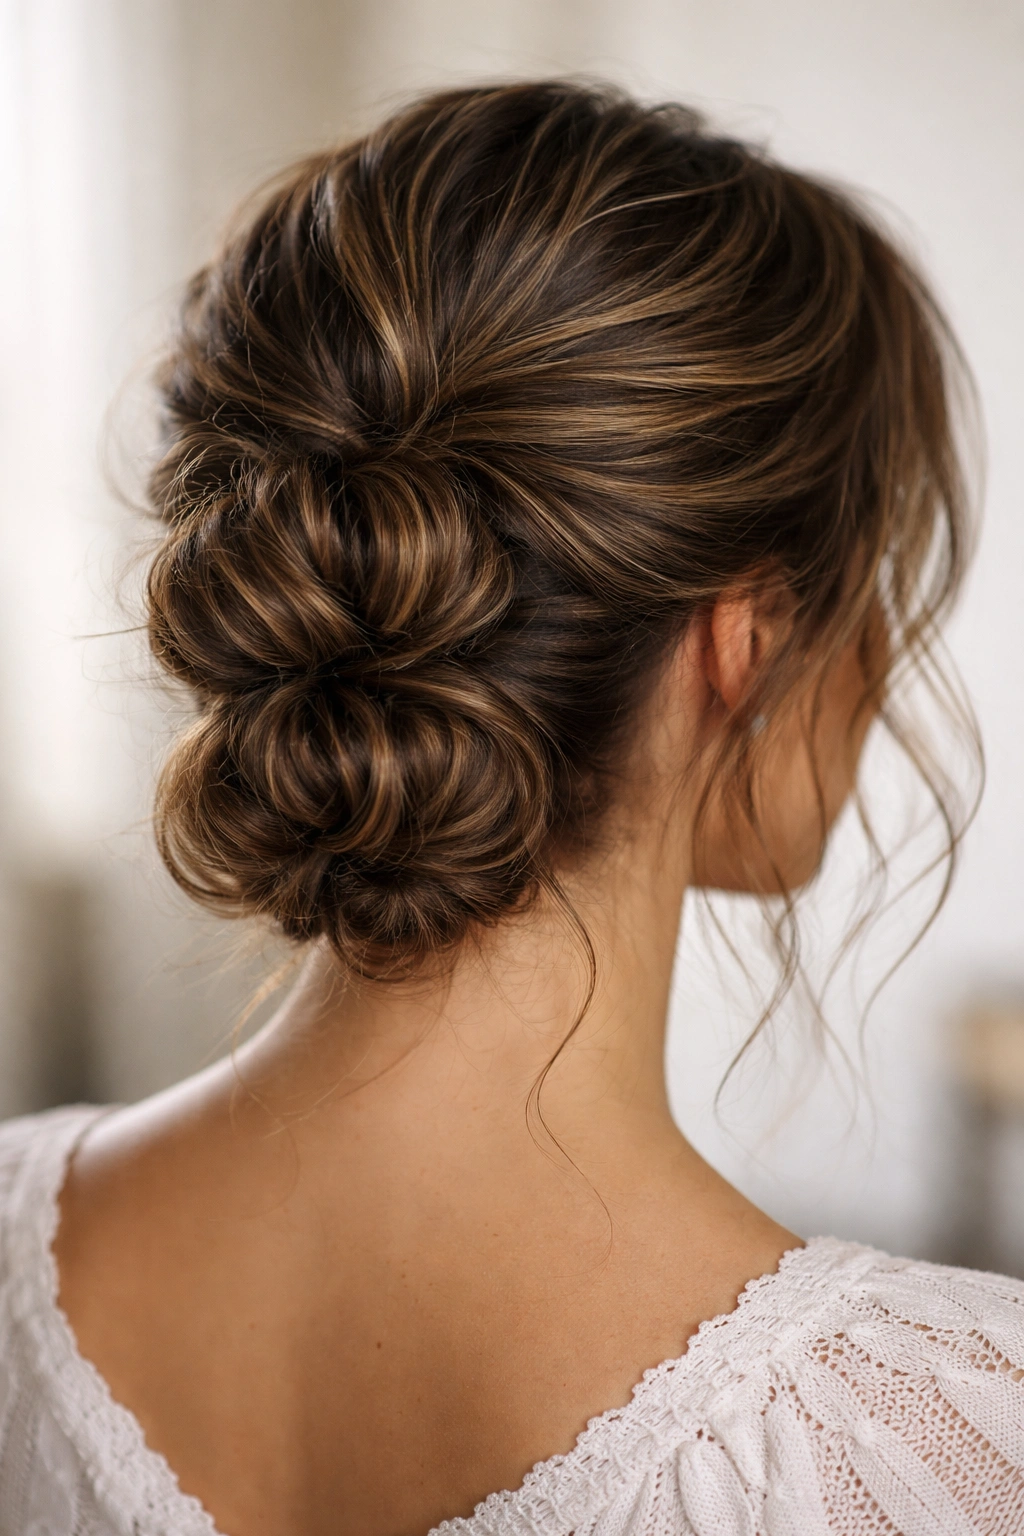
5. The Twisted Low Bun with Wrap Detail
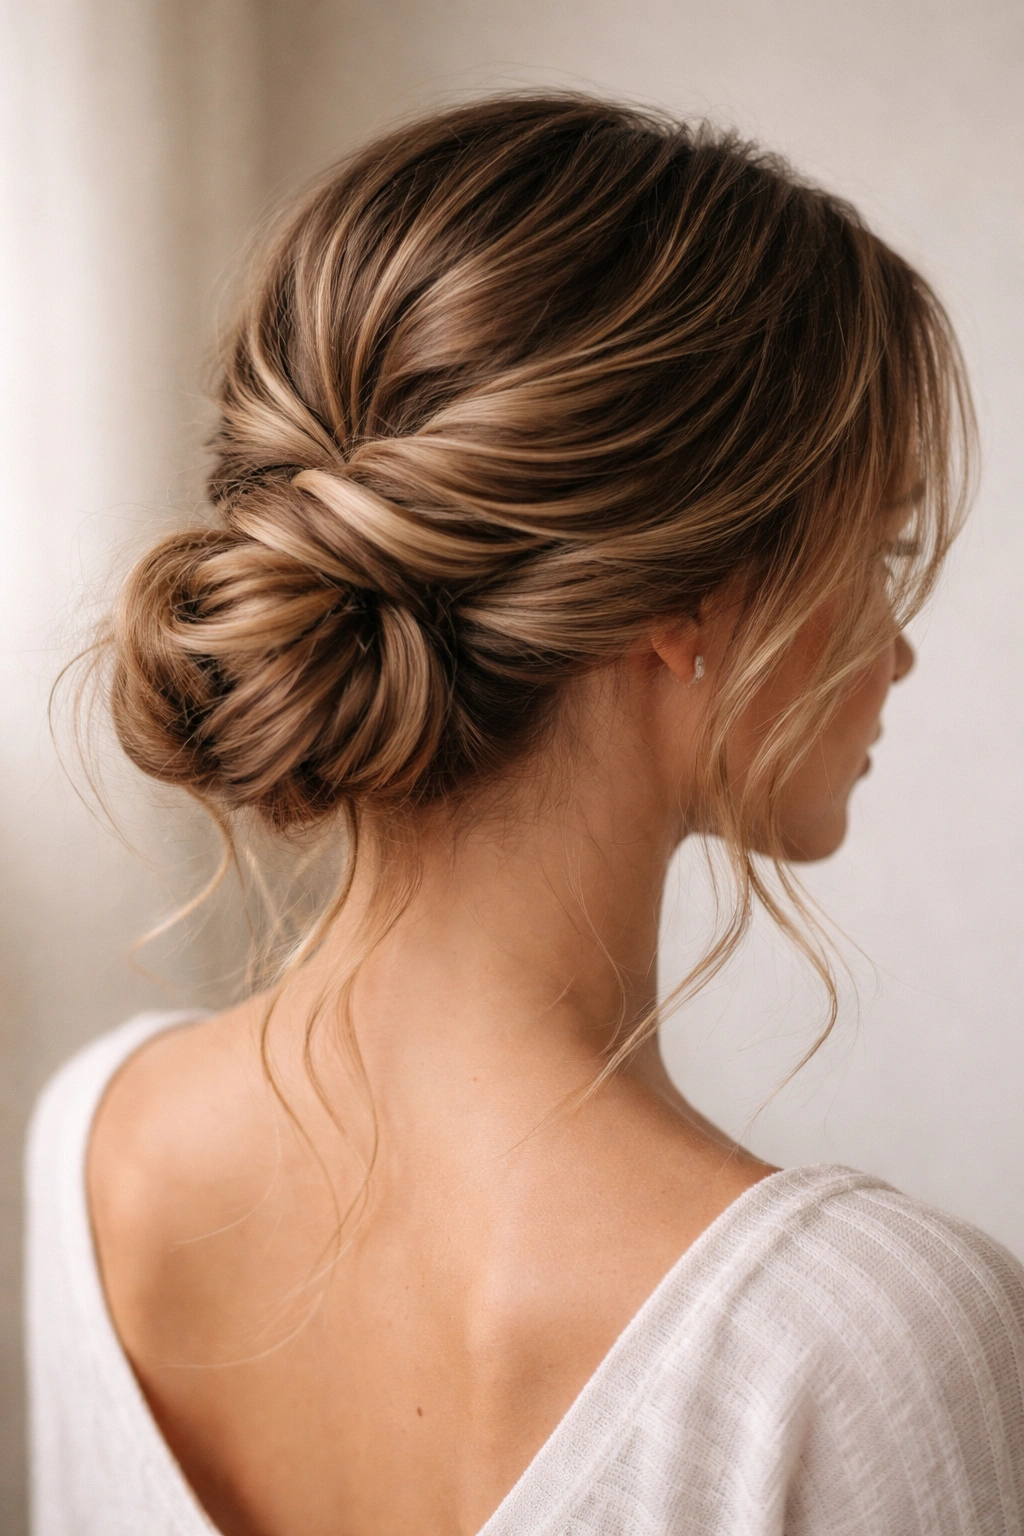
This style is similar to the basic textured wrap bun, but you’re adding an extra element—you twist the hair at the crown, gather it with those twists visible, and then wrap everything into a bun. It looks more intricate than it actually is.
Creating Dimension Through Twists
Multiple twists gathered together create visual interest and structure that makes the bun look intentional and carefully crafted. With wavy hair, these twists blend beautifully with your natural texture rather than looking too done.
Step-by-Step Technique
- Create one or two loose twists starting at the crown and going down toward the nape of your neck
- Gather the ends of the twists plus any loose hair into a low ponytail
- Keep the ponytail slightly loose rather than super tight
- Twist the ponytail once or twice, then wrap it into a bun
- Secure with bobby pins
- Gently pull at the twists from the crown to make them look fuller
Worth knowing: You can do one large twist down the center or two thinner twists on either side. Two twists create a more delicate, feminine look, while one thick twist is more dramatic.
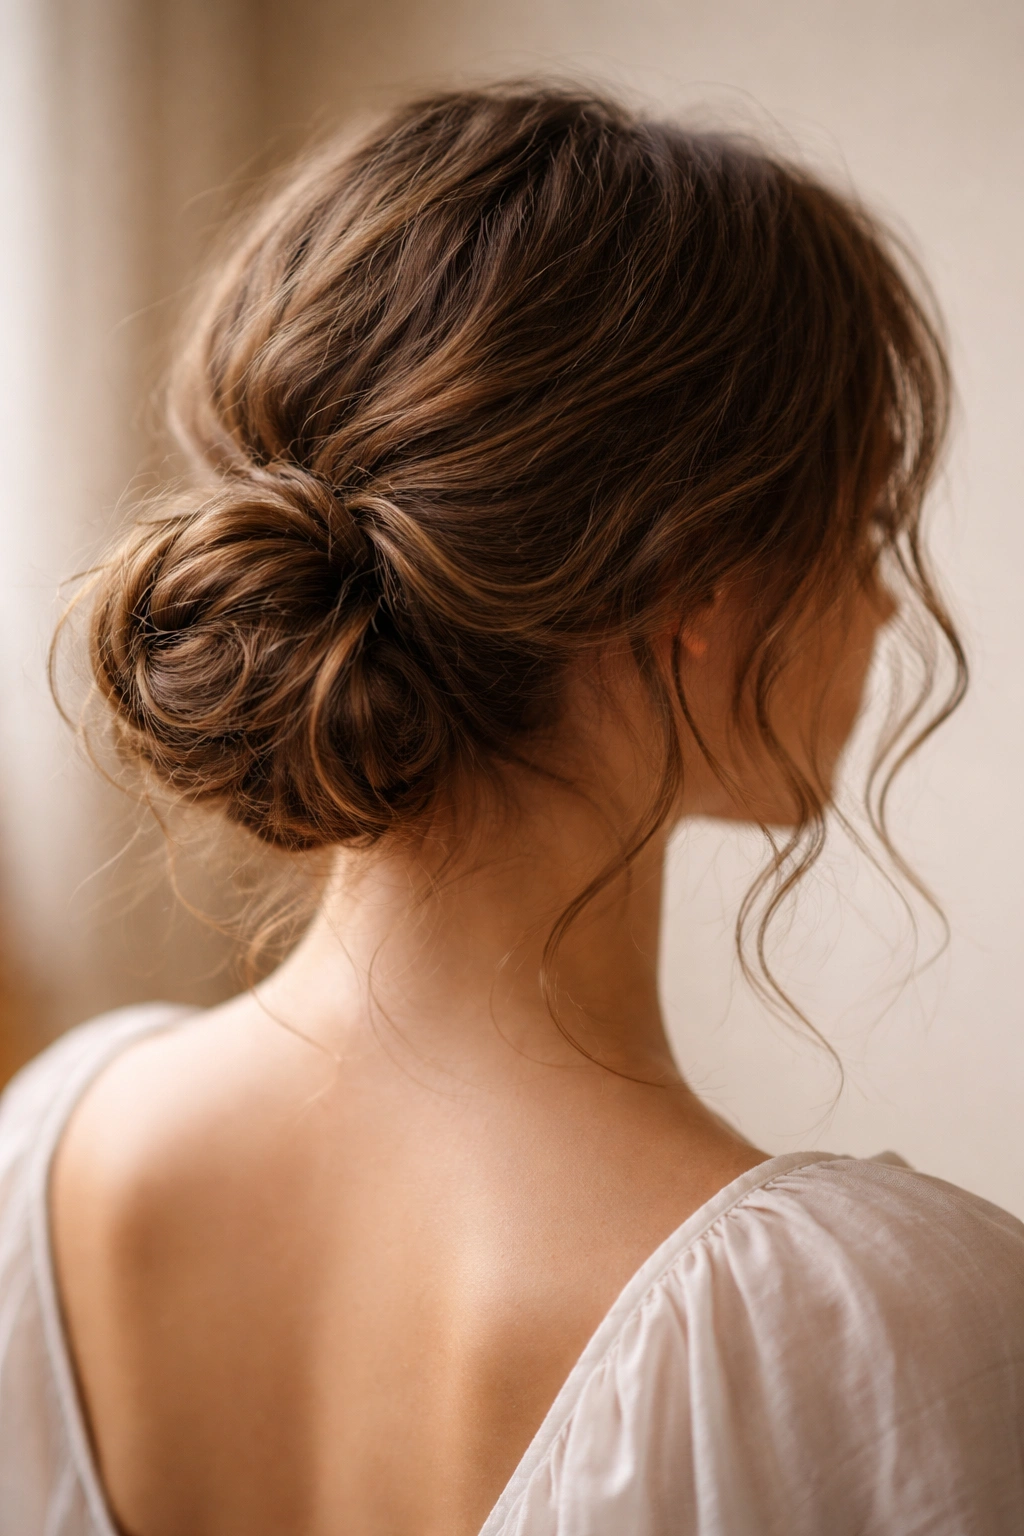
6. The Messy Low Bun with Textured Pieces
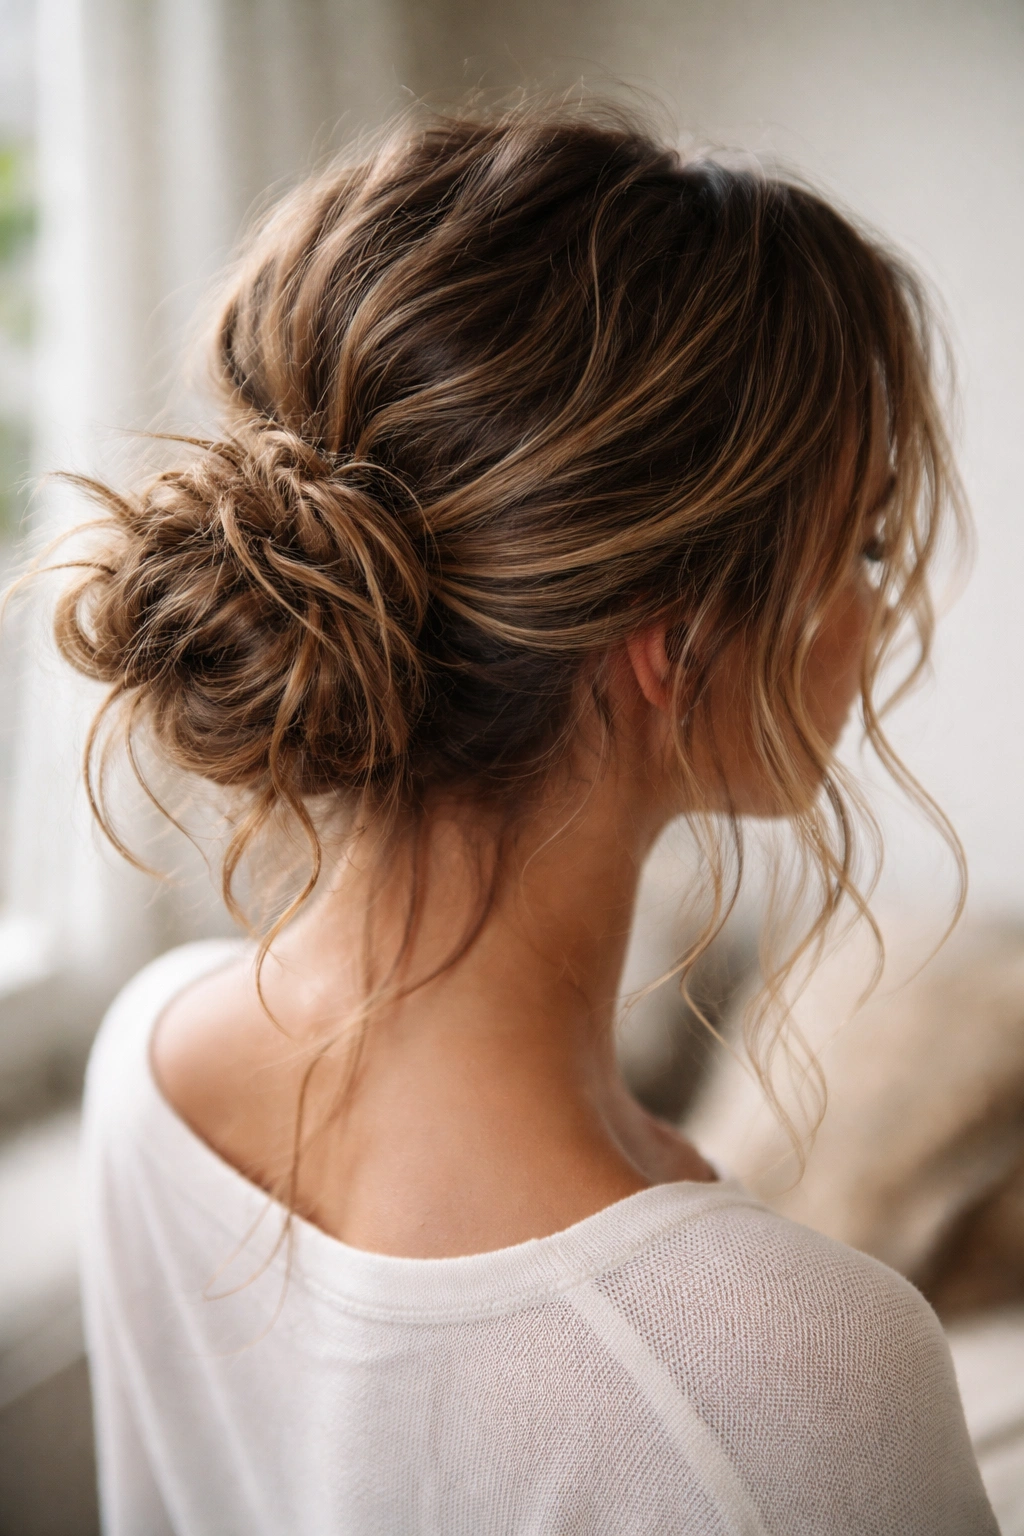
This is the “I woke up like this” bun that took approximately five minutes to create but looks like it might have taken longer. It’s all about embracing every piece of texture and wave in your hair and making deliberate messiness look intentional.
Leaning Into the Texture
With wavy hair, a messy bun isn’t actually messy—it’s just allowing your natural texture to exist. Pieces will naturally wave and curl in different directions, which is exactly what makes this style work. It’s sophisticated because it’s honest about what your hair wants to do.
Creating Intentional Messiness
- Gather hair into a very loose, low ponytail—this should feel almost too loose
- Loosely twist or braid the ponytail without trying to make it perfect
- Wrap it into a bun shape and secure loosely with bobby pins
- Deliberately pull out face-framing pieces and let pieces stick out from the bun
- Use your fingers to separate the bun a bit so it looks piecey rather than one solid blob
- Spray with a flexible hold hairspray, not a heavy one—you want movement
Pro tip: This style looks best on second or third-day hair when your waves have really set and have some texture and grit to them.
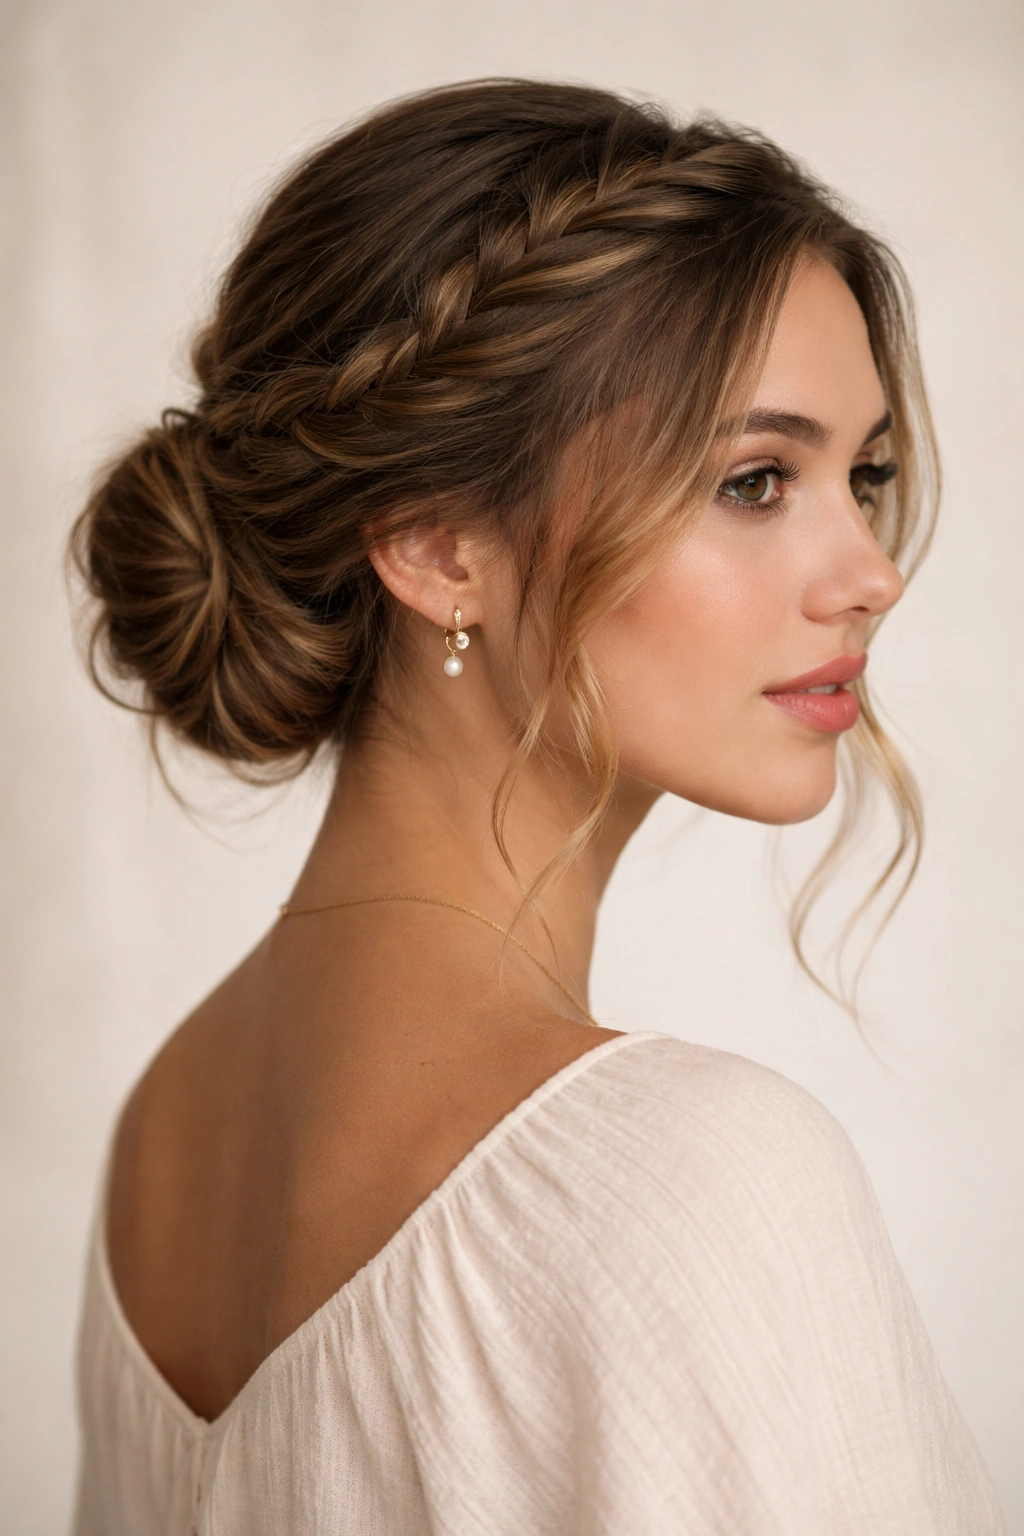
7. The Dutch Braid Low Bun
Unlike a regular braid where you’re crossing strands over each other, a Dutch braid goes underneath, creating a 3D, raised effect that looks incredible with wavy hair. You’re creating this braid from the top of your head down and then gathering the end into a low bun.
The Dimensional Advantage of Dutch Braids
Dutch braids create visible texture and structure that complements wavy hair beautifully. The braid sits on top of your head rather than disappearing into it, so it creates actual visual interest and polish. This is the style you wear when you want people to know you put effort in.
Dutch Braid to Bun Process
- Section off the top of your hair and begin a Dutch braid at your crown
- Continue braiding down the back of your head, keeping the braid on the looser side
- At your lower neck, stop braiding and gather the end of the braid plus remaining hair into a low ponytail
- Twist the ponytail gently and wrap it into a bun
- Secure completely with bobby pins
- Tug at the Dutch braid to make it look fuller and more textured
Worth knowing: Dutch braids work best on hair that’s at least shoulder-length and ideally has some natural wave or texture to begin with. Straight hair can look flat with a Dutch braid, but wavy hair is perfect for this.
8. The Halo Low Bun
This style wraps a braid or twist around the circumference of your head, then gathers the remaining hair into a low bun at the back. It’s romantic and feels more formal than a casual bun, but still works beautifully with wavy hair.
Creating the Halo Effect
A braid that circles your head creates an elegant frame for your face. When you then gather the back into a low bun, you have a two-part style that looks intricate and special. With wavy hair, the texture gives the halo dimension and makes it look less like a tight, formal style.
How to Build a Halo Bun
- Begin a braid on one side of your head near your ear
- Braid horizontally across the back of your head toward the opposite ear
- Secure the end of the braid with a bobby pin
- Gather all remaining hair (including the end of the braid) into a low ponytail
- Twist the ponytail loosely and wrap into a bun
- Pin securely and gently loosen the halo braid to add fullness
Pro tip: This style looks best if you slightly backcomb or tease the crown area before creating the halo. This creates more volume and makes the bun look fuller at the back of your head.
9. The Sleek Low Bun with Waves Below
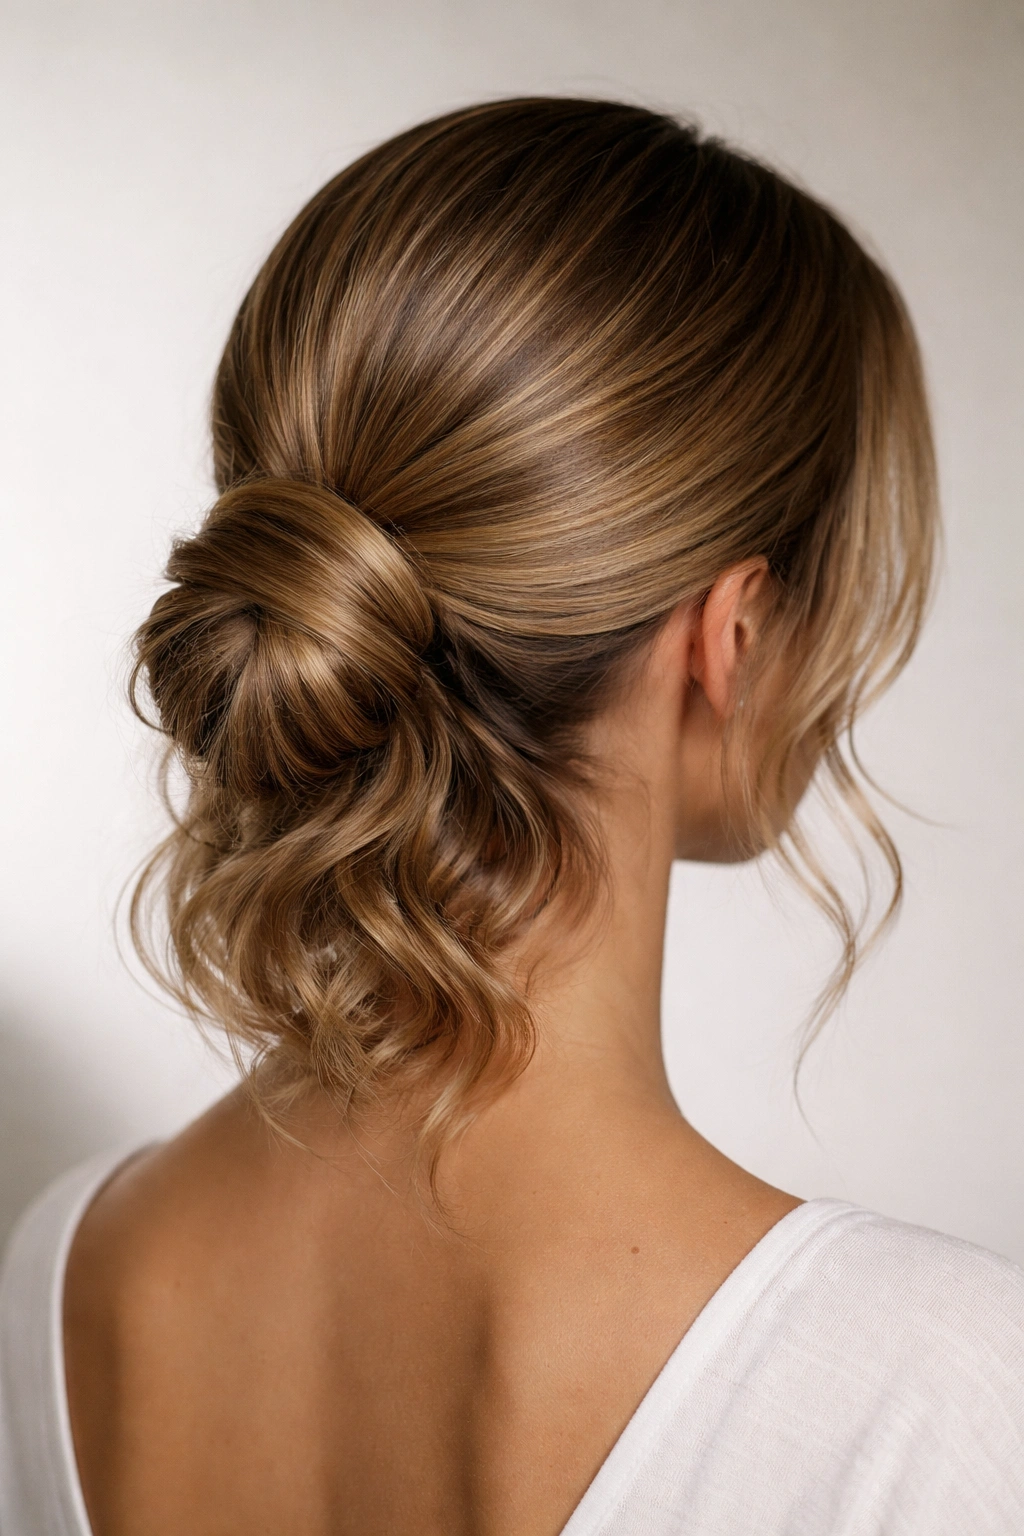
Sometimes what makes a low bun work is contrast—sleek, smooth hair at the crown that transitions into beautiful waves lower down. You’re smoothing the top while allowing the bottom section to show off its natural wave pattern.
Playing With Texture Contrast
By smoothing just the crown area and sides, you reduce bulk where it might overwhelm your head shape, but you keep the waves where they look best—framing your shoulders and neck. This hybrid approach gives you polish without sacrificing your natural texture.
Building Sleek Crown, Wavy Bottom
- Apply a smoothing serum or light gel to the crown and sides of your head
- Brush these sections smooth and flat
- Gather all your hair into a low ponytail, keeping the crown sleek and the lower sections wavy
- The contrast is already built in at this point
- Twist the ponytail loosely and wrap into a bun
- Secure with bobby pins
- Let the waves show throughout the bun—don’t try to smooth them
Worth knowing: The key is using a light smoothing product, not a heavy gel. You want the top to look intentionally smooth, not artificially slicked back.
10. The Crisscross Low Bun

This style involves creating two or more twists that weave through each other before gathering everything into a bun. It looks intricate and detailed but is actually quite simple once you understand the mechanics.
Layering Twists for Visual Interest
Multiple twists that cross over each other create a woven, patterned look that’s visually sophisticated. With wavy hair, these twists don’t need to be perfectly smooth—they look great slightly textured and undone.
Creating the Crisscross Pattern
- Create one twist starting on the left side of your head and twist down toward the center back
- Create another twist on the right side, also twisting toward the center back
- Where they meet at the center back, they naturally weave together or you can deliberately cross them
- Gather the ends of both twists plus any loose hair into a low ponytail
- Twist that ponytail gently and wrap into a bun
- Secure with bobby pins and gently pull at both twists to create fullness
Pro tip: You can do two, three, or even four twists depending on how intricate you want the style to look. More twists = more visual interest, but also more time to create.
11. The Ribbon-Woven Low Bun
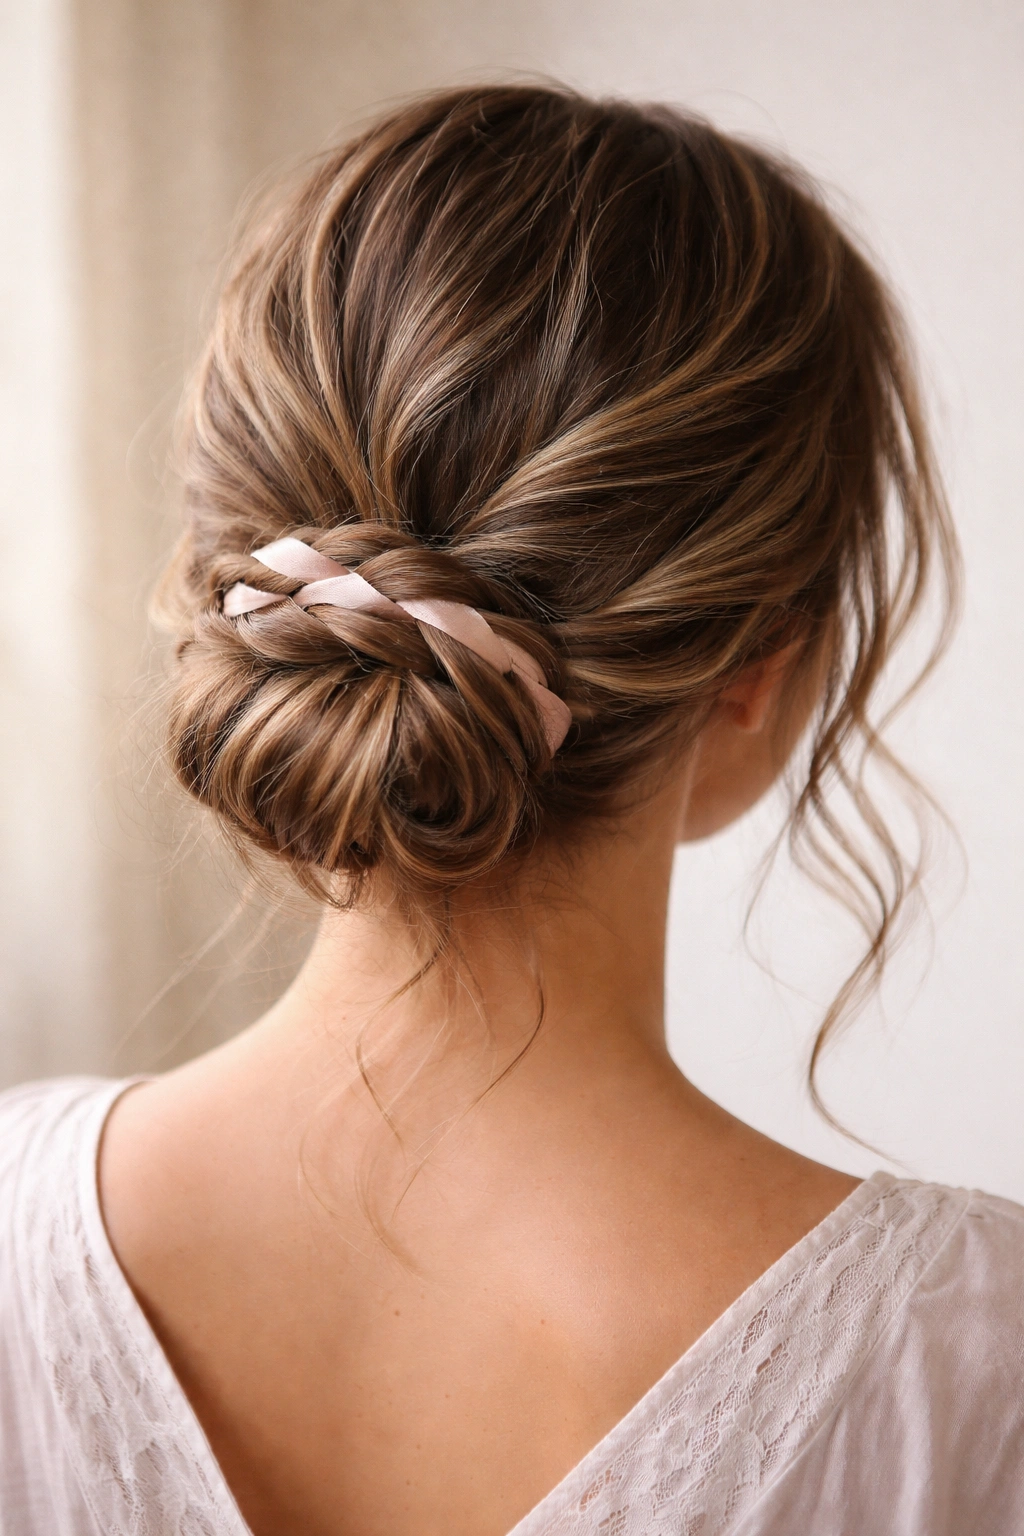
This is where you literally weave a thin ribbon through your hair or bun to add color, shimmer, or texture. You’re gathering your hair into a low bun in the usual way, then threading a ribbon through it and securing both the hair and the ribbon with bobby pins.
Adding Color Without Dye
A ribbon woven through a low bun gives you the chance to add a pop of color, metallics, or texture without any commitment. You can change the ribbon every day or whenever you want. It’s a small detail that completely changes the vibe of the hairstyle.
How to Incorporate Ribbon
- Create your low bun using the method you prefer—twisted, braided, whatever
- Take a thin ribbon in your chosen color or pattern
- Begin weaving it through the bun, going under and over sections of hair
- Wrap the ribbon around the base of the bun if you want an extra decorative touch
- Secure the end of the ribbon with bobby pins so it doesn’t come loose
- The ribbon adds both visual interest and a little extra hold
Worth knowing: Silk ribbons or very thin ribbons work best. Thick ribbons can look costume-y unless that’s what you’re going for.
12. The Stacked Low Bun with Volume
This style creates the illusion of more hair and more volume by gathering hair at the nape, creating one small bun, then gathering slightly higher and creating another small bun that sits above it. From the back, it looks like one substantial bun, but it’s actually multiple sections creating dimension.
Building Volume Strategically
With wavy hair that can sometimes look flat at the back of the head, stacking small buns creates the perception of fullness. The layers of twists or braids going into each bun add texture and visual interest. It’s architectural and modern.
The Stacked Bun Technique
- Divide your hair into two or three horizontal sections
- Create a small bun from the lowest section and pin it securely
- Gather the next section up and create another small bun, pinning it just above the first one
- If you have a third section, create another bun above that
- All of these sit low on the back of your head but in a stacked formation
- Gently pull at each bun to make them look fuller and less tight
Pro tip: This style works best if you tease or backcomb each section slightly before twisting and securing. The texture gives you more grip and makes each bun look bigger.
13. The Curved Low Bun
Instead of gathering hair straight back into a centered low bun, you’re creating an arc or curve to where the bun sits. You might gather it slightly to the left, or create an asymmetrical placement that curves along the contour of the back of your head.
Using Shape to Flatter Your Head Shape
A curved or asymmetrical bun follows the natural contours of the back of your head better than a perfectly centered one. It can make your neck look longer, your head shape look more balanced, and generally just look more intentional and custom-fitted to your head rather than a generic bun.
Creating the Curved Placement
- Brush your hair straight back but imagine a curved line instead of a centered line
- Gather your hair along that curved line at the nape of your neck
- Twist the ponytail gently and wrap it into a bun
- Position the bun along that curved line you imagined
- Secure with bobby pins
- The curve should be subtle—not so extreme that it looks off-center, but enough to create visual interest
Worth knowing: This style looks best with a deep side part or a slightly off-center part. The part draws attention to the curved bun placement.
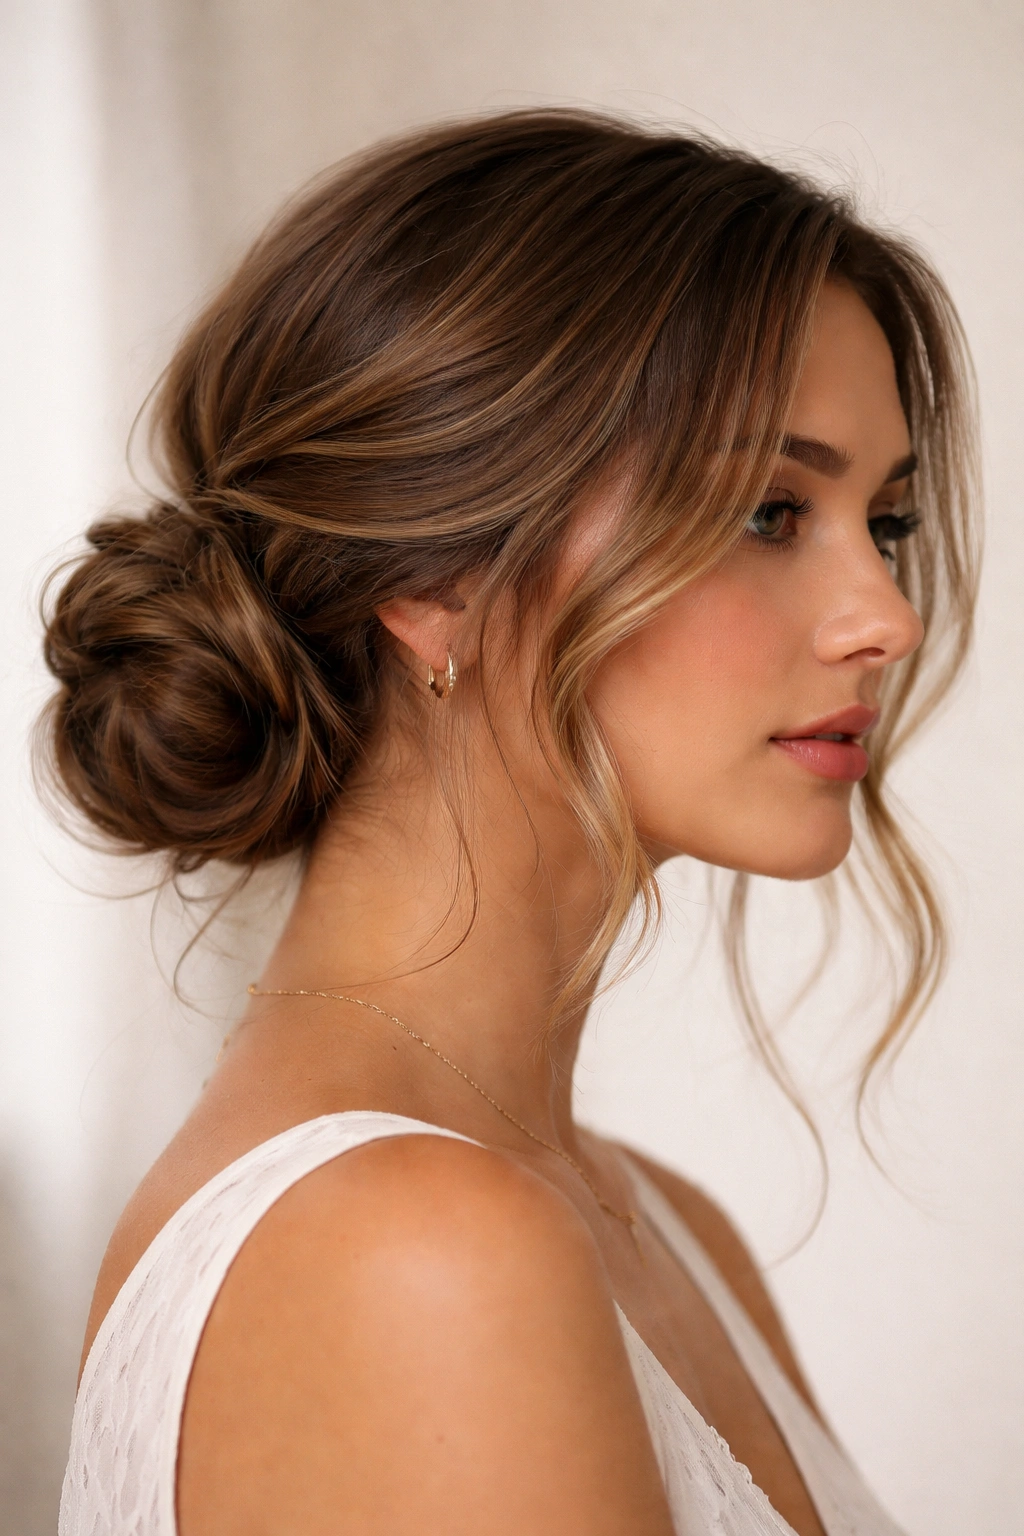
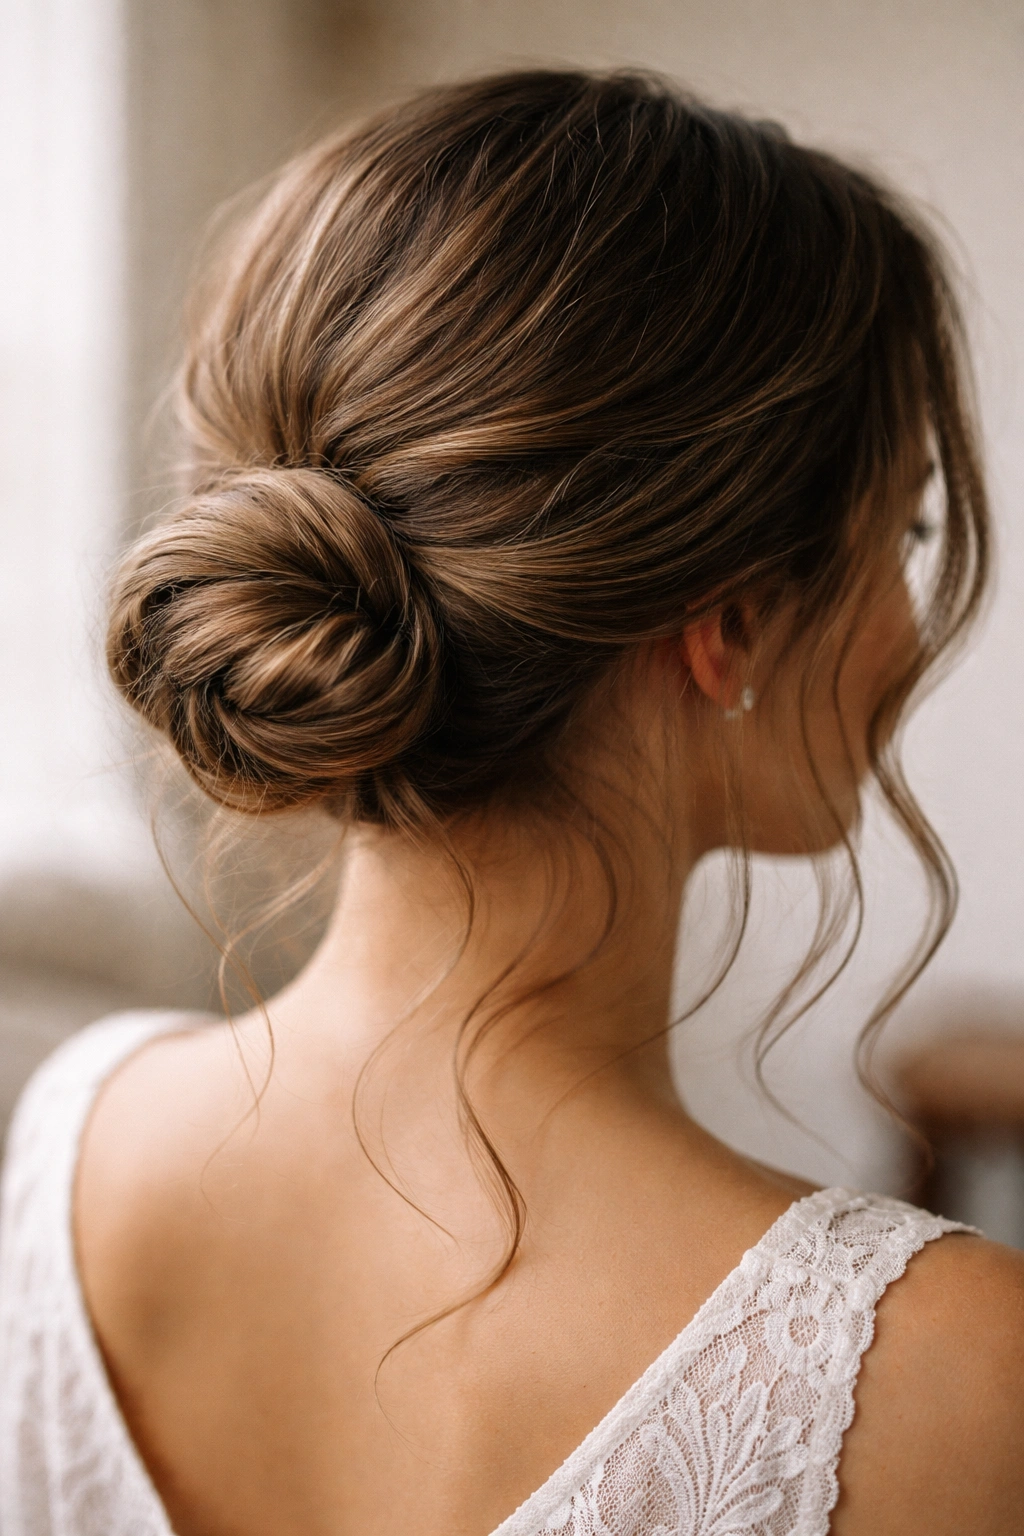
14. The Romantic Wispy Low Bun
This is the low bun for when you want maximum femininity and softness. You’re deliberately pulling out smaller, wispier pieces all around the bun to create a softer, more romantic silhouette rather than a sleek, controlled look.
Creating Softness Through Strategic Pieces
Wavy hair is perfect for this style because the pieces you pull out will naturally wave and curl. You’re not fighting your hair’s texture; you’re leveraging it to create intentional softness. This is the style that looks effortless but romantic, put-together but not overdone.
Building the Wispy Effect
- Create a low bun using any of the techniques mentioned above—twisted, braided, wrapped, whatever
- Secure it completely first
- Then, gently pull out small pieces all around the bun—at the sides, at the nape, around the bun itself
- Don’t pull these pieces hard; let them stay slightly connected to the bun
- Use your fingers to slightly curl or wave the pieces if they’re not naturally waving
- Spray with a flexible hairspray that allows movement
Pro tip: This style actually looks better on second-day hair when your waves are set and slightly textured from the previous day’s styling.
15. The Graphic Low Bun with Geometric Pins
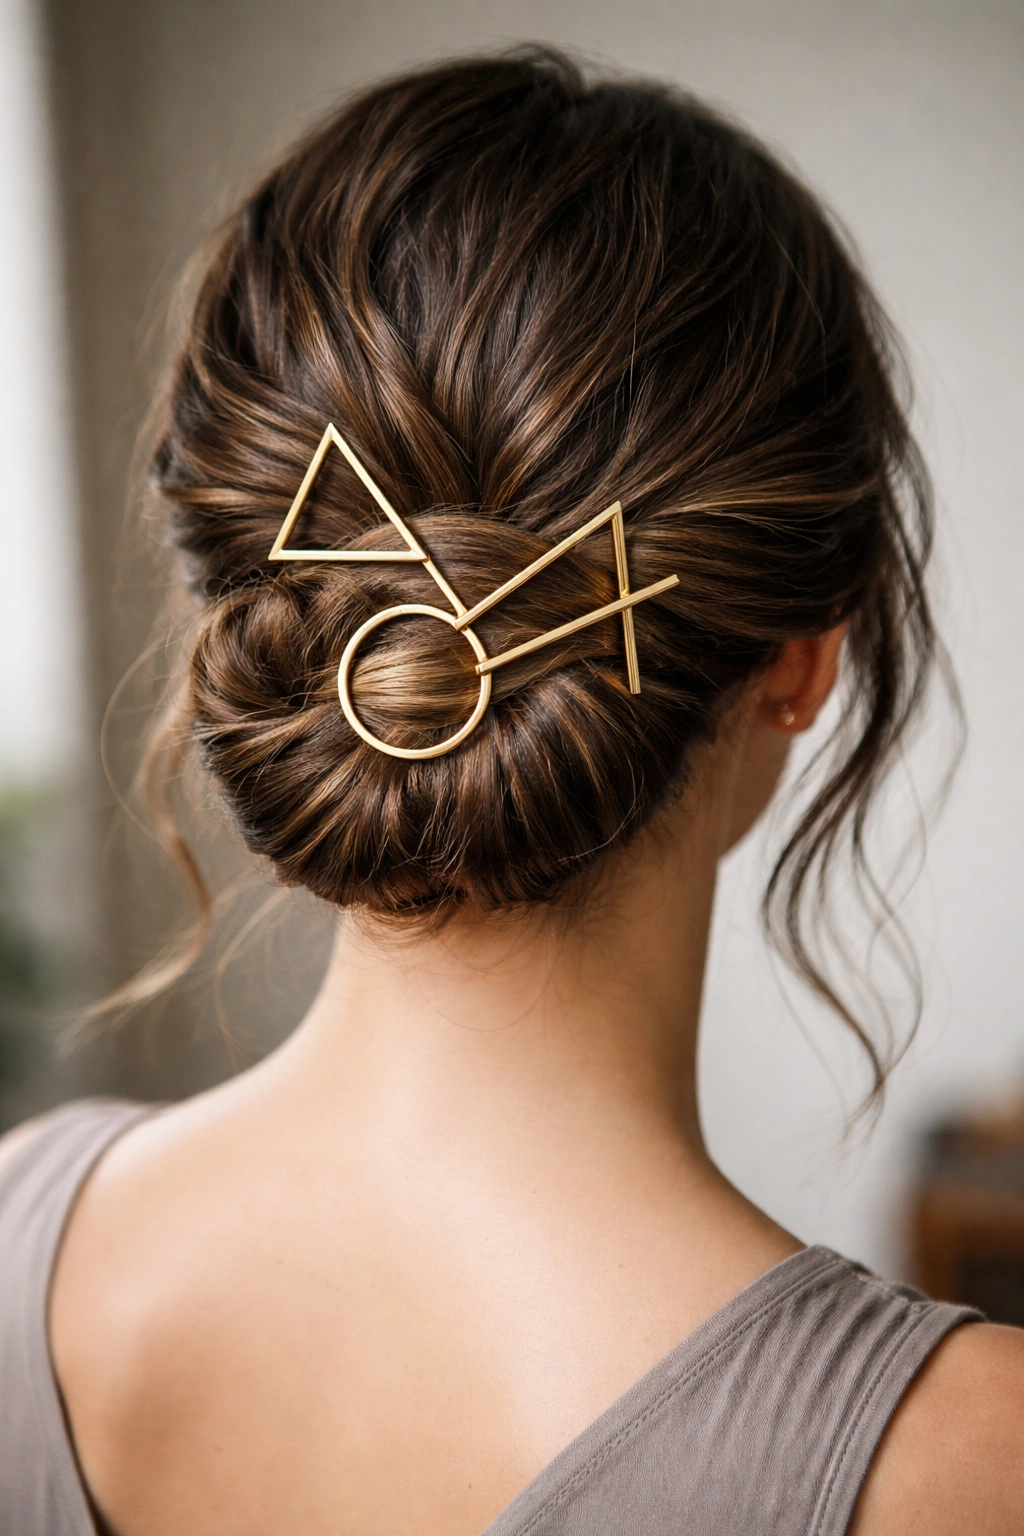
This final style is less about the technique of the bun and more about making it a statement through styling details. You’re creating any low bun you prefer, then securing it with decorative bobby pins, claw clips, or hair sticks that are visible and become part of the design.
Using Accessories as Styling
Graphic pins or decorative clips transform a basic bun into a statement style. They’re functional—they actually help hold the bun—but they’re also design elements. With wavy hair, these accessories stand out beautifully against the textured backdrop of your waves.
Styling With Intention
- Create your low bun using any method—this is all about what comes next
- Instead of hiding your bobby pins, use decorative ones and make them visible
- You can use multiple pins in the same color or mix colors for a more eclectic look
- Or use geometric claw clips or decorative hair sticks to secure the bun
- Position these accessories on top of the bun or woven through it so they’re clearly visible
- The accessories become as much a part of the style as the bun itself
Worth knowing: This works especially well if your hair color is different from the typical bobby pin color. Gold or silver pins show up beautifully in darker hair, while tortoiseshell or clear pins work great in lighter hair.
Final Thoughts
The beauty of low buns with wavy hair is that your natural texture does half the work for you. You don’t need your hair to be perfectly smooth or slicked back—in fact, you want to embrace the waves and use them as a design element rather than trying to hide them. Whether you go for a textured, undone vibe or something more polished and detailed, a low bun is the perfect compromise between letting your waves show and keeping hair functional and off your shoulders when you need it to be.
The key is experimenting with placement, deciding how much texture you want to show versus smooth, and choosing techniques that work with your natural pattern rather than against it. Start with whichever style calls to you, practice it a few times so it feels natural, then gradually work your way through others as you find your favorites. Your wavy hair is an asset—these bun styles are all designed to prove it.