Wavy hair is a gift—it’s got natural texture, movement, and volume that can make an updo look effortlessly chic without hours of styling. But here’s the challenge: short wavy hair doesn’t always cooperate with traditional updos meant for long locks. You need styles that work with your waves instead of against them, styles that take maybe five to ten minutes and don’t require a chemistry lab’s worth of products or a professional’s steady hand.
The good news? Some of the most flattering updos for short wavy hair are surprisingly simple. Whether you’re dealing with layers, a textured bob, or shoulder-length waves, there are dozens of ways to sweep your hair up that enhance your natural wave pattern instead of fighting it. These updos work for casual days at work, weekend brunches, humid weather when you want your hair off your neck, or those mornings when your waves need a quick refresh.
This isn’t about complicated techniques or trendy styles that look nothing like the tutorial videos. We’re talking about real, wearable updos that actually hold throughout the day, that you can recreate in under ten minutes once you get the hang of them, and that genuinely look better with wavy texture than they would with straight hair. Your waves are actually the secret weapon here—they provide grip, they add volume, and they make everything look more intentional and less “trying too hard.”
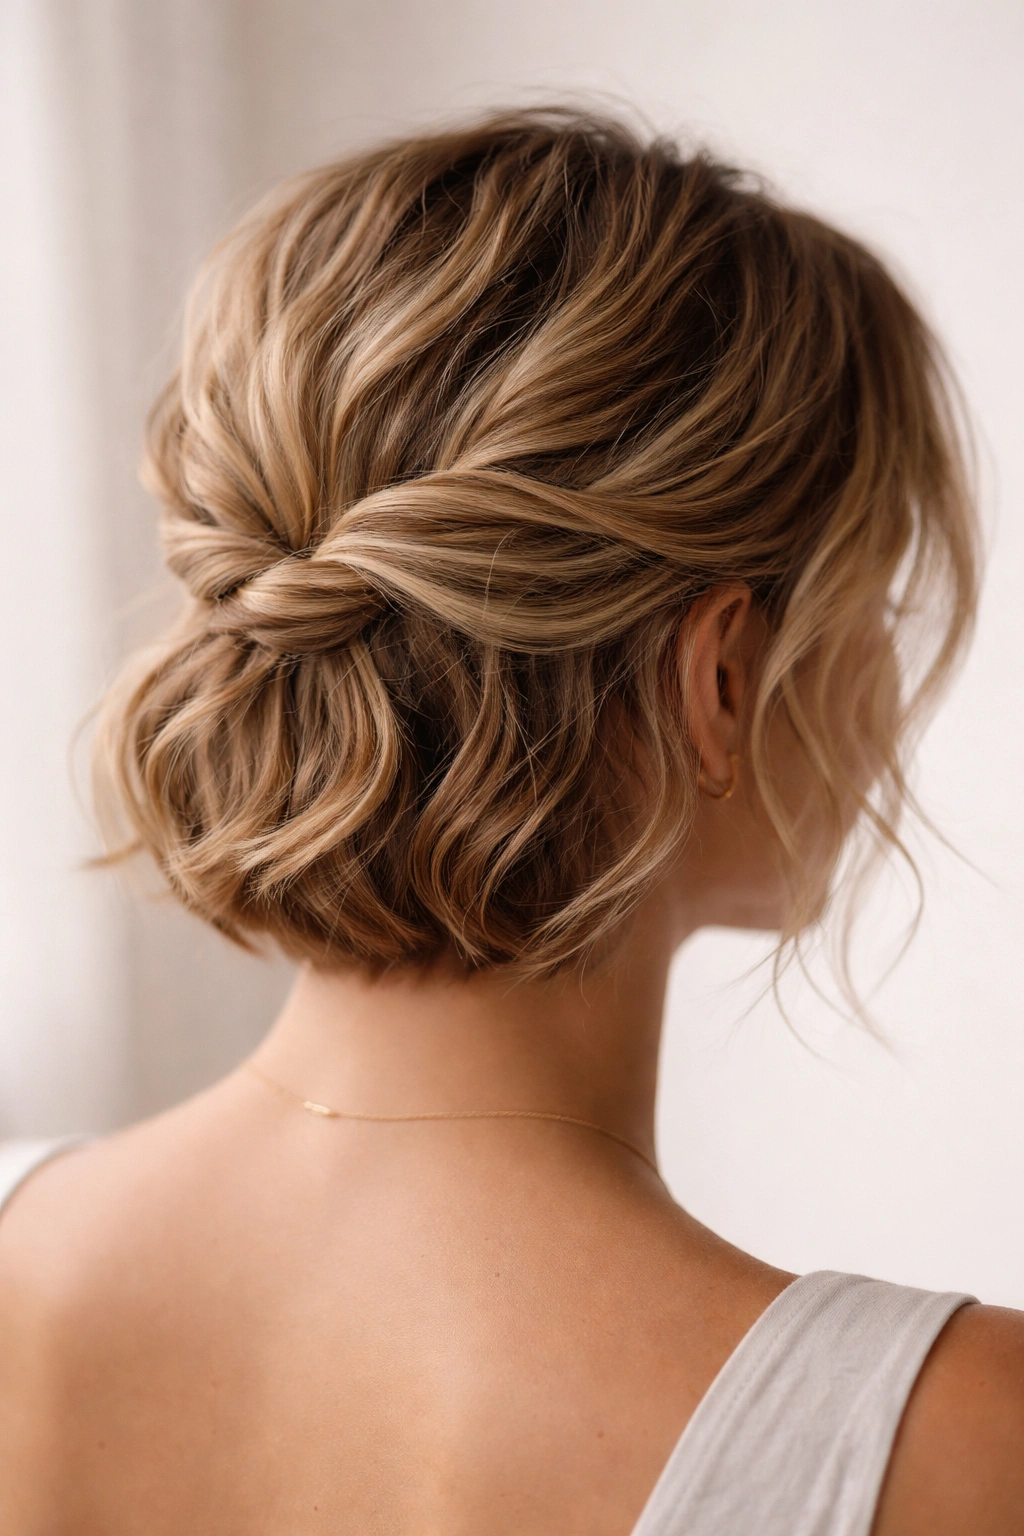
1. The Twisted Crown
The twisted crown is one of the easiest updos for short wavy hair because it works with your natural texture rather than fighting it. Start by taking a section of hair from one side of your head near your temple and twist it loosely back toward the nape of your neck. The key is keeping the twist relatively loose and slightly tousled—tight, perfect twists look odd with wavy hair and defeat the whole purpose of embracing your texture.
How to Perfect It
Wrap the twisted section around the back of your head like a crown, securing it with bobby pins hidden underneath. Then take another twist from the opposite side and do the same thing, weaving it through or under the first twist. This creates dimension and a fuller look. Your waves naturally fill in any gaps, which is exactly what you want.
Pro Tips to Keep It Secure
- Use texture spray on damp hair before twisting for extra grip
- Keep bobby pins in a straight line along the base of the twist—don’t scatter them around
- Gently pull at the twisted section to slightly loosen it after pinning, creating a softer, more romantic look
- This style holds beautifully for 8-10 hours, even in humid weather
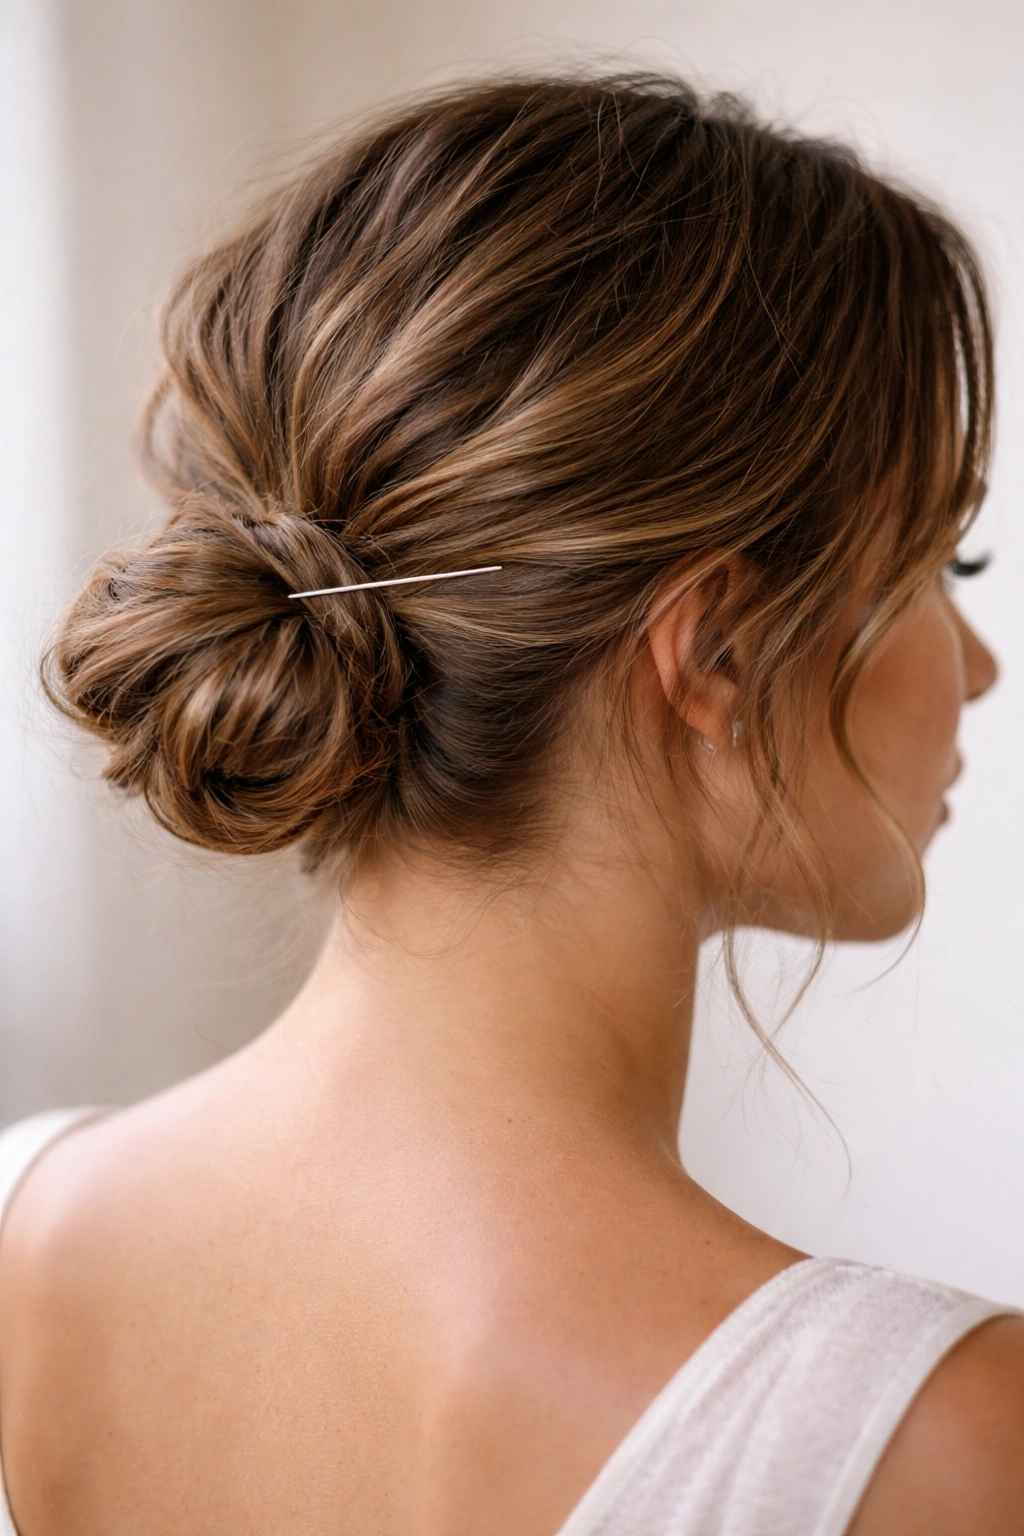
2. The Messy Side Knot
A side knot is casual, quick, and absolutely stunning on wavy hair. Flip your head to one side and gather hair into a loose, slightly off-center knot at the base of your neck or slightly lower depending on your hair length. The “messy” part is non-negotiable here—a perfect, tight knot looks corporate and dated; a slightly tousled knot with a few wispy pieces looks effortlessly intentional.
Building Texture First
Before creating the knot, scrunch your damp hair with a curl-enhancing mousse or sea salt spray. This wakes up your waves and gives the knot something to grip. If your hair is on the straighter side, finger-wave it or curl it with a waving iron before tying it up.
Making It Last All Day
- Secure the knot with at least three bobby pins, crisscrossing them for maximum hold
- Leave a few face-framing pieces loose—these soften the style and disguise any imperfections
- If you notice the knot loosening midday, gently tug at the outer edges to redistribute the twist and tighten it from the inside
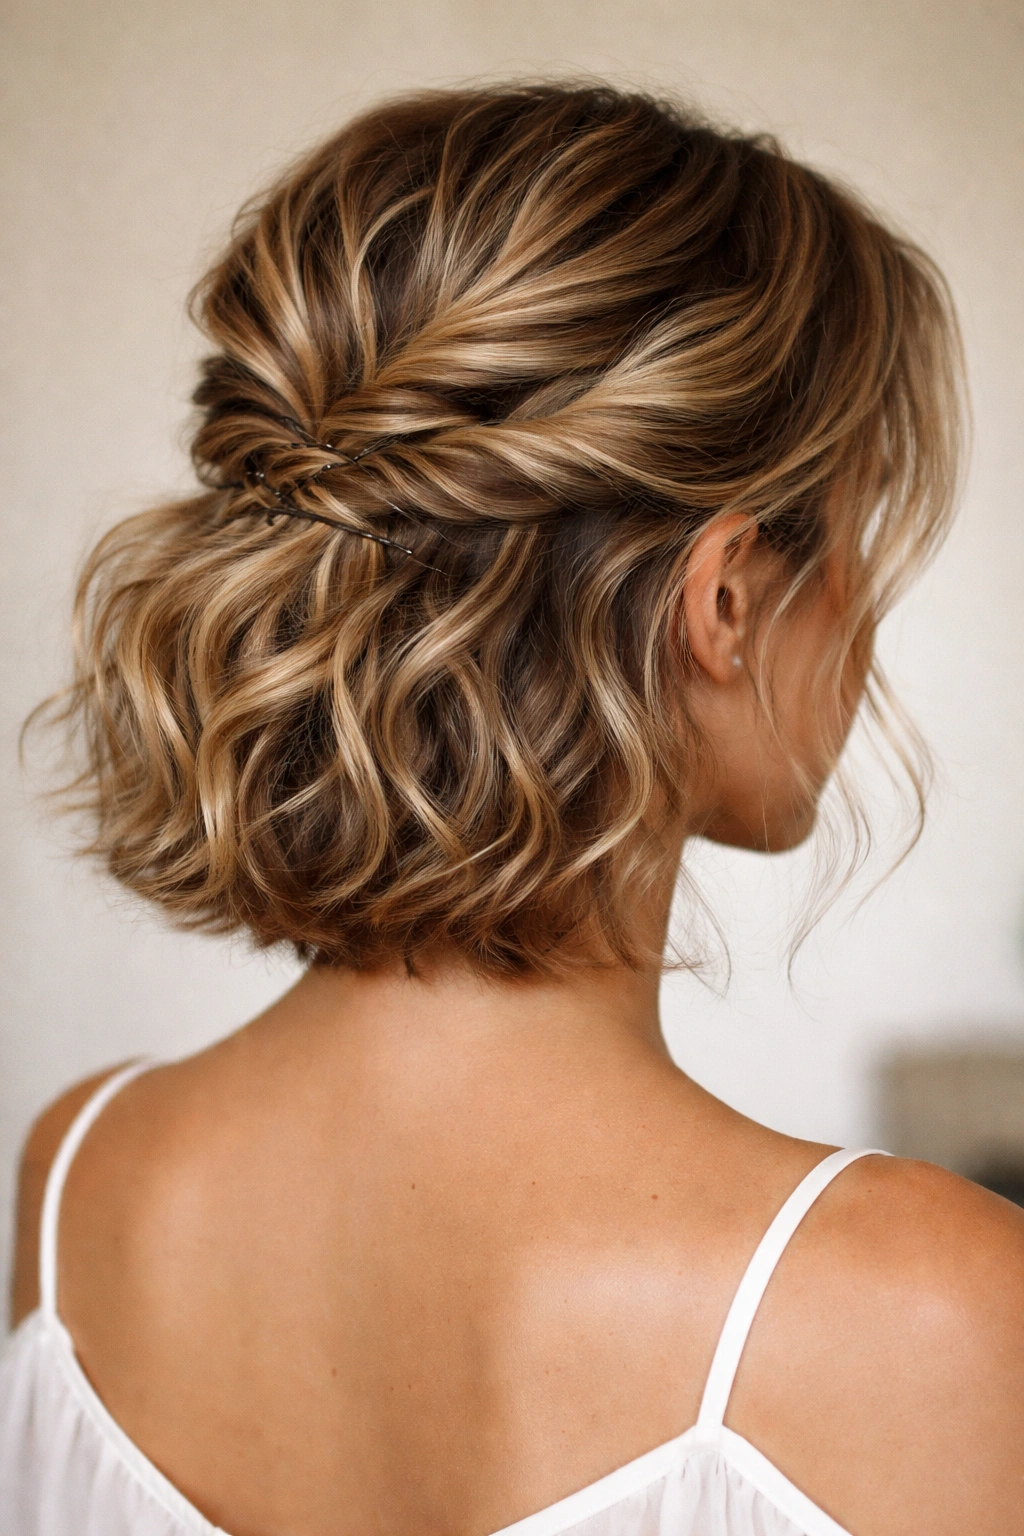
3. The Half-Up Twisted Bun
This is the Goldilocks of short hairstyles—not fully up, not fully down, but genuinely flattering on everyone. Take the top half of your hair, twist it loosely, and wrap it into a bun at the crown. The bottom half flows down, showing off your wave pattern while keeping hair off your face.
The Technique That Works
Divide your hair horizontally from ear to ear. Take the top section, twist it back loosely, and coil it into a bun at the crown. Instead of making it perfectly round and smooth, let it be slightly loose and airy. Your waves will naturally create texture and volume.
Styling Details That Elevate It
- Leave 2-3 face-framing pieces out to soften the look
- Use a texture powder or dry shampoo at the roots before creating the bun for more grip and body
- Secure with bobby pins in matching color to your hair
- A few loose pieces around the bun look intentional, not sloppy—encourage this by gently pulling them out
4. The Low Ponytail with Volume
Don’t underestimate the power of a simple, well-executed low ponytail on wavy hair. The difference between a boring ponytail and a chic one is all about the placement and how you manipulate the hair around the elastic.
Creating Dimension in a Low Style
Gather hair into a ponytail at the nape of your neck, but don’t make it perfectly smooth. Let your waves show through. Instead of pulling it as tight as possible, keep it loose and relaxed. Use a clear elastic rather than a colored one if you want the style to feel more sophisticated.
The Secret to Volume
- Before tying it, use a volumizing mousse on damp roots and scrunch while drying
- After securing the ponytail, gently pull at sections of hair near the roots to create dimension and lift
- Wrap a small section of hair from the ponytail around the elastic to hide it—this single step transforms the look from casual to polished
- Tease slightly at the base of the ponytail for subtle lift
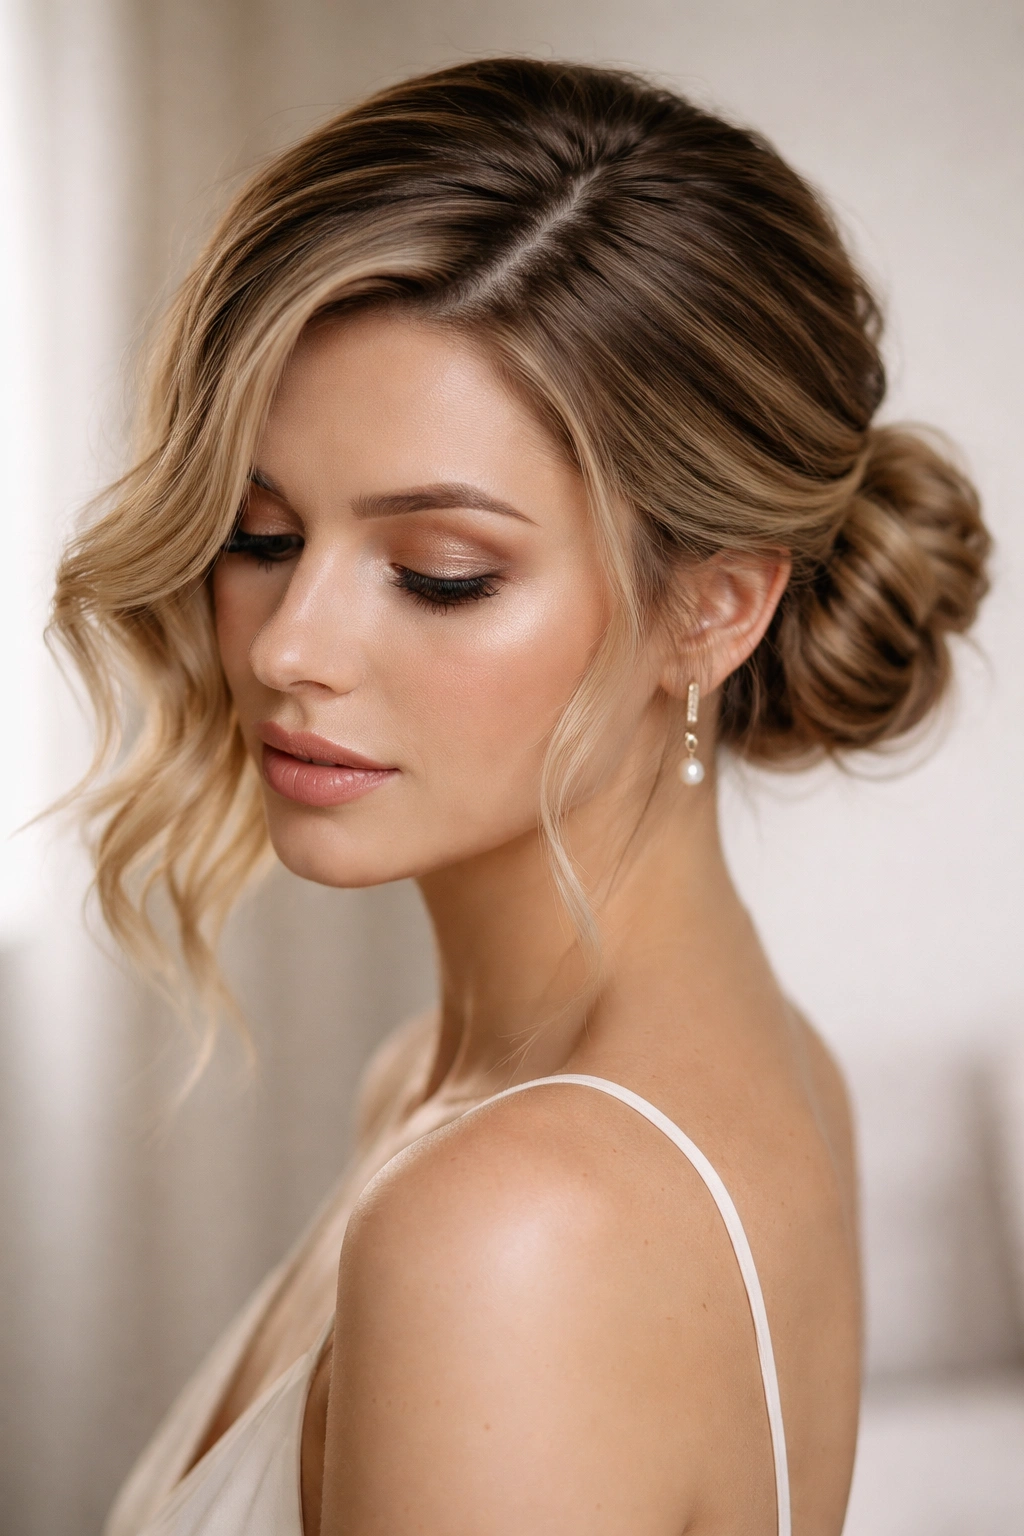
5. The Sleek Wrap Bun
When you want something more polished and put-together, a wrap bun delivers. Gather hair into a low ponytail, twist it loosely, and wrap it around the base of the ponytail into a bun. The waves give it natural texture even though the overall look is more refined.
Achieving the “Sleek” Part
Use a smoothing serum or lightweight styling cream to tame flyaways without weighing down your waves. Slick back baby hairs and edges with a fine-tooth comb and a tiny bit of edge control. The contrast between the smooth, gathered hair and the textured bun looks intentionally modern.
Longevity and Maintenance
- This style holds wonderfully all day with just three to four bobby pins
- If pieces start falling out, quickly smooth them back with your serum and re-pin
- This bun actually looks slightly better toward the end of the day when it’s relaxed—never try to make it more perfect as the day goes on
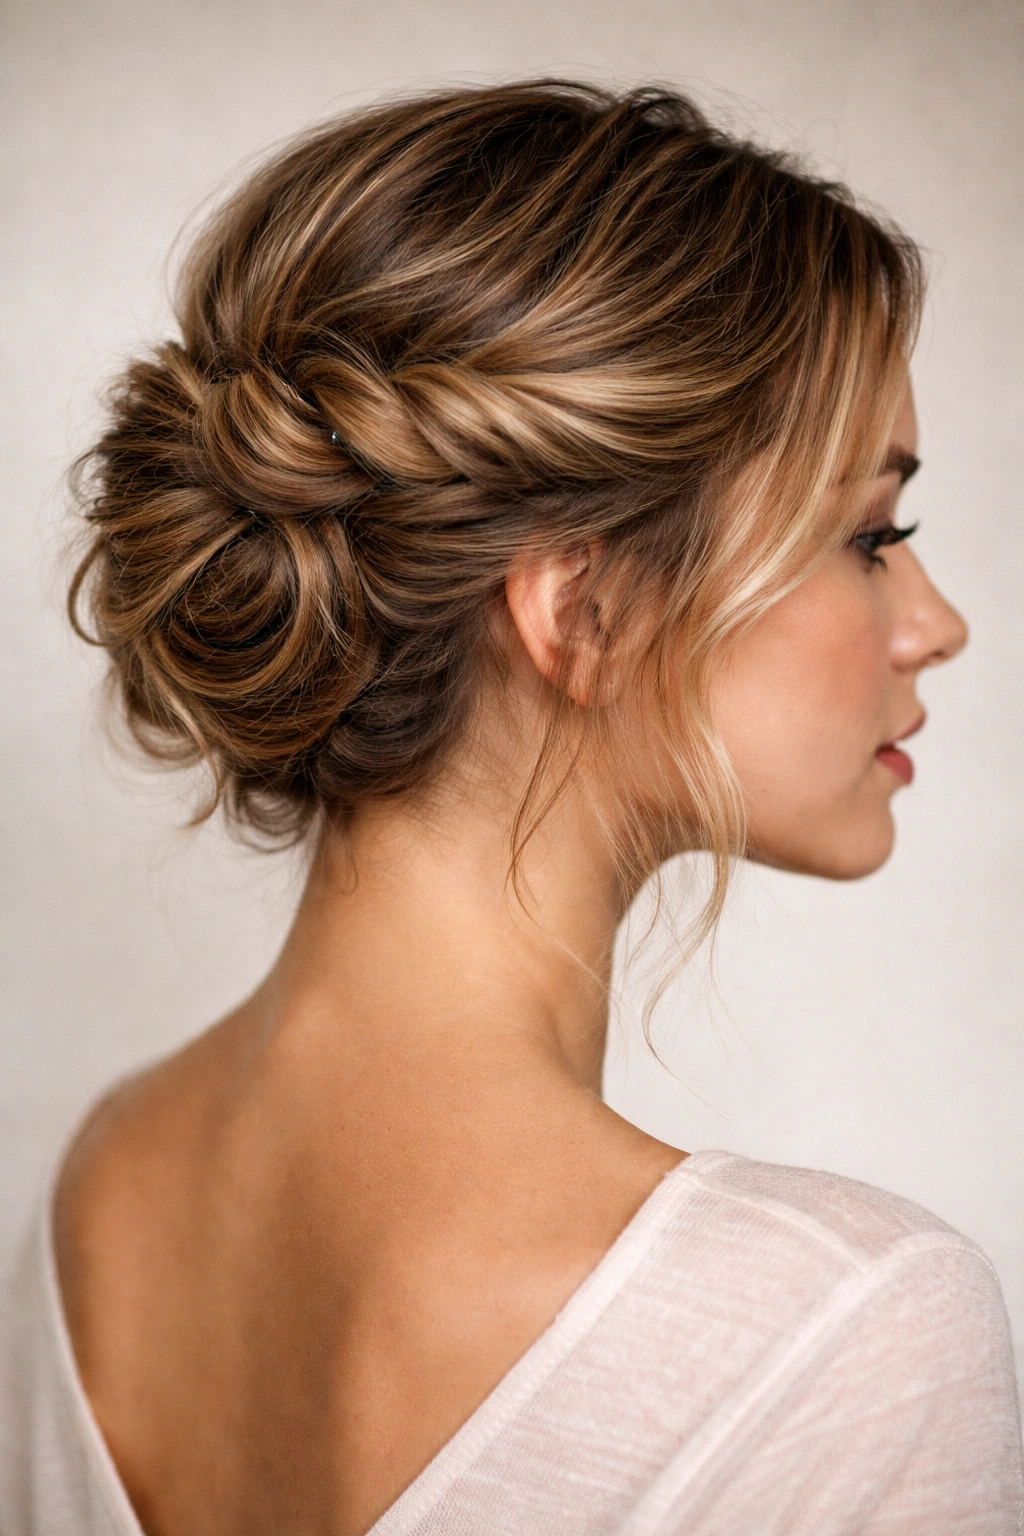
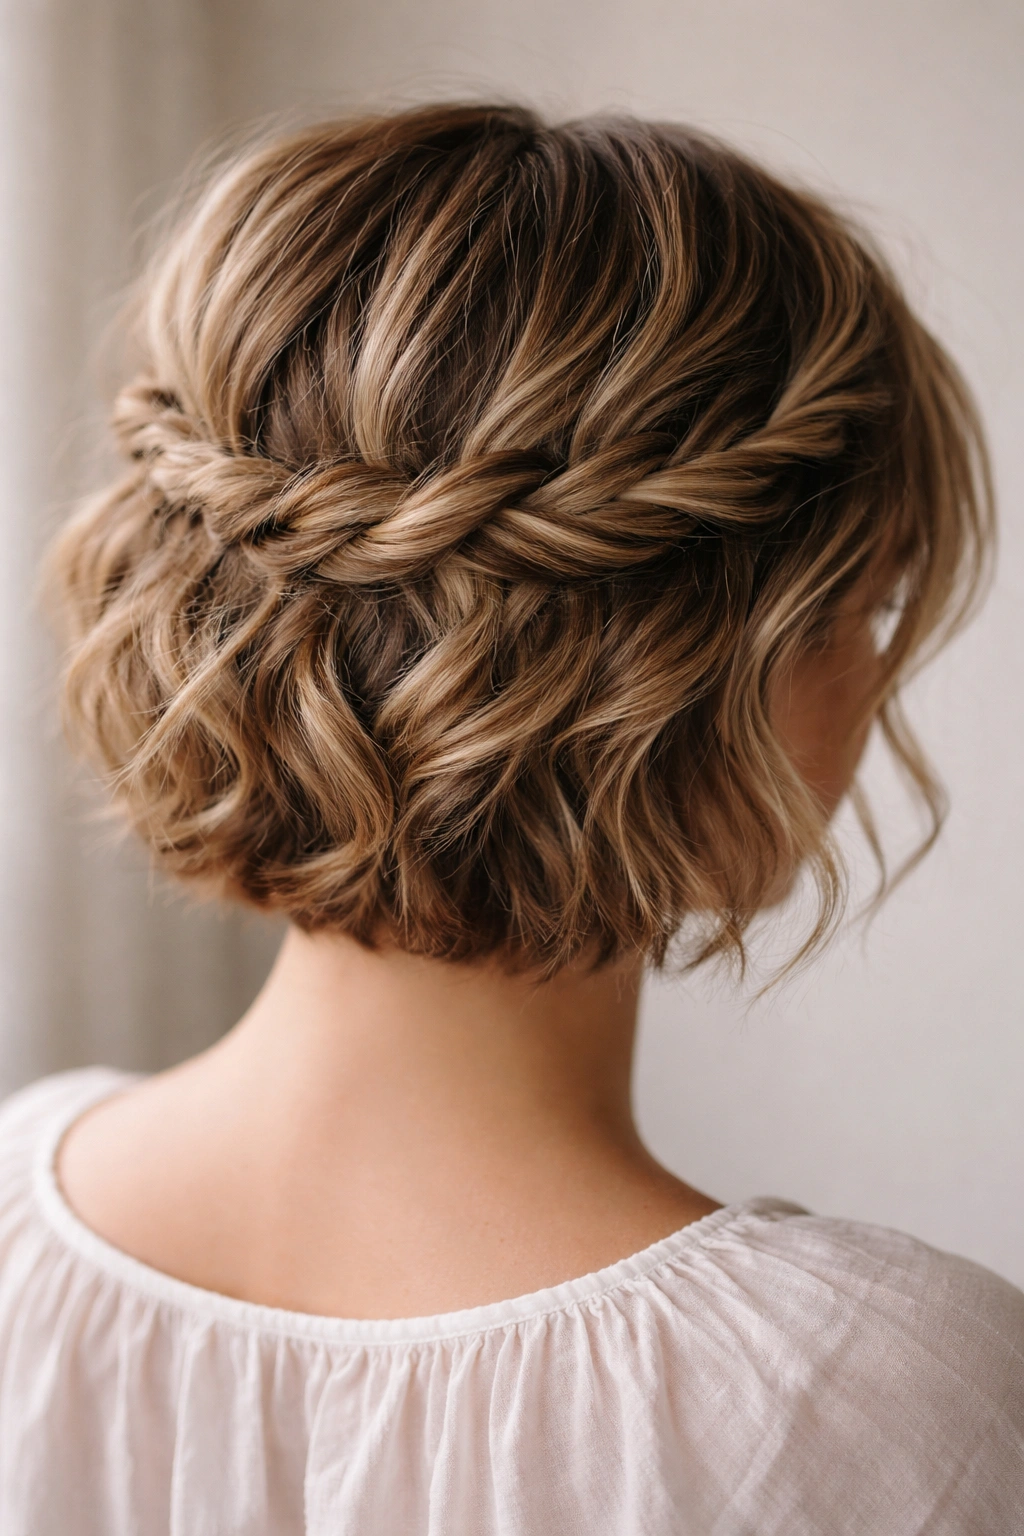
6. The Braided Updo Crown
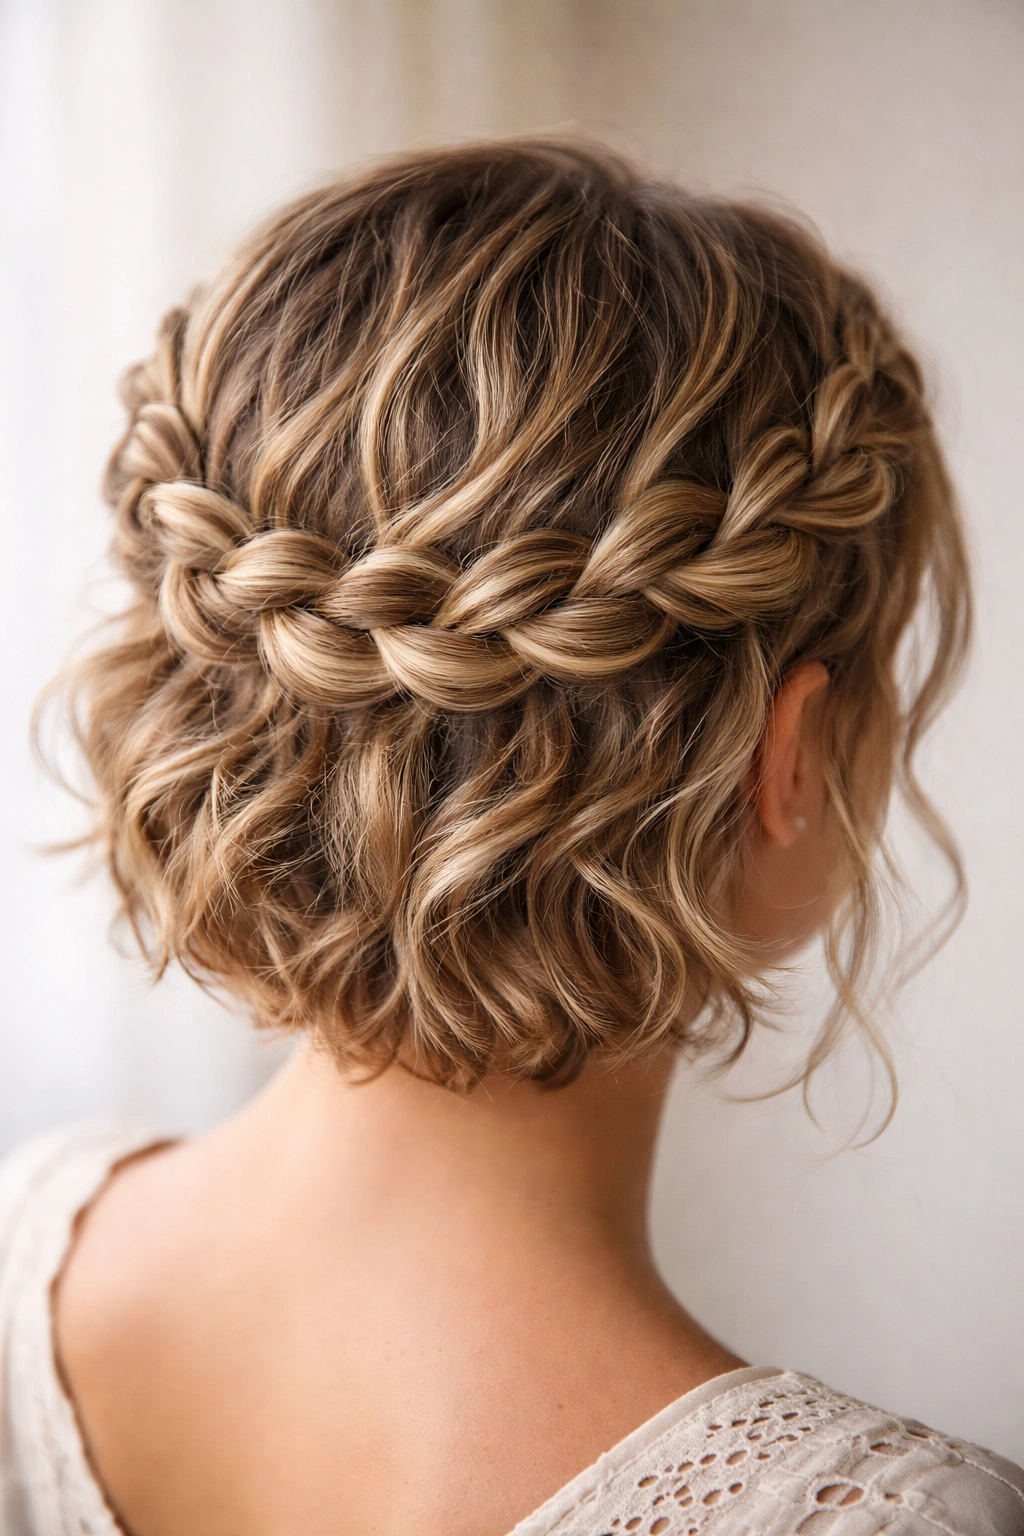
If you can braid, you can create this style. Take a loose, slightly tousled three-strand braid (or a more relaxed fishtail if you’re comfortable with it) and wrap it around the crown of your head like a halo, securing it with bobby pins.
Working with Wavy Hair Braids
Your waves actually make braids look fuller and more interesting than if you started with straight hair. Don’t brush the braid smooth after you create it—gently pull at the sides to loosen it and let it blend with your natural wave pattern.
Steps to Master This
- Create the braid on one side, starting near your temple and braiding toward the back of your head
- Once you’ve braided as far back as you can, wrap the remaining length around the back and secure it on the opposite side
- Gently tug at the braid all the way around to create a softer, fuller appearance
- Pin as needed with bobbies hidden under the braided section
7. The Textured Topknot

A topknot is typically a high, centered bun. On short wavy hair, the trick is embracing the texture rather than trying to smooth it into perfection. Flip your head, gather hair at the crown, and secure it into a slightly loose bun. When you flip back upright, you have instant volume and that coveted “I woke up like this” vibe.
Building Natural Texture
Use a texturizing spray before creating the bun—this gives grip and enhances your wave pattern. If your hair is freshly washed and slippery, blow-dry it with a diffuser or let it air dry partially so it has some texture to work with.
Styling for Maximum Impact
- Don’t make the bun perfectly round; let it be slightly asymmetrical and tousled
- Leave wispy pieces around your face and neck
- Use a clear elastic so the focus is on the texture, not the hair tie
- This topknot works especially well on days when your waves are particularly bouncy
8. The Deep Side Part Updo
Change your part, change your face—and your entire updo aesthetic. Take a deep, exaggerated side part (significantly off to one side, not a traditional center or side part). Gather the larger section into a low bun on that same side, leaving the smaller section down and framing your face dramatically.
Why This Works with Waves
Your waves naturally fill in around an asymmetrical bun and create more visual interest than a centered style would. The deep side part adds face-framing dimension, and the asymmetrical bun balances it perfectly.
Execution Tips
- The deeper the part, the more dramatic the effect
- Secure the bun low enough that it sits against the back of your head, not perched at your crown
- Smooth the part with a fine-tooth comb and a drop of serum for definition
- This style is surprisingly easy to do and looks way more complex than it actually is
9. The Claw Clip Bun
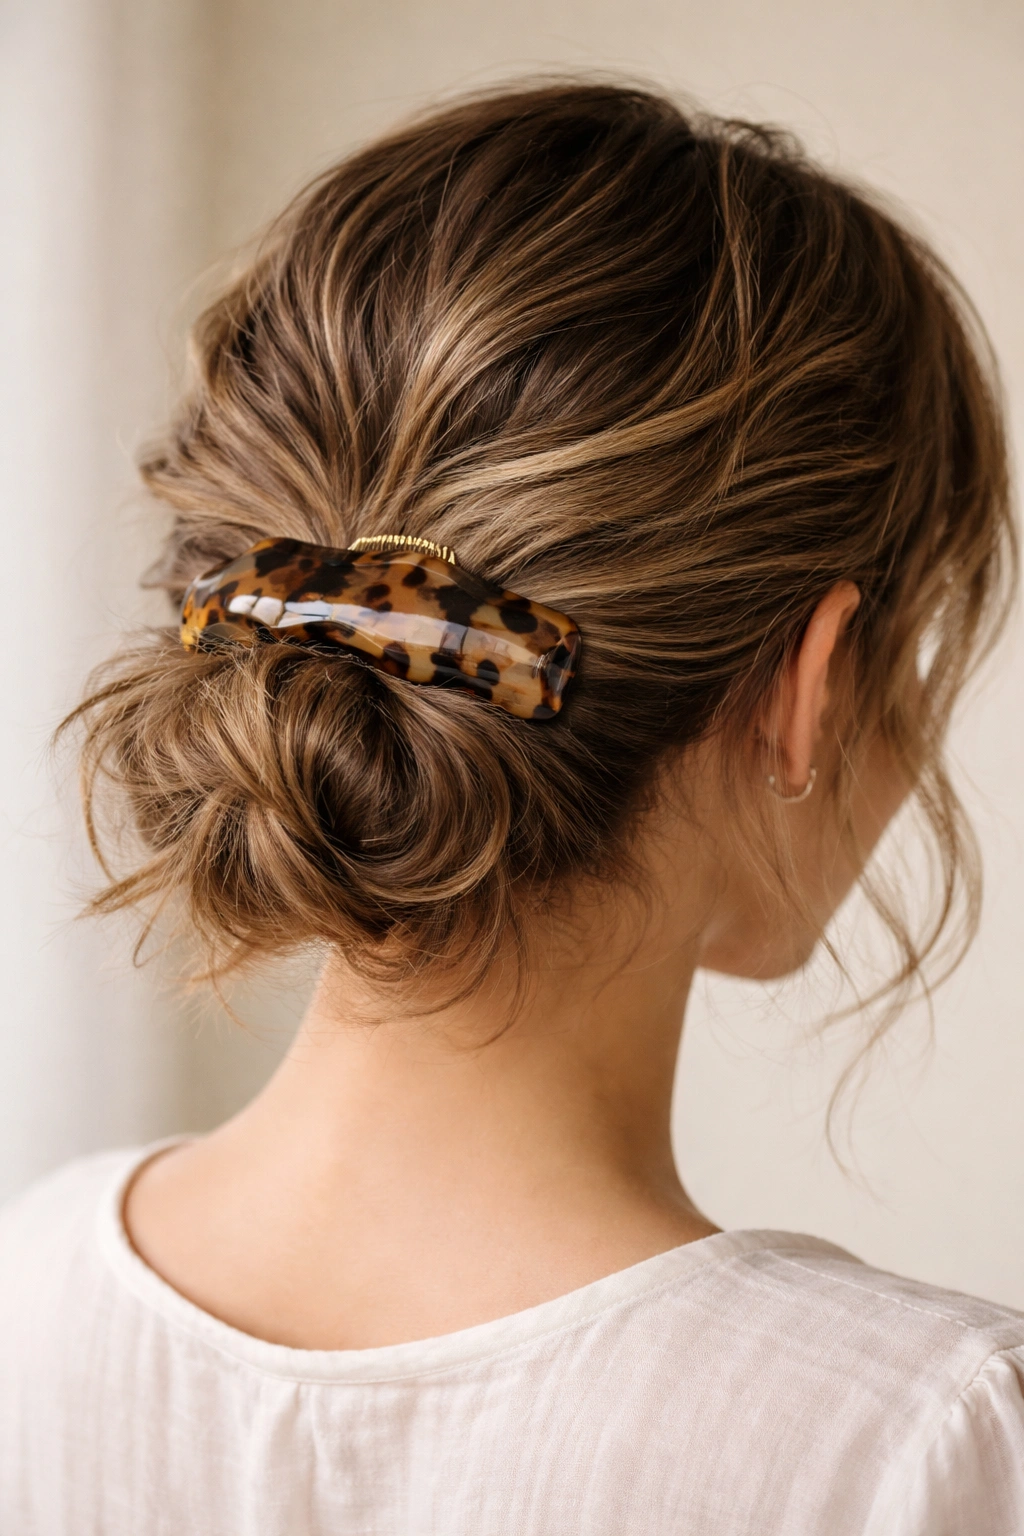
A claw clip isn’t just for securing ponytails—it can hold an entire short bun and actually look intentionally fashionable. Create a low ponytail or gather hair loosely, then twist or scrunch it and secure it with a claw clip positioned horizontally at the base.
Choosing the Right Clip
A tortoiseshell or neutral-colored claw works with any hair color and any outfit. The clip itself becomes a design element, so choose one that complements your style. Medium and large clips work better for short hair than tiny clips.
Making It Look Intentional
- Don’t make the bun too tight or perfect; the claw clip aesthetic works with slightly messy texture
- Leave pieces out intentionally—this style celebrates the slightly undone vibe
- Crinkled texture, waves, and a claw clip create a cohesive look that feels current and effortless
- The clip holds surprisingly well and removes easily without creating dent lines in your hair
10. The Pinned Waves Updo
Instead of gathering hair into a traditional updo, pin your waves directly against the back of your head, using bobby pins to secure them in place. This creates a cascading, half-up-half-down hybrid that showcases your wave pattern while keeping hair off your neck.
The Technique
Work with your hair in its natural wavy state. Starting from one side, gently curve a section of waves back toward the center back and pin it. Repeat from the other side, overlapping the pins to create a secure, sculpted look. It sounds complicated but feels incredibly natural once you try it.
Why This Suits Short Hair
Short waves are the perfect length for this—they don’t have enough length to fall completely down but have enough texture to pin and shape. The finished look is romantic and intentional without feeling overdone.
Securing Without Damage
- Use bobby pins with flat ends rather than crimped ones—they grip better on wavy texture
- Pin horizontally rather than vertically for maximum hold
- Use at least four to five pins to distribute the weight
11. The Threaded Low Bun
This technique is nearly invisible but creates a beautifully sculpted, secure bun. Create a low ponytail, then thread a bobby pin through the elastic and into the ponytail itself before twisting the hair around the pin and the elastic. It’s a hack that makes short hair buns look polished and held tight without visible pins.
Why the Threading Method Works
Instead of securing the bun with multiple pins scattered around it, you’re anchoring it from the base. This method distributes weight evenly and prevents the bun from slipping or loosening throughout the day—critical for short hair, which doesn’t have much weight to hold things in place.
Step-by-Step Execution
- Create a low ponytail and secure with an elastic
- Open a bobby pin and thread it through the elastic, creating a V-shape
- Twist your ponytail loosely around the pin and elastic
- Pin the ends of the bobby pin into the bun, creating a secure base
- This method typically requires just two bobby pins total, versus four or five with traditional methods
12. The Twisted Half-Up Knot

A half-up style that’s just a tiny bit more intentional than a basic half-up. Take the top section of hair, twist it loosely, and tie it into a small, loose knot right at the crown. This sits somewhere between a bow and a bun and works beautifully on shorter lengths.
Creating the Right Look
Avoid making the knot too tight—it should look soft and slightly undone, even if it’s actually quite secure. The twist leading up to the knot should be visible, not hidden.
Material and Styling Details
- Use a small fabric or velvet elastic in a matching color for a luxe feel
- Leave face-framing pieces out on both sides for softness
- This knot shows off your waves in the back while the twist adds sophistication at the crown
- Works great for casual office settings or weekend outings
13. The Rolled Crown Updo
Start with a deep side part and roll a section of hair from one side across the back of your head toward the opposite side, securing it as you go with bobby pins. This creates a sculpted crown effect that’s vintage-inspired but works beautifully with modern, wavy texture.
The Rolling Technique
Instead of twisting, you’re rolling the hair like you’re creating a curl. Keep it loose and let your natural waves blend in. The goal is a soft, voluminous crown, not a sleek, tight roll.
Pinning for Security and Aesthetics
- Use bobby pins that match your hair color and pin them in a horizontal line along the rolled section
- Cover pins with the rolled hair—they should be mostly hidden
- Gently pull at the rolled section to loosen it and create texture
- This style looks best when it’s slightly disheveled, so don’t over-perfect it
14. The Double Bun
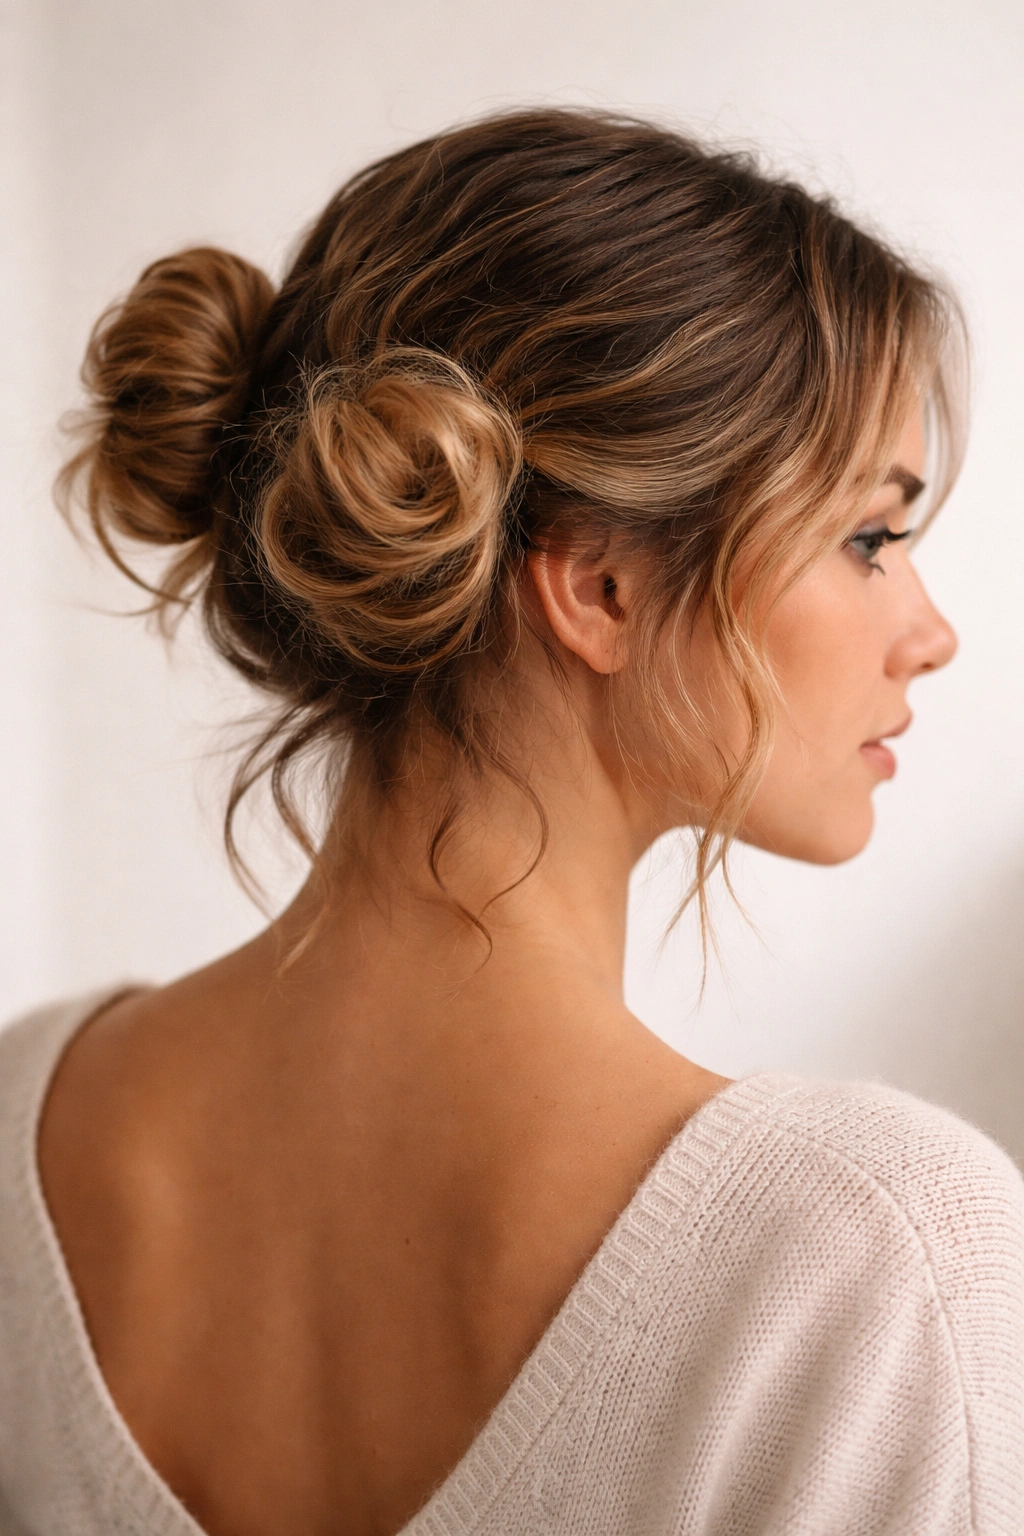
Fun, youthful, and surprisingly sophisticated when done right, double buns on short wavy hair create height and movement. Create two buns—one at each side of your head at roughly ear level—keeping them slightly loose and tousled.
Balancing the Proportions
On short hair, keep the buns relatively small so they don’t overwhelm your face. The buns shouldn’t be at the very back of your head but slightly off to the sides, creating a balanced, symmetrical look.
Achieving the Right Vibe
- Use fabric or velvet elastics in a matching color for a softer appearance
- Leave a small section of hair loose down the center back for visual interest
- This style is casual enough for everyday wear but can also work for more playful events
- The waves naturally create dimension and keep the style from looking too juvenile
15. The Velvet Scrunchie Ponytail Bun
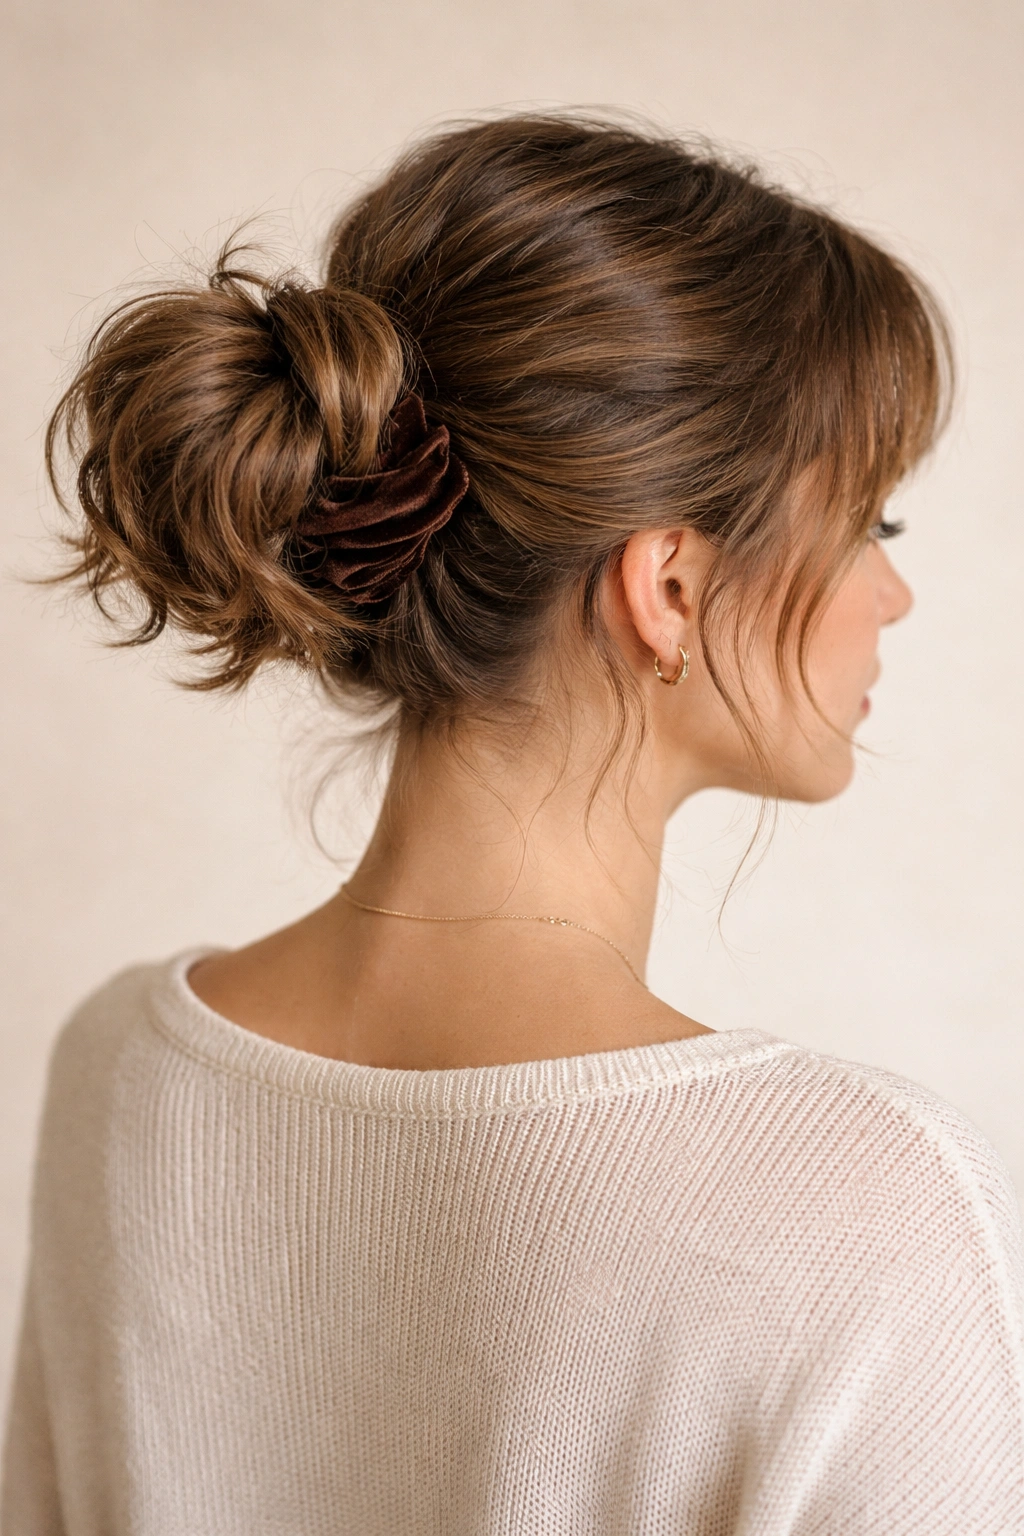
A velvet scrunchie changes everything. Gather hair into a mid-height ponytail, secure it with a velvet scrunchie in a complementary color, then twist the ponytail loosely and wrap it around the base of the scrunchie, securing the ends with a bobby pin. The scrunchie becomes a design feature.
Color Coordination Tips
Match the scrunchie to your outfit or choose a jewel tone that complements your hair color. A burgundy or emerald velvet scrunchie can elevate a casual style instantly.
Creating Dimension
- Before tying the ponytail, tease slightly at the roots for lift
- Don’t make the bun too compact; let it be slightly loose and airy
- The velvet scrunchie should sit visible at the base of the bun, not hidden
- This combination looks intentional and fashion-forward while being incredibly easy to execute
16. The Tucked Twist Updo
One of the easiest and most forgiving updos for short wavy hair: take a section from one side, twist it loosely, and tuck the twist into the hair at the back of your head, securing it with a bobby pin or two. It’s minimalist, modern, and works on hair of any waviness level.
The Simplicity is the Strength
Because you’re not creating a full bun or braiding anything complex, this style relies entirely on texture and shape. Your waves do most of the work, and any slight messiness actually enhances the look.
Making It Work for You
- Use a lightweight texture spray before twisting for grip without crunch
- Don’t twist too tightly—loose, relaxed twists work better with waves
- You’re essentially tucking one piece of hair into the body of the hair below it, using the natural wave pattern to help hold it
- Takes less than five minutes once you know the technique, and it holds all day
Final Thoughts
Short wavy hair is genuinely easier to style into updos than you might think. The texture is actually your biggest asset—it provides grip, creates natural volume, and makes even simple styles look intentional and polished. These sixteen updos range from five-minute minimal styles to slightly more involved options for days when you want to feel extra put-together.
The secret to mastering any of these is practice and embracing imperfection. The best updos on short wavy hair look slightly undone, slightly tousled, and like you didn’t spend an hour perfecting them—even if you actually did. Stop fighting your waves and start using them as your secret styling weapon. You’ll find yourself creating new variations once you understand the basic techniques, and you’ll probably discover that your short wavy hair is way more versatile than you ever realized.