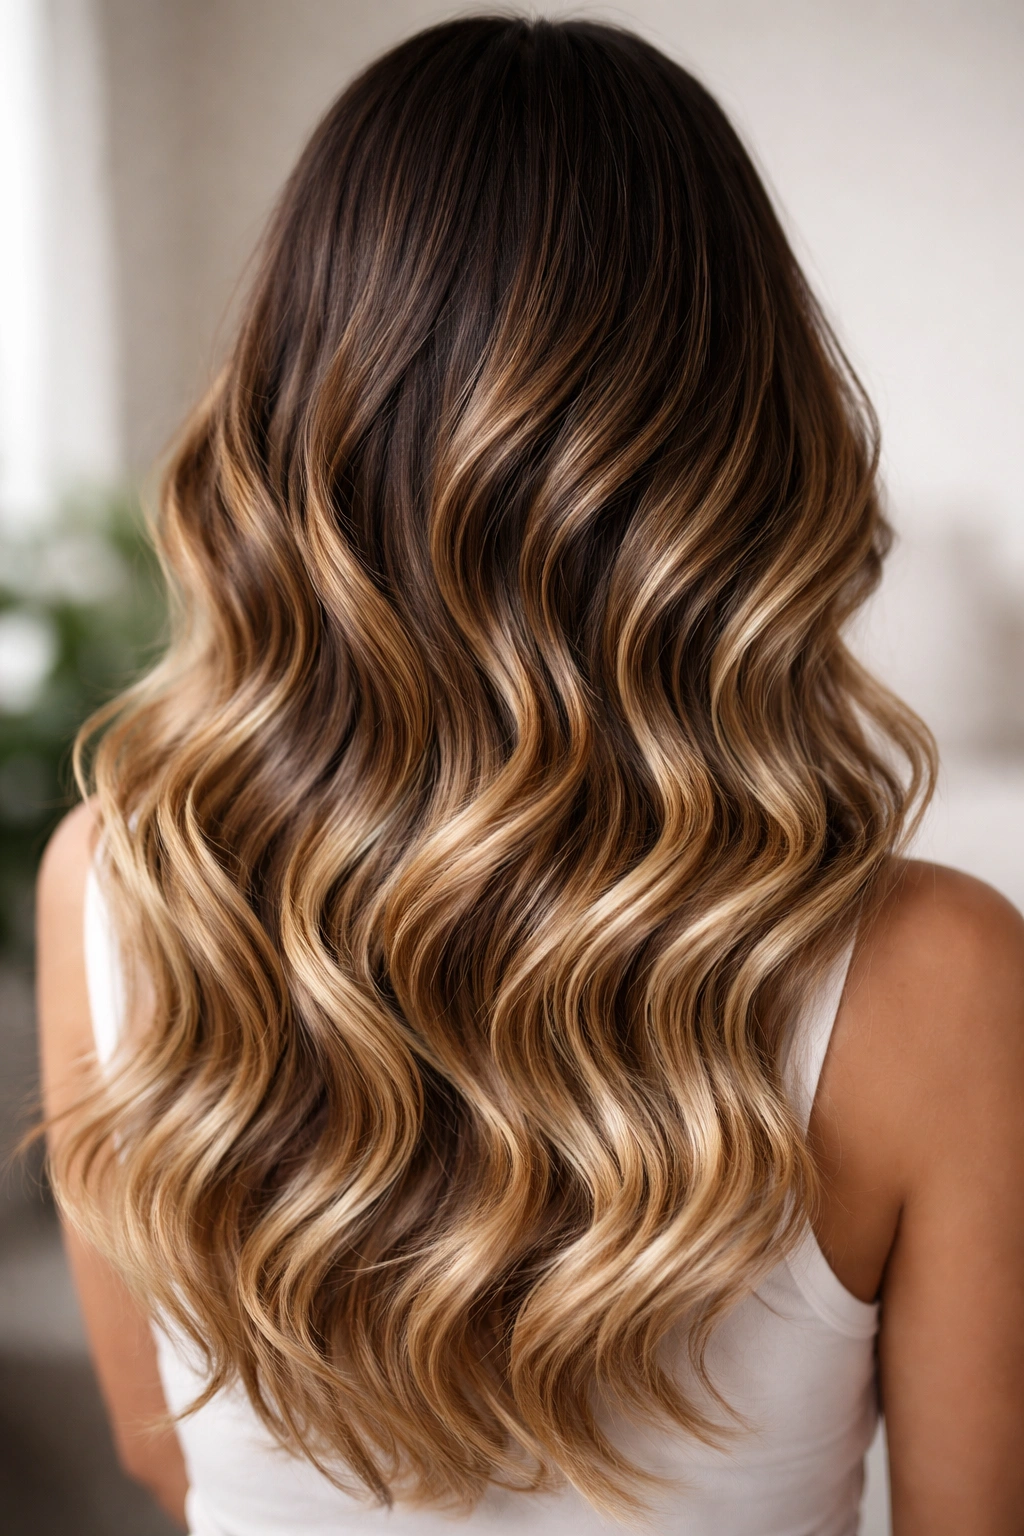
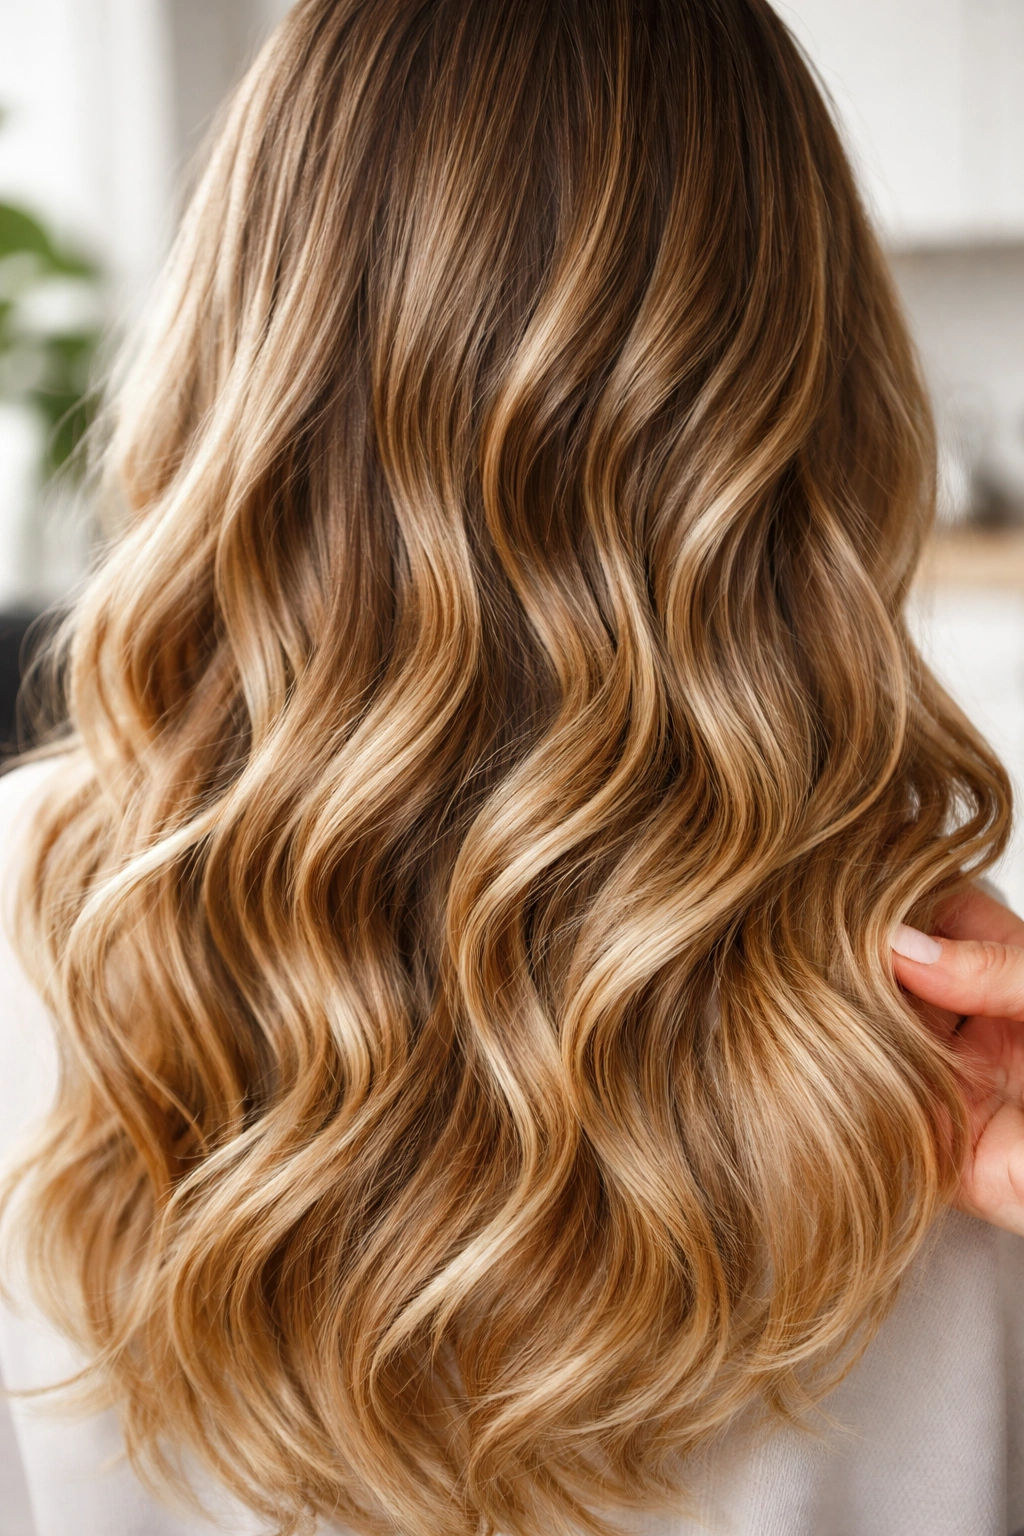
Ombre coloring and wavy hair are a match made in heaven. When you combine the dimensional depth of ombre with the movement and texture of waves, you get something genuinely eye-catching—the kind of hairstyle that works whether you’re heading to casual brunch or a night out. The beautiful thing about this combination is how versatile it is. You can go subtle with just a hint of color shift, or bold with dramatic contrast. You can work with your natural wave pattern or enhance it. The ombre adds visual interest that makes even simple waves feel intentional and styled.
What makes wavy ombre styles so popular is that they’re forgiving in ways that stick-straight hair isn’t. Waves naturally break up the color transition, making any ombre look more blended and less stark. Plus, if your styling isn’t perfect one day, the texture actually works in your favor—a slightly messy wave with ombre just looks effortlessly chic rather than undone.
The key to nailing a wavy ombre hairstyle is understanding how the color placement interacts with your wave pattern. Where the lighter shade begins, how it blends into the darker roots, and how the waves catch and reflect that color shift—these details matter. With the right cut and the right color strategy, a wavy ombre can add years of dimension to your look and make styling feel less like a chore and more like creating something beautiful.
Understanding Ombre on Wavy Hair
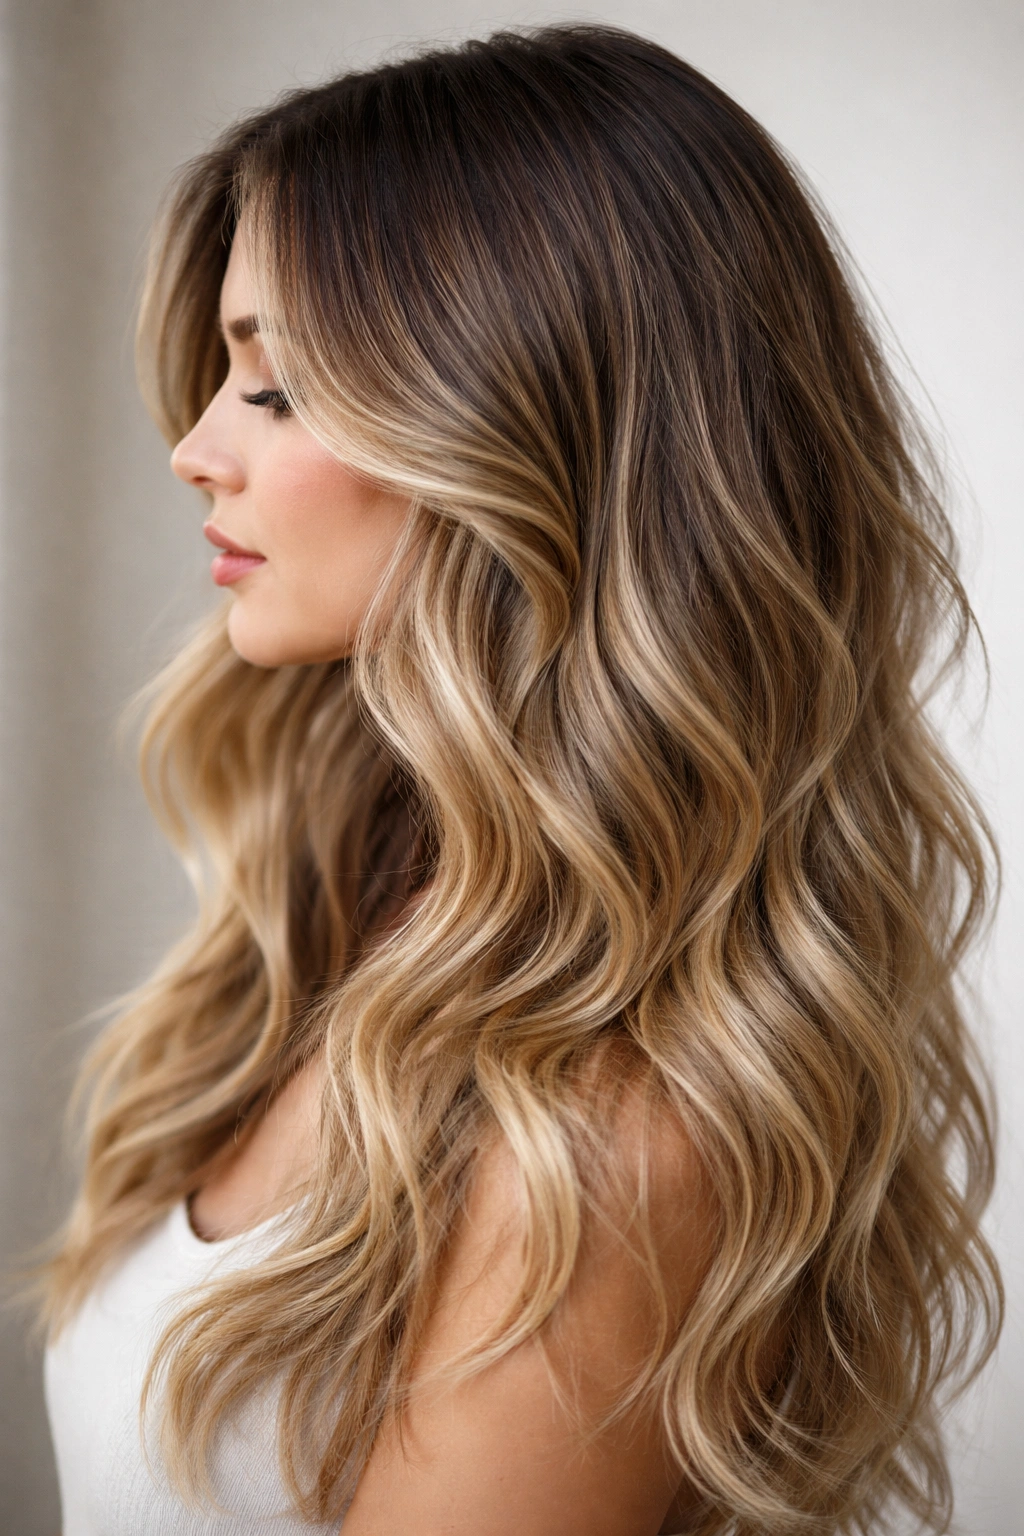
Ombre is fundamentally about a color gradient—darker at the roots and gradually lightening as you move toward the ends. On wavy hair, this gradient becomes three-dimensional. The waves create natural shadows and highlights that interact with the color shift, making the ombre appear richer and more complex than it might on straight hair.
The way the light hits wavy sections changes constantly depending on the angle. That’s why ombre looks so dimensional on waves—the color transition isn’t flat and one-directional. Instead, lighter ends catch light differently in different curls, creating depth that keeps people looking. Your natural root color becomes an asset rather than something you’re fighting against.
One crucial thing to understand: ombre works best when there’s intentional contrast between your roots and your ends, but that contrast doesn’t have to be dramatic. Some of the most sophisticated wavy ombre styles use subtle shifts—like going from dark brunette to a warm medium brown, or from black to deep chocolate. These quieter transitions often feel more wearable and age-appropriate than stark root-to-blonde ombre, though bold choices work beautifully too depending on your skin tone and personal style.
How to Maintain Wavy Ombre Color
Maintaining an ombre is different from maintaining a single-process color because you’re managing a gradient. The most common mistake people make is focusing all their color maintenance on the ends, when actually the blend zone is what needs the most attention. As that gradient grows out, it can start to look patchy or muddy rather than intentional.
The best approach is to get a color refresh every six to eight weeks, but instead of doing a full ombre again, your colorist should do a partial touch-up that extends and refreshes the blend. This keeps the gradient looking intentional while managing the maintenance load. Between appointments, use sulfate-free shampoo and purple or blue-toning conditioner if your ombre includes lighter tones—these products keep those lighter sections from going brassy or yellow.
For your waves, a leave-in conditioner is non-negotiable. Ombre-colored hair, especially lightened ends, tends to be drier. Feed it with hydrating products between washes, use a heat protectant before styling, and try to air-dry when you can to minimize heat damage. The more you can support the health of your hair, the better the color will look—dull, damaged hair makes even beautiful ombre look less intentional.
Choosing the Right Shade Combination for Your Skin Tone
Your skin tone absolutely influences which ombre shades will look best on you. This isn’t about rules that can’t be broken, but about what creates the most flattering frame around your face.
If you have warm or golden undertones, ombre combinations with caramel, honey, copper, or warm blonde work beautifully. Think dark chocolate fading to caramel, or warm brunette melting into golden blonde. These create a harmonious warmth that complements your natural coloring.
Cool undertones shine with ash blonde, platinum, cool brunette, or even silver undertones in the lighter sections. A cool brunette fading to ash blonde, or black melting into silver-toned blonde, creates striking contrast without clashing with your complexion.
Neutral undertones get to play with everything. You can lean into warm tones or cool tones depending on what you’re drawn to and what you want to emphasize. The beauty of having neutral undertones is the flexibility.
The Right Cut for Wavy Ombre Styles
Your cut matters as much as your color. A blunt, choppy cut with lots of layers makes ombre read differently than a long, flowing cut with subtle layering. There’s no single “right” cut—it depends on what effect you want and how you’re going to style your waves.
Choppy, textured cuts with plenty of layers make ombre look edgy and intentional. The layers interrupt the color gradient, creating multiple points where the lighter color shows through, which adds movement and visual interest. This cut works great if you like a more deliberately styled look or if you have naturally textured hair that loves layers.
Long, subtly layered cuts let the ombre shine as a smooth gradient from root to end. The waves frame the color shift gradually, creating an almost watercolor effect. This approach feels more elegant and romantic, less rock-and-roll.
Medium-length cuts hit a sweet spot where you get enough movement to show off the waves, but the color transition is visible without feeling choppy. A textured, razored cut works beautifully here—it gives you dimension in the cut and dimension in the color, which layers beautifully.
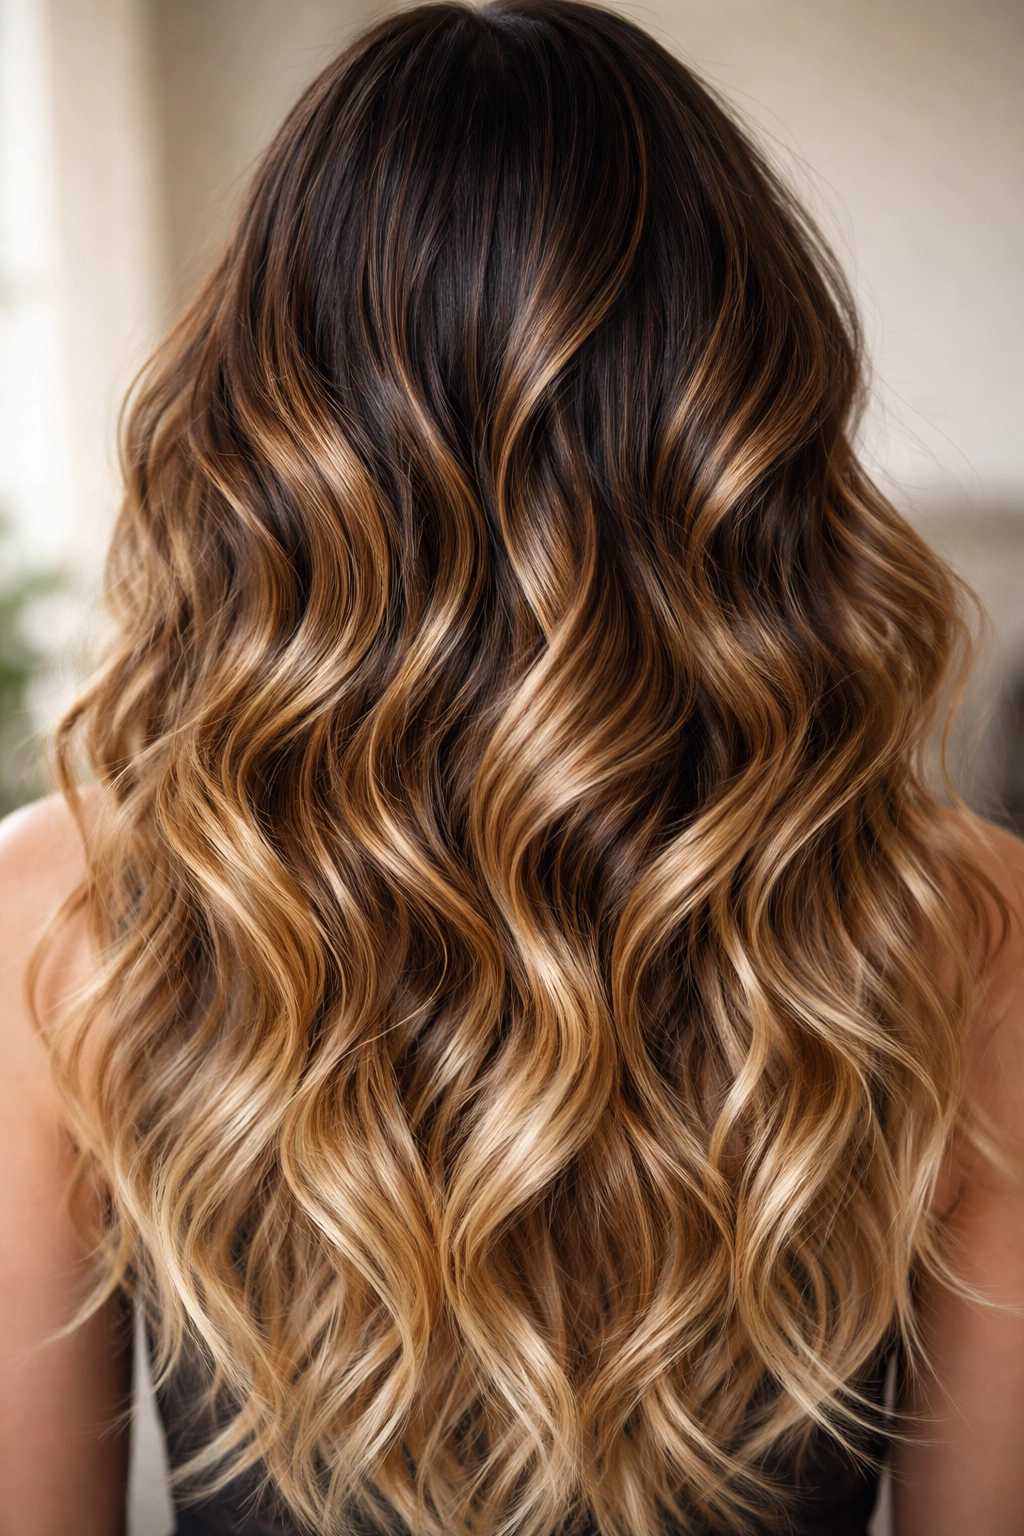
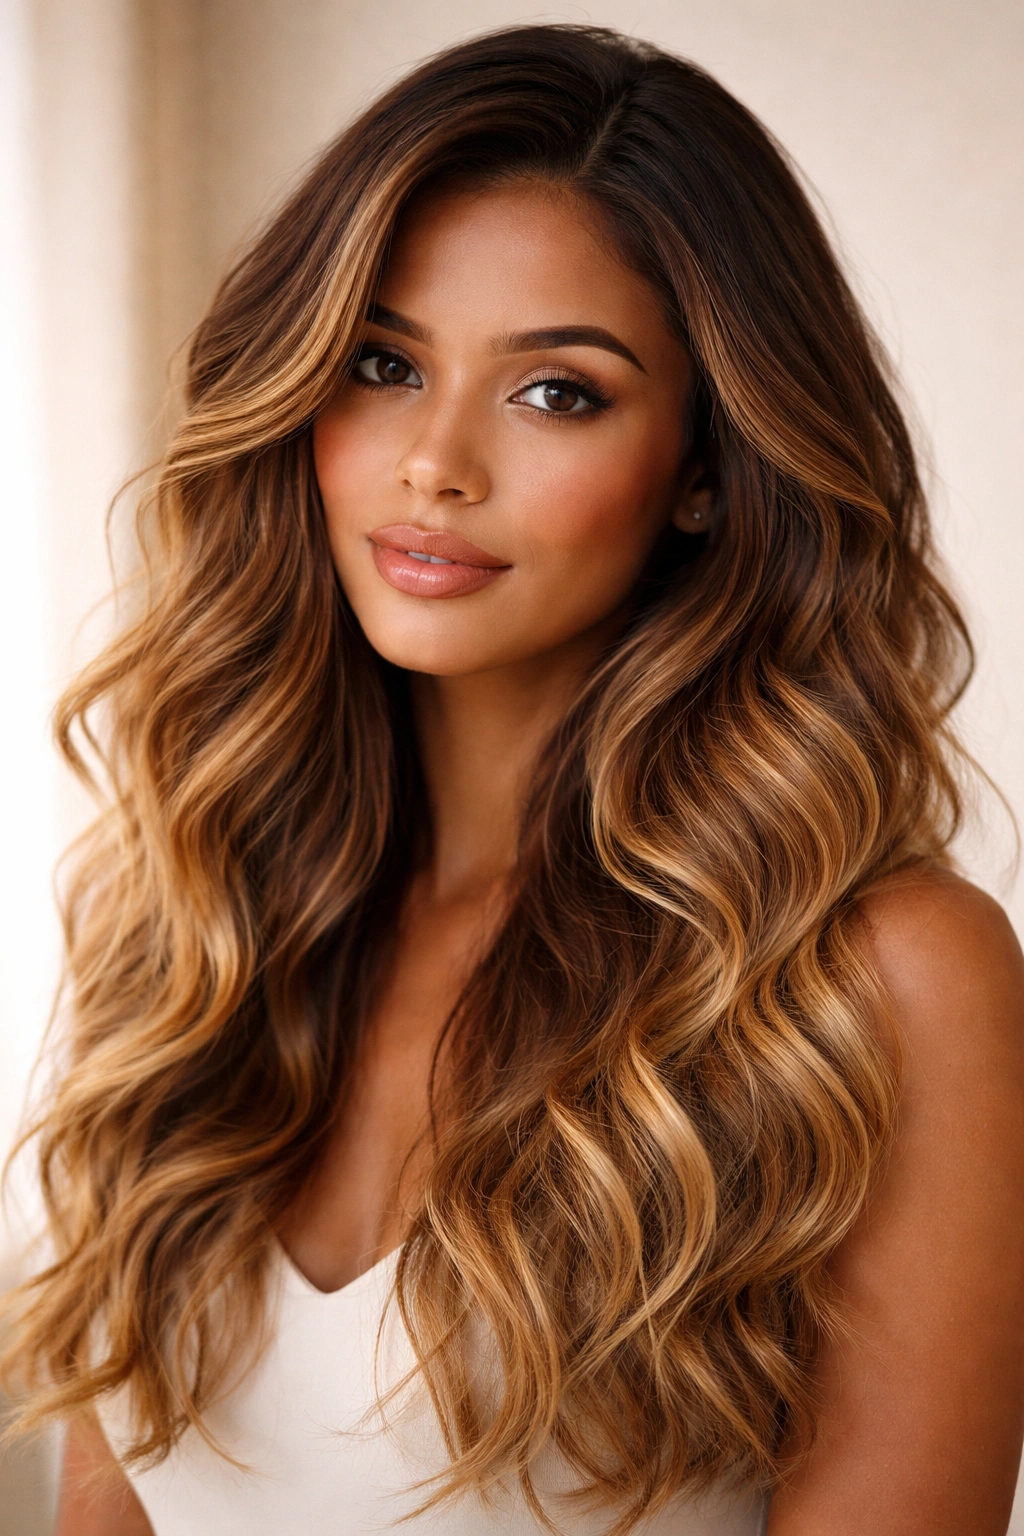
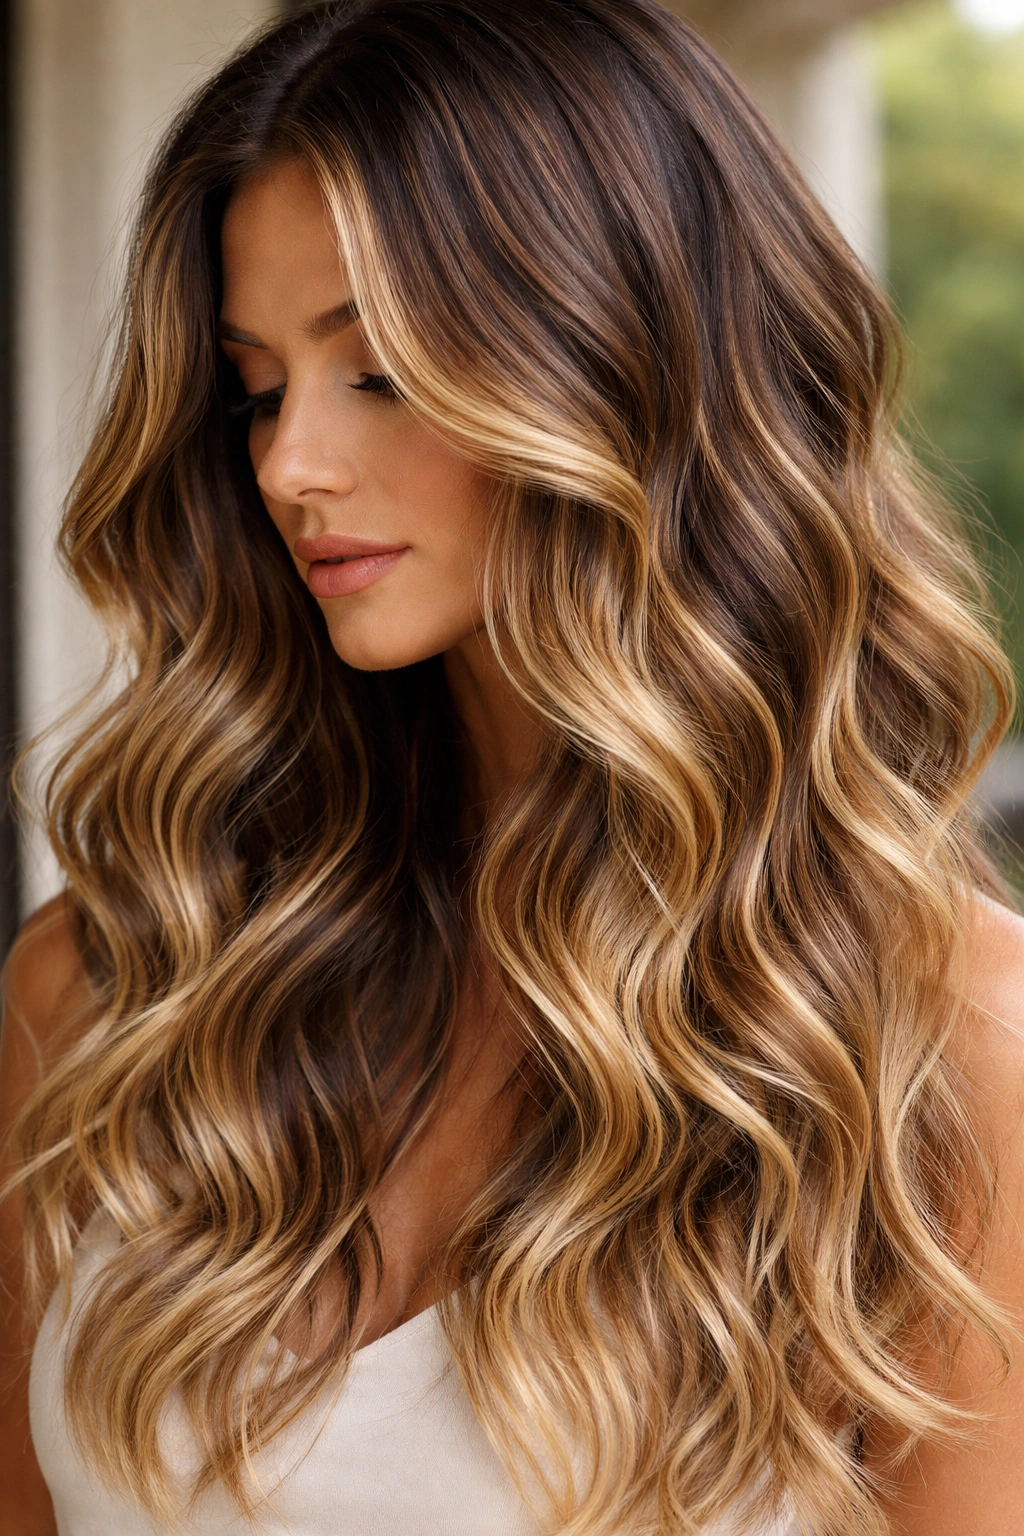
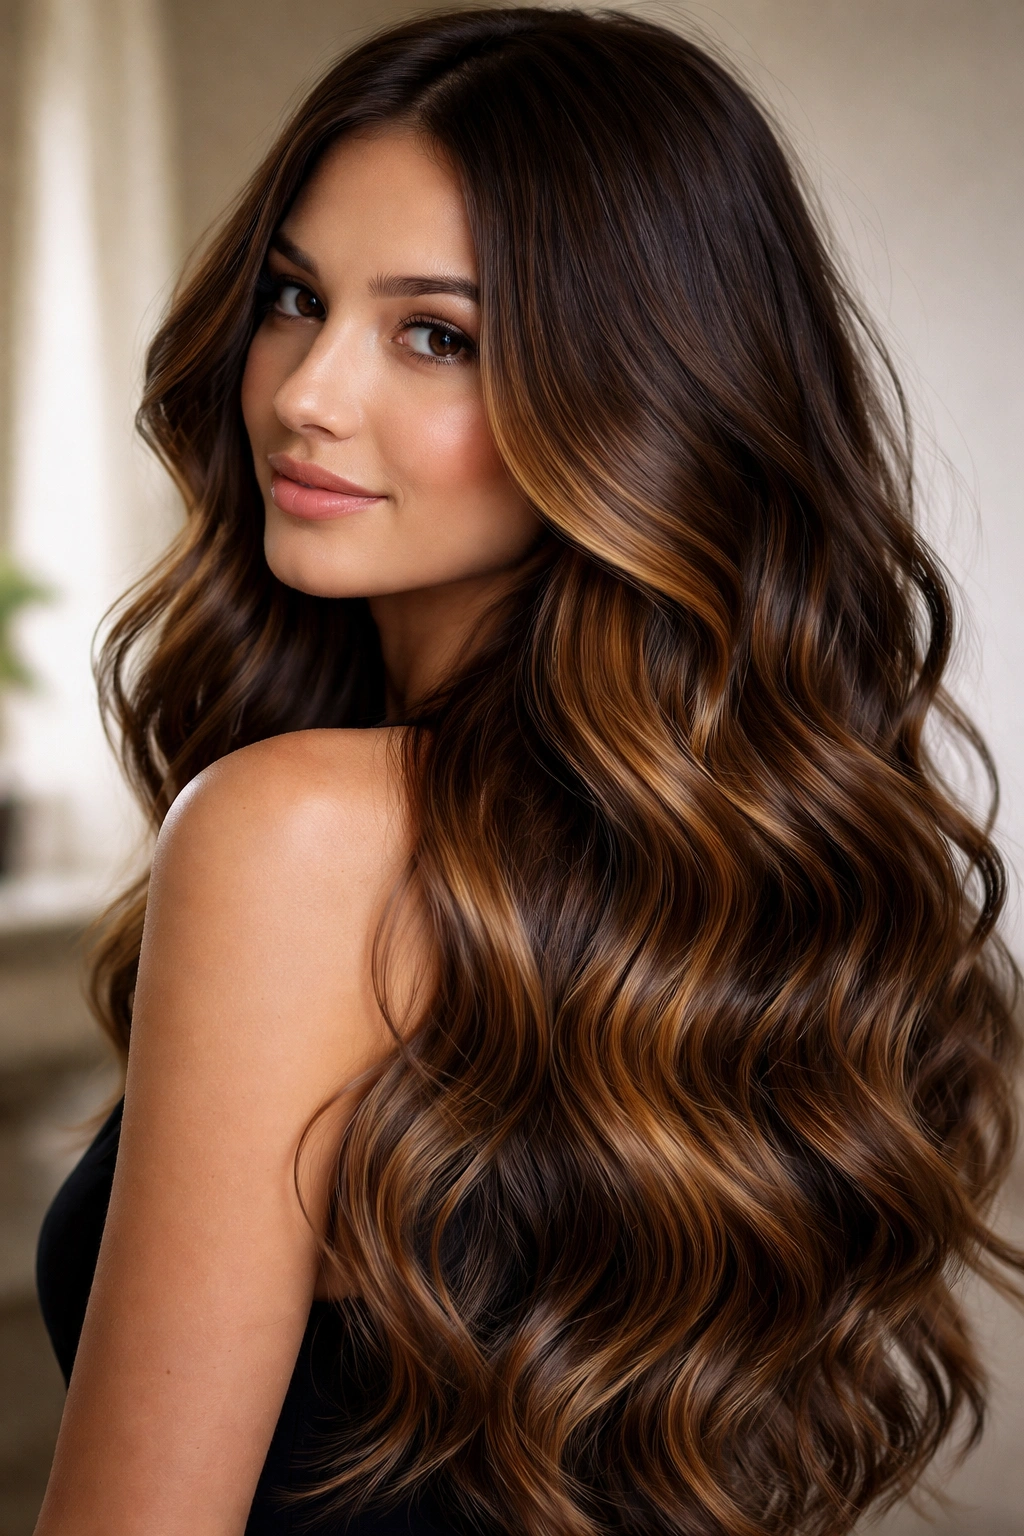
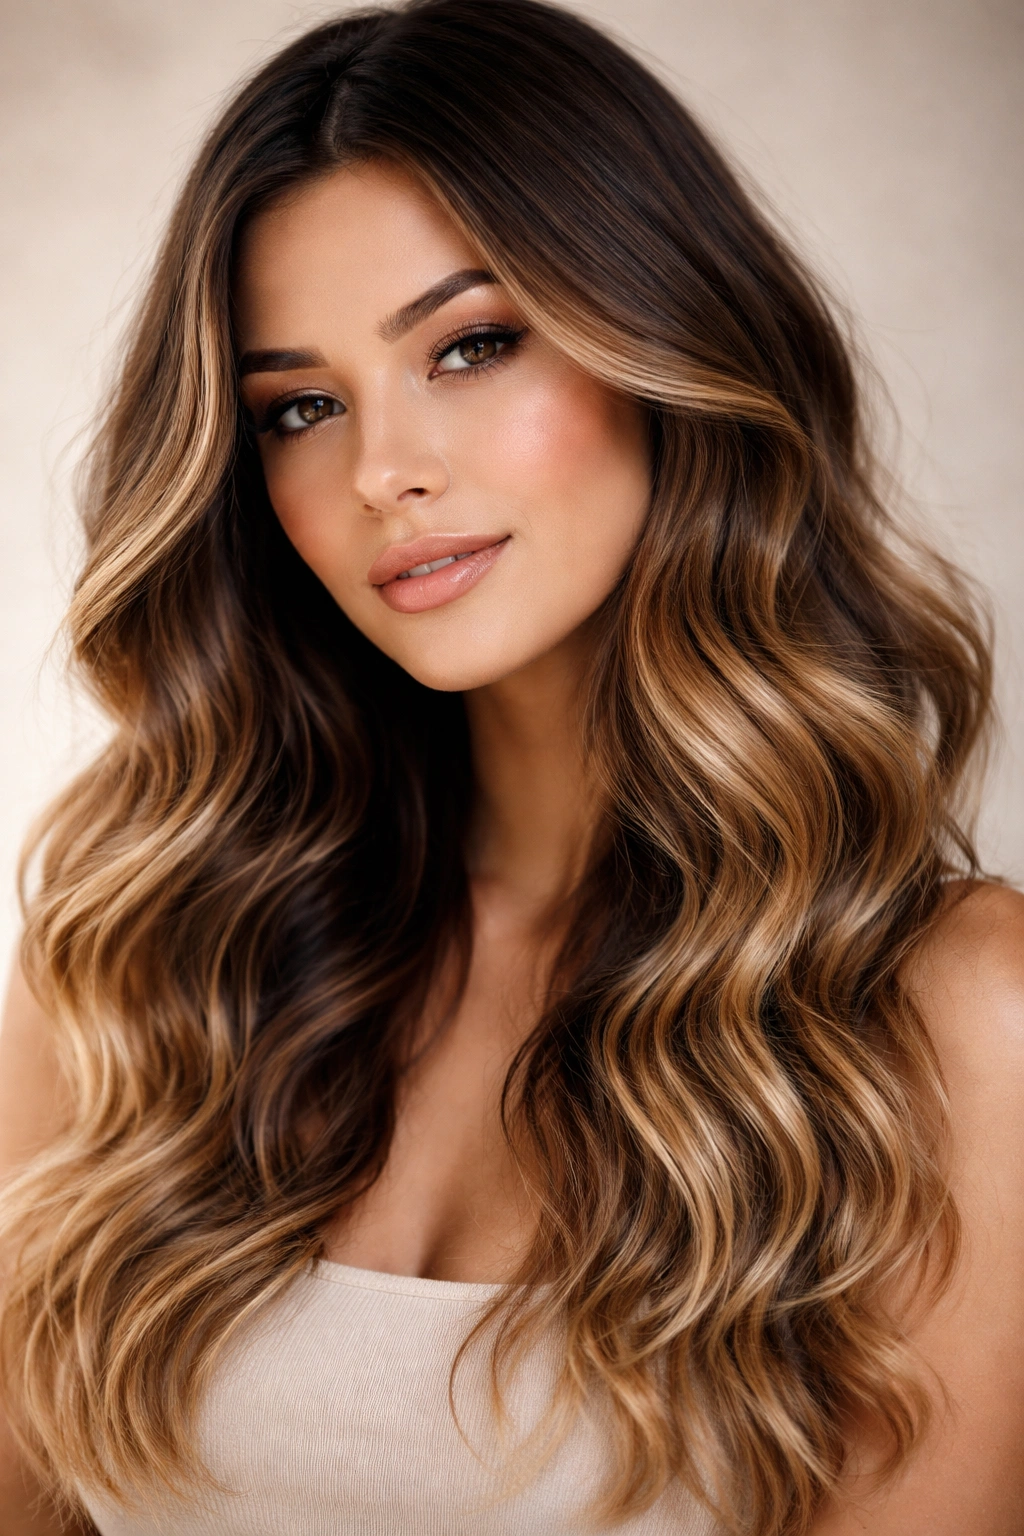
1. Beachy Brunette to Blonde Waves
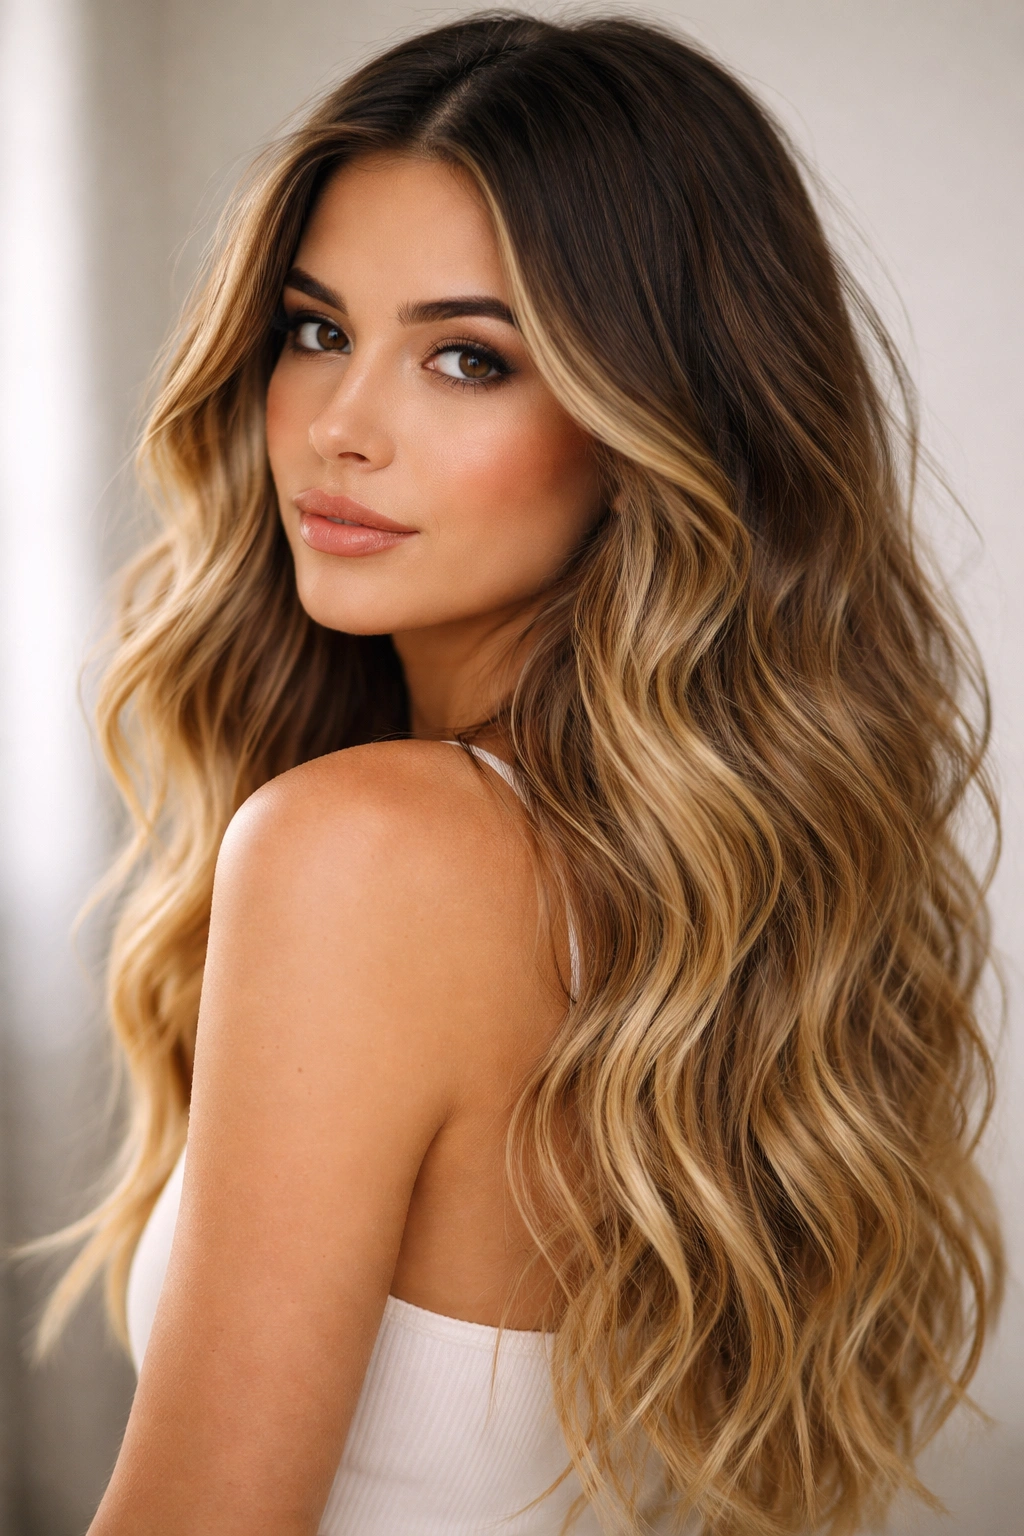
This is the quintessential wavy ombre style—dark brunette roots melting into honey blonde ends with plenty of dimension in between. The appeal is that it looks naturally sun-kissed, like you’ve been spending time at the beach, even when you’re living nowhere near the ocean.
Why This Style Works
Brunette-to-blonde ombre flatters almost every skin tone when you choose the right shades of each. The brunette base is sophisticated and keeps the style from feeling too light or washed out, while the blonde brings brightness to your face. The dimensional blend in between means there’s always a color working for your features—darker where it’s needed, lighter where it brings light to your complexion. Plus, this color combination is one of the most forgiving for grow-out. As your roots start to show, you’re literally growing into the intended color gradient.
Styling for Maximum Impact
- Enhance your waves with a sea salt spray or texturizing product before heat styling
- Use a 1.25-inch curling iron or wand to create loose, intentional waves throughout
- Work in sections and alternate the direction you curl to avoid uniformity
- Rough-dry your hair for more volume and texture, or air-dry for a softer, more natural wave
- Let longer sections dry under their own weight for a straighter appearance at the tips
Pro tip: This style photographs beautifully in natural light. The honey tones in the blonde really come alive when sunlight hits them, so if you’re planning photos, outdoor light is your friend.
2. Black Roots With Platinum Blonde Ends
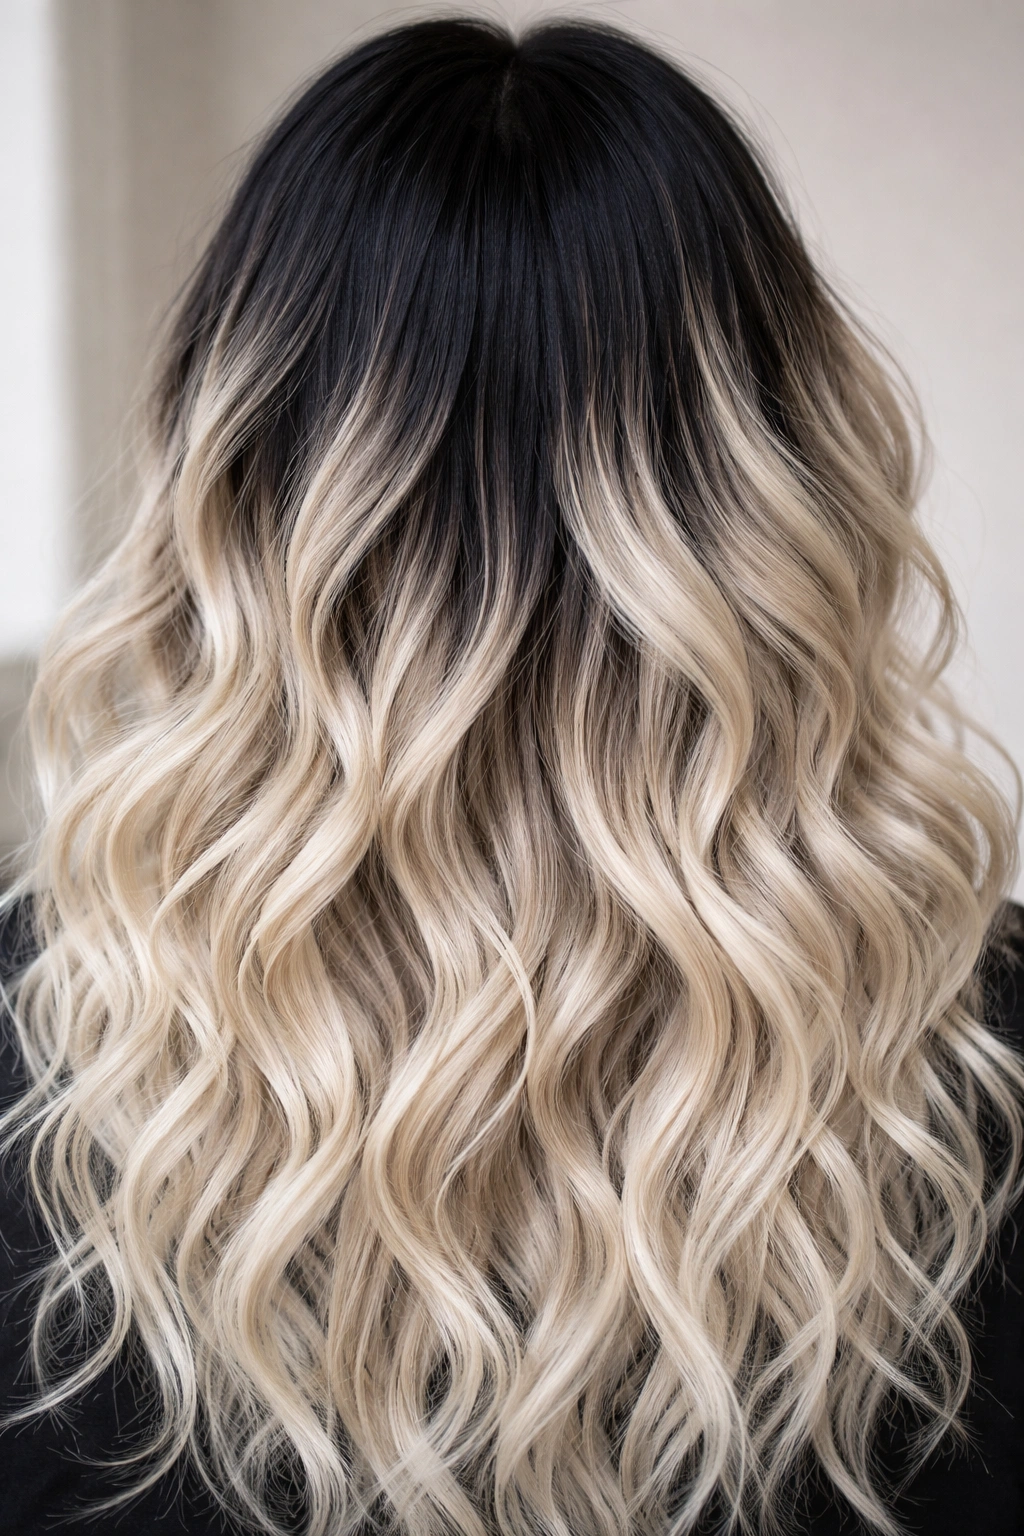
When you want serious contrast and drama, black-to-platinum ombre delivers. This is high-impact, high-fashion styling that makes a statement. The deep, rich black roots anchor the look while platinum blonde ends feel edgy and cool.
Why This Style Works
The contrast is what makes this one compelling. There’s no subtlety here—you’re creating a clear visual line from dark to light. On wavy hair, that contrast becomes almost architectural because the waves create natural dimension that emphasizes the color shift. This style reads as intentional, confident, and creative. It works especially well if you have cool undertones or fair skin that platinum blonde flatters, but it can work with warmer complexions too if you choose a warmer platinum rather than an icy one.
Styling for Maximum Impact
- Waves need to be pronounced to show off this color contrast effectively
- Use a medium-barrel curling iron for classic waves or a smaller iron for more texture
- Consider adding texture spray before curling to give your waves better grip
- Part your hair in different ways throughout the week to vary where the color contrast shows
- Braiding your hair while damp creates a more organic, less uniform wave pattern
Worth knowing: Platinum blonde requires purple or violet toning shampoo at least once weekly to stay silver-toned and not go yellow. The darker your roots, the more important this maintenance becomes visually.
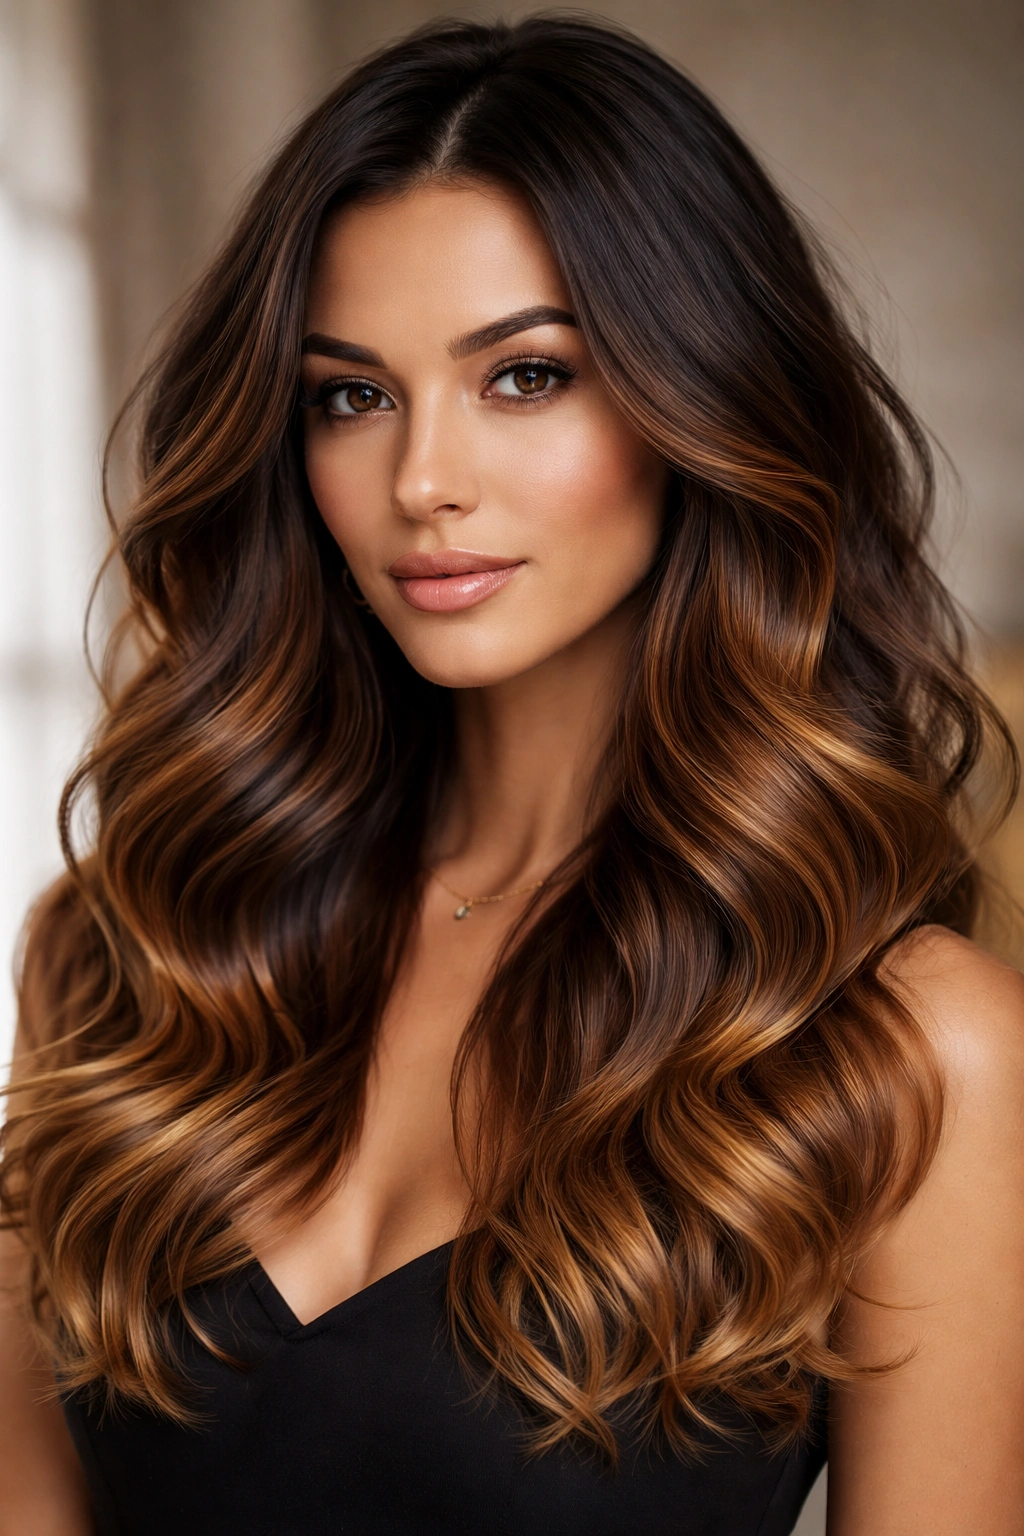
3. Copper to Caramel Warm Ombre
This warm, autumnal gradient goes from deep, rich copper at the roots to light caramel at the ends. It’s a color combination that screams warmth and richness, especially beautiful in natural light.
Why This Style Works
If you have warm undertones or olive skin, this ombre is genuinely flattering. The copper brings out warmth in your skin while the caramel adds brightness without being harsh. There’s less contrast than some ombre styles, so it reads as more subtle and sophisticated rather than dramatic. The warm tones also make this one of the lowest-maintenance ombre options because both colors are in the same warm family—they blend together naturally and grow out gracefully.
Styling for Maximum Impact
- Wavy texture is crucial for showing off these warm, dimensional tones
- Use a straightening iron twisted slightly to create soft S-waves for a tousled effect
- Consider loose braids or twists while damp for romantic, undone waves
- Warm lighting brings out these tones beautifully, so indoor styling looks particularly good
- Maintain warmth with a color-safe shampoo designed for warm or red tones
Pro tip: These warm tones deepen in cooler months and can lighten in summer sun, which actually works in your favor for maintaining the ombre naturally.
4. Ash Brown to Silver Blonde Waves
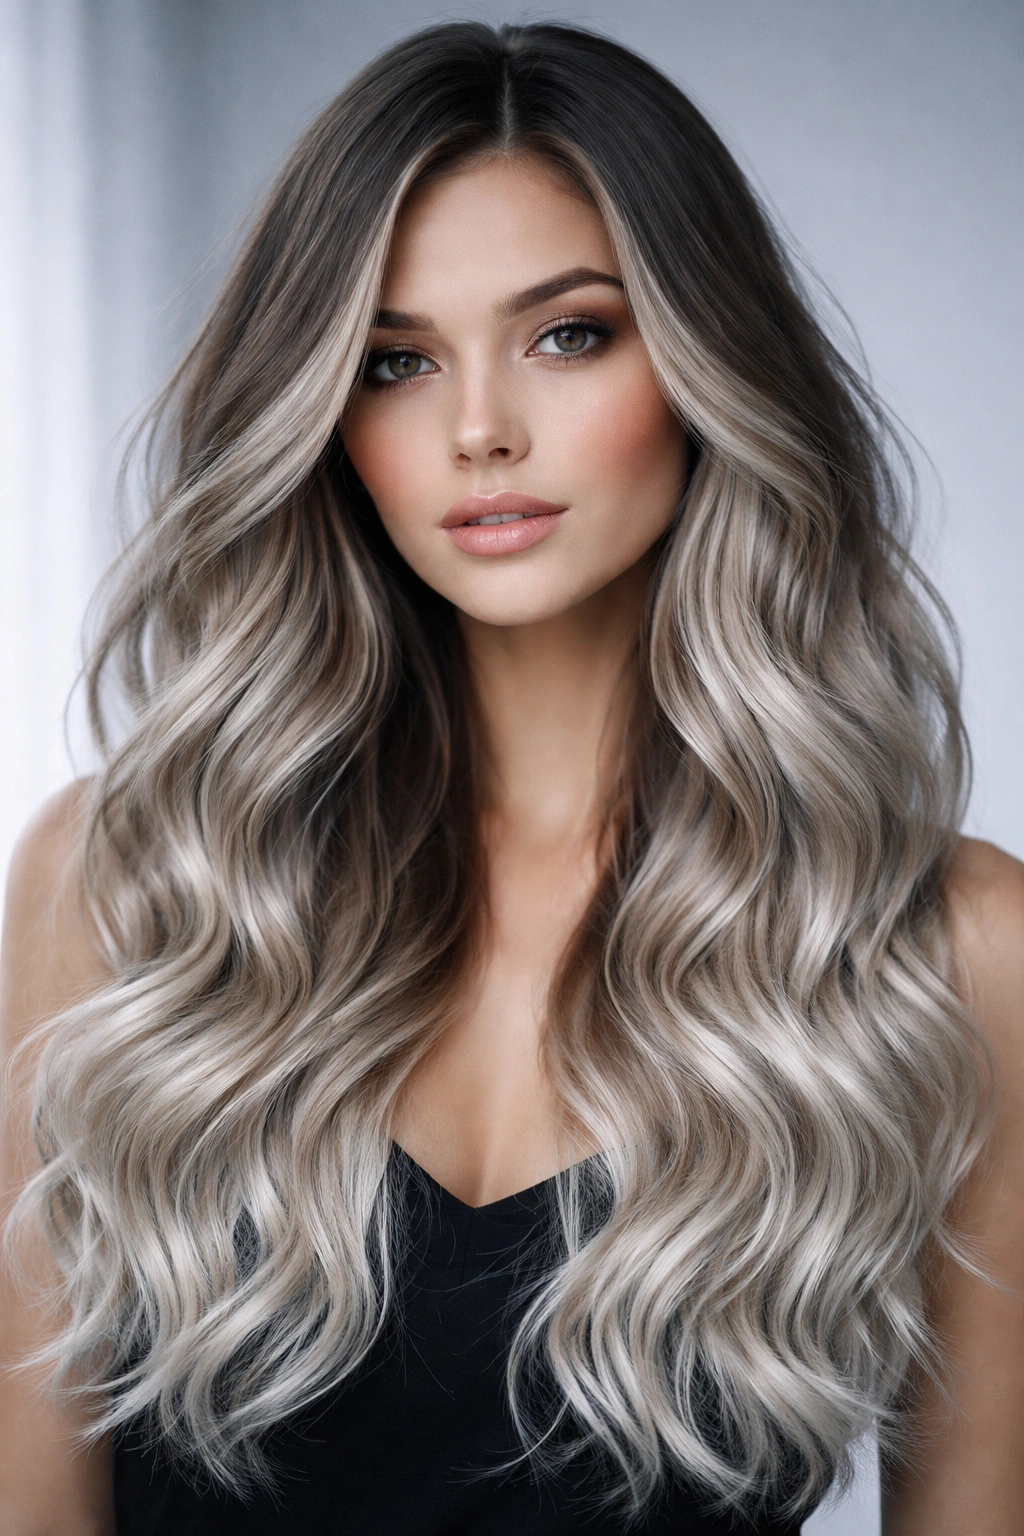
This is the cool-toned counterpart to beachy brunette-blonde ombre. Ash brown roots fade to silver or platinum blonde, creating a sophisticated, cool-toned gradient. The ash tones keep everything from feeling too warm or brassy.
Why This Style Works
If you have cool undertones or fair skin, this combination is incredibly flattering. The ash brown is cool enough to feel modern and intentional rather than just a faded brown, while silver blonde is striking without being platinum. On wavy hair, the cool tones create an ethereal, almost mysterious quality. The waves catch the light differently depending on the angle, and the ash tones make this look feel more textured and less flat than it would on straight hair.
Styling for Maximum Impact
- Create soft, romantic waves with a larger barrel iron for an elegant effect
- Dry your roots with a blow dryer for volume, then let mid-lengths and ends air-dry slightly
- Use a texturizing mousse applied to damp roots for additional texture and hold
- Pin curls or overnight braids create very soft, natural-looking waves
- The cool tones look particularly striking with minimal styling product, letting natural texture show
Worth knowing: Silver blonde can look greenish in chlorine, so if you swim regularly, use a swimming cap or clarifying shampoo afterward.
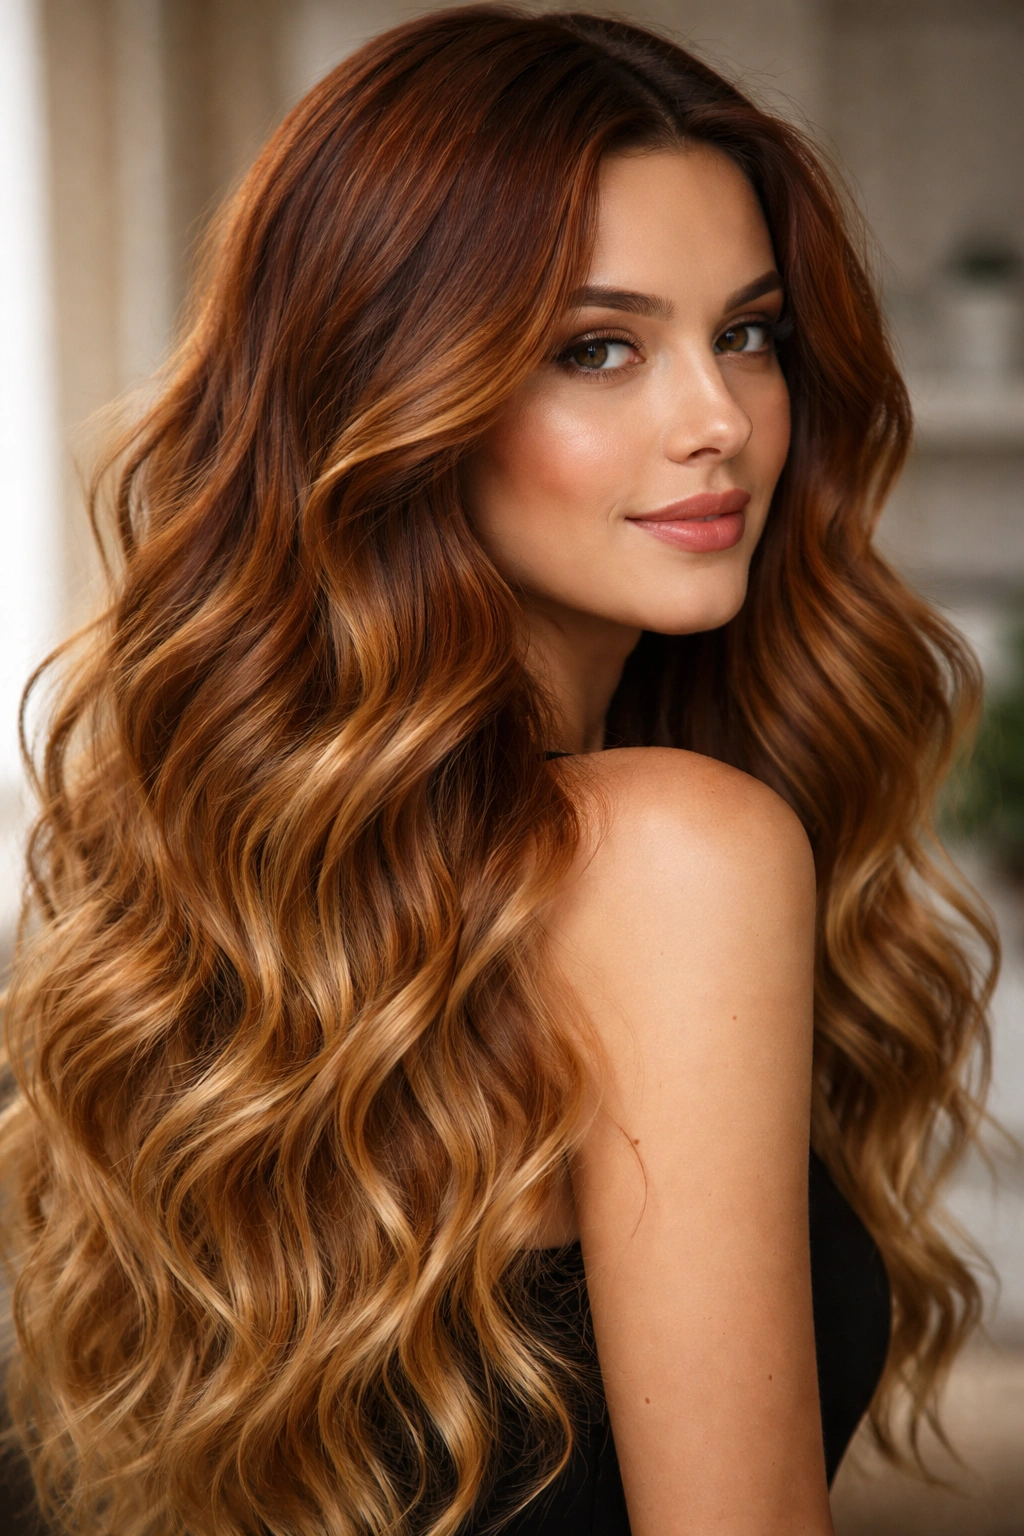
5. Dark Red to Copper Ombre Waves

If you want to make a bold statement without going the blonde route, red-to-copper ombre is striking. Dark burgundy or deep red roots melt into brighter copper or lighter red tones toward the ends.
Why This Style Works
This color combination is inherently dimensional. Even from a distance, the color shift reads as intentional and creative. Red tones tend to photograph beautifully and stand out in photos compared to more neutral colors. The red-to-copper gradient works well if you have warm undertones, olive skin, or if you just want to add richness and uniqueness to your look. The warm red tones are less common than blonde ombre, which means your style will feel more distinctive.
Styling for Maximum Impact
- Waves are essential here—they create peaks and valleys that make red tones shimmer
- Use a blow dryer with a concentrator nozzle to direct your waves
- Wave-enhancing products specifically designed for texture work better than slick, shiny products
- Tousled, undone waves show off red tones more beautifully than perfectly uniform waves
- Consider adding shine serum to the ends to make the lighter copper tones glow
Pro tip: Red can fade faster than other colors, especially lighter reds. Minimize shampooing to once or twice weekly and use color-safe products formulated for red hair.
6. Balayage-Style Wavy Ombre
Balayage is the hand-painted technique that creates a more organic, less linear ombre. Instead of a straight gradient from root to end, balayage adds highlights and lighter pieces throughout, creating a more natural, sun-kissed effect on wavy hair.
Why This Style Works
Balayage feels more natural than a strict ombre because the highlights are placed strategically rather than uniformly. On wavy hair, this technique creates incredible dimension because the lighter pieces are scattered throughout rather than confined to just the ends. The effect is that your waves have depth and movement from every angle. Balayage also grows out more gracefully than ombre because there’s no harsh line to maintain—the lighter pieces just blend with your natural roots.
Styling for Maximum Impact
- Waves show off balayage best when the texture is visible and pronounced
- Use a texturizing spray before curling to improve grip and hold
- Curl sections away from your face for a flattering frame
- Vary your part to show different angles of the balayage throughout the week
- Minimize blow-drying to let your natural waves do the work
Worth knowing: Balayage requires a skilled colorist. The placement of highlights determines whether you get a harmonious blend or a choppy, disconnected look. Find someone experienced with this technique.
7. Espresso to Caramel Mid-Length Waves
For a more understated approach, consider dark espresso roots transitioning to caramel blonde in the mid-lengths and ends, on hair that hits around shoulder-length. The shorter length keeps things from feeling overwhelming while the color adds dimension.
Why This Style Works
Mid-length hair is the sweet spot for ombre because it shows off the color transition without the hair feeling too long or heavy. Espresso-to-caramel is a sophisticated gradient that feels modern without being as bold as some ombre combinations. The transition happens gradually over a shorter distance, which actually makes the blend look more intentional. This length is also practical—easier to style, easier to maintain, and the color tends to look fresher longer because the ends aren’t as far from your roots.
Styling for Maximum Impact
- Mid-length waves look great with a shaggy, textured cut with layers
- Use a medium-barrel iron to create soft waves throughout
- Piece out your waves with your fingers while they’re still warm for a lived-in effect
- A textured, piecey styling product looks better on this length than a slick product
- Try side-parting to shift where the light hits the ombre
Pro tip: This length is perfect for trying ombre if you’re not totally committed. If you love it, you can grow it out. If it’s not your thing, it grows out relatively quickly compared to longer styles.
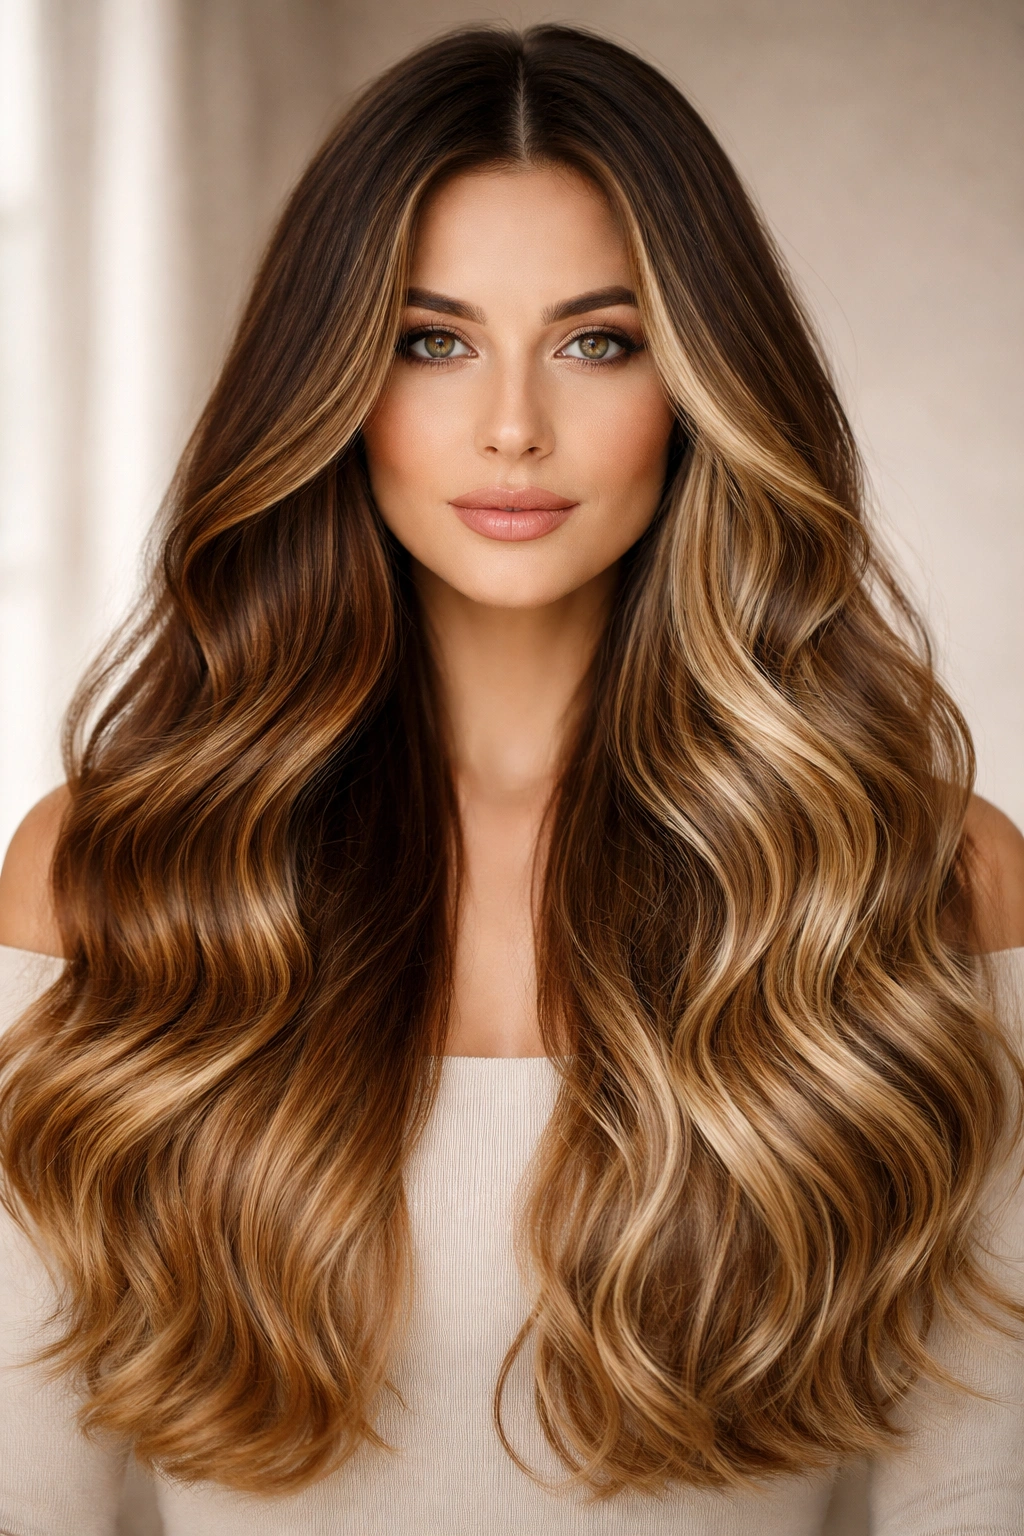
8. Dark Blonde Roots to Icy Platinum Ends
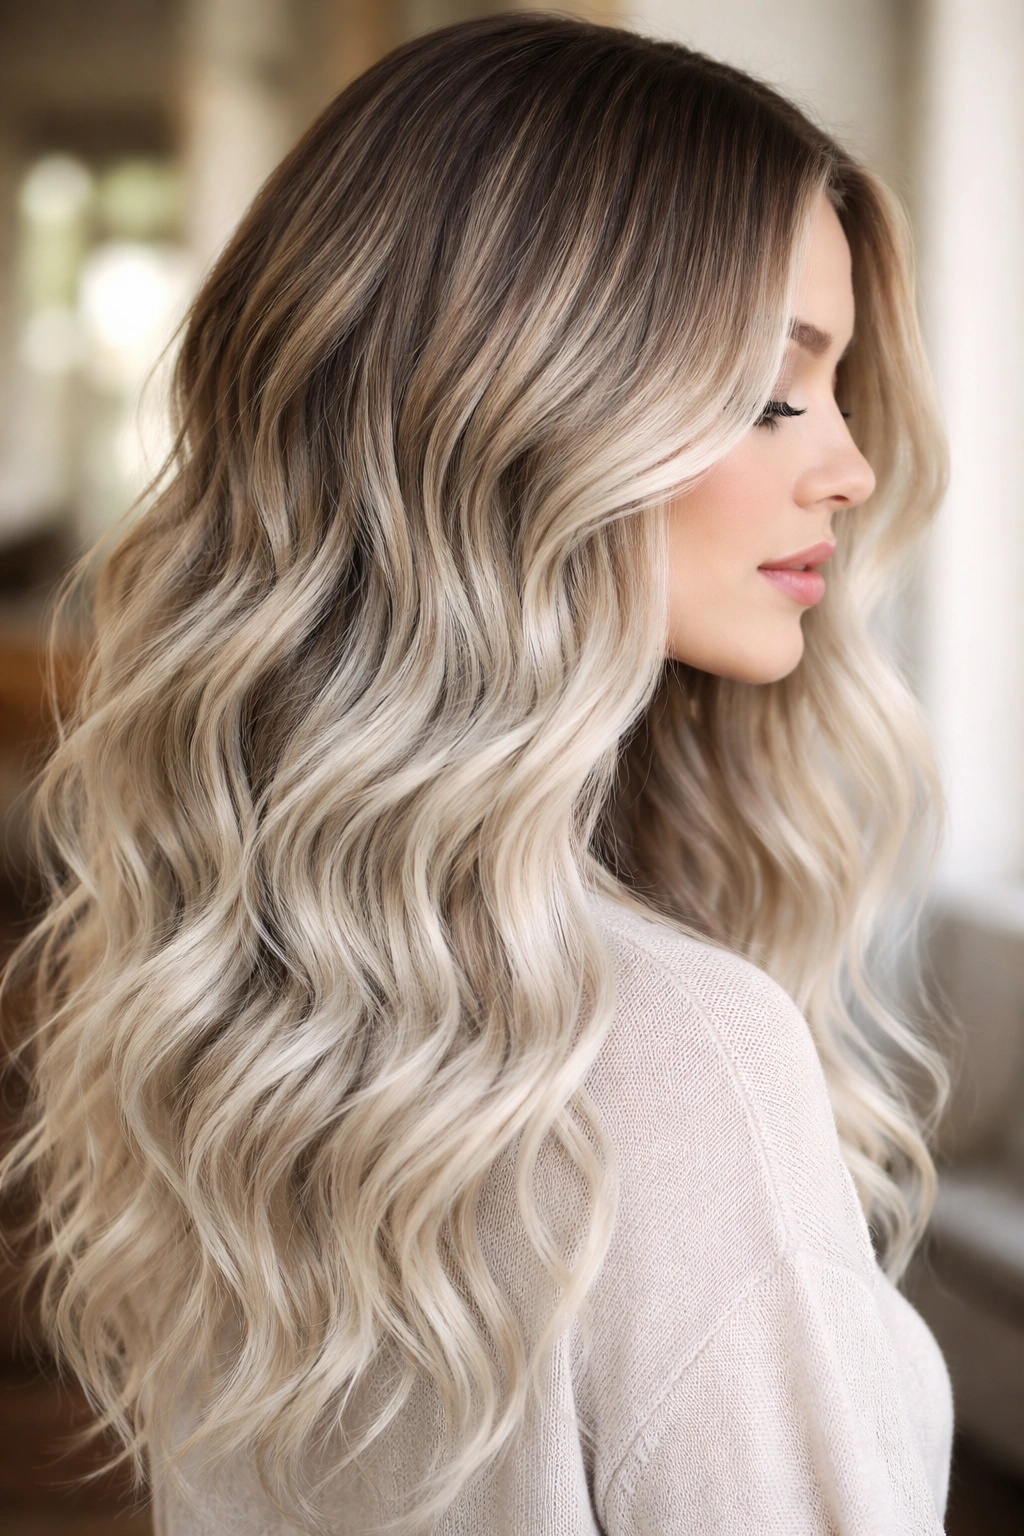
This is a more subtle ombre for people who want dimension without harsh contrast. Dark blonde or light brunette roots fade into icy platinum blonde ends, creating a cool-toned, sophisticated look.
Why This Style Works
Because both the root and end colors are in the blonde family, this ombre feels less dramatic than darker root/lighter end combinations, but it’s still distinctly ombre rather than just slightly damaged blonde. The color shift is noticeable without being jarring. On wavy hair, this creates an elegant, layered effect—the roots anchor the look while the icy platinum ends catch light beautifully. This works well if you want dimension but prefer a more understated aesthetic or if you’re concerned about high-maintenance color.
Styling for Maximum Impact
- Soft, romantic waves look best with this subtle color combination
- Use a curling iron or wand to create loose waves rather than tight curls
- Let your hair air-dry slightly before heat styling for more natural-looking waves
- A light texture spray keeps waves looking soft rather than crunchy
- The cool tones look striking with minimal styling product
Worth knowing: This requires regular toning to keep the icy platinum from going yellow or brassy. Purple shampoo is essential maintenance.
9. Auburn to Honey Blonde Ombre Waves
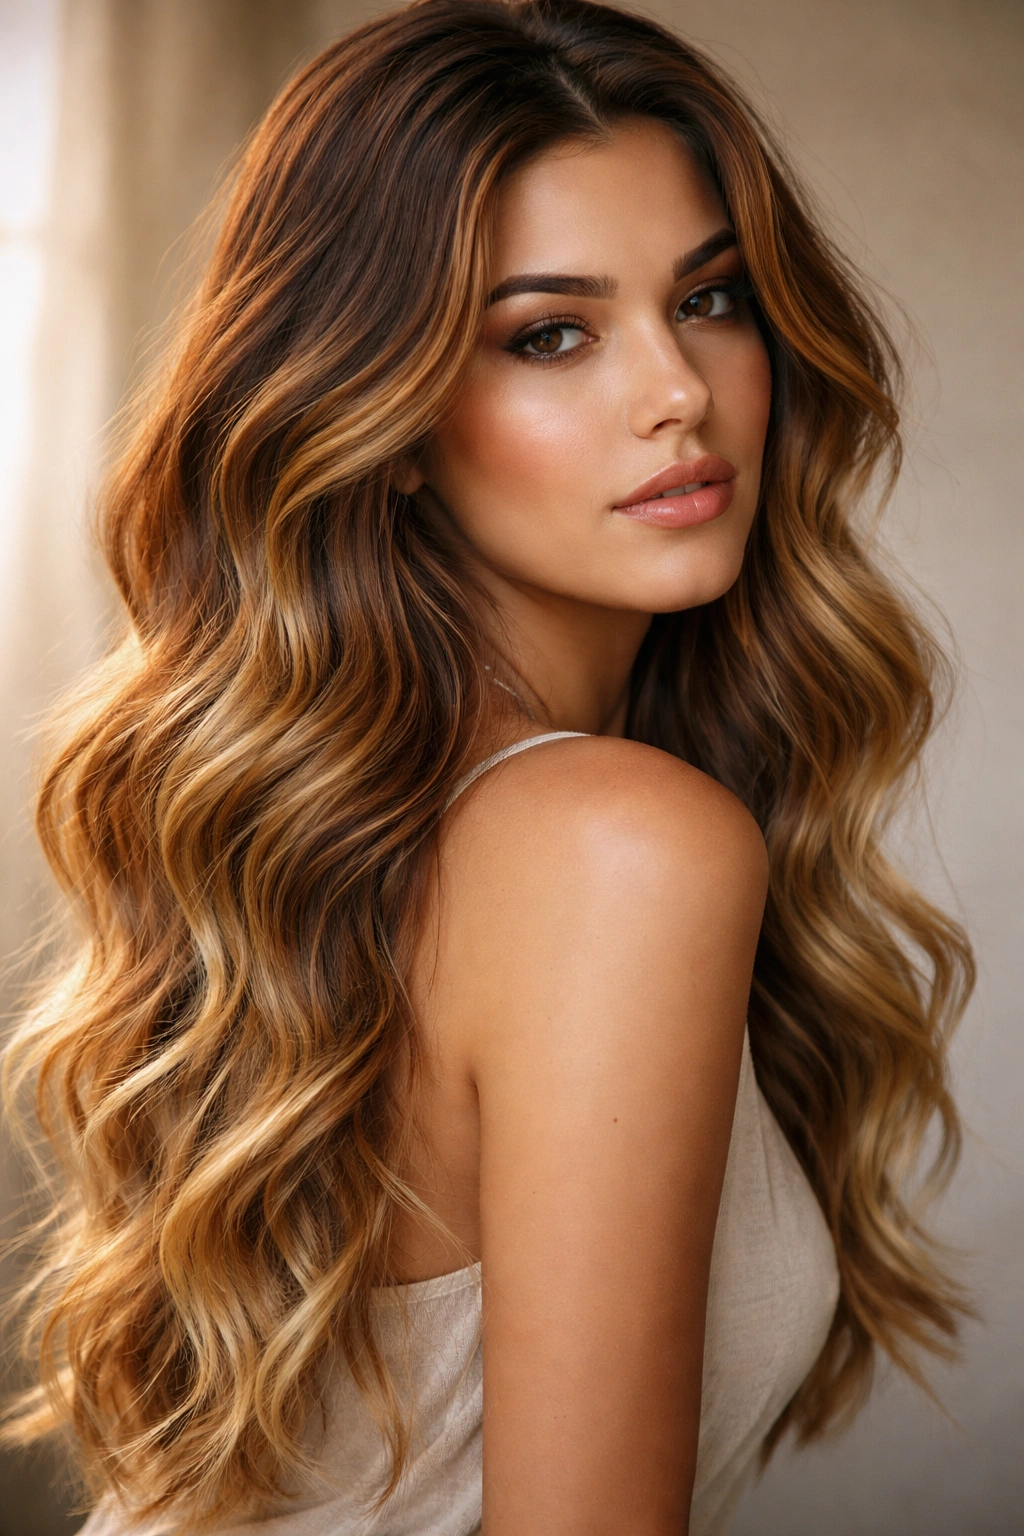
For a warm, earthy feel, auburn or reddish-brown roots fading to honey blonde creates a gorgeous autumnal ombre. This is especially beautiful if you have warm undertones or olive skin.
Why This Style Works
Auburn is rich and interesting without being as bold as bright red. The fade to honey blonde is warm and golden, creating a harmonious color story. There’s dimensional depth here—the auburn brings richness while honey blonde adds light and brightness. On wavy hair, this combination creates a sun-kissed effect that feels natural. The warmth of both colors makes this ombre feel wearable and approachable rather than high-fashion or experimental.
Styling for Maximum Impact
- Waves that are loose and tousled show off these warm tones beautifully
- Use a blow dryer to add volume at the roots, then let your natural texture take over
- Warm lighting really brings out the richness of auburn-to-honey, so this looks especially good indoors
- Beach waves or salt spray styling suits this color combination
- Minimize heat styling to preserve the warmth and shine of these tones
Pro tip: These warm tones actually look better as they fade slightly, developing more depth and complexity. You don’t have to be as strict about touch-ups as you would with blonde ombre.
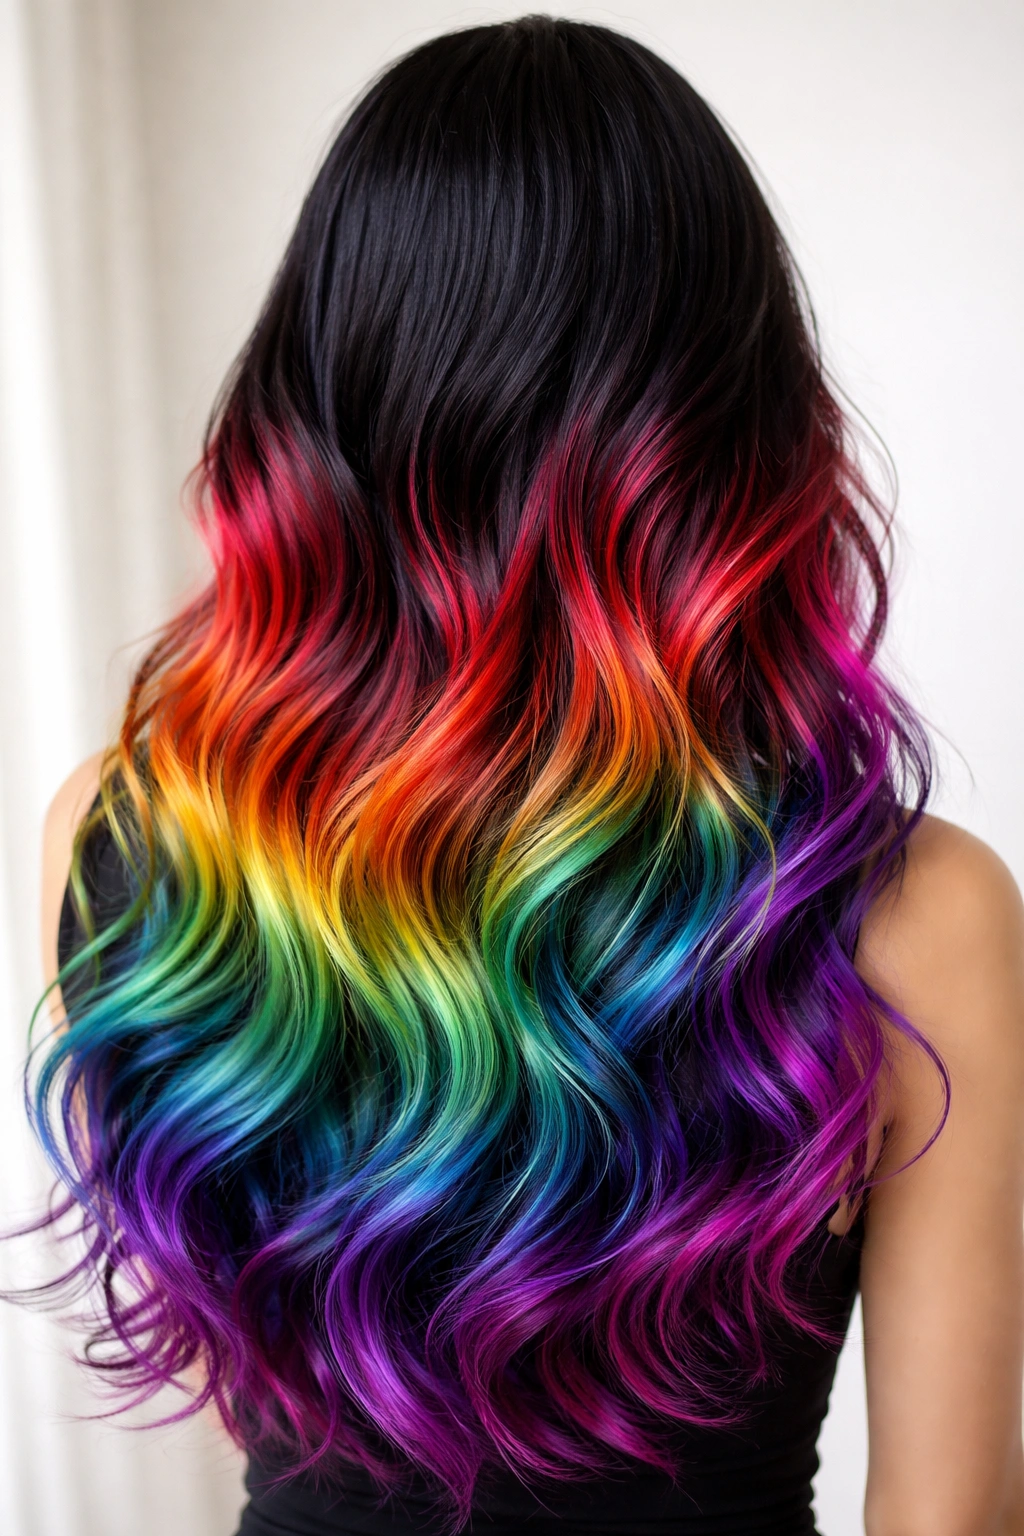
10. Black Roots With Rainbow Ombre Ends
For the bold and creative, black roots fading into rainbow-toned ends—starting with red or magenta, moving through purple, blue, and potentially green—creates art on your head. This is statement-making styling for people who love color.
Why This Style Works
Rainbow ombre only works when your waves are pronounced enough to show off all the color transitions. The movement of wavy hair is what makes rainbow ombre look intentional rather than chaotic—the waves create structure and dimension that keeps the color from feeling too busy. This style requires commitment to maintenance and an adventurous color spirit, but the payoff is a hairstyle that’s uniquely you.
Styling for Maximum Impact
- Waves must be the star here—invest in a good wave-creating tool
- Consider layers throughout to create more surface area for showing off the different colors
- Use color-depositing conditioners to maintain each color section
- Minimize washing to keep colors vibrant and separate
- Style with light, textured products rather than heavy, shiny ones
Worth knowing: Rainbow colors fade quickly, especially lighter shades and pastels. Plan for weekly or bi-weekly color refreshing with toners or color-depositing conditioners.
11. Chocolate Brown to Caramel Balayage Waves
Similar to traditional balayage but leaning into a warmer color story, chocolate brown roots with caramel highlights woven throughout creates dimension without a strict ombre line.
Why This Style Works
This approach feels more modern and natural than uniform ombre because the lighter tones are placed strategically rather than uniformly. The highlights are positioned around the face and through the lengths, which flatters more face shapes and creates movement. Chocolate brown is rich and flattering on most skin tones, while caramel highlights add warmth and brightness. The balayage technique means grow-out is more forgiving.
Styling for Maximum Impact
- Wavy texture is essential—this style needs texture to show off the strategic highlights
- Style with texturizing products that emphasize natural waves rather than creating uniformity
- Vary your styling—some days tousled and undone, other days with more defined waves
- Rough-dry your hair to enhance the dimensional effect of the balayage
- Side-parting shows off the highlights placed near your face
Pro tip: When you get this colored, ask your colorist to focus highlights around your face and through the mid-lengths. This placement is what makes balayage flattering.
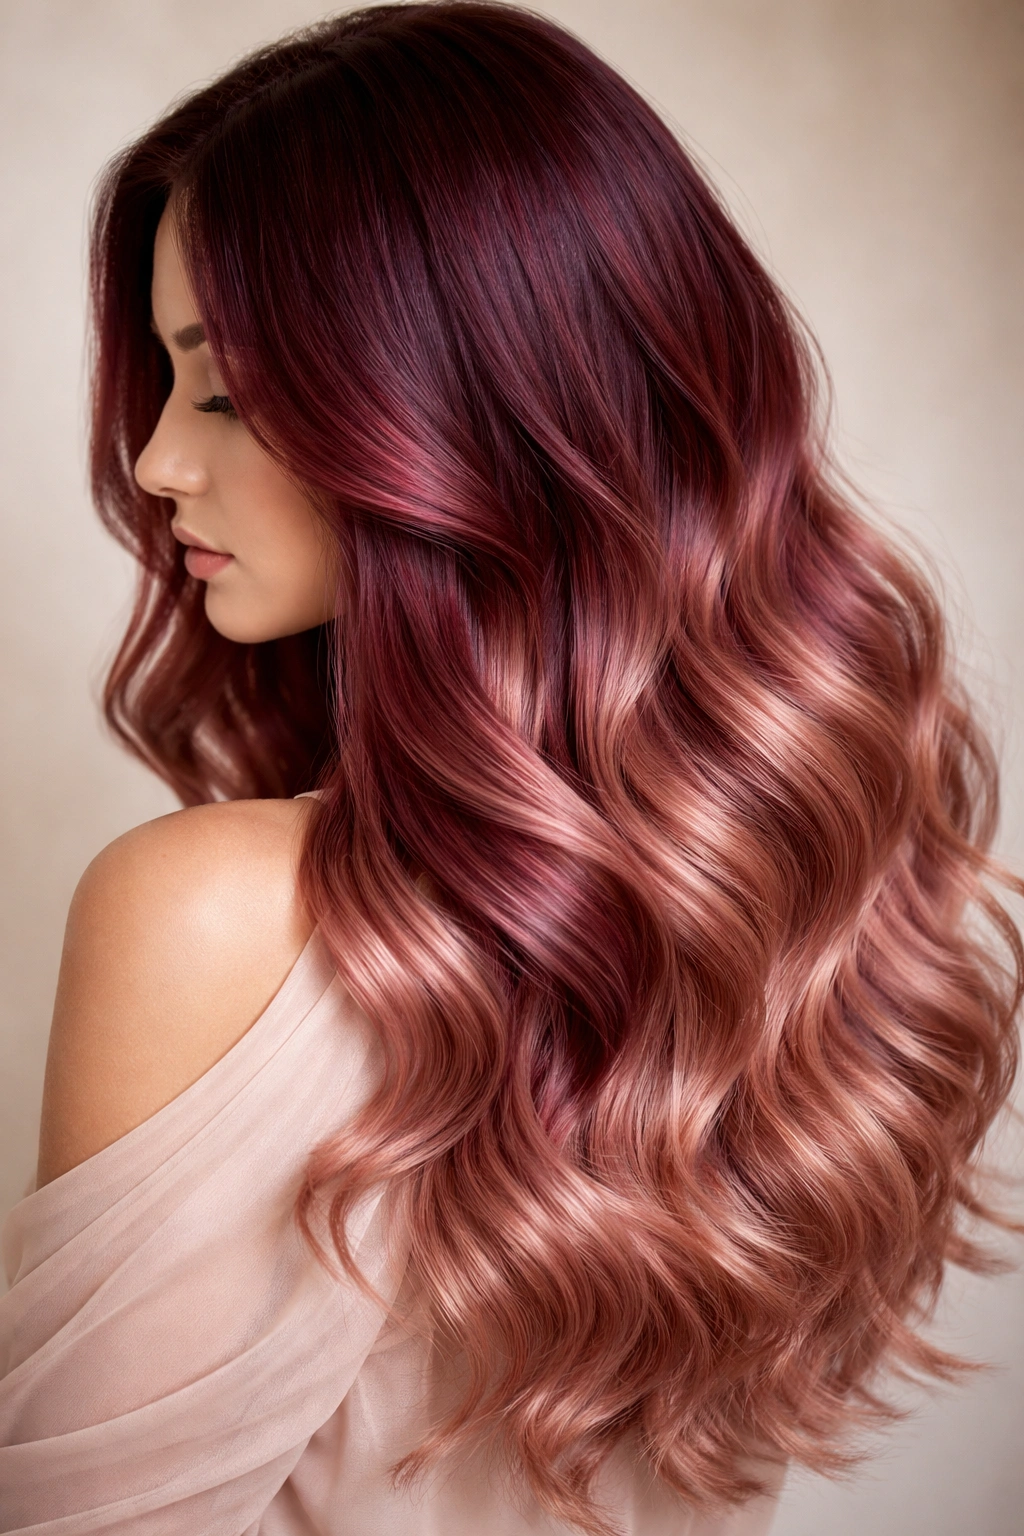
12. Burgundy to Rose Gold Waves
Deep burgundy roots transition to rose gold or peachy blonde tones, creating a romantic, blush-toned ombre. This is feminine and sophisticated without being boring.
Why This Style Works
Rose gold is flattering on most skin tones, especially if you choose the right undertone—cooler rose gold for cool undertones, warmer rose gold for warm complexions. Burgundy grounds the look with richness and drama while rose gold feels romantic and soft. Together they create a color story that feels intentional and editorial. On wavy hair, the blend between burgundy and rose gold looks effortlessly beautiful—the waves create natural breaking points that make the color transition feel organic.
Styling for Maximum Impact
- Soft, romantic waves are perfect for this delicate color combination
- Use a large-barrel curling iron for loose waves rather than tight curls
- Air-drying or using a diffuser creates softer waves than blow-drying with a round brush
- Minimal styling product lets the delicate color shine
- This color combination looks best in soft, natural light
Worth knowing: Rose gold can fade toward yellow or orange if your maintenance shampoo is too warm-toned. Use a slightly cool-toned color-safe shampoo to keep the rose undertones.
Choosing Between Ombre and Balayage
The difference between ombre and balayage is one of the most important decisions when planning your wavy color. Ombre follows a consistent gradient from dark roots to light ends. Balayage, on the other hand, uses hand-painted highlights that are placed strategically throughout, creating a less linear effect.
Ombre is more dramatic and fashion-forward. It reads as intentional and creative from a distance. Balayage is more subtle and natural-looking. It blends with your roots more gracefully and can look like natural sun-bleaching if done well.
On wavy hair, ombre creates a more obvious dimensional effect because the color gradient is uniform and consistent. Balayage creates dimension through placement rather than gradient, which can feel more natural if you prefer a less obvious color treatment.
Consider your lifestyle and styling preferences. If you love a dramatic look and don’t mind regular touch-ups, ombre might be perfect. If you prefer something that grows out gracefully and requires less frequent color maintenance, balayage might be the better choice.
Preparing Your Hair for Ombre Coloring
Before you commit to an ombre color, your hair needs to be in good condition. Ombre, especially with lightening involved, requires healthy hair to look good. Start treating your hair better at least two to three weeks before your color appointment.
Deep condition regularly—at least twice weekly during this prep period. Use a hydrating hair mask, leave-in conditioner, or hair oil. Pay special attention to your ends, which are the oldest part of your hair and most prone to damage.
Avoid heat styling as much as possible during the prep period. Air-dry when you can. If you must blow-dry, use a heat protectant spray. Each bit of heat stress reduces your hair’s ability to hold color and maintain the healthy appearance that makes ombre look beautiful.
Get a trim before your color appointment, even if it’s just a quarter-inch dusting. Removing damaged ends means your colorist is working with healthier hair, which takes color more evenly and looks better overall. Plus, trimmed ends photograph and feel better once your color is done.
Styling Tools and Products for Wavy Ombre Hair
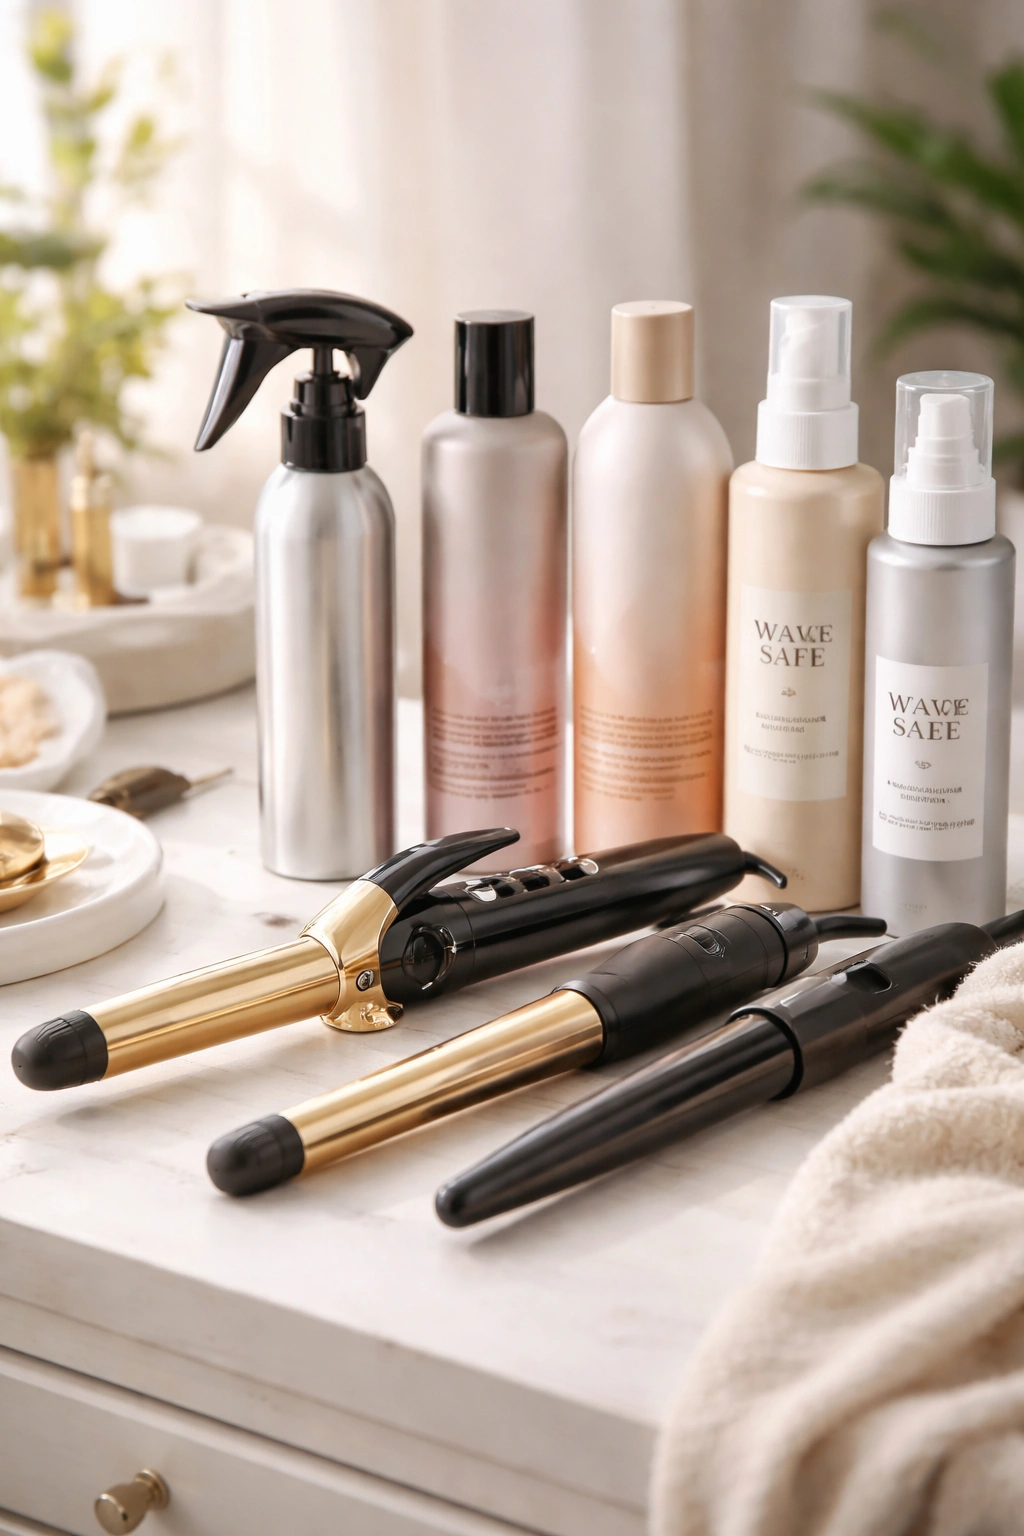
Creating and maintaining beautiful waves on ombre hair requires the right tools and products. A quality curling iron or wand is essential—look for one with adjustable heat settings so you can dial in the right temperature for your hair type.
For styling, invest in products designed specifically for your hair type. If you have fine hair, heavy products will weigh you down. If you have thick or coarse hair, lightweight products won’t give you enough hold. Wave creams, texturizing sprays, sea salt sprays, and mousse all serve different purposes. Experiment to find what works for your hair.
A heat protectant is non-negotiable if you’re heat-styling regularly. This goes on damp hair before blow-drying or styling with hot tools and creates a barrier between your hair and heat damage. It’s especially important for ombre hair because lightened ends are more vulnerable to damage.
For maintenance, color-safe shampoo and conditioner are worth the investment. Regular shampoo strips color more aggressively, fading your ombre faster. Color-safe formulas are gentler while still cleaning effectively. If your ombre includes blonde or silver tones, purple shampoo keeps those colors from going brassy.
Final Thoughts
Wavy hair with ombre is a powerful combination. The waves add movement and texture while the ombre adds dimension and visual interest. Together, they create something that catches attention without looking overdone or high-maintenance, even though the reality is somewhere in between.
The key to making any of these styles work is choosing a color combination that flatters your skin tone, getting a cut that supports your natural or desired wave pattern, and committing to the maintenance this color treatment requires. Ombre on wavy hair isn’t a set-it-and-forget-it color choice, but the payoff in terms of how you look and feel is genuinely worth the effort.
Whether you go for subtle dimension or dramatic contrast, beachy and warm or cool and sophisticated, there’s a wavy ombre style that’s right for you. The best approach is to find inspiration that speaks to you, save photos showing different angles, and have a detailed conversation with your colorist about exactly what you want and how committed you are to maintenance. From there, you’re ready to step into a hairstyle that looks intentional, beautiful, and undeniably you.