Rubber bands aren’t just for quick-fix ponytails—they’re actually one of the most versatile styling tools for curly hair, and when used intentionally, they can create stunning, textured looks that enhance your natural curl pattern instead of fighting it. The key is choosing the right placement, the right type of bands, and understanding how tension interacts with your specific curl pattern. Whether you’re heading to the gym or looking for a polished style that lasts all day, rubber band hairstyles offer hold without the harsh chemicals of some styling products, plus they’re low-heat options that protect your curls from daily damage.
What makes rubber band styling so effective for curly hair is that bands create defined sections that allow your curls to cluster together and form more pronounced ringlets. Unlike straight hair, where rubber bands can create creases and dents, curly hair naturally springs back and bounces around the bands, creating a textured, voluminous effect. The placement of bands—whether stacked, diagonal, or strategically spaced—determines the final look, from effortlessly bouncy to dramatically sculptural. And here’s something most people overlook: the right rubber band technique can actually reduce frizz by keeping curl groups contained while allowing them their full volume.
Throughout this guide, you’ll discover eight distinct rubber band hairstyles specifically designed for curly hair, each with detailed techniques, styling tips, and product recommendations to help you recreate them at home. Whether you have loose waves or tight coils, short curls or long ringlets, these styles adapt to your curl type and can be dressed up or down depending on the occasion.
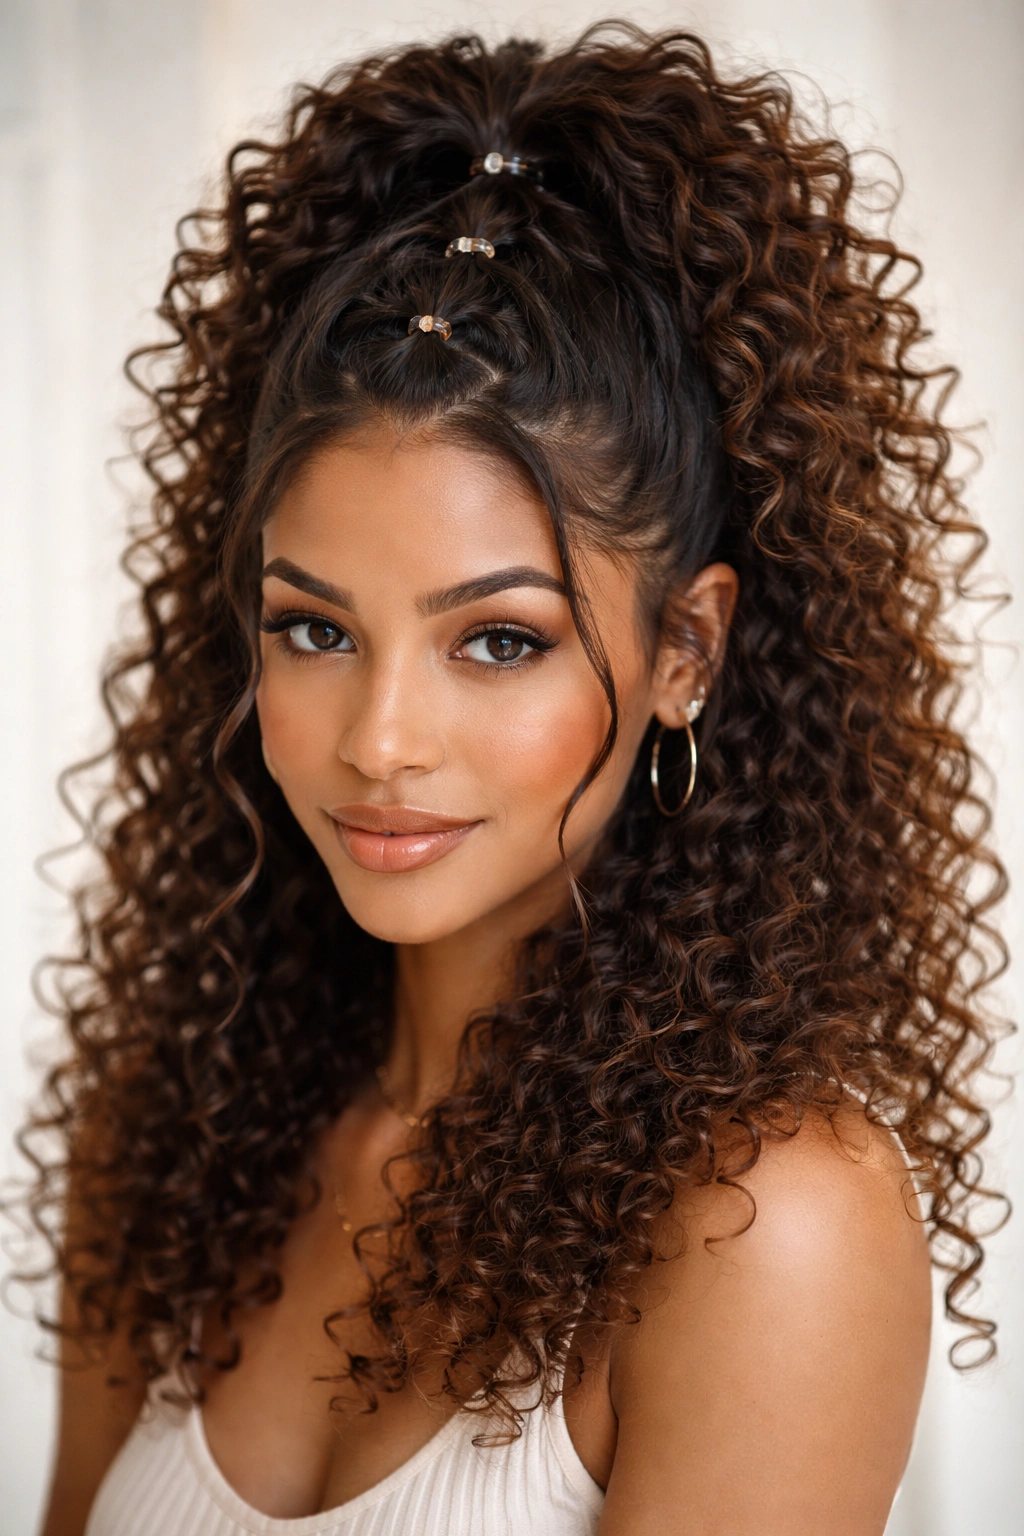
1. High Curly Ponytail with Layered Banding
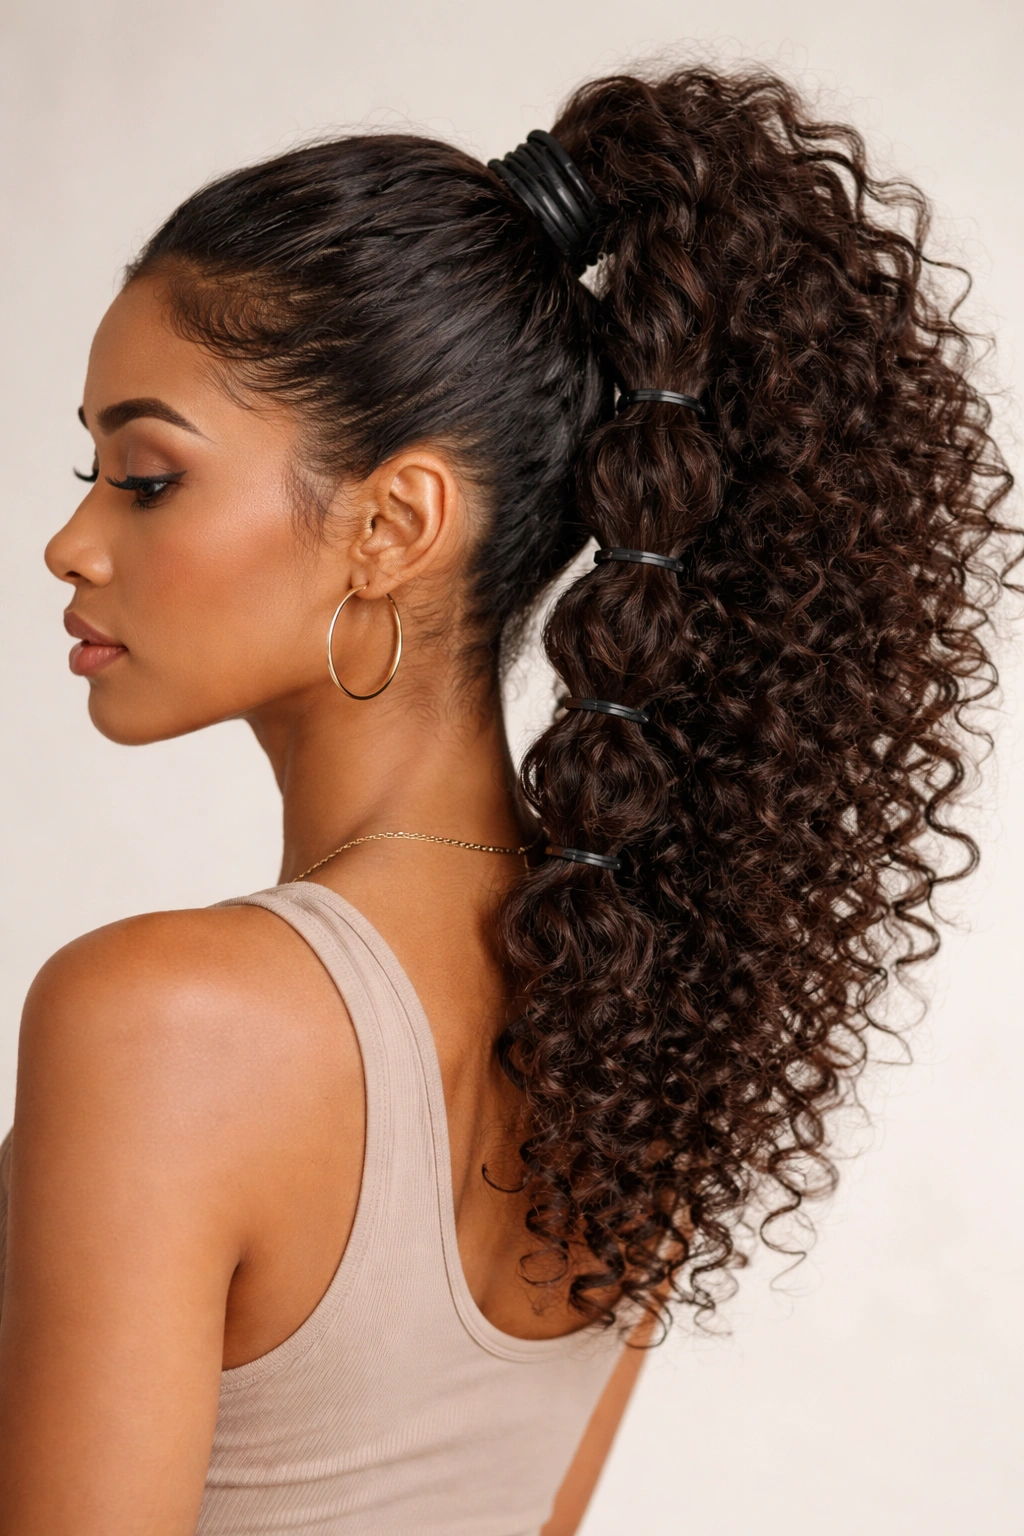
A high curly ponytail isn’t just a functional style—it’s a statement that celebrates your curl texture while keeping everything off your face and neck. The magic happens when you add multiple rubber bands positioned at different heights, creating a stacked effect that breaks up the visual length of your ponytail and adds incredible dimension. This style works beautifully for both everyday wear and special occasions, and because it’s built from sectioned bands rather than one tight elastic at the crown, it distributes tension more evenly across your curls, reducing breakage.
Why This Works for Curly Hair
The layered banding technique transforms a standard ponytail into something visually dynamic that celebrates rather than flattens your curl pattern. Each rubber band creates a “bubble” effect where your curls pouf out between the bands, giving the illusion of thicker, fuller hair while actually protecting curl strands from the stress of one tight elastic pulling on everything at once. For curl types ranging from loose waves to tight coils, this method prevents the dreaded dent that single elastics leave behind. The stacked design also keeps your curls bouncing freely rather than bunched into one dense mass, which means more movement and that coveted, intentional texture throughout the day.
How to Create This Style
- Start with curls that are either freshly styled or refreshed with a light curl cream or refresh spray to reactivate your natural pattern
- Gather your hair into a high ponytail at the crown, using a large soft elastic or silk scrunchie as your base—this initial band should sit where you want the top of your ponytail to be, typically 2-3 inches above your natural hairline
- About 1.5 to 2 inches below that first band, place your second rubber band, securing it firmly around the ponytail shaft
- Continue adding rubber bands every 1.5 to 2 inches down the length of your ponytail, making sure each band is tight enough to hold but not so tight that it compresses your curls completely
- Between each rubber band, gently use your fingers or a wide-tooth comb to fluff and separate the curls, encouraging them to pouf out from between the bands
Styling Tips & Product Suggestions
- Use small, seamless rubber bands in a color that matches your hair for a more polished look, or choose a contrasting color for a fun, playful aesthetic
- Before banding, apply a light leave-in conditioner or curl-defining cream to individual sections of your ponytail to enhance definition and reduce frizz between the bands
- If your curls are prone to drying out, mist lightly with a hydrating spray before adding your bands to maintain moisture throughout the day
- This style works particularly well on second or third-day curls that have already settled into their pattern—fresh wash-day curls may be too puffy to control with this technique
Pro tip: Once you’ve placed all your bands, take a bobby pin or a small hair clip and gently roll a small section of curls around each band, pressing the curls outward. This creates an extra-dimensional bubble effect that looks intentional and polished rather than casual.
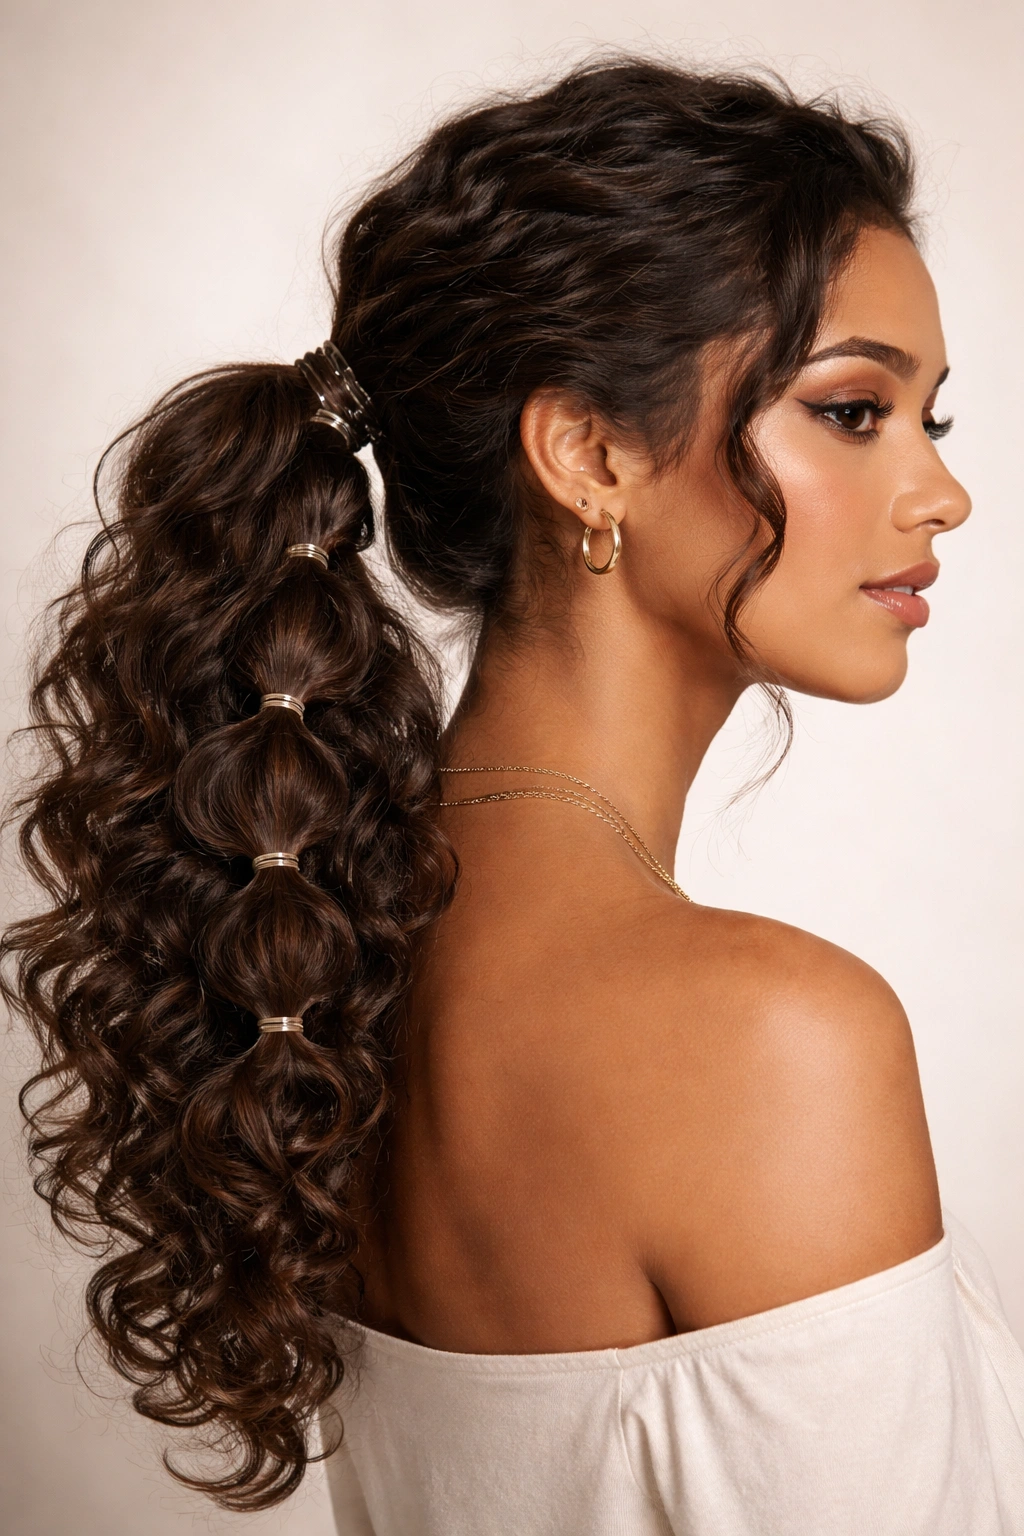
2. Sectioned Bubble Ponytail for Definition
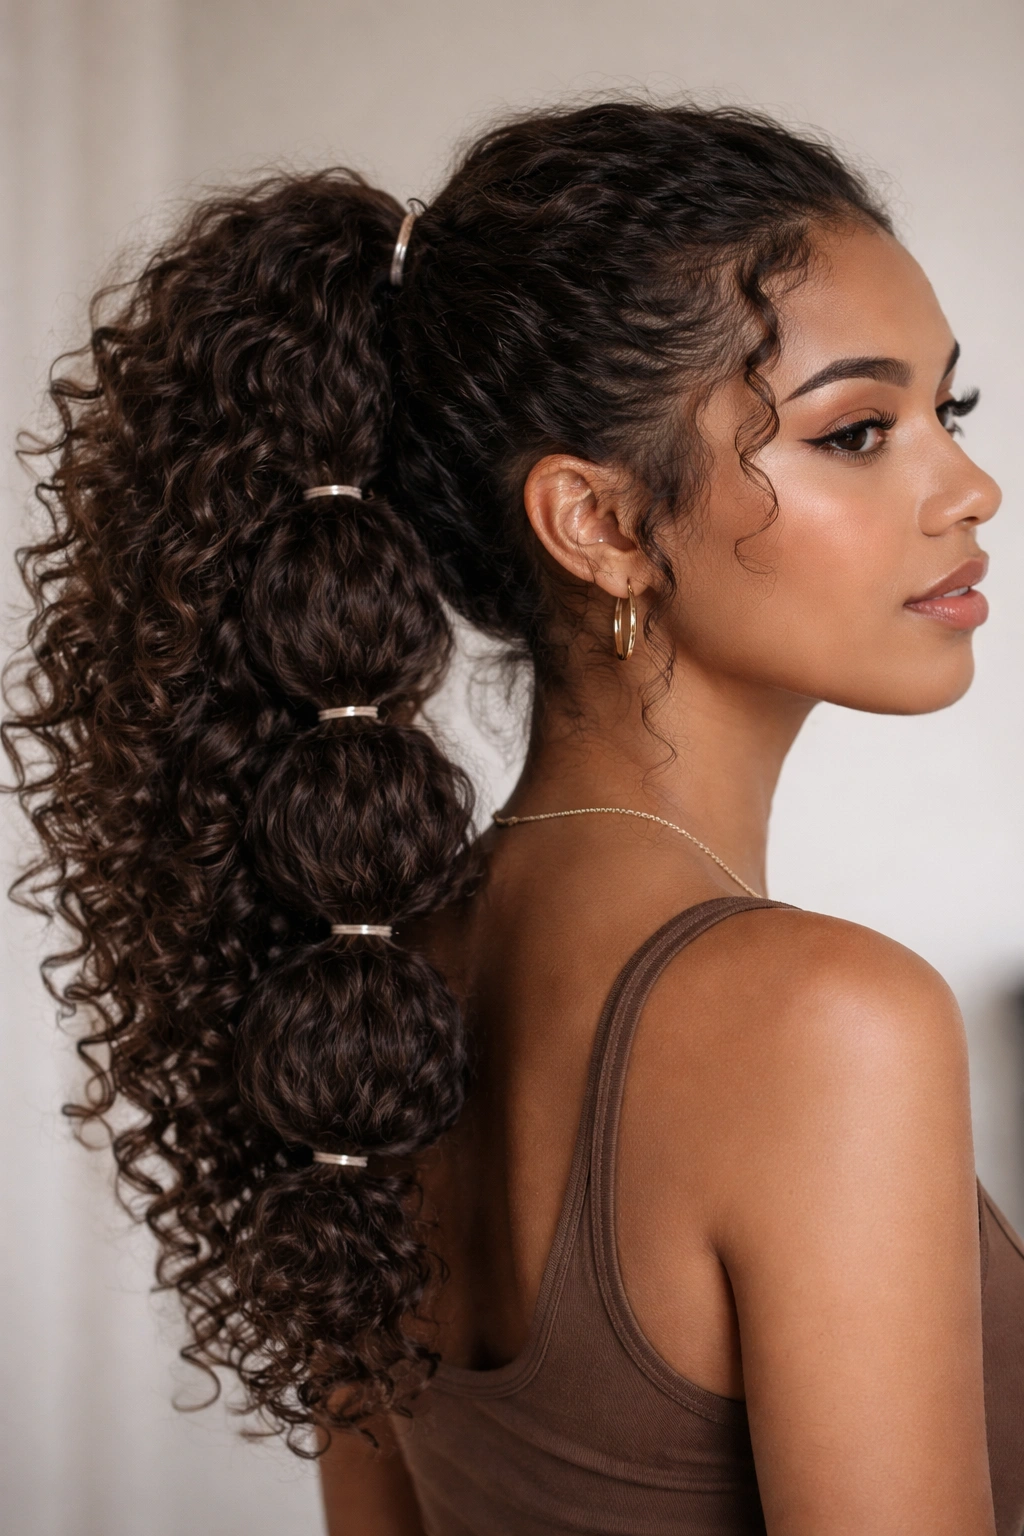
The bubble ponytail has become a go-to style across all hair types, but for curly hair, the technique needs a slight adjustment to prevent your bands from creating visible dents that take days to recover from. Instead of sectioning a straight ponytail, you’re using rubber bands to cinch your curls into defined sections while allowing them to maintain their natural texture and volume. The result is a ponytail that looks fuller, bouncier, and more intentionally styled than a traditional single-band ponytail, plus each section can be gently separated and fluffed to customize the level of poofiness you want.
Why This Works for Curly Hair
Curly hair naturally wants to cluster and form cohesive curl groups, and the bubble ponytail technique works with that tendency rather than against it. Each rubber band essentially creates a boundary that says “this group of curls stays together,” which actually reduces frizz by containing those curls that would otherwise brush against each other and create friction. The spacing between bands allows each curl cluster to express its full texture and bounce, giving your overall ponytail more visual interest and movement than you’d get from a flat, single-banded style. For curls that tend toward the frizzy side, this compartmentalized approach keeps strands organized without requiring heavy products or flattening techniques.
How to Create This Style
- Brush or finger-comb your curls into a ponytail at your desired height (high, mid, or low) and secure with a soft elastic or silk scrunchie at the base
- Starting just below your elastic, place a rubber band around the ponytail about 1 to 1.5 inches down, pulling tight enough to cinch but not compress
- Slide the section between the base elastic and this first rubber band upward, gently pressing curls outward to create a bubble
- Repeat this pattern down the length of your ponytail—new rubber band, separate the section between bands, fluff and separate, move down and repeat
- For a curlier effect, use a medium-tooth comb to gently pick out individual curls within each bubble, encouraging them to separate and expand
Styling Tips & Product Suggestions
- Clear or matte-finish rubber bands are nearly invisible in the hair and work best for a polished look, while colored bands can create a trendy accent—choose based on your desired aesthetic
- Apply an anti-frizz cream or curl-holding gel to the base of each bubble section before banding if you’re working with particularly frizz-prone curls
- A light hairspray at the end helps set the style without making curls feel crunchy or weighed down—use the lightest spray you can find
- This style is especially effective on curls that have been moisturized and defined the night before, allowing them to have already settled into their pattern
Worth knowing: The number of bubbles you create should depend on your ponytail length—longer hair can have 5-7 bubbles, while shorter ponytails look better with 3-4. The spacing makes the visual difference between “intentional style” and “just pulling up my hair,” so don’t skimp on sections.
3. Two-Strand Twisted Crown with Rubber Bands
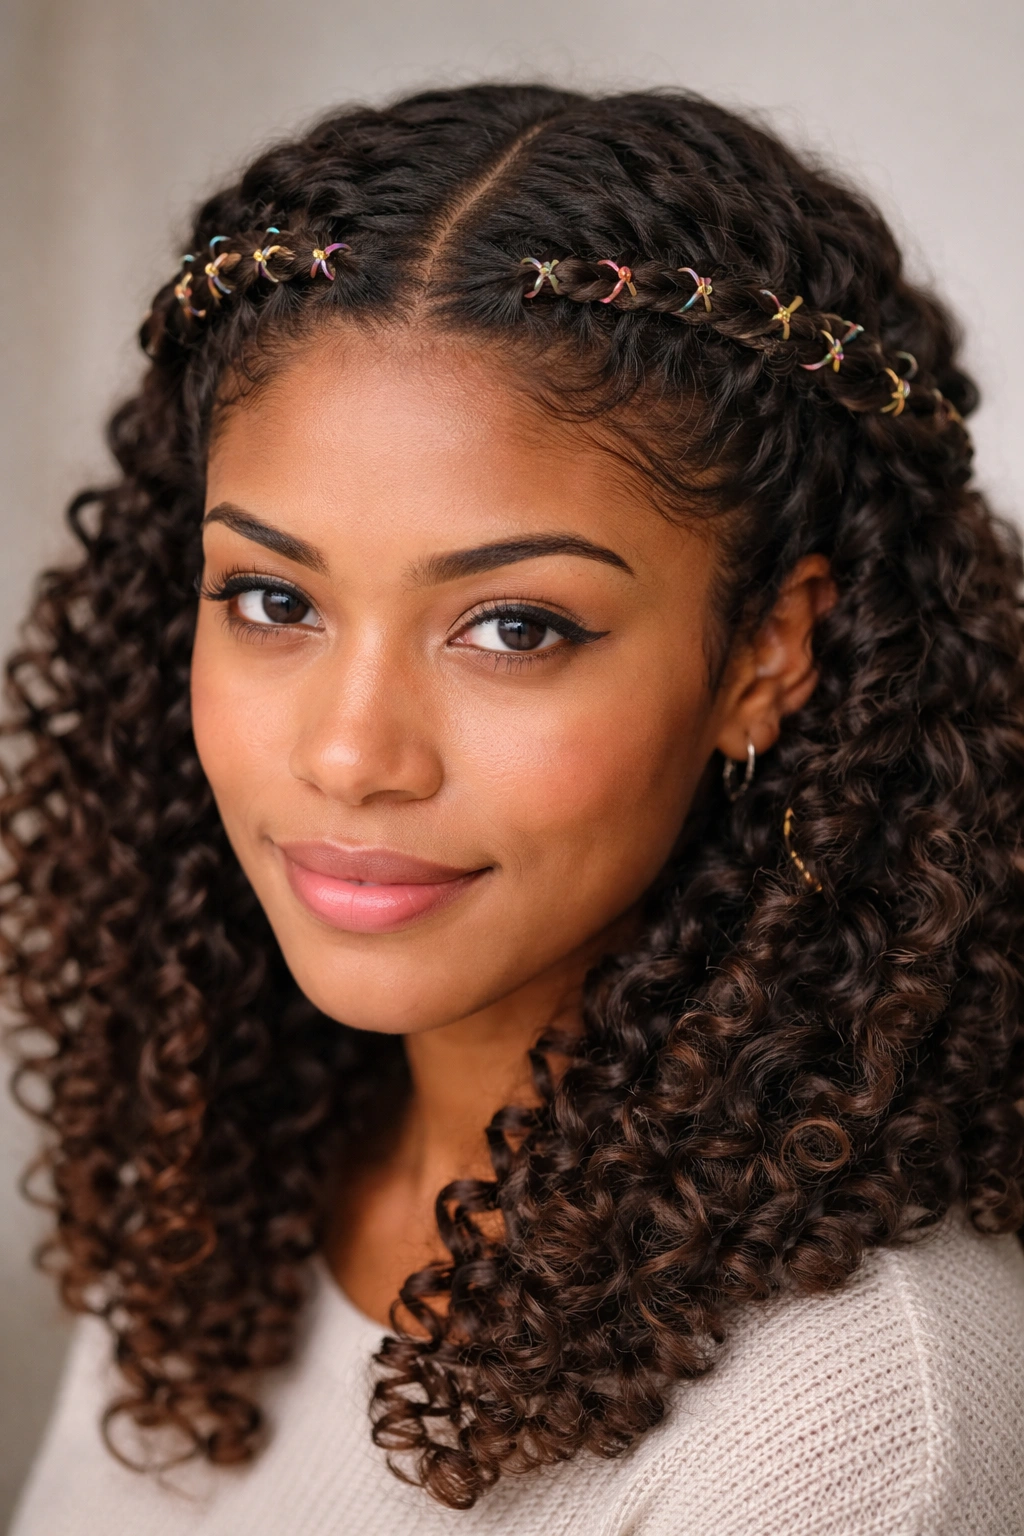
A twisted crown hairstyle positioned around your head creates an elegant, romantic look that works equally well for casual weekend wear and formal occasions. The technique involves creating two twisted sections that spiral around your head and meet at the back, secured with rubber bands to hold the twist in place and create defined texture. For curly hair, the twist technique intertwines your curl strands in a way that creates a woven, intricate appearance—the curl pattern actually enhances the visual interest of the twist rather than making it look flat or blended like it might on straight hair.
Why This Works for Curly Hair
When you twist curly hair, the individual curls maintain their texture and shape while being woven together, creating a multi-dimensional effect that reads as much more intricate and intentional than a twist in straight hair. The rubber bands placed strategically along the twist don’t flatten your curls—they actually hold the twisted pattern in place while allowing each curl to still express itself. This creates a hairstyle that looks delicate and detailed from a distance but shows beautiful textural complexity up close. The tension of the twist is distributed across the curl structure rather than pulling a single strand straight, making it easier on your hair than methods that compromise your natural pattern.
How to Create This Style
- Start with curls that have been styled and set for at least a few hours, so they hold their pattern well (day-two curls are ideal)
- Section your hair horizontally from one side of your head, starting above your ear and working toward the back
- Divide this section into two equal pieces and begin a simple two-strand twist, crossing one section over the other and working toward the back of your head
- As you twist, place a small rubber band every 2-3 inches along the twist to secure the pattern and prevent the sections from unraveling
- Repeat the same process with the other side of your head, creating a mirror-image twist that meets the first one at the nape
- Secure both twists together at the back with a larger rubber band or decorative clip
Styling Tips & Product Suggestions
- Apply a light mousse or curl cream to each section before twisting—this gives grip and helps the twist hold its shape throughout the day
- Use very small, clear rubber bands that won’t show against your hair; place them on the underside of the twist where they’re less visible
- If you’re working with particularly loose or frizzy curls, set the twist lightly with a flexible-hold hairspray before adding bands to prevent individual curls from popping out of the twist
- This style works best when you’re not trying to make the twist smooth—embrace the textural imperfection and encourage small curls to peek out of the twist for a lived-in aesthetic
Pro tip: Before you finish, gently use your fingertips to slightly loosen the twist by pulling the curls outward—this creates a softer, fuller crown effect rather than a tight, compact twist. You want it to look intentionally tousled, not like you’re pulling your hair so tight your scalp hurts.
4. Stacked Bun with Textured Layers
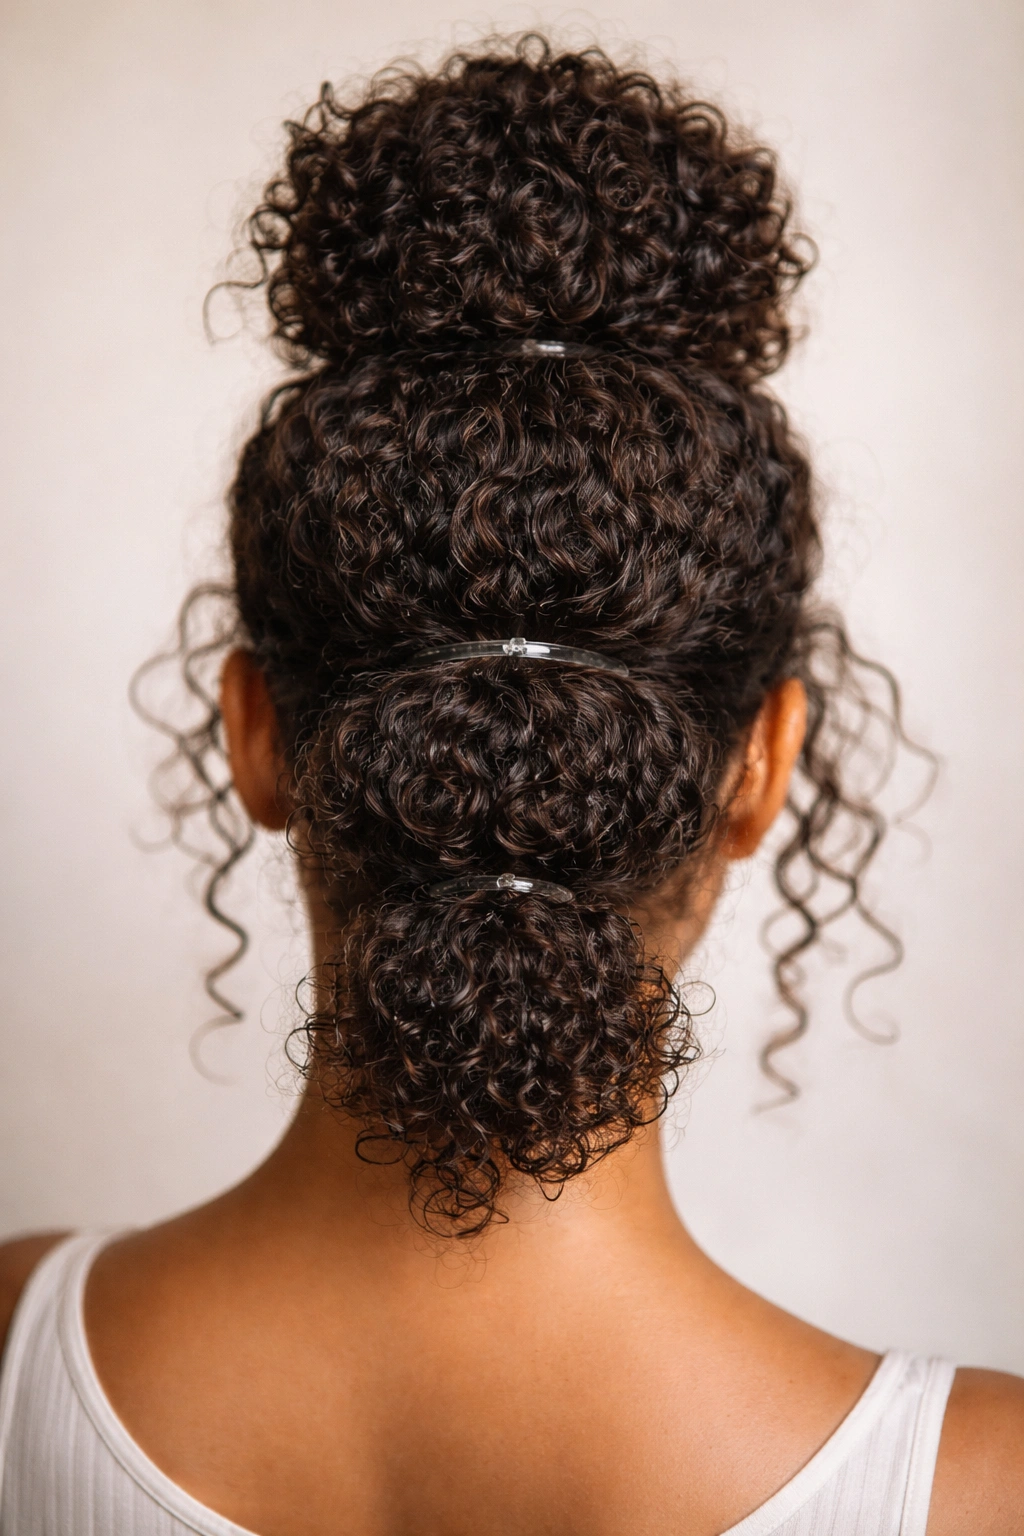
A stacked bun takes the concept of using rubber bands for structure and turns it into an updo that’s suitable for everything from a casual work-from-home day to a more polished event. By creating layers of buns stacked vertically on top of each other, separated and secured by rubber bands, you create a style that looks complicated and elegant but is actually quite simple to execute. For curly hair, the layers are naturally textured and voluminous, giving you a bun that’s never flat, sleek, or overly polished—it’s intentionally curly and architectural.
Why This Works for Curly Hair
Stacking multiple bun layers means you’re distributing your hair volume across several distinct sections rather than trying to twist everything into one dense ball at the crown. Each layer gets to maintain its curl texture while being shaped into a bun, so you end up with a style that looks full and textured rather than tight and smooth. This approach also means you’re not putting all the weight and tension on one section of hair at your crown—you’re distributing the load across multiple bands and multiple anchoring points. For curly hair that tends toward the delicate side, this is a gentler updo option that still provides the security and polished look of a traditional bun.
How to Create This Style
- Start with moisturized, defined curls—this style works beautifully on day-two or day-three curls
- Gather all your hair into a high ponytail and secure with a soft elastic or silk scrunchie
- About 2 inches below that first band, place a second rubber band and twist the section of ponytail above it into a loose bun shape; secure the bun with bobby pins placed horizontally through the bun to hold the shape
- Move down another 2 inches and place a third rubber band, then twist that section into another bun and pin it
- Continue creating 3-5 buns depending on your hair length, spacing them evenly and creating progressively smaller buns as you move down (optional, for a tapered effect)
- Leave the remaining ponytail tail hanging loose, or wrap it around the bottom bun and pin to hide the ends
Styling Tips & Product Suggestions
- Use a strong-hold mousse or curl-defining gel on each section before twisting it into a bun—this gives the bun shape clarity and helps it hold for hours
- Small, flat bobby pins in a color matching your hair work best; place them horizontally through the bun so the weight distributes evenly
- After securing all your buns, gently separate and fluff each one by using your fingers to pull small curl clusters outward
- A light spritz of flexible-hold hairspray keeps individual curls in place without making the bun feel crunchy or overly constructed
Worth knowing: The beauty of this style is that it actually improves throughout the day—as your curls relax slightly, the buns become even more textured and voluminous. Expect it to look slightly tighter and more defined right after you create it, and progressively softer and fuller as time passes.
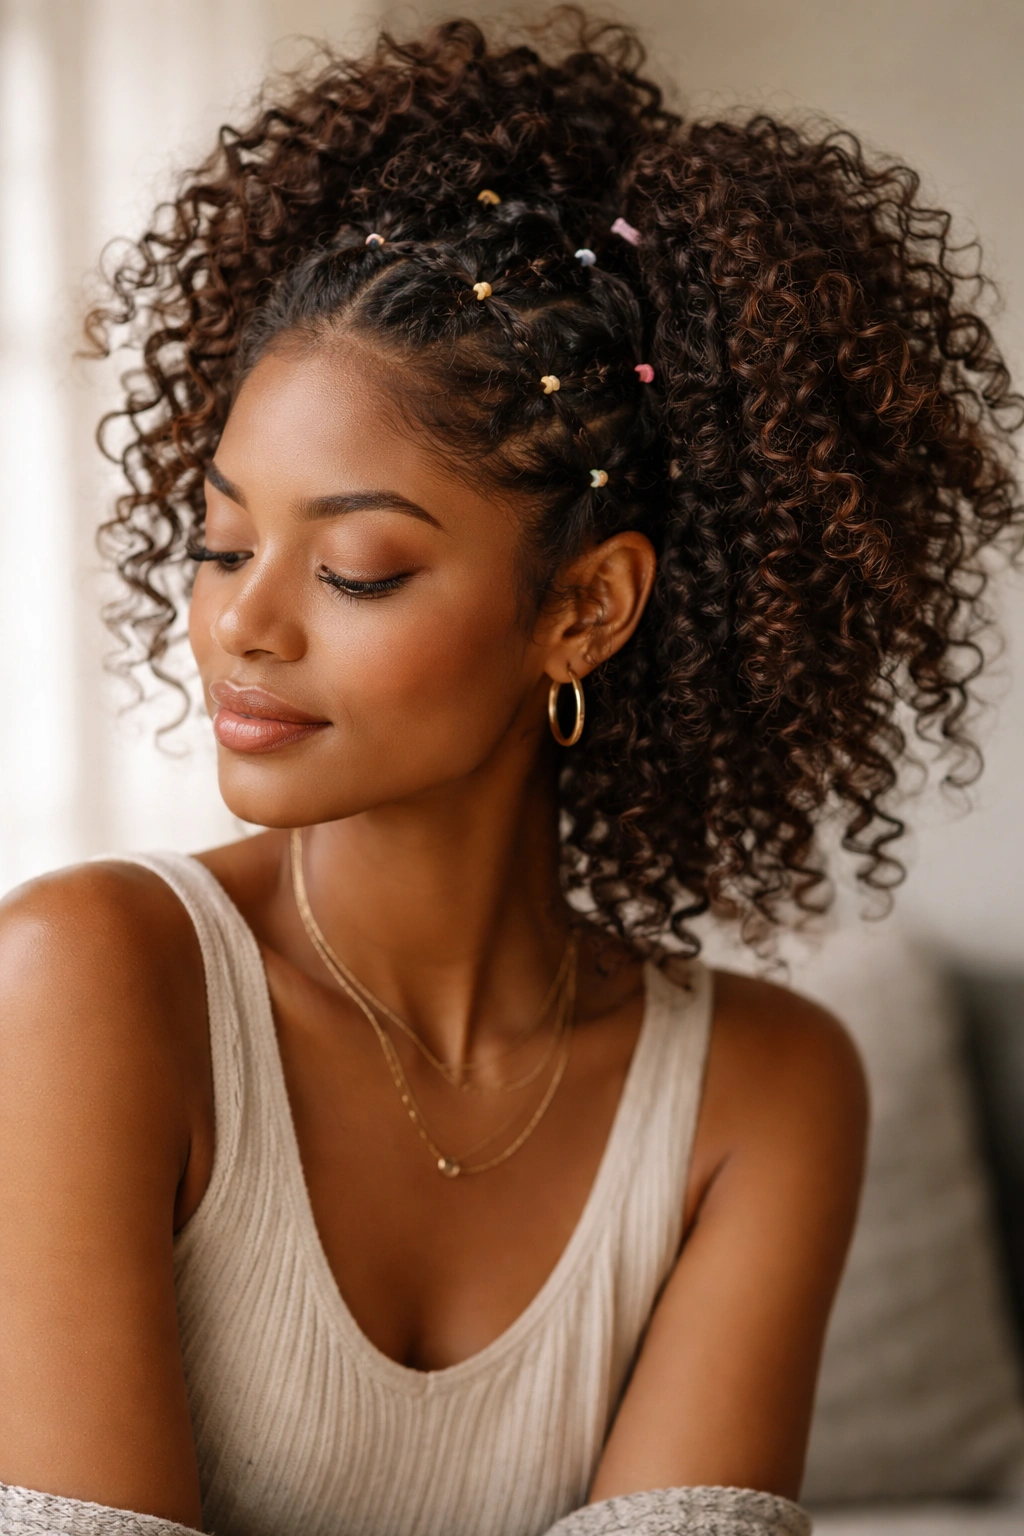
5. Half-Up Curly Style with Strategic Banding
The half-up style is a classic that works for virtually any occasion, and for curly hair, it’s an elegant way to frame your face while still showing off your full curl pattern below. By using rubber bands strategically placed in the upper section, you create defined texture and intentional styling that makes the half-up look feel polished rather than like you simply threw your hair up. The technique involves creating a ponytail with the upper portion of your hair, then using rubber bands to add dimension and structure to that section while the lower curls fall freely, creating a beautiful balance between control and texture.
Why This Works for Curly Hair
The half-up style for curly hair is all about creating visual interest in the upper section without weighing down the free-flowing curls below. By using multiple rubber bands in the upper ponytail, you’re creating a focal point at the crown that draws the eye upward and frames the face beautifully. The banding technique adds texture and dimension that makes the style look intentional and styled rather than just casually pulled back. Meanwhile, the curls below remain full, bouncy, and unencumbered, giving you the best of both worlds—defined, polished styling on top and uninhibited curl pattern below.
How to Create This Style
- Begin with freshly styled or refreshed curls—you want the full curl pattern expressing itself, especially in the lower section
- Gather the top section of your hair (from temples back) and create a ponytail at the crown, securing with a soft elastic or silk scrunchie
- Place the first rubber band about 1 inch below the base elastic, creating a small bubble effect
- Add a second rubber band about 1 to 1.5 inches below that, and optionally a third for maximum texture
- Gently fluff the sections between each band, pulling curls outward to create dimension
- Option: take one small section from the ponytail just below the base band and wrap it around the band to hide the elastic
Styling Tips & Product Suggestions
- Use a curl-defining cream on the upper section before banding to enhance the texture of those bubbles and help them hold definition
- Small, seamless rubber bands work best for this style, or choose a metallic or jeweled option if you want the bands to be a design feature
- After banding, use a light touch to flip your head over and finger-comb the lower section to encourage maximum volume
- A flexible-hold hairspray on the upper banded section keeps the bubbles looking fresh throughout the day without affecting how the lower curls move
Pro tip: This style is perfect for second-day curls because the upper curls have already settled and will hold their banded shape beautifully, while the lower curls still have bounce and definition. Try it when you’re refreshing your curls rather than right after wash day for optimal results.
6. Side Ponytail with Cascading Curls
A low side ponytail is inherently romantic and flattering, and when you add rubber band layering to it, you transform it from a simple low-pony into a style with serious visual impact. By banding a side ponytail at strategic intervals, you create cascading sections of defined curls that seem to flow and spill rather than just hang straight down. For curly hair, this technique is a game-changer because it takes advantage of your natural curl movement and makes each section pop individually while the overall style maintains elegance and polish.
Why This Works for Curly Hair
The side ponytail placement already creates a flattering angle that frames one side of your face, and adding rubber band layering to that style creates additional visual interest and definition. Each banded section becomes a distinct curl cluster that maintains its own texture while contributing to the overall cascading effect. The side placement means that as curls move and shift throughout the day, they create this beautiful, organic-looking waterfall effect that’s far more visually compelling than a side ponytail without banding would be. Your curls essentially create their own movement and dimension—the bands just organize that movement into an intentional, styled pattern.
How to Create This Style
- Start with well-moisturized, defined curls for this style to truly shine
- Brush or finger-comb your curls to one side of your head, gathering them toward your ear on one side
- Create a low ponytail just behind the ear or at the nape, securing with a soft elastic or silk scrunchie in a color that matches your hair
- Beginning about 1.5 inches below the base elastic, place a rubber band around the ponytail
- Continue spacing rubber bands every 1.5 to 2 inches down the length of your ponytail
- Between each band, use your fingers to gently pull curls downward and outward, creating a slightly stretched effect that emphasizes the cascading shape
- Leave the very end of your ponytail loose and uncut so it tapers to a point with the natural curl pattern
Styling Tips & Product Suggestions
- A light curl cream applied before creating the ponytail helps curls maintain their definition through the banding process
- Use clear or discreet rubber bands that won’t interrupt the visual flow of the cascading curls
- Lightly mist the ponytail with a hydrating spray after banding to refresh the curls and enhance their movement
- If you want a more polished aesthetic, tuck a small decorative element (like a metallic clip or a silk scrunchie in a coordinating color) at the base of the ponytail to draw attention upward
Worth knowing: The cascading effect is most dramatic when you use at least 4-5 rubber bands and really embrace the space between them. Fewer bands create a more subtle effect, while more bands create maximum texture and visual interest. Choose based on your hair length and the aesthetic you’re going for.
7. Rubber Band Spiral Bun for Curly Hair
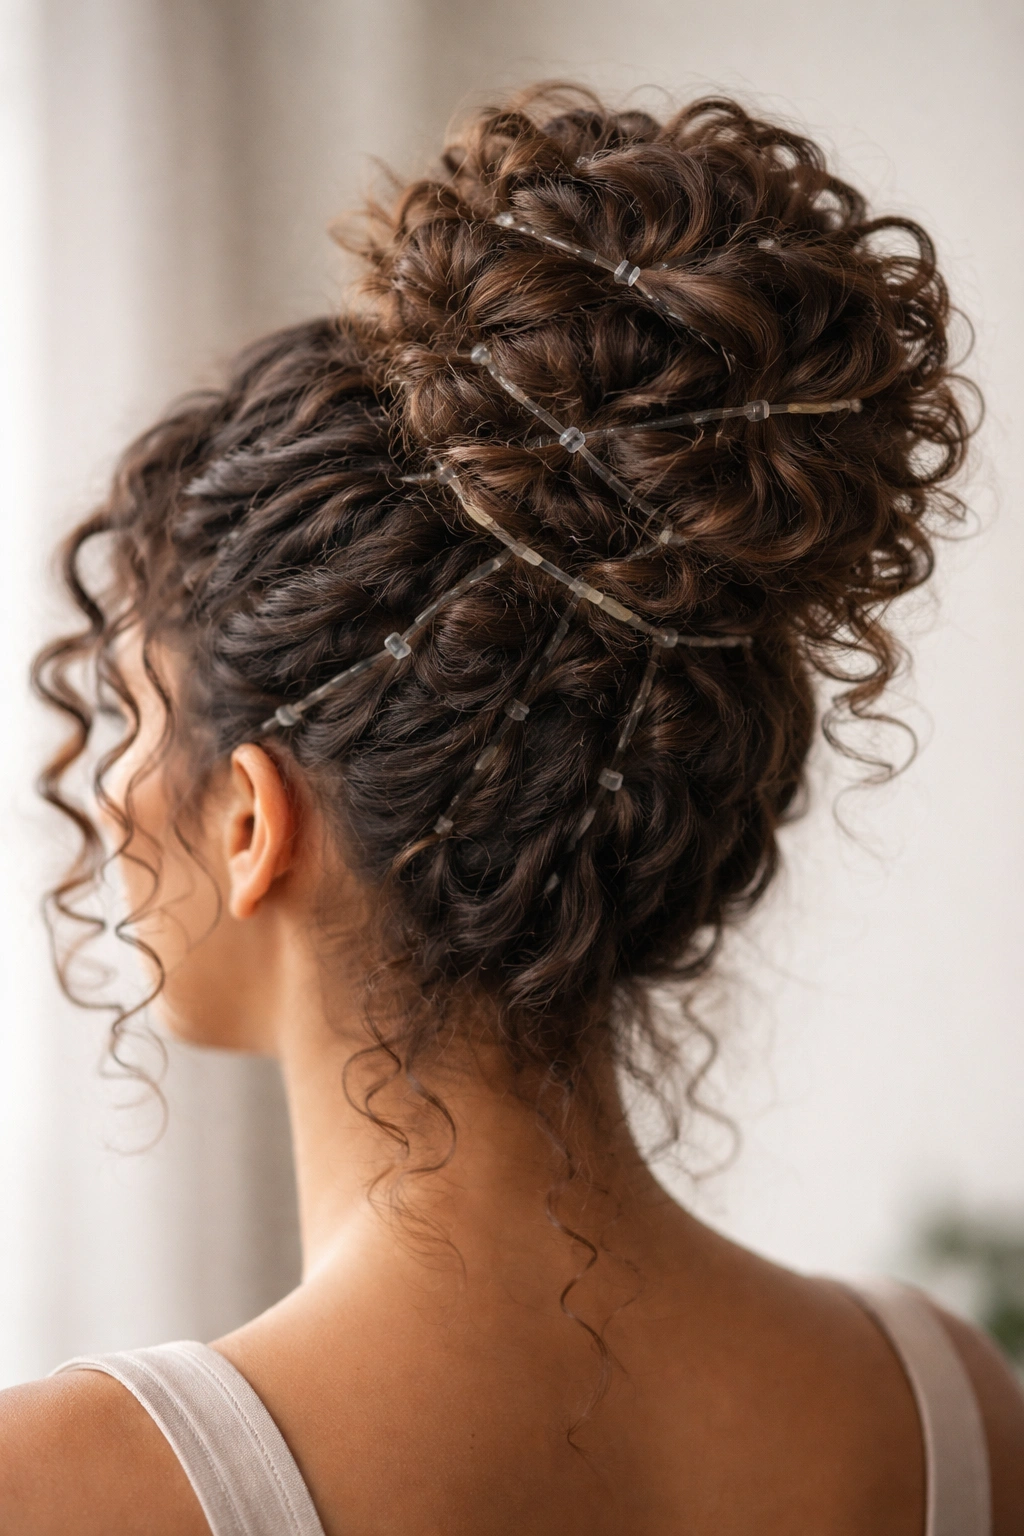
A spiral bun created with the help of rubber bands is a stunning updo option that works for both everyday wear and more formal occasions. Instead of twisting your ponytail into a bun and pinning it, you’re using rubber bands placed in a spiral pattern to create the bun shape and hold it in place. For curly hair, this technique is particularly effective because the rubber bands allow your curls to maintain their texture throughout the structure of the bun—you end up with a bun that’s clearly made of curls rather than a smooth, twisted shape.
Why This Works for Curly Hair
A traditional spiral bun created with twisting can flatten curly hair and make the bun look smaller and less textured than you’d want. Using rubber bands in a spiral pattern, however, allows you to create the bun shape while keeping your curls expanded and textured throughout. Each band is placed in a spiral pattern around the ponytail, creating an invisible internal structure that holds the bun’s shape while your curls pouf out between and around the bands. The result is a bun that looks full, dimensional, and intentionally curly rather than smooth and polished. It’s a more relaxed take on the updo that actually flatters curly hair much better than traditional slicked-back bun techniques.
How to Create This Style
- Start with curls that are styled and set, preferably day-two or day-three curls that hold their pattern well
- Create a high ponytail at the crown and secure with a soft elastic or silk scrunchie
- Lightly tease the ponytail at the base to create texture and grip for the bun structure
- Place a rubber band about 1 inch below the base elastic, wrapping it firmly to secure
- Loosely coil the ponytail upward in a spiral motion; as you coil, place another rubber band every full spiral rotation to hold the spiral in place
- Once you reach the end of your ponytail, tuck the tail underneath or around the bun and secure with a bobby pin
- Continue placing rubber bands around the entire spiral, creating an internal structure that’s invisible from the outside
Styling Tips & Product Suggestions
- A lightweight texturizing spray or curl cream applied to the ponytail before creating the spiral helps the bun hold its shape without looking stiff
- Use small, seamless rubber bands in a color matching your hair so they’re invisible
- After securing all the bands, gently use your fingers to pull small curl clusters outward from the spiral, creating a textured, full appearance
- A flexible-hold hairspray sets the style without making individual curls feel crunchy or overly constructed
Pro tip: The key to a beautiful spiral bun on curly hair is resisting the urge to make it tight and smooth. Instead, embrace the textural imperfection and encourage curls to show their natural pattern throughout the bun. This is a style that looks better when it’s slightly undone and clearly curly rather than when you’ve tried to tame everything into submission.
8. Braided Band Ponytail for Curl Control

A braided band ponytail combines two techniques—subtle braiding and rubber band placement—to create a style that’s both decorative and practical. The upper section includes a small braid that travels from one side of your head and feeds into a ponytail, which is then banded for extra definition. This style works beautifully for curly hair because the braid creates a focal point that’s intricate and visually interesting, while the banded ponytail below maintains all your natural curl texture. It’s a step up in complexity from a simple ponytail but still accessible enough for everyday wear.
Why This Works for Curly Hair
The braid in the upper section creates texture and visual interest that plays beautifully with curly hair—when you braid curly strands, they maintain their texture and create a far more intricate, detailed appearance than a braid in straight hair. The bands placed in the ponytail section below the braid then add additional dimension and definition, creating a multi-textured style that celebrates your curl pattern rather than trying to smooth it away. The combination of the braid and the banded sections creates a hairstyle that feels both intentional and effortlessly textured—polished enough for most occasions but clearly curly and natural.
How to Create This Style
- Start with well-styled curls; day-two curls work particularly well for this style
- On one side of your head, gather a small section of hair from your temples—this will be your braid section
- Create a three-strand braid with this section, working toward the back of your head and keeping the braid fairly loose so your curls show through
- Secure the braid with a small elastic, then gather this braid plus the rest of your hair into a ponytail at the back of your head
- Secure the full ponytail with a soft elastic or silk scrunchie
- Place rubber bands down the length of the ponytail, spaced every 1.5 to 2 inches
- Gently fluff the sections between each band, pulling curls outward to create the bubble effect
Styling Tips & Product Suggestions
- Apply a light curl cream to the section you’ll be braiding to give the braid grip and help it hold its shape
- Keep your braid intentionally loose—you want to see individual curls throughout the braid, not a tight, compressed plait
- Use a medium-hold hairspray on the braid after creating it to help it hold throughout the day without looking overly constructed
- The rubber bands in the ponytail section work best when they’re slightly loose—you want the curls to expand around them rather than being compressed
Worth knowing: This style works particularly well as a casual-to-semi-formal option because it has enough styling effort visible to feel intentional and polished, but enough curl texture visible to feel naturally you. It’s a confidence builder for anyone who worries that styled curly hair always has to look slicked-back or smoothed.
Final Thoughts
Rubber bands are an underrated styling tool for curly hair because they work with your natural texture rather than against it, creating defined, voluminous styles without the need for heat, heavy products, or techniques that compromise your curl pattern. Whether you’re choosing a simple high ponytail with layered banding or attempting the more complex spiral bun, the principle remains the same: thoughtful band placement creates visual structure while allowing your curls to maintain their natural bounce and texture.
The most important takeaway is that there’s no one “right” way to use rubber bands with curly hair—the techniques work across different curl types, from loose waves to tight coils, and across different lengths and densities. What matters is that you’re paying attention to placement, tension, and the fluffing-and-separation step that transforms a rubber-banded ponytail from looking like you just pulled your hair back to looking like an intentional, styled choice.
As you experiment with these styles, pay attention to which ones make you feel most confident and which ones work best with your hair’s particular pattern, length, and texture. You might find that the half-up style is your everyday go-to, but the spiral bun becomes your favorite for special occasions. Or you might discover that the sectioned bubble ponytail is your secret weapon for taming second-day curls when you’re not ready to wash. The beauty of rubber band styling is that once you understand the technique, you can adapt these eight styles endlessly—adjusting heights, spacing, and the number of bands based on your specific curl needs and the look you’re trying to achieve on any given day.