Getting your curls camera-ready for the workplace doesn’t mean you have to fight your natural texture or spend an hour with a flat iron every morning. The truth is that curly hair offers incredible versatility for professional styling — if you know which techniques actually work with your curl pattern instead of against it. The challenge most people face isn’t that curls can’t look polished; it’s that conventional “professional” hairstyle advice was written for straight hair and completely ignores what makes curly hair unique.
Your curls have density, volume, and movement that straight hair simply doesn’t have. That’s not a limitation — that’s your secret advantage in the workplace. You can create updos that look intentional and elegant, half-styles that frame your face beautifully, and sleek looks that command attention in a conference room. The key is understanding how moisture, products, sectioning, and securing techniques work specifically for curly textures.
What you’ll find in this guide are ten professionally polished hairstyles that actually work for curly hair, created by people who have curls and understand the daily reality of styling them. Each style includes the exact techniques, products that genuinely help, and honest tips about what goes wrong and how to fix it. Most importantly, these aren’t styles that require you to change your hair — they work with your natural curl pattern to create looks that are both beautiful and practical for a full workday.
1. The Sleek High Bun
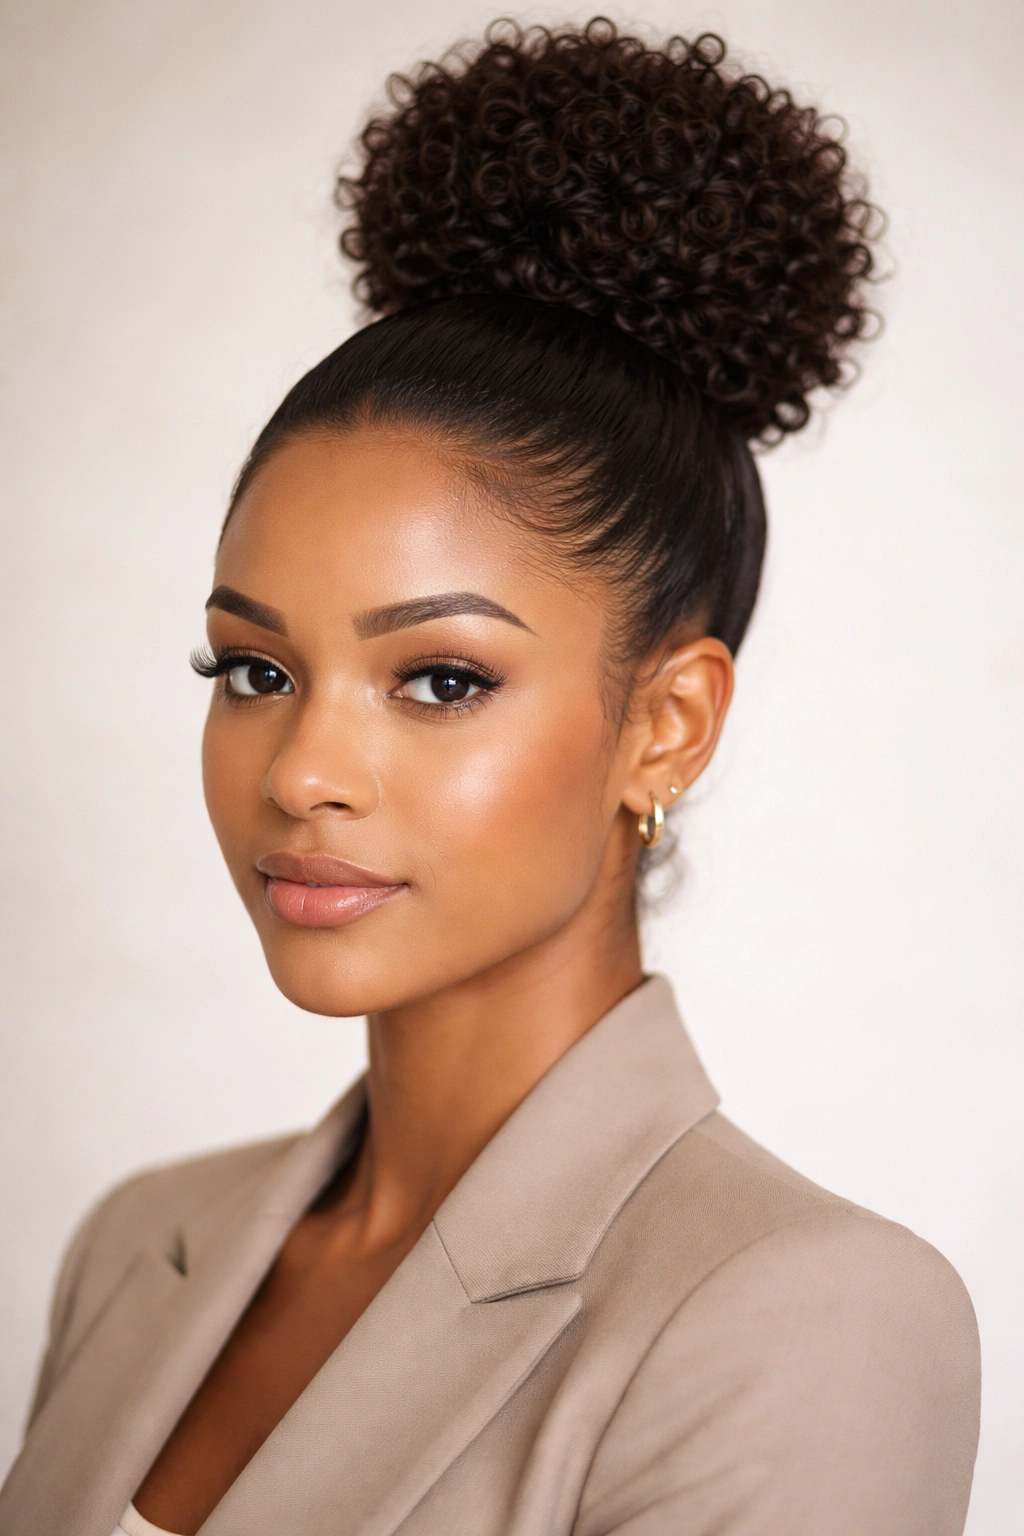
A sleek high bun represents the ultimate professional power move for curly hair, provided you’re working with your curl pattern rather than against it. This style reads polished and intentional without requiring your hair to be straight or flat. The key is creating enough tension and smoothness at the crown that the style looks refined, while allowing your curls to bunch naturally at the base of the bun where they catch and hold the design.
Why This Works for Curly Hair
The high bun actually suits curly hair because the natural volume and texture of curls create a fuller, rounder bun shape than straight hair could achieve with the same technique. Rather than looking thin or wispy, your bun will have genuine presence and dimension. The curls themselves provide the “fluff” that makes this style look expensive and intentional, not like you pulled your hair up in desperation five minutes ago.
How to Create This Style
Start with refresh spray or water misted lightly through your curls — this reactivates your curl pattern and makes strands more cooperative. Use a fine-tooth comb or detangling brush to smooth the hair at your crown, working from your hairline back toward where you want the bun positioned. Apply a smoothing serum or edge control cream to the very top layer of hair and smooth it down as you gather your ponytail high on your crown. Twist the ponytail loosely once around your fingers to form the bun shape, then secure with bobby pins pushed horizontally through the twisted section. Pin the underside where it won’t be visible, working from multiple angles to ensure the bun doesn’t slip.
Pro Styling Tips
- Use a smoothing serum on just the top layer rather than throughout your entire head — this keeps your roots sleek while letting your curls maintain their natural pattern beneath
- Mist the finished bun with light-hold hairspray rather than a heavy one, which can weigh down your curls and make the bun look stiff
- For extra security, wrap a thin strand of hair around the base of the bun where it meets your head and pin it down — this creates a finished, polished look and prevents flyaways
- If your curls are particularly fine or prone to slipping, use a bun cage or shaper underneath your twisted hair for structural support
2. Braided Crown
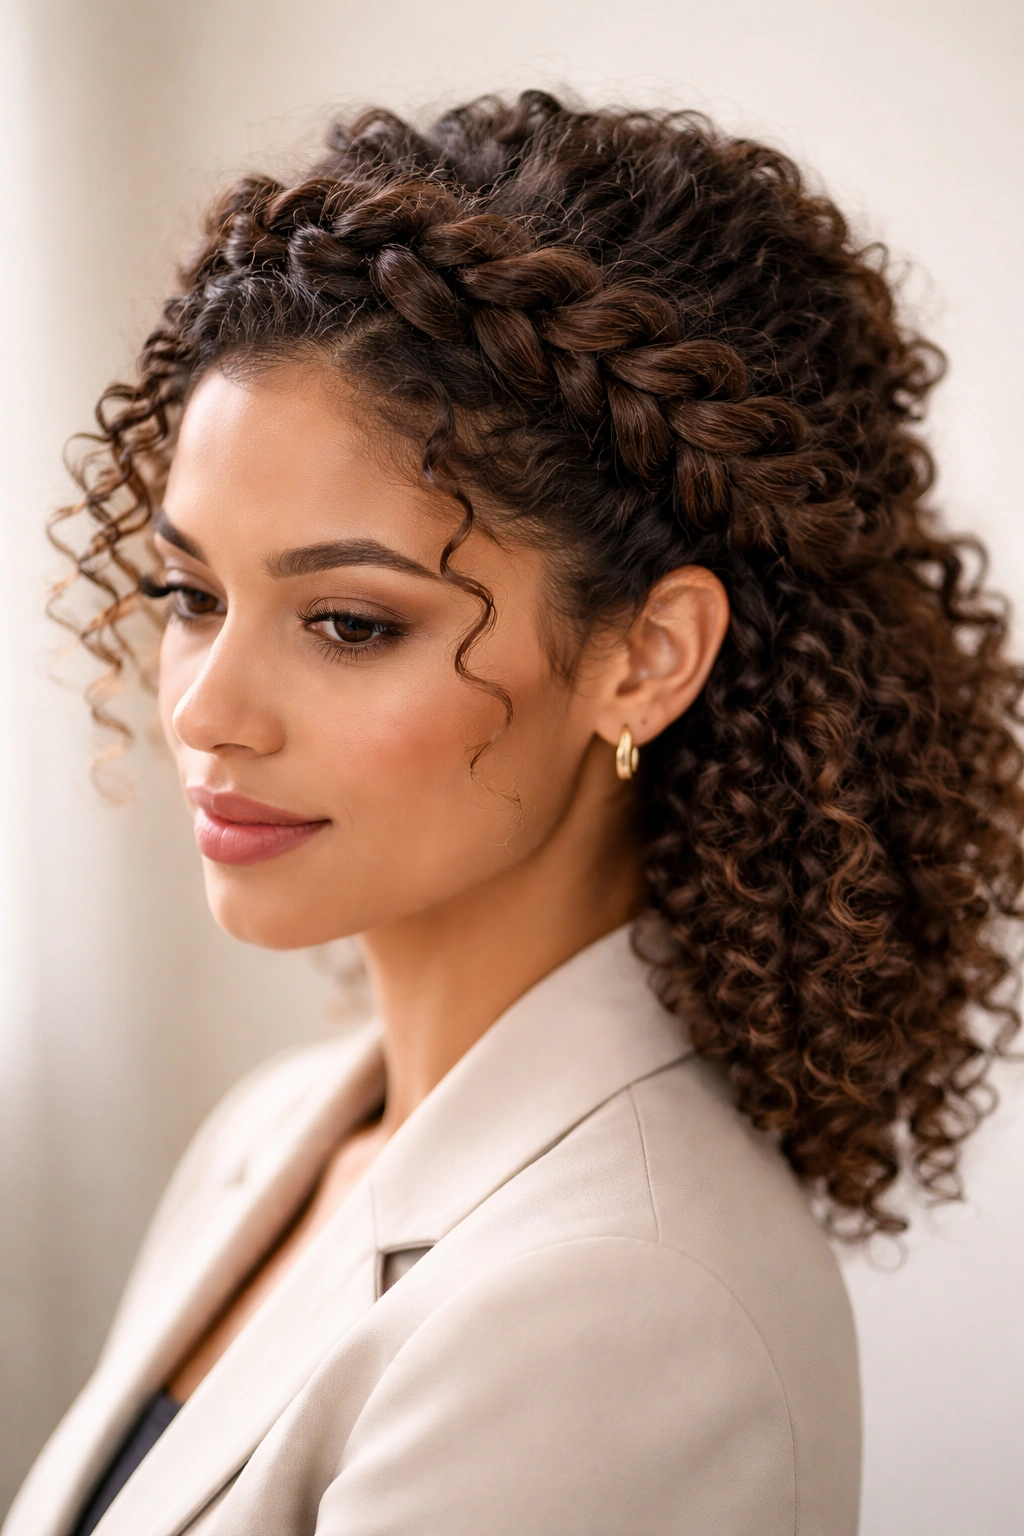
A braided crown is deceptively sophisticated and works beautifully with curly hair because your natural texture actually makes the braid look fuller and more interesting than a flat braid would on straight hair. This style keeps hair off your face and neck while creating a focal point at your crown that reads as intentional and professional. The braid itself becomes a design element rather than just a utilitarian style.
Why Braids Are Ideal for Curly Textures
Braids thicken visibly when they contain curly hair because each curl occupies more space within the braid structure. A three-strand braid made from curly hair looks fuller and more textured than the same braid made from straight hair. This natural fullness makes braided styles read as polished without requiring you to use tools or products that would change your texture. The slight frizz that curly hair naturally has within a braid actually adds to the visual interest and makes the style look less severe.
How to Create This Style
Divide your hair into three sections at the crown, starting approximately where your temples meet your forehead. Dampen each section lightly and apply a light styling cream that provides hold without crunchiness. Braid these three sections together using a standard over-under pattern, braiding loosely enough that your curls can puff out slightly from within the braid. Continue the braid down toward the back of your head, tucking it around toward the opposite side of your crown to create a crown effect. Secure the end with a clear elastic or a bobby pin tucked beneath your curls where it won’t show. Let your remaining curls fall naturally down your back.
Making It Last All Day
- Apply the styling cream to damp hair and allow it to dry slightly before you begin braiding — damp braid stays intact much better than soaking wet braid
- Braid loosely enough that you can see individual curls peeking through the braid pattern — this is the whole visual point
- Secure the braid end with a clear elastic or bobby pins that match your hair color, never a metallic clip that catches light
- If your braid is slipping throughout the day, use a texturizing spray at the roots to increase grip on individual strands
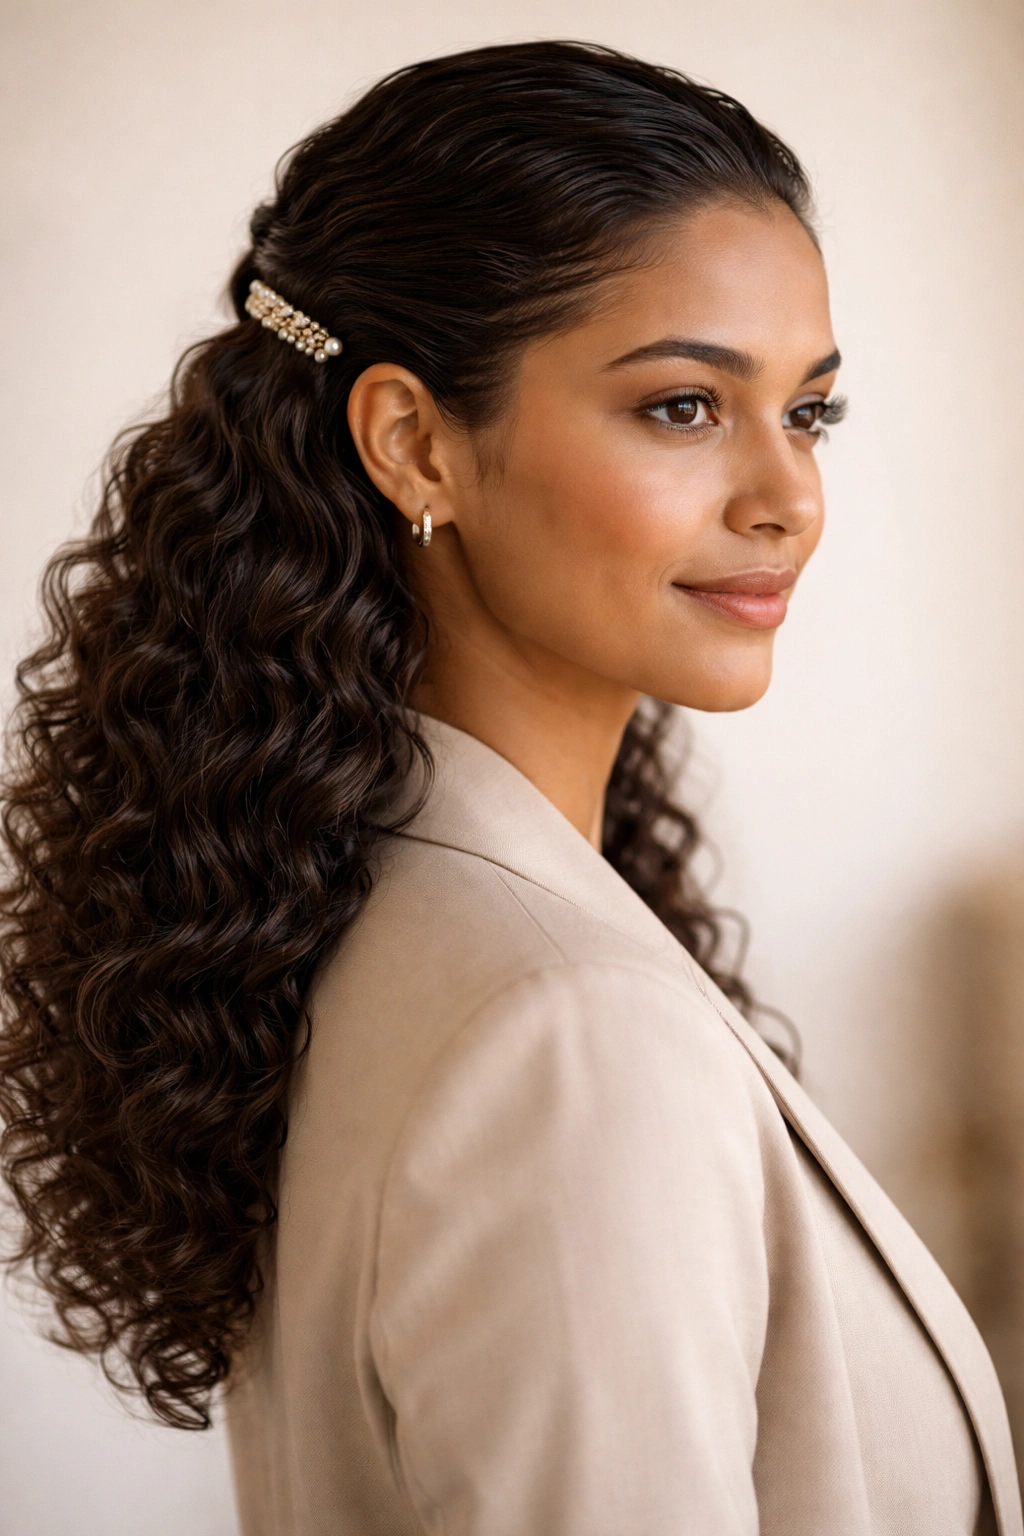
3. Half-Up Half-Down Waves
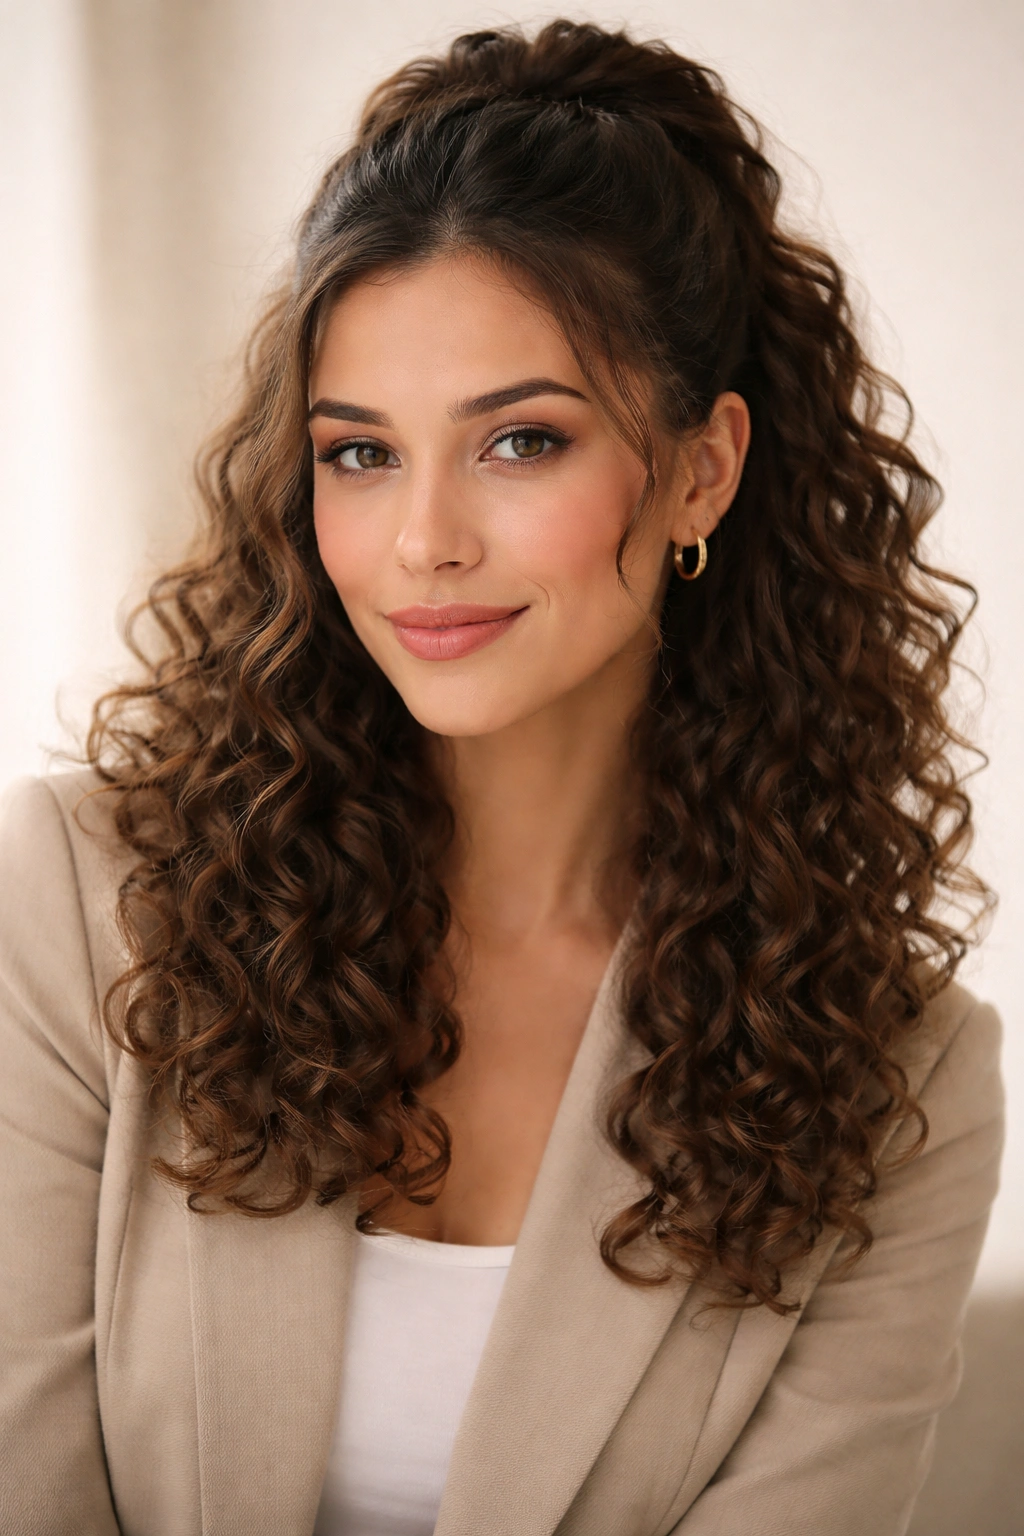
The half-up half-down style hits a perfect balance for curly hair — you get professional polish by lifting hair away from your face and neck, while your full curl pattern is visible and celebrated. This is the style that says you’re competent without being severe, and it works beautifully for everything from client meetings to creative sessions. The key is creating intentional texture rather than trying to smooth everything into waves.
Why This Style Suits Curly Hair Particularly Well
Half-up styles allow curly hair to shine because your curl pattern does most of the visual work. You’re not fighting your texture or trying to create waves that don’t naturally exist in your hair. Instead, you’re enhancing the waves and curls that are already there and creating a frame for your face. The style reads as put-together because the upper section is secured and intentional, while the lower section demonstrates that you’ve actually worked with your hair rather than fighting it.
Creating Intentional Waves
Start by refreshing your curls with water or a refresh spray, scrunching upward to reactivate your curl pattern. Allow curls to dry or air-dry for several minutes until they’re damp but not soaking wet. Apply a wave-enhancing cream or mousse to the lower section of your hair, scrunching upward again to encourage curl definition. For the upper section that you’ll be pulling up, apply a lightweight styling cream that provides hold without weighing down your crown.
Gather the hair at your crown — roughly from ear to ear across the back of your head — and secure it with a clip or bobby pins. Don’t pull too tightly; you want to lift the hair away from your neck without creating tension at your scalp. Leave face-framing sections around your temples loose and curling naturally. The finished look should show waves throughout the lower section and a secured-but-not-severe upper half.
Long-Day Maintenance
- Use a wide-tooth comb or your fingers to gently separate curls in the lower section rather than a brush, which breaks up your curl pattern
- Keep a lightweight hairspray in your desk for touch-ups; light mist rather than heavy application maintains your curl definition
- If the upper section feels loose by mid-afternoon, use a small bobby pin on each side of the clip for additional security
- Embrace slight frizz — it’s actually what makes this style work on curly hair and reads as texture rather than messiness
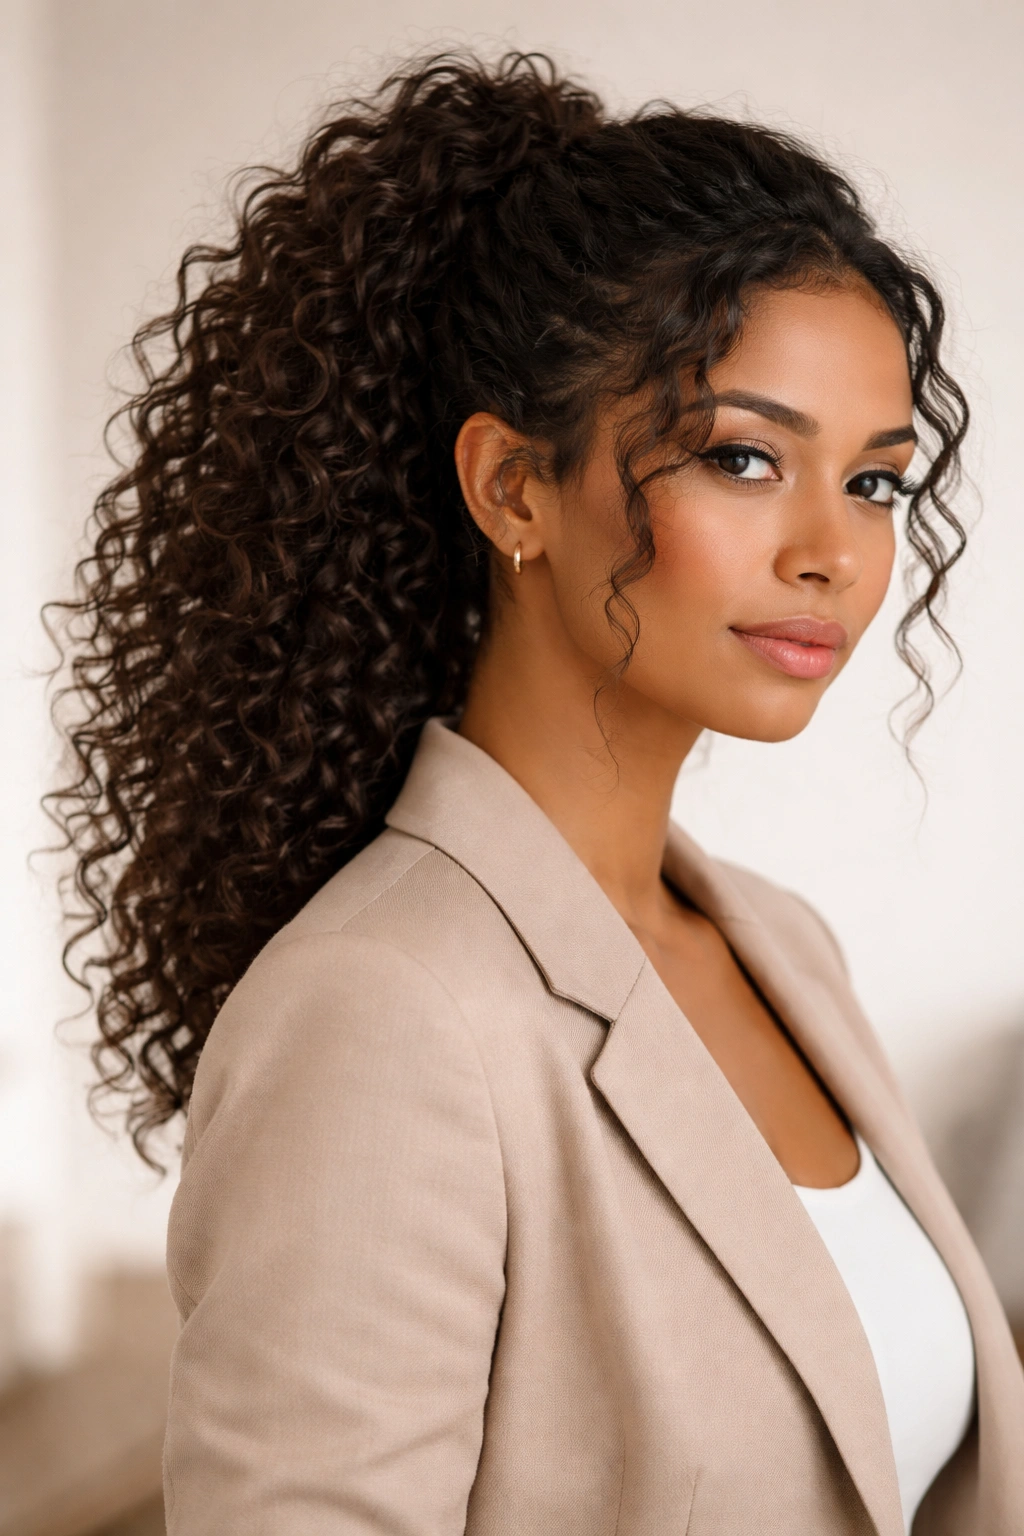
4. The Pineapple Updo
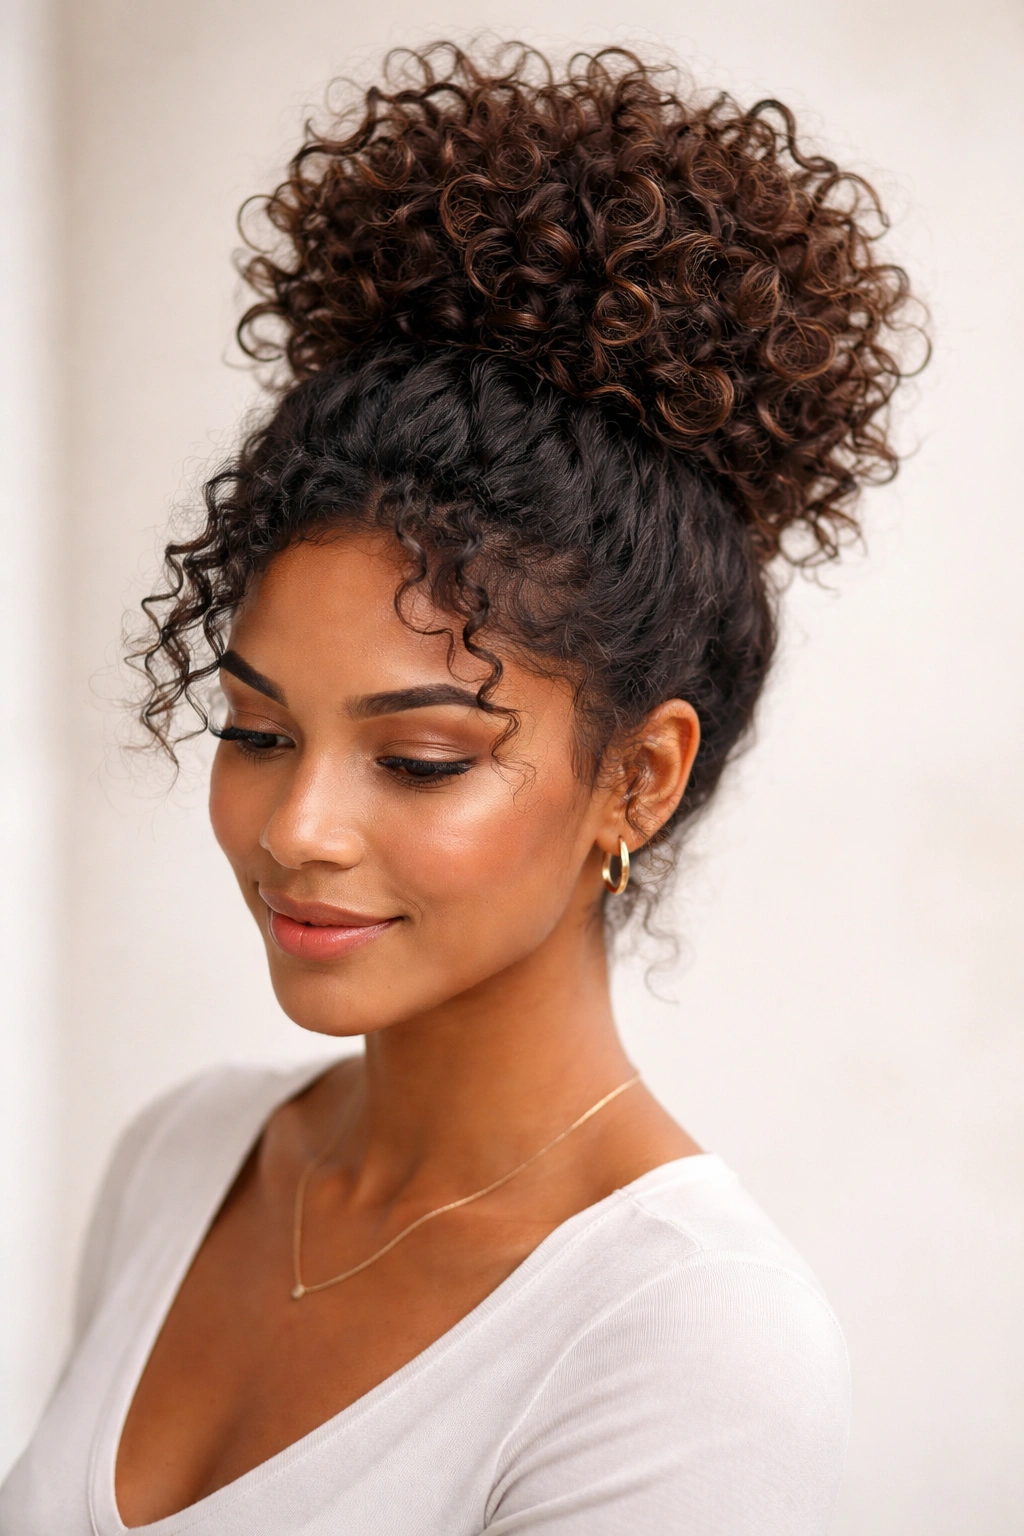
The pineapple updo gets its name from the distinctive crown shape created when you gather curly hair high on top of your head in a secure ponytail. This style is both incredibly practical and surprisingly chic. It works for curly hair because the natural volume of your curls creates a full, sculptural shape that looks intentional and fashion-forward rather than utilitarian. The pineapple is the go-to style for anyone with curls who wants maximum security and minimal fuss during a demanding workday.
Why Curly Hair Makes This Style Work
A pineapple works so well on curly hair because the shape is created by the natural projection of your curls, not by smoothing and styling. When you gather curly hair high on your head and secure it loosely, the curls themselves create the full, rounded shape. This is actually harder to achieve with straight hair, which tends to look thinner and less interesting in this style. Your curl pattern is doing the heavy lifting here, which means you can create this look quickly without requiring multiple passes with a brush or straightener.
Step-by-Step Creation
Flip your head upside down and use your fingers to gather your curls high at the crown — this creates lift and fullness naturally. Stand upright while still holding your curls up, and use a soft scrunchie or claw clip to secure your gathered ponytail. The ponytail should sit directly on top of your head, with curls cascading downward from that secured point. Don’t smooth or tension the ponytail excessively; you want the curls to maintain their natural pattern and fullness.
For added security, use a bobby pin or two inserted horizontally through the base of the ponytail, hidden beneath the curl cluster. Apply a light-hold hairspray to seal the style and prevent individual curls from slipping out of the main ponytail throughout the day.
Making It Professional
- Ensure the scrunchie or clip is secured tightly enough that the ponytail doesn’t slip, but not so tightly that you’re creating tension headaches
- Use a scrunchie in a neutral color or a claw clip that matches your hair rather than a contrasting color that stands out
- Allow curls to fall naturally from the ponytail point — don’t try to smooth or arrange them, which defeats the purpose of this style
- The pineapple works best when you’ve spent the previous night sleeping on your curls or have freshly refreshed them that morning
5. Twisted Low Bun
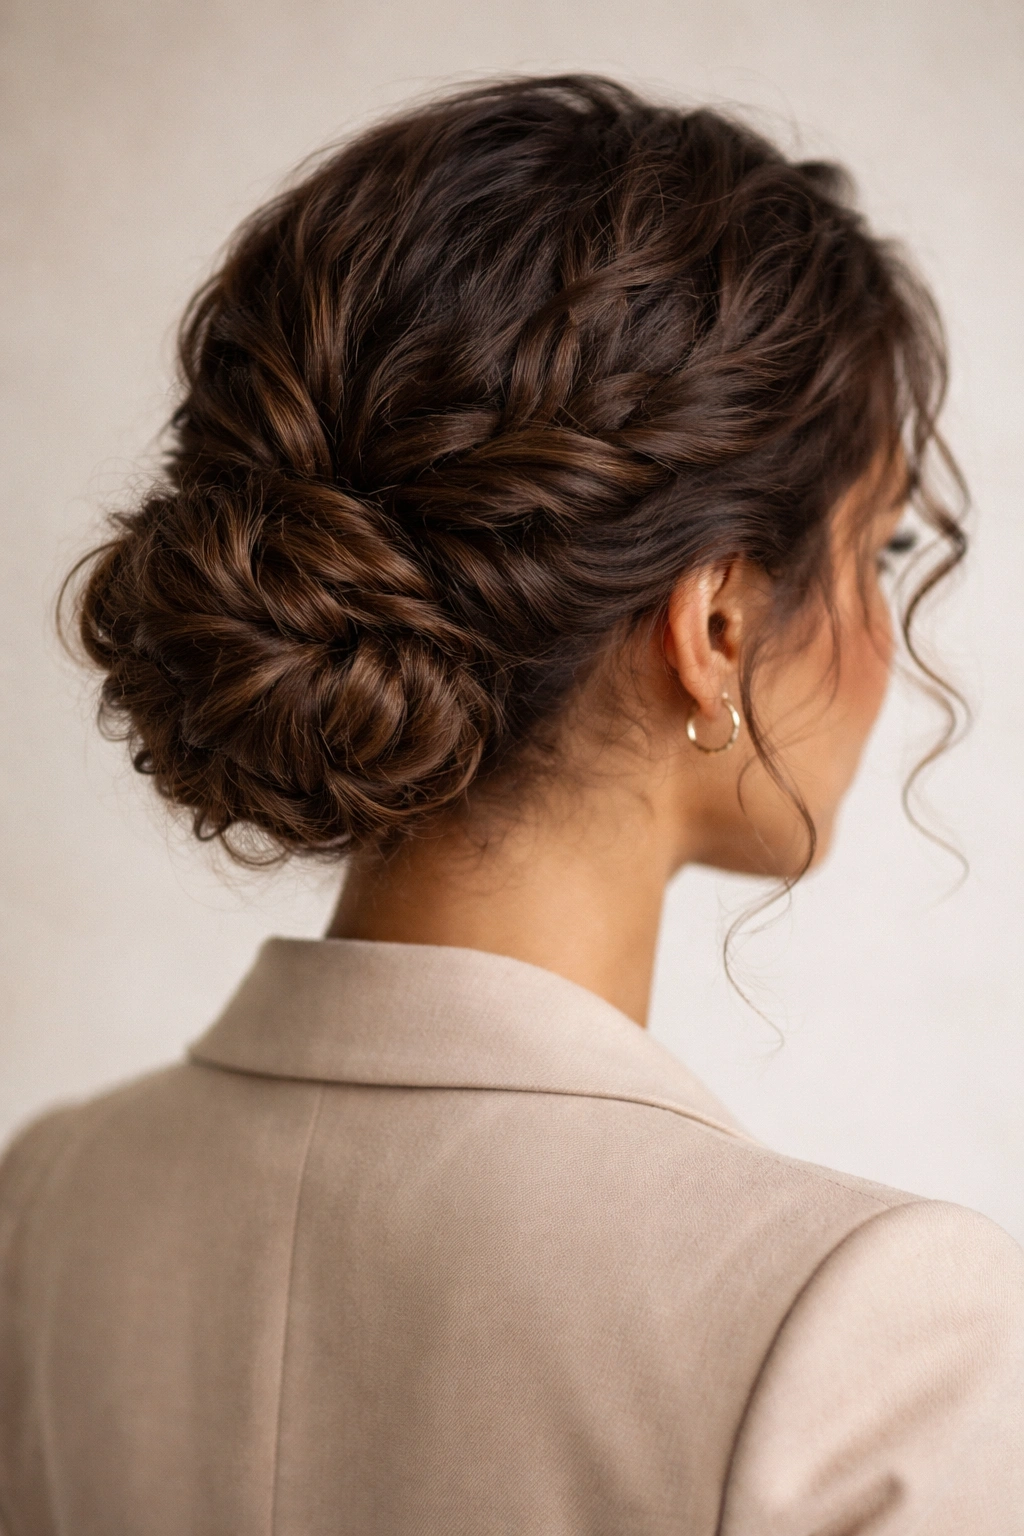
A twisted low bun combines elegance with security, creating a style that looks intentionally polished while actually being relatively quick to create. Unlike a high bun, a low bun reads as sophisticated and controlled, making it ideal for situations where you want to project calm competence. Twists work better on curly hair than many other securing techniques because the curl pattern helps grip and hold the twisted sections in place.
Why Twists Are Perfect for Curly Hair
When you twist curly hair, the twists naturally grip because each curl catches and holds against the adjacent curl in the twist structure. This means your twisted low bun will stay secure throughout the day without requiring excessive bobby pins or tension. Straight hair twists can slip and slide, but curly hair twists are naturally grippy. The slight texture and frizz that appears in a curl twist actually adds to the polished look rather than detracting from it.
Creating a Secure Twisted Low Bun
Gather your hair at the nape of your neck into a low ponytail and secure with a clear elastic. Dampen this ponytail slightly with a spray bottle or refresh spray. Divide the ponytail into two even sections. Twist one section clockwise around your fingers, then twist the second section also clockwise. Wrap these two twisted sections around each other to create a double-twist structure, working from the base of the ponytail toward the ends.
Coil the resulting double-twist around itself at the base of the ponytail to form a bun shape. Secure with bobby pins inserted through the bun and into the base, making sure the pins go through multiple sections of the twist to prevent slipping. Smooth any obvious flyaways with a small amount of edge control cream applied with a soft brush, and finish with a light hairspray.
Longevity Tips for All-Day Hold
- Use a lighter elastic that won’t create a visible crease in your low bun — clear elastics are ideal
- Apply a light styling cream or mousse to your ponytail before twisting; this helps the twist structure hold without making your hair crunchy
- Insert bobby pins while the twist is still slightly damp, as they grip better than they would if inserted into completely dry hair
- If your bun loosens during the day, simply tuck any loose sections back into the bun and re-pin them — the twist structure makes this quick and invisible
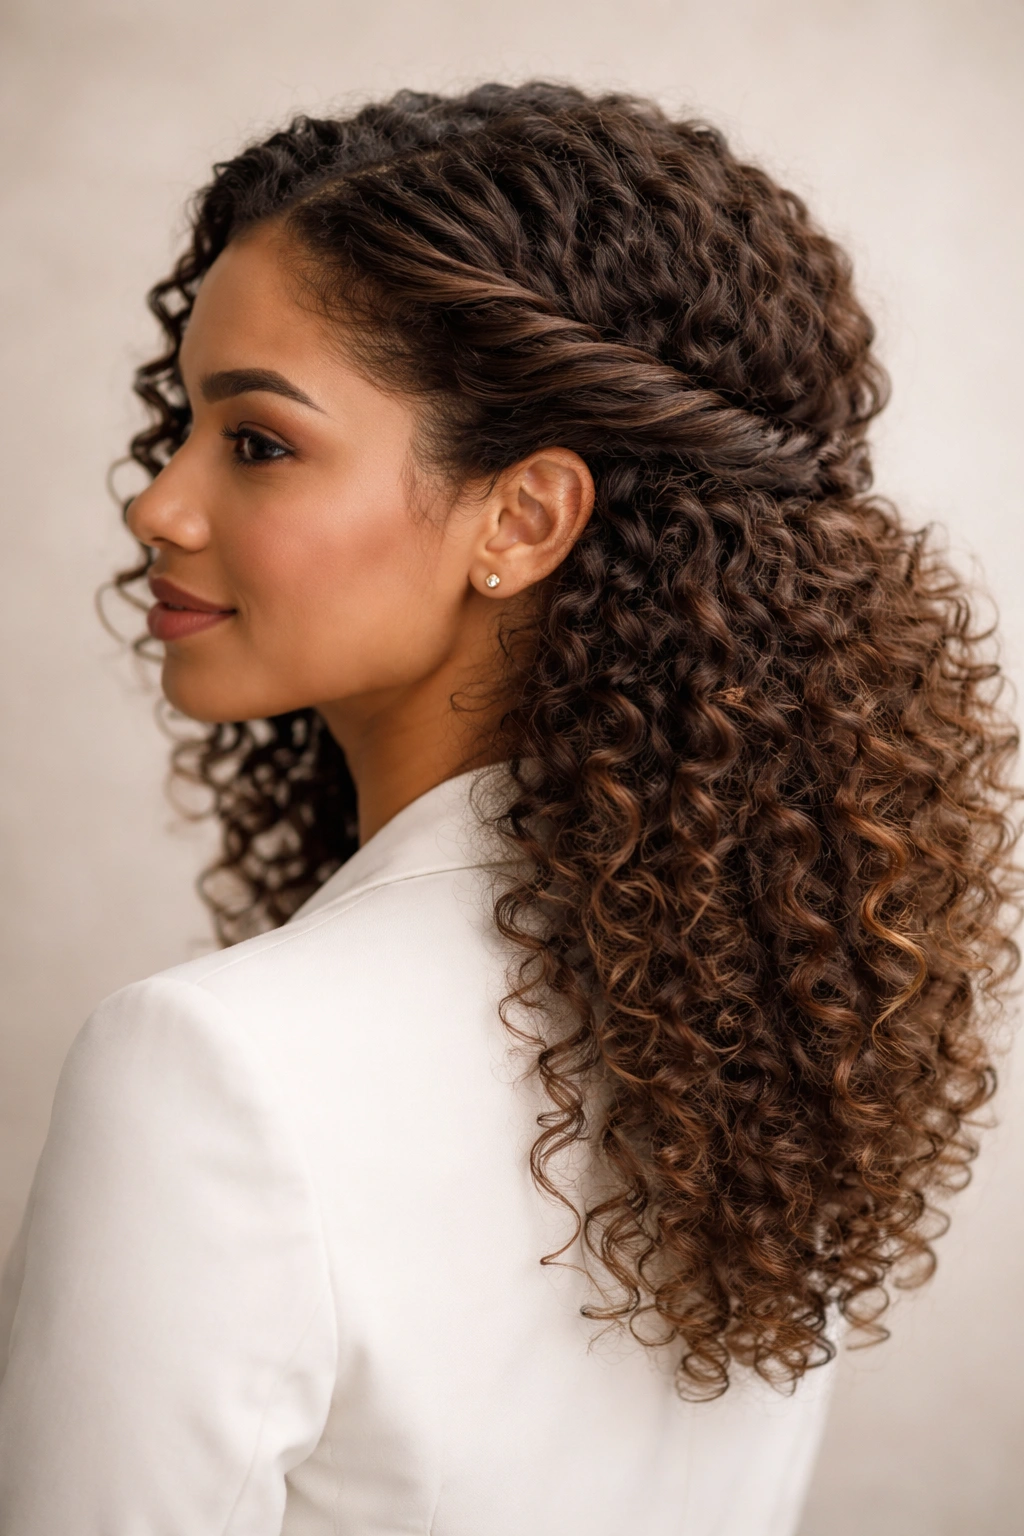
6. Deep Side Part with Clip
A deep side part with a secure clip is the perfect style for curly hair when you want to keep hair back from your face but not fully secured. This style works because it plays to your natural curl pattern — the deep side part creates asymmetry that’s flattering, and the loose curls on one side frame your face beautifully while the clipped side stays back and professional. It’s quick to create in the morning and adjustable if you need to release it partway through the day.
Why Side Parts Flatter Curly Hair
A deep side part automatically creates dimension and draws attention to your face rather than your hair shape. For curly hair, this is ideal because curls can sometimes look very round or ball-like when parted down the middle. A deep side part elongates your face and creates an asymmetrical, modern silhouette. Your curls fall naturally along this side part, creating waves and curves that look deliberate and styled rather than accidental.
Styling the Side Part Look
Create a deep side part by using a rattail comb to draw a line from approximately above one eyebrow back to the crown of your head. Push most of your hair toward the fuller side. On the smaller side of the part (the side with less hair), gather the first couple of inches of curls near your temple and clip them back using a decorative clip or bobby clip in a neutral color.
Refresh your curls with water or refresh spray, scrunching them upward to enhance your natural wave or curl pattern. Allow them to dry slightly or air-dry completely depending on your curl type. The clipped side should show some texture and curl, not be smoothed flat — clips work as design elements here, not as ways to flatten your hair. The unclipped side should fall freely across your face and shoulder, creating a soft frame.
Maintaining This Style Throughout the Day
- Choose a clip that complements your hair color and has a secure clasp — tortoiseshell, metal, or pearl clips work professionally
- Don’t smooth the clipped section flat; allow curls to puff slightly out from under the clip for a textured look
- If curls are falling out from under the clip by mid-afternoon, simply re-mist them with refresh spray and re-clip — no need to restyle your entire head
- This style works best when your curls have been refreshed or are a day or two old with a bit of texture already established
7. Textured Ponytail with Face-Framing Layers
A textured ponytail is the workhorse style for curly hair in professional settings — simple enough to create in five minutes, secure enough to last all day, but intentional enough that it looks like you made an effort. The secret is not fighting to smooth your ponytail flat. Instead, you’re allowing your curl texture to be visible throughout the ponytail, creating a style that’s both practical and visually interesting.
Why Texture Is Your Asset Here
A ponytail made from straight hair can look thin or wispy if your hair density isn’t substantial. A ponytail made from curly hair automatically has volume and presence. Your curls create texture and dimension within the ponytail itself, so it doesn’t need to be slicked down or smoothed to look polished. In fact, a slicked ponytail actually looks less professional on curly hair because it removes the intentionality and tries to make your hair look like something it’s not.
Creating a Polished Textured Ponytail
Gather your hair into a high or mid-level ponytail at the crown or slightly back, depending on the vibe you want to project. Pull the ponytail tight enough that it’s secure and won’t slip, but not so tight that you’re creating tension at your scalp or pulling curls straight. Use a soft scrunchie or elastic covered in fabric rather than a bare elastic, which can crease and damage your curls.
Leave two to three small sections of curl around each temple loose and unclipped — these face-framing sections should fall naturally alongside your face. Apply a light styling cream or mousse to your actual ponytail, then use your fingers (not a brush) to separate curls within the ponytail and enhance individual curl patterns. The goal is for the ponytail to look textured and intentional, not smooth.
Face-Framing That Actually Works
- Leave your face-framing layers loose at the very beginning before you secure the ponytail, not as an afterthought
- These framing pieces should be curled or wavy, not straight — allow them to maintain their natural curl pattern
- They should fall roughly to jaw level or slightly longer, creating a soft frame rather than stringy pieces
- If these pieces fall into your face throughout the day, use bobby pins to tuck them behind your ears temporarily, or use a lightweight hairspray to help them stay where you want them
8. Twisted Sides with Secure Anchors
Twisted sides offer a more intricate look than a simple ponytail while remaining completely practical for a full workday. This style involves twisting sections of hair from each side of your head and securing them toward the back, creating an elegantly framed silhouette while keeping hair off your face and neck. Curly hair excels at this style because twists grip naturally and the curl pattern adds visual interest.
The Architecture of This Style
Picture two twisted sections coming from each temple, traveling back along the sides of your head, and meeting at the back where they’re secured together. The twists themselves become design elements — they’re visible and intentional, not hidden away. This style reads as polished because it demonstrates that you’ve actually styled your hair, but it’s quick enough to create without a second person to help or special equipment beyond bobby pins.
Step-by-Step Twisted Sides
On each side of your head, starting near your temple, gather a section of hair about two inches wide. Dampen this section lightly with a refresh spray. Twist this section loosely (you want to see curl peeking through) as it travels from your temple back toward your ear. Continue the twist toward the back of your head, following a path roughly along where your ear sits.
Once you’ve twisted each side back to the nape of your neck, secure both twisted sections together using bobby pins or a small claw clip. You can combine them into one twisted shape, cross them over each other, or pin them side by side — all three look professional and intentional. The remaining hair below these twists falls naturally, showing your full curl pattern.
Securing So It Lasts
- Apply a lightweight styling cream to the sections you’re twisting before you begin — this helps them grip without crunchiness
- Twist loosely enough that individual curls are visible within the twist, creating texture rather than a smooth spiral
- Use bobby pins that match your hair color and insert them through multiple sections of the twist at various angles for security
- If the twists loosen throughout the day, gently tighten them by rolling them slightly back toward their starting point and re-pinning
9. The Topknot with Loose Tendrils

A topknot with loose tendrils gives you the polish of a secured updo combined with the softness of loose curls framing your face and neck. This style is particularly flattering for curly hair because the contrast between the tightly secured topknot and the freely falling curls below it reads as intentional and fashion-forward. You’re showing off your curls while simultaneously demonstrating control and professionalism.
Why This Contrast Works Professionally
Hairstyles that show only tight control can read as severe or overly formal, while hairstyles that show only loose curls can read as undone in certain professional contexts. A topknot with tendrils hits the sweet spot — you have the polished element (the secured knot) combined with the soft element (the falling curls). This signals that you’re confident enough in your appearance to let your natural texture show while also being intentional enough to secure part of your hair.
Creating the Perfect Topknot
Gather the hair at the very crown of your head into a high ponytail, using a soft scrunchie. Leave two substantial sections of curl — one on each side of your face at about temple height — completely loose and unsecured. These will become your tendrils. From the high ponytail at your crown, twist the gathered hair and wrap it around itself to form a knot shape, securing with bobby pins as you go. You want the knot to sit directly on top of your head, creating height and visual interest.
The loose tendrils on either side of your face should be long enough to fall at least to your jaw, preferably to your shoulder. Enhance their curl pattern using a styling cream or mousse applied to damp hair, scrunching upward to activate your natural curl. These tendrils should look intentionally curly, not like you forgot to include them in your style.
Styling Details That Matter
- Use a decorative scrunchie or a fabric-covered elastic in a color that complements your hair — this becomes a visible design element on a topknot
- The topknot should sit high enough that you can see it from the front when you look in the mirror — it’s a statement, not hidden
- If your topknot is too tight, you’ll create tension headaches by day’s end; if it’s too loose, it’ll slip by mid-morning — aim for snug but comfortable
- The tendrils should be refreshed or at least a day old; brand-new freshly-washed curls sometimes don’t have enough texture to maintain the tendril look
10. Slicked-Back Waves with Accessories
A slicked-back style works on curly hair when you approach it differently than you would on straight hair. Instead of trying to flatten your curls completely, you’re creating smooth waves and curls that are slicked back and secured, allowing your texture to show while demonstrating intentional styling. Add accessories and you’ve created a look that’s simultaneously polished and fashion-forward.
Reframing “Slicked Back” for Curly Hair
“Slicked back” on straight hair means smooth and flat. “Slicked back” on curly hair means your waves and curls are shaped and defined, pulled back from your face, and secured with product that provides hold without crunchiness. Your curls are still curls — they’re just curls that have been encouraged to wave back rather than frame forward. This is a much more realistic and flattering goal for curly hair than trying to achieve flat, straight texture.
Creating Waves That Slick Back
Start with damp hair and apply a wave-defining cream or smoothing serum throughout. Using your fingers or a wide-tooth comb, encourage your curls to wave back from your face, pushing them toward the back and sides of your head. Allow this to air-dry or use a diffuser on low heat to set the shape while maintaining your curl pattern.
Once dry, apply a light edge control cream or smoothing gel to the hairline and temples, smoothing hair back and creating a polished, finished look at the front. Secure hair at the back with bobby pins or a small clip, or gather it into a low ponytail if you prefer. The key is that the front remains smooth and intentional while the back shows your actual curl texture.
Accessorizing for Visual Interest
- Add a decorative hair clip, comb, or pin at the back where you’ve secured your slicked-back section — this becomes a focal point and adds sophistication
- Use a metallic or pearl accessory if you want glamour, or a tortoiseshell piece for subtle elegance
- Alternatively, use a silk or fabric headband across the front of your hair where you’ve slicked it back — this creates a polished, intentional look
- If you choose a headband, ensure it’s wide enough to look intentional rather than like it’s holding flyaways in place
Final Thoughts

Curly hair in a professional setting isn’t about fighting your texture or spending hours straightening to match outdated standards of “polished.” It’s about understanding that your curls are actually an asset — they offer volume, movement, and visual interest that straight hair requires tools and products to create. The ten styles in this guide work because they’re built around how curly hair actually behaves, not against it.
What all of these styles share is that they combine intention with ease. You’re not spending an hour on your hair, but you’re also not leaving it completely unstyled. You’re using simple techniques like twists, clips, and ponytails combined with your natural curl pattern to create looks that read as professional and polished. The key is finding the style that fits your daily schedule and your comfort level — some people love the simplicity of a textured ponytail, while others enjoy the intentionality of a braided crown.
Remember that the best professional hairstyle is one you can recreate consistently and that makes you feel confident. Your curls have texture, personality, and presence that deserve to be seen. The workplace doesn’t need you to erase your hair to be taken seriously — it needs you to show up as yourself, prepared and intentional. These styles do exactly that.