When you’re a guest at a wedding and your hair is naturally curly, the styling stakes feel higher than they might for straight-haired guests. You’re not just looking for something that looks good — you need a hairstyle that’ll hold up through cocktail hours, dancing, and humidity shifts without turning into a frizzy disaster. The good news? Curly hair actually has incredible styling potential, and there are so many gorgeous options that work beautifully for weddings. The challenge isn’t finding possibilities; it’s choosing which one suits your texture, your outfit, and your comfort level.
Curly hair brings movement, volume, and texture that can elevate a wedding look in ways straight hair simply can’t achieve. A well-styled curly updo has an elegance that feels effortless yet intentional. Partial updos that blend curls with strategic pinning create a romantic, undone vibe that photographs beautifully. Even wearing your curls completely down, with the right prep and finishing products, can be absolutely stunning at a formal event. The key is understanding which hairstyles work with your curl pattern rather than against it, and knowing exactly how to prep and set each style so it stays gorgeous from ceremony to the last dance.
What follows are twelve wedding guest hairstyles specifically designed for curly hair — each one tested on different curl patterns and textures. These aren’t styles that require you to fight your natural hair; they’re styles that celebrate it.
1. The Structured Curly Updo
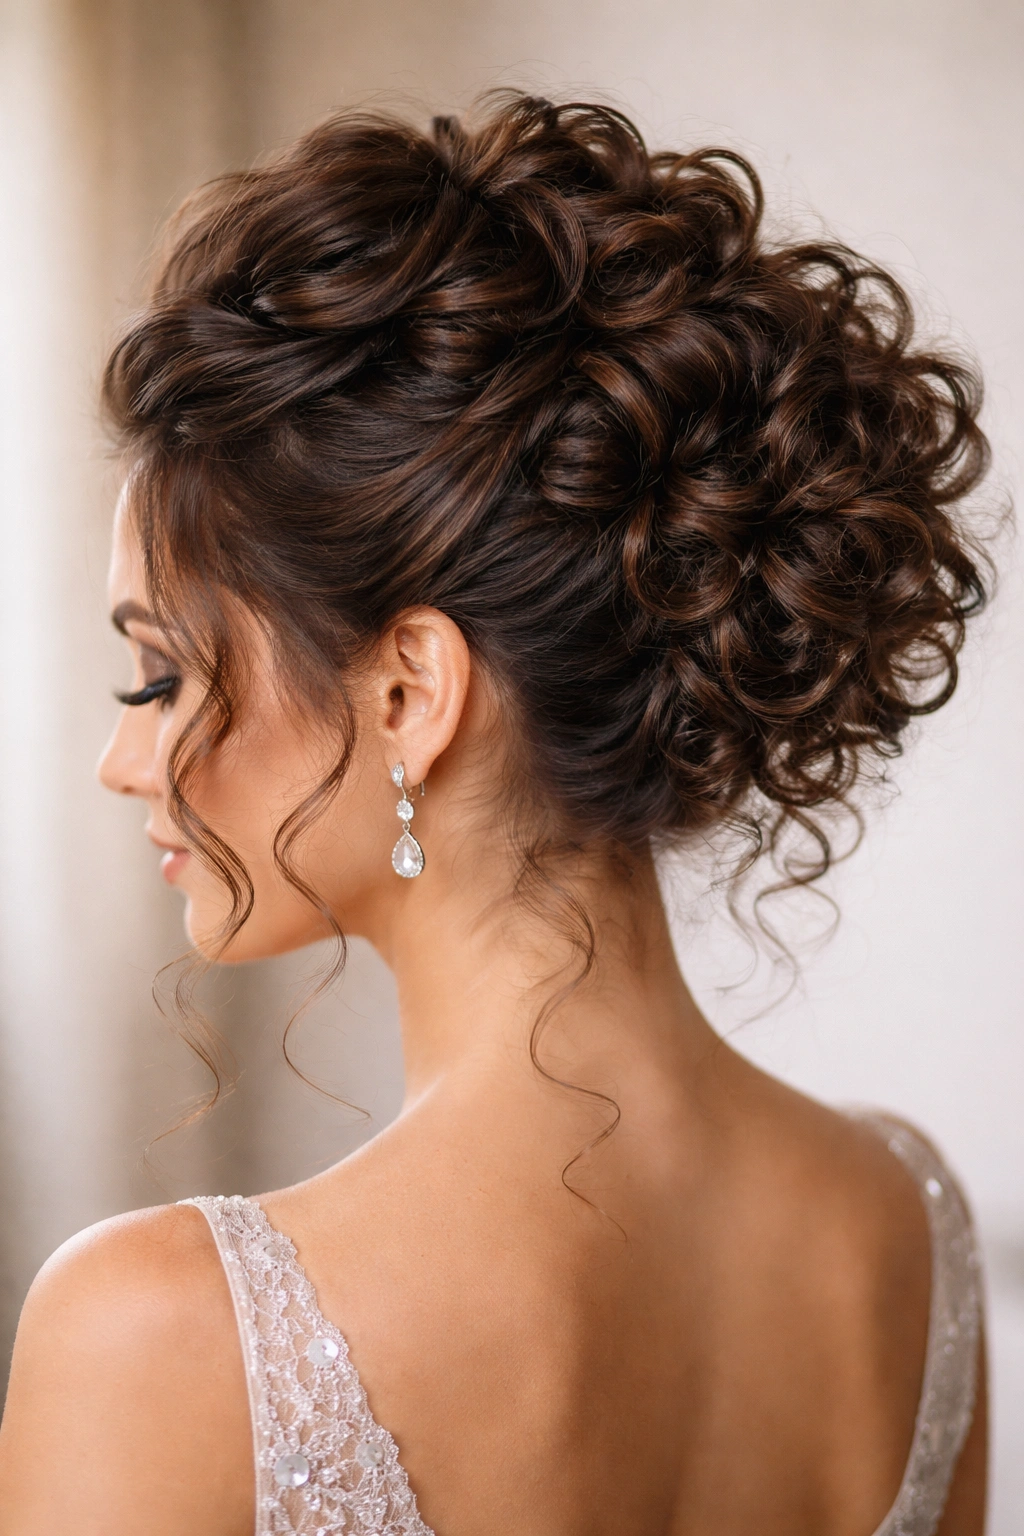
A true curly updo is the most elegant choice for formal weddings, and when executed well, it looks like you’ve got professional-level styling skills. The beauty of this style is that it takes your natural curl volume and gathers it into a polished knot or twisted arrangement that feels both sophisticated and intentional. Rather than smoothing curls into a sleek bun (which rarely works for curly hair and often looks forced), you’re working with your texture by creating a structured updo that showcases individual curls within an organized shape.
How to Create This Look
Start with curls that have dried completely — don’t attempt this with damp hair. Use a light curl-defining cream or mousse beforehand to ensure your curls are well-defined and not frizzy. Flip your head upside down and gather your hair at the crown into a high ponytail, securing it with a strong elastic. Divide the ponytail into 2-3 sections and gently twist each section, wrapping them around the base of the ponytail to form a textured knob. Use bobby pins to secure each twisted section, tucking the ends under and pinning strategically so curls stay visible around the edges. Finish with a light hairspray (not too much, or you’ll kill the curl definition) and tuck small baby’s breath or delicate flowers into the pins for a romantic touch.
What Makes This Style Wedding-Worthy
- The updo keeps curls completely off your shoulders and neck, which matters during a warm ceremony or outdoor reception
- Individual curls remain visible throughout the style, so it never looks stiff or overly processed
- You can customize the height and tightness based on your hair thickness and how much uplift you need
- Small sections of curls often escape naturally around the face, adding a romantic, lived-in quality
Pro tip: Avoid using a straightening flat iron to tame frizz before pinning — this defeats the purpose of celebrating your curls. Instead, use a curl cream and let the natural texture work for you.
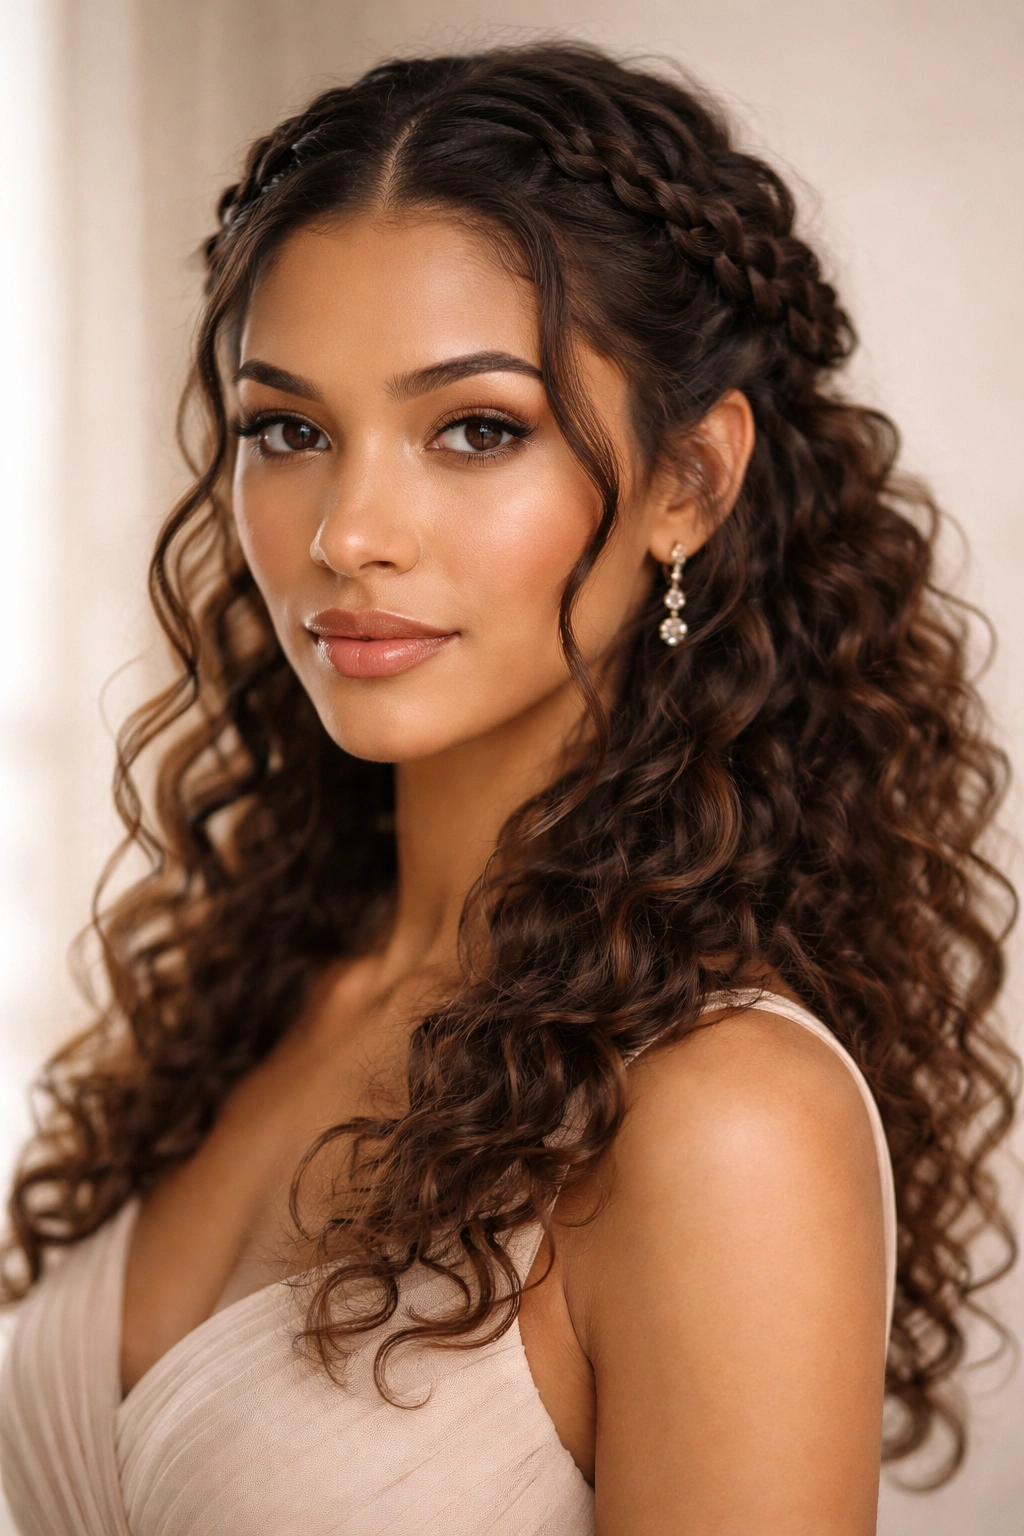
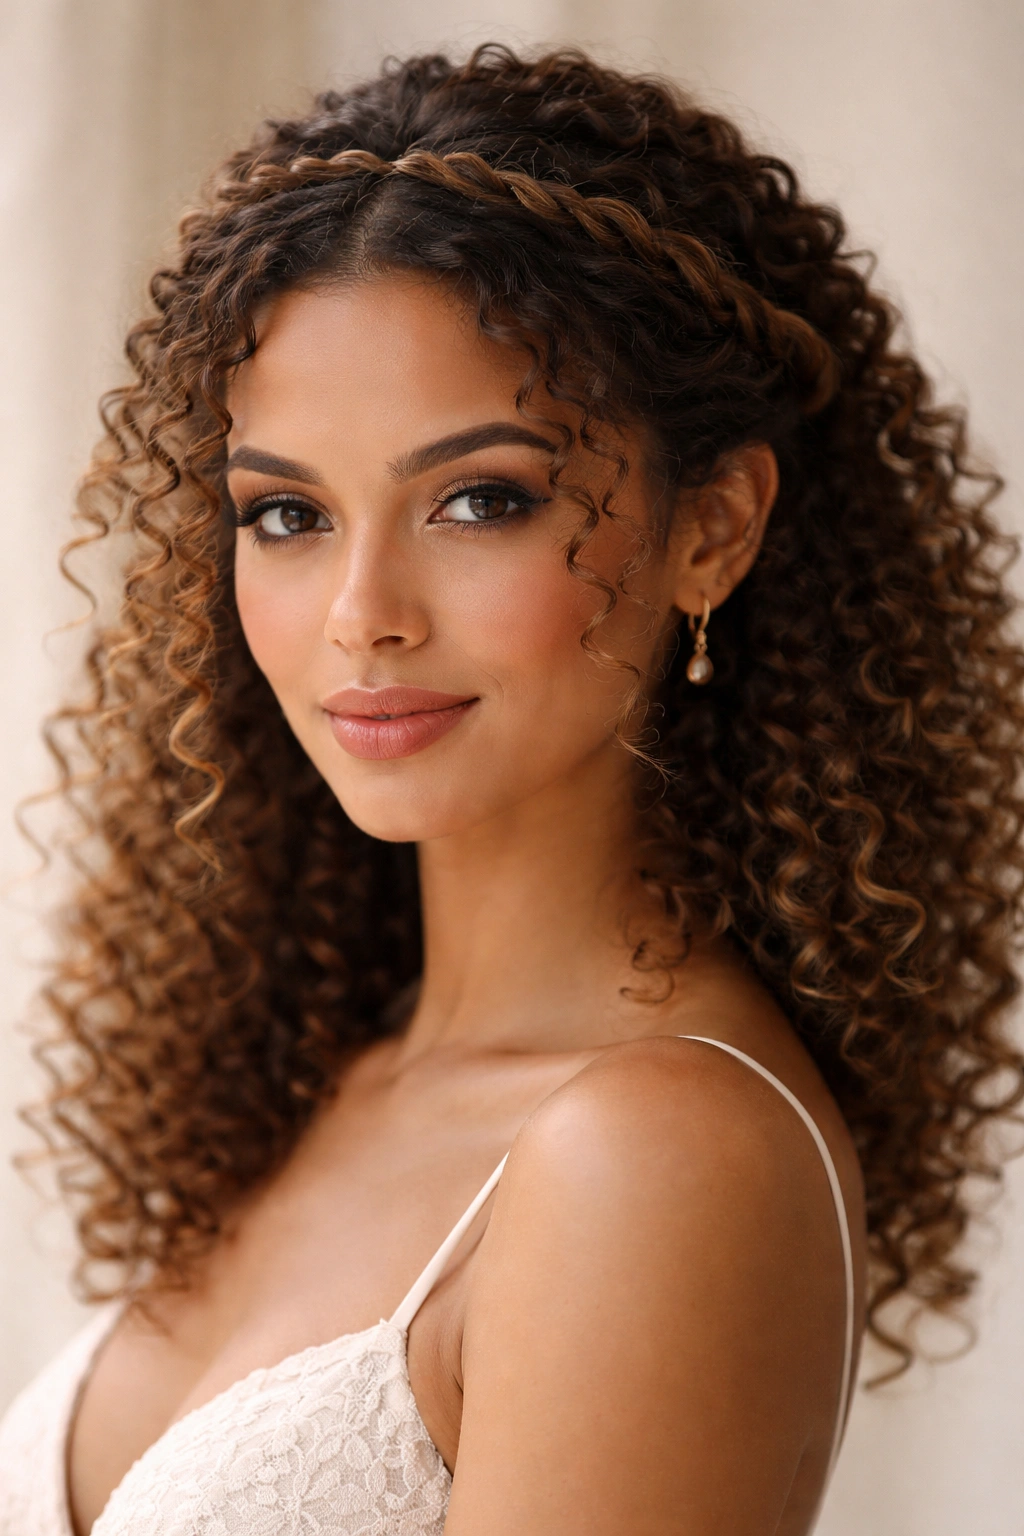
2. The Romantic Half-Up, Half-Down
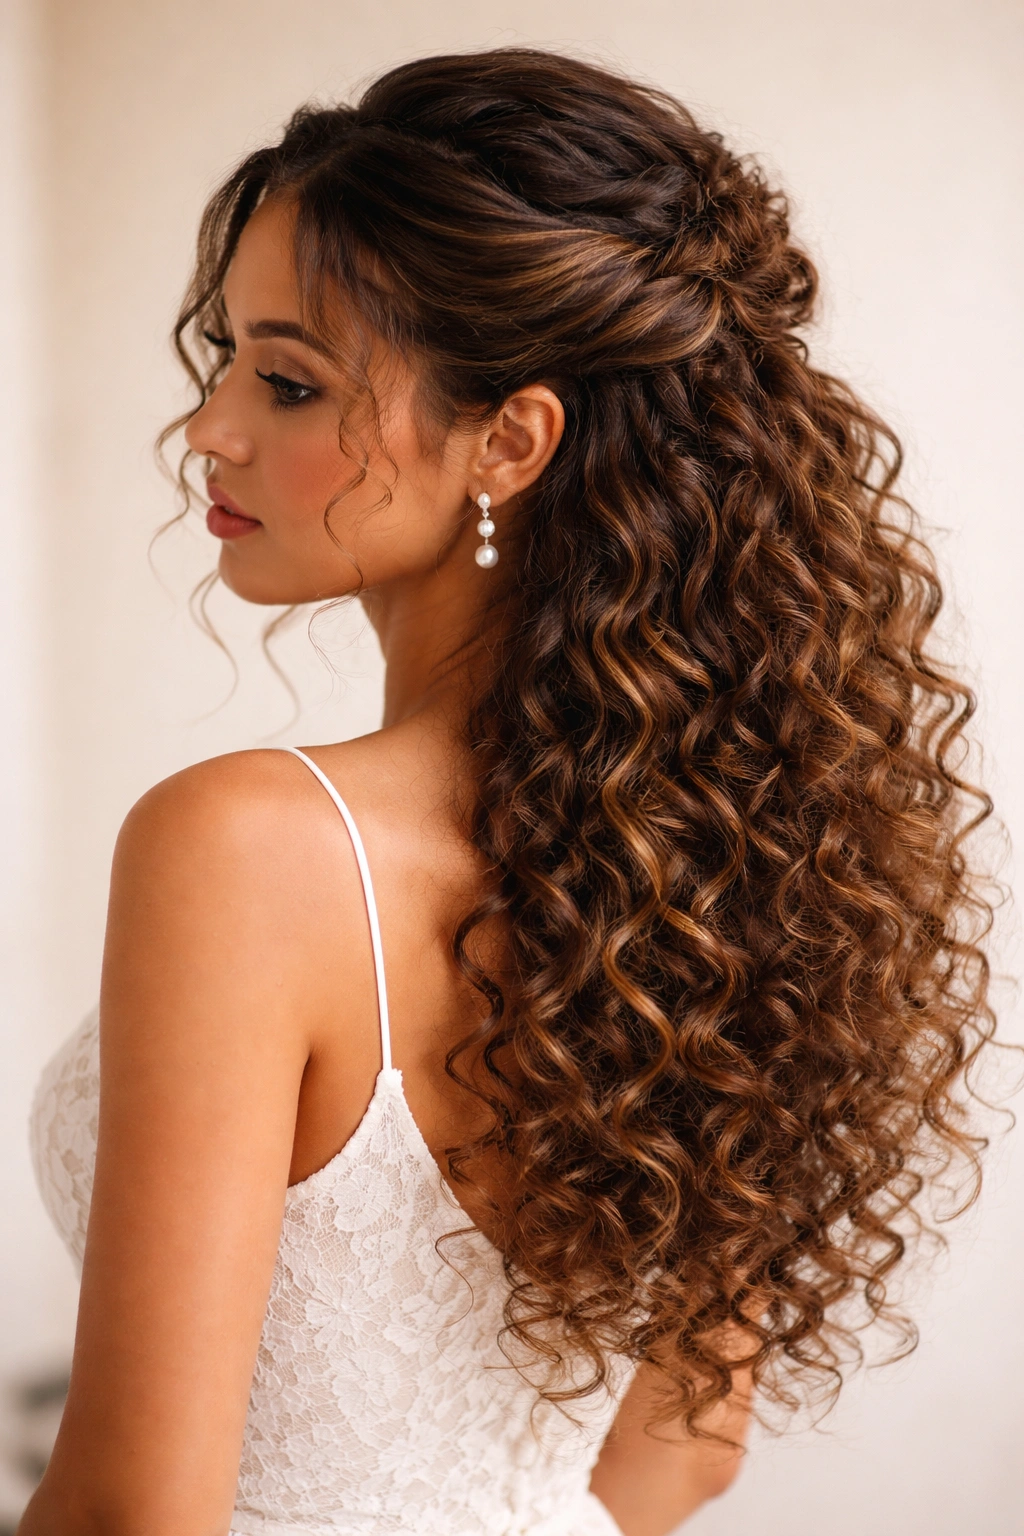
This style splits the difference between wearing your curls completely loose and putting them entirely up, making it perfect if you want movement and volume while keeping hair partly away from your face and neck. The half-up styling is forgiving on curly hair because you’re not trying to wrestle all your curls into one structure — you’re just controlling the top portion while letting the majority of your curls flow freely. This works beautifully with any curl pattern, from loose waves to tight coils.
Why It Works for Curly Hair
The half-up style respects your hair’s natural volume while creating a focal point at the crown. You’re using your curl texture as the main design element rather than fighting it. For curly hair, this is genuinely easier to execute and maintain than many other styles because you’re not trying to contain everything in one tight knot.
How to Style It for Maximum Impact
- Take a section from each temple and twist loosely toward the back, pinning both twists together at the crown with decorative bobby pins or a metallic clip
- Alternatively, create a Dutch braid along each side from temple to crown, then pin both braids together at the back
- Leave the bottom three-quarters of your curls completely down and loose
- Use a curl-refreshing spray on the down portion about an hour before you need to look perfect, and finger-comb gently through your curls to revive their shape
- Add a delicate hair comb or small decorative pins at the crown area where the half-up section starts
Worth knowing: This style works especially well if your hair is thinner on top, because the pinned section at the crown creates the illusion of more volume at the crown.
3. The Twisted Crown with Loose Curls
This style creates an elegant crown-like frame for your face while keeping the bulk of your curls in their natural, loose state. Two twisted sections wrap around the back of your head like a crown, and everything else hangs freely. It looks more intricate than it actually is, which makes it a smart choice if you want to look like you spent serious time on your hair without actually spending hours styling.
What Makes It Stand Out
The twisted crown works with every curl pattern and every head shape because you’re customizing where the twists sit based on your face shape. If you have a rounder face, position the twists lower for a lengthening effect. If you have a longer face, position them higher to add width. The loose curls below create movement and softness that the twists alone wouldn’t provide.
Step-by-Step Creation Process
- Start with completely dry, curl-defined hair
- Take a thin section from one temple and twist it gently but firmly, moving it toward the back of your head while keeping it flat against your scalp (like a flat twist or Dutch braid, but with two strands instead of three)
- Repeat from the opposite temple, twisting toward the back
- At the back of your head, pin both twists together using bobby pins, allowing them to sit about an inch below your crown for a balanced look
- Leave all remaining curls loose and undefined — the contrast between the structured twists and the loose curls is what makes this style work
- Finish with light hairspray and gently separate some curls at your crown to add volume
Insider note: If your twists are loosening throughout the event, use a small clear elastic to secure them before pinning — the elastic will be hidden under the bobby pins and provides backup hold.
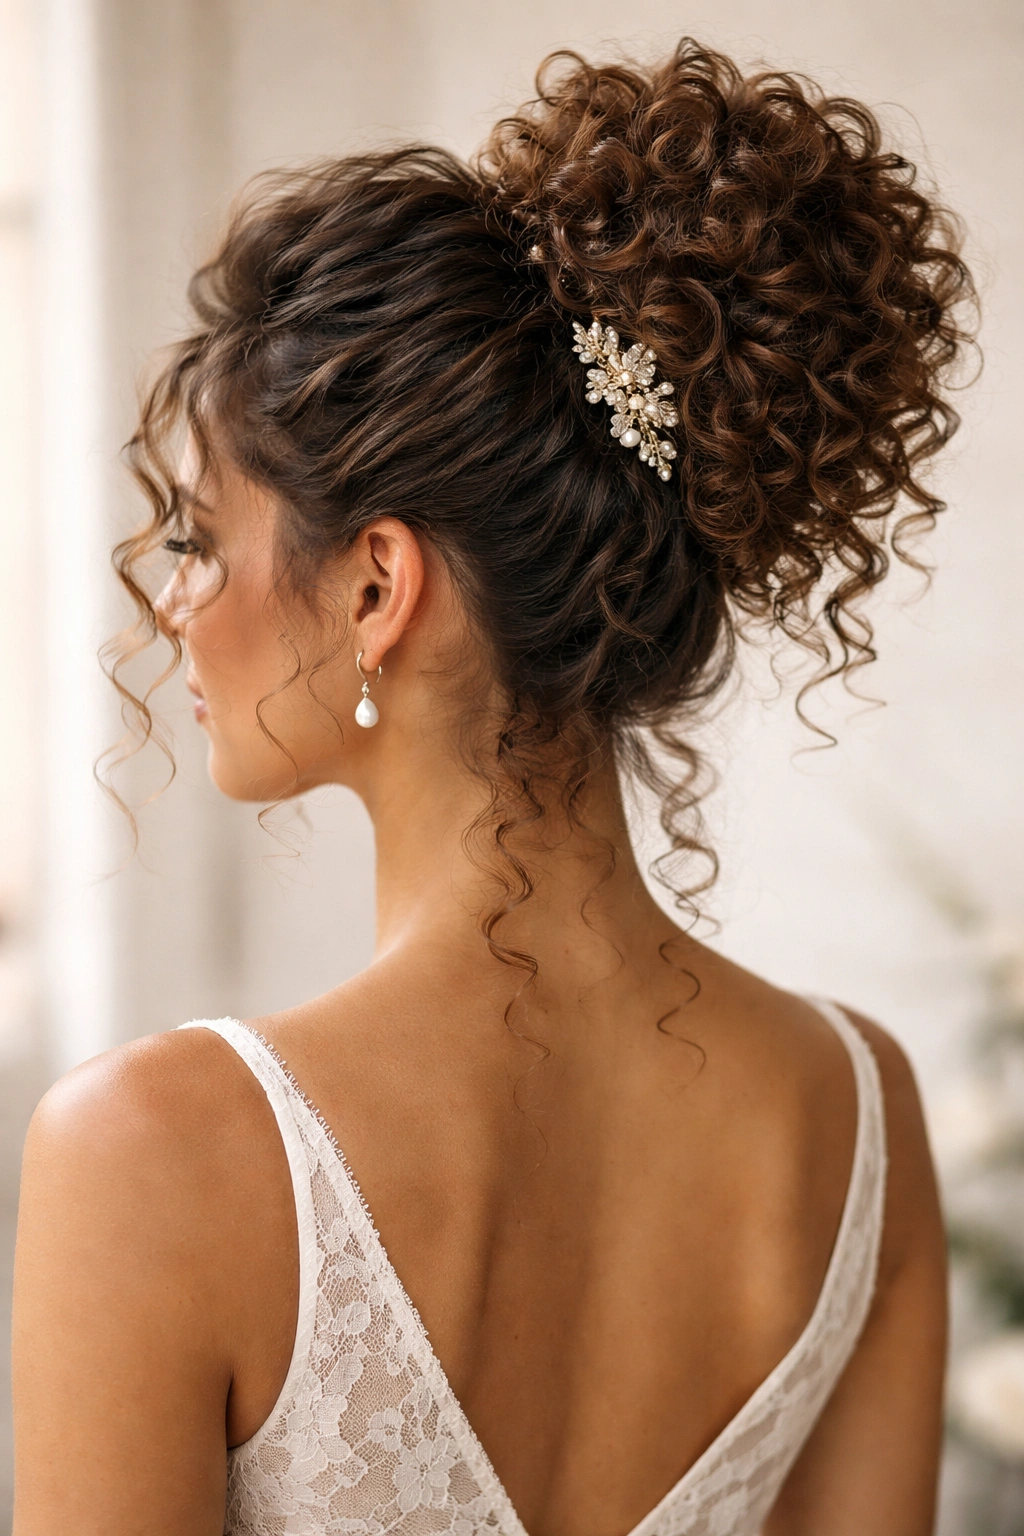
4. The Voluminous Curly Ponytail
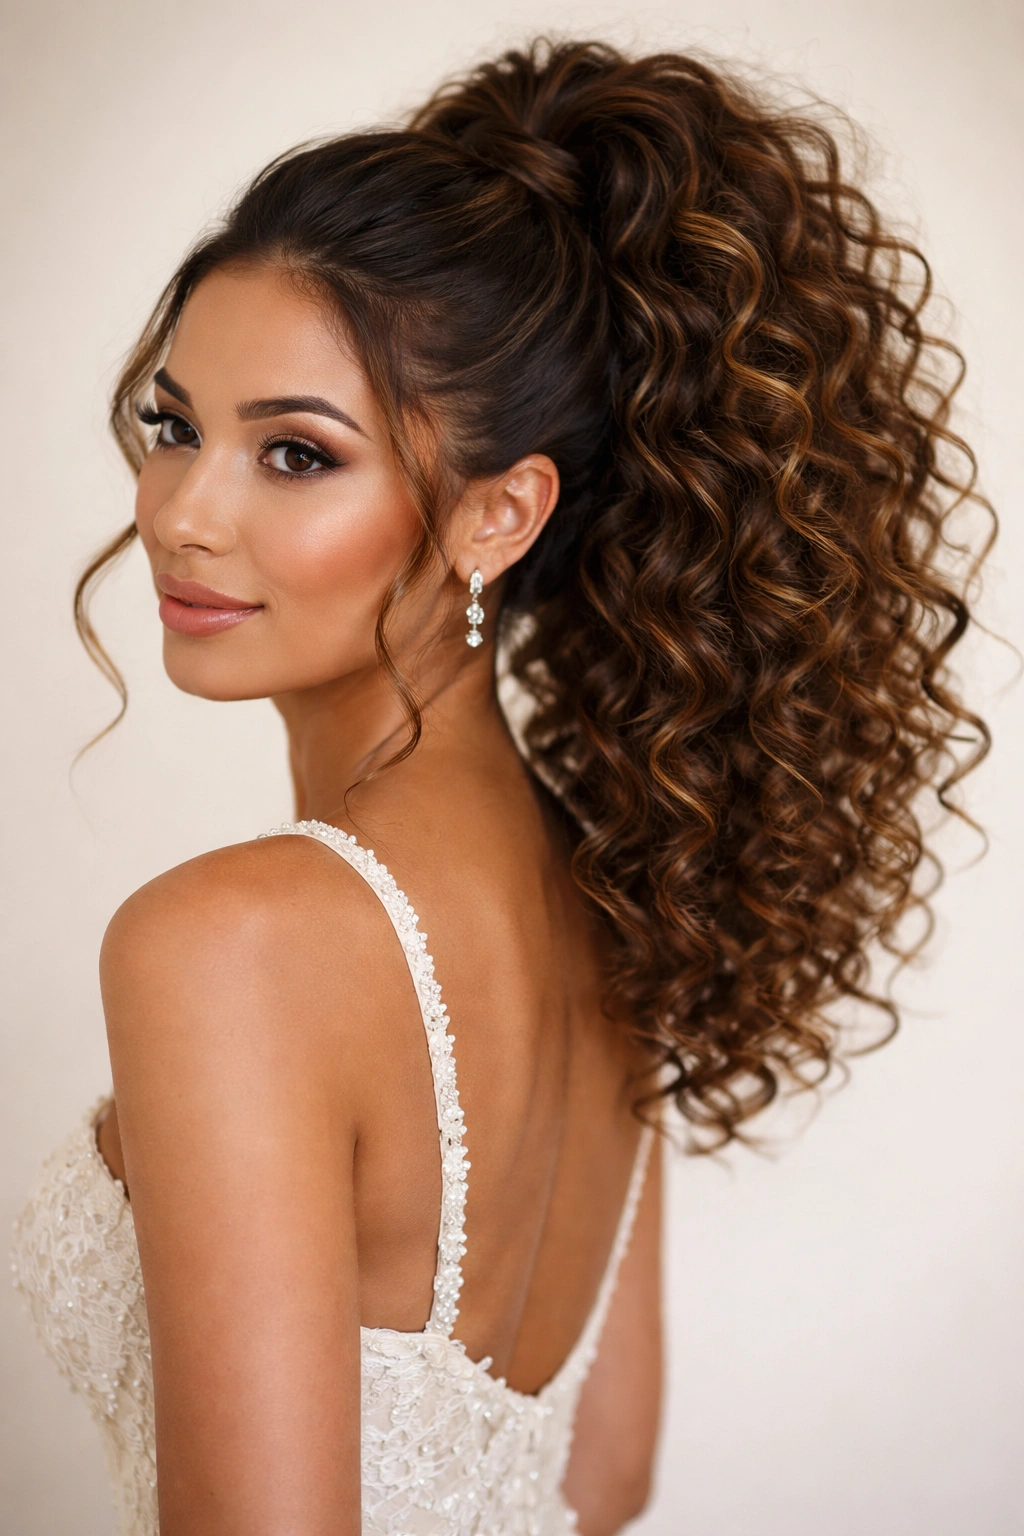
A high ponytail might seem too casual for a wedding, but when you’re working with natural curls and you style it intentionally, it becomes a statement look that’s both polished and undeniably glamorous. The volume from your curls transforms a standard ponytail into something with genuine presence. The key is positioning it high enough to feel elevated, securing it in a way that maintains your curl definition, and adding texture to the elastic so it doesn’t slip.
How to Achieve the Look
- Brush your curls gently with a wide-tooth comb or your fingers to slightly blend them together, but don’t fully detangle — you want some texture to remain
- Flip your head over and gather hair at the crown into a high ponytail, positioning it at your crown rather than the very top of your head
- Secure with a strong elastic, then take a small section from the ponytail itself and wrap it around the elastic to hide it, pinning the wrapped section with a bobby pin
- Gently pull at the ponytail section by section, creating height and texture throughout — don’t pull too hard or you’ll deflate your curls, but gentle pulling adds volume and dimension
- Use a lightweight hairspray to set the texture without weighing curls down
- Optional: Add a decorative comb, small clip, or delicate chain-link hair accessory where the ponytail begins
Quick Curl-Specific Tips
- Never use a tight elastic that compresses your curls — look for thick, padded elastics or fabric-covered bands
- If you have very coily hair, consider sectioning your ponytail into 2-3 sub-sections and slightly twisting each one before securing, which adds visual interest
- Curly hair ponytails photograph beautifully from the side, so position yourself accordingly for wedding photos
Real talk: A curly ponytail is actually less formal than an updo on curly hair, so save this for a daytime wedding, a garden party setting, or if the wedding vibe is more relaxed and modern.
5. The Braided Crown with Braids Down
This style is all about texture, dimension, and intentional detail — it says you actually spent time on your hair without looking overdone. You’re creating two Dutch or French braids that frame your face and travel back toward a low ponytail, combining the structure of braids with the softness of your natural curls. This works beautifully for all curl types and is surprisingly easier to execute than you might expect.
Why This Style Elevates Your Look
Braids automatically add visual interest and complexity to a hairstyle. When you combine braids with natural curls, you get a style that feels both put-together and effortlessly romantic. The braids control your hair just enough to keep it neat while the curls around and within the braids remain visible and beautiful.
The Styling Process
- Start with dry, curl-defined hair
- Take a section from your right temple and create a Dutch braid (braiding under instead of over), moving it toward the back of your head while keeping tension even
- Repeat on the left side, creating a matching Dutch braid
- At the back, gather both braids plus any loose hair into a low ponytail, securing with an elastic
- Let the ponytail section remain curly and loose, fanning it out slightly so the curls get full visibility
- Gently pull at the edges of each braid to loosen it slightly, which adds volume and creates a softer, more romantic appearance
- Finish with curl cream and light hairspray
Things to Know
- This style works best if you have medium to thick hair — if your hair is very fine, the braids might look too thin
- Curly hair actually braids more easily than straight hair because your texture naturally grips itself, making the braids less likely to slip
Pro tip: If you’re nervous about braiding, practice once or twice before the wedding. French braiding curly hair is easier than it seems because the texture does half the work for you.
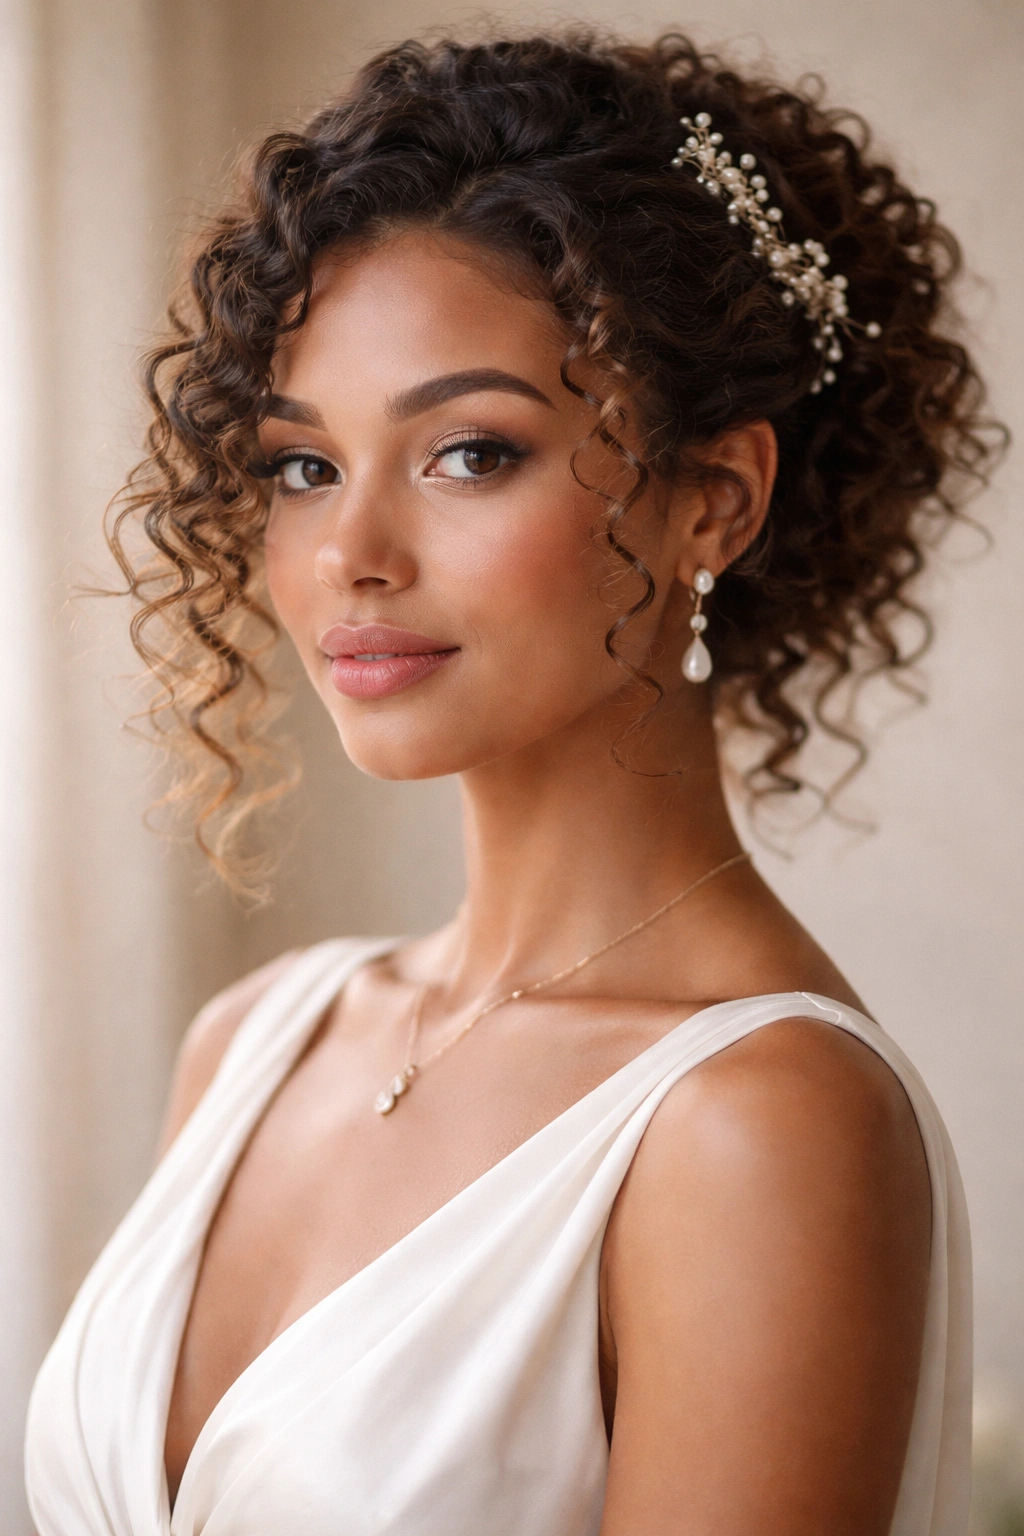
6. The Spiral Curls with Decorative Pins
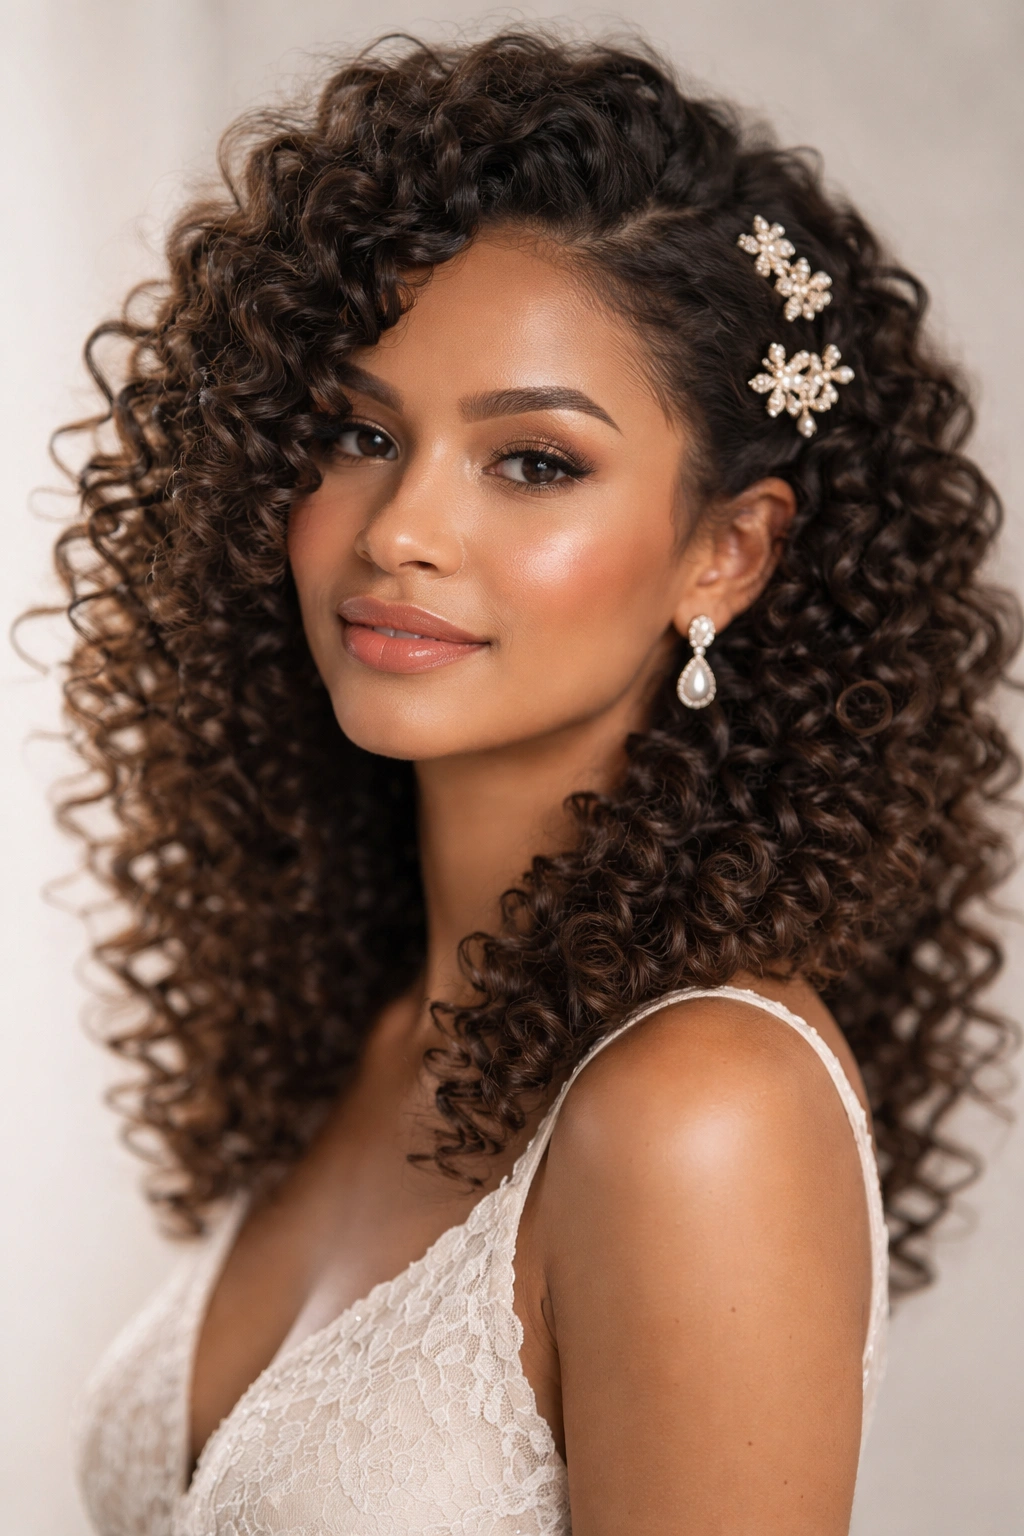
Sometimes the most stunning wedding hairstyle isn’t actually a “style” in the traditional sense — it’s your natural curls, beautifully defined and intentionally arranged with strategic, decorative elements. This approach works if you have gorgeous spiral or coil-like curls that are your hair’s best feature. Rather than pinning curls away or braiding them, you’re framing your face with your curls and using beautiful pins to create focal points of elegance.
What Makes This Approach Wedding-Appropriate
Curly hair that’s well-defined and well-hydrated is genuinely glamorous on its own. Adding a few strategically placed decorative pins transforms your natural curls from everyday hair into intentional, formal styling. This is the option for you if you love your curls exactly as they are and want to celebrate them without changing their fundamental structure.
How to Execute This Look
- Start the day before the wedding by moisturizing your curls deeply — well-hydrated curls look shinier and more polished
- The morning of the wedding, refresh your curls using a lightweight curl cream or curl spray, scrunching gently to encourage springiness
- Avoid brushing your curls — instead, finger-comb them very gently to separate them and enhance definition without flattening them
- Take 3-5 decorative bobby pins, small jeweled clips, or delicate hair combs and position them strategically where curls frame your face
- Position pins asymmetrically (not directly in the center, but slightly off to one side) for a modern, intentional look
- Use pins that coordinate with your dress color or metal tone — rose gold pins with a champagne dress, for example, or pearl-studded clips with navy
Pin Placement Considerations
- Place pins where they won’t get covered by hair, but where they’re still visible
- Asymmetrical pin placement looks more refined than centering everything
- Consider the neckline of your dress — pins higher up work with high necklines, while lower placement complements strapless or sweetheart necklines
Worth knowing: This style looks best if you have time to sleep on your curls the night before so they’re fully set and defined, rather than freshly washed and processed.
7. The Low Bun with Curled Layers
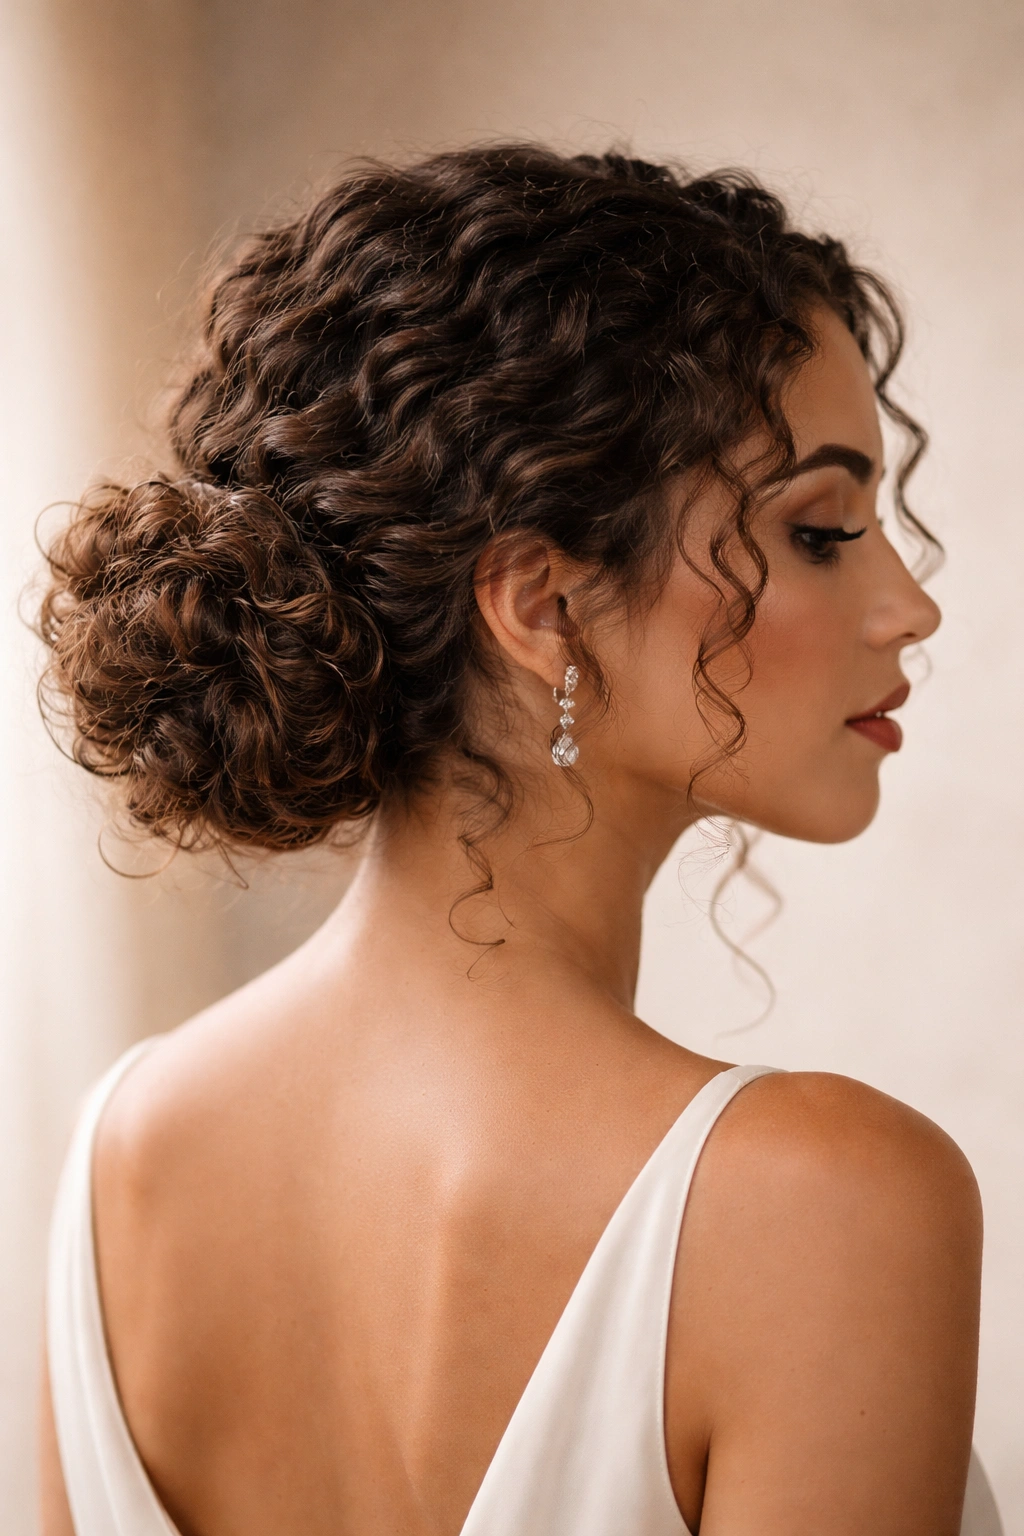
A low bun on curly hair shouldn’t be smooth and sleek — it should be textured and full, with individual curls visible throughout the structure. When you create a low bun that celebrates your curl texture instead of fighting it, you get something sophisticated, romantic, and genuinely beautiful. This works especially well for formal weddings because it feels elegant and timeless without looking stiff or overly processed.
How to Create This Look
- Start with dry, curl-defined hair
- Gather hair into a low ponytail at the nape of your neck, positioning it slightly to one side for added visual interest
- Secure with a strong elastic, then take small sections of the ponytail one at a time
- Gently twist each section and wrap it around the base of the ponytail, securing each wrapped section with bobby pins
- Resist the urge to smooth anything down — the more you can see individual curl texture within the bun, the better it looks
- Leave 2-3 small pieces of hair loose around your face, curling them around your finger to enhance their spiral shape
- Finish with a light hairspray that won’t weigh curls down
Why Curly Buns Work for Formal Events
A smooth bun can actually look too simple for a wedding, but a textured curly bun has inherent dimension and interest. The texture does the visual work for you, so you don’t need extra ornamental elements unless you want them. This style is especially flattering if you have a longer neck or defined shoulders, as it shows off those features beautifully.
Real talk: This style is more forgiving than an updo if you have shorter or finer curly hair, because the texture creates the illusion of fullness even if your hair density is on the lighter side.
8. The Soft Side Sweep
A soft side sweep takes your curls and directs them to drape over one shoulder, creating asymmetry, movement, and a romantic, slightly sultry vibe. This works beautifully for curly hair because you’re using the natural weight and volume of your curls to create a cohesive look, rather than fighting your texture. The one-shoulder sweep is flattering on most face shapes and works with almost any dress neckline.
How to Style It
- Start with curls that are dry and well-defined
- Use a light curl cream or mousse, scrunching gently through your curls to enhance definition without creating frizz
- Create a side part by combing hair to one side, starting from behind one ear
- Pin the smaller side (the side with less hair) loosely at the back of your head with a few bobby pins — you want it to stay in place but look casual
- Let all curls on the larger side sweep forward and over one shoulder
- Gently arrange the swept side so curls drape naturally without looking too controlled
- Add a decorative hair comb or small clip where the sweep begins at the side, just for visual interest
What Makes This Style Work
The soft side sweep is less formal than an updo but more intentional than wearing your hair completely down. It’s perfect for weddings where you want to look polished but not overly formal. The asymmetry is inherently modern and flattering.
Quick Styling Tips
- This works best if you have hair that reaches at least your shoulders so there’s enough length to sweep and drape
- If your curls are very coily and don’t naturally drape, consider very lightly smoothing the swept side with a small amount of serum to encourage it to fall gracefully
- Photograph beautifully from the side angle, which matters for wedding photos
Pro tip: Use bobby pins that match your hair color so they’re invisible if they happen to show, and position them where your curls will cover them.
9. The Twisted Halo Crown
A twisted halo crown wraps your entire head with twisted sections, creating an elegant frame that feels both whimsical and sophisticated. This style is inspired by bohemian aesthetics but feels formal enough for a traditional wedding. It works on all curl types and actually feels more secure than you’d expect because the twists wrap around your head and pin to each other, creating a self-supporting structure.
Why This Style Is Stunning
A halo crown automatically draws attention to your face and makes you feel special — which matters when you’re a guest at someone’s wedding. The structure is visible enough to photograph beautifully but soft enough that it doesn’t look rigid or overly styled. This style says “I put thought into my appearance” without screaming “I spent three hours styling.”
The Creation Process
- Start with dry, curl-defined hair
- Take a thin section from one temple and twist it gently but firmly, moving it toward the back of your head while keeping it flat against your scalp
- Continue the twist all the way to the back of your head
- Pin the end of the first twist at the back of your head with a bobby pin
- Repeat from the opposite temple, creating a matching twisted section that mirrors the first one
- Pin the second twist where it meets the first at the back of your head
- Optional: Take a section from the nape of your neck and twist it upward, wrapping it into the existing crown structure and pinning it where it naturally sits
- Leave curls everywhere else completely loose and untouched, so the halo twists frame a full volume of loose curls
Variations for Different Hair Lengths
- If you have very long hair, you can create a second row of twists slightly lower to add complexity
- If you have shorter hair, a single set of twists is plenty and looks less fussy
- The more twisted sections you add, the more formal the style becomes — two twists is romantic, four twists is very formal
Worth knowing: This style holds beautifully all day and night because once the twists are pinned, they’re structurally sound. You could do this style for a 5 PM ceremony and still look perfect at 11 PM dancing.
10. The Curled and Clipped High Style
This is a bridesmaid or guest style that feels intentional and put-together without being overly complicated. You’re starting with your natural curls, using hot tools to enhance them slightly (if your curls need a little boost), and then using clips and pins to create a high-crowned look that’s simultaneously undone and polished. This works if you want the ease of your curls with just slightly more intentionality.
How to Achieve Maximum Impact
- Refresh your curls the morning of the wedding using a curl cream or curl spray
- If you want to enhance your natural curl pattern, take small sections and gently curl them with a curling iron set to a medium heat — you’re not creating new curls, just encouraging the ones you have to spring tighter and more defined
- Create a deep side part
- Gather the hair at your crown into a clip or decorative claw, positioning it high but slightly to one side of center
- Let the rest of your curls fall freely, framing your face and cascading past your shoulders
- Use bobby pins to secure any sections that don’t fall where you want them, but keep these invisible by tucking them under other curls
- Add one more decorative element — maybe a second smaller clip slightly lower, or a few strategic bobby pins with pearl or jeweled heads
Why This Works for Curly Hair
Curly hair naturally has dimension and movement, so you’re not adding as much heat or product as straight-haired guests might need. Your curls are doing most of the visual work, and the clips are just providing a focal point and slight structure.
Pro Styling Notes
- This style actually looks better slightly undone rather than overly controlled
- The height at the crown is what makes this feel formal — the looseness everywhere else keeps it from feeling stiff
Real talk: If your hair is already in a good curl pattern, you might not need any heat tools at all. Sometimes your natural curls are already perfect, and you just need to add intentionality with strategic pinning.
11. The Romantic Braided Updo
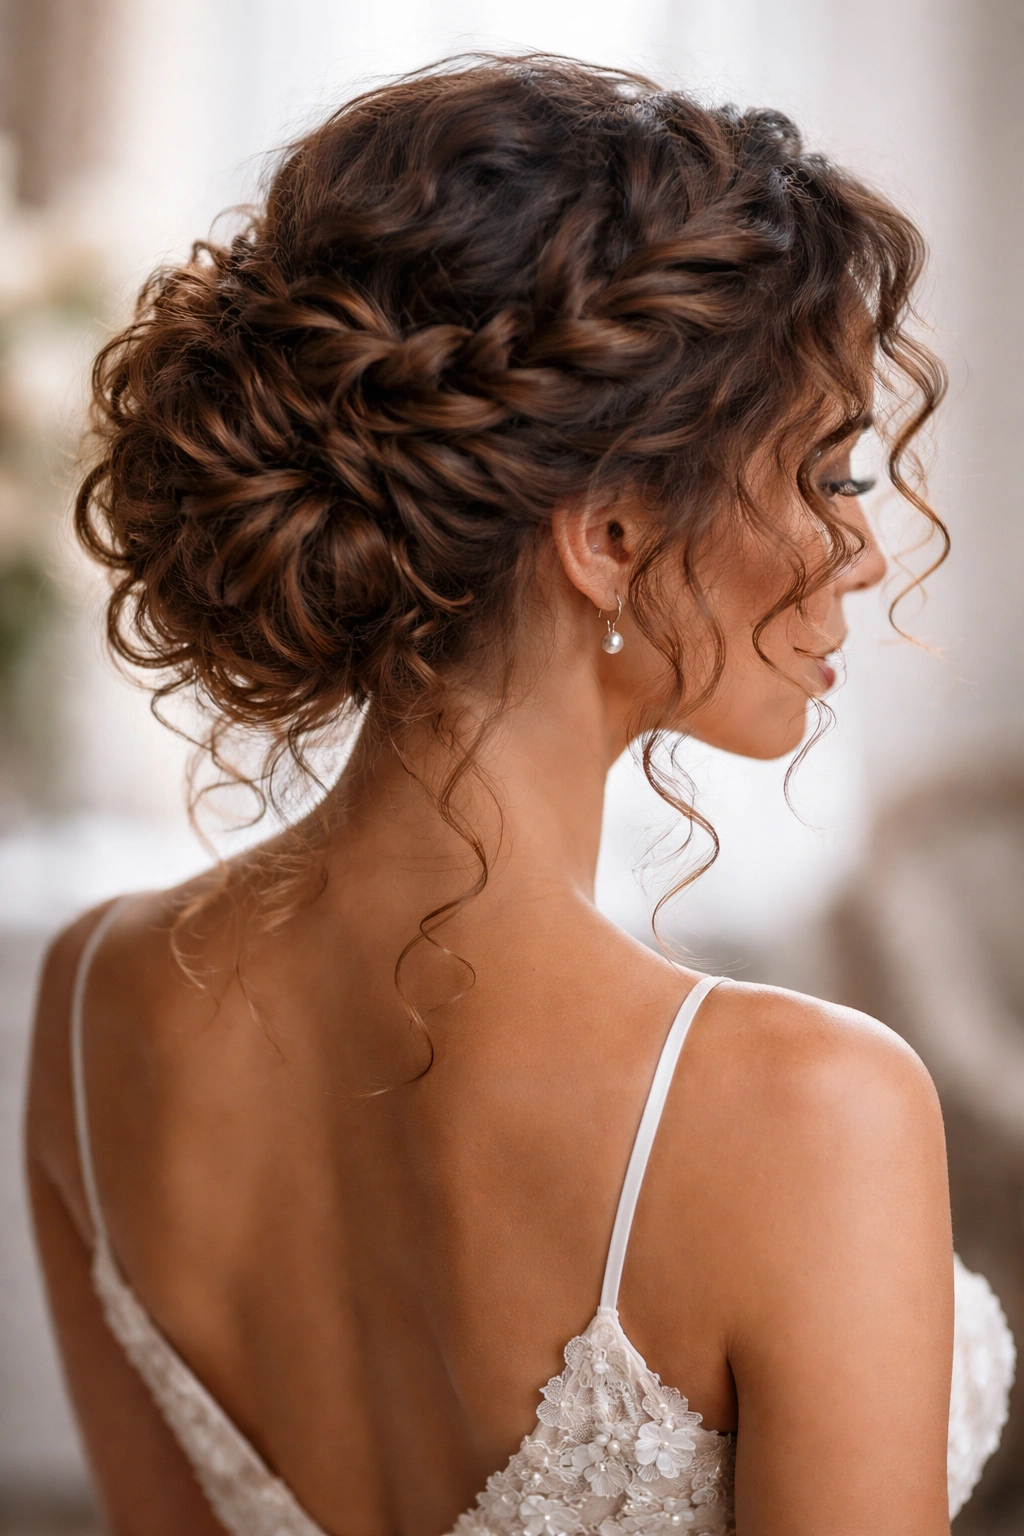
This style combines the elegance of an updo with the visual interest of braids, giving you a wedding hairstyle that feels both sophisticated and romantic. You’re creating two or more braids throughout your hair and then gathering everything into a bun-like structure at the back of your head. The braids are visible within the updo, creating complexity and visual interest that a plain updo wouldn’t have.
How to Build This Style
- Start with completely dry, curl-defined hair
- Create a Dutch or French braid from your right temple toward your right ear, stopping at ear level and leaving the bottom half of your hair unbraided
- Repeat on the left side, creating a matching braid that also stops at ear level
- Create a center braid starting at the crown and traveling straight down the back of your head, also stopping at ear level
- Gather all three braids plus any loose hair into a low ponytail at the nape of your neck
- Twist the ponytail into a loose knot, securing it with bobby pins
- Gently pull at each braid to loosen it and add volume
- Finish with light hairspray
What Makes This Special
This style is visually complex enough to be memorable but not so complicated that it looks overdone. The combination of braids and loose curls appeals to multiple aesthetic preferences — if you love braids, you get that; if you prefer loose curls, you get that too.
Time and Difficulty Considerations
This style takes longer than a simple updo (plan for 20-30 minutes if you’re doing it yourself), but it’s not so complicated that you need professional skills. If you’ve ever braided your own hair, you can do this style.
Insider note: Practice this once before the wedding day so you know how long it actually takes and where the tricky parts are. Most people find the gathering-everything-together-at-the-end step to be the trickiest part, so practice that specifically.
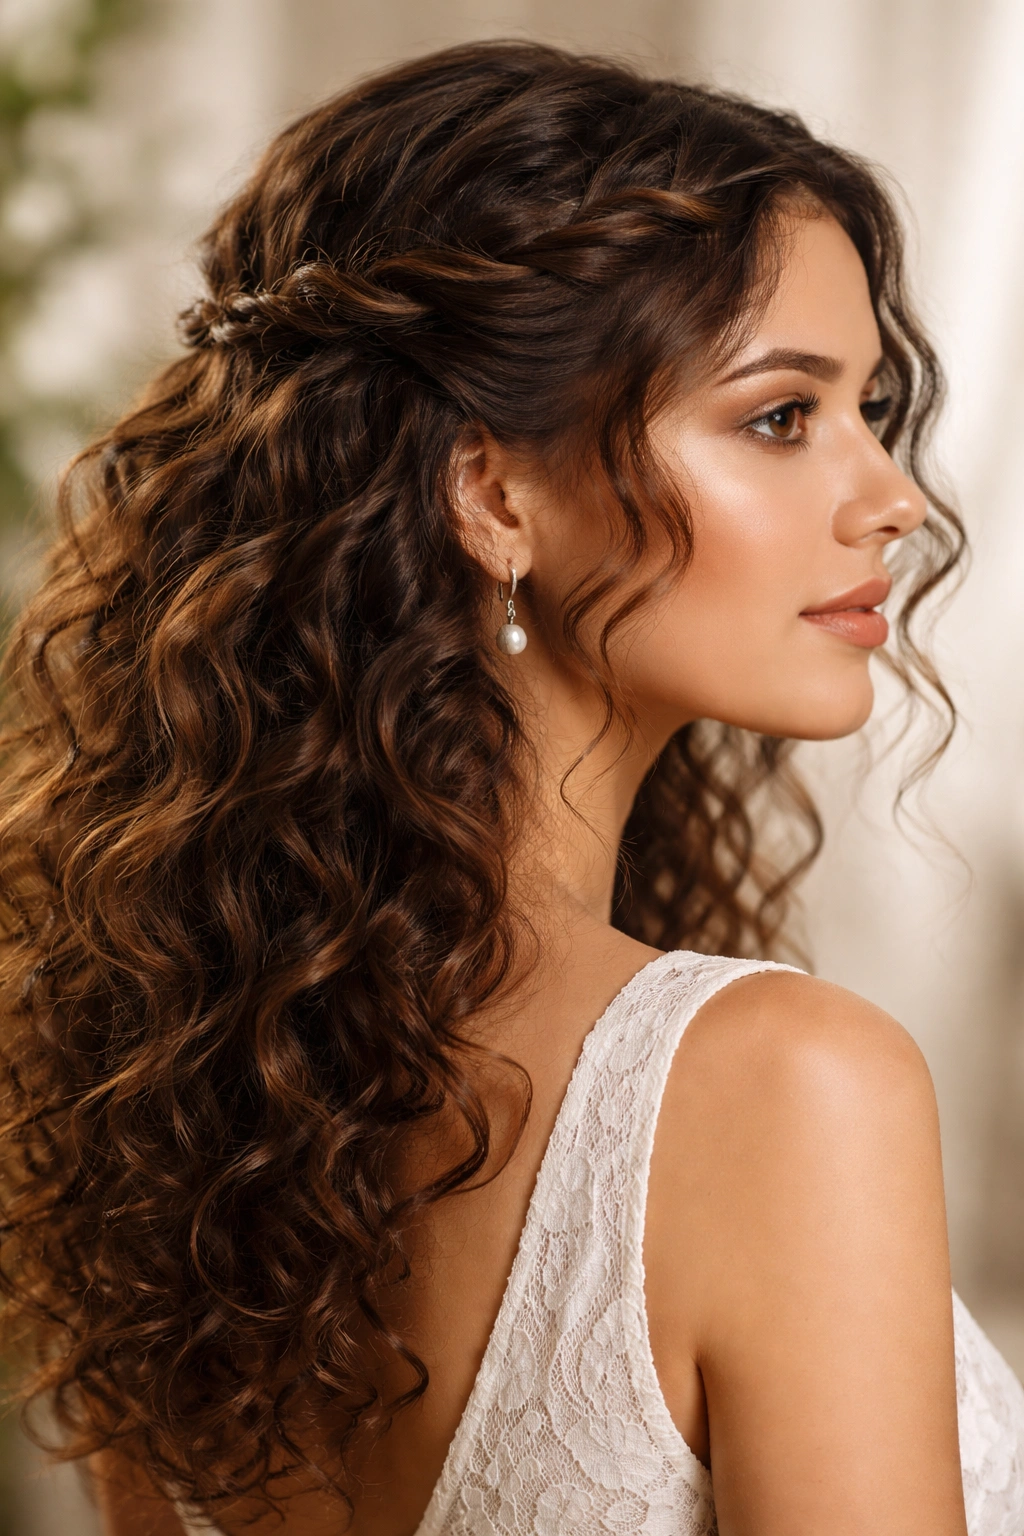
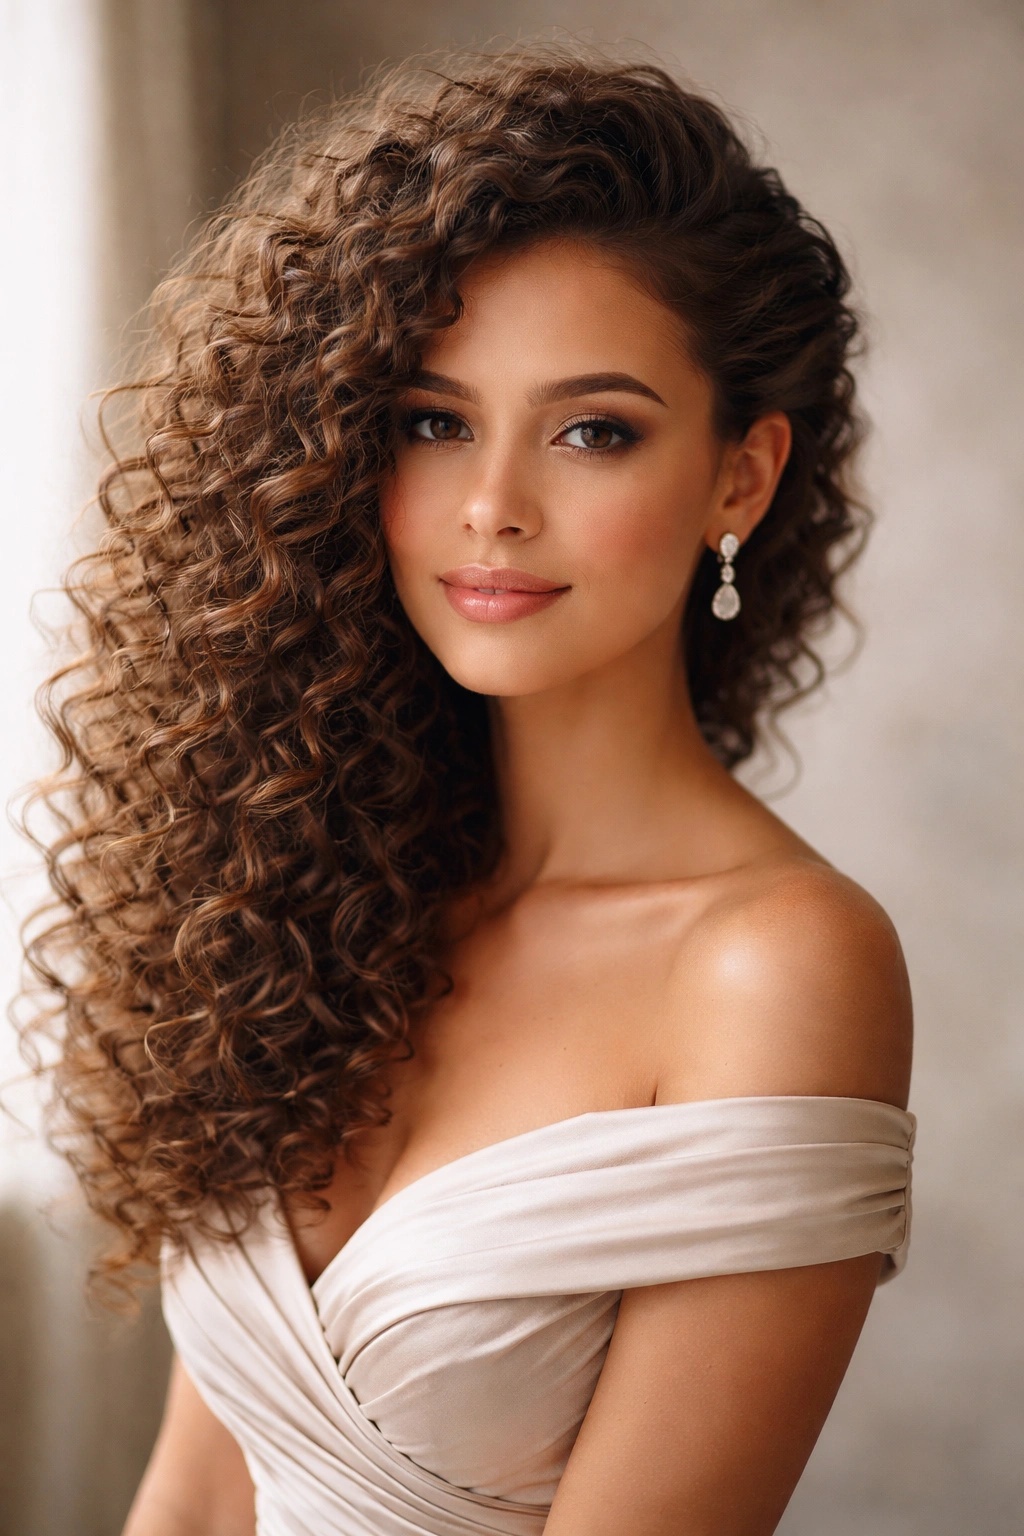
12. The Bouncy Curls with Face-Framing Layers
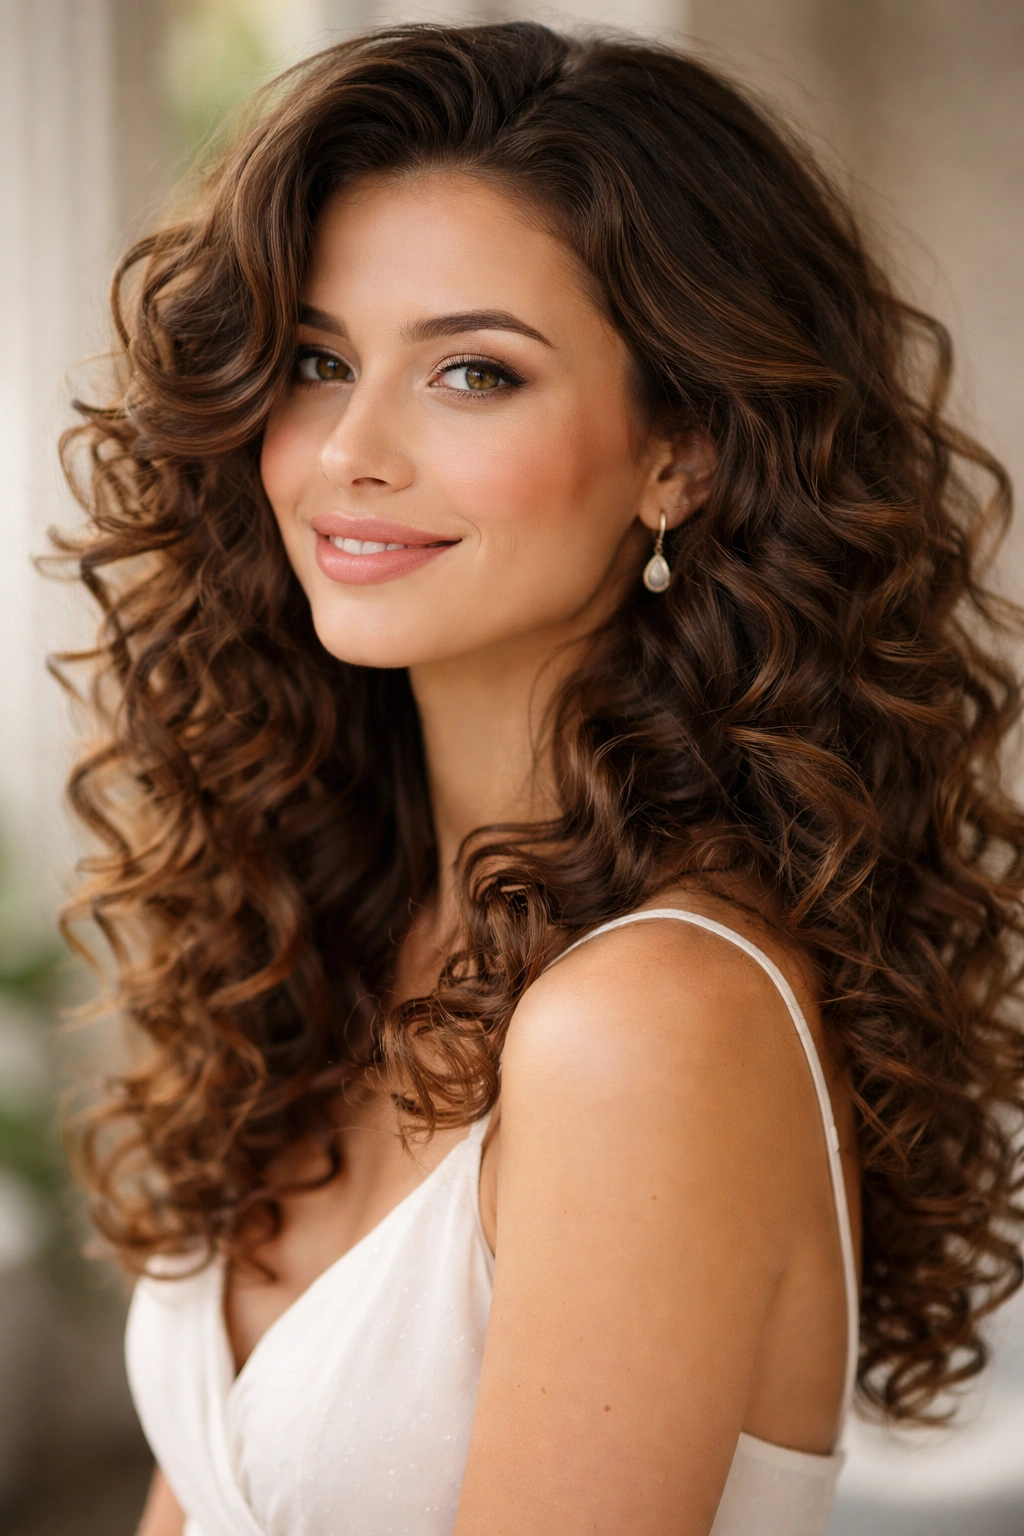
Sometimes the most elegant choice is to wear your curls mostly down, completely loose and free, but with intentional styling that says you’ve put thought into your appearance. This style works if you have beautiful, well-defined curls that are literally your best feature, and if you want the freedom and comfort of wearing your hair loose. You’re adding subtle structure and intentional face-framing, but the majority of your hair remains in its natural state.
Why This Works for a Wedding
Curly hair worn completely loose can absolutely be formal and elegant if it’s well-maintained and intentionally styled. The key is that it needs to look intentionally undone rather than casually undone. There’s a difference, and that difference comes from prep, product choice, and styling technique.
The Styling Approach
- Begin the night before the wedding by deep-conditioning your curls — really saturate them with a hydrating mask
- The morning of the event, rinse your curls with cool water to seal the hair cuticle and enhance shine
- Apply a lightweight curl cream while your hair is still damp, scrunching gently
- Let your curls air-dry completely or use a diffuser on low heat
- Once dry, gently finger-comb your curls to separate them and enhance definition
- Create a side part, running a fine-tooth comb down to create clean lines
- Take small sections from each temple and gently pin them back with decorative bobby pins or small clips, opening up your face without pulling hair away from it
- Use a curl-refreshing spray on any sections that need a boost
- Finish with a very light, flexible hairspray that won’t crunch your curls or make them feel stiff
Product and Prep Matter
This style lives or dies based on curl definition and shine. You need products that hydrate rather than weigh down, and you need curls that are genuinely healthy and well-maintained. If you’ve been struggling with dry, frizzy curls, this isn’t the style for you — save it for when your curls are in their best condition.
Worth knowing: This style is the most vulnerable to environmental factors like humidity and heat. If the wedding is outdoors on a hot, humid day, you might want to consider one of the updo or partial-updo options instead. But if conditions are favorable, nothing says “I’m confident in my natural hair” like beautifully styled, completely loose curls.
Final Thoughts
The truth about styling curly hair for a wedding is that you have more options than you probably realize, and most of them are actually easier to execute than you’d think. Curly texture naturally creates visual interest and dimension, which means you don’t need complicated techniques or excessive products to look polished and intentional. Your curls are already doing half the work — you’re just directing that natural texture toward a more formal presentation.
The style you choose should align with three things: your curl pattern (tight coils need different approaches than loose waves), the wedding’s formality level, and most importantly, your own comfort. You’ll look best in a hairstyle that makes you feel confident and like yourself, just elevated for the occasion. Try your chosen style at least once before the wedding day so you know exactly how long it takes, where the tricky parts are, and whether you need professional help or can manage it on your own.
Start with a really good curl cream or defining product suited to your specific curl type, and don’t underestimate the power of hydration — curls that are deeply moisturized look shinier, feel softer, and hold styles better than dry curls. Finally, remember that some of the most beautiful moments in wedding photographs happen in candid moments, and curly hair that’s moving and bouncing captures those moments in a way that sleek, flat hair sometimes can’t. Your curls are an asset, not a problem to solve.