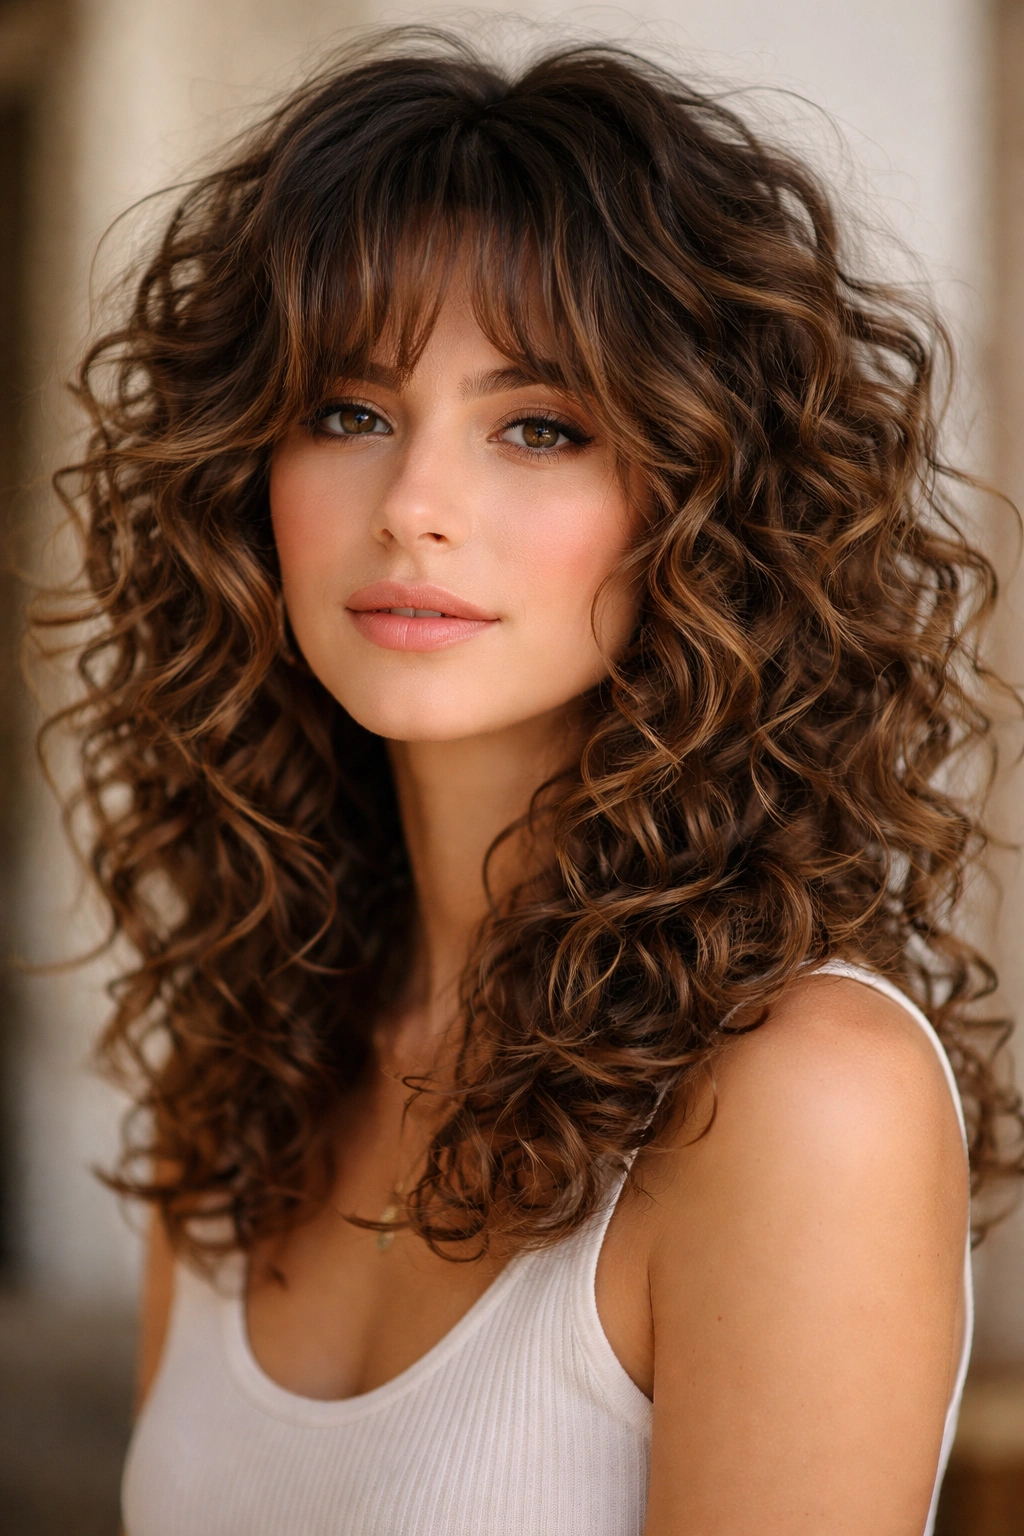
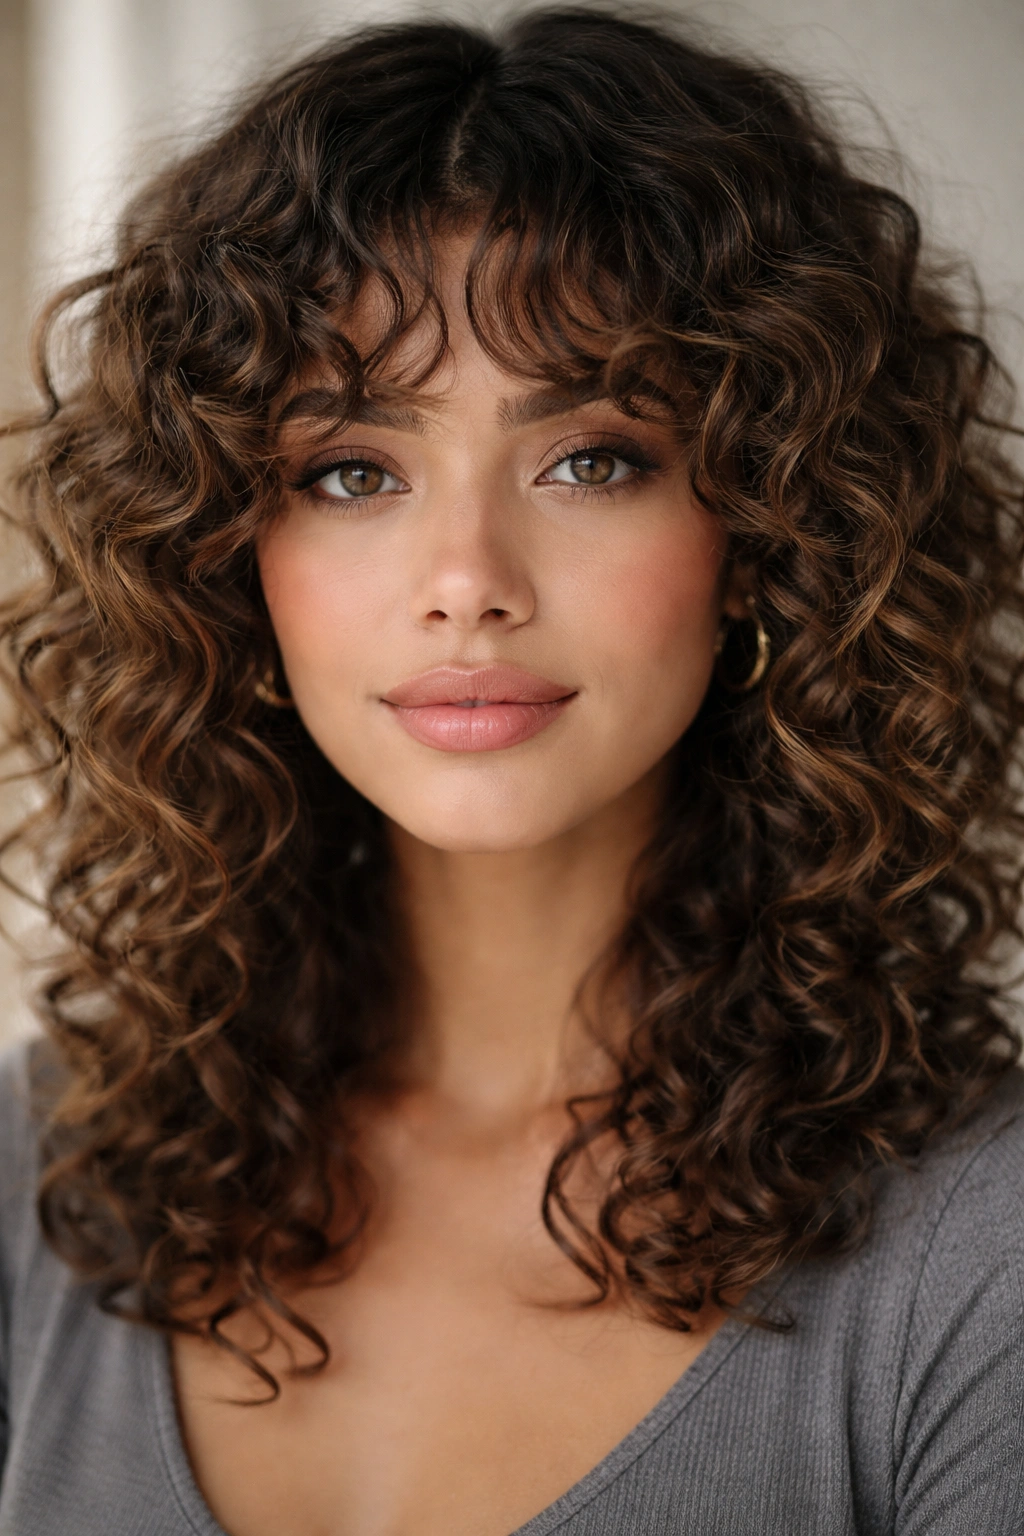
Curly hair doesn’t follow rules. It bounces when it wants to, shrinks when humidity hits, and has a personality entirely its own — and that’s exactly what makes curly hairstyles some of the most striking, expressive looks you can wear. Whether your curls are loose and wavy, tightly coiled, or somewhere in the beautifully chaotic middle, the right style can shift things from “frustrated frizz morning” to genuine head-turner in a matter of minutes.
The challenge most curly-haired people run into isn’t a shortage of style ideas — it’s knowing which styles actually work with their specific curl pattern, density, and length. A hairstyle that looks effortless on straight hair often translates completely differently on curls. Shrinkage changes the perceived length. Humidity changes the shape. Moisture levels change the definition. Working with those quirks instead of against them is the difference between a style that holds all day and one that falls apart by noon.
What separates a great curly hairstyle from a forgettable one comes down to a few things: how well the style respects the natural shape of the curl, how it handles volume — either embracing it or containing it with intention — and how manageable it stays throughout the day. The 15 styles here cover all three marks, and they span a wide range of curl types, from 2B waves to 4C coils.
Some of these are quick enough for a Tuesday morning before work. Others are worth saving for a night out or a special occasion. But all of them do the same thing: they make curly hair the main event, not something to apologize for.
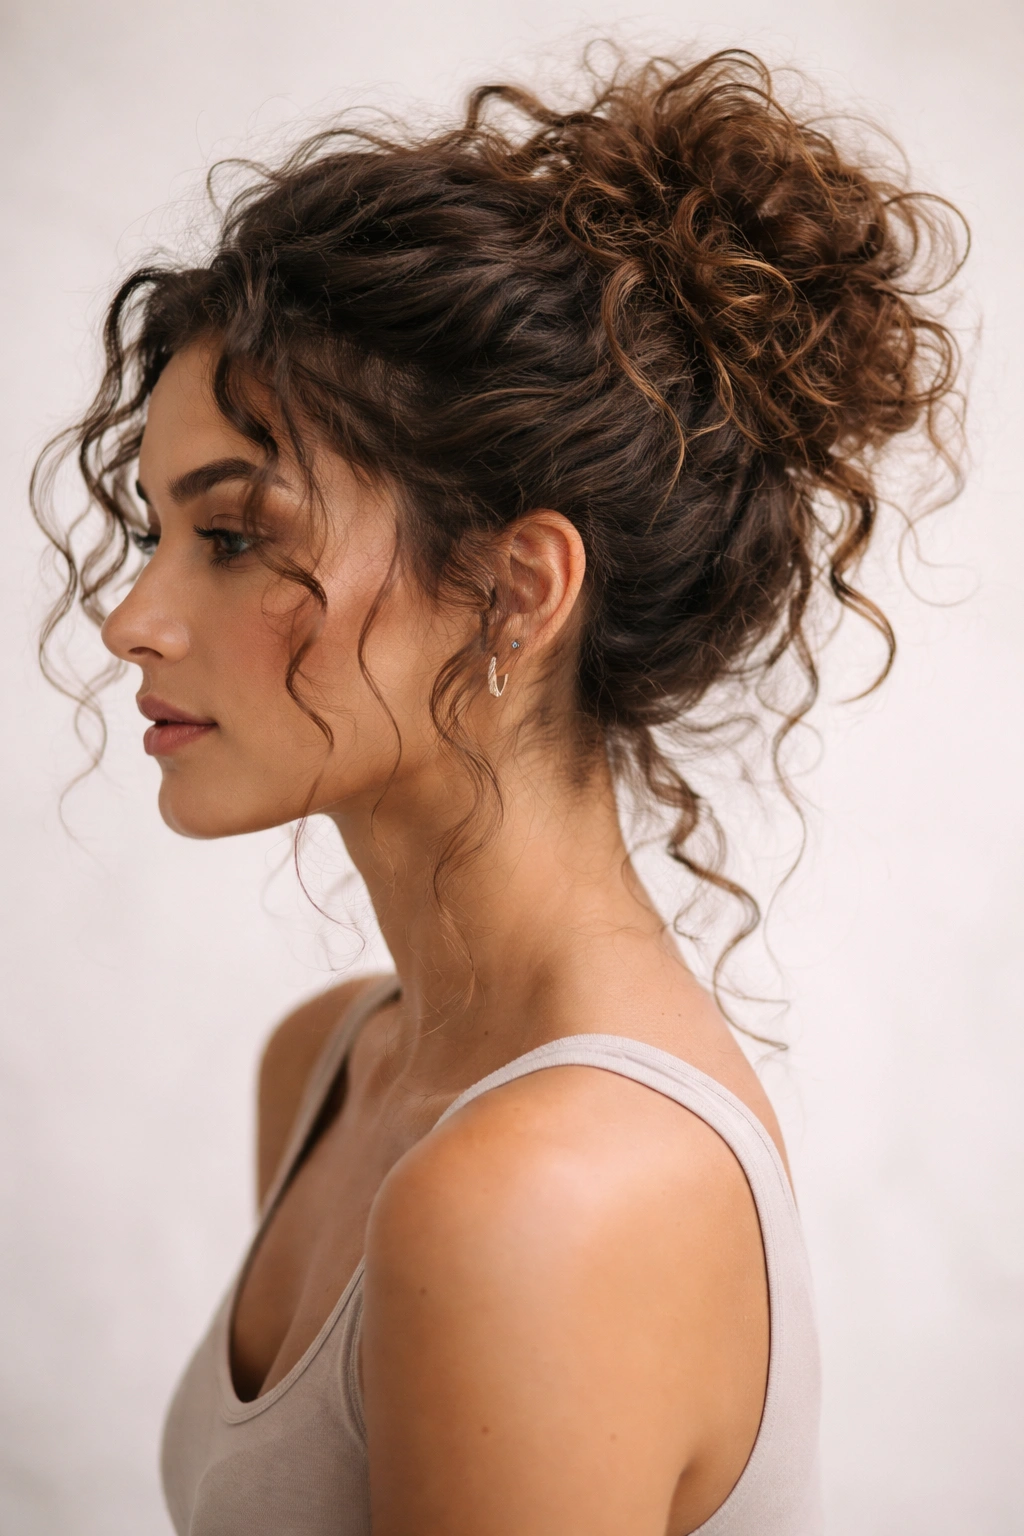
1. The Pineapple Updo
The pineapple updo takes about 45 seconds to do and somehow looks intentional and chic anyway. Named for its resemblance to a pineapple’s leafy crown, this style gathers all your curls loosely at the very top of the head — preserving your curl pattern while keeping hair off your face and neck.
Why This Style Respects Your Curls
The secret to making the pineapple work is keeping the elastic loose enough that it doesn’t crease or dent your curls. A silk or satin scrunchie is non-negotiable here — standard rubber bands pull at the hair shaft and leave a compression mark that can take days to grow out. What makes this style particularly smart is that it doubles as a protective sleeping style; worn overnight, it keeps curls intact and ready to refresh in the morning with minimal effort.
How to Build the Perfect Pineapple
- Flip your head forward and gather all your hair loosely toward the very top of the crown
- Use a satin scrunchie — the smoother the fabric, the less friction on your curl pattern
- Leave 2-3 face-framing pieces out at the front for a softer, more deliberate finish
- The higher the ponytail placement, the more volume spills over the top when you flip back upright
- Works best on medium to longer lengths, though a miniature version can work on shorter curls too
Pro tip: Mist the gathered section lightly with water and a leave-in conditioner before securing — you’re preserving the style and refreshing day-two curls at the same time.
2. Half-Up Half-Down Curls
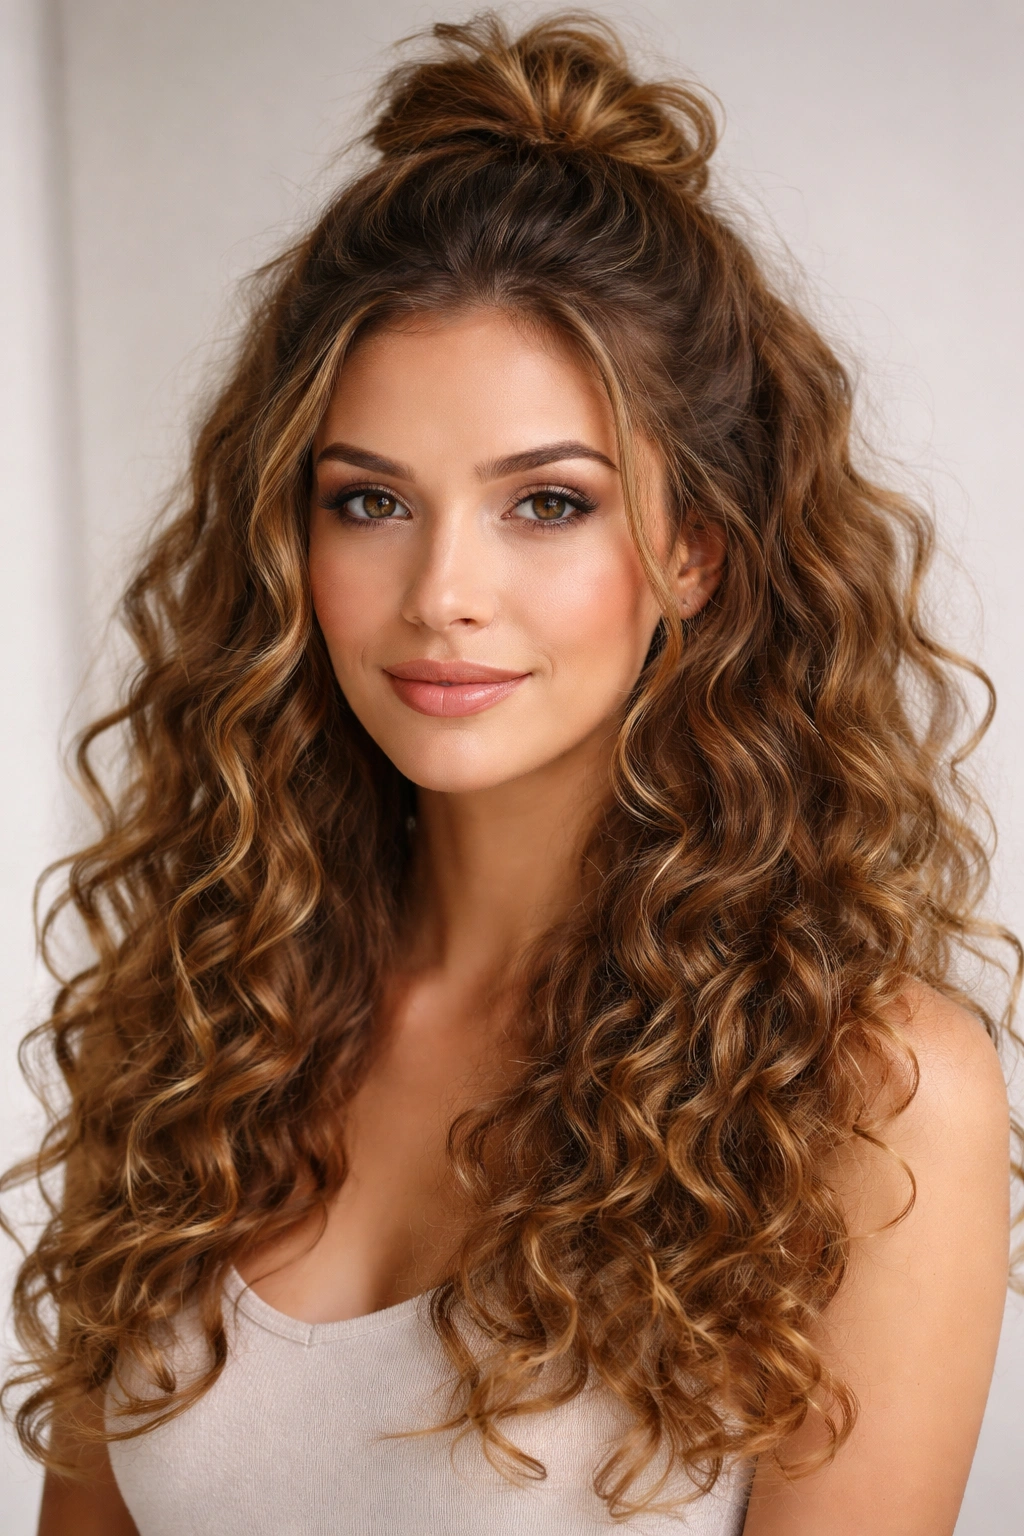
Few styles show off curly hair as generously as the half-up, half-down look. It splits the volume beautifully — pulling the top section up to create lift and shape at the crown while letting the bottom half cascade freely. The result is structured but relaxed, which hits exactly the right note on days when you want to look put-together without trying too hard.
The Structure That Makes It Work
The small bun or knot formed by the upper section acts almost like a hair accessory — it frames the face and lifts the overall silhouette without hiding any of your curl length. On looser wave patterns (2B-3A), this style creates a romantic, effortless feel. On tighter coils (3C-4B), it builds impressive vertical height and shows off curl definition in both sections at once.
Variations Worth Knowing
- Twisted half-up bun: Take two small front sections and twist them back toward the center before securing — adds visual interest without any tools beyond a single elastic
- Braided crown half-up: Braid each side section back and pin them together at the crown for a boho variation that suits events and formal gatherings
- High vs. low placement: A high half-up reads dramatic and editorial; a lower placement just above the nape is softer and more romantic
Quick Setup Tips
- A claw clip instead of a hair tie gives a more effortless look with less crease risk
- Gently pull a few tendrils loose from the top section after securing to soften the shape
- Scrunch the bottom half with a curl cream after styling to keep both sections looking cohesive
Worth knowing: The half-up looks most proportional when the dividing line falls roughly at the temple — not too high and not too low.
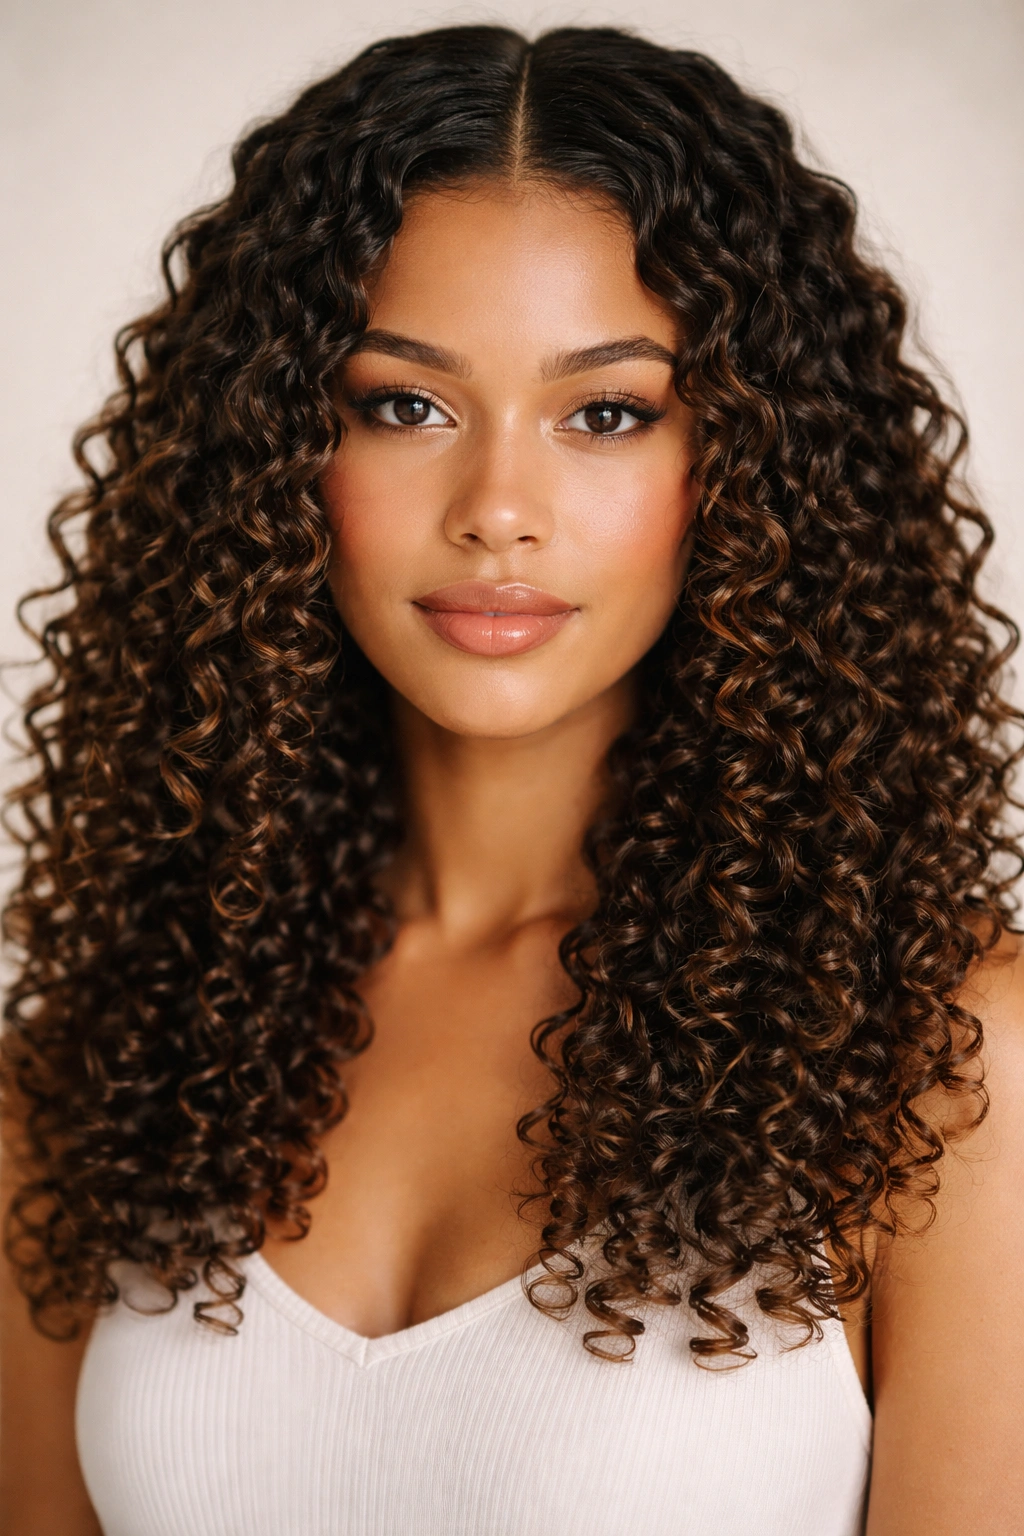
3. Wash-and-Go

The wash-and-go is as close to a philosophy as it is a hairstyle. The whole premise is working with your natural curl pattern in its purest form — fresh from the shower, product applied, and left to dry without manipulation. No overnight techniques, no heat, no extra steps. Just your curls doing exactly what they were always going to do.
Why It Works Across Curl Types
When done well, a wash-and-go on 3C-4C hair delivers extraordinary definition and shrinkage that showcases the density and bounce of tight coils. On 2C-3B curls, the result is naturally voluminous and lived-in with real movement and shine. The key variable isn’t curl type — it’s product selection. The right combination of a curl-defining cream and a light gel gives hold without the dreaded crunch.
The Layering Method That Gets Results
- Start on freshly washed, soaking wet hair — applying products to damp hair often dulls the definition
- Apply a leave-in conditioner first as a base layer, raking it through section by section
- Follow with a curl cream, scrunching upward from the ends toward the roots
- Seal everything with a light hold gel, applying it with the praying hands method — smooth product between palms and glide over the curls without disturbing them
- Diffuse on low heat or air dry completely without touching — any manipulation while drying creates frizz
Pro tip: The “squish to condish” technique — scrunching water and conditioner into your hair while still in the shower — is one of the most effective ways to build curl definition before a single styling product has even been applied.
4. The Curly Bob
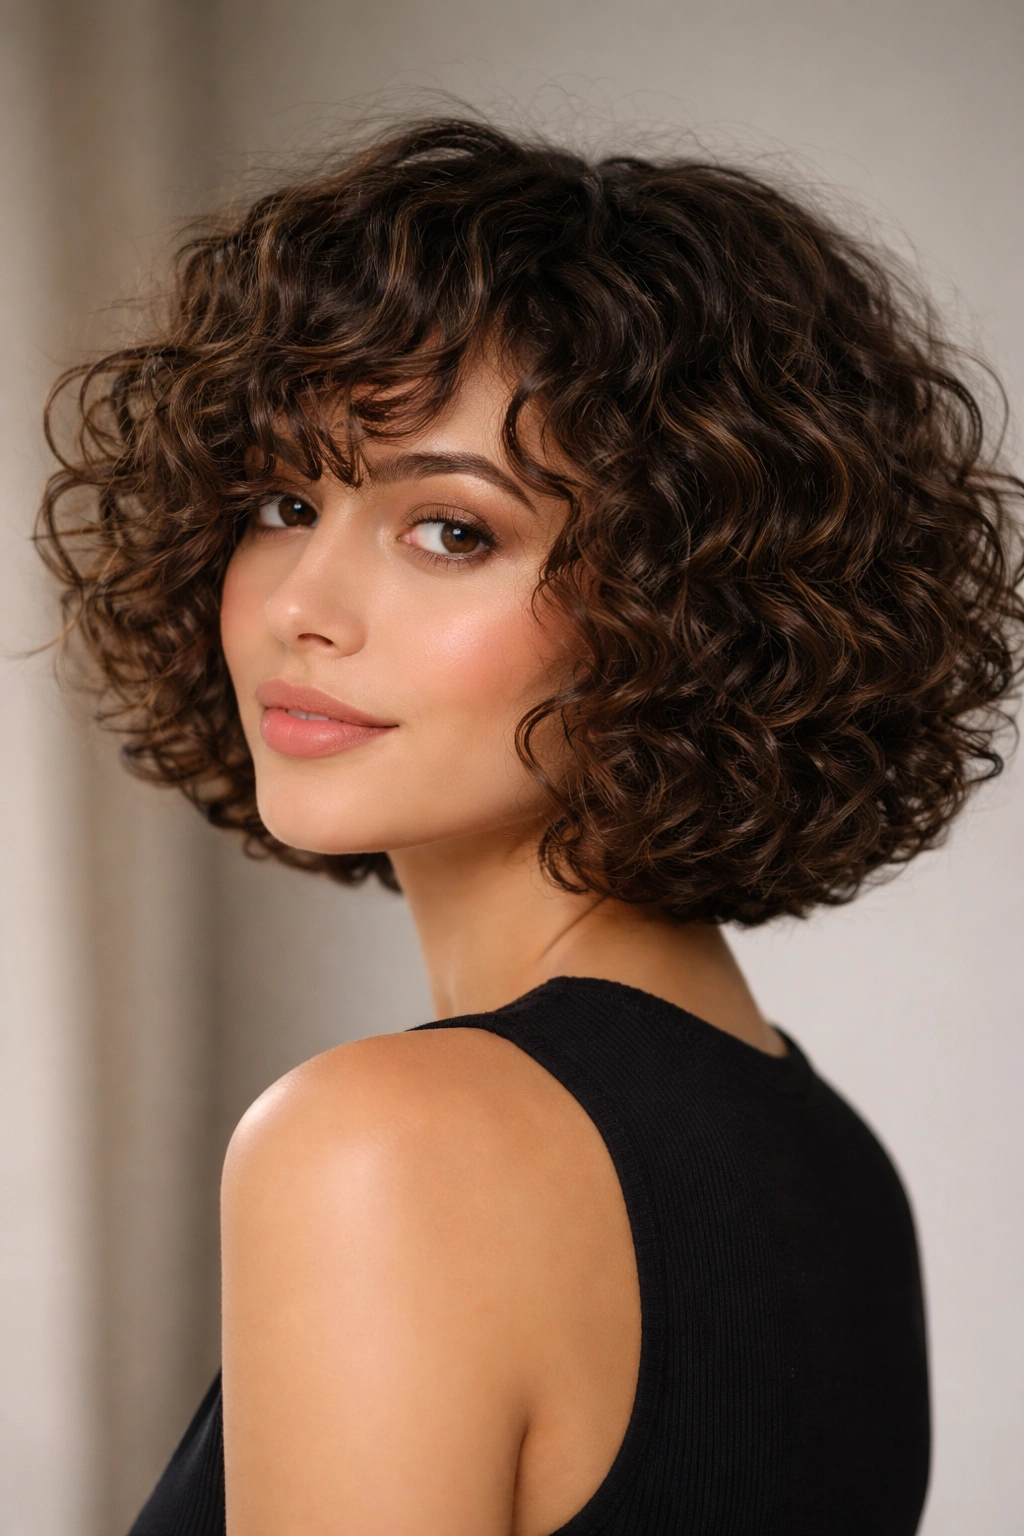
The curly bob is one of the most transformative haircuts available for curly textures, and it’s been a cornerstone in natural hair communities for decades. When cut correctly — meaning dry-cut by someone who genuinely understands how curls shrink — a curly bob creates a round, bouncy shape that looks polished with zero styling effort and spectacular with five minutes of work.
What Makes a Curly Bob Different From a Regular Bob
A standard bob on straight hair translates very differently on curly hair because of shrinkage. A curl measuring six inches wet can spring back to three inches dry. This means a skilled curly stylist cuts the hair at its natural dry, coiled state — accounting for how each section behaves individually rather than treating all the hair as one uniform length. The result is a shape that sits correctly whether your curls are fully defined or air-dried into a soft halo.
Styling Options for the Curly Bob
- Defined and sleek: Apply a curl cream on sopping wet hair, diffuse, then finish with a light serum for glossy definition
- Big and voluminous: Diffuse upside down on low heat, then shake the roots loose with fingertips once fully dry
- Pinned asymmetry: Pin one side behind the ear for an asymmetrical, fashion-forward look that adds a new dimension to the cut
Who It Suits Best
- Works especially well on 3A-4A curl patterns where shrinkage creates natural roundness
- Denser hair types benefit from some interior thinning to reduce pyramid-shaped volume
- Finer, looser wave patterns may need a slightly longer bob length so the wave has enough length to show before it loses definition
Pro tip: Ask for a dry cut specifically — and if possible, have your stylist cut curls individually rather than in large sections. That’s what creates the signature shape rather than a blunt, boxy edge.
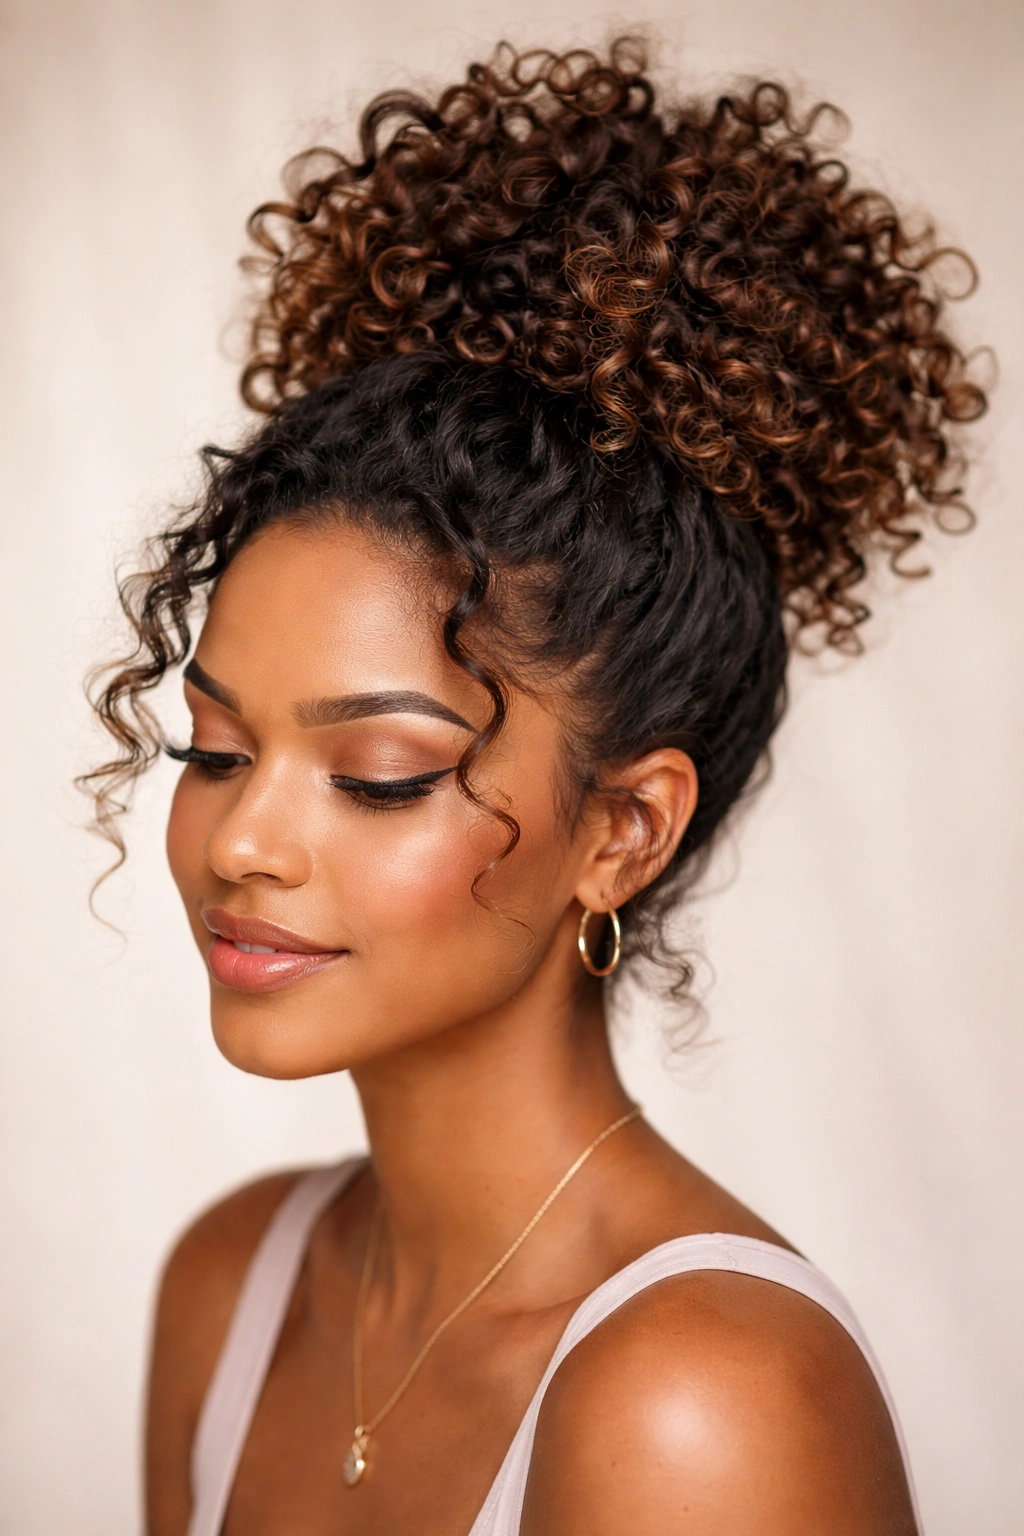
5. High Curly Puff
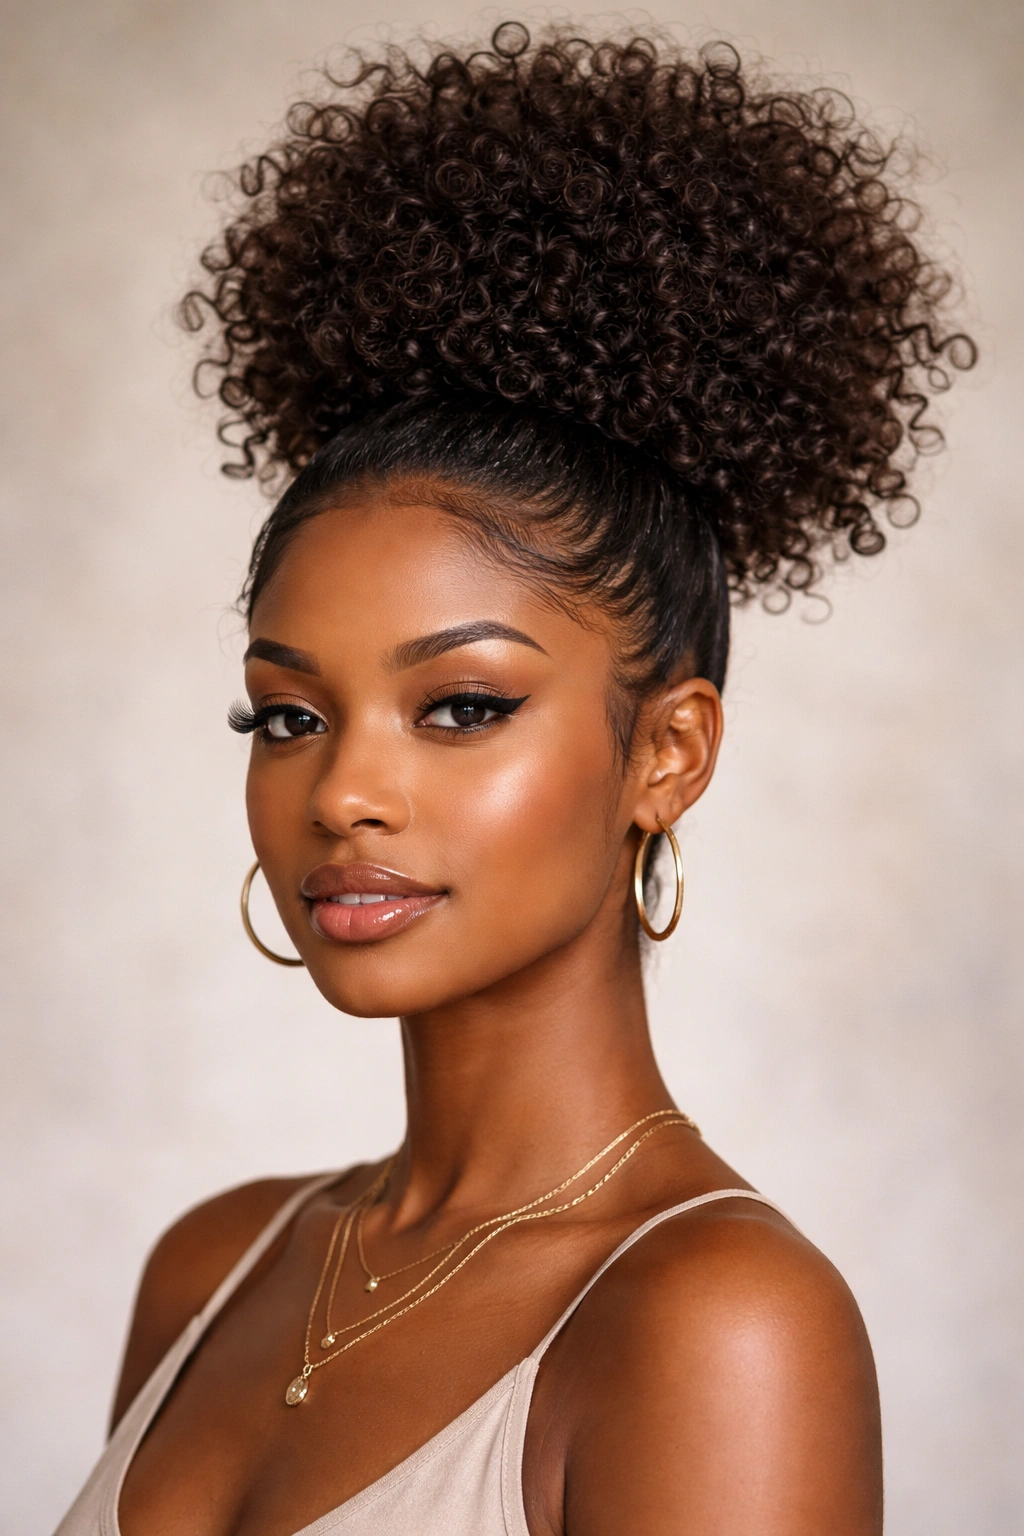
The high curly puff is the icon of natural hair styling. Bold, round, and unapologetically voluminous, this style takes the full weight of your curls and lifts everything upward into a cloud of texture at the crown. It’s one of the most flattering shapes for oval, square, and heart-shaped faces — and it takes under three minutes to execute.
Building the Puff Without Frizz
Moisture is everything with the curly puff. When your hair is dry or lacking hydration, the puff looks dull and unruly rather than full and defined. Mist your hair lightly with water and work a small amount of edge control along the hairline before gathering everything up. A soft-bristle brush or a Denman brush helps smooth the perimeter without disrupting the curl texture higher on the head.
Size and Placement Options
- High puff: Gathered just above the crown for maximum height — the most dramatic version
- Mid puff: Positioned at the back of the crown, lower and more casual
- Low puff at the nape: Almost a ponytail but fuller — a subtler version for professional settings
Accessories That Elevate the Puff
- Satin-lined headbands in bold colors or prints frame the puff beautifully and add a deliberate element
- Jeweled or beaded hair picks inserted through the base add dimension and a personal style signature
- A silk scarf tied around the base completely transforms the look with minimal effort
Worth knowing: For longer, heavier hair, the puff often needs a second elastic placed about an inch from the first — this prevents the base from sagging throughout the day as the weight of the curls pulls downward.
6. Bantu Knots
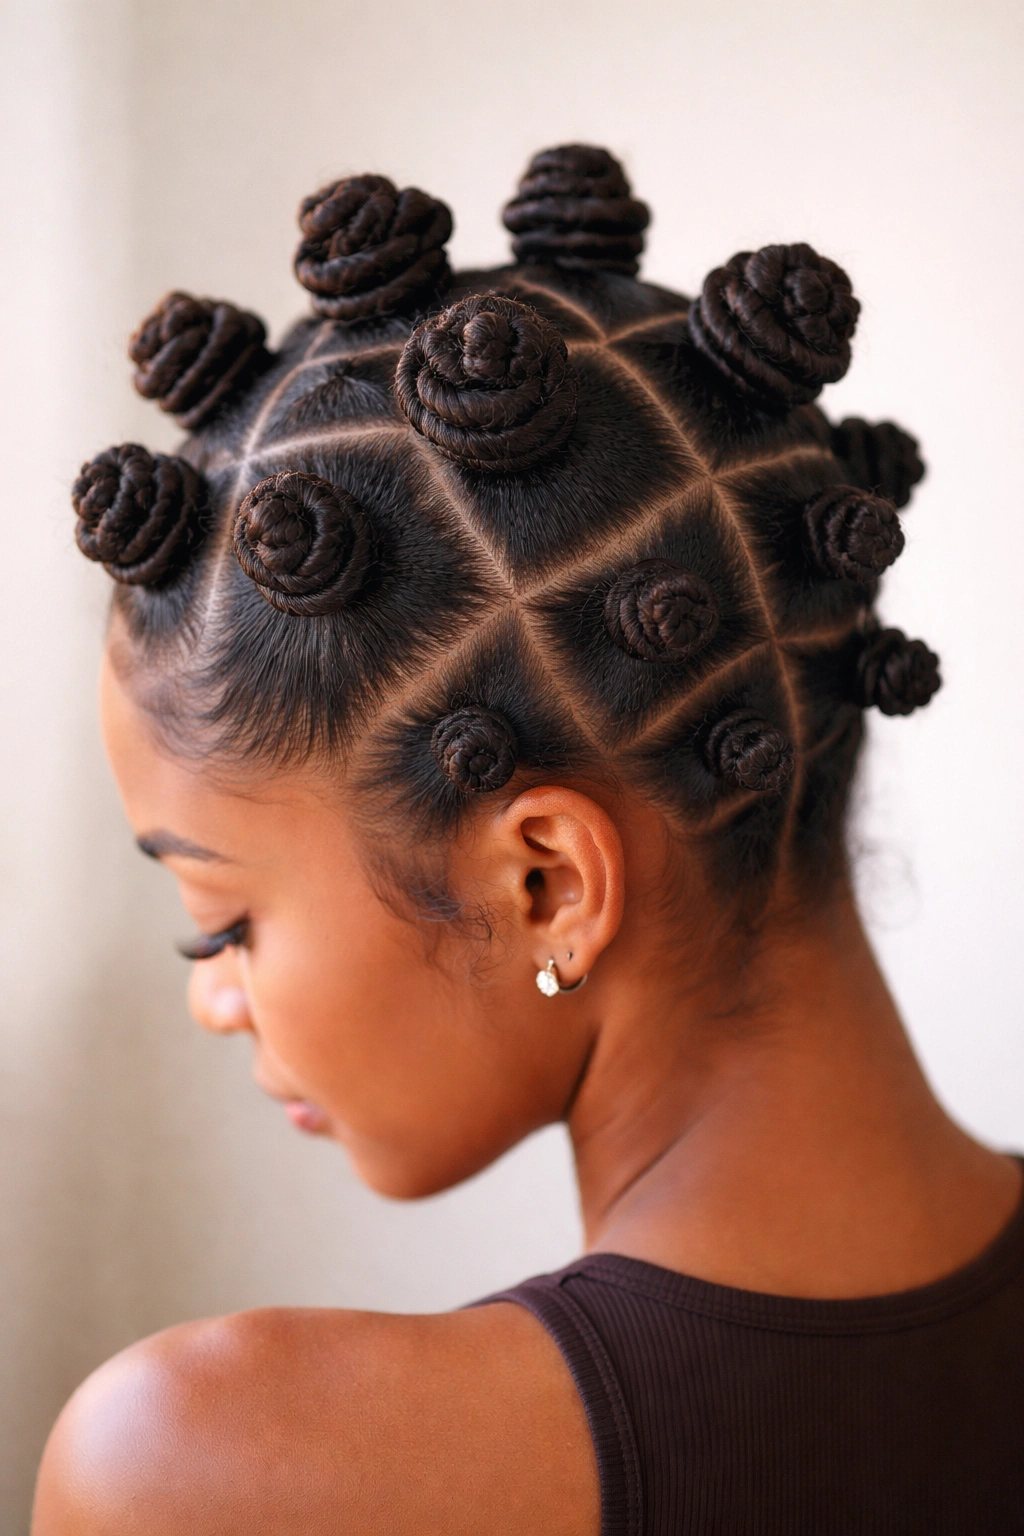
Bantu knots are both a finished hairstyle and a styling technique, and that dual function is a big part of why they’ve remained a cornerstone of natural hair culture for generations. Worn as knots, they’re a textured, sculptural style with deep roots in Southern African traditions. Released overnight, they create Bantu knot-outs — spiraled curls with extraordinary definition and spring.
Wearing Bantu Knots as a Style
The geometric pattern of neatly sectioned, wrapped knots creates a genuinely striking look. The size of each knot determines the overall feel: larger sections make a bold, chunky statement, while smaller, more numerous knots create an intricate, detailed effect that takes longer but reads more elaborate. Clean, even partings are everything here — a rat-tail comb and steady hands make the difference between knots that look intentional and ones that look unfinished.
How to Create Clean, Long-Lasting Knots
- Part hair into sections with a rat-tail comb, clipping away sections not currently being worked on
- Apply a twisting cream or butter to each section before wrapping — this holds the knot and defines the curl for any future knot-out
- Twist each section tightly from root to tip, then coil the twisted rope around itself at the base, tucking the end underneath to secure it
- Finish with a light oil or shine spray over all the knots for a polished, sealed look
Pro tip: Doing Bantu knots on stretched hair creates a looser, more elongated spiral when released. On freshly washed hair at its natural shrinkage, the resulting curl-out is tighter, bouncier, and more defined.
7. The Twist-Out
The twist-out is one of the most versatile and consistently worn styles in the natural hair world. The principle is elegant in its simplicity: two sections of hair are twisted together, left to set, then unraveled to reveal a defined, uniform curl pattern that looks nothing like the twists themselves. The result is a soft, spiraled texture with consistent shape and enough volume to make an impression.
Why the Twist-Out Works the Way It Does
When hair is twisted, it compresses into a tight spiral shape. The product applied during twisting holds the fibers in that formation as the hair dries or sets. When unraveled, each strand retains the coiled memory of the twist — creating a defined wave or curl depending on your natural texture. Tighter coils produce a more defined, springy twist-out. Looser waves produce a more relaxed, bohemian texture. The technique genuinely works across the full spectrum.
Setting Your Twist-Out for Maximum Definition
- Start on clean, freshly washed hair or stretched hair — both work but produce distinctly different textures
- Apply a moisturizer or leave-in first, followed by a defining cream or custard before twisting
- Twist each section tightly from root to tip, keeping the twist under consistent tension throughout
- Allow the hair to dry completely before releasing — a damp twist-out will fall flat within hours
- For the sharpest definition, twist the night before and release fresh in the morning
How to Separate Without Creating Frizz
- Wait until hair is 100% dry before touching a single twist — this is the rule that matters most
- Coat fingertips lightly with a hair oil before separating to reduce friction and frizz
- Pull each twist apart into 2-3 sections, working from the ends upward toward the root — never downward
- Shake your head once all twists are released and use fingertips at the roots to lift and separate for volume
Pro tip: Retwisting any ends that unravel during the day takes 30 seconds and easily extends the style by two or three more days.
8. Braided Crown with Curls
The braided crown — also known as a halo braid — sits at that intersection of elegant and genuinely wearable. A woven band frames the face while the rest of your curls flow freely beneath it. Done with the right method, it looks like a salon result but takes about 15 minutes at home.
The Two Approaches to a Braided Crown
The first method uses two Dutch or French braids, one on each side, braided toward the back and pinned where they meet. The second uses a single braid that starts at one ear, travels along the hairline all the way around the head, and ends where it began — a true crown braid. The two-braid method is easier for beginners; the single-braid wrap creates a cleaner, more seamless look and photographs beautifully.
Making the Braid Sit Right on Curly Hair
- Lightly stretch the sections being braided before starting — this prevents shrinkage from pulling the braid tighter than intended during wear
- Use a small amount of edge control or braid cream on each section as you work
- Keep the tension even throughout — inconsistent tension creates a bumpy, uneven crown rather than a smooth halo
- Pin the end securely with bobby pins that match your hair color to keep them invisible
Styling the Free Curls Beneath
- Fully diffuse or air-dry the curls before braiding so the released portion is defined and set
- Leave a few shorter face-framing pieces free at the front of the braid to soften the look
- Finish with an oil sheen on the loose curls below for a nice contrast between the braided section and the free-flowing texture
Worth knowing: On 4C hair, the braided sections may need extra product to stay smooth — applying an edge control or braid wax directly to the completed braid tames flyaways along the crown.
9. Side-Swept Curls
Side-swept curls occupy an elegant, romantic space that almost no other curly hairstyle reaches. Instead of even volume distributed symmetrically, this style directs everything toward one shoulder — creating a dramatic, cascading effect that photographs beautifully and flatters nearly every face shape.
Creating the Sweep on Natural Curls
The most reliable way to achieve a side sweep is to diffuse your curls leaning to one side, then coax everything over once fully dry. Using your fingers to redirect the roots while diffusing locks in a directional memory that holds long after the dryer is put away. A wide-tooth comb can gently sweep fully dry curls from one side to the other, though finger-styling is less disruptive to the curl pattern overall. A few bobby pins tucked underneath at one temple hold the swept side in place all day.
Face-Framing Techniques Within the Style
- Leave shorter pieces around the face on the non-swept side for balance — a completely bare side can feel stark
- Pull the swept curls slightly forward at the shoulder to create a soft “S” shape rather than letting them fall straight down
- Use a light-hold hairspray on the swept crown section only (not the curls themselves) to lock the directional placement without stiffening the texture
When This Style Makes the Most Sense
Side-swept curls are particularly well-suited for events, date nights, and formal occasions where you want to feel dressed up without committing to an updo. The style works at every length — from a side-swept curly bob to longer spirals. Shorter hair benefits from a deeper side part to create the illusion of the sweep, while longer lengths cascade naturally with almost no encouragement.
Pro tip: Sleeping on the same side as your intended sweep — with a satin pillowcase — can actually pre-set the directional shape overnight before you’ve touched a single product the next morning.
10. Curly Shag with Layers
The curly shag is a cut-based style that delivers maximum personality with minimum daily effort. Characterized by heavy layering, curtain bangs or fringe, and a short-to-long graduation from crown to ends, the shag works extraordinarily well on curly textures because each individual layer creates a distinct spring that adds to the overall movement of the style.
What Makes the Shag a Curly-Hair Win
Layers and curly hair have a complicated history — the wrong layering creates a triangle or pyramid shape where the crown is flat and the bottom is enormous. The shag gets around this by cutting layers that graduate naturally with the curl: shorter layers at the top spring up and create height, while longer layers at the bottom add length and movement without excessive bulk. A skilled stylist cuts each layer to work with the curl’s natural spring, not against it.
Key Features of the Curly Shag
- Curtain bangs: These soft, face-framing pieces split at the center and curl outward naturally — on curly hair, they require almost zero styling and frame the eyes beautifully
- Interior thinning: Removing weight from the interior of thick, dense curls allows each layer to move independently rather than clumping into heavy masses
- Choppy ends: Rather than a blunt perimeter, the shag has lightly textured ends that spring up into individual curls
Maintaining the Shape Between Cuts
- Trim every 8-10 weeks to prevent the layered shape from losing its structure as curls grow
- Apply a curl cream to each layer section individually while styling to keep them separated and bouncy
- Diffuse upside down to maximize height in the shorter crown layers
Pro tip: Ask your stylist to cut the curtain bangs dry on your natural curl — bangs cut wet will spring up considerably shorter than intended once the curl contracts.
11. Space Buns with Curls
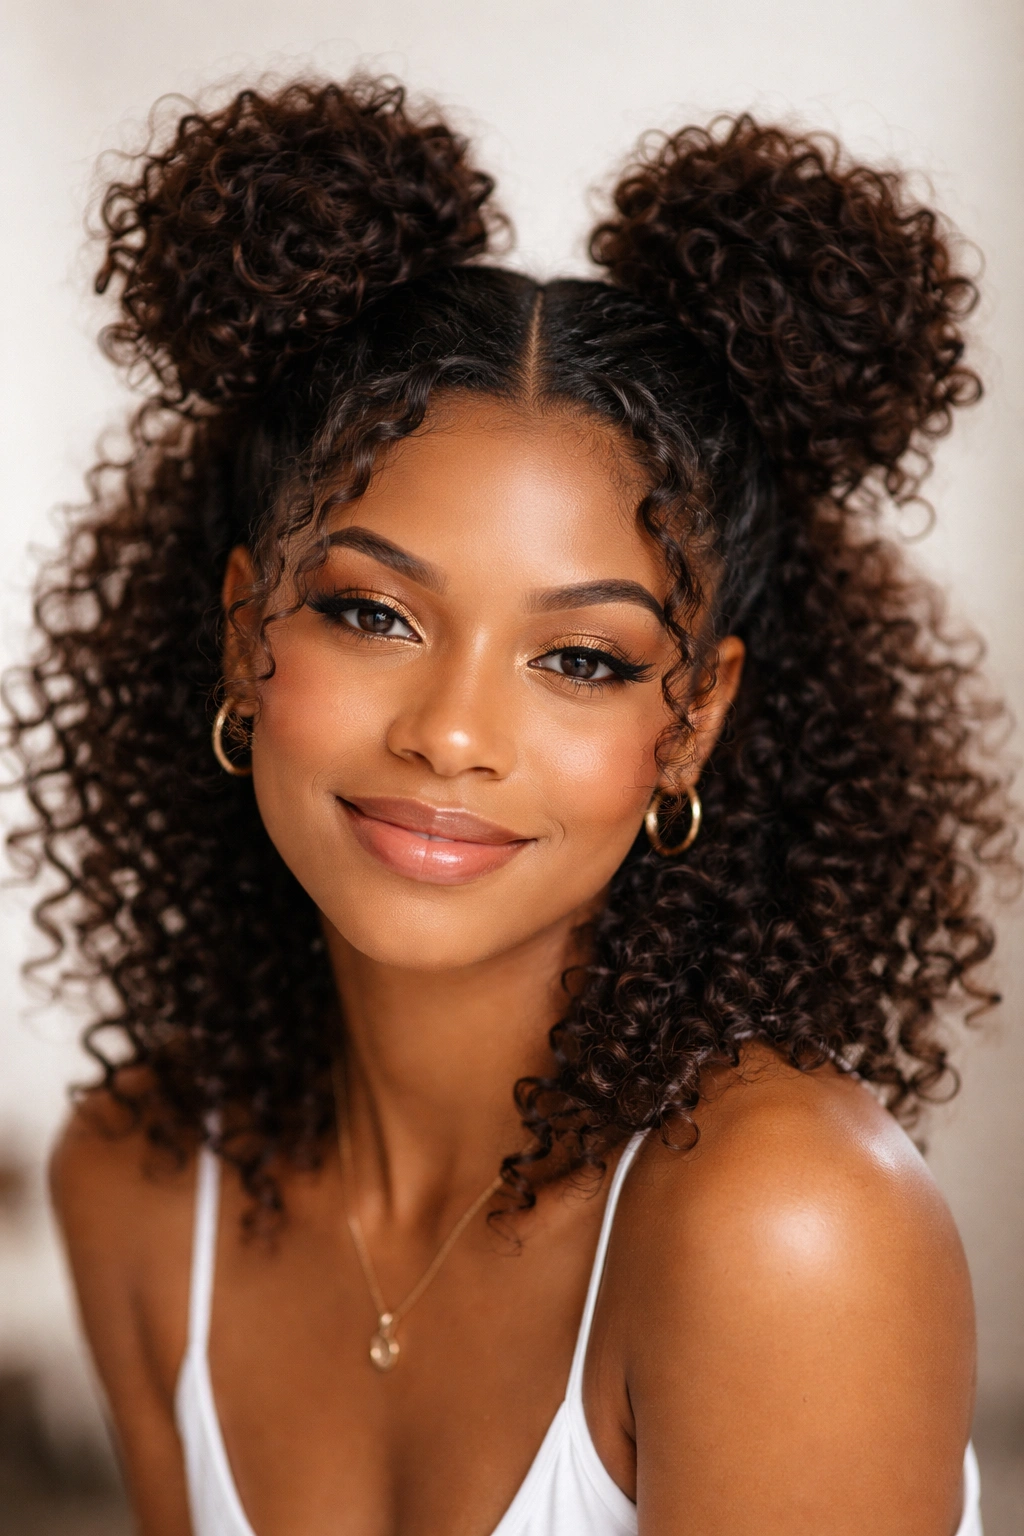
Space buns on curly hair have an energy that’s hard to match — playful, bold, and effortlessly editorial all at once. Two buns positioned high on either side of the head let the natural texture of the curls overflow each bun base, creating a soft, rounded shape with a frizzy halo that looks deliberately cool rather than accidental.
Building Space Buns That Actually Stay Put
The structural challenge with curly hair space buns is gathering enough hair to form a full, round bun without the elastic pulling the texture apart at the hairline. The trick is gathering each section loosely at first, wrapping the length around the base twice rather than twisting up too tightly, and securing with a second elastic through only one loop. This creates a relaxed, full bun rather than a strained, pulled-tight one that looks uncomfortable.
Variations Worth Trying
- Half-space buns: Pull only the top half into buns and leave the bottom curls free — a softer version that suits semi-formal settings
- Messy space buns: Deliberately pull a few curls free from each bun after securing for a deconstructed, intentionally undone look
- Accessorized space buns: Wrap a thin ribbon or silk scarf around each bun base — adds color, texture contrast, and a completely different personality to the same style
Who This Style Works for Best
Space buns naturally suit shorter to medium lengths since longer, heavier hair can make the buns too large to hold their position. Denser, thicker curl textures create the most impressive round shapes, though finer curls with the right product can achieve a similar full effect with some strategic root lifting.
Worth knowing: Spritz each gathered section with a light-hold hairspray before wrapping — the added texture grip keeps the buns in position much longer, even in humidity.
12. Low Bun with Curly Tendrils
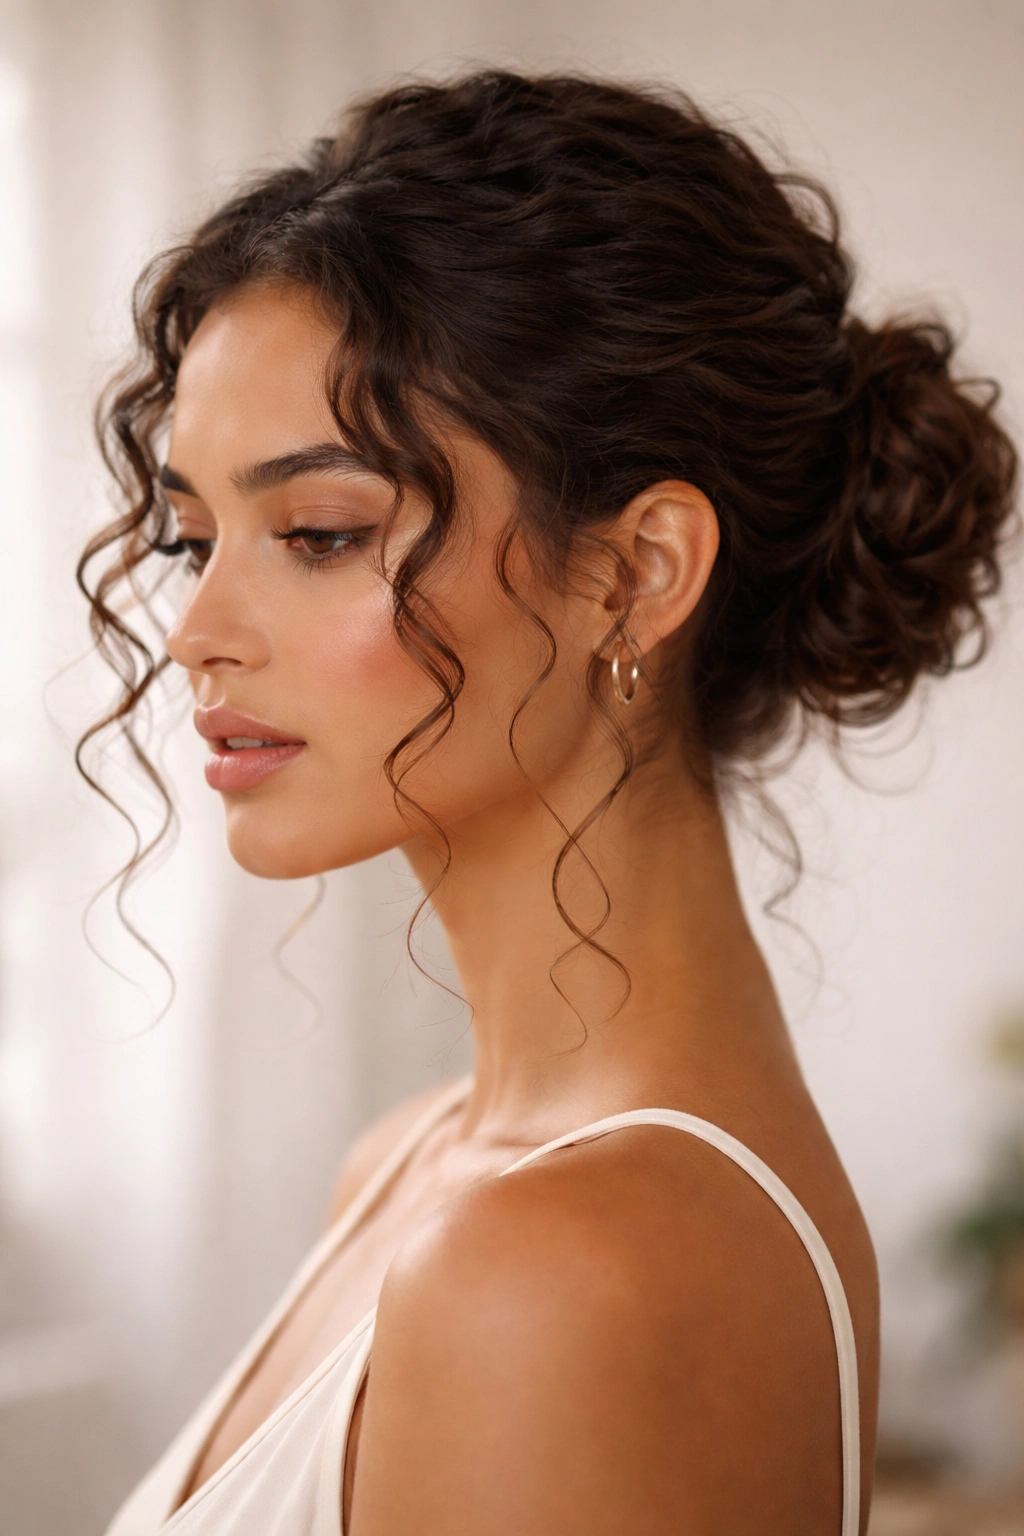
The low bun with curly tendrils is the curly hair answer to the classical chignon — polished enough for professional settings, delicate enough for formal events, and relaxed enough for everyday wear when you want something more thoughtful than a quick ponytail without fully committing to a complex updo.
The Balance Between Neat and Natural
What makes this style work — and what separates it from simply throwing hair into a bun — is the deliberate release of tendrils around the face and neck. These aren’t random escapes. They’re chosen pieces: the shorter layers at the temples that coil naturally, the section just in front of the ear on each side, and a piece or two at the nape if your hair allows. Each tendril frames a different part of the face and softens the structured bun behind.
Creating Perfect Tendrils
- Apply a curl defining cream to the intended tendril pieces before pulling the rest of the hair back
- Wrap each piece around a finger once, hold for 10 seconds, and release — this encourages a tighter coil on looser wave patterns
- For tight coils that don’t need encouragement, pull the piece forward and let it spring back naturally into its own shape
- Finish each tendril with a small amount of flexible hold gel to maintain the definition throughout the day
Securing the Bun Without Damage
- Use a snag-free elastic to gather hair at the nape — never a standard rubber band
- Twist the length into a loose rope, wrap around the base twice, and pin ends underneath with U-shaped hairpins
- For heavy, dense hair, cross two bobby pins at the base of the bun in an X shape for added security
Pro tip: This style on day-two or day-three curls is often better than fresh wash day — the natural oils give the bun a cohesive, uniform shape that freshly washed, maximally bouncy curls sometimes resist.
13. Curly Fringe and Bangs
Bangs on curly hair require a particular kind of commitment — and a particular kind of stylist — because they behave differently from bangs on straight hair in almost every way. But when they’re cut and maintained correctly, curly bangs are one of the most distinctive and flattering style choices in the book. The natural curl adds movement, softness, and character that straight bangs simply can’t replicate.
Types of Curly Bangs and What Each Does
Curtain bangs split at the center and fall away from the face on each side, creating a soft, open frame around the forehead. On curly hair, these require virtually no daily styling — the curl pattern does all the work. Side-swept bangs fall across the forehead in one direction, adding asymmetry and a softly romantic quality. Full-face fringe — bangs cut straight across — works on curly hair only with fine, loose curl patterns (2A-2C); on tighter textures, the natural spring creates a very short forehead fringe effect that most people aren’t expecting when they sit in the styling chair.
How to Maintain Curly Bangs at Home
- Apply a small amount of curl cream to bangs on wash day, shaping them as they air dry
- Diffuse the bang section with a nozzle held close to the roots for maximum curl definition
- On non-wash days, spritz bangs with water and reshape with fingers — bangs are the easiest section of curly hair to refresh because of how little hair is involved
- Trim every 4-6 weeks minimum; curly bangs that grow out quickly lose their shape and start covering the eyes in a way that reads unkempt rather than intentional
Why the Cut Matters More Than Anything
Always have curly bangs cut dry and in their natural curl state. A stylist who cuts wet sections will almost certainly cut them too short once the curl contracts after drying. For curly bangs specifically, the dry-cut rule isn’t negotiable.
14. Messy Curly Updo
The messy updo looks like it took five minutes and three hours simultaneously — effortlessly undone in a way that actually requires skill to achieve intentionally. Unlike a sleek updo that fights curly hair’s natural texture, this style leans into the frizz, the flyaways, and the volume, treating them as features rather than problems.
The Anatomy of a Good Messy Updo
A successful messy curly updo has three things working together: a secure anchor point (the base where most of the hair is pinned), intentional loose pieces (selected curls released around the face, nape, and sides), and consistent texture throughout (you don’t want one section looking smooth while another looks completely undefined). The chaos needs to look curated — which sounds contradictory but is completely achievable with the right approach.
Building the Look
- Start on day-two or day-three hair — the natural oils and slight deflation of older curls make them easier to gather and shape into a cohesive updo
- Gather all hair loosely at the back of the head — somewhere between the crown and the nape, not quite either
- Twist the gathered section loosely twice, fold it in on itself into a rough bun shape, and secure with 3-4 bobby pins rather than an elastic — pins create a softer, more irregular shape
- Pull 3-5 individual curls deliberately free from the bun and around the face — these are your intentional escapes, not accidents
Finishing for the Right Polished-Undone Look
- Use a light-hold hairspray on the entire updo after pinning to set the flyaways in place, not smooth them down
- Apply a tiny amount of hair oil to palms and pat gently over any sections that look dry rather than deliberately textured
- Add a decorative clip, vintage pin, or thin scrunchie near the base — a single finished element makes the looseness look chosen rather than careless
Pro tip: The messy updo actually holds better on hair that isn’t freshly washed. Slightly older curls have more grip and natural texture, which keeps bobby pins in place and prevents the bun from slipping as the day goes on.
15. Defined Spiral Curls with a Center Part
Defined spiral curls with a clean center part represent the pinnacle of wash-day styling — the look that showcases every single curl at its absolute best. The center part does two things simultaneously: it creates a symmetry that balances the natural volume of curly hair, and it opens the face, bringing the eyes and cheekbones forward. Combined with maximally defined spirals, the result is a style that feels both natural and deliberate.
Building Definition That Lasts All Day
The foundation of defined spirals is hydration at the strand level, not just product layering on top of underprepared hair. Starting from soaking wet hair and working product through in sections — never in one rough all-over pass — is what creates consistent definition from root to tip. The LOC method (liquid, oil, cream) or LCO method (liquid, cream, oil) both work well; the difference comes down to which sealant goes last and how much hold you want at the finish.
The Center Part Technique for Curly Hair
- Use the end of a rat-tail comb to create the part on freshly washed, still-wet hair — attempting a center part on dry curly hair creates frizz and disrupts curl definition
- Work the part from the forehead straight back to the crown with light, even pressure
- Apply product immediately after parting to prevent the natural curl from pulling the part off-center as the hair dries
Holding the Definition Through the Entire Dry Cycle
- Apply a flaxseed gel or medium-hold curl gel as the final product layer over your curl cream — gels create the “cast” that holds the definition as curls dry, then crunch out into soft spirals once fully set
- Diffuse on low heat using the hover-and-scrunch technique: hold the diffuser near the hair, press upward, hold for 10-15 seconds, move to the next section
- Once fully dry, scrunch out the gel cast with oiled palms — this is called “scrunching out the crunch” (SOTC), and it’s the moment where stiff, crunchy curls transform into bouncy, touchable spirals
Worth knowing: A center part draws direct attention to facial symmetry. If you prefer a softer, less geometric frame, shift the part just 1-2 centimeters off-center — it creates a significantly more relaxed, organic feel while keeping most of the visual benefits of the centered look.
Final Thoughts
Curly hair gives you styling options that straight and wavy textures genuinely can’t access — the volume, the texture, the natural sculptural quality that makes styles like the curly puff, the braided crown, and defined spirals look the way they do. The key, across all 15 of these styles, is working with what your curls naturally want to do rather than forcing them into shapes that fight against their texture.
A few things hold true across all of these looks: moisture is always the foundation, product application on soaking wet hair almost always outperforms application on damp hair, and a satin or silk surface touching your curls at night (pillowcase, bonnet, or scarf) is one of the highest-return habits you can build into your routine regardless of which style you’re maintaining.
The styles here span the full range — from the five-second pineapple to the more structured braided crown, from the perfectly defined wash-and-go to the deliberately chaotic messy updo. There’s no single right way to wear curly hair. But there is a version of each of these styles that works for your specific curl pattern, and the more you experiment with them, the faster you’ll find which ones feel like yours.
Curly hair isn’t difficult. It’s just different — and once you understand that difference, these styles stop feeling like challenges and start feeling like options.