Curly updos are the ultimate style solution when you want to elevate your look, protect your curls, or simply enjoy a chic, polished vibe without spending hours on styling. For Black women with textured, curly hair, the possibilities go far beyond basic buns — your natural curl pattern is a gorgeous asset that deserves updos designed specifically to showcase and honor it. Whether you’re heading to a professional event, a casual date, or just want a change from your everyday style, curly updos offer the flexibility to look put-together while keeping your hair healthy and moisturized.
The beauty of curly updos is that they work across every hair type and texture. Loose waves, tight coils, springy curls, and thick, voluminous textures can all rock these styles with equal confidence. Many of these updos also double as protective styles, gently gathering your hair away from your face and shoulders while maintaining moisture and reducing daily manipulation. You don’t need special products or hours of prep time — most of these styles come together in 15 to 30 minutes once you understand the foundational technique.
What makes curly updos different from straight-hair updos is that they celebrate texture rather than fight against it. Instead of taming your curls into submission, these styles work with your natural pattern, creating dimension, movement, and visual interest that stick-straight styles simply can’t match. The key is understanding how to work with your curl pattern, choosing the right products for hold without crunch, and using techniques that enhance rather than flatten your texture.
1. High Curly Bun
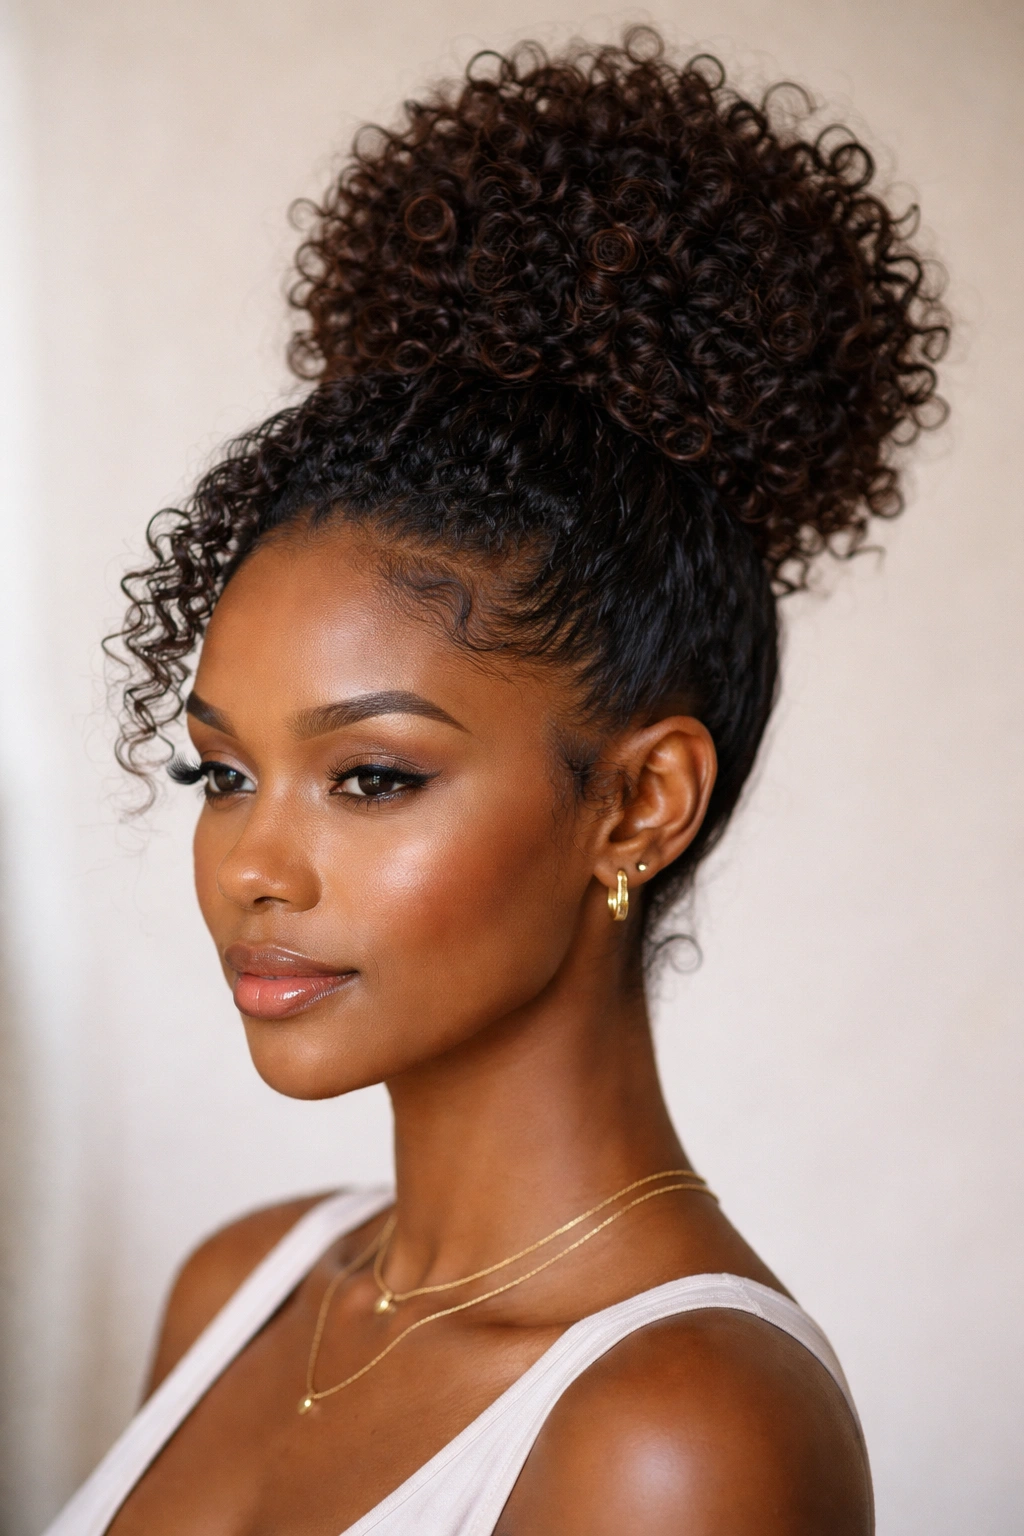
The high curly bun is the workhorse of curly updos — elegant enough for a gala yet casual enough for everyday wear. This style takes all your curls, gathers them high on your crown, and secures them into a voluminous bun that celebrates your curl pattern at full height. The bun sits at the very top of your head, creating a lifted, elongated silhouette that flatters most face shapes and instantly adds polish to any outfit.
How to Create Your Perfect High Curly Bun
Start with moisturized, detangled curls that have dried completely — wet curls won’t hold the bun shape properly. Apply a light curl-defining gel or cream to your hair, then use your fingers (not a brush) to gently flip your head upside down and gather your curls toward the crown. Flip back up slowly and gather everything into a high ponytail using a silk or satin scrunchie, which won’t disrupt your curl pattern the way a regular elastic does. Twist the ponytail gently and wrap it around the base to form the bun, securing with bobby pins tucked underneath so they’re hidden within the curl texture.
- The bun works best when you don’t oversmoother your curls — let them stay bouncy and textured for visual interest
- A loose, organic bun shape looks more flattering than a tight, compressed one; aim for a relaxed, effortless feel
- Use 3 to 4 bobby pins to secure, inserting them vertically into the bun rather than flat against your scalp
- Pin a silk scarf or hair cuff around the base for an extra polished, luxe touch
Pro tip: If your bun feels loose by midday, mist lightly with a curl refresher spray rather than remaking the entire updo — it reactivates the gel and restores hold in seconds.
2. Goddess Braids Updo
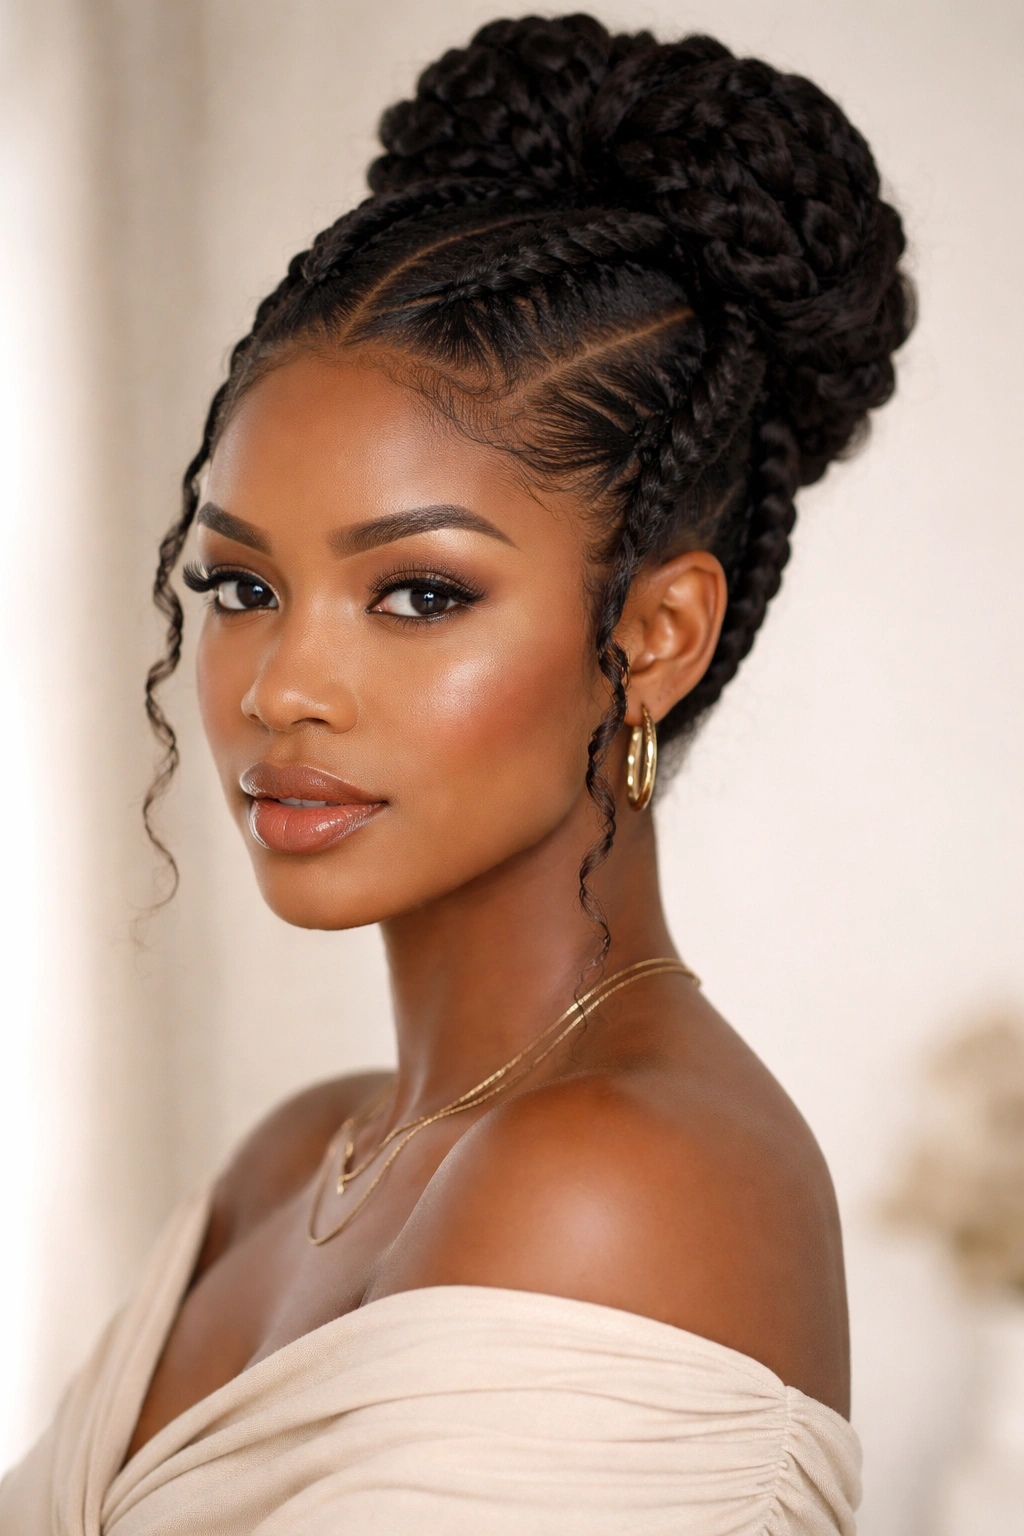
Goddess braids are thick, sculptural, and absolutely stunning when you pull them up into an updo. This style involves two or more large, loosely twisted or braided sections that frame your face and sweep toward the back of your head, where they’re pinned into a bun or looped crown. The magic of goddess braids is that they look intricate and intentional while actually being quite straightforward to execute, and they protect your curls beautifully while looking editorial.
Why Goddess Braids Are the Ultimate Protective Updo
Goddess braids work with your natural curl texture rather than trying to flatten it — the braid sections stay chunky and three-dimensional, showcasing your curls even within the braided structure. Because the braids are thick and loosely woven, you can fit more hair into each section, which means less tension on your scalp and less manipulation of individual curls. This style distributes the weight of your hair evenly, reducing breakage and stress on the roots.
- Start by parting your hair into two sections from your center parting, or use a side part if you prefer asymmetry
- Create a loose braid or twist (a twist is actually easier and looks fuller for curly hair) on each side, pulling pieces slightly outward to create dimension
- Bring both braids to the nape of your neck and secure them into a low bun, or loop them into a crown for an extra feminine touch
- Use only as much tension as you need to keep the braids in place — looseness is the whole point here
Worth knowing: You can create goddess braids with completely dry curls or with damp, product-moisturized hair. Damp hair gives you a bit more grip, but dry curls create a fuller, bouncier final look.
3. Twisted Crown Bun
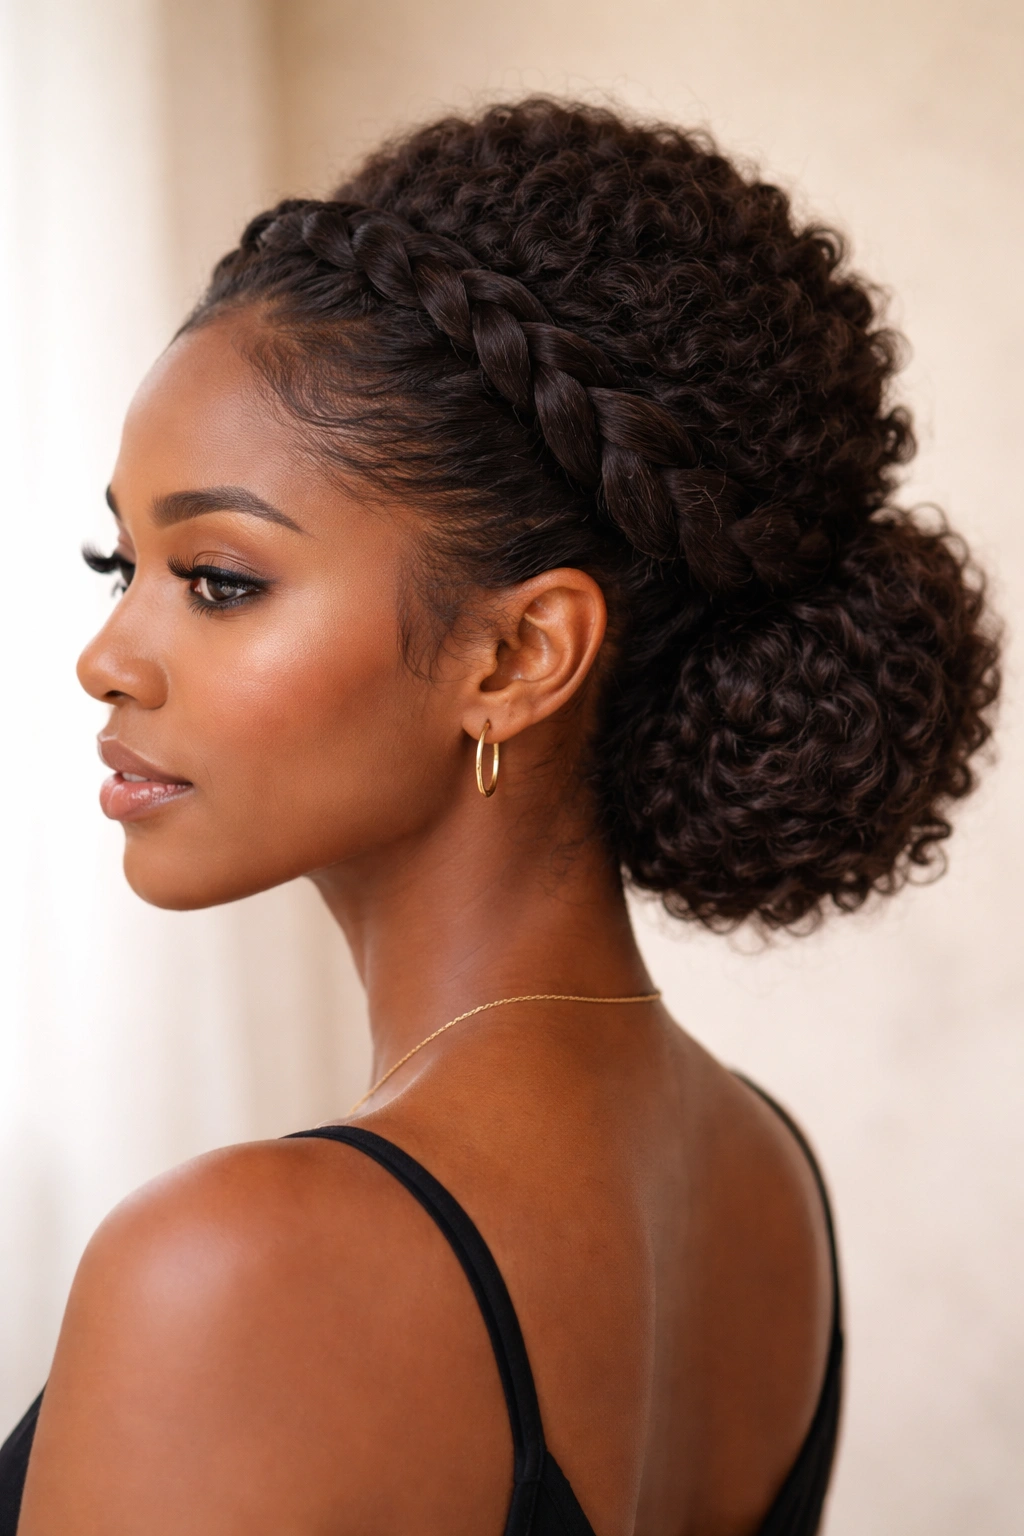
The twisted crown bun is a romantic, soft updo that feels elevated without being severe. You create two thick twists that start at your temples and wind around the back of your head like a crown, then gather all your hair into a bun at the nape. This style has that undone, almost bridal quality that photographs beautifully and works for everything from weddings to Sunday brunch.
The Art of the Perfect Crown Twist
The crown twist works because it frames your face while protecting the majority of your curls underneath. Start by taking a section of hair from one temple — roughly from your ear backward — and begin twisting it gently, incorporating more hair as you move backward around your head. The twist should sit on top of your head, not underneath, so you’re creating a visual line that follows your crown. Once you’ve brought the first twist to the back, secure it with a bobby pin or a small rubber band, then repeat on the other side.
- Use a light curl cream or gel on each section before twisting to give you grip without drying your curls out
- Keep the twist fairly loose and chunky rather than tight — this maintains the volume and texture of your curls within the twist
- Once both twists are pinned at the back, gather all remaining hair and twist it into a loose bun at your nape
- If you have layers or some shorter pieces, leave a few face-framing tendrils loose around your temples for a softer look
Insider note: This style holds best on second-day or third-day hair, when your curls have had time to set and your scalp has naturally moisturized the hair closest to the roots.
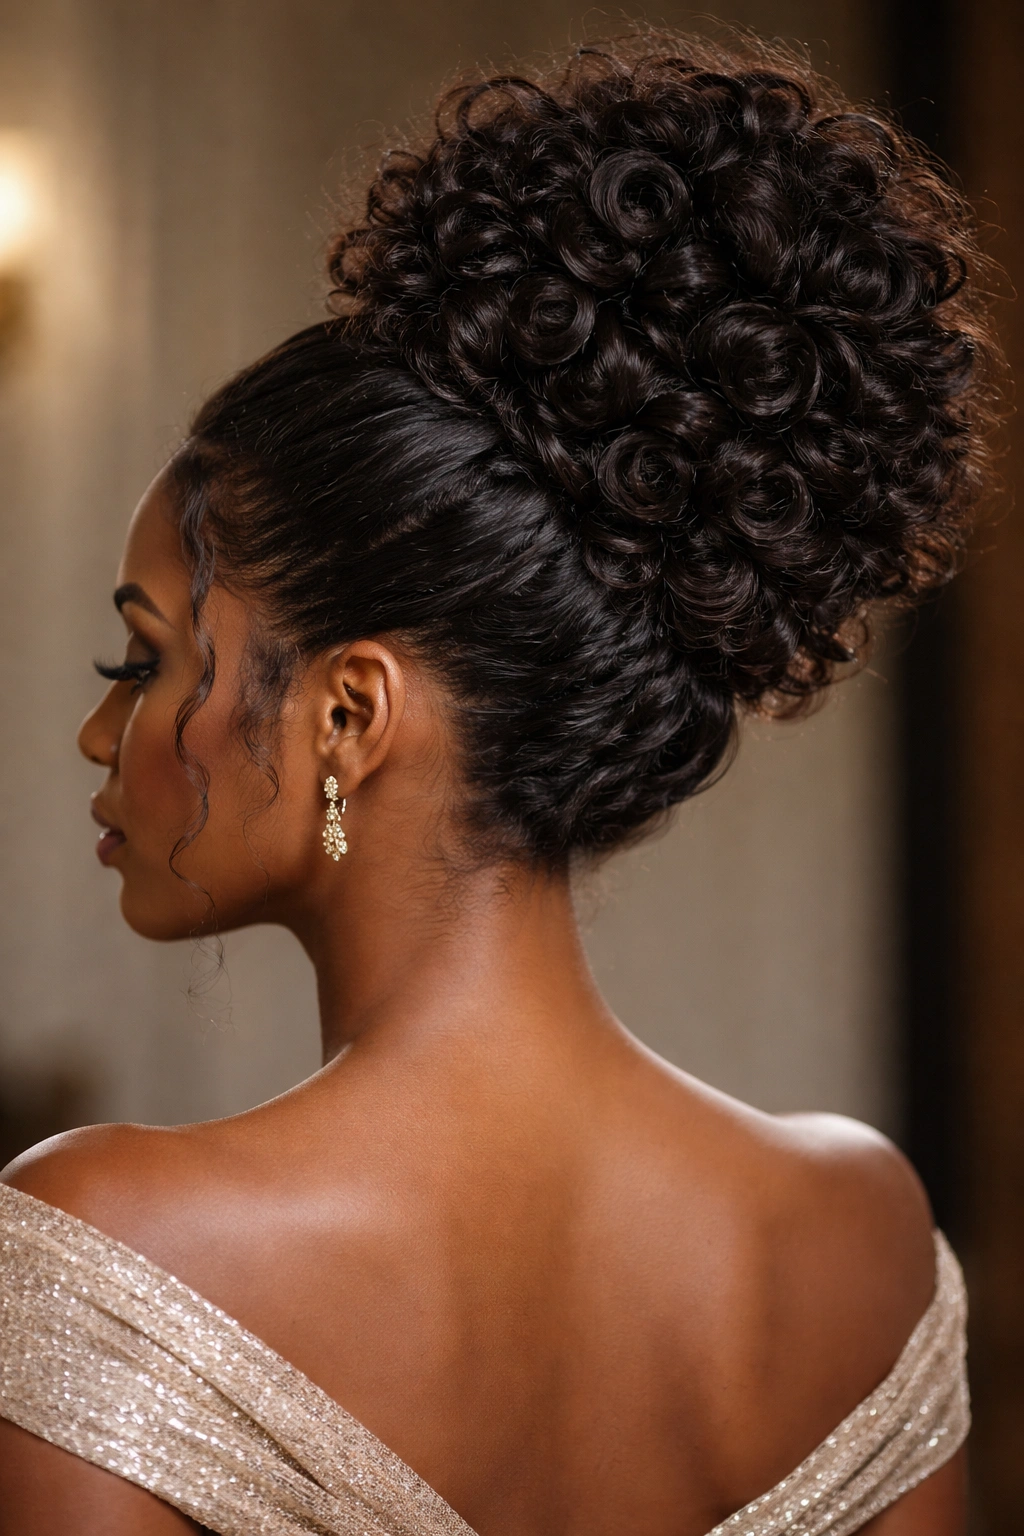
4. Curly Puff with Accessories

The curly puff is the highest-impact updo in terms of drama and presence — it’s essentially your natural curl pattern gathered into an enormous, glorious mound at the crown of your head. You’re not creating a tight, compressed puff here; instead, you’re gathering your curls loosely so they retain their full natural volume. Add decorative cuffs, clips, or a silk scarf, and you’ve got a statement style that announces that you’re comfortable, confident, and absolutely styling.
Building Your Most Voluminous Curly Puff
A stunning puff starts with moisturized, well-defined curls that have been allowed to dry completely with their shape intact. Apply a light hold product to damp hair and use your fingers to gently fluff and separate your curls as they dry — more separate curls create more volume in the final puff. Flip your head upside down, gather all your hair toward the crown, and secure with a soft silk scrunchie positioned fairly high so the weight of your curls can create lift. Once gathered, gently lift and fluff the puff with your fingers, creating an organic, rounded shape rather than a tight ball.
- The puff should look almost cloud-like — individual curls visible, not compressed into a solid mass
- Use a silk scrunchie, never a standard elastic, which will create creases and disrupt your curl pattern
- Anchor the scrunchie position with 2 to 3 bobby pins inserted horizontally underneath to prevent slipping
- Add a coordinating silk scarf, decorative cuff, or vintage clip for visual interest and personality
Pro tip: A puff actually holds better and looks more polished on curls that have been allowed to air-dry fully for at least a few hours, or overnight. Gel-set curls are your best friend for this style.
5. Half-Up Half-Down Curls
The half-up half-down style strikes the perfect balance between showing off your curls and keeping some hair off your face and neck. You’re gathering roughly the top half of your hair — from the crown backward — and securing it while allowing the bottom half to flow freely down your back. This approach gives you the sophistication of an updo without sacrificing the visual impact of your full curl length and volume.
Styling Half-Up Curls for Maximum Impact
The key to this style is making sure the gathered portion looks intentional and polished while the down portion maintains gorgeous texture and definition. Start by parting your hair vertically from ear to ear across the crown, creating a section that runs from your center part down to each ear. Gather this top section into a small bun, ponytail, or braid, securing it at your crown with a silk scrunchie or small rubber band covered in hair. The bottom half of your curls should fall freely, so make sure they’re well-moisturized and any frizz is tamed with a light anti-frizz serum or oil.
- You can twist, braid, or simply gather the top section — each creates a slightly different aesthetic
- Try securing the top section to one side for an asymmetrical, more modern look, or straight back for classic symmetry
- Let a few face-framing pieces fall loose on purpose — they should look intentional, not accidental
- The secured portion should sit at the crown, not so high it looks like just a small accessory, and not so low it blends into the loose curls
Worth knowing: This style works wonderfully with accessories like cuffs or decorative clips placed right at the securing point, drawing the eye to where the two textures meet.
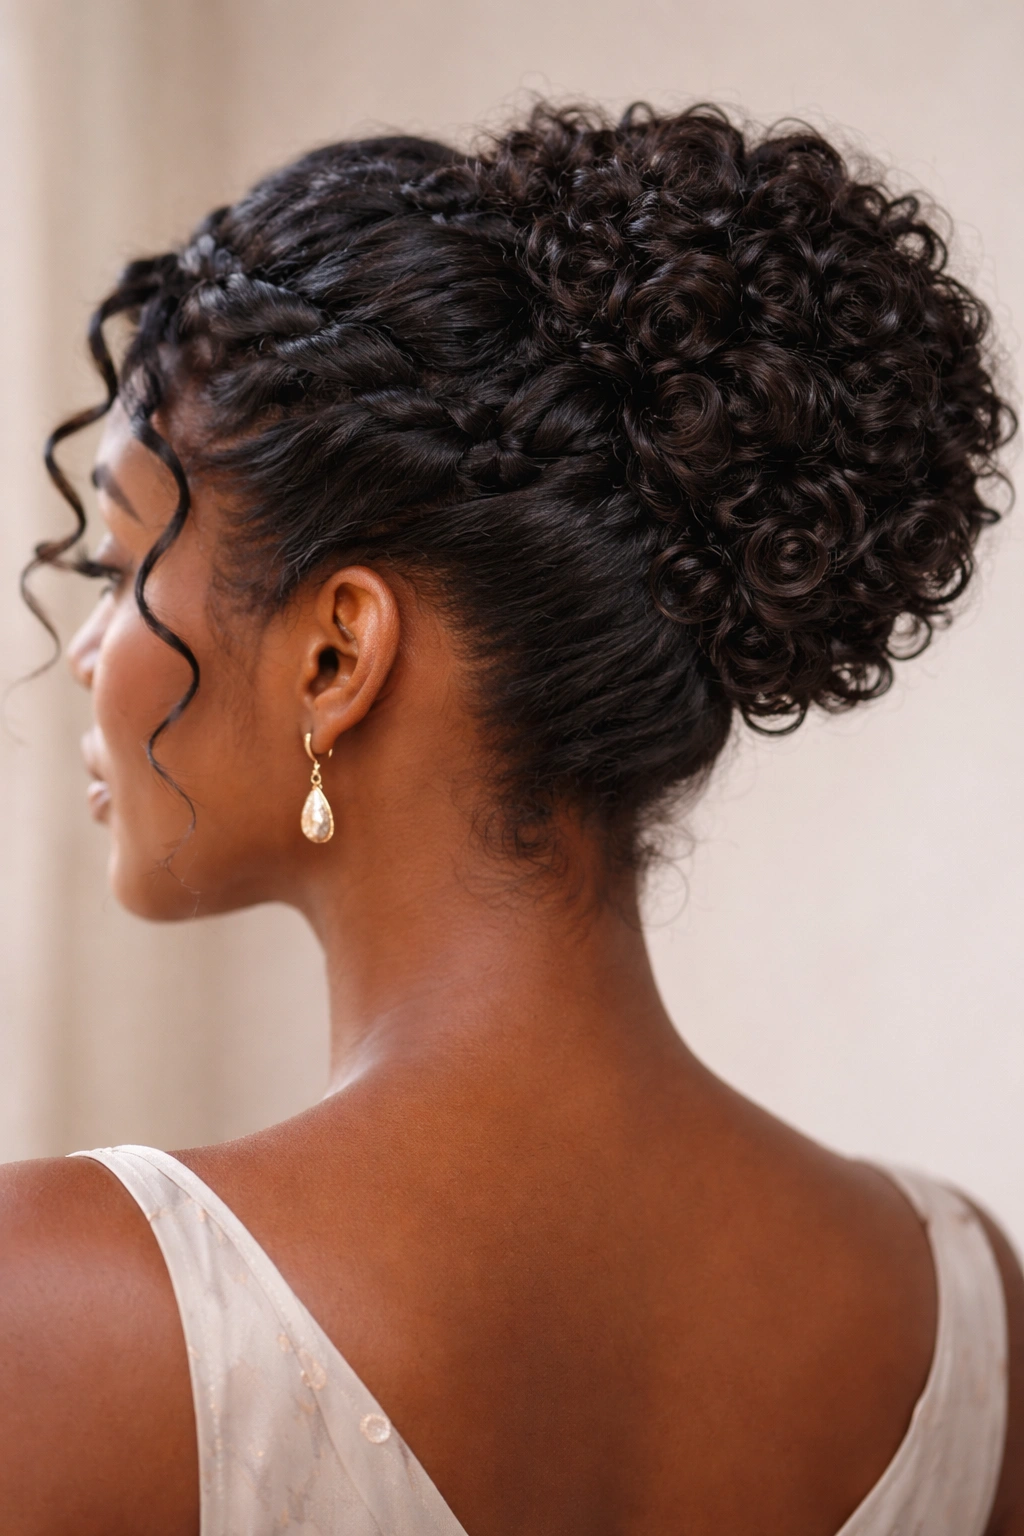
6. Spiral Curl Bun

The spiral curl bun is pure artistry — you’re essentially taking individual curls from your head and wrapping them around each other to create a gorgeous, three-dimensional bun that shows off your curl pattern at its most beautiful. This updo is all about celebrating texture, and it reads as intentional and high-effort even though the technique is relatively straightforward once you understand the mechanics.
Creating a Bun That Showcases Your Natural Spirals
Begin with curls that are completely dry and have been gently separated with your fingers so individual curl strands are visible. Starting at your crown, use your fingers to pick up a section of curls and gently wrap them around your index finger in a spiral motion, creating a loop. Continue adding hair and wrapping, building outward and downward to create an increasingly larger spiral formation. As you build the spiral, secure it with bobby pins inserted horizontally into the bun, pinning as you go rather than waiting until the end.
- Work slowly and deliberately — this style takes 15 to 20 minutes, but the result is worth the extra time
- Don’t try to make the spiral perfectly symmetrical; organic, slightly irregular spirals actually look more beautiful
- Use a light gel or curl cream as you work to give the curls structure without making them stiff or crunchy
- The finished bun should show individual curl strands and pattern, not be compressed into a smooth shape
Pro tip: If individual sections feel loose as you work, use a small bobby pin to anchor that section before moving on to the next spiral. You can remove these temporary pins once the overall bun structure is secure.
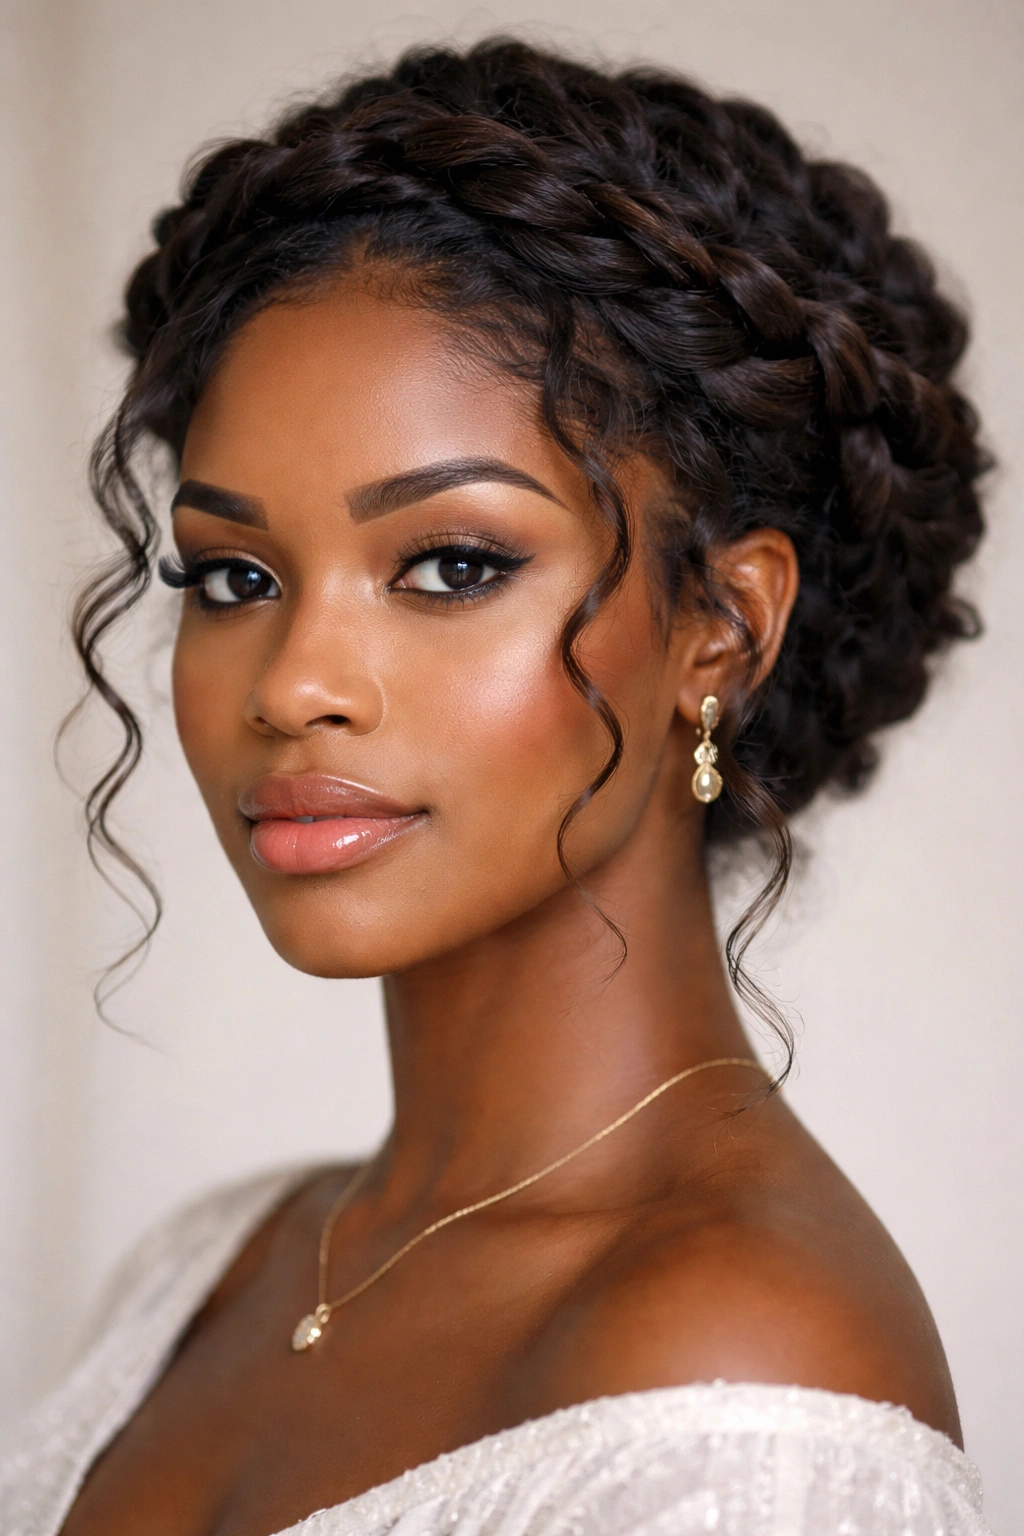
7. Braided Halo Updo
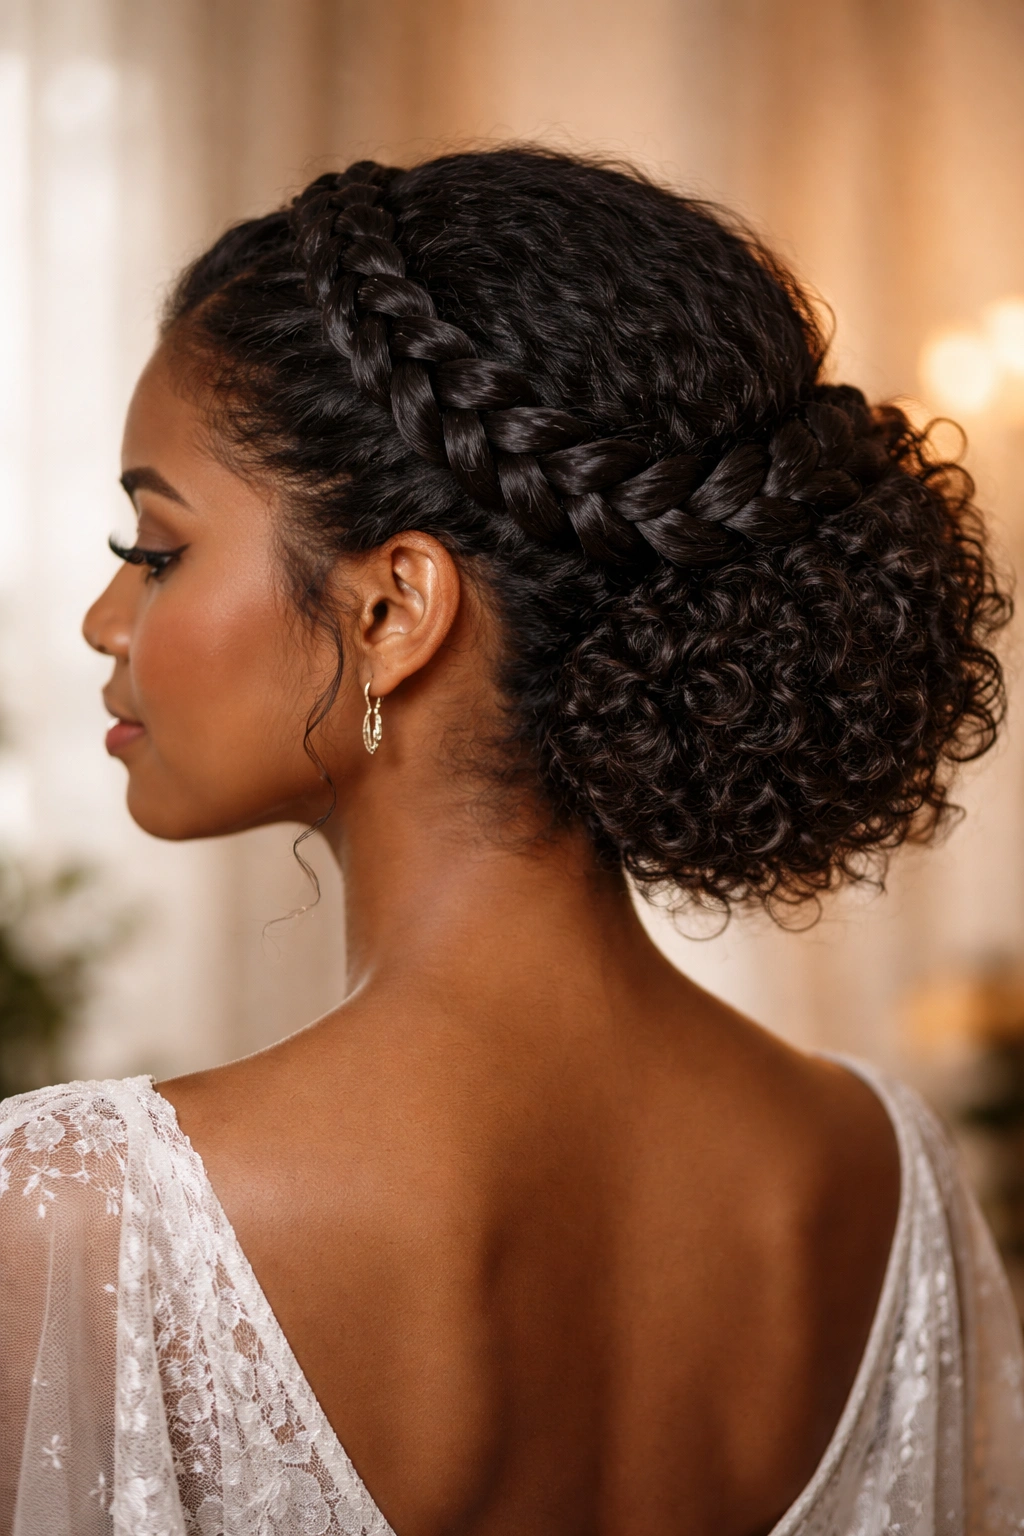
The braided halo is romantic, ethereal, and absolutely perfect for special occasions — think engagement parties, rehearsal dinners, or weddings. You’re creating two braids that start at the sides of your head and meet at the back, forming a halo-like crown. The remaining hair is gathered into a bun or loose ponytail underneath, creating a multi-layered, textured updo that feels elegant and slightly vintage without being costumey.
Executing the Perfect Braided Halo
Start by parting your hair down the center, then take a section from behind one ear and begin a loose braid, working it backward around your head at roughly crown height. The braid should sit on top of your head, not too tight, so you maintain your curl texture. Bring the first braid all the way to the opposite side of your head, securing it with a bobby pin. Repeat on the other side, bringing the second braid to meet the first on the opposite side. The two braids should form a complete loop around the back of your head.
- Use relatively thick braids made from chunky sections of hair — this looks more striking and complements curly textures better than thin, tight braids
- Pull each braid slightly outward as you create it, giving it a looser, fuller appearance that works with your natural curl pattern
- Once the halos are secured, gather all remaining hair and twist or braid it into a bun at the nape of your neck
- Leave a few face-framing curls loose for a romantic, intentionally undone feel
Worth knowing: This style looks most striking when you use contrasting elements — perhaps gold or pearl hair cuffs placed where the braids meet at the back, or a coordinating silk scarf woven through one of the braids.
8. Side-Swept Curly Waves
The side-swept style takes all your curls and gathers them to one side of your head, creating an asymmetrical updo that’s sophisticated and effortlessly chic. Your curls cascade over one shoulder and sweep down your back, while the other side of your head is mostly clear, creating beautiful visual balance. This look works for both casual and formal occasions, and it’s incredibly flattering because the asymmetry draws attention to your features.
Building a Side-Swept Updo That Stays Put
Start with curls that have been moisturized and allowed to fully dry. Create a deep side part, parting your hair significantly off-center to one side. Gather all your hair to the opposite side of where the fuller part is located, creating a low ponytail or twisted section at your ear or the nape of your neck on the side where you’re gathering. Secure this with a soft scrunchie or elastic. The gathered section can be left as a loose ponytail, twisted into a spiral, or braided, depending on the level of formality you want.
- The side sweep should feel intentional but not severe — you’re not pulling all your hair so tight that you have a clear line of separation
- Allow some pieces to fall loose around the gathered section, creating softness and texture rather than a completely solid shape
- Use a light smoothing serum or curl-defining cream on the side of your head that’s more exposed, maintaining definition without frizz
- Pin any loose sections underneath with bobby pins hidden within your curls
Pro tip: A dramatic side-swept updo photographs beautifully in profile, making it an excellent choice for events where professional photos will be taken.
9. Stacked Curls Updo
The stacked curls updo is all about volume and drama — you’re literally stacking your curls on top of each other to create a towering, gorgeous silhouette that’s impossible to miss. This style works best if you have medium to long curls that can be gathered and pinned, creating multiple tiers or levels of curl at the back and crown of your head. The result is a style that looks intricate and complex but is actually made up of simple layering techniques.
Layering Curls for Maximum Height and Impact
Begin with fully dried, separated curls that have excellent shape and definition. Create a lower ponytail first, gathering curls from roughly your nape to the middle of your head, and secure with a silk scrunchie. Use bobby pins to pin this ponytail up toward your crown in a loose, rounded shape. Now gather the upper section of your hair (above where you secured the first ponytail) into a second, higher ponytail and pin that up as well, positioning it to overlap slightly with the first section. You now have two distinct layers of curls stacked on top of each other.
- Each layer should remain somewhat loose and fluffy rather than compressed, maintaining visible curl texture at each level
- Use 4 to 6 bobby pins per layer, inserting them vertically and crisscrossing for stability
- The outline of the stacked updo should be roughly triangular, wider at the bottom and narrowing toward the crown
- Gently fluff each section with your fingers once everything is pinned to ensure texture is visible
Worth knowing: This style requires a fair amount of hair to look truly voluminous, but it’s possible to create a more modest stacked updo even with medium-density hair by being thoughtful about your pin placement.
10. Twisted and Pinned Crown
The twisted and pinned crown is a softer alternative to braids, using twisted sections to create an intricate look that frames your face beautifully. You’re creating multiple twists that wind through your hair, pinning them strategically to form a crown-like effect. This style is excellent if you find braiding challenging or if you prefer the softer aesthetic that twists create compared to the more structured look of braids.
Building Your Twisted Crown One Section at a Time
Start by taking a section of hair from near one temple and twist it gently as you move backward around your head. Rather than incorporating more hair into the twist as you go (like you would with a braid), you’re keeping the twist section-specific. Once you’ve twisted partway around your head, pin the end of that twist with a bobby pin, then start a new twist nearby. Create multiple parallel twists that gradually wind around your head, each one secured with a pin where it ends.
- Use a light curl cream to help the twists hold their shape without making your curls crunchy
- Twists work best when they’re relatively loose and chunky — tight twists won’t accommodate your curl pattern effectively
- Space your twists roughly an inch apart for a balanced, intentional appearance
- Once all twists are pinned, gather any remaining hair and create a bun at the nape to complete the crown effect
Insider note: Twisted crowns actually hold better on second or third-day hair, when your natural oils have had time to set the curl pattern and your scalp has moisturized the roots. Fresh-from-wash hair can be trickier to work with.
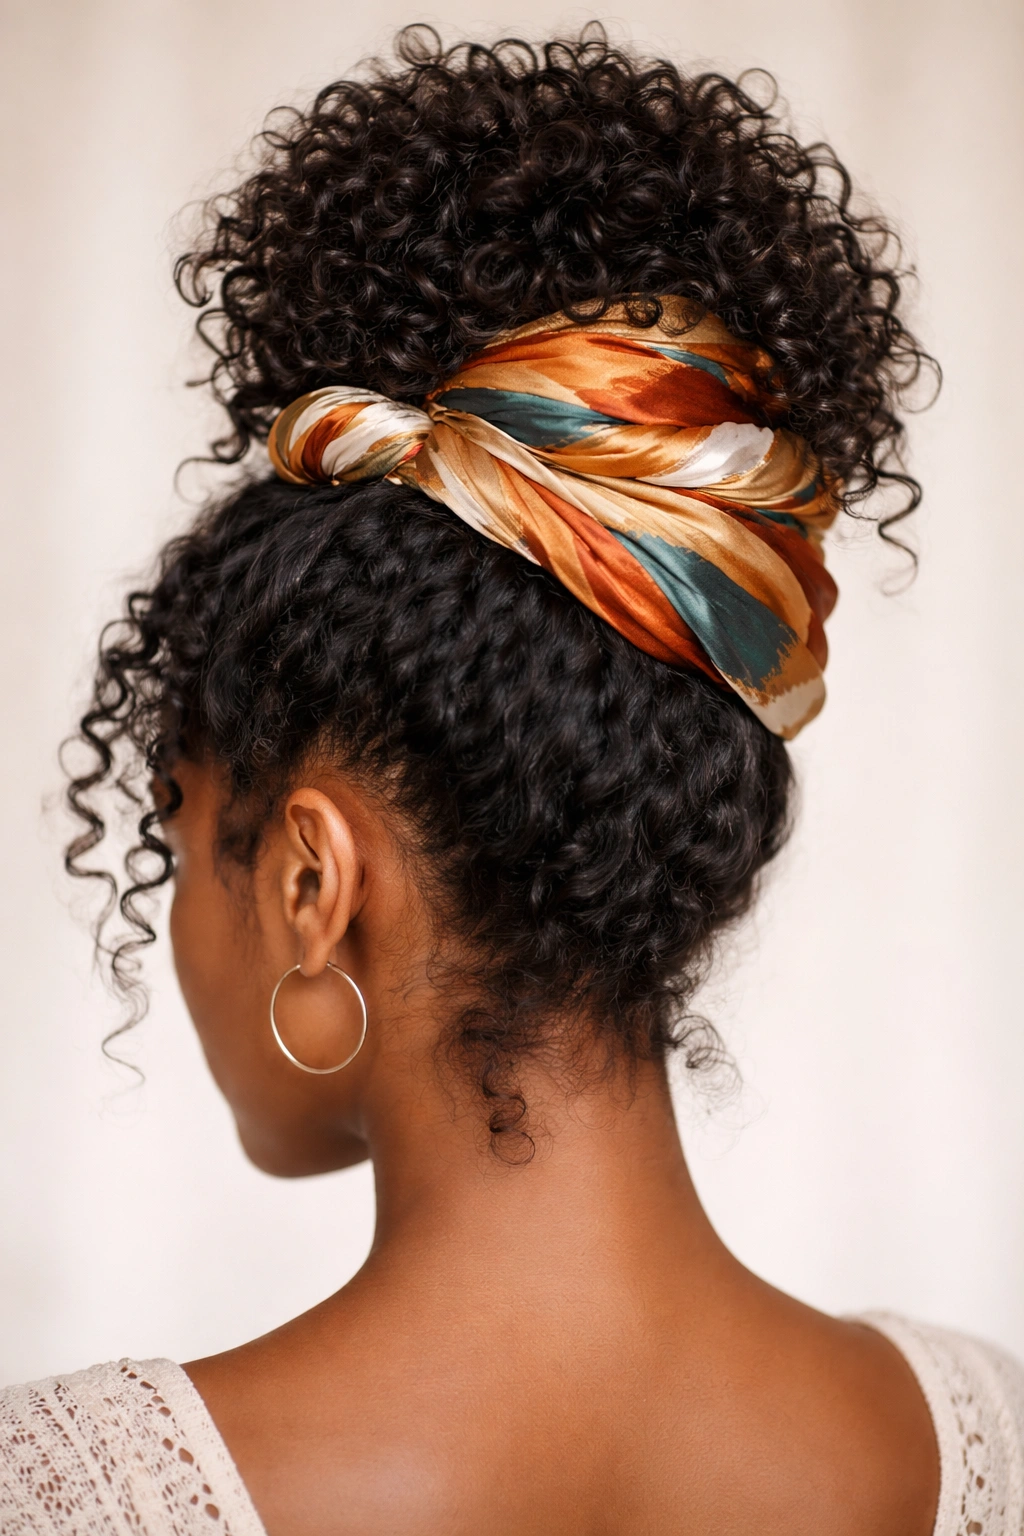
11. Scarf-Wrapped Bun
The scarf-wrapped bun takes a basic curly bun and elevates it with a coordinating silk or satin scarf woven through or wrapped around the bun structure. The scarf adds color, pattern, and texture while also protecting your curls and keeping flyaways tamed. This is a style that works for casual wear all the way up to formal occasions, depending on what fabric and color you choose for your scarf.
Incorporating a Scarf Into Your Bun for Style and Protection
Start by creating a high or mid-height ponytail with all your curls, secured with a silk scrunchie. Gently twist or gather the ponytail and wrap it around the base to form a bun, securing with bobby pins. Now take your scarf — a silk scarf works best because it’s gentle on your curls and won’t create friction — and either wrap it around the base of the bun or weave it through the bun structure. You can wrap it multiple times if you have a longer scarf, creating concentric rings of color, or weave it through in a more organic pattern.
- Choose a scarf color that either complements or contrasts with your outfit depending on the look you’re going for
- Silk or satin scarves are non-negotiable — cotton will absorb moisture from your curls and cause frizz
- You can use a long, narrow scarf, a traditional square scarf folded into a triangle, or a dedicated hair wrap
- Secure the scarf end with a bobby pin tucked underneath so it’s hidden
Pro tip: If you’re using a patterned scarf, position it so the pattern faces outward rather than hidden — you want the visual interest to be visible.
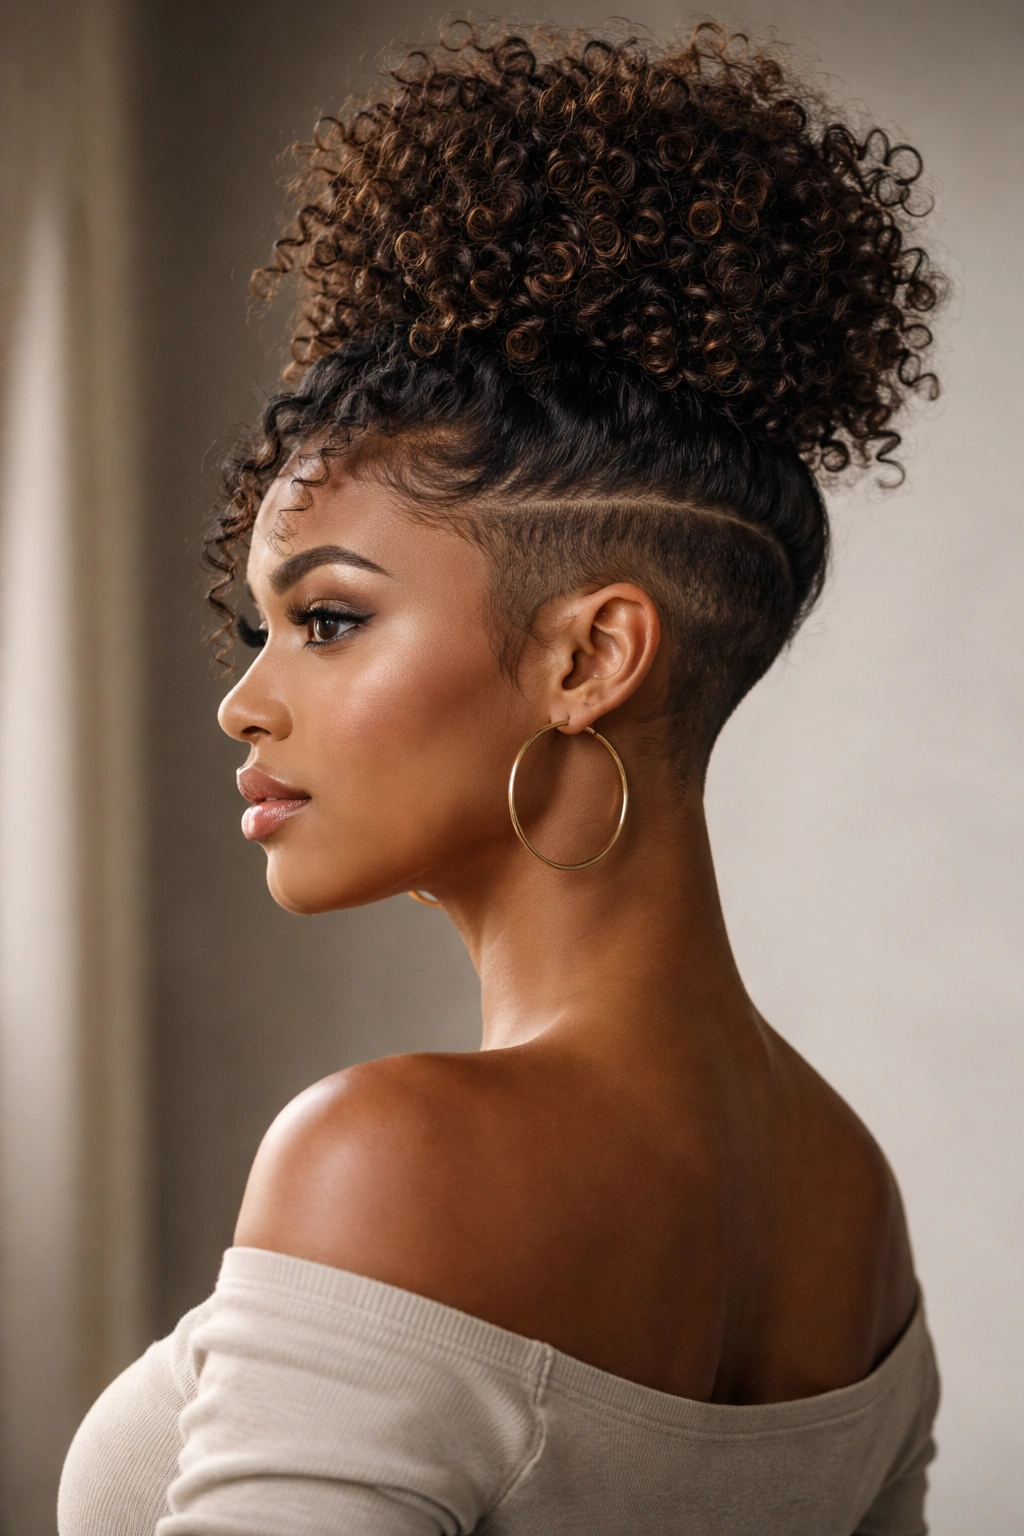
12. Curly Topknot with Undercut
The curly topknot with undercut is a modern, edgy style that works beautifully if you have an undercut or shaved side section. You’re gathering your curls into a high topknot and letting the undercut (shaved or very short) show through on the sides and back. This creates a bold silhouette and makes a statement, while keeping most of your curls up and away from your face. It’s a style that reads as intentional and fashion-forward.
Creating a Topknot That Showcases Your Undercut
Begin by gathering all your hair as high as possible on your crown — you want the topknot to sit right at the very top of your head. Secure it with a silk scrunchie, positioning it high and tight enough to stay in place but not so tight that you’re creating tension and discomfort. Gently twist or gather the secured ponytail into a knot shape and pin it securely with 3 to 4 bobby pins inserted vertically. Use your fingers to fluff the topknot, creating an organic, slightly undone shape rather than a tight, compact knot.
- The contrast between the voluminous topknot and the exposed undercut is what makes this style work, so don’t worry about the topknot being huge
- You can leave the area where your undercut is completely smooth, or allow a few baby curls or texture to show if you prefer a less stark look
- A lightweight styling spray or gel on the topknot helps it hold all day without becoming heavy or crunchy
- This style looks especially striking from the back, so it’s perfect if you’re going to an event where people will see you from behind
Worth knowing: If you’re considering an undercut specifically for styling updo options, keep in mind that it requires regular maintenance as it grows out. The undercut will eventually blend with your regular hair if you don’t maintain it with periodic trims.
Final Thoughts
Curly updos are about celebrating what makes your hair uniquely beautiful while giving yourself a polished, intentional look. Whether you choose a dramatic spiral bun, romantic braided halo, or edgy topknot, the key is working with your natural texture rather than fighting it. Most of these styles become faster and easier with practice — the first time you create a twisted crown might take 20 minutes, but within a few repetitions, you’ll be able to pull it together in under 10.
The best updo for you depends on your daily routine, the occasion, and your personal style preference. If you’re protective-styling for hair health, stick with the looser braids and twists that minimize tension on your scalp. If you’re going out for a special event, go bold with a stacked curl bun or a side-swept style that photographs beautifully. And if you’re just trying to get your curls off your shoulders for a casual day, a simple high puff or half-up style does the job elegantly.
Remember that your hair doesn’t need to be perfectly smooth or uniform for an updo to look stunning — in fact, the slight variations in your curl pattern and the visible texture is what makes curly updos so visually interesting and beautiful. These styles have room for personality and imperfection, which is exactly what makes them work so well with natural, textured hair.