Curly hair on a wedding day is a gift—but only if you know how to work with it. While straight-haired brides can sometimes get away with a hastily pinned updo, curly hair demands a style that actually honors the texture, supports the weight, and won’t unravel halfway through the first dance. The right updo doesn’t fight your curls; it showcases them, gives them structure, and keeps them exactly where you put them for twelve hours straight.
The challenge most curly-haired brides face is finding updos that go beyond the obvious bun. Most bridal hair inspiration boards feature sleek, polished styles built on straight hair. But curly hair has different needs—it requires styles that anchor waves and coils without flattening them, that distribute weight evenly across a mass of texture, and that actually look more romantic and voluminous when done right. The good news is that curly hair is naturally more interesting than any product could make straight hair look.
What makes a wedding updo work beautifully with curly hair comes down to three things: respecting your curl pattern rather than fighting it, using the right base techniques to anchor everything securely, and choosing styles that intentionally show off texture instead of hiding it. Whether you have tight coils, loose waves, or a gorgeous combination of both, there’s an updo here that will make you feel like the most polished, bridal version of yourself—while still looking like you.
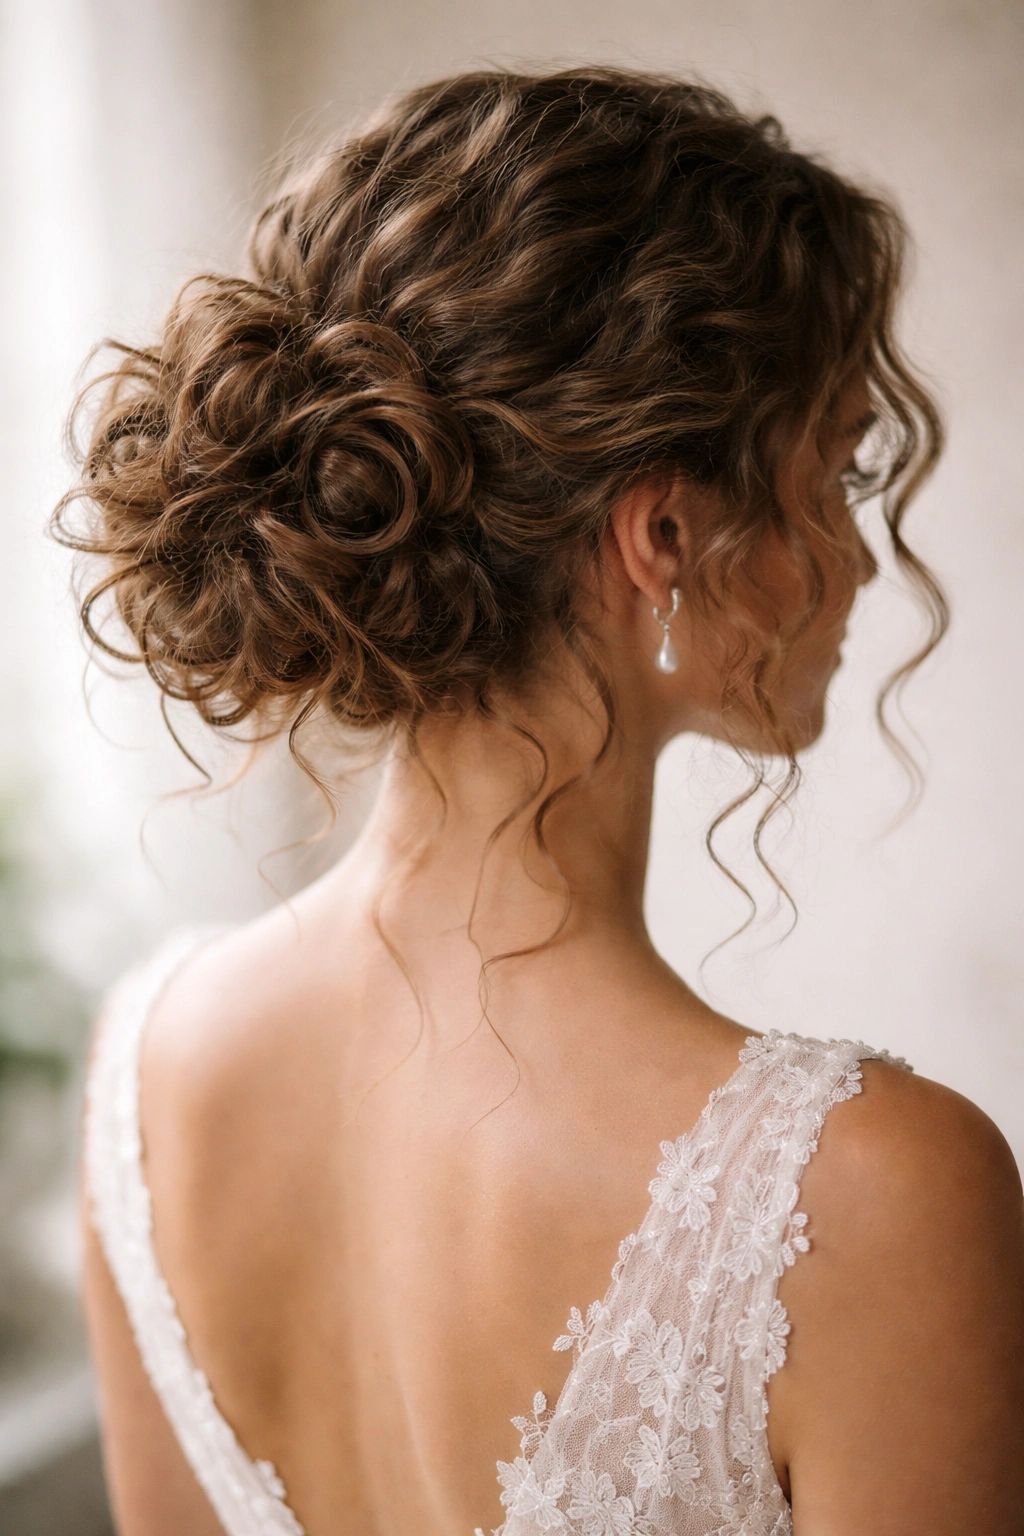
1. The Soft Romantic Topknot with Loose Curls Framing the Face

This is the style for brides who want their curls visible and celebrated. The bulk of the hair gets twisted and pinned into a high, soft knot at the crown, but the twist is loose and deliberately undone-looking—not a tight, severe bun. What makes this work with curly hair is that the knot’s texture reads as intentionally voluminous rather than messy.
Why This Style Suits Curly Hair
The topknot creates a secure anchor point high on the head where the weight of curly hair is distributed most effectively. Because you’re not pulling the knot tight, your natural curls maintain their spring and dimension. The looseness of the twist actually mimics the texture of your curls, so it looks cohesive and romantic rather than stiff.
How to Create It
Section off the top third of your hair at the crown and loosely twist it, leaving a bit of texture showing within the twist itself. Wrap the twisted section around itself to form a knot and secure it with bobby pins inserted into the knot’s texture. Pull a few face-framing pieces down intentionally and separate them so they curl naturally around your jawline. Mist everything with a lightweight hairspray that won’t weigh curls down.
Best For
Brides with medium to long curly hair who want an effortless, romantic vibe without sacrificing structure. This works beautifully for outdoor ceremonies, garden receptions, and bohemian wedding aesthetics.
Worth knowing: Don’t smooth the twist flat—your curl texture creates the beauty here. The more imperfectly placed the curls in the knot, the more intentional and high-end it looks.
2. The Twisted Crown with Cascading Curls Down the Back
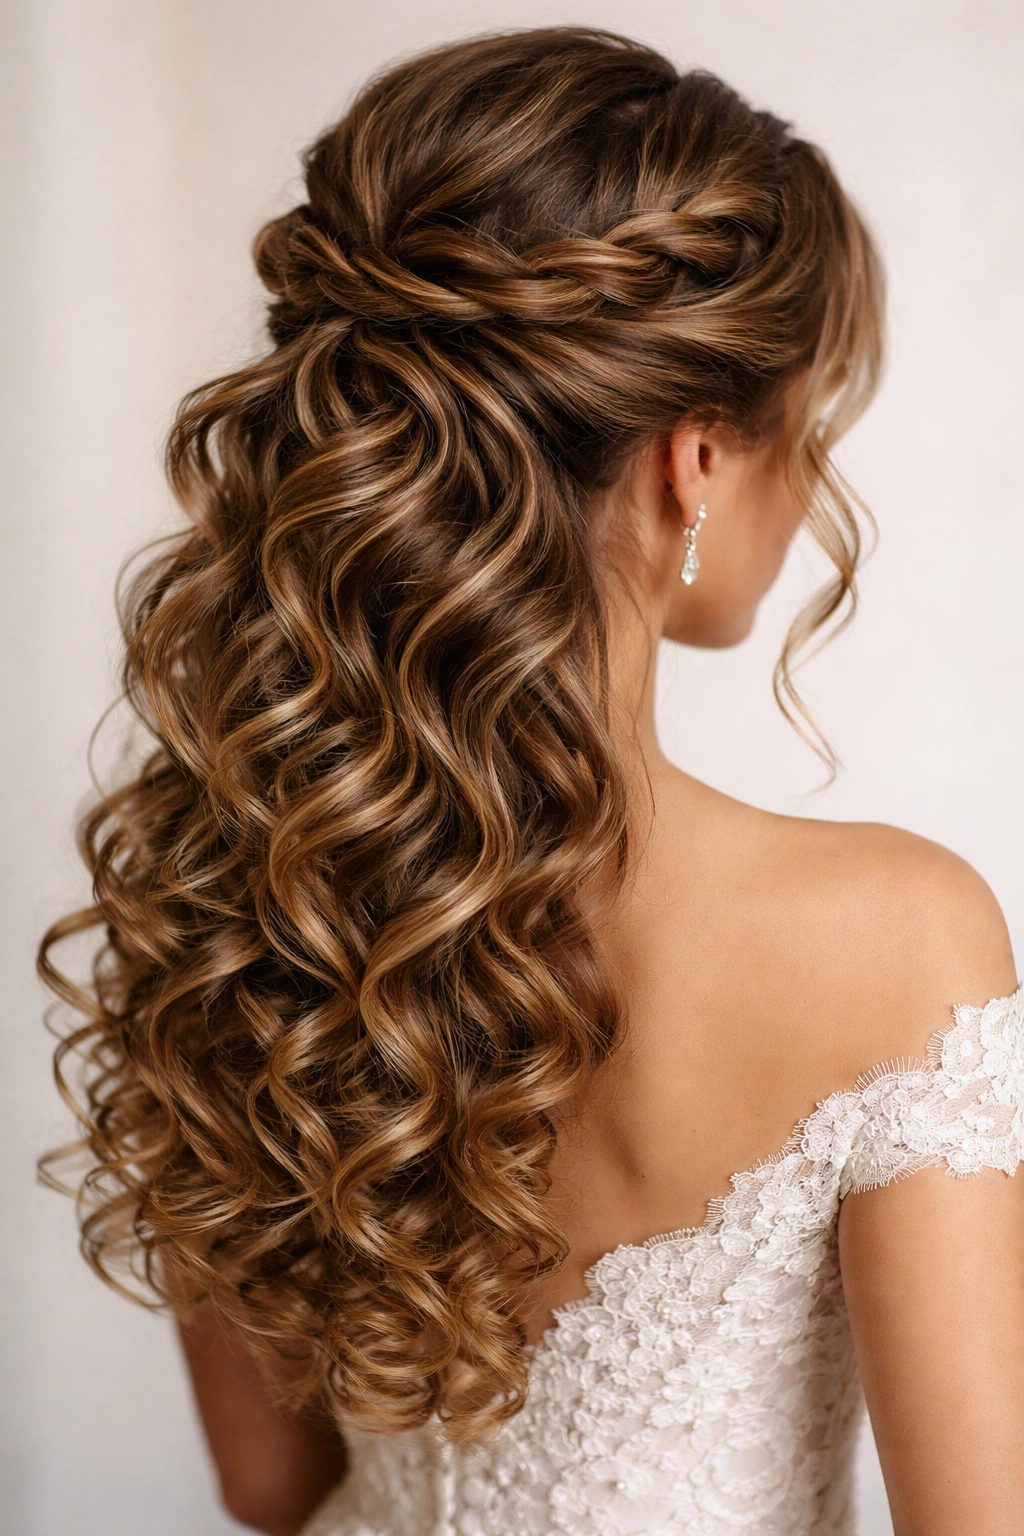
This style wraps twisted sections of hair around the crown like a halo, then lets the rest of the hair flow down the back in loose, bouncy curls. It’s elegant enough for a formal ceremony but playful and youthful at the same time. The twisted crown gives structure without making you feel like your hair is all tucked away.
The Architectural Beauty of Crown Twists
Two or three twisted sections (depending on your hair volume) spiral around the perimeter of your head and pin into place, creating a frame that holds everything together. The twists follow your natural hairline, so they look both intentional and comfortable. This approach distributes the weight of your curls evenly rather than loading everything at the back of your head in a single point.
Styling Steps That Actually Work
Start by creating a deep side part. Twist a section of hair from one side of your part and pin it behind your ear, then twist another section and wrap it behind your head at ear level. If you have enough hair, a third twist from the other side completes the crown. The remaining hair cascades down in its natural curl pattern—don’t separate or define these curls too much; they should look like they’re just falling naturally.
When This Works Best
This style shines for beach weddings, semi-formal daytime ceremonies, and any wedding where you want to feel like your hair is styled but still authentically you. It’s especially flattering if you have face-framing pieces or shorter layers because they naturally fall around your face beautifully.
Pro tip: Use flexible bobby pins that grip texture instead of slippery metal ones. Clip the pins deep into the twist itself, not just on the surface.
3. The High Ponytail with Textured Poof
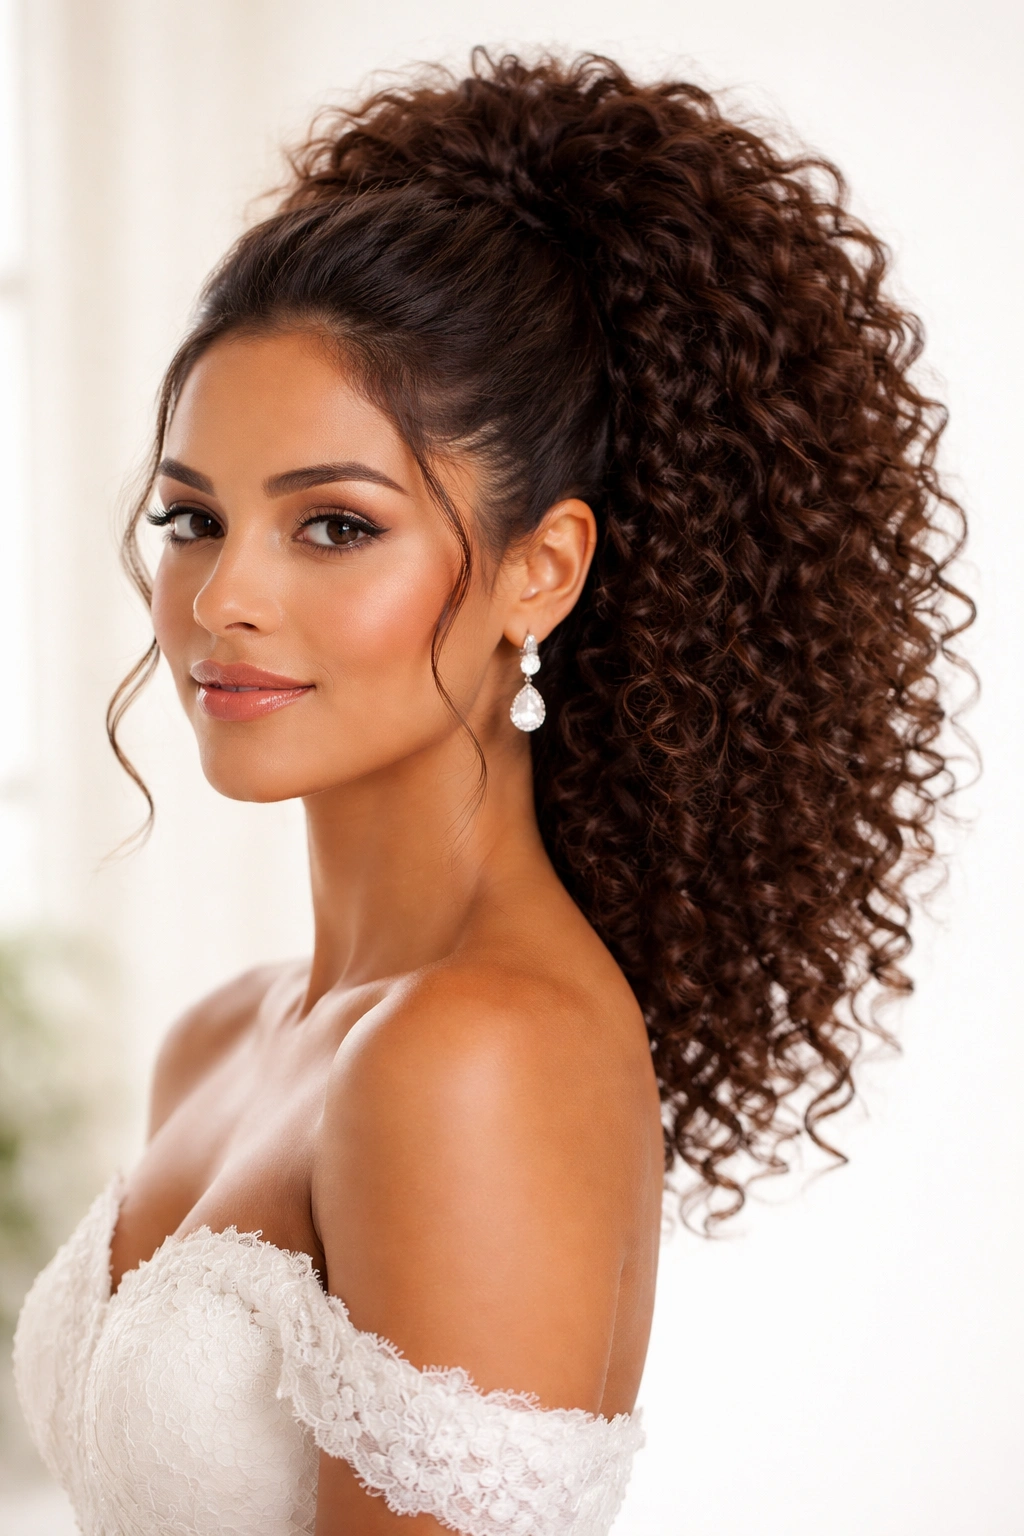
A high ponytail works surprisingly well with curly hair if you understand the technique. The key is creating volume and texture in the ponytail itself rather than sleek smoothness. This gives you the polish of a ponytail with the romance of curls actually visible and celebrated.
Building Height Without Heaviness
Start by blow-drying your curls with a diffuser attachment to maximize volume and separate the curl pattern slightly. Use a volumizing mousse on damp roots before diffusing—this gives you height without needing to tease excessively. Gather the ponytail high on your head but not so tight that you’re pulling hair out of your scalp; there should be a comfortable amount of give. Secure with a covered elastic that matches your hair color.
Adding Texture and Movement
Once your ponytail is secured, gently separate the sections of curls with your fingers, pulling them slightly to increase the poof and volume. This isn’t backcombing; it’s just opening up the curl formation so more surface area of the curls is visible. You can also wrap a small section of hair around the elastic to hide it, securing that section with a bobby pin for a more finished look.
Making It Wedding-Appropriate
Add pearl or crystal hair pins throughout the ponytail, spacing them out so they twinkle without looking overdone. If you have loose curls or waves, spiral a thin braid around the base of the ponytail for added texture and visual interest. A few escaped tendrils around the face make this feel intentional rather than severe.
Real talk: This style actually photographs better than you might think because your curls catch light beautifully from this angle, and the volume reads as dramatic and romantic rather than casual.
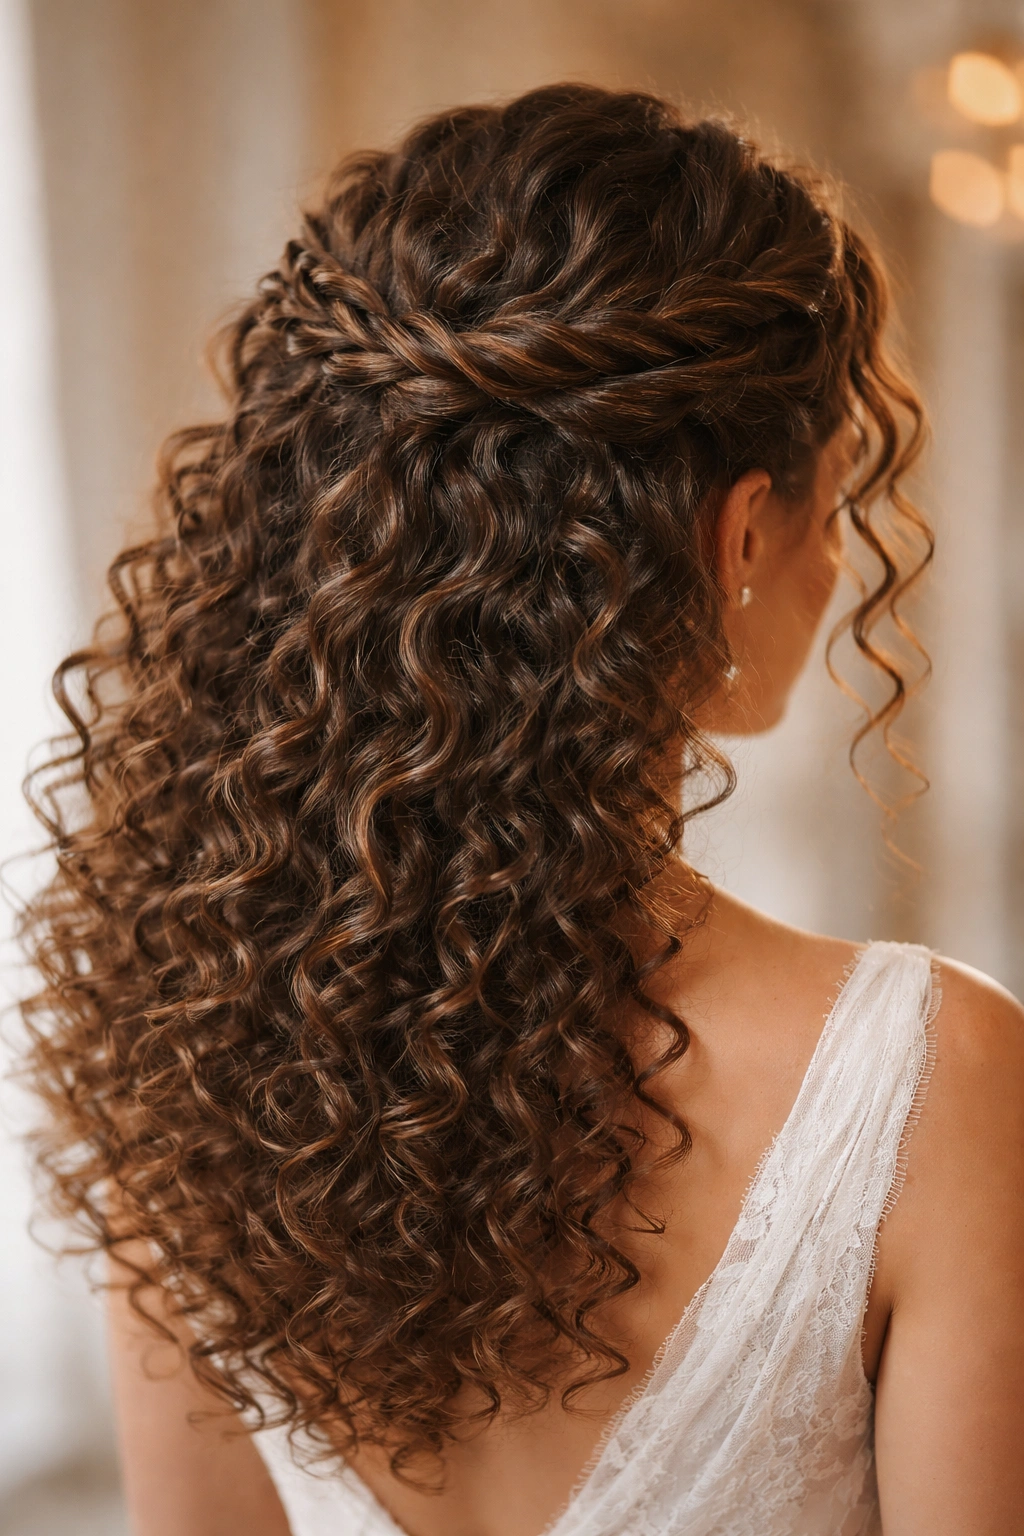
4. The Braided Halo with Center-Back Curls
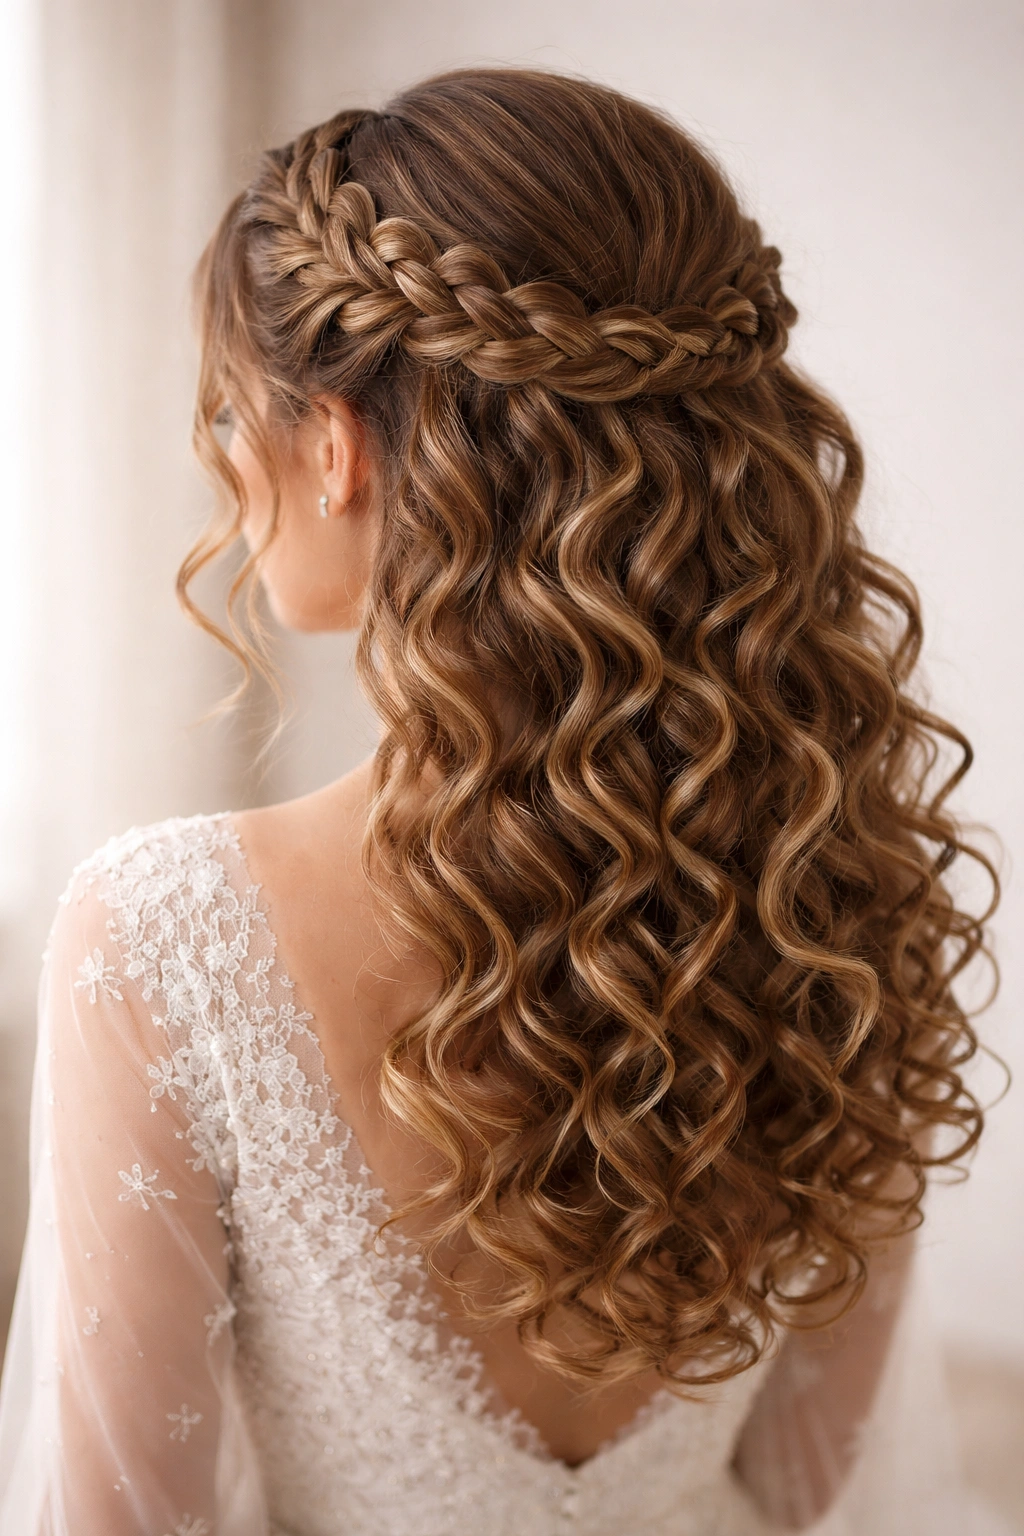
This style braids texture into your updo rather than just pinning curls in place. Two Dutch braids (or French braids, depending on your preference) start at the temples and braid around your head like a crown, meeting at the back where they’re secured. The hair below the braids flows in its natural curls, creating a stunning contrast between the structured braids and the free-flowing curls.
Why Braiding Works With Curly Hair
Braiding actually enhances curly texture by creating definition and visual interest. Because your curls are already textured, they fill in the gaps in the braid, making it look fuller and more intricate than a braid on straight hair would look. The braid becomes a design element rather than just a way to manage your hair.
Creating the Braided Crown
Start one Dutch braid at your temple on one side, braiding toward the back and incorporating small sections as you go. The braid should follow your natural hairline and curve toward the back of your head. Create a matching braid on the other side, and have them meet at the center back of your head. Cross them, wrap them together, and pin securely. This creates a fuller-looking crown because the two braids interact with each other.
The Curl Release Below
The magic happens in the section below the braids. These curls fall freely and can be as loose and voluminous as your natural pattern allows. You might gently separate curls with your fingers to increase volume, or you can leave them completely natural. This creates an intentional style that doesn’t feel like you’ve constrained all your hair.
Perfect For
Brides who want an ethereal, bohemian feel with enough structure to last through a full day of wedding activities. This style photographs beautifully from every angle because the braids create dimension and the curls create movement.
Worth knowing: Have your stylist braid slightly loosely so the braid looks intentionally relaxed rather than overly controlled. Tight braids can actually make curly hair look smaller; loose braids let texture breathe.
5. The Low Side Knot with Face-Framing Spirals
This is the style for brides who want elegance, movement, and the ability to show off their entire face. The hair is gathered to one side at the nape of the neck and twisted into a soft, low knot. Spiral curls are pulled down intentionally on both sides of the face, creating a frame that’s both romantic and flattering.
Creating Intentional Face-Framing Curls
Before pinning the knot, separate two thick sections of hair—one on each side of your face—and run your fingers through them in a spiraling motion to define and elongate the natural curl pattern. These sections should start at the temple and flow down alongside your face. They’re the first thing people see, so make sure they’re intentional and beautiful.
Positioning the Low Knot
Gather the remaining hair to one side at the base of your neck—this asymmetry is what makes the style feel modern and interesting. Twist the gathered hair and wrap it into a knot, securing it with pins. The knot should feel soft and slightly undone; you’re not aiming for a perfect, smooth bun. Your natural curl texture within the knot should be visible.
Finishing Touches
Pin the face-framing curls in place with small bobby pins hidden within the curl pattern so they’re not visible. You want those curls to feel like they’re falling naturally, not pinned aggressively. A delicate hair vine or small cluster of baby’s breath pinned into the knot adds bridal polish without overwhelming the style.
Why Brides Love This Look
It’s flattering on every face shape because the curls frame your features. It’s romantic and timeless, so it won’t feel dated looking back at wedding photos years later. And because the hair isn’t pulled back tightly, you’re not creating tension on your scalp that can lead to discomfort during a long day.
Pro tip: Have your stylist use a lightweight hairspray and touch it up between the ceremony and reception; face-framing curls can relax slightly over time, and a quick refresh keeps them looking perfect.
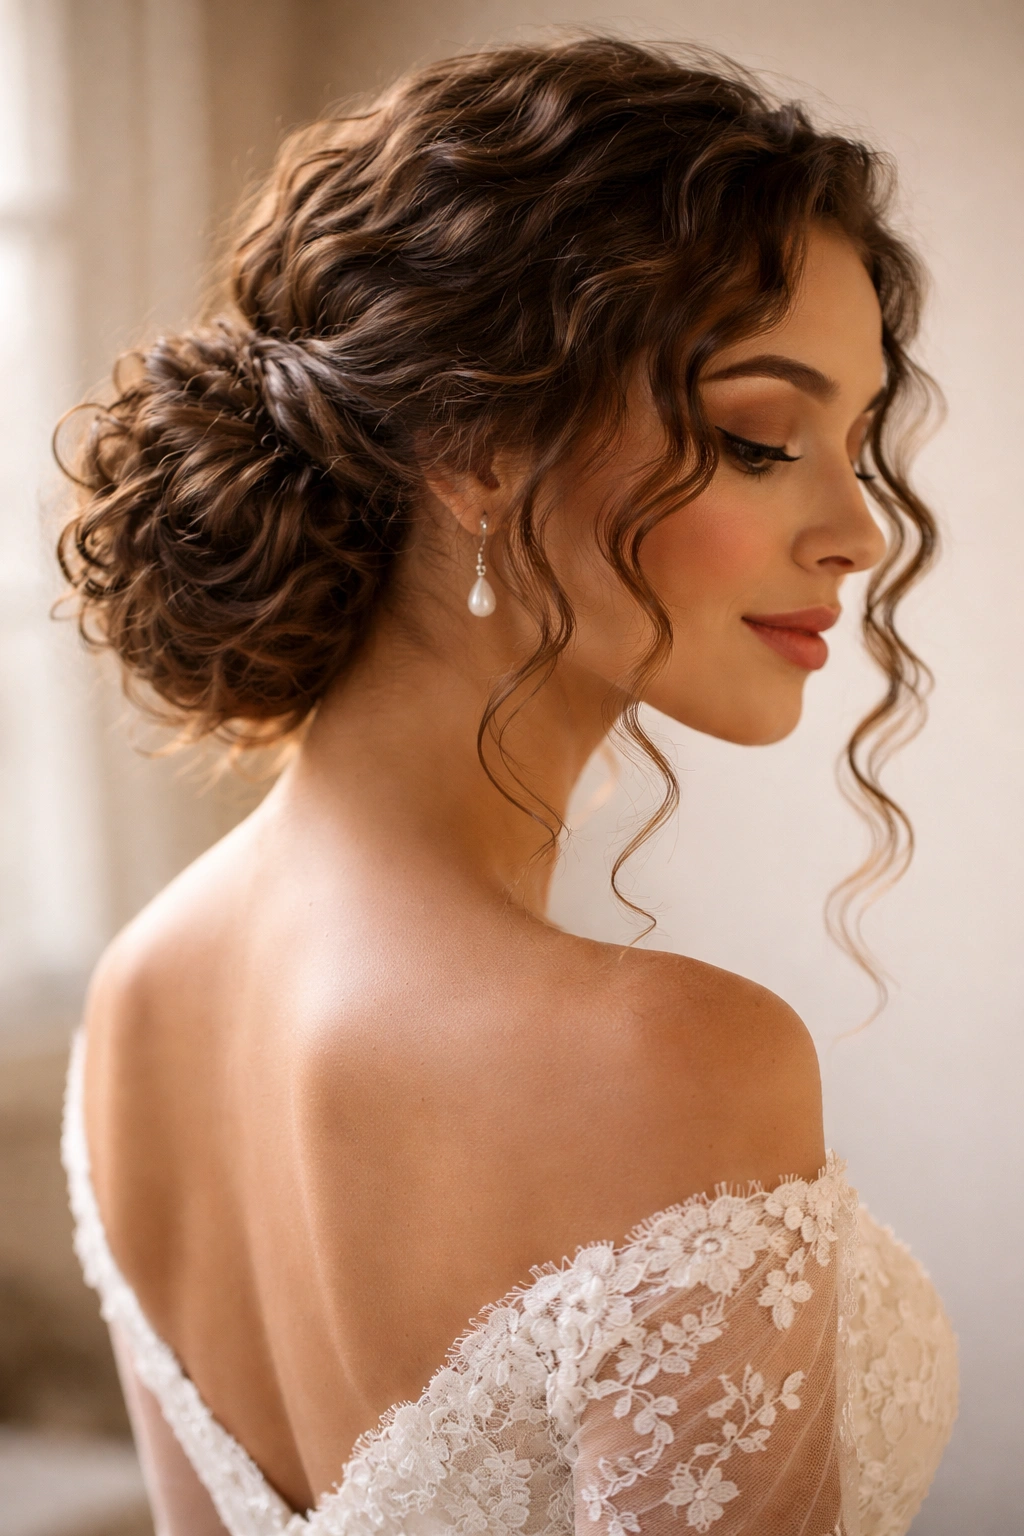
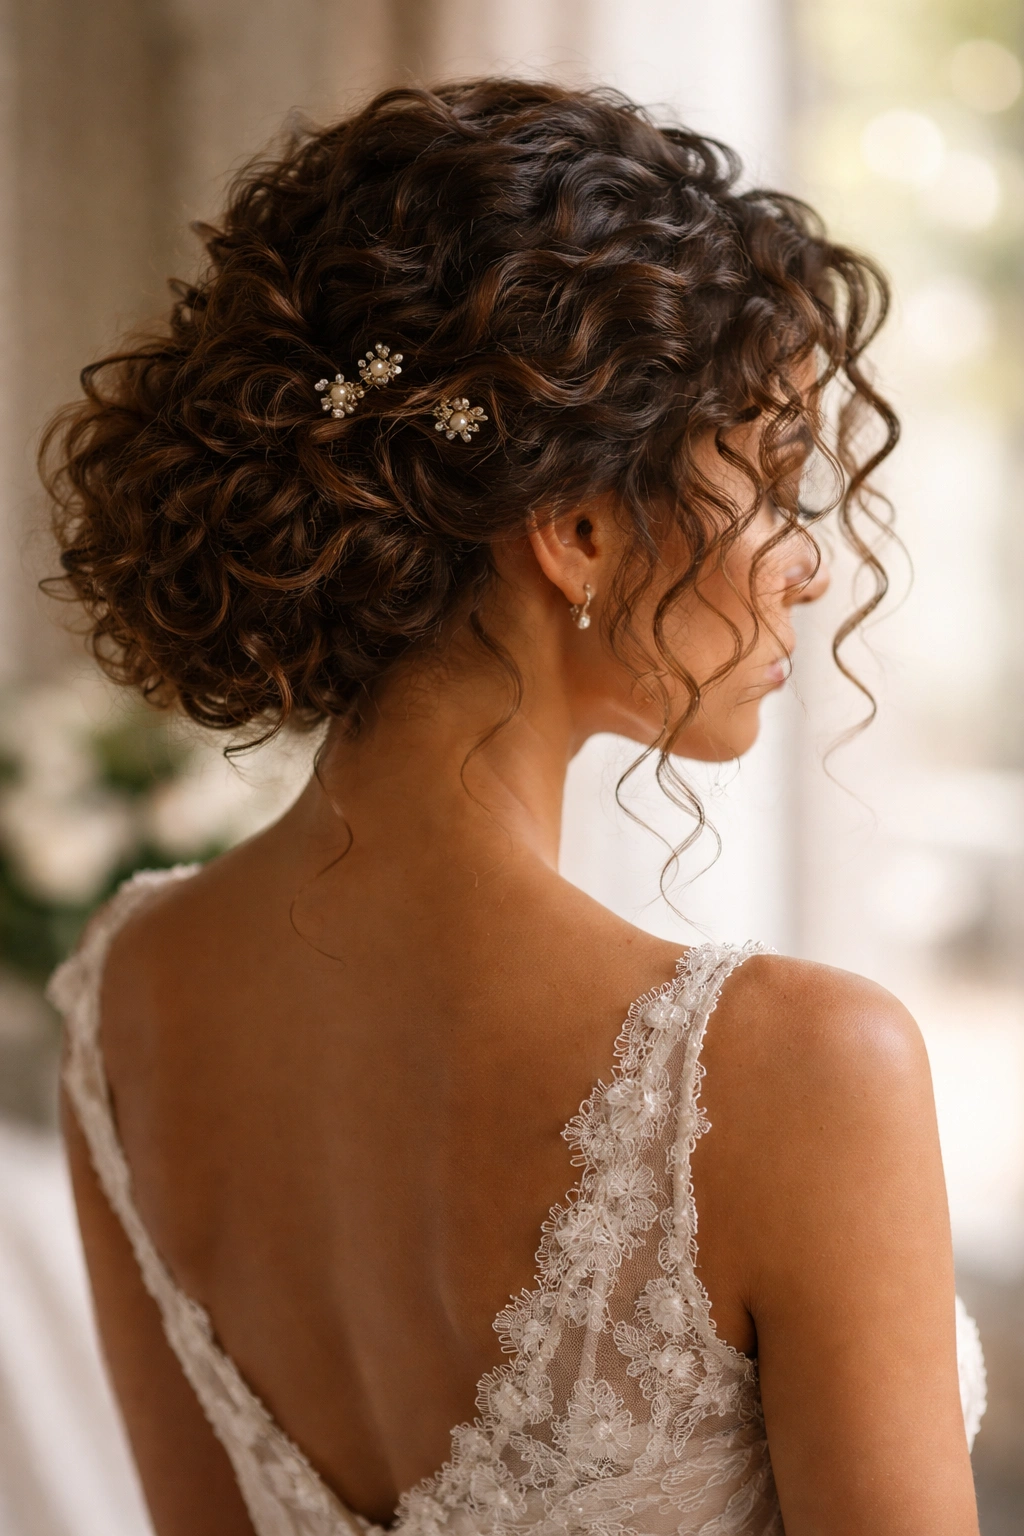
6. The Wrapped Bun with Pearl Hair Sticks
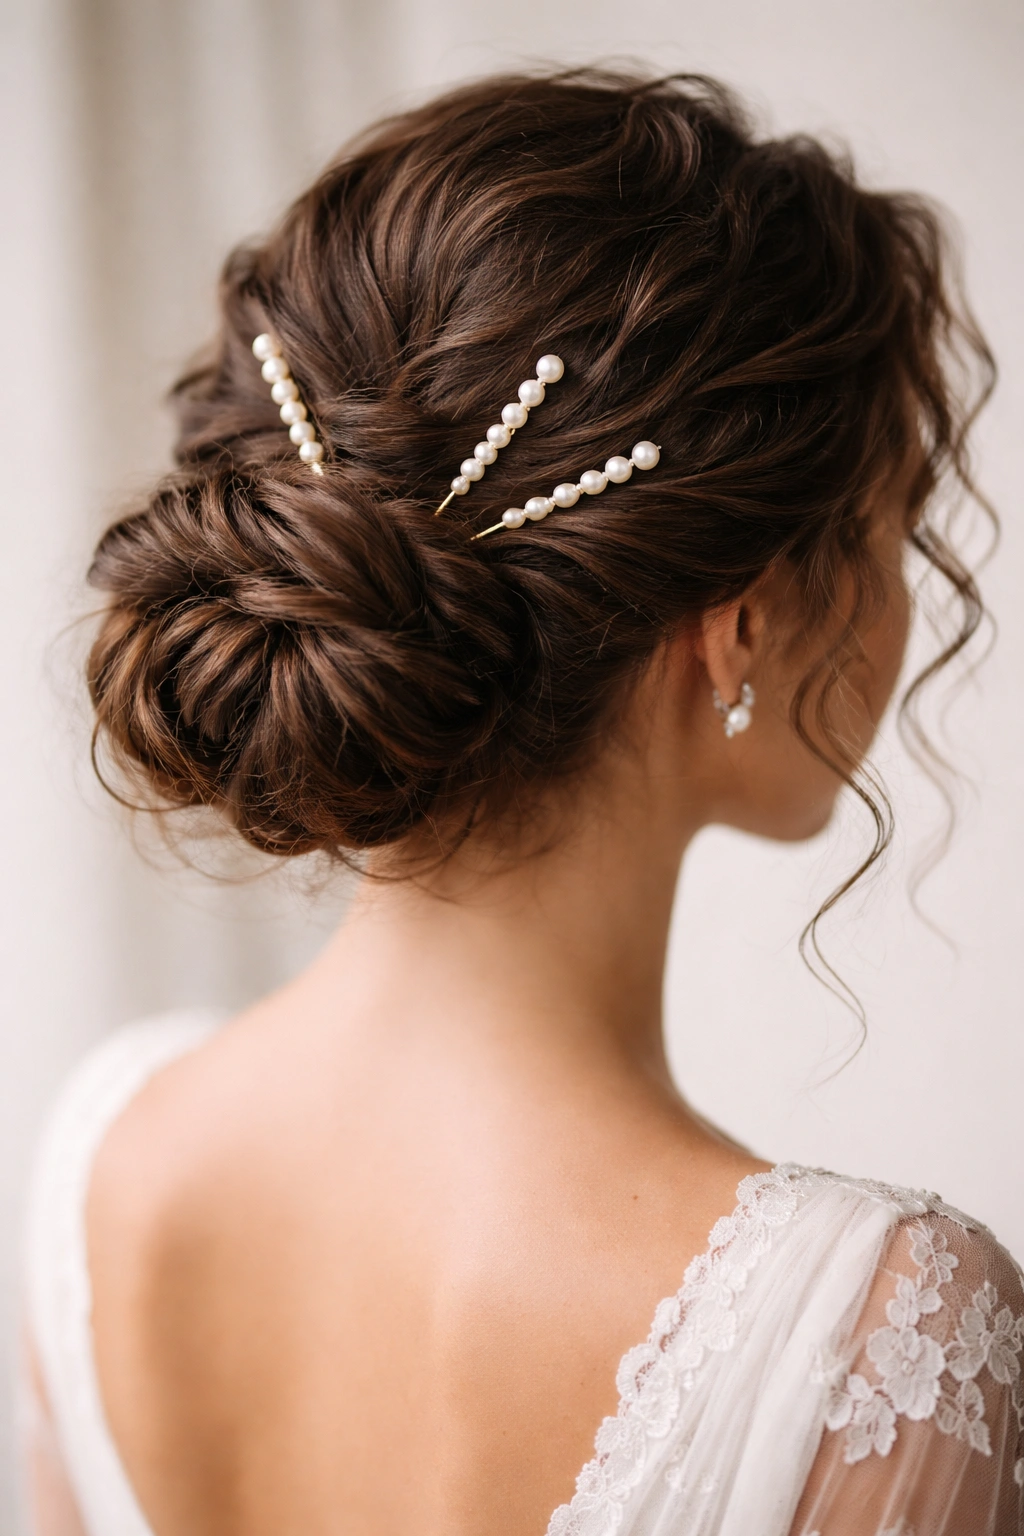
This style takes a classic low bun and elevates it with decorative pearl hair sticks woven through the bun’s texture. The bun itself is deliberately soft and textured—not a tight, smooth, ballerina bun. The sticks add bridal elegance and also function as additional anchors to keep everything secure through a long day of celebration.
Constructing the Textured Bun
Gather your hair low at the nape of your neck and twist it loosely. Wrap the twisted hair around itself to form a bun, but leave some texture showing through. Don’t smooth it down with a brush or serum; the curl pattern visible within the bun is what makes this style look intentional and beautiful. Secure with bobby pins inserted into the textured sections of the bun.
Positioning the Hair Sticks
Pearl or decorative hair sticks should be inserted horizontally through the bun, crossing each other to create an X or weaving through the bun in parallel lines. The sticks serve a dual purpose: they’re beautiful to look at and they dramatically increase how secure the bun is. Even if you move your head suddenly or someone accidentally bumps your hair, the sticks help anchor everything in place.
Adding Dimension With Escaping Curls
Pull a few small curls out from the bun intentionally—maybe two or three on each side—and let them fall naturally. These shouldn’t look accidental; they should look like you deliberately styled them this way. They soften the formality of the bun and add movement and romance.
Who This Suits
Brides who want an upscale, polished look with enough texture and movement to feel personal. This style works beautifully for formal evening weddings, garden ceremonies, and any aesthetic where you want to look elegantly put-together but not severe.
Worth knowing: Pearl hair sticks are actual functional hair accessories, not just decorative. They’re worth investing in because they’re genuinely helpful and they look expensive and bridal in photos.
7. The Half-Up Bubble Ponytail with Cascading Curls
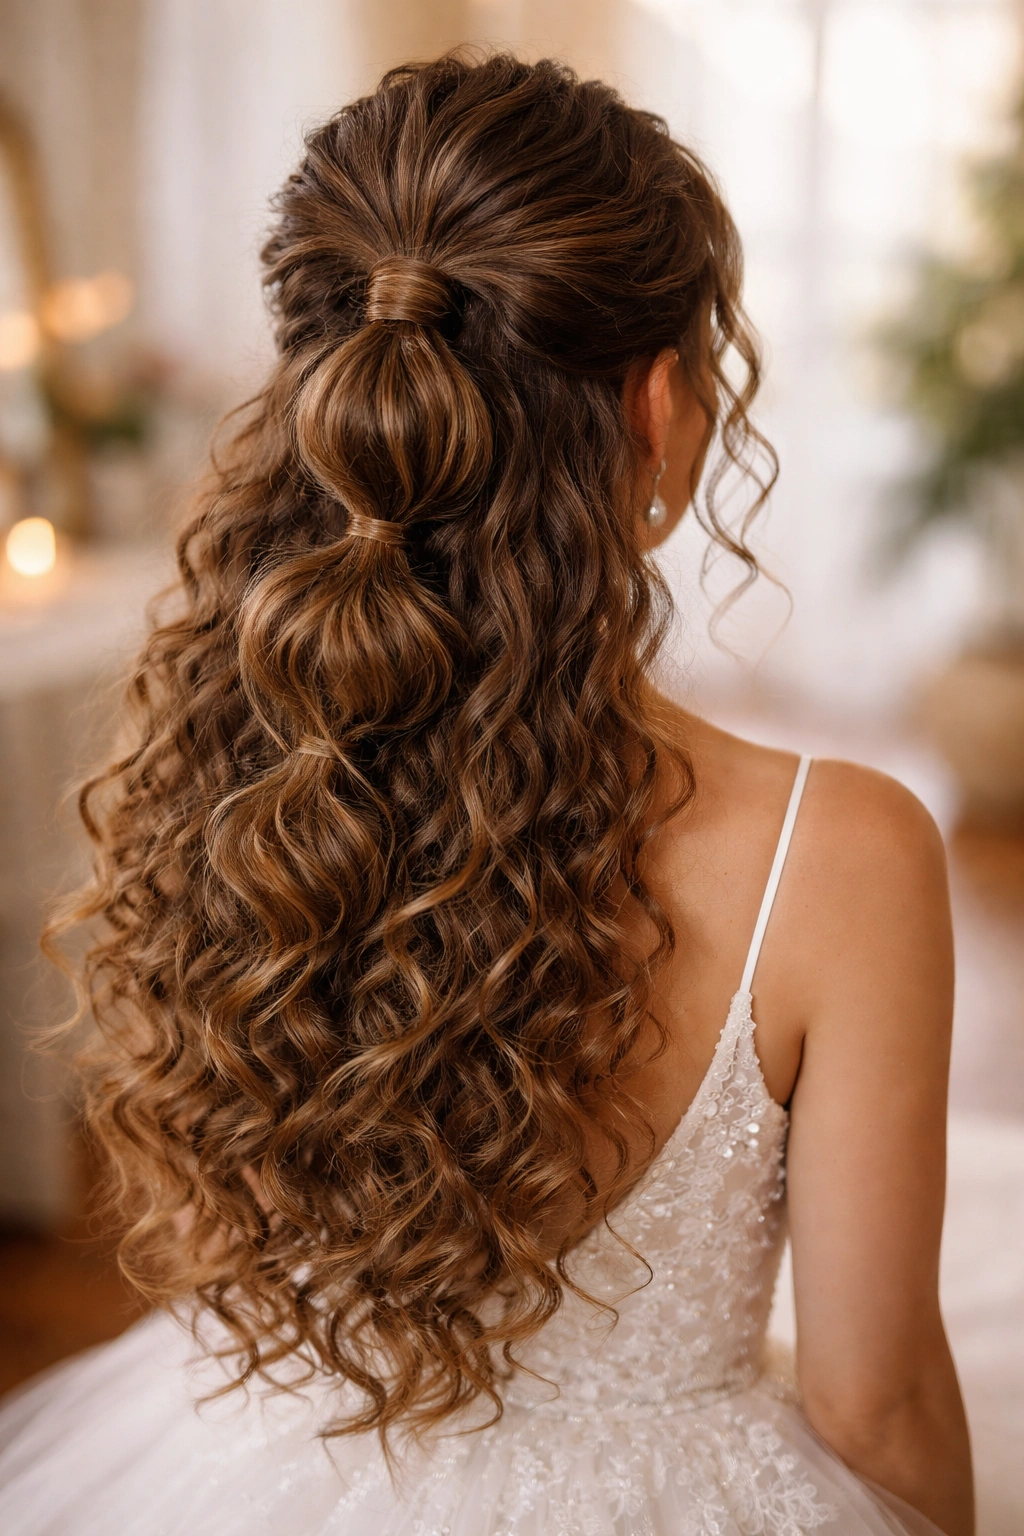
This style takes the trendy bubble ponytail concept and adapts it perfectly for curly hair. A section of hair from the crown is gathered and secured, then separated into 2-3 “bubbles” by tying additional elastics down the length of the ponytail. The result is voluminous, textured, and utterly romantic. The bottom half of your hair flows freely in its natural curls.
Why Curly Hair Makes This Look Extraordinary
On straight hair, bubble ponytails can look a bit flat. But on curly hair, each bubble naturally puffs out with texture, creating a dramatically voluminous style that photographs beautifully. The curls within each bubble add dimension that no product could create on straight hair. This is a style where your natural texture is actually an advantage.
Building the Bubbles Step-by-Step
Gather the top third of your hair at the crown and secure it with a covered elastic. Now, gather the section just below that elastic (which will include some of the hair from the top section plus some new hair) and secure it with another elastic positioned about two inches below the first one. Repeat once more if you have enough length. After each bubble is secured, gently pull sections of curls outward and upward to create volume.
Styling the Cascading Curls
The bottom section of your hair—roughly the bottom third—should fall freely. You can separate these curls slightly with your fingers to increase the poof and definition, or leave them completely natural. If you have loose waves, you might define them more dramatically. If you have tight coils, just letting them fall naturally creates beautiful texture.
Best Occasions for This Look
This works beautifully for modern, stylish brides who want something that feels celebratory rather than traditional. It’s excellent for garden weddings, outdoor ceremonies, and any aesthetic where you want to feel young and romantic rather than formal and contained.
Real talk: This style actually feels more comfortable than it looks because you’re not gathering all your hair tightly. The bubble structure distributes weight better than a standard ponytail.
8. The Crown Knot with Graduated Curl Release
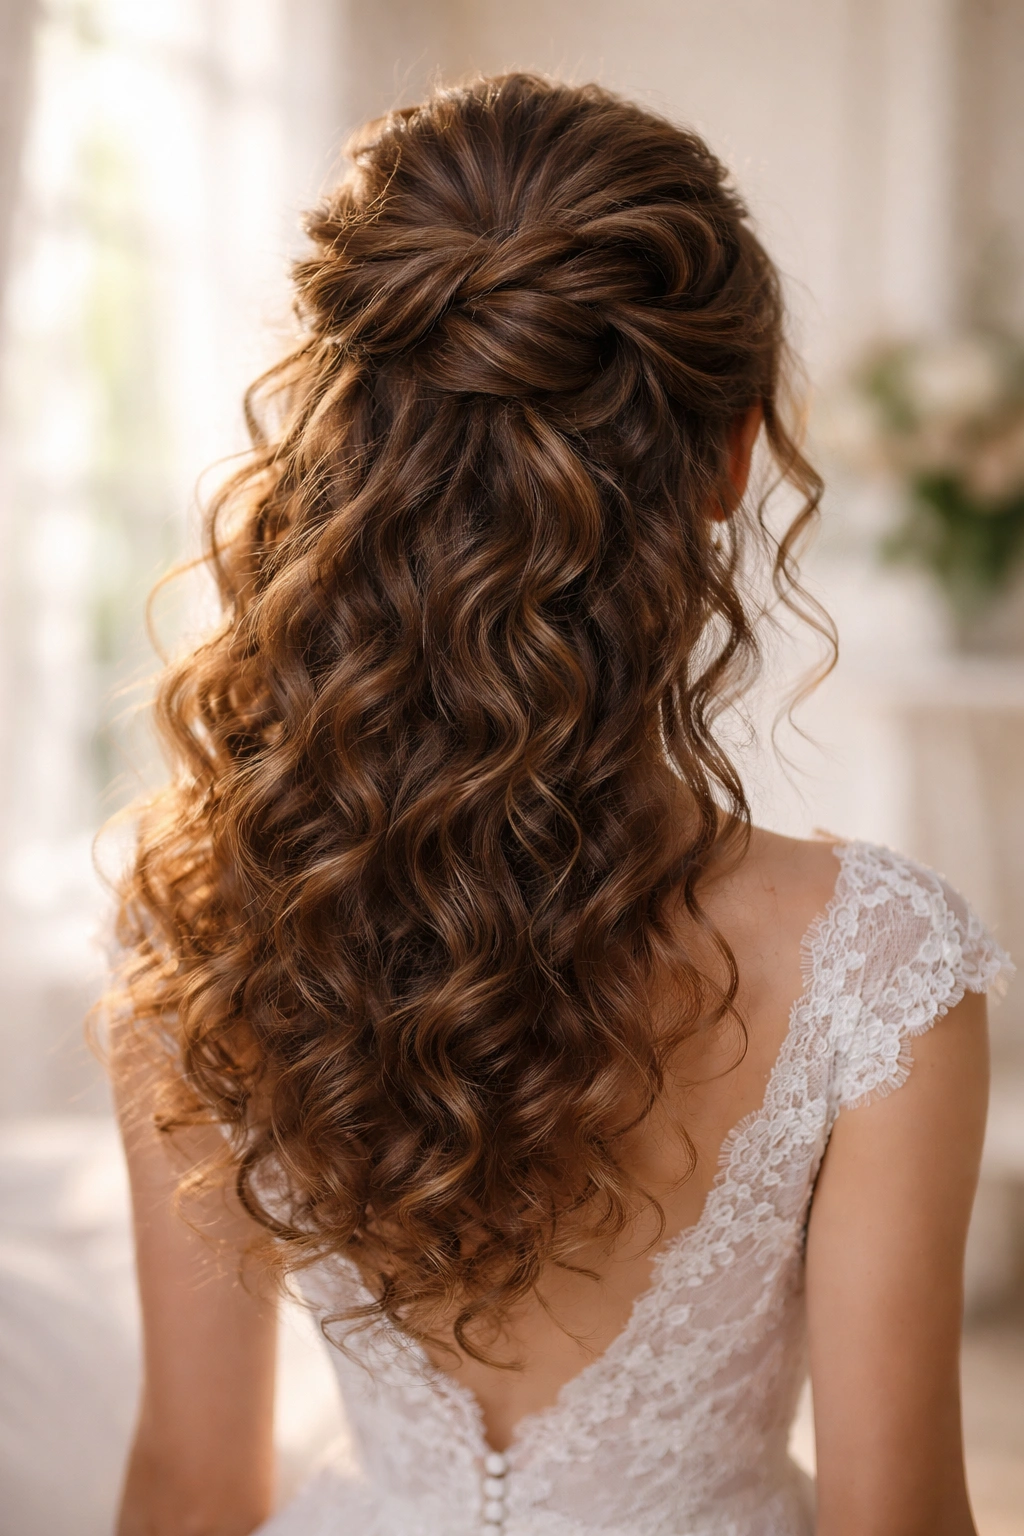
This style is architectural and modern while still feeling romantic. A thick section of hair from the crown is twisted and coiled into a knot right at the top of your head. Then, layer by layer, you gradually release curls down the back and sides, creating a cascading effect that looks like your hair is flowing out of a central crown point.
Understanding the Graduated Release
The key to this style is releasing the hair at different levels rather than all at once. You might secure the crown knot tightly, then release hair every inch or two as you move down the back of your head. Each release point can be secured with a small bobby pin hidden within the curl pattern. From the front or side, it looks like curls are organically flowing; from the back, there’s beautiful architecture and structure.
Creating the Crown Knot Foundation
Section off a large, thick section of hair from your crown—roughly a quarter of your total hair. Twist this section loosely and coil it into a knot at the highest point on your head. Don’t make it tight; let the curl texture show through. Secure it thoroughly with bobby pins because this knot is going to support the rest of the style.
Releasing the Cascades
Below the crown knot, gather another section of hair, twist it loosely, and pin it at the nape of your neck but not tightly—let the twist relax so curls can escape. On each side of your face, you can do the same: gather a section, twist it loosely, and pin it so curls flow out naturally. The effect is that curls are cascading from a structured crown.
Who Should Choose This Style
Brides who want a style that photographs beautifully from every angle and who don’t mind spending time getting it styled correctly. This works for formal weddings, classic elegance, and any bride who wants to feel like she’s wearing a statement style rather than a casual updo.
Worth knowing: This style actually benefits from being refreshed during the reception. A stylist (or your maid of honor with some bobby pins) can tuck any curls that escape back into their release points, keeping everything looking intentional all day.
9. The Twisted Double Crown with Wrapped Center
This style creates visual interest and movement by building two twisted sections into a crown that sits slightly back from the very top of your head. The remaining curls flow down the back in a gorgeous cascade. The “wrapped center” refers to the place where these two twists meet and wrap around each other before heading to the back.
Creating Balanced Architecture
Start with a center part (or an off-center part if you prefer asymmetry). Section off a thick portion of hair on each side starting near the temple. Twist each section loosely, and curve them toward the back of your head so they meet at the crown. Here’s where the magic happens: wrap these two twisted sections around each other, creating a intertwined crown effect, then pin them securely at the point where they meet.
Anchoring With Strategic Pinning
Use bobby pins inserted deeply into the twisted sections where they wrap around each other. Because the twists are intertwined, they actually support each other, which means this style is more secure than you might expect. Add additional pins on each side where the twist anchors to your scalp.
The Curl Cascade Behind
Everything below the wrapped crown simply flows down naturally. You can lightly separate curls with your fingers to increase volume, or leave them completely natural. The most beautiful effect is when you have a good amount of curl freedom here because it creates a contrast between the structured crown and the loose, romantic curls below.
Photography and Movement
This style creates beautiful visual lines that photograph well. When you turn your head, the twists catch light differently, and the cascading curls move in a way that reads as romantic and effortless in photos. It’s also a style that actually moves gracefully when you move—it doesn’t feel stiff or immobile.
Pro tip: If you’re nervous about the twists holding through dancing, ask your stylist to use flexible bobby pins and to pin the style slightly loosely so it can shift slightly rather than fight against movement.
10. The Romantic Mess Bun with Intentional Undone Texture
This is the style for brides who want to look polished and bridal without sacrificing the natural beauty of their curls. The entire concept is built on the idea that a “messy” bun made with curly hair isn’t actually messy—it’s intentionally textured and romantic. Every imperfect element is exactly what makes it beautiful.
Redefining What “Messy” Means for Curly Hair
A messy bun on straight hair can look actually unkempt. But a messy bun on curly hair reads as intentionally romantic because your curls naturally have texture and movement. You’re not trying to hide this texture; you’re celebrating it as part of the style. The visible curl formations, the spirals, the way individual curls catch light—all of this is the design.
Building the Romantic Mess Bun
Gather your hair loosely at the nape of your neck or slightly to the side. Don’t brush it smooth; you want to see your natural curl pattern. Twist the gathered hair loosely—the twist should show texture, not be slicked and smooth. Wrap this twist into a bun shape, but don’t make it tight. Insert bobby pins into the textured parts of the bun, not trying to control every curl, but just anchoring the overall shape.
Adding Intentional Undone Elements
Pull out small sections of curls around the bun—several on each side, maybe one or two at the nape of your neck. These shouldn’t look accidental; they should look like you deliberately styled them there. If you have fine curls or waves, you can create little spirals by running your finger through a curl. If you have tight coils, just leaving them to fall naturally looks beautiful.
Embellishing Without Overwhelming
Add a delicate hair comb, a vintage pin, or a subtle hair vine into the bun. The embellishment should whisper elegance, not shout it. Pearls or crystals scattered throughout the bun create a bridal feel without making you feel like you’re wearing a costume.
Occasions When This Shines
This style works beautifully for any bride, regardless of venue or formality level. It’s especially perfect for outdoor weddings, bohemian aesthetics, garden ceremonies, and any celebration where you want to feel authentically yourself while still looking beautifully bridal. In wedding photos, this style reads as romantic, effortless, and genuinely elegant in a way that overly controlled styles sometimes don’t.
Real talk: This style often photographs better than you expect because natural texture and movement are more visually interesting than a slicked-back bun. Your curls catch light beautifully, and the overall effect reads as high-end and thoughtful rather than casual.
Final Thoughts
The best wedding updo for your curly hair isn’t about finding something that works despite your curls—it’s about finding a style that actually lets your curls be the star. Every style here celebrates texture, respects your natural pattern, and keeps everything secure through a full day of celebration. Your curls aren’t an obstacle to work around; they’re the actual design of the style.
Before your wedding day, have at least two trials with a stylist who genuinely understands curly hair. Bring photos of styles you love, but more importantly, bring details about your curl pattern, density, and how your hair behaves throughout the day. Tell your stylist exactly what you’re worried about—whether that’s curls falling out, the style looking limp by evening, or certain sections not staying put. These conversations help them build a style strategy that’s personalized to your specific curls.
On the wedding day itself, use light hairspray, not heavy-hold products that weigh curls down and make them look sticky in photos. Have bobby pins and a small brush available during the reception for any quick touch-ups. Most importantly, remember that your curls are beautiful exactly because they have texture and movement. A perfect, completely controlled updo isn’t the goal—a style that showcases your curls and keeps them exactly where you put them is.