Curly hair has a whole conversation happening at the crown, and not every style needs to smooth it down or pull it back into submission. If you’ve ever felt trapped by the endless slicked-back tutorials online, you’re not alone—many curly-haired people crave styles that celebrate the texture and bounce they’ve worked hard to maintain, rather than flattening it against the scalp for a sleek finish.
The difference between a slicked-back style and a textured alternative comes down to intention. Slicked-back styles use gel, water, or pomade applied with a toothbrush and firm pressure to create a smooth, controlled surface from root to tip. The no-slick-back category, by contrast, embraces the natural lift, pattern, and dimension of your curls—letting them spring from the scalp without being plastered down. You can still have updos, ponytails, buns, and braids; you’re just doing them in a way that honors the curl pattern rather than fighting against it.
The styles that follow work across curl types, from loose waves to tight coils, and they all share one thing: they look intentional and polished without requiring you to sacrifice the texture that makes your curls yours. Whether you’re heading to work, attending an event, or just looking for a fresh way to wear your hair on a regular Tuesday, these eight styles prove that curly hair can be both styled and textured.
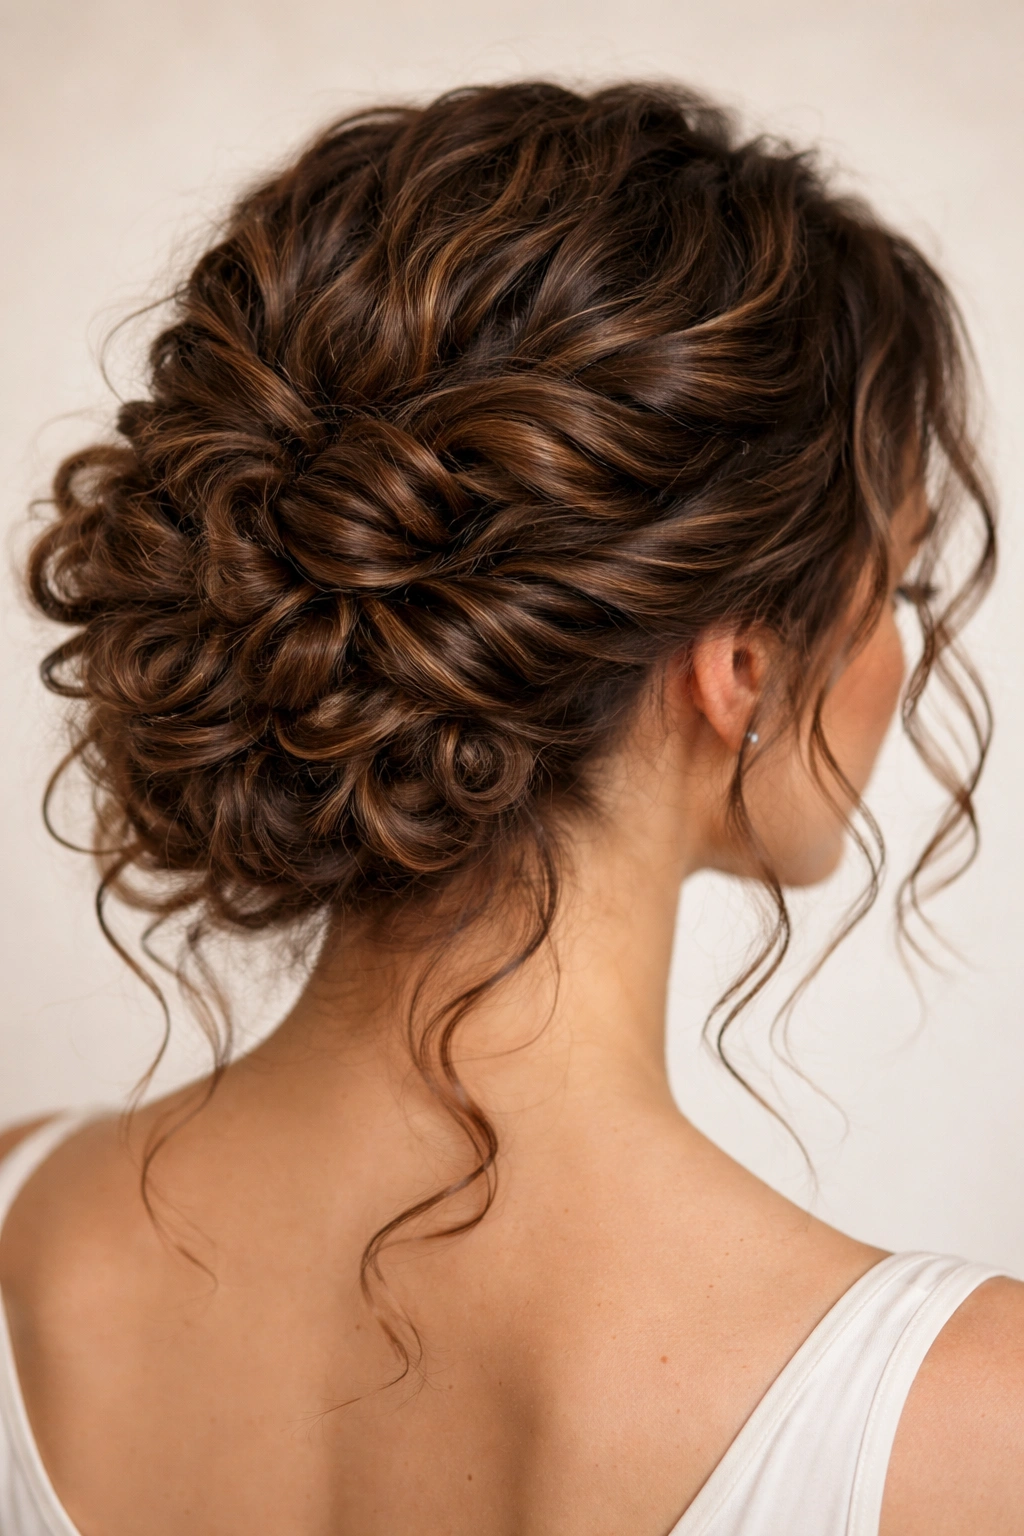
1. Loose Textured Bun
This is the no-slick-back answer to the classic bun, and it’s infinitely more flattering for curly hair. Instead of smoothing everything back with product and pins, you’re gathering your curls into a knot at the crown or nape and letting the texture show—both in how you form the bun and in the curls that frame the base.
How to Build the Look
Start with second-day or lightly dampened curls that have natural definition and hold. The key to making this work is not applying heavy products to the whole head. If your curls need refreshing, spray them with a curl-refreshing spray or light water mist, then gently scrunch in a tiny bit of gel only to the mid-lengths and ends where you need definition.
Flip your head forward and gather all your hair toward the crown or the nape, depending on where you want the bun to sit. As you pull your curls together, let them fold and bunch naturally—don’t comb or smooth them into submission. Wrap the gathered section into a loose coil and secure with bobby pins, leaving a few curls intentionally loose around the base and face. The beauty is in the imperfection: some curls will stick out, some will create height, and some will frame your face.
What Makes This Different From a Slicked Bun
- Texture remains visible throughout — you can see the individual curl pattern, not a solid mass of smooth hair
- No need for heavy-hold gels or pomades on the scalp, which can weigh curls down and feel sticky
- Purposeful flyaways look intentional rather than frizzy, because they’re framed within an overall textured aesthetic
- Takes less styling time — no smoothing, no toothbrush, no precision requirements
- Works with curls at any stage — second-day curls, damp curls, or freshly styled curls all look good
Pro tip: Wrap a small section of your own hair around the base of the bun to hide the bobby pins and soften the overall look, leaving a few curls loose for that effortless vibe.
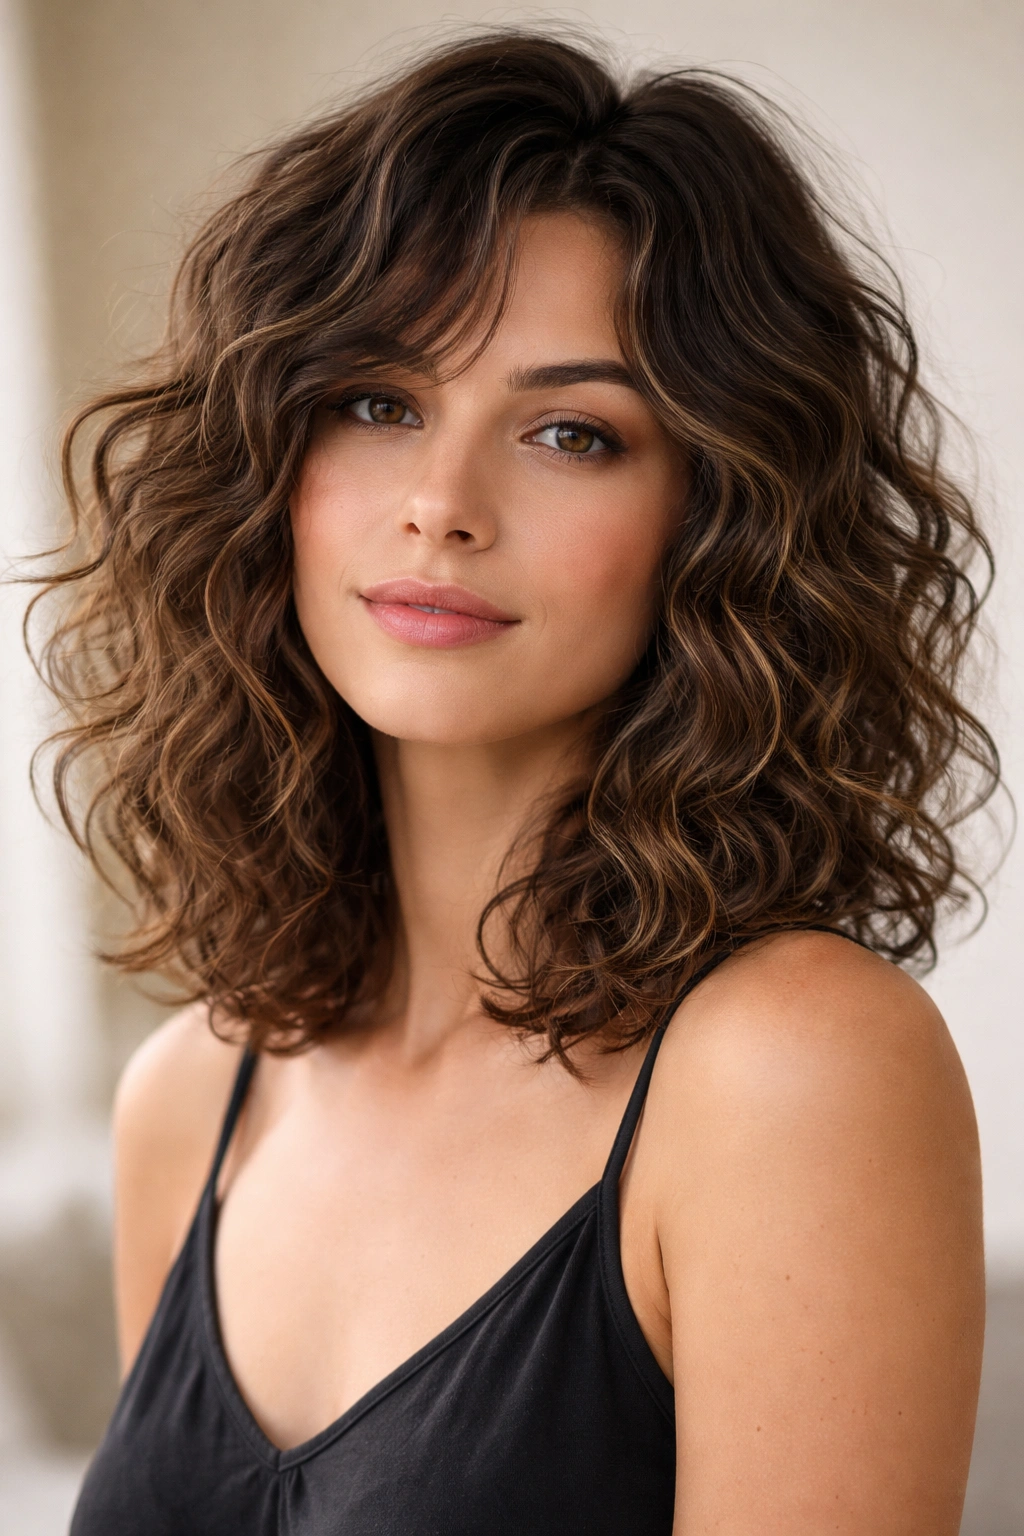
2. Face-Framing Layers With Defined Curls

Layers cut specifically to work with your curl pattern—not against it—create immediate movement and shape without requiring you to style your curls any differently than you normally would. Face-framing pieces make a statement because they’re visible and textured, not hidden under a slick surface.
Why This Cut Transforms Your Curl Game
A good layered cut for curly hair removes bulk from the interior while keeping length and weight where it counts. Face-framing layers sit right at cheekbone length or slightly longer, which means they catch light, move independently from the rest of your hair, and create the illusion of more volume. The texture of the curls becomes an asset rather than something to minimize.
When you style these layers, you’re not smoothing them—you’re scrunching in your regular leave-in conditioner and styler and letting them dry however they naturally fall. Sometimes they’ll spiral tighter, sometimes they’ll create a slightly wavier texture, but the cut ensures they’ll move and frame your face rather than lying flat.
The Practical Benefits
- Instantly adds shape and movement to your face without requiring a slick, sculpted finish
- Reduces styling time because you’re working with your curl pattern, not against it
- Creates dimension that’s visible from all angles, especially important if your curl type tends to look flattened or one-dimensional
- Maintains length where you want it while removing weight and bulk from the crown
- Works whether your curls are wet or dry styled, since the cut is intentional about how curls will sit
Worth knowing: Bring photos of face-framing layers you love to your consultation, and make sure your stylist understands curly-cut techniques—not all stylists are equally skilled at cutting curly hair in a way that honors the texture.
3. The Half-Up Curl Knot
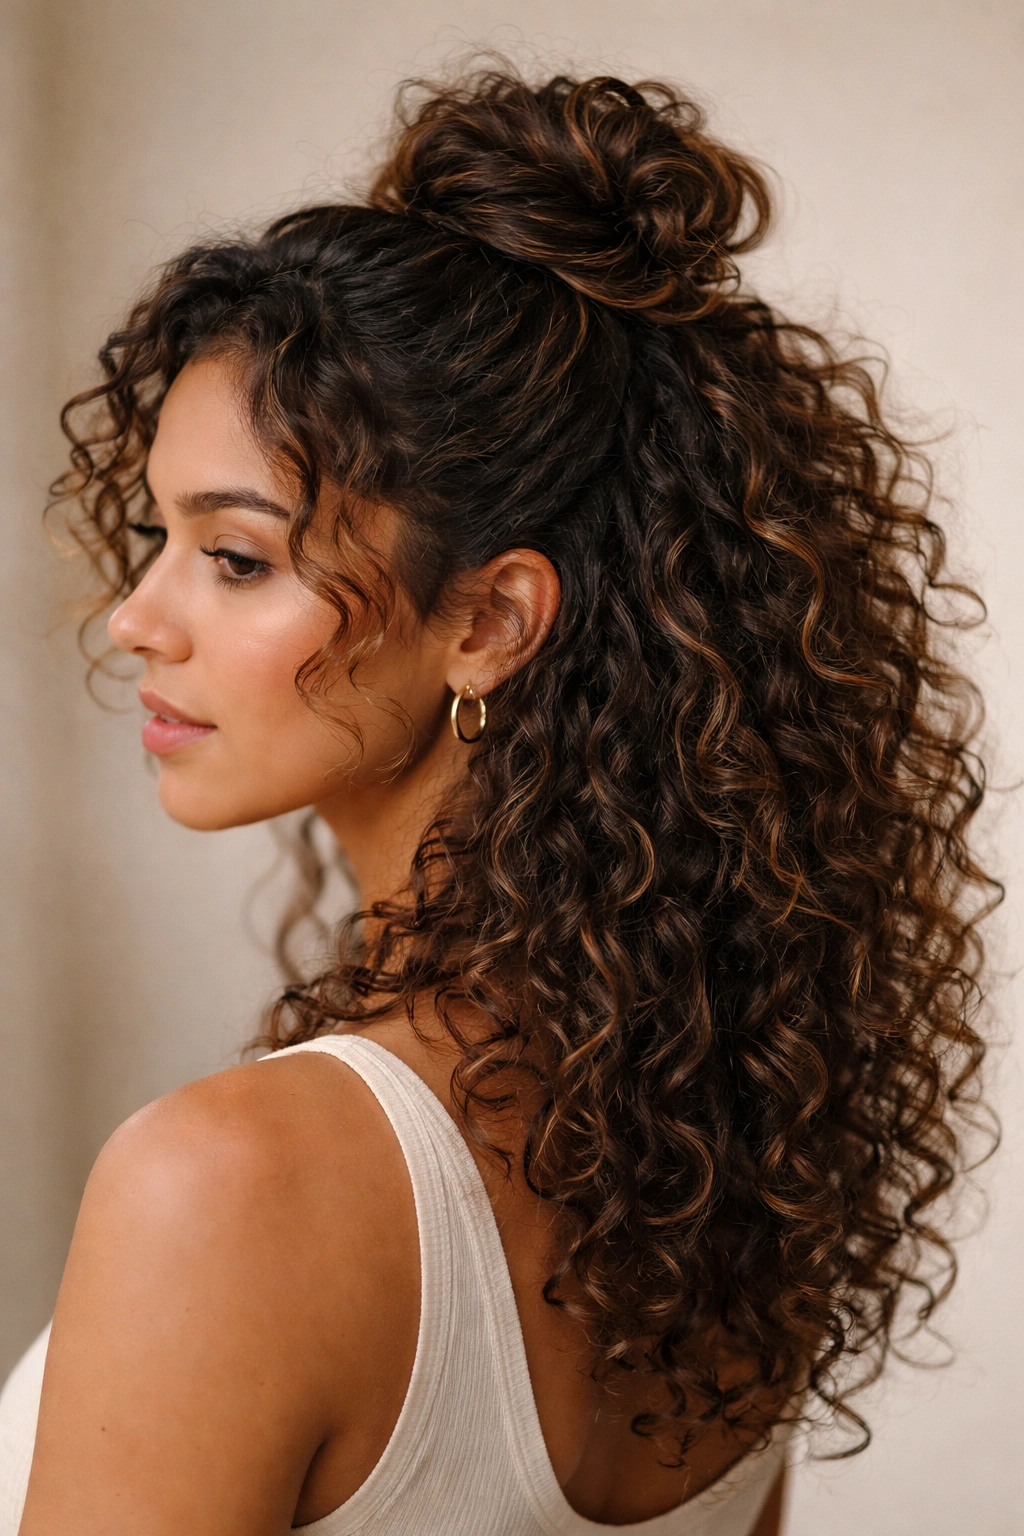
This is a sophisticated middle ground between fully down and fully up, and it’s perfect for curly hair because the top section can be gathered and knotted without flattening the crown. It’s basically a textured half-up style that looks intentional and polished rather than accidental.
How to Create This Textured Half-Up
Take a section of hair from the crown area—roughly from your temples to the back of your head—and gather it into a loose ponytail at the midpoint of your head. Instead of tying it with an elastic, twist the gathered section gently and wrap it into a loose, flat knot. Secure with bobby pins hidden underneath and within the texture. Let the rest of your curls fall freely over your shoulders.
The magic is that your curls stay defined throughout—there’s no smoothing, no gel applied to the scalp, no flattening. You’re just corralling the top section into a knot that reads as intentional and styled. Any loose curls around your face or at the nape look natural and intentional because they’re part of a cohesive, textured look.
Why It Works for Curly Hair
- Crown volume stays intact because you’re not pulling or smoothing the entire head back
- The knot becomes a design feature that shows off the texture of your curls rather than hiding them
- Quick to achieve — no precision required, no blow-drying, no perfecting
- Works for both casual and professional settings depending on how loose or tight you make the knot
- Keeps hair off your face without the severe look of a fully slicked-back style
Insider note: Dampening just the section you’re about to knot helps it hold better without needing heavy product, and loose twists hold longer than super-tight ones on curly hair.
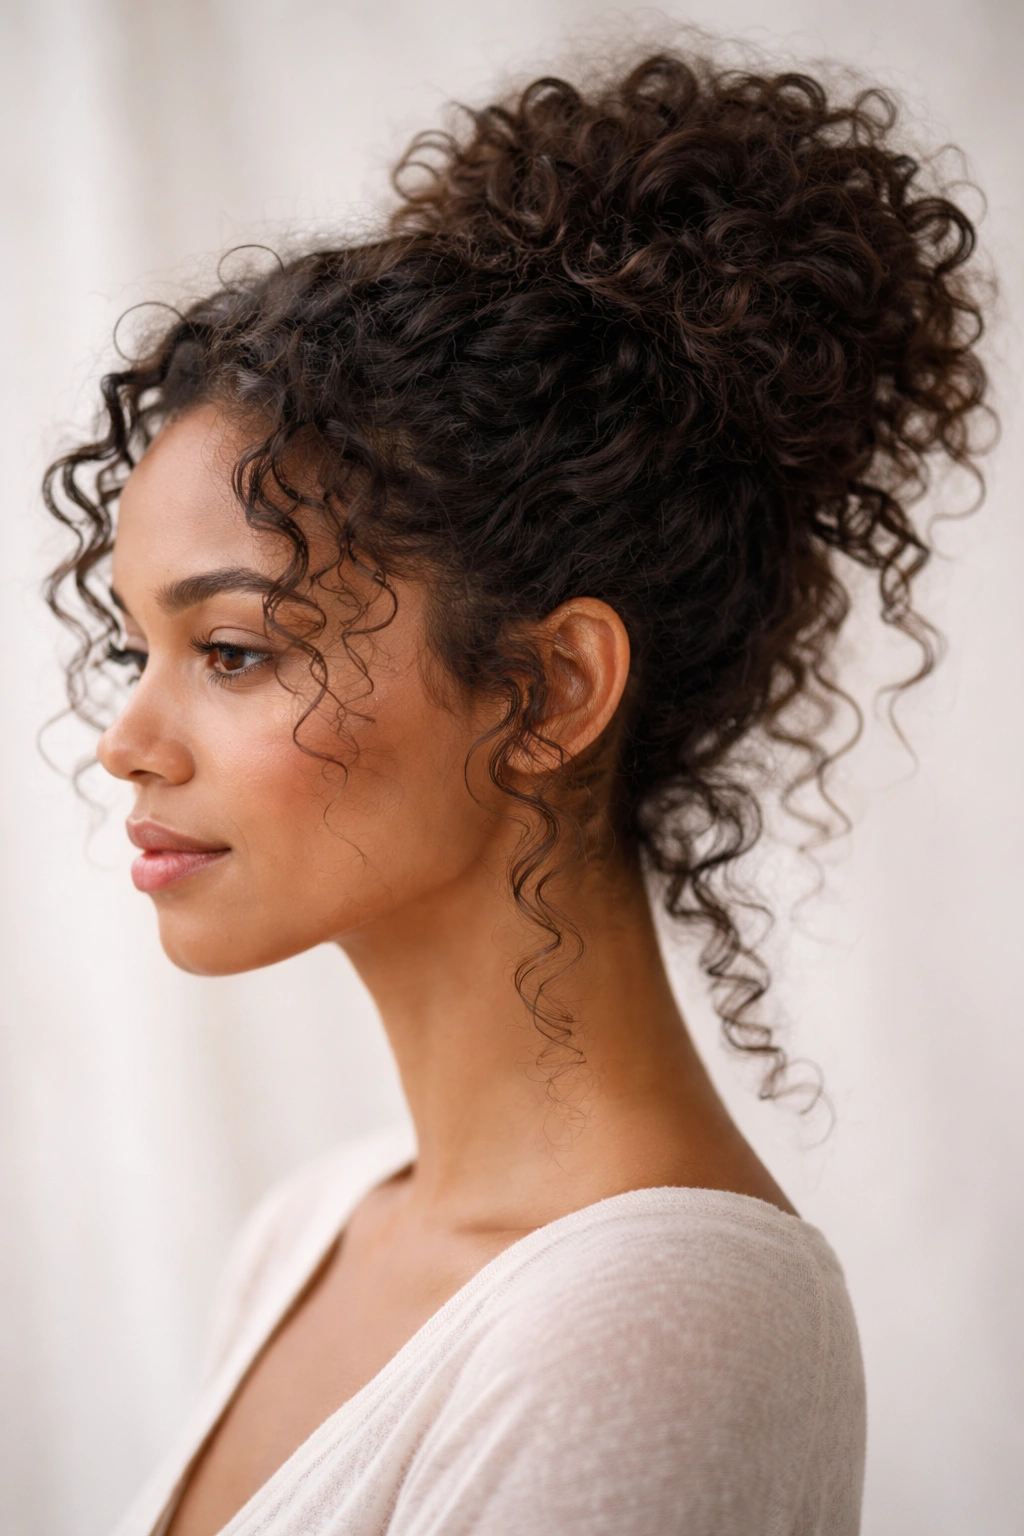
4. Tousled Ponytail With Defined Curls
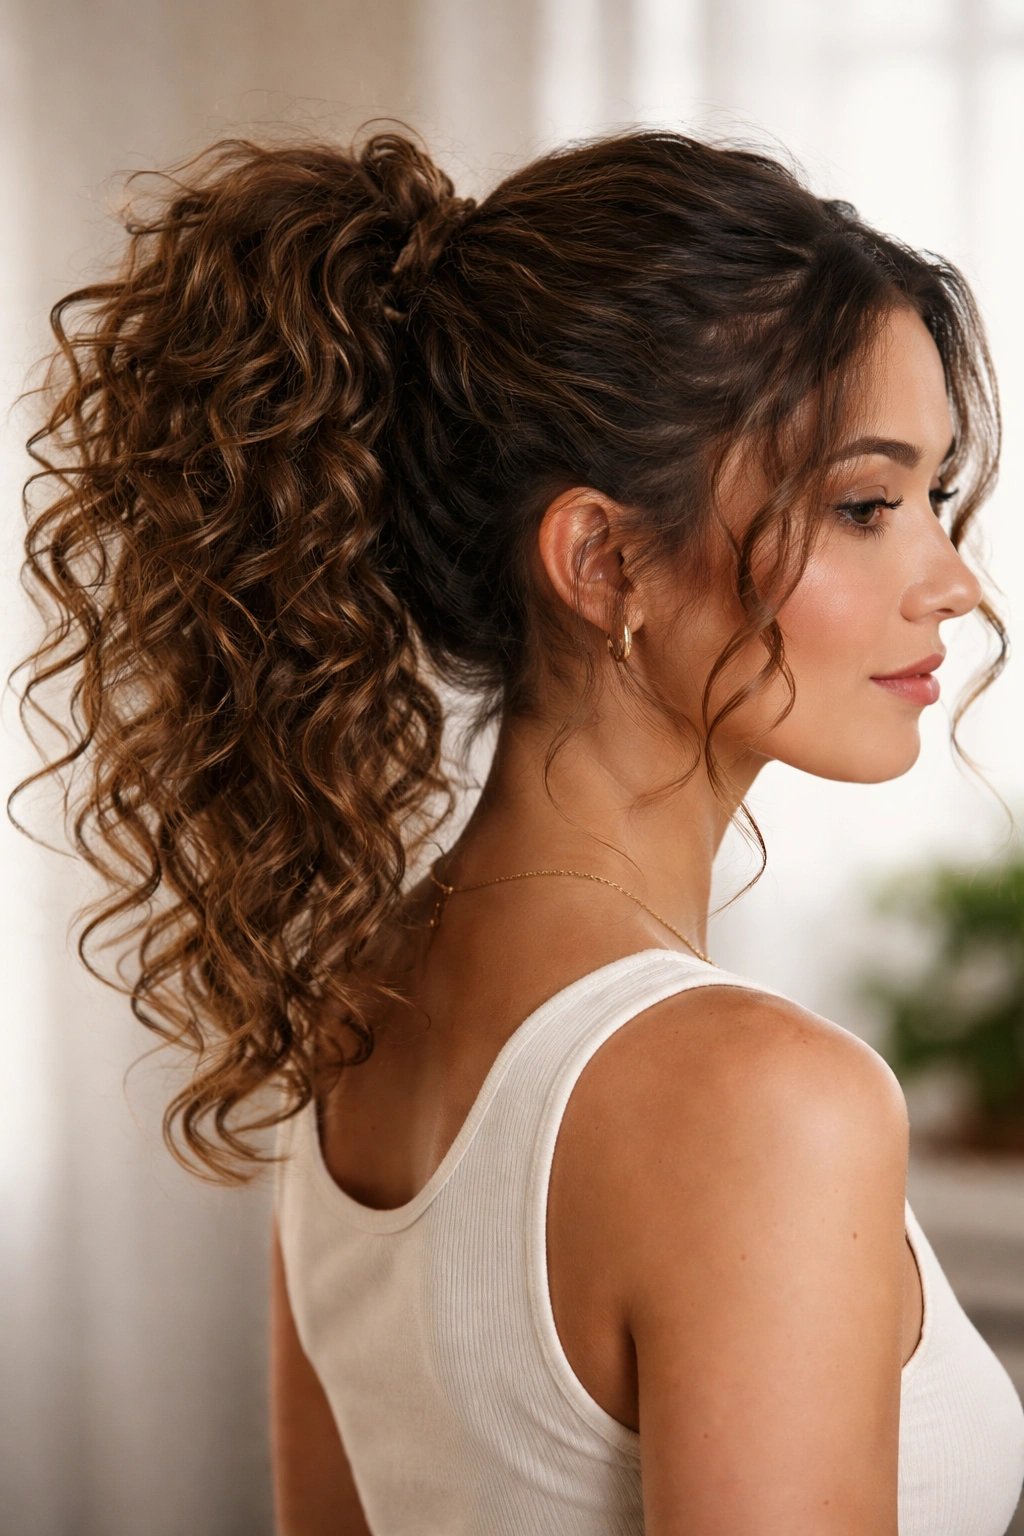
A ponytail doesn’t have to be slicked back. In fact, one of the most flattering ponytails for curly hair is slightly messy, with defined curls visible throughout, and a small section of hair left out around the face to soften the overall effect.
Building a Textured Pony
Flip your head forward and gather all your hair into a ponytail at whatever height feels right—high at the crown, mid-back, or low at the nape. Use a fabric hair tie or a claw clip rather than a rubber elastic, as these are gentler on curls and less likely to create a dent. Once gathered, don’t smooth or comb the ponytail; let the curls bunch and fold as they naturally will.
If you want more definition, scrunch a small amount of curl cream or gel through the ponytail section while it’s gathered, then let it dry or air-dry. Take one small section from near your temple and gently pull it out—this loosens the ponytail slightly and frames your face. The result is a ponytail that reads as polished and intentional without being slicked.
The Advantages of a Textured Pony
- Hides the elastic underneath the bulk of your gathered curls, so you don’t see a visible “line” in your hair
- Curls stay defined throughout the day, not getting flattened from product buildup
- Works for active days — keeps hair contained without the commitment of an updo
- Looks soft and approachable rather than severe or too-formal
- Requires minimal styling products on your roots or scalp, keeping curls light and bouncy
Pro tip: A satin or silk hair tie prevents friction damage and curl breakage better than standard elastics, especially if you wear ponytails frequently.
5. Spiral Curls Styled on Top With Volume
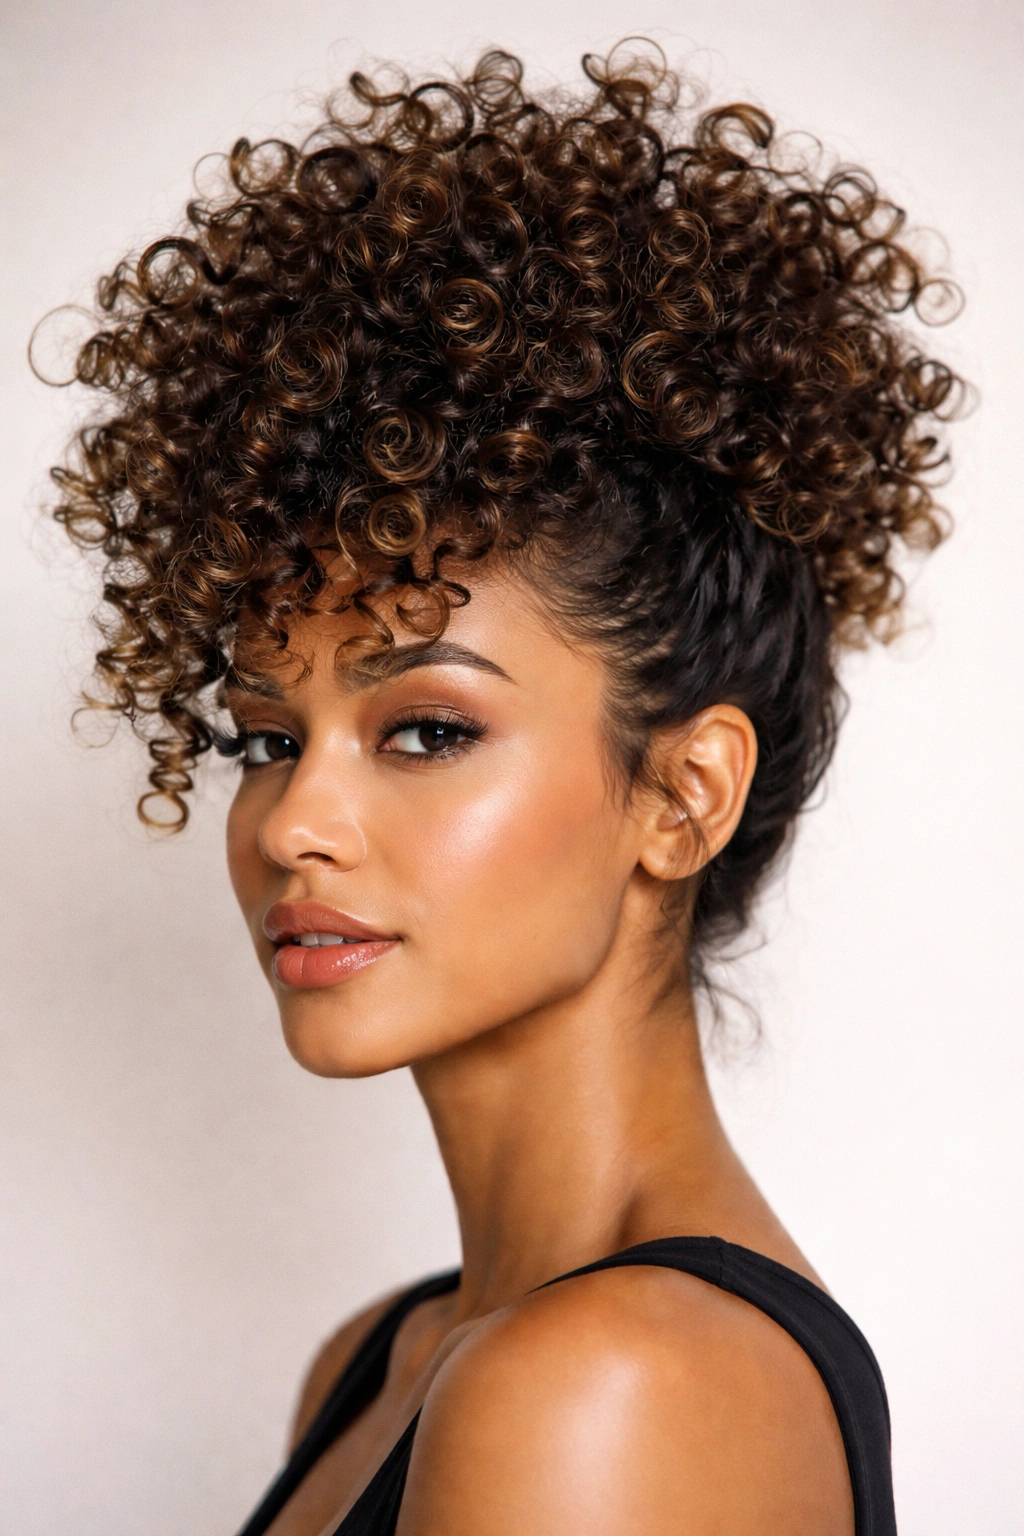
This style is about creating height and dimension at the crown by stacking your curls in a specific way, rather than pulling them back and down into a flat surface. It’s elegant, textured, and completely curly-hair-forward.
Creating the Stacked Effect
Start with curls that have good definition and hold. You can use your regular styling routine—leave-in conditioner, curl cream, gel, whatever your curls respond to best. The difference is that instead of smoothing anything or brushing anything out, you’re enhancing the curl pattern and directing where you want curls to sit.
Use your fingers to gently lift and arrange curls at the crown, encouraging them to fold upward and create height. Some people find it helpful to pin curls in place as they dry to encourage them to set in that upward direction, then release the pins once they’re fully dry. You’re essentially working with your natural curl pattern to create more volume at the crown, which is the opposite of the slicked-back flattened effect.
Why This Creates Impact
- Draws attention upward and flatters the face by creating a fuller appearance at the crown
- Shows off curl definition by making curls the main visual feature rather than something to downplay
- Lasts longer than you’d expect because you’re working with your curl pattern, not against it
- Adapts to different occasions — can look sporty and casual or polished and intentional depending on overall styling
- Works on curls of all lengths and curl types, from loose waves to tight coils
Worth knowing: The drier your curls are when you style them this way, the longer the effect will last. Fully dry curls hold their pattern better than damp curls for this particular technique.
6. Curly Lob With Tousled Texture
A lob (long bob) cut for curly hair should be shaped to complement your curl pattern, which means it’ll have more dimension and movement than a straight-haired lob. The texture is the point—you’re not smoothing it or straightening it into submission.
What Makes a Curly Lob Different
A good curly lob is cut in layers that encourage your natural curl pattern to spring up and create shape. It usually hits somewhere between the shoulders and mid-back, and it’s cut to be fuller around the face and potentially slightly shorter at the back, creating a shape that complements your head and face rather than just hanging straight down.
When you style a curly lob, you’re using your usual curl products and technique—scrunch, diffuse or air-dry, define as needed—but you’re not flat-ironing sections or smoothing the hair back. The result is a cut that looks intentional and shaped, not just “long curly hair,” and the texture is clearly visible as part of the aesthetic.
The Benefits of a Shaped Curly Lob
- Creates dimension and movement without requiring you to style your hair differently than you already do
- Flatters more face shapes than a simple straight-across long style because the layers create angles
- Sits better on the shoulders and stays shaped longer because the cut is designed for curl
- Looks polished and intentional while still celebrating your natural texture
- Requires less maintenance than longer straight hair, since you’re not fighting your curl pattern
Pro tip: Layers in a curly lob can be cut to follow your curl pattern rather than fighting against it—this is something to discuss explicitly with a curly-hair-specialist stylist.
7. Twisted Knots Updo
This is a creative updo that sits somewhere between casual and formal, and it’s built entirely from twists and loose knots of curly hair rather than smooth, slicked sections. It’s textured, dimensional, and unique.
How to Build Twisted Knots
Section off a portion of hair and gently twist it—not tightly, but loosely enough that your curl pattern is still visible within the twist. Wrap that twist into a loose knot at the back of your head and secure with bobby pins. Repeat with another section, slightly overlapping with the first knot. Continue until you’ve incorporated the amount of hair you want into the updo.
Leave some curls completely loose around the face and nape to soften the look and ensure it doesn’t read as too formal or severe. The individual twists and knots create a beautiful texture pattern when viewed from behind or above, and from the front, you get loose face-framing curls.
Why This Works as a Polished Updo
- Completely texture-forward — the twists and knots showcase your curl pattern rather than hiding it
- More interesting to look at than a simple bun because of the dimensional knot pattern
- Flexible in formality — can be dressed up for events or dressed down for everyday wear
- Stays put because twisted sections naturally have more grip than smooth sections
- No smoothing products required on the scalp, keeping your curls light and bouncy
Insider note: Dampening each section slightly before twisting helps it hold better, and you can add a small amount of curl cream to the twist sections if you want extra hold without flattening your roots.
8. Curly Braided Crown
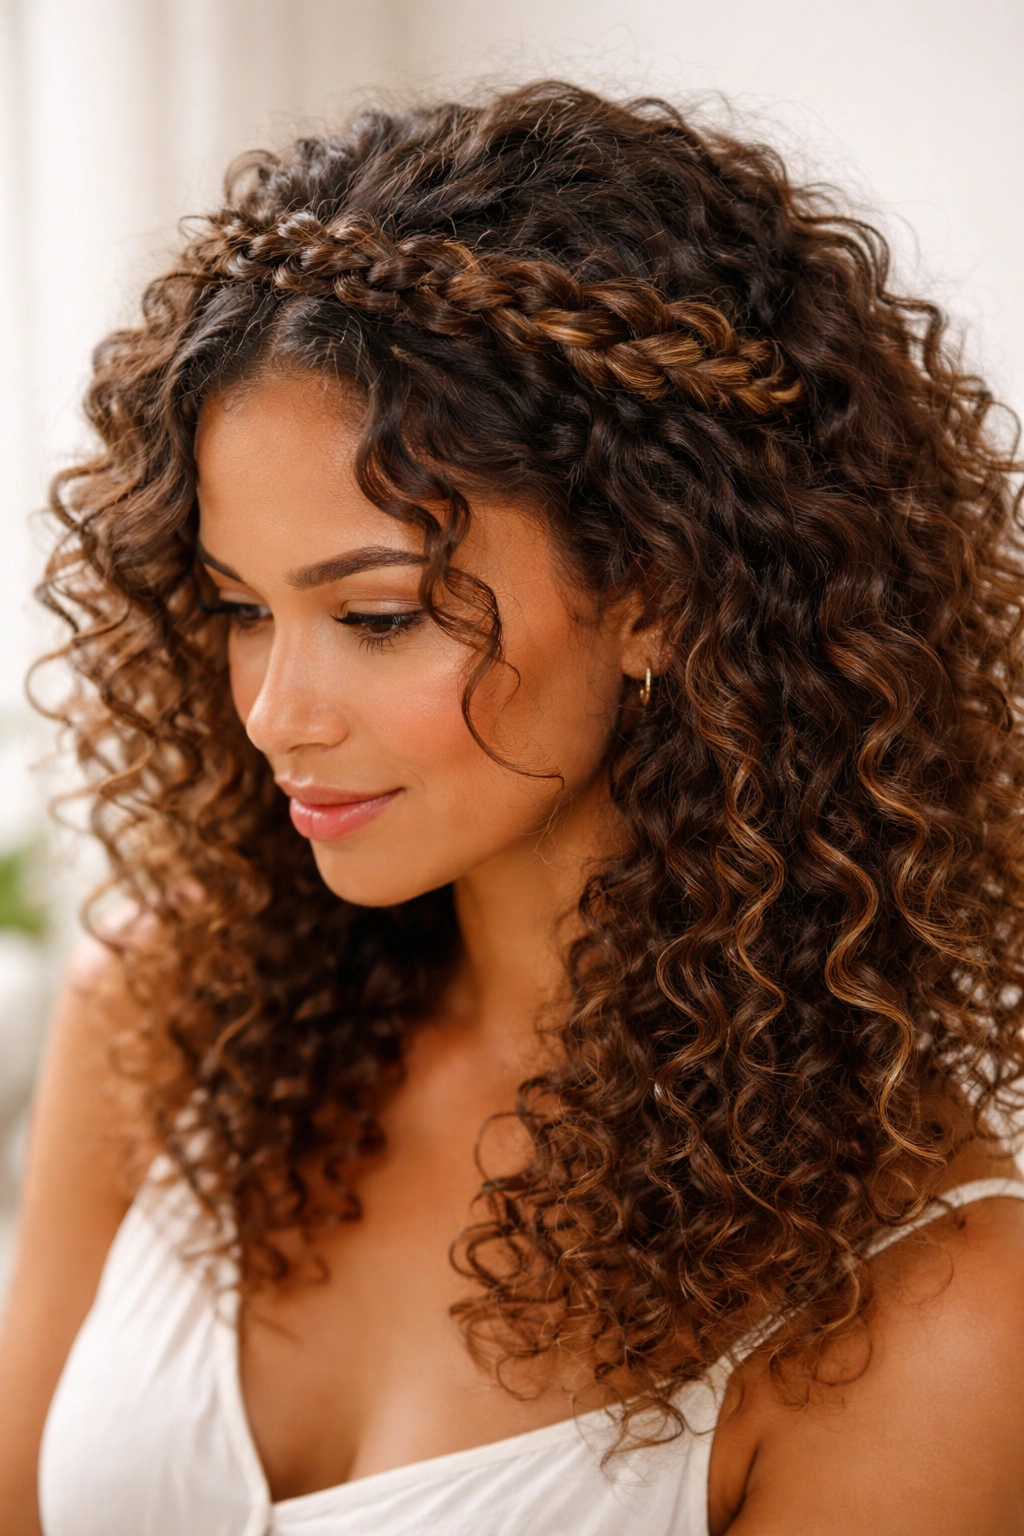
A braid that runs across the crown or wraps around the back of the head can frame curls beautifully without requiring you to slick anything back. The braid becomes a design feature, and the loose curls surrounding it are the main event.
Creating a Curly-Friendly Braid
This works best with a loose braid—either a three-strand braid done loosely or a more textured, loose braiding technique that allows your natural curls to puff out between the strands. Start at one temple, braid loosely across the back of the head, and secure at the opposite temple or let it flow into the rest of your curls.
The key is not pulling too tightly, which would flatten your curls and defeat the purpose. A loose braid holds better on curly hair anyway because the texture naturally grips the strands. You can braid just a thin section for a delicate effect or incorporate more hair for a bolder statement.
The Appeal of a Braided Crown
- Frames the face beautifully without pulling hair back into a severe slicked style
- The braid is a design feature, not an afterthought—it becomes an integral part of the look
- Works on curls at any stage — freshly styled curls, second-day curls, or even slightly damp curls
- Functional and beautiful — keeps some hair back while letting the bulk of your curls fall freely
- Reads as intentional and polished even when done loosely and casually
Worth knowing: Curly hair has more grip than straight hair, so you can braid more loosely than you might think and the braid will still hold throughout the day.
Final Thoughts
Curly hair doesn’t need to be slicked, smoothed, or flattened to be styled. Every style here proves that texture, definition, and intentional curls can be both beautiful and polished. The styles that work best for your hair depend on your curl type, your lifestyle, and what feels good on your head—but the overarching principle is the same: you’re working with your curls, not against them.
When you stop fighting your natural texture and start styling in ways that enhance it, something shifts. Your curls last longer in a style because you’re not working against the curl pattern. Your hair feels lighter and healthier because you’re not using heavy products to flatten the scalp. And most importantly, you’ll probably like how you look in the mirror—confident in your curls rather than wishing they were something else.
The next time someone suggests a slicked-back style, you now have eight textured alternatives that are equally polished, significantly more interesting, and infinitely more true to who you are.