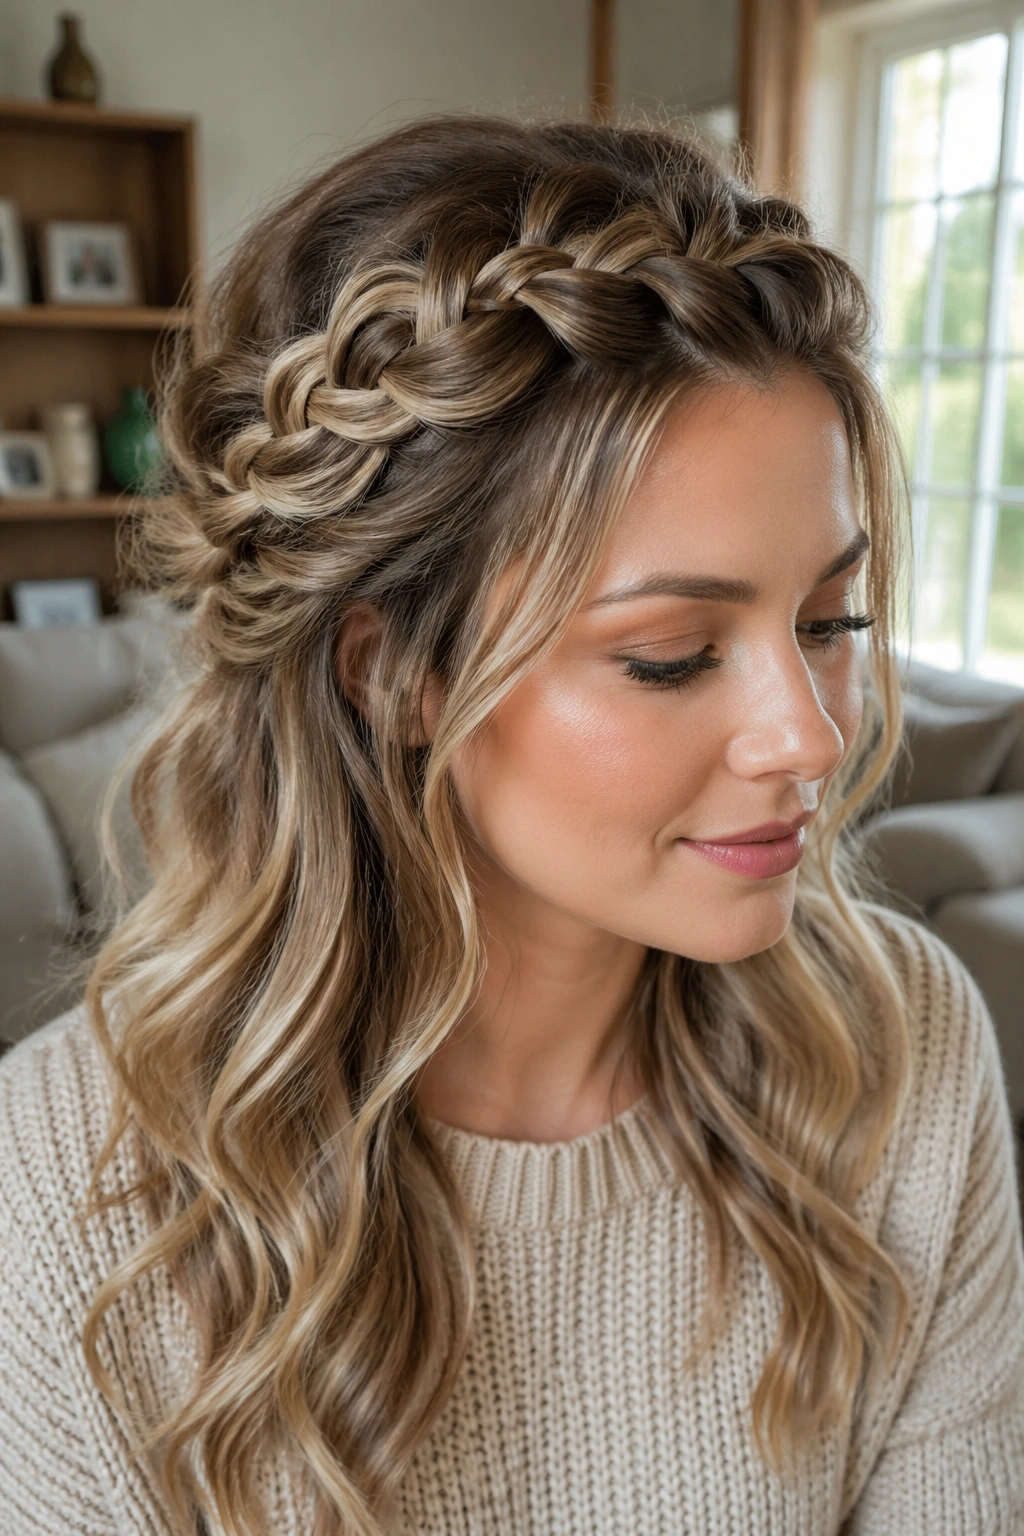
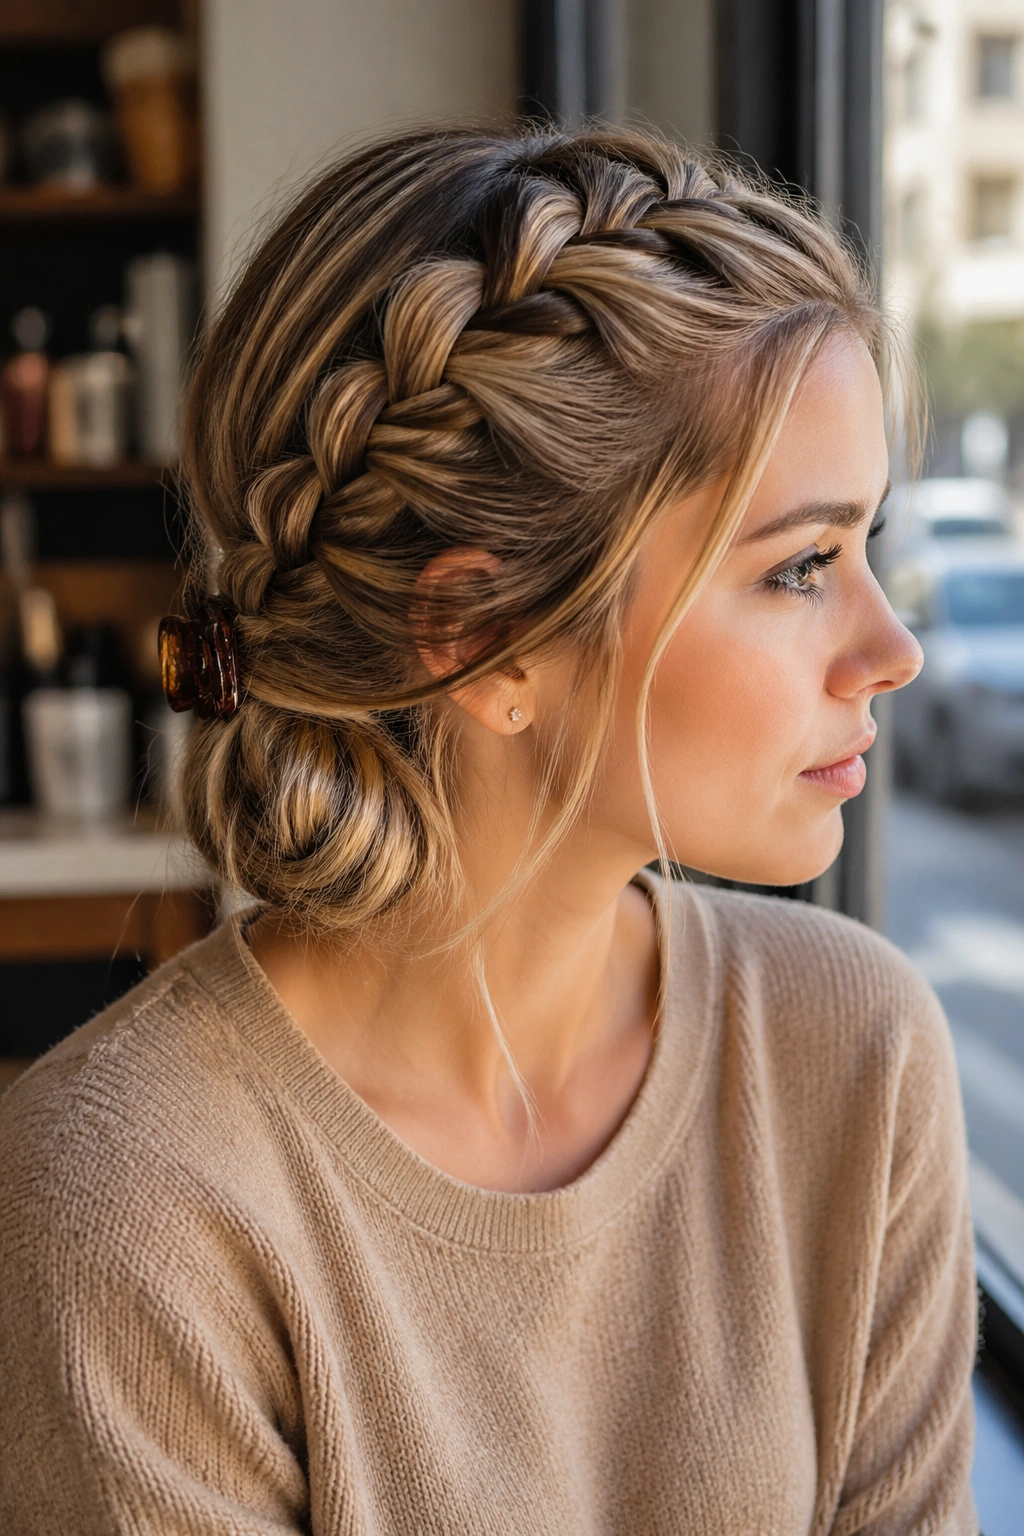
Limp hair has a habit of giving up early. You smooth it, you fluff it, you tilt your head like that helps, and then it falls back to the scalp an hour later as if nothing happened.
Half-up Dutch braids are one of the few styles that actually change that story. They do not just decorate the hair; they build a little architecture at the crown. Because the braid crosses under instead of over, it sits raised on the head, which means the roots look lifted even when the rest of the hair is being stubborn.
That raised line matters more than people think. A little grit at the roots, a clean part, and a braid that starts with tension but finishes soft can make fine hair look fuller and second-day hair look intentional. Too much polish flattens everything. Too much looseness and the braid loses its shape. The sweet spot is somewhere in the middle, and that is where Dutch braids shine.
Some of these styles are sleek, some are messy, some lean romantic, and a few are the kind you wear when you need your hair out of your face before coffee. Start with the one that fits your hair length and texture. The rest can wait.
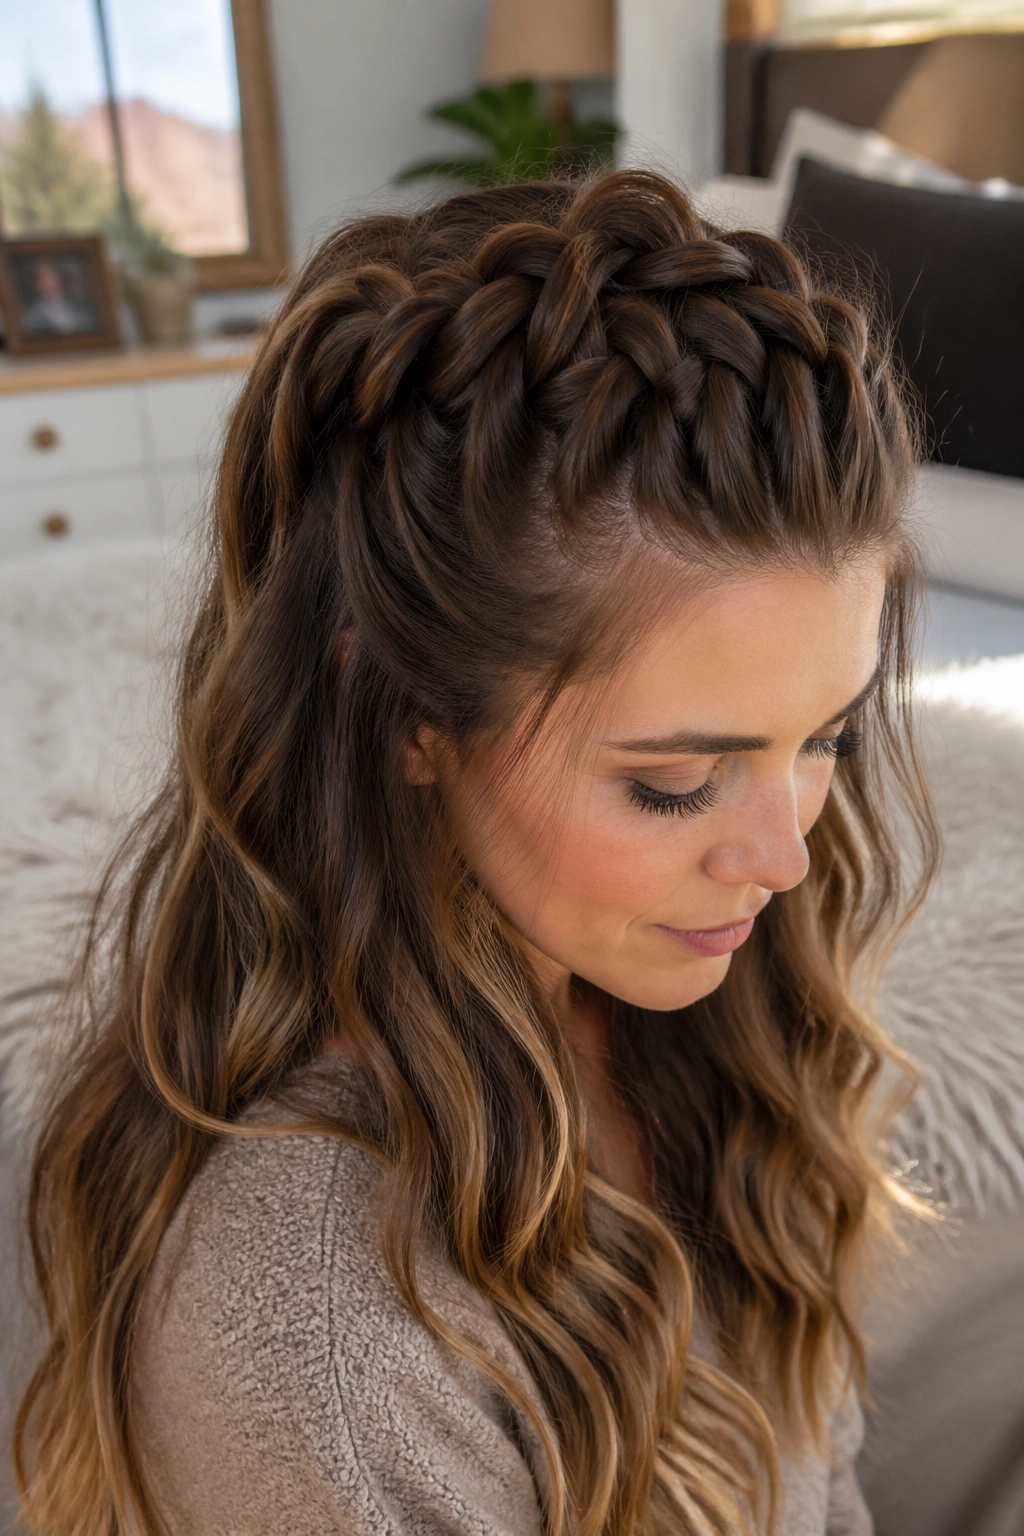
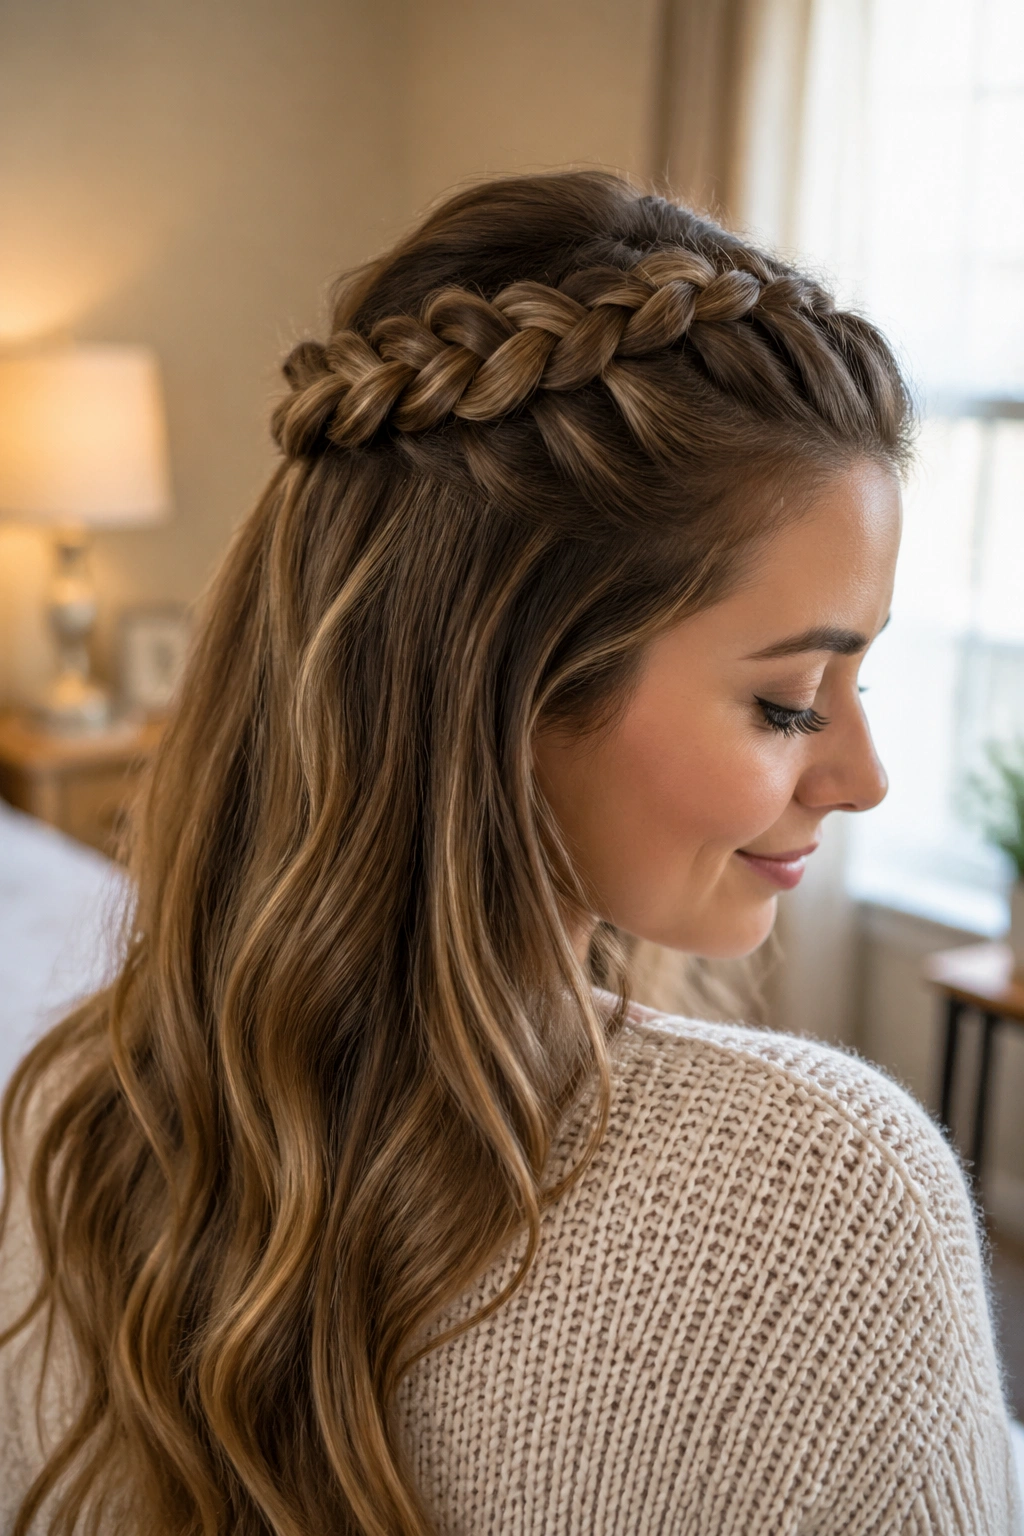
1. Classic Half-Up Dutch Crown Braid
The classic crown braid is the style I reach for when I want lift without overthinking it. It starts at one temple, curves across the back of the head, and lands on the other side like a raised band that makes the whole top half look fuller.
Why It Lifts the Roots
The trick is in the sectioning. Keep the top panel about 2 inches deep, braid with even tension, and let the braid sit just above the crown instead of hugging the scalp too tightly. That little bit of height makes limp hair look like it has structure.
- Best on day-two hair or hair with a mist of dry shampoo
- Use 1.5-inch sections at the front for a neat line
- Secure the end with two bobby pins crossed in an X
Tip: Gently pancake the outer edges after you pin it. Not the whole braid. Just the sides. That tiny move gives the braid a wider, thicker look.
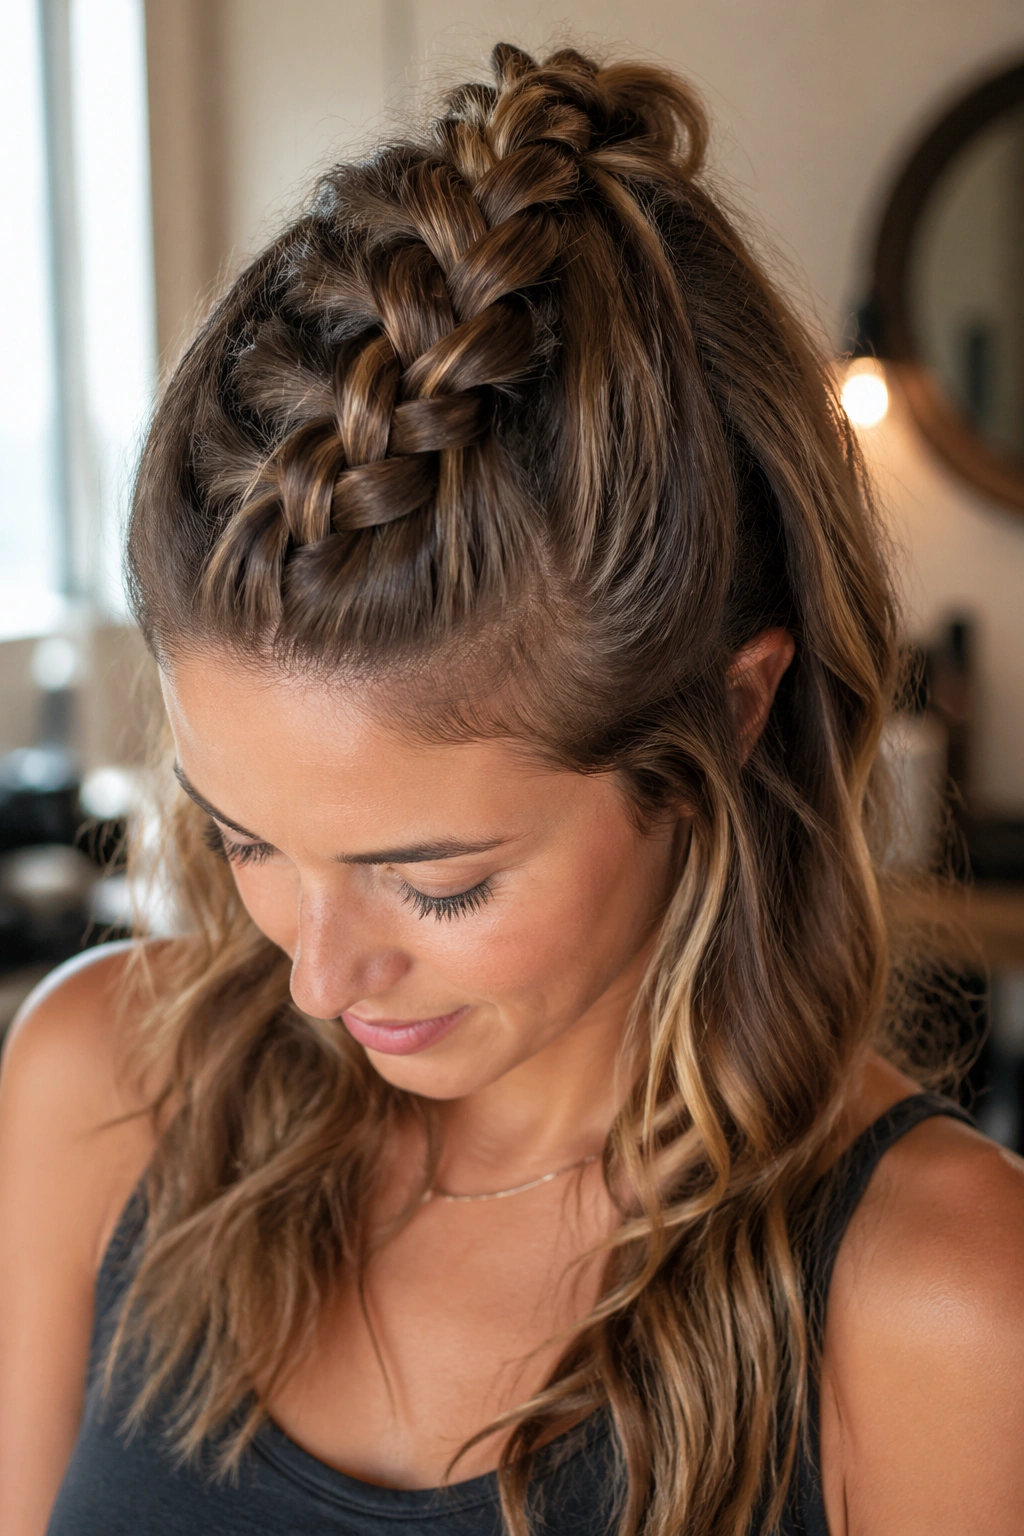
2. Sleek Center Dutch Braid Ponytail Lift
A center Dutch braid leading into a half ponytail is one of the fastest ways to fake fuller hair. The braid gives the top a spine, and the ponytail keeps the ends lively instead of dragging everything downward.
The clean middle part is what makes this version work on flat hair. A rat-tail comb helps here, and a pea-sized amount of styling cream on the sides keeps flyaways from puffing out at the temples. The braid should run from the hairline to the midpoint of the head, then stop and blend into a small pony.
Use this when the top looks lifeless but the ends still have some swing. If the hair is extra slippery, mist the crown with texturizing spray before you braid. That tiny bit of grit makes a bigger difference than people expect.
3. Loose Dutch Braid Halo With Waves
Why does a loose halo braid make limp hair look fuller? Because it frames the face and gives the eye something raised to follow, which is half the battle when the rest of the hair lies flat.
A loose halo sits softer than a tight crown braid. The braid starts near one temple, travels around the head, and leaves the lower lengths in waves or a soft bend. If the hair is shoulder-length, this version looks especially nice because the braid and the loose ends balance each other instead of fighting for attention.
How to Wear It
Keep the braid a little wider than you think it needs to be. A 1-inch section from the hairline is enough for the front, then let the braid open up as it moves back. Pin it underneath the opposite side so the ends disappear.
The best part is that this style does not need absolute perfection. A few loose pieces around the face help it look softer, and softer often reads as fuller.
4. Twin Skinny Dutch Braids Into a Half Knot
When the top layer feels too sparse for one big braid, two skinny Dutch braids do the job better. They create width without asking the hair to behave like it has more density than it does.
I like this look on hair that is flat at the sides but still has some life through the lengths. Each braid starts at the temple, follows a slight diagonal, and meets at the back where you tie them together into a small half knot. That knot gives the style a little lift at the exact place where limp hair usually collapses.
- Keep each braid no wider than your thumb
- Tie the knot with a small clear elastic first
- Pin the knot from underneath so it does not tip forward
A tiny knot is less fussy than a full bun. And on fine hair, less bulk at the back often looks better.
5. Pancaked Dutch Braid for Fine Hair
Fine hair needs a braid that plays bigger than the actual strand count. Pancaking does that, and it does it without heat or teasing that can make the roots feel rough.
The braid itself should be normal and even at first. Once it is secured, gently pull the outer loops of each section outward with the pads of your fingers. Not hard. Just enough to widen the braid so it looks fuller from the side. That widening effect is what makes this style feel almost custom-made for limp hair.
The other thing that helps is starting with hair that is not freshly washed. Day-one hair can be too silky. Day-two hair has more bite, and a light dusting of dry shampoo at the roots gives the braid something to grab. The result looks thicker, not crunchy. That’s the goal.
6. Side-Swept Dutch Braid Into a Clip
Unlike a centered braid, a side-swept half-up braid puts the weight where hair usually needs it most: right at one side of the crown. That creates lift without making the whole head look too done.
This style works especially well with a deep side part. Braid from the heavier side toward the back, then gather the tail and clip it under the opposite side with a medium barrette or a slim jaw clip. The loose side keeps moving, which makes the braid feel softer and more wearable.
It suits hair that falls flat around the temples. A side-swept line can make the front look less narrow, which is handy if your hair naturally separates too much at the part. Use a clip that grips, not one that just sits there and slides off after lunch. Small difference. Big annoyance.
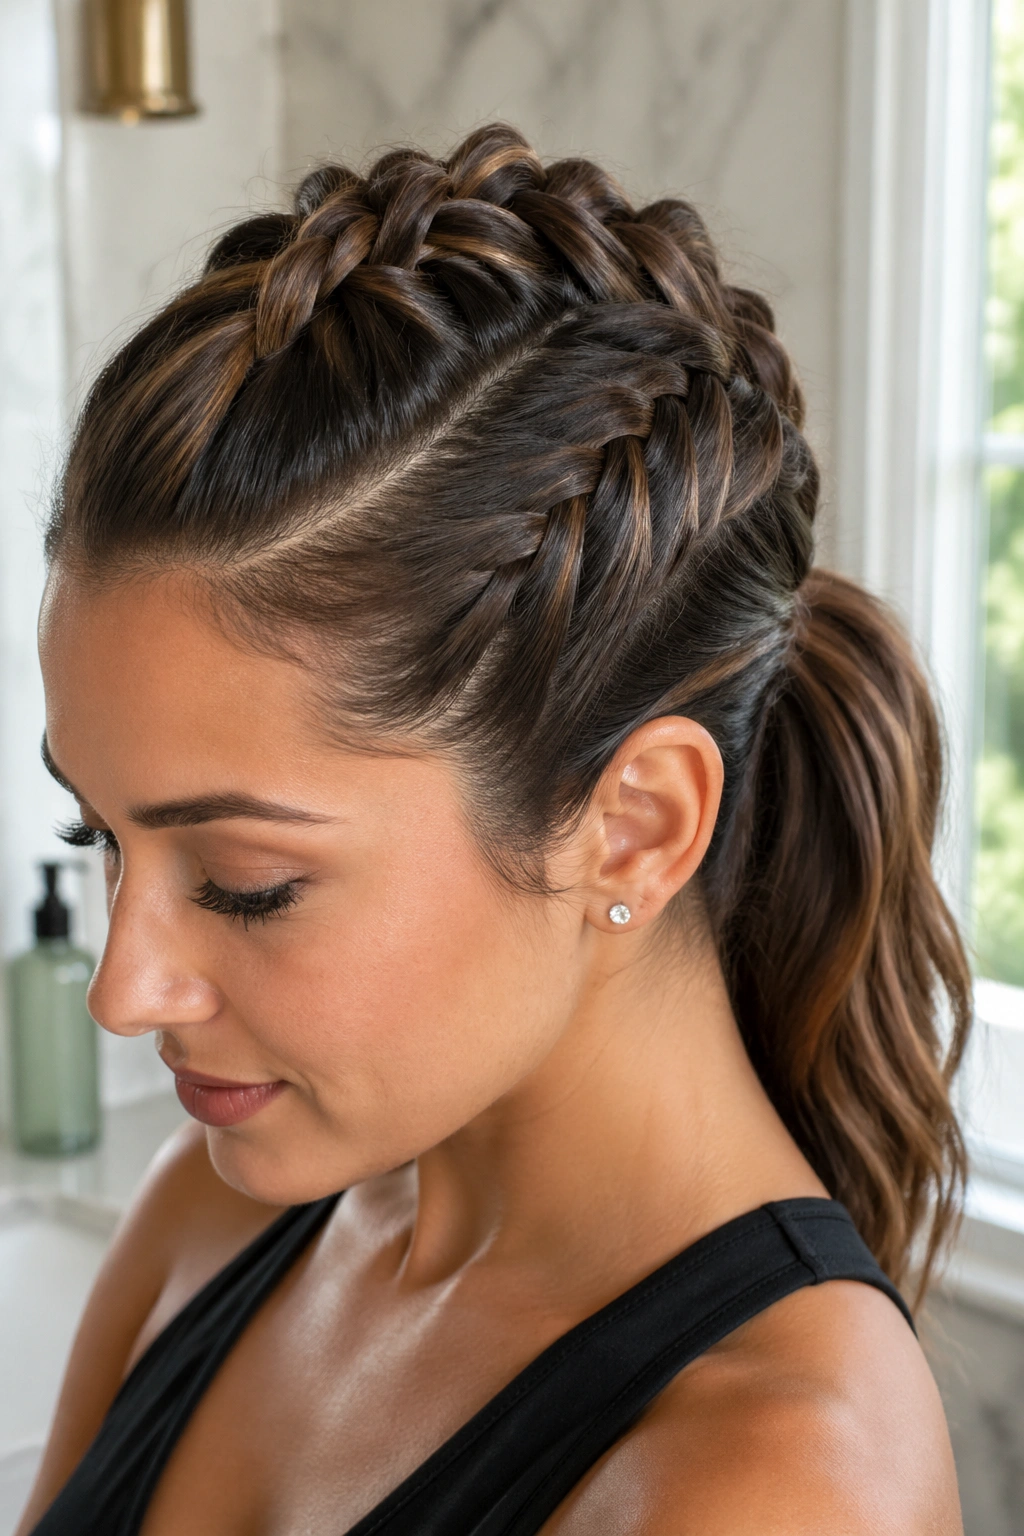
7. Mohawk Half-Up Dutch Braid
This one is for days when the crown needs to look taller, not just neater. A central Dutch braid running from the forehead toward the back creates a mohawk line that lifts straight up through the middle of limp hair.
Why It Works on Flat Roots
The braid pulls the top sections inward from both sides, which gives the center a little height. That means the style builds shape right where fine hair usually collapses first. It’s also a strong choice for layered hair because the braid gathers short pieces instead of letting them separate and frizz out.
- Backcomb the crown lightly before braiding
- Start with a section about 2 inches wide
- Finish with a small elastic and hide it under the braid tail
Best tip: Keep the braid snug at the front and a touch looser as it moves back. That creates height without making your scalp feel tight.
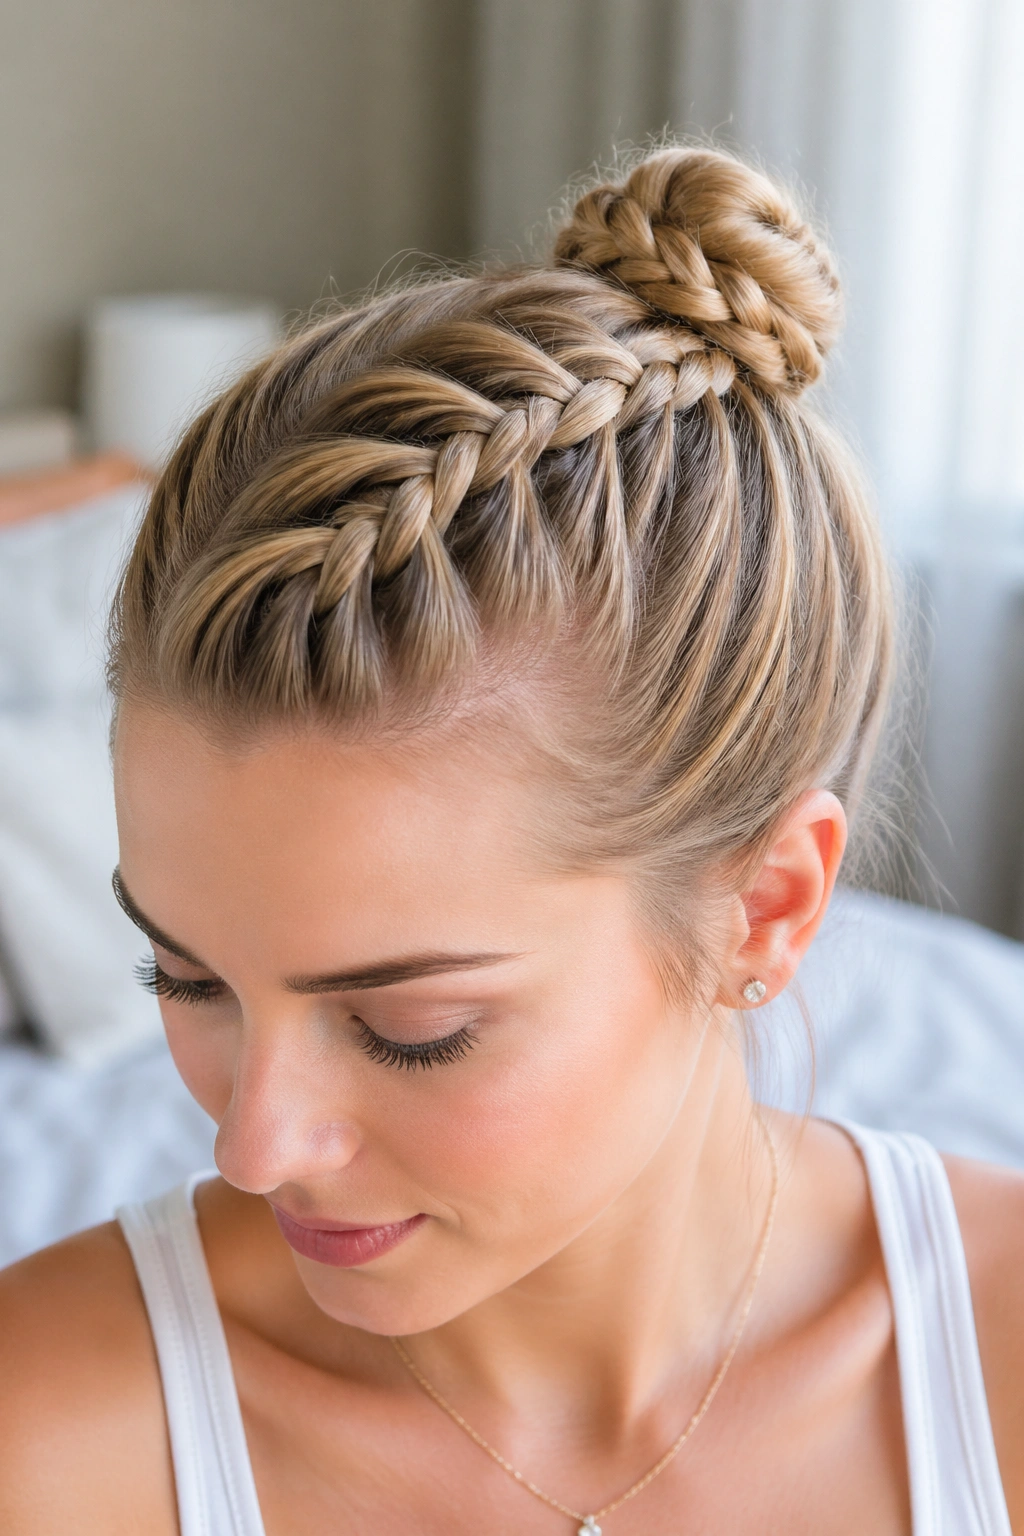
8. Dutch Braid Wrapped Into a Mini Bun
A tiny bun at the back can make limp hair look denser than a long hanging braid. It sounds backward, but it works because the eye reads the bun as a finished shape instead of a half-finished style.
The braid starts at the front or slightly off-center, travels to the crown, and then gets twisted into a small coil. Pin it flat and tuck the ends under the bun so nothing sticks out. The bun should sit high enough to lift the silhouette, but not so high that it looks like a topknot that gave up halfway through.
This is a nice pick for straight hair that drops easily. The bun gives the style a point of focus, so the hair does not have to rely on length for impact. A few loose front pieces keep it from feeling stiff.
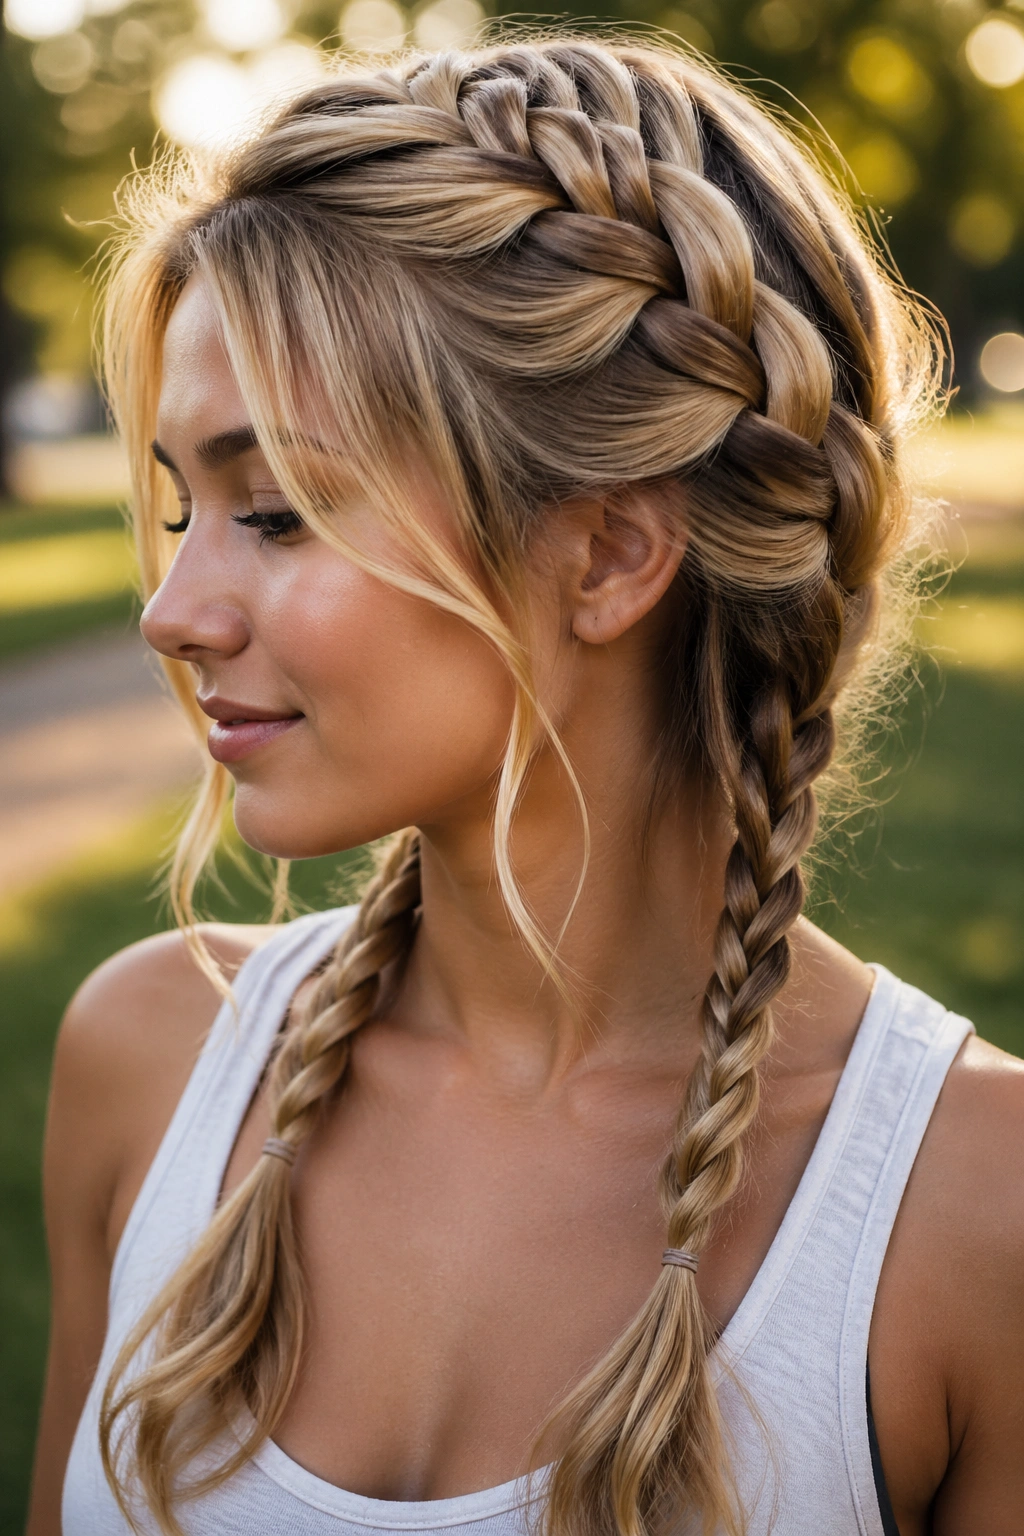
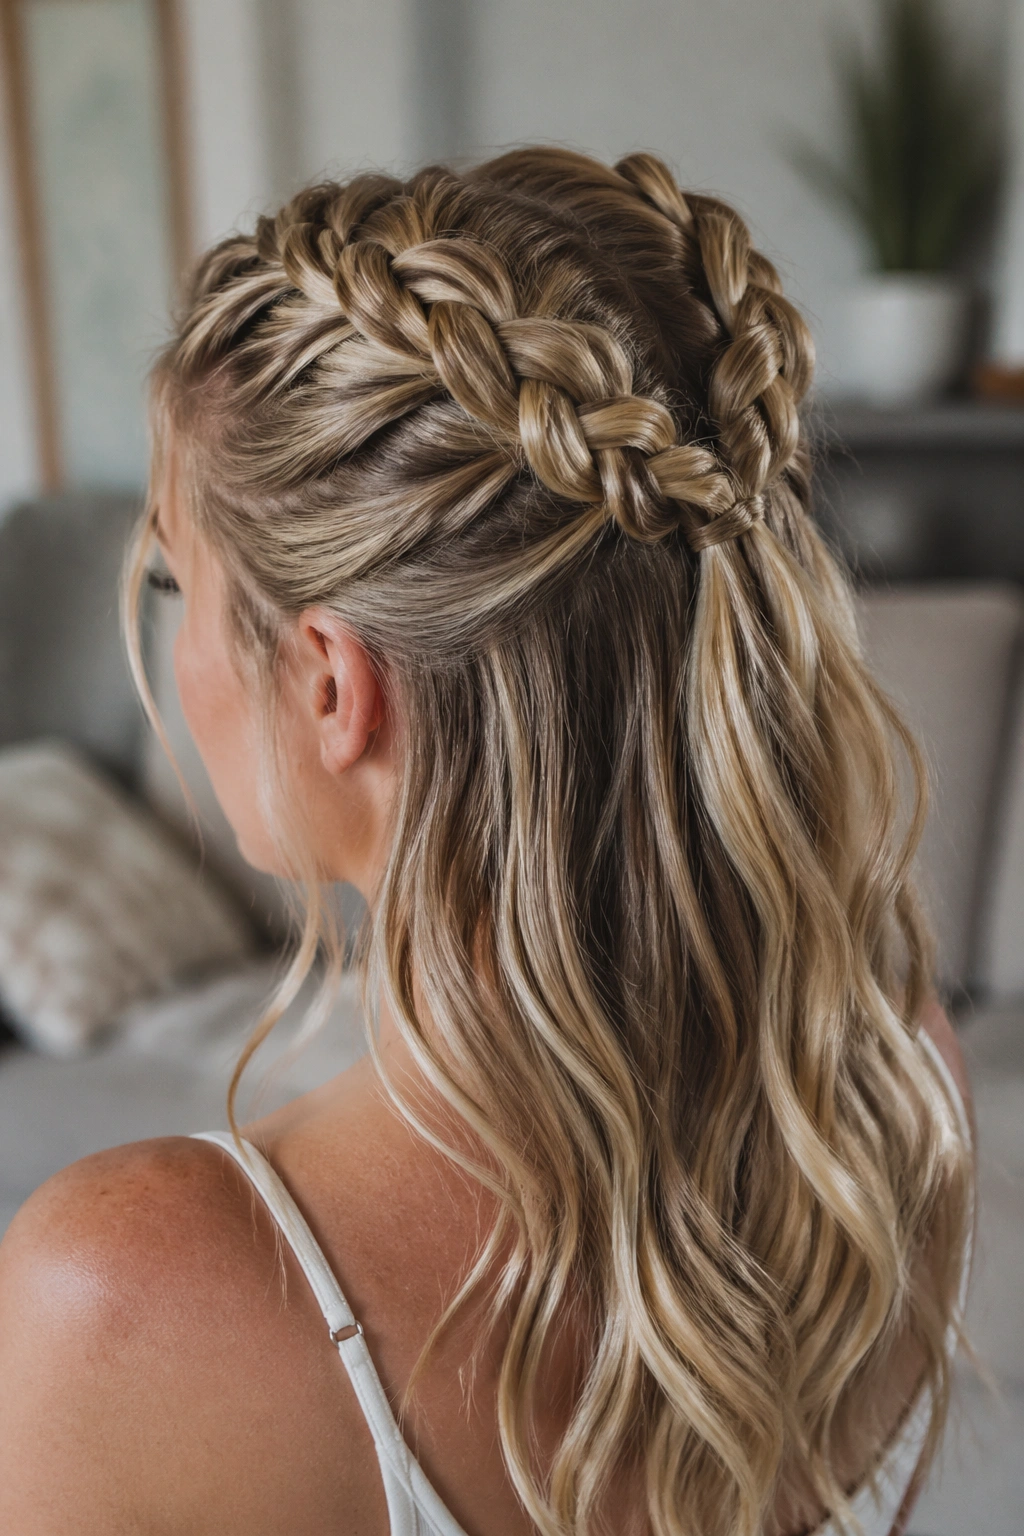
9. Double Dutch Braids Meeting at the Back
What if the lift you want needs to come from both sides? Double Dutch braids solve that neatly. They create structure at the temples, which is exactly where limp hair often starts to look thin.
How to Use It
Part the hair down the middle, then Dutch braid each side from the hairline back toward the crown. Meet the two braids at the back and tie them together with a clear elastic. The join should sit high enough to read as half-up, not low enough to feel like a school-day style unless that is the mood you want.
The strength of this look is balance. If one side tends to fall flatter, this style evens that out fast. It also works well with straight or barely wavy hair because the two braids create visible texture without needing curls.
A little tug at the outer edges makes both braids look broader. Don’t overdo it. You want width, not fuzz.
10. Dutch Braid Headband Across the Hairline

If the front pieces fall in your eyes by noon, braid the problem into place. A Dutch braid headband keeps the hairline neat and gives the crown a lifted edge at the same time.
This version starts near one temple, hugs the hairline, and stops near the other temple, where you pin it under a layer of hair. The rest stays loose, which keeps the style from feeling heavy. On limp hair, that separation helps a lot because the braid acts like a little built-in band instead of making the whole head feel pulled back.
- Use a fine-tooth comb for the front section
- Aim for a braid that is about 1 inch wide
- Pin the end under a top layer, not on top of it
The result looks clean around the face and fuller through the crown. That’s a good trade.
11. Ribbon-Woven Dutch Braid Accent
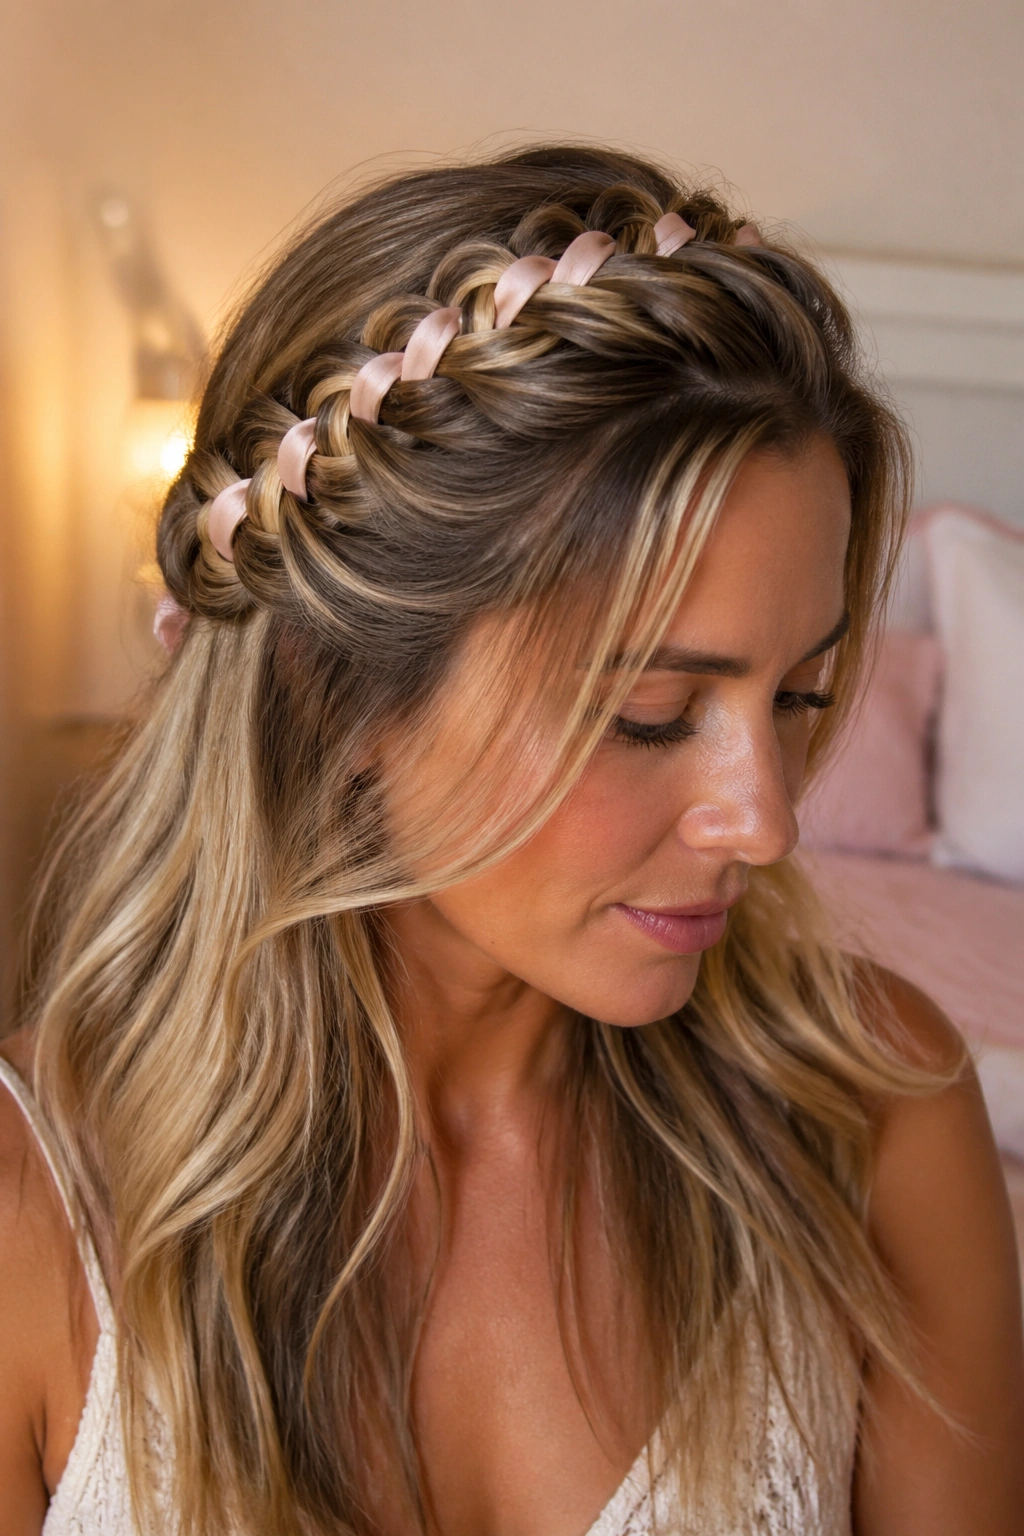
A narrow ribbon woven through a half-up Dutch braid changes the whole shape of the style. The braid looks wider, the sectioning reads more clearly, and limp hair suddenly feels styled instead of merely controlled.
Choose a ribbon that is about 1/4 inch wide so it does not overwhelm the braid. Satin gives a smooth finish; grosgrain holds its place better. Feed it into one of the outer sections at the start, then keep it running through the braid as you cross under. The color peeking through breaks up the thinness of the strands, which helps a braid on fine hair look more substantial.
This is a smart choice for simple outfits. A black ribbon on dark hair feels polished. A pale ribbon on light brown hair gives a softer contrast. Keep the rest of the hair loose and slightly waved so the ribbon has room to show.
12. Half-Up Dutch Braid With Bubble Ends
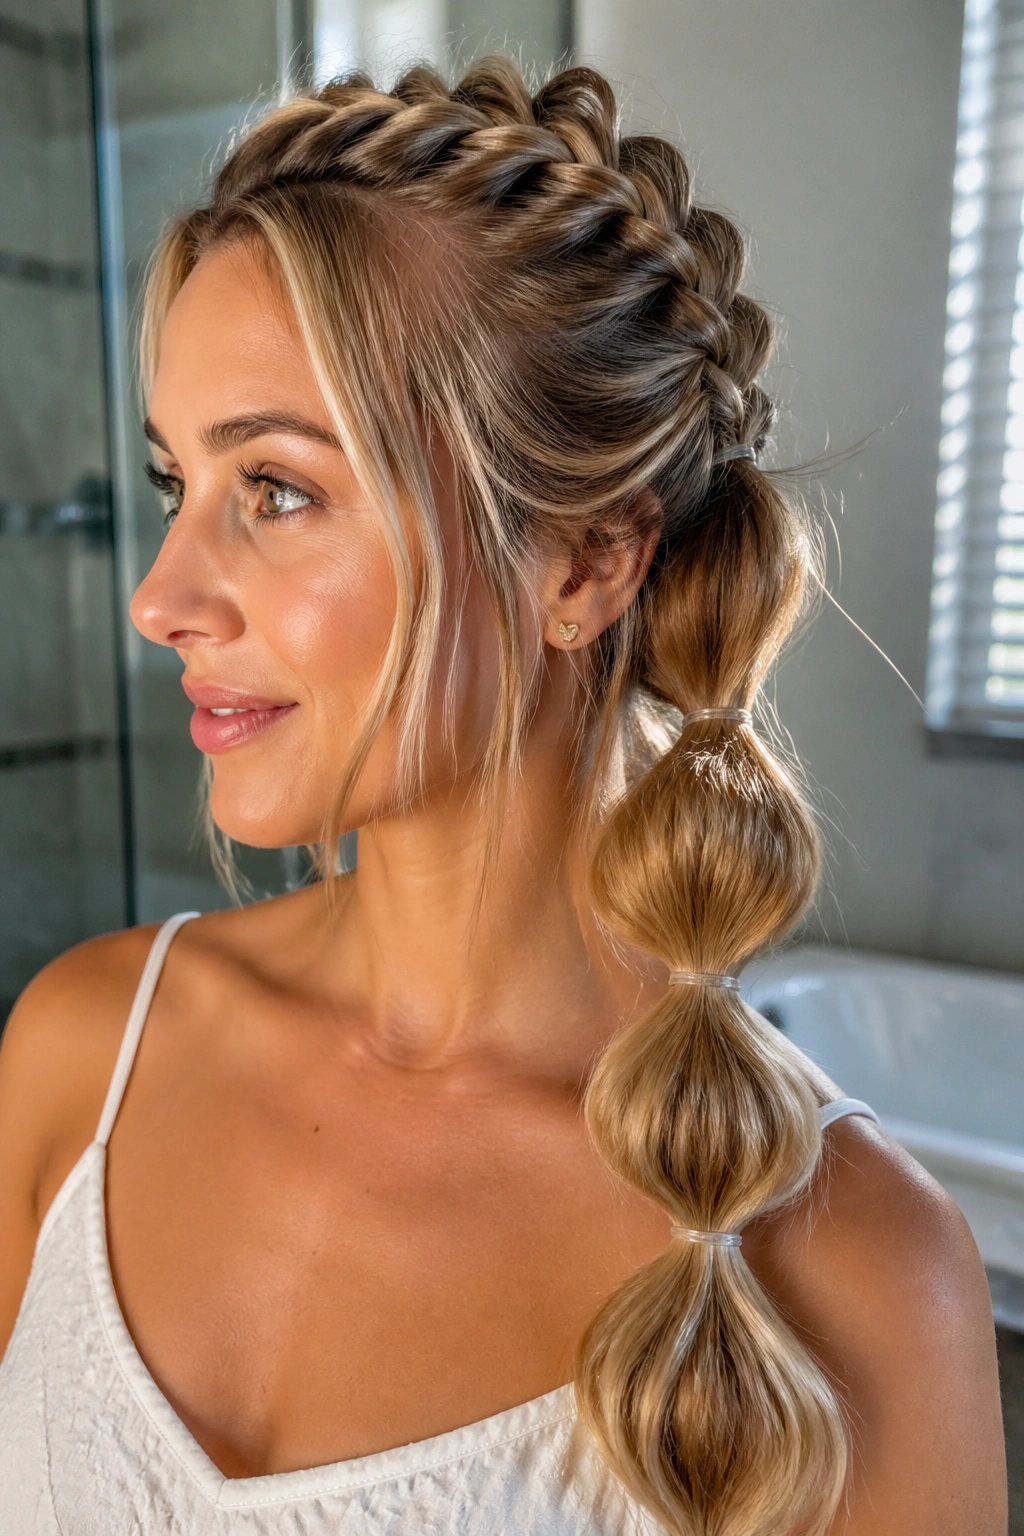
A normal braid tail can disappear on limp hair. Bubble ends fix that by breaking the length into puffy little sections that read as fuller from a distance.
Start with a half-up Dutch braid that runs to the crown or slightly past it. Secure the tail with a small elastic, then add more elastics every 2 to 3 inches down the loose end. Gently pull each section outward until it forms a round bubble. That little inflation gives the eye more shape to read.
Compared with a standard braid, this version feels a bit more playful. It works best when the hair is smooth through the top but slightly textured through the ends. If the hair is very fine, use clear elastics so the bubbles stay the focus, not the hardware.
13. Micro Dutch Braids Across the Crown
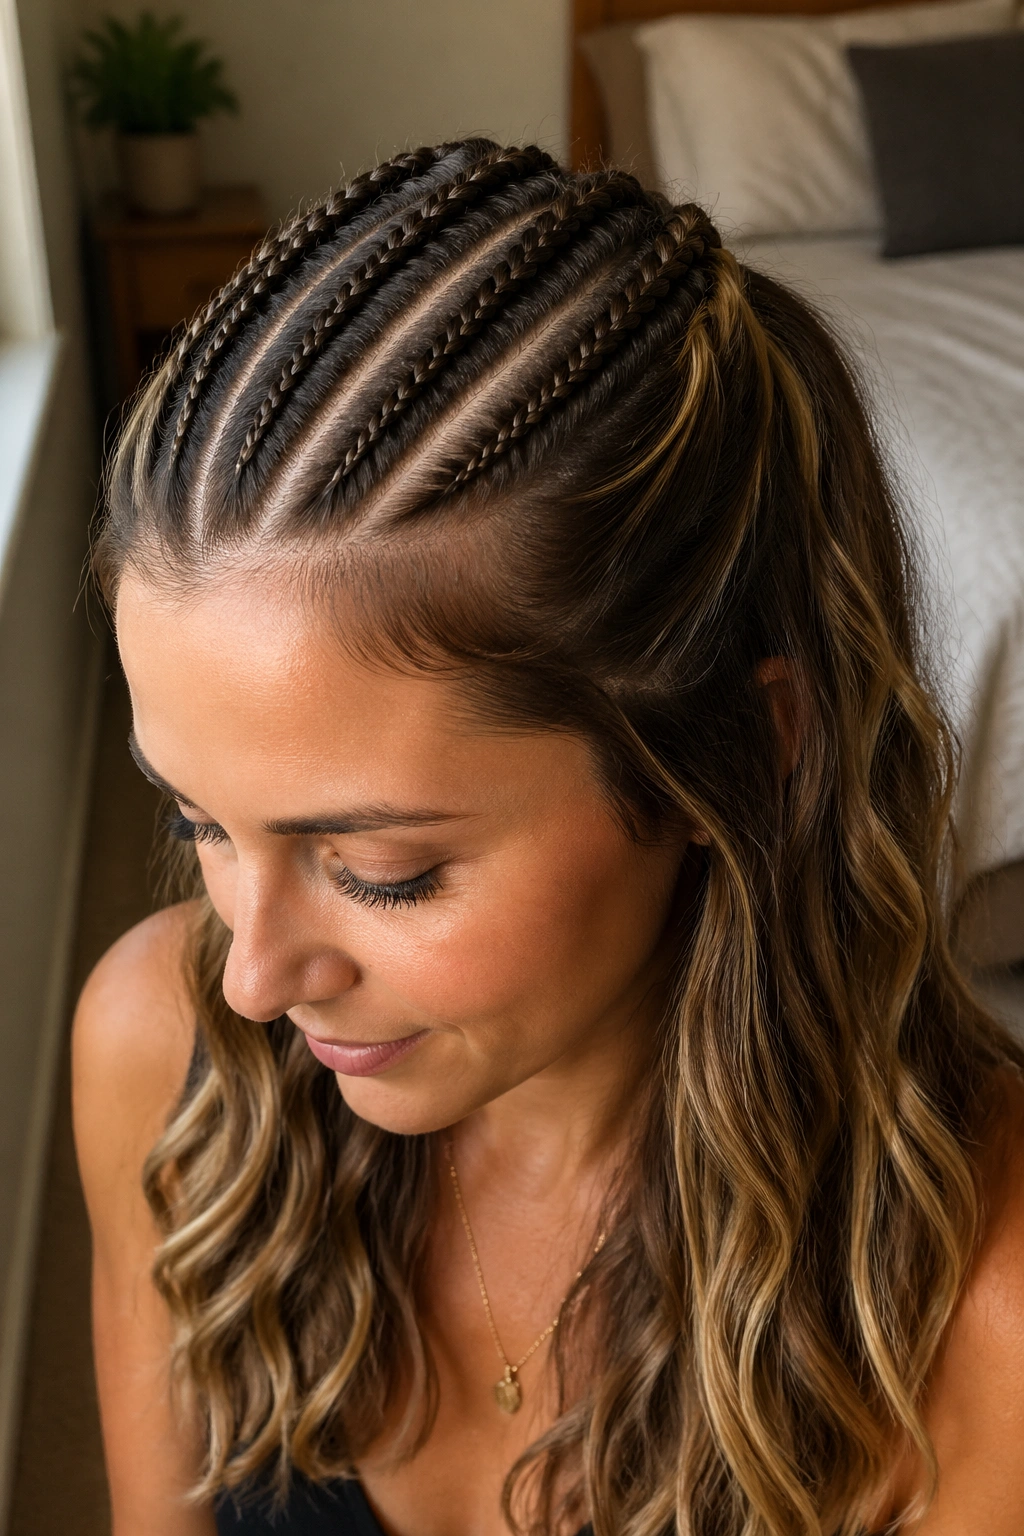
Micro braids are a sneaky way to add lift because they create several narrow ridges instead of one heavy braid. On limp hair, that can be a better visual move than one big central piece.
The Science Behind the Look
Each tiny braid holds its own shape, and when you place three or four of them across the crown, the head starts to look fuller without a lot of bulk. It is a clean option for straight hair, but it works on wavy hair too if the sections are kept neat.
- Section the crown into three or four slim panels
- Keep each braid about 1/2 inch wide
- Pin the ends flat so they disappear under the top layer
Best for: hair that looks thin at the roots but still has enough length to pin securely.
The style is subtle from the front and more interesting from the side, which is part of its charm.
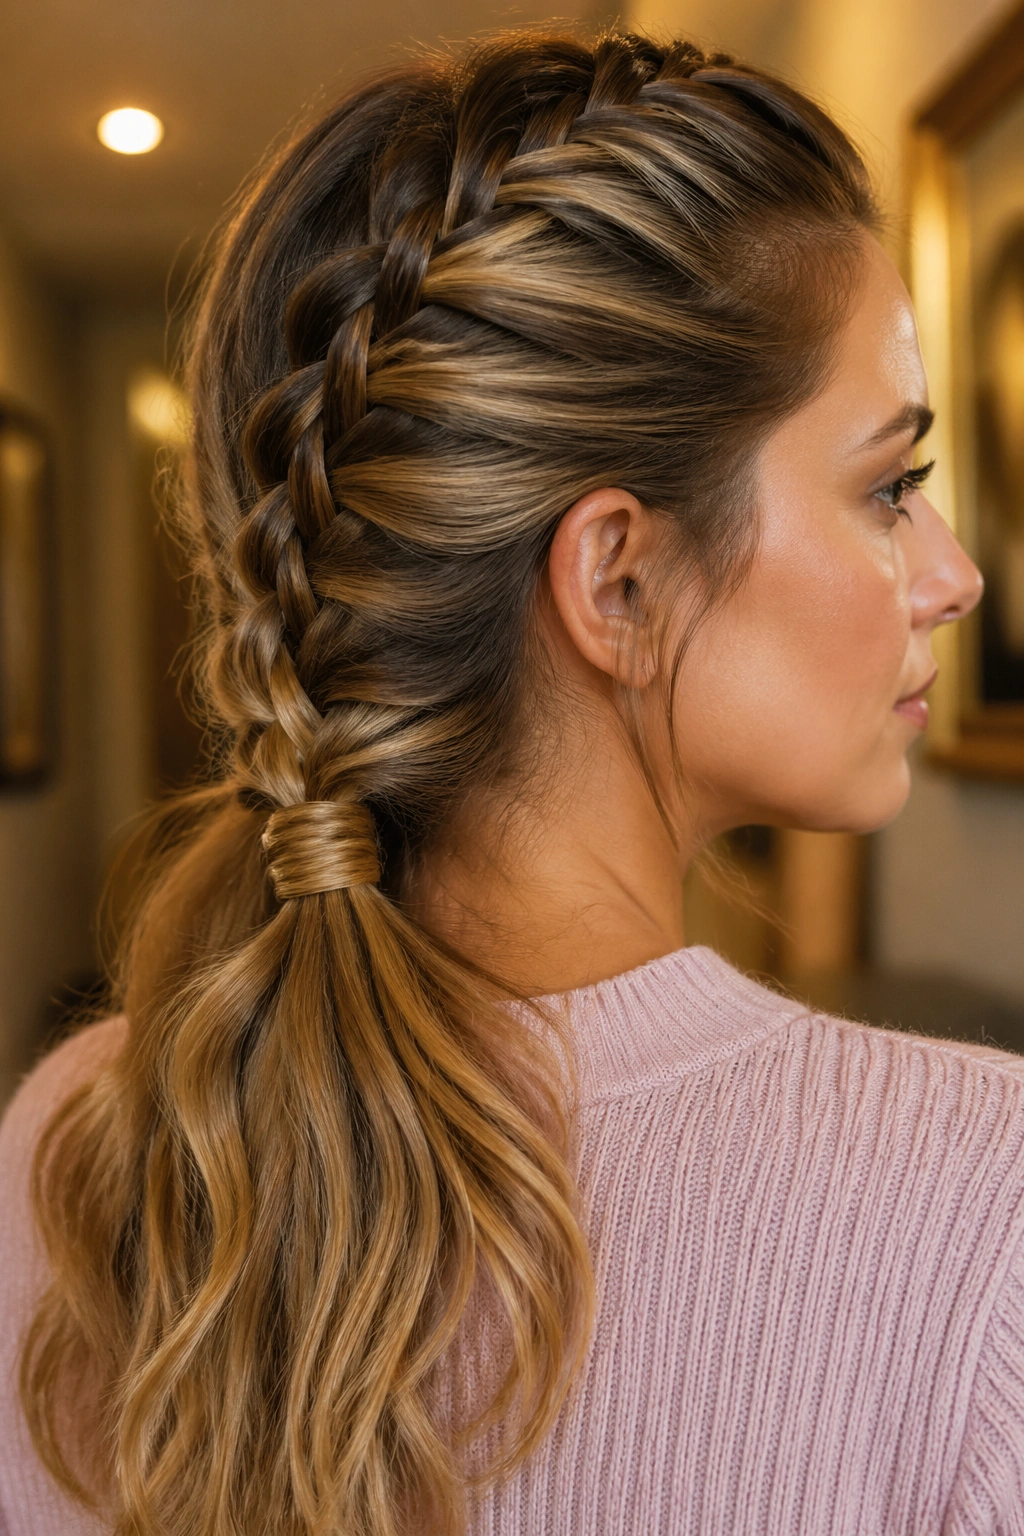
14. Dutch Braid Into a Low Half Pony
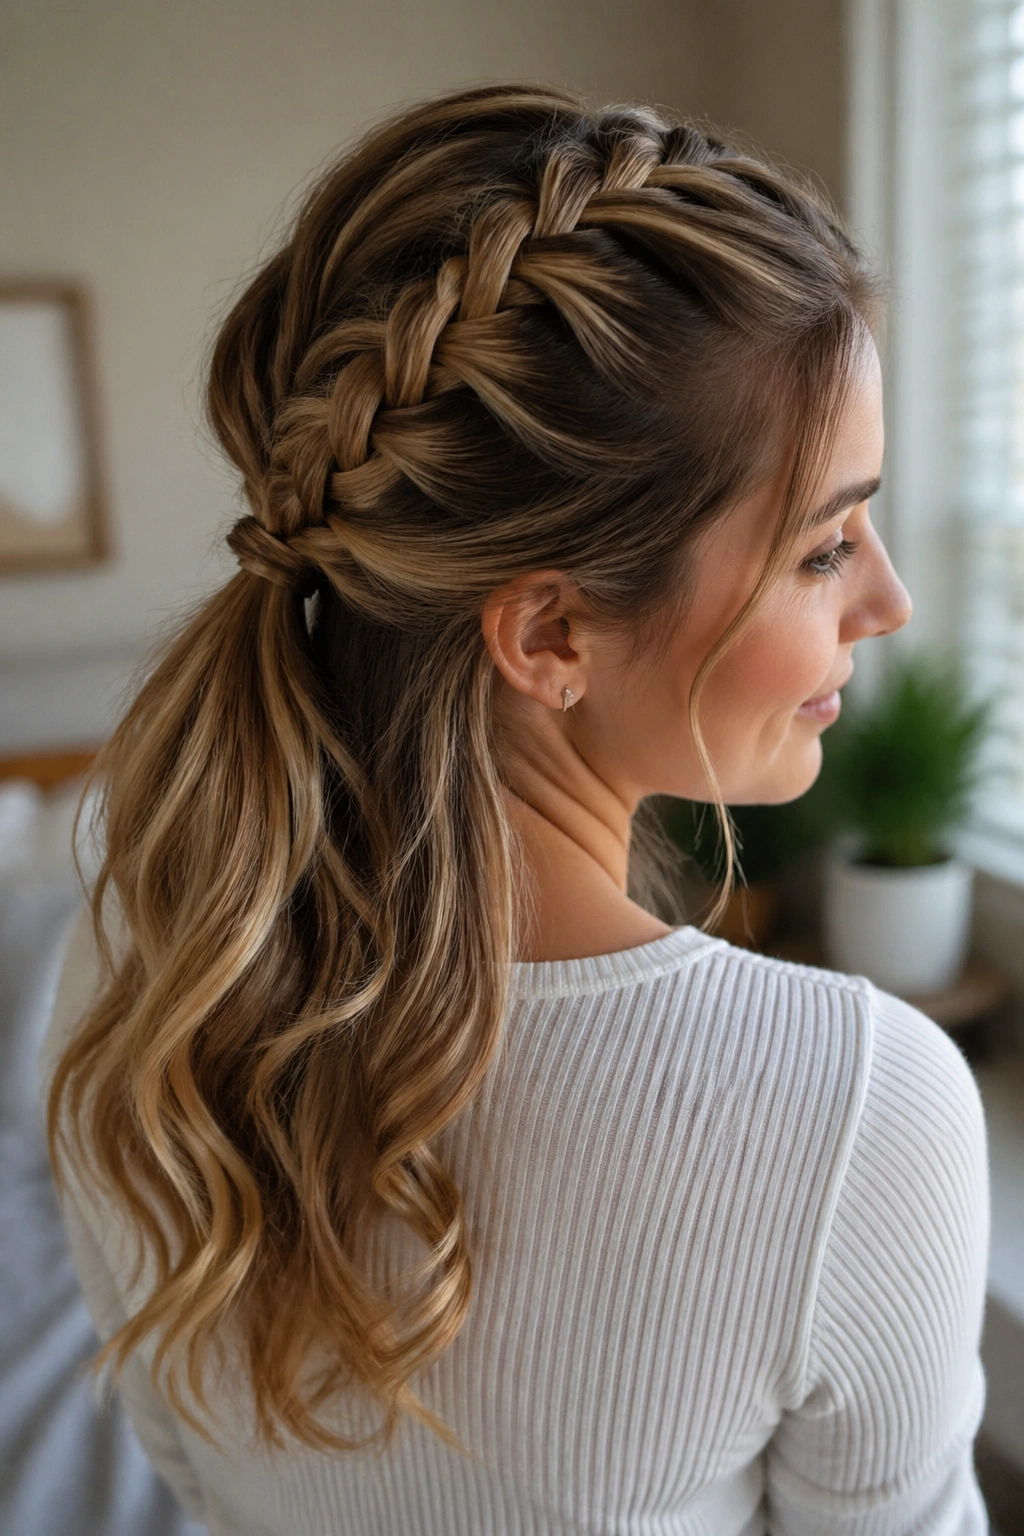
A low half pony gives the braid somewhere to go without dragging the crown down. That matters when the goal is lift, not length.
This style starts like a regular half-up Dutch braid, but instead of pinning the end flat, you gather it into a small ponytail at the back of the head. The pony should sit just below the crown, not at the neck. That placement keeps the volume up high where it matters. A soft curl at the ends helps, but it is not mandatory.
The look is tidy enough for work and loose enough for weekends. It’s also one of the better choices if your hair likes to split at the back. The ponytail anchors the braid and keeps it from slipping out of shape.
15. Curly Hair Half-Up Dutch Braid Lift
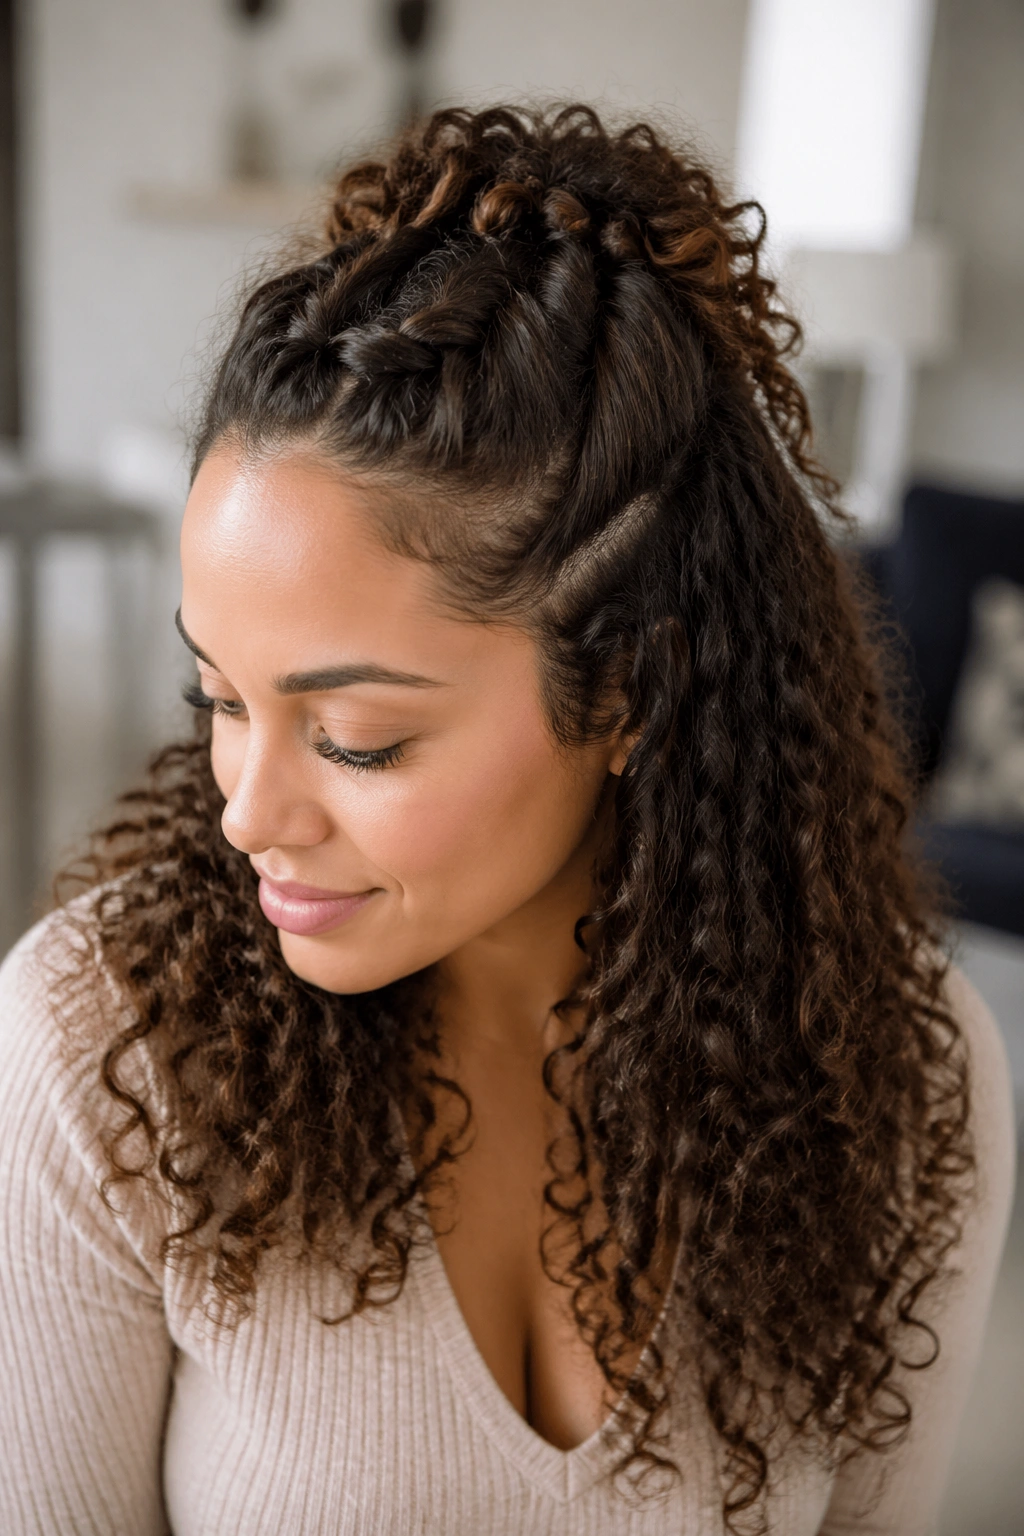
Can a Dutch braid work on curls without flattening them? Yes, as long as you braid with a gentle hand and stop before you crush the texture.
The best approach is to braid only the top section and leave the lower curls alone. That keeps the crown lifted while the rest of the hair keeps its shape. If the curls are very tight, stretch them a little first so the braid can sit without snagging. If they are looser, braid on dry hair and use a small amount of cream on the ends to keep frizz in check.
How to Wear It
Use your fingers more than a comb. A comb can separate curls too sharply, and then the braid starts looking stiff. Pin the braid where the curl pattern is least likely to puff, usually just behind the ears or at the crown.
That balance—lift on top, texture below—is what makes this version feel easy instead of overworked.
16. Thick-Hair Chunky Dutch Braid Half-Up
Chunky hair needs a chunkier braid. A thin half-up braid on dense hair can disappear into the mass, which is frustrating when you’re trying to show shape.
A wider Dutch braid solves that by holding onto more hair from the top panel. Start with a section about 2 to 2.5 inches wide, then keep the braid broad and full rather than tight and tiny. Because thick hair has weight, the braid should be pinned with stronger grips, not flimsy clips that slide once the hair warms up.
- Use large bobby pins or two crossed pins
- Let the braid sit slightly above the crown
- Finish with a mist of firm-hold spray at the roots only
This style works well when you want the braid to be a feature, not a whisper. It has enough heft to match dense hair without looking squeezed.
17. Dutch Braid With Face-Framing Tendrils
A braid can do all the lifting in the back, but the front matters too. Face-framing pieces soften the line and stop limp hair from looking pulled tight.
This version uses a half-up Dutch braid as the anchor, then leaves two slim tendrils out at the temples. Keep them about 1/2 inch thick so they look intentional. Curl them away from the face if you want a softer line, or leave them straight if the rest of the hair is sleek. The braid gives height; the loose pieces keep the shape from turning severe.
This is one of those styles that looks especially good on layered cuts. The shorter front pieces help disguise any thinness at the hairline, which is a small trick, but a useful one. The braid handles structure. The tendrils handle softness. Both matter.
18. Half-Up Dutch Braid With Claw Clip Finish
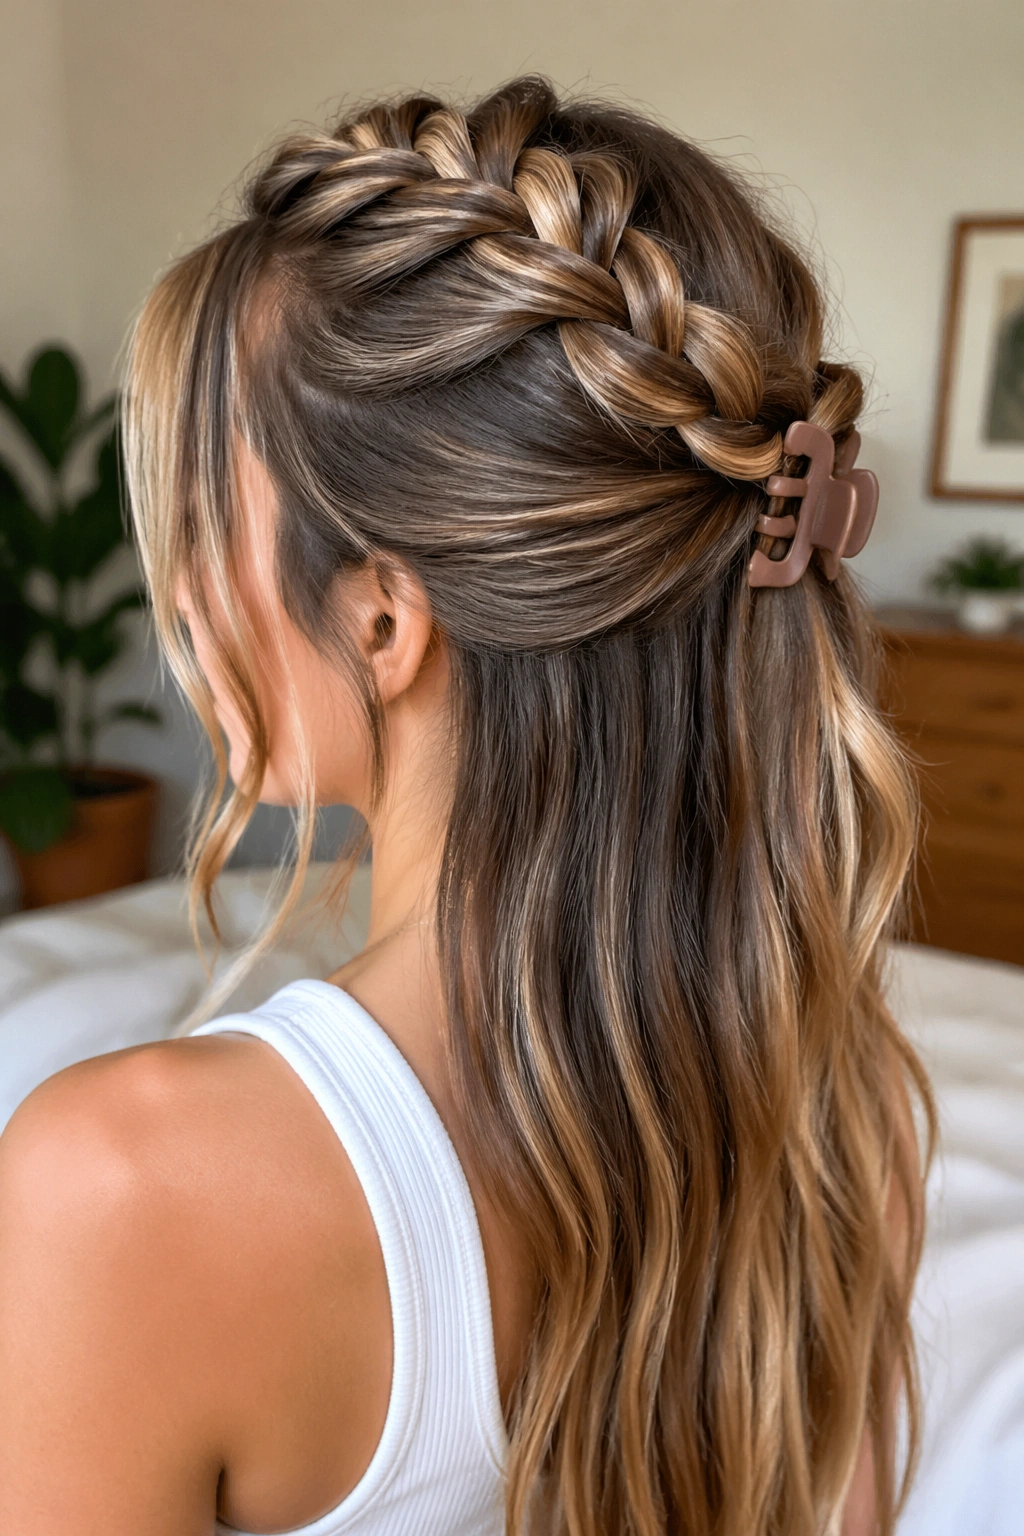
A claw clip finish is less fussy than an elastic, and on limp hair that can be a blessing. The clip also adds a little lift because it holds the braid away from the head instead of flattening it down.
Unlike a tidy tied-off braid, this version lets the end of the braid fold upward into the clip. Use a medium clip, around 2.5 to 3 inches, and make sure it grips the braid plus a bit of the loose hair underneath. If the clip is too small, the style slips. If it’s too large, the shape gets clumsy fast.
This look fits longer hair best because there is more length to catch. It’s a good “I have ten minutes” style that still looks considered. Not fancy. Just smart.
19. Dutch Braid Into a Messy Half Bun

The messy half bun is one of the easiest ways to give flat hair a little lift and a little personality. The braid feeds into the bun, and the bun gives the top half somewhere to expand.
Start the Dutch braid at the front and take it to the crown. Instead of tying it off neatly, twist the end around itself and pin it into a loose bun. Pull a few strands from the bun with your fingers so it looks soft, not sculpted. That looseness helps the style read fuller, which is useful when the hair is naturally fine.
What to Watch For
- Don’t make the bun too low
- Keep the braid snug at the scalp
- Pin from underneath so the bun stays rounded
A messy bun that sits high enough will lift the face. One that sits too low just looks tired.
20. Crisscross Dutch Braids Over the Crown
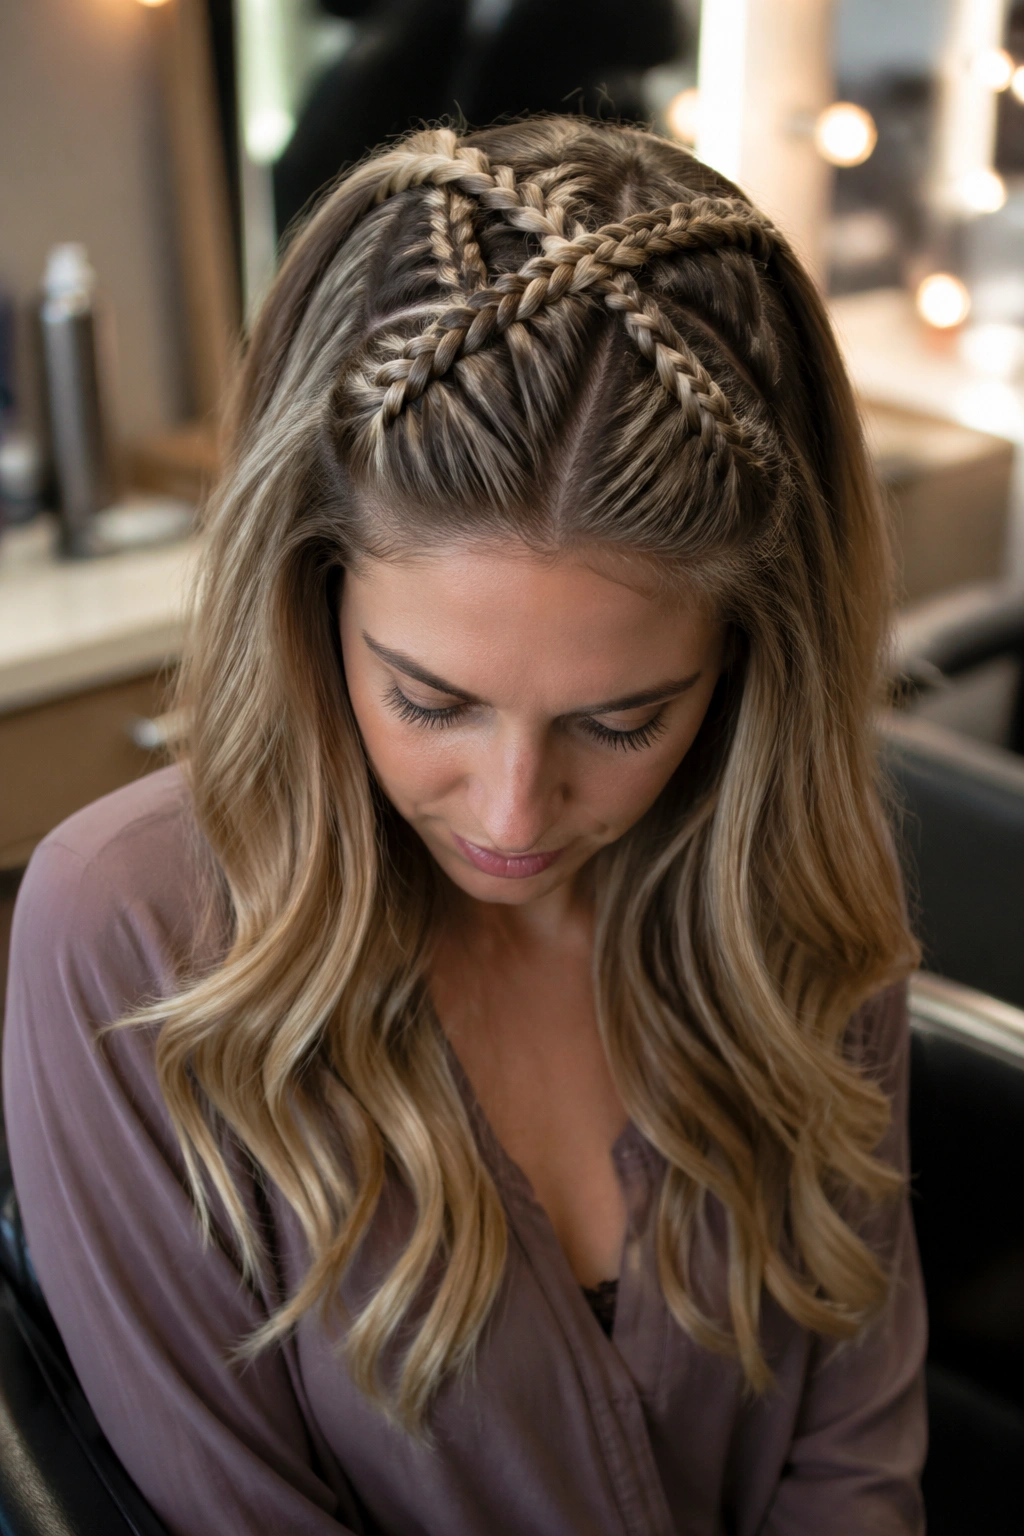
A crisscross braid pattern is a good answer for roots that separate too much. The overlap creates a lattice across the crown, which adds visual thickness even before you touch the ends.
Here, two small Dutch braids cross over each other and get pinned into an X shape near the back. You can keep the rest of the hair loose, wavy, or straight. The point is not to cover the whole head. The point is to create movement where the scalp usually looks too exposed.
The effect is a little more styled than a single braid, but not hard-edged. It’s especially useful if the top layers are thin and the lower layers have more body. The eye sees the crossing lines and reads fullness, which is exactly why this shape works.
21. Dutch Braid With a Scarf Woven In
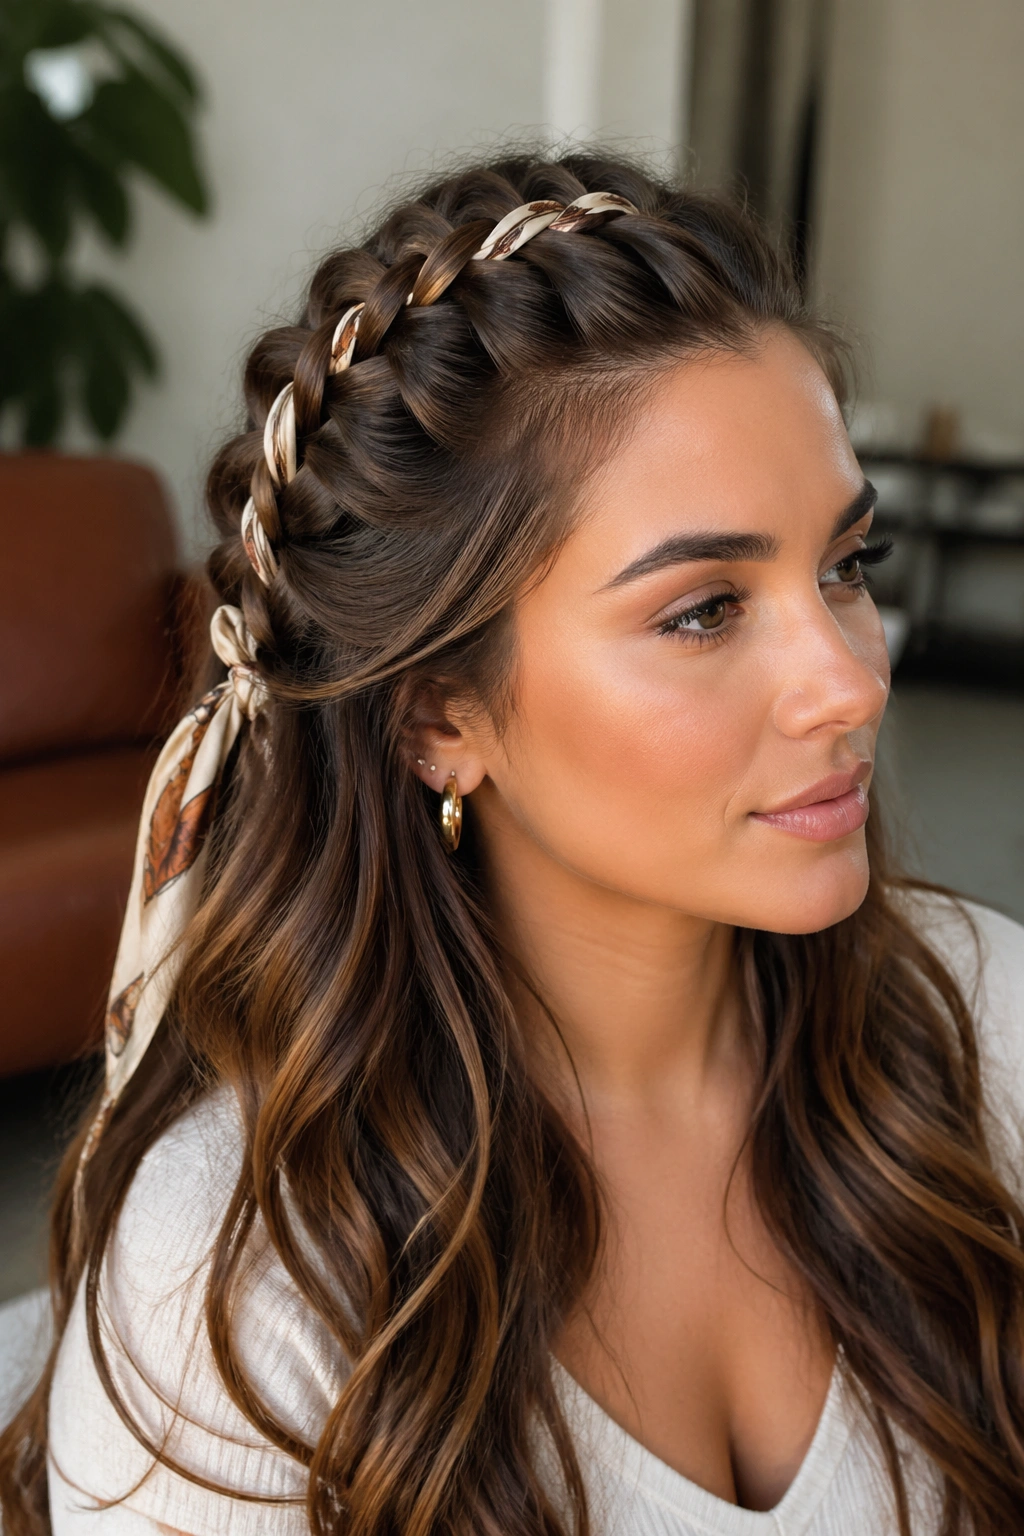
Why add a scarf when the braid already has structure? Because fabric changes the scale. A slim braid can look fuller the moment a soft scarf runs through it.
Pick a scarf that is narrow enough to braid with, about 1 inch wide if it’s lightweight silk or satin. Fold it into a strip and tuck it into one outer section at the start of the braid. Keep the weave even so the scarf does not bunch in one spot. The hair gets texture, the scarf gives volume, and the whole style feels a little more finished.
How to Use It
Choose a scarf that matches your outfit or repeats one color from it. That keeps the braid from looking random. If your hair is very silky, the scarf also helps the braid hold shape longer, which is a nice bonus.
This works best when the rest of the hair stays soft and loose. Too much structure around the scarf can make the whole thing feel stiff.
22. Three-Section Dutch Braid Crown

A three-section crown braid is one of those styles that looks much more complicated than it actually is. That’s useful, because limp hair often needs shape more than effort.
The braid is made from three slim Dutch braid segments placed across the top half of the head. Each one starts a little farther back or off to the side, then the segments are pinned together so they form a lifted crown line. The result has more surface area than a single braid, which gives the crown a fuller appearance.
- Keep each section narrow and even
- Pin each braid before the next one goes in
- Leave a bit of spacing so the shape does not flatten into one strip
It’s a good choice for hair that needs more visual density at the top but not a lot of extra length manipulation. The style does the filling in for you.
23. Dutch Braid With a Hidden Elastic Finish
A hidden elastic finish is for people who like clean lines and do not want a little clear band ruining the look. It also keeps the braid tail tucked close, which helps the style sit flatter in a good way.
The braid ends in a small tie at the back, then a thin strand of hair wraps around the elastic until the band disappears. Pin the wrapped strand underneath with a single bobby pin. That leaves the finish looking smooth and polished, but not overdone.
This style is good for fine hair because it keeps the braid from unraveling at the end, which can happen when strands are very soft. It also works well if you plan to wear the style all day. The hidden finish does not snag as much as a bulky clip, and that matters more than people admit.
24. Soft Dutch Braid Into Rope Twist Ends
A rope twist gives the braid a looser, airier finish than a standard three-strand tail. That makes it useful when the top half needs lift but the ends look too thin for a full braid.
Start the Dutch braid at the crown, then split the remaining hair into two sections and twist each one clockwise before wrapping them around each other. That two-strand motion is fast, and it gives the end a rope-like shape that feels lighter than a braided tail. The twist should be gentle, not tight, or it turns too rigid.
Unlike a fully plaited tail, this version keeps the eye moving. It suits medium-length hair especially well because the rope finish does not demand a lot of length. If the ends are layered, this is a cleaner choice than forcing a full braid that frays at the bottom.
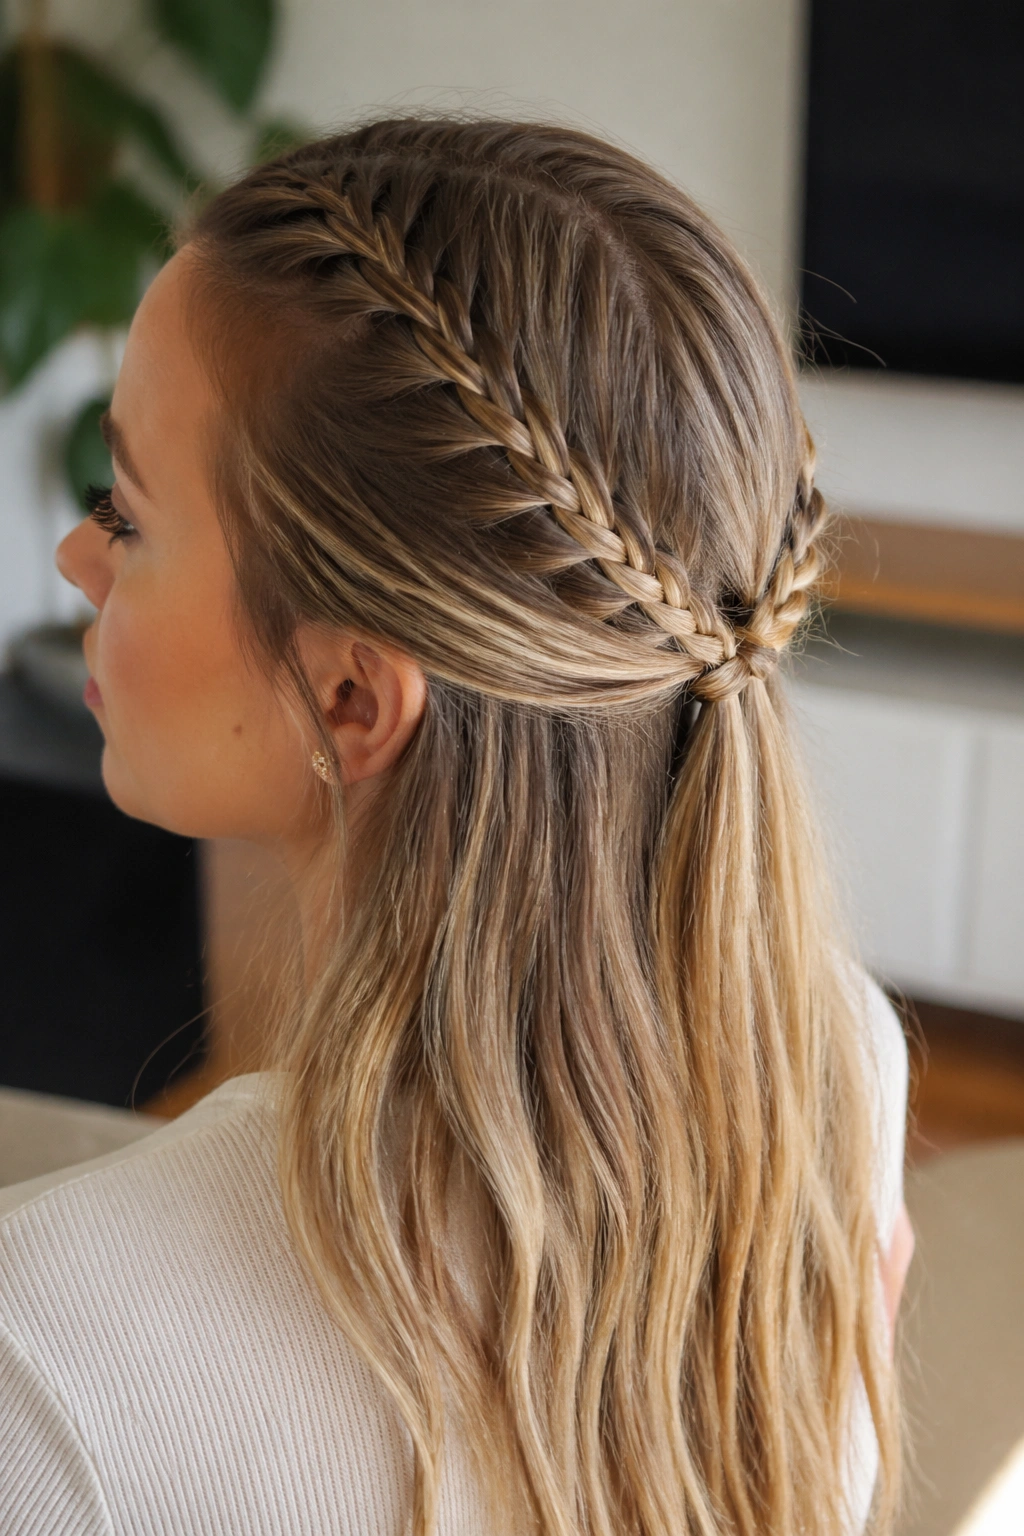
25. Slim Temple Dutch Braids Into a Half Knot
Slim temple braids are a nice fix when the sides look flat but you do not want a heavy braid across the whole head. They lift the outer edges and pull the eye toward the center.
Why the Shape Helps
The braids start right above the temples, then angle back and meet into a small half knot at the crown. That knot gives the style a little height exactly where the head starts to flatten. Because the braids stay slim, the look remains light.
- Use very small sections at the temples
- Tie the knot at the highest point of the crown
- Secure with two pins if the hair is slippery
This version is especially handy for layered hair because shorter front pieces can blend into the braid instead of poking out. It’s neat, quick, and a little more interesting than a basic half pony.
26. Inverted V Half-Up Dutch Braid
A V shape creates lift by directing the eye upward. That sounds small, but on limp hair, visual direction matters. The braid does not just sit there; it points.
Start with two diagonal Dutch braids from the temples and angle them toward a center point at the back, so the overall shape makes an inverted V. That angle opens the crown and adds width at the top without making the style heavy. It’s a smart option for long hair that tends to fall flat at the sides.
The best part is how clean it looks from behind. The lines converge neatly, and the braid can be pinned under a layer of hair or tied off with a small elastic. If your hair is long enough, this shape holds well and still leaves plenty of length down your back.
27. Sporty Tight Dutch Braid Half-Up
Does a tight braid always mean flat hair? Not if the goal is staying power. A sporty half-up Dutch braid is meant to hold shape, survive movement, and keep the top from collapsing by noon.
This style is built with firm tension from the hairline to the crown, then secured snugly so it does not wobble around. It’s a good choice for gym days, travel days, or any day when you want hair out of the way without losing all sense of style. The tension should feel secure, not painful. There’s a difference.
How to Wear It
A little dry shampoo at the roots helps the braid lock in place. Keep the braid straight down the center or slightly off-center depending on your part. If the hair is fine, avoid layering too many pins; one solid tie is usually enough.
The look is practical first. That is exactly why it works.
28. Dutch Braid With Beaded Pins
A few beaded pins can make a simple half-up Dutch braid look intentional without turning it into something precious. The braid stays doing the real work; the pins just catch the eye.
Place the pins where the braid starts to widen or where it meets the loose hair. Three to five small pins is usually enough. Too many, and the braid starts to lose its clean line. The point is a little sparkle or texture, not a hardware store across the back of the head.
- Choose pins with flat backs so they sit close
- Place them asymmetrically for a softer look
- Keep the rest of the hair calm and smooth
This is a useful trick for hair that needs height but not a ton of styling. A small detail near the braid can make limp hair feel more finished in a way that still looks easy.
29. Dutch Braid Sweep With a Deep Side Part

A deep side part can change the whole mood of a half-up Dutch braid. It gives one side more lift, which is handy when the hair naturally falls too evenly and ends up flat everywhere.
The braid starts on the heavier side and sweeps across the crown in a soft curve. Because one side has more hair to work with, the braid looks fuller almost by default. The other side stays loose, which keeps the style from feeling crowded. This is one of my favorite moves for very straight hair because the part itself does half the styling.
The deep part also helps the braid last longer. When the hair wants to fall flat, a stronger part line gives it something to hold onto. The whole thing feels a little more dramatic without requiring more tools.
30. Double Dutch Mohawk With Big Volume
A double Dutch mohawk is the louder cousin of the sporty braid, and when the hair is limp, sometimes louder is better. The two braids create a raised center ridge that reads as volume from the front and the side.
Unlike a sleek mohawk braid, this version is intentionally widened after braiding. Pancake both braids, pull the center a little higher, and pin them close enough to form one strong visual line. That gives the crown height without making the sides disappear completely.
Best For
- Long hair that falls flat at the roots
- Thick hair that needs shape, not more length
- Days when you want the style to feel bold, not soft
A small amount of root powder at the crown helps the style hold that lifted shape. If you skip the prep, the braid may still look nice, but it will not keep that punchy outline for long.
31. Dutch Braid Bow Half-Up Style
A braid that turns into a bow sounds playful because it is playful. It also works better than you might think on limp hair, since the bow adds a visible shape right where the crown needs bulk.
Start with a half-up Dutch braid and stop it at the back with enough length left to loop into two small arches. Pin each side of the loop so it reads like a bow, then wrap a thin strand around the middle to hide the join. The shape should look soft, not stiff. If the loops are too small, the bow disappears. If they are too large, the hair starts to sag.
What Helps
- Use medium-thickness hair or a bit of texturizing spray
- Keep the loops even on both sides
- Hide the center wrap with a strand from the braid tail
It is a fun style, yes, but it still has the useful side effect of lifting the crown.
32. Five-Minute Office Dutch Braid Lift
This is the fastest style in the bunch, and that matters on mornings when your hair has already decided not to help. A small Dutch braid at the front can give enough lift to make the whole head look more awake.
Braid a narrow section from the hairline back to the crown, then pin it under a smooth top layer or tuck it into a low half-up twist. The point is not decoration. The point is to create a tidy front line and a little rise at the roots. That alone can change how the rest of the hair falls.
It’s a good office choice because it looks calm and controlled, even when the hair underneath is not. A light mist of hairspray at the sides keeps the braid from puffing out by midafternoon, which is often the only thing standing between “polished” and “why is this doing that?”
33. Soft Dutch Braid With Tucked Ends
What if you want lift but not a visible finish? Tucked ends solve that neatly. The braid gives the crown shape, and the hidden end keeps the look soft and a little unfinished in a good way.
Run the Dutch braid from the front to the back, then fold the tail underneath itself and pin it flat against the head. The tuck keeps the silhouette close, which is useful when the hair is fine or the ends are a bit scraggly. This style looks especially good on mid-length hair where a dangling braid tail can feel too long.
How to Wear It
Keep the braid loose enough to broaden slightly after you secure it, but not so loose that it falls apart. A couple of hidden pins can hold the tail without showing. If you want extra softness, leave two small face-framing pieces out around the temples.
The finish is quiet. The lift is still there. That is the whole appeal.
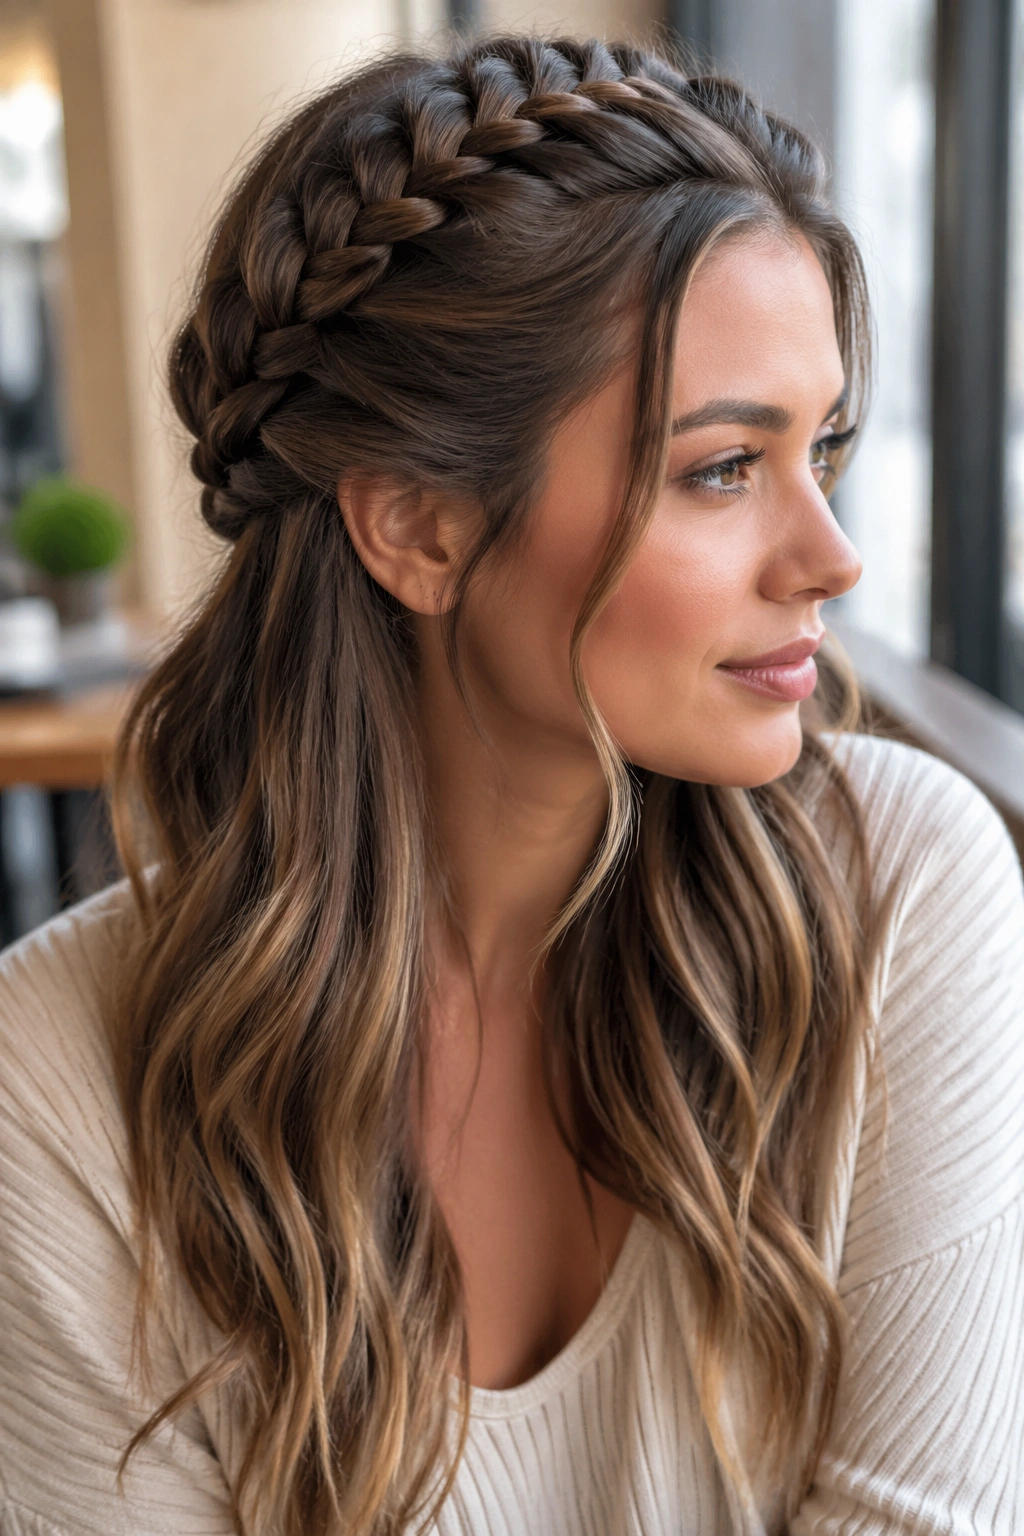
A good half-up Dutch braid does one thing better than most styles: it gives limp hair a visible shape before the rest of the hair has a chance to argue. That is why these versions keep working on fine hair, straight hair, thick hair, and everything in between. The lift lives at the scalp, not only in the ends.
And honestly, that is what makes them useful. You can go polished, sporty, soft, or a little dramatic without changing the basic idea. Once the braid starts holding the crown up, the rest gets easier.