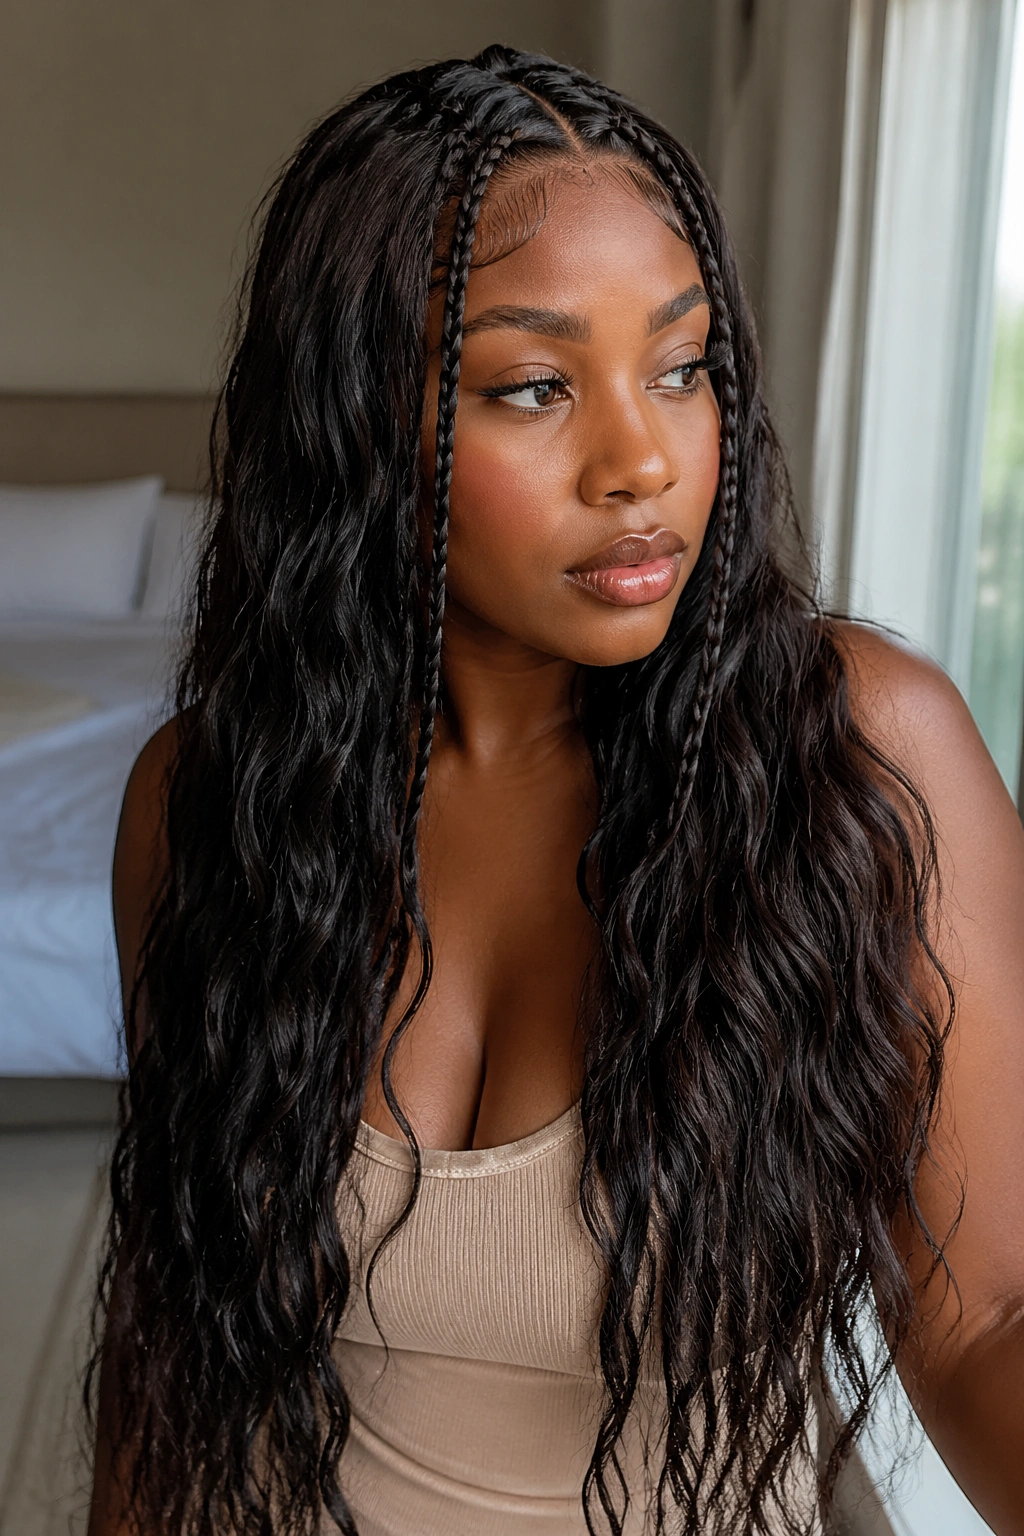
Waist-length hair changes lace braids in a way shorter tutorials usually miss. The braid has weight. A lot of weight. That means the sectioning, the tension, and even the direction your hands move matter more than they do on collarbone-length hair.
A lace braid is the one-sided cousin of a French braid: you keep feeding in hair from only one side, so the braid hugs the head and leaves the other side free. On hair that reaches the waist, that small technical difference makes a big visual difference too. The braid doesn’t disappear into the rest of the hair. It sits there like a clean line against a curtain of length.
I like styles that respect the length instead of fighting it. Thin accent braids, crown braids, ribbon-woven strands, and heavier hybrids all behave differently once the hair is long enough to swing against your back. Some look airy. Some look formal. Some are the kind of style you can wear with a sweater and still look like you meant it.
A rat-tail comb, a few snag-free elastics, and a light hand are doing most of the work here. Tiny choices matter more than fancy tricks. The styles below are the ones that actually make sense on hair down to the waist, because they hold their shape, show off the length, and do not collapse the second you walk outside.
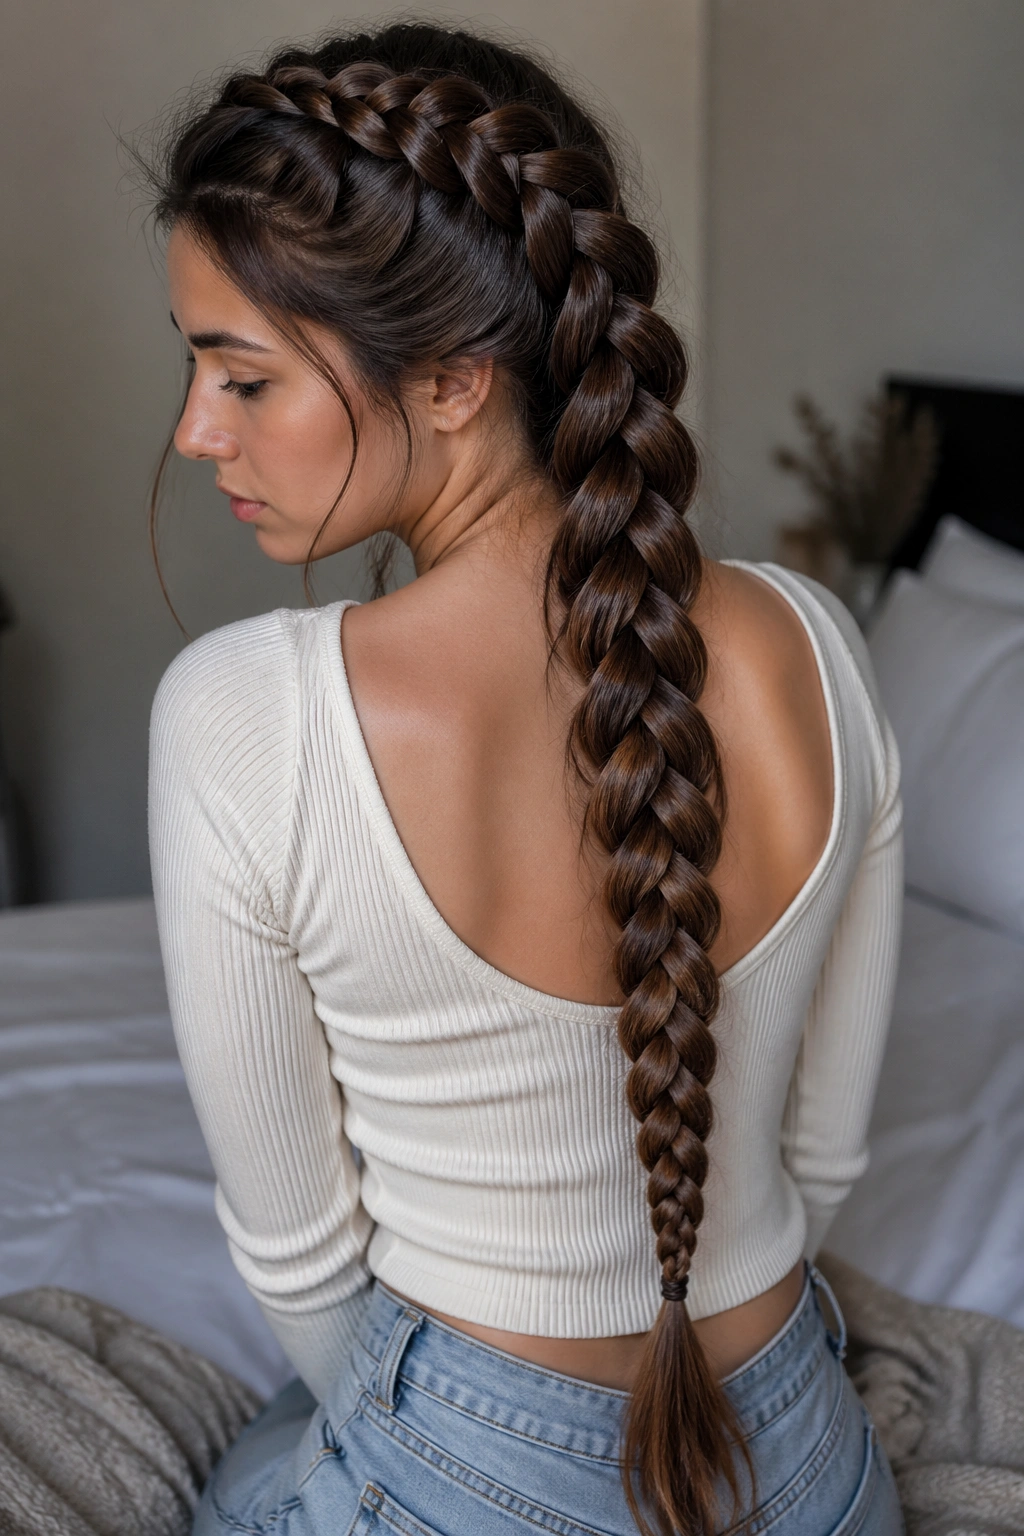
1. Classic Side Lace Braid
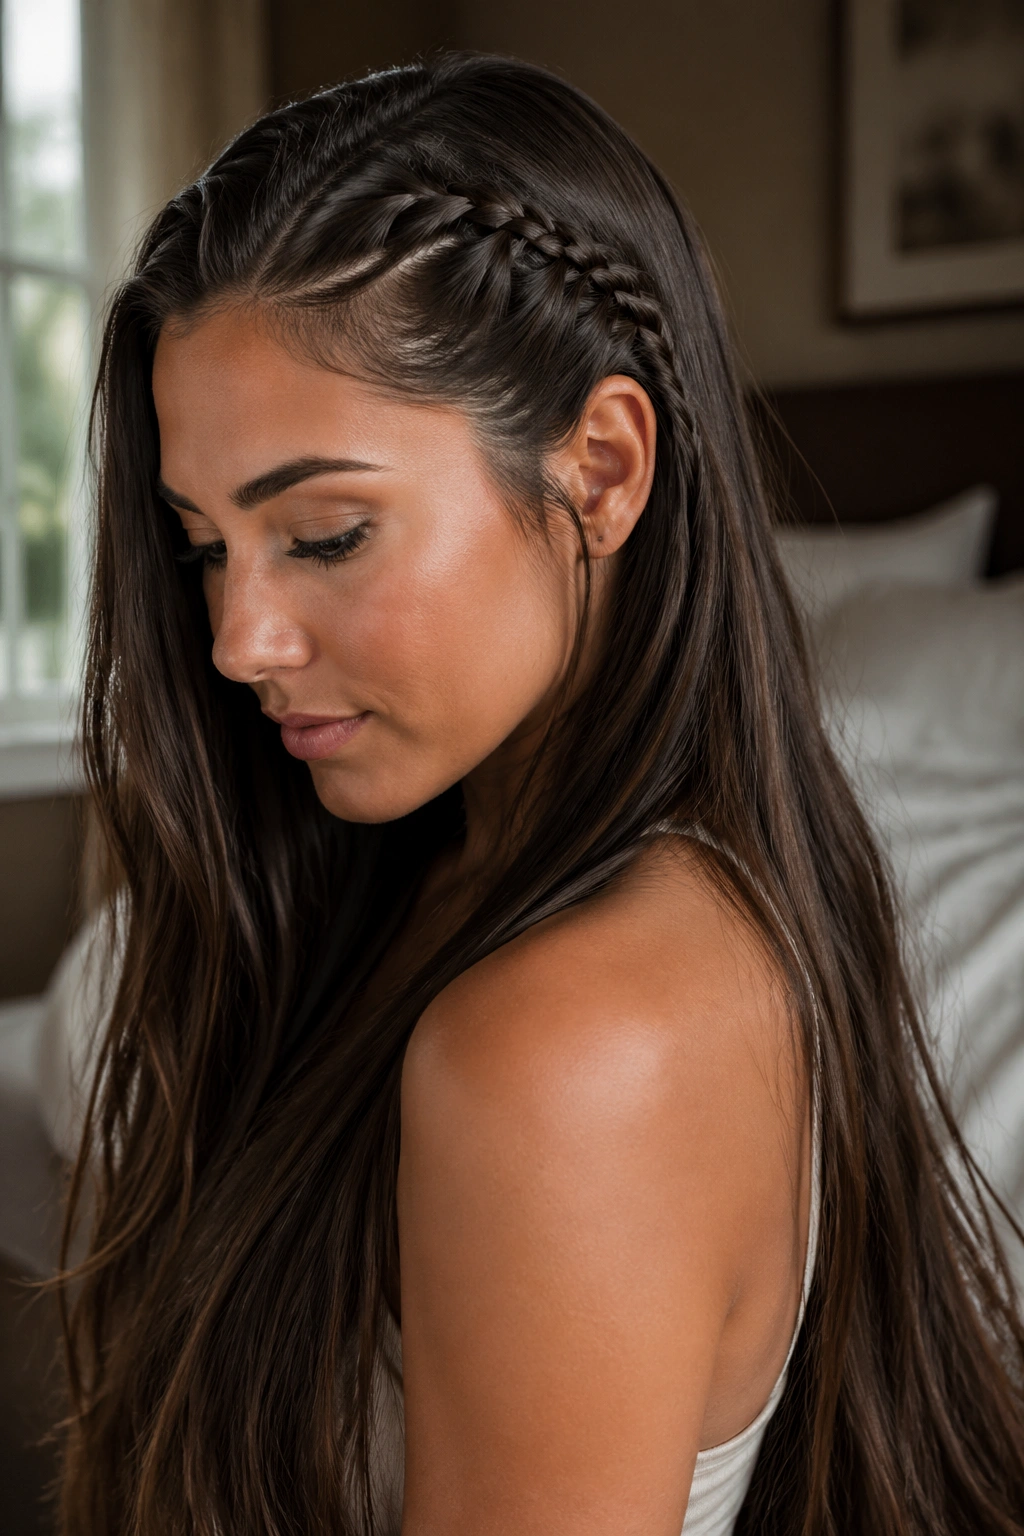
A classic side lace braid is the cleanest place to start, and on waist-length hair it looks richer than it does on shorter lengths. The braid traces the hairline on one side, then melts into the rest of the hair with a soft line that feels simple rather than plain.
Start with a 1- to 1½-inch section near the temple, then keep adding hair only from the top side as you braid downward. The lower side stays free. That’s the whole point. On very long hair, the loose length gives the style a nice drop, almost like a frame that leads the eye down the back.
Length changes the rules.
If your ends tangle fast, mist them lightly with water or a leave-in spray before you braid. The braid itself only needs moderate tension — tight enough to hold, loose enough that the scalp doesn’t feel pulled. On waist-length hair, I’d stop the braid around the jawline or just below the ear if you want the rest of the hair to stay full and draped.
A tiny elastic, a dab of smoothing cream at the front, and one or two bobby pins near the base usually do the trick. Nothing fussy. Just a braid that knows how to sit still.
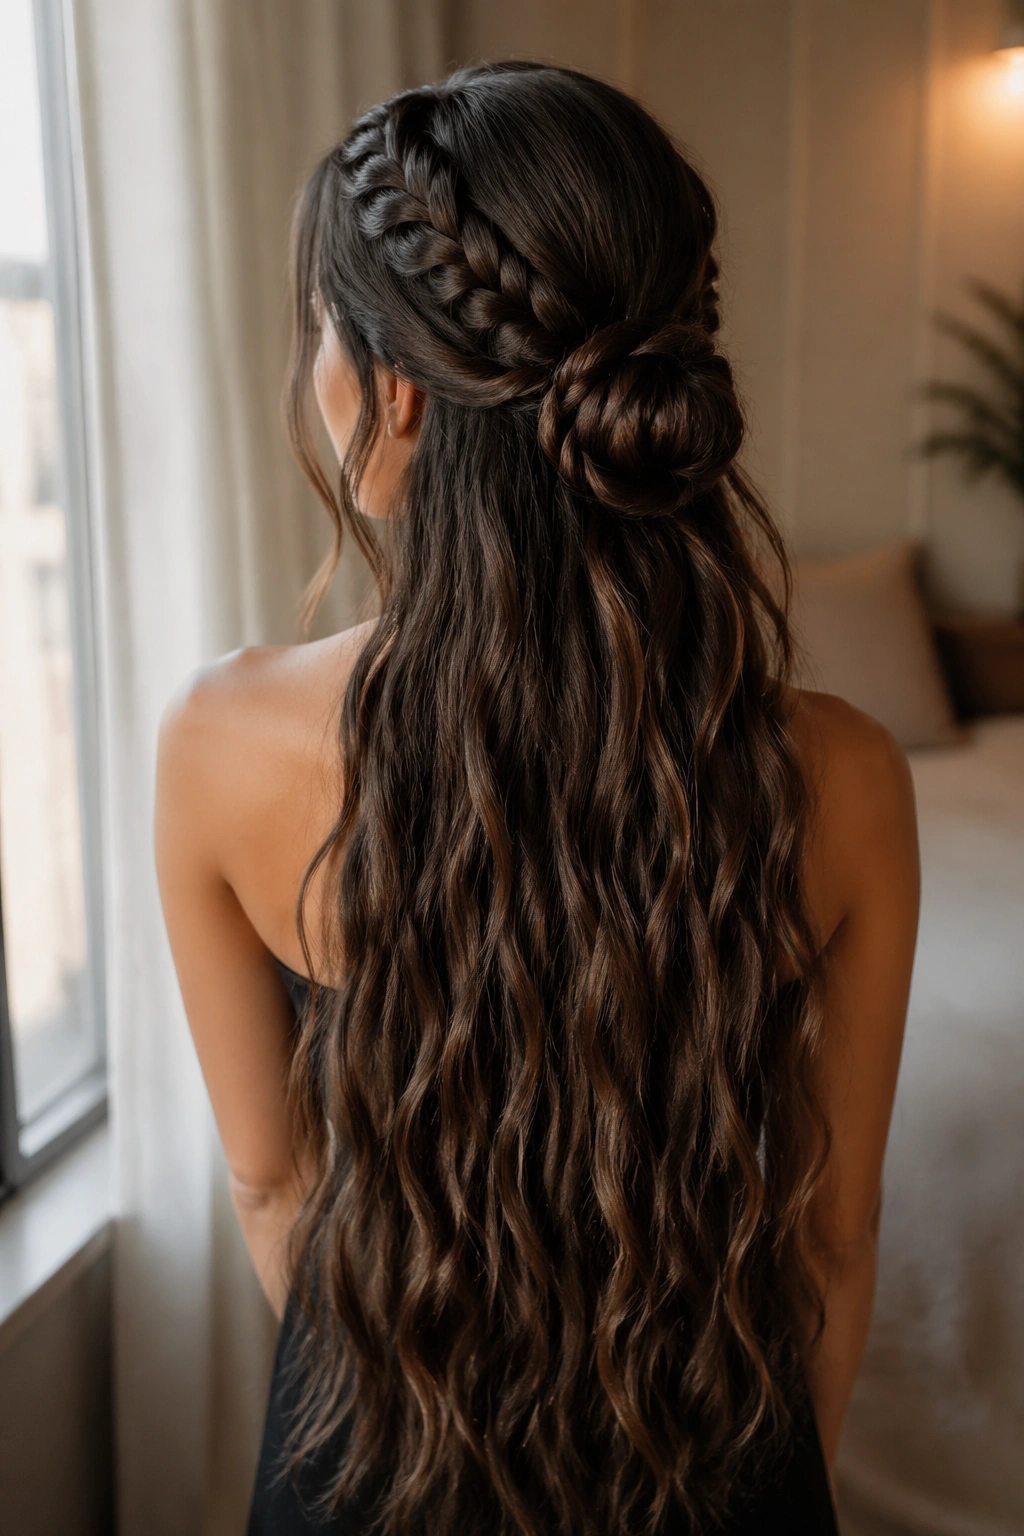
2. Half-Up Crown Lace Braid
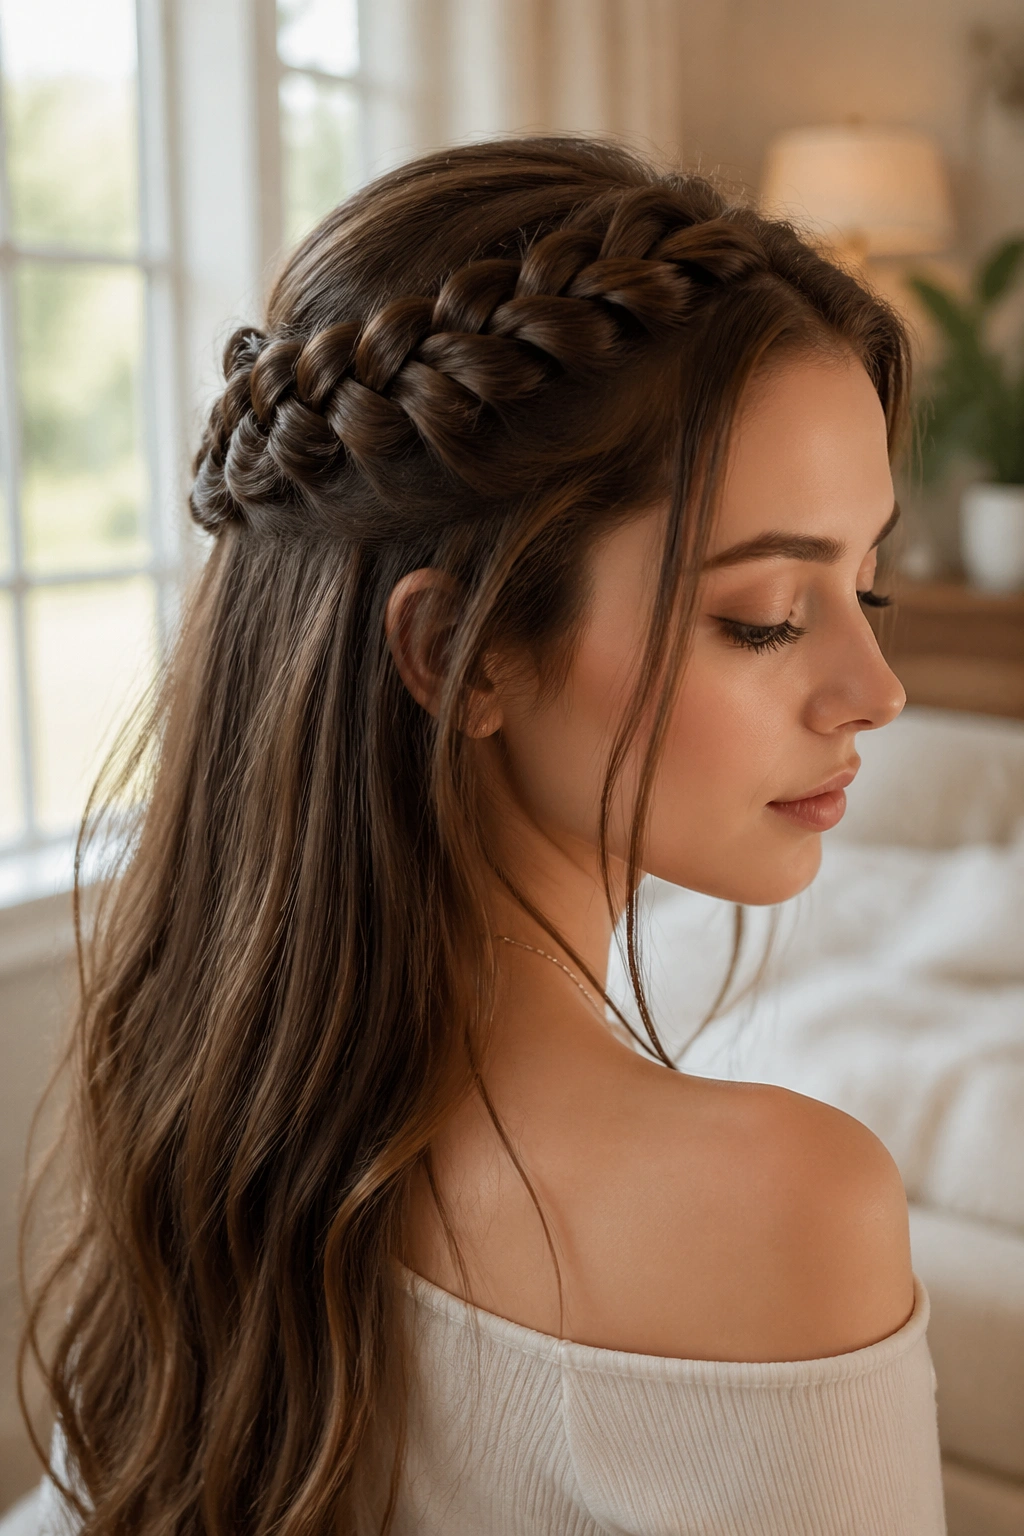
This is the style that makes long hair look intentional without hiding the best part of it. A half-up crown lace braid sweeps across the top of the head like a band, then leaves the rest of the hair loose and heavy down the back.
Why it works on waist-length hair
The braid gives the crown some structure, which matters when the lower half of your hair is so long that it can drag the whole look downward. A neat braid at the top keeps the style from feeling flat. It also clears the face in a way that lets cheekbones, earrings, and necklines do some work.
How to pin it cleanly
Start the braid above one temple and work across the head, feeding in hair only from the top side. Keep the braid about 3/4 inch wide so it stays delicate against the fullness of the length below. Once you reach the opposite side, tuck the end under a layer of hair and pin it with 2 or 3 crisscrossed bobby pins.
A small trick helps here: lightly roughen the top section with dry shampoo before braiding. Clean, silky hair can slide more than you’d expect, especially when it’s very long. The braid should rest on the head, not creep away from it.
Wear this with straight lengths, soft waves, or a smooth blowout. It works all three ways.
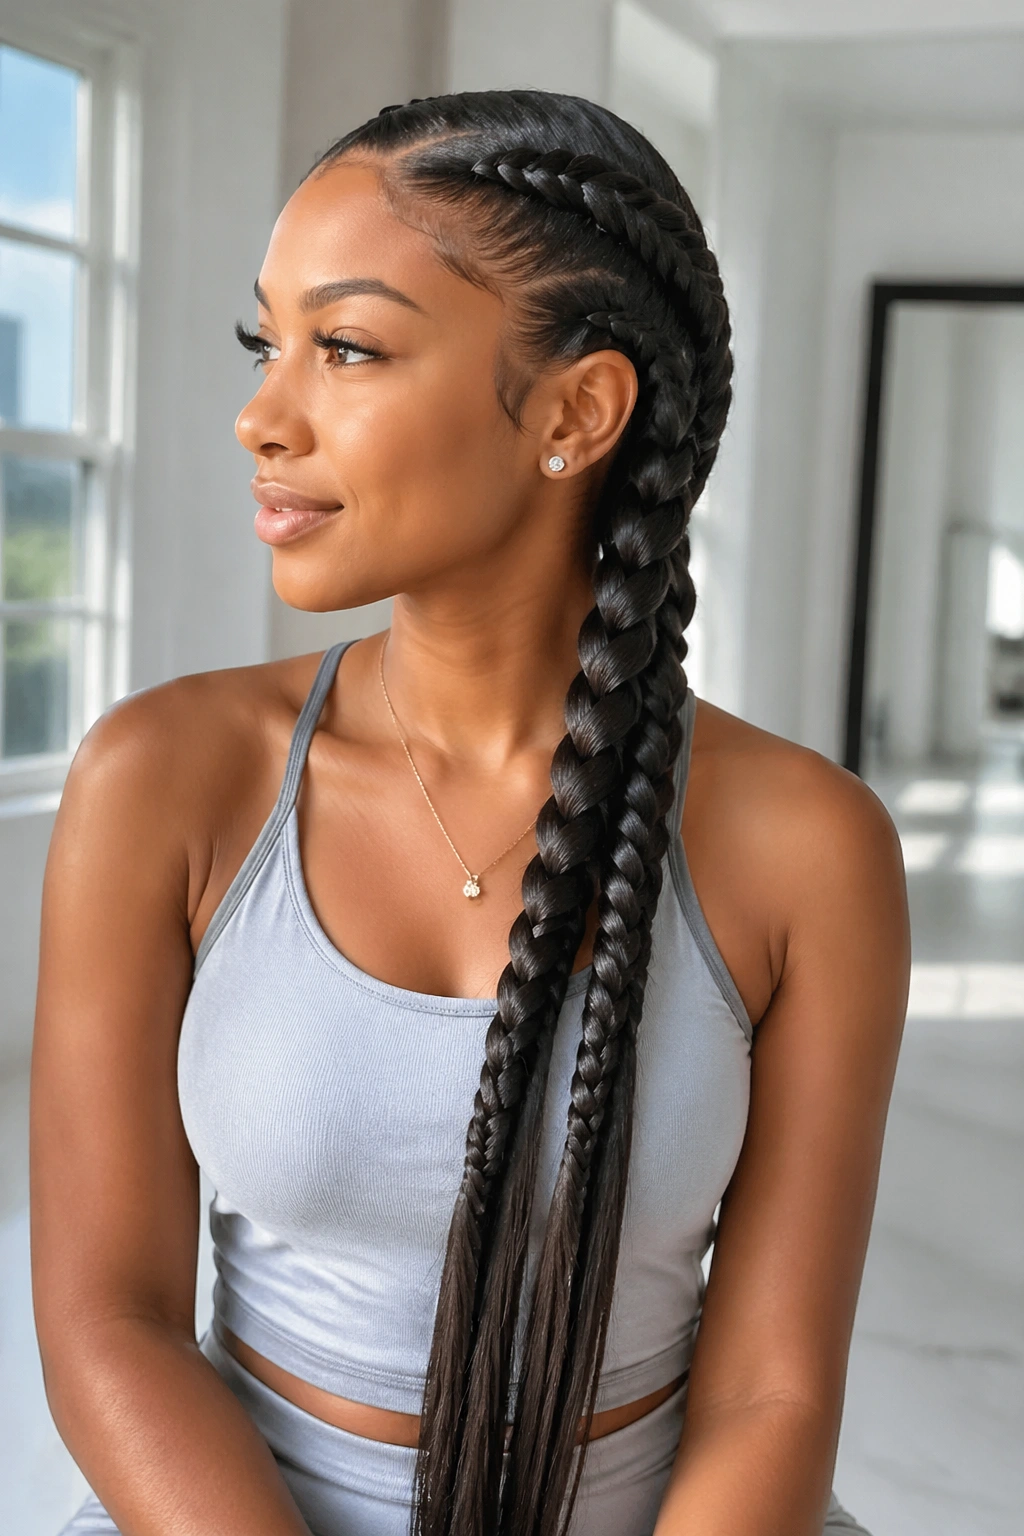
3. Double Lace Braids into a Low Ponytail
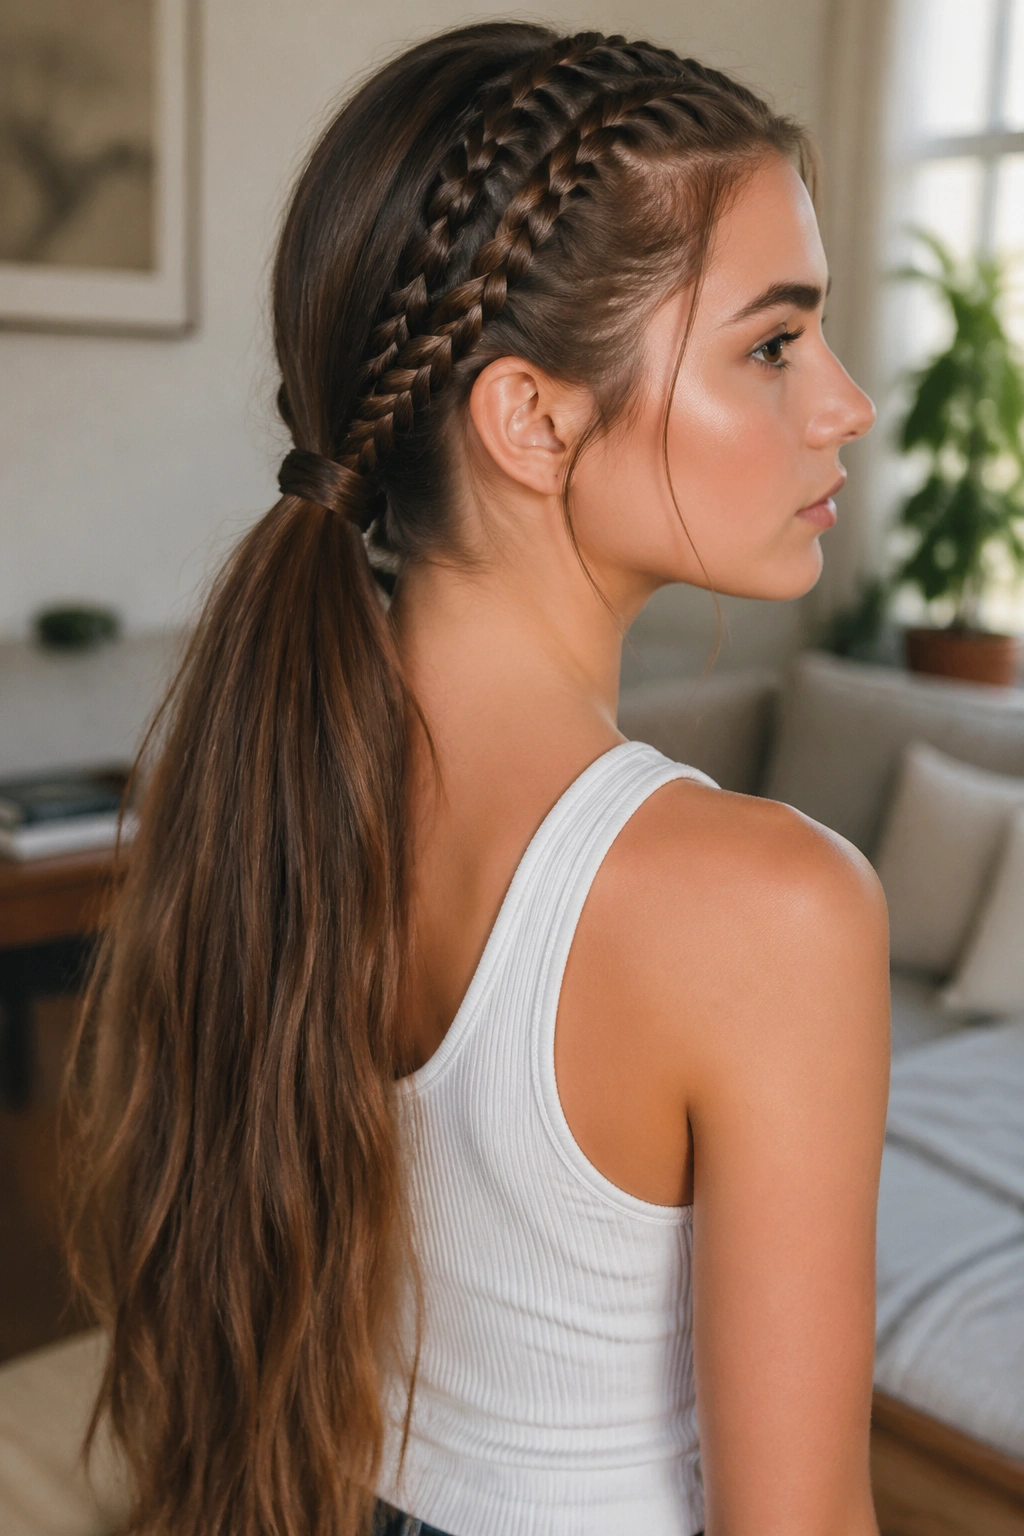
Two slim lace braids feeding into one low ponytail feel practical without looking dull, which is harder to pull off than people think. On waist-length hair, this style has a little extra drama because the ponytail still keeps going after the braids end. It reads as polished and sturdy at the same time.
What to do
- Part the hair down the middle or slightly off-center.
- Take a 1-inch section from each temple.
- Braid each side as a lace braid, adding hair only from the hairline side.
- Stop both braids at the nape and join them into one ponytail.
- Wrap a thin strand of hair around the elastic if you want the finish to look cleaner.
The main thing to watch is balance. If one braid sits higher than the other, you’ll notice it right away once the hair is gathered. Long hair shows asymmetry fast. That’s not a disaster, but it does mean you should check both sides in a mirror before tying anything off.
This is one of my favorite braid hairstyles for long hair when you want the length secure and still visible. It’s good for travel, errands, or any day you don’t want loose hair in your way but also don’t want a full updo. Simple. Steady. Useful.
4. Ribbon-Woven Lace Braid
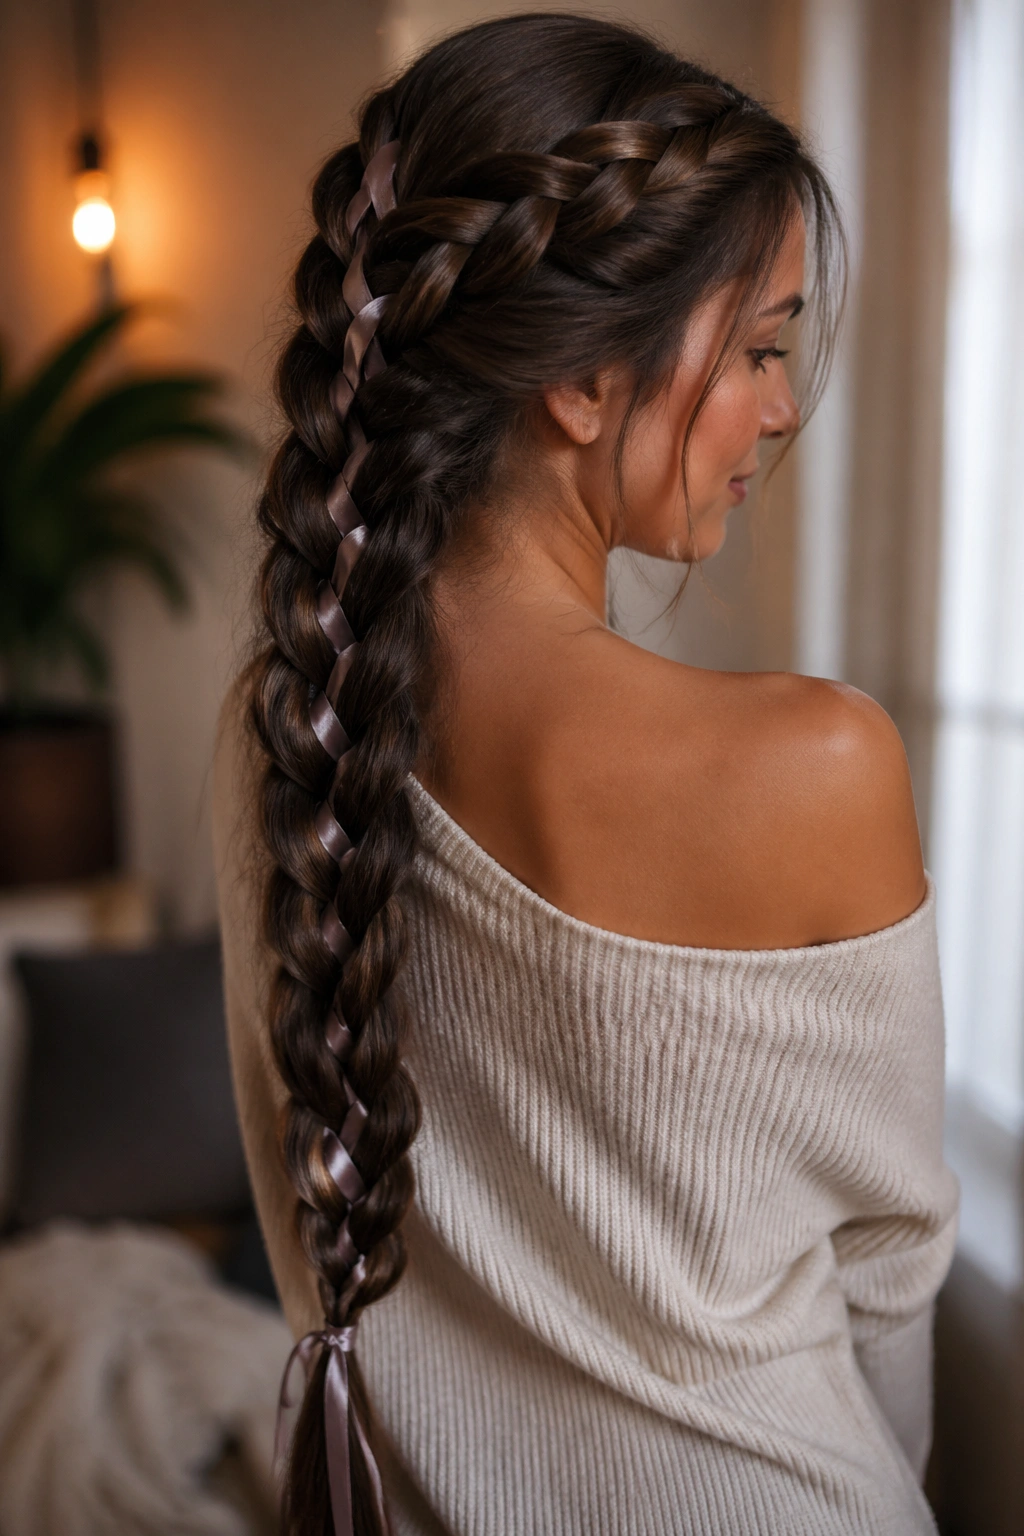
A ribbon woven through a lace braid can look sweet, sharp, or a little old-world, depending on the color and texture you pick. On hair down to the waist, the ribbon has room to show itself instead of getting swallowed by the braid. That’s the payoff.
Use a ribbon that’s 1/4 to 1/2 inch wide. Satin gives you a softer finish; grosgrain holds its shape better and doesn’t slip as much. I like anchoring the ribbon under the first braid stitch so it stays hidden at the top, then letting it travel with the outer strand as you braid downward.
Choosing the ribbon
Keep the width modest. A thick ribbon can make the braid bulge, and waist-length hair already carries enough visual weight. If you want the braid to feel softer, choose a ribbon close to your hair color. If you want it to stand out, use a contrast that can be seen from across the room.
Finishing the end
Tie the ribbon just above the elastic, then let the tails hang a few inches below the braid. That little trail looks better than a giant bow in most cases. A bow can work, sure, but it can also tip the style into costume territory if the rest of the outfit is quiet.
The cleanest version of this style lets the braid and ribbon do the talking. Nothing else needs to compete.
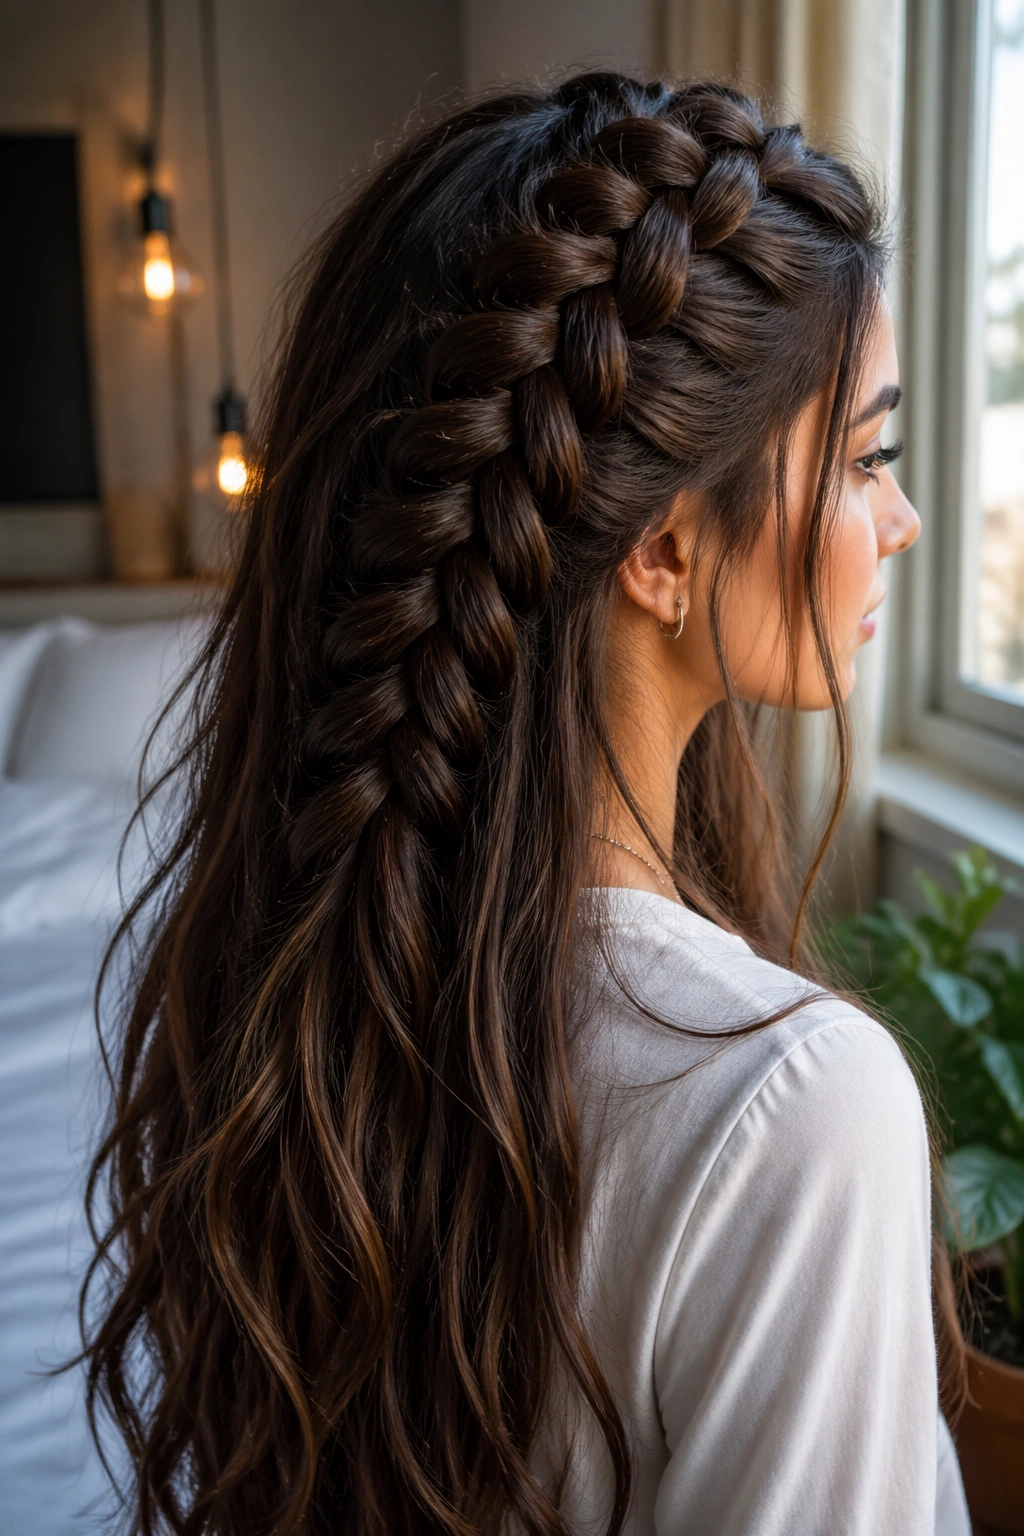
5. Dutch-Lace Hybrid Braid
A flat lace braid is pretty. A Dutch-lace hybrid has more lift. That matters on very long hair, because the length can pull a braid downward and make the top look closer to the scalp than you want.
Start by braiding under, like a Dutch braid, for the first 3 or 4 stitches. Then switch to feeding hair in from only one side, the way you would with a lace braid. That tiny change creates a braid that rises off the head at the crown and then softens into a one-sided line.
The result is useful if your hair is thick or heavy at the roots. It also helps if your layers keep slipping out of a regular braid. The lifted base gives the style a little architecture, which sounds fancier than it feels. In practice, it just means the braid doesn’t flatten itself halfway down.
I like this braid with a touch of root mousse or light cream, not a hard product. Too much hold makes the braid look stiff, and waist-length hair already brings enough presence. Keep the crown smooth, braid with even tension, and let the lower lengths stay loose.
It’s a good choice when you want the braid to be seen from the front and not only from the back.
6. Waterfall Lace Braid
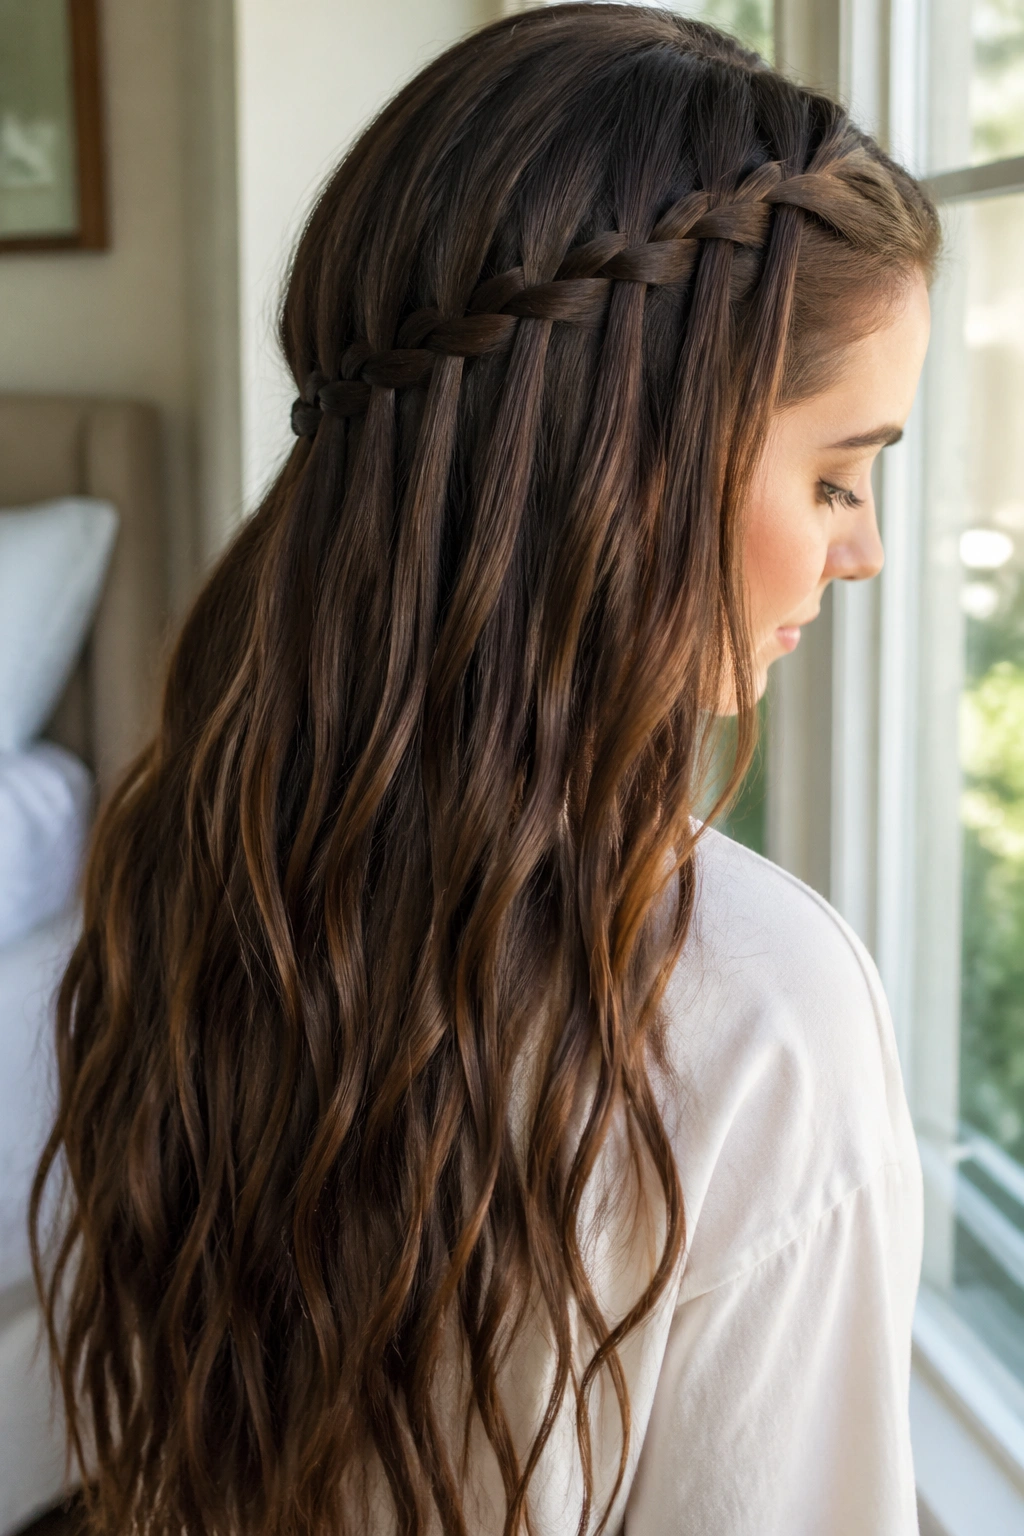
Why does a waterfall braid look so good on waist-length hair? Because the long drops give the braid room to breathe. The style becomes a moving line of hair, not just a braid sitting on the head.
The trick is to keep the dropped sections narrow. If you release chunks that are too wide, the whole thing starts to look messy instead of airy. I’d use 1/2-inch drops at most, and I’d clip the loose hair out of the way while braiding so you don’t accidentally grab the wrong strand.
What makes the braid stay neat
The top line has to stay consistent. If one stitch is tight and the next is loose, the waterfall line breaks. That’s more obvious on long hair because the eye has farther to travel. A tidy braid line paired with loose length creates the contrast that makes the style work.
Where it looks best
Soft waves help. Straight hair can handle it, but the dropped pieces sit nicer when the ends have some bend. If your hair is layered, be careful with the shortest layers near the face. They love to escape. Sometimes a tiny clear elastic hidden under the hair is the difference between a clean fall and a fussy one.
This is the braid I’d pick when I want something pretty but not rigid. It has movement built in.
7. Fishtail Lace Braid
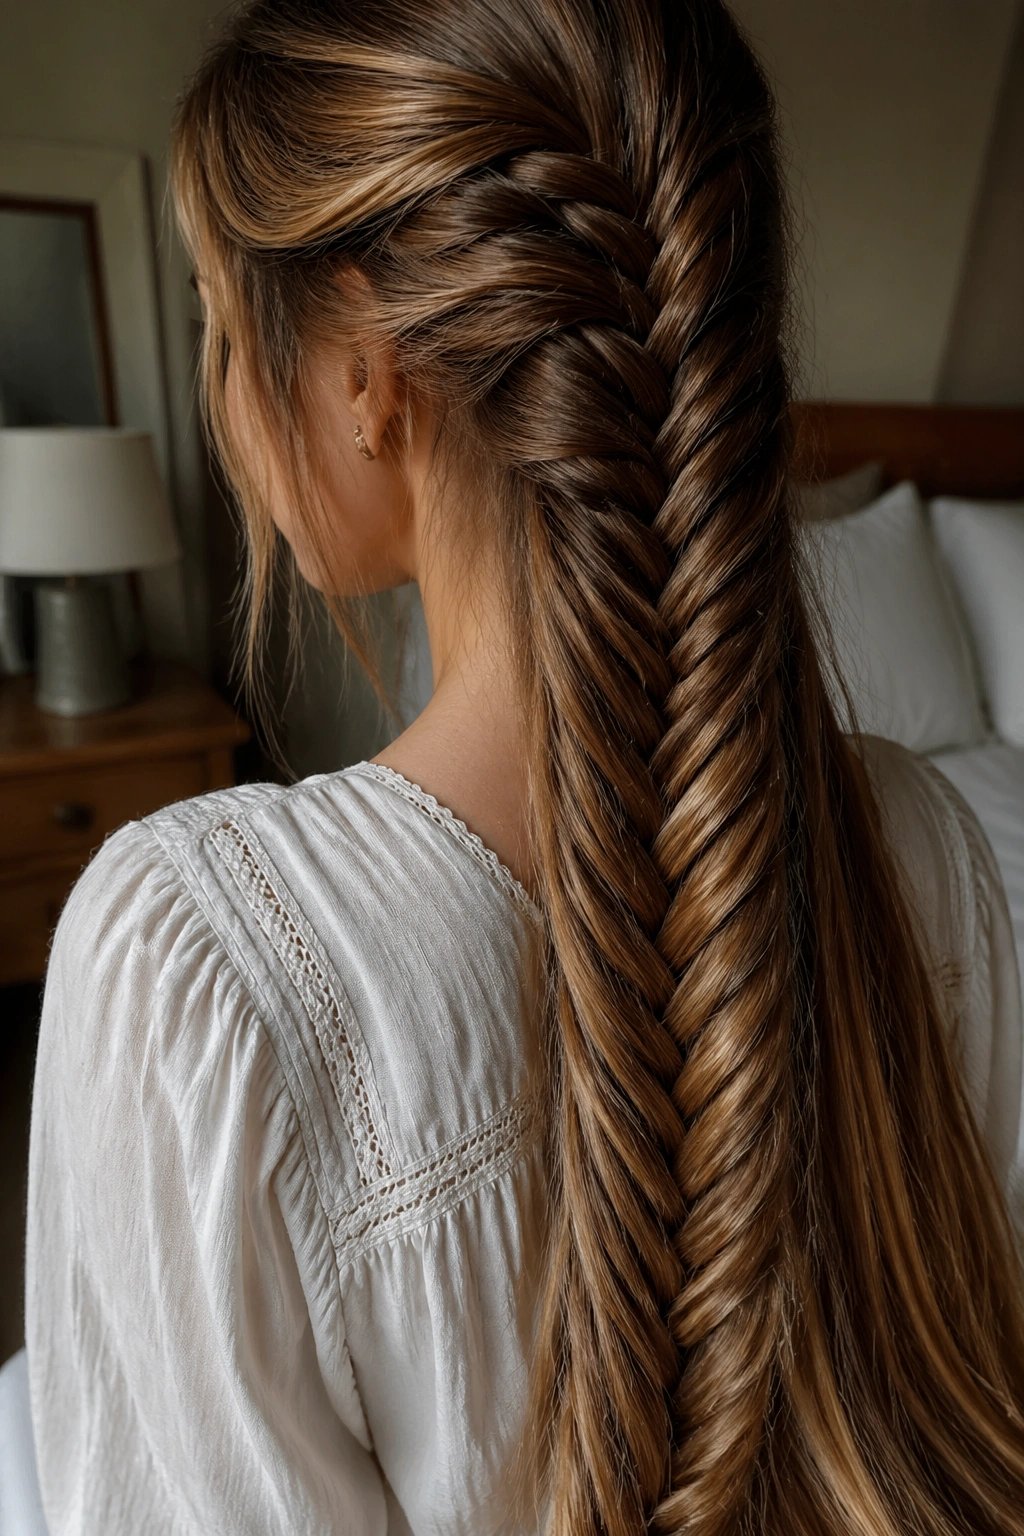
If your hair is silky and likes to slip through your fingers, a fishtail lace braid is often easier to control than a three-strand version. It’s slower. No pretending otherwise. But the texture is worth it, especially on hair that reaches the waist and can show off a long, narrow tail.
Split the braid into two sections once you’ve done the top lace portion, then take tiny pieces — about 1/4 inch wide — from the outer edge and cross them over. Keep the bites small. Big pieces make the fishtail look chunky and uneven.
There’s a rhythm to it after a while. Pull, cross, smooth, repeat. The braid should feel firm but not squeezed. When it’s done, you can pancake it a little by tugging the outer edges if you want a wider, softer look. Don’t go too far. Over-pancaking can make the braid collapse, and waist-length hair gives you enough bulk already.
I like this style on second-day hair because the texture helps the braid grip. Freshly washed hair can work, but a little dry shampoo at the roots makes life easier. The braid ends up looking detailed without being precious, which is a good thing. Hair that long needs some restraint.
8. Rope-Twist Lace Braid
This is the braid I reach for when the hair is extra smooth and refuses to behave. A rope-twist lace braid has more grip than a standard braid because the strands twist around each other instead of lying flat.
When rope twists beat three-strand braids
If your hair is straight, fine, or freshly blown out, a rope twist can stay cleaner at the scalp. Start with two sections, twist them in the same direction, then wrap them around each other in the opposite direction. Feed in hair from only one side as you move down the head. That gives you the lace effect without the soft collapse that sometimes happens with a regular braid.
How to keep the twist neat
A light styling cream on the mid-lengths helps. So does misting the roots with texture spray before you start. You do not need much. Too much product makes the strands sticky, and then the twist gets lumpy instead of sleek.
- Use two equal sections at the start.
- Keep the twists tight at the scalp and looser through the ends.
- Secure with a small elastic that matches your hair color.
- Smooth flyaways with a pea-sized amount of cream on your palms, not directly on the braid.
The final effect is a little sharper than a standard lace braid. It feels modern without trying too hard.
9. Face-Framing Lace Braids into Loose Waves
Tiny lace braids near the face can do more than people expect. They pull the front pieces back just enough to show the shape of the face, then leave the rest of the hair to spill down in loose waves. On waist-length hair, that mix of control and softness looks expensive in the best plain-language sense of the word: it looks finished.
Start each braid at the temple with a half-inch to 1-inch section, then braid back toward the ear and stop once you’ve covered the front layers. Secure each side with a small clear elastic or pin the ends under a layer of hair. You’re not trying to make the braids the star. They’re there to guide the eye.
Tiny braids, big payoff.
This style works especially well if the lengths are curled in 1 to 1¼-inch sections or left in natural waves. Straight hair can feel a little too severe unless the rest of the finish is glossy and smooth. I also like it when the hair is parted off-center, because the asymmetry keeps the front from feeling too sweet.
If your fringe or shorter layers keep falling forward, this is a clean fix. It doesn’t hide the length. It just frames it better.
10. Lace Braid Bun with Length Left Out
A lace braid bun with length left out is the answer for days when you want some hair secured but you cannot quite give up the waist-length drama. The braid controls the top, the bun sits low and neat, and the rest of the hair stays free. It’s half-up without feeling flimsy.
Start one side lace braid at the temple and bring it toward the nape. Instead of continuing all the way down, wrap the braided section into a small low bun and pin it with U-pins or 4 to 6 bobby pins. Keep the bun under 3 inches wide so it doesn’t sit like a lump at the back of the head.
The loose hair should fall cleanly from just below the bun. That split between pinned top and open length is what makes the style interesting. If the bun is too big, it starts to steal attention from the hair you meant to show off. That’s a common mistake with long hair. People overbuild the top because they’re nervous about the weight. Don’t.
A little smoothing oil on the free lengths and a quick pass with a brush around the hairline are enough. The whole look should feel controlled, not frozen.
11. Zigzag Part Lace Braid

A zigzag part sounds fussy until you see it on long hair. Then it makes perfect sense. A straight part can look heavy when the hair reaches the waist, especially if the texture is dense. A zigzag breaks that visual block and gives the braid a sharper start.
Why the part matters
The braid itself doesn’t have to be complicated. The part is the detail. Draw it with a rat-tail comb, making small shifts every 1/2 to 3/4 inch as you move back from the hairline. Once the part is in place, braid along one side as a lace braid so the line of the braid follows the pattern you already made.
What to watch for
- Keep the zigzag shallow if your hair is fine. Deep peaks can look jagged.
- Smooth the roots before braiding so the part stays visible.
- Use a tiny bit of pomade at the temples if flyaways are standing up.
- Don’t make the braid too wide, or the part detail gets lost.
This style works best on straight or slightly wavy hair where the part line can still be seen. It’s not the simplest braid on the list, but it gives you a little more personality without demanding a full updo.
12. Pulled-Through Lace Braid
A pulled-through lace braid is the move when you want the look of a braid but need more hold than a real braid sometimes offers. That matters on waist-length hair, because heavy lengths can tug a regular braid downward and flatten the shape.
Instead of weaving three strands, you build a chain of tiny ponytails. Start with a small section at the crown, then add hair from only one side as you go. Each new section gets tied off with a clear elastic about 1 to 1½ inches below the last one, then the top ponytail gets split and pulled through the next. The result looks full and clean from the outside.
Why it holds up so well
The elastics do the structural work. That means the braid keeps its shape even if the hair is slippery or very dense. It’s also a good choice for long hair that has layers, because the shorter pieces are less likely to pop loose from a ponytail than they are from a traditional braid.
If you want it softer, tug each loop gently with your fingers once the whole chain is built. Not too much. You’re widening the braid, not undoing it.
This is a solid option for long days, active plans, or hair that needs to stay put without looking tight. It has a little more engineering behind it, and that’s fine. Sometimes hair needs engineering.
13. Waist-Length Halo Lace Braid
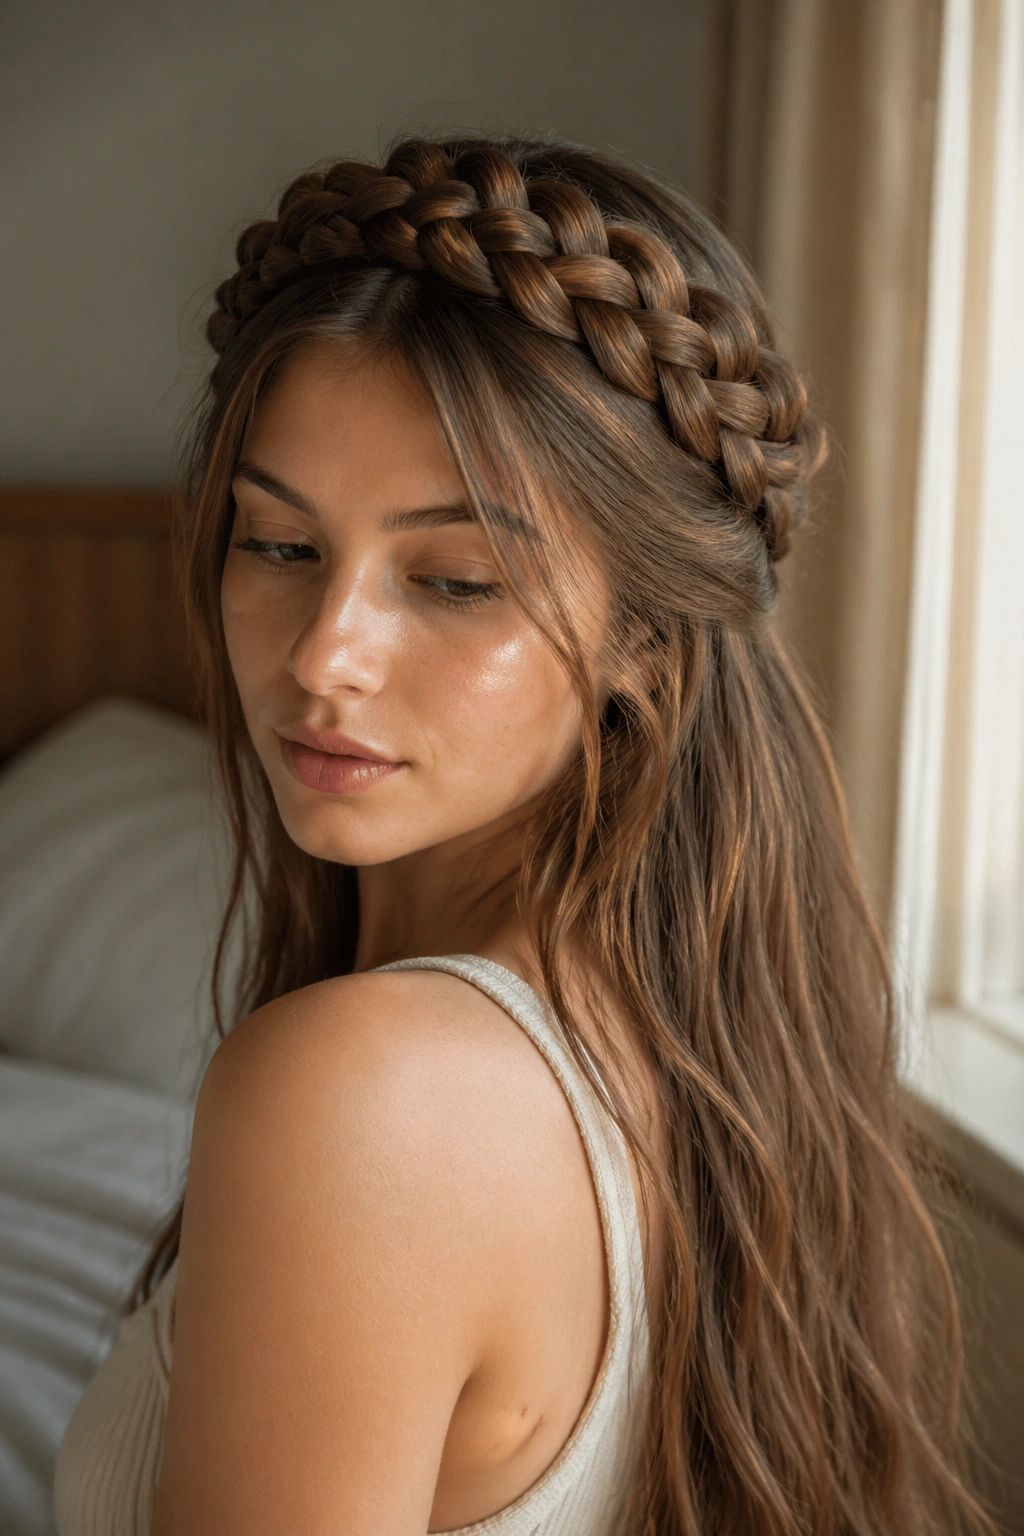
A halo lace braid is the most dramatic style on this list, and waist-length hair makes it feel lush instead of tiny. The braid travels around the head like a crown, then uses the length to create a clean finish that feels complete from every angle.
Keep the braid narrow — around 3/4 inch is plenty — or it starts to overwhelm the face. The key is support. Pin every 2 inches or so with bobby pins placed in a crisscross pattern, because long hair pulls more than most people expect. If you skip the extra pins, the braid will loosen at the back first.
I like this style when the rest of the hair is either tucked into the halo’s path or left as a low cascade. Both work. What matters is that the braid stays visible against the length below it. A halo on waist-length hair should feel like a frame, not a helmet.
There’s a particular satisfaction in this one. The hair is still long, still heavy, still obvious from across the room, but the braid changes the shape of all that length. It gives the hair a top line, which is half the battle with very long styles. If you want something that looks calm from the front and full from the back, this is the one I’d keep near the top of the list.