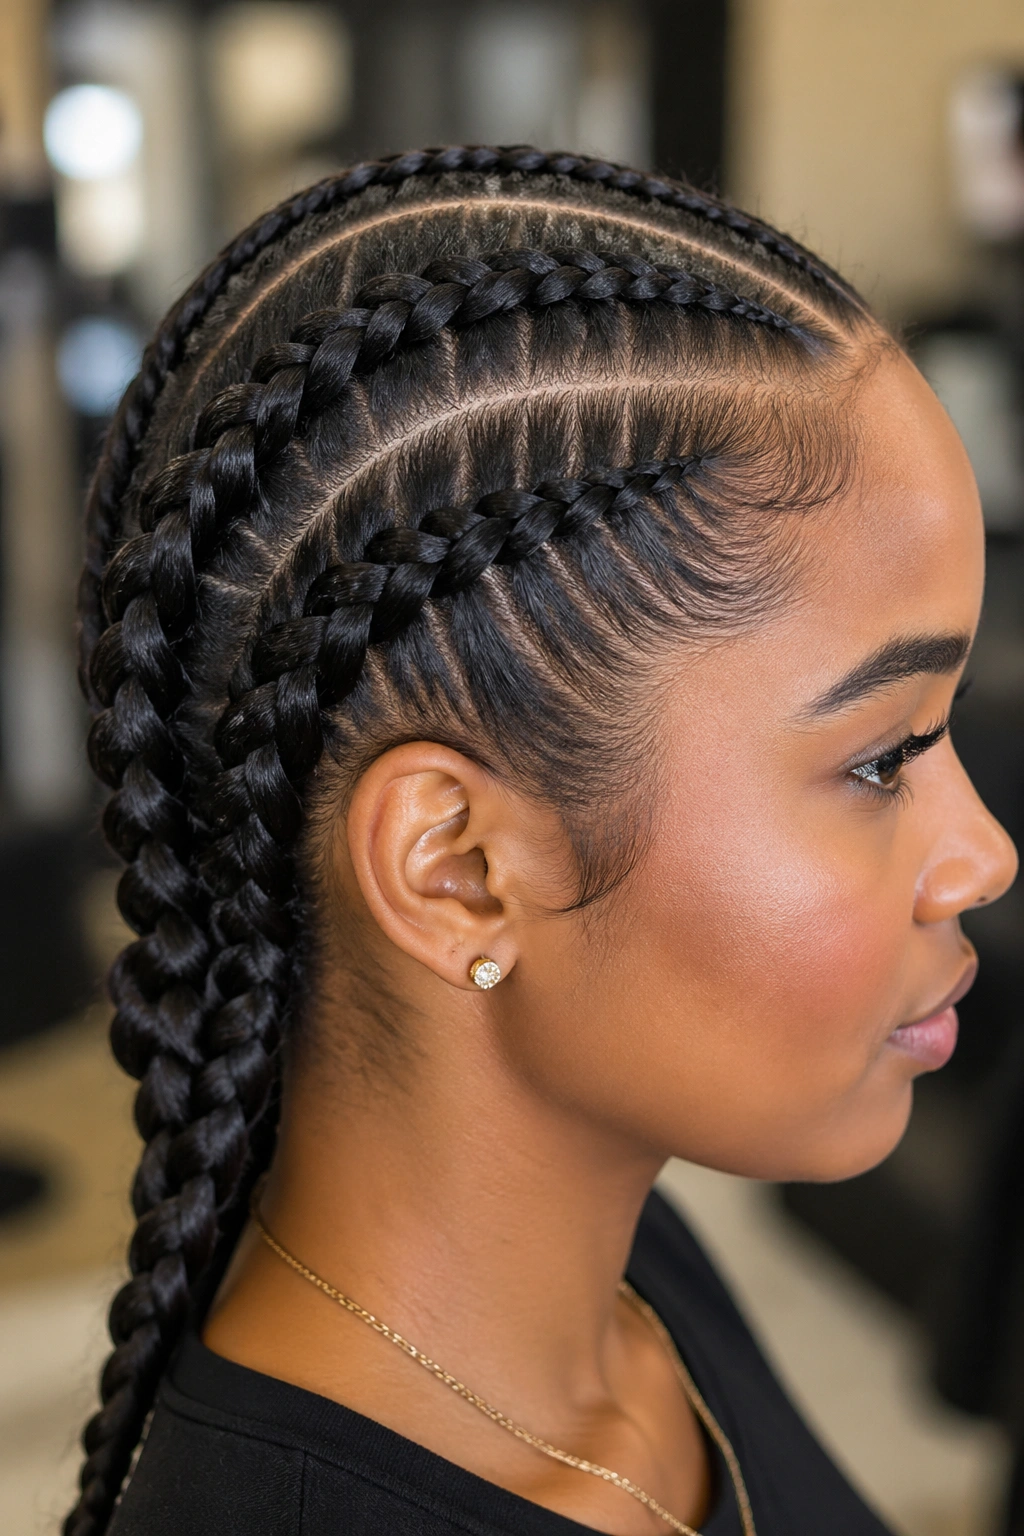
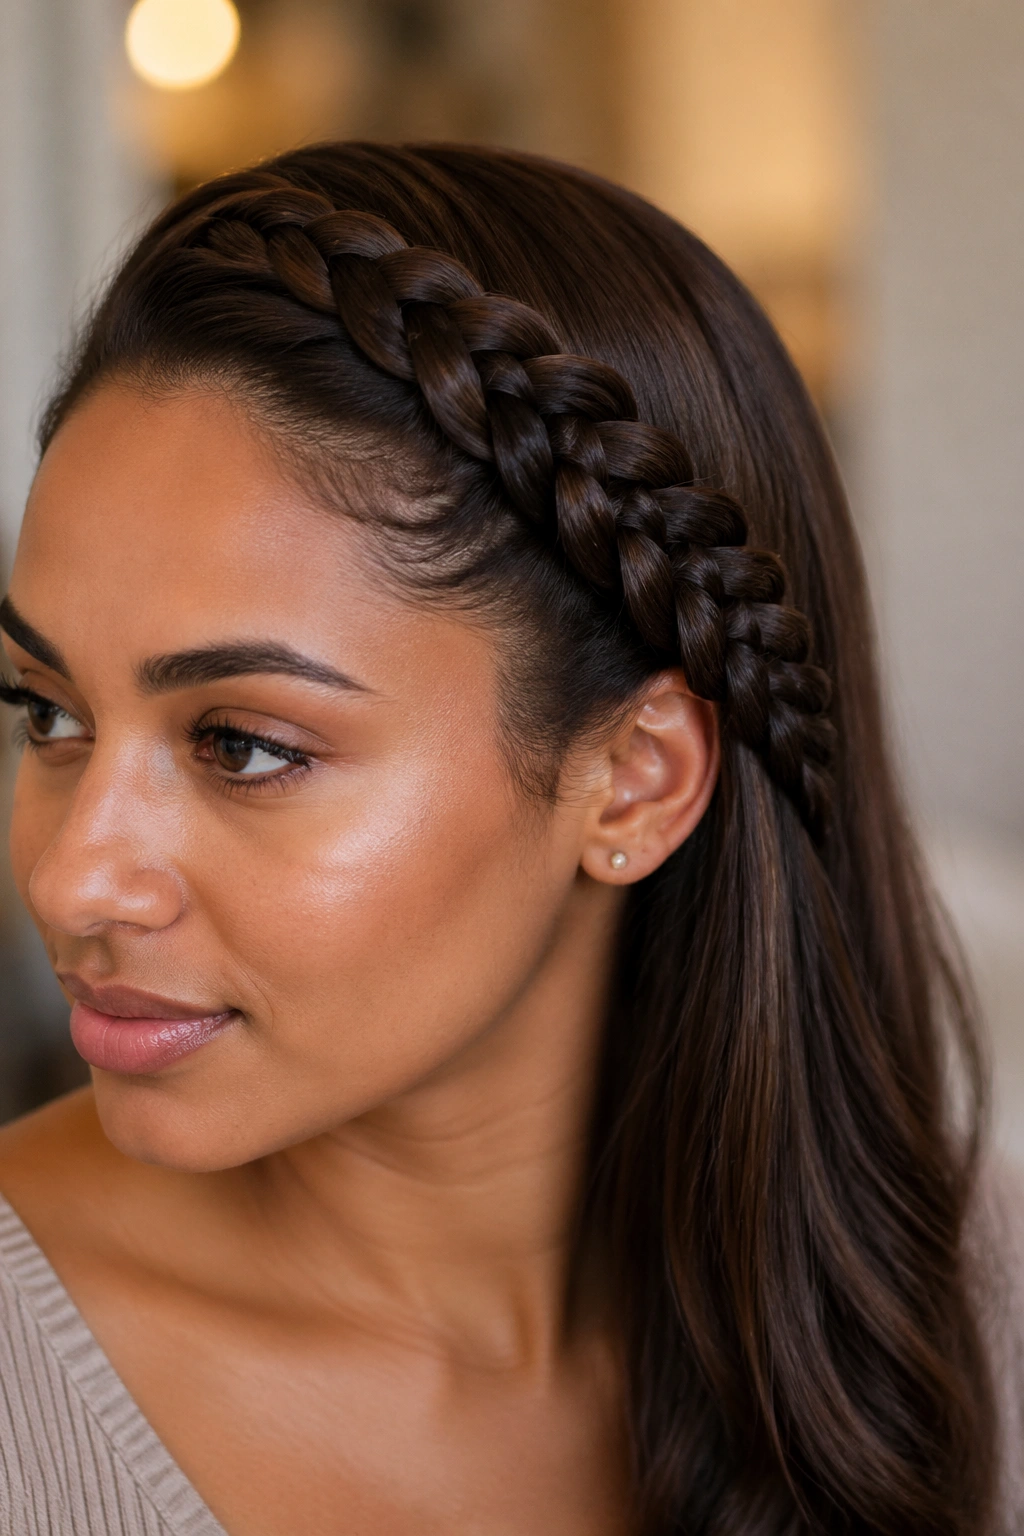
A Dutch braid that stays neat through a commute, a school pickup line, and a windy walk home is not magic. It’s tension, section size, and a clean anchor at the nape. Get those three right and the braid behaves; miss one and the whole thing starts fraying at the edges by lunch.
Most people blame their hair when a braid slips. Usually it’s the setup. Fine hair needs grip powder or second-day texture, silky hair needs a little grit from dry shampoo, and layered cuts need smaller sections so the shorter pieces have somewhere to go. A braid that starts loose at the crown never feels secure later, no matter how nicely you finish the ends.
Dutch braids are especially good for long wear because the strands cross under the middle, which keeps the braid sitting on top of the hair instead of sinking into it. That raised shape gives you more hold at the scalp and more control over the finished look. A tight enough braid can survive a gym session; a well-planned one can also look polished enough for a meeting or a wedding.
Some styles here are clean and strict. Others are softer, a little lived-in, and better when you want movement without losing control. All of them share one thing: they keep the braid anchored where it matters, and that is the part people usually get wrong.
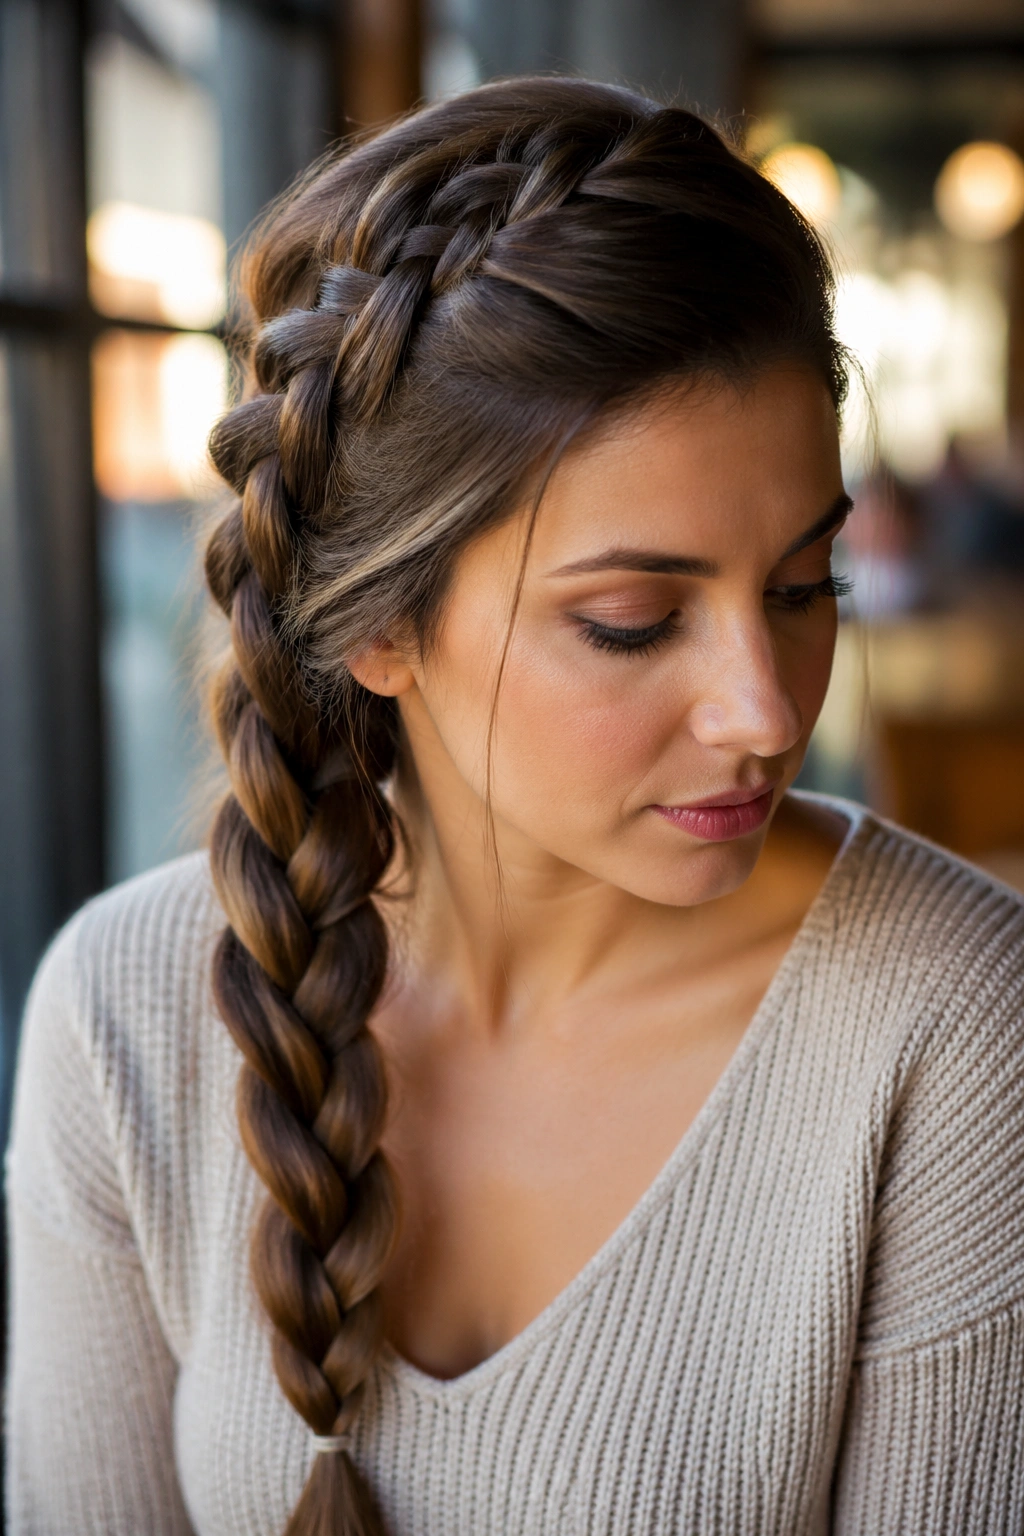
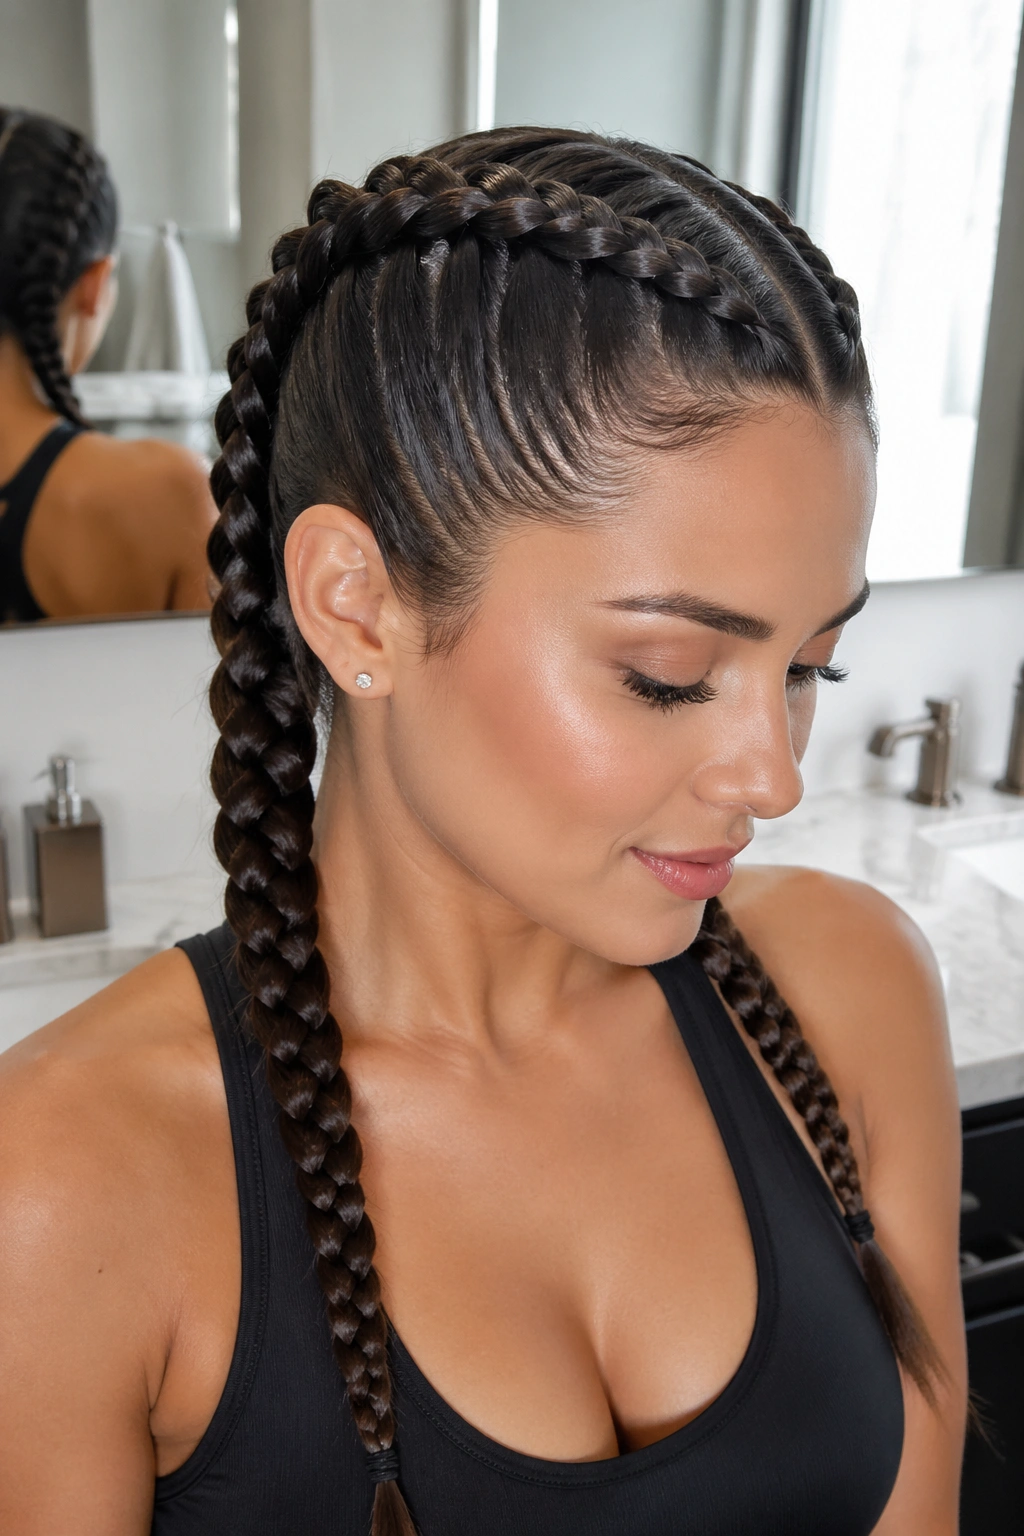
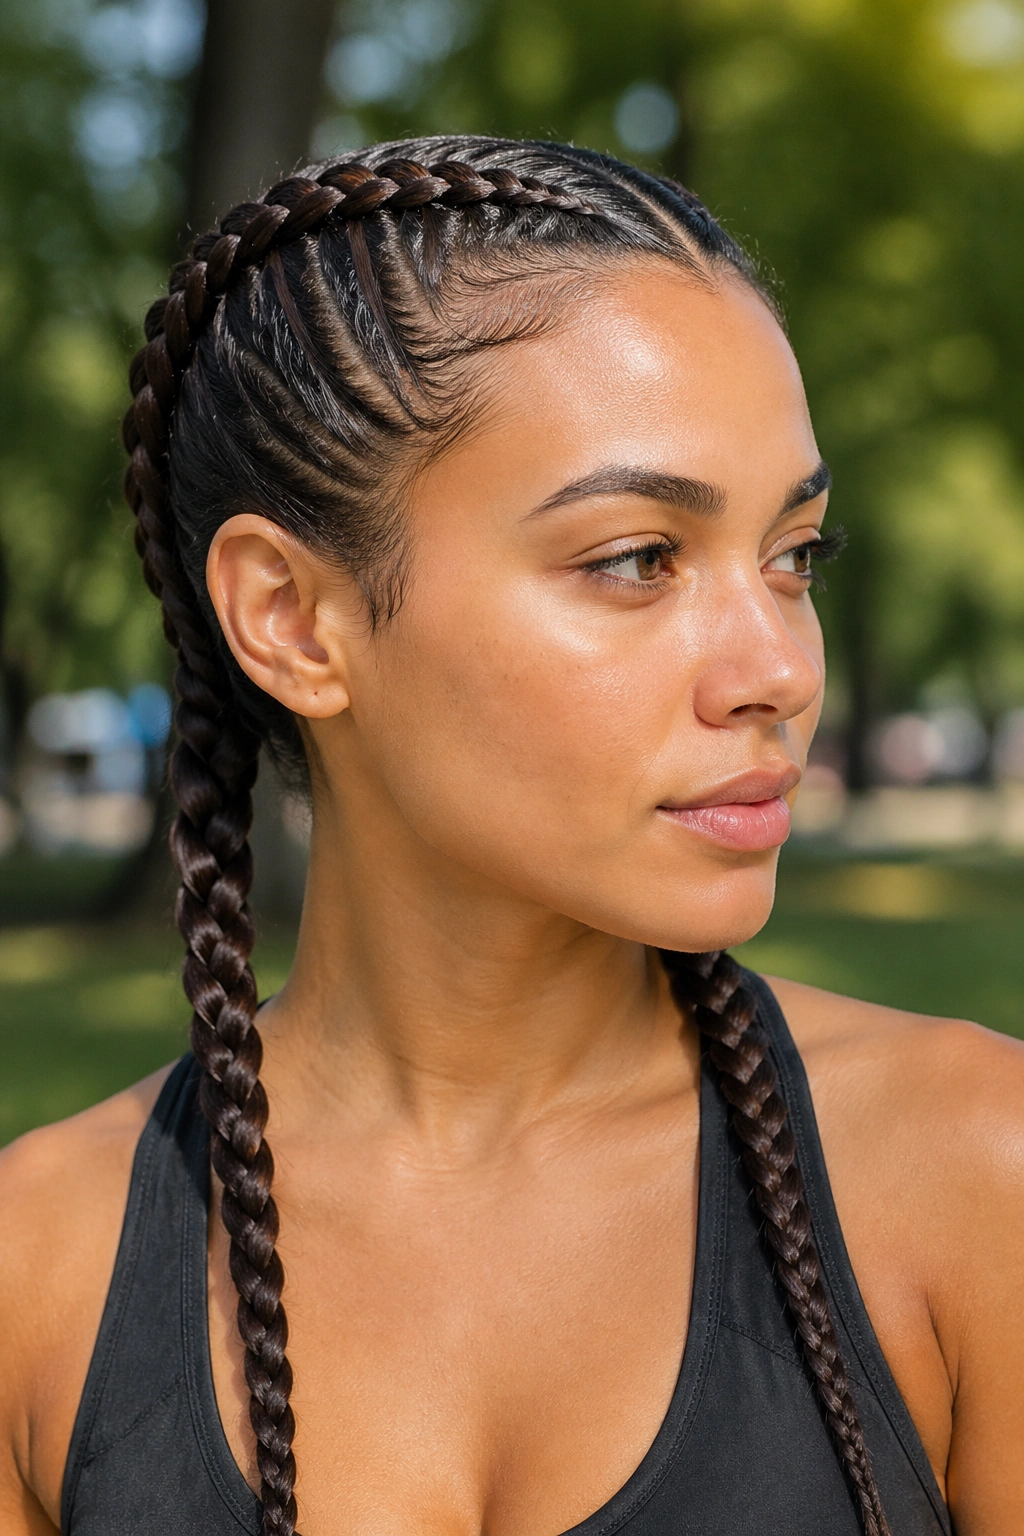
1. The Center-Part Dutch Braid That Holds All Day
This is the braid I’d reach for first if I wanted one style to behave from morning to night. A straight center part gives both sides the same tension, which keeps the braid from twisting or drifting as it grows down the back.
Why It Stays Put
Start with 1-inch sections at the hairline and keep the first few cross-unders snug. That early grip is what decides whether the braid feels secure or loose by noon.
- Make the part clean all the way to the nape.
- Cross each side under, not over, with steady pressure.
- Keep the section size the same on both sides.
- Finish with a snag-free elastic and a light mist at the crown.
Tiny tip: if your hair slips easily, rough it up with dry shampoo before you start. Clean, silky hair is gorgeous. It is also slippery.
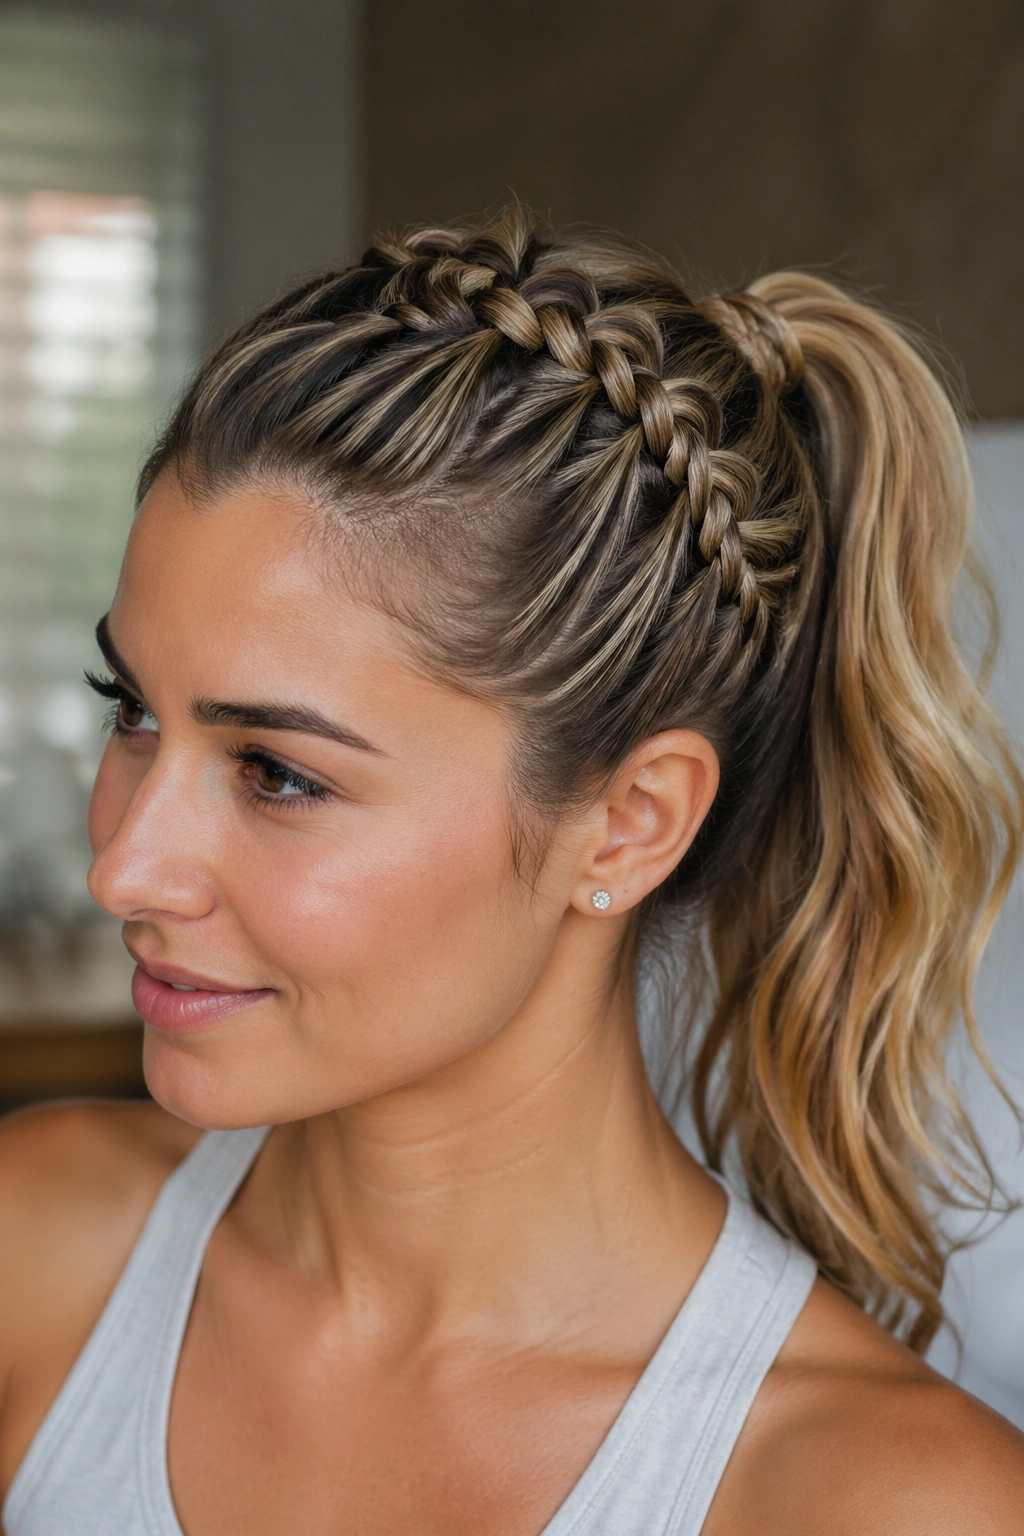
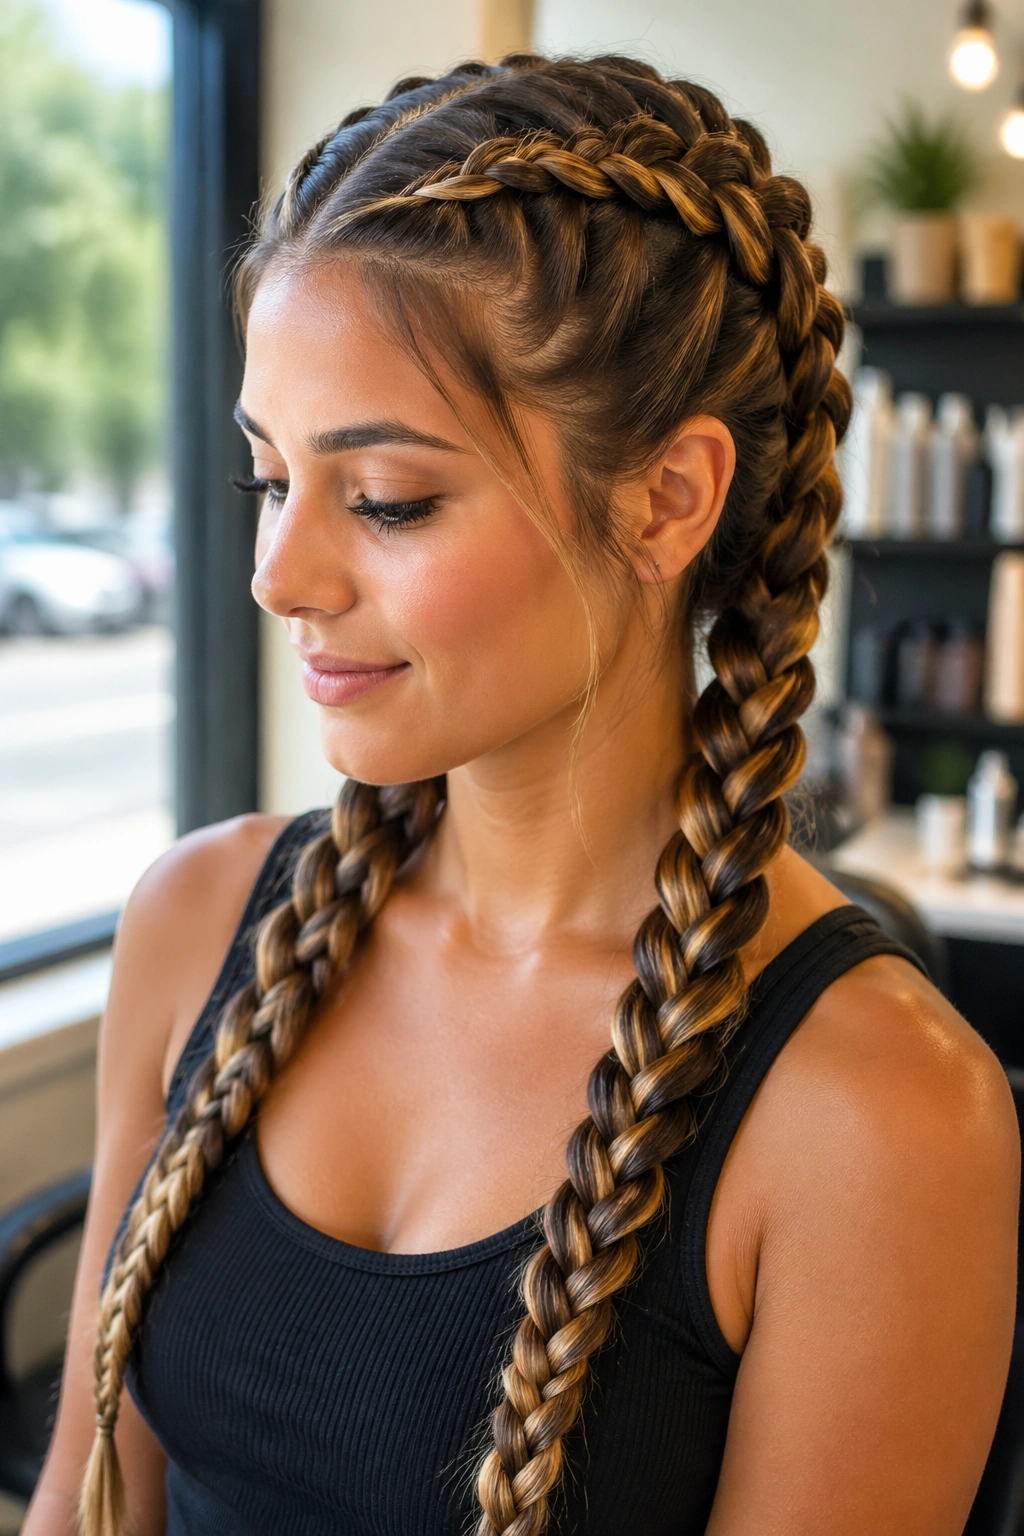
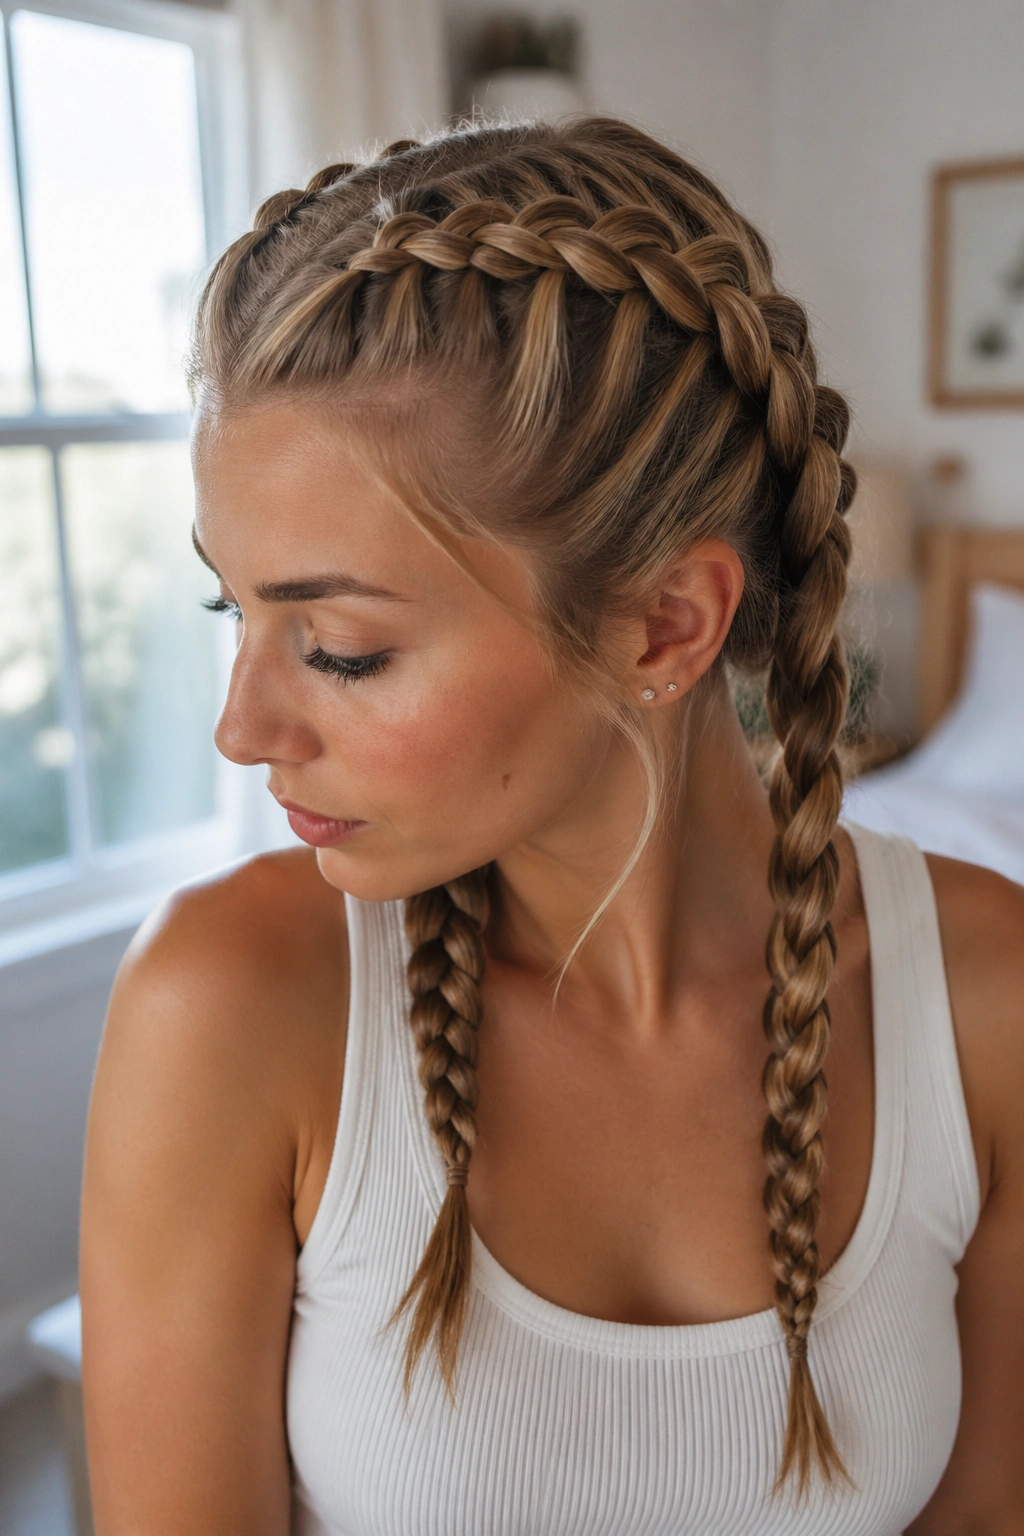
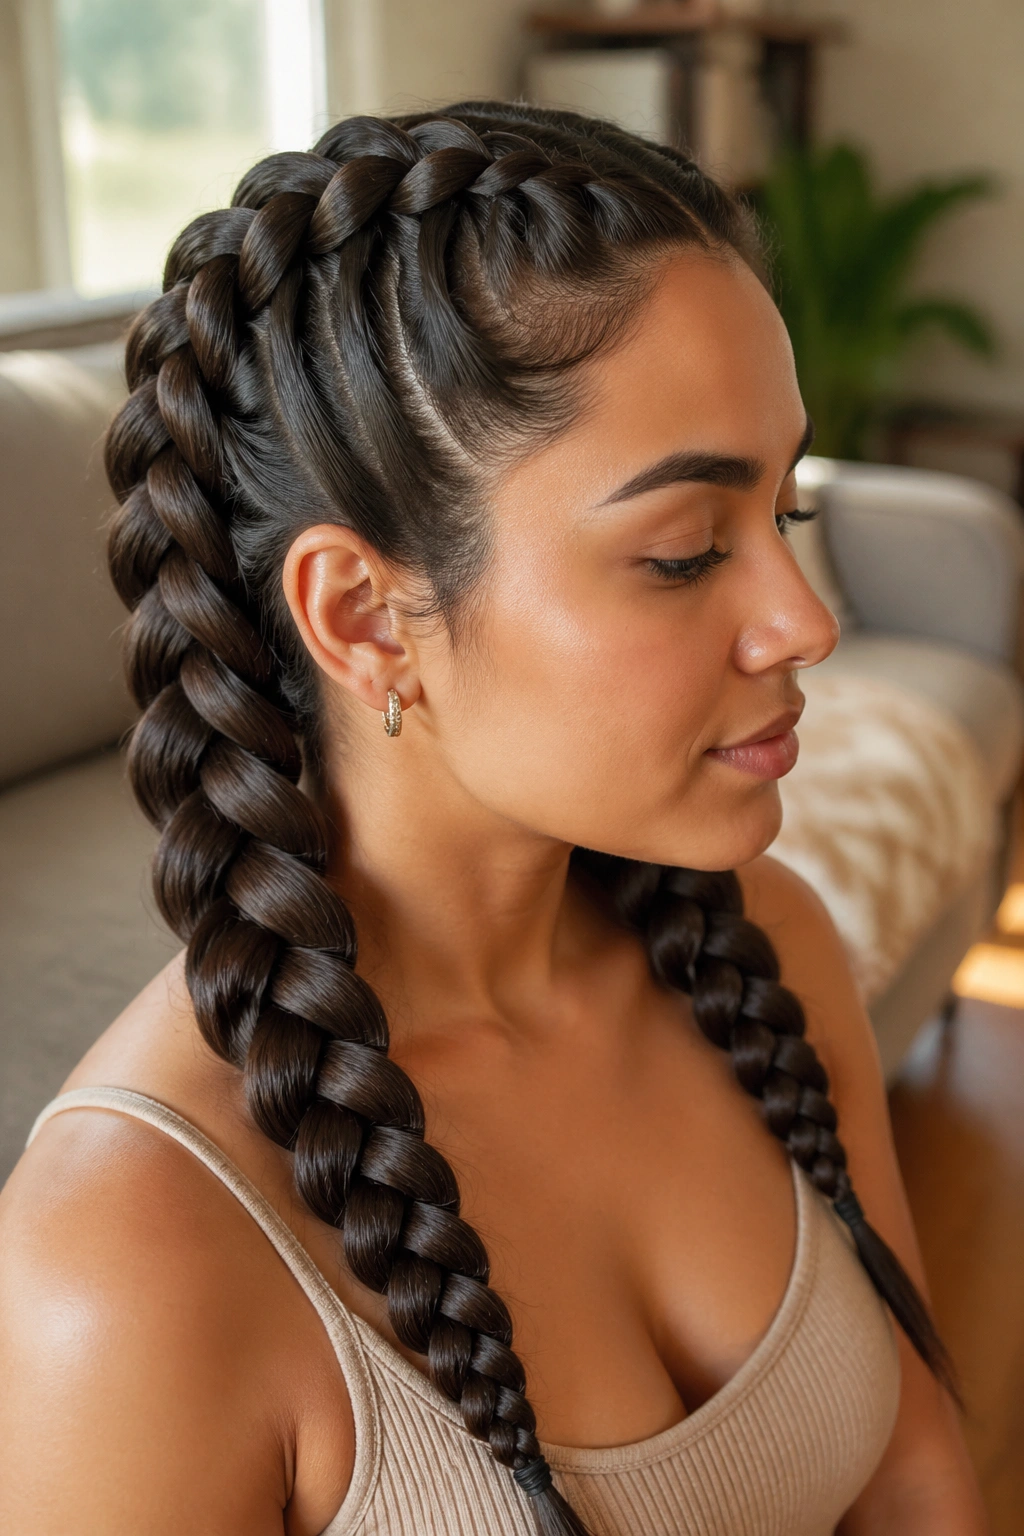
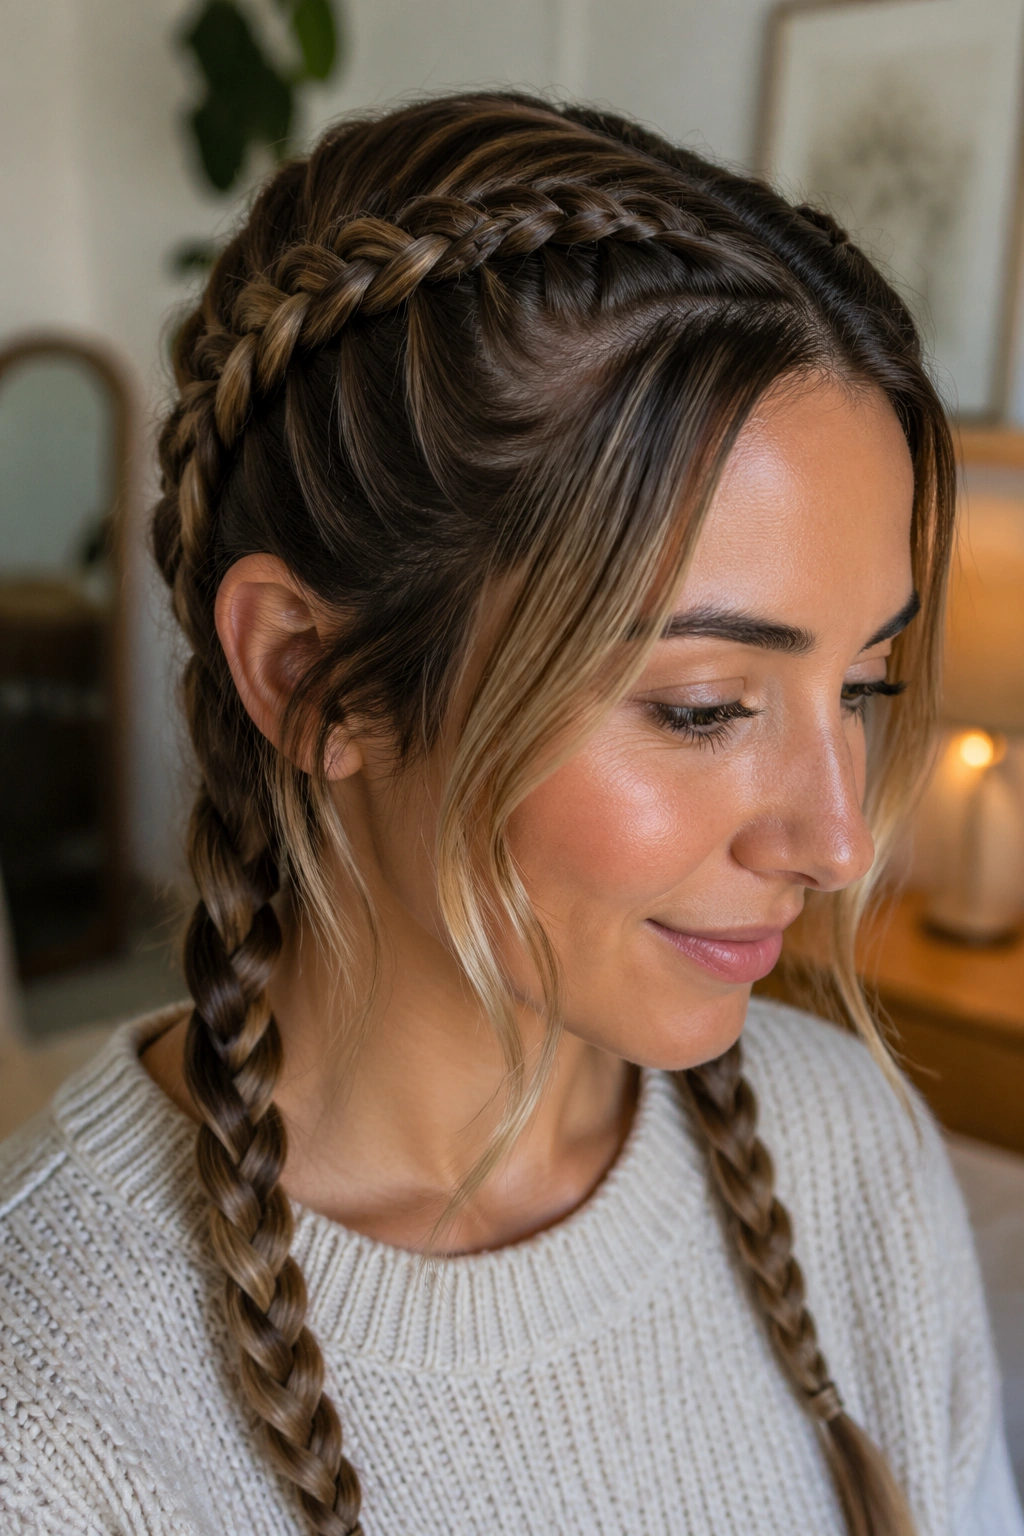
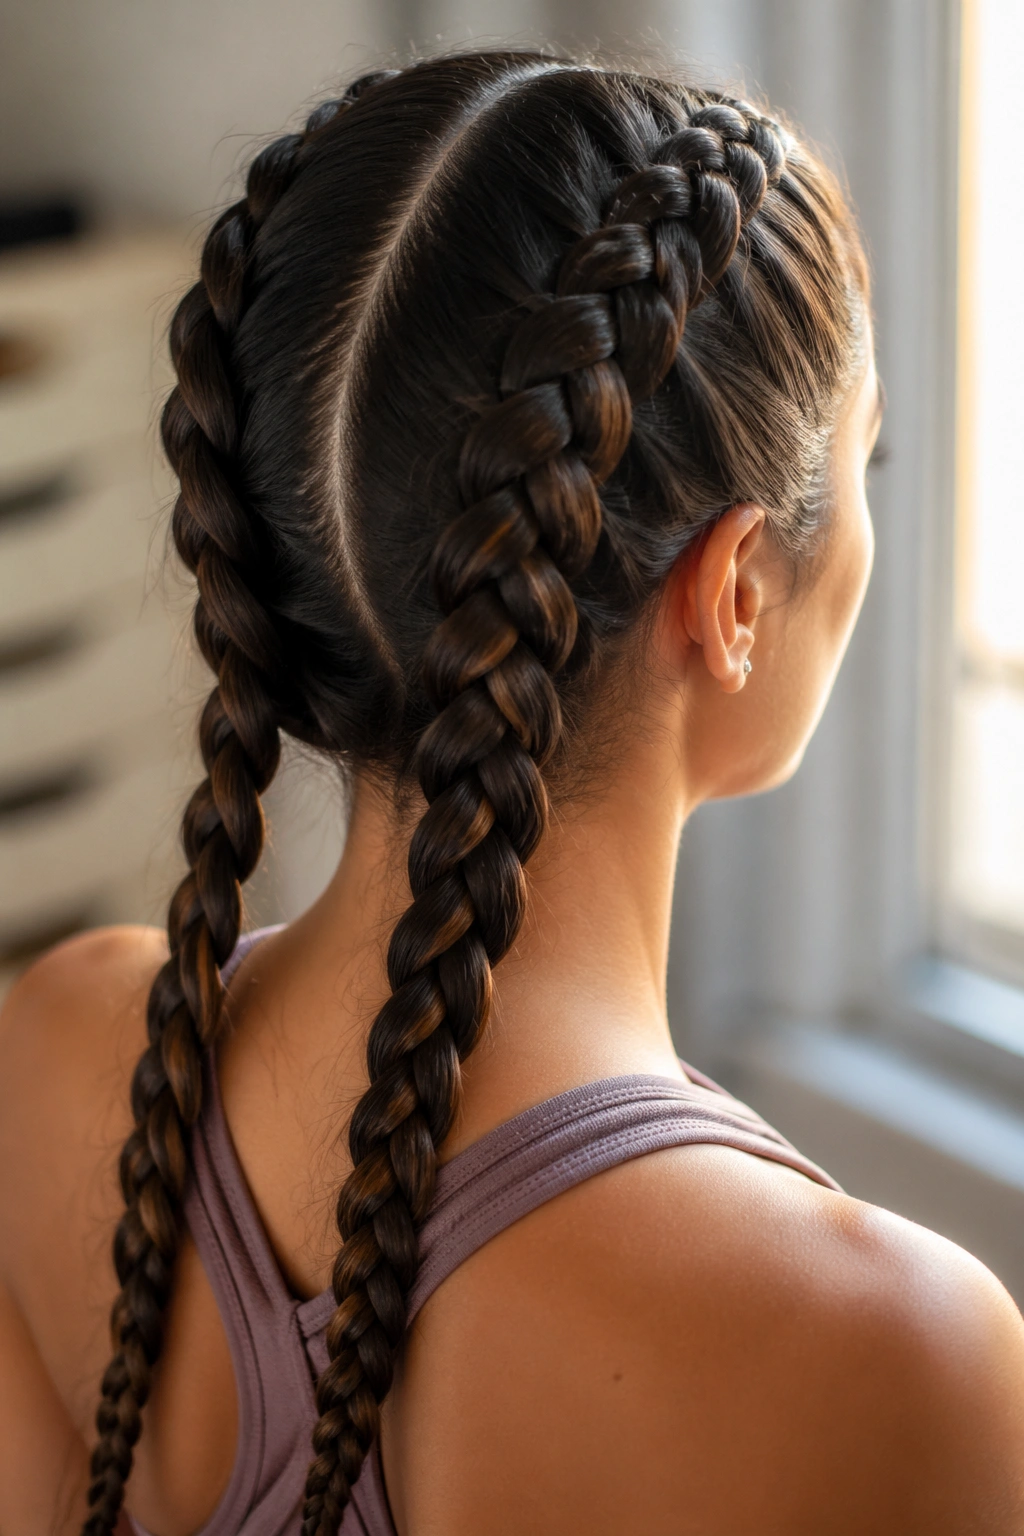
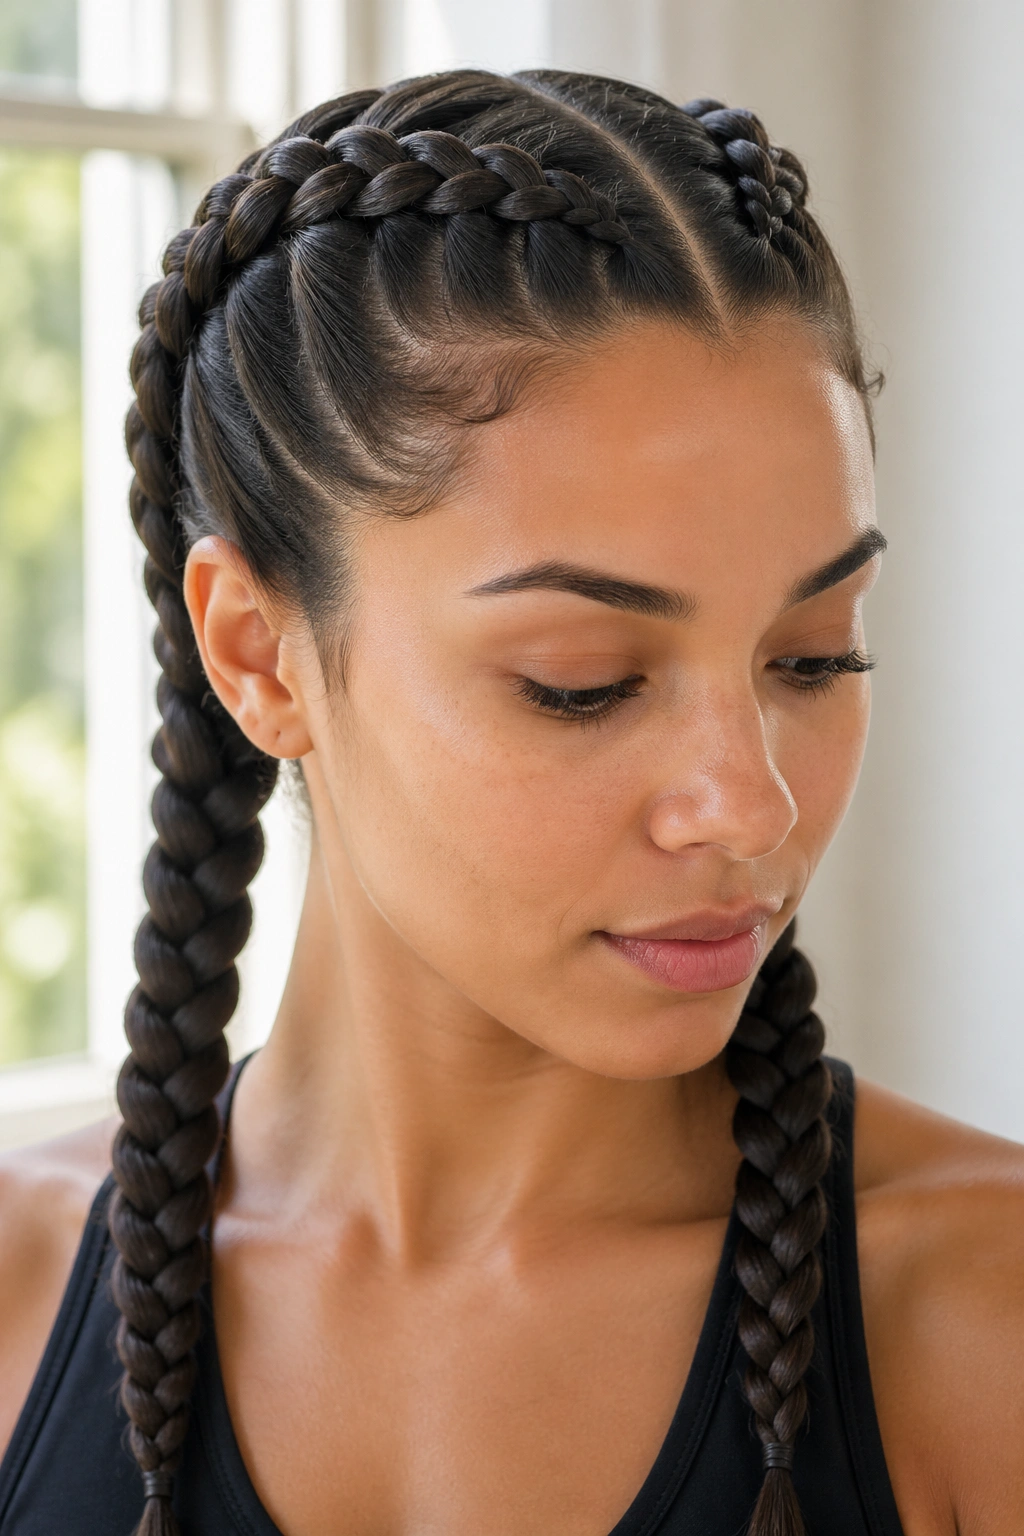
2. Twin Dutch Braids for a Clean, Locked-In Finish
Want a style that feels secure without turning into a helmet? Twin Dutch braids are the sweet spot. They spread the weight across both sides of the head, so each braid carries less pull and the whole style tends to stay balanced longer.
The trick is symmetry. Make the part straight, then match the section size on both sides as closely as you can. If one braid is wider, it will sit lower and loosen faster.
Keep the braid anchored close to the scalp for the first 3 to 4 inches, then decide how tight you want the ends. Tight ends are better for workouts. Softer ends look nicer under a coat or scarf.
3. Boxer Braids That Sit Tight Against the Scalp
Boxer braids do not need to be painfully tight to stay put. They just need to be firm enough that the braid hugs the head instead of hovering off it. That’s the part that makes them so good for long days, especially if you move around a lot.
The Sweet Spot for Tension
Go too loose and the braid puffs out by lunchtime. Go too tight and your scalp starts complaining before you’ve even finished breakfast.
- Start the braid right at the hairline.
- Keep the first crossover close to the scalp.
- Use small, even pickups as you move back.
- Stop pulling the braid apart until after it’s secured.
A little texture spray helps here, but don’t pile it on. Boxer braids work because they’re neat, not because they’re crunchy.
4. A Side Dutch Braid That Sweeps Over One Shoulder
If you keep tucking hair behind one ear all day, this braid saves you the trouble. A deep side part shifts the braid’s weight to one side, which makes the style feel softer without making it less stable.
Start just above the temple and follow the head’s curve down toward the opposite ear. That diagonal path gives the braid a natural place to sit, and it also hides the base of the braid better than a straight middle part does.
A couple of hidden pins behind the ear help a lot. Use them where the braid meets the collarbone, especially if your hair is thick and likes to slide.
5. The Dutch Braid Ponytail That Keeps Length Controlled
Long hair behaves better when the braid and ponytail work together. The braid handles the top half, where slipping usually starts, and the ponytail keeps the rest from turning into a loose curtain by afternoon.
A polished version starts with a Dutch braid from the hairline to the crown or nape, then stops and gathers the remaining hair into a ponytail. That handoff matters. Keep the elastic tight at the braid end, then secure the ponytail base a second time if your hair is heavy.
Wrap a small strand around the elastic if you want a neater finish. It takes ten seconds and makes the whole style look more deliberate.
6. The Low Dutch Braid Bun That Never Feels Fussy
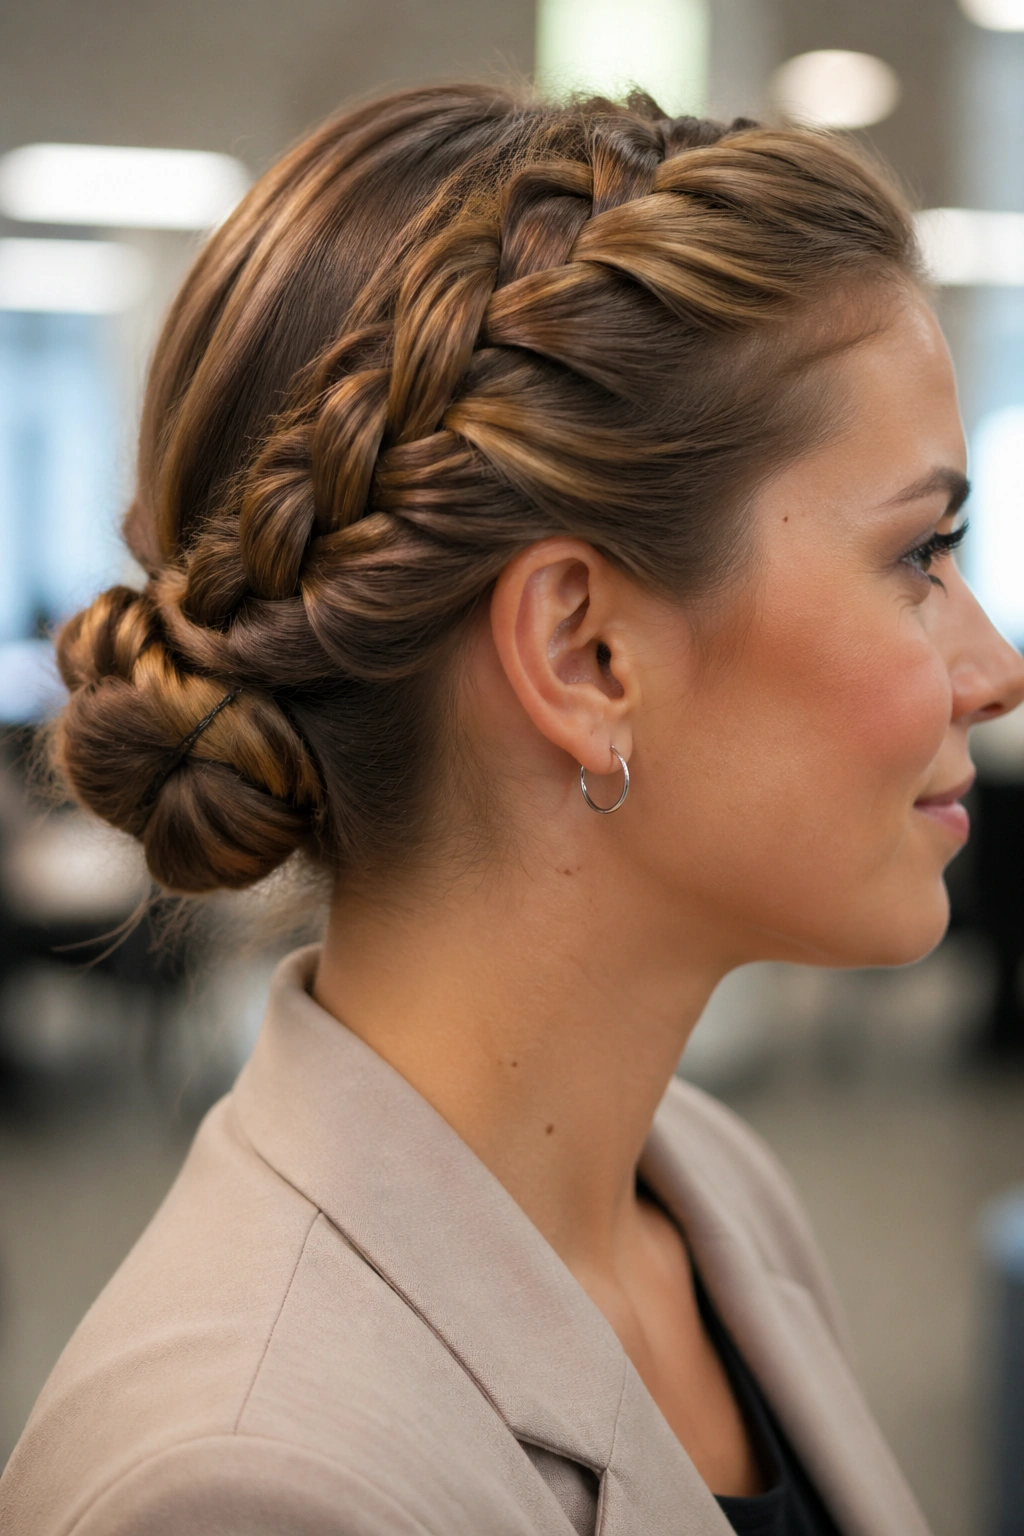
The neatest buns often start with a braid that feels almost too snug. That snugness is what keeps the bun from sagging at the back of the head, which is the usual weak spot.
Braid down to the nape, then coil the length into a low bun and pin it in an X shape with two bobby pins. If your hair is dense, use a third pin at the bottom edge. You want the bun to feel pinned, not merely parked there.
This is the style I like for long office days and dinners where you do not want to keep fixing your hair. It also works when your ends are a little dry. They disappear anyway.
7. Dutch Crown Braid That Frames the Hairline
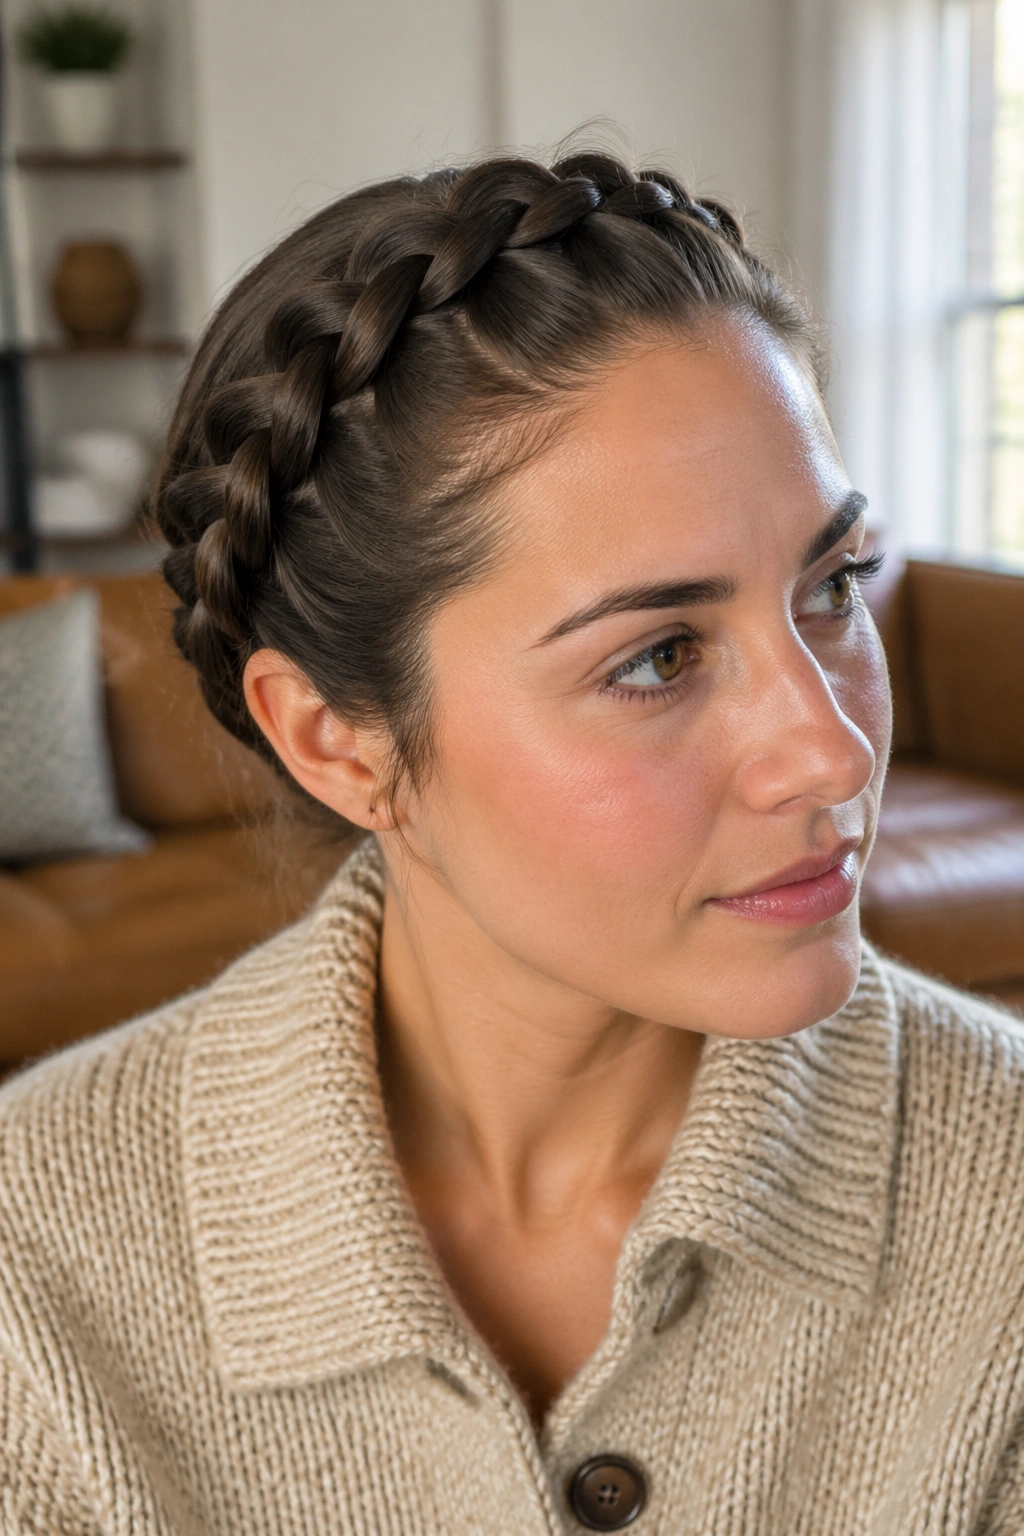
Need a braid that looks polished from the front and still stays steady at the back? The crown braid does both jobs at once. It starts near one temple, travels around the hairline, and gives the face a clean frame without needing a lot of extra styling.
What Keeps the Crown from Loosening
The hairline is the weak point, so keep your pickups small for the first few inches. That matters more than people think.
- Follow the curve of the head, not a straight line.
- Pin every 1.5 to 2 inches as you go.
- Keep the braid snug at the temples.
- Hide the tail under the braid instead of leaving it loose.
If you skip the extra pins, the crown often slides at the back. Not by much. Enough to annoy you.
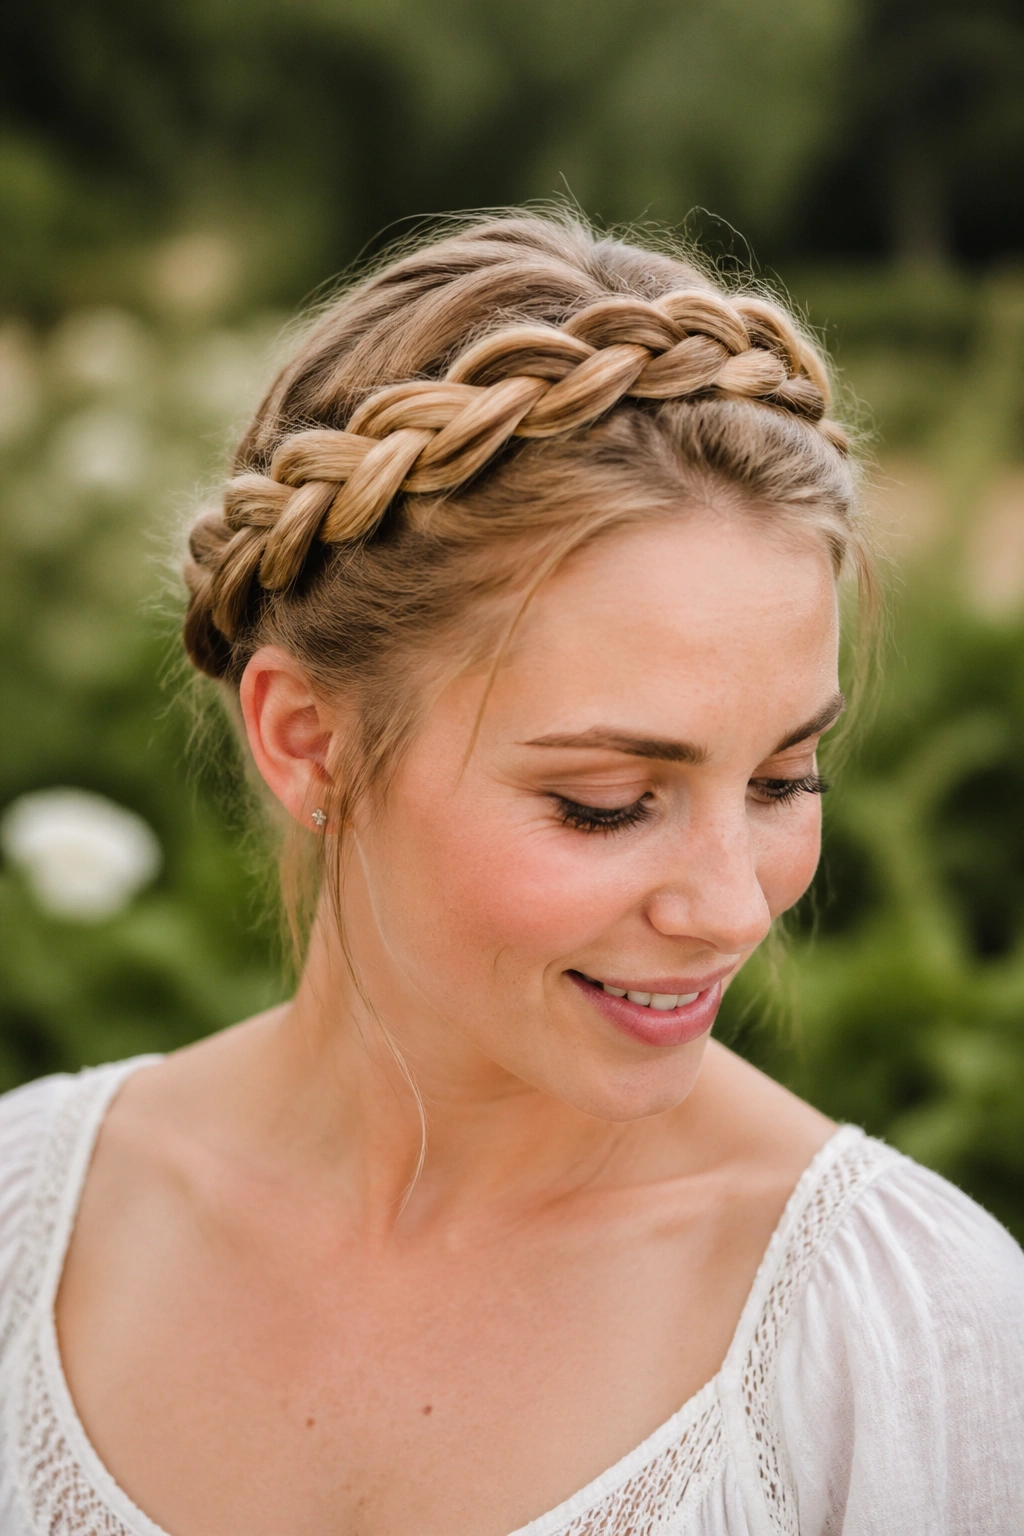
8. A Dutch Halo Braid Wrapped All the Way Around

This is the style that saves you when you want every strand off the neck and off the face. A halo braid circles the head like a frame, and because it sits close to the scalp, it tends to hold better than looser braided updos.
The trick is pinning the seam where the braid ends and begins. That spot needs more support than the rest, because it carries the weight of the entire loop. I like to cross two pins over the join, then add one more pin underneath if the hair is thick.
Use a mirror at the back. Always. Halo braids can look finished from the front while the hidden seam is slowly slipping at the nape.
9. Dutch Milkmaid Braids Crossed Over the Head
Unlike a halo braid, milkmaid braids feel a little softer and more old-world. You make two Dutch braids, bring them up and across the top of the head, then tuck the ends under so the whole shape reads as one rounded crown.
That crossover is the part worth getting right. If the braids are too loose, they sag. If they’re too stiff, the style can look boxy. I prefer a snug braid at the roots and a tiny bit of width through the mid-lengths.
Small Details That Help
- Make the two braids equal in thickness.
- Keep the ends tucked flat under the crossed sections.
- Use pins that match your hair color.
- Add a silk ribbon if you want a softer finish.
The ribbon is optional. The pinning is not.
10. Half-Up Dutch Braids That Keep the Front Pieces Tamed
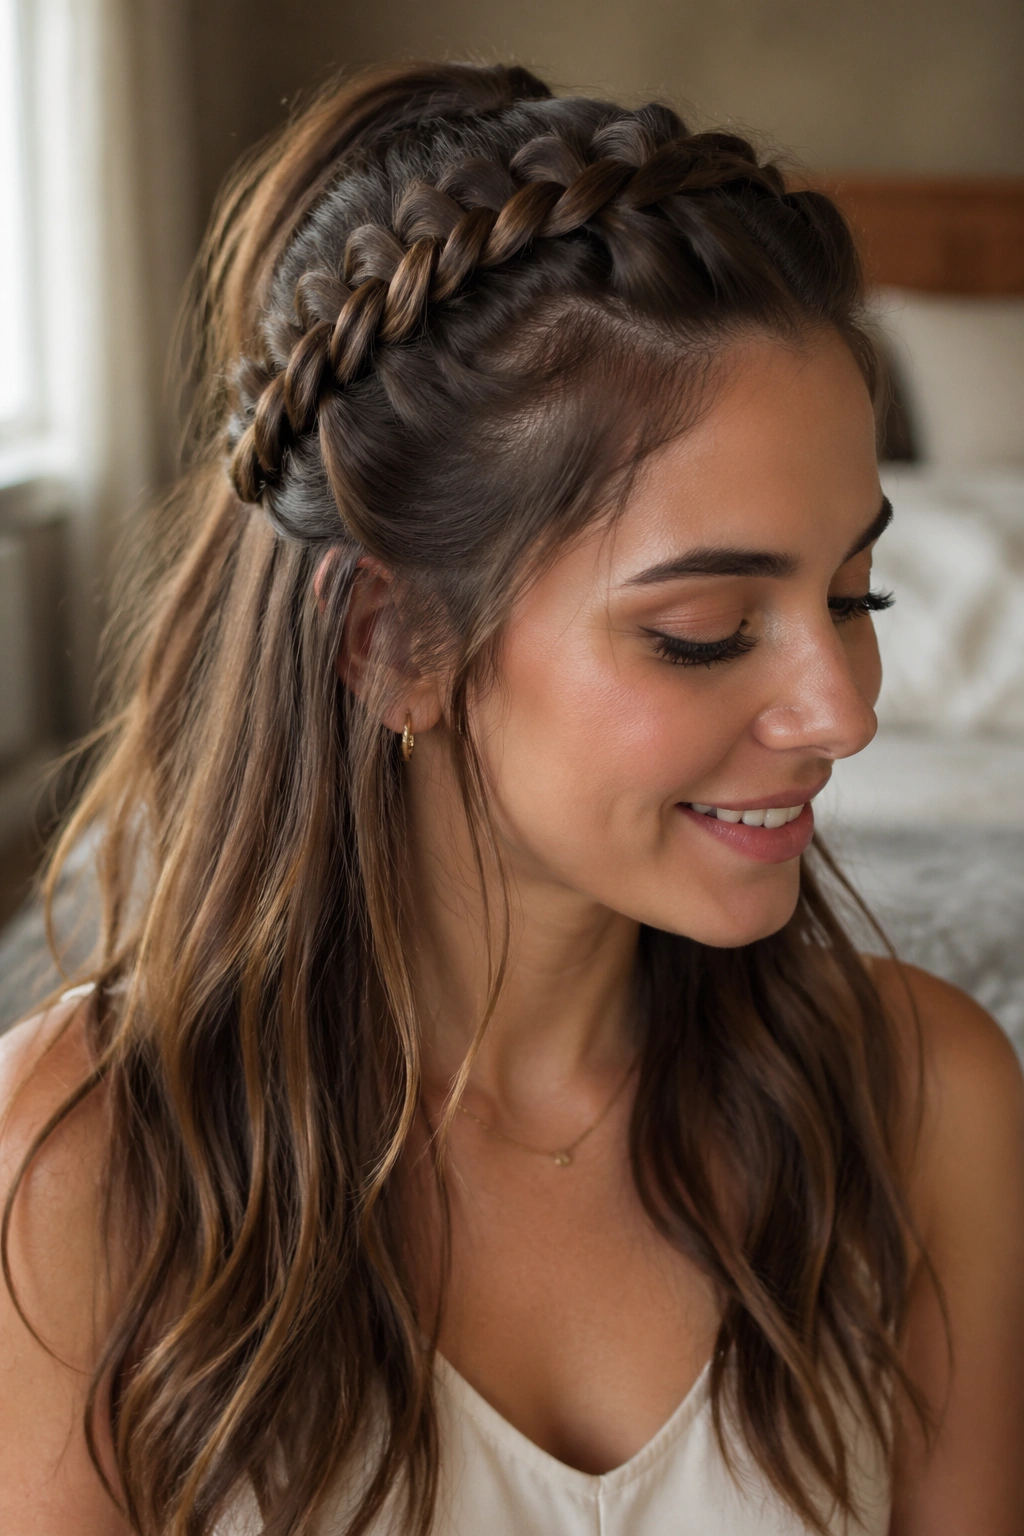
Half-up versions are the sneaky workhorse of this whole list. They let you keep the front and crown controlled while the rest of the hair moves freely, which is useful when you want some softness without losing the braid’s hold.
This works especially well on layered cuts. The top section gets braided tight enough to stay in place, while the lower hair keeps its natural shape. If your front layers fall out easily, mist the section with light hold spray before you begin.
I like this style for long days indoors because it keeps the face open without flattening the rest of the hair. That balance is hard to get with one braid alone.
11. A Dutch Braid Into a Wrapped Low Bun
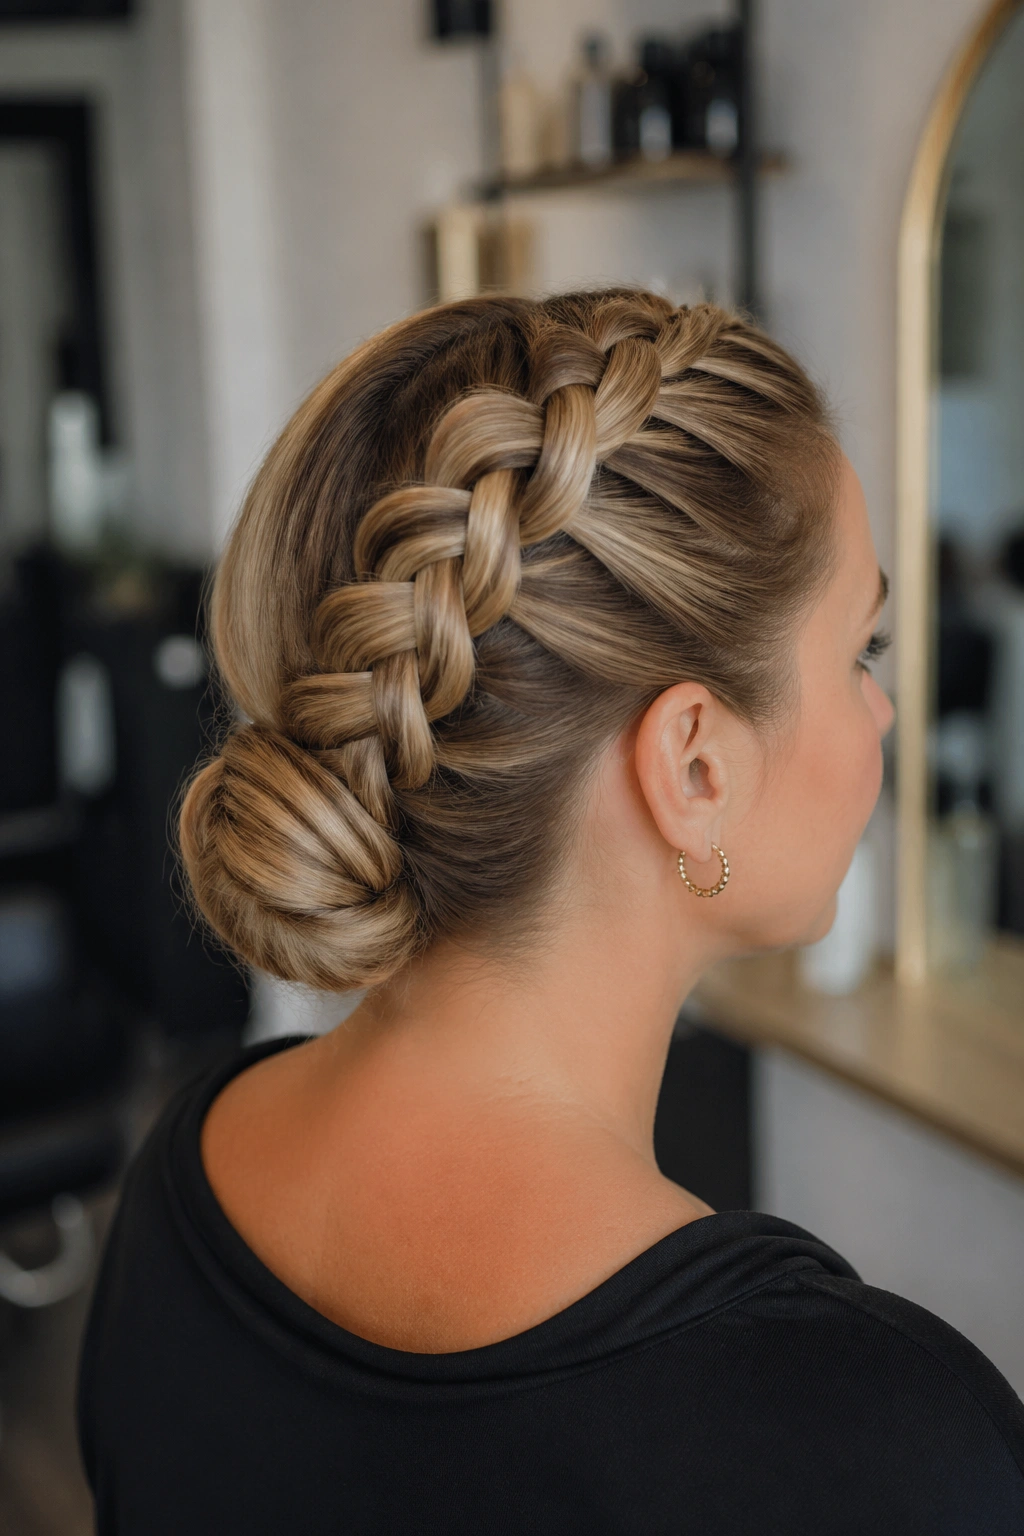
Start the braid at the crown, then hide the rest in a bun and nobody sees the handoff. That’s the charm of this style. The braid gives the bun a locked-in base, and the bun keeps the tail from swinging around all day.
Where the Trick Happens
Stop braiding when you reach the nape and secure the length with a small elastic. Then wrap the tail into a coil close to the head, not out at the ends.
- Coil the hair in one direction only.
- Pin the bun from both sides.
- Tuck any short tail ends underneath.
- Use a few small pins instead of one giant one.
The bun should sit low and compact. If it feels bulky, it will wobble.
12. Twin Dutch Pigtails With Loose Ends
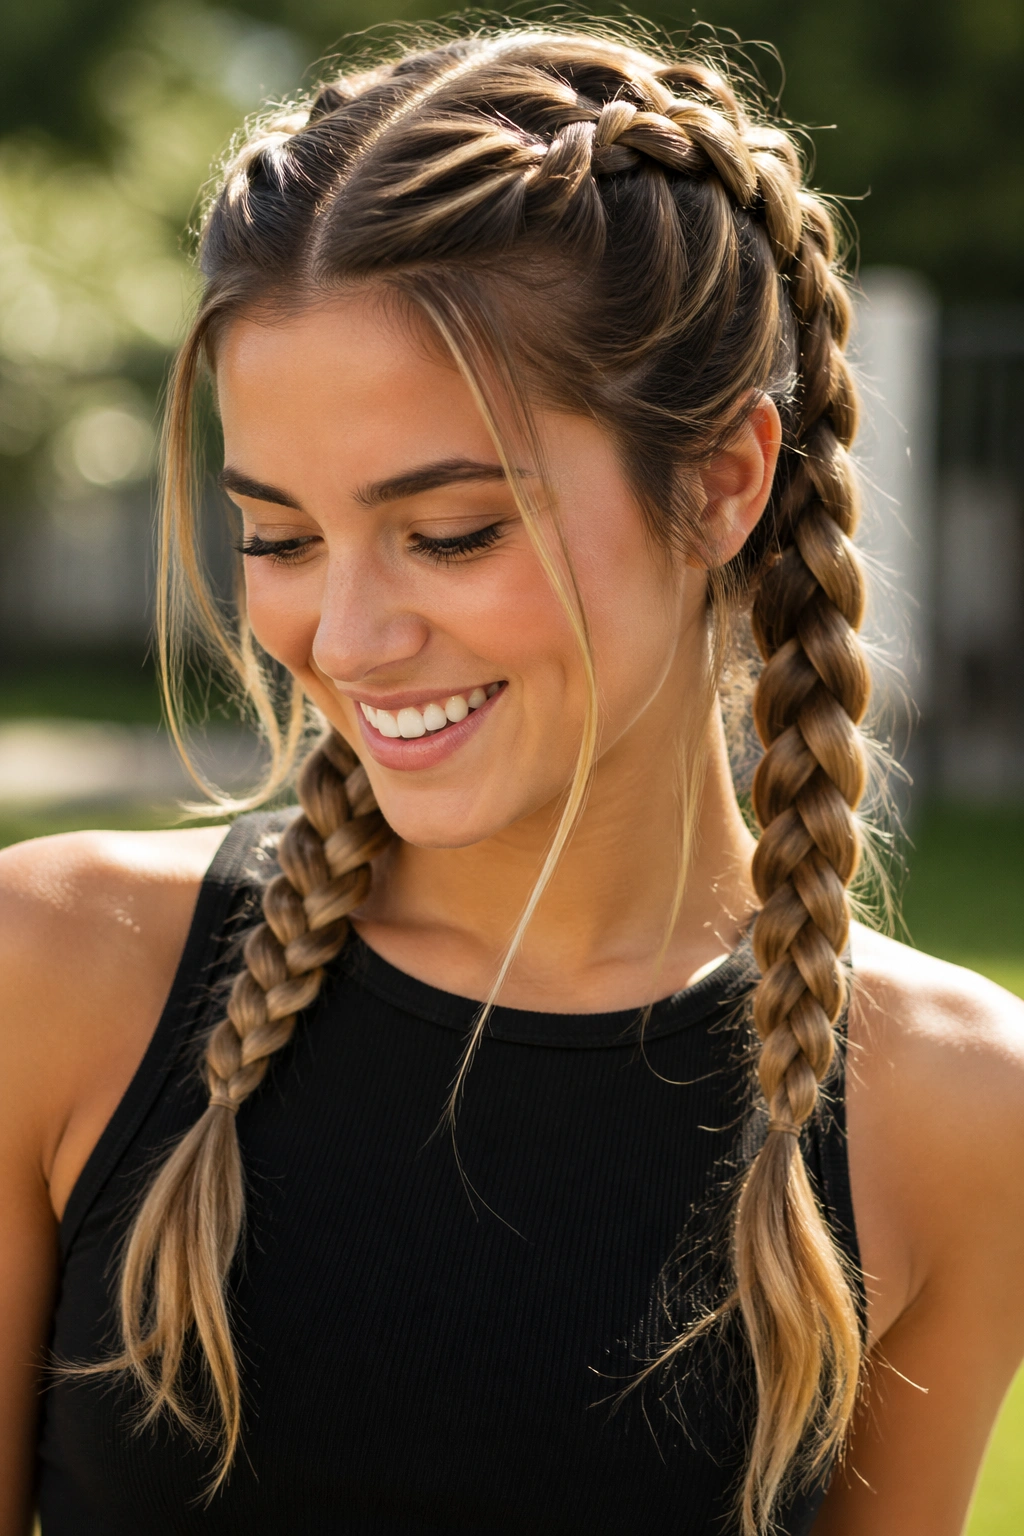
Fast, cheerful, and stubborn. Twin pigtails with Dutch braids give you the control of braided roots and the movement of loose ends, which makes them a nice middle ground between sporty and relaxed.
The lower half can stay straight, waved, or curled. That choice changes the whole mood. Straight ends look sharper; soft bends make the style feel more casual and less school-uniform.
Keep the braids a little lower on the scalp than boxer braids if you want them to feel less severe. That one change makes a big difference. The style still holds, but it doesn’t pull your whole face back with it.
13. Ribbon-Woven Dutch Braids With a Little Extra Grip
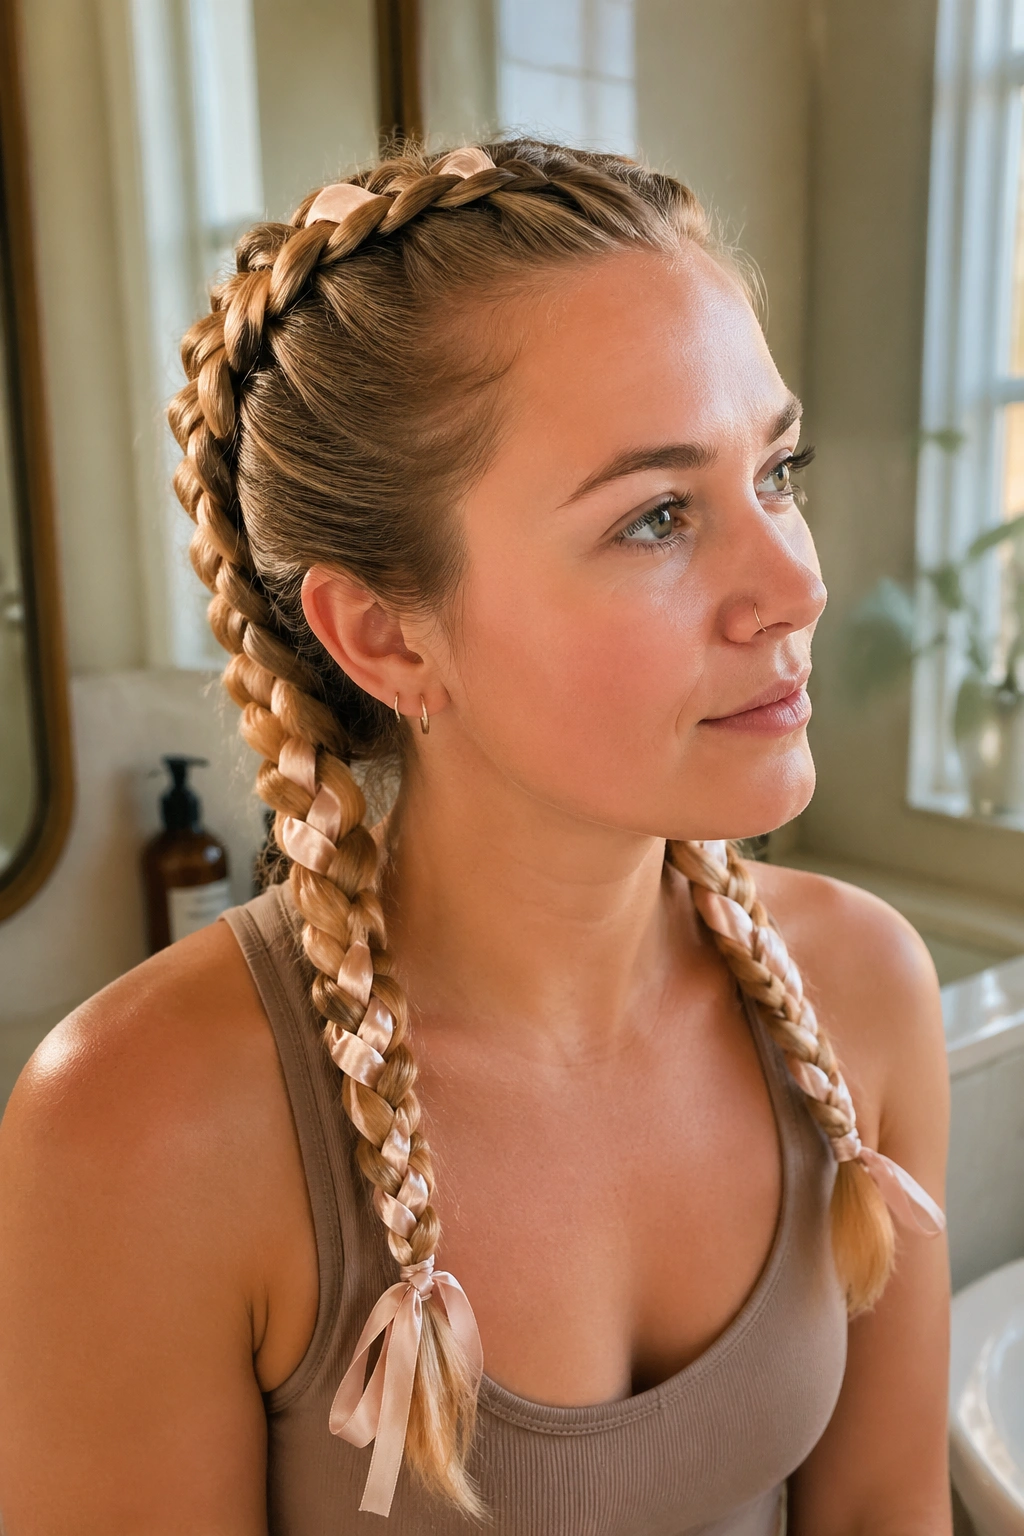
A 1/4-inch ribbon can do more than decorate here. When you weave it through the outer sections of a Dutch braid, it adds a little structure and can help the braid feel more secure, especially on smooth hair.
Choose a ribbon that lies flat. Satin works if you want shine; cotton gives a bit more friction. Tie it near the starting point, then feed it in with the hair as you cross under.
What to Watch For
- Keep the ribbon flat so it doesn’t twist.
- Match the ribbon width to the braid size.
- Secure the end with a tiny clear elastic.
- Avoid silky ribbon on very slippery hair unless you use texture spray first.
The braid looks prettier with ribbon, yes. It also feels more anchored. Both matter.
14. Dutch Braids with Clip-In Extensions for Extra Length
What if your braid falls apart because the hair is too short to anchor? Clip-ins help more than people expect. Extra length gives the braid more weight, and that weight can actually improve the way the braid hangs and holds.
Place the extension tracks low enough that they stay hidden, but not so close to the part that they create a bump. That usually means a little space below the crown and away from the braid’s first few pickups. If the clips sit too high, the braid starts fighting the hardware.
Brush the hair and extensions together before you begin. A clean blend matters more than sheer length.
15. Fine-Hair Dutch Braids Built on Texture Powder
Fine hair needs friction. Without it, the sections slide around like they’re made of silk thread, which is why a Dutch braid can look gorgeous for ten minutes and limp an hour later.
Tiny Changes That Matter
Dry shampoo or texture powder at the roots gives the hair a bit of bite. You do not need much.
- Dust the crown and hairline lightly.
- Work the product in with your fingertips.
- Use smaller pickups than you would on thick hair.
- Backcomb the crown just once if the top is too smooth.
Skip heavy cream here. It usually makes fine hair collapse faster, not slower.
16. Curly-Hair Dutch Braids That Keep the Volume
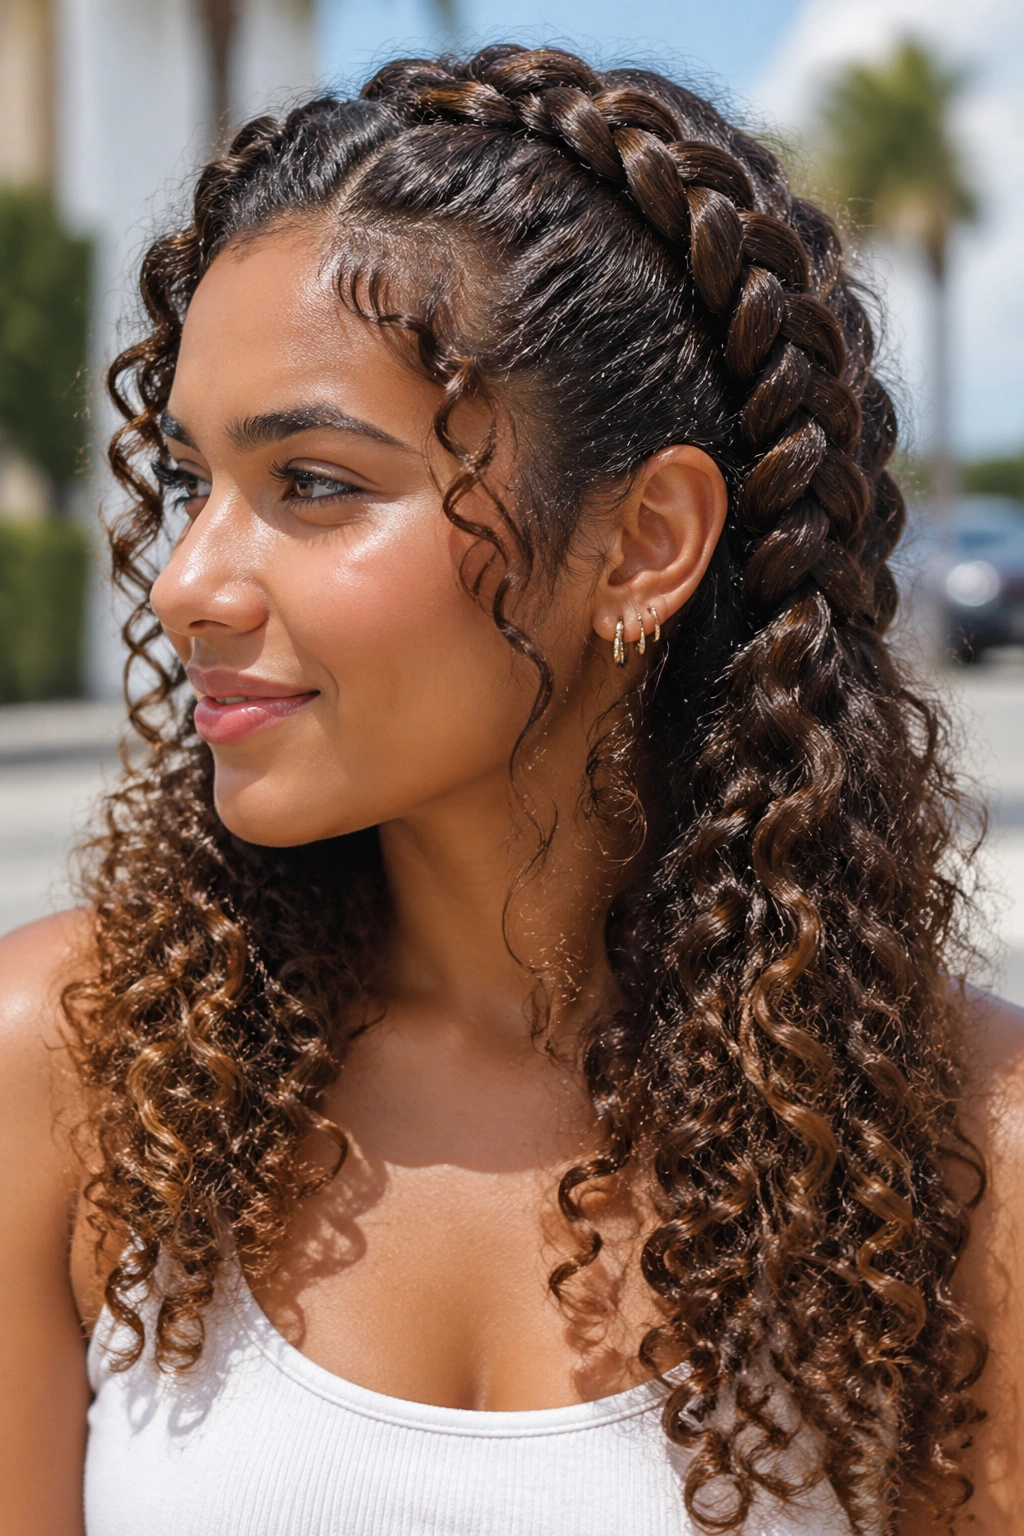
Curly hair has a spring to it that straight hair can’t fake. That spring helps a braid hold shape, but it also means the sections can puff if you pull too hard or comb them into a flat sheet before braiding.
Braid on fully dry hair, and use your fingers to separate the curls instead of brushing them smooth. A little curl definition left in the braid makes the style feel richer and keeps the finish from getting fuzzy too fast.
Leave the ends curly if you like the contrast. It looks good. More important, it avoids the stiff, overworked finish that curly hair gets when it’s forced into a straight-hair braid formula.
17. Sleek Straight-Hair Dutch Braids That Stay Glassy
Straight hair slips, so you have to make the braid do extra work. A fine-tooth comb, a little styling cream, and a snug first 2 inches can make the difference between a braid that holds and one that slides out of its own part.
I like a very small amount of gel right at the hairline. Not enough to freeze the hair. Just enough to keep the flyaways from escaping before the braid is secured. Then I finish with a clear elastic and smooth the top lightly with my palms.
The braid should look clean, not stiff. That line matters. Shiny is good; plastic-looking is not.
18. Chunky Dutch Braids for Thick Hair and Big Shape
If your hair takes forever to dry and fills your hand in one grab, this is your lane. Chunky Dutch braids use larger sections, which helps keep thick hair from turning into a dense rope you have to wrestle for twenty minutes.
Why Bigger Sections Help
Smaller sections can make thick hair look overworked and frizzy. Bigger ones keep the braid readable and easier to pin later.
- Use broader pickups at the temples.
- Keep the braid close to the scalp through the first third.
- Don’t over-pancake the braid before it’s secured.
- Use a sturdy elastic that won’t stretch out.
This style looks strongest when the braid itself has a little heft. Fight that instinct to shrink it down.
19. Skinny Accent Dutch Braids Along the Hairline
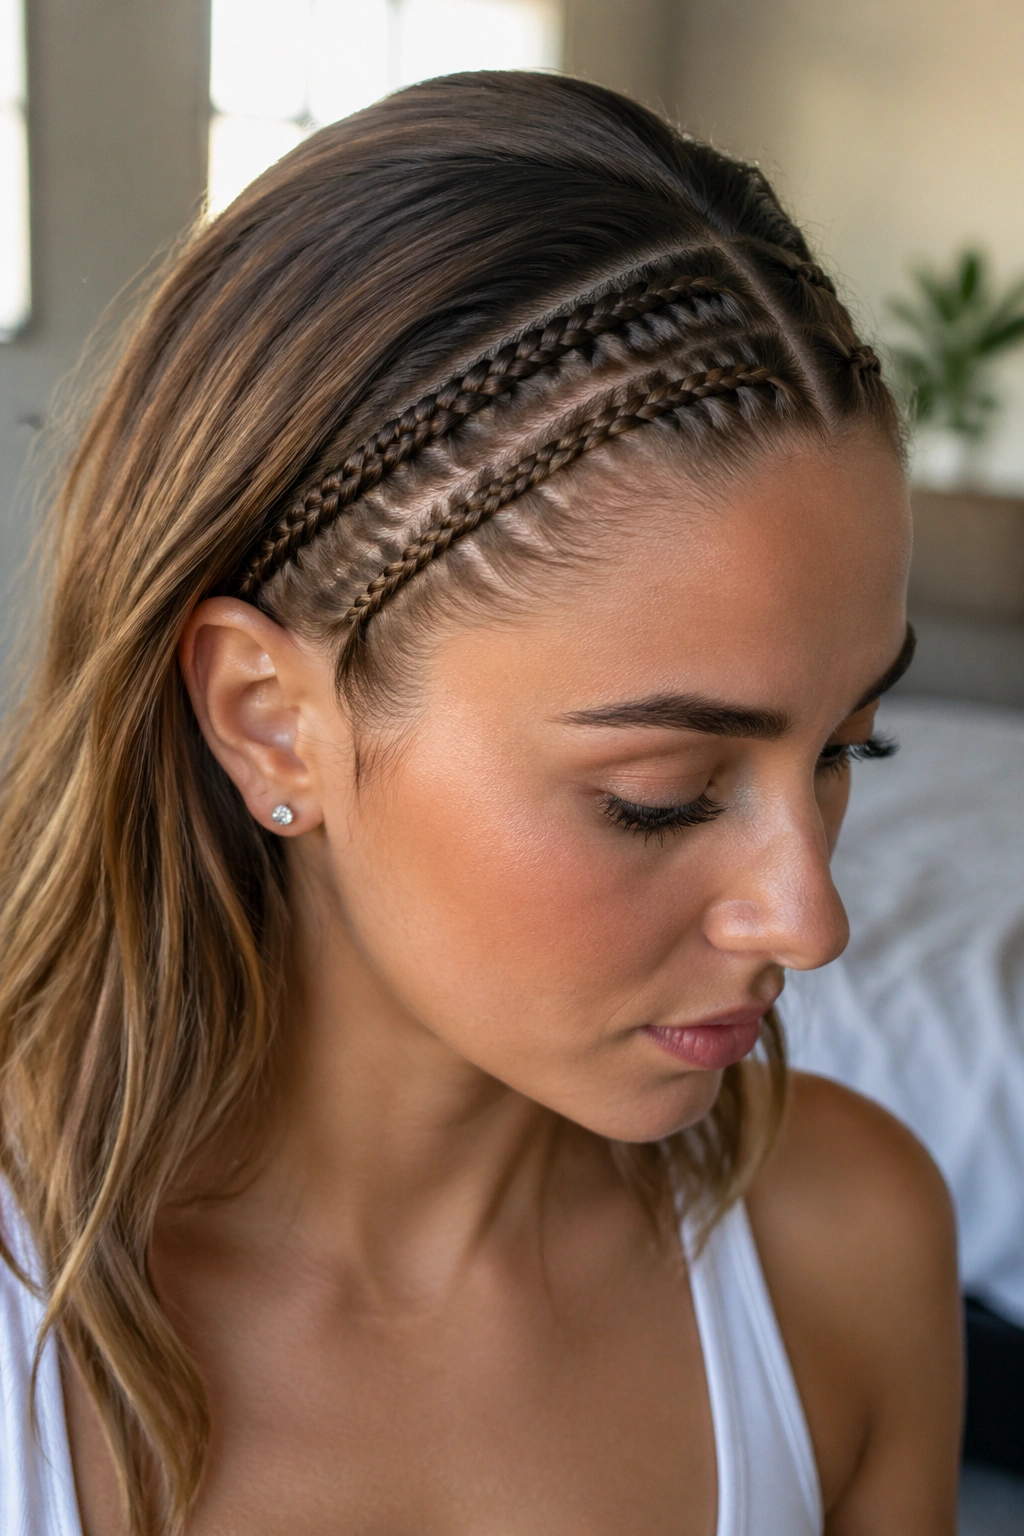
Need your bangs to stay put without flattening the whole head? A skinny accent braid along the hairline does that job neatly. It’s small, quick, and useful when you want the front controlled but the rest of the hair free.
Start at the temple and follow the hairline back toward the ear or crown. Keep the section narrow—about the width of a pencil or a little wider if your hair is dense. Tiny braids need small pins and tiny elastics, otherwise they look clunky.
This one is great for workout days, windy weather, or just keeping a growing fringe out of your eyes. It sounds minor. It isn’t.
20. Dutch Braid Mohawks With Clean Side Panels
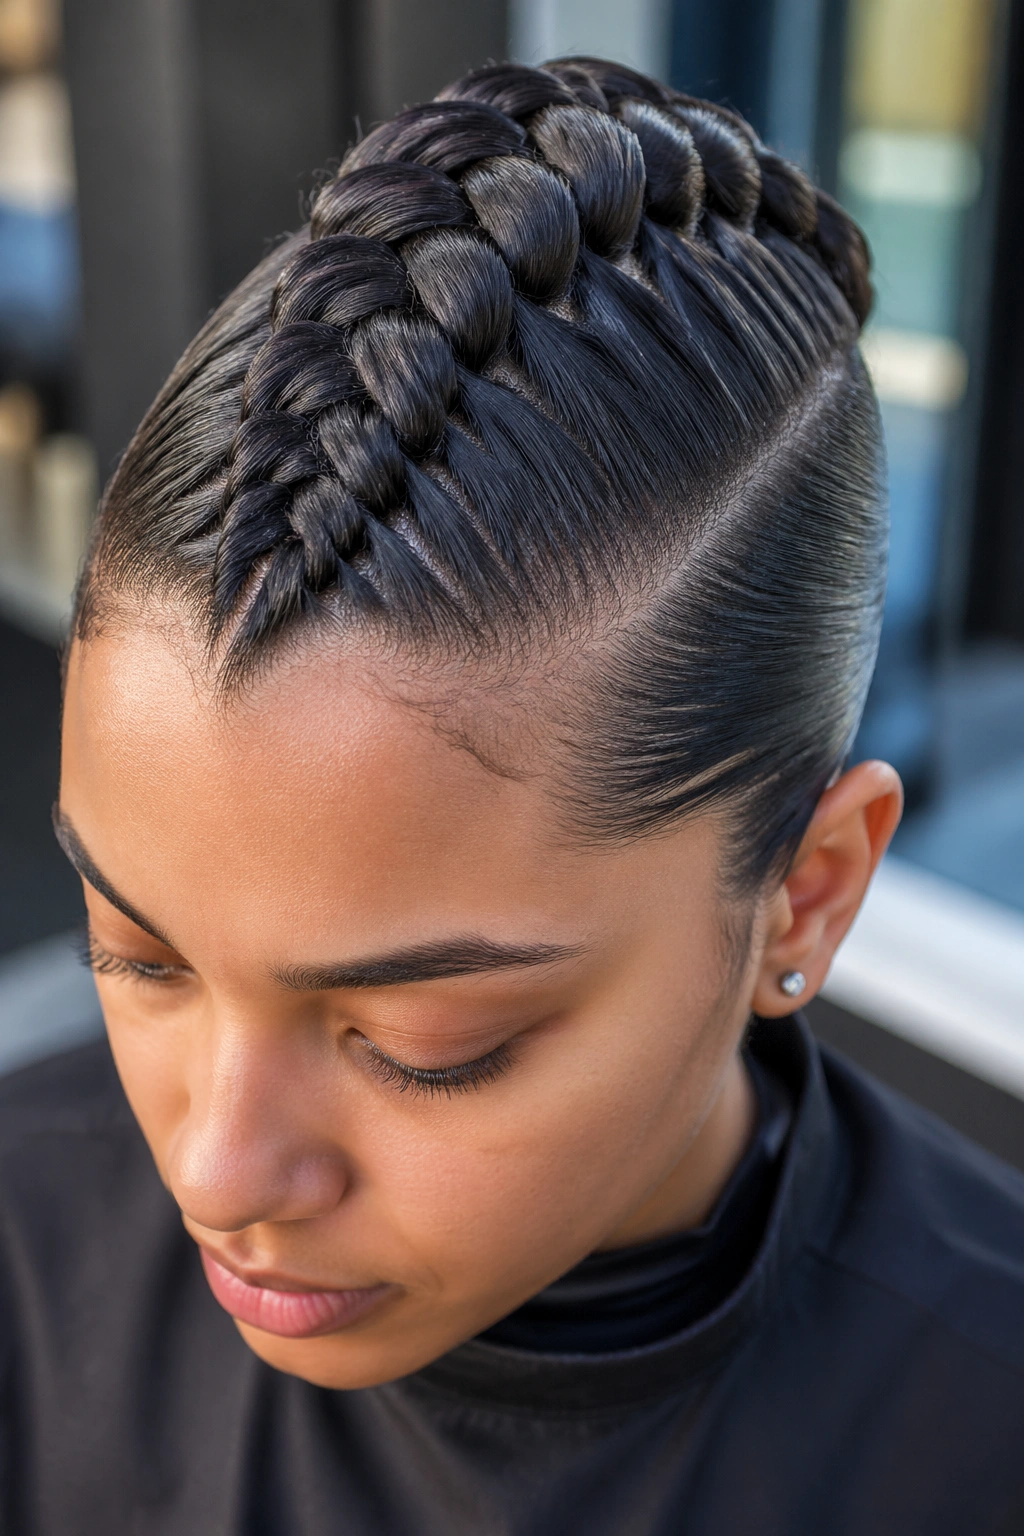
The edgier the style looks, the more boring the technique has to be. A Dutch braid mohawk holds because the braid runs right down the center, where the hair gets the most support, while the sides are slicked back or pinned flat.
How to Lock It Down
The center braid should start right at the front hairline and move straight back. Keep the side sections tight and smooth so they don’t puff out and compete with the braid.
- Use a tail comb for a straight center part.
- Clip the side hair away before braiding.
- Pin the braid at the nape before styling the rest.
- Smooth the sides with a little cream or gel.
This style can look tough, polished, or a little both. The clean sides make the braid look sharper.
21. Dutch Braid with a Bubble Ponytail Finish
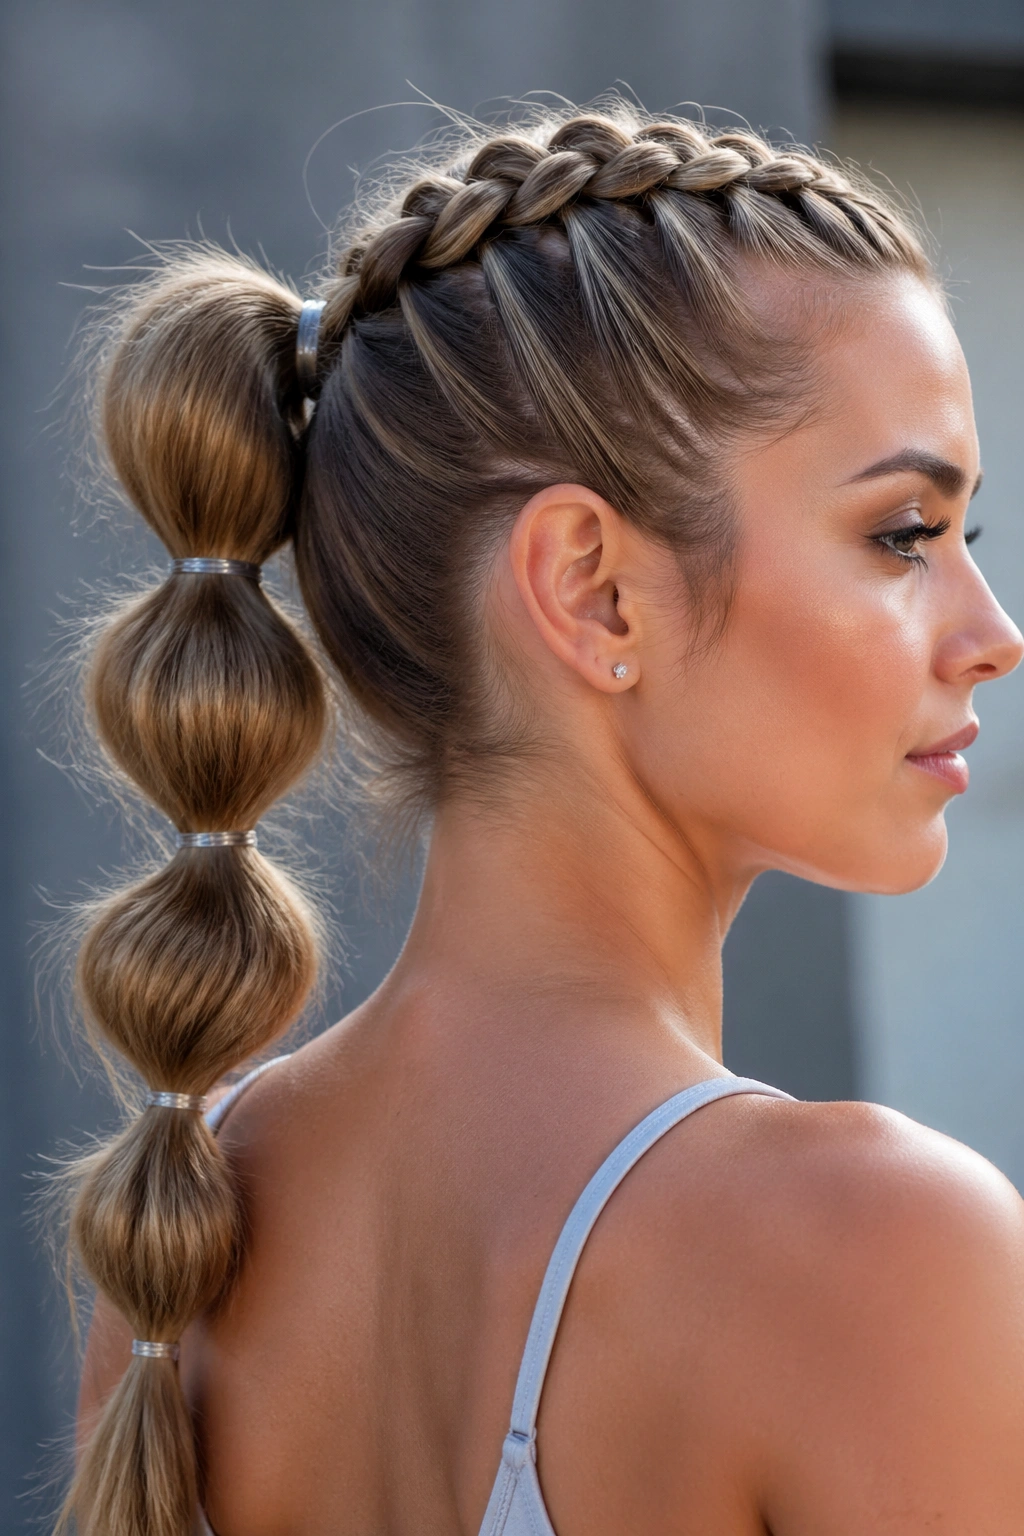
The braid does the heavy lifting; the bubbles just finish the job. That’s why this style holds so well. The Dutch braid keeps the top fixed in place, and the bubbles add anchors all the way down the length.
Braid from the hairline to the crown or mid-back, then gather the tail into a ponytail. Add small elastics every 2 to 3 inches down the tail and tug each section outward until it rounds into a bubble. Keep the pulls even so the style doesn’t look lopsided.
It’s playful, yes, but it also stays put. The extra elastics make that happen.
22. A Dutch Braid Updo Hidden Under Pins
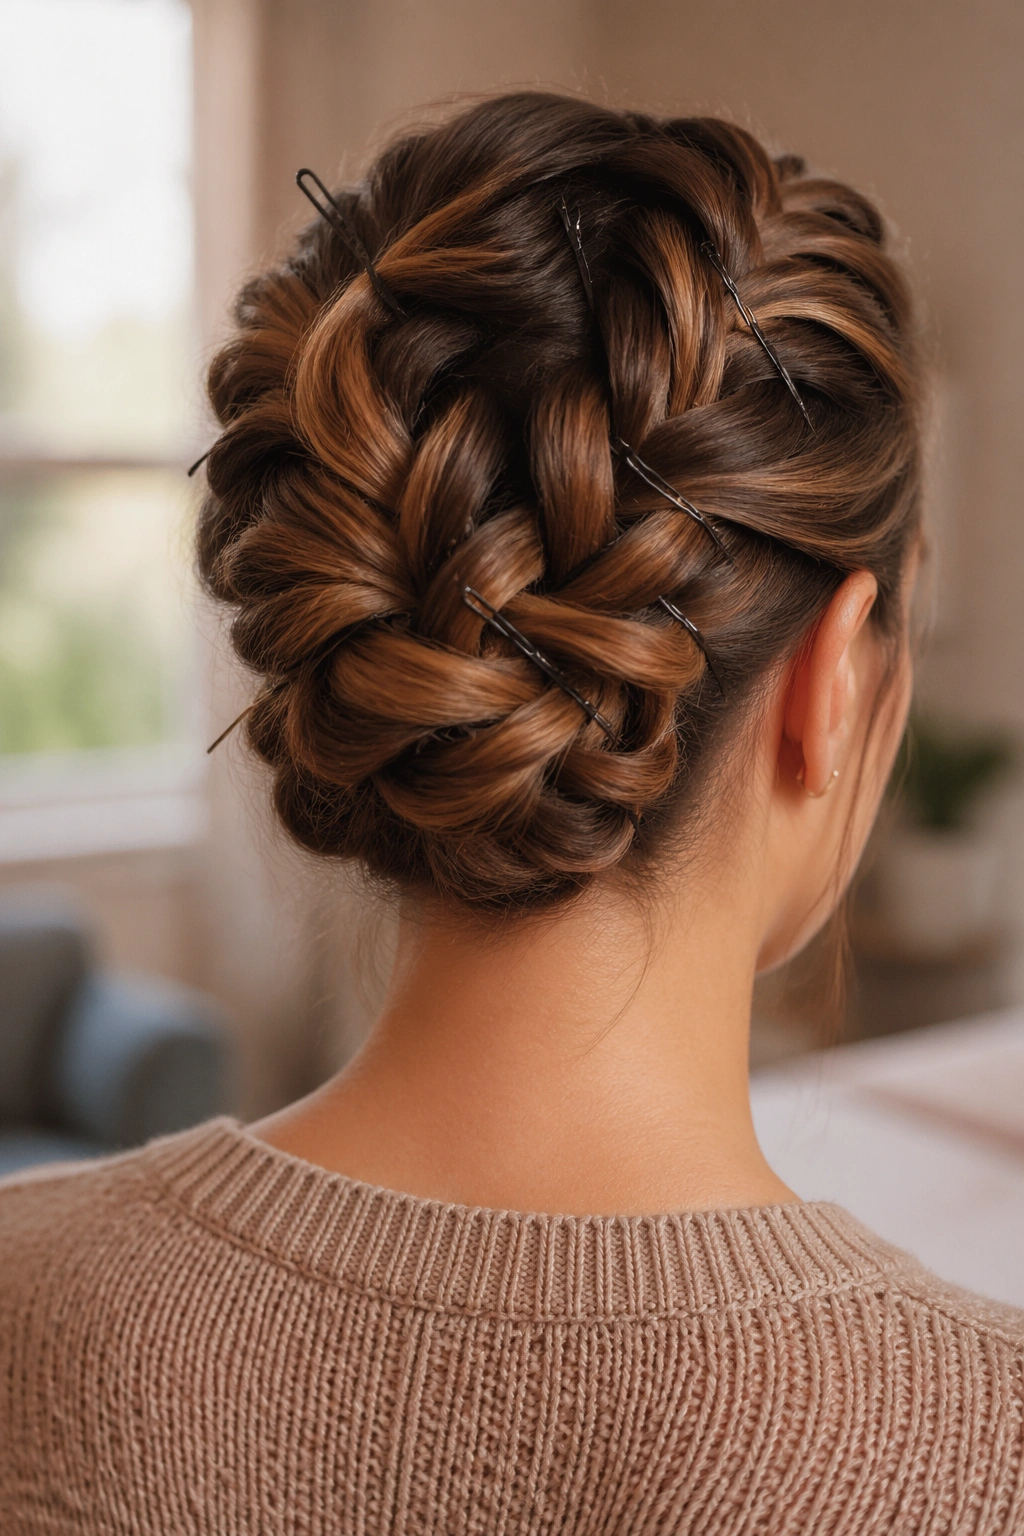
This is the style for people who want their braid to disappear into the updo. The Dutch braid starts the shape, then the length gets folded or looped into something more formal, which gives you control without leaving a long tail hanging around.
Pin Placement Matters Here
Use U-pins or small bobby pins in different directions. One pin does not hold an updo this heavy.
- Fold the braid close to the head.
- Pin the center first, then the edges.
- Cross the pins for better grip.
- Spray the pinned areas lightly so they don’t slide.
If your hair is slippery, this is the style that benefits most from a little texture spray at the roots.
23. Dutch Braids That Work on Bob-Length Hair
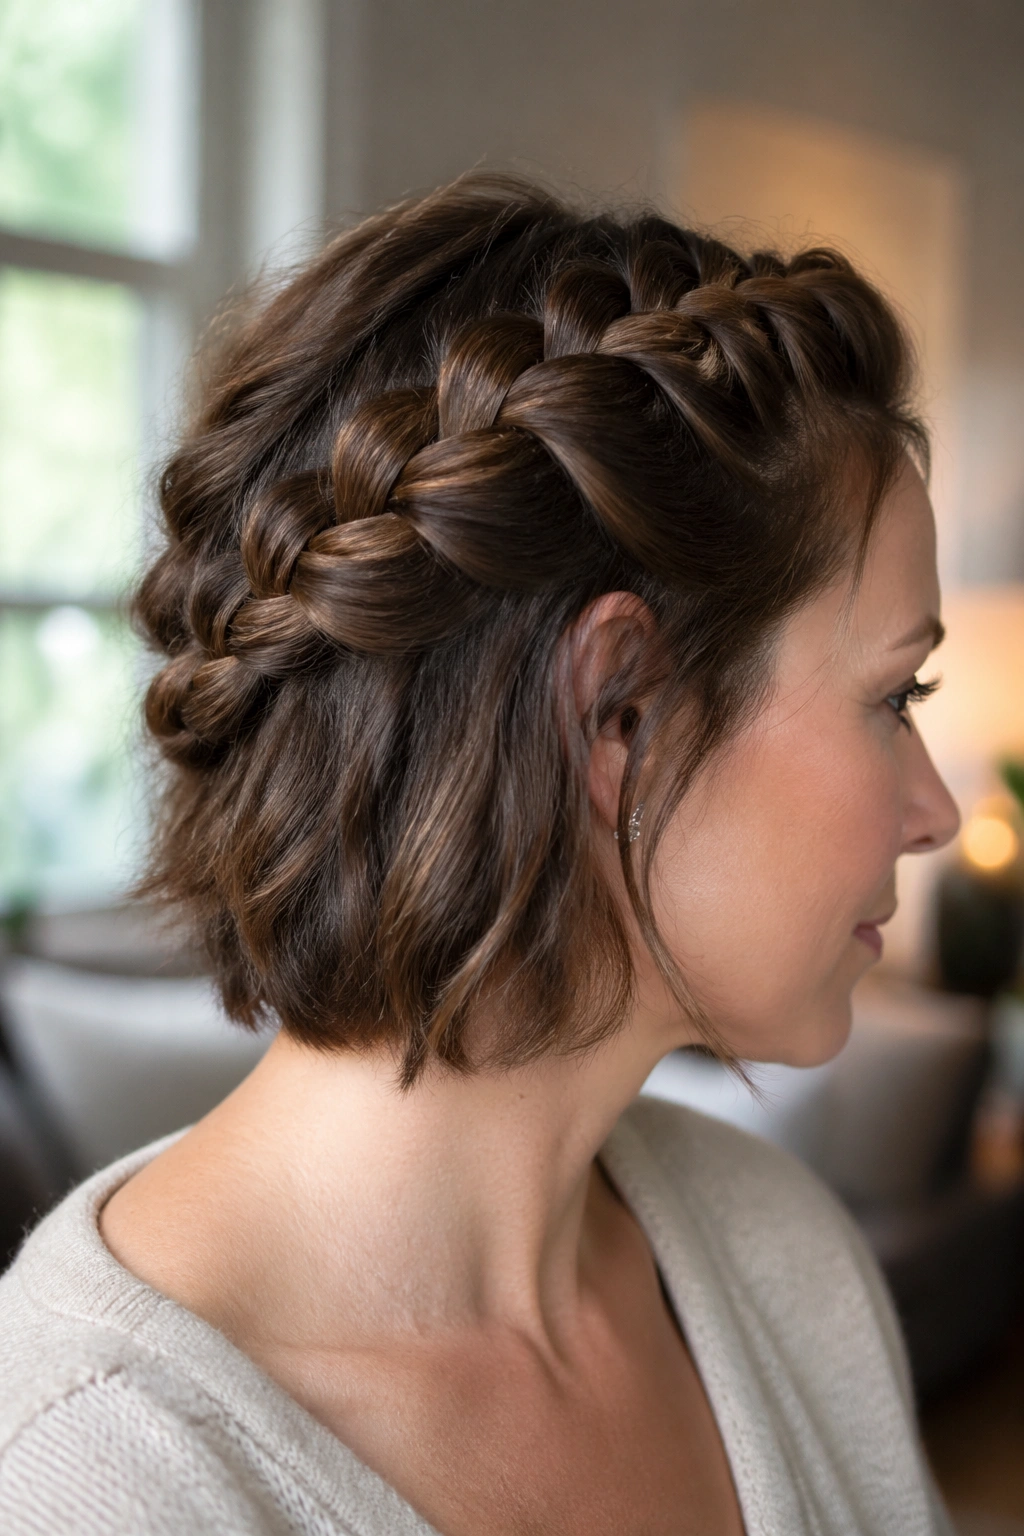
Short hair can do this. You just have to stop pretending it has the same reach as waist-length hair. On bob-length cuts, a Dutch braid usually lives on the top section and finishes with pinned ends tucked under the rest of the hair.
Start at the temple or just behind the part, and keep the sections small. If the braid reaches only to the ear, that’s fine. The point is to control the front and crown, not force the braid to do a job the hair can’t support yet.
A few bobby pins hidden under the top layer help the style stay attached. Small hair, small tools. That’s the rule.
24. Gym-Proof Dutch Braids That Hold All Day
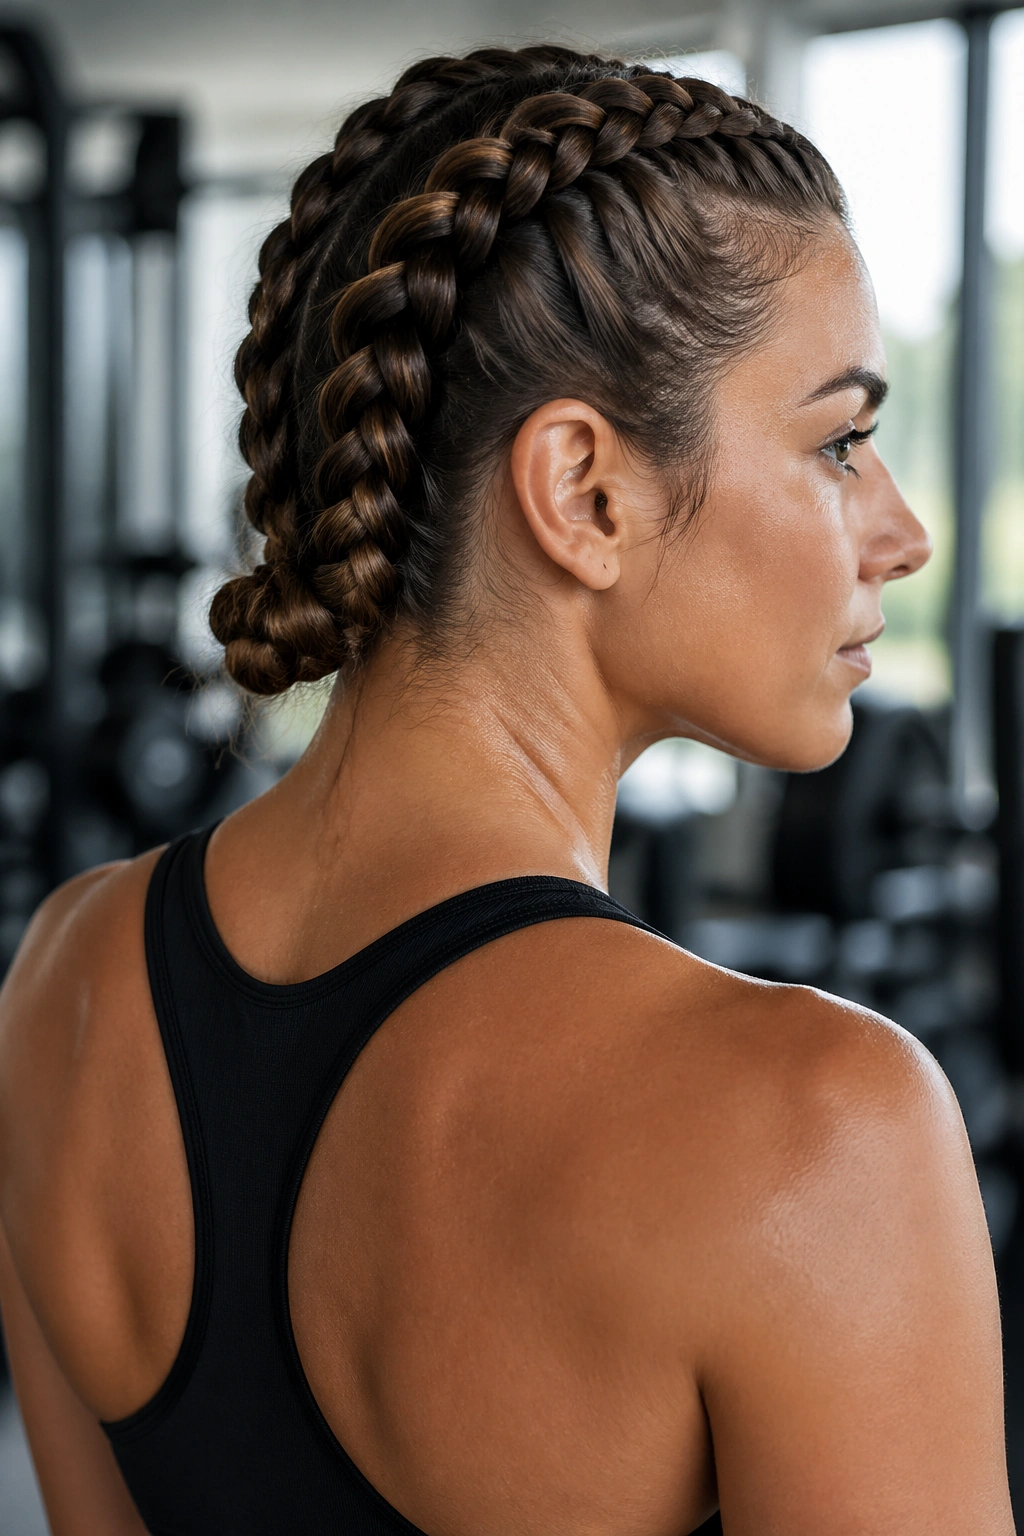
Trying to keep hair off your neck without ending up with a sore scalp? The answer is a braid that’s snug at the root and sensible at the ends. For workouts, I usually prefer twin braids or a single center braid that ends in a tight tie at the nape.
Use a bit of matte pomade or anti-slip spray at the hairline, then braid with steady pressure rather than brute force. The braid should feel secure, not punishing. If your temples start aching, you went too far.
A gym braid has one job. It needs to stay there while you move, sweat, and toss on a hood later. That’s the standard.
25. Bridal Side Dutch Braids With Soft Face Pieces
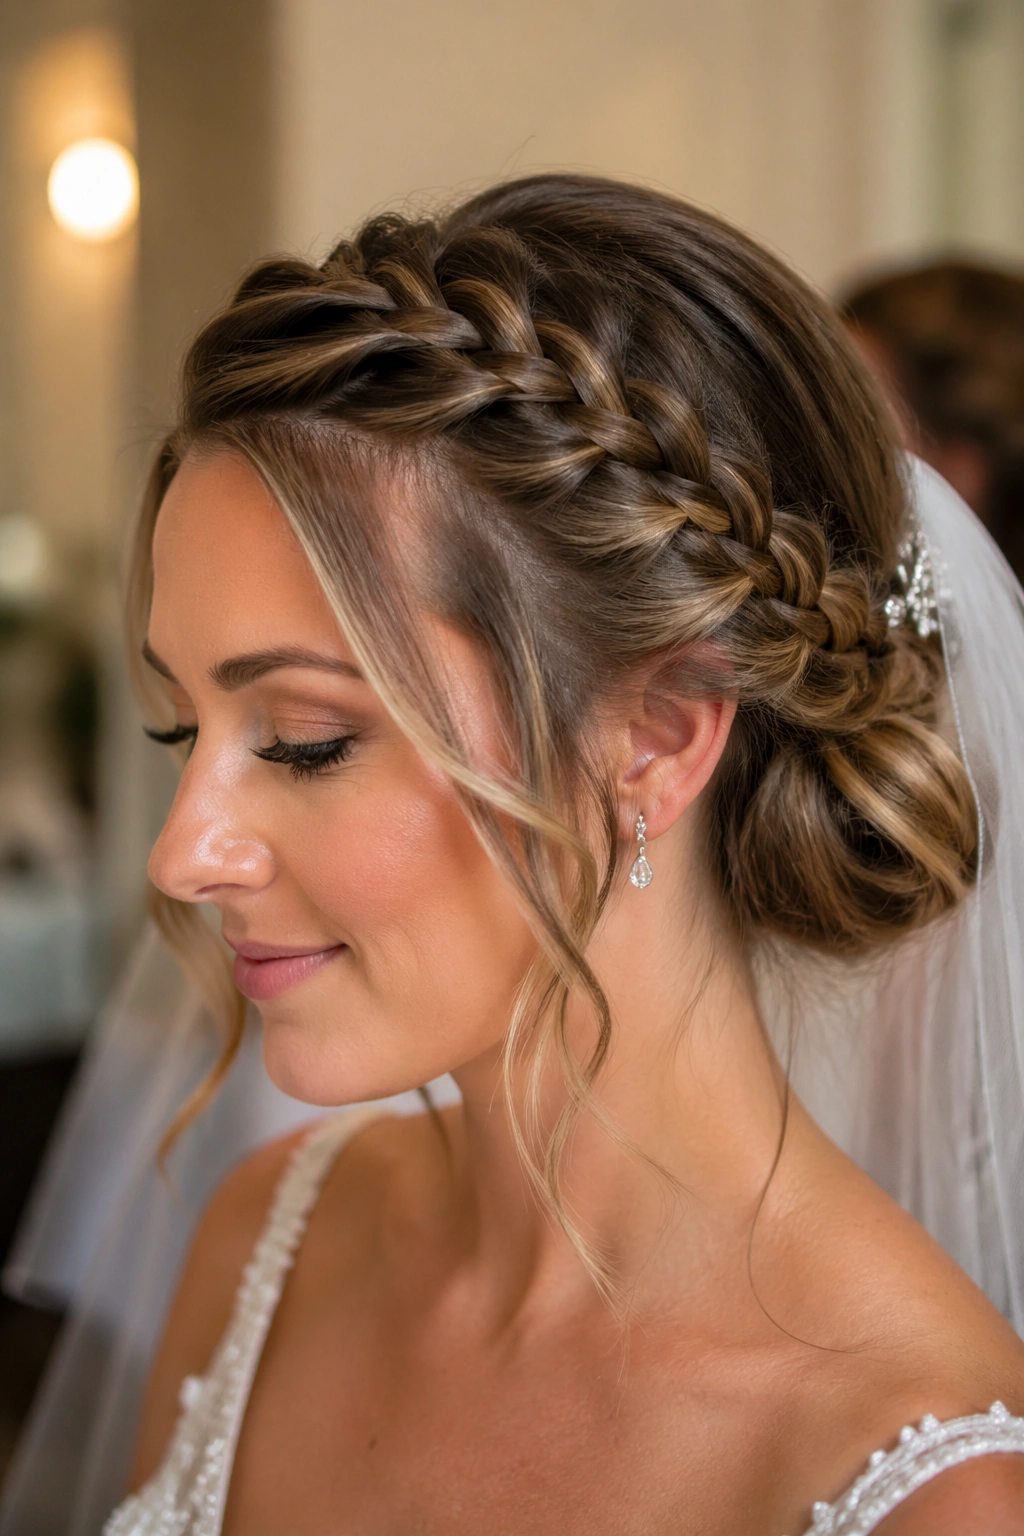
The braid should feel secure, but the front should still move a little. That balance matters in bridal hair, where a style can go from elegant to stiff in one heavy-handed pass with hairspray.
What Keeps It from Slipping
Use a side Dutch braid that begins near the temple and curves into a low bun or pinned finish. Keep a few face pieces loose, but control them with a light wave so they don’t drop flat.
- Secure the braid before adding decorative pins.
- Place pearl pins after the shape is fixed.
- Tuck the veil comb near the braid’s strongest point.
- Keep the front pieces soft, not wispy.
If the braid is too polished, the whole look can lose warmth. A little movement helps.
26. Feed-In Dutch Braids That Build Shape Gradually
When the braid gets better as it goes, feed-in sections are the reason. Instead of grabbing large chunks at once, you add hair in small slices as you move down the head, which keeps the braid smooth and well anchored.
This is a smart move for thick or layered hair. The gradual build means the braid feels less bulky at the top and more secure by the time you reach the nape. It also helps keep shorter pieces from popping out before they’re long enough to be folded in.
The finish looks cleaner because the base is cleaner. That’s the whole point here.
27. Dutch-Fishtail Hybrids for a Long-Lasting Finish
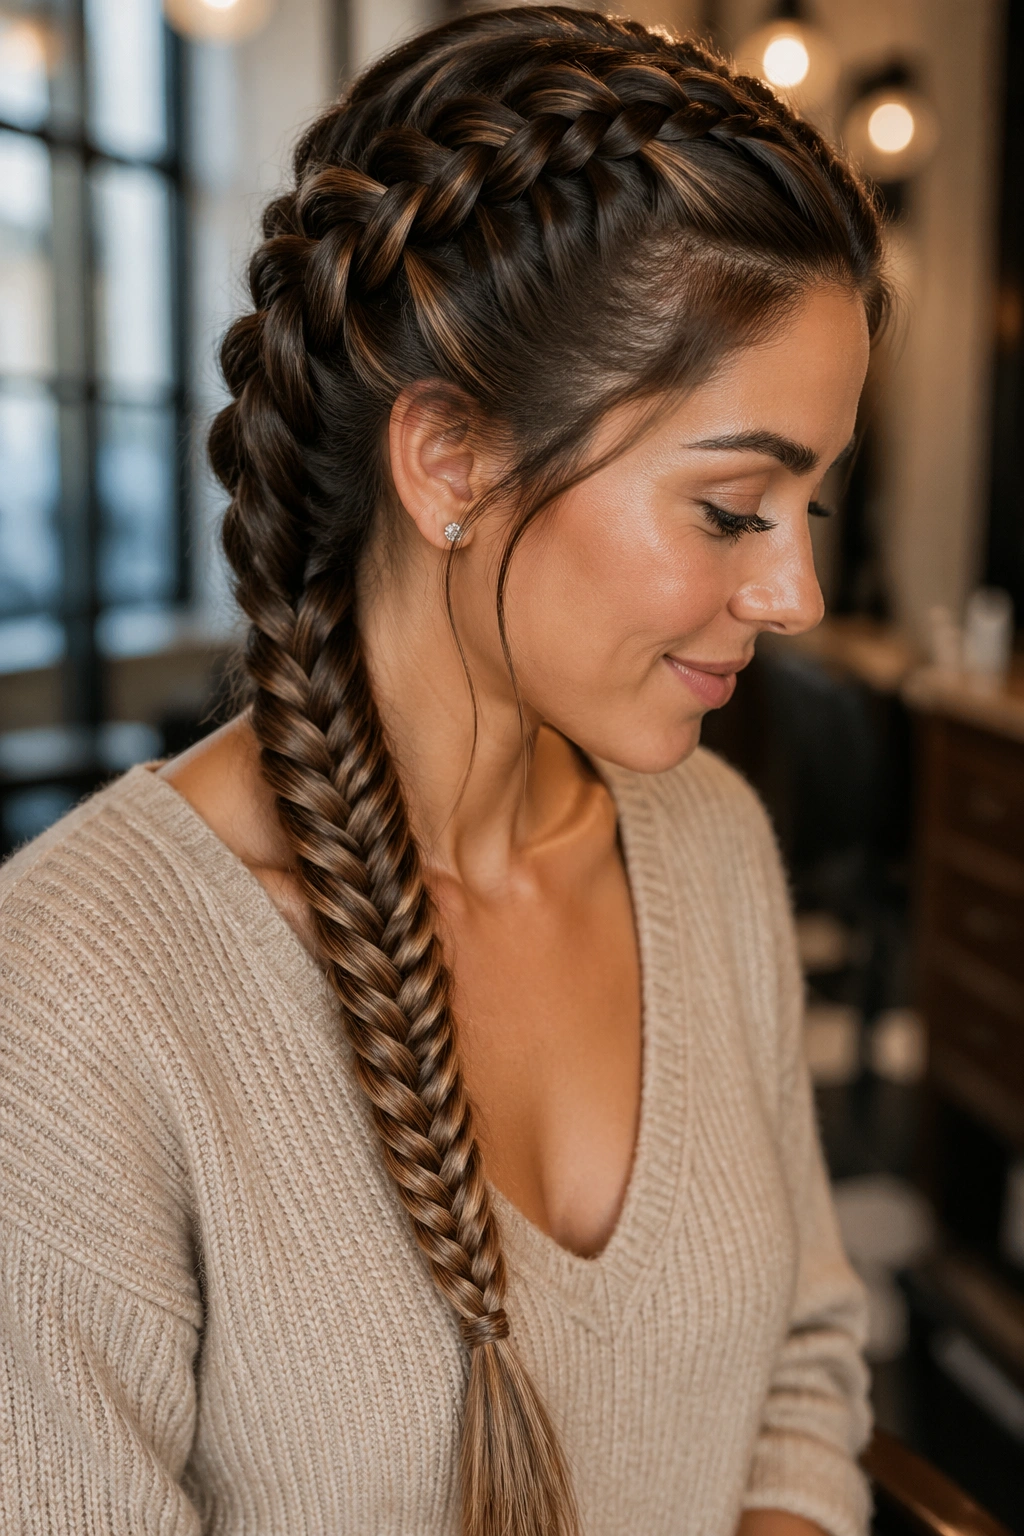
A Dutch start gives the braid its anchor; the fishtail finish slows the unraveling. That combination works well when you want the base to stay tight but the tail to look detailed without adding a lot of bulk.
How to Switch Gears
Braid in Dutch style from the hairline to the mid-lengths, then divide the tail into two sections and fishtail from there. Keep the switch point clean so the change looks intentional.
- Make the Dutch section firm.
- Split into two even halves.
- Cross tiny pieces from the outside to the inside.
- Finish with a small elastic and a pinch of shaping.
It’s a good pick when you want texture without a bulky tail.
28. Dutch Lace Braids That Sweep Along One Side
A lace braid looks delicate, but it can stay put better than a loose full braid. Because you only add hair from one side, the braid travels neatly along the head and doesn’t need as much width to keep its shape.
This is a good option near the face or along the part line. It keeps bangs and front layers under control while leaving the rest of the hair free. That makes it useful on days when you want part of your hair tied down but not all of it.
Keep the non-braided side smooth so the contrast reads clearly. If both sides are fussy, the braid loses its line.
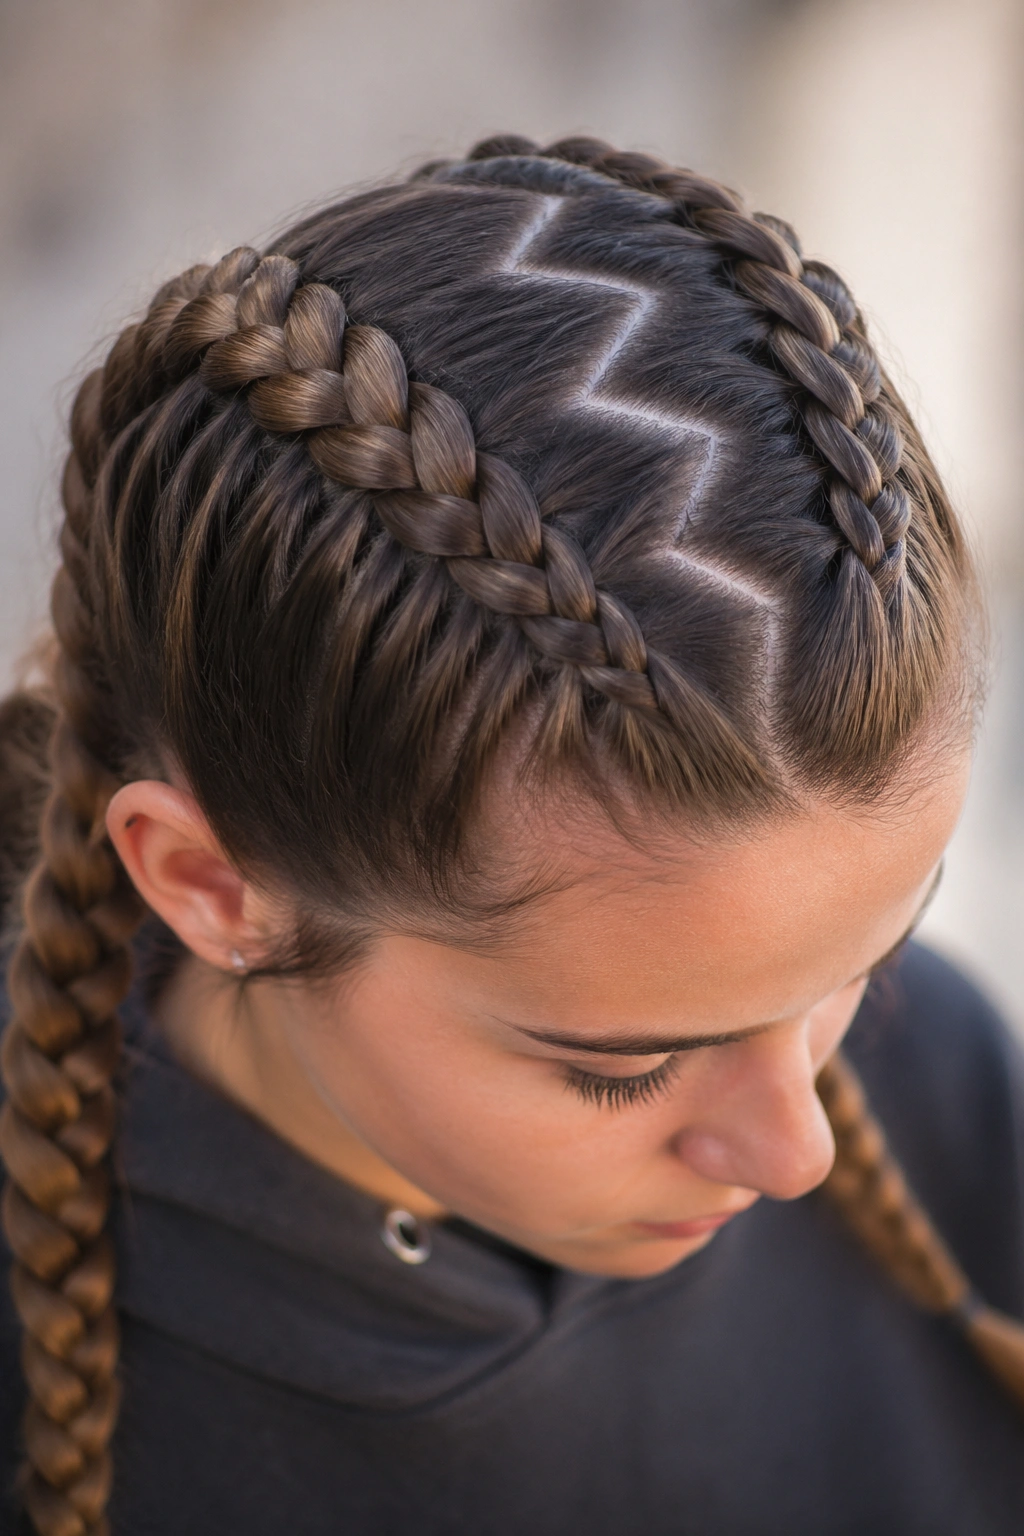
29. Zigzag-Part Dutch Braids for Extra Grip at the Root
A zigzag part is small work, but the payoff is real. It gives twin Dutch braids a little more visual interest and helps disguise the flat, straight line that can make scalp braids look too severe.
Why It Helps
The broken part line creates a slightly more forgiving base, especially if your hair grows in different directions or has some cowlicks around the crown.
- Use the tip of a tail comb to draw the zigzag.
- Keep the peaks and valleys small, not jagged.
- Start each braid right after the part is set.
- Pin the braids low so the part stays visible.
It’s one of those tiny details people notice even if they can’t name it.
30. Layer-Friendly Dutch Braids That Catch Short Pieces
Layers are where braids get messy. The shorter pieces want to fall out, and the braid can look neat at the top while turning fuzzy halfway down. The fix is to start a little tighter and keep the pickups close together so those short strands get folded in early.
A light mist of hairspray on the front layers helps too. Don’t soak the hair. Just enough to keep the shorter pieces from springing loose before they’re woven in. If your layers are chin-length or shorter, you may need a few hidden pins near the temples.
This style rewards patience. Rush it and the layers escape.
31. Twin Dutch Braids Twisted Into One Braided Bun
What do you do when you want the security of twin braids and the neatness of a bun? You combine them. Twin braids give you two anchored tracks, then you twist or wrap both ends into one low bun at the back.
The Part That Makes It Work
Braid both sides tightly to the nape, then wrap each tail around the same center point. Pin one braid, then the other, so they support each other instead of fighting for the same spot.
- Use at least four pins for a thick bun.
- Cross the pins where the bun feels heaviest.
- Tuck ends under the outer loop.
- Finish with a light mist around the crown.
It’s a strong style for travel, long workdays, or any time you don’t want to think about your hair again.
32. Dutch Braids with a Scarf Woven Through
A scarf can stabilize a braid more than people think. Woven through a Dutch braid, it adds a little grip and gives the whole style a visible line of color or pattern without making it feel costume-like.
Use a narrow scarf, folded into a strip about 1 inch wide. Tie it near the starting point and feed it through the outer strands as you braid. If the fabric is slippery, choose cotton or a matte woven scarf instead of something slick.
The trick is keeping the scarf flat. Once it twists, the braid starts looking busy in the wrong way.
33. Soft, Undone Dutch Braids That Still Last
Soft does not have to mean flimsy. The braid can stay tight at the scalp and still look relaxed through the lengths if you loosen only the outer edges after it’s secured.
That’s the part most people rush. They pancake the braid before it’s tied off, and then it loosens in the wrong places. Better move: finish the braid, secure it, wait a few minutes, then gently tug the sides with your fingertips. The shape opens up, but the root stays firm.
If you want one braid that can survive a full day and still look wearable at night, this is the one I’d pick. Keep the crown controlled, leave the ends soft, and let the braid do its job without fuss.