Pins are not the point. The braid is.
A good braid bun that holds without a single pin relies on tension, overlap, and a clean anchor at the base, so the style grips itself instead of waiting for metal clips to rescue it. That matters when your hair is silky, layered, freshly washed, or simply tired of being stabbed into submission.
Some buns collapse because the braid was too loose. Others fail because the coil was built in the wrong direction, so the ends fought the rest of the style all day. Once you start looking at braid buns that hold without a single pin this way, the whole subject gets easier. You stop asking, “Where do I put the bobby pins?” and start asking, “What is doing the holding?”
Second-day hair usually gives you a head start. Straight hair often needs a little dry shampoo or texture spray at the roots, while curly hair tends to behave better with a touch of leave-in and a small amount of gel at the hairline. A slick, freshly conditioned finish looks nice for about ten minutes, then it slides. That’s just how it goes.
1. Rope-Twist Low Bun
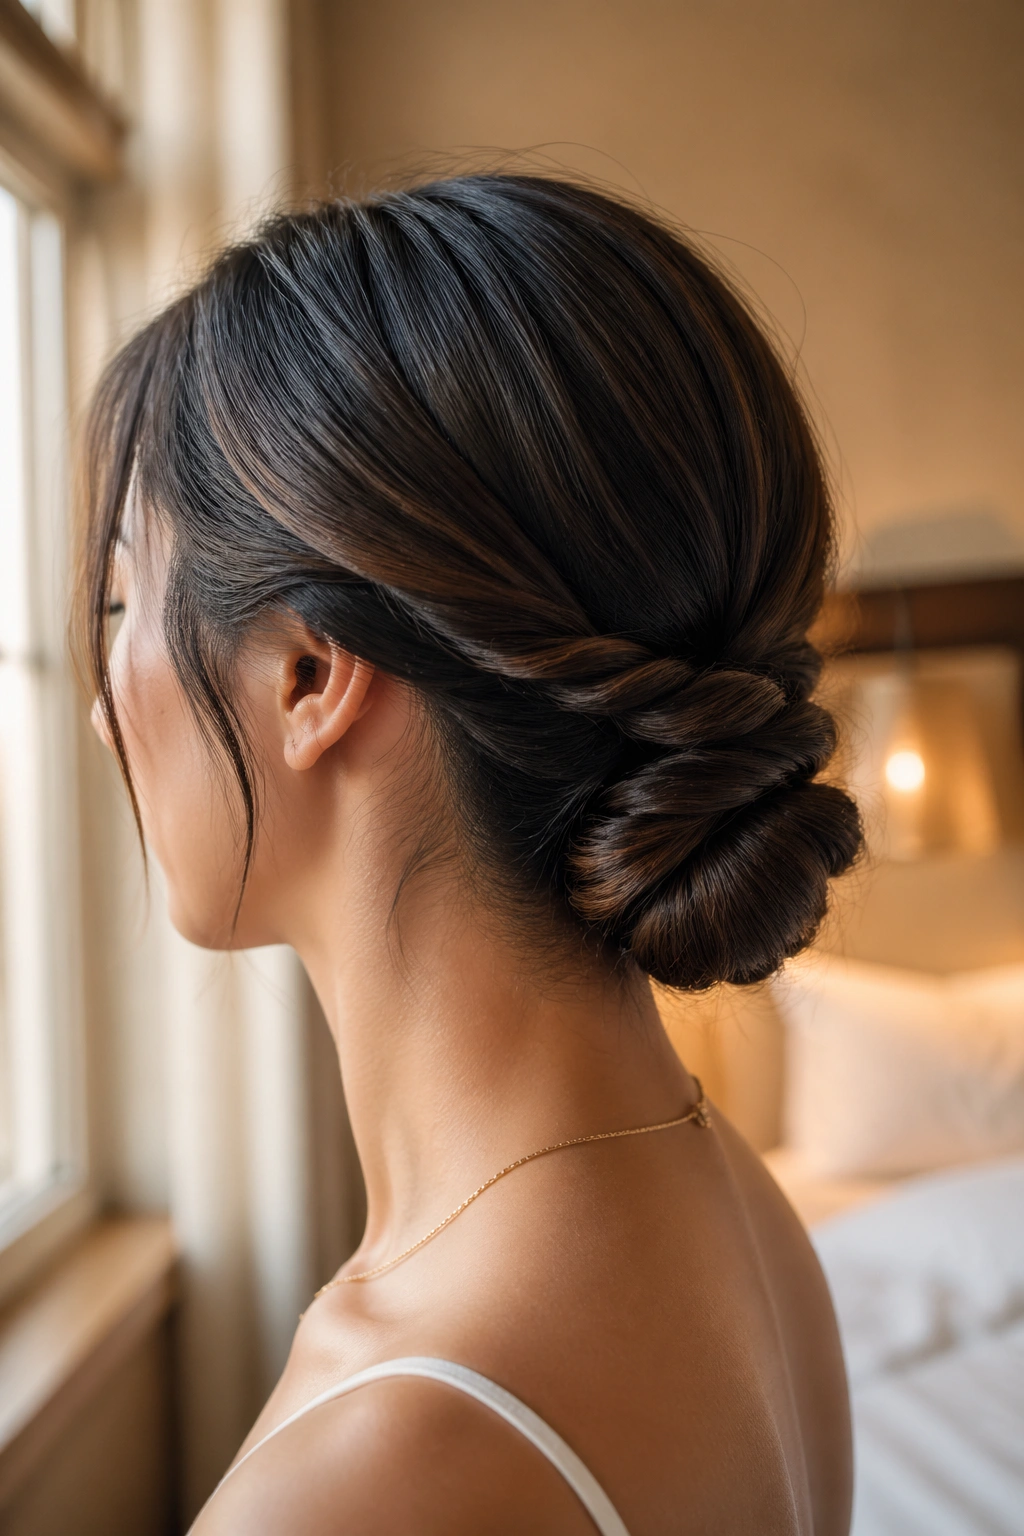
A rope-twist bun is one of the cleanest pin-free styles you can wear, and I mean that in the literal sense: the twist does most of the gripping for you. Start with a low ponytail, split it into two equal pieces, then twist each piece in the same direction before wrapping them around each other in the opposite direction. That opposing movement is what gives the style its little self-locking bite.
Why it stays put
The rope shape is tighter than a loose braid, and tightness matters here. Once the two twisted strands are wrapped into a coil at the nape, the bun fights unraveling in two ways at once — the twist pulls inward, and the base elastic stops the whole thing from slipping down.
- Best hair type: fine, medium, or straight hair with a little texture spray
- Best length: shoulder length and longer
- Needed: 1 strong hair tie and 1 small elastic for the end
- Hold level: good for errands, office days, and dinner out
My favorite trick: twist the sections until they start to spring back on themselves. If they feel floppy in your hands, the bun will be floppy too.
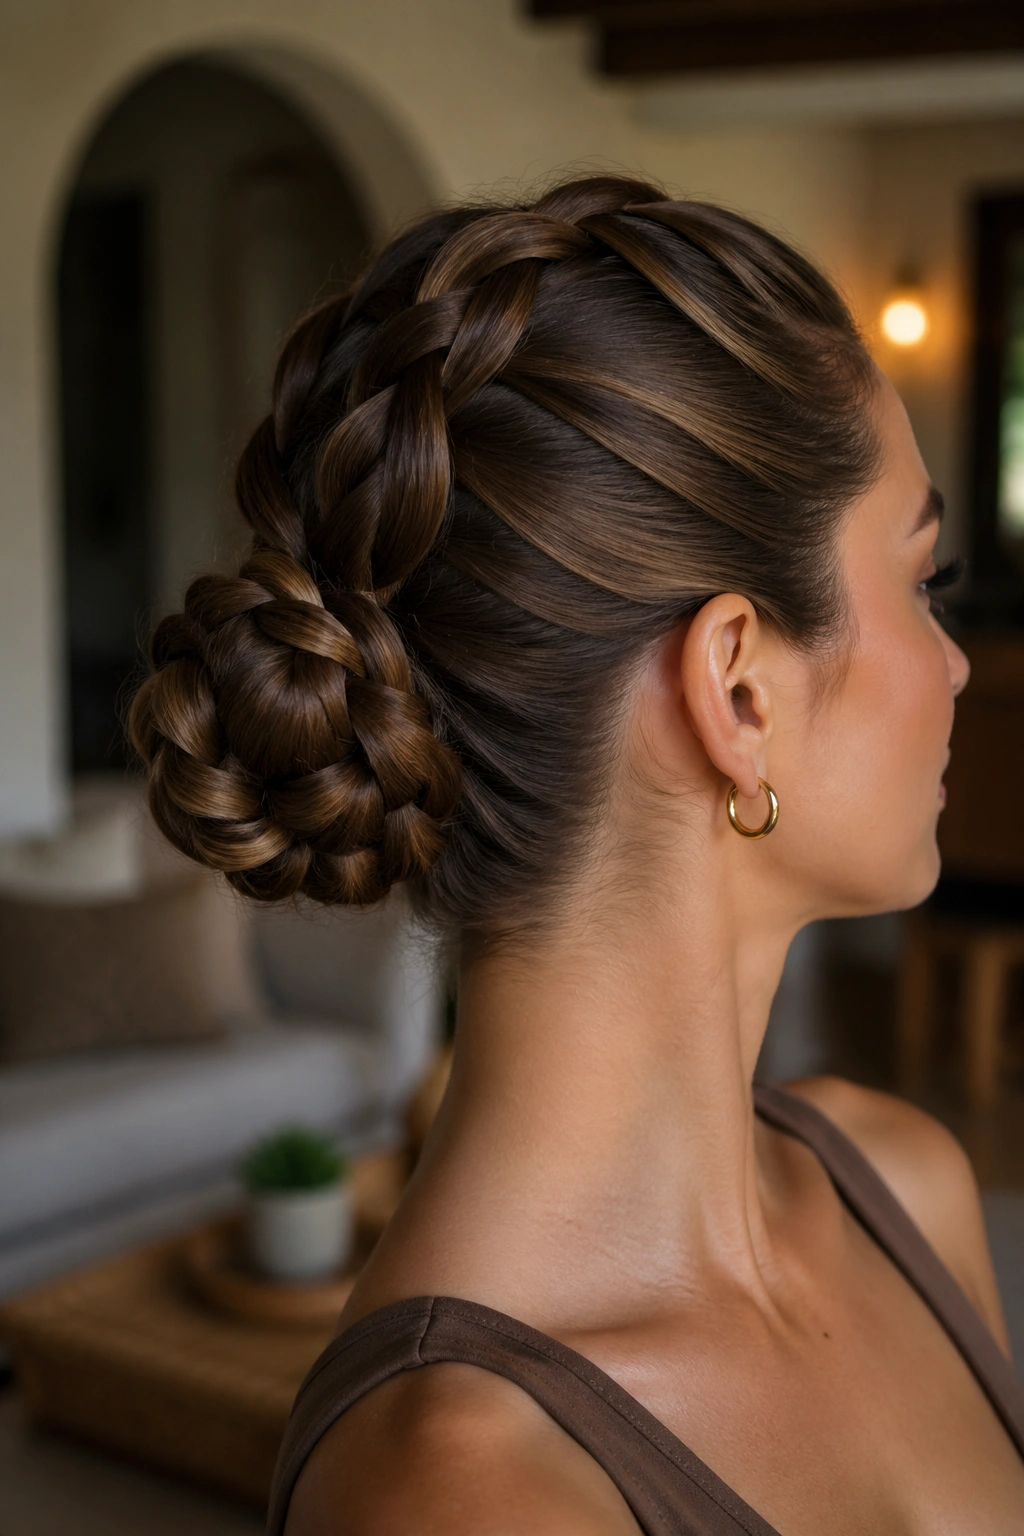
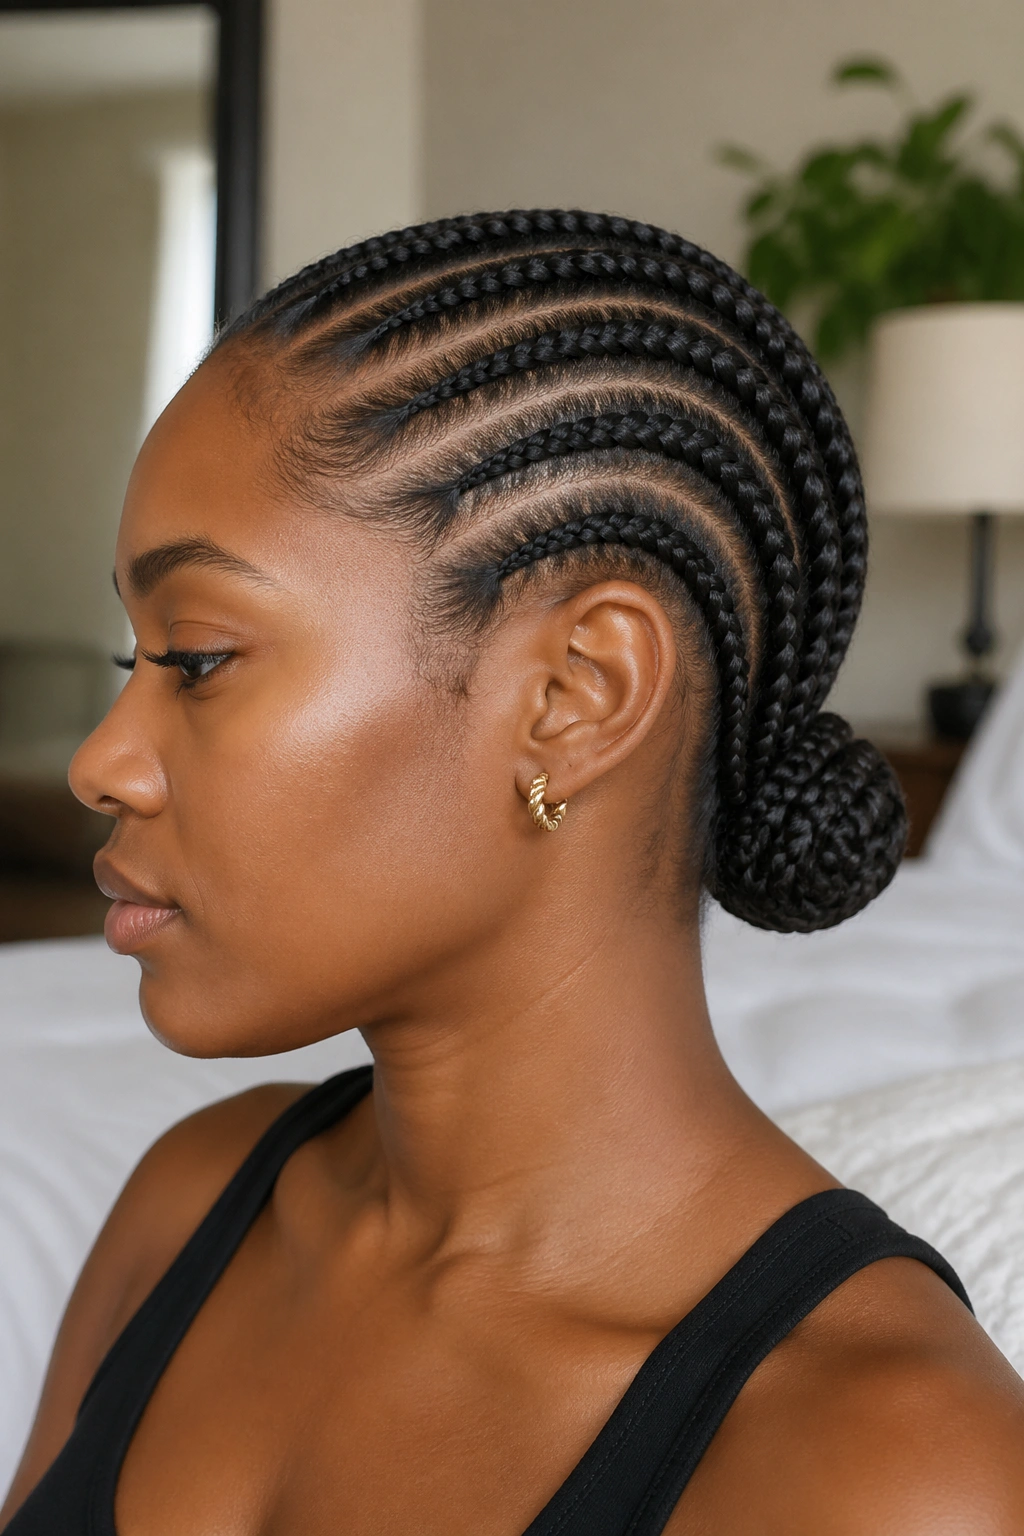
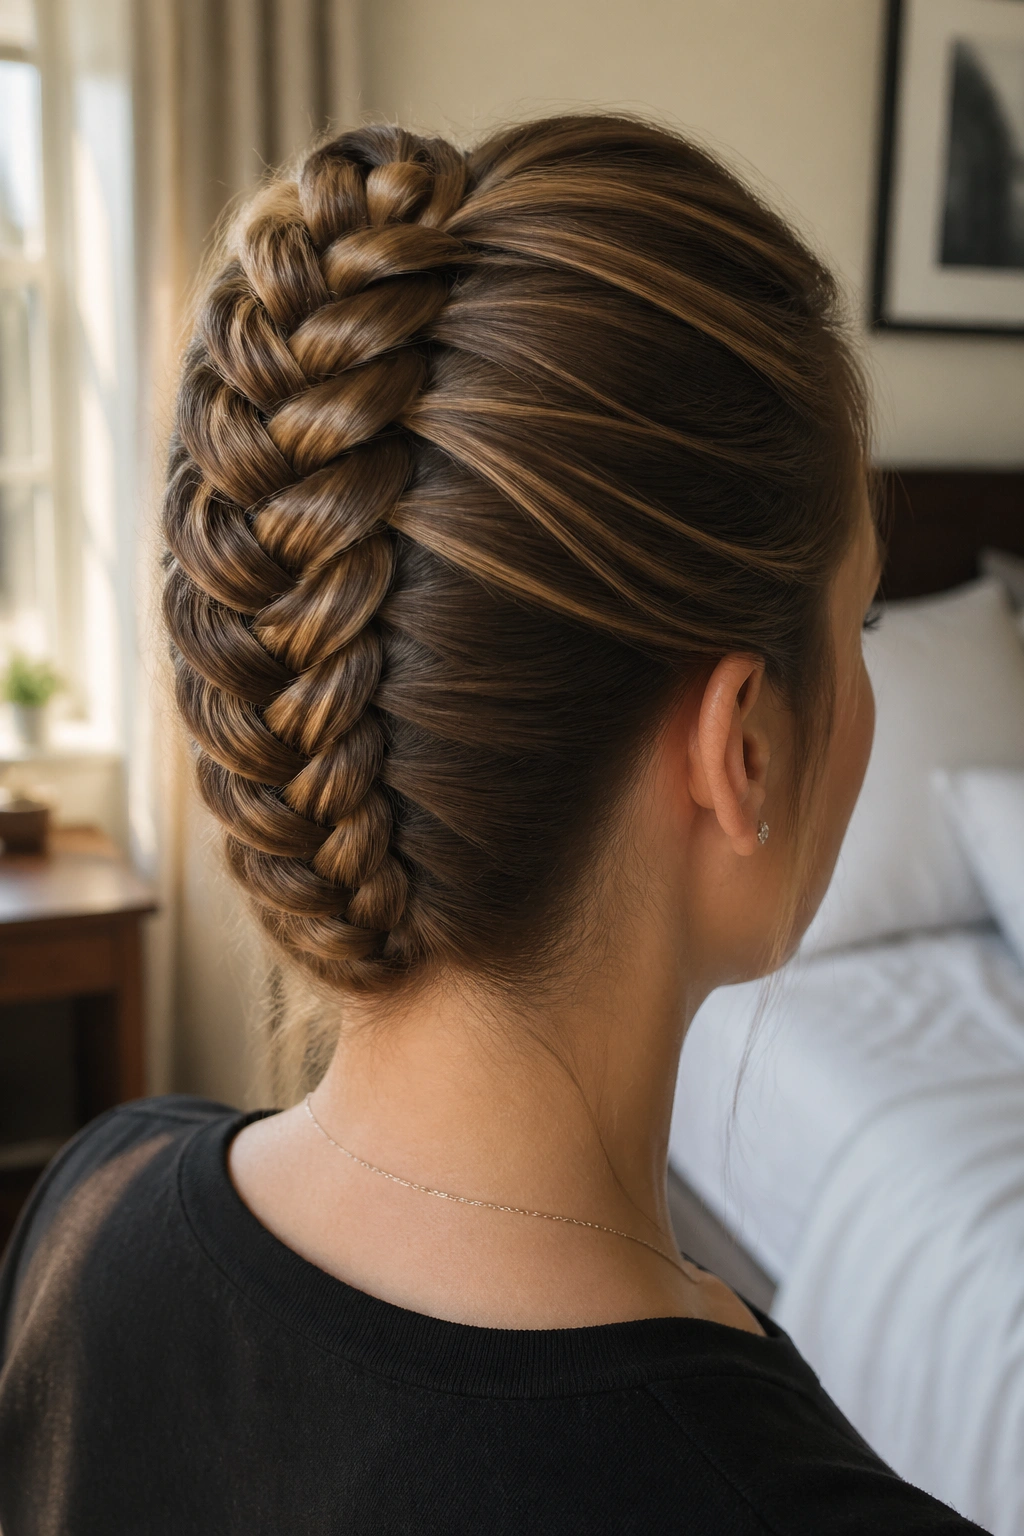
2. Dutch Braid Coil Bun
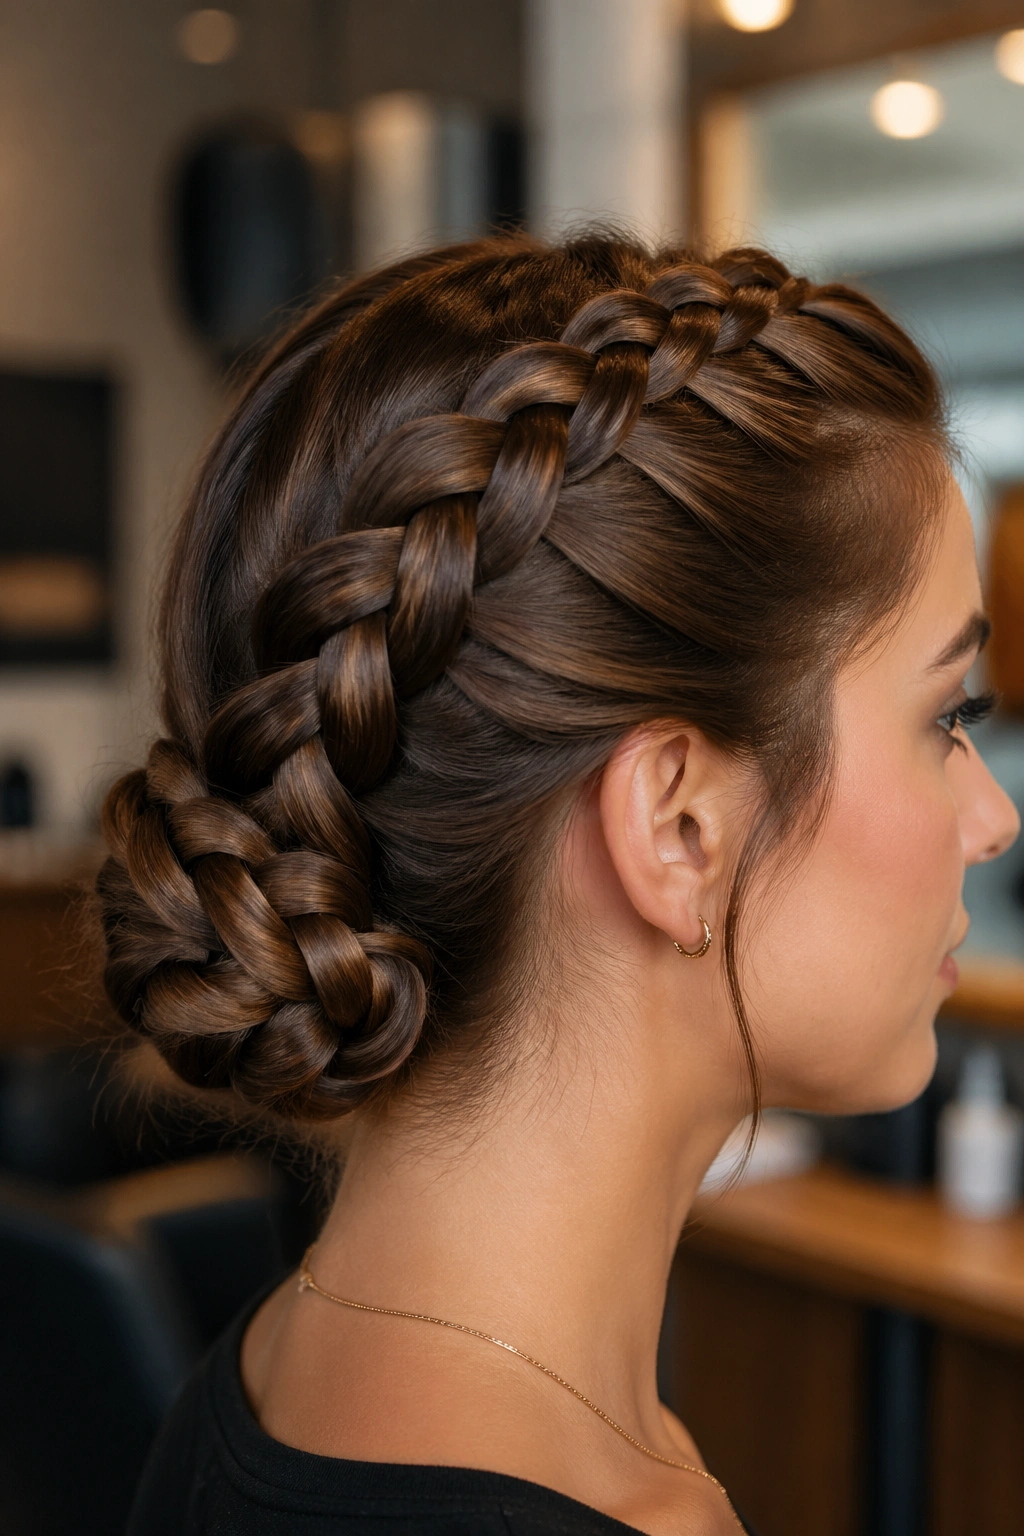
Why does a Dutch braid hold so well in a bun? Because the braid sits on top of the hair instead of sinking into it. That raised stitch line gives the style a built-in ridge, and that ridge is the whole point when you want a bun that does not need a single pin.
Braid straight down the center or slightly off-center, depending on where you want the bun to sit. Stop when you reach the nape, tie off the end, then wind the tail around the base in a flat coil. If your hair is layered, keep the braid snug through the last few inches; loose ends are what make this style start to puff and drift.
What makes it different
A regular low bun can look pretty but feel weak. A Dutch braid coil looks a little more deliberate, and that is exactly why it holds.
- Use a smoothing cream on dry ends
- Add dry shampoo at the crown if the hair is silky
- Keep the braid centered so the bun doesn’t lean
- Wrap the tail clockwise or counterclockwise, but stay consistent
This one has a neat, pressed-in look without feeling fussy.
3. French Braid Fold-Under Bun
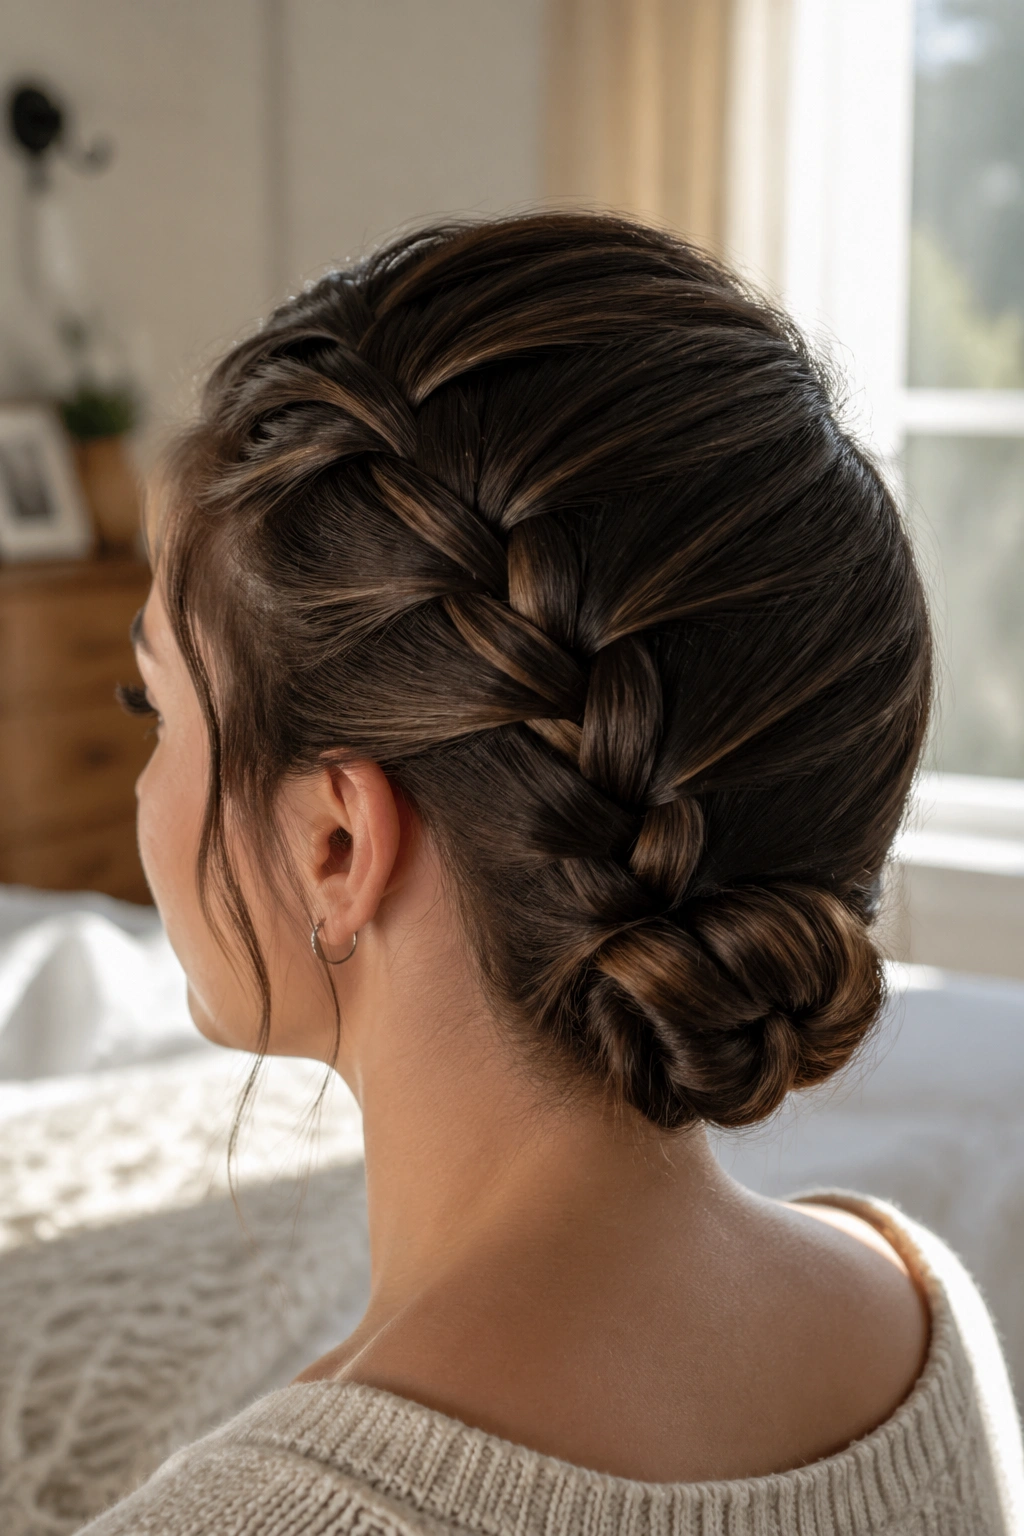
A French braid fold-under bun gives you that polished, tucked look people usually expect from pins, except the braid itself does the job. Begin at the hairline, feed sections into the braid as you move toward the nape, and keep the braid fairly compact. When you reach the bottom, leave a short tail, fold that tail upward, and tuck it under the last braid stitches before wrapping the rest around the base.
That fold is the part people skip, and it matters. It creates a little pocket where the tail can hide instead of hanging loose and pulling the style down. If you have medium-thick hair, this bun holds especially well because the braid has enough body to support the fold.
A small opinion: this is the best “I need to look put together fast” braid bun in the whole group. It reads tidy without looking stiff.
4. Box Braid Cinnamon Bun
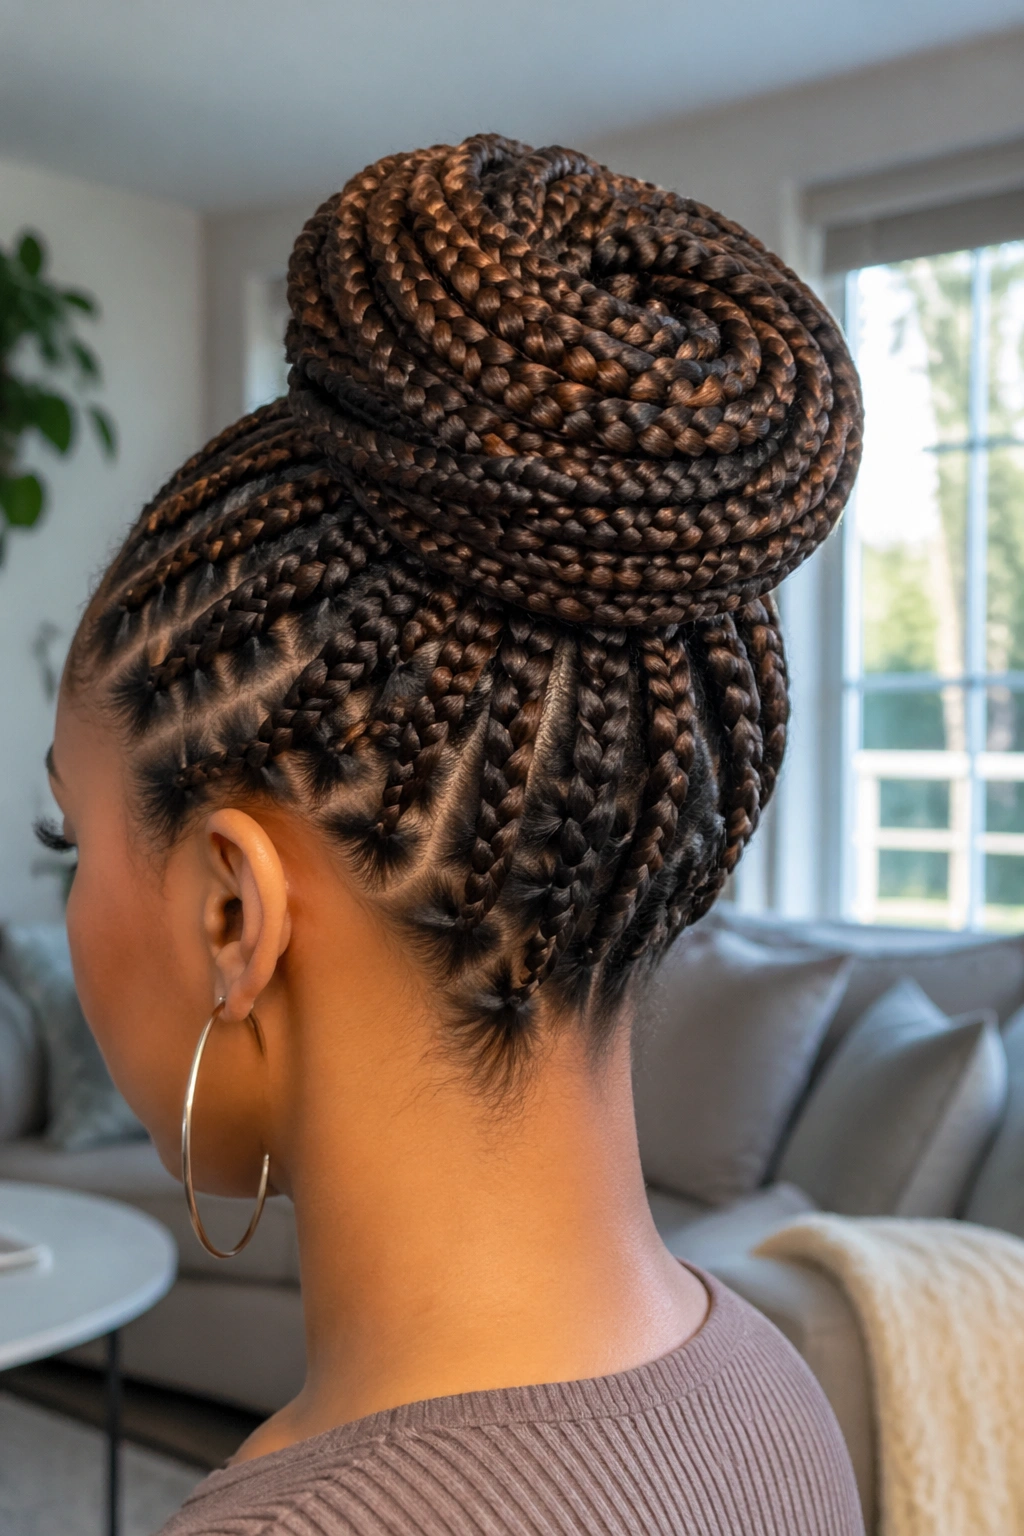
Box braids and cinnamon buns get along for one simple reason: weight helps. When you gather the braids and coil them flat around the head, the strands settle into one another like stacked cords, which gives the bun a surprisingly steady shape even without pins.
The key is to keep the spiral tight at the start and wider at the outer edge. Start with a low ponytail or central gather, then wrap the braids around the base in a flat circle. Use the length of the braids to cover the elastic, and let the ends tuck under the coil rather than hanging off the side.
- Works best on box braids, knotless braids, or small faux locs
- Use a strong elastic or a large snag-free scrunchie
- Keep the first wrap close to the scalp for better hold
- If the bun feels heavy, split it into two flatter loops instead of one tall stack
This one is easy on the eyes and easy on the scalp, which is a nice combination.
5. Feed-In Crown Bun
Feed-in braids give a braid bun a kind of built-in rail system. The braid lines run close to the scalp, so the hair is already being directed toward the bun before you even start coiling. That is why this style stays neat for so long, and why it tends to look better halfway through the day than most buns do at the start.
The part people get wrong
The hold should come from the braids, not from yanking the hairline into submission. Pulling too tight at the edges makes the style uncomfortable, and it does not even improve the structure much. The better move is to braid firmly through the center section, then let the bun itself sit low and compact at the back.
Use this one when you want a dressed-up finish with strong shape. It works for weddings, work functions, or any day when you’d rather not keep checking a mirror. The crown-to-bun path makes the whole thing look intentional.
6. Side Braid Chignon Knot
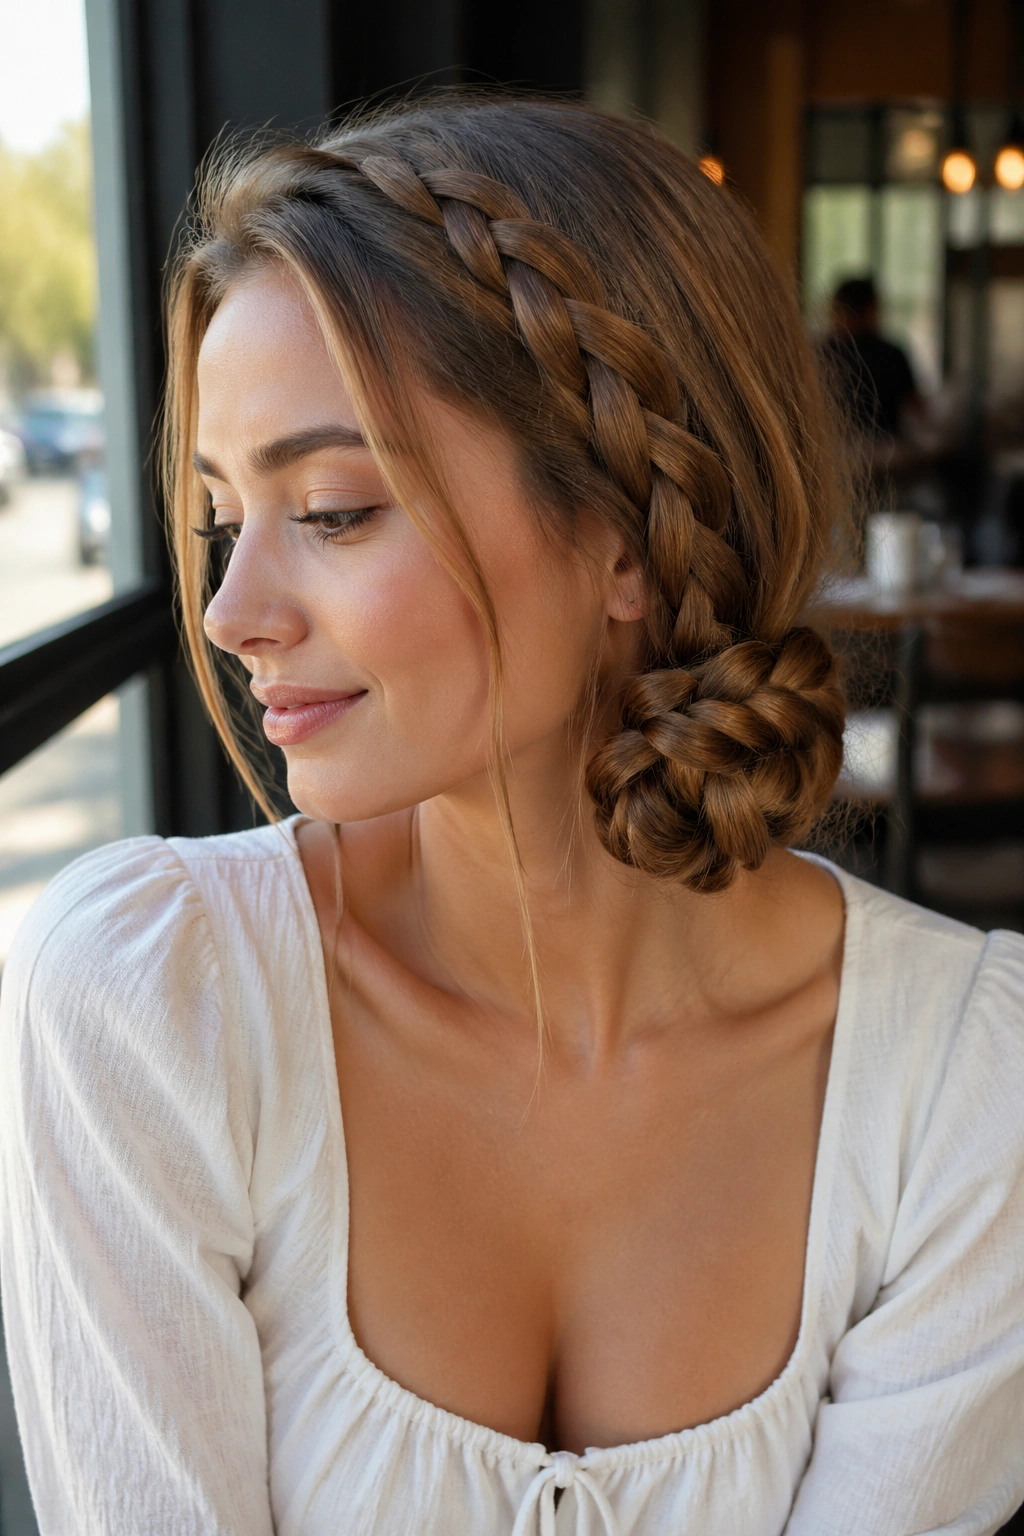
A side braid chignon has a little more personality than a straight-back bun, and I think that helps it hold. The off-center placement gives the style a directional pull, so the hair settles into the knot instead of fighting symmetry at the nape. One deep side part, one braid swept low, and one compact knot on the heavier side — that’s the whole idea.
This is the braid bun I’d pick for hair that falls flat fast. The side placement adds visual weight, and the knot can be tucked close to the jawline so it feels secure rather than airy. If your hair is especially slippery, work a pea-sized amount of styling cream through the mid-lengths before braiding. Not at the roots. You want grip, not grease.
One sentence is enough here: the lower the knot sits, the steadier it feels.
7. Fishtail Wrapped Bun
A fishtail braid looks delicate from a distance, but the structure is stubborn. That’s the part I love. Each tiny crossover adds friction, so when you wrap a fishtail into a bun, the braid tends to compact instead of unraveling into soft strands.
How to get the most from it
Braid the hair all the way down to the ends, then secure it with a small elastic. Wrap the tail around a low or mid-level base, keep the coils flat, and slide the tail under the first loop of the braid rather than laying it on top. That little tuck makes a real difference.
- Best for long hair
- Best for hair with some texture or natural bend
- Better with a snug braid than a loose one
- Looks especially good with a matte finish
If you want the bun to feel less severe, gently widen the braid a touch before wrapping it. Just a touch. Too much and the hold starts to wobble.
8. Bubble Braid Bun
Bubble braids are playful, but they are also practical in a way people underestimate. Once you section a ponytail with small elastics every inch or two, the bubbles create their own shape and bulk. When that chain gets wrapped into a bun, all those rounded segments press against each other and keep the style from collapsing.
A bubble braid bun works especially well on medium-length hair that doesn’t want to stay in a sleek coil. The puffed sections hide tiny shifts in the style, which is useful if your hair gets frizzy or puffy in humidity. Make each bubble even by tugging gently on both sides after placing the elastic, then stop. You want shape, not collapse.
Quick read on this style:
- Needs 4 to 7 small elastics depending on length
- Great for straight, wavy, or lightly curly hair
- Bigger bubbles create a fuller bun
- Smaller bubbles make the style feel neater
It’s fun, but it is not flimsy.
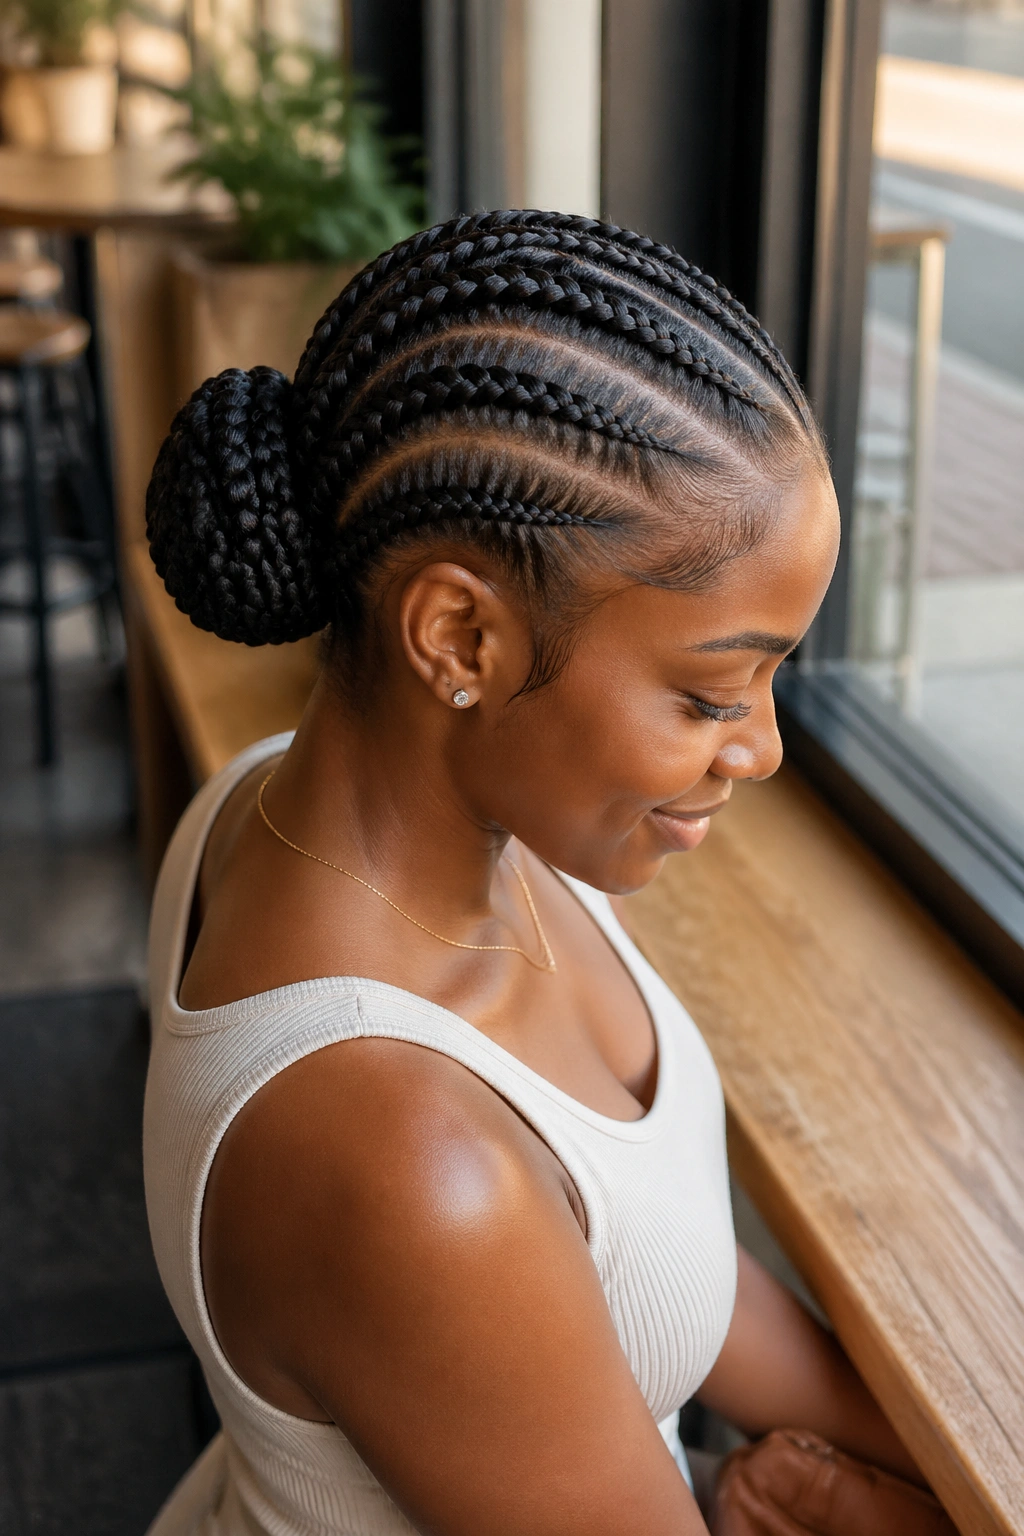
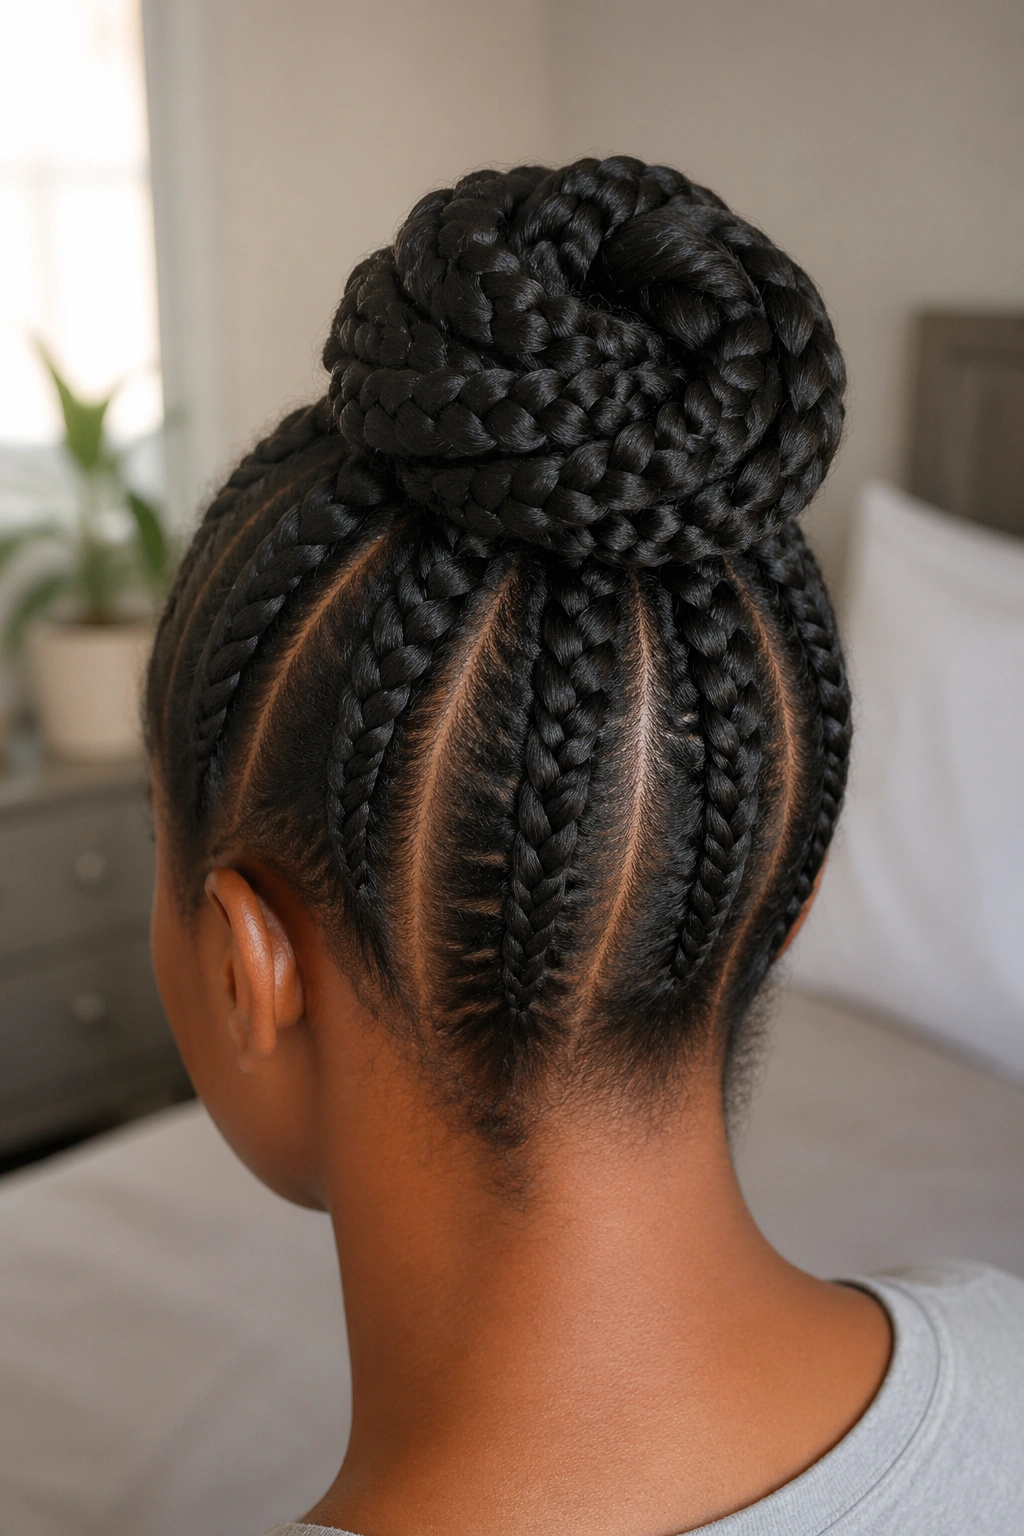
9. Cornrow Low Roll Bun
Cornrows change the whole game because the braid direction is already telling the hair where to go. By the time you reach the nape, the strands are organized, flat, and ready to be rolled into a low bun that holds on its own. That’s why this style is a workhorse for natural hair and active days.
What to watch for
The rows need to be even. Not perfect, even. If one side is much tighter than the other, the bun starts to tilt and the scalp feels the difference by midday. Add a small amount of gel or edge control to the part lines, keep the braids neat, and roll the ends inward so they disappear under the bun rather than sticking out.
This is one of the best options for heat, humidity, and workouts because the scalp braid pattern keeps the style close to the head. It doesn’t bounce around. It sits.
- Best for coily and textured hair
- Best for medium to long lengths
- Best when you want low manipulation
- Better if the ends are tucked while still slightly pliable
10. Halo Braid Knot
A halo braid bun sits somewhere between romantic and practical, which is a nicer place for a hairstyle to live than people admit. The braid wraps around the head like a crown, then the ends meet at the back and form a knot or small bun that hides under the braid line. That perimeter anchor is what keeps the style from shifting.
Compared with a milkmaid style, the halo sits flatter and usually feels more secure because the braid travels all the way around the head before it gets gathered. It’s a good choice when you want a softer silhouette without losing structure. Medium to long hair handles this best, especially if the hair has a little texture or day-old grit.
A little advice: braid the halo slightly tighter than you think you need. Not painful-tight. Just firm. The braid should feel settled against the head, not loose enough to puff up and separate.
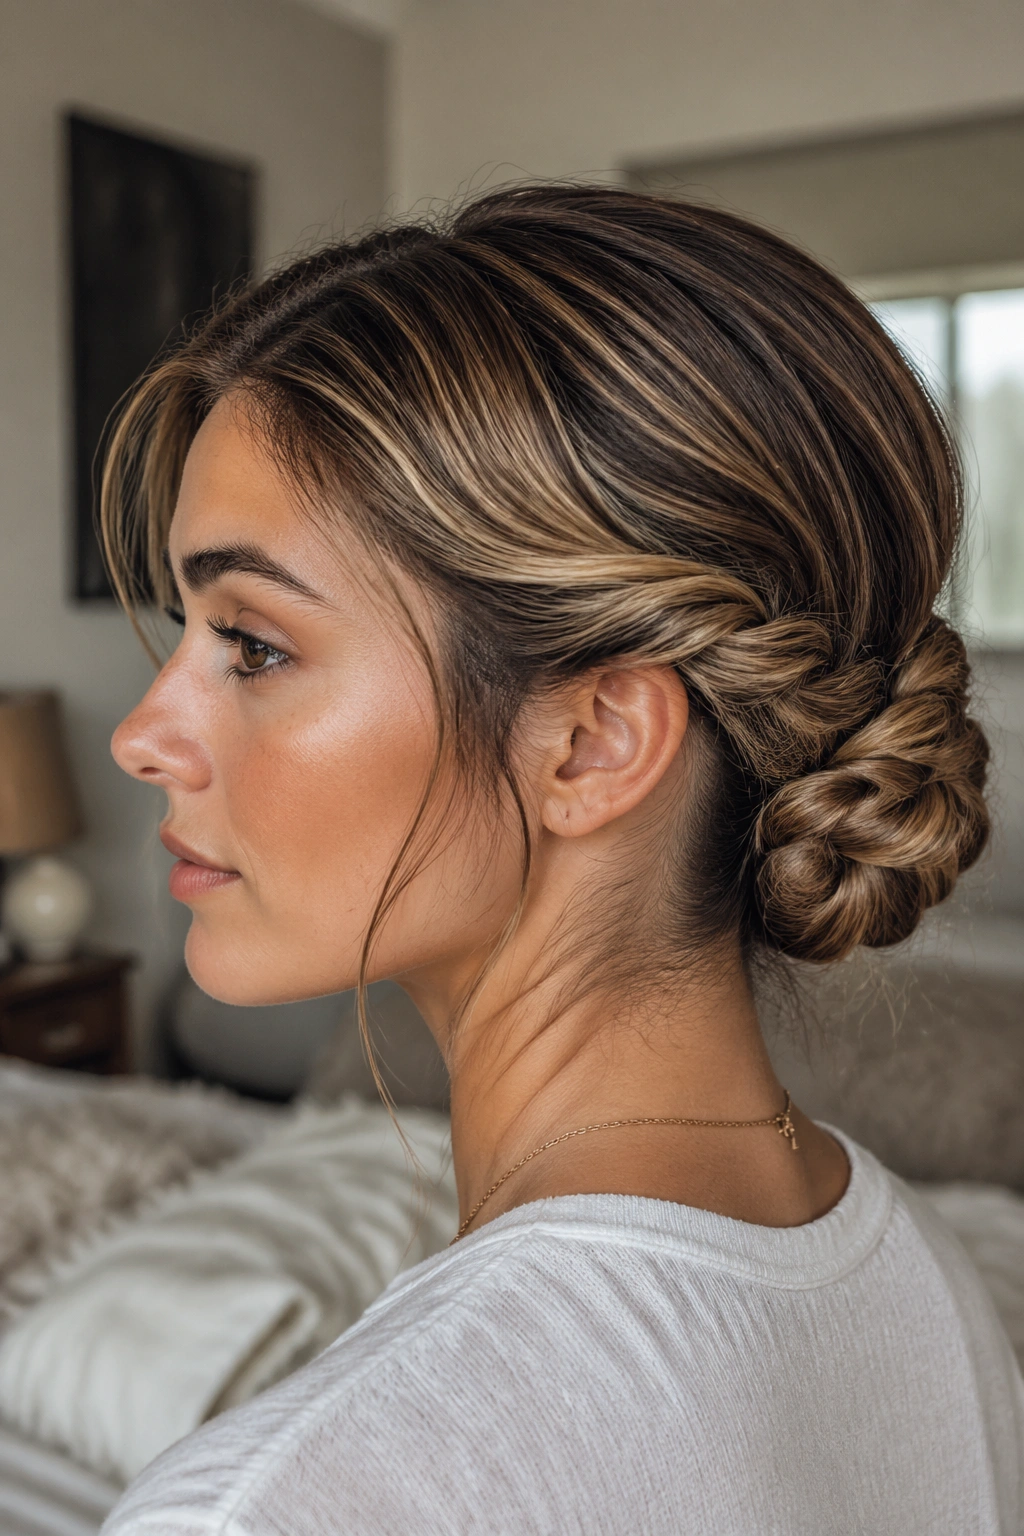
11. Two-Strand Flat-Twist Bun
Two-strand flat twists are underrated because they do not look as dramatic as a full braid, but they lock hair down fast. On coily hair especially, the flat twist pattern lays close to the scalp and keeps the strands aligned, which makes the final bun feel grounded instead of puffy.
Why flat twists are different
A braid crosses over and over. A flat twist wraps sections around each other. That twist shape gives you a low-profile base, and low-profile bases are easier to secure without pins. Part the hair into two or four clean sections, twist them toward the back, then gather the ends into a bun at the nape.
If your hair is dry, use a twisting cream or a light gel on the roots before starting. If it’s already moisturized and stretched, you may not need much at all.
Best use cases:
- Protective styling
- Humid weather
- Low-friction sleep styles
- Days when you want the bun to feel close to the scalp
It’s a calm style. No drama, no slipping.
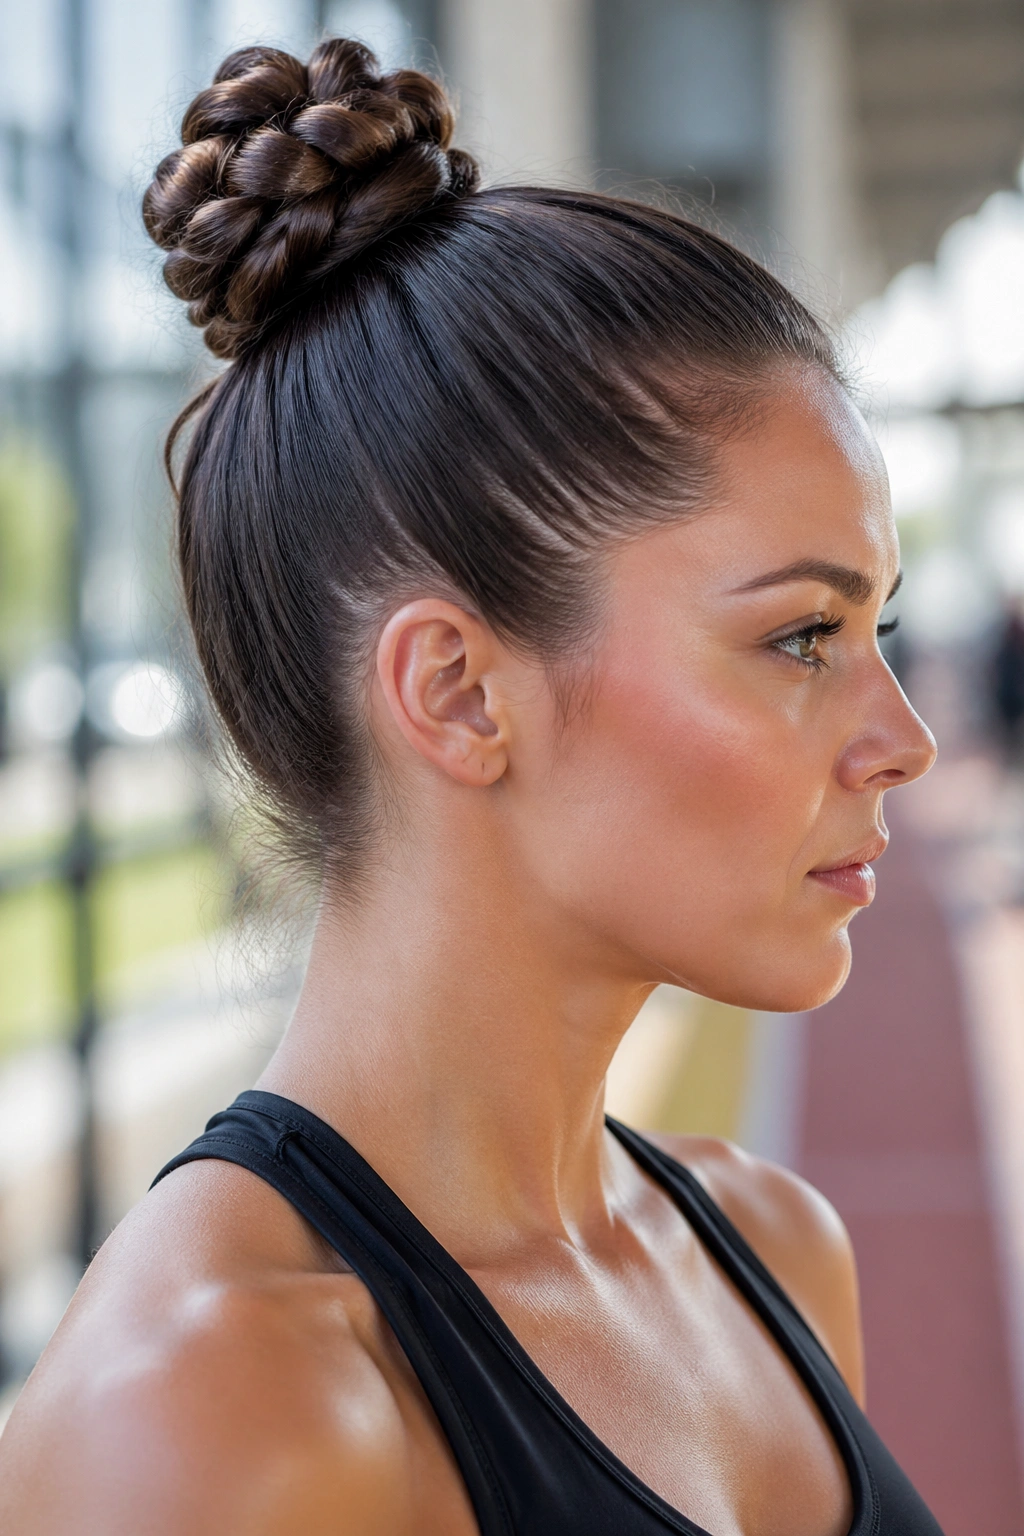
12. High Braided Topknot
A high braided topknot has one job: keep hair up and out of the way without turning into a loose mess by lunchtime. The braid is what makes that possible. Gather the hair high at the crown, braid the ponytail tightly, then wind the braid around its own base until you get a firm knot at the top of the head.
The best version starts with a strong elastic and ends with the braid tail tucked under the knot itself. If the braid is long, use a second small elastic halfway down the tail so the wrap stays compact. That little extra band helps more than people expect.
This style is honest about what it is. It’s not soft. It’s not trying to be. It’s for workouts, rushed mornings, and hot rooms where you want your hair to behave.
One sentence, because it deserves one: the tighter the first ponytail, the better the topknot holds.
13. Braided Banana Bun
The banana bun has a long, slim shape that feels polished without needing any shiny extras. When you braid the hair first, the twist of the braid gives the bun a firm center line, and that center line helps the style stay flush against the head. It should sit like a smooth ridge, not a puffed lump.
This one works especially well on medium to long hair because you need enough length to fold the braid vertically rather than squeezing it into a tiny ball. Start the braid low, then guide it upward along the back of the head, folding the length inward as you go. The final tucked end should disappear into the base.
The look is a little old-school, in a good way. Elegant. Clean. Slightly formal.
If your hair is slippery, add a small amount of mousse before drying. If it’s naturally textured, don’t overdo the product or the braid can get too soft to hold its shape.
14. Loc-Friendly Woven Bun
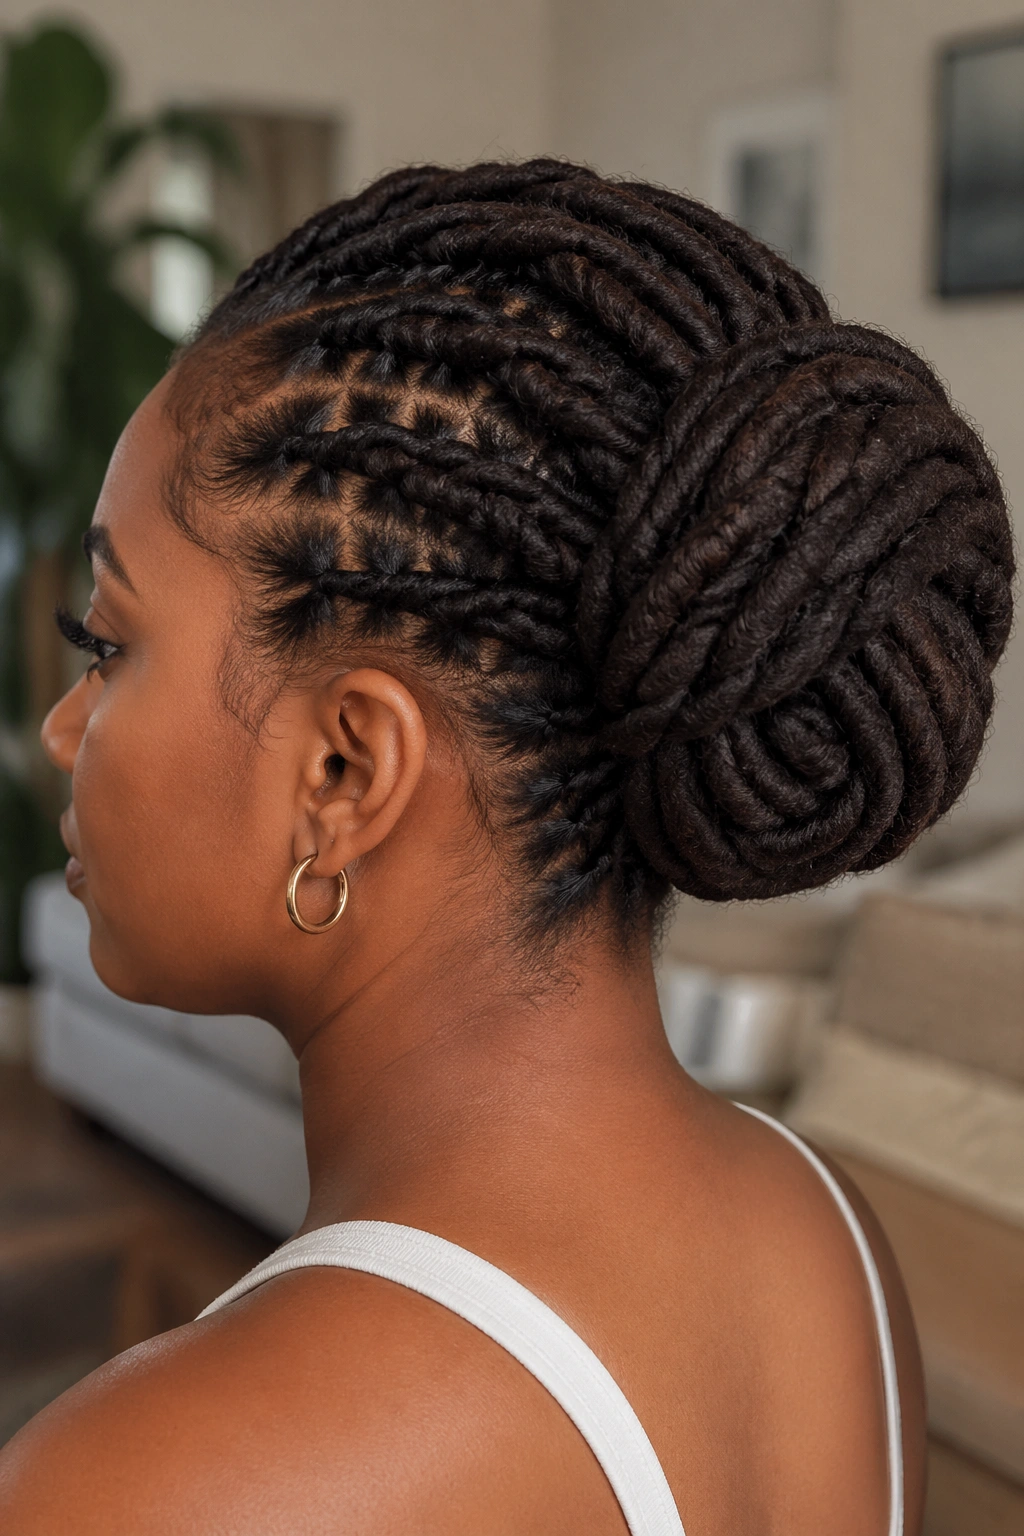
Locs make a braid bun behave differently, and that’s a good thing. The individual strands already have body, so the bun does not need much help to stay put. What it needs is direction. That’s where a woven bun comes in: section the locs into two or three parts, cross them over one another, and wrap them into a low or mid-height bun that feels balanced instead of bulky.
Practical details that matter
Use a wide elastic, a loc tie, or a soft band that can handle the weight. Thin elastics can dig in and make the bun feel unstable. Keep the sections even so the bun sits centered, and avoid yanking the roots too hard. A secure loc bun should feel snug, not harsh.
- Best for mature locs or medium-weight locs
- Best when you want low manipulation
- Best paired with a satin scarf at night
- Better if the edges are left calm instead of slicked down heavily
This is the kind of style that can carry you through a full day without much fuss.
15. Four-Strand Pull-Through Bun
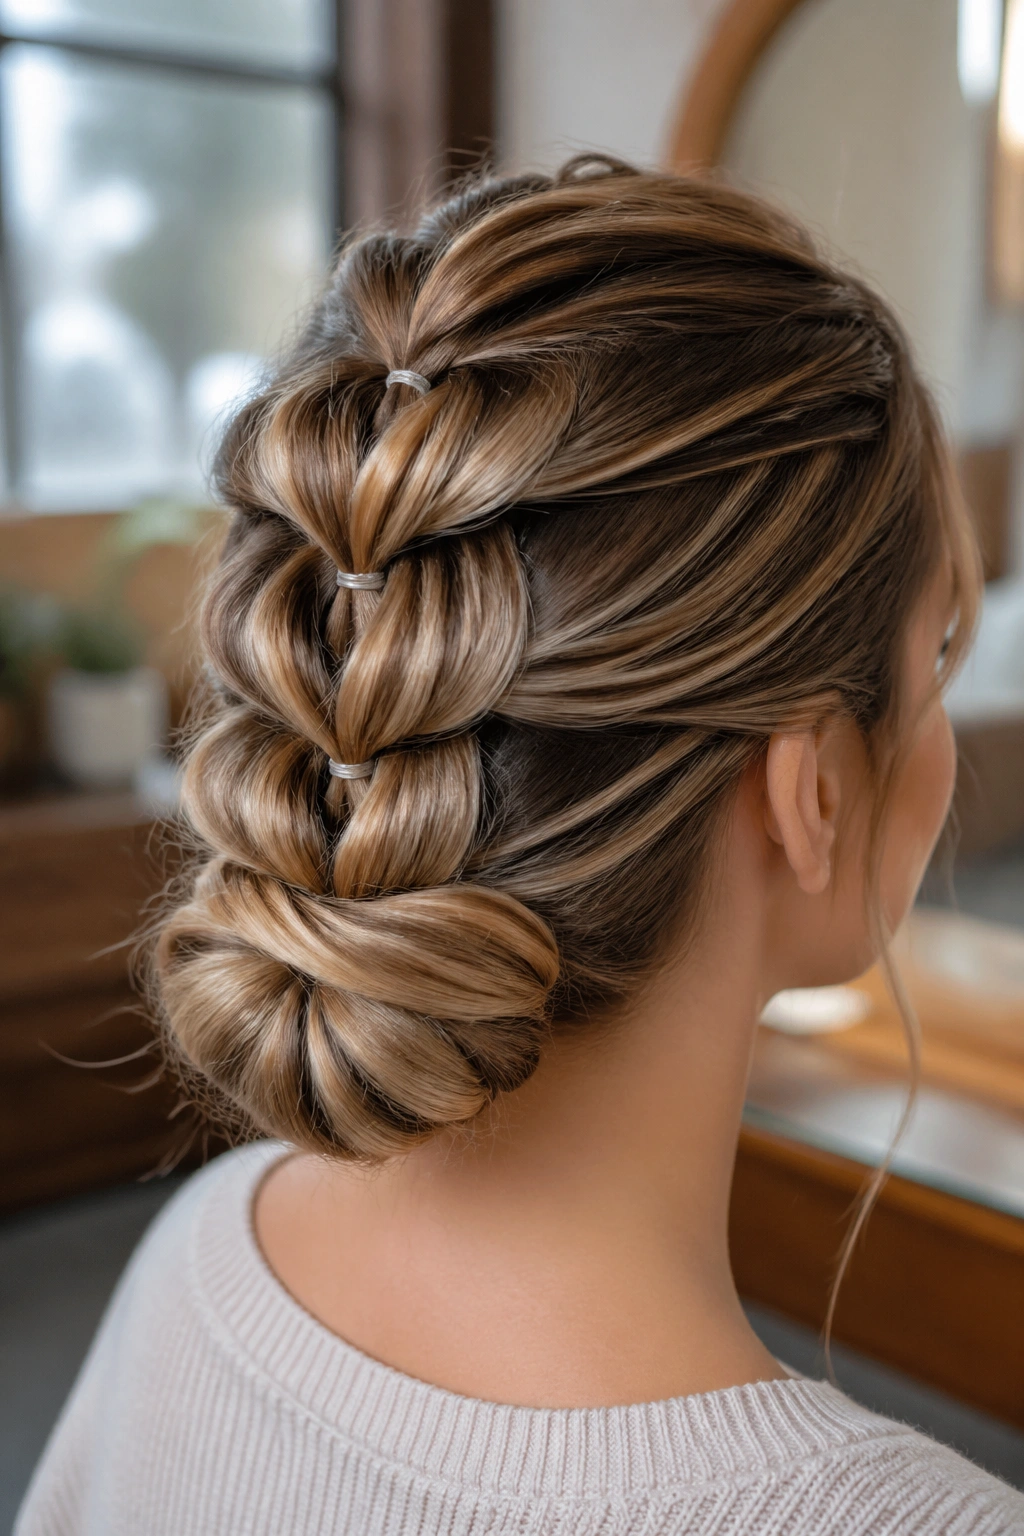
Why bother with a pull-through braid when a normal braid exists? Volume, mostly. And control. A pull-through braid builds itself from small ponytails, each one linked to the next with little elastics, so the finished chain has a thick, segmented look that holds a bun shape beautifully.
Start high, mid, or low, depending on where you want the bun. Section the hair into stacked ponytails, loop each lower pony through the one above it, then gently fan out the sides to create fullness. Once you reach the end, wrap the chain around the base and secure the tail under the last loop.
How to make it hold
Keep the elastics even, about an inch or two apart, and do not stretch the loops so much that the braid loses its structure. The bun should feel springy in your hands, not soft and loose.
This style suits thick hair, layered hair, and anyone who likes a bit of size in the bun without using a donut or pins.
16. Messy Braided Sockless Bun
There’s a reason people keep coming back to the messy braid bun. It works on real hair, with real time pressure, and it doesn’t ask for perfect part lines. Braid the ponytail loosely, bend it over itself, and wrap it into a soft knot at the back or crown. The braid gives the bun enough structure to stay in place, while the looseness keeps it from looking overdone.
Second-day hair is perfect here. It has more grip, less slide, and a little natural bend that helps the bun settle. Freshly washed hair can do it too, but it usually needs a touch of dry shampoo first.
This is the bun I’d wear when I want my hair off my neck and I do not want to think about it. That’s the whole appeal. It looks casual, but it still holds.
A good messy braid bun should feel slightly imperfect and still secure when you shake your head.
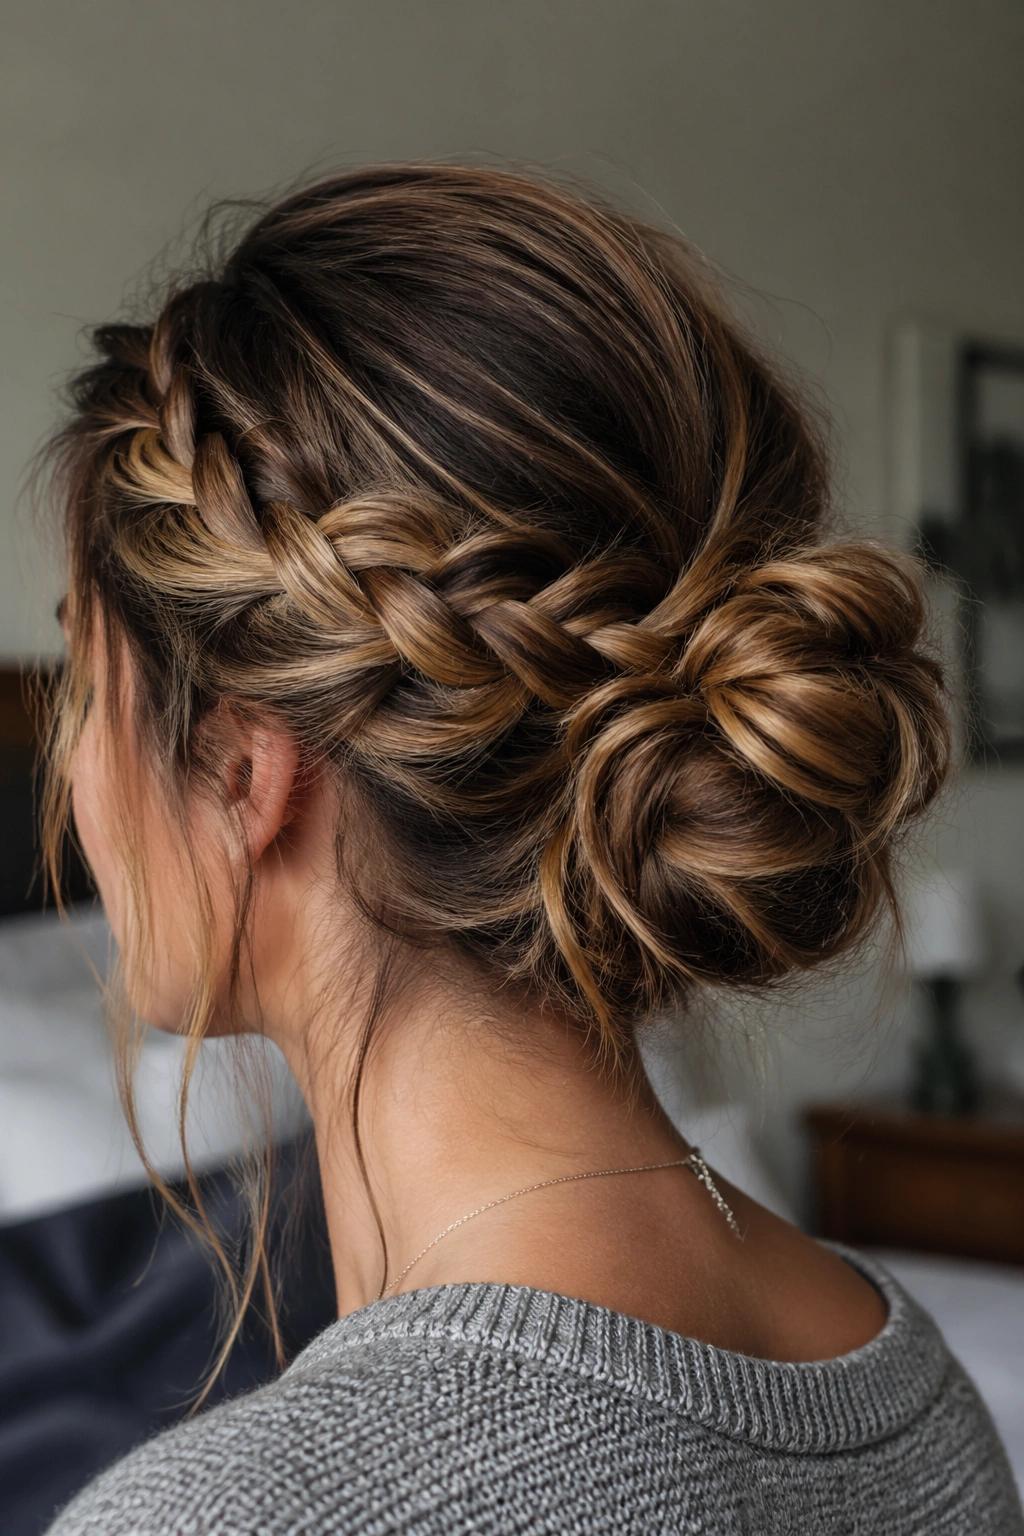
17. Braided Space-Bun Hybrid
A space-bun hybrid is proof that a bun does not have to be one single lump to hold well. Split the hair into two braids, usually from the crown or the temples, then wrap each braid into its own small bun. The two-bun structure distributes the weight, so you get more stability than you’d expect from something that looks playful.
This style is great for shorter lengths that can’t always make one full low bun. It also works when you want something a little more fun without relying on clips or pins to shape the buns. Each side secures itself with its own elastic, and the braid tail folds back under the coil.
What makes it different: the support comes from balance. One bun is not fighting the whole head on its own.
Use this when you want a style that moves well, stays comfortable, and still looks deliberate. It’s less serious than a chignon. That is part of the charm.
18. Milkmaid Wrapped Bun
The milkmaid braid usually lives as a crown style, but when you convert it into a wrapped bun, it gets a cleaner finish and a stronger hold. Braid both sides, bring them across the top of the head, then gather the remaining length at the back into a compact bun that sits under the braid line. The crown braids act like a built-in frame.
Compared with a halo style, this one feels a little more lifted. The braids sit visibly over the hairline, which gives the look shape and keeps the back bun from slumping. It’s a pretty choice for dinners, photos, and events where you want the hair to look styled without looking stiff.
If your hair is layered, braid a little tighter through the first few inches. That keeps shorter pieces from escaping around the temples. Do not bury the braid in too much product; you want a touch of grip, not a slick slide.
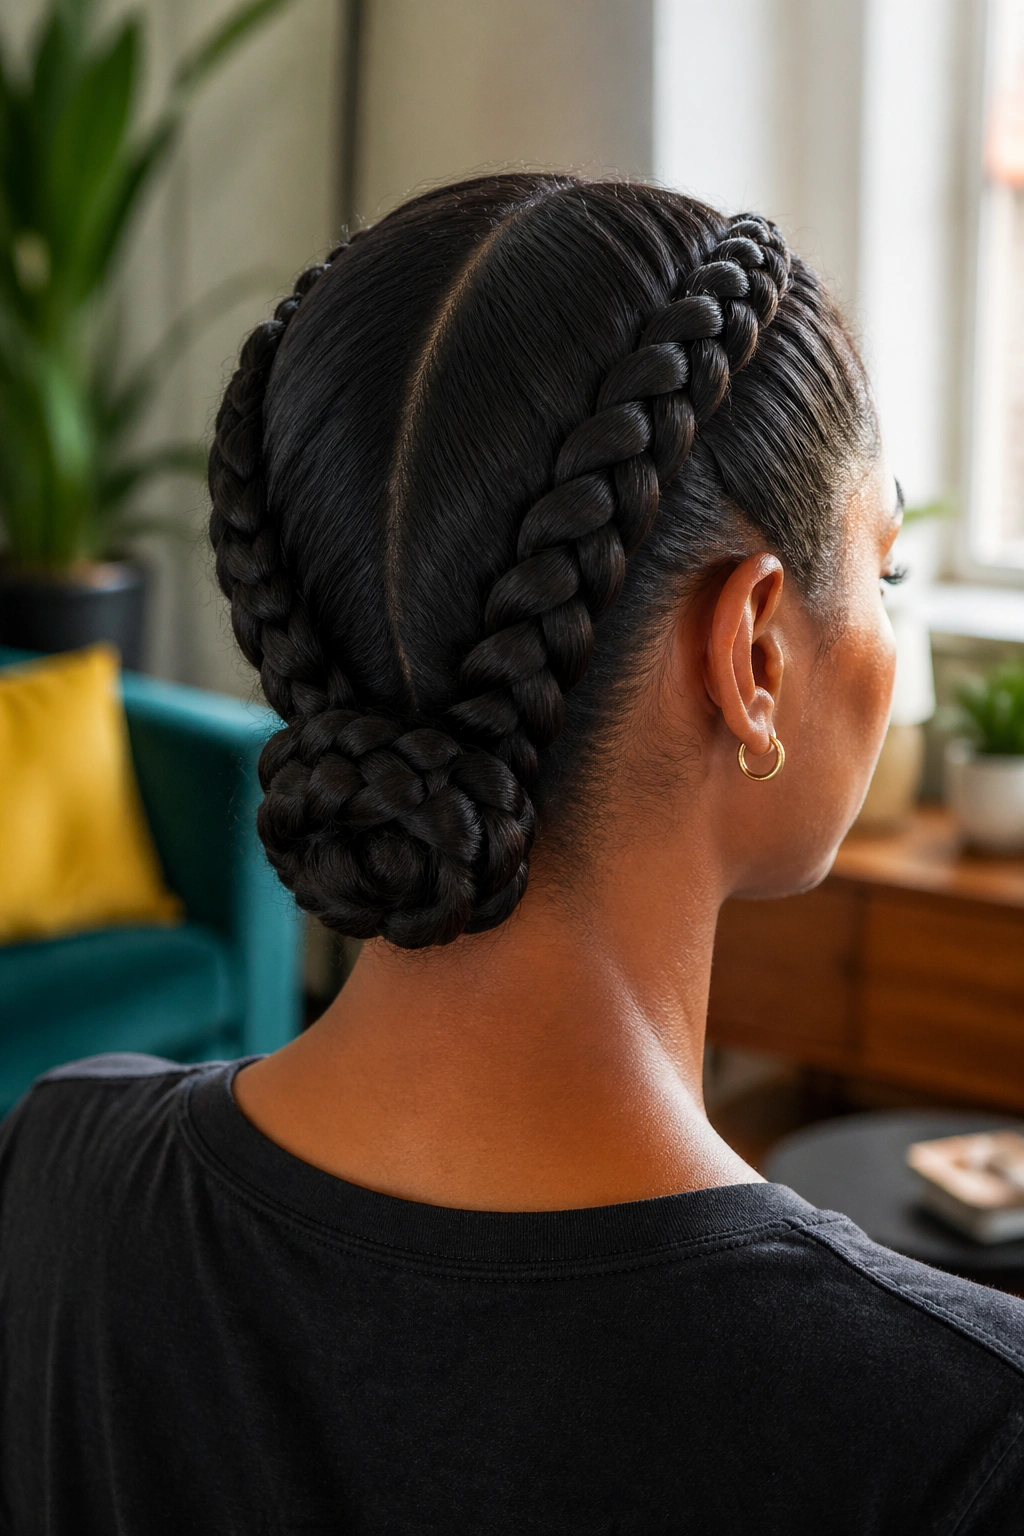
19. Double-Braid Anchor Bun
Two braids can hold a bun better than one, and that is the whole charm of the double-braid anchor style. Braid one section from the left, another from the right, then meet them at the center and coil the joined lengths into a single bun. You’re building support from two directions instead of asking one braid to do all the work.
The anchor system
The first braid stabilizes the left side. The second stabilizes the right. Once they meet, the base has twice the grip, which is why this style works so well for fine hair or layered hair that tends to slide out of simple buns.
- Keep both braids the same tightness
- Match the part lines so the bun sits evenly
- Use a small elastic at the meeting point
- Tuck the ends toward the center of the coil, not outward
This is a strong everyday option if your hair usually refuses to stay where you put it. No drama. Just leverage.
20. Tucked-In Protective Bun
A tucked-in protective bun is the kind of style I trust when I want my hair left alone for a while. Braid the hair into one large braid or a few medium braids, then fold the length inward so the ends disappear underneath the base. The tuck is what keeps the style neat, and the braid pattern is what keeps it secure.
For long hair, fold the braid in thirds before wrapping, not in one giant loop. That makes the bun flatter and less likely to tilt. For coily or textured hair, a little moisture cream on the ends can help the tuck stay smooth without making the bun slippery.
This style works well for workdays, travel, or overnight protection because the shape stays close to the head and the ends are hidden. Sleep on a satin pillowcase or wrap the bun with a scarf, and it usually looks better the next day, not worse.
That’s not something every hairstyle can claim.
21. Curly-Ends Braid Bun
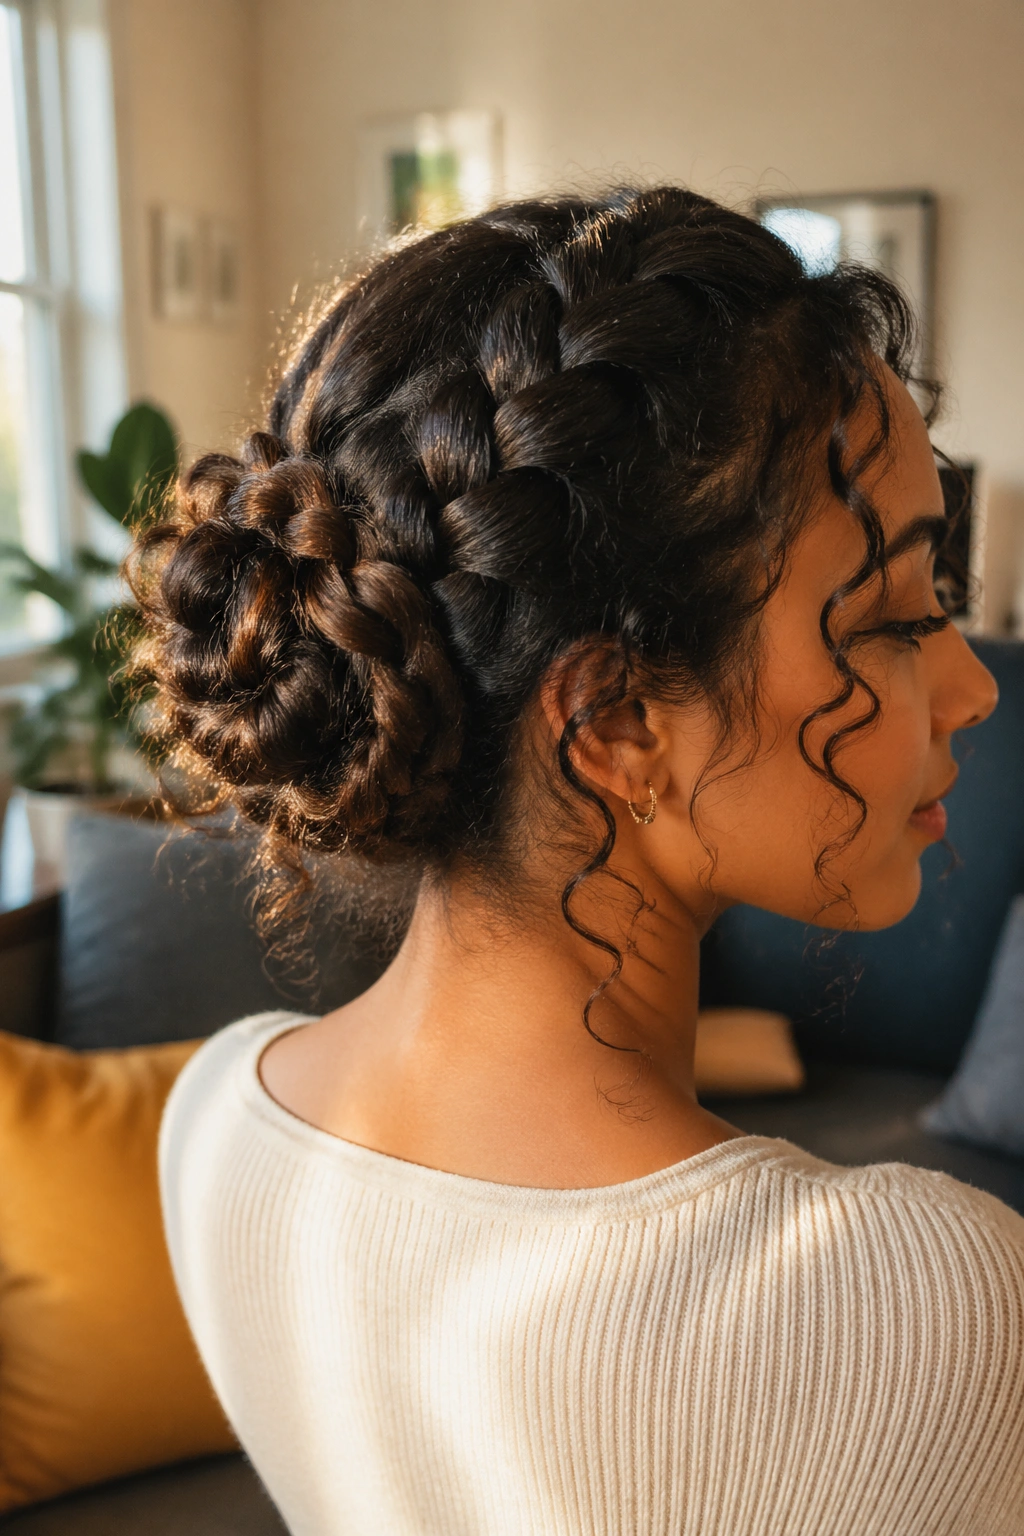
Curly ends make a braid bun feel softer, but they also help with hold. The texture at the end of the braid adds a bit of friction, and that friction keeps the wrapped bun from sliding loose as fast as a slick tail might. It’s a small thing, but small things matter when you want a bun that stays put without help.
Braid through the mid-lengths, then leave the last 2 or 3 inches free if your hair has natural curl or bend. Wrap the braid into a bun and let the ends peek out on purpose. The shape should look finished, not accidental. The loose curls soften the edges and make the bun feel less severe.
If you have very fine hair, skip heavy oil at the ends. A little too much shine can turn into a little too much slip. Keep the base secure and let the curls do the visual work.
This is one of the prettiest ways to get a pin-free hold without losing movement.
22. The No-Fuss Gym Bun
If you want one braid bun to memorize, make it this one. Gather the hair into a high or mid ponytail, braid it firmly, then wrap the braid around the base and secure the end under the coil with a single elastic. That’s it. No drama. No hunting for bobby pins in the bathroom sink.
The trick is to start with a base that already feels stable. The ponytail should sit where you actually want the bun, because once the braid is wrapped, changing the position gets messy fast. For long hair, a halfway elastic on the braid tail helps the wrap stay compact. For medium hair, a tighter braid usually does the job.
This is the style for movement: walking, lifting, commuting, sweating, chasing a train, chasing a child, or just getting through a day without fussing with your hair every twenty minutes. It looks clean enough for real life and tough enough for a busy one.
If I had to hand someone a single pin-free braid bun and tell them to learn it first, this would be the one.