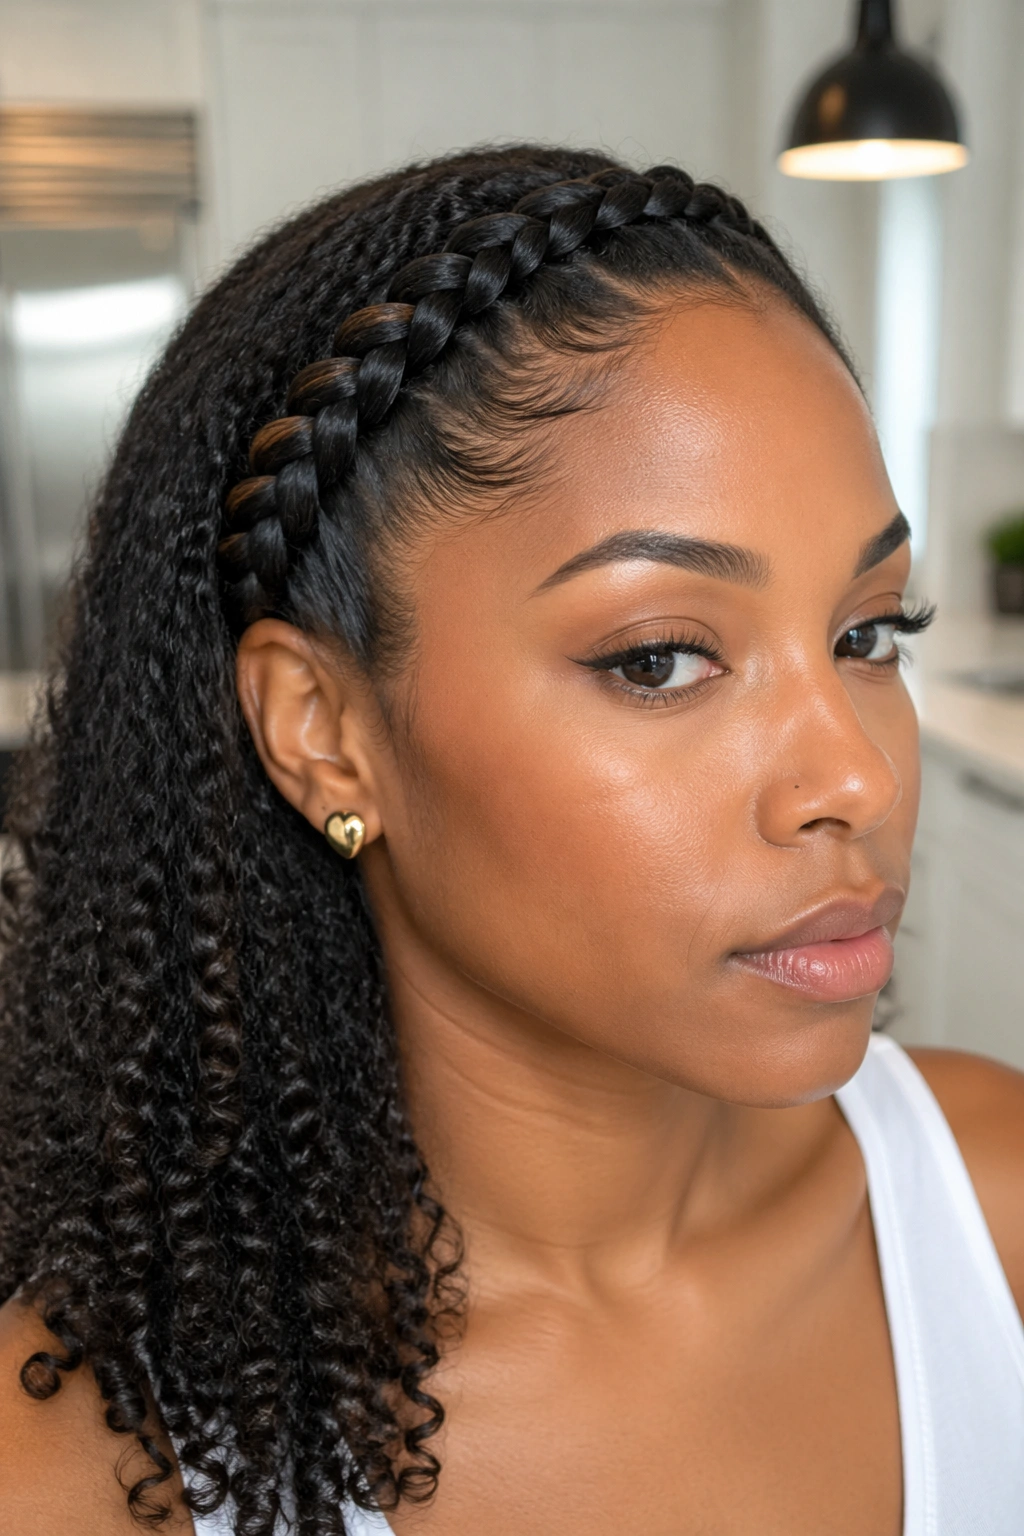
Side rope braids for 3B and 3C curly hair work because they cooperate with bend and spring instead of fighting it. That matters more than people think. A side braid gives the style direction, the rope structure gives it shape, and the curl pattern does the rest.
3B and 3C hair can hold a twist beautifully, but it can also puff up fast if the sectioning is sloppy or the prep is too heavy. A braid that starts clean and narrow can still look soft by the time you finish it. A braid that starts loose and uneven tends to look tired before you even leave the house.
A rope braid is not complicated, either. Twist each section in the same direction, then wrap them around each other the opposite way. That round, spiraled look is the whole point. On curly hair, especially hair with a bit of grip and shrinkage, the pattern stays put in a way that flat braids often don’t.
Some side rope braids read sporty. Some look polished enough for dinner, work, or a dressier outfit. The useful part is that the same technique can move in a lot of directions, as long as you match it to your texture, your length, and how much volume you actually want to keep.
1. Low Side Rope Braid for 3B and 3C Curls
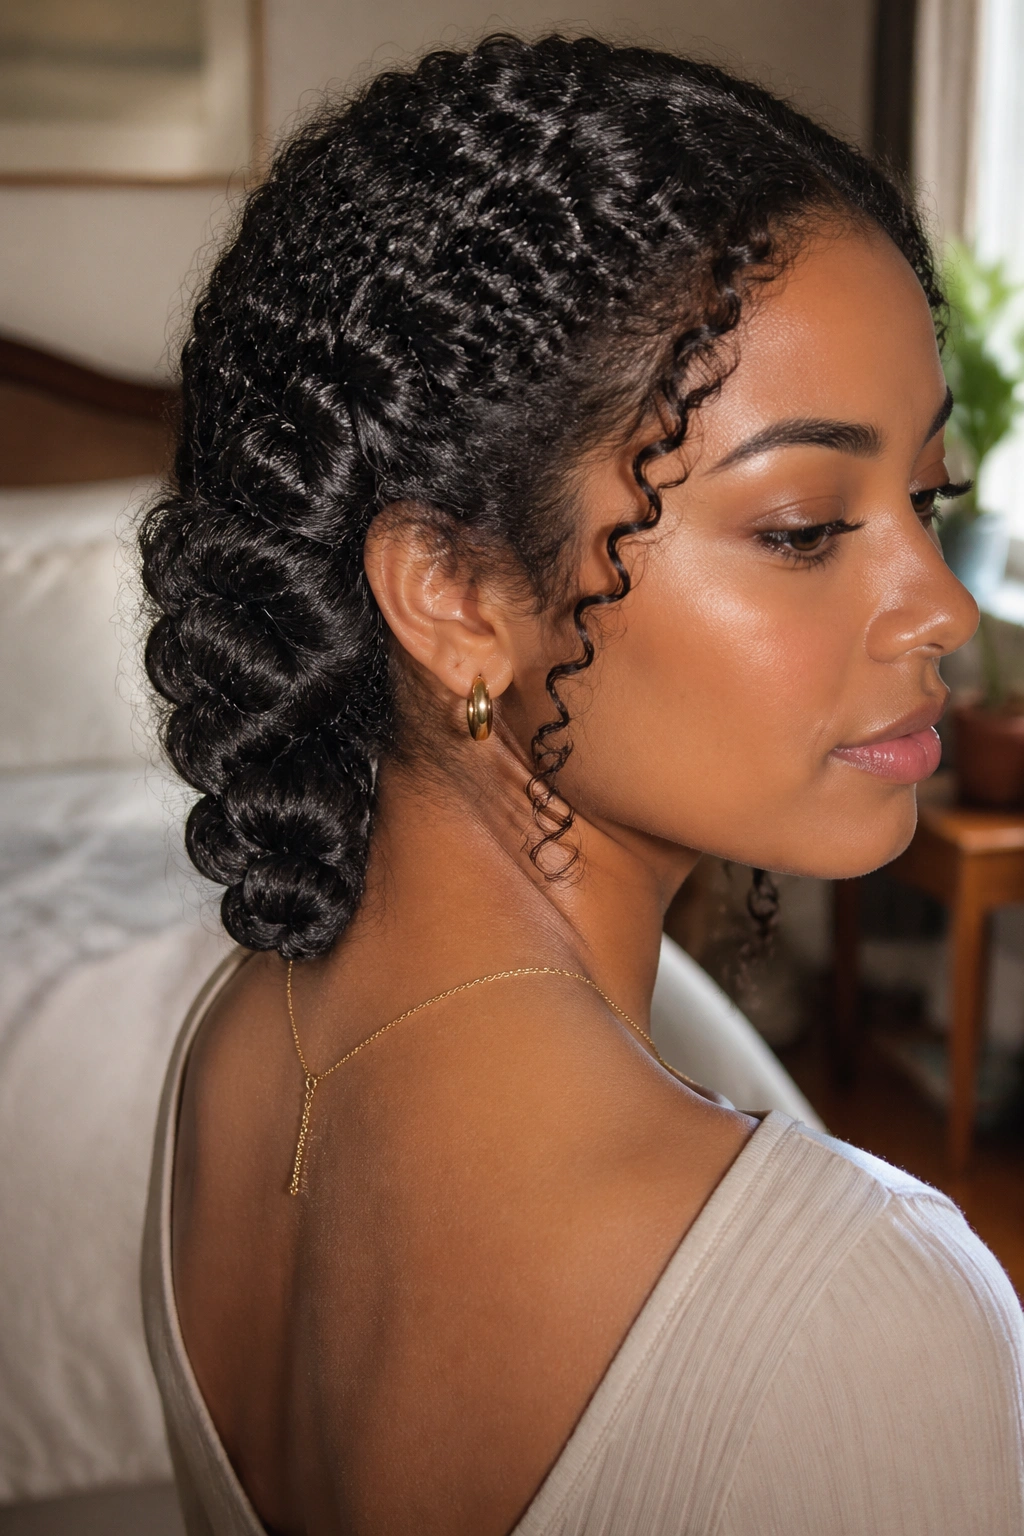
A low side rope braid is the safest place to start, and I mean that in the nicest way. It keeps the shape close to the head, which matters when 3B and 3C curls want to swell at the first hint of humidity.
Why the Nape Placement Helps
Keeping the braid low, near the nape or just behind the ear, gives the curls a chance to keep their natural body without turning into a halo of flyaways. The style feels calm. Grounded. A little more finished than a loose braid thrown over one shoulder.
It also works well when your hair has layers. Shorter pieces near the crown can stay tucked into the braid path instead of slipping out around the temples, which is where many side styles start to get messy.
- Use two sections that are close in size so the rope twists stay round.
- Start at the heavier side of your part and angle downward toward the nape.
- Keep the first twist snug, then ease up slightly through the length.
- Finish with a small snag-free elastic and hide it with a curl or a tiny cuff if you want a cleaner look.
Best tip: keep the braid low enough that it rests against the shoulder, not high enough to float away from the head. That one detail changes the whole feel.
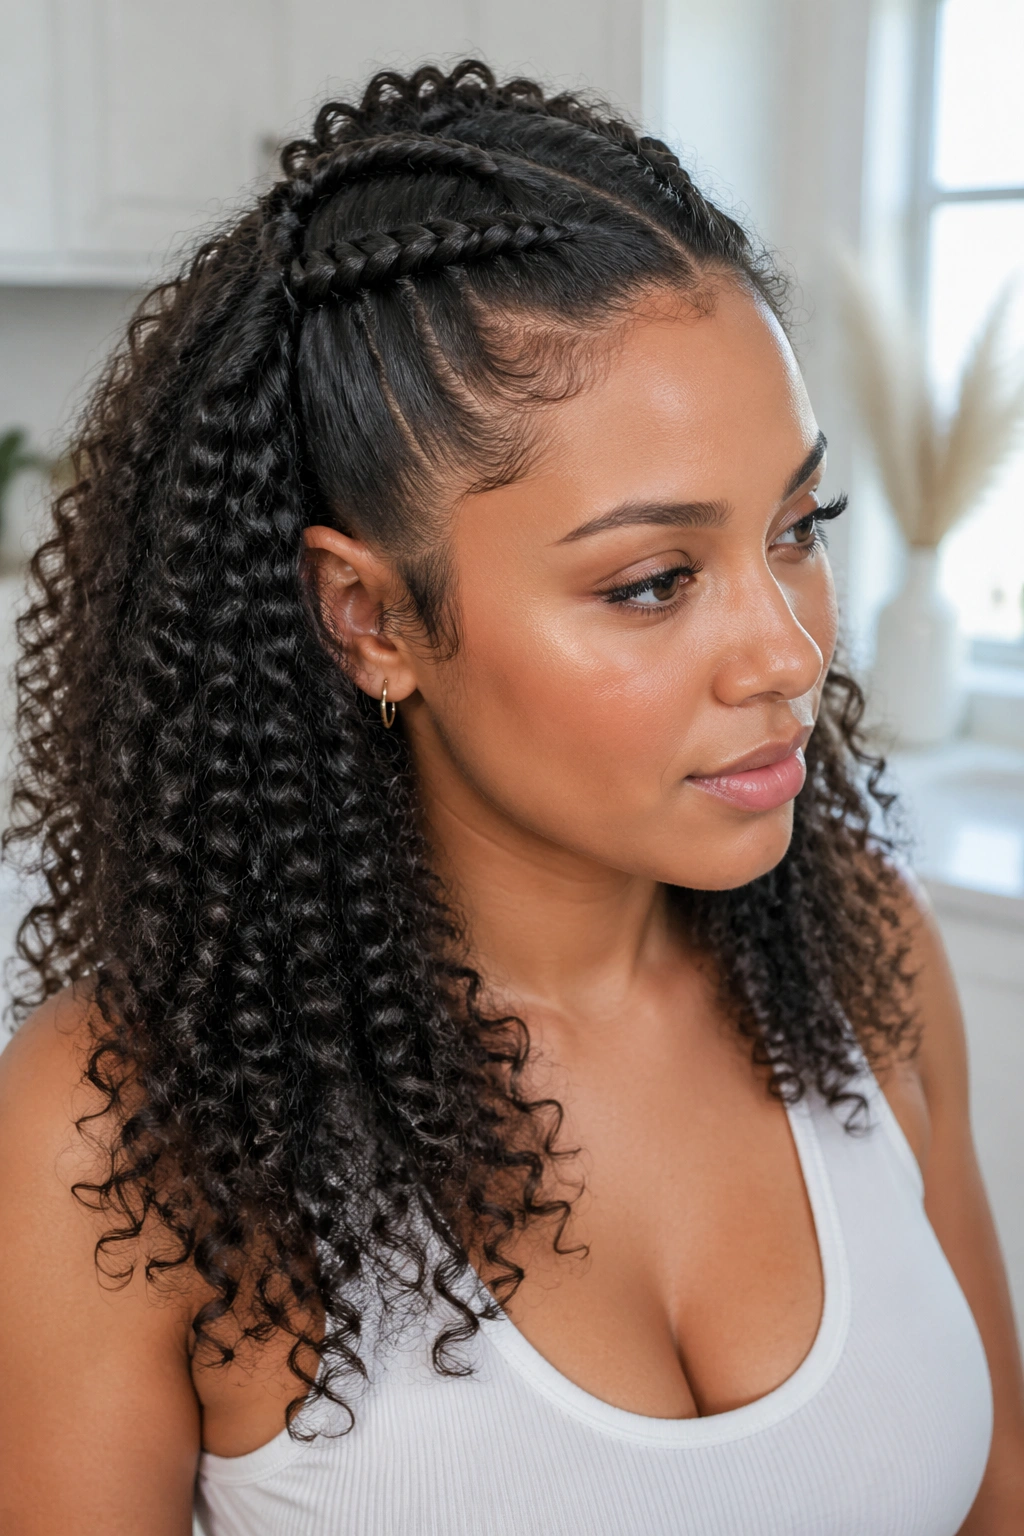
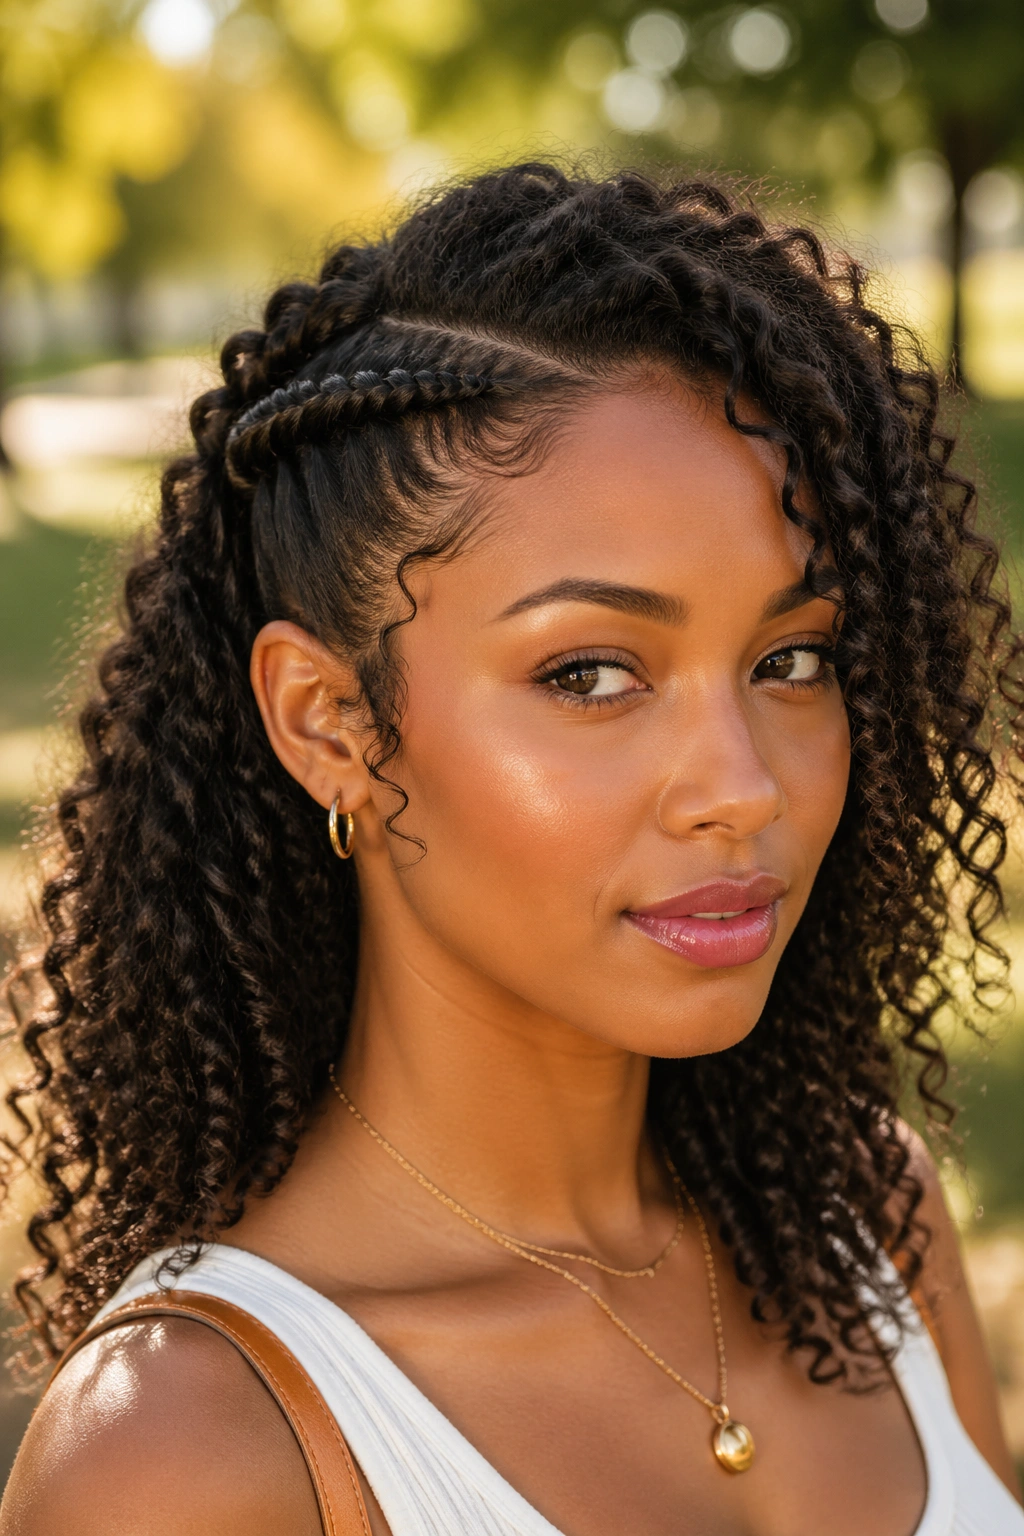
2. Deep Side Part Rope Braid with Face-Framing Pieces

A deep side part changes the whole mood of the braid. It makes the style look intentional before you even twist the first section, which is useful on hair that loves to spring back and lose its shape.
On 3B and 3C curls, a deep part also helps balance volume. You get a little drama on top, a little softness at the front, and enough asymmetry to make the side rope braid feel like a real style instead of a fallback. That is a small thing. It matters anyway.
The cleanest version starts on damp hair with a rat-tail comb and a dab of gel or curl cream at the roots. Part it once. Then leave it alone. Repeatedly redrawing the part usually causes puffing, and the front section never quite lays the same way twice.
Face-framing pieces help here too. Pull out two thin curls near the front if you want the braid to look softer around the cheekbone. Skip them if your hairline frizzes easily or if you want a sharper finish. Both versions work. The difference is mood, not technique.
3. Half-Up Side Rope Braid for Busy Curl Days
What if you want your curls visible but not in your face all day? The half-up side rope braid is the answer that does not ask for much.
How to Keep the Crown from Puffing
The trick is to grab only the top third or half of the hair, starting near the temples and crown, then braid that section diagonally toward one side. The rest of the curls stay loose, which keeps the style airy instead of heavy.
That balance is why this version works so well on 3C hair with a lot of shrinkage. The crown stays controlled, but the lower curls still move. If you have 3B curls that loosen up as the day goes on, this style gives you structure without forcing the ends into a rigid shape.
A small elastic at the back is enough. No need to yank the top tight. That mistake leaves a flat patch around the crown and a sore scalp by lunchtime.
A loose half-up braid can look charming in the mirror and chaotic by the time you are halfway through the day. Keep the top section clean, keep the braid angle deliberate, and let the remaining curls do their own thing.
4. Crown-Swept Side Rope Braid That Starts at the Temple
There is a small window after wash day when the hair still has enough stretch to hold a clean braid line and enough softness to bend without snapping into a stiff shape. This style lives in that window.
The Sectioning Pattern
Start at the temple on the fuller side of the head. Gather a narrow strip—about 1 to 1.5 inches wide—then twist it back along the hairline before feeding it into the side braid. That slight sweep makes the braid look like it belongs to the shape of the head instead of sitting on top of it.
A few details make it work better:
- Keep the front section thin so it follows the curve of the hairline.
- Twist away from the face first, then wrap the two sections together in the opposite direction.
- Smooth the base with a small brush or fingertips coated in a little curl cream.
- Pin any short front pieces under the braid if they refuse to stay in line.
This style is good when you want the braid to look sculpted without losing the softness of curls around the face. It also handles layered cuts better than a blunt, straight-across section. The layers disappear into the braid path instead of poking out like little antennas.
5. Side Rope Braid into a Low Puff for Extra Volume
A side braid that ends in a low puff gives you the best of both worlds. You get the clean line of the braid at the top and the fullness of your curls at the bottom, which is a nice trade when your hair is thick and you do not feel like shrinking it into a tiny rope from root to tip.
I like this version on dense 3C hair because it uses the braid as a control point. The braid keeps the side neat, then the puff takes over once you reach the back of the head or just below the ear. It looks intentional, but not severe. That balance is hard to fake.
The ends matter here. If your curls are dry, the puff will look frayed. If they are too wet, the braid can slacken and the puff loses lift. A little leave-in and a light cream usually does the job. Heavy butter can weigh the ends down and make the puff collapse into a droopy knot.
One more thing: this style loves a satin scrunchie or a soft elastic at the transition point. Tight bands leave a dent. Loose bands slip. Use the one that grabs without scraping, then fluff the puff with your fingers instead of a comb. That keeps the texture visible.
6. Sleek Side Rope Braid for Wash-and-Go Stretch
Unlike a fluffy braid, the sleek side rope braid keeps the braid line visible from root to end. That makes it a better pick when you want the side shape to read cleanly, not fuzzy and cloud-like.
This version works well on hair that has been stretched a little—maybe with banding, maybe with a diffuser on low heat, maybe from a good second-day wash and go. The goal is not straight hair. The goal is enough length that the braid can sit close to the scalp without fighting its own shrinkage.
A small amount of gel at the roots helps a lot. Not a helmet. Just enough to smooth the part and the first inch or two of hair. After that, a cream or light mousse keeps the braid soft while the structure holds. If you pile on product, the braid gets slippery and starts loosening at the ends.
This is the version I’d pick for shorter 3B curls or tighter 3C curls that frizz at the temples. It reads neat even when the rest of the hair has body. If you like your hair to look polished but not flat, this one earns its keep.
7. Chunky Side Rope Braid on Stretched 3B and 3C Hair
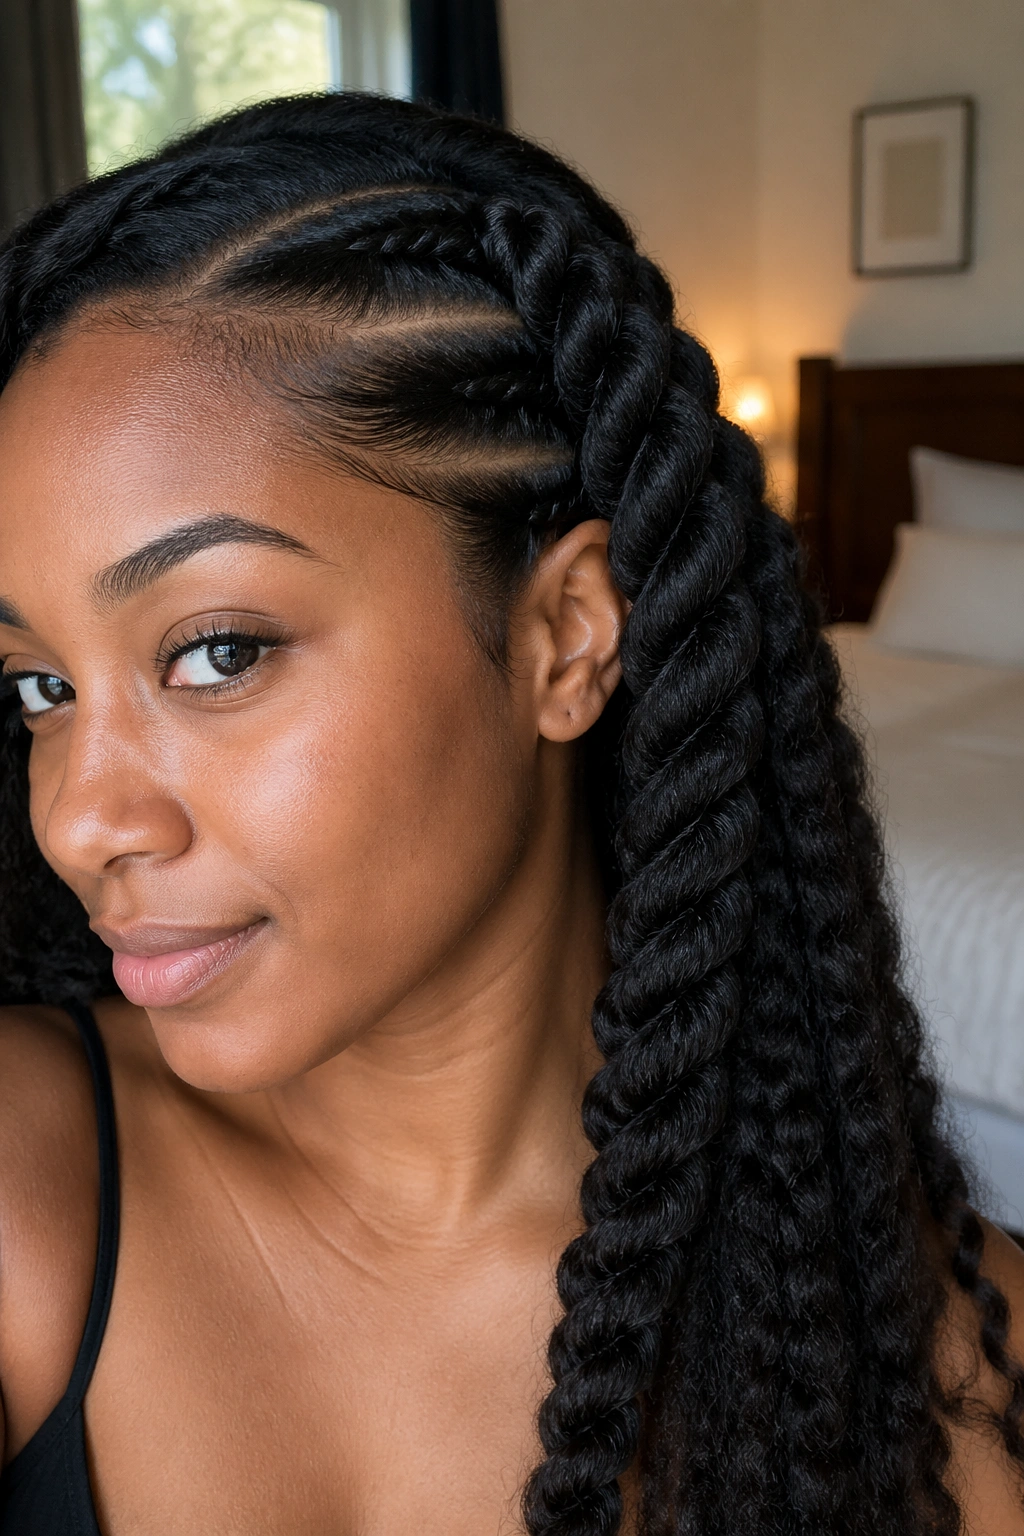
Why Stretching Helps
A chunky side rope braid shows off the spiral pattern better when the hair has been stretched a bit first. The braid looks thicker, the twists show more clearly, and the final shape has a little more length before shrinkage takes over.
That does not mean you need a blowout. Banding overnight, a twist-out that is only partly separated, or a gentle low-heat stretch can all work. The point is to reduce the immediate recoil at the roots and through the middle of the strand. Too much stretch, though, can make the braid feel loose and give it less grip.
How Much Stretch to Aim For
Aim for hair that still has bend. If the curls are completely flattened, the rope braid can look thin and hollow. If the hair is only mildly stretched, the braid keeps body and still lies close enough to the head to hold its shape.
What to Skip
- Skip heavy oils at the roots, because they make the sections slide apart.
- Skip tiny, overcomplicated sections if the hair is already long and dense.
- Skip combing through the ends too hard after stretching, because that is where breakage usually starts.
- Skip a braid that is pulled so tight it leaves the scalp shiny and sore.
A chunky braid is best when you want visible texture and a bigger profile. It is not the neatest option. It is the one with the most presence.
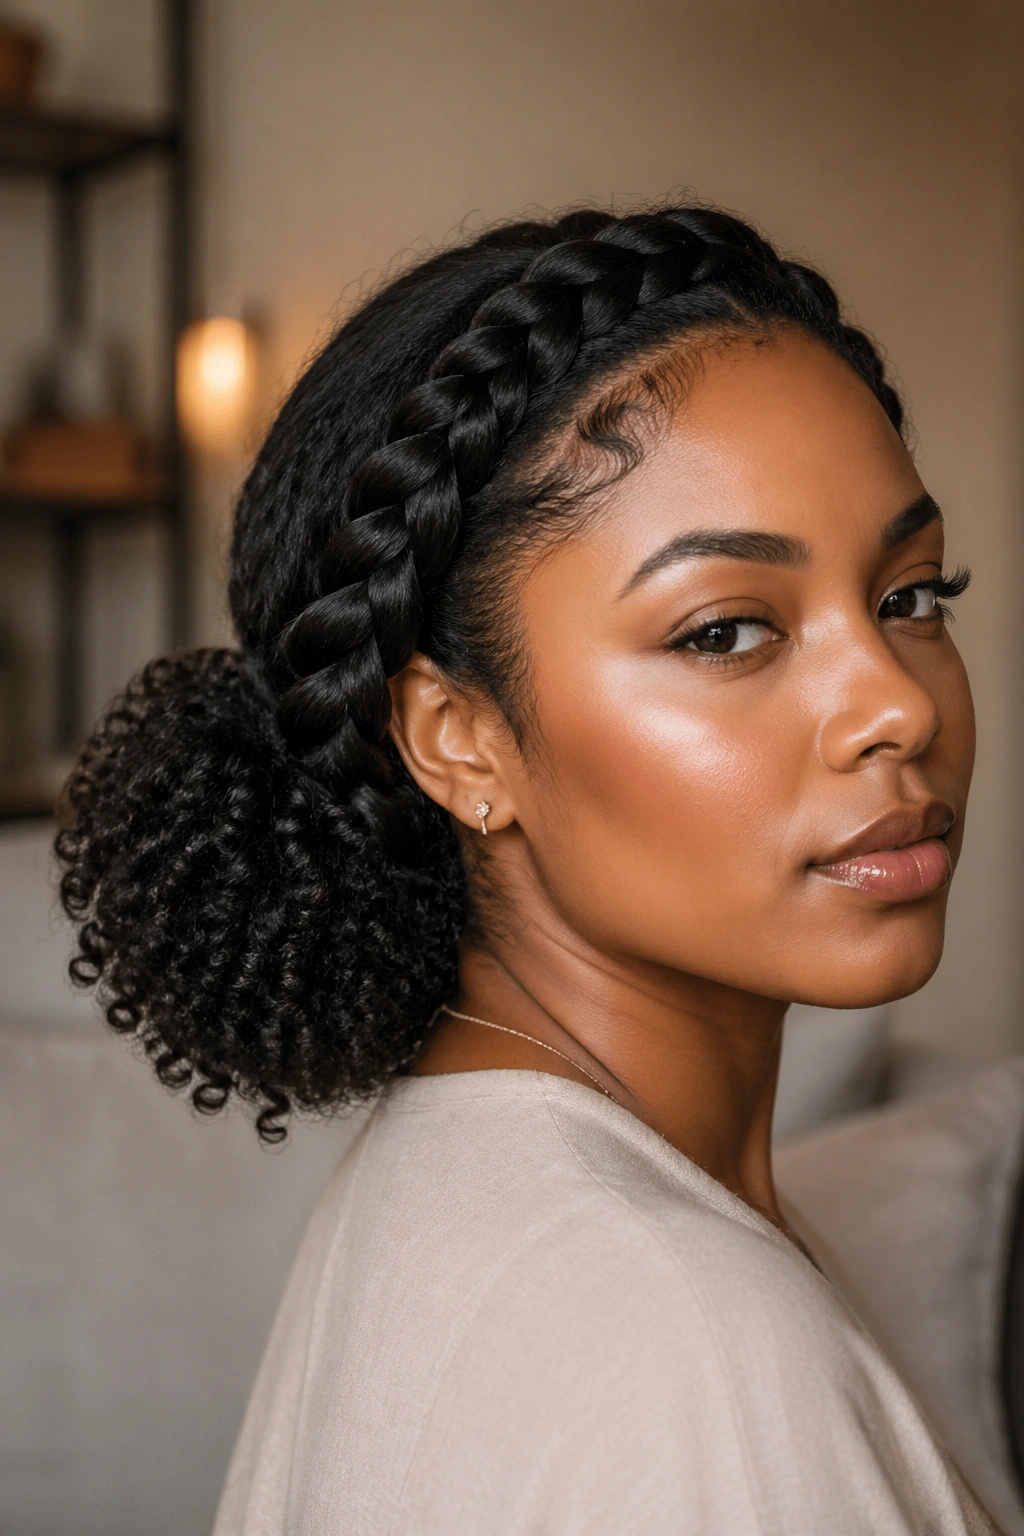
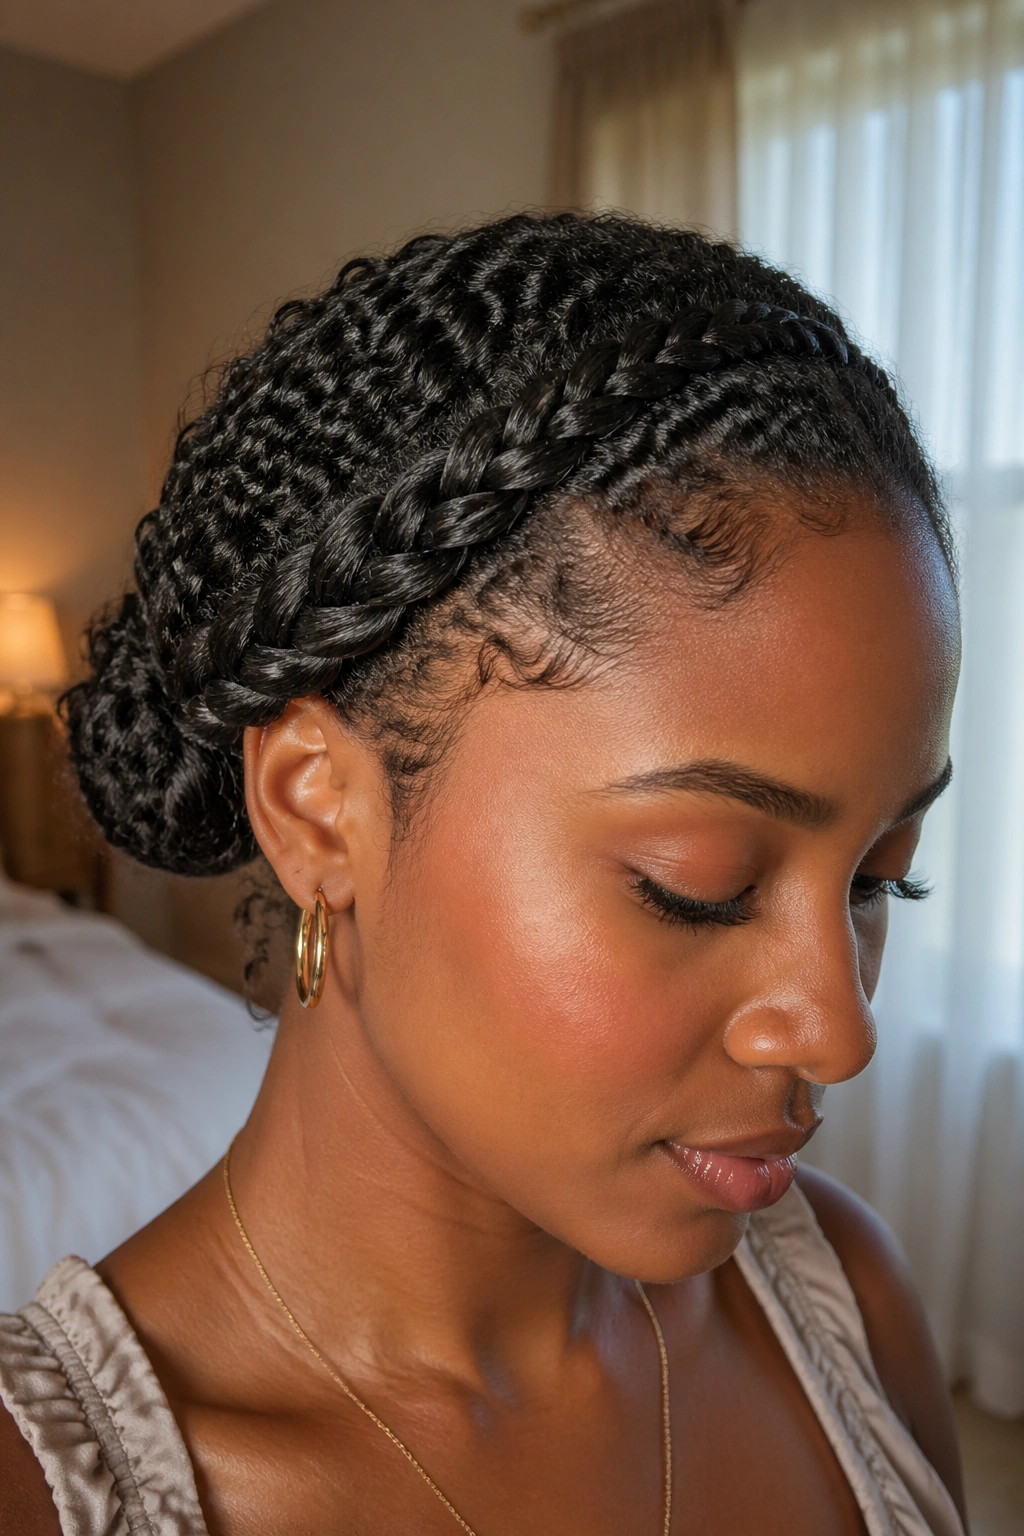
8. Side Rope Braid Wrapped into a Bun
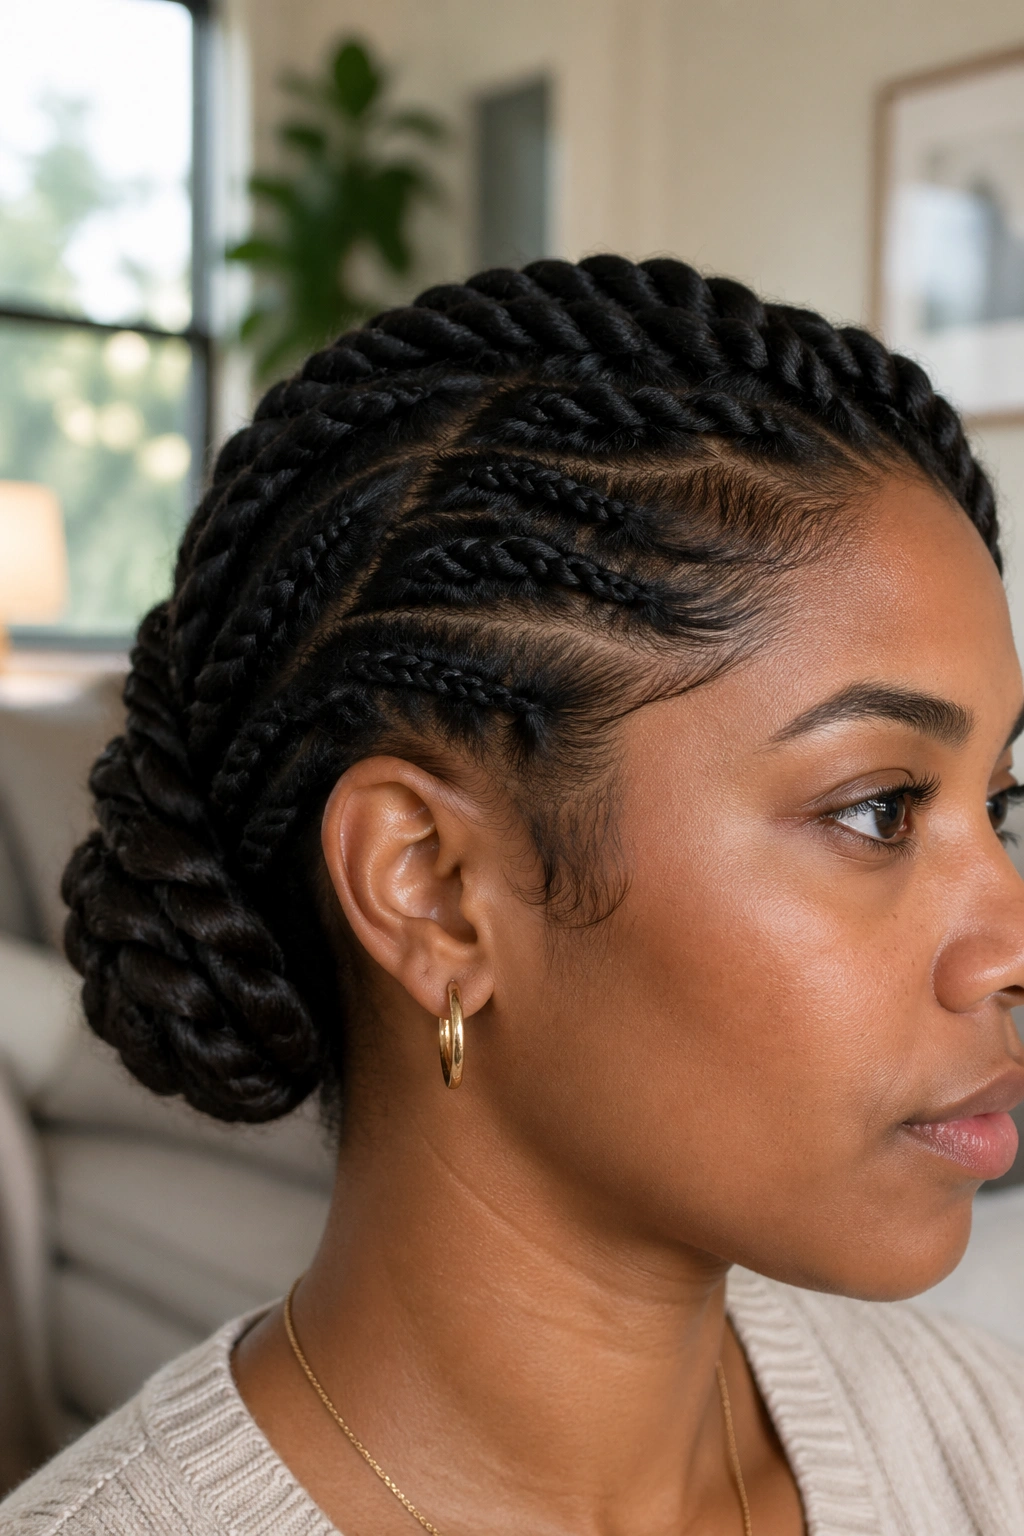
A side rope braid wrapped into a bun looks more polished than it has any right to. The braid gives the style structure, then the bun pulls everything together in one clean knot.
This is the version I reach for when I want the hair off my neck but still want something prettier than a plain puff or a basic bun. The braid starts at the side, travels low across the head, and then winds into a bun behind the ear or at the nape. The result feels deliberate. Not stiff. Just finished.
It works especially well on medium-length 3B and 3C curls because the braid can feed enough hair into the bun without needing a dozen pins. Use a soft elastic to secure the braid first, then wrap the tail around itself and pin the underside with U-pins or two bobby pins crossed in an X.
A little caution: if you make the bun too tight, the side braid loses its softness and the whole style starts looking formal in a dry, unhelpful way. Leave the bun with some lift. Let a few curls sit loose around the edges. That tiny bit of movement is what makes it wearable.
9. Double Side Rope Braids for a Sporty Finish
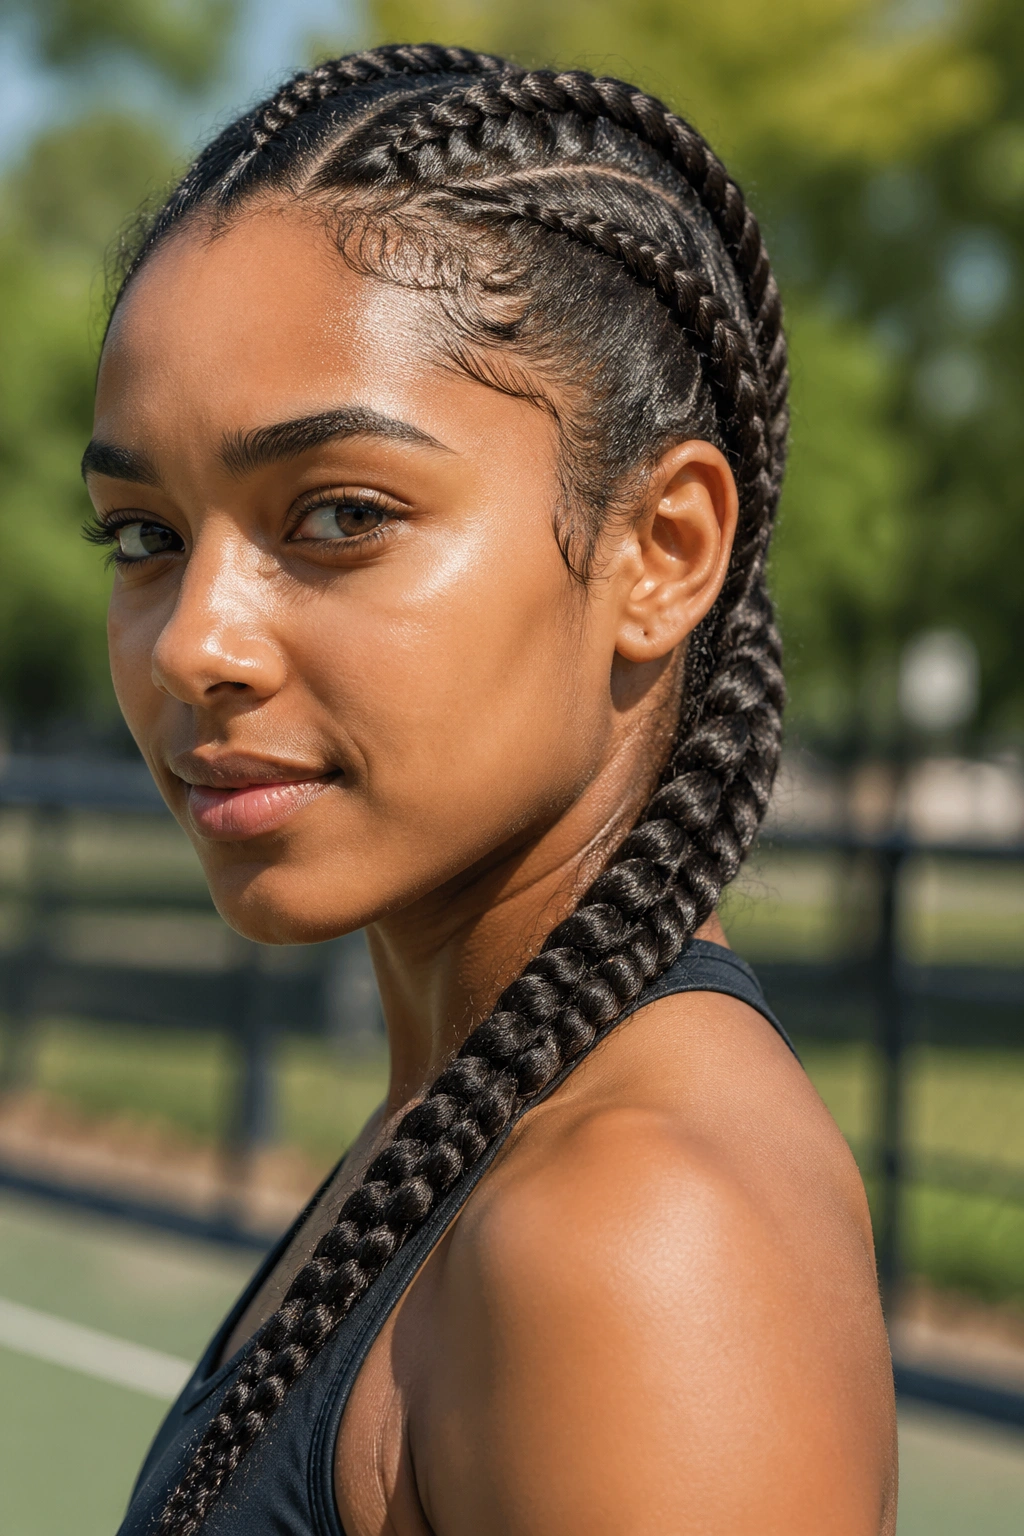
Need something that stays put under headphones, a hood, or a long commute? Double side rope braids solve that problem without making the hair feel overworked.
The look is simple: create two slim rope braids, one starting near the temple and one slightly lower, both moving toward the same side or into one low tie at the back. On 3B and 3C hair, that extra braid gives more control over bulk, which is useful if one giant side braid tends to puff into a triangle by midday.
How to Keep the Temples Flat
The hardest part is the front. If the sections at the temples are too large, the braid bunches up and sticks out in a way that feels bulky. Keep the front sections narrow, smooth them with your fingertips, and braid with steady tension instead of yanking.
A few details help the style last:
- Clip one section away while you braid the other so the parts stay clean.
- Use a light gel at the hairline if the front frizzes fast.
- Keep the braids parallel for the first few inches so the style reads neat.
- Tie the ends together with one elastic if you want a low, sporty finish.
This is not the fanciest side rope braid on the list. It is one of the most practical. That counts for a lot.
10. Side Rope Braid with Beads, Cuffs, or Thread
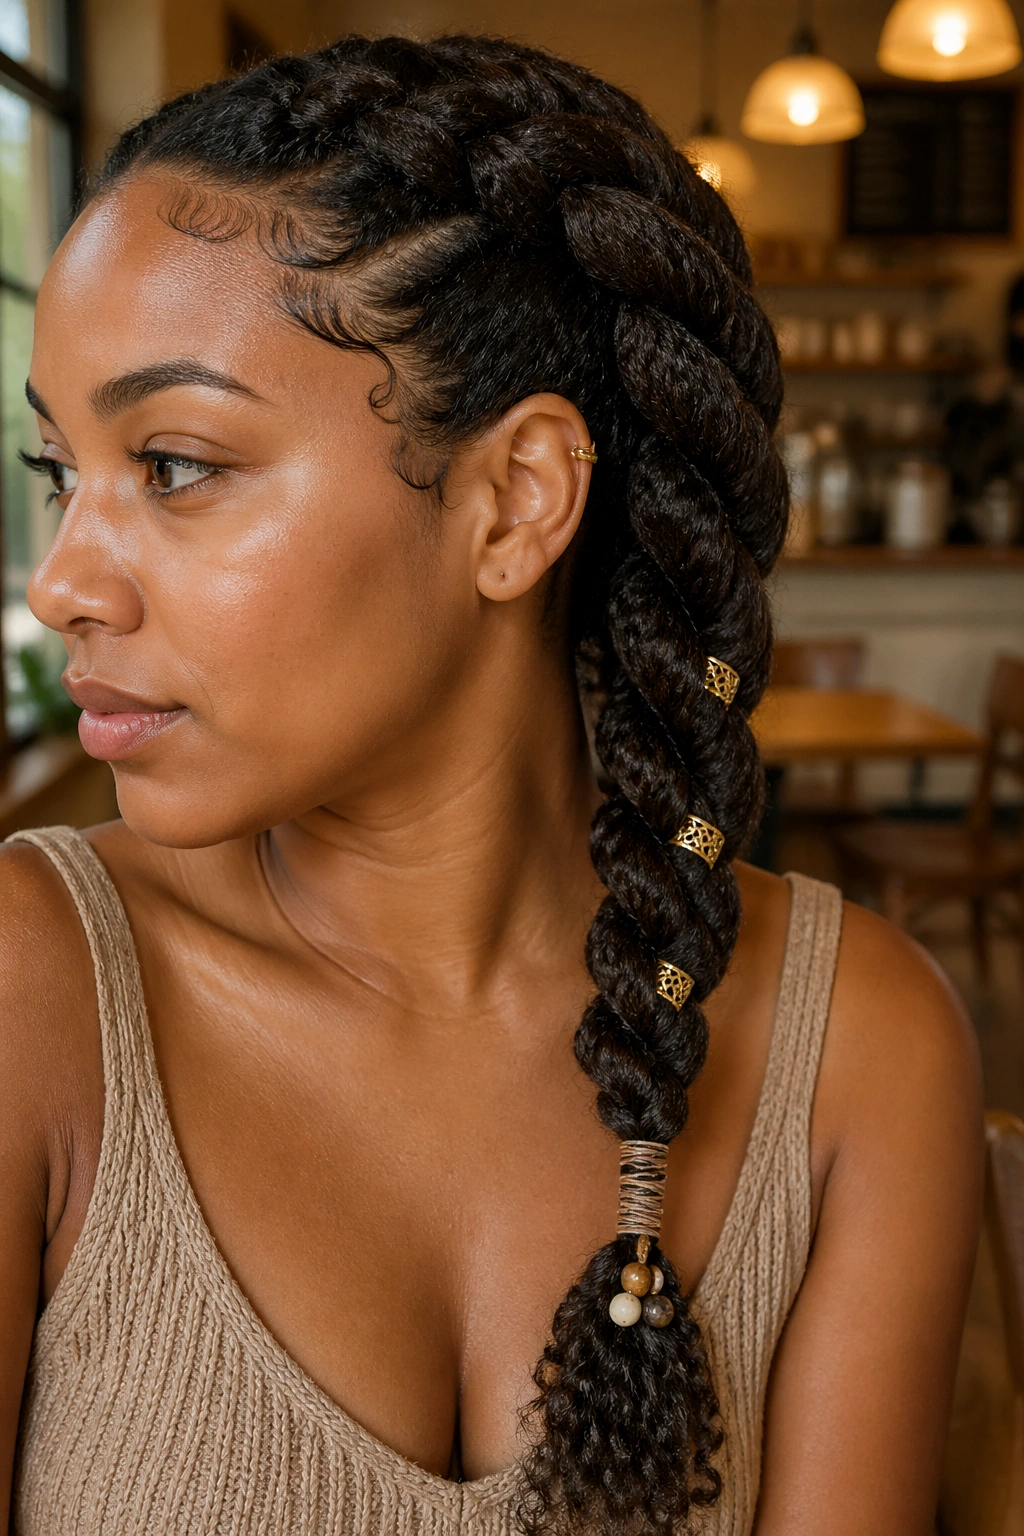
A pair of tiny gold cuffs can fix a braid that feels plain in about ten seconds. So can a few wooden beads, a strip of thread, or even a single wrapped accent near the end.
Accessories work well on side rope braids because the braid already has a clear line. You are not decorating a cloud of curls; you are decorating a shape. That makes the finish look cleaner and keeps the extras from disappearing into the hair.
The trick is restraint. Three to five cuffs is plenty. One or two beads near the tail can be enough if the braid is thick. Thread wrap works best when the braid is stretched a little, since the coils stay visible and the wrap does not get buried in shrinkage.
A small warning: heavy beads can tug on fine hair, especially if the braid starts at the temple. If the braid feels pulled forward after ten minutes, remove the weight. The style should sit comfortably. Decorative pieces should not feel like a chore.
11. Tucked-End Side Rope Braid for 3B and 3C Curls
Tucked ends are the difference between a cute braid and a style that survives rubbing against collars, jackets, and car seats. If you want the side rope braid to act like a protective style, this is the version that earns the name.
The basic shape is the same, but the tail gets folded under itself or tucked behind the braid base and pinned flat. That keeps the oldest, driest part of the hair from hanging loose and brushing against everything in sight. On 3B and 3C hair, where the ends can dry out faster than the roots, that matters more than it sounds like it should.
A soft cream or leave-in on the ends helps before tucking. Not a pile of product. Just enough slip so the tail folds without snagging. If the hair is layered and the ends keep poking out, use two bobby pins crossed slightly apart. One pin often slips. Two usually hold.
This version is also good for bedtime if you want to wear the braid longer than one day. Sleep on satin, wrap the head lightly, and the braid keeps its shape much better than a loose side style.
12. Asymmetrical Halo Rope Braid with a Side Drop

Unlike a full halo braid, this version leaves one side of the face open. That tiny change makes the style feel softer and less formal, which is useful when you want something pretty without looking like you are headed to a costume party.
Start the rope braid at the front hairline on one side, travel across the crown, then let it drop into a side braid instead of circling all the way around. On 3B and 3C curls, the crown texture gives the braid enough grip to hold the sweep, and the side drop keeps the final shape from looking too stiff.
This version likes medium to long hair, especially if the layers around the crown are not too short. If you have a lot of shrinkage at the top, smooth a little leave-in along the roots before you start. That keeps the front pieces from popping loose right where you need the line to stay clean.
I would choose this braid for an outfit that needs one strong detail and not much else. It frames the face, shows off the texture, and leaves one shoulder open. Easy. Clean. A little dressier without doing too much.
13. Loose Side Rope Braid with Flared Ends

A braid does not have to stay tight all the way to the end. In fact, on 3B and 3C hair, a loose side rope braid with flared ends can look more natural than a perfectly taut one.
The key is controlled looseness. Twist the braid firmly at the scalp, then ease off slightly through the mid-lengths and let the last few inches open into soft curls or a small flare. If you pull the outer loops apart too much, the braid gets fuzzy. If you leave it too tight, it loses the relaxed shape that makes this version interesting.
How to Keep the Flare Controlled
Use your fingers, not a brush, to fluff the braid. A tiny bit of mousse or a dab of styling cream on your palms helps smooth the surface before you tug at the loops. Tug in small increments. Stop early. Look at it from the side. Then stop again if it already has enough shape.
This is the one I’d choose for second-day curls, a casual outfit, or any day when I want the side braid to feel soft around the face and still look finished at the ends. The shape is simple. The texture does the talking.
And that is really why side rope braids work so well on 3B and 3C hair: they follow the curl instead of flattening it, which is a much better deal for your hair and for your patience.