A shaved head is optional. That’s the part people miss.
You can get the same sharp, lifted, slightly rebellious shape with braids, pins, gel, and a little patience — no clippers required. The trick is the silhouette. A mohawk-style braid is less about bare sides and more about creating a strong center ridge, tight side control, and a finish that looks deliberate from every angle.
That’s why mohawk braids without shaved sides work so well. They give you the attitude of a mohawk and the flexibility of a protective style, formal style, or weekend style, depending on how you finish them. Some versions look clean and polished. Others feel gritty and bold. A few can go straight from school drop-off to a night out without changing a thing.
Hair texture matters here, but not in the annoying gatekeeping way a lot of braid advice makes it sound. Thick hair gives you volume. Fine hair likes extra grip from mousse or texturizing spray. Coily hair holds shape fast, though sectioning needs more care if you want those lines to stay crisp. And yes, if your edges are fragile, you’ll want to keep the tension sensible. Pretty hair is not worth a sore scalp.
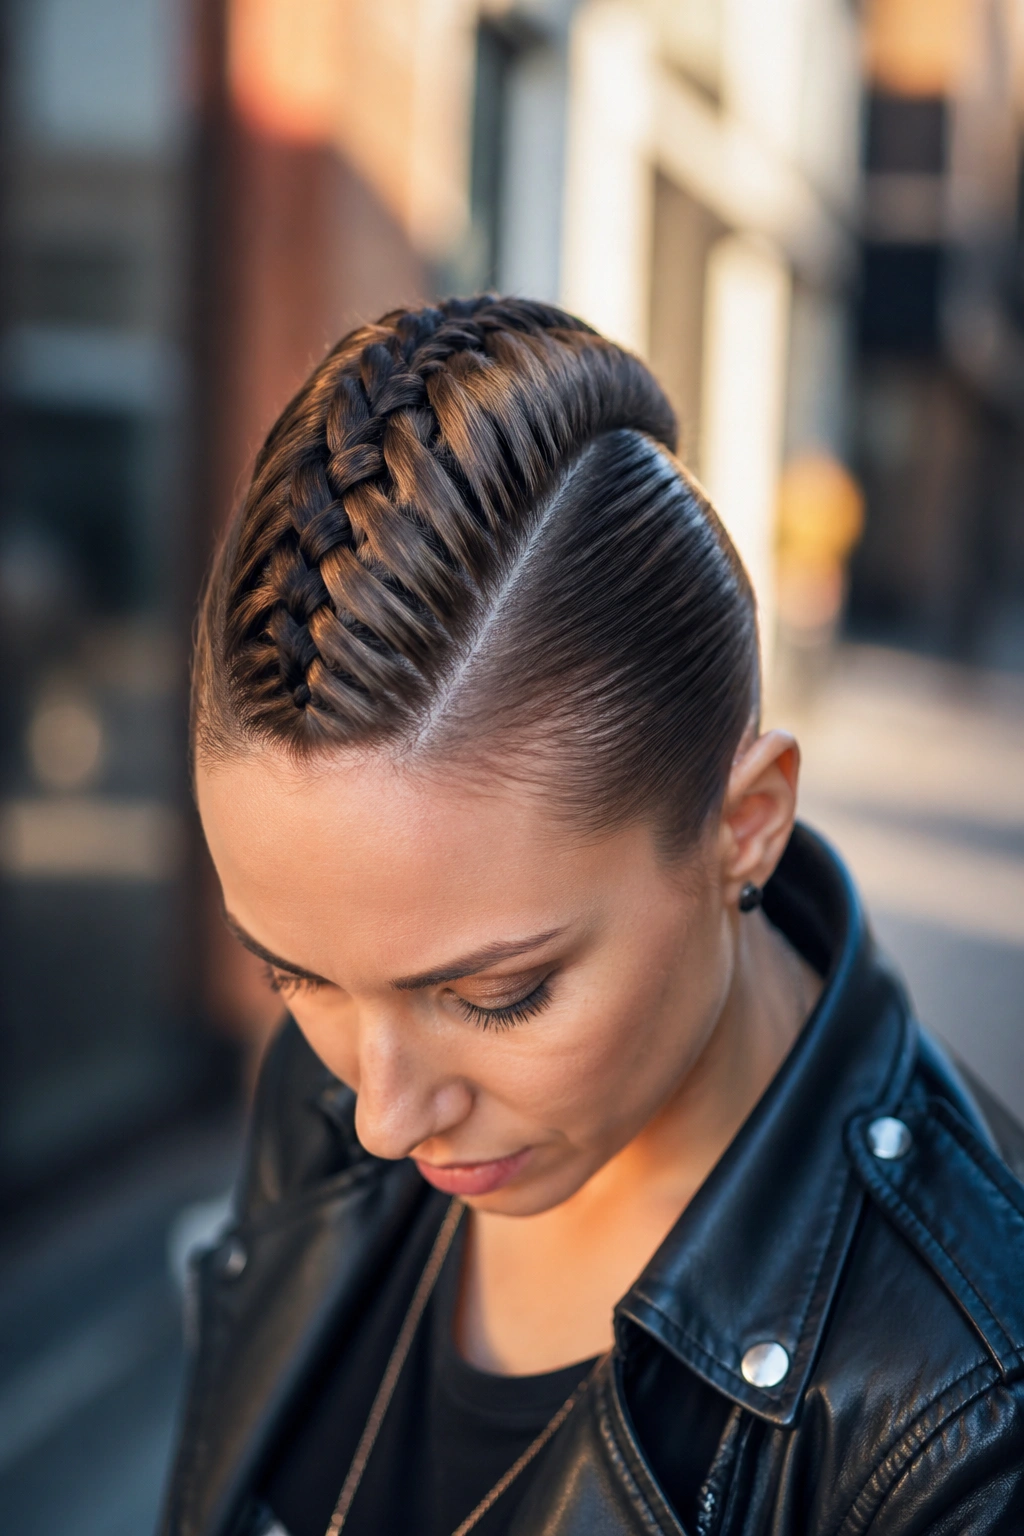
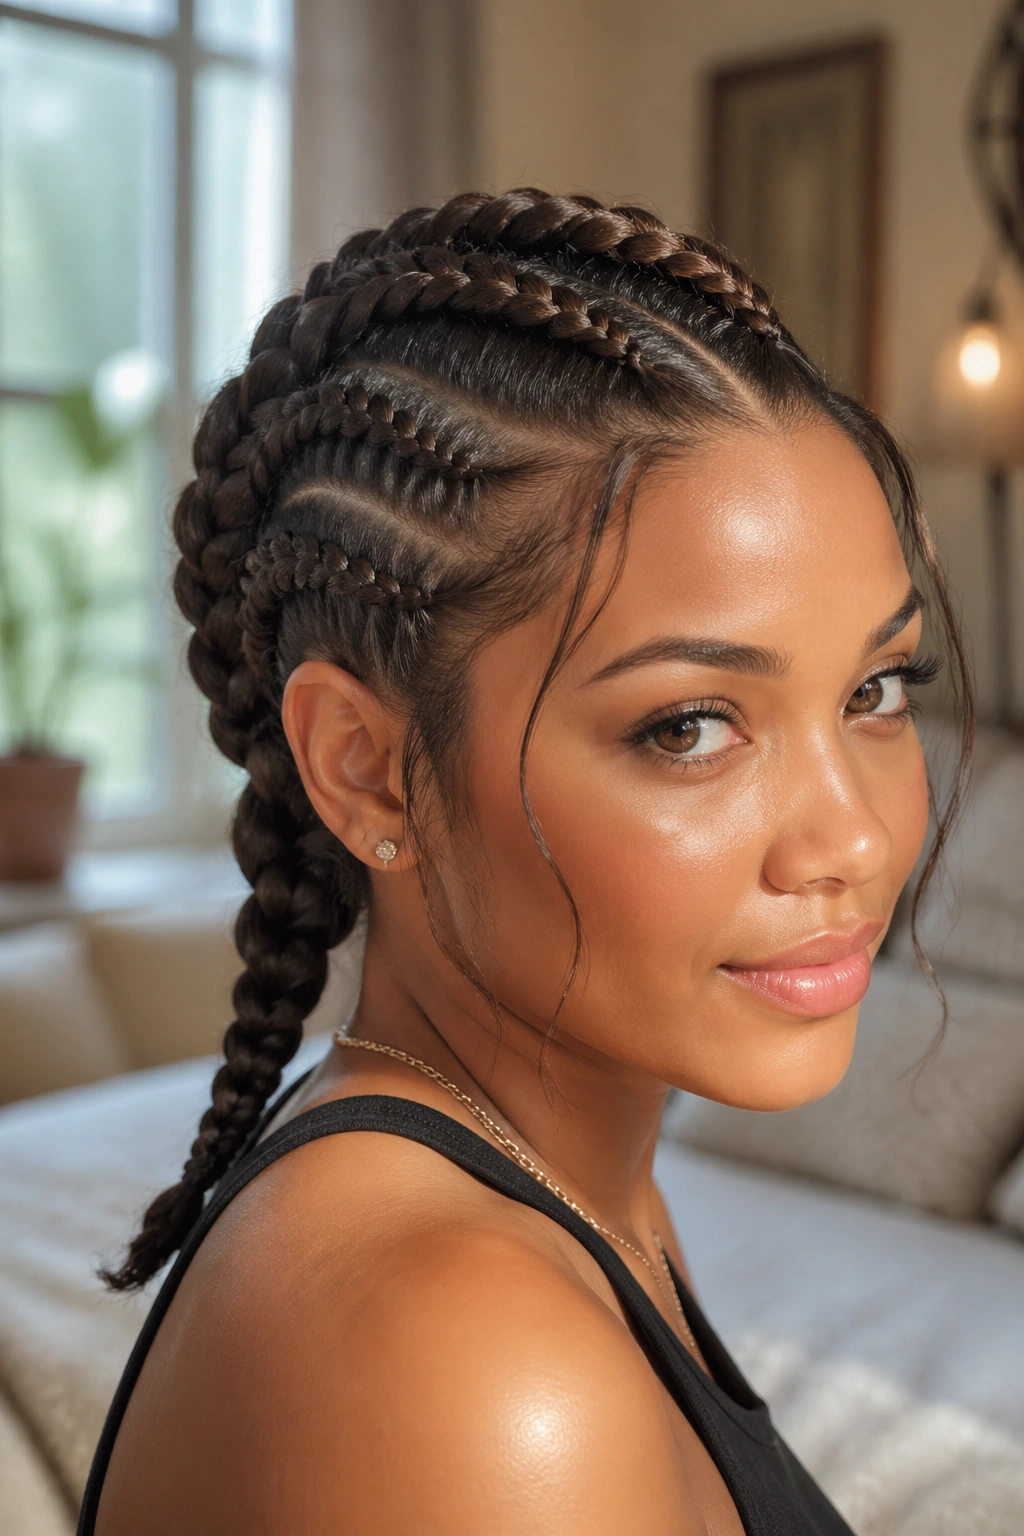
1. The Center Dutch Braid Mohawk
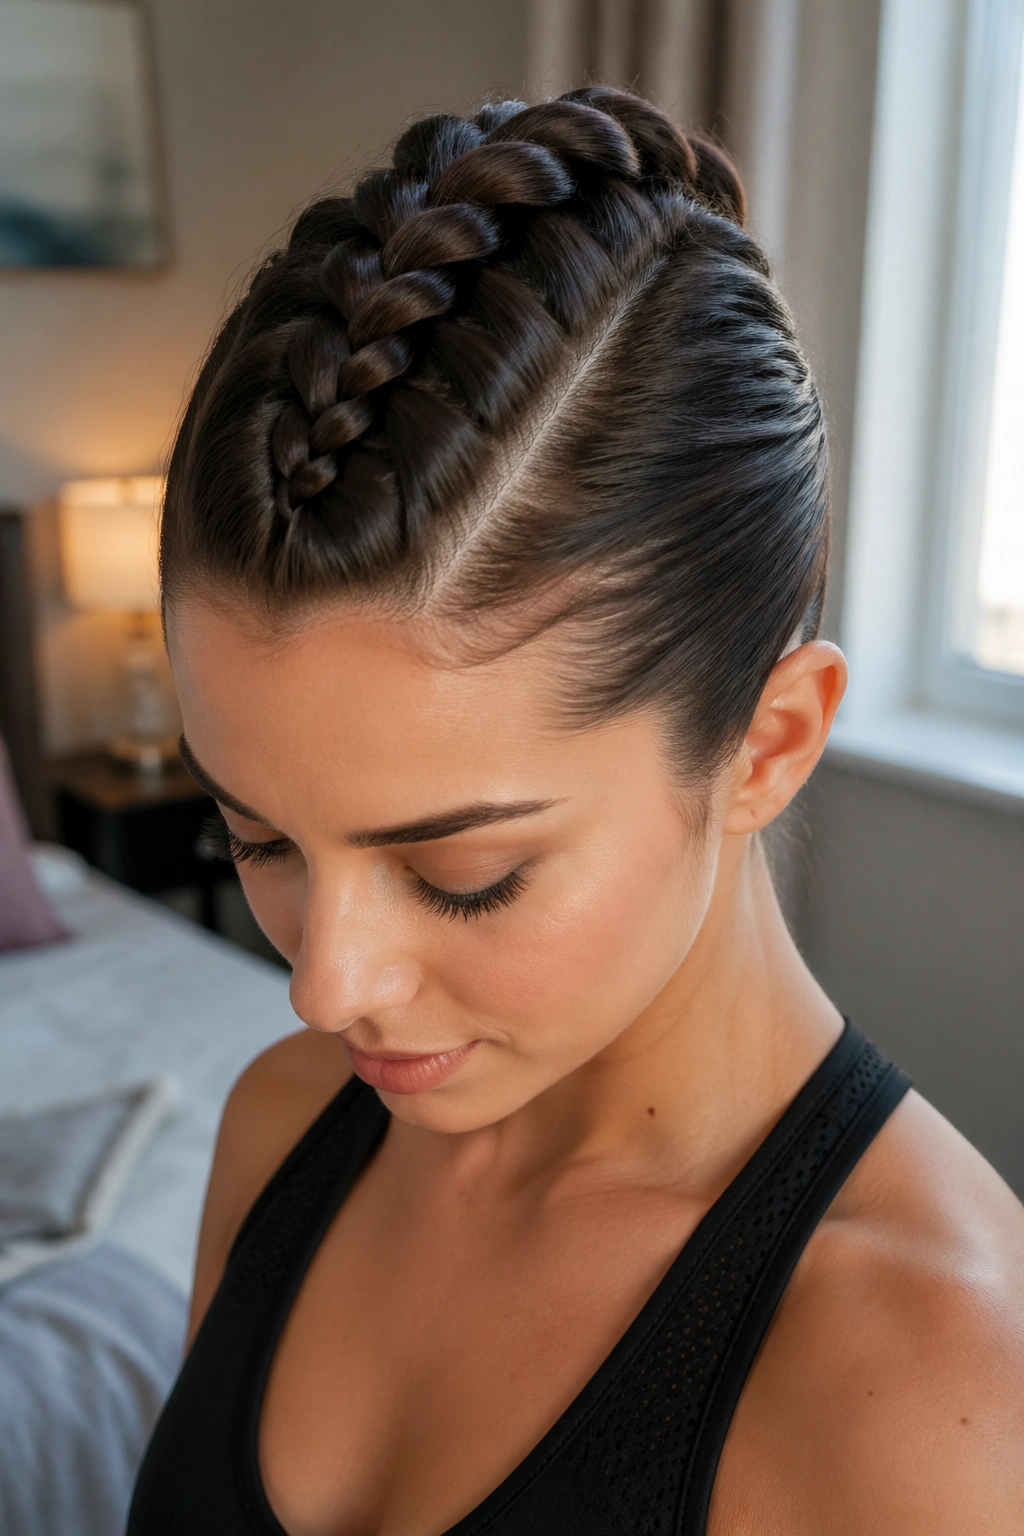
This is the cleanest place to start, and honestly, it’s the version most people picture when they hear braided mohawk. One thick Dutch braid runs down the middle of the head, while the sides are smoothed back so the braid reads like a raised crest. It’s tidy, strong, and easy to dress up or down.
Why it works so well
A Dutch braid sits on top of the hair instead of disappearing into it, which gives you height. That height is the whole point. The braid catches the eye first, and the slicked sides make the shape look even sharper. If you want a mohawk outline without going full punk-rock haircut, this is the one that does the job with the least drama.
A rat-tail comb helps a lot here. So does a little edge control near the temples and behind the ears. If your hair slips while you braid, mist the section lightly with water or apply a pea-sized amount of mousse before you start. Too much product makes everything slippery. Too little and the braid loosens halfway through the day. There’s a middle ground.
Best on: medium to long hair, straight to coily textures
Looks strongest with: a clean middle part or no part at all
Finish it with: a clear elastic and a few hidden pins under the braid base
Tiny detail that matters: pull the outer braid loops a little after you finish. Not too much. Just enough to give the braid a thicker, fuller spine.
2. Boxer Braids Pinned Into a Crest
Want something that looks athletic and sharp rather than soft? Two boxer braids can be tucked, pinned, or wrapped together down the center to create a faux mohawk ridge. It’s a clever move because the side braids keep the hair tight to the scalp, while the middle gets all the height.
What I like about this version is the control. Nothing flops around. Nothing feels overly precious. It holds up to wind, sweat, and long days better than a lot of fancier styles.
How to keep it from falling flat
The braid placement makes or breaks this look. Start the boxer braids a little higher than you’d expect, closer to the crown than the temples. That gives the middle section room to feel lifted instead of squashed. When both braids reach the back, pin them into each other with bobby pins that match your hair color. Cross the pins in an X shape if you want extra grip.
If your hair is layered, shorter front pieces can slip out. That’s normal. Use a small amount of styling cream on the flyaways before braiding, then finish with a light mist of flexible hairspray. Heavy spray can make the style feel crunchy, and nobody needs that.
Where this style shines
- Gym days when you still want shape
- Concerts, festivals, and long errands
- Hair that needs to stay off the face completely
- Medium-density hair that can support two firm side sections
Pro tip: braid the side sections with the same tension from root to end. If one side is tighter than the other, the crest ends up leaning, and you can see it in pictures immediately.
3. The Bubble Braid Mohawk
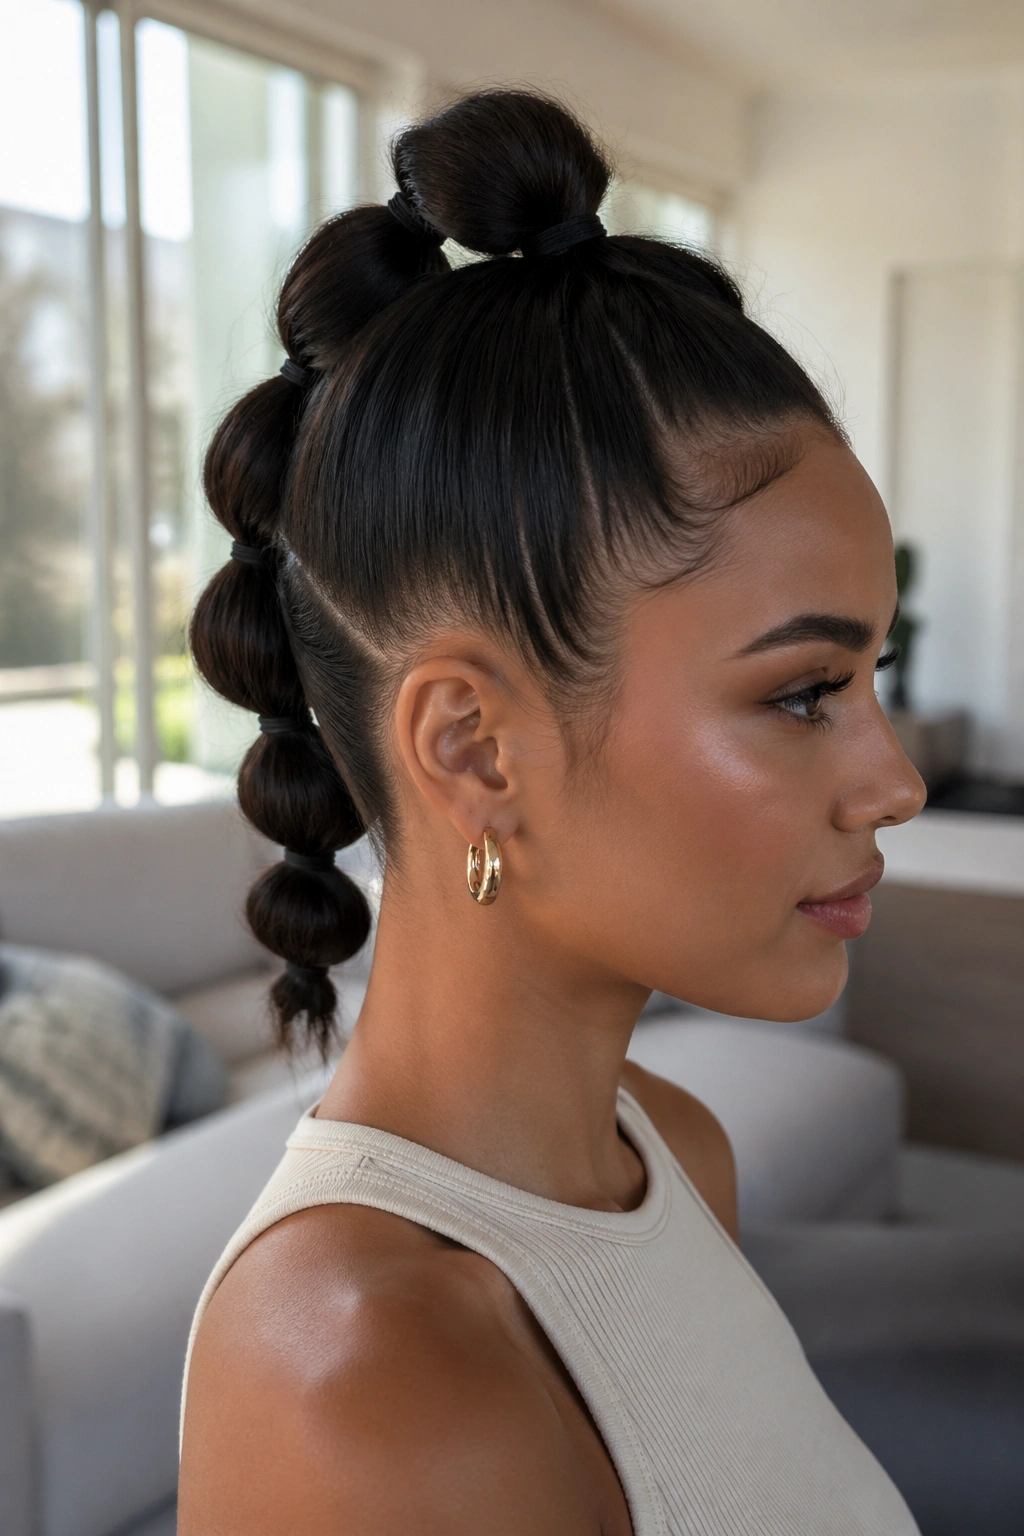
This one has a playful edge. Instead of one continuous braid, you build a center ponytail and section it with elastics every 2 to 3 inches, then gently puff each segment into a bubble. It still gives that mohawk line down the head, but the texture is rounder, softer, and a little more playful than a classic braid.
Bubble braid mohawks are great when you want height without spending forever on intricate plaits. They also work on hair that doesn’t like staying in a tight braid for long. If your hair is silky, the bubbles can be a blessing because the elastics do most of the work.
A little backcombing at the crown helps. Not a lot. Just enough to give the first section lift before you secure the top elastic. Then smooth the sides toward the center and clip them out of the way if needed. Once the ponytail is in place, add elastics down the length and fan out each gap with your fingers.
- Use snag-free elastics so you’re not fighting tangles later.
- Space the elastics evenly, usually 2 to 3 inches apart.
- Gently tug each section from the sides, not the middle.
- Keep the crown slightly fuller than the lower bubbles.
One thing people get wrong: they try to make every bubble the same size. Don’t. A little unevenness looks more natural and gives the whole style movement.
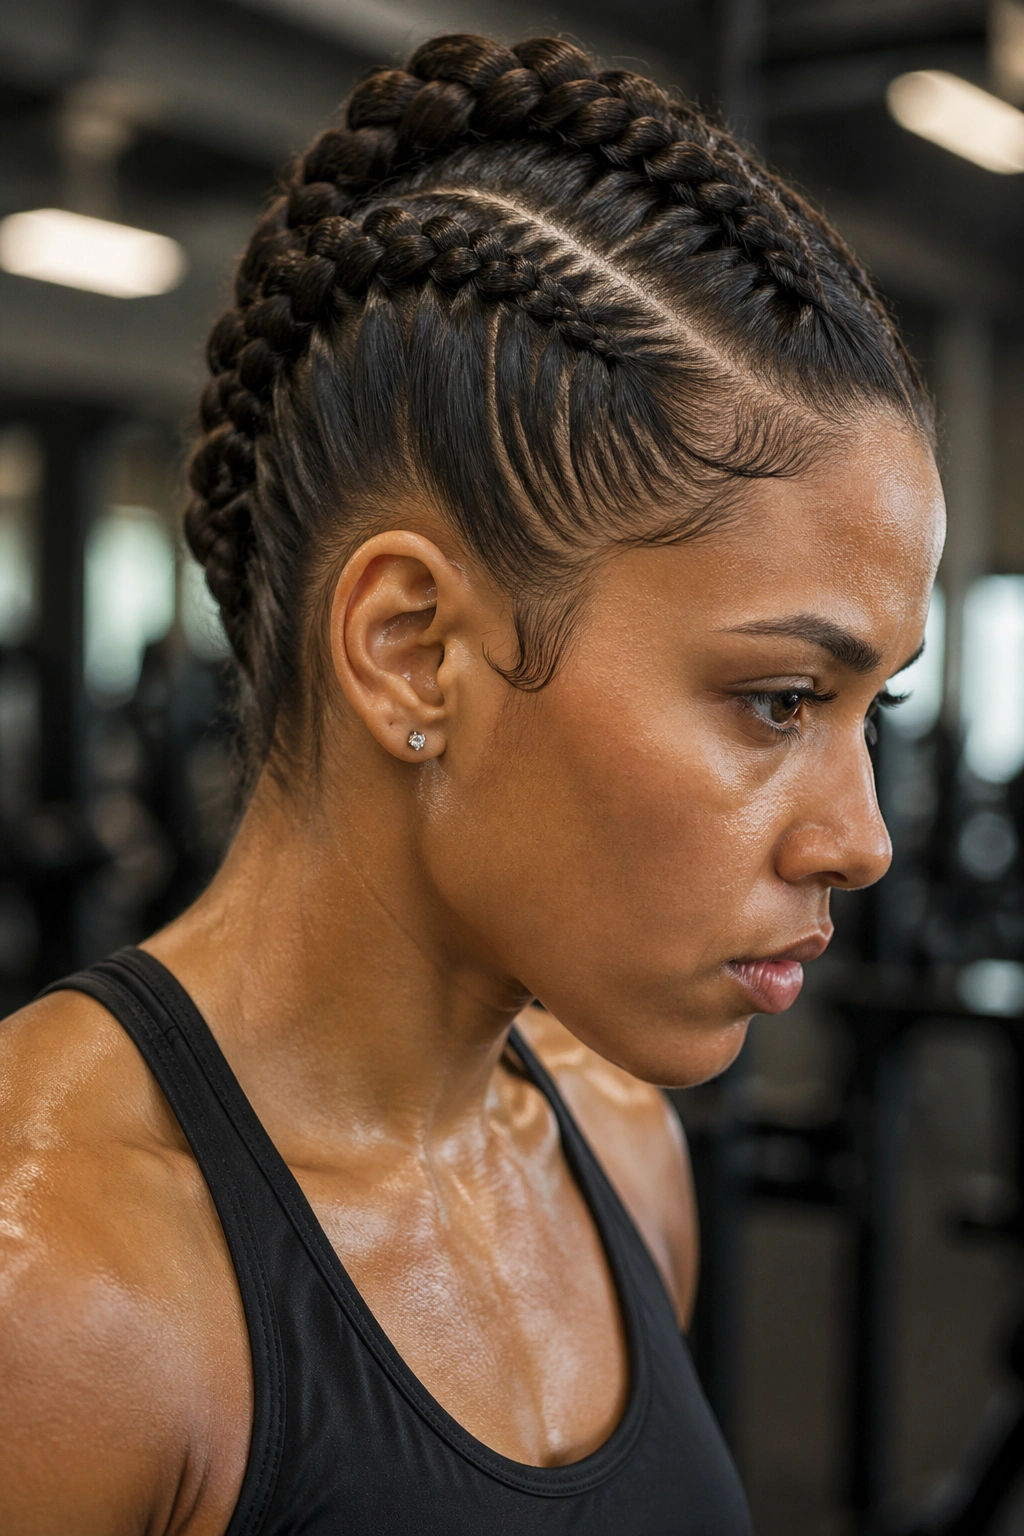
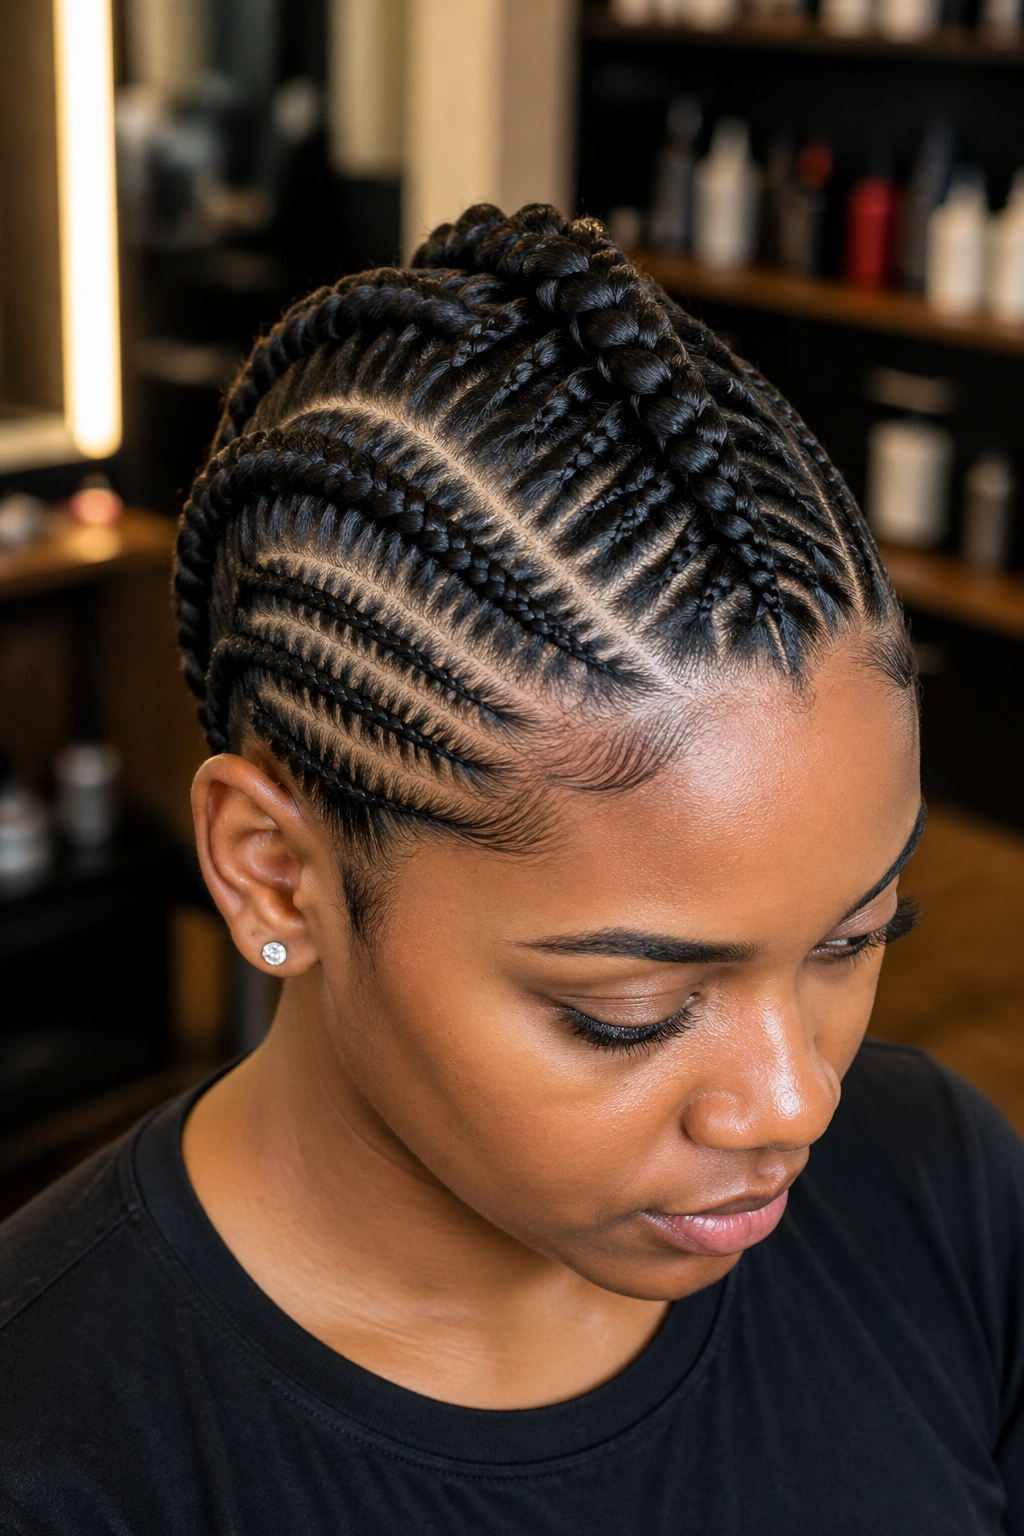
4. Cornrow Sides With a Braided Center Strip
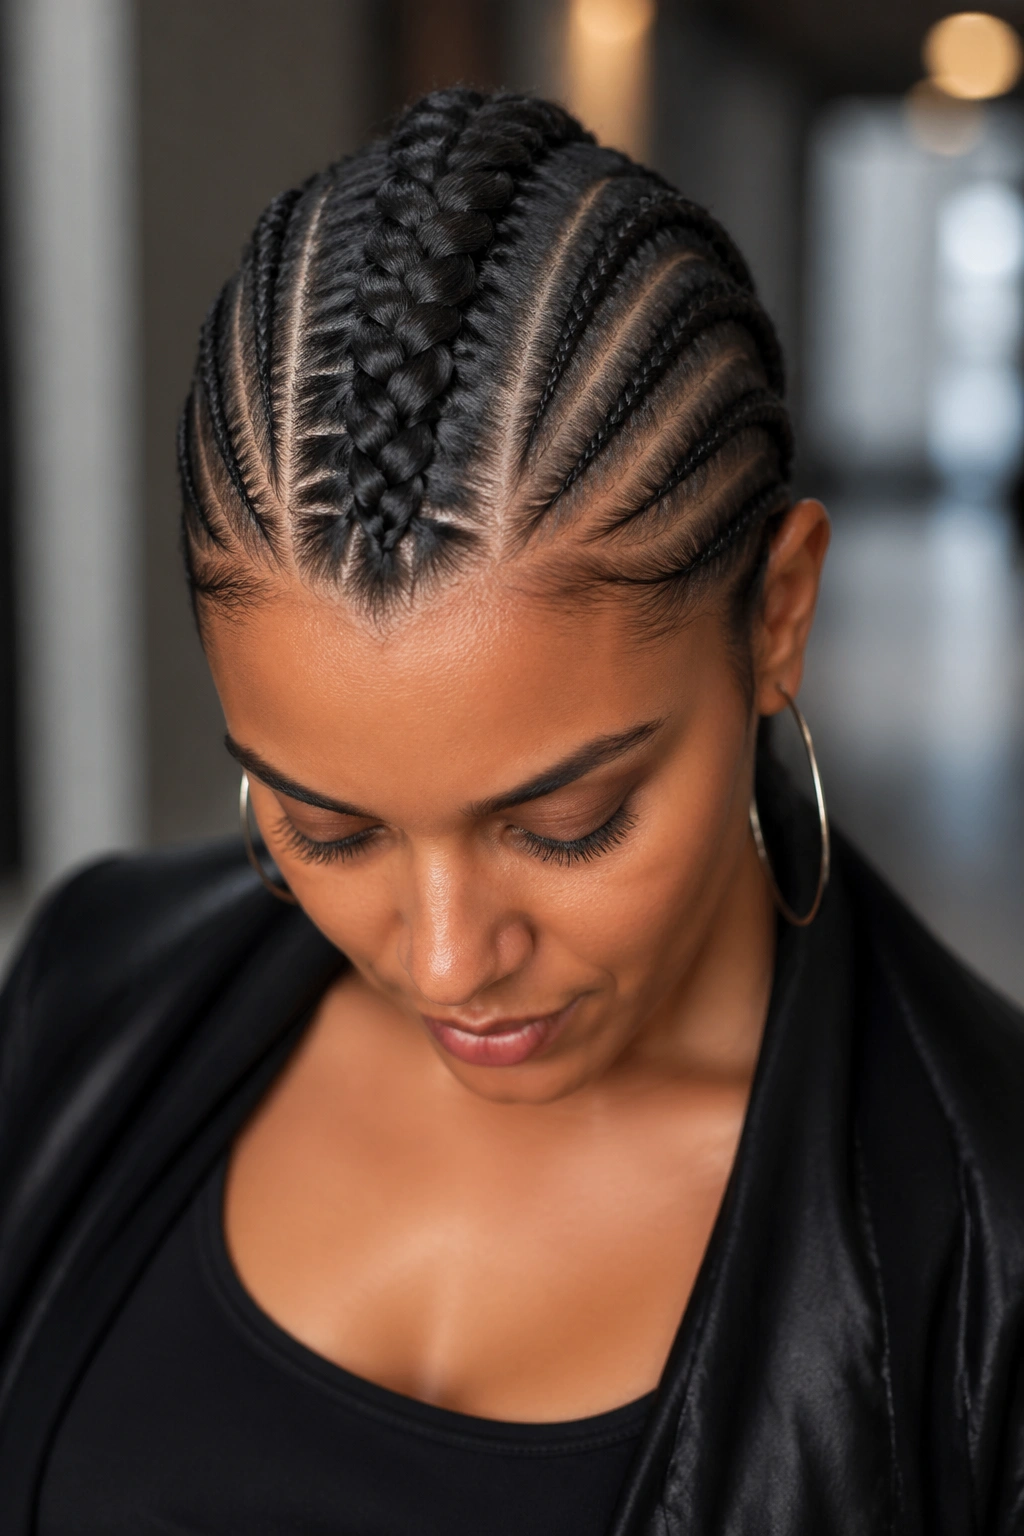
If you want structure, this is the workhorse style. Tight cornrows along the sides feed into a thicker center braid or braided strip, which gives the whole head a strong mohawk profile without cutting anything. It’s sleek from the front and graphic from the back.
The beauty of this version is that it can be as simple or as detailed as you want. Two side cornrows can be enough. Or you can build four, six, even more narrow rows if you like a busier look. Either way, the center becomes the star.
The parting matters more than the braid
Cornrows look best when the part lines are clean. Use the pointed end of a comb and take your time. A crooked part is hard to hide once the braid is in, and the eye goes straight to it. Apply a small amount of braiding gel to each section before you start. That keeps the roots neat and helps the rows stay flat.
The center strip can be a chunky three-strand braid, a Dutch braid, or even a set of mini braids joined together. Pick the one that suits your hair length. Shorter hair usually behaves better with a single center braid. Longer hair can handle more detail.
This style is also one of the better choices if you want the mohawk look to last more than a day. It stays put. A satin scarf at night helps a lot, and a few drops of lightweight oil on the scalp keep the rows from looking dry.
Best for: natural hair, protective styling, long wear
Best finish: matte, sleek, and close to the head
Not ideal if: you want lots of loose movement around the face
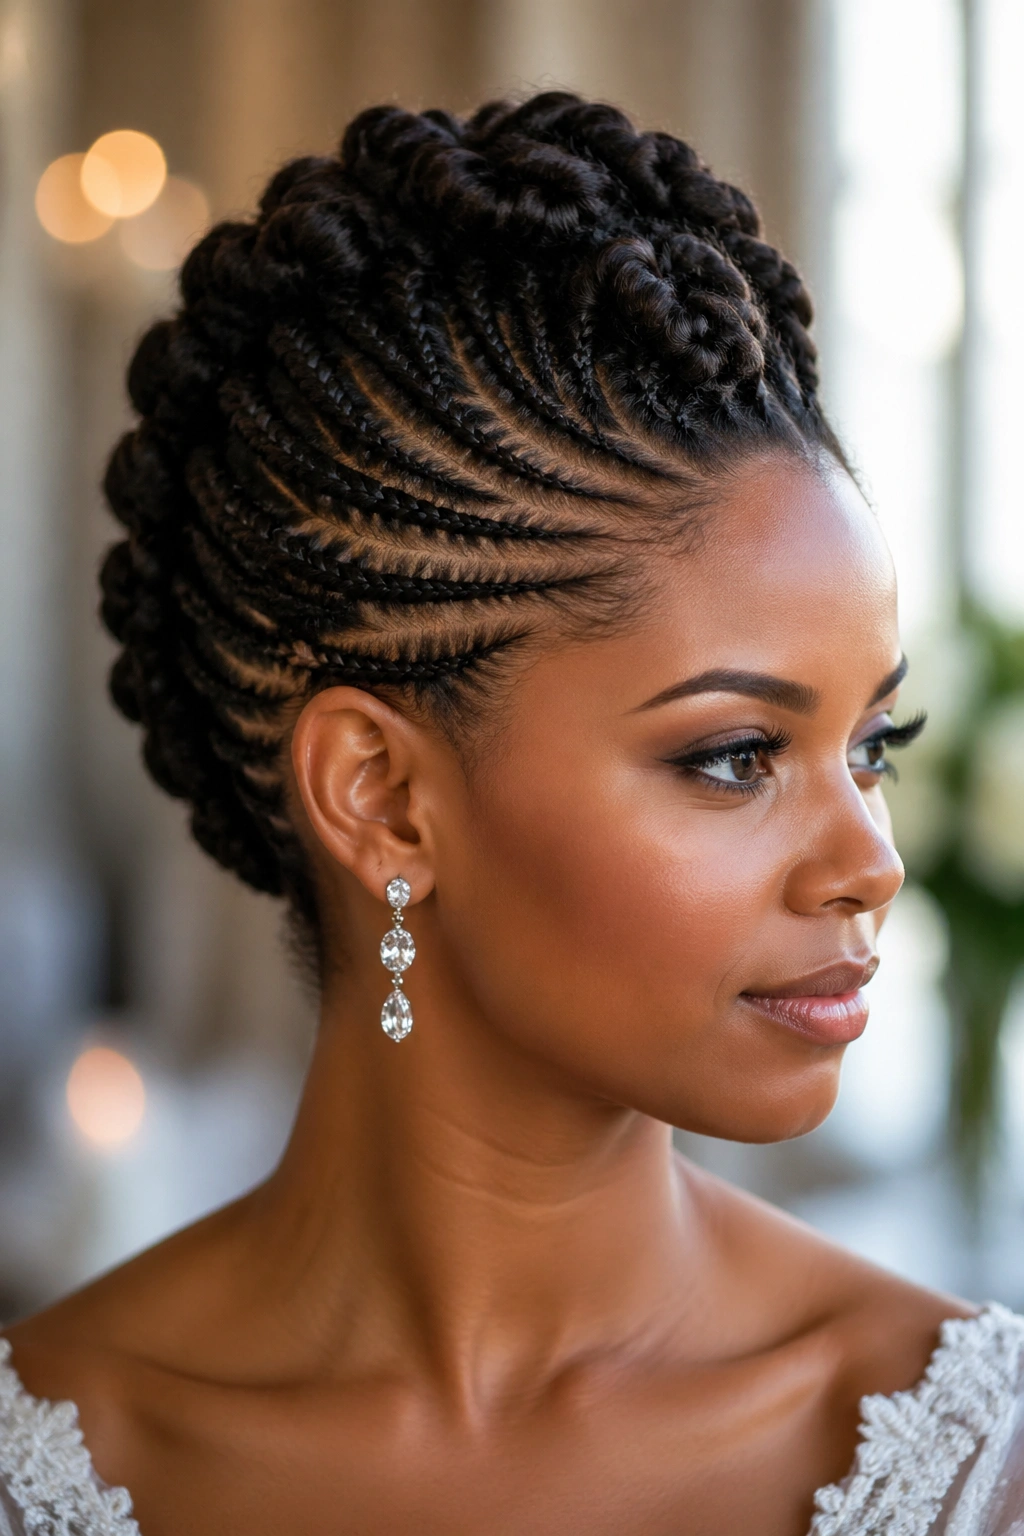
5. The Fishtail Hawk
A fishtail braid changes the whole mood. Instead of the cleaner, classic three-strand look, you get that woven, almost scaled texture that looks more detailed up close. Put it in the center of the head with smooth sides, and the result feels dramatic without trying too hard.
This is one of those styles that looks harder than it is. The braid itself only uses two sections, but the crosses are smaller and more frequent, so the finished rope looks intricate. That makes it a strong choice for weddings, photo shoots, or any day when you want your hair to do more than behave.
What makes it different
A fishtail braid gives visual density. Even when the sections are not huge, the tiny crossing pattern makes the braid look thick and layered. That means it can fake fullness pretty well on medium hair. On long hair, it gets even better because the pattern can travel down the back like a strip of woven fabric.
Start with the hair slightly damp or grippy from texture spray. Split the crown section into two pieces, then keep taking small outer pieces and crossing them over. The smaller your pieces, the more detailed the braid looks. Larger pieces create a chunkier, more casual version.
A fishtail hawk is beautiful when the braid is a little loosened at the edges. I’m not a fan of overpancaked braids here. Too much tugging makes the center look bulky in a messy way. Keep the shape controlled and let the texture do the talking.
How to wear it: sweep the rest of the hair back tightly and keep the braid centered. You want the eye traveling straight down the middle, not wandering off to the sides.
6. The Braided Faux Hawk Updo
This is the one for people who like structure but don’t want a single braid hanging down the back. The hair gets sectioned into a series of small braids or folded braid loops that stack along the crown, creating a raised, almost sculpted faux hawk shape. It feels formal, but not stiff.
You can build this style on shoulder-length hair or longer hair, and it works especially well if you have layers that usually escape from more traditional braids. Instead of fighting those layers, this style contains them.
The shape comes from stacking, not length
That’s the mistake people make. They think they need a huge amount of hair to get the mohawk effect. They don’t. What they need is height at the crown and a clean taper toward the sides. Small braids pinned upward can create that in a way that loose braids can’t.
Section a strip from the forehead to the nape, then divide it into three or four smaller pieces. Braid each one, then pin the braids back and up so they overlap slightly. The result is a raised spine that looks intentional. If the ends are long, tuck them under. If they’re short, let them disappear into the pins.
Use this when you want a dressed-up finish
- Weddings
- Formal dinners
- Evening events
- Anytime you want the mohawk shape without a sporty feel
A bit of shine serum on the top section helps the style read cleaner. Use it sparingly, though. A greasy crown ruins the whole effect faster than you’d think.
7. The Rope Twist Mohawk

Rope twists have a sleeker, more modern line than a standard braid. Twisting two sections around each other creates a cord-like effect that works beautifully down the center of the head. It feels sharp, and the twist pattern shows off color or highlights in a way that a flat braid sometimes hides.
This style is especially useful on hair that’s too slippery for a long-lasting three-strand braid. The twist grips differently. It can also be faster if your hands are already comfortable with two-strand styling.
A quick method that holds
Gather the center strip and split it into two even sections. Twist each section clockwise, then wrap them around each other counterclockwise. That opposite motion is what keeps the rope from unraveling. If both directions go the same way, the braid loosens. Fast.
A little mousse at the roots helps, and so does clipping the side hair out of the way before you start. You want the center strip clean. If you’re doing a high rope hawk, start near the front hairline and keep the twist tight to the scalp for the first few inches. That keeps the lift visible.
This is a strong everyday option because it’s quick and polished, but it does have one catch: rope twists can loosen more easily than a braided pattern if your hair is very layered. A tiny clear elastic every few inches can save you from spending the afternoon redoing the ends.
Best pairing: hoop earrings, a leather jacket, clean makeup, or nothing fancy at all. The style carries enough attitude on its own.
8. Feed-In Braids Running Into the Middle
Feed-in braids are one of the best ways to get a mohawk profile that looks smooth at the scalp and fuller through the length. Hair is added gradually as the braid moves back, which gives the style a natural taper at the base and a thicker visual line through the center.
There’s a reason this version shows up so often in protective styling. It’s neat. It’s adaptable. And it gives you control over the exact width of the braid ridge.
Why the gradual buildup matters
If you start with a huge chunk of hair at the root, the braid can sit bulky and pull too hard on the scalp. Feed-in braiding solves that by starting small and adding hair in little sections. The root lies flatter, and the braid looks smoother where it matters most.
You’ll need a comb, a few clips, and patience. Part the center strip, then create narrow side rows that feed into it. If your hair is thick, divide the feed-in sections smaller than you think you need. Bigger chunks make the braid lumpy. Smaller additions give a cleaner line.
A lot of people love this style because it lasts and looks neat even after several days, but the tension has to stay under control. If your scalp feels tight or hot, stop and adjust. Braids should sit snug, not painful.
Good to know:
- Best for medium to dense hair
- Works well with added braid hair if you want more length
- Can be worn with a high ponytail end or tucked under
- Needs a satin bonnet or scarf at night
I’d choose this one when you want a strong mohawk shape that still feels polished in daylight.
9. The Rope-Braid Ponytail Hawk
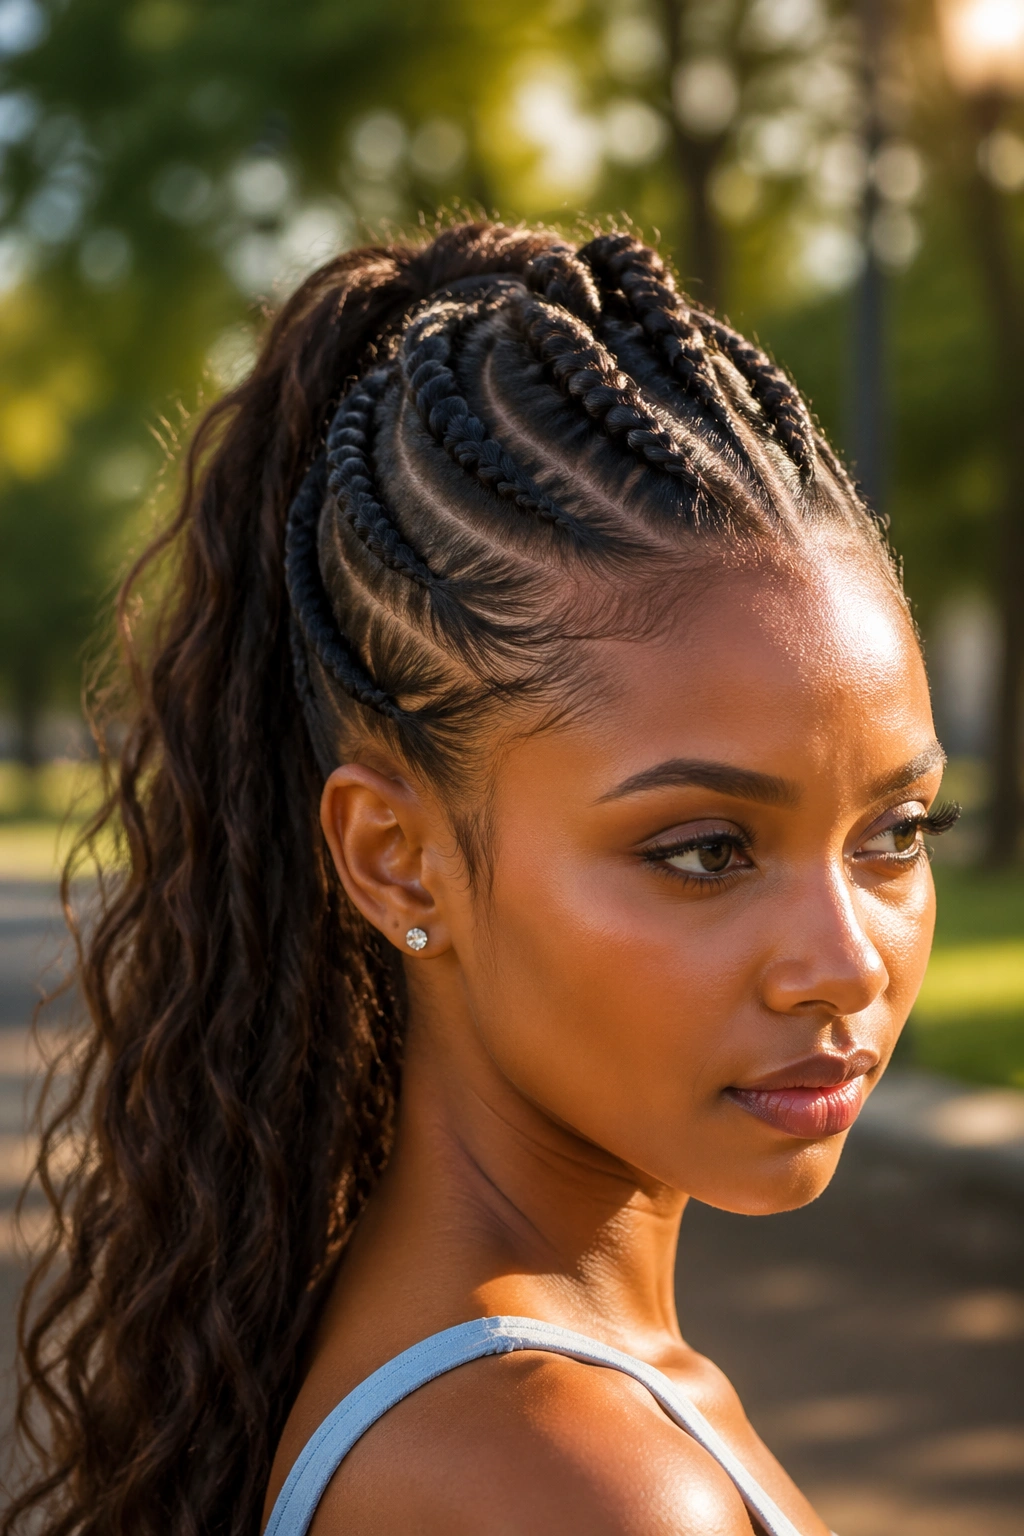
This version is all about movement. Instead of keeping the braid glued to the head from root to tip, you build a lifted center section and let it fall into a ponytail at the back. The braid or twist at the front gives the mohawk outline, while the ponytail keeps things relaxed and easy to wear.
It’s less rigid than a full scalp braid. That’s the appeal. It looks intentional, but it doesn’t feel locked down.
The shape needs a clean top and a loose tail
Start by creating volume at the crown. Backcomb the roots a touch if your hair is flat, then smooth the top layer before securing a high or mid-height ponytail. Braid or rope-twist the ponytail itself, depending on the finish you want. A braid gives more structure. A twist looks softer.
The sides should stay pulled back and slightly tight, but not stretched so much that your face looks over-pulled. That balance matters. Too much tension makes the style look severe. Too little and the mohawk shape disappears.
This is one of my favorite styles for second- or third-day hair, frankly. The texture helps the braid hold, and a little dryness in the strands can actually make the ponytail behave better. Freshly washed hair can be too slippery, especially if you have fine strands.
Add a wrapped elastic base if you want the style to look more finished. A small strand of hair wrapped around the ponytail holder does more than people think. It hides the rubber band and gives the whole style a cleaner edge.
10. The Crown-to-Mohawk Hybrid Braid
Here’s the cleanest answer if you want something softer than a hard mohawk but still crave that lifted center line. A crown braid starts around one side of the head, curves across the top, and then narrows into a central braid or twist toward the back. It gives you the mohawk shape without looking too severe.
The curve matters. That arc across the crown softens the style and makes it feel more romantic. Still, the raised center keeps it from drifting into basic updo territory.
Where this style really earns its keep
A crown-to-mohawk hybrid is useful when you need your hair out of your face but still want some shape near the top. The braid can frame the hairline, create a subtle lift around the temples, and end in a low braided tail or tucked bun at the nape.
If your hair is long enough, braid from the front hairline toward the crown on each side, then gather the ends into a central section. If your hair is shorter, fake the curve by pinning two side braids toward the center and letting them meet in the middle. It’s not about exact symmetry. It’s about the line the eye follows.
This style behaves well with waves and curls, too. A few loose pieces around the face can soften the shape if you want it less strict. Just don’t overdo it. Too many wisps and the mohawk effect disappears.
Best use case: when you want the face-framing comfort of a crown braid and the edge of a center ridge
Best finish: soft, slightly undone, and secure at the back
11. The Half-Up Braided Top Knot Hawk

This one has energy. A lifted braided section runs from the front hairline to the crown, then gathers into a top knot or braided bun, while the lower hair stays loose. The result is a mohawk silhouette with movement underneath, which is why it works so well for people who don’t want to commit to a fully pinned style.
It’s also a smart choice when you want the braid to carry most of the visual weight. The bun gives height. The loose bottom keeps the look from feeling too severe. And because the sides are smoothed back rather than shaved, you get the full mohawk attitude with none of the permanent haircut part.
A few things make this style hold up better. First, tease the crown a little before you braid. Second, secure the bun with two pins from opposite directions so it doesn’t slide. Third, leave the bottom hair with some texture — a slight wave or bend gives the whole style more life than pin-straight lengths.
If you have thick hair, split the top section smaller than your instinct says. A giant top knot can look heavy and pull the braid flat. If you have fine hair, a texturizing powder at the roots helps the bun stay lifted. Use a tiny amount. Too much turns the hair chalky.
This is the style I’d reach for when I want braids to look playful rather than formal. It has enough edge for denim and boots, enough polish for dinner, and enough flexibility that you’re not stuck babysitting it all day. That matters more than people admit.