A five-minute braid can save a school morning.
Not every hairstyle needs to be polished within an inch of its life. With kids braids, the real win is simpler: hair stays out of the eyes, the part looks tidy enough to pass in a hallway mirror, and nobody has to wrestle with a brush for half an hour before the first bell.
The trick is matching the braid to the morning you actually have. Some styles need only a comb and one elastic. Others need a few bobby pins and a steadier hand. And some look fancier than they are, which is my favorite kind of school hairstyle. A rat-tail comb, a spray bottle, and snag-free elastics go a long way. So does knowing which braid will behave on damp hair, which one will hold on fine hair, and which one is worth the extra minute.
Start with the easiest versions first. Then work up to the styles that look elaborate but only ask for a little patience and a clean part.
1. Classic Three-Strand Braid
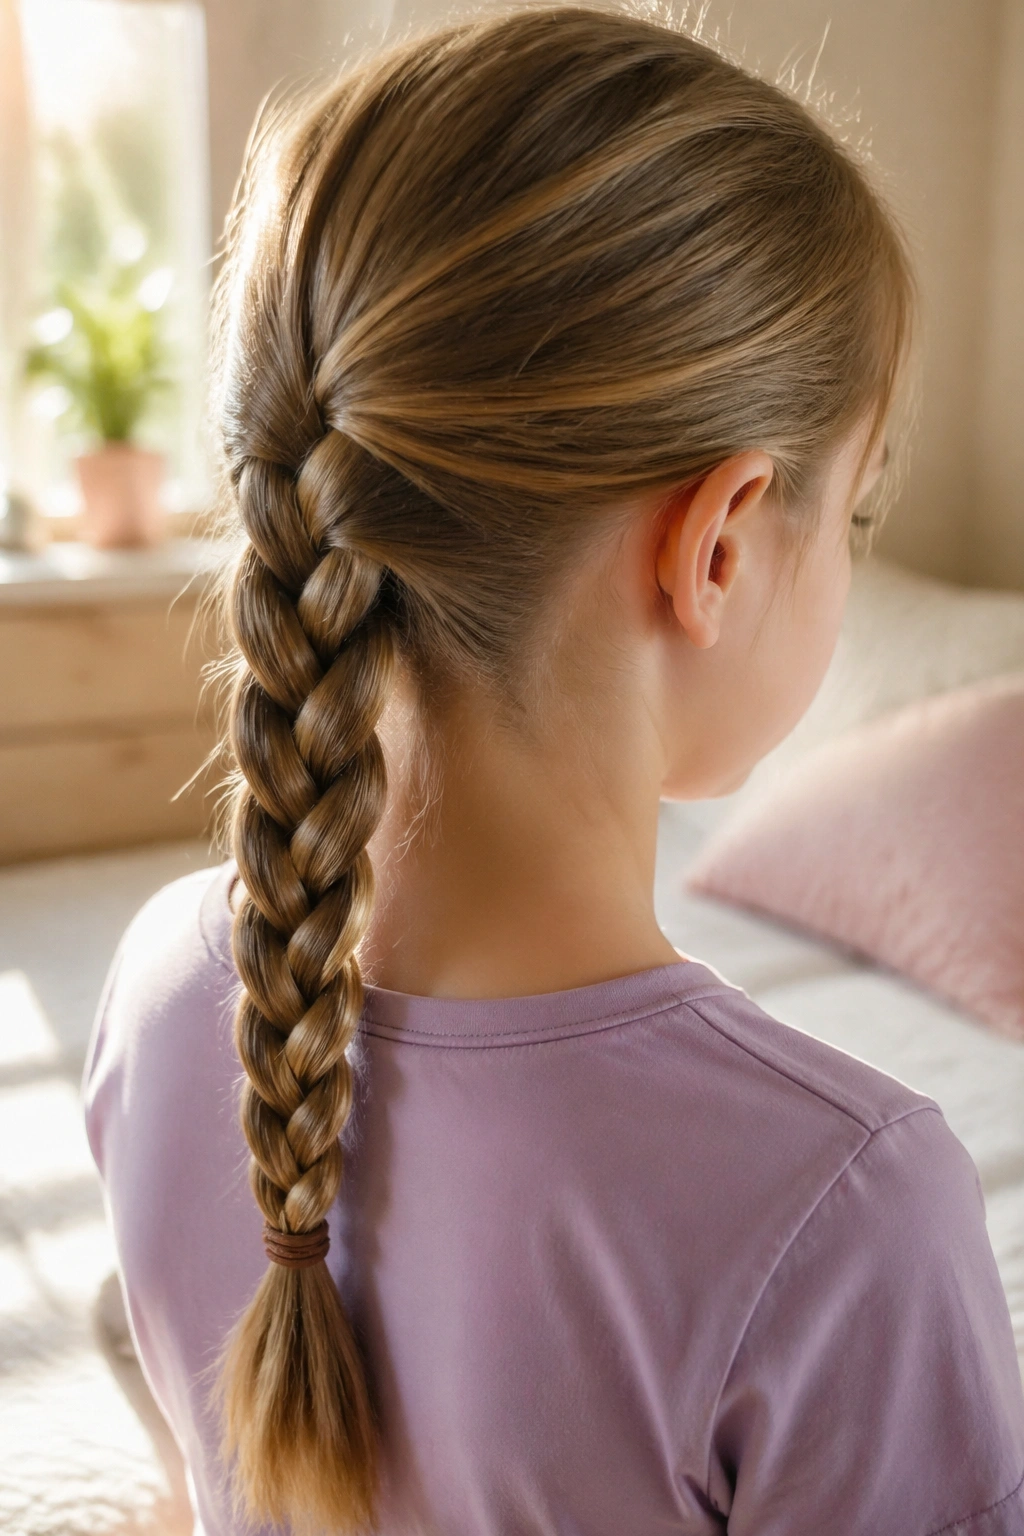
The plain three-strand braid earns the top spot because it never asks for drama. You divide the hair into three even sections, cross the outside pieces over the middle, and keep going until the ends disappear into a small elastic. That’s it. No fancy hand positioning. No gymnastics.
Why It Works Before School
It is the braid you can do half-awake. On shoulder-length or longer hair, it usually takes about 2 to 4 minutes once you stop overthinking it. It also forgives a little unevenness, which matters on mornings when one child is bouncing around and the other is asking where the left shoe went.
- Best on hair that has been brushed out and lightly misted
- Good for straight, wavy, and loose curls
- Easy to dress up with a ribbon or a bow at the end
- Comfortable under hoodies, sweaters, and school jackets
My one hard rule: keep the tension even from top to bottom. If the top is tight and the lower half is loose, the braid starts to look slouchy fast. Smooth each section with your fingers before crossing it over, and the whole thing looks cleaner without extra effort.
2. Side Braid
If your child hates hair falling into the face, the side braid is the polite answer. It shifts the whole style off-center, which makes it feel softer and a little more relaxed than a braid sitting straight down the back.
That off-center placement also helps if the hair has layers. Shorter pieces that would escape a center braid often stay put better when the braid starts low near one temple and travels over one shoulder. The shape looks intentional even when the braid itself is simple.
I like this one for mornings when you want something tidy but not stiff. A side braid can be neat enough for class photos, then loose enough to survive recess without looking overworked. If the front pieces are slippery, tuck in a tiny clip on the heavy side first. That little move saves a lot of redoing.
3. Low Braid
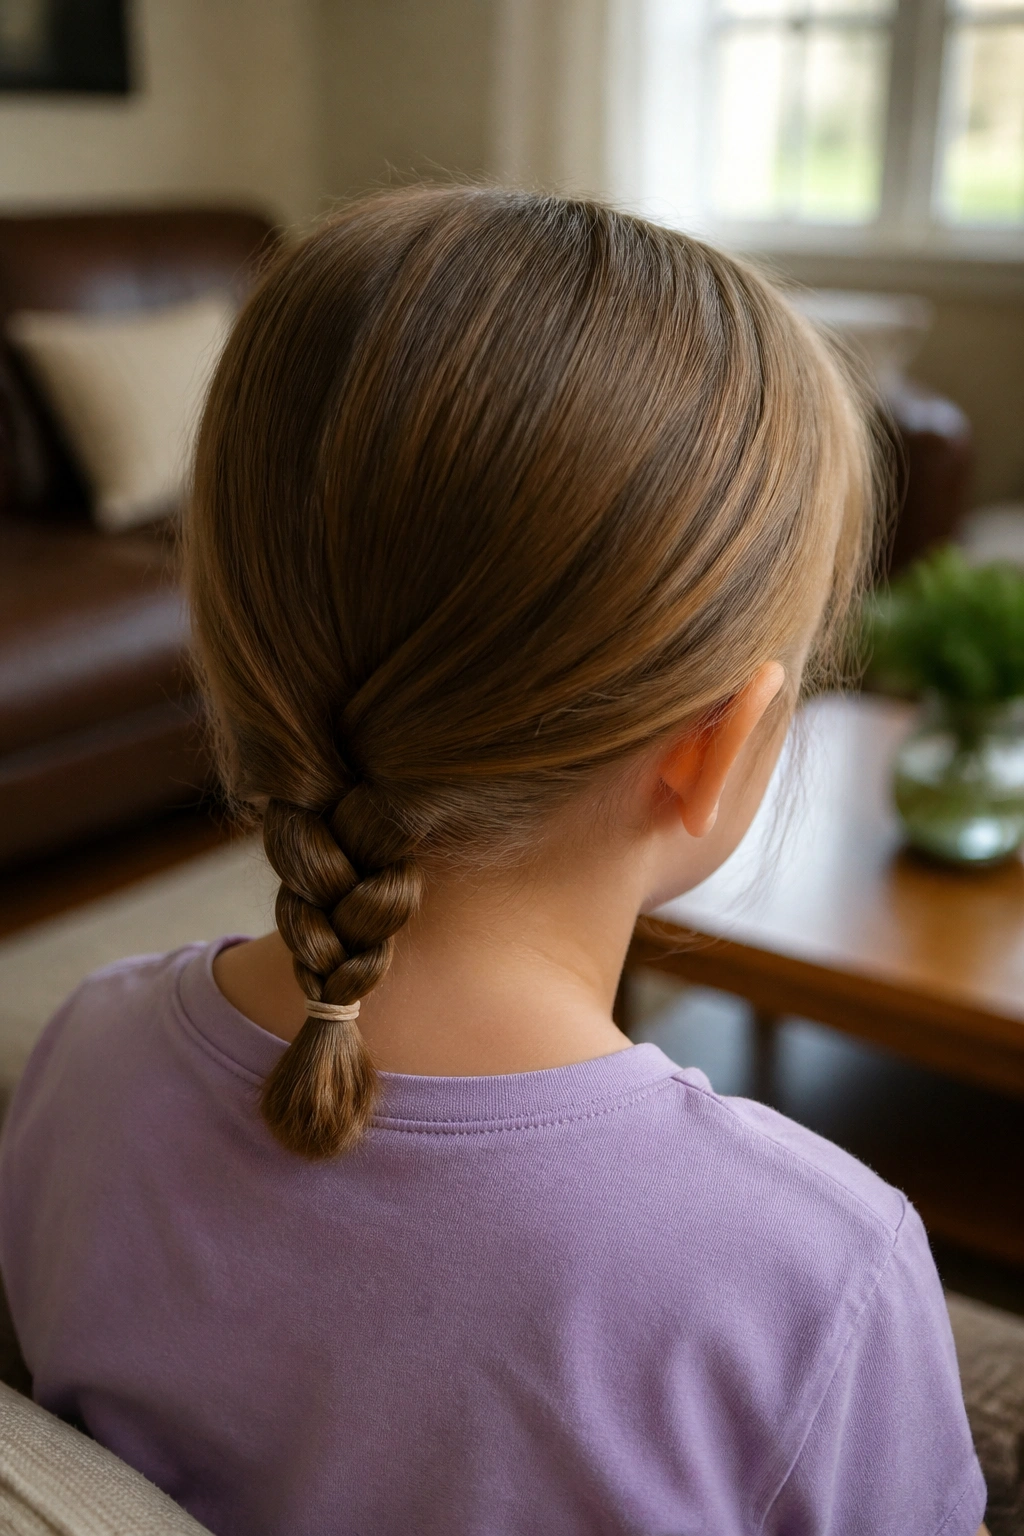
Why does the low braid show up so often in busy homes? Because it sits under hats, under backpack straps, and under the general chaos of a school day without making a fuss.
The braid starts at the nape, where the hair is calmest and easiest to control. That makes it a solid choice for kids who wiggle during styling, since you can keep one hand close to the neck while the rest of the hair hangs still. A low braid also feels gentler on tender scalps than a braid pulled high and tight.
How to Keep It Neat
Use a small amount of leave-in conditioner or detangler on the ends before you braid. Just a little. Too much product makes the sections slippery, and then the braid loses its grip by midmorning.
A soft elastic at the bottom matters too. Hard elastics can snag when a child pulls the braid over a shoulder or takes off a sweatshirt. The whole style stays calmer when the finish feels soft instead of sharp.
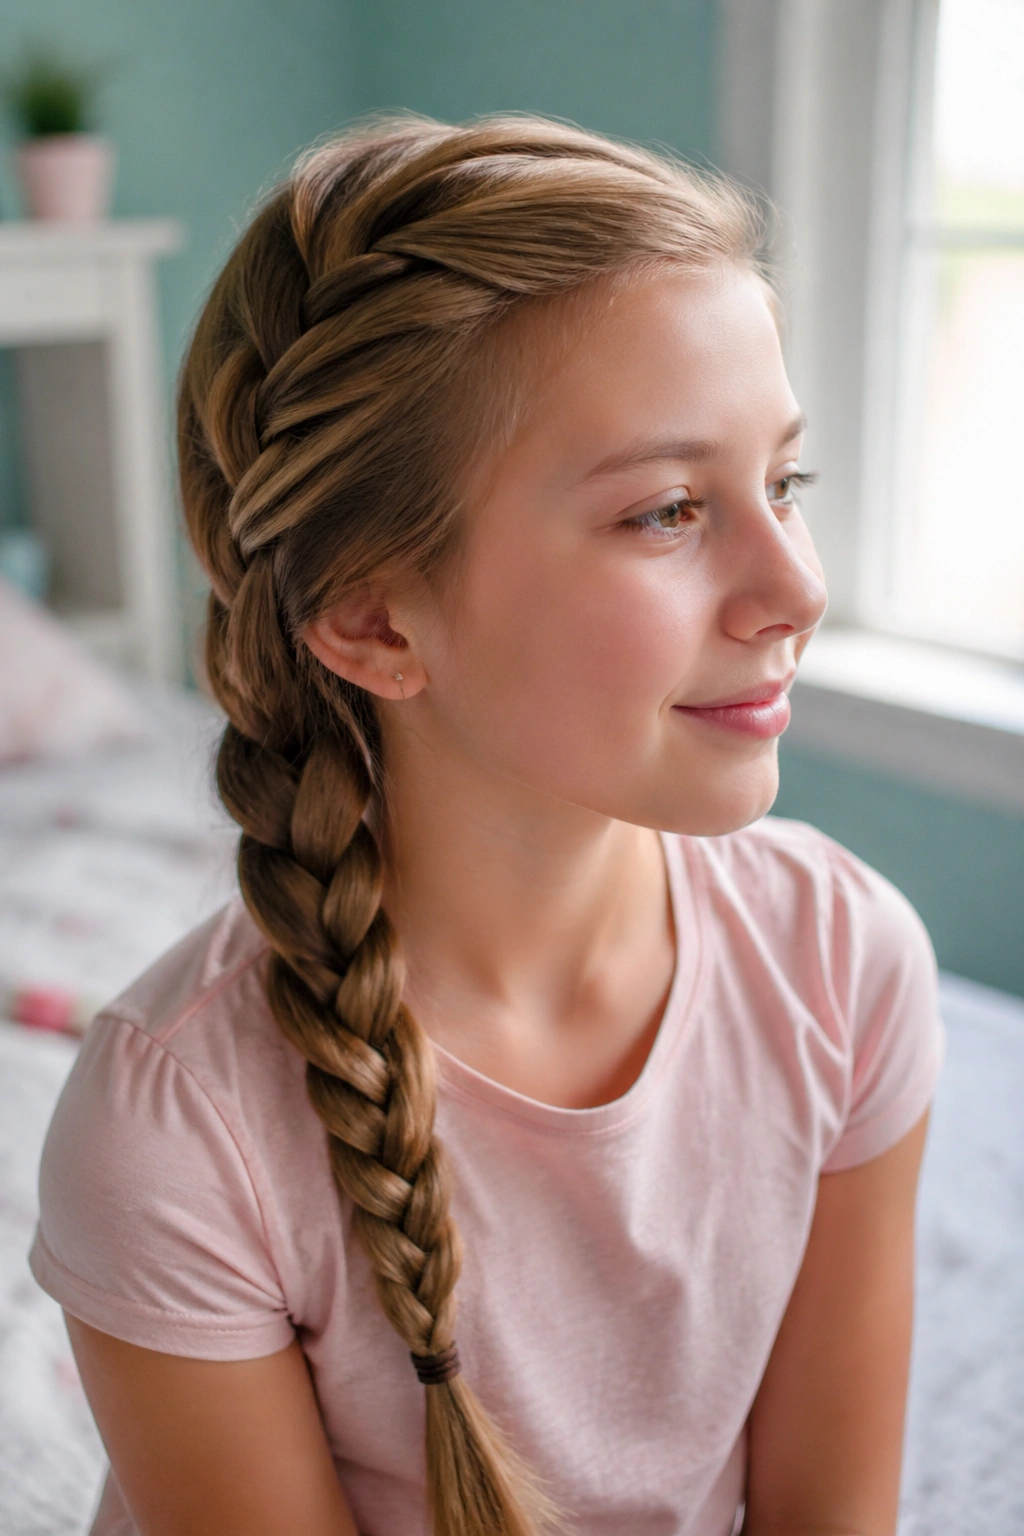
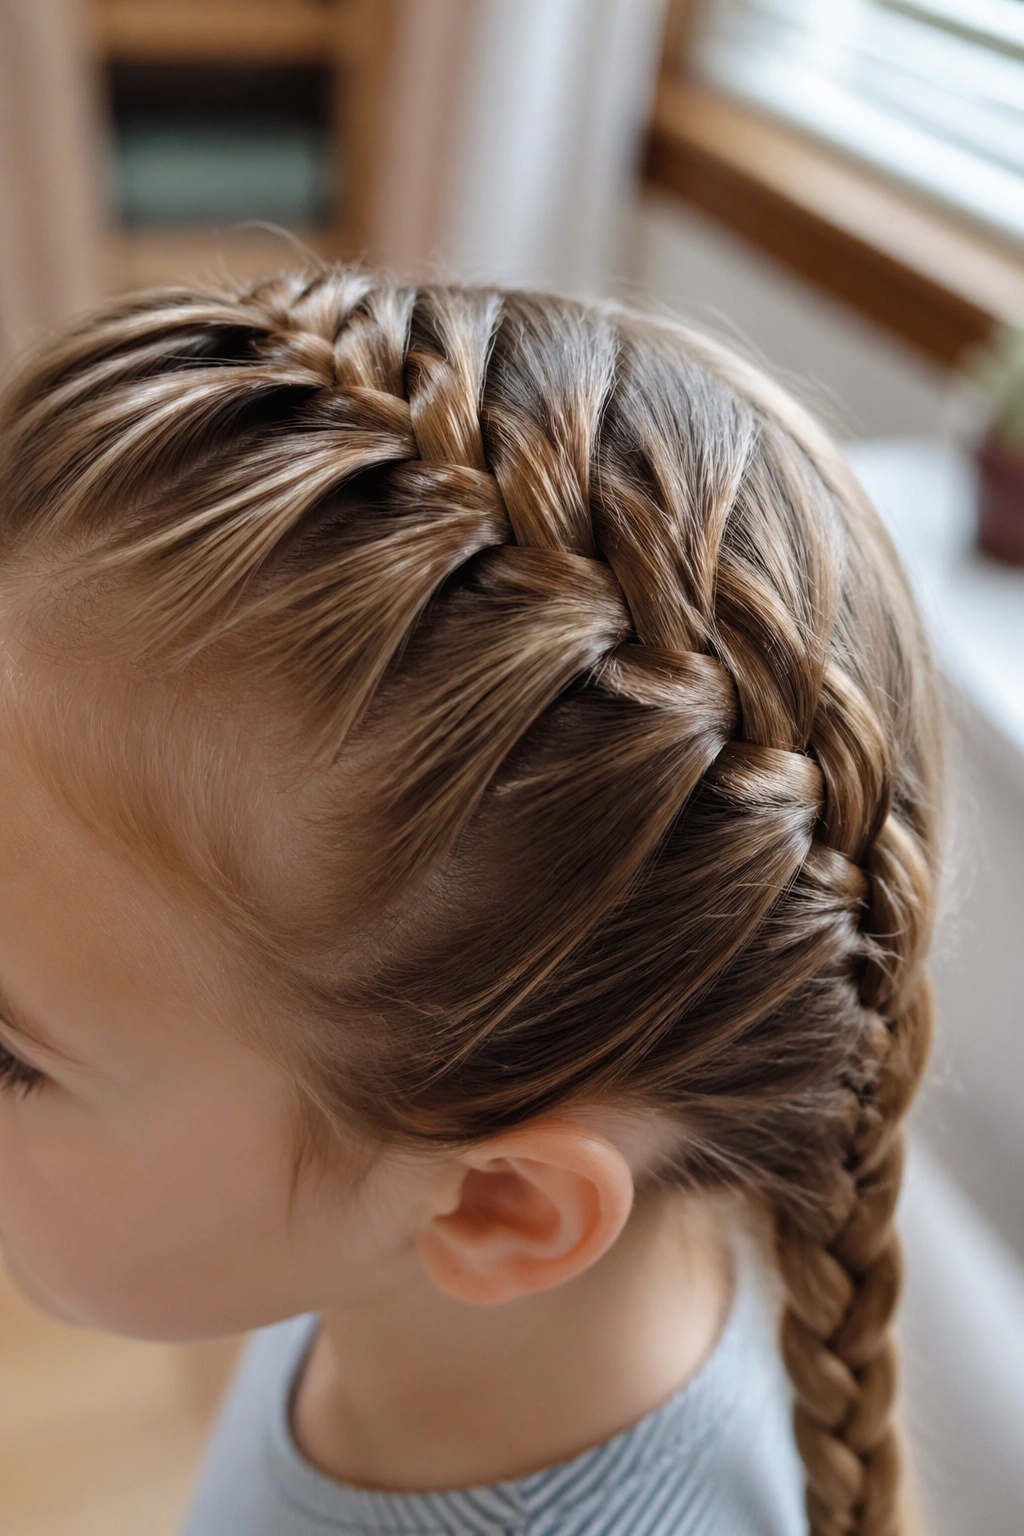
4. French Braid
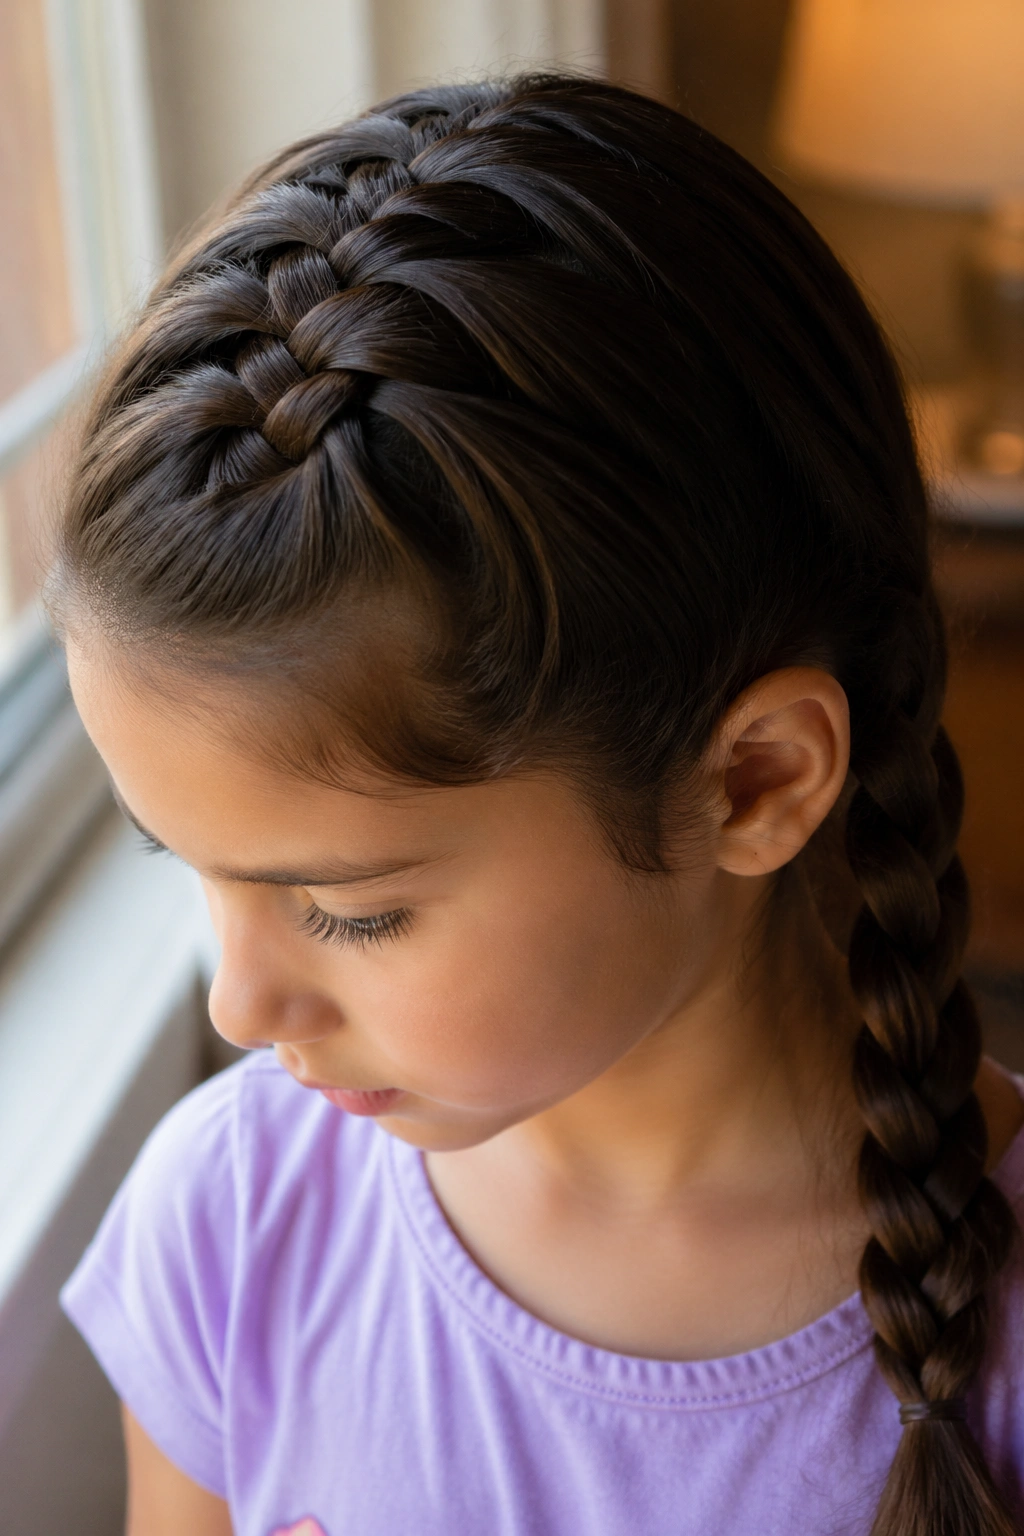
When bangs keep slipping into the eyes right before school, the French braid earns its place. It pulls hair up from the hairline as you go, which means the front stays controlled instead of collapsing into the face the second you let go.
The braid looks complicated from the outside. It isn’t. You start with a small section at the crown, split it into three pieces, then add a bit of hair from each side every time you cross over. The only part that needs practice is keeping your hands close to the head. Drift too far away and the braid gets loose and bumpy.
The Grip That Makes It Work
A French braid holds best when the section you add is about the width of your thumb, not a huge chunk. Small additions keep the braid smooth and stop that puffy, lopsided look that shows up when morning hands move too fast.
If the child has fine hair, a light mist of water helps. If the hair is thick, a quick brush and a clean part usually do the job. Either way, don’t rush the first two crosses. Those set the line for everything that follows.
5. Dutch Braid
A Dutch braid is the French braid’s louder cousin. Instead of crossing sections over the middle, you cross them underneath, so the braid sits up from the scalp instead of melting into it. That raised look makes the pattern easy to see, which is handy when you want a style that looks more detailed than it is.
It also behaves well on thick hair. A French braid can disappear into a dense head of curls or waves, and then you spend the whole morning wondering if the braid is there at all. The Dutch version stays visible, even when the hair has plenty of volume.
The first few times, the hand motion feels backward. Then it clicks. Once it clicks, it’s almost automatic. Keep the sections even, keep the part clean, and don’t yank the hair tight enough to make the scalp complain. A braid should stay in place. It should not feel like a tug-of-war.
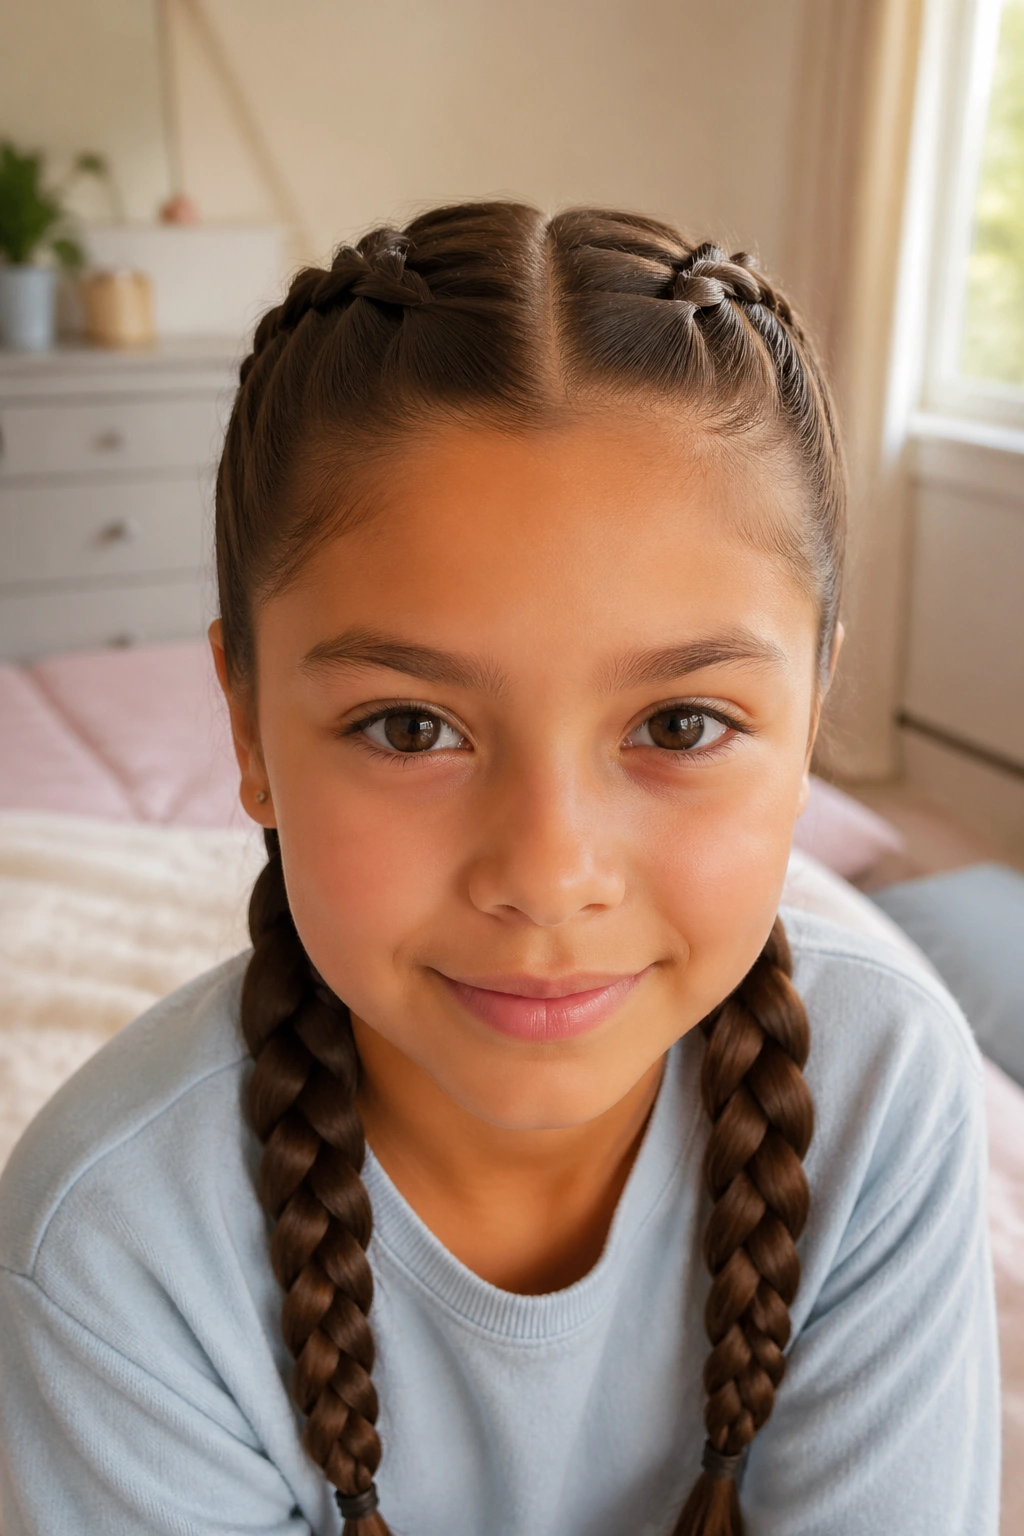
6. Double French Braids
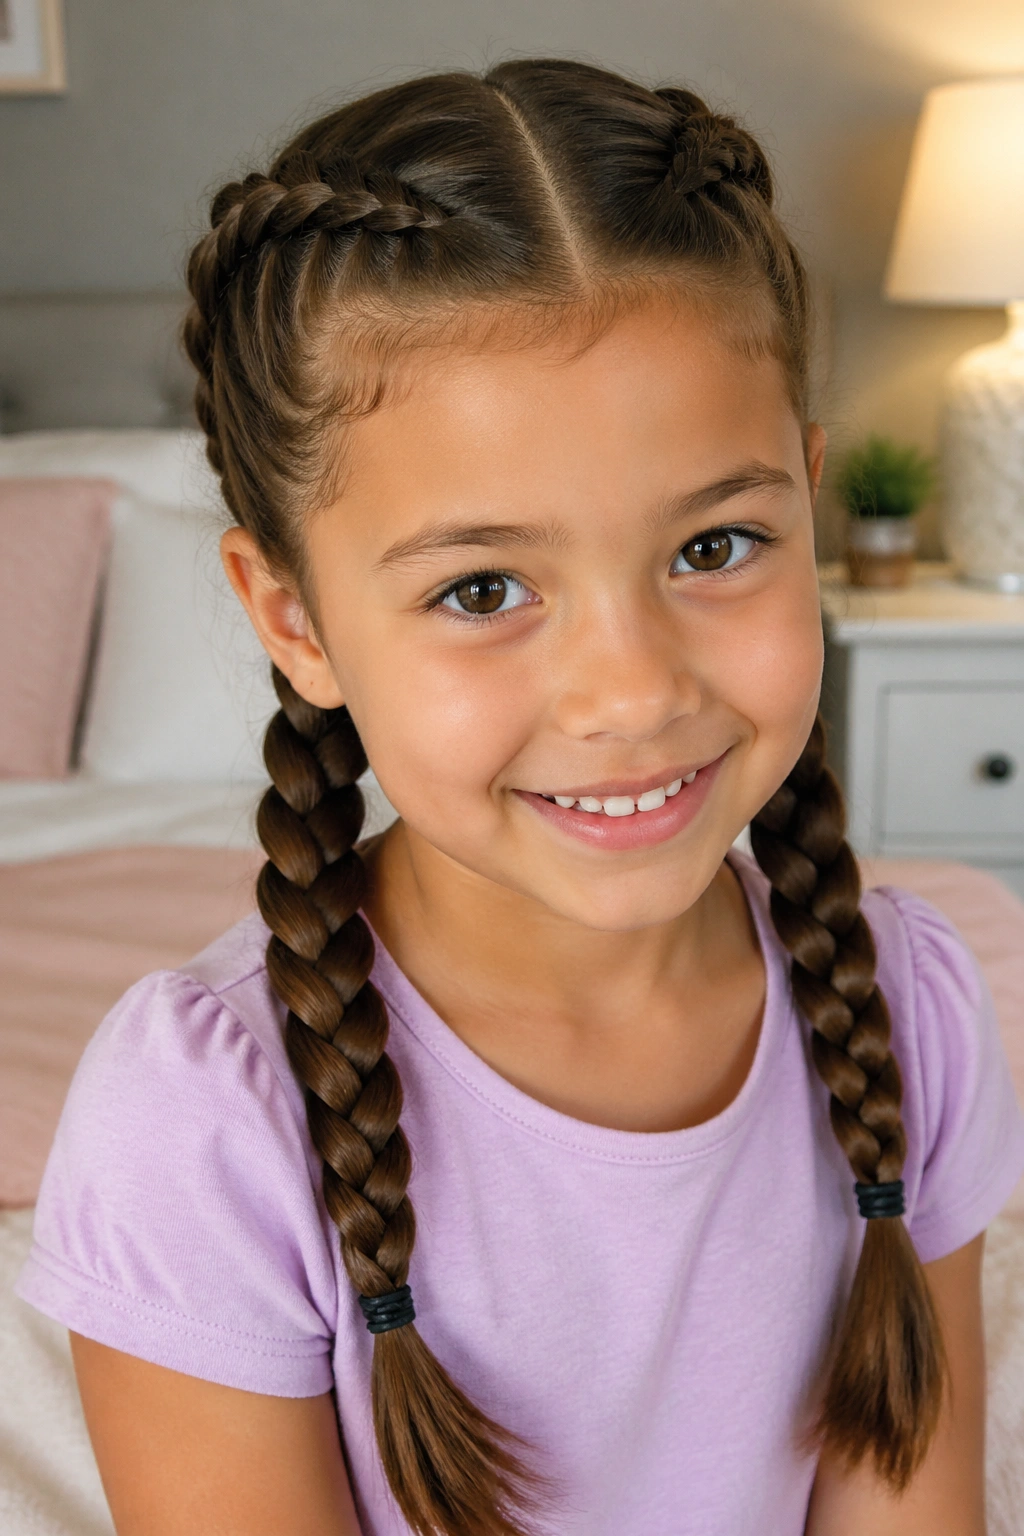
A single braid is fine. Double French braids are better when the day starts with running, climbing, or a child who insists on flipping their head every seven seconds.
The center part gives the style structure, and each braid keeps its side of the hair under control. That balance matters on long school days because hair stops swinging into the cheeks, the backpack straps don’t wreck the shape, and the whole style tends to survive playground speed better than a loose ponytail.
What Makes Them Different
- They keep the head balanced instead of heavy on one side
- They work well for active kids who need hair out of the face
- They can be finished with tiny elastics or braided all the way to the ends
- They take only a little longer than one braid once your hands know the pattern
If you want them to lie flatter, braid close to the scalp for the first few passes. If you want a softer look, widen the center part a little and loosen the braid at the end. Tiny tweaks change the whole mood of the style.
7. Double Dutch Braids
Double Dutch braids are what I reach for when I want hold. Not stiffness. Hold.
The raised braid pattern gives the style shape from the crown down, which makes it feel neat even on thick or textured hair that refuses to sit still. The middle part is the key. Keep it straight, clip one side away, and work the other side in sections that stay close to the scalp. Once the first braid is done, the second one goes faster because your hands remember the movement.
Why They Stay Put
- The braid sits on top of the hair instead of sinking into it
- The style keeps the front controlled all day
- It works well with a little leave-in cream on the ends
- It looks clean even if the rest of the outfit is pure chaos
For school mornings, I like these best when the child has long hair and a busy day ahead. They can be dressed up with colored elastics or left plain. Either way, they do the job without looking fragile.
8. Pull-Through Braid
Not a real braid, and that is the whole point.
The pull-through braid looks like one of those elaborate styles that belongs in a salon chair, but it’s built from ponytails and elastics. That makes it a smart choice for slippery hair, because you are not trying to weave sections together by hand. You are stacking small ponytails, splitting each one, and pulling the next section through. Simple. A little repetitive. Very useful.
On fine hair, it adds body fast. On thick hair, it creates a chunky, rounded shape that stands out in a way a normal braid sometimes does not. And if a child will not sit still for a French braid, this is a calmer option because each step is a small reset.
For school, I’d use it when you want a bigger-looking style in less than ten minutes. It is especially good with a bow at the bottom, since the braid itself already has a lot of shape and the bow does not have to do the heavy lifting.
9. Fishtail Braid
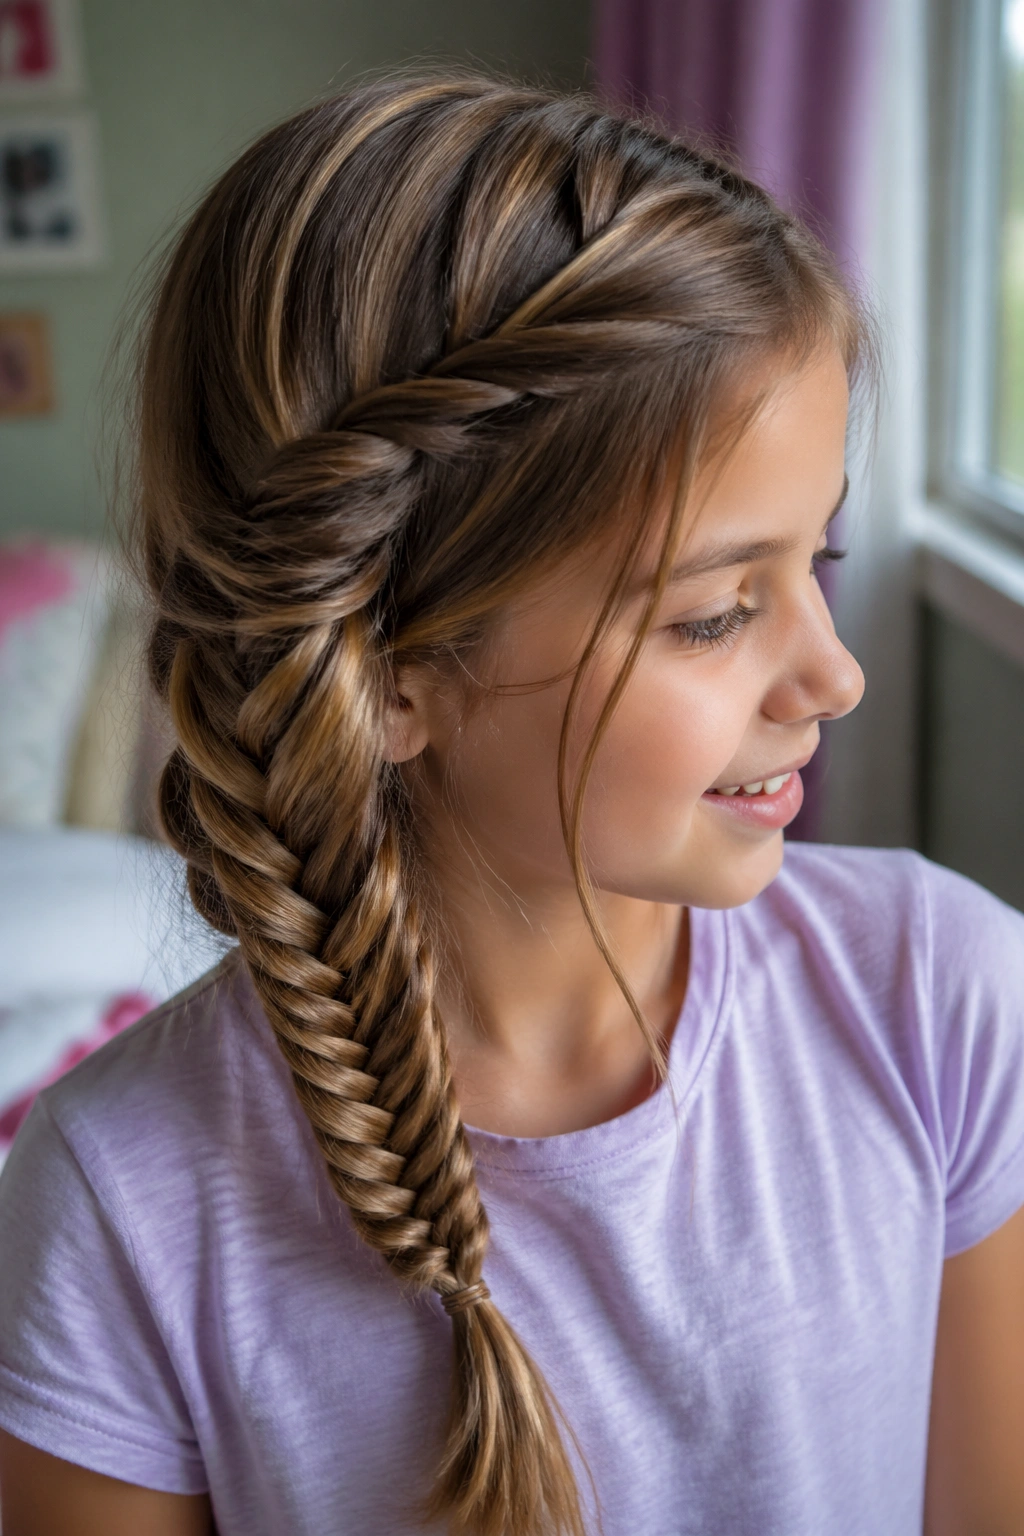
Can a fishtail braid be easy? Yes, if you stop trying to make every section tiny and perfect.
A lot of people make this braid harder than it needs to be. The basic move is simple: split the hair into two sections, take a small piece from the outside of one side, cross it over to the other, then repeat on the other side. Larger sections give you a quicker result and a looser, more lived-in braid that still looks polished enough for school.
How to Use It in a School Rush
Start low and keep the pieces chunky. A tight, precise fishtail takes patience, and patience is not always available before breakfast. A loose fishtail, though? That is fair game.
It works best on hair that has a little texture, so if the hair is freshly washed and slick, let it sit for a bit or add a tiny bit of dry shampoo at the roots. The braid holds better and the shape stays visible. Long hair especially likes this one. Shorter layers can slip, which is annoying, so I usually save it for kids whose hair reaches at least the shoulders.
10. Rope Twist Pigtails
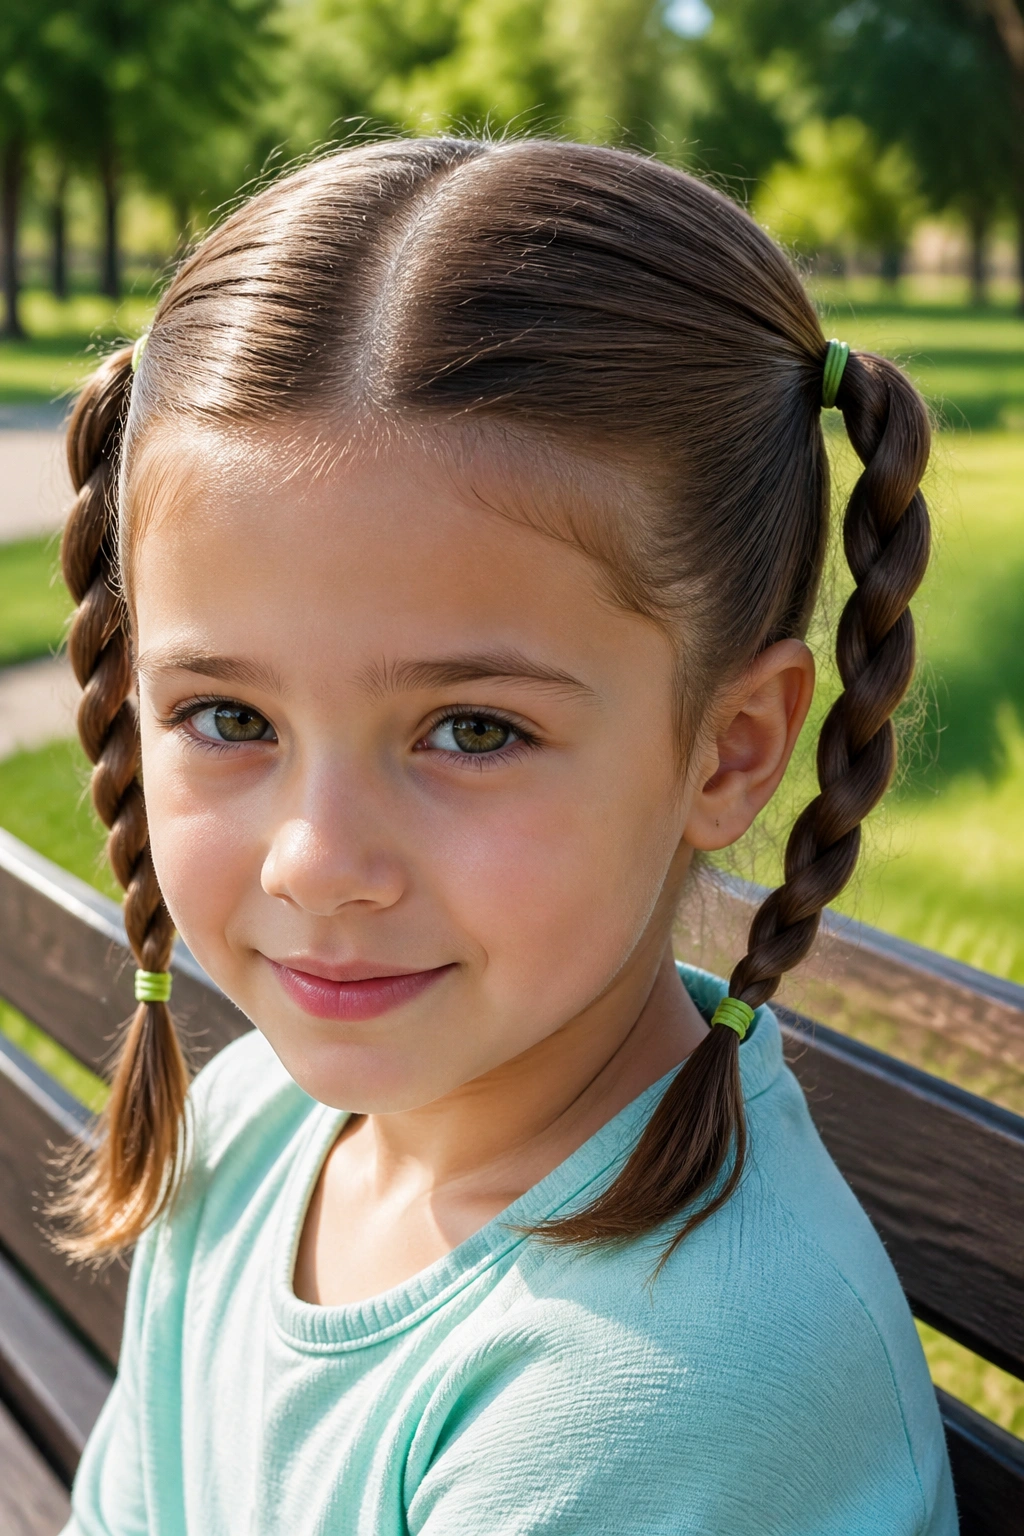
When the hair is tangled at the nape and somebody is already annoyed about socks, rope twists can save the mood.
Each side gets split into two sections, twisted in the same direction, then wrapped around each other the opposite way. That sounds fussier than it feels. In practice, it is one of the fastest braid-like styles you can do on a child, especially if the hair is short to medium length or if the ends tend to fray out of regular braids.
Key Details That Matter
- Twist both sections tightly before wrapping them together
- Use a small elastic at the base so the twist starts cleanly
- Keep the sections equal in thickness or the twist wobbles
- Works well on damp hair that has been detangled first
I like rope twists for younger kids because the motion is easy to repeat and the style does not need a lot of symmetry to look decent. If one side ends up a little thicker than the other, no one notices from across the classroom.
11. Half-Up Braid
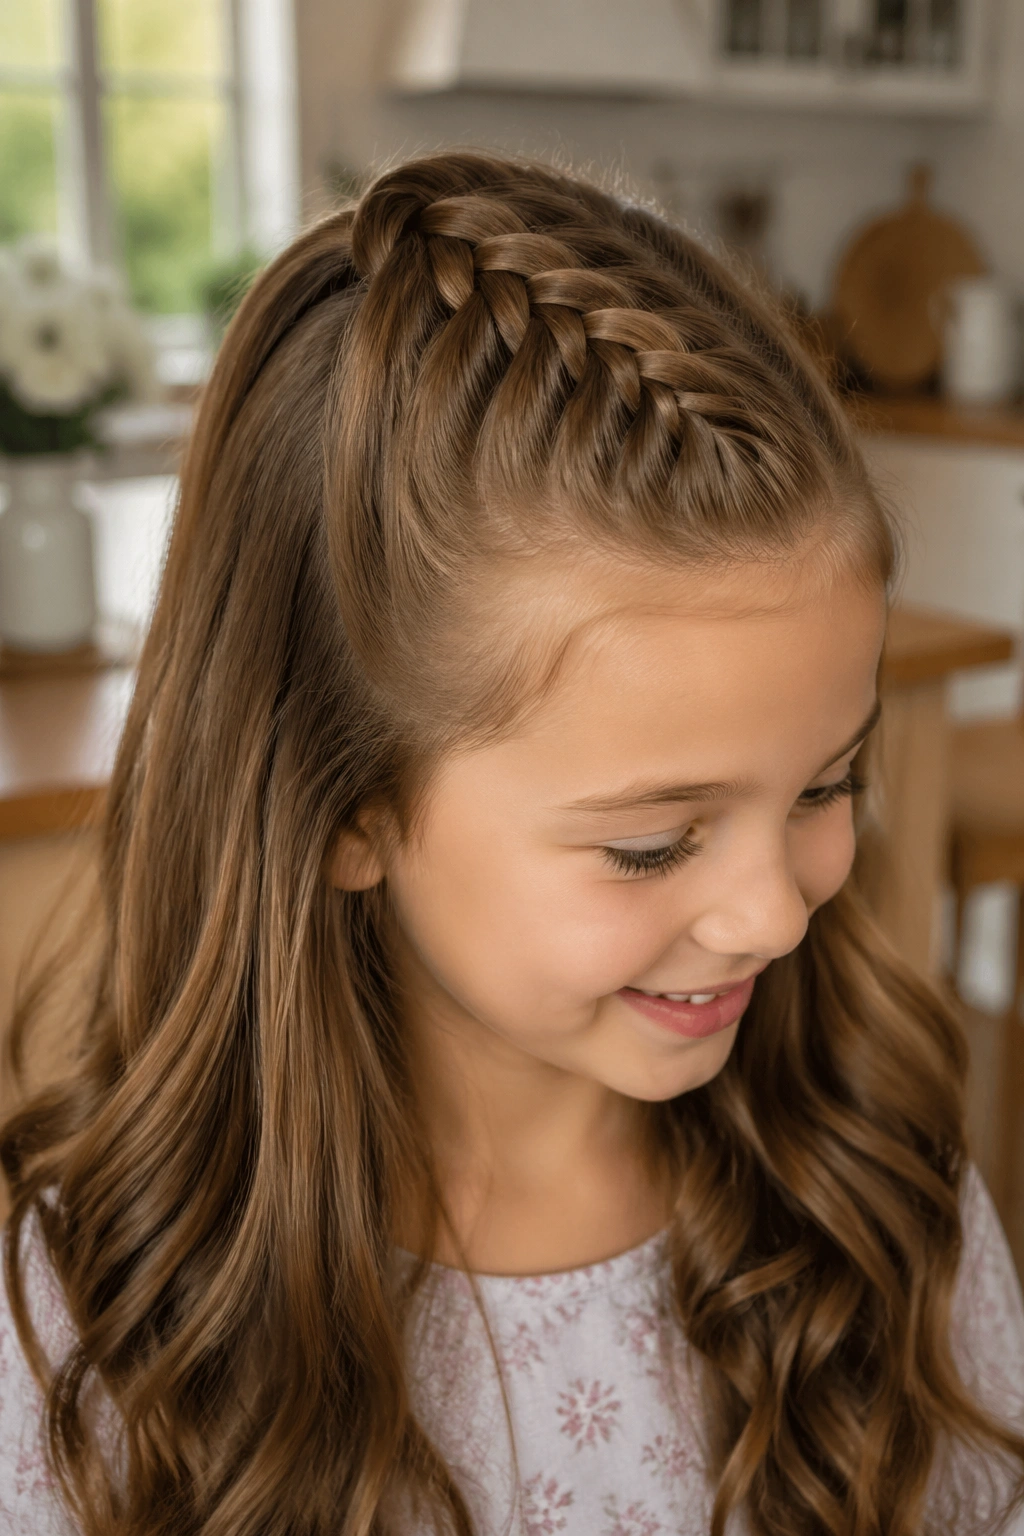
Some kids want their hair down. They just do not want it in their eyes.
That is where the half-up braid earns its keep. You braid the top section — just enough to hold back the front and sides — and leave the rest loose. It feels lighter than a full braid, and it’s kinder on kids who like the movement of loose hair but can’t stand the constant brushing away of bangs.
This one works well when the hair is layered or curly, because the braid only has to control the top third or so. The lower length can stay natural, which keeps the style from feeling too grown-up or too serious. A small bow, a clip, or even a plain elastic at the back finishes it cleanly.
It also hides messy ends. That sounds small, but on school mornings, small is everything.
12. Braided Ponytail
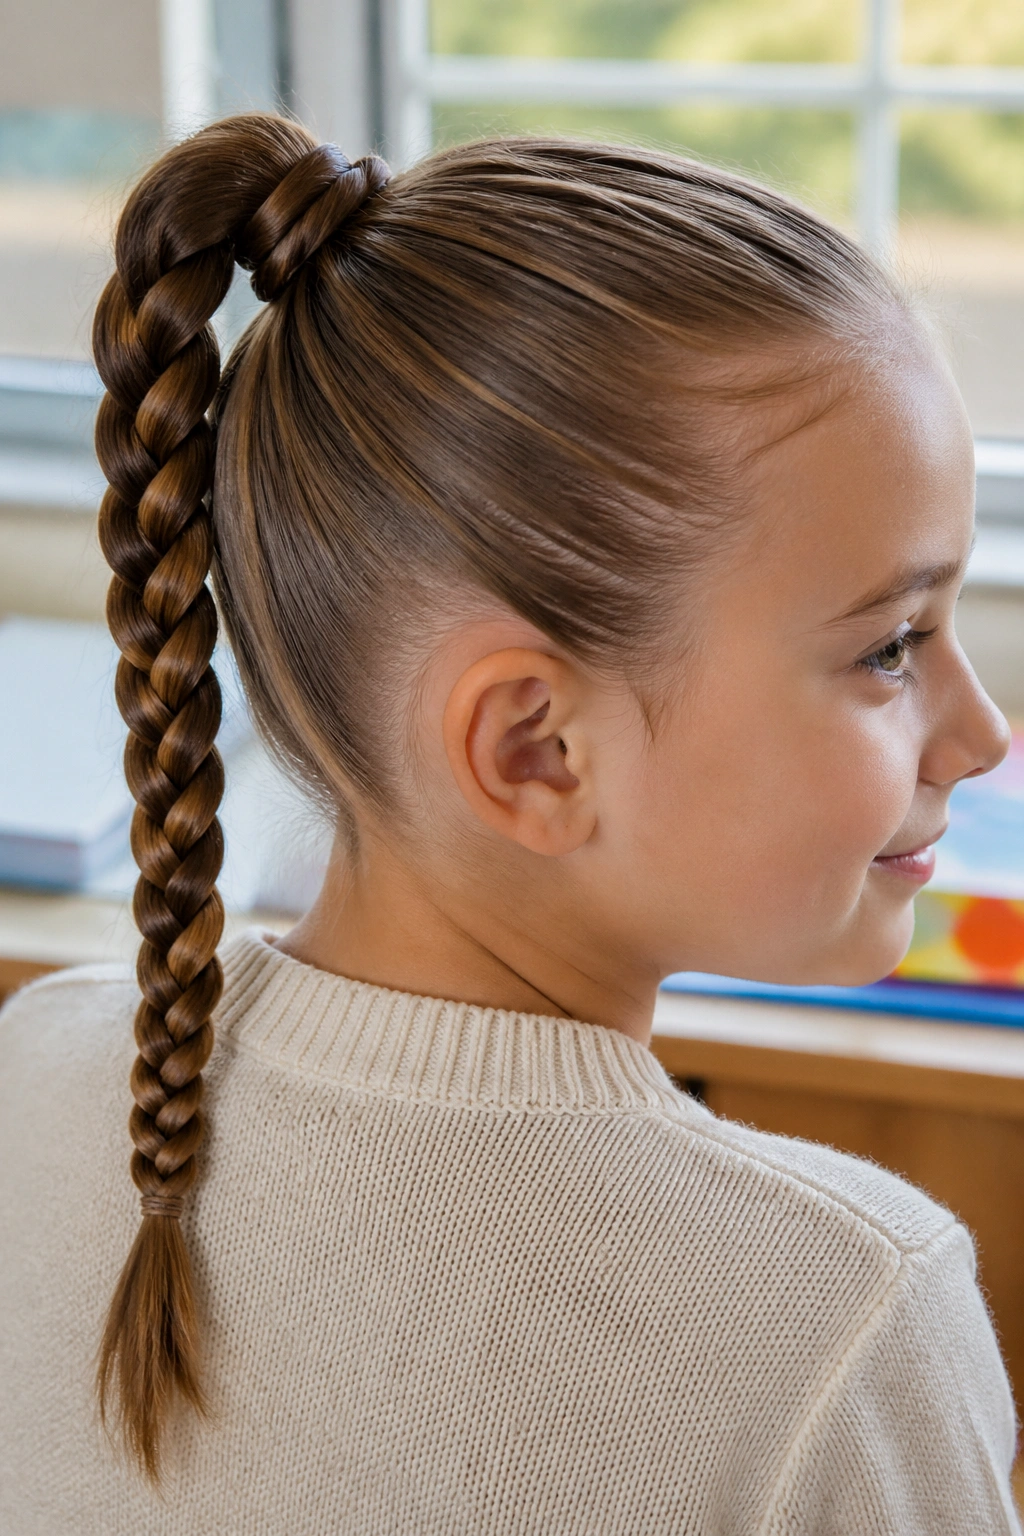
A braided ponytail is what happens when you want speed at the top and neatness at the bottom.
You start with a regular ponytail, which takes care of the parting and the hairline right away. Then you braid the tail. That means less work near the scalp, where most kids are fussy, and more control over the length, which is usually the part that flops into lunch or gym time.
Why Parents Like It
- The ponytail base can sit high, mid, or low
- It keeps the top neat without requiring a full braid
- It is fast on thick hair that takes forever to section
- The braid at the end keeps the ponytail from unraveling by noon
Use a soft brush to smooth the base before you tie it up. Once the ponytail is secure, the braid itself goes fast. A dab of serum on the ends helps if the hair frays easily, but don’t overdo it. Too much shine product makes the braid limp, and nobody wants that.
13. Crown Braid
A crown braid sounds formal. In practice, it can be a very practical school style if you keep your expectations sane.
The easiest version is usually a braid that travels along the hairline and wraps around the head, then gets tucked and pinned at the back. That keeps the front clear, the sides tidy, and the neck free. If the child has a field trip, a concert, or one of those days when a neat style matters a little more, the crown braid does the job without needing curls or heat.
The important part is pinning. Use small bobby pins, not huge ones that poke out and annoy everybody. Cross the pins in an X if the braid is heavy. That shape holds better than a single straight pin, and it does not slide as much when the child takes off a hoodie.
It looks polished, yes. More useful than it looks, too.
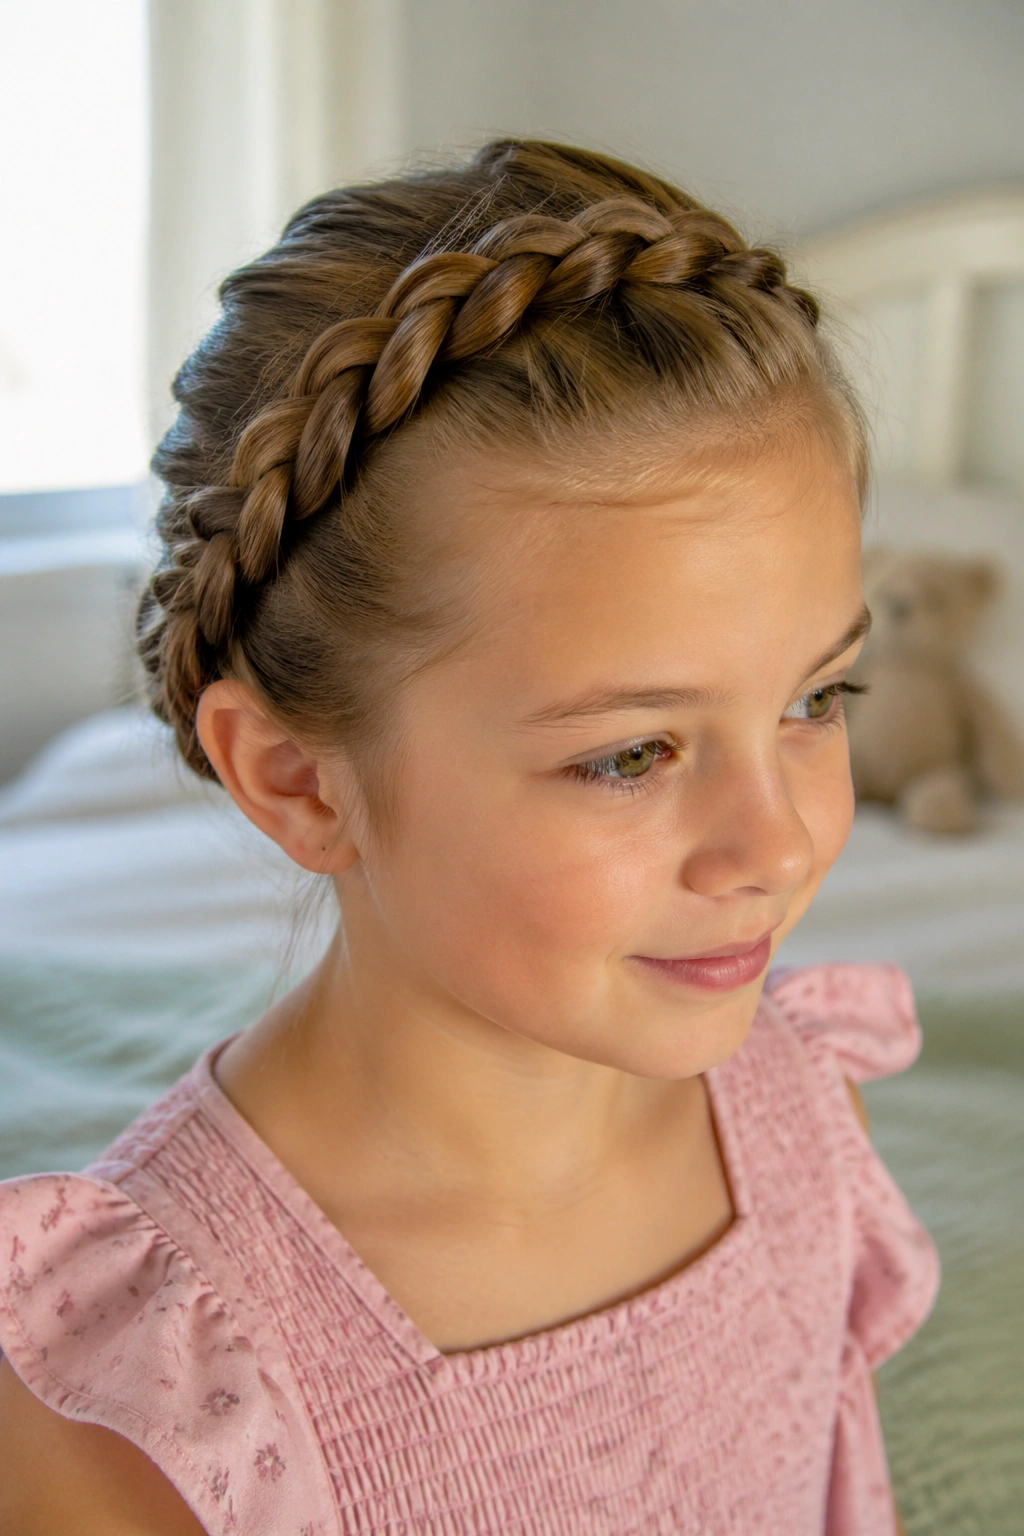
14. Halo Braid
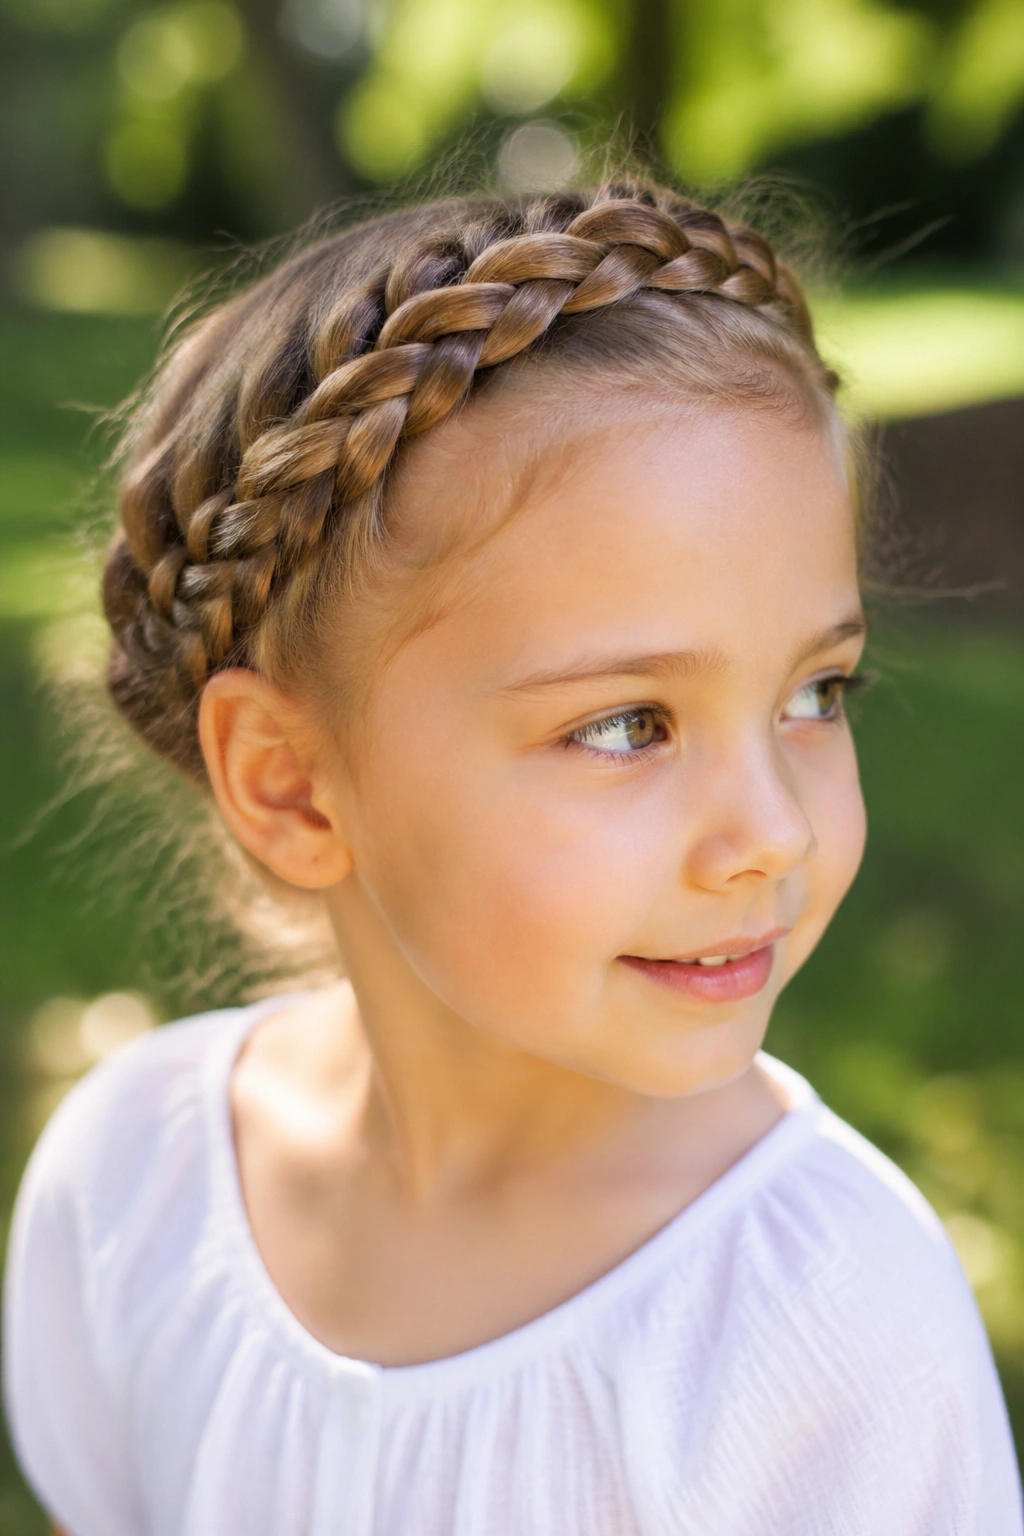
A halo braid sits flatter than a crown braid, and that changes the whole feel of it.
Instead of standing out around the head, the braid hugs the perimeter and stays close to the scalp. That makes it a nice choice for kids who want their hair off the neck but do not want a bulky braid sitting around the crown. It feels softer, less formal, and a little easier to wear all day.
The style works best when the hair is long enough to wrap and pin without a fight. If the hair is layered or slippery, a few extra pins near the nape help the braid stay put. And if you are short on time, you can fake the halo effect by braiding two sides and tucking them into each other at the back. It is not the same as a textbook halo braid, but it gives you the look without the fuss.
Clean. Practical. That’s the appeal.
15. Bubble Braid with a Braided Base
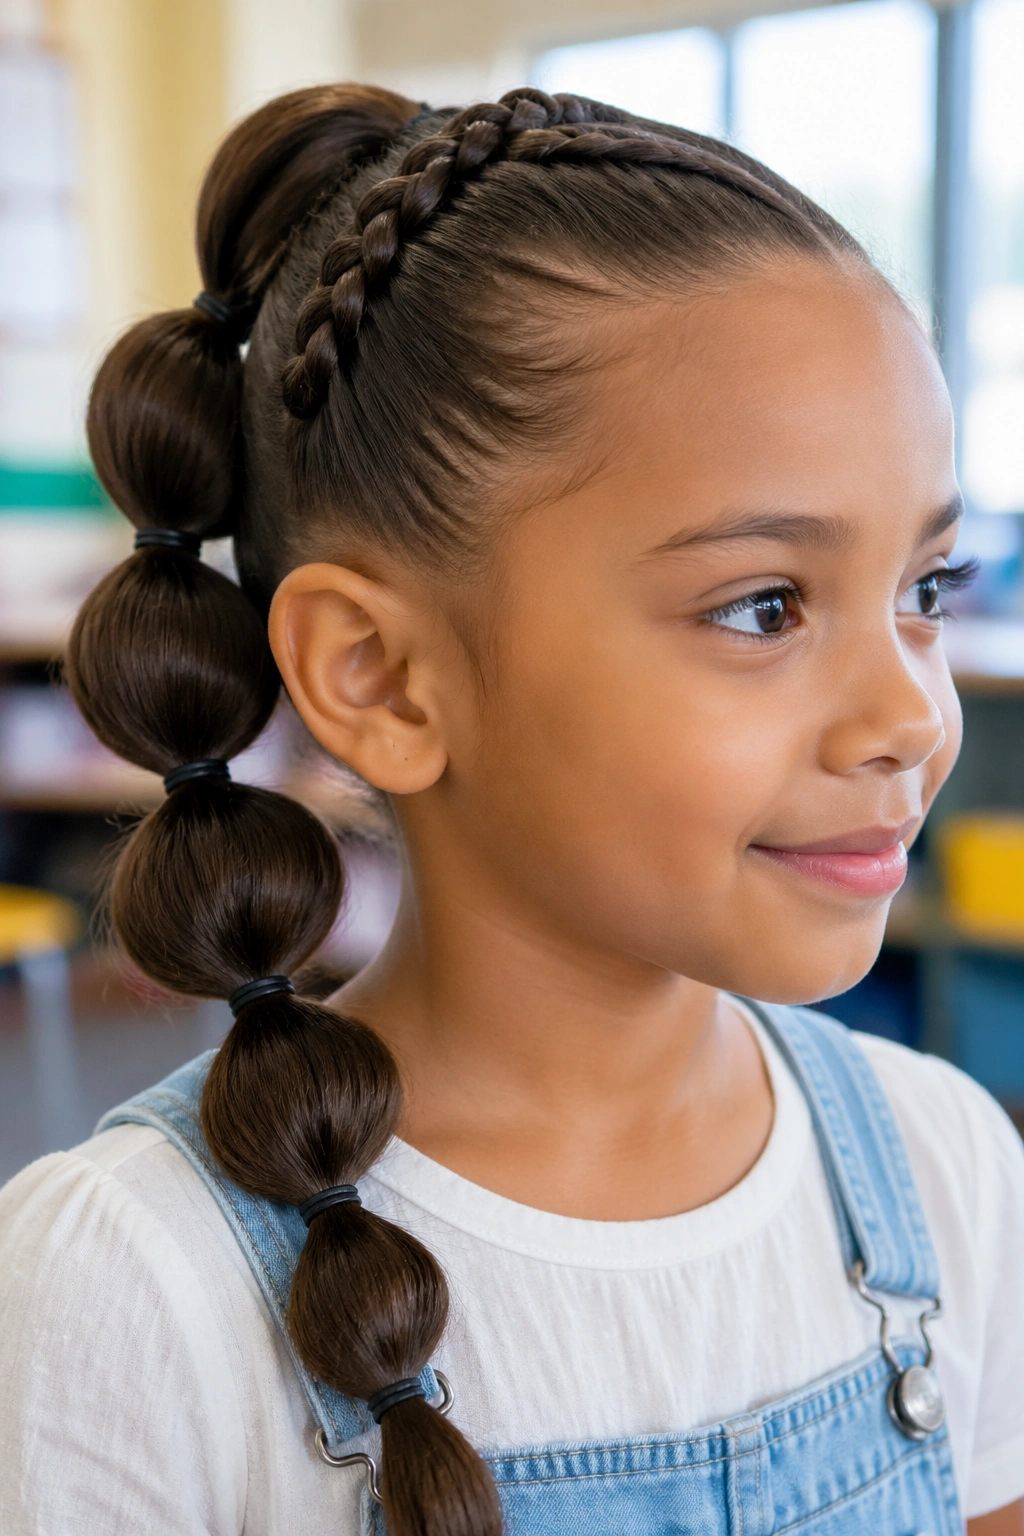
The braid part can be tiny; the bubbles do the work.
This style starts with a small braid or even a narrow three-strand section at the top, then turns into a series of elastics spaced down the length. Pull each section gently outward after tying it off, and the hair fills into round little bubbles that hold their shape. The result looks playful and a little dressy, which is nice when the school outfit is plain and you want the hair to do some of the talking.
What the Bubbles Change
- They make fine hair look fuller
- They hide uneven lengths well
- They need only a few clear elastics
- They stay neat even when the braid itself is simple
Keep the elastics about 1.5 to 2 inches apart, depending on hair length. Too close together and the bubbles disappear. Too far apart and the shape sags. The style is surprisingly forgiving once you get the spacing right, which is why I keep it in the “faster than it looks” category.
16. Accent Braid Along the Hairline
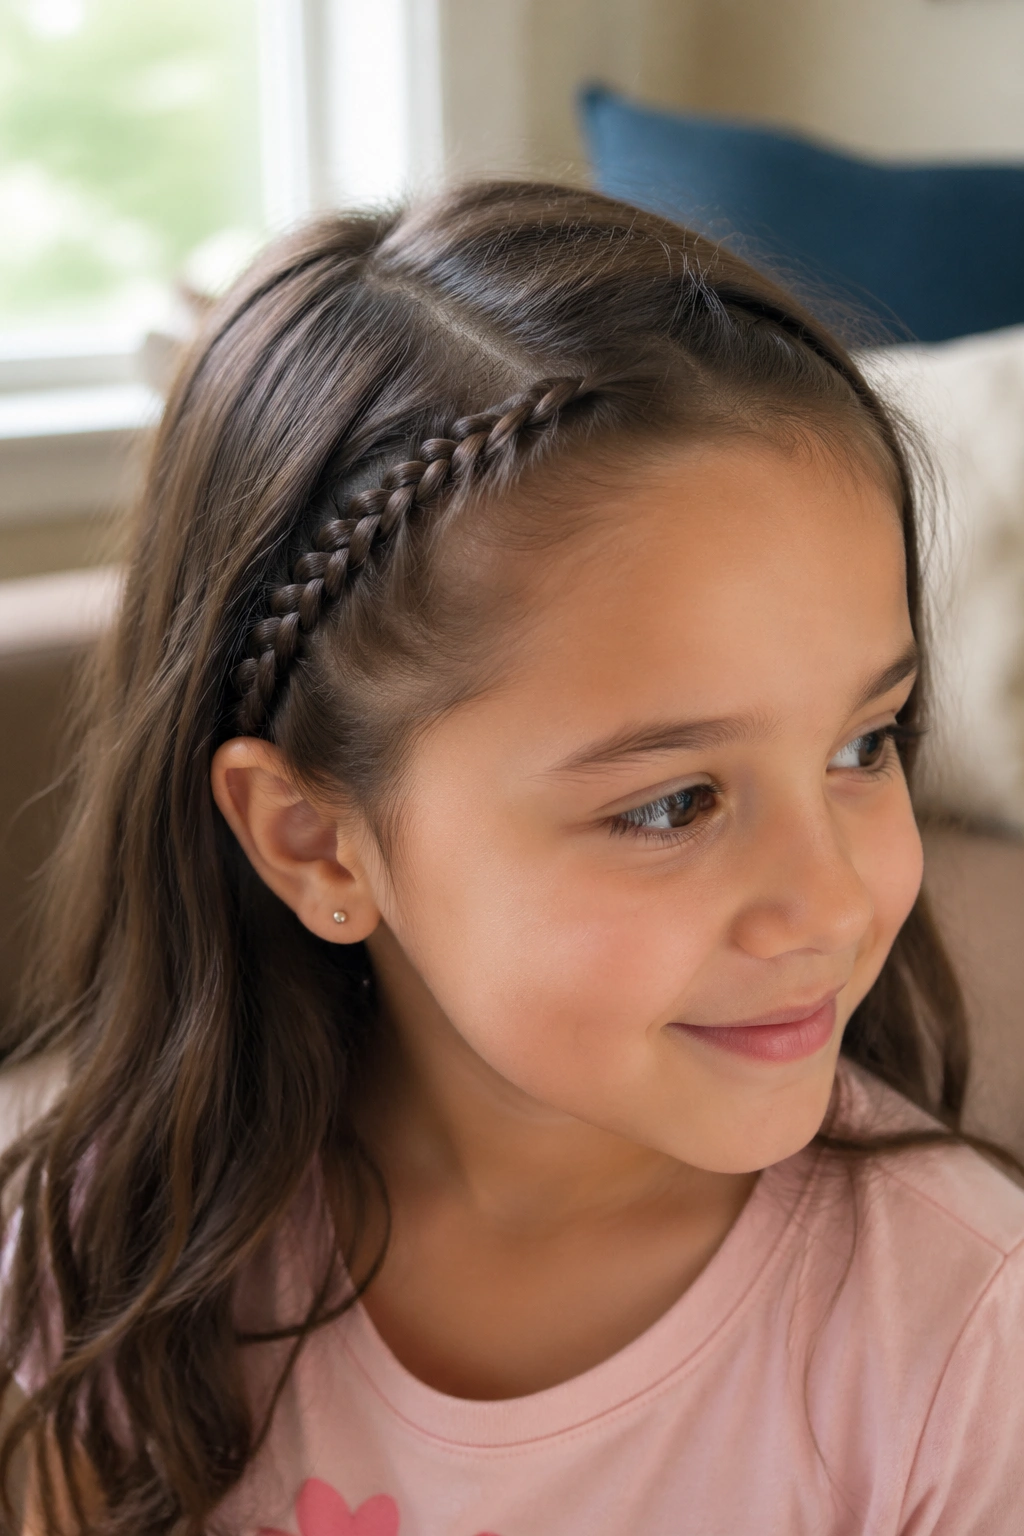
Want one detail that makes the whole hairstyle look more finished? Add a tiny accent braid near the hairline.
This works especially well for kids who are growing out bangs or have curls that pop loose around the face. A small braid tucked near one temple keeps those pieces under control without taking over the entire style. It can sit alone, blend into loose hair, or tuck behind the ear with a clip.
Where to Place It
- Along one temple for a soft side detail
- On both sides if you want symmetry
- Just behind the bang area to keep eyes clear
- Under a headband when you want the braid to stay subtle
The big mistake here is pulling too tight. An accent braid should look like it belongs to the style, not like it is guarding the front of the head. Keep it loose enough to move a little, and it will sit better for longer. On school mornings, small braids like this are often the smartest ones.
17. Space Buns with Braided Pigtails
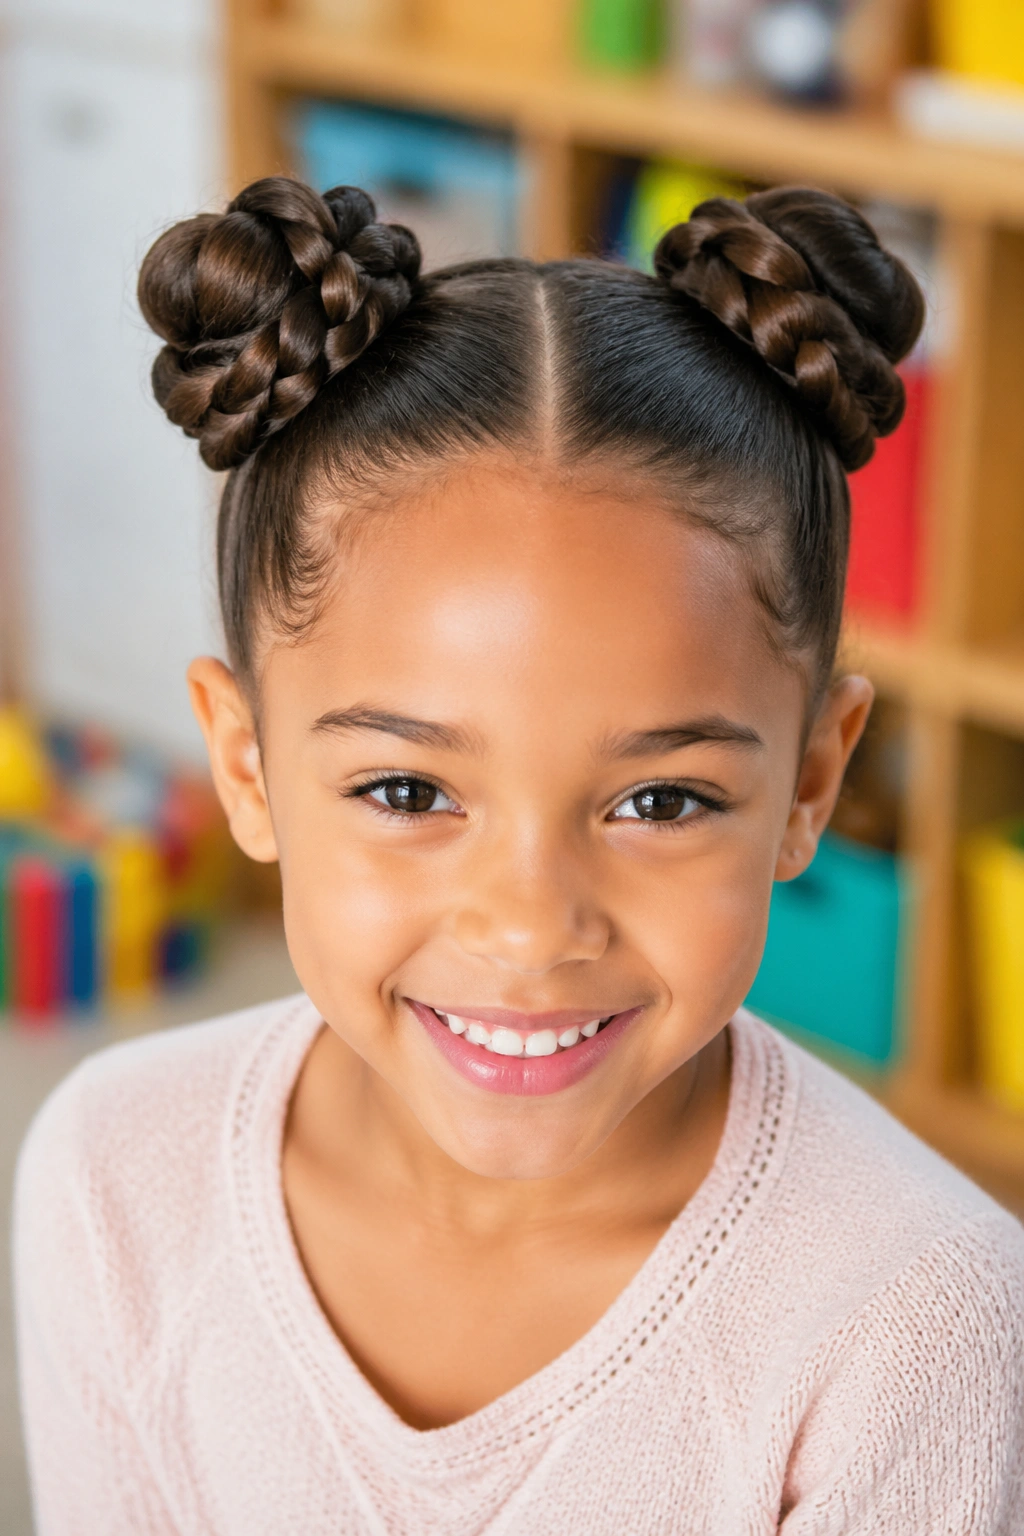
Want a style that can survive running, jumping, and an overexcited backpack toss? This is one of the better bets.
Start with two pigtail sections, braid each one, then coil the braids into buns on either side of the head. The braid gives the bun shape and grip, which keeps the ends from fraying out by lunchtime. It also turns a simple pigtail into something more playful without needing a lot of extra skill.
The parting matters more than people think. A clean center part makes the style balanced, and two small elastics at the base keep the braids from loosening before you wrap them. If the child has thick hair, you may need a couple of extra pins to hold the buns in place. Fine hair usually cooperates with fewer.
I like this style for active days because it stays cheerful-looking even after a rough morning. That counts for a lot.
18. Zigzag Part Braids
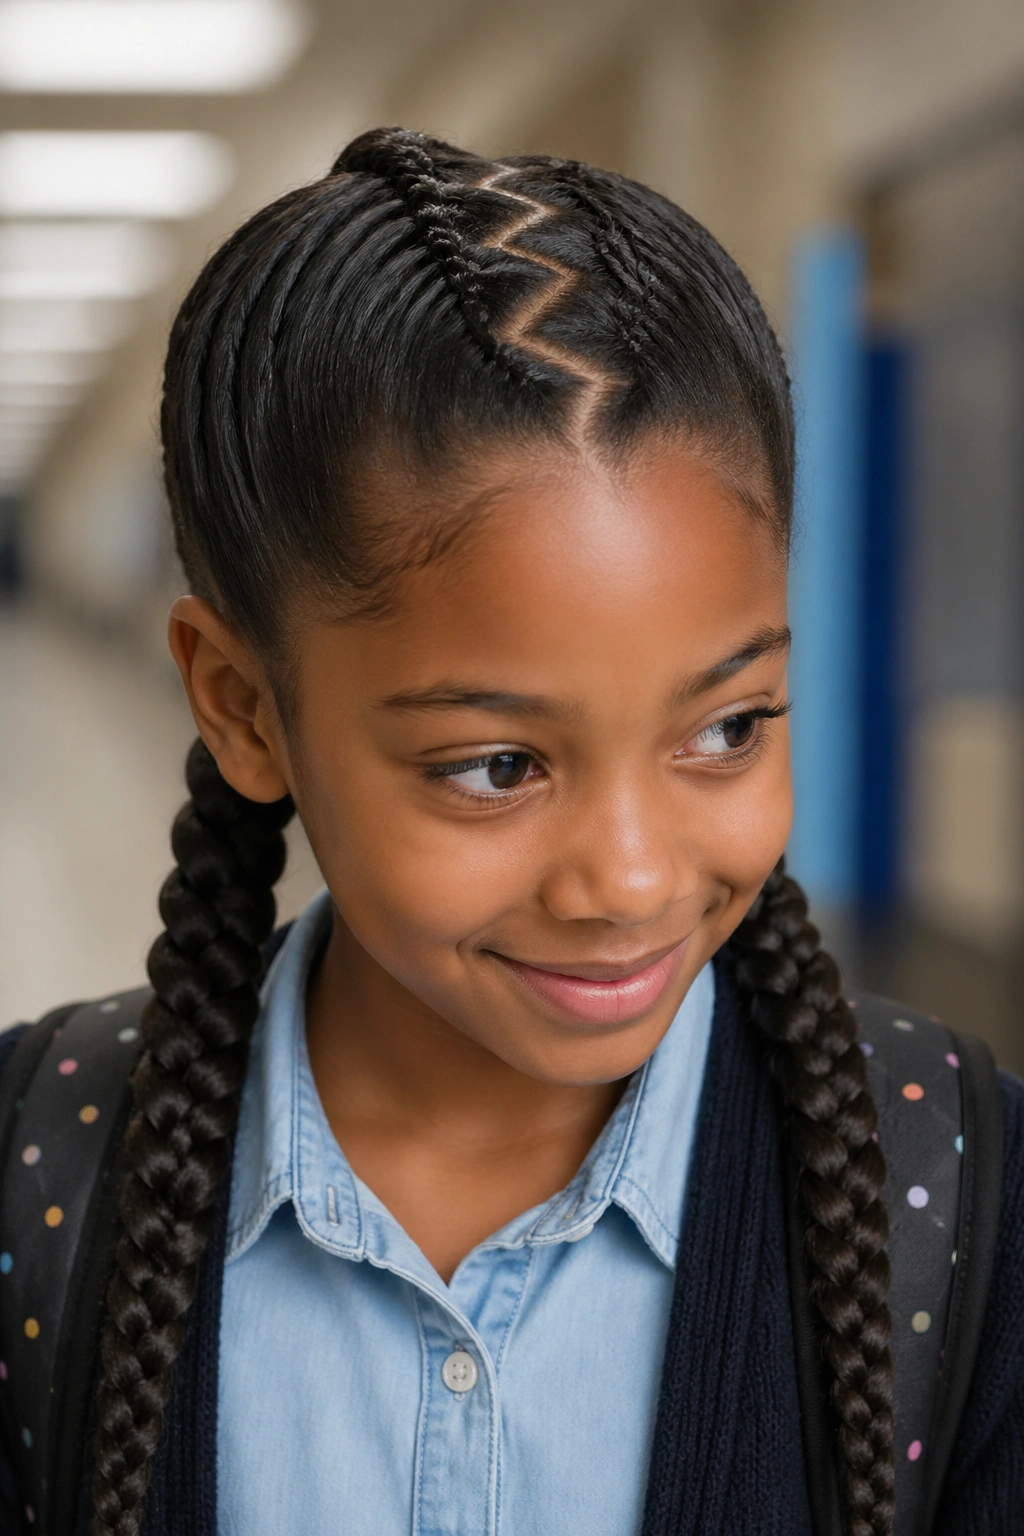
A zigzag part can make two very simple braids look like you spent more time than you did.
The braiding itself is basic. The part is the part — literally. Use the tip of a rat-tail comb to carve a zigzag line from forehead to crown, then create two braids, pigtails, or braided ponytails from there. The pattern gives the whole style energy, even if the actual braid is the same old three-strand style you have done a hundred times.
On coily or very textured hair, make the zigzags a little wider so the part stays visible and does not blur into the hair. On fine hair, keep the line crisp and shallow. You do not need a ruler. You do need a calm hand.
This is a good choice when a child wants something special but not fussy. The part gives the style personality. The braids keep it practical. Nice balance.
19. Ribbon-Woven Braids
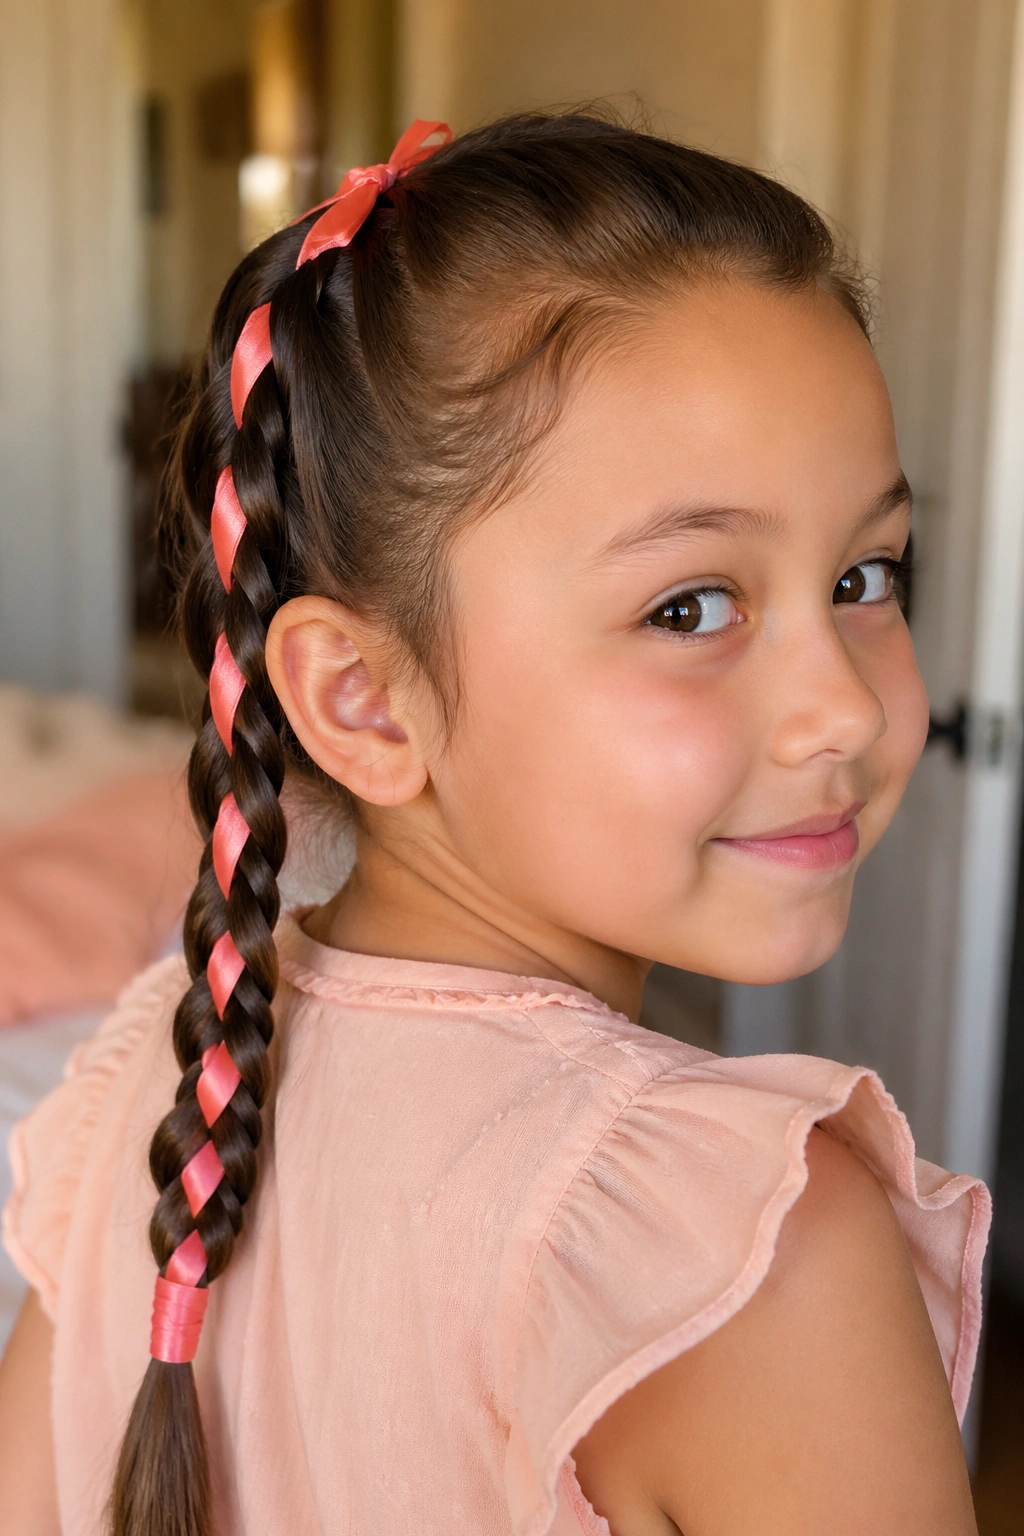
A ribbon-woven braid is one of those school hairstyles that looks more deliberate the moment you add a narrow strip of color.
Pick a ribbon that is about 1/4 to 1/2 inch wide and long enough to trail with the hair — roughly the same length as the braid, plus a little extra for tying. A grosgrain ribbon usually behaves better than something slippery. Satin can slide around and make the braid harder to keep neat, which is not what you want when time is short.
A Few Things That Help
- Tie the ribbon in at the top so it stays anchored
- Keep it flat as you braid so it does not twist
- Choose a color that shows up against the hair
- Trim the ends after the braid is secure so nothing frays
I like this style for special school days because it feels cheerful without being loud. It also works well when you want the braid itself to stay simple and let the ribbon do the decorating. That saves time and keeps the braid from looking overworked.
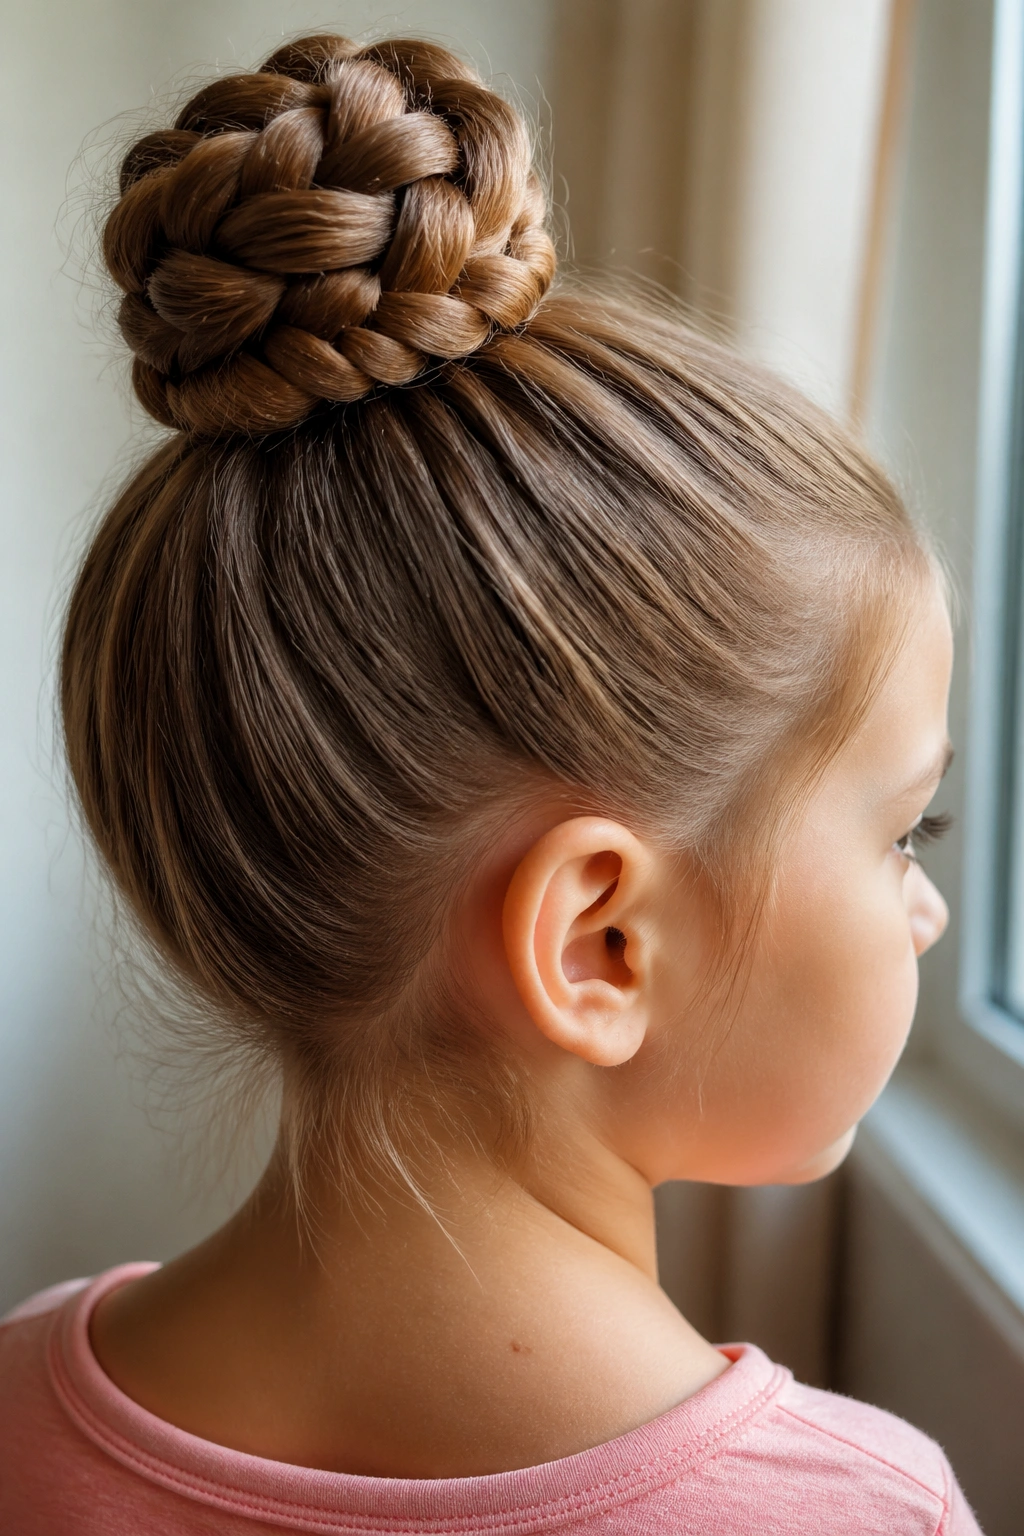
20. French Braid into a Bun
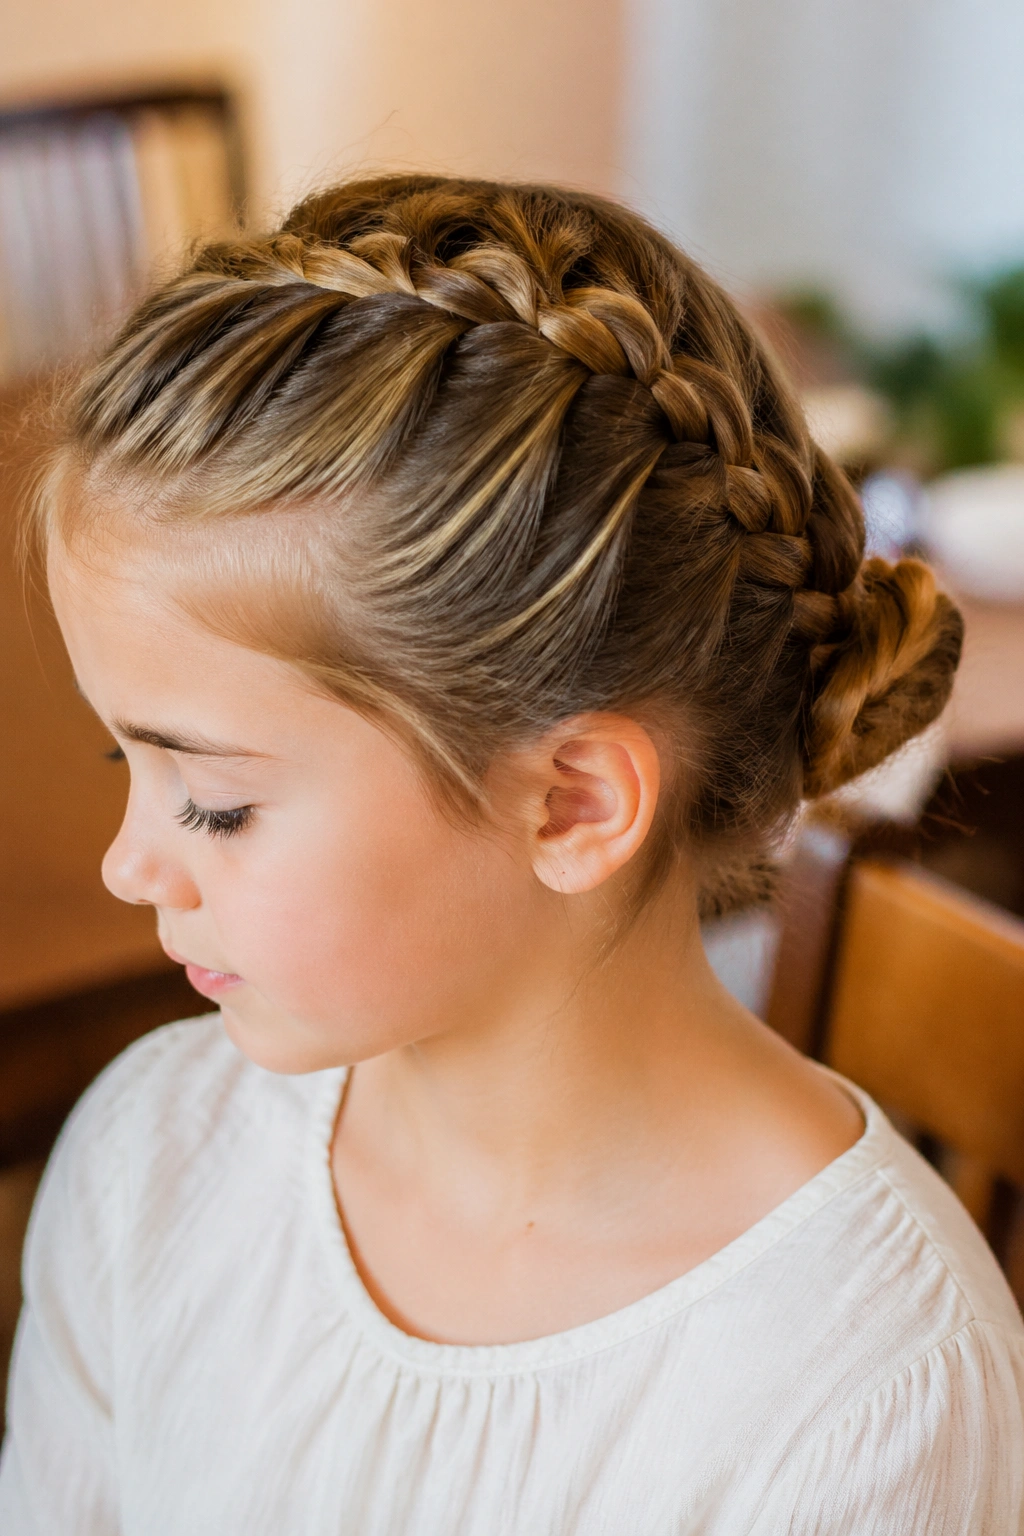
This is one of the smartest ways to keep hair under control on a day when the neck gets warm or the schedule runs long.
Start with a French braid at the crown, work it down toward the nape, then twist the remaining length into a bun and pin it in place. The braid does the front-half work, which means the bun does not have to fight flyaways on its own. That combination is why the style stays neater than a plain bun on most kids.
Unlike a loose bun, this version has structure built in. The braid gives the bun a solid base, and the bun gives the braid a clean finish. It is a good pick for uniforms, concerts, assemblies, or any school day when you want hair off the face and off the collar.
Use two elastics if the hair is heavy. Add three or four bobby pins around the bun itself. If it still feels loose, pin at the base first. That is where the weight sits.
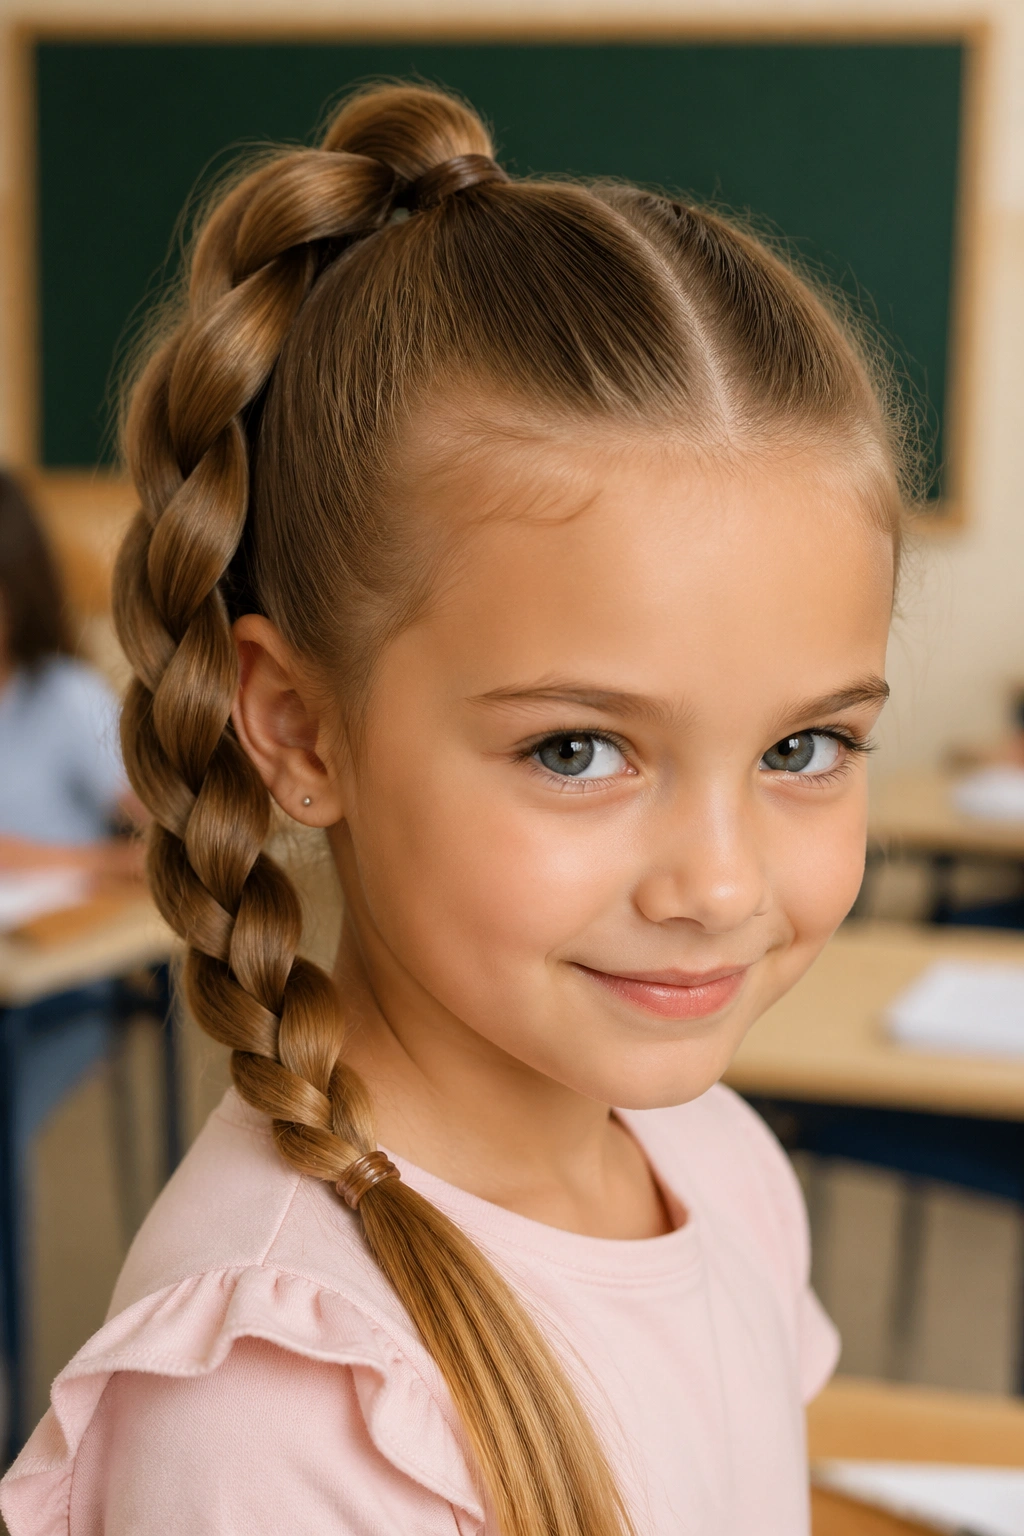
21. Dutch Braid into a Ponytail
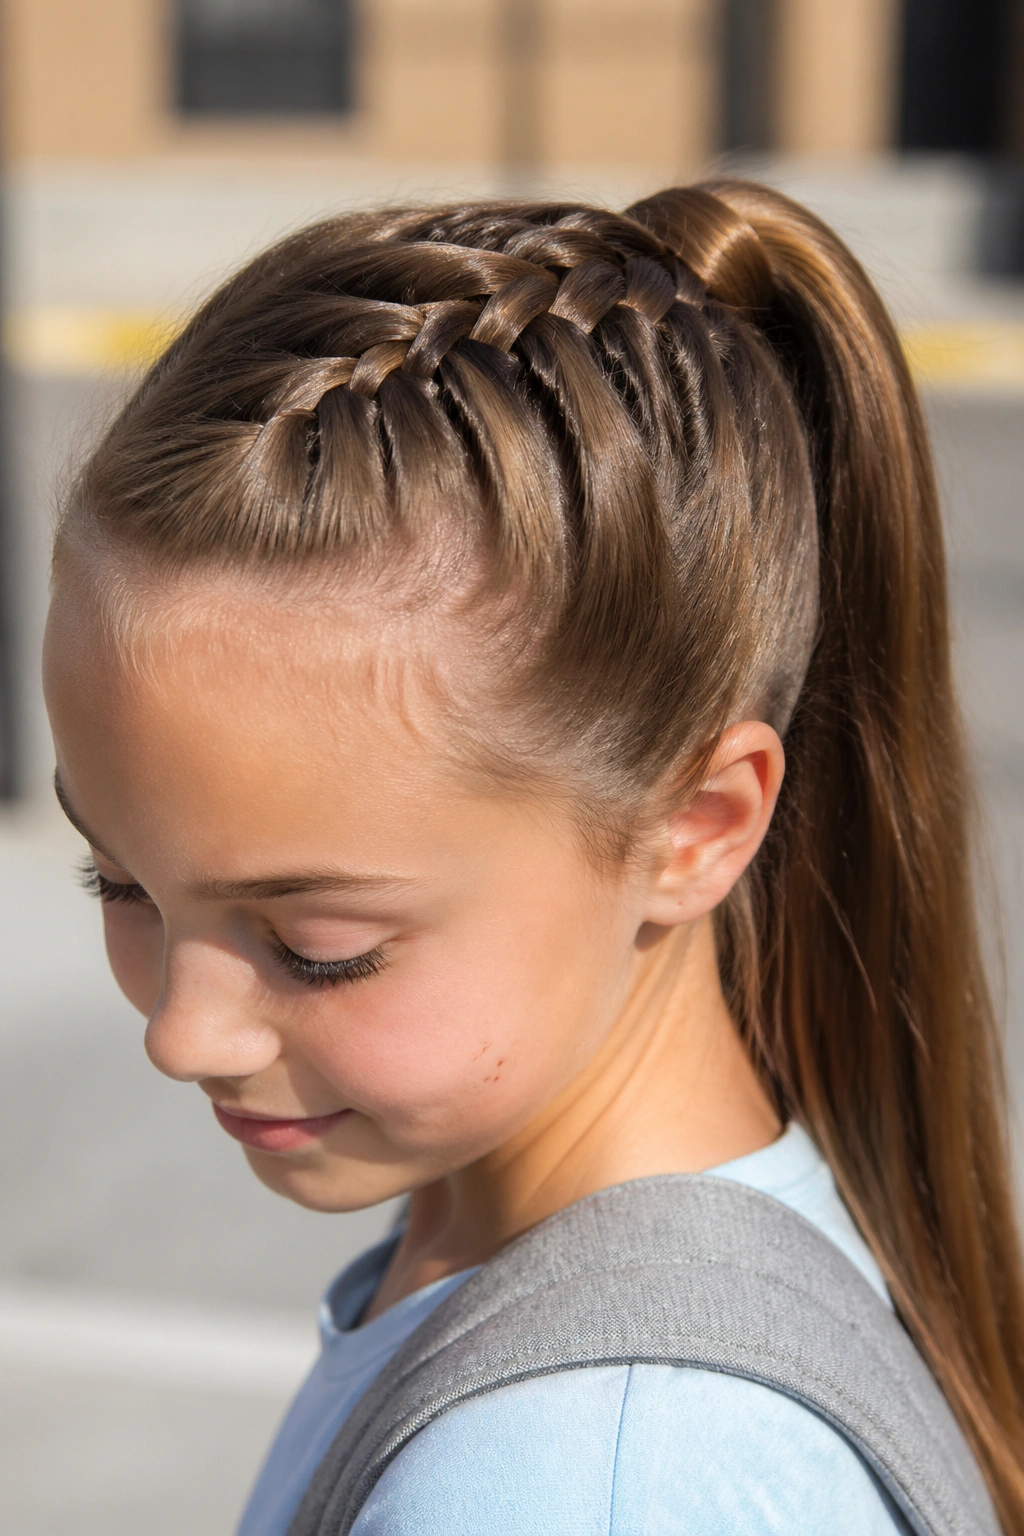
A Dutch braid into a ponytail is the compromise style for mornings when a full braid feels like too much but a plain ponytail feels too bare.
You start the Dutch braid at the hairline, keep it tight enough to hold the front, then stop around the crown or upper back of the head and gather the rest into a ponytail. That gives you the raised braid detail at the top and the speed of a ponytail at the bottom. Clean front. Fast finish. No overcomplication.
It works especially well on thick hair because the braid controls the front section before the ponytail takes over. On straight hair, a little texture spray at the roots can help the braid hold. On curly hair, finger detangling before you start keeps the parting clearer and saves you from fighting the whole head at once.
This is the style I’d reach for when the child wants something that looks braided but still moves around easily at recess. It does both jobs without dragging out the morning.
22. Braided Bun
The braided bun is the rescue style I keep in my back pocket.
You can build it from a low braid, a side braid, or even a braid that starts at the nape and runs into a twist. Once the braid is finished, coil it into a bun and secure it with one elastic plus a few pins. It takes hair that would otherwise flop, frizz, or fall apart by lunchtime and turns it into something tidy enough to get through the day without another round of fixing.
There’s a nice honesty to this one. It does not pretend to be delicate. It just works. If the braid looks a little imperfect before you wrap it, that is fine. The bun hides a lot, and the overall shape still reads as neat and intentional.
For rushed school mornings, this is often the one I end up choosing. Not because it is the fanciest braid on the list. Because it is dependable, quick, and good at making a rough morning look pulled together before the backpack even hits the floor.