Coquette braids with bows and pastel ribbons do what slick ponytails can’t: they soften a face in seconds and make even second-day hair look intentional. The trick isn’t piling on more decoration. It’s choosing braid shapes that hold their line and ribbon details that sit where the eye actually lands.
A good ribbon braid has a little tension at the crown, a little looseness through the length, and one clear focal point. Too many tiny bows can start to look fussy. One bow at the right spot, or a ribbon woven all the way through a braid, usually does more work than a whole box of clips.
These styles lean into that sweet, slightly old-fashioned feel people reach for when they want their hair to look soft but still arranged. Some are fast enough for a school run or brunch. Others take a few extra minutes and a mirror that doesn’t wobble.
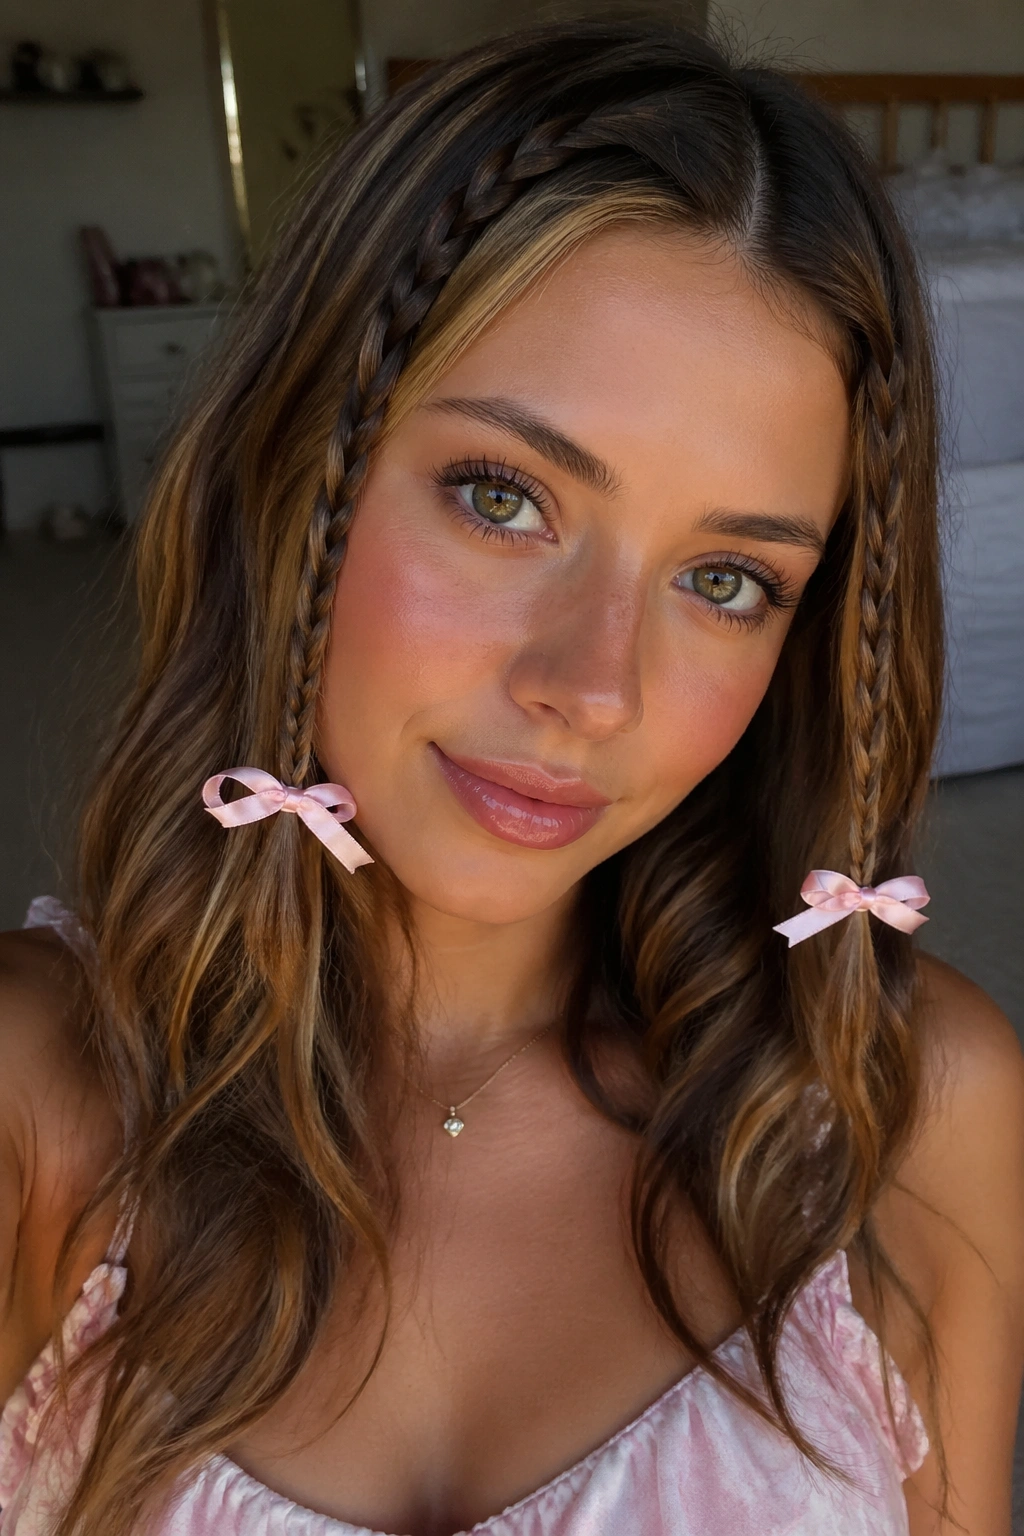
1. Mini Coquette Face-Framing Braids With Baby Pink Bows
Face-framing braids are the easiest place to start because they don’t ask much from the rest of your hair. You take two slim sections near the temples, braid each one, and finish with tiny baby pink bows just below cheekbone level. That placement matters. Too high and the bows disappear into the hairline; too low and the effect gets sleepy.
Why this one works
The neat little braid line keeps the style from reading like a random clip job, while the bows give it that soft, doll-like finish people want from coquette hair. I like this style on loose waves, straight hair, and even messy curls that need a little order at the front.
- Use 1/4-inch ribbon if you want the bows to stay delicate.
- Tie each braid with a tiny clear elastic first, then knot the ribbon over it.
- Keep the braids narrow, about 1/2 inch wide, so the front pieces still feel airy.
- Leave the rest of the hair down or pin it half-up for a gentler look.
Best move: match the ribbon color to your blush or lip color. It sounds small. It makes the whole style feel pulled together.
2. Twin Dutch Braids Threaded With Lavender Ribbon
Twin Dutch braids have a little more backbone, which is nice if your hair slips out of everything else. The ribbon gets threaded through the center of each braid, almost like a stitched seam, and lavender is a smart choice because it shows up without screaming for attention. The braid itself stays the star.
A Dutch braid sits on top of the hair instead of sinking into it, so the ribbon lands in plain view from every angle. That’s the point. If you’re wearing a ribbon, let people see it. Satin works well here because it glides through the braid without snagging every few inches.
I’d keep the ribbon width to 3/8 inch or 1/2 inch. Wider than that, and the braid starts to bulge. Thin and neat is better. Pull the braid apart just a touch at the edges if you want a softer, fuller shape.
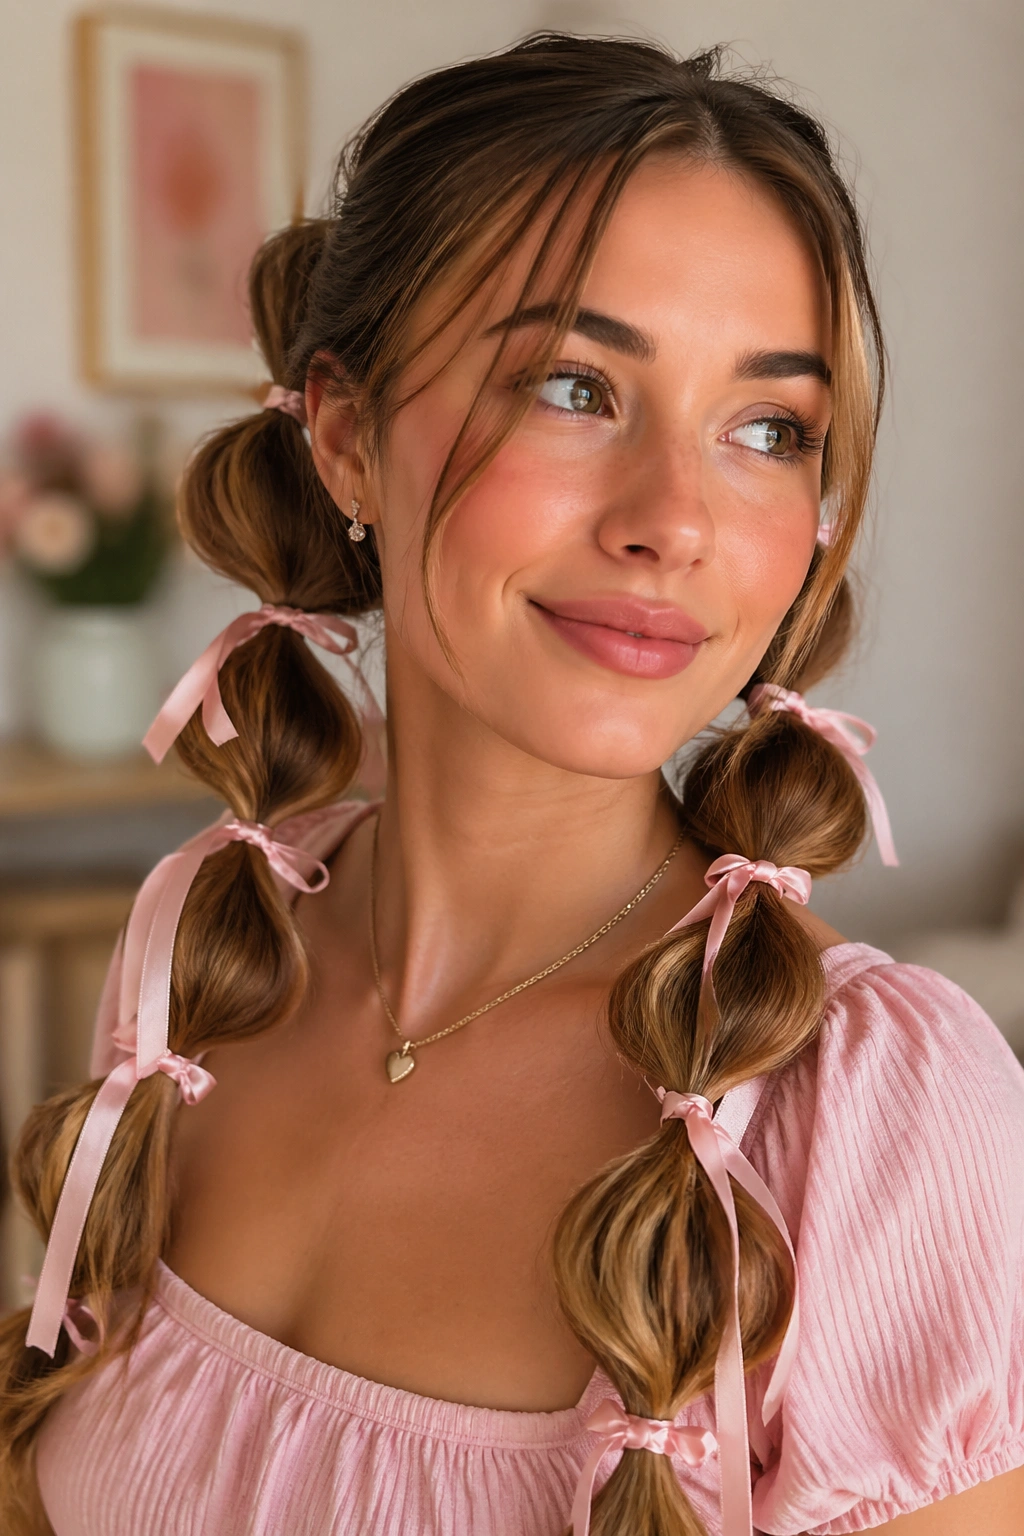
3. Bubble Braids Tied With Blush Ribbon
Bubble braids look playful before you even add ribbon, which makes them a very good fit for coquette hair. Split the ponytail into evenly spaced sections with clear elastics, about 2 to 3 inches apart, then wrap blush ribbon around each elastic so every bubble gets its own little finish.
The fun part is how forgiving this style is. Your sections do not need to be identical. Slightly uneven bubbles can actually look more natural, especially if the ribbon tails are left a bit long. That gentle messiness keeps the style from feeling stiff.
If your hair is thick, this is one of the easiest ribbon looks to hold. If your hair is fine, tug the sides of each bubble outward before tying the ribbon so the shape has more body. It reads sweet, but it also has a little attitude.
4. Crown Braid With an Oversized Ivory Bow
A crown braid wants a focal point, and an oversized ivory bow gives it one without making the style look crowded. The braid wraps around the head like a halo, then the bow sits at the nape or just behind one ear, where it breaks the circle and keeps the shape from feeling too formal.
This style is one of my favorites for hair that’s been lightly waved first. The texture helps the braid grip better, and the crown line looks softer, less “done.” If the braid feels too neat, gently press the outer loops with your fingers to loosen it. Not too much. You want structure.
What to watch for
- Pin the braid with bobby pins that match your hair color so they disappear.
- Choose a bow with a slightly wider tail; it reads richer than a tiny knot.
- Keep the crown braid close to the hairline if you want a true coquette feel.
- Use a satin bow if the braid itself is detailed, or you can end up with too many textures fighting each other.
5. Half-Up Pigtail Braids With Satin Ribbon Ends
Half-up pigtail braids are pure charm when you finish them with satin ribbon ends. The look is simple: two braids start near the temples, travel back toward the crown, and stop at the midpoint of the head, where they’re tied off with ribbon that drapes over the remaining hair.
How to keep them sweet, not childish
The shape matters more than the decoration. Keep the part clean and the braids tight enough to stay lifted, then soften the crown with a tiny pinch of volume. That tiny lift changes everything. It makes the style feel airy instead of school-day plain.
- Part the hair in the center for symmetry.
- Braid each side to the same stopping point.
- Tie with 6 to 8 inches of ribbon tails if you want visible movement.
- Let the rest of the hair fall in waves or soft bends.
I like this one because it works on shoulder-length hair as well as long hair. You do not need waist-length strands to make it look finished.
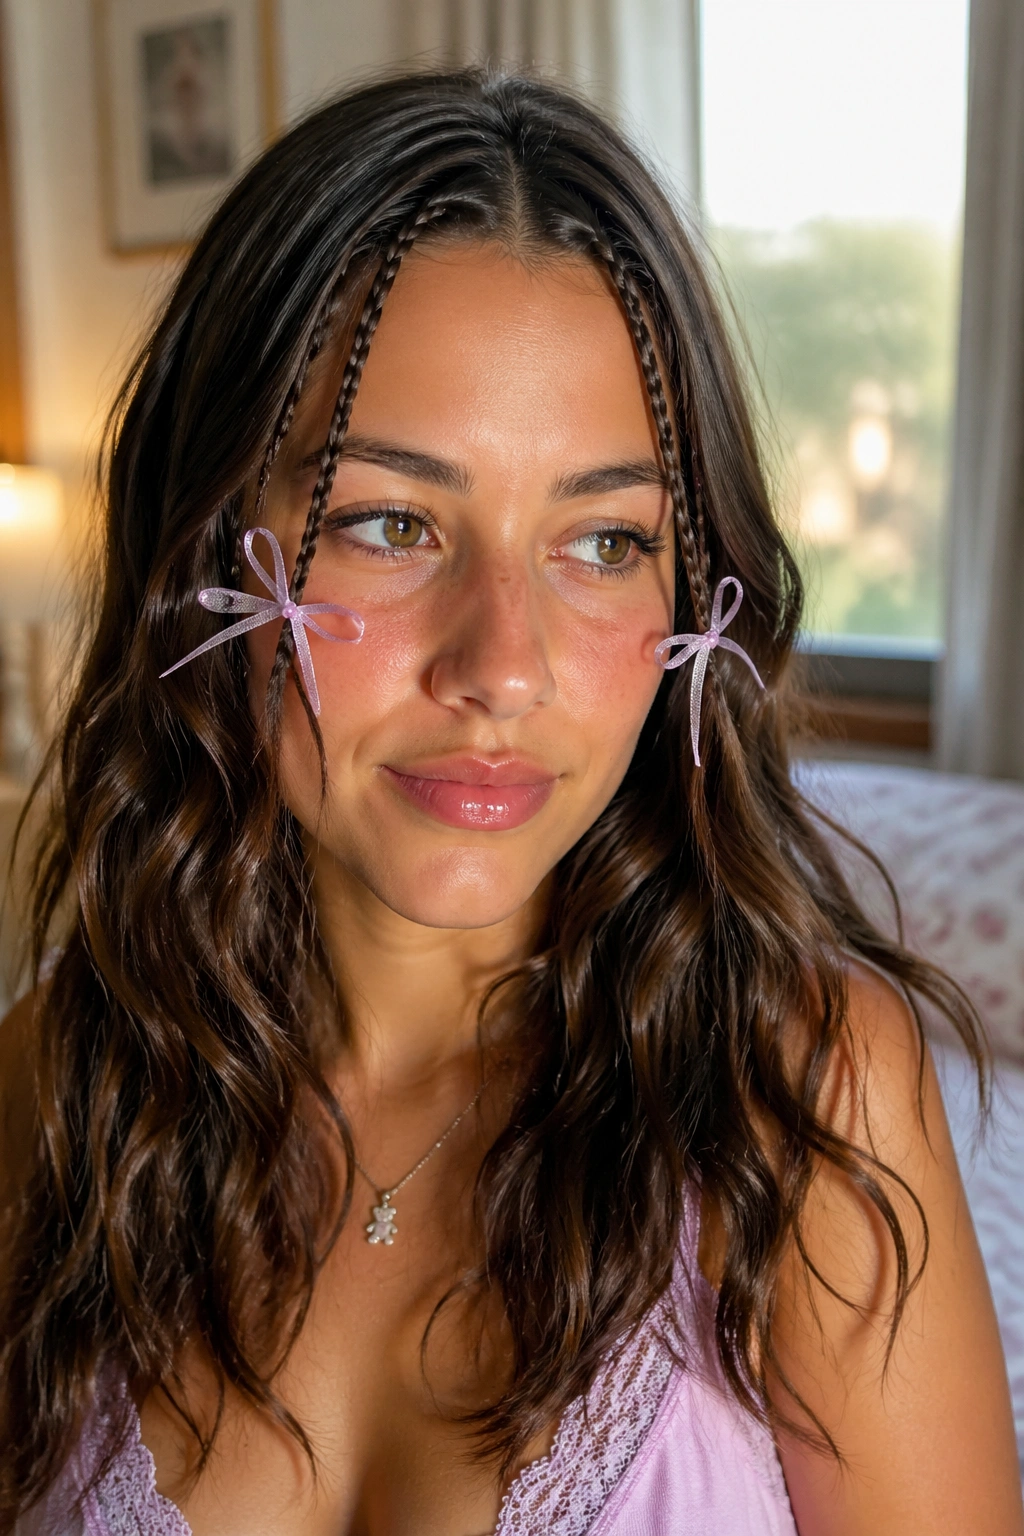
6. Micro Braids at the Hairline With Loose Waves
Micro braids at the hairline are tiny, but they carry a lot of visual weight. Just two or three slim braids near the front can change the whole face shape, especially when the rest of the hair is left loose and softly waved. Add pastel bows at the ends, and the style goes straight into coquette territory without turning fussy.
This one works best when the braids are super narrow, almost pencil-thin. A chunky front braid can overpower the face. Tiny braids do the opposite. They frame the eyes, show off a middle part or curtain fringe, and let the ribbon sit like a small finishing note.
I’d keep the bows small here. Think nail-sized rather than palm-sized. Bigger bows can crowd the temples. The best version feels almost like an accessory someone slipped in last minute, which is exactly why it works.
7. Side Braid With a Ribbon Ladder
Can a side braid feel soft and polished at the same time? Yes, if you treat the ribbon like part of the braid instead of a separate add-on. A ribbon ladder means you weave a narrow pastel strip over and under the braid’s crossings so the color peeks through in regular intervals.
That little rhythm gives the braid a dressed-up feel without making it heavy. I like this on one-shoulder outfits, open collars, and dresses with a plain neckline, because the braid sits off to one side and gives the whole outfit a clear shape.
How to use it
- Start the braid behind one ear and angle it down toward the opposite shoulder.
- Use a ribbon that is slightly shorter than the braid, so the ends don’t tangle.
- Keep the braid moderately tight at the top and softer near the bottom.
- Finish with a small bow under the braid tip rather than on top of it.
The side angle does the flattering work here. The ribbon just makes it harder to ignore.
8. French Braid Into a Low Bow Knot
A French braid that ends in a low bow knot has that neat-start, soft-finish contrast that coquette styling loves. The braid begins cleanly at the crown, catches the sides of the hair as it goes, then stops at the nape where the ends are tied into a low knot with a bow sitting right under it.
The visual trick is restraint. You want the top of the braid to look precise, almost tailored, while the bottom feels loose enough to soften the neck. That mix keeps the style from reading too severe. A blush or cream ribbon works well because it lightens the base without stealing attention from the braid line.
If your hair is layered, tuck the shorter pieces into the braid as you go. Don’t fight the flyaways too hard. A few soft wisps around the ears make the whole thing feel less formal.
9. Braided Bun Wrapped in Pastel Ribbon

A braided bun is the style I reach for when I want the ribbon to feel like part of the architecture, not a decoration slapped on top. Braid the hair first, coil it into a bun, then wrap pastel ribbon around the base once or twice before tying the bow on the side.
The ribbon should be snug enough to stay put, but not so tight that it cuts into the braid. A flat satin ribbon works better than a stiff grosgrain here because it settles against the hair instead of sticking out at odd angles. If your bun is low and slightly loose, the ribbon gives it shape. If the bun is very sleek, the ribbon breaks up the stiffness.
One nice detail: leave the bow tails uneven. One long, one short. It feels a little less choreographed, which I think helps the style more than perfect symmetry ever does.
10. Fishtail Braid With Long Tails of Ribbon
Fishtail braids already have that fine, woven texture that looks prettier the longer you stare at it. Add one pastel ribbon running through the center, and the braid turns into a soft line of color instead of a plain plait. Long tails of ribbon at the end make the style feel more romantic than tidy.
What makes it different
The tight crisscrossing of a fishtail braid can handle a thinner ribbon than a three-strand braid can. That’s a good thing. A narrow ribbon slips through the braid more cleanly and doesn’t break up the pattern. I’d use 1/4-inch satin or even a thin velvet cord if you want a little texture.
- Pull the fishtail apart gently at the sides after braiding.
- Let the ribbon hang at least 4 to 6 inches below the tie.
- Keep the top close to the scalp if you want the color to show more.
- Use this on long hair, where the pattern has room to breathe.
The whole look gets better if the braid is slightly imperfect. Fishtails are happier that way.
11. Waterfall Braid With Tiny Bows
A waterfall braid looks airy because pieces drop through it on purpose, and that built-in movement makes it a natural home for tiny bows. The bows can sit where each dropped section would have fallen, or you can place them along the braid line like little pauses. Either way, the style stays light.
I like this braid on hair with loose bends because the curves echo the braid pattern. Straight hair works too, but the result feels sharper. If you want softer lines, curl just the ends with a one-inch iron before braiding. Not the whole head. Just the lower half.
Tiny bows are the right scale here. Three small bows are enough. More than that starts to distract from the waterfall shape. One at the temple, one near the ear, one near the back? Lovely. More than that? A bit much.
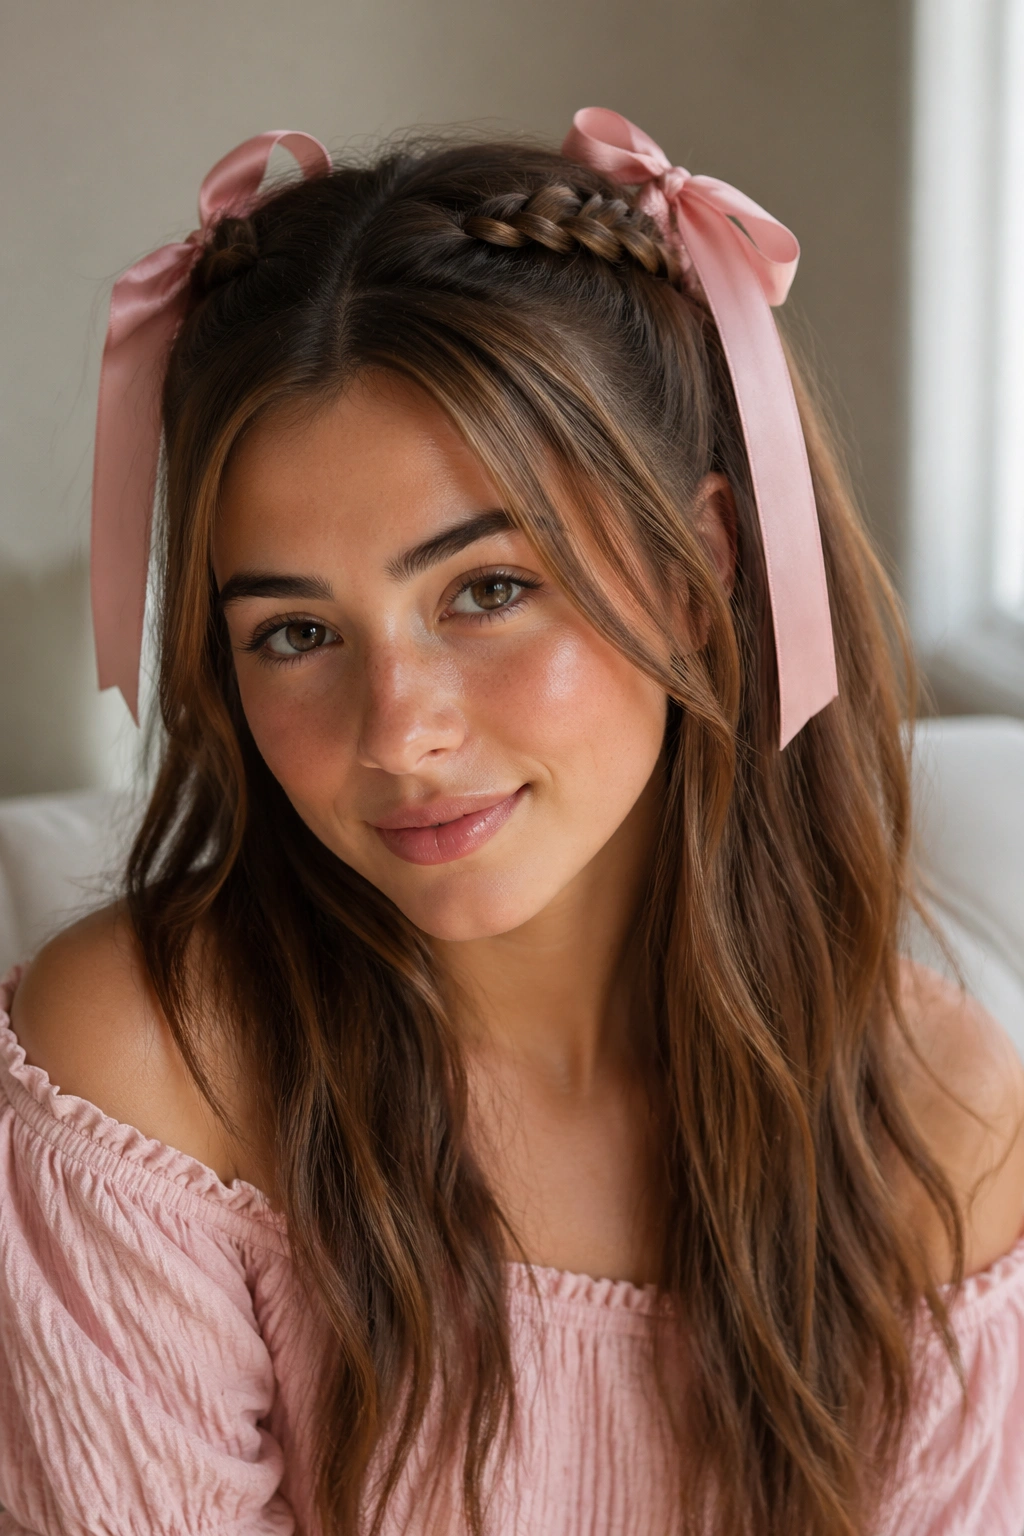
12. Coquette Headband Braid With Satin Ribbon

A braided headband is one of those styles that looks far more intricate than it is, which is always satisfying. You braid a slim section from behind one ear across the top of the head, pin it like a headband, and finish with a satin ribbon bow just above the opposite temple. The rest of the hair stays down.
This is a good choice if you want the front of your hair controlled but don’t want a full updo. The braid acts like built-in hair jewelry. It also keeps the line of your face open, which makes soft makeup and flushed cheeks stand out more. That’s part of the coquette mood too.
If the braid is too tight, it can look severe. Leave a tiny bit of slack, and keep the ribbon soft rather than stiff. Cream, pale blue, and pink all work. I’d skip anything shiny enough to look plastic.
13. Low Pigtail Braids With Gingham Bows
Low pigtail braids have a quiet charm that feels almost nostalgic. Split the hair cleanly down the center, braid both sides just below the ears, and tie each end with a small gingham bow. The checked pattern gives the look a picnic feel without going full costume.
The best part is the low placement. It keeps the braids from looking juvenile and gives the bows a calmer setting. If the hair is very thick, braid loosely so the pigtails lie flatter against the neck. If the hair is fine, tighten the first inch at the roots, then relax the rest for more body.
I’d keep the bows small and neat. Gingham already brings pattern, so you do not need giant loops. A little checked bow at each end is enough to make the braid feel finished.
14. Rope Twists Finished With Pastel Ties
Rope braids are underrated because they have a clean twist pattern that looks especially good when the hair is slick or freshly brushed. Twist two sections together, then secure the end with a pastel tie or ribbon. The shape is simple, but it gives you a shiny, polished line that reads more thoughtful than a basic ponytail.
The twist pattern is what makes this style work on shorter layers. Rope braids hold together better than many people expect, and they don’t rely on lots of tiny sections. That makes them handy when your hair is smooth and slippery, or when you want a style that won’t collapse halfway through the day.
A pastel tie at the end keeps it in the coquette lane. Soft lilac, pale mint, or dusty rose all look good. If you want the twist to look fuller, tug it gently once it’s tied off. Just a little.
15. Crisscross Braids With Mini Bows at the Part
Crisscross braids bring a bit of geometry into the picture, which sounds less sweet than it looks. Tiny braids cross over each other near the part line, then each crossing gets a mini bow tucked where the sections meet. It’s neat, detailed, and a little flirtier than a straight center part.
Where the bows should go
The best placement is close to the scalp, not floating halfway down the head. When the bows sit near the crossing points, they echo the braid pattern instead of covering it. That keeps the detail readable.
- Use two or four mini braids, depending on how busy you want the style.
- Keep the bows the same color for a clean look, or alternate two pastel shades.
- Pin the crossings flat so the braid line does not puff up.
- Leave the rest of the hair straight or softly waved.
I like this style for a party or a dressier day because it has that “I paid attention” feeling without asking for a huge amount of time.
16. Pull-Through Braid With Ribbon Loops
A pull-through braid is one of the easiest ways to fake a thick, full braid when your hair is medium or fine. It uses little ponytail sections stacked down the back, which means the shape stays bold. Add ribbon loops between the sections, and you get a coquette version that feels playful but still controlled.
This is the style for people who like structure. Each loop can be puffed outward a little, then tied off with ribbon at the end of a section. The result is a braid that looks almost braided and partly tied together, which sounds odd and looks charming. Use a ribbon that isn’t too slippery, or the loops will slide loose.
If you’re new to ribbon styles, this is a forgiving place to start. You can hide the elastics under the ribbon, and the braid still looks good if one section ends up slightly bigger than the next.
17. Milkmaid Braids With Soft Bow Tails
Milkmaid braids have that classic wrapped-around-the-head shape that feels instantly feminine, almost old photo album sweet. Two braids loop over the crown and meet at the opposite side, where soft bow tails can hang behind the ear or toward the nape. The bow tails make the style less severe than a bare pinned braid.
The key is keeping the braids loose enough to feel soft. Tight milkmaid braids can look a bit stern. A little looseness at the edges, plus a few face-framing strands, fixes that fast. I’d use satin or silk ribbon here because it settles into the braid instead of poking out like a wire.
One small thing matters a lot: tuck the braid ends under the wrapped sections, not over them. That keeps the shape smooth and helps the bow tails feel like the finishing touch instead of an afterthought.
18. Messy Braid With Lace Ribbon
A messy braid sounds casual, but lace ribbon gives it a quieter kind of romance. The braid can be loose, a little uneven, even slightly frayed at the edges. The lace ribbon softens all of that and turns the imperfection into part of the look.
This is one of the few coquette braids where I would not chase precision too hard. Pulling every section identical can kill the charm. Let a few shorter pieces slip free around the temples. Let the braid sit lower than you planned. The lace ribbon will handle the rest.
The trick is choosing lace that is light, not stiff. Heavy lace can drag the braid down and make the ends bulky. A narrow strip, maybe 1/2 inch wide, is enough. Tie it low and leave the ends just long enough to brush the shoulder.
19. Braided Ponytail With a Bow at the Base
A braided ponytail with a bow at the base is crisp, easy, and sharper than it sounds. Start with a high or mid ponytail, braid the tail all the way down, and tie a bow around the elastic at the base so it sits like a gift wrap detail. The whole thing feels cleaner than a loose braid and more polished than a plain pony.
The pony height changes the mood. High sits playful and bright. Mid sits softer. Low can feel almost elegant if the bow is satin and the braid is slightly loosened. I’m partial to the mid version because it gives the bow room to breathe without dragging the braid into formal territory.
If your hair is layered, braid the ponytail a little tighter at first so the shorter pieces stay inside the shape. After that, tug the braid apart a touch for softness. Not a lot. Enough to see the weave.
20. Four-Strand Braid With One Accent Ribbon
A four-strand braid looks more complex than a three-strand braid, which is part of the appeal. Add one accent ribbon as a fourth strand, and the braid gets a ribbon line that feels built in rather than attached later. The result is tidy, pretty, and a little more serious than the looser styles above.
A small technical note
If the ribbon is acting like a strand, it has to be long enough to move with the braid. Short ribbon ends are a headache. I’d start with at least 18 to 24 inches past the braid length so you have room to tie and trim.
- Keep the ribbon flat as you braid so it doesn’t twist.
- Pick a satin finish if you want the color to read clearly.
- Use this braid when you want one ribbon line, not a lot of scattered bows.
- A single pale ribbon strand works better than a busy pattern here.
This is the braid I’d pick when I want the ribbon detail to feel smarter and less sugary.
21. Heart-Part Braids With Matching Pastel Ribbons
A heart part turns the scalp into the first detail people notice, which is a bold move for a hairstyle that still wants to feel soft. Once the heart shape is carved into the part, split the hair into two braids and finish each one with matching pastel ribbons. Pink and lilac are the obvious choices, but pale blue can be lovely too.
The heart shape only works if it’s clean enough to read. Don’t try to freehand it with a dull comb in bad light. Take your time. Even a slightly uneven heart can still look sweet, but the main lines should be clear. After that, keep the braids simple so the part stays the focus.
This style feels best when the ribbons are the same width and tied at the same height. If one side is drooping and the other is tight, the heart loses its balance fast.
22. Braided Scarf Wrap Style With Satin Ribbon
Can a ribbon act like both accessory and braid support? Absolutely. In this style, a satin ribbon or narrow scarf is woven along one side of a braid, then wrapped around the base or tied near the nape so it reads as part of the finished shape. The effect is softer than a plain braid and more wearable than a full scarf style.
This works especially well when you want color near the face but don’t want to wear a bold headband. The ribbon sits close to the braid line and gives the eye a clean path down the hair. If the ribbon is slippery, anchor it with a tiny clear elastic before you start the braid. That one move saves a lot of fiddling later.
I like a slightly matte satin here. Too glossy, and the ribbon can look separate from the hair. A soft finish blends better.
23. Half-Up Topknot With Accent Braids and a Bow
A half-up topknot can lean plain fast. Accent braids fix that. Take two slim braids from the front or temples, pull them back into a small topknot, and tie a bow under the knot so the ribbon peeks out from below instead of sitting on top like a gift tag.
Why I keep coming back to this one
The style gives you height at the crown, shape at the temples, and enough looseness through the back to keep it relaxed. That mix is what makes it work. It doesn’t need perfect symmetry, either. Slightly uneven accent braids are fine, even better if you’re going for a softer face frame.
- Use two accent braids about 3/8 inch wide.
- Keep the topknot small so the bow does not get lost.
- Choose a ribbon with a little body, not one that flops flat.
- Let a few front pieces fall free for softness.
This is one of the most wearable coquette braid looks in the whole set.
24. Long Coquette Side Braid With a Bow Cascade
A long side braid with a bow cascade is the style I’d hand to someone who wants the ribbon idea to stay visible all day. The braid starts off to one side, travels over the shoulder, and gets interrupted by two or three small bows spaced down the length like little markers. The final bow can be larger, almost like a full stop at the end.
The spacing matters more than the ribbon color here. If the bows are packed too close together, the braid looks crowded. Leave at least a few inches between them so each one has room. That little bit of air makes the braid feel elegant instead of overworked.
I’m fond of this one because it has range. Wear it with a plain tee and it looks deliberate. Wear it with a dress and it reads more dressed up without needing any extra accessories. If you only try one style from this list, make it this one. It carries the coquette mood without getting precious, and that’s a nice place to land.