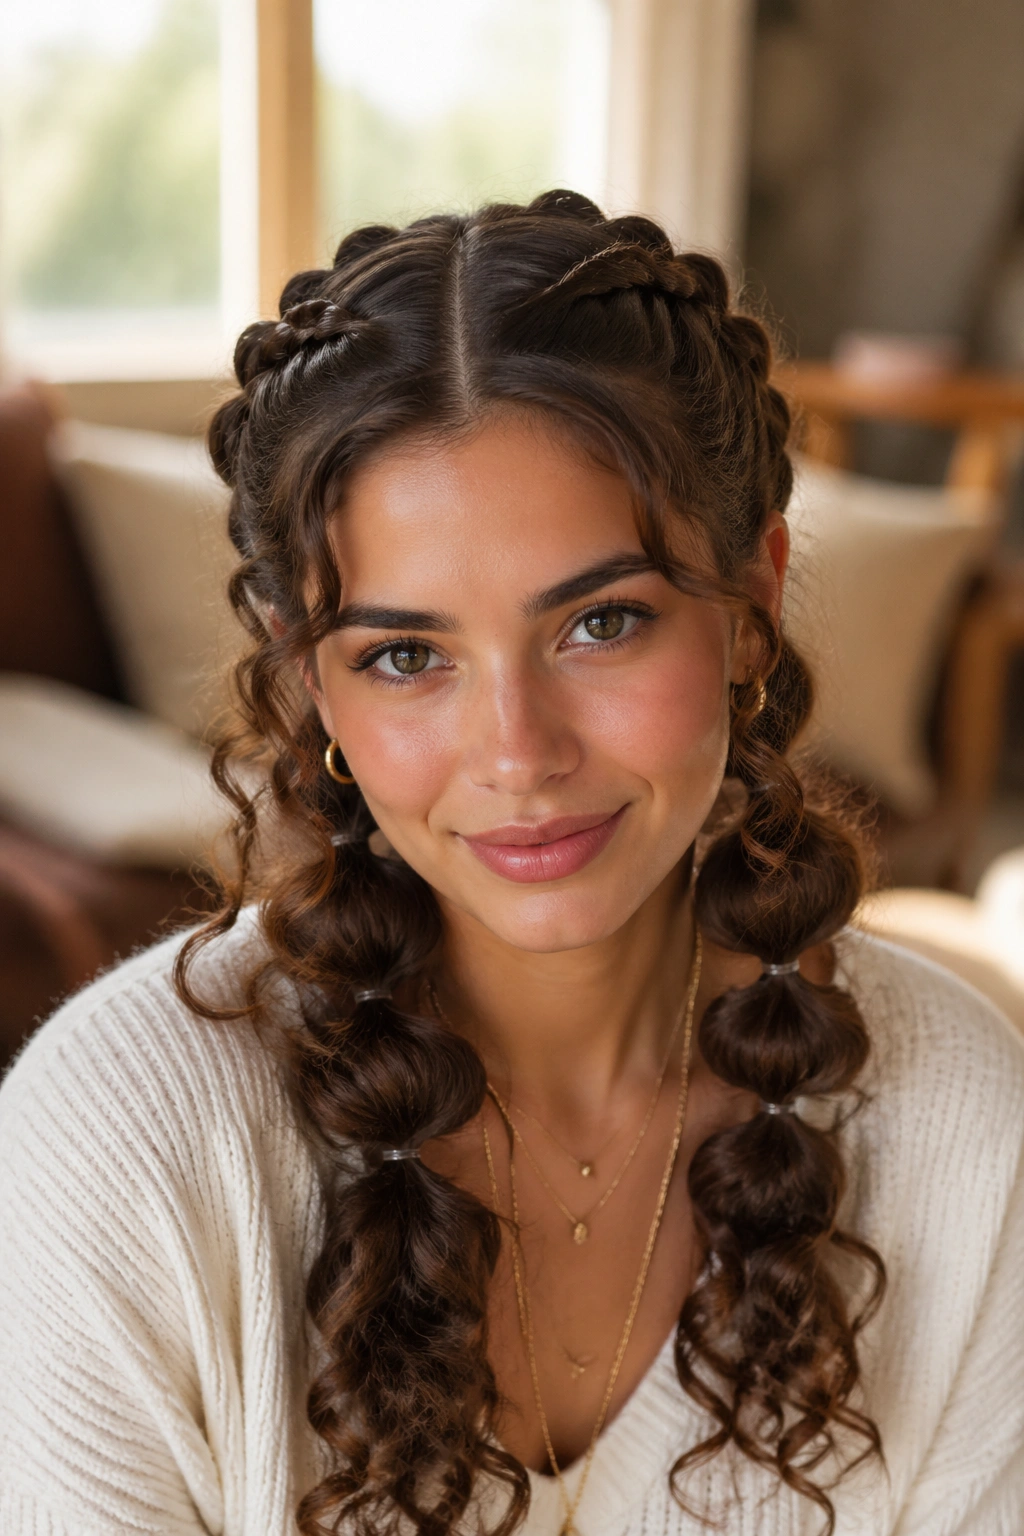
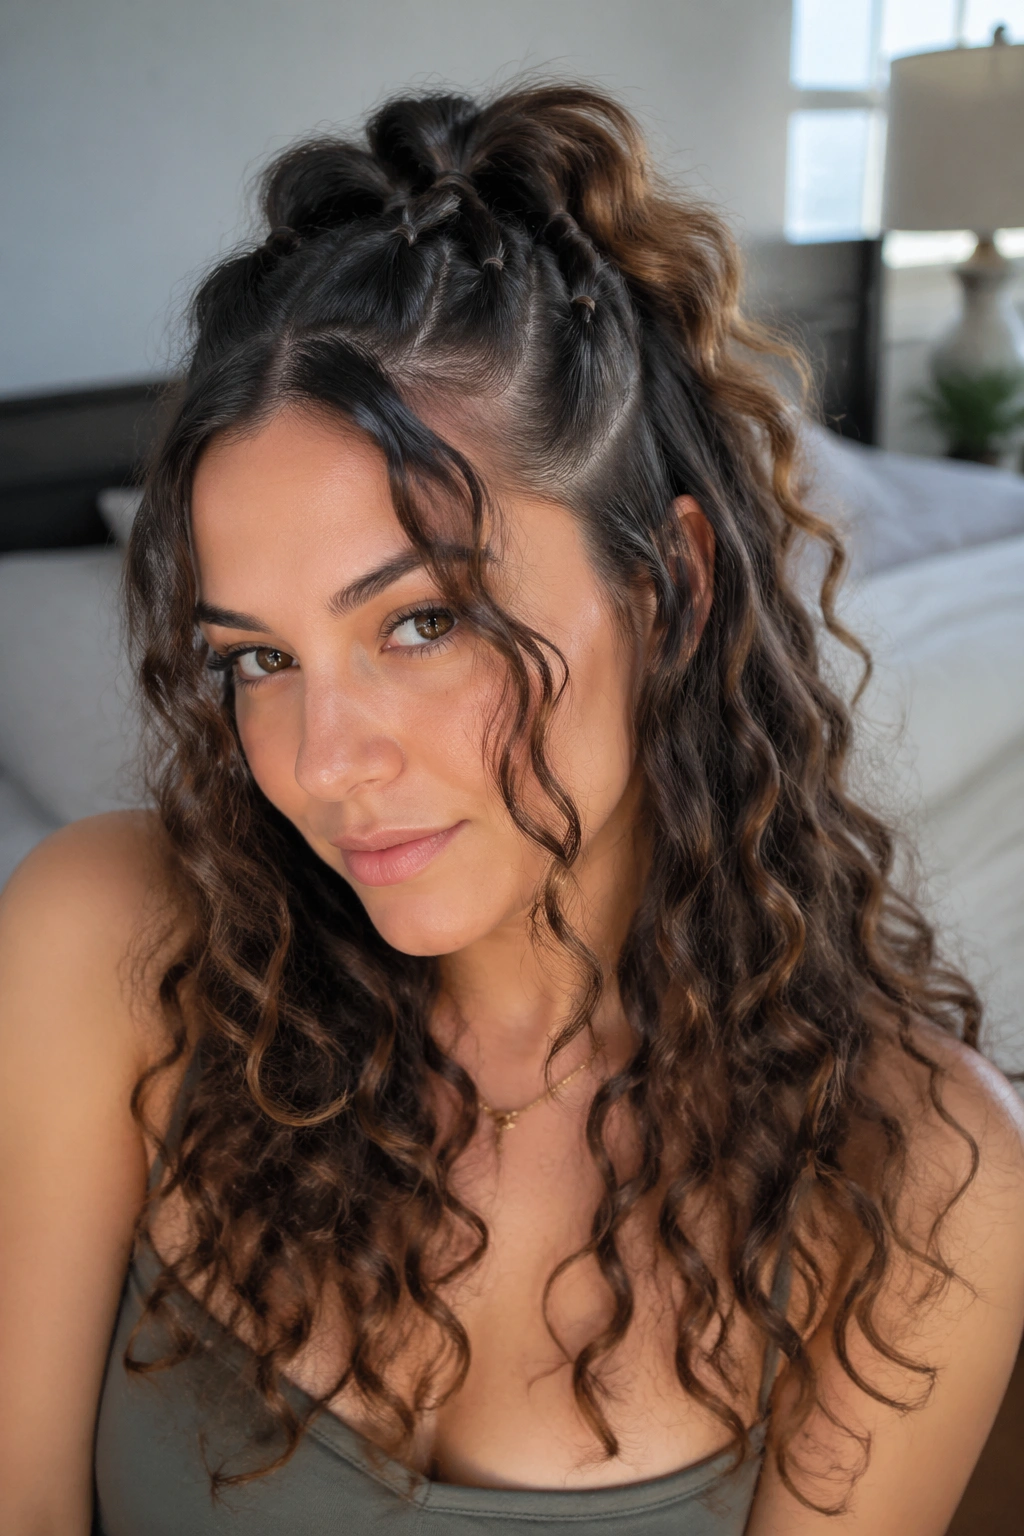
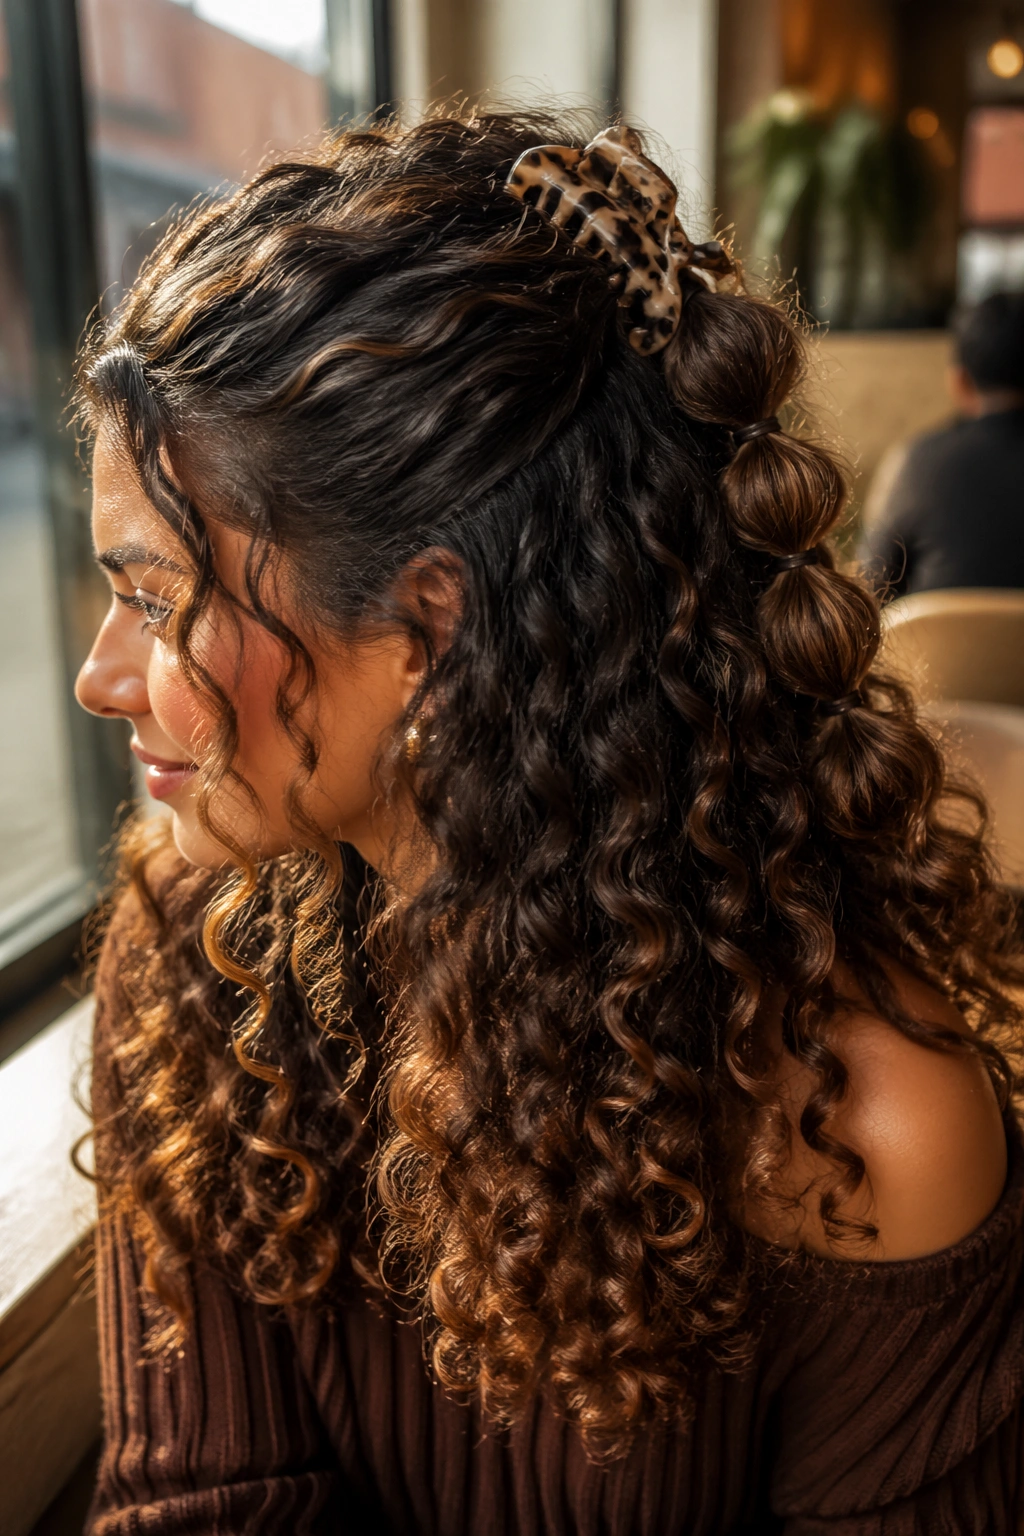
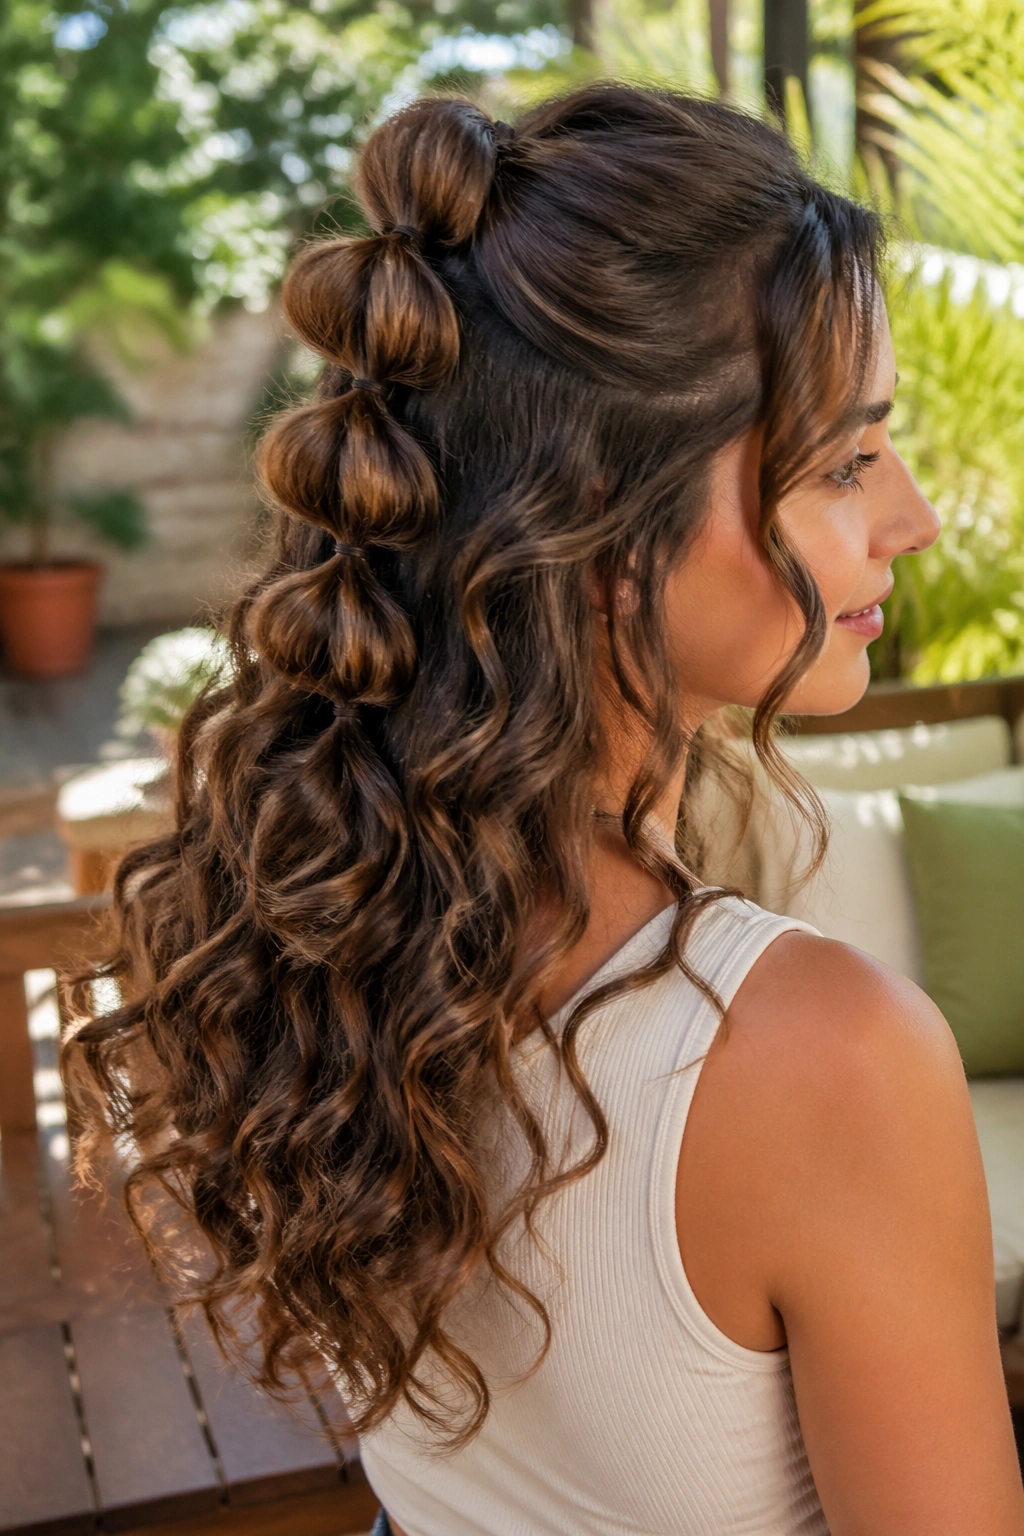
Half-up bubble braids have a way of making curls look fuller without making them look fussy. That’s the sweet spot, honestly. You keep the front off your face, show off the bounce through the lengths, and get those little rounded “bubble” sections that feel playful instead of stiff.
On bouncy curls, the style gets even better because the texture does half the work for you. The curls fill out each section, so the bubbles look soft and plush rather than tight and skinny. If you’ve ever tried to force curly hair into a sleek style and ended up with frizz at the crown, this is the prettier route.
The trick is choosing the right half-up bubble braid shape for your curl pattern and your mood. A high version can feel energetic. A low version leans romantic. Tiny bubbles read neat and polished; big ones feel airy and a little dramatic. Once you know how to place the elastics and how much to tug, the rest is mostly styling attitude.
And yes, a few clear elastics, a rat-tail comb, and a little patience go a long way. That’s the whole game.
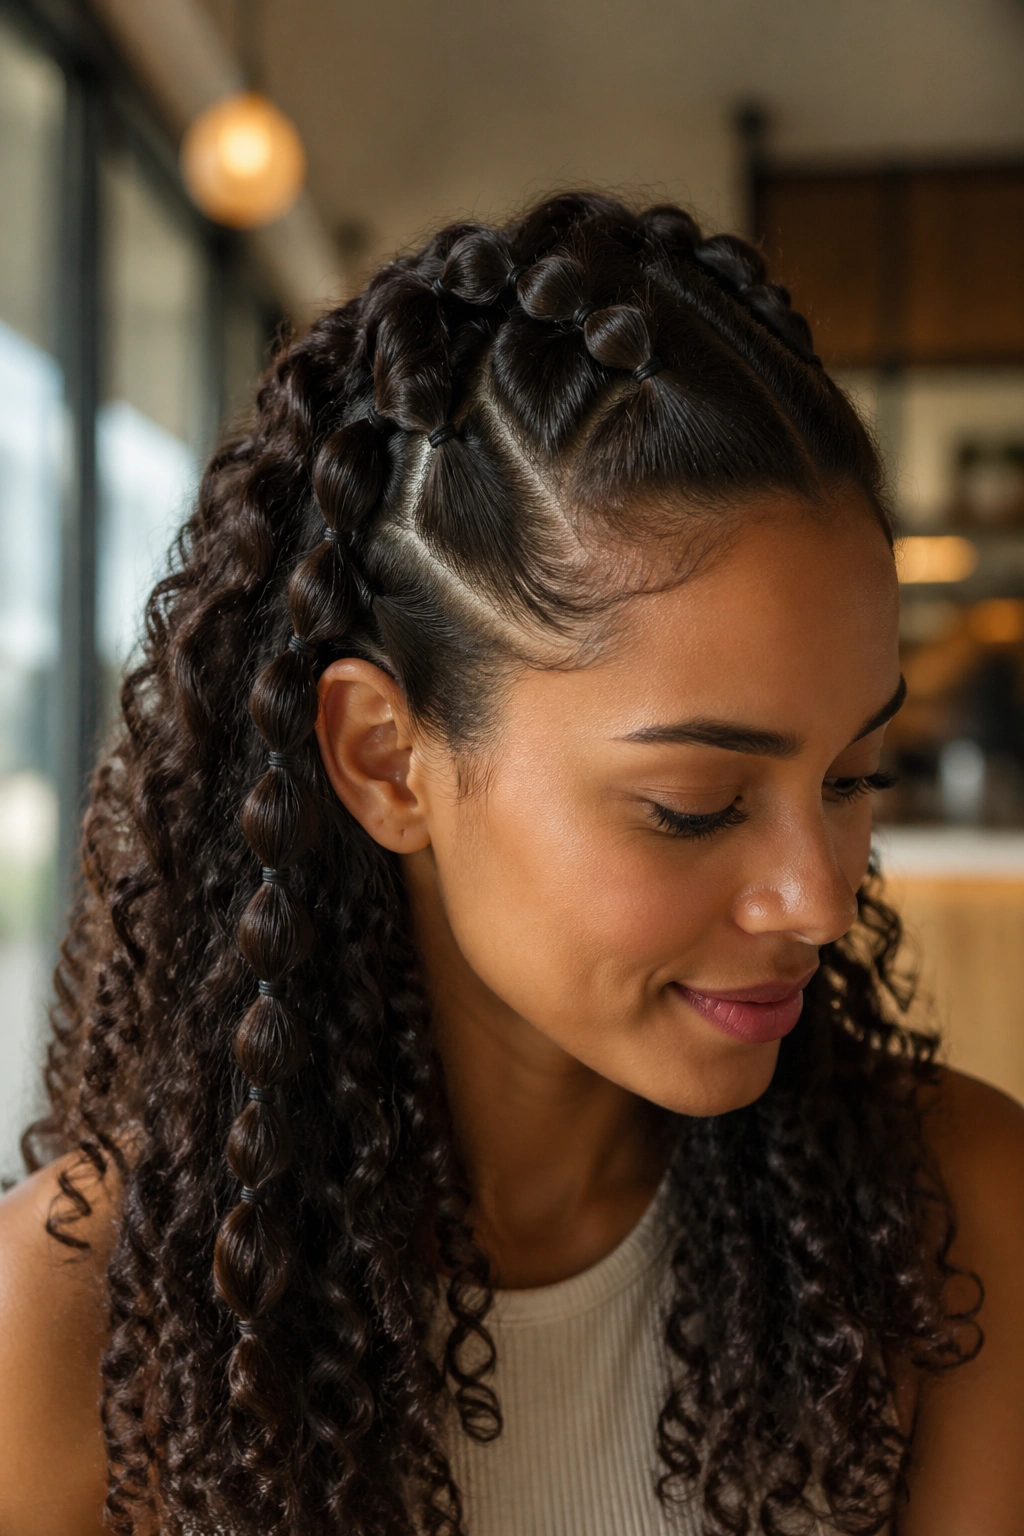
1. Sleek Crown Bubble Half-Up
This is the cleanest place to start. Pull the top section from temple to temple, smooth it back, and let the curls below stay loose and full. The contrast is what makes it work: the crown looks neat, while the lengths stay soft and bouncy.
A slicker top also makes the bubbles look rounder. If your curls are thick, that first section should be held with a light gel or styling cream, then secured with a small elastic before you place the next one about 1½ inches lower. Tug each bubble out a little at the sides, not the middle. That keeps the shape even.
This version is a good pick when you want the style to look polished with a blazer, a satin dress, or anything with a high neckline. It doesn’t fight the curls. It frames them.
Tiny detail, but it matters: keep the crown section narrow enough that the bubbles sit above the rest of the hair instead of sinking into it. That’s where the shape starts to look expensive without trying too hard.
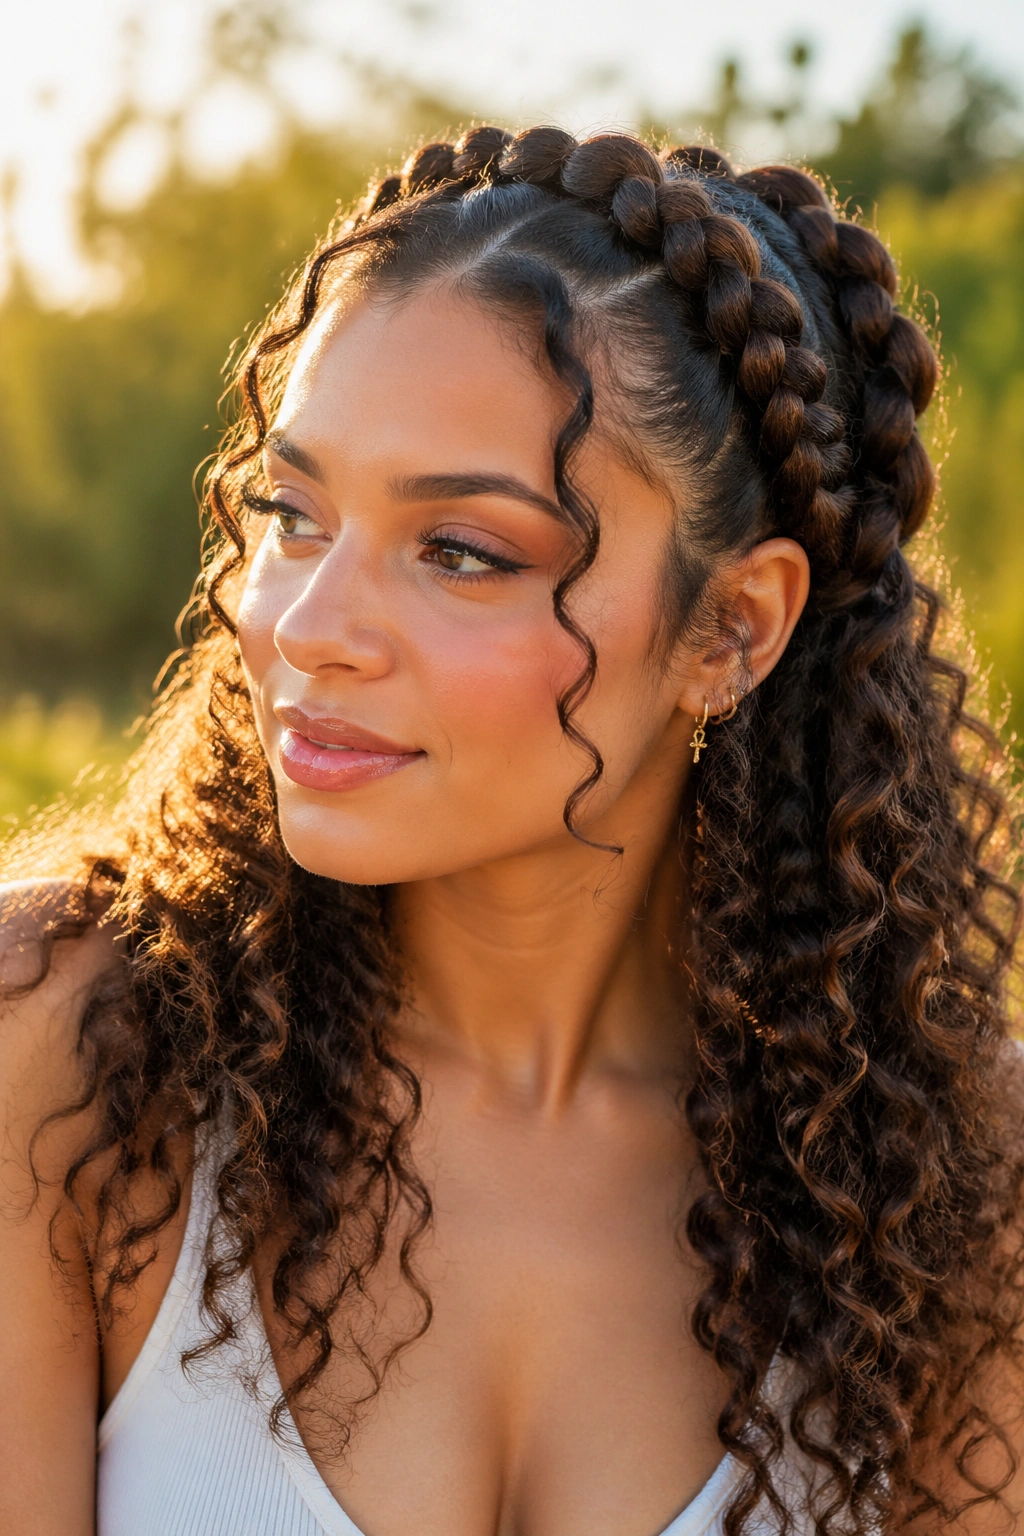
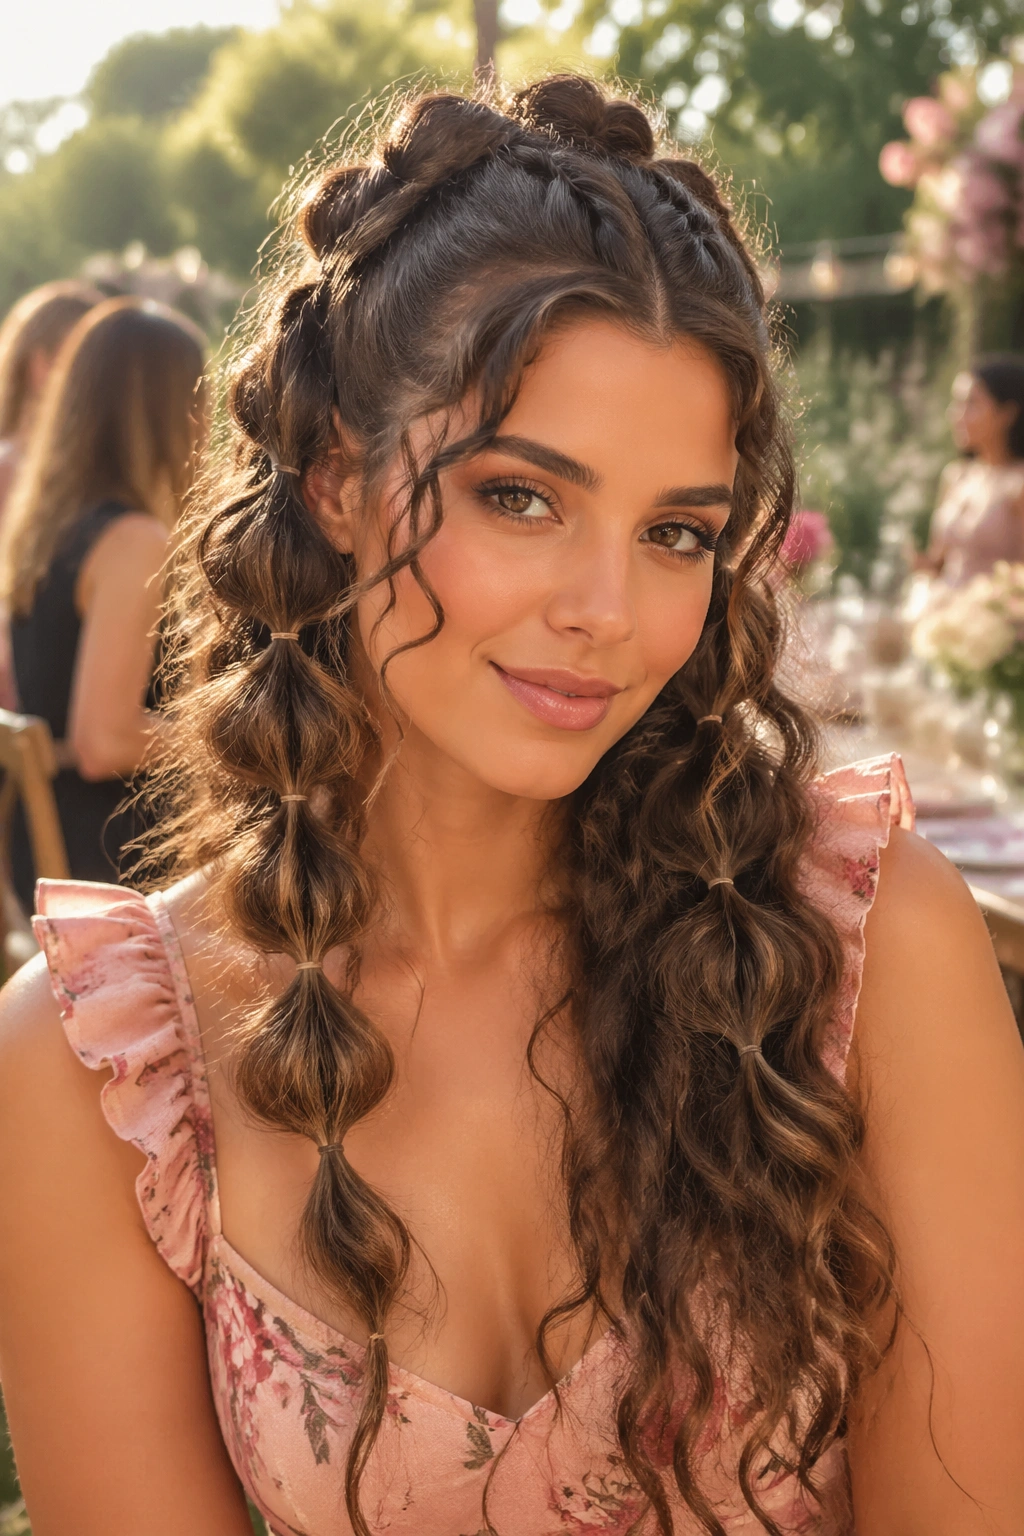
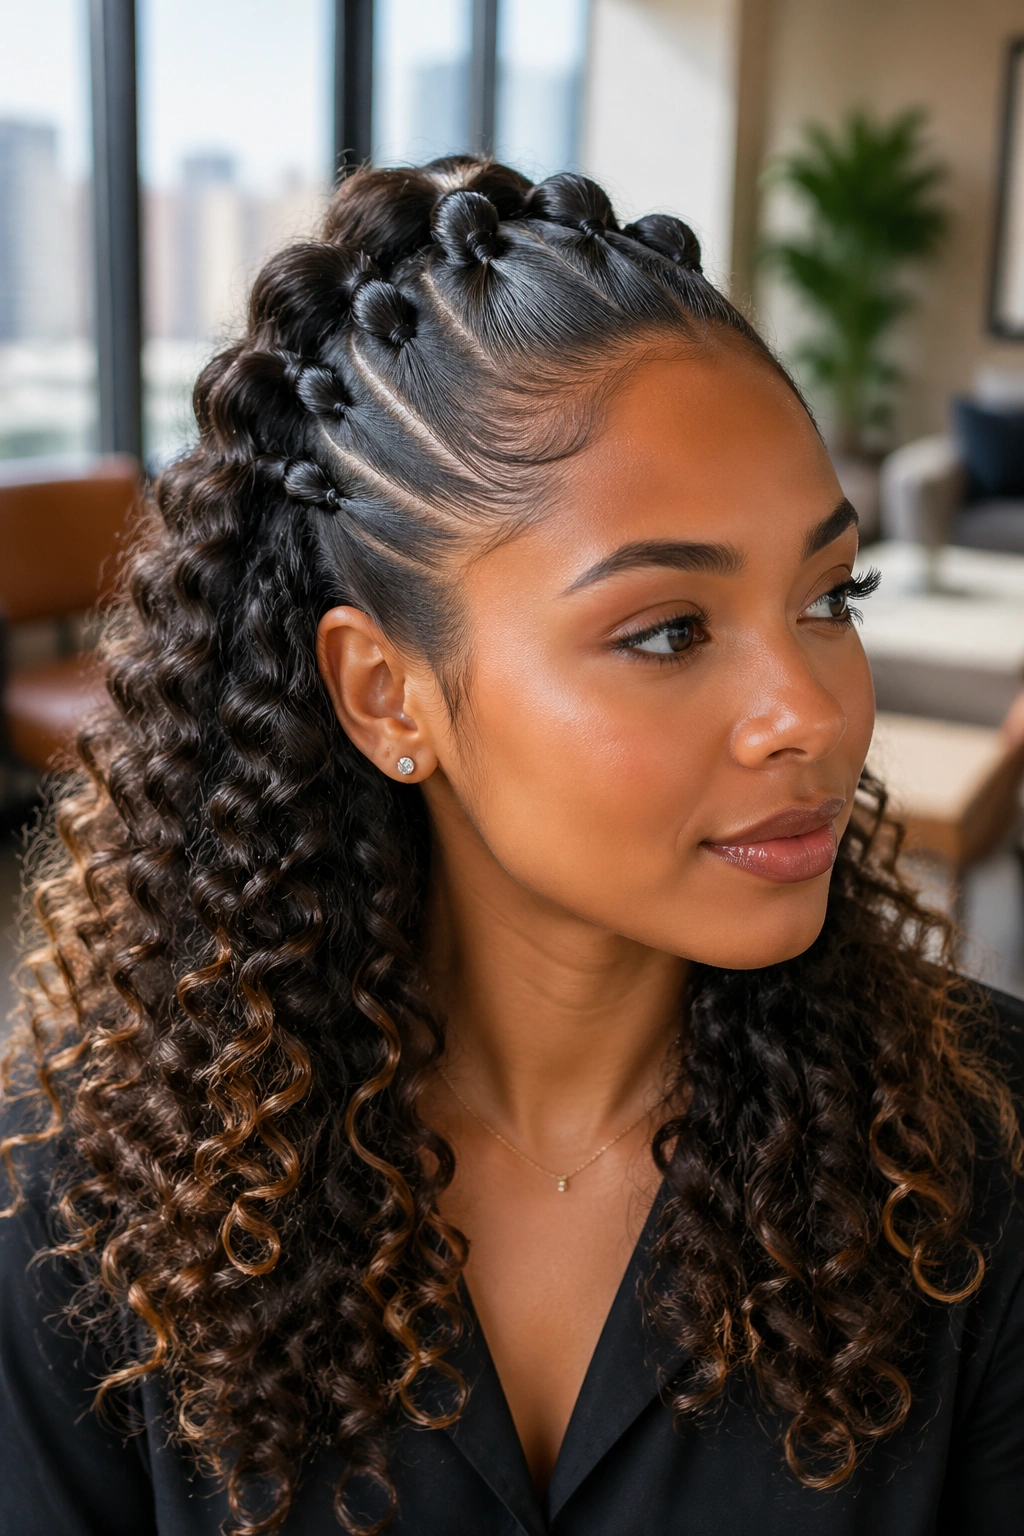
2. Soft Center-Part Bubble Braids
A center part changes the whole mood. Instead of one strong sweep back, you get two balanced half-up sections that sit like soft rails along the scalp before joining the bubble tails. On curls, that symmetry looks calm and a little romantic.
Why It Softens the Whole Look
The center part leaves the face open in a flattering way, especially if you have curly fringe or loose tendrils near the cheekbones. It also makes the style easier to adapt for round, oval, or heart-shaped faces because the lines stay even on both sides.
A lot of people make this look too tight at the front. Don’t. Use a comb to make a clean part, then smooth only the top inch or so near the hairline. Leave the rest of the curl pattern alone so the bubbles still feel full.
Small Things That Help
- Use two clear elastics per side if your curls are dense and springy.
- Start the first bubble just above the ear line so the shape doesn’t sit too low.
- Pull the bubbles apart gently after each tie, not all at once at the end.
- Leave the ends curly instead of stretching them flat. That gives the braid a softer finish.
Best move: keep one or two face-framing pieces loose if you want the style to feel less severe.
3. Side-Swept Bubble Braids
Why do side-swept bubble braids feel so easy to wear? Because asymmetry does the styling for you. One side takes the visual weight, the other side stays lighter, and the whole look feels a little less formal than a centered style.
This works especially well if your curls are medium to long and you like hair that falls across one shoulder. Sweep the half-up section toward your preferred side, secure it just off-center, then build the bubbles with small elastics every 1 to 2 inches. The result is relaxed, but not sloppy.
There’s also a practical upside. Side-swept placement lets you keep one side of your face more open if you’re wearing earrings, a high collar, or a dramatic neckline. It gives the eye somewhere to go.
The parting doesn’t have to be perfect. In fact, a slight diagonal part often looks better because it matches the way curls naturally fall when you move.
4. Tiny Temple Bubbles for Curly Hair
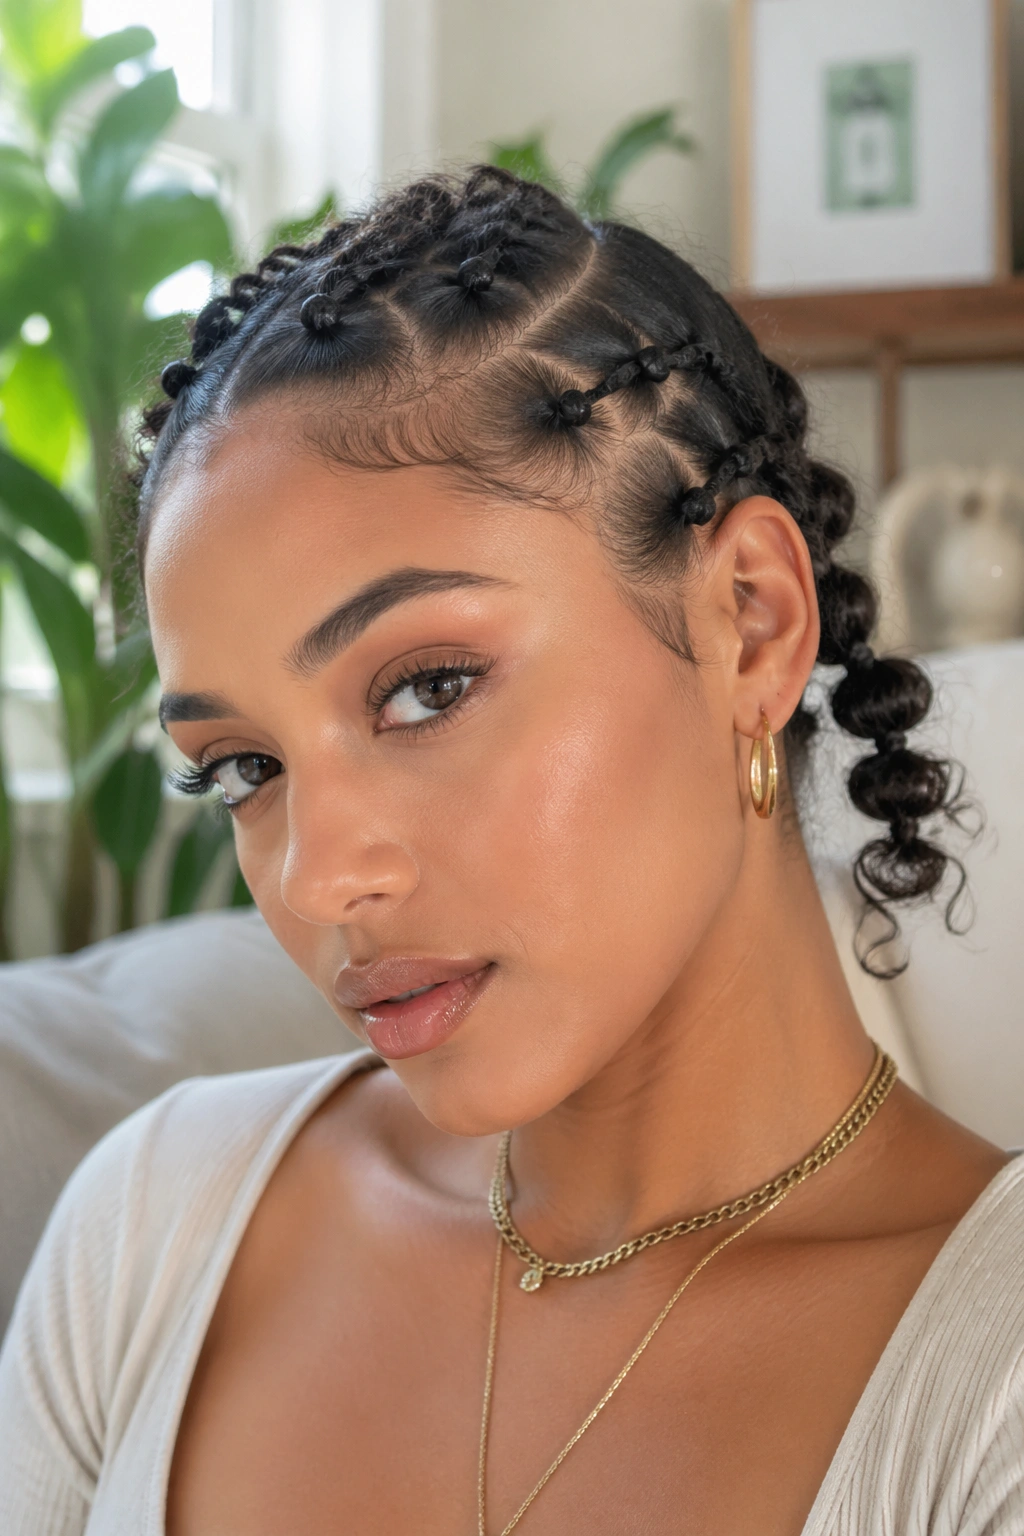
If your curls are thick and springy, tiny temple bubbles are the least fussy version. The style starts with small sections at each temple, almost like mini twists that feed into a short bubble chain at the back.
I like this one for second-day curls because the texture already has grip. You do not need to flatten much at the roots. Just smooth the front edge, gather a slim section from each side, and secure each small tail with a few tiny elastics spaced close together. The bubbles stay petite, which keeps the look neat.
What Makes It Work
- The small size keeps the style light on dense curls.
- The bubbles sit close to the head, so they do not pull on the roots as much.
- It’s a smart fix if you want a half-up style but don’t want a huge section of hair tied back.
- It also plays nicely with layered cuts, since the shorter pieces around the face stay free.
A tiny bubble chain can look almost delicate, which is rare on curls with a lot of volume. That contrast is the charm.
5. Bubble Mohawk Half-Up
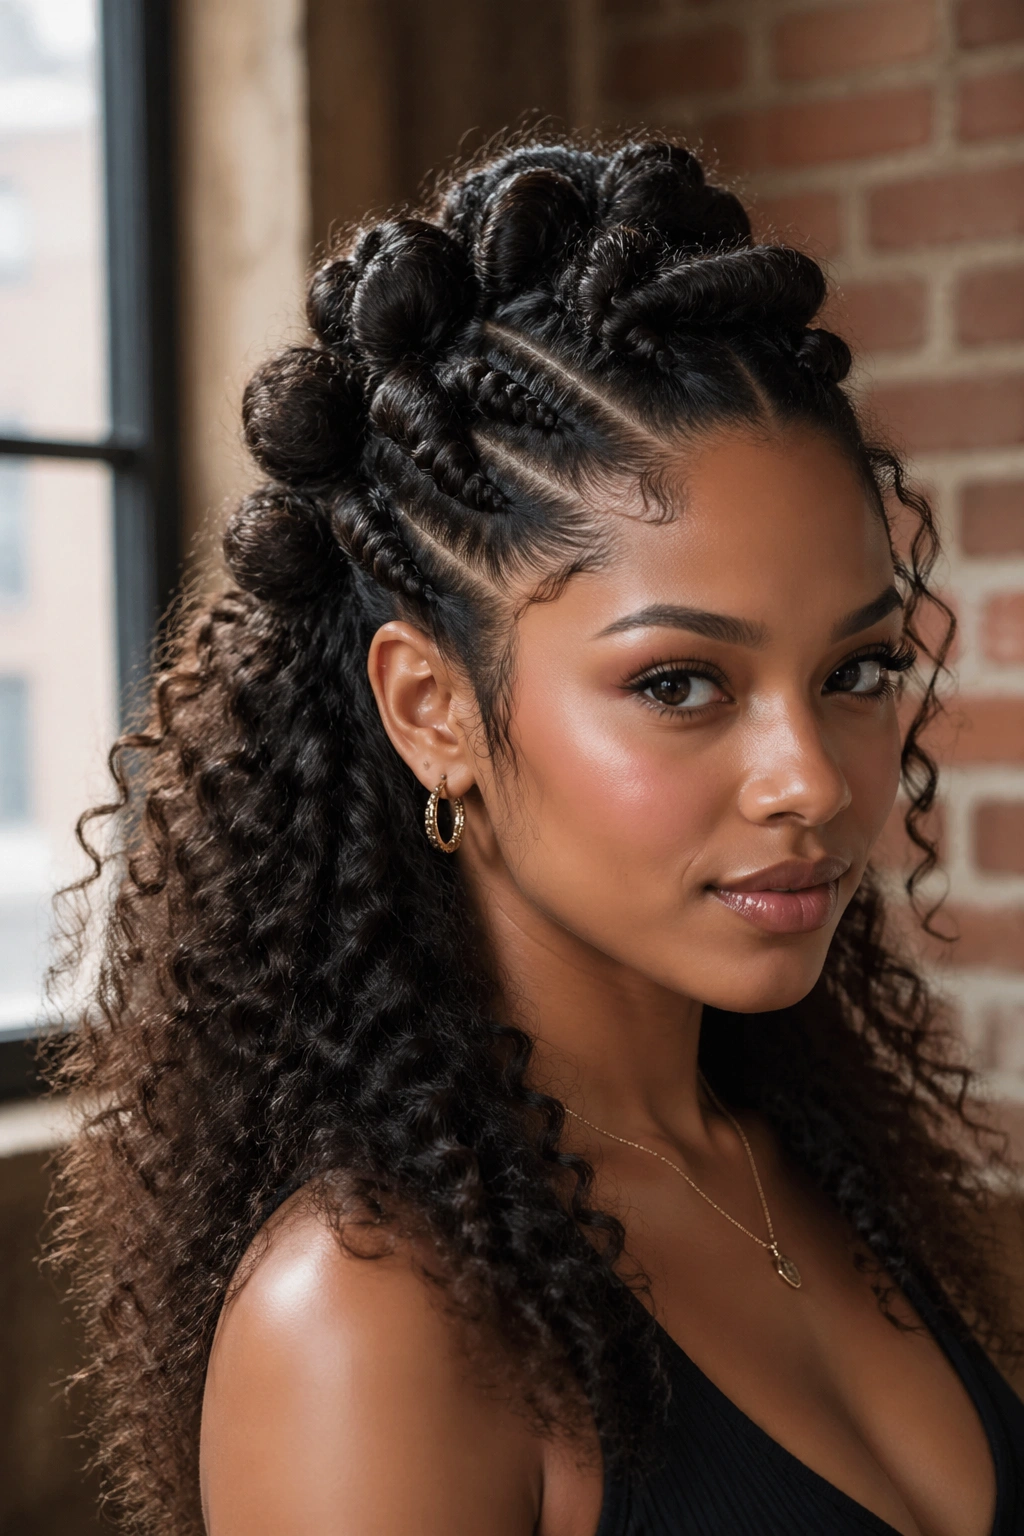
This is the bold one. The bubbles stack down the center of the head like a soft mohawk, and on bouncy curls the shape gets even better because the volume pushes each section up instead of letting it hang flat.
Start with a narrow strip from the front hairline to the crown, then secure a small elastic, puff the section, add another elastic lower down, and repeat until you reach the point where you want the half-up tail to stop. The sides stay down and curly, which keeps the look from feeling costume-y.
What makes this version special is the height. It lifts the face, shows off the curl pattern around the sides, and creates a stronger outline than a standard half-up braid. If you’ve got a long face or you like hair that makes a statement, this one earns its place.
Do not make the center strip too wide. The style gets heavy fast, and the bubbles lose that stacked, architectural feel. Narrower is cleaner here.
6. Ribbon-Wrapped Bubble Pony
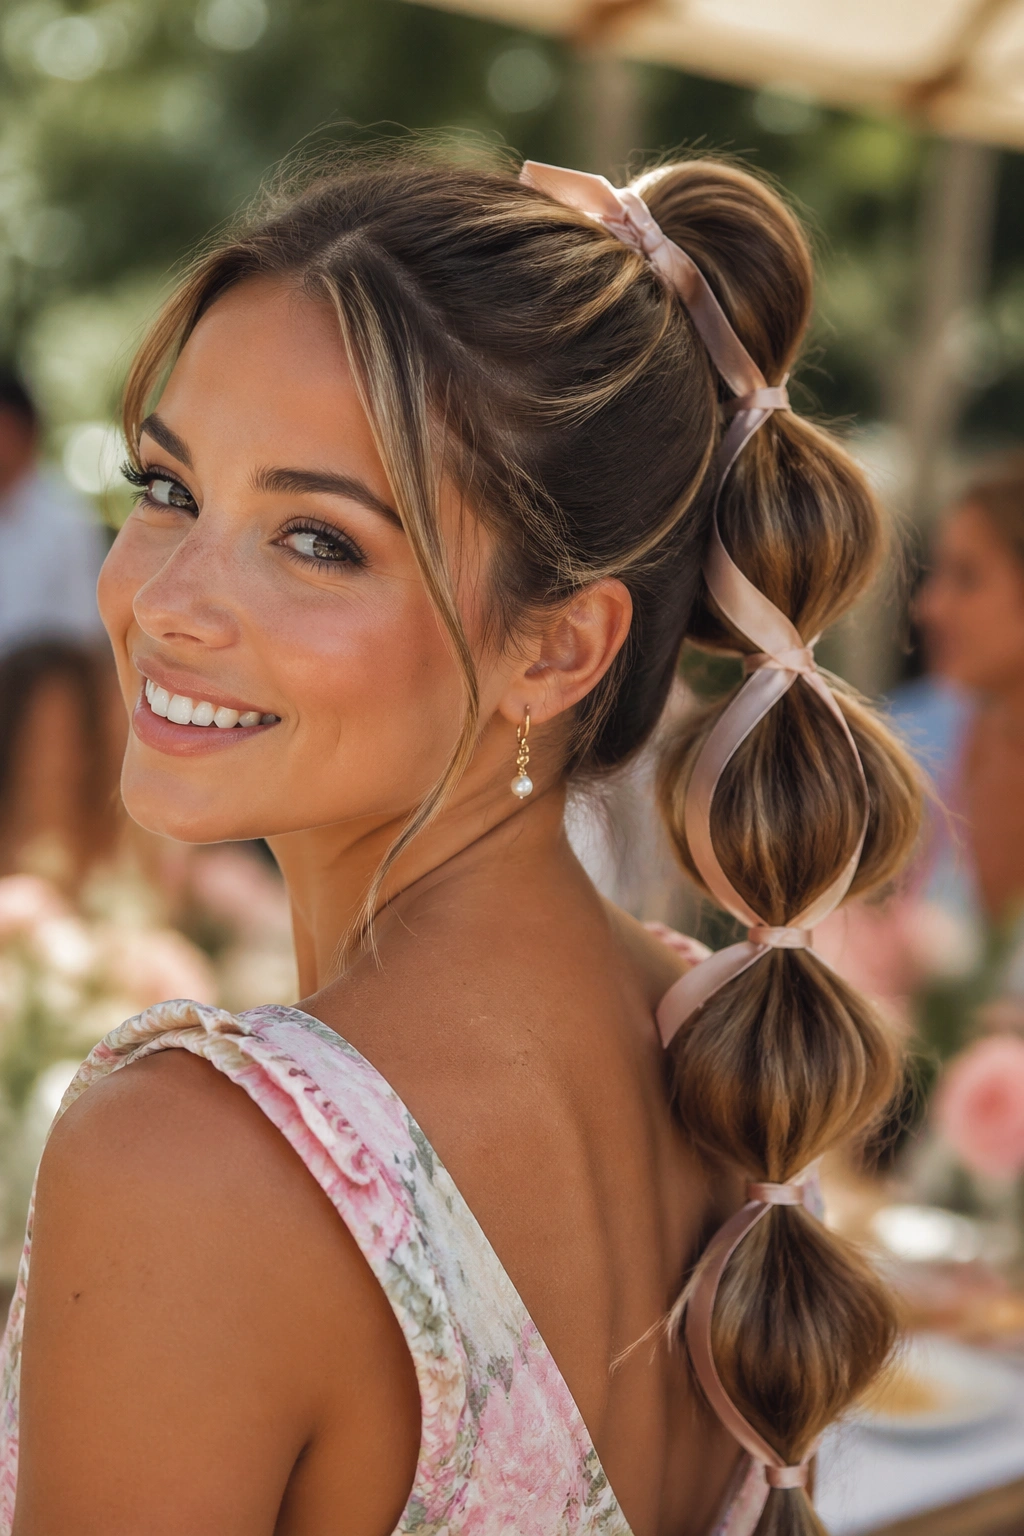
A ribbon changes the whole tone. Instead of looking like a simple elastic-based style, the half-up bubble braid starts to feel softer, more finished, and a little more dressed up. The ribbon also hides the joins between the bubbles, which is useful if your elastics are bright or your hair is very dark.
Unlike a regular bubble pony, this version doesn’t rely only on the bubbles for interest. The ribbon gives the eye a second line to follow, so the hair can be a little looser and still feel intentional. That makes it a good choice for events, photos, or any outfit that needs something feminine without going overboard.
Use a narrow satin ribbon or grosgrain ribbon that can be tied flat. Wrap it around the first elastic, then continue threading it down the length or tie it around each bubble segment if you want a more obvious finish. The ribbon should sit snug, not cinched.
Best for: medium to long curls, especially when the curls are brushed into loose clumps rather than stretched tight. The softer the curl texture, the better the ribbon seems to settle.
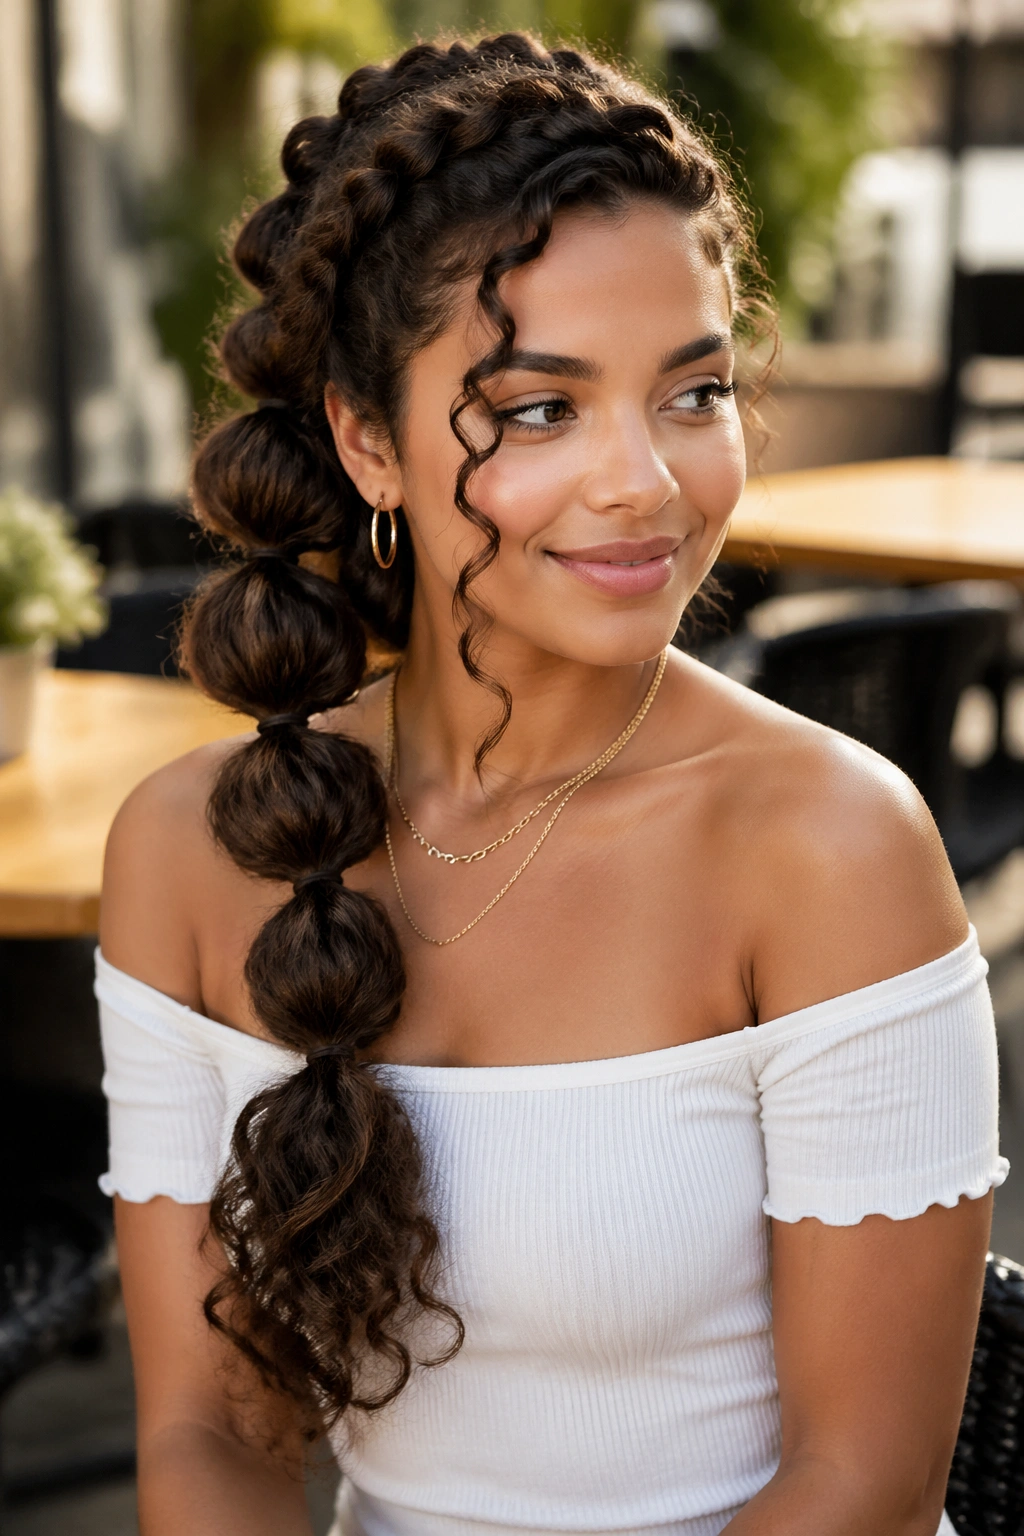
7. Low Half-Up Bubble Tail
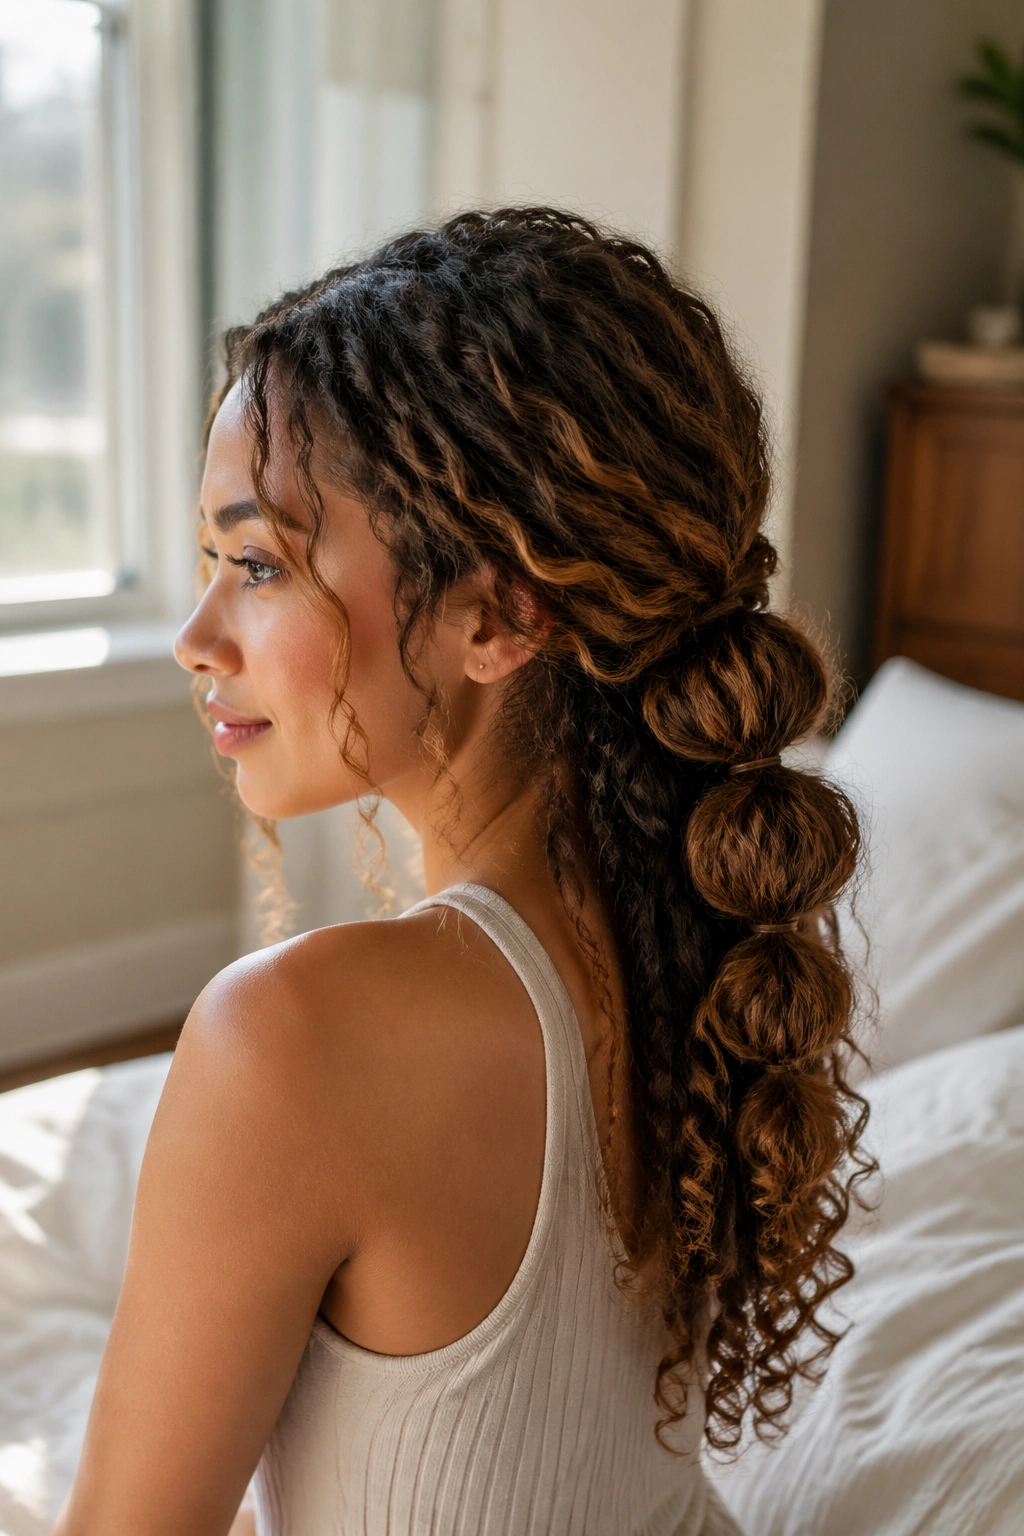
A low half-up bubble tail feels calmer than a high one. The anchor sits just above the nape or around the middle back of the head, so the top of the style has a gentler shape and the curls below spill out in a heavy curtain.
This is one of my favorite options for thick curly hair because it doesn’t fight the hair’s natural weight. High placements can make dense curls feel piled up. Low placements let the texture sit where it wants to sit. That sounds simple, and it is. Simple usually wins here.
The bubbles themselves can be wider apart than you’d expect. Two or three larger sections often look better than a long chain of tiny ones, especially if the curls underneath are full and springy. Keep the top smooth, but not helmet-flat. A little movement at the roots helps the whole thing breathe.
It’s also a good everyday style when you want your hair off your cheeks but still want the length visible from the back.
8. Bubble Braids With Face-Framing Curls
The front pieces matter more than people think. Leave them out on purpose, and suddenly the half-up bubble braid looks softer, less staged, and much more wearable with curly hair.
What to Leave Out on Purpose
Choose two pieces near the cheekbones or one piece on each side of the part. Let them follow their natural curl pattern, then smooth the rest of the half-up section back with your fingers or a brush. The contrast between the polished bubbles and the loose tendrils gives the style depth without needing extra accessories.
How to Shape the Curtain Pieces
- Curl the front pieces in the direction they already want to fall.
- Use a tiny bit of cream on the ends only, so they stay separated.
- Pull them forward after the bubbles are done, not before.
- If the pieces are too stiff, mist them lightly and scrunch once.
The face-framing curls are not an afterthought. They’re the part that makes the style look lived-in instead of overcontrolled.
9. Twisted Rope Half-Up With Bubbles
Can a rope twist make bubble braids look fuller? Absolutely. The twist adds a little tension and gives the top section a different texture before you even get to the first elastic.
Start by twisting each side section away from the face, then bring them together at the back and secure them into one half-up tail. From there, add elastics down the length to create the bubble effect. Because the top half is already twisted, the braid reads as more detailed without needing a complicated pattern.
This is a nice fix for fine curls or looser waves that don’t naturally make oversized bubbles. The twist helps build the illusion of thickness, especially near the crown where hair often looks a little flatter than you want. If your curls have less density, this version gives them some backbone.
A small warning: keep the twist loose. A tight rope twist can make the style look stiff and can pull the curl pattern apart in a way that feels rough instead of soft.
10. Claw-Clip Bubble Half-Up
Some styles look like they took planning. This one can look like you knew exactly what you were doing on a rushed morning.
Clip the top section up with a sturdy claw clip, let the curls underneath stay free, then release the top hair just enough to form a short half-up bubble chain. The clip gives you control while you work, and it keeps the section from slipping while you place the elastics.
Why It’s Handy
- It gives you a clean grip point if your curls are slippery.
- You can adjust the placement before committing to the first elastic.
- It works well when you want a casual look with a little structure.
- It’s a good answer for hair that keeps sliding out of small ties.
The claw clip does not have to stay in the finished style, though it can. A small matte clip tucked at the base makes the whole thing feel relaxed. If you choose a shiny clip, the look becomes more decorative, which can be fun if the rest of your outfit is simple.
11. Double Halo Bubble Braids
Two curved half-up sections can wrap around the head like a soft halo, and on curls that shape looks rich instead of overdone. The key is to keep each side section rounded as you bring it back, so the bubbles follow the natural curve of the skull instead of hanging straight down.
This version has a lot of presence. It’s a good pick for weddings, formal dinners, or any event where you want your hair to feel styled from every angle. The bubbles can be medium-sized, and the ends can stay curly or be tucked under a little if you want the back to feel cleaner.
A detail people skip: the curve should start near the temples and meet a little above the center of the back of the head. If you pull the sections too low, the halo effect disappears and you end up with two ordinary half-up tails.
The style works best when the bubbles are puffed evenly on both sides. Uneven puffing makes one side look flat, which throws off the whole shape.
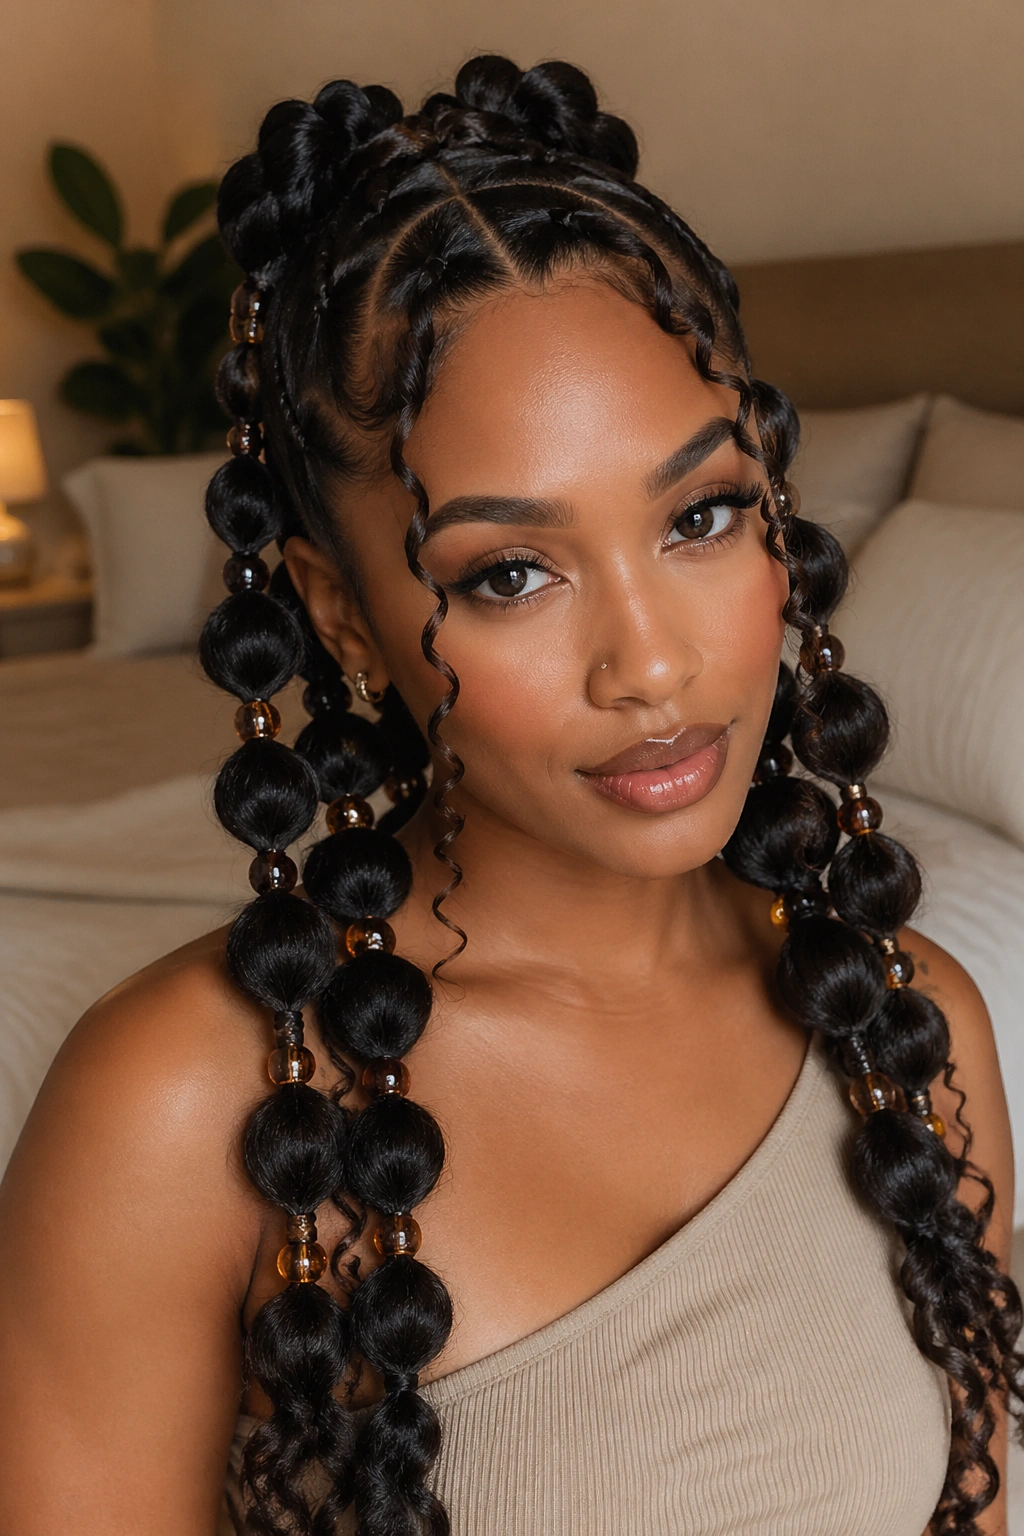
12. Bubble Braids With Beads
Beads change the texture of the style in a pretty direct way. Instead of relying only on puffed sections, you get a bit of sound, shine, and movement every time the hair shifts.
Where to Place the Beads
Put the beads between bubbles, not right on top of the elastic. That keeps them visible and lets the bubble shape stay round. A few small beads per side is enough; too many and the style starts to feel heavy on the half-up section.
What Works Best
- Wooden beads give the braid a softer, earthy feel.
- Clear or metallic beads make the bubbles look sharper.
- Smaller beads sit better on fine curls.
- Larger beads show up more on thick, dark hair.
A beaded style can lean playful or dressed up depending on the finish of the rest of the hair. Keep the curls below loose and touchable if you want it to feel fun. Smooth the top more tightly if you want the beads to look deliberate and polished.
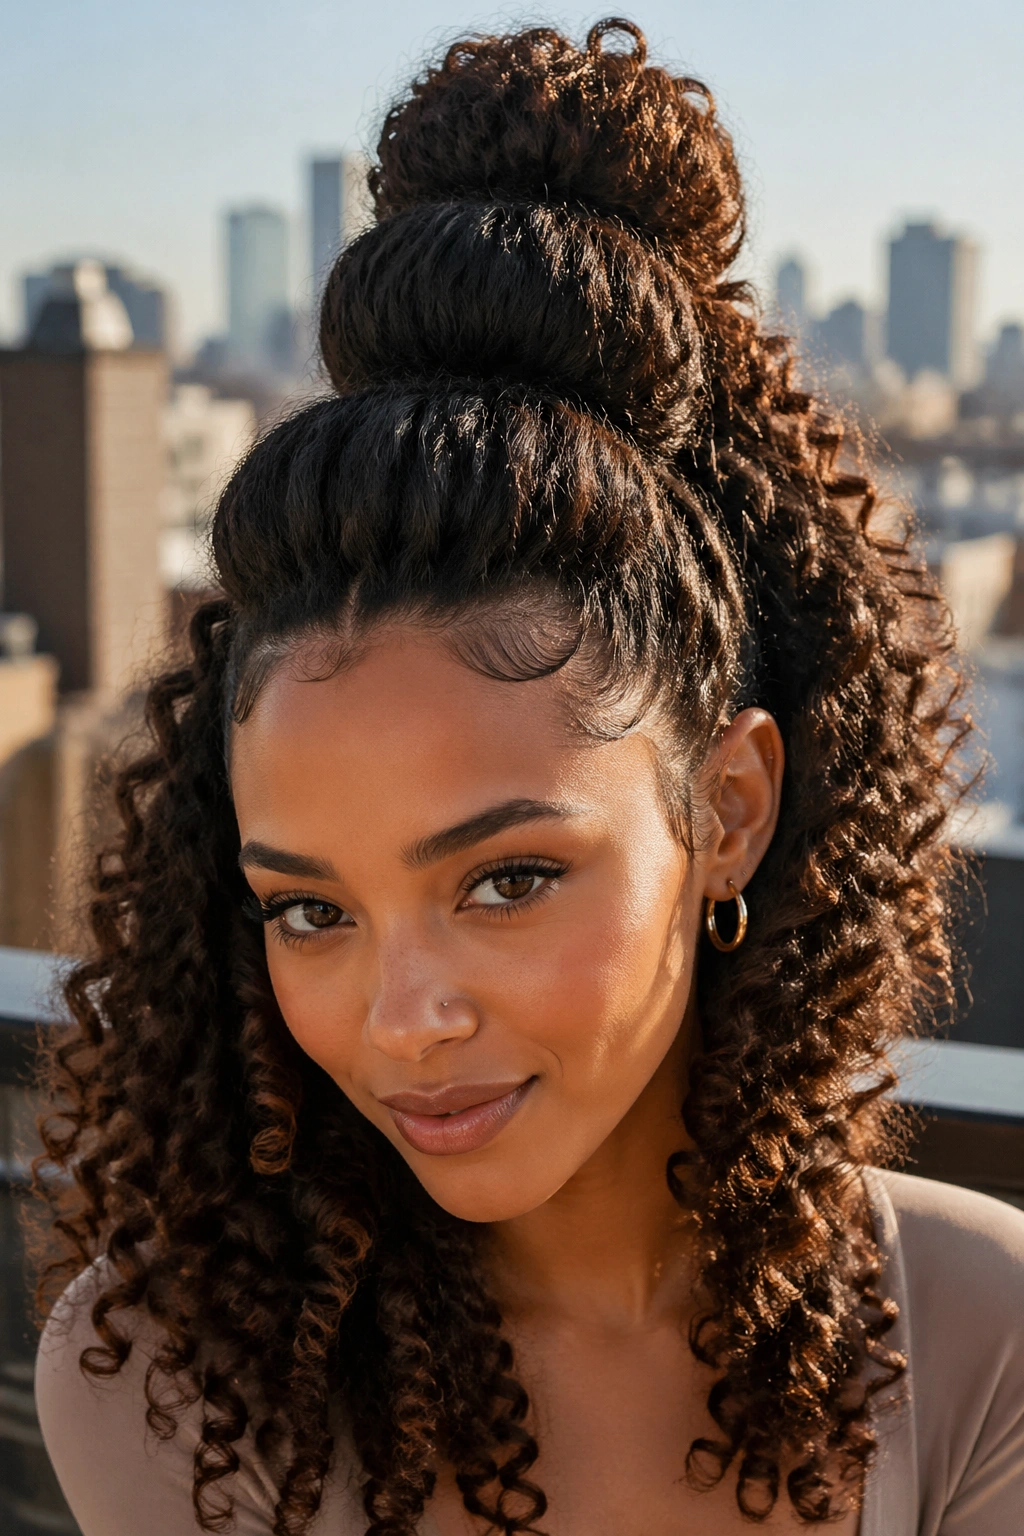
13. High Lift Bubble Half-Up
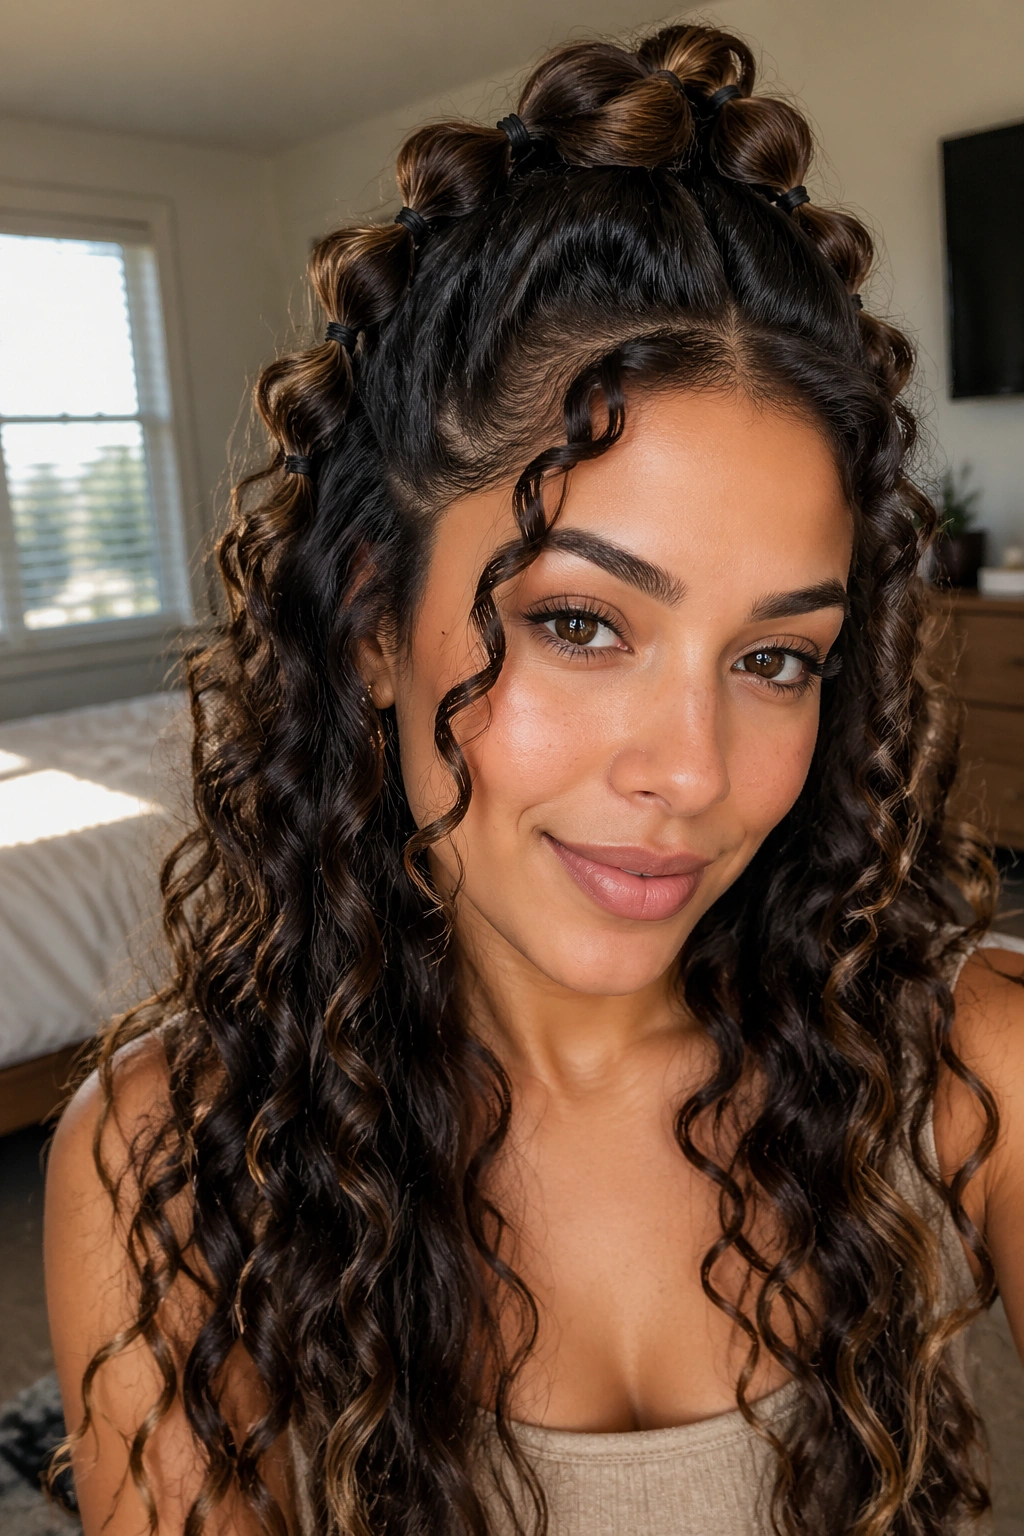
What if you want the face-lift effect without turning the style into a full ponytail? Go higher. A high half-up bubble braid pulls the eye upward and gives the roots a little extra height, which can be flattering on round and oval faces.
The high placement also lets the curls underneath fan out more dramatically. That’s the part I like. The bubbles sit like a little crown, and the loose lengths become the softer counterweight below. If your curls are medium length or longer, this shape gives you the most movement.
Use a root-lifting spray or a light mousse at the crown if your hair tends to collapse. Not much. Just enough to keep the top from going flat halfway through the day. Then secure the first elastic at the highest point you can comfortably reach without making the style tight.
This version can feel sporty with sneakers or dressy with a sheer top and earrings. Same hair, different mood.
14. Loose Pull-Through Bubble Braid
Unlike tight bubble braids, this one uses bigger sections and longer gaps between elastics. The result is softer, more relaxed, and a little more boho without tipping into messy.
The sections are pulled through just enough to build shape, then gently expanded so the bubbles look wide and airy. On curls, that looseness is a gift. It lets the natural texture fill the shape instead of sitting trapped inside it. If your hair is thick, this is one of the least demanding ways to wear the style because you do not need perfect symmetry for it to look good.
I’d use this version when the curls are in a good mood. By that, I mean defined, springy, and not too frizzy at the top. If the roots are rough, the loose style can turn shapeless faster than a tighter version.
Best for weekend wear, brunch, and long hair that likes a little room to move. It is a forgiving style, which is often the nicest kind.
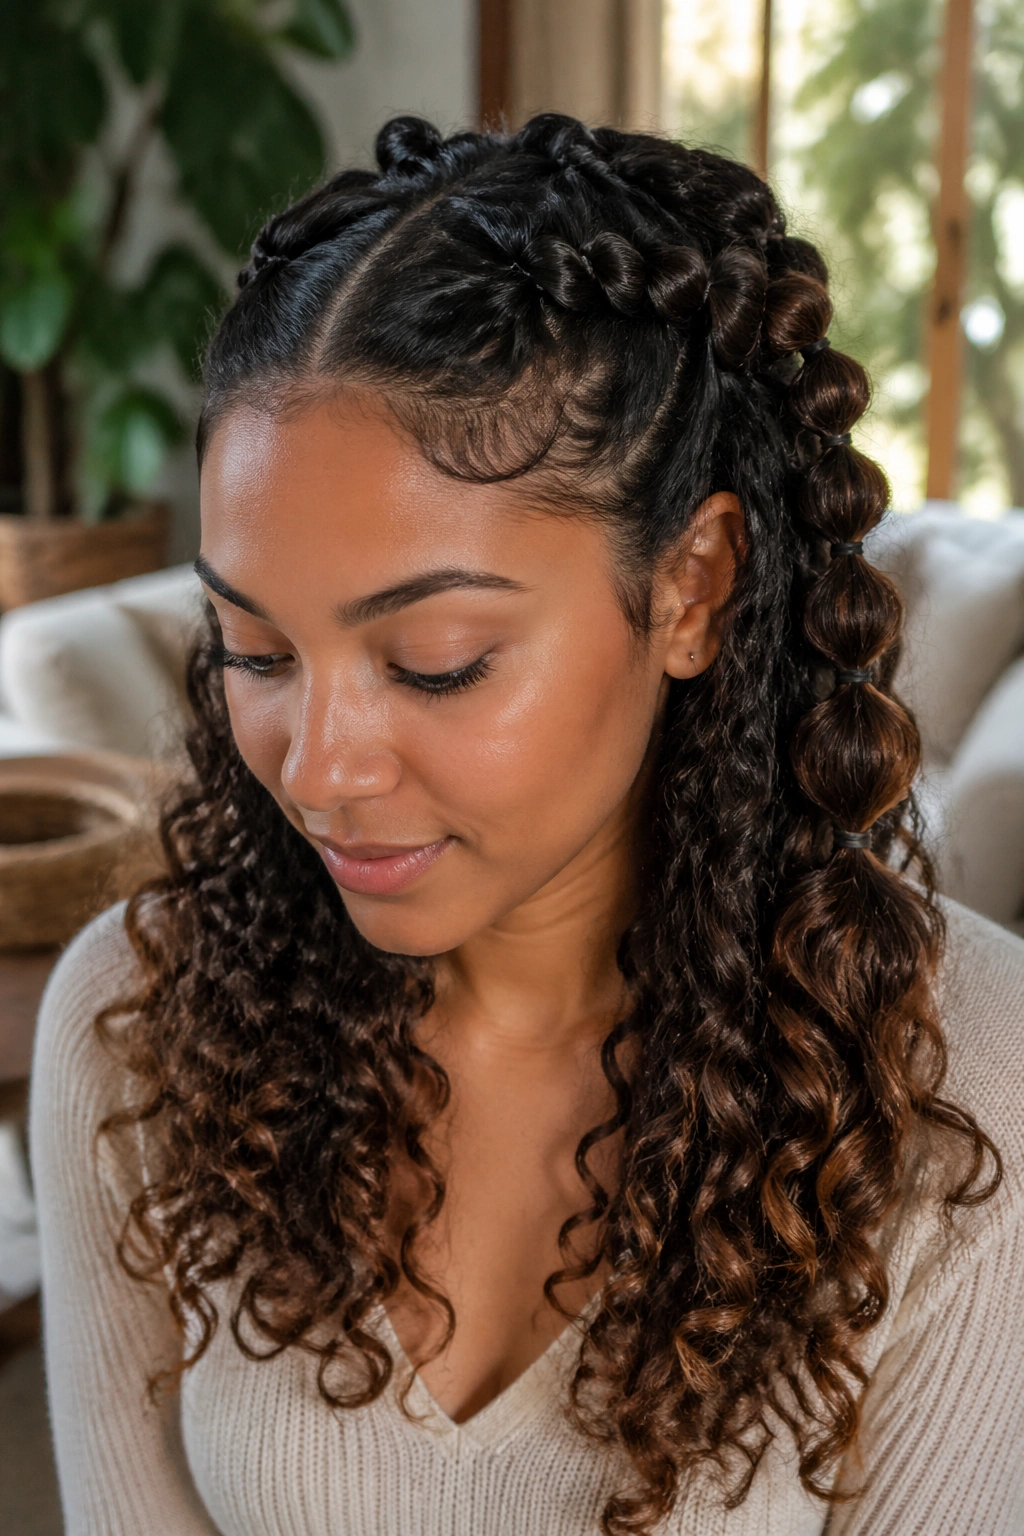
15. Mixed Cornrow-to-Bubble Half-Up
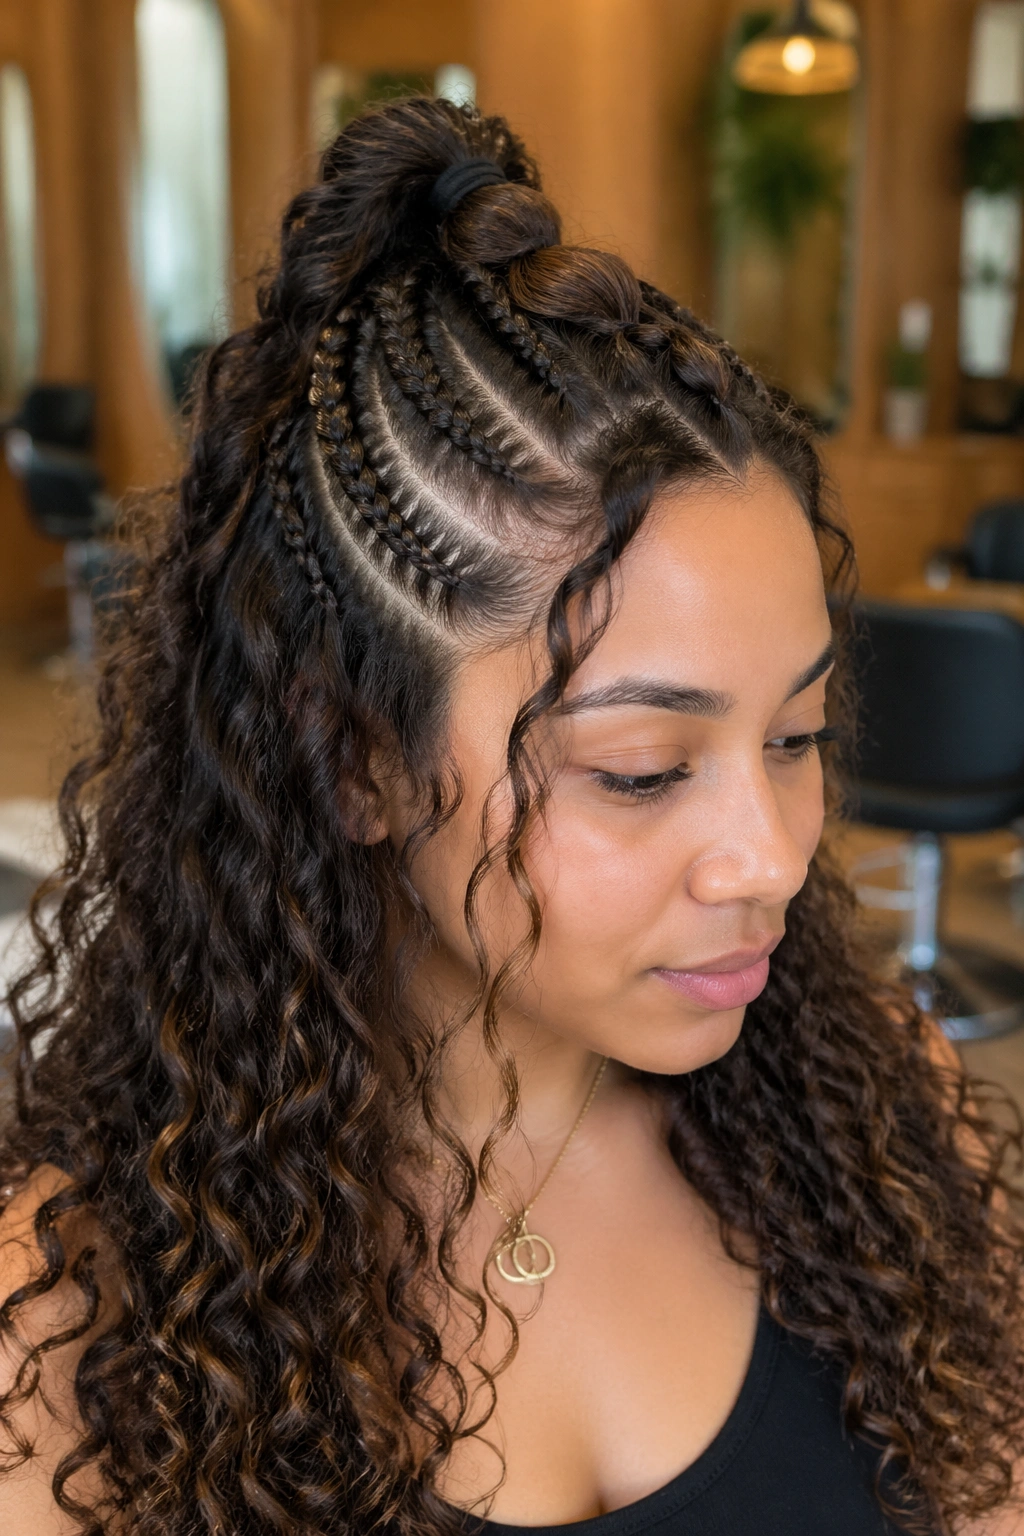
A few small braids near the hairline change the whole architecture of the style. The front stays neat, the midsection gets detail, and the bubbles come in after that as a softer finish.
This combination is especially useful when you want the hair to stay in place longer. The mini braids at the top create grip, so the bubble sections don’t slide around as much. They also help with uneven curl patterns at the front, which can happen if some pieces are tighter than others.
What to Ask Your Stylist or Do Yourself
- Start with two to four small braids near the temples or along the part.
- Join them into one half-up section at the crown.
- Add clear elastics every 1 to 1½ inches down the tail.
- Keep the bubbles slightly smaller near the top and wider toward the ends.
This is a practical style with a pretty finish. That combination is hard to beat.
16. Romantic Soft-Section Bubble Braids
The softest half-up bubble braids are the ones that look almost brushed together instead of sharply separated. The bubbles are there, but they’re rounded and gentle, with a little fuzz at the edges that makes the style feel human.
A style like this loves curls that have a bit of lived-in texture. If you’ve slept in your hair, or if your curls have loosened slightly through the day, that’s not a problem. It can help. Pull the top section back loosely, secure it, then nudge the sections apart just enough to see the shape. Don’t chase perfection here. You’ll wreck the charm.
One small trick: mist your hands with water and smooth only the outer layer of the crown before you tie it back. That keeps the top from looking puffy in the wrong places while leaving the curls themselves intact. The finish should feel soft, not flat.
This is the version I’d choose for a date night, a garden party, or any setting where hair should feel pretty without looking overworked.
17. Statement Oversized Bubble Half-Up
Why do oversized bubbles work so well on curls? Because the curl pattern fills the space. A big bubble on straight hair can look empty. On bouncy curls, it looks plush and deliberate.
How to Keep Big Bubbles from Collapsing
Use fewer sections and give each one room. Three large bubbles often look better than five medium ones when the hair is dense. After each elastic, tug the sides outward and slightly upward so the bubble becomes round instead of droopy.
A Few Things That Help
- Start with a strong base elastic at the crown.
- Use snag-free bands so the hair can expand without breaking.
- Leave the ends curly, not stretched to the point of looking limp.
- Keep the sections evenly spaced, or the larger bubbles will lean.
Oversized bubbles are a nice choice if you like drama but do not want extra accessories. The hair itself does the decorating.
18. Minimalist Elastic-Only Bubble Braids
This is the version I reach for when the outfit is busy. No ribbons, no beads, no clips. Just clean elastics, well-placed sections, and curls doing what curls do best.
Minimalist styles look expensive when the parting is neat and the bubbles are even. That’s the whole trick. Smooth the top section back, secure it, then add two or three more ties down the length. Make the puffing subtle rather than extreme. The result is tidy, modern, and easy to pair with strong earrings or a printed dress.
It also works well on hair that already has a lot going on in the texture. If your curls are dense and springy, you do not need decoration to make the style interesting. The shape alone is enough.
The reason this version stays useful is that it never fights the hair. It frames it. That’s a small distinction, but it’s the one that matters when you want the style to last through an entire day without becoming a project.
19. Party-Ready Glittered Bubble Half-Up
A little sparkle changes everything. A fine mist of glitter spray, a few jewel pins near the crown, or even a single metallic elastic can turn the style from everyday into evening without changing the braid itself.
The smart move is to keep the glitter near the top section, where the light hits first. Too much sparkle down the bubbles can make the look feel busy. One accent near each side of the part, or a row of tiny pins tucked where the half-up section begins, is enough to catch attention without overwhelming the curls.
- Use light-reflective pins if you want the style to stay elegant.
- Pick fine glitter spray instead of chunky glitter for curly hair.
- Keep accessories secure at the base so they don’t snag the curl pattern.
- Let the curls underneath stay soft and loose; they balance the shine.
This is the kind of style that works when you want your hair to help carry the outfit instead of competing with it. And honestly, that’s a nice place for hair to be.
Half-up bubble braids on bouncy curls have range, which is why they keep showing up in so many different forms. One version can look clean and quiet. Another can be playful, dressed up, or a little dramatic. The shape changes fast, and that is the whole appeal.