Finding a hairstyle that balances “low effort” with “high impact” feels like a constant battle when you are working with Type 4 natural hair. We have all been there—standing in front of the mirror with a wide-tooth comb and a prayer, wondering if we really have the stamina for a six-hour box braid session. Sometimes you just want something that looks like you spent the entire morning at a salon without actually having to sacrifice your entire Saturday.
Bubble braids have become that specific “cheat code” for the natural hair community. While they are called braids, there is actually no braiding involved in the traditional sense. It is a series of gathered sections secured with elastics, creating a “bubble” effect that thrives on the natural volume and density of coily and kinky textures. Unlike flatter hair types that need to backcomb or tease their hair to get those bubbles to stay round, Type 4 hair provides its own built-in structural support. Your shrinkage is no longer the enemy here; it is actually the secret ingredient that keeps those bubbles looking full and lush.
The beauty of this style lies in its versatility. You can go from a sleek, professional low ponytail to a playful set of space buns or a dramatic faux-hawk in a fraction of the time it takes to do cornrows. Because our hair has so much personality and grip, these styles tend to hold better and look better as they age. They are protective, too, provided you handle your edges with care and don’t over-tighten those elastics.
Whether you are looking for a quick mid-week refresh or a centerpiece style for a big event, the following variations show just how much range you can get out of a simple pack of rubber bands and some moisturizing cream. We are leaning into the texture, the volume, and the sheer audacity of Type 4 hair.
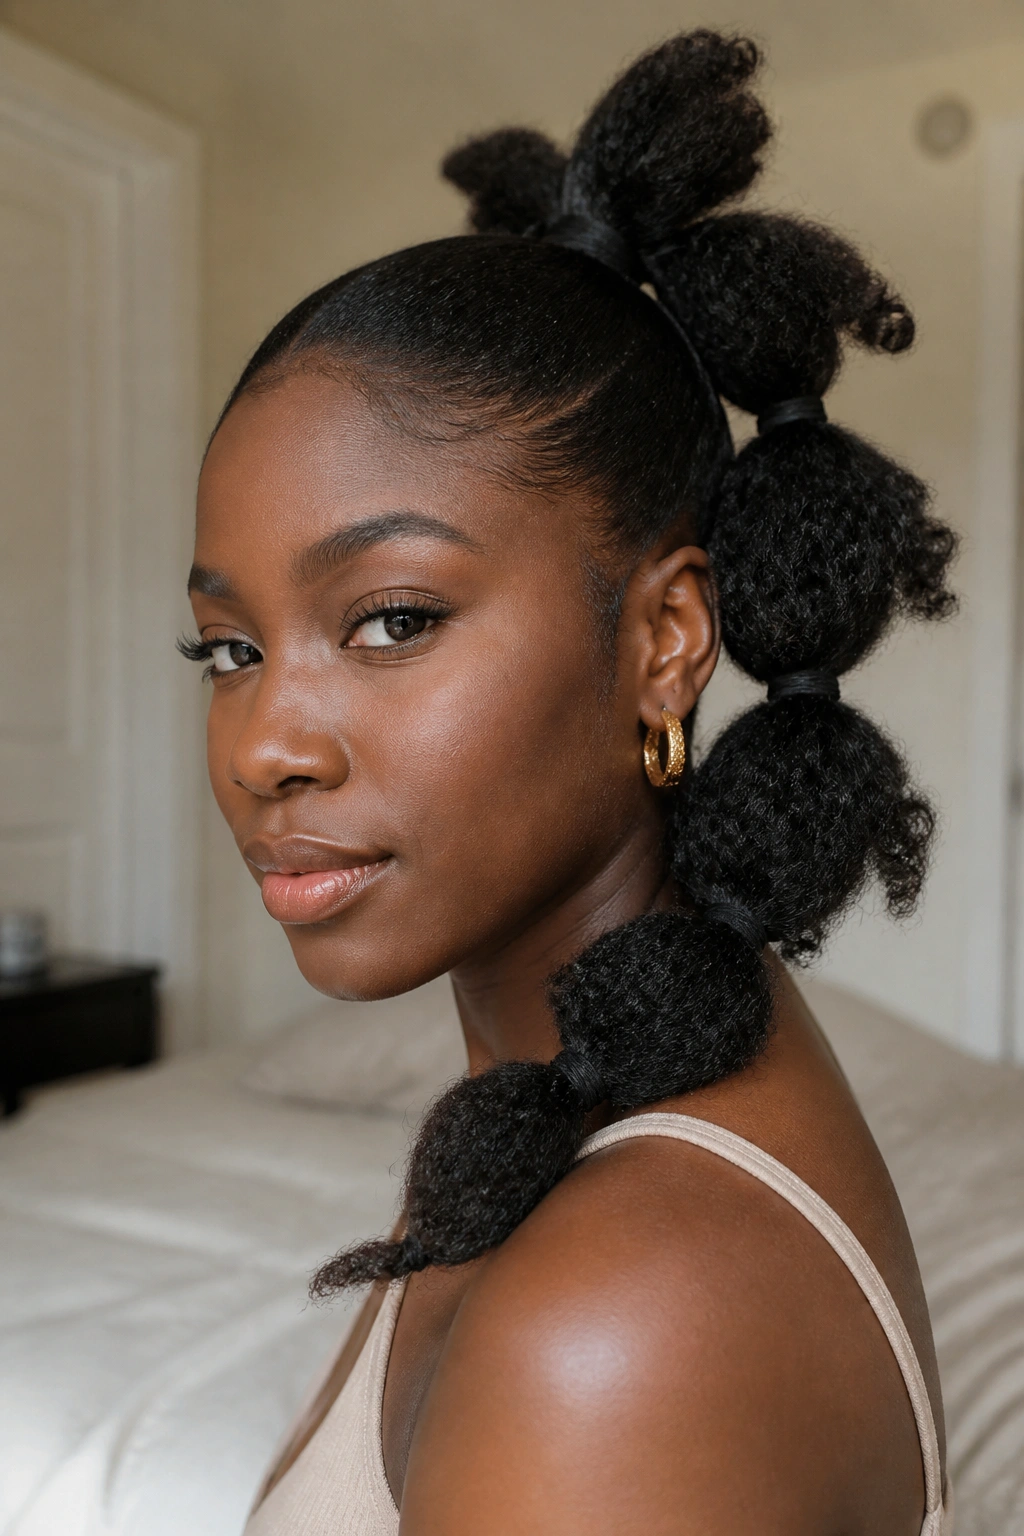
1. The Classic High-Volume Bubble Ponytail
This is the blueprint for the entire trend. If you have thick 4c hair, a high bubble ponytail allows you to showcase your length while keeping your ends protected and tucked away. It starts with a sleek base—usually achieved with a generous amount of edge control or a firm-hold gel—brushed up into a single high puff.
Why It Works for Coily Textures
Because Type 4 hair is prone to shrinkage, the “bubbles” in the ponytail actually help to keep the hair stretched throughout the day. You are essentially using the elastics as anchors. Instead of the hair retreating into a tight puff, the weight and placement of the bands create a structured, architectural look.
Quick Styling Steps
- Apply a leave-in conditioner to damp hair to ensure the core of your bubbles stays hydrated.
- Use a boar bristle brush to sleek the hair into a high ponytail.
- Space your elastics about two to three inches apart down the length of the tail.
- Gently “pancake” or pull at the sides of each section to create the round bubble shape. Pro tip: Always soak your elastics in a little bit of hair oil before applying them to prevent them from snapping or snagging your fragile coils during removal.
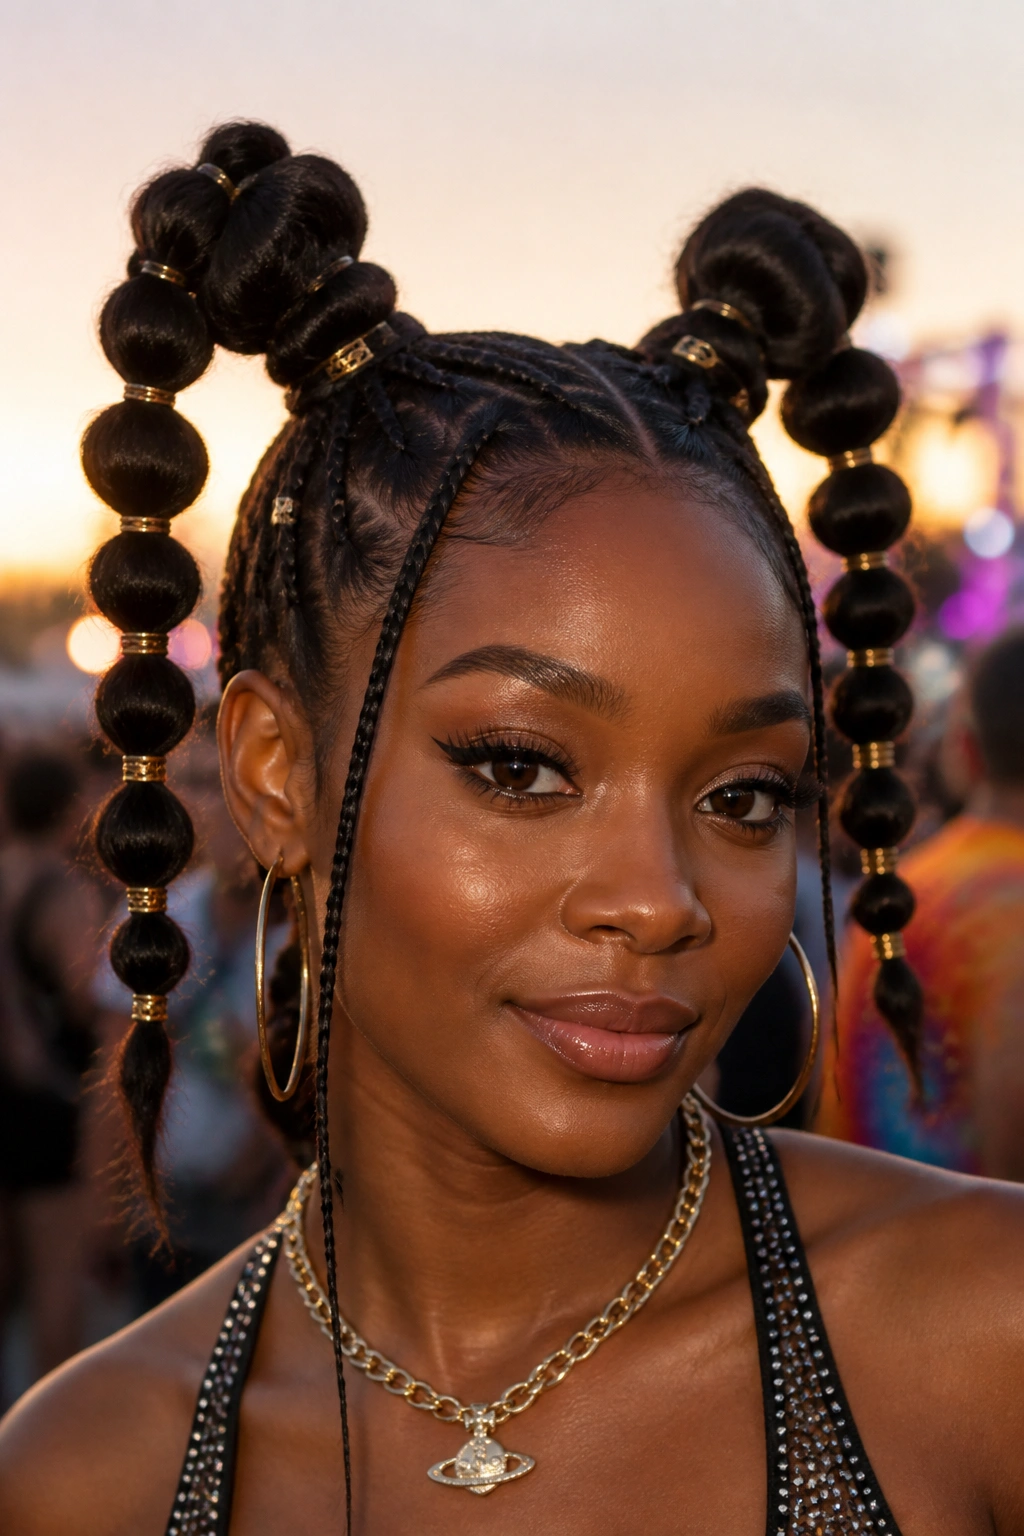
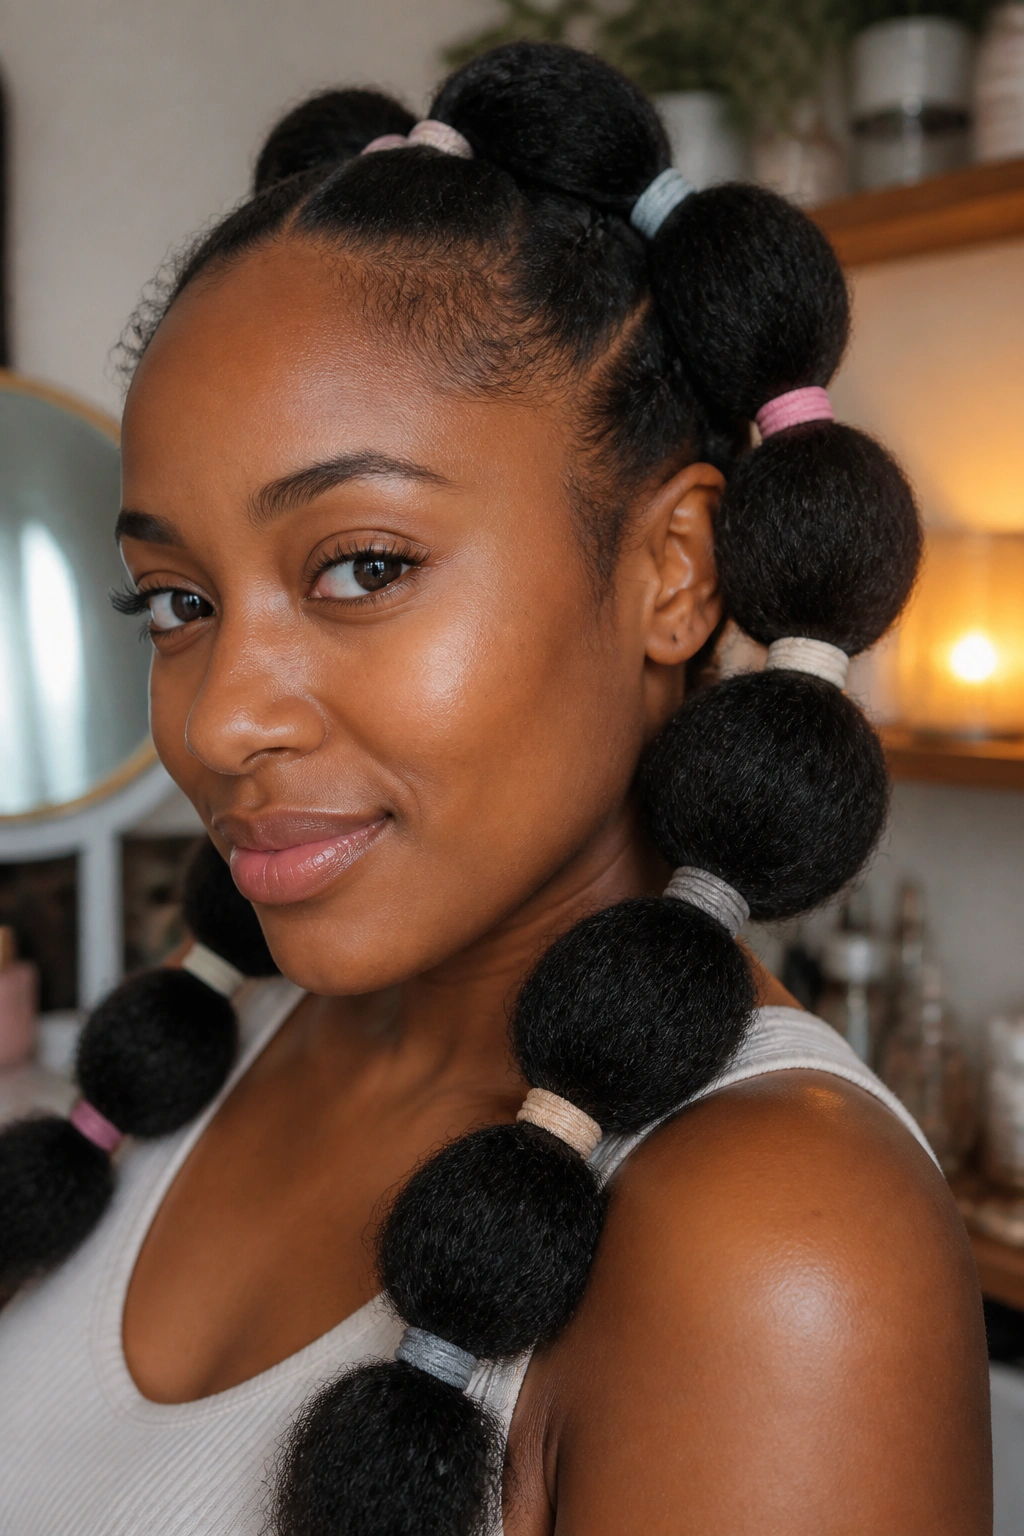
2. Low Slung Double Bubble Pigtails

There is something undeniably nostalgic about pigtails, but the bubble technique matures the look. By keeping the pigtails low at the nape of the neck, you create a more sophisticated silhouette that works just as well with a blazer as it does with a sweatshirt.
The secret to making this look “grown-up” on Type 4 hair is the parting. A clean, sharp center part is essential. Use a rat-tail comb and a bit of styling wax to ensure that line is crisp. For the bubbles, you want to keep them relatively uniform in size. On 4b or 4c hair, the natural kinky texture ensures the pigtails don’t just hang limp; they have a certain “bounce” and rigidity that makes the bubbles look almost like spheres of velvet. It is a tactile, beautiful style that emphasizes the density of your mane.
3. The Galactic Space Bun Bubbles
Space buns are already a favorite for naturals because our hair naturally wants to form those perfect circular puffs. Adding bubbles to the “stems” of the buns or even making the buns themselves out of mini-bubbles takes the look to a different dimension.
Is This Practical for Daily Wear?
Absolutely. While it looks intricate, it is one of the more durable styles for Type 4 hair because the hair is secured at multiple points. If you are heading to a music festival or just want to keep your hair off your neck during warmer months, this is a top-tier choice.
How to Build the Buns
- Divide the hair into two equal sections with a vertical part.
- Secure each side into a high ponytail.
- If you have shorter hair, add a bit of Marley braiding hair to the base of the ponytail for extra “bubble” material.
- Place elastics every inch, fluffing the hair out as you go, then wrap the “bubbled” tail around the base and pin.
4. Half-Up Half-Down Multi-Bubbles
Sometimes you aren’t ready to commit to a full updo. You want the drama of your coils falling over your shoulders, but you need the hair out of your face. This is where the half-up bubble style shines.
Imagine you are headed to a brunch where you want to look effortless but put-together. You section off the front third of your hair, creating three or four small ponytails that feed into each other with bubbles. The rest of your Type 4 hair is left out in its natural glory—maybe a fresh wash-and-go or a defined twist-out.
The Mechanism of the Feed-In
- Start with a small ponytail at the very front hairline.
- Secure it, then pull that tail back into the next section.
- Add an elastic to combine them, creating a bubble between the two points.
- Repeat until you reach the crown of your head. The contrast between the structured, sleek bubbles on top and the wild, voluminous texture in the back is a stunning way to highlight the versatility of your hair.
5. Side-Swept Romantic Bubbles
This style is for when you want to feel a bit more elegant. By shifting the entire “ponytail” to one side, you create a soft, asymmetrical look that frames the face beautifully. It is a fantastic choice for wedding guests or even brides with Type 4 hair who want to keep things natural but structured.
To get this right, you have to be mindful of the tension. Type 4 hair is famously strong but its points of curvature are fragile. When sweeping the hair to one side, use a soft-hold cream rather than a heavy-duty gel to keep the hair pliable.
The bubbles here should be larger and softer. Instead of tight, round spheres, aim for an elongated “teardrop” shape. You can achieve this by spacing the elastics further apart—maybe four inches—and only lightly tugging the hair outward. The result is a cascading effect that looks like a complex braid but takes ten minutes to assemble.
6. Short Hair Bubble Accents
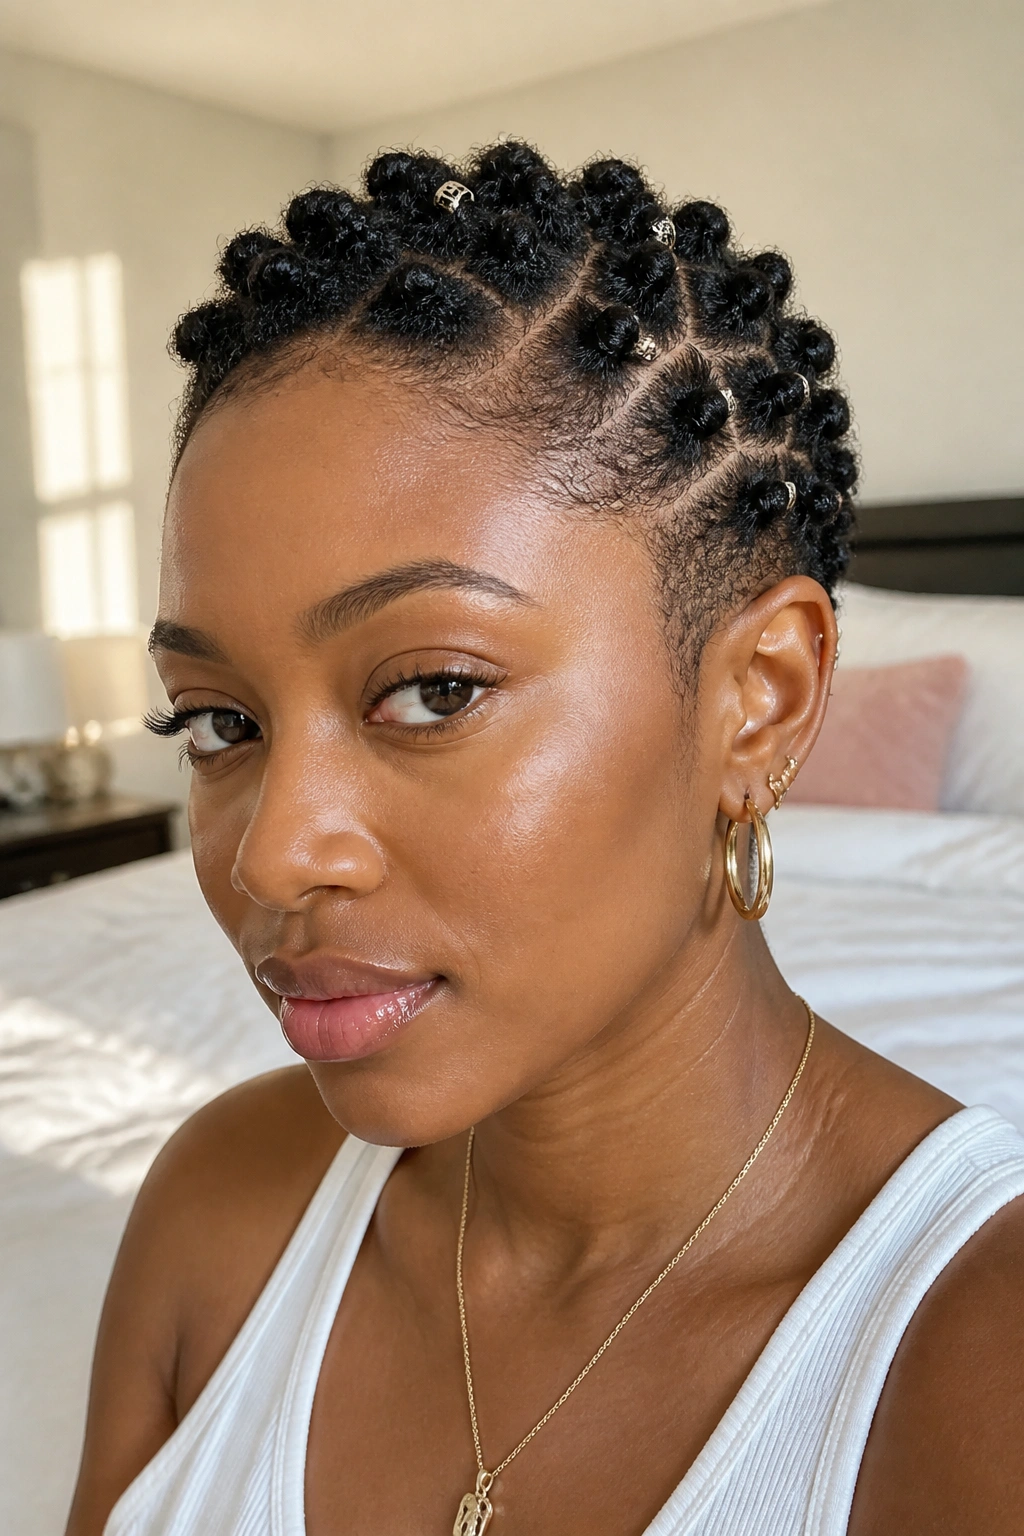
Don’t let the “length” requirements of most bubble braid tutorials discourage you. If you are rocking a TWA (Teeny Weeny Afro) or a tapered cut, you can still participate.
What Makes It Different?
Unlike long-hair styles that focus on the “tail,” short hair bubble braids focus on the scalp. You are essentially creating “flat” bubbles that sit against the head, similar to how cornrows look.
Who It Is Best For
This is perfect for someone in the “awkward stage” of hair growth. If your hair is too long to be a TWA but too short for a ponytail, mini-bubbles are your best friend. Recommendation: Use small, colorful silicone bands. They provide more grip on shorter hair lengths. Just be sure to use a pair of hair scissors to snip them out later—never pull them off, or you’ll lose the progress you’ve made on your hair growth.
7. The Butterfly Bubble Braid
The butterfly effect is all about intentional messiness. While most bubble styles aim for sleekness, this one celebrates the “frizz” and texture that comes naturally to 4c hair. It is supposed to look ethereal and slightly unraveled.
You start with a standard bubble ponytail, but instead of pulling the hair out evenly to make a circle, you pull small loops of hair out further than others. This creates a jagged, wing-like texture. Because Type 4 hair has so much “shrinkage-memory,” these loops will stay in place without needing a gallon of hairspray. It turns your ponytail into a piece of wearable art.
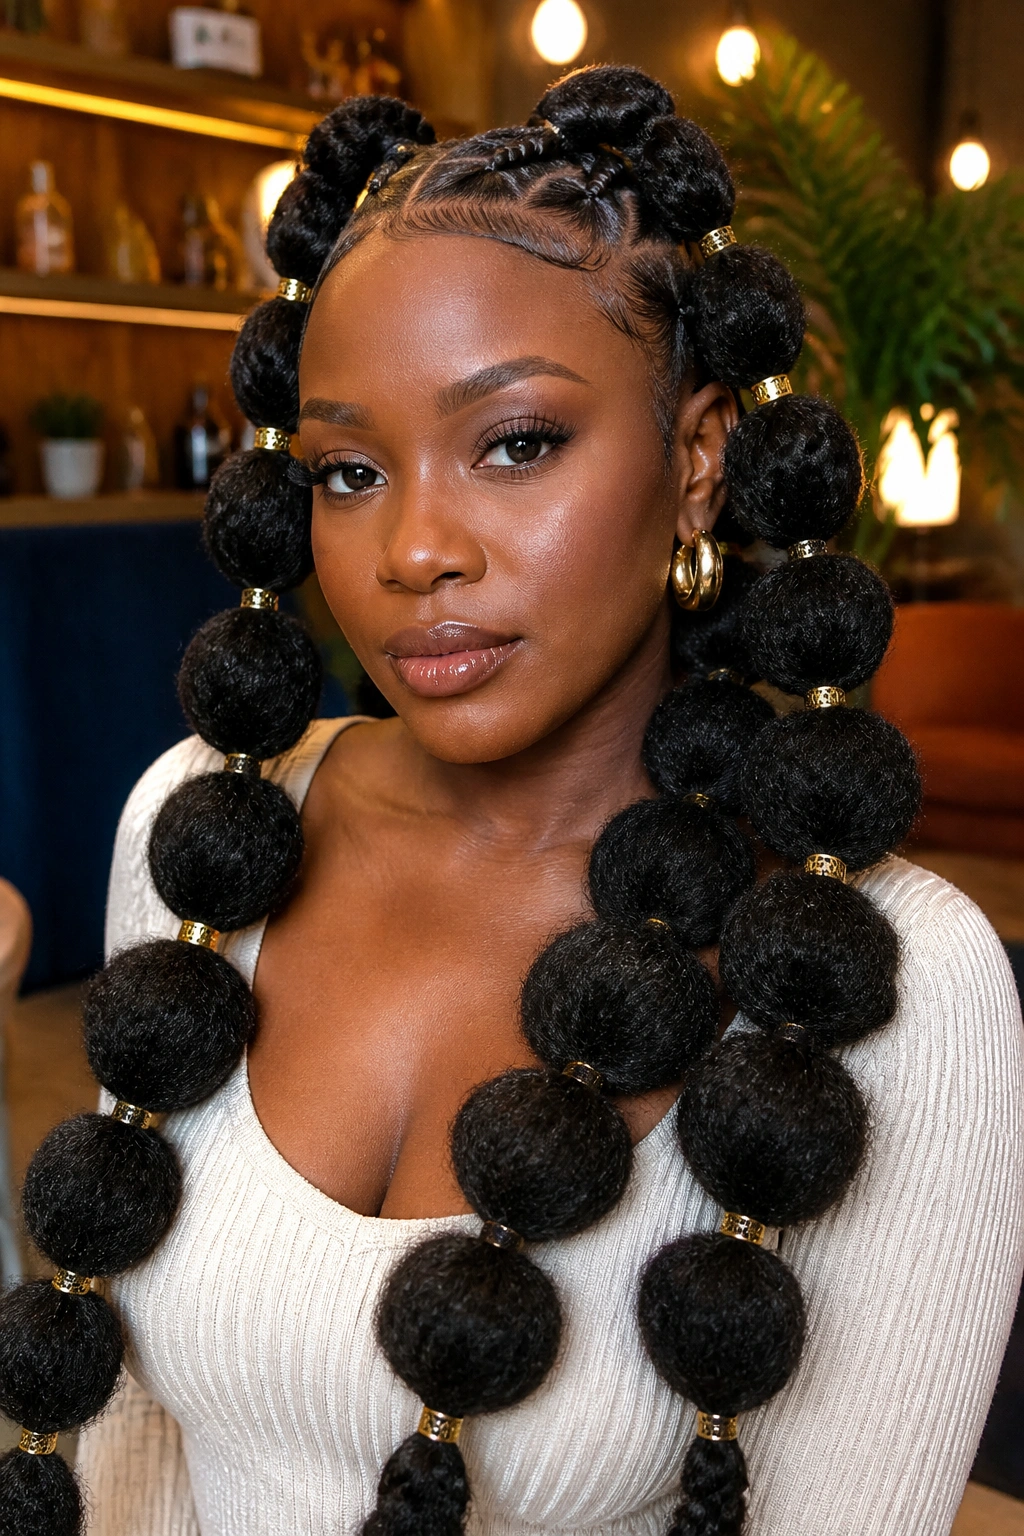
8. Butterfly Bubbles with Gold Leaf Accents
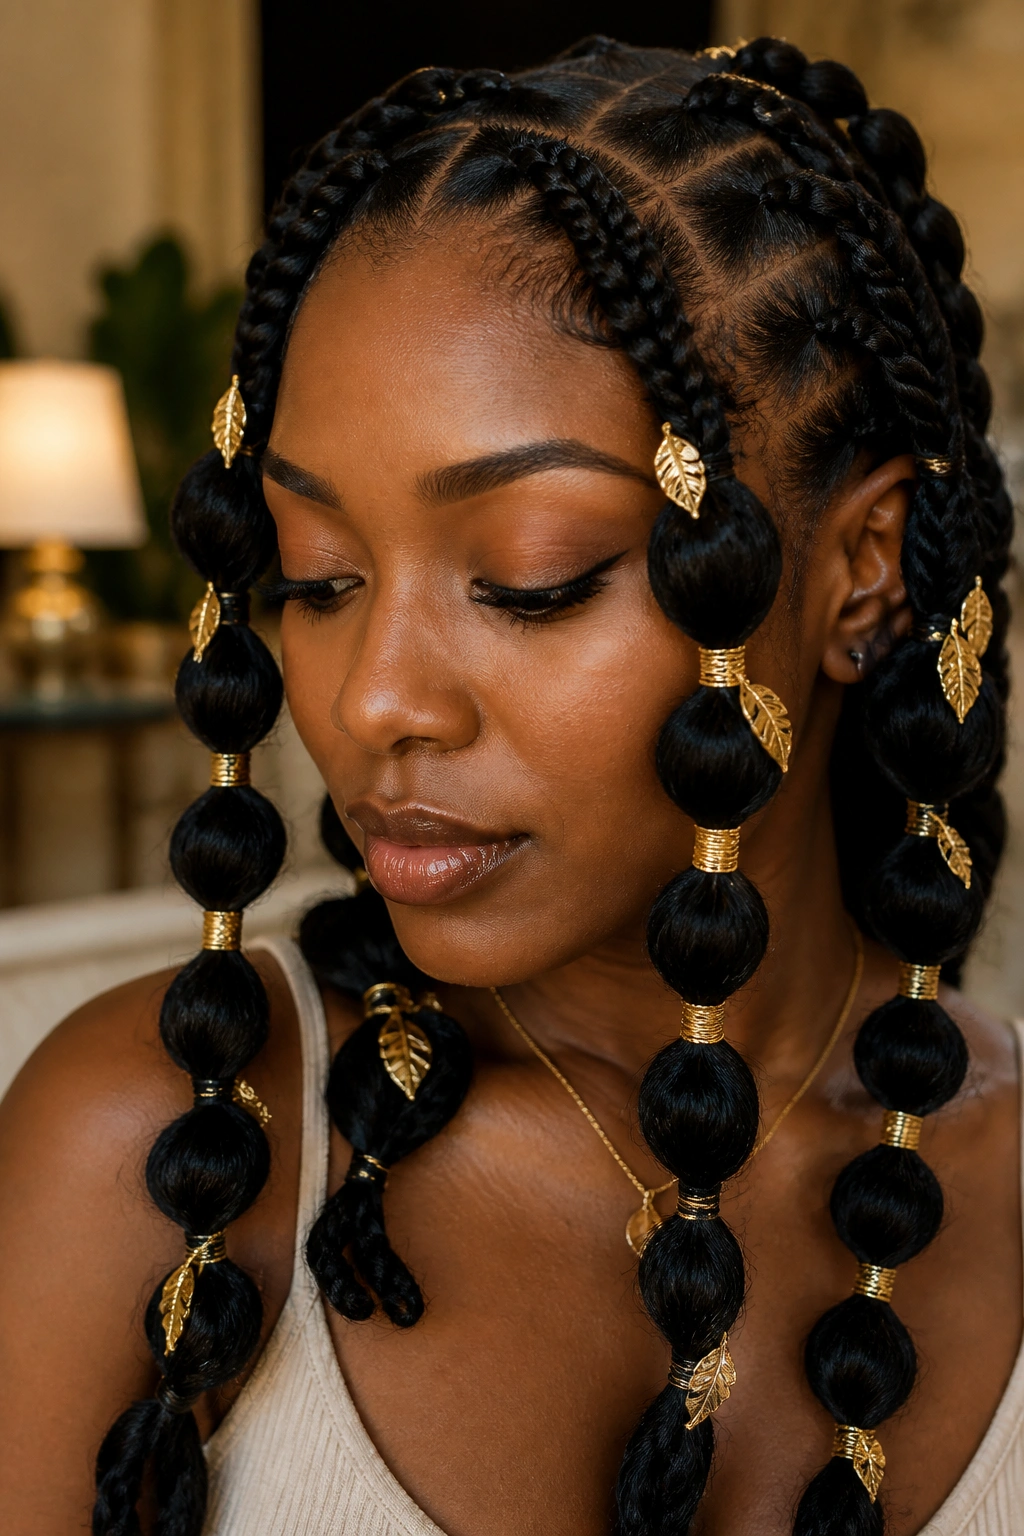
If the standard butterfly look isn’t enough, adding metallic accents takes it to a high-fashion level. This isn’t just about hair; it’s about making a statement. You can find gold or silver wire at most beauty supply stores, which you can wrap around the elastics.
On the dark, rich canvas of Type 4 hair, gold leaf or gold cuffs pop with incredible intensity. The texture of the “butterfly” loops provides the perfect nooks and crannies to tuck in small floral pins or jewels. It is a maximalist approach that looks particularly stunning in photos.
9. Triple-Row Bubble Mohawk (The Fro-Hawk)
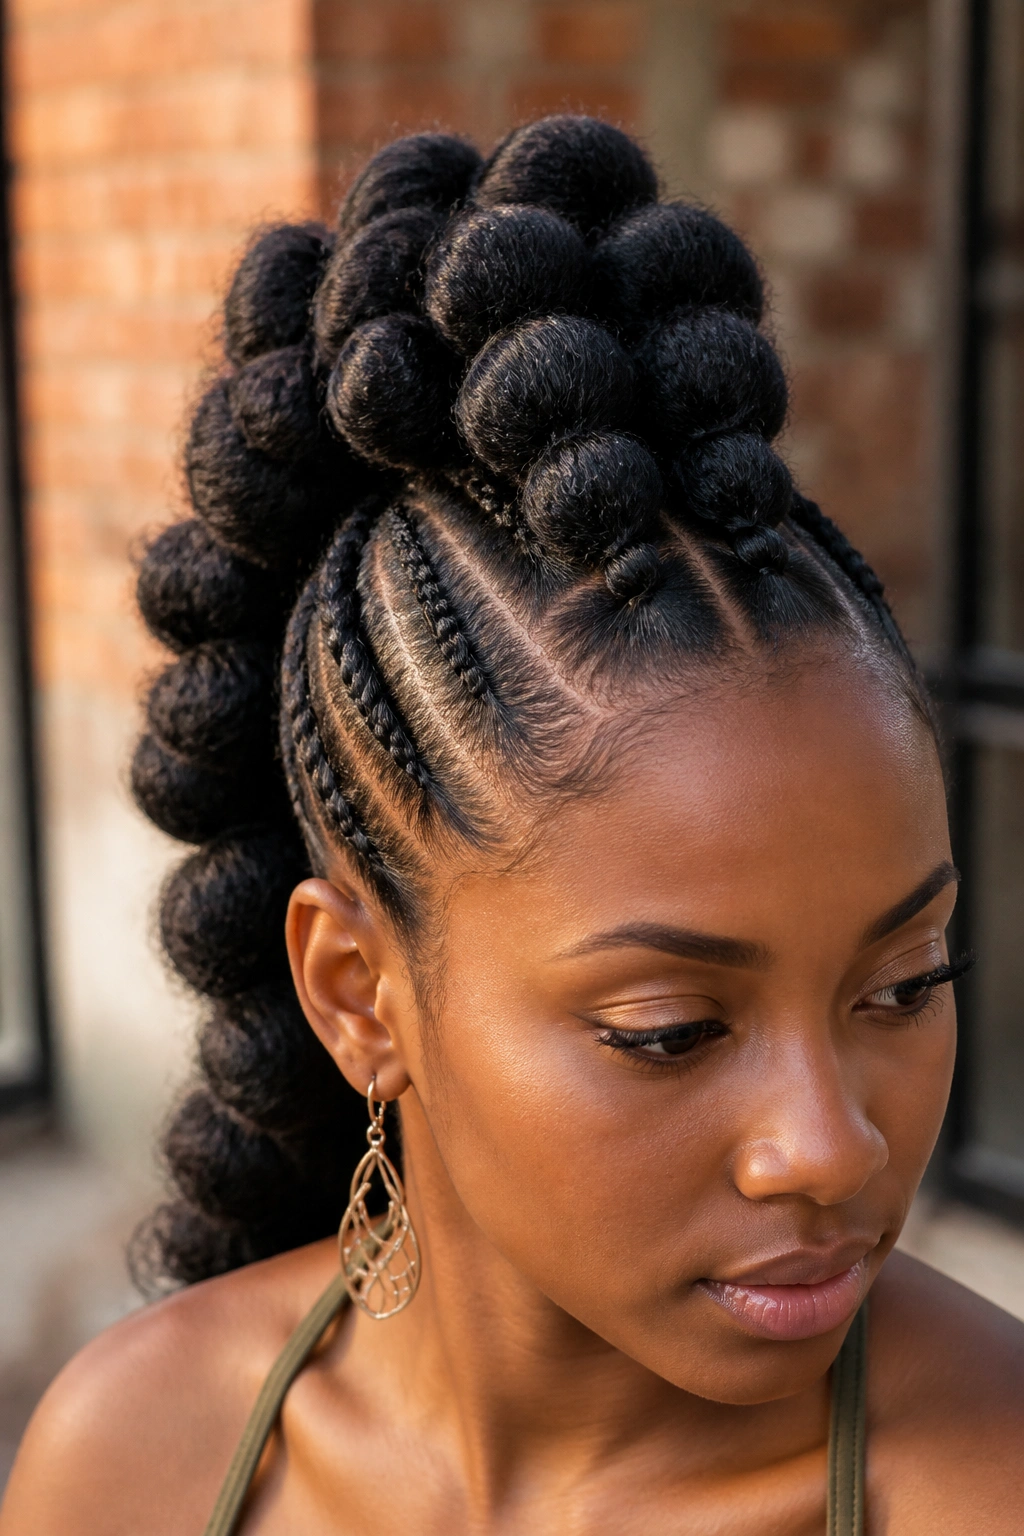
The Mohawk is a staple in the natural hair world because our hair “defies gravity” so naturally. To create a bubbled version, you divide your hair into three vertical columns from forehead to nape.
Each column is then turned into a series of bubbles. This creates a very dense, very structured look that mimics the appearance of a complex weave or an elaborate set of bantu knots. It’s an edgy look that completely protects the ends of your hair since they are tucked into the bubbles. If you’re a side-sleeper, this is actually a surprisingly comfortable style to maintain because the “action” is all down the center of your head.
10. Ombre Extensions with Bubble Braids
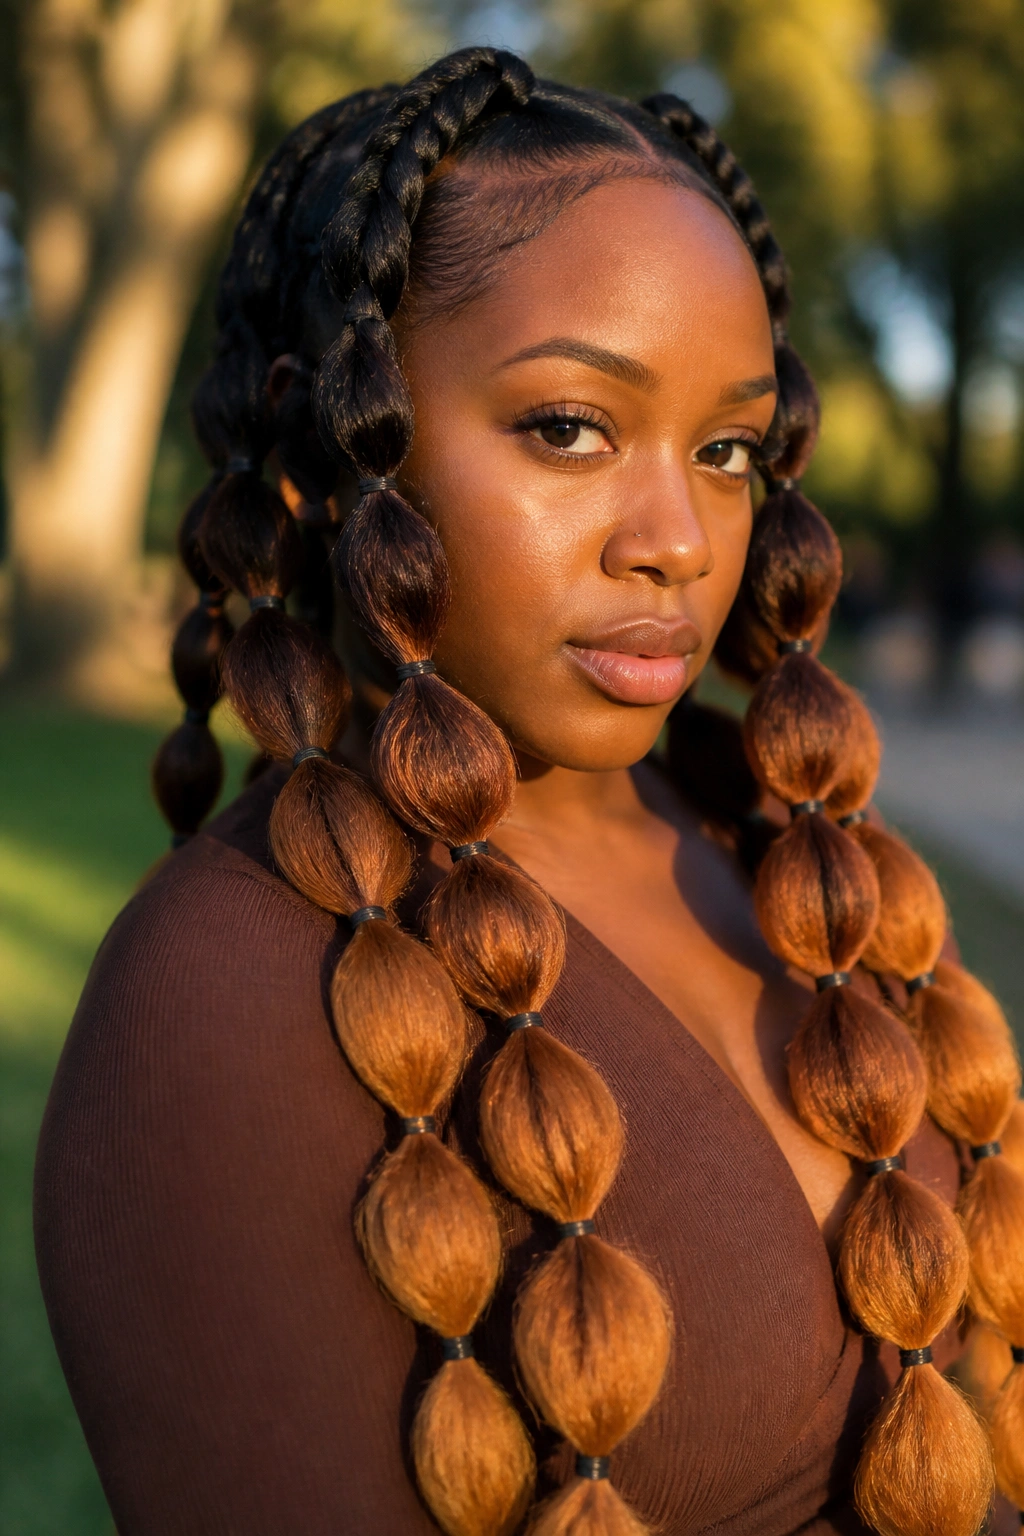
Sometimes the goal is length that our natural hair hasn’t reached yet. Adding Kanekalon or Marley hair to your bubbles is a great way to experiment with color without the commitment of dye.
Why Add Extensions?
Extensions provide a consistent base if your hair has different textures or lengths across your head. They also add “meat” to the bubbles, making them look jumbo and dramatic.
How to Integrate Them
- Secure your natural hair into a small, tight bun where you want the ponytail to start.
- Loop the extension hair over the bun and secure with a heavy-duty elastic.
- Blend your natural hair into the extension hair using a bit of styling cream.
- Proceed with the bubbling process. The ombre effect—starting dark at your roots and fading into a copper, honey blonde, or even a bold blue—looks spectacular when the color transition happens right at the “pinch” of a bubble.
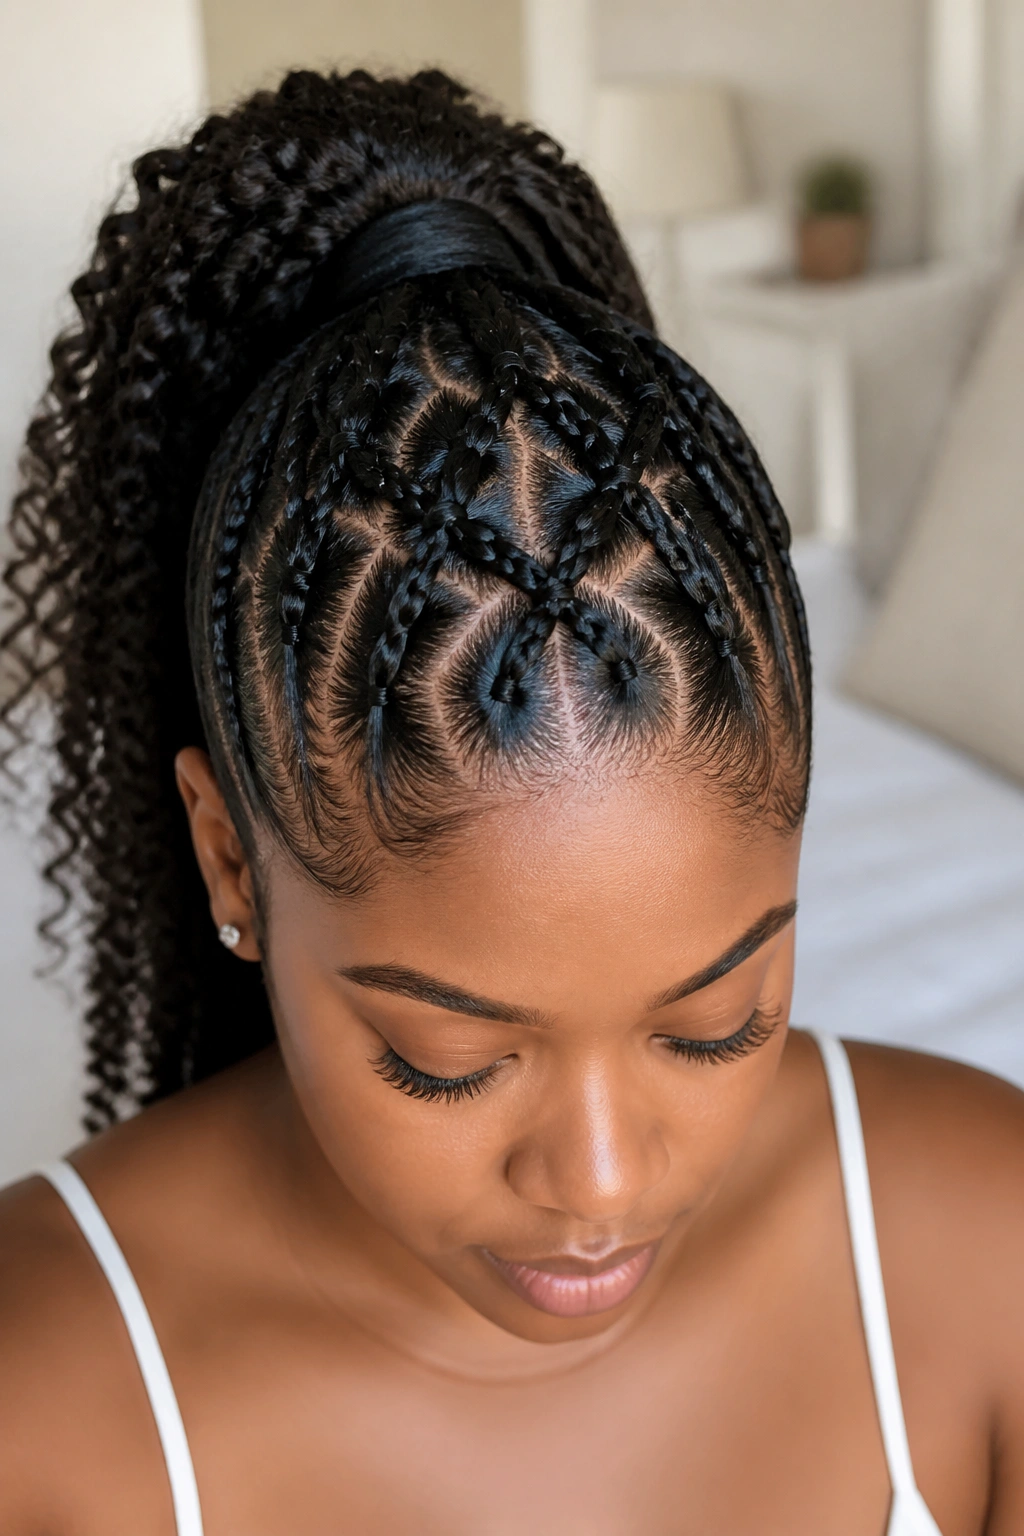
11. Zig-Zag Parting with Mini Bubbles
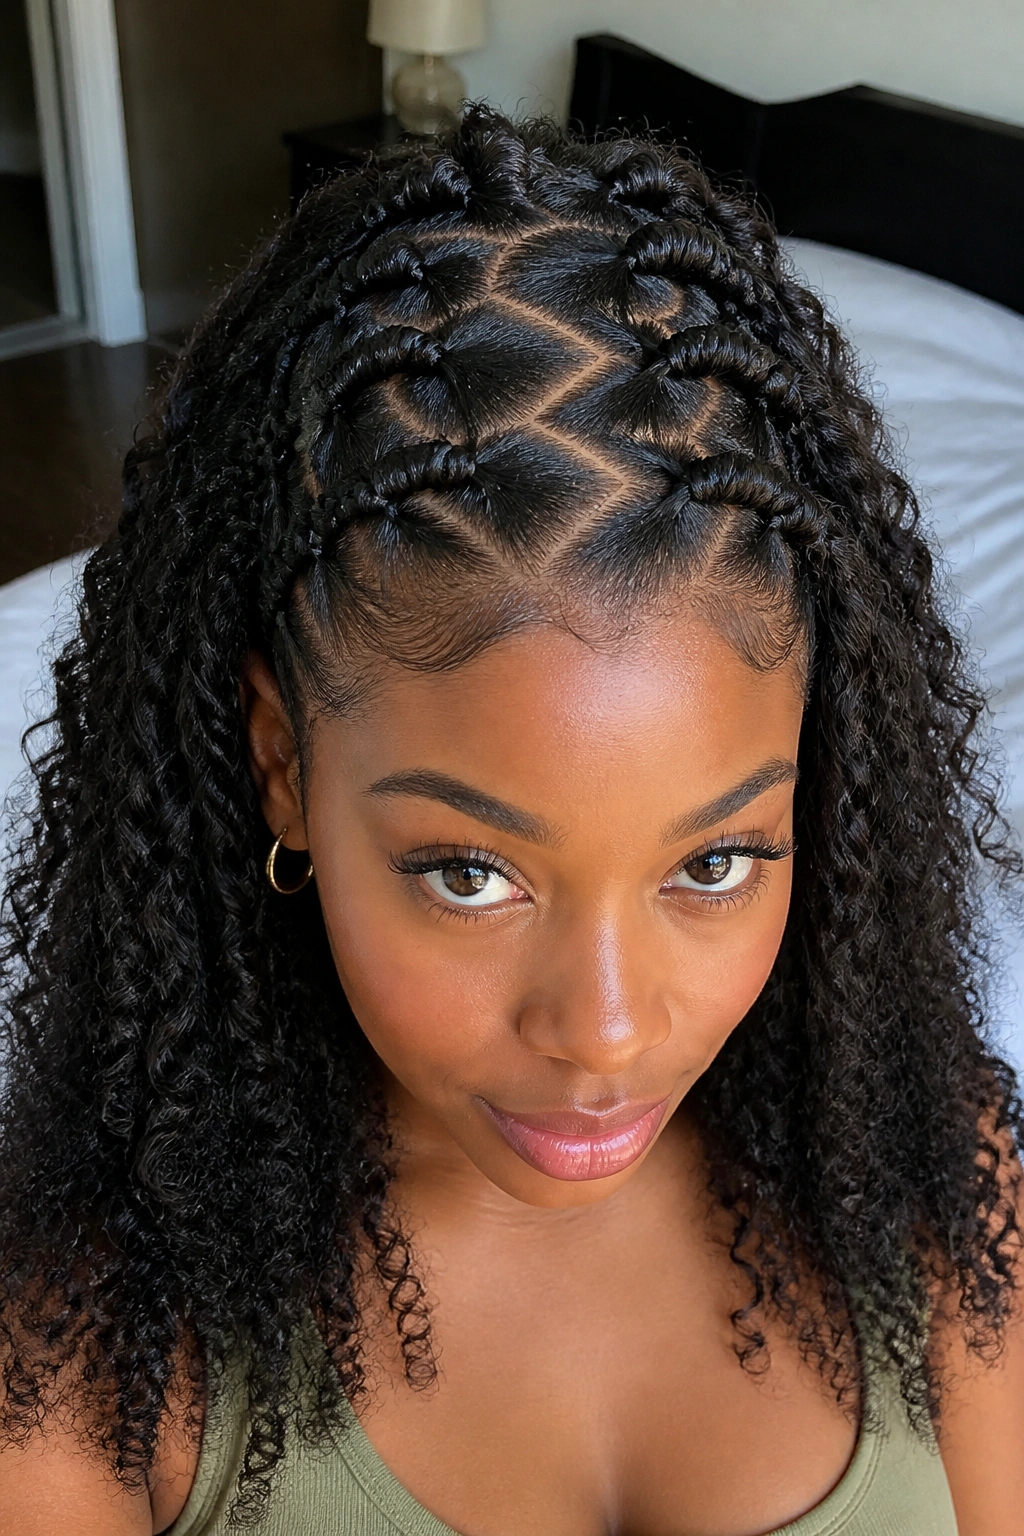
The parting is the unsung hero of any Type 4 hairstyle. If you’re bored with straight lines, a zig-zag part adds an immediate sense of “design” to the look.
This requires a steady hand and a good rat-tail comb. Once the part is established, you can create two rows of mini bubbles that follow the jagged line. It’s a bit of a “90s throwback” vibe that has stayed relevant because it looks so deliberate. For 4c hair, the zig-zag part stays visible longer because the hair is less likely to “slide” back together than finer hair types.
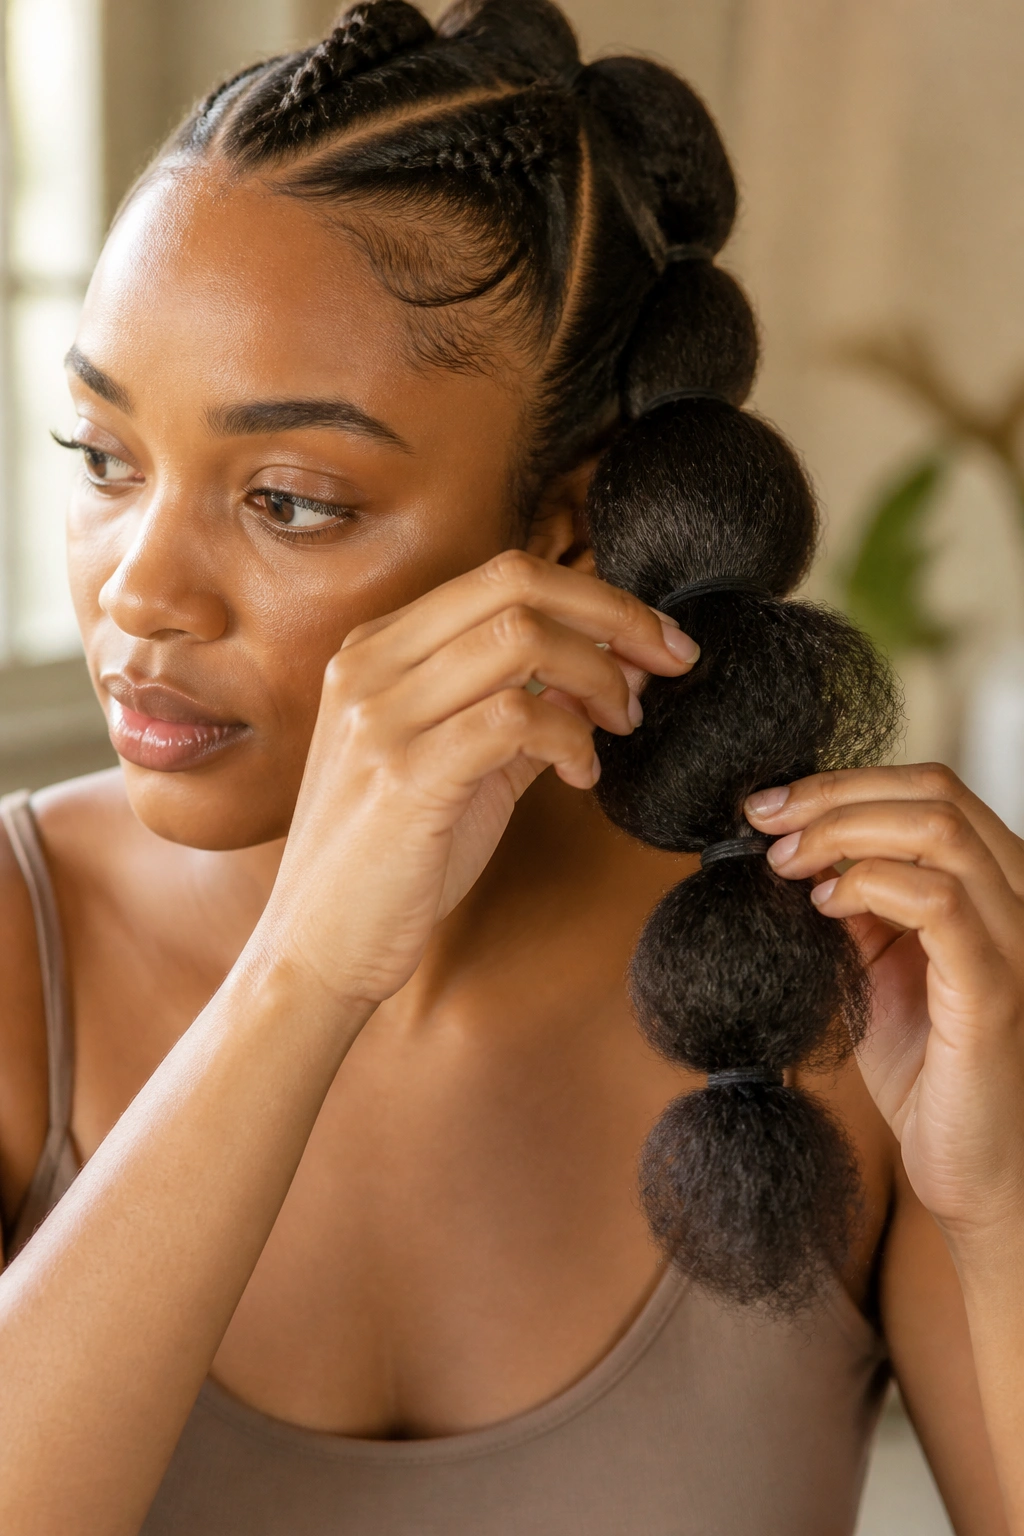
12. French Braid Hybrid Bubbles
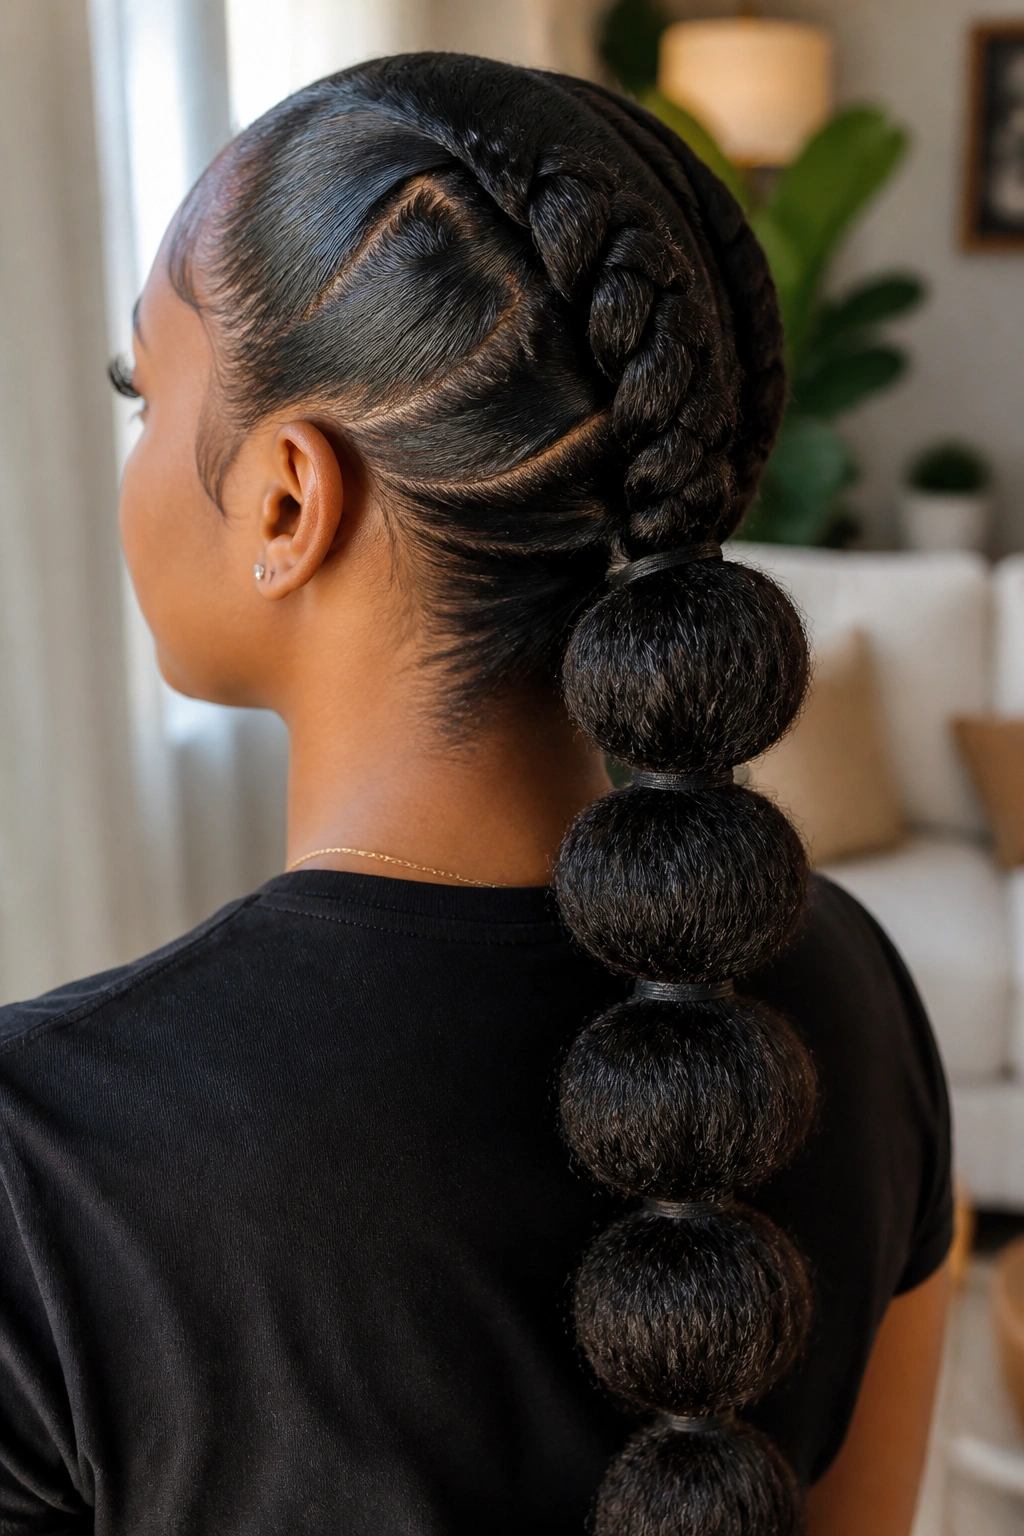
This is for the person who actually can braid but wants to save time. You start by French braiding or flat-twisting the hair from the forehead back to the crown. Once you reach the point where the hair would normally become a free-hanging braid, you switch to bubbles.
It gives you the sleek, “tucked-in” look of a braid against the scalp but the voluminous, playful look of bubbles in the back. It’s the best of both worlds. Plus, the French braid section helps to distribute the weight of the hair more evenly, which is great if you have very heavy, dense coils.
13. Bubble Braids with Curly “Leave-Out” Ends
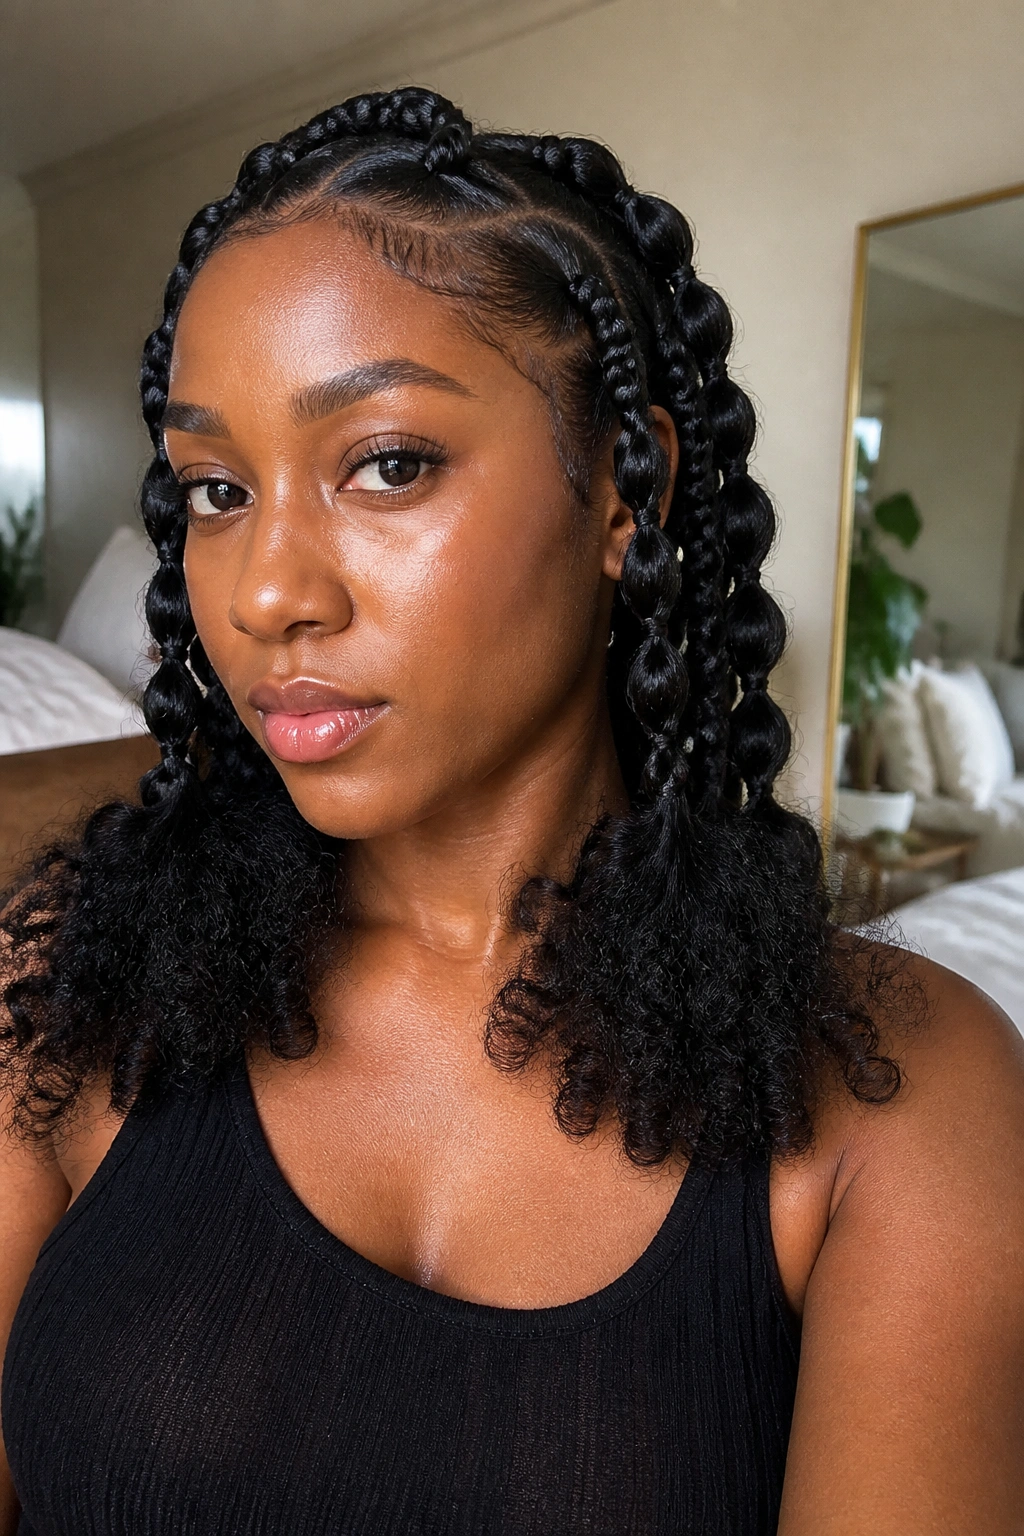
Who says you have to bubble the hair all the way to the bottom? One of the most popular ways to wear this on natural hair is to stop the bubbles about three or four inches from the ends.
You secure the last elastic and then fluff out the remaining hair into a massive, curly puff. If your hair is Type 4, those ends will naturally form a beautiful, textured cloud. You can define them further with a bit of curling jelly or just let them be “wild.” It adds a bit of softness to the otherwise geometric look of the bubbles.
14. The “Crown” Bubble Braid
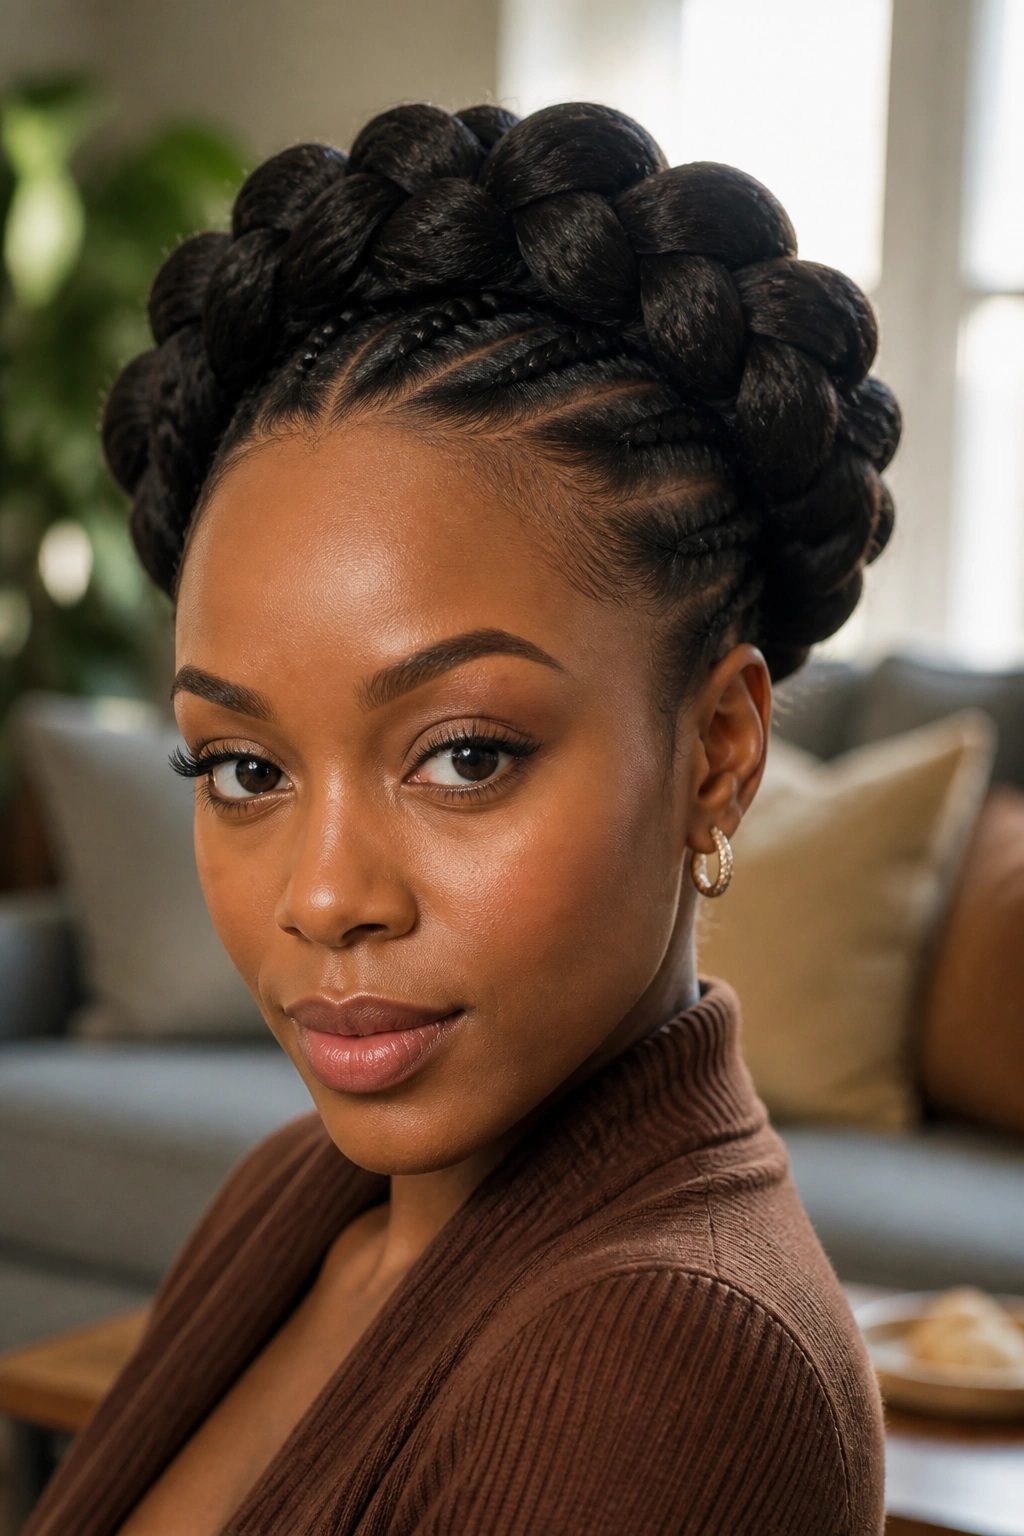
This involves creating a circle of bubbles that goes all the way around the perimeter of your head. It’s like a halo braid, but much easier to execute.
You start behind one ear and work your way around, feeding each section into the next. On Type 4 hair, this “halo” looks incredibly thick and regal. It’s a fantastic protective style because it keeps your ends completely shielded from the environment. Just make sure you aren’t pulling the sections too tight around your temples—the hair there is the most prone to traction alopecia.
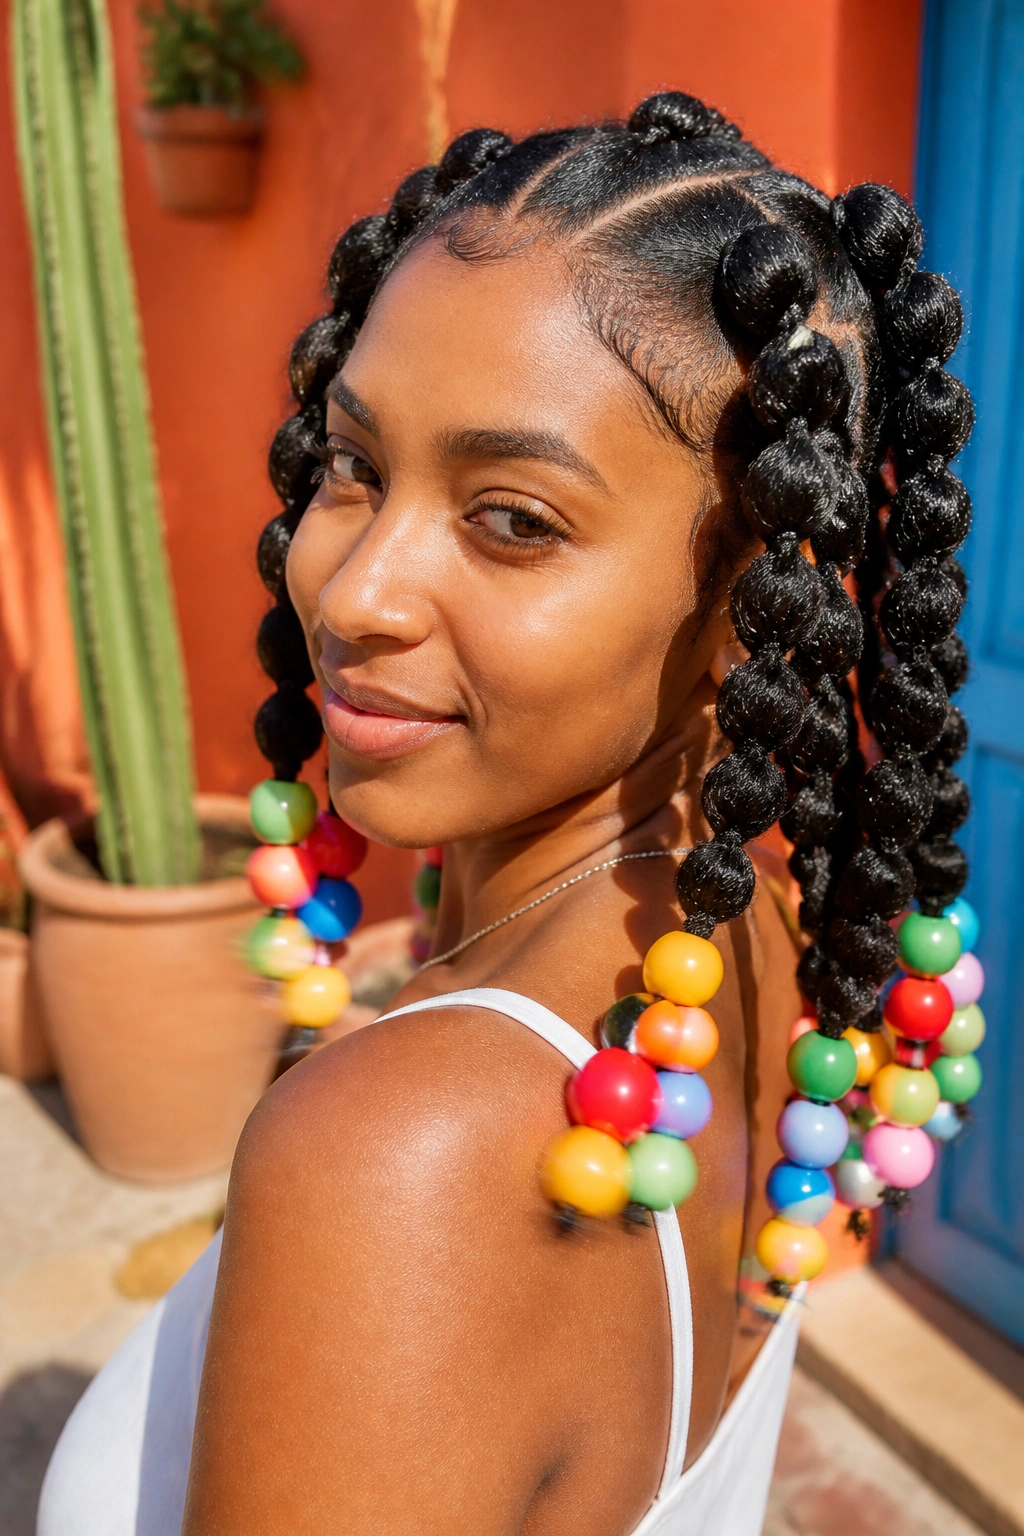
15. Bubbles with Colorful Jumbo Beads
If you want to lean into a more traditional or Afro-centric aesthetic, adding jumbo wooden or plastic beads to the ends of your bubble braids is a must.
The weight of the beads actually helps the bubble braids hang with a bit more “swing.” It’s a rhythmic, musical hairstyle—you’ll hear the beads clack as you move. For Type 4 hair, the beads provide a nice contrast to the soft, matte texture of the coils. It’s a favorite for younger naturals, but it has plenty of appeal for adults looking for a “vacation hair” vibe.
16. Heart-Parted Accent Bubbles
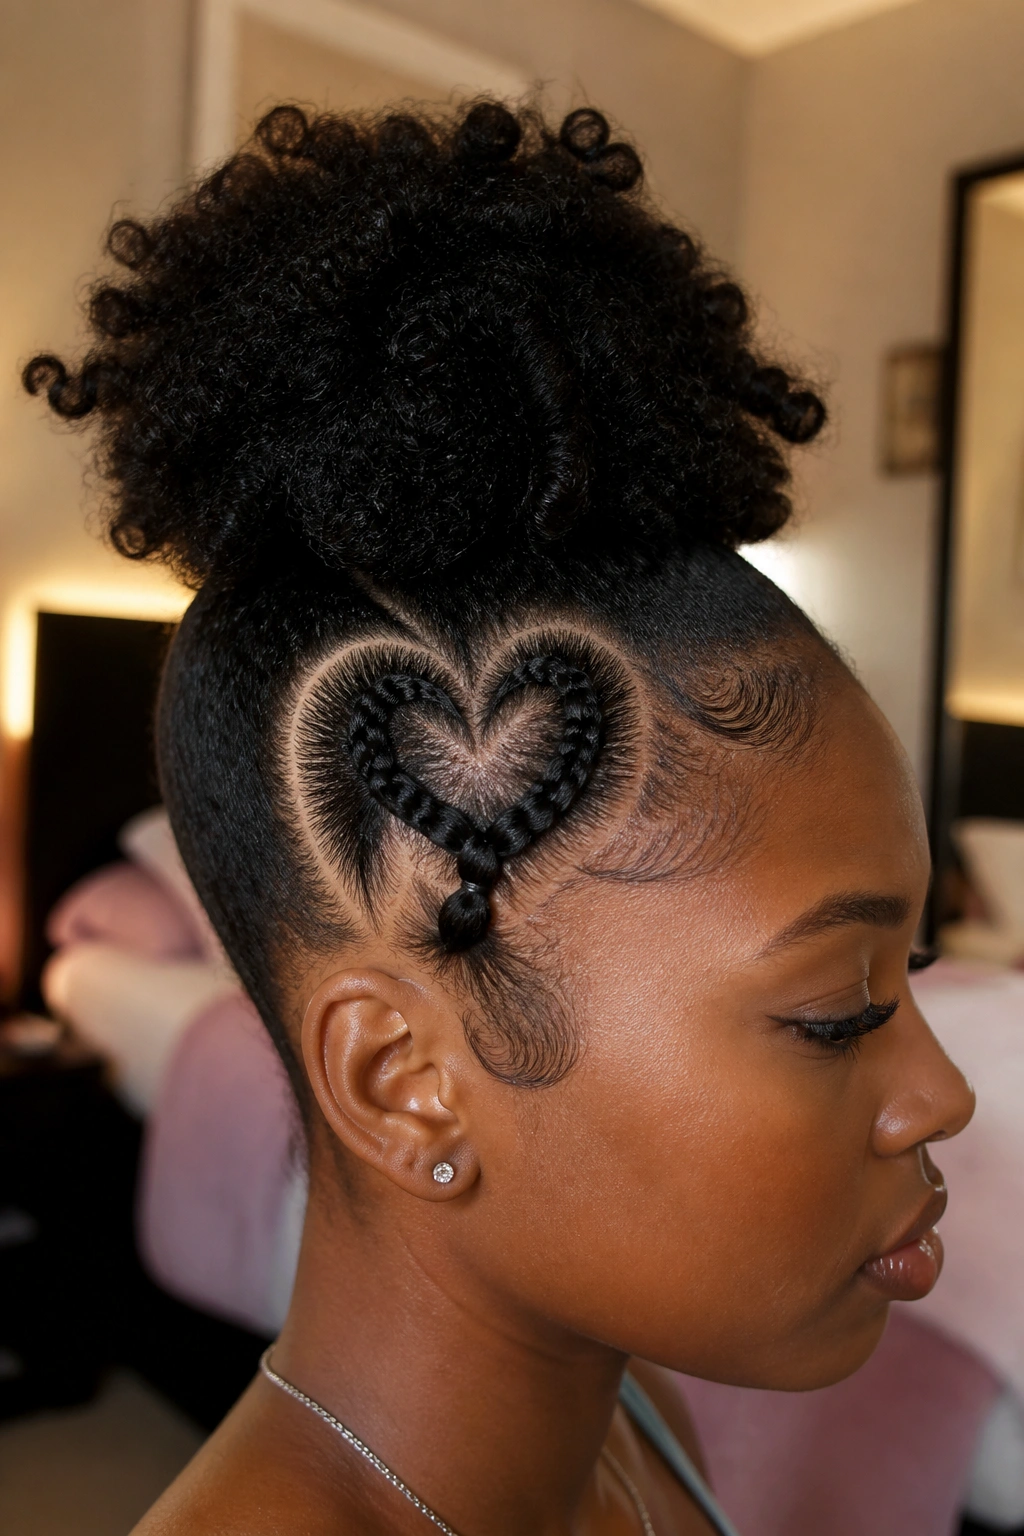
This is a high-skill parting technique where you create a heart shape on the side of the head, and the hair within that heart is gathered into a small bubble braid.
The rest of the hair can be in a puff, a bun, or left out. It’s a “hidden detail” that people only notice when they get close. Because Type 4 hair holds a part so well, the heart shape stays crisp for days. It’s a little bit of whimsy that shows off your personality.
17. The “Pineapple” Bubble Ponytail

The pineapple method is usually for sleeping, but it can be a style in itself. You gather all the hair at the very front of the head, almost on the forehead.
You create 2-3 large bubbles that “waterfall” forward over your face. It’s a bold, edgy look that works particularly well if you have a shorter back and sides. It’s essentially a textured fringe made out of bubbles. It’s daring, fashion-forward, and keeps people’s eyes on your facial features.
18. Criss-Cross Front Section Bubbles
Before the main ponytail or buns start, you can create a “lattice” effect on the front of your head. You take small sections of hair, bubble them once, then cross the tails over each other into the next row of sections.
This creates a “diamond” pattern on the scalp. It’s a great way to manage “new growth” if you are between wash days. The criss-cross pattern hides any frizz at the roots and makes the whole style look like it took hours of professional work.
19. Bubbles with Ribbon Intertwined
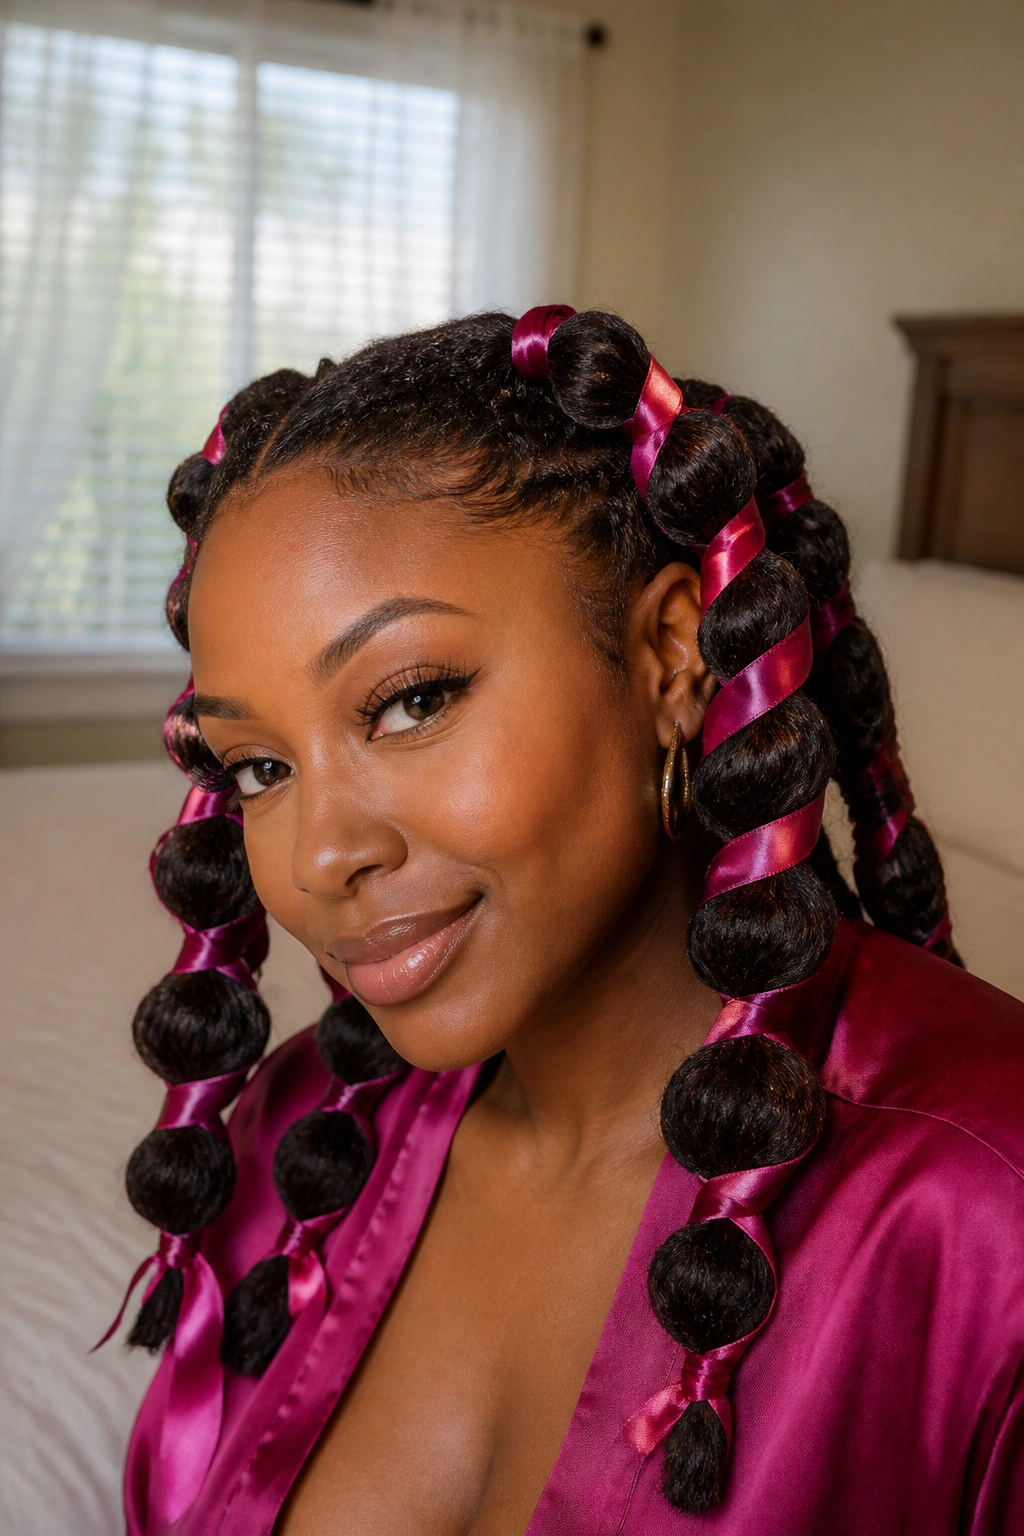
Instead of just using elastics, you can take a long piece of satin ribbon and wrap it around the “pinched” parts of the bubbles.
The ribbon adds a pop of color and a different texture (shiny vs. matte). It also helps to hide the rubber bands if you aren’t a fan of the “exposed elastic” look. Using a ribbon that matches your outfit can tie your whole look together. Just be sure to use satin or silk—cotton ribbons can suck the moisture out of your Type 4 hair and cause breakage.
20. Faux-Locs Bubble Hybrid
If you have existing faux locs or even real locs, you can still do bubble braids! You simply treat each loc as if it were a section of hair.
Because locs are already thick and structured, the “bubbles” you create will be massive and very defined. It’s a great way to style locs for a formal event without having to do a complex updo. The texture of the locs adds an extra layer of “grit” to the style that looks incredibly cool.
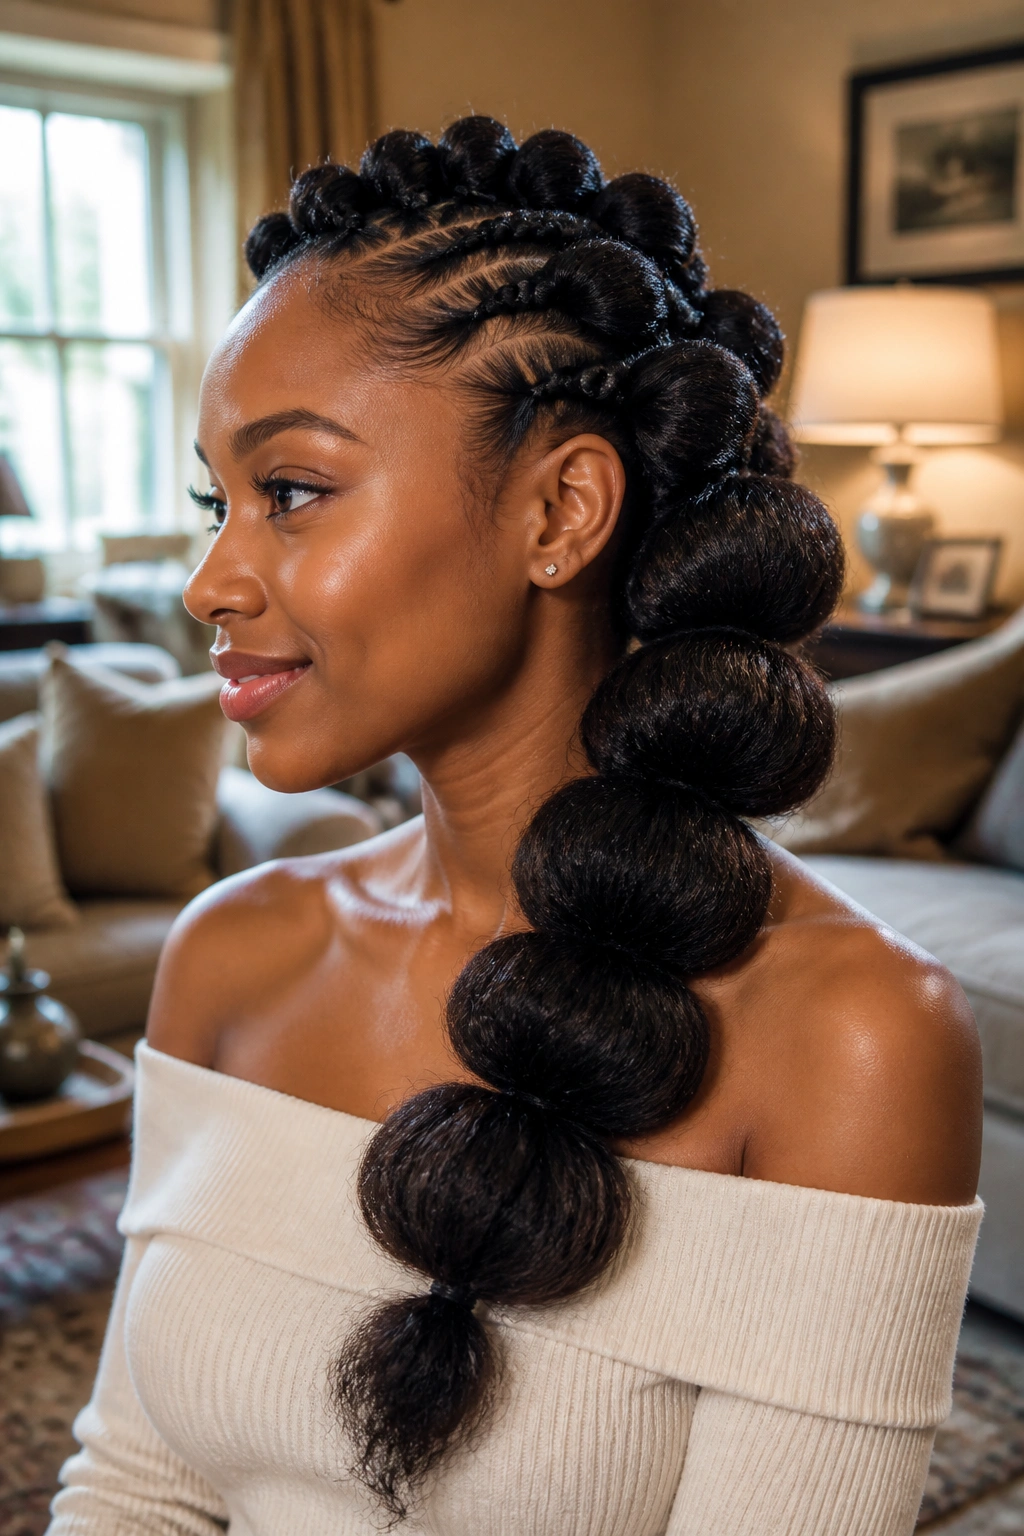
21. Sleek Low-Back Triple Bubbles
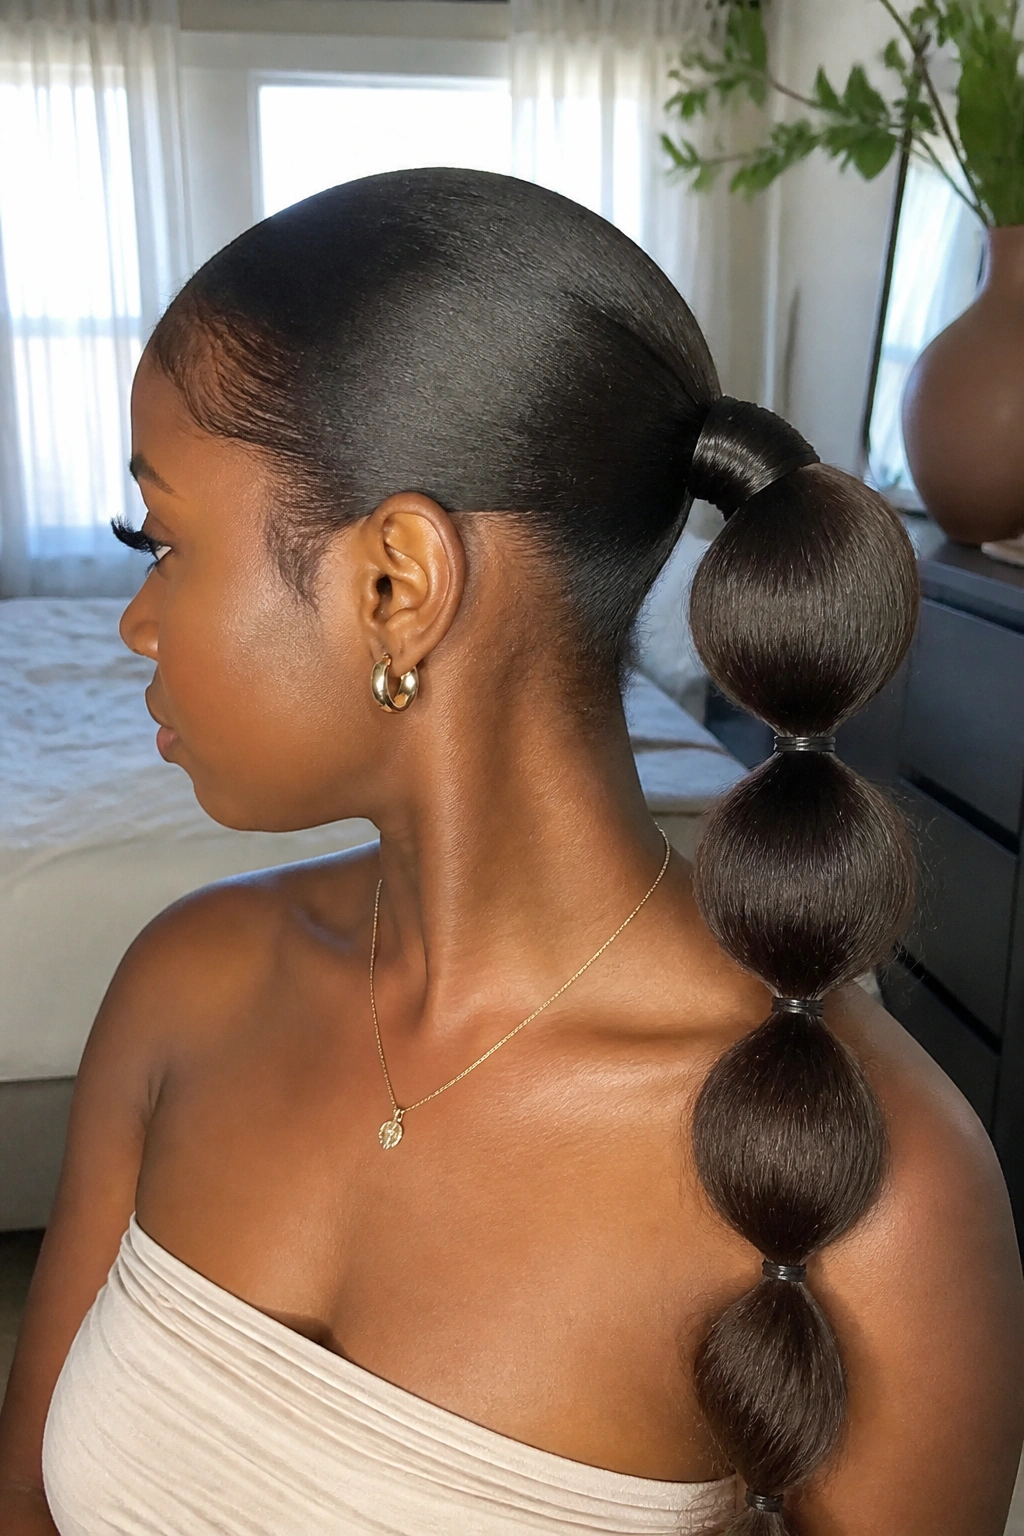
For a more minimalist, “clean girl” aesthetic, a single low ponytail with just three large, perfectly uniform bubbles is the way to go.
This style relies on perfection. The hair should be as sleek as possible, and the bubbles should be exactly the same size. On Type 4 hair, achieving this level of sleekness usually involves a good blow-dry (with heat protectant!) to stretch the hair first. The result is a sophisticated, “quiet luxury” look that proves bubble braids aren’t just for casual days.
22. Rainbow Elastic “Festival” Bubbles
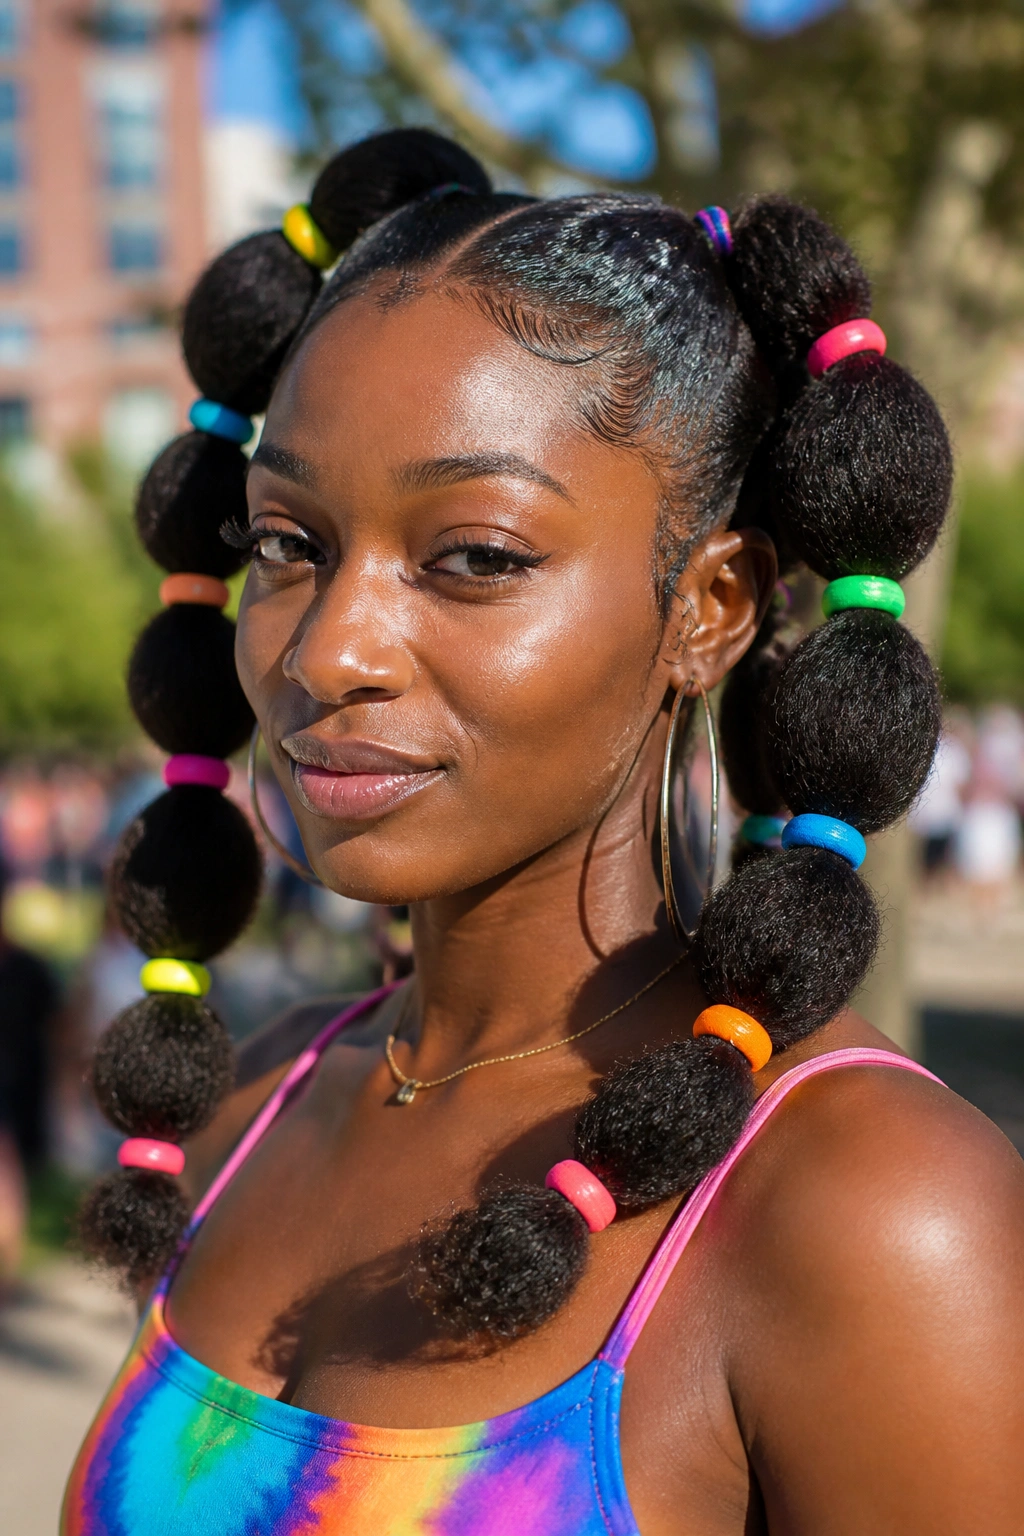
Finally, we have the most fun version: using a different color elastic for every single bubble.
If you have ten bubbles in a ponytail, you use ten different colors. It’s vibrant, loud, and joyful. On dark hair, these neon colors look electric. It’s a great way to celebrate the playfulness of natural hair. It reminds us that hair doesn’t always have to be “serious” or “perfectly laid”—it can just be fun.
Preparing Type 4 Hair for Tension
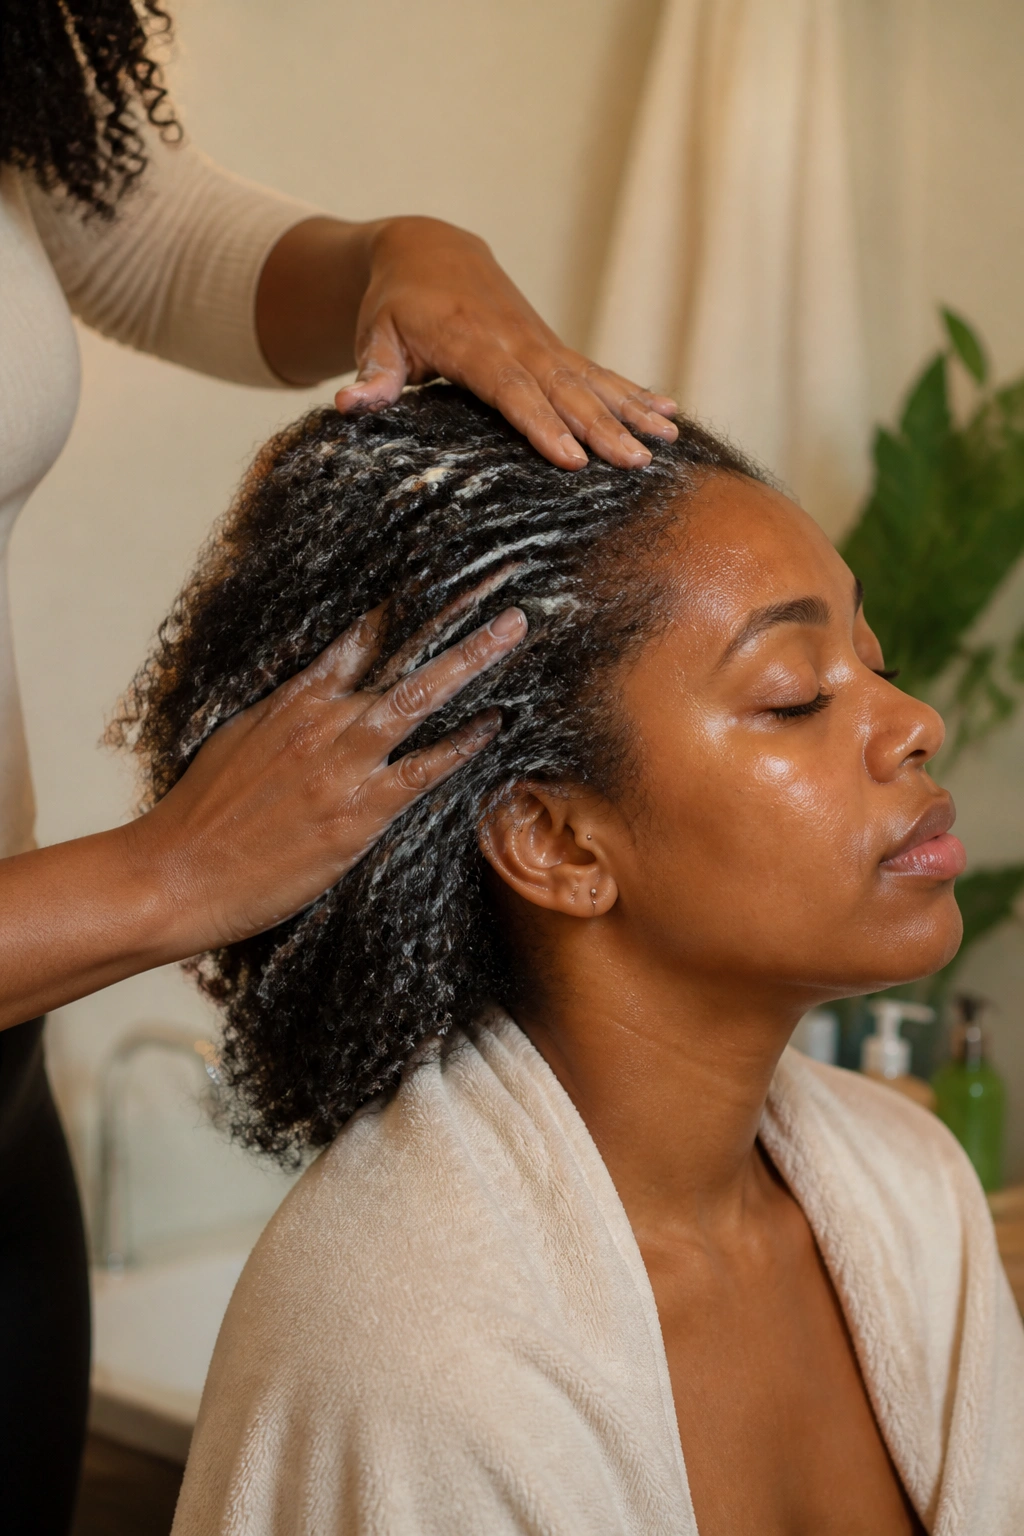
Before you even reach for the elastics, you have to prepare your hair. Type 4 hair is the most fragile of all hair types because the “bends” in the hair strand are natural weak points. If you apply tension to dry, brittle hair, you are going to see a lot of “hair dust” on your shoulders—also known as breakage.
Start with a deep conditioning treatment. You want your hair to be as “elastic” as the bands you’re using. A protein-moisture balance is key here. Once the hair is washed and conditioned, apply a heavy leave-in or a botanical gel. This provides “slip.” Slip is your best friend when sectioning because it prevents the hair from tangling back onto itself.
If you are going for a sleek look, you might want to work on stretched hair. You don’t necessarily need a flat iron—a “tension blowout” with a blow dryer on a cool or medium setting is usually enough to get the hair elongated enough to make the bubbles pop. Working on soaking wet hair can lead to “bubble shrinkage,” where your style looks great at 9:00 AM but has shrunk by 30% by noon.
Choosing the Right Elastics for Coily Hair
Not all rubber bands are created equal. In fact, most of those cheap, multicolored bands from the dollar store are a nightmare for Type 4 hair. They have tiny ridges that act like saws against the hair cuticle.
Look for “Ouchless” bands or silicone elastics that have a smooth finish. Even better, look for small, cloth-covered hair ties. If you absolutely have to use the standard rubber ones, here is a professional secret: soak them in a bowl of jojoba or olive oil for twenty minutes before you use them. The oil creates a barrier so the rubber doesn’t “grab” the hair.
Also, consider the size. If you’re doing jumbo bubbles, you need a band that can wrap around your hair density at least twice without being so tight it cuts off circulation to the hair shaft. If the band is too tight, you’ll notice “thinning” at the points where the bubbles are pinched. That’s a sign of mechanical damage, and it’s something to avoid at all costs.
How to “Puff” the Bubbles Without Tearing
The “pancaking” technique—where you pull the hair out to create the bubble—is where the magic happens. However, if you do this too aggressively on Type 4 hair, you can cause the “inner” hairs of the bubble to snap.
Instead of grabbing a large chunk of hair and yanking, use your fingers to gently “tease” the outer layers of the section. Think of it like fluffing a pillow. You want to move in a circular motion, pulling a little from the left, then the right, then the top, then the bottom.
If you find that the hair isn’t “sliding” out easily, it means your hair is too dry. Stop immediately and apply a tiny bit of hair oil or a moisturizing mist to that section. The hair should move with minimal resistance. Remember, the goal is a bubble, not a tangled nest.
Maintaining Bubble Braids Overnight
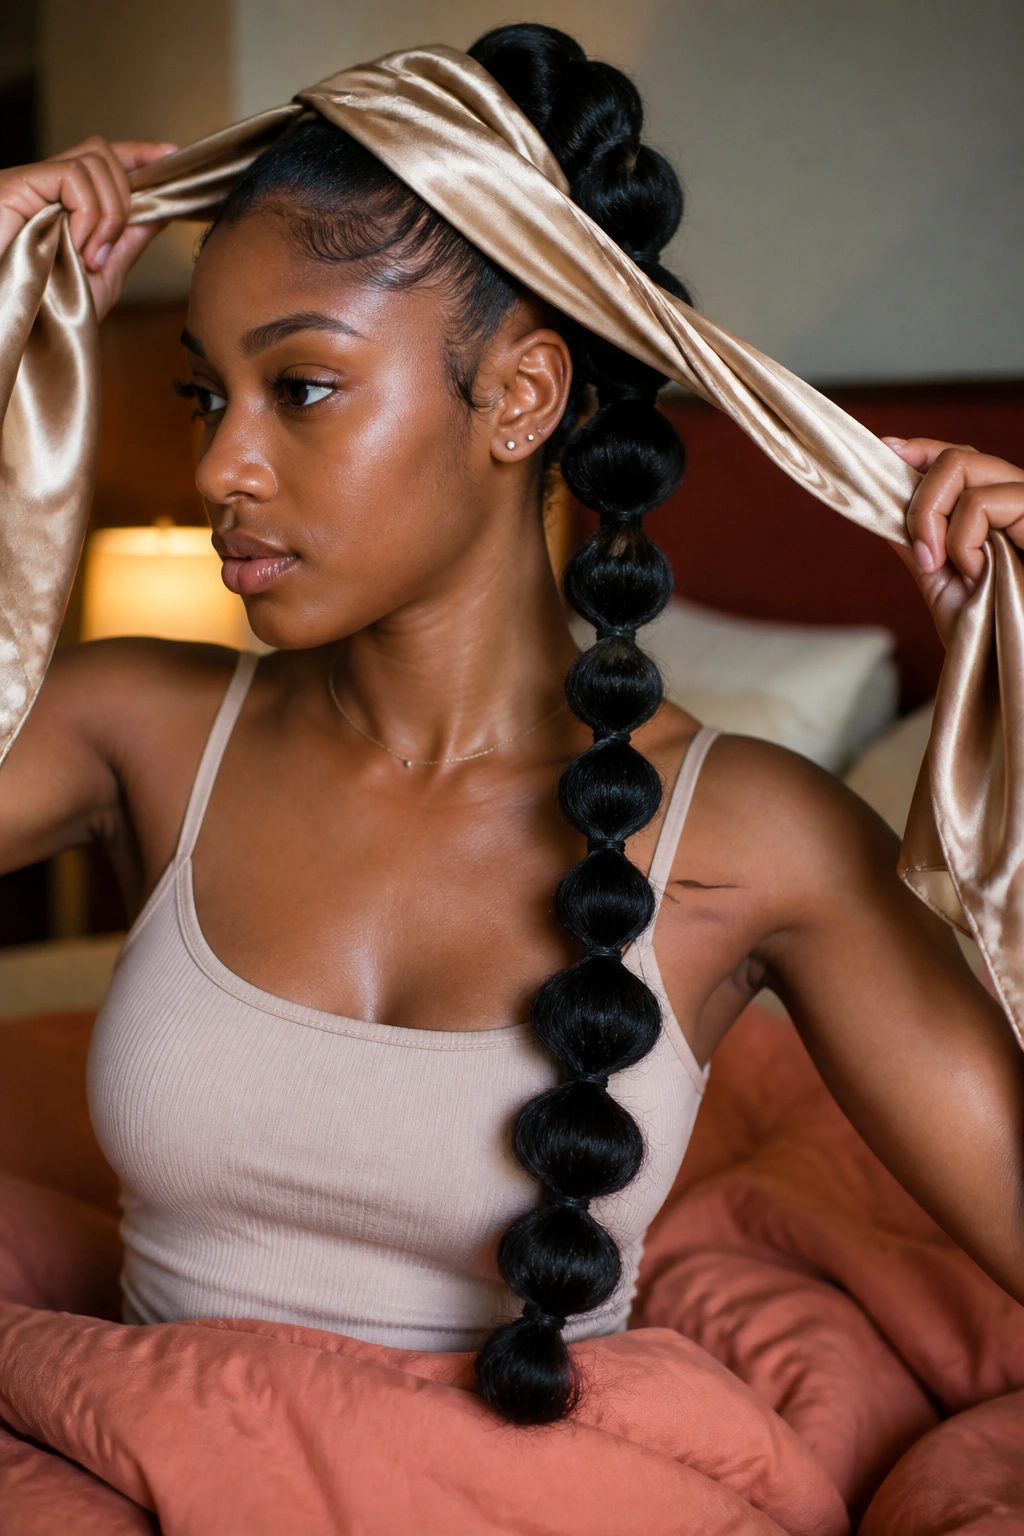
One of the biggest questions people have is: “How do I sleep with these?” If you’ve spent thirty minutes getting your parting and bubbles perfect, you don’t want to wake up with a frizzy mess.
The first rule is the satin or silk scarf. But here is the trick: don’t just throw a bonnet on and hope for the best. A bonnet allows the ponytail to move around, which creates friction and frizz. Instead, use a long silk scarf to “wrap” the base of your hair (the sleek part). For the bubbled ponytail itself, you can actually use a “hair sleeve” or even a clean silk stocking to keep the bubbles compressed and in place.
If you have multiple bubble braids (like pigtails), you can gently fold them up and pin them to the top of your head before putting on your scarf. This prevents you from laying on the elastics, which can be uncomfortable and cause tension on your scalp.
Safe Removal to Prevent Length Loss
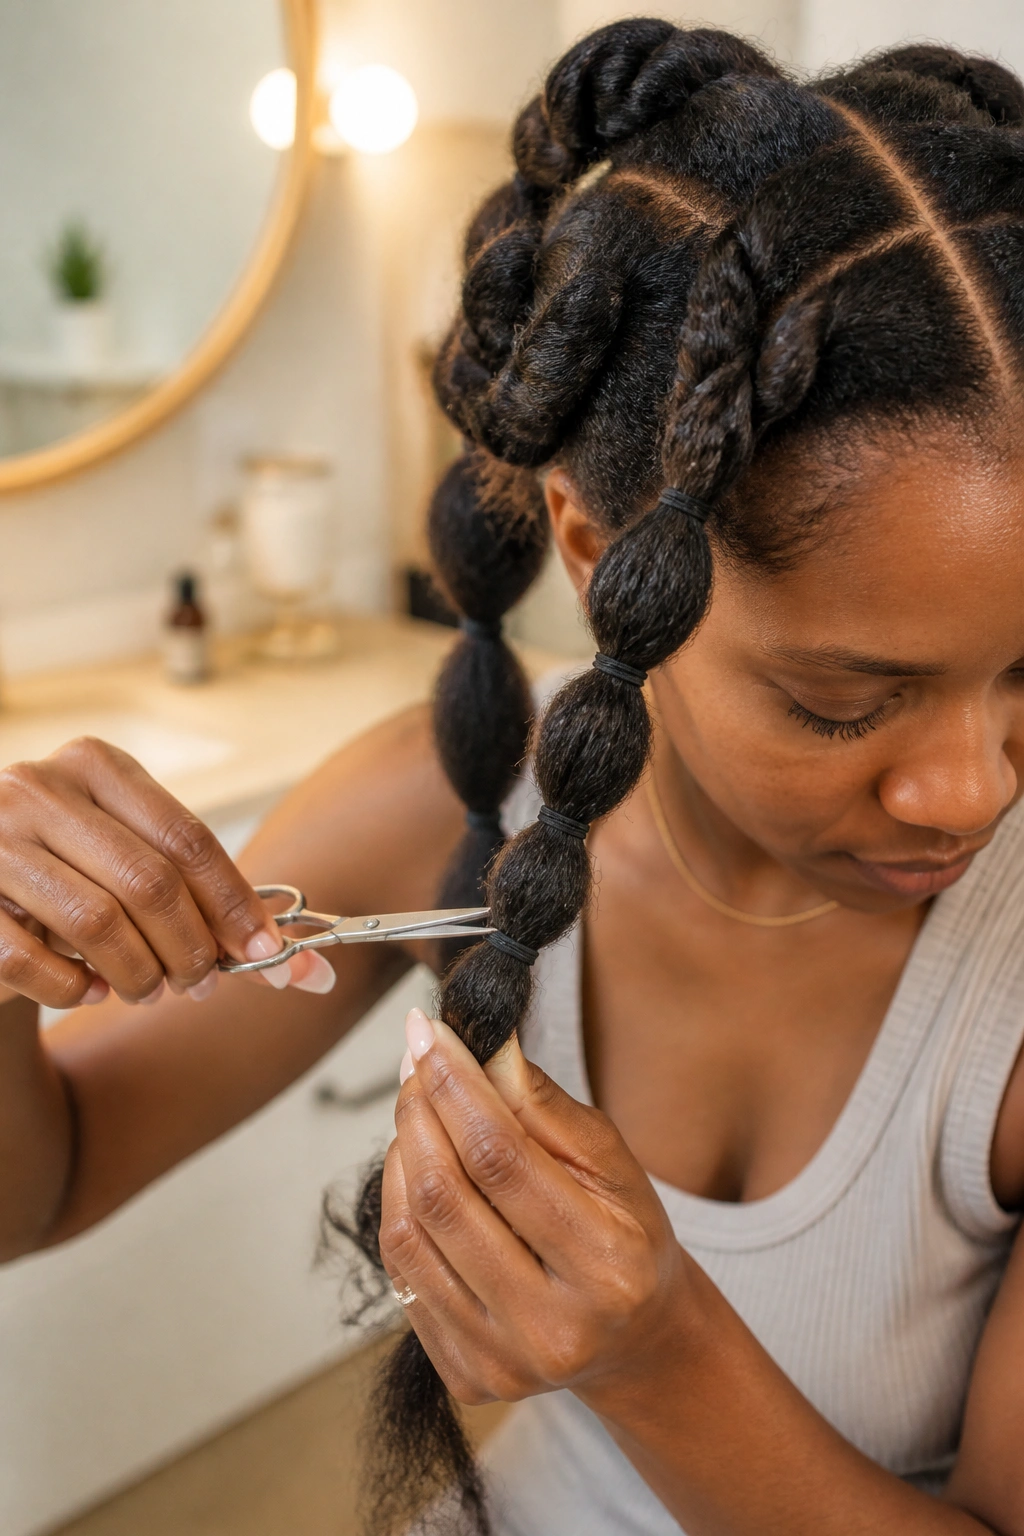
The removal process is actually where most people damage their hair. After a few days, your Type 4 hair will have started to “mesh” with the elastic. If you try to slide the elastic off, you will inevitably take a few strands of hair with it.
Never slide the bands off. The only safe way to remove bubble braids on Type 4 hair is to snip the elastics. Use a pair of small embroidery scissors or a specialized “hair elastic cutter” (yes, they exist!). Carefully hook the tool under one loop of the elastic and snip. The band will pop off, and your hair will remain intact.
Once all the bands are out, don’t immediately go in with a comb. Your hair will be in “crinkled” sections. Use your fingers and a bit of oil to gently detangle each section. You’ll likely see some “shed hair”—don’t panic. We naturally lose about 100 hairs a day, and because your hair was secured in bubbles, those shed hairs had nowhere to go. They aren’t breakage; they’re just natural shedding that has been “held captive” for a few days.
Final Thoughts

Bubble braids are more than just a “lazy” alternative to traditional braids; they are a celebration of the unique structural properties of Type 4 hair. We spend so much time trying to tame our volume or fight our shrinkage, but this style asks us to use those exact traits to create something beautiful.
From the boardroom-ready sleek low pony to the festival-inspired rainbow butterfly look, there is a version of this style for every personality and every occasion. The key is in the details: the health of your hair, the quality of your elastics, and the gentleness of your touch. When you treat your coils with respect, they will reward you with a style that looks like a million bucks. So, the next time you’re staring at your reflection and feeling overwhelmed by your mane, grab a pack of (oiled!) elastics and start bubbling. You might just find your new signature look.