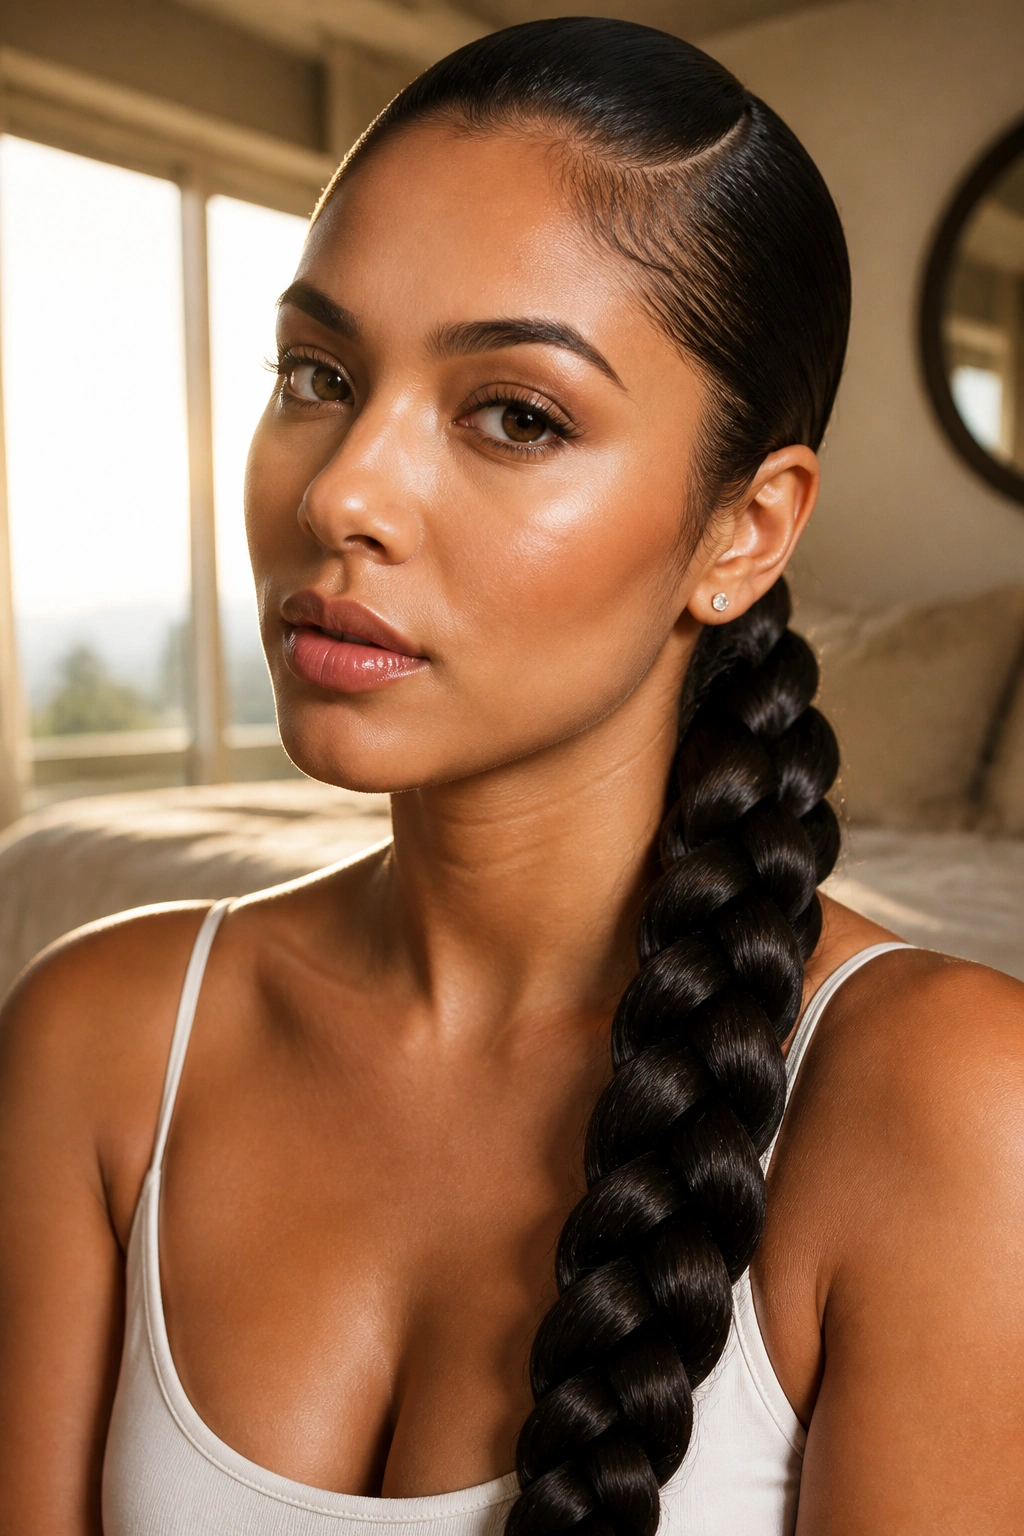
The frustration of a perfectly styled slick-back braid that begins to sprout a halo of frizz by lunchtime is a feeling most of us know too well. There is a specific kind of satisfaction that comes from a high-tension, high-gloss style that looks as though it was painted onto the scalp. It is clean, it is intentional, and it keeps hair entirely out of the way during a long day. But the gap between a “freshly done” braid and one that actually survives the friction of a jacket collar or a humid afternoon is wider than people think.
Getting a braid to stay “down” isn’t just about how hard you pull; it’s about the architecture of the prep work. Most people grab a tub of gel and hope for the best, but veteran stylists know that the secret lies in the layering of products and the specific brush strokes used before the first crossover even happens. If the base isn’t flat, the braid will never be. I have spent years testing which patterns hold up best against gravity and movement, and it usually comes down to how the hair is anchored at the root.
Texture also plays a massive role. Whether you are working with type 4 curls that require a heavy-duty wax or fine, straight strands that need a bit of “grit” to keep from sliding out of the plait, the goal is the same: zero movement. We aren’t looking for a soft, touchable finish here. We are looking for a structural masterpiece that stays put.
The following styles are the ones I’ve found to be the most reliable for those days when you don’t have the time or the inclination to touch up your hair. They range from athletic staples to more elevated, formal looks, but they all share one common trait: they stay exactly where you put them.
The Foundation of a Long-Lasting Slick Back
Before you even pick up a comb, you have to understand that “slick” is a state of being for the hair, not just a finishing touch. To get that glass-like finish, you need to work in sections. If you try to slick back all your hair at once, the middle layers will almost always remain puffy, which leads to the style loosening up within hours.
Choosing Your Adhesive
Not all gels are created equal. For a style that stays down all day, you generally want to avoid anything with a high alcohol content, as this will flake once it dries and you’ll end up looking like you have a bad case of dandruff.
- Water-based gels: Good for a temporary hold and easier to wash out, but can sometimes “re-curl” the hair if the weather is humid.
- Wax-based pomades: These provide a much stiffer hold and are excellent for keeping stubborn flyaways flat, but they require a clarifying shampoo later.
- Edge controls: These are highly concentrated and should be used sparingly along the hairline and the nape of the neck.
The Brush Factor
A standard plastic brush won’t do the job. You need a firm boar bristle brush. The natural bristles are packed closely together, which allows them to catch every single stray hair and pull it into the direction of the braid. When I’m doing a slick-back, I brush the hair into the desired shape before I apply the heavy-duty product, then brush again once the product is in to “laminate” the strands together.
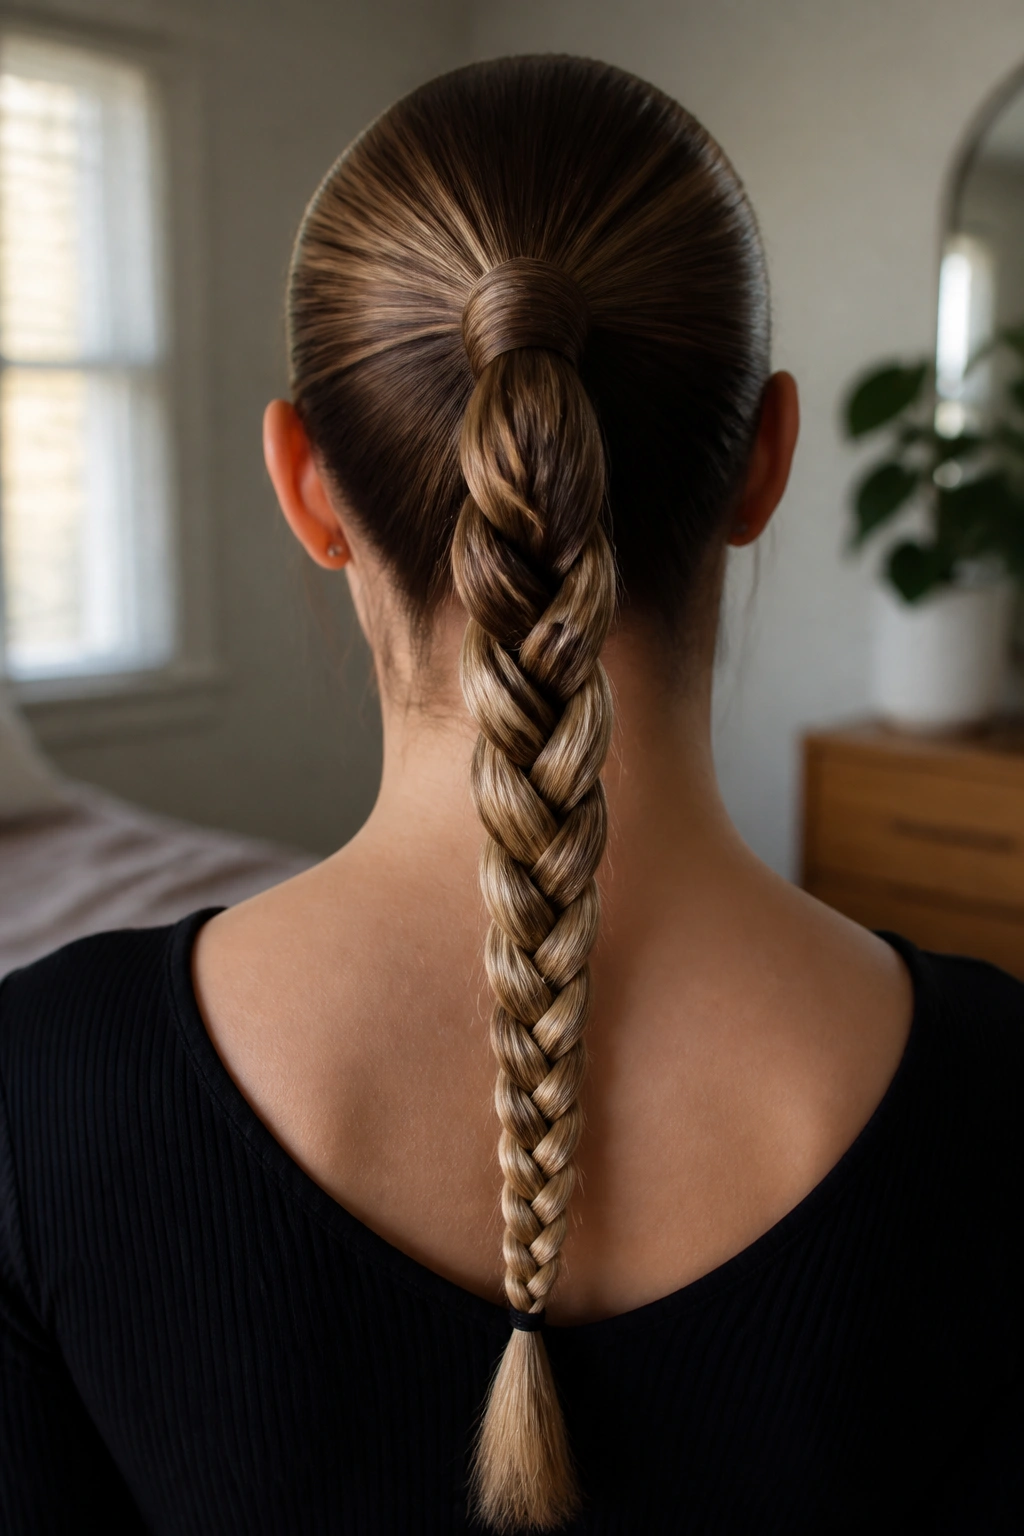
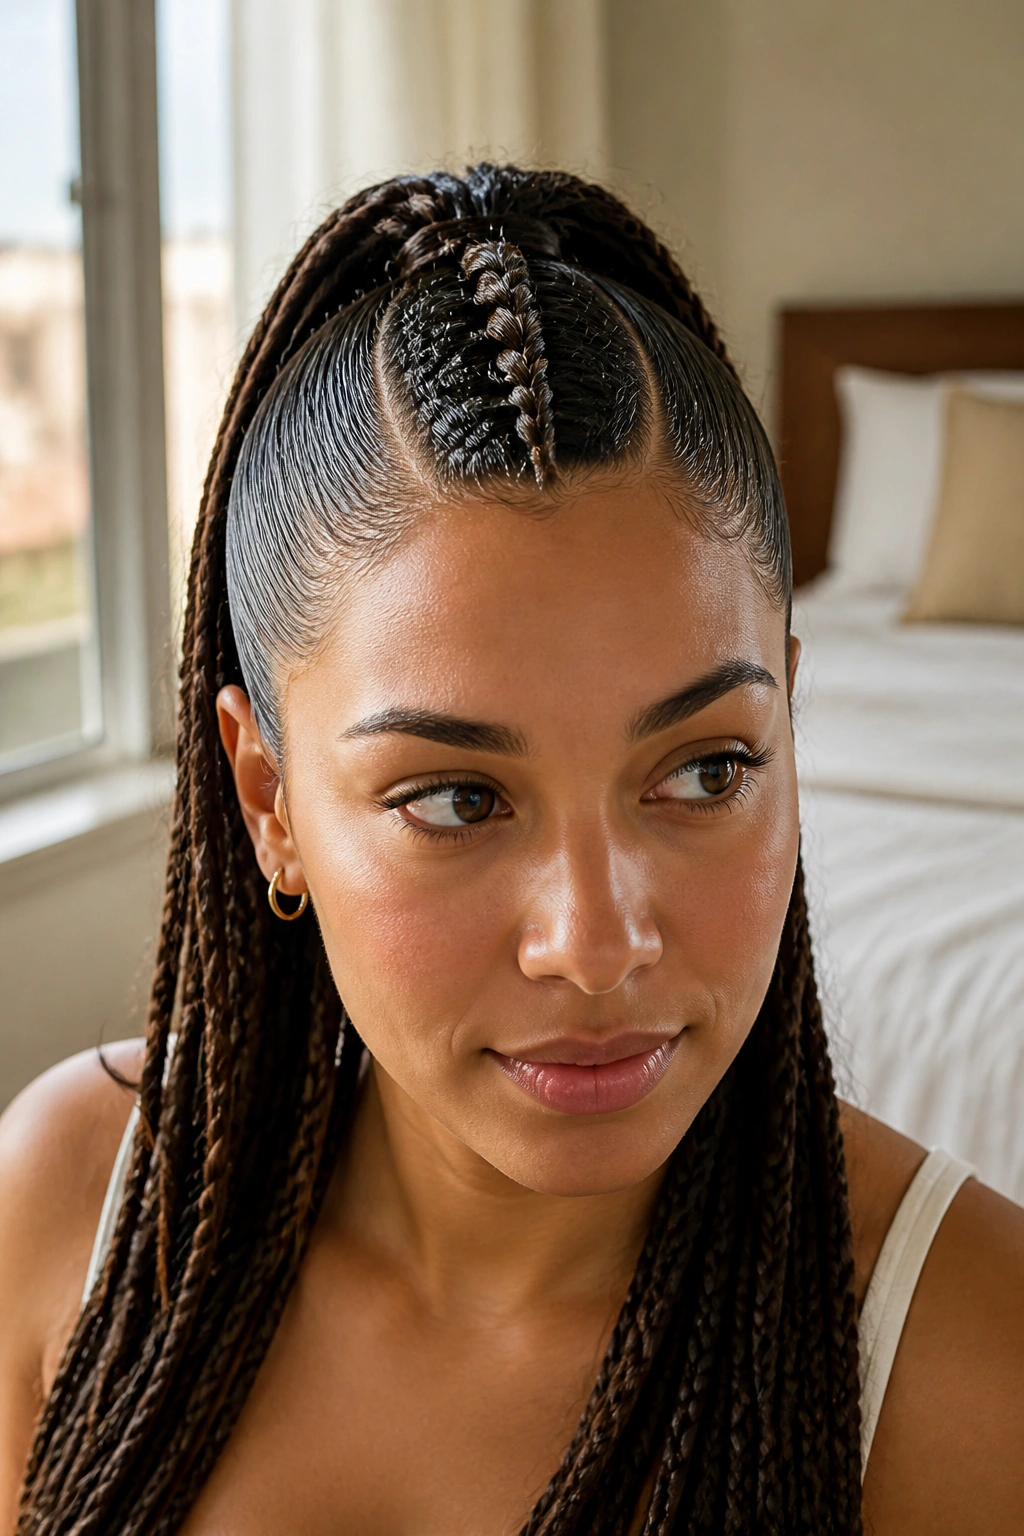
1. The High-Tension Classic Three-Strand
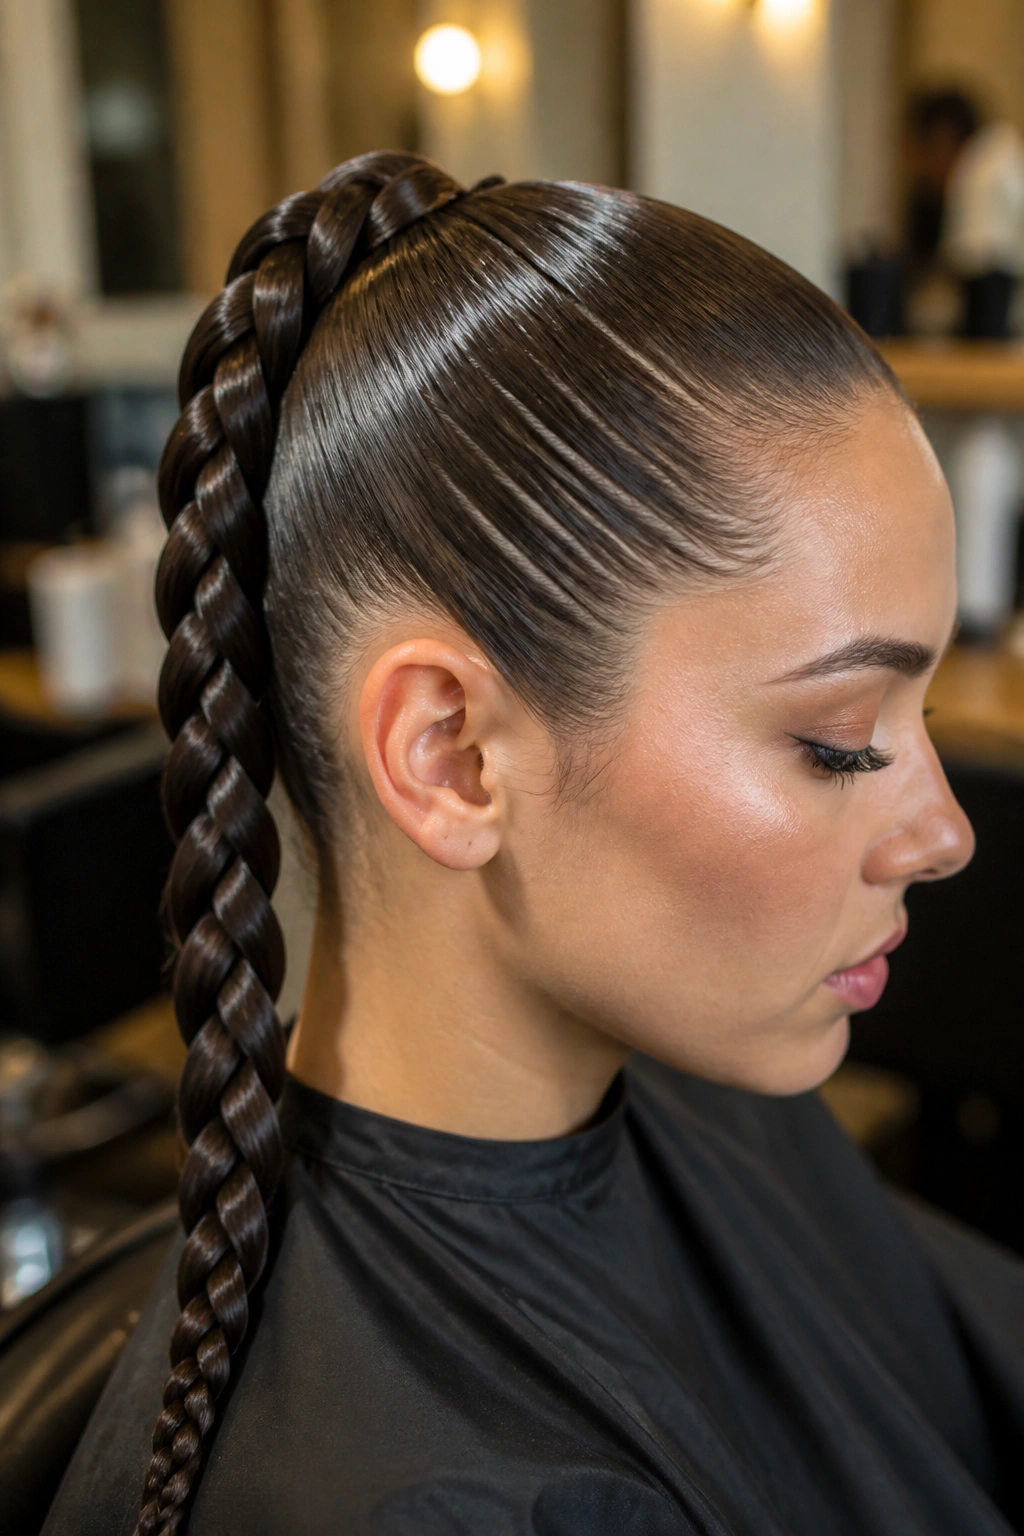
This is the workhorse of the slick-back world. It looks simple, but the key to making it stay down all day is the “double-anchor” method. Instead of trying to braid directly from a loose ponytail, you secure the hair into a very tight, sleek base first.
Why the Double-Anchor Works
When you secure the hair with a bungee cord or a heavy-duty hair tie before braiding, you create a fixed point that doesn’t move. Most braids fail because the base of the ponytail starts to sag under the weight of the braid itself. By using a high-shine pomade and a firm brush to get the hair into a ponytail first, you ensure the “slicked” part remains undisturbed.
How to Execute the Braid
- Apply a generous amount of styling cream from roots to mid-shaft.
- Brush upward toward the crown, focusing on the nape of the neck where “kitchen” hairs tend to escape.
- Secure with a hair tie that matches your hair color.
- Braid the tail as tightly as possible.
- Pro tip: Use a tiny amount of clear gel on your fingertips as you braid to keep the strands from fraying.
2. Low-Slung Dutch Double Braids
Dutch braids are often called “inside-out” braids because you cross the strands under rather than over. This creates a 3D effect that sits on top of the head. When done with enough tension and product, these are virtually indestructible.
The Science of “Under”
Because you are crossing the hair underneath, the braid acts as its own anchor against the scalp. This style is particularly effective for people with shorter layers or “baby hairs” because the “under” motion traps those shorter pieces beneath the bulk of the braid. I’ve seen these stay perfectly intact through a heavy workout and a full night’s sleep.
Achieving the “Glass” Scalp
To get the scalp looking like glass between the two braids, you must use a rat-tail comb to create a razor-sharp center part. Apply a wax-based edge control directly onto the part. This prevents any fuzz from rising up along the line of the braid. If you have thicker hair, you might need to “pre-slick” the sections with a light-hold hairspray before you start the actual braiding process.
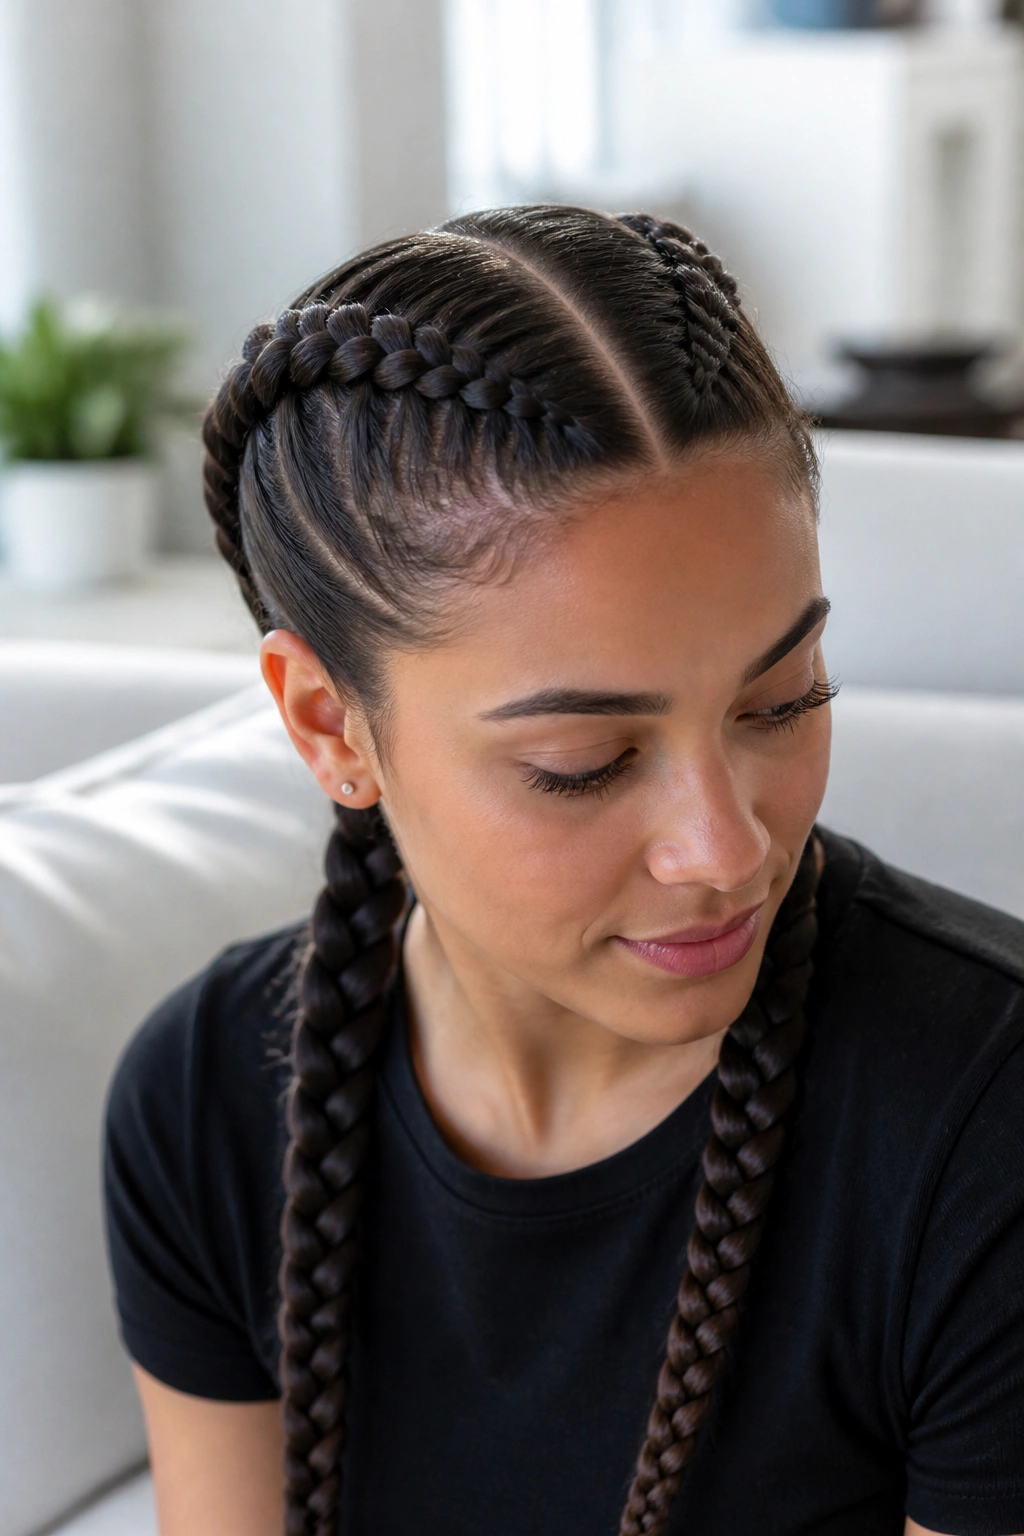
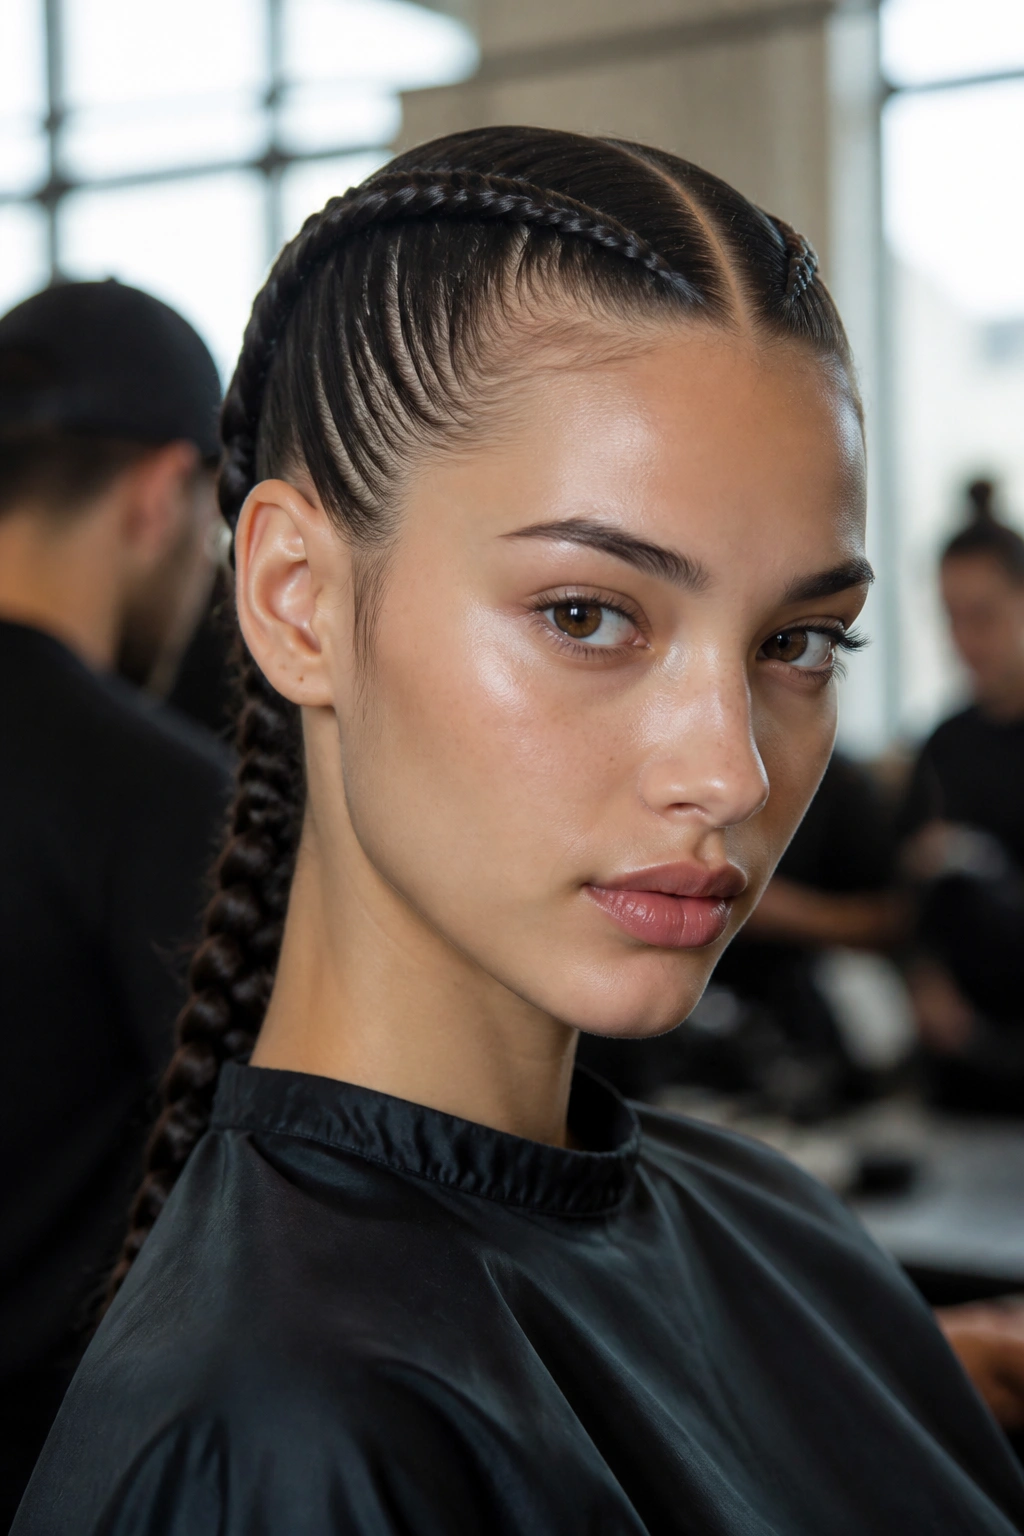
3. Triple-Row Slicked Feed-In Braids
Feed-in braids are a staple for a reason. By adding small amounts of hair (either your own or extensions) as you go, you maintain a consistent thickness and, more importantly, a consistent level of tension from the hairline to the ends.
Why Three Rows?
A single braid can sometimes feel heavy, and two can look a bit “Pippi Longstocking” if not done right. Three rows—one down the center and two on the sides—distribute the weight of the hair more evenly. This means less pulling on your edges and a more secure hold for the hair at the back of your head.
Maintaining the Flatness
- Use a “tuck” technique where the natural hair is tucked under the feeding-in hair to hide any flyaways.
- Apply gel to each sub-section before it is added to the braid.
- Finish the style by tying a silk or satin scarf around the head for 15 minutes to “set” the hair flat.
4. The Wet-Look Bubble Braid
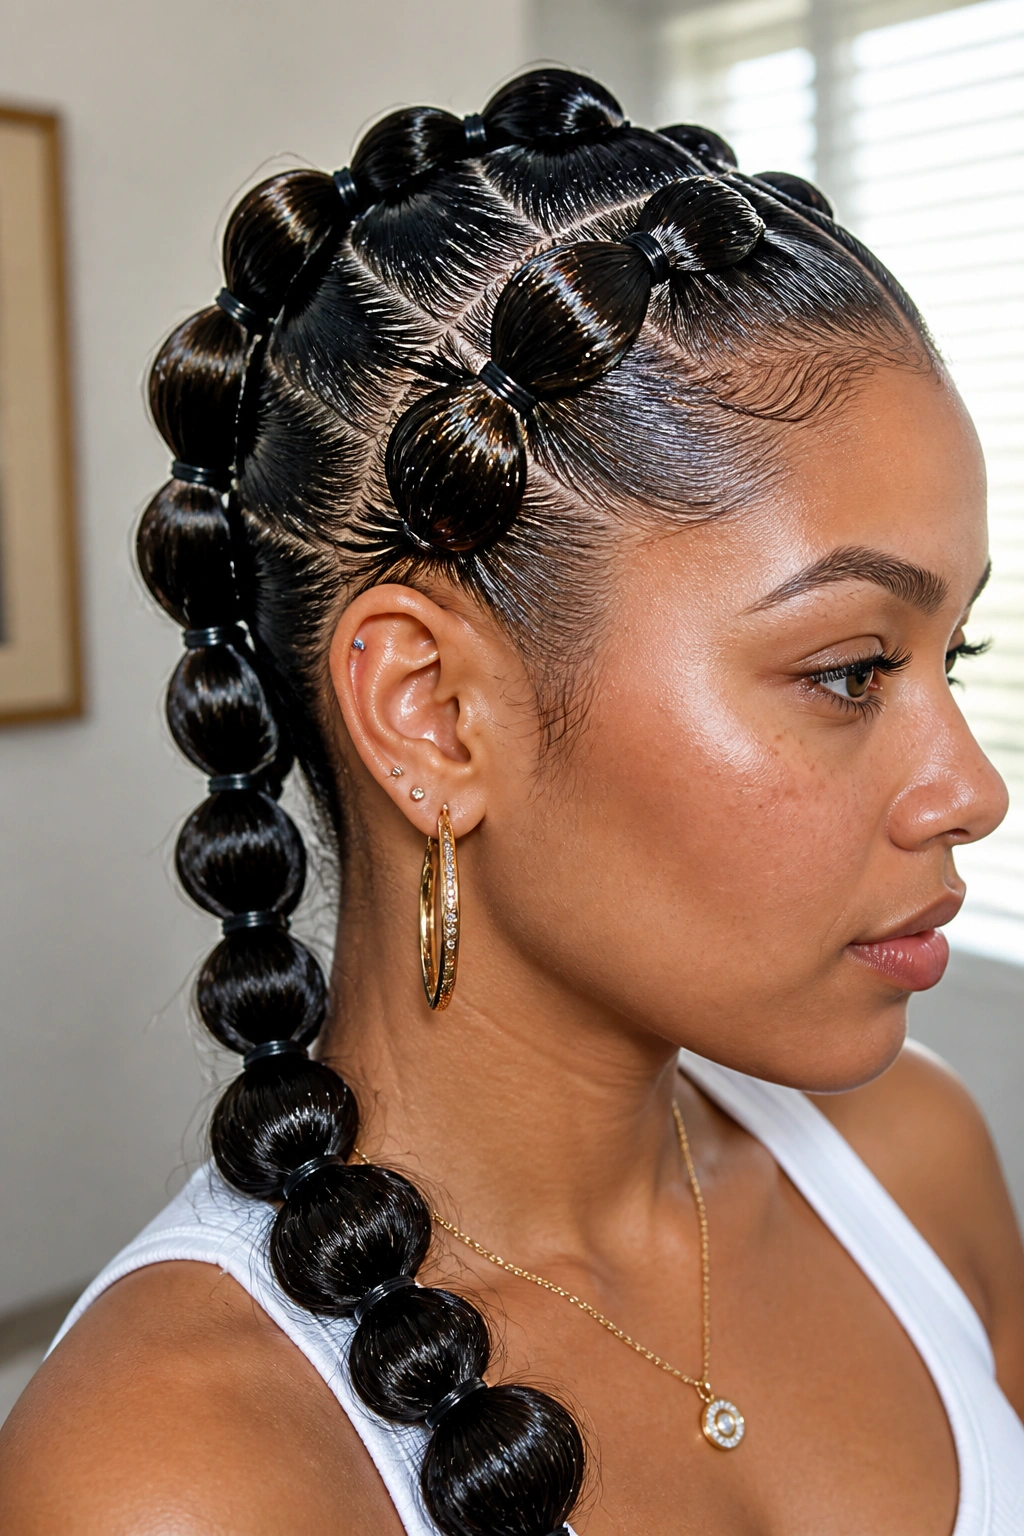
Technically, a bubble braid is a series of small ponytails, but it functions with the same sleekness as a traditional braid. It is currently one of the most popular styles because it is significantly easier to achieve for those who struggle with complex finger movements.
Creating the “Wet” Texture
To make this stay down, you want the hair to look almost wet. This is achieved by mixing a high-shine gel with a little bit of hair oil. This combination prevents the “crunchy” feeling while providing a “moldable” hold.
The Elastic Strategy
The secret to a bubble braid that doesn’t move is using clear, high-quality elastics. Cheap elastics will snap halfway through the day, especially if they are stretched over thick sections of hair. I always recommend using two elastics per “bubble” for extra security. Space them about two inches apart, and lightly “pancake” or pull at the sections to create the bubble shape, but keep the hair closest to the scalp perfectly flat.
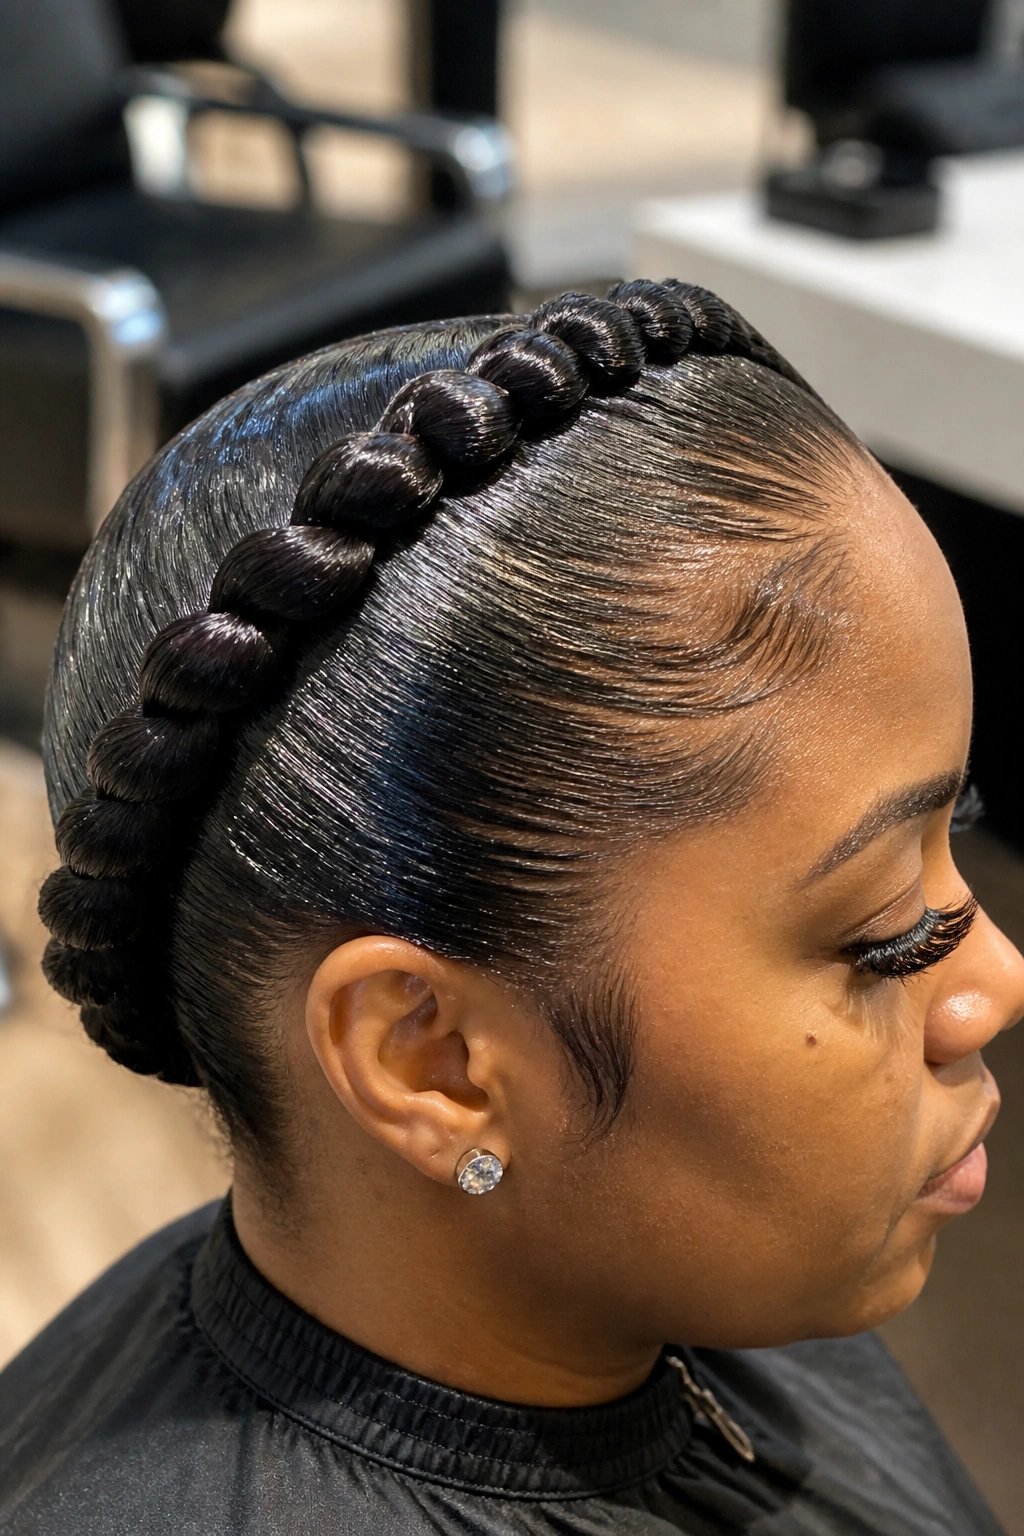
5. Slicked-Back Crown Braid with Laid Edges

The crown braid, or “halo” braid, is a sophisticated way to keep everything locked in. Because the braid wraps around the circumference of the head, there are no loose ends to fray or fall.
Locking the Perimeter
The most common point of failure for a crown braid is the area behind the ears. This is where hair is the finest and most likely to slip out. To prevent this, apply a dab of heavy-duty pomade to the hair behind your ears before you reach that point in your braiding.
Styling the Edges
A crown braid looks best when the “edges” or “baby hairs” are intentionally styled. Use a small edge brush or a clean toothbrush with a bit of firm-hold gel to create soft “s-curves” along the forehead. This not only looks polished but also acts as a visual “seal” for the rest of the style.
6. The Formal Fishtail Bun
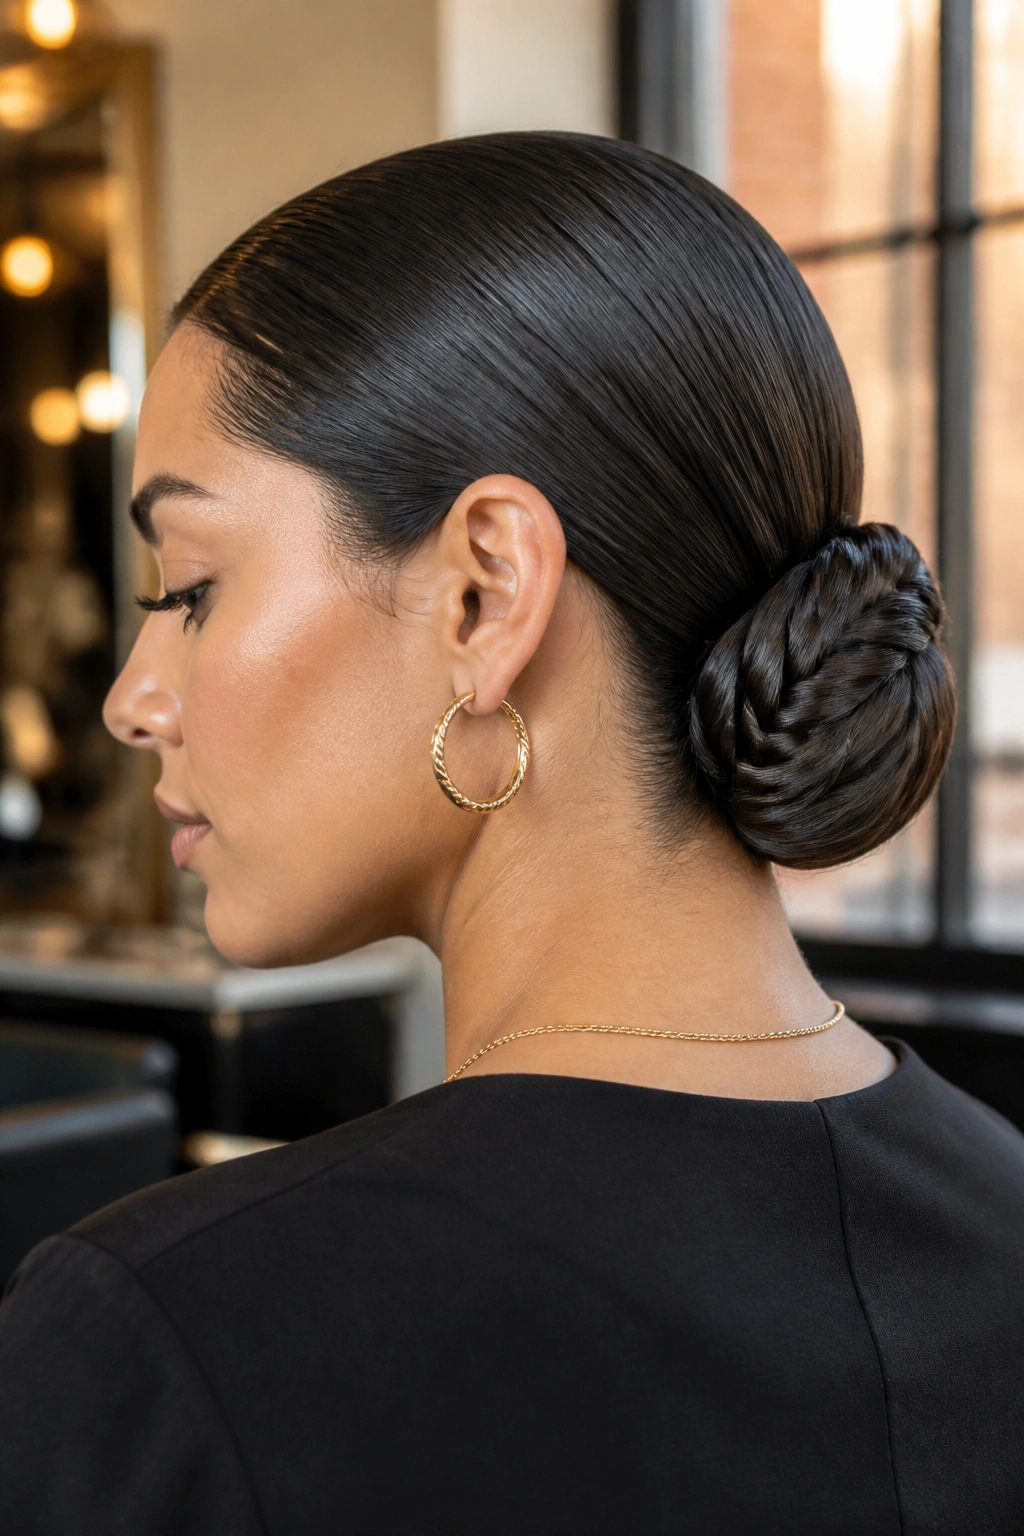
A fishtail braid is notorious for coming loose because the strands are so small. However, when you transition a slicked-back fishtail into a low bun, you create a very secure, elegant look.
Achieving High Tension
Unlike a messy fishtail, a slicked-back version requires you to pull each tiny strand very tight. I find that using a “dry oil” spray helps the strands glide over each other without creating frizz.
Securing the Bun
Once the fishtail is complete, wrap it into a tight coil at the nape of the neck. Use “u-shaped” hair pins rather than standard bobby pins. U-pins are designed to catch both the braid and the hair on the scalp, locking the bun in place without the “squishing” effect that bobby pins can have.
7. Tight Micro-Braids into a Low Tail
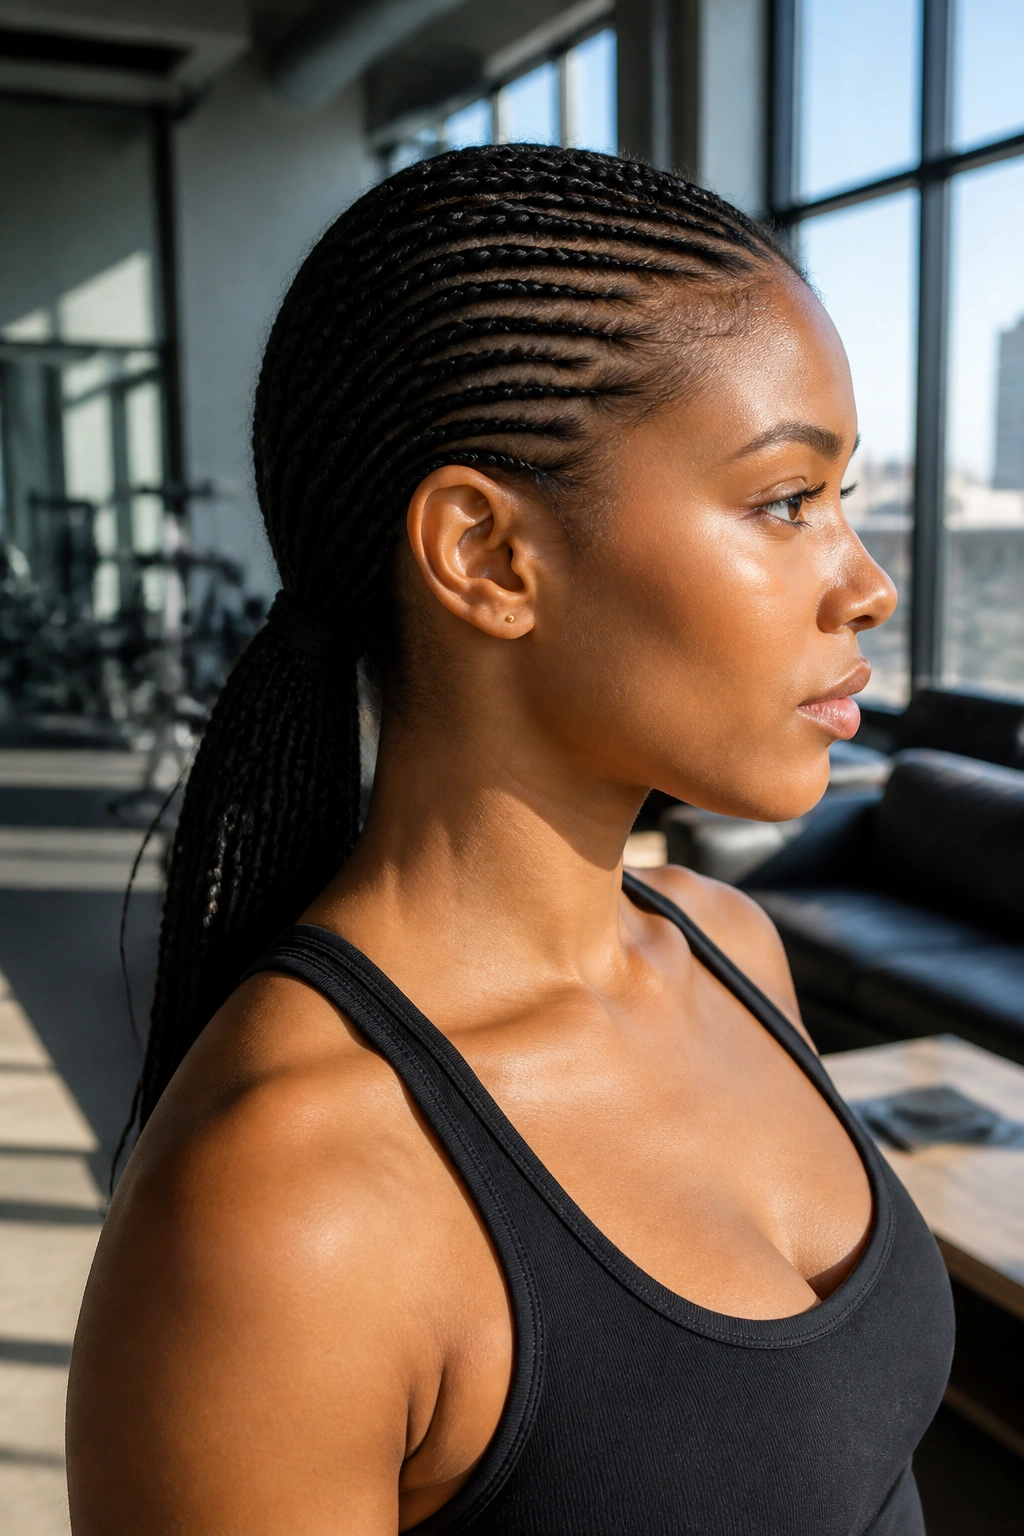
If you have a lot of hair, sometimes one braid isn’t enough to contain it all. Dividing the top section of the hair into four or five tight micro-braids that feed into a single low ponytail or braid is a great way to ensure the front stays flat.
Sectioning for Success
The key here is symmetry. Use the arch of your eyebrows as a guide for your parting. Each micro-braid should be about half an inch wide. Because the sections are so small, you can get them incredibly close to the scalp, which creates a “corset” effect that holds everything down.
The Finishing Tail
After you’ve completed the micro-braids to the back of the crown, gather all the remaining hair and the ends of the small braids into one large, tight plait. This style is a favorite for athletes because it simply does not move, regardless of intensity.
8. Reverse French Braid with a Glossy Finish
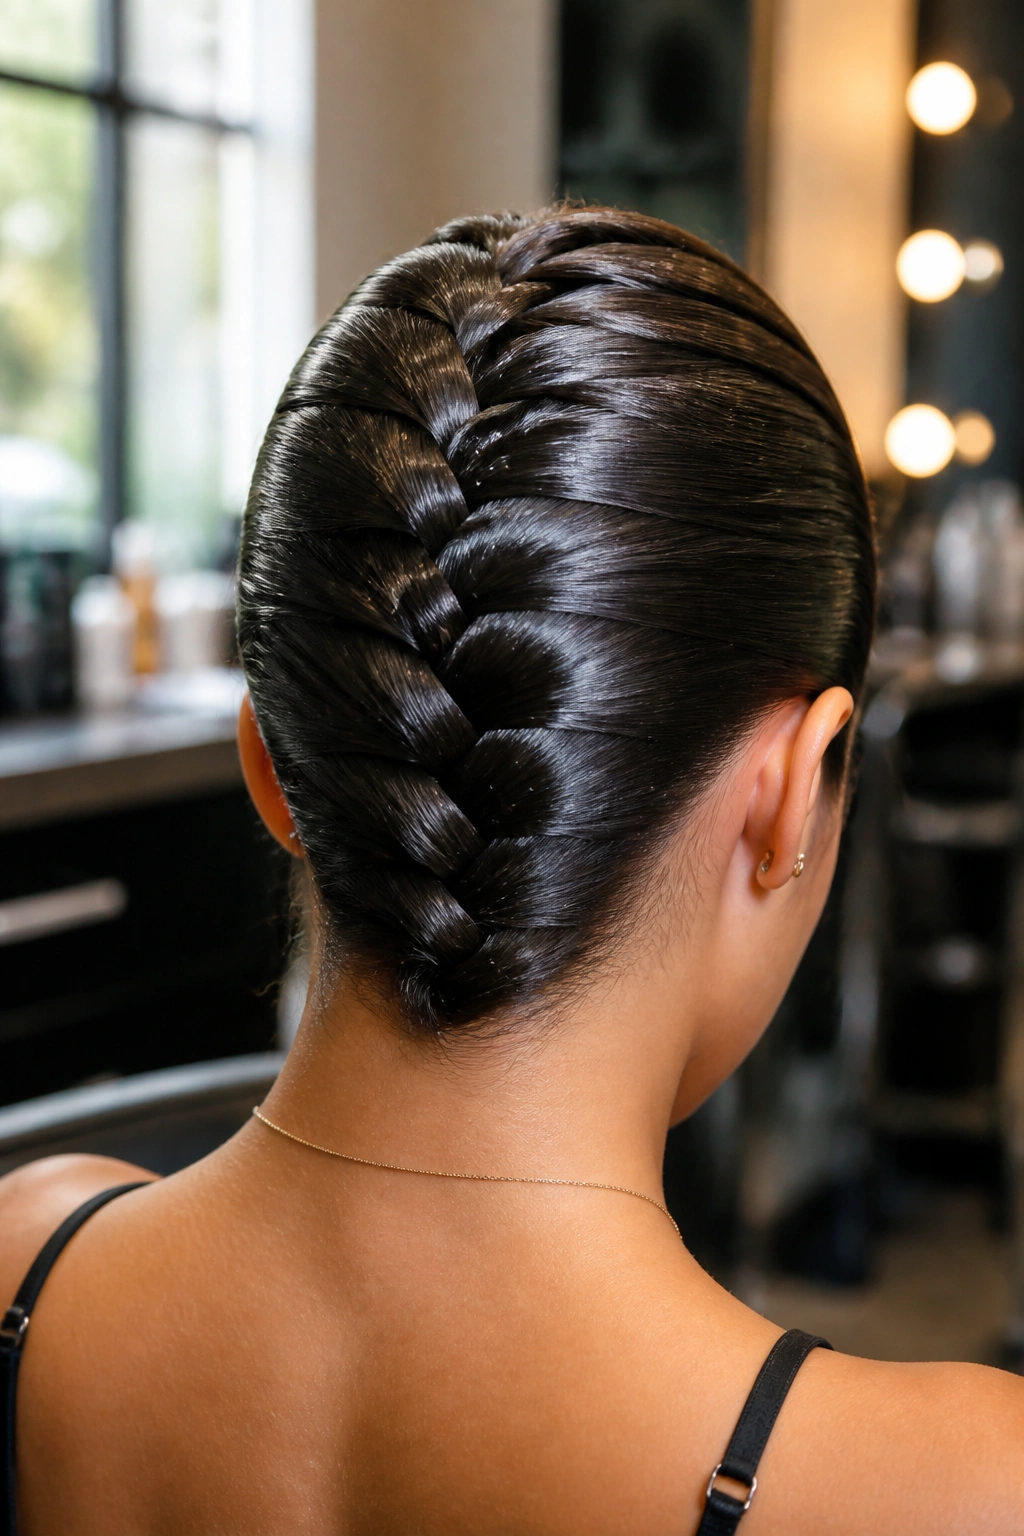
Usually, we think of French braids starting at the forehead. A reverse version starts at the nape of the neck and moves upward. While this is often finished with a top-knot, it can also be done as a very sleek, tight style that keeps the neck clear.
Handling the Gravity Challenge
Braiding upward is difficult because you are working against the natural fall of the hair. To make this stay down, you actually need to tilt your head forward while braiding. Apply gel to the back of your head (the part that is usually hidden) to ensure that the hair stays flat against the skin as you move toward the crown.
Why This Style Stays Put
The hair at the back of the head is often the first to frizz up due to friction from sweaters and coats. By braiding it upward, you remove that friction point entirely. It is a very “architectural” look that remains remarkably clean-shaven throughout the day.
9. The Diagonal Parted Slick Braid
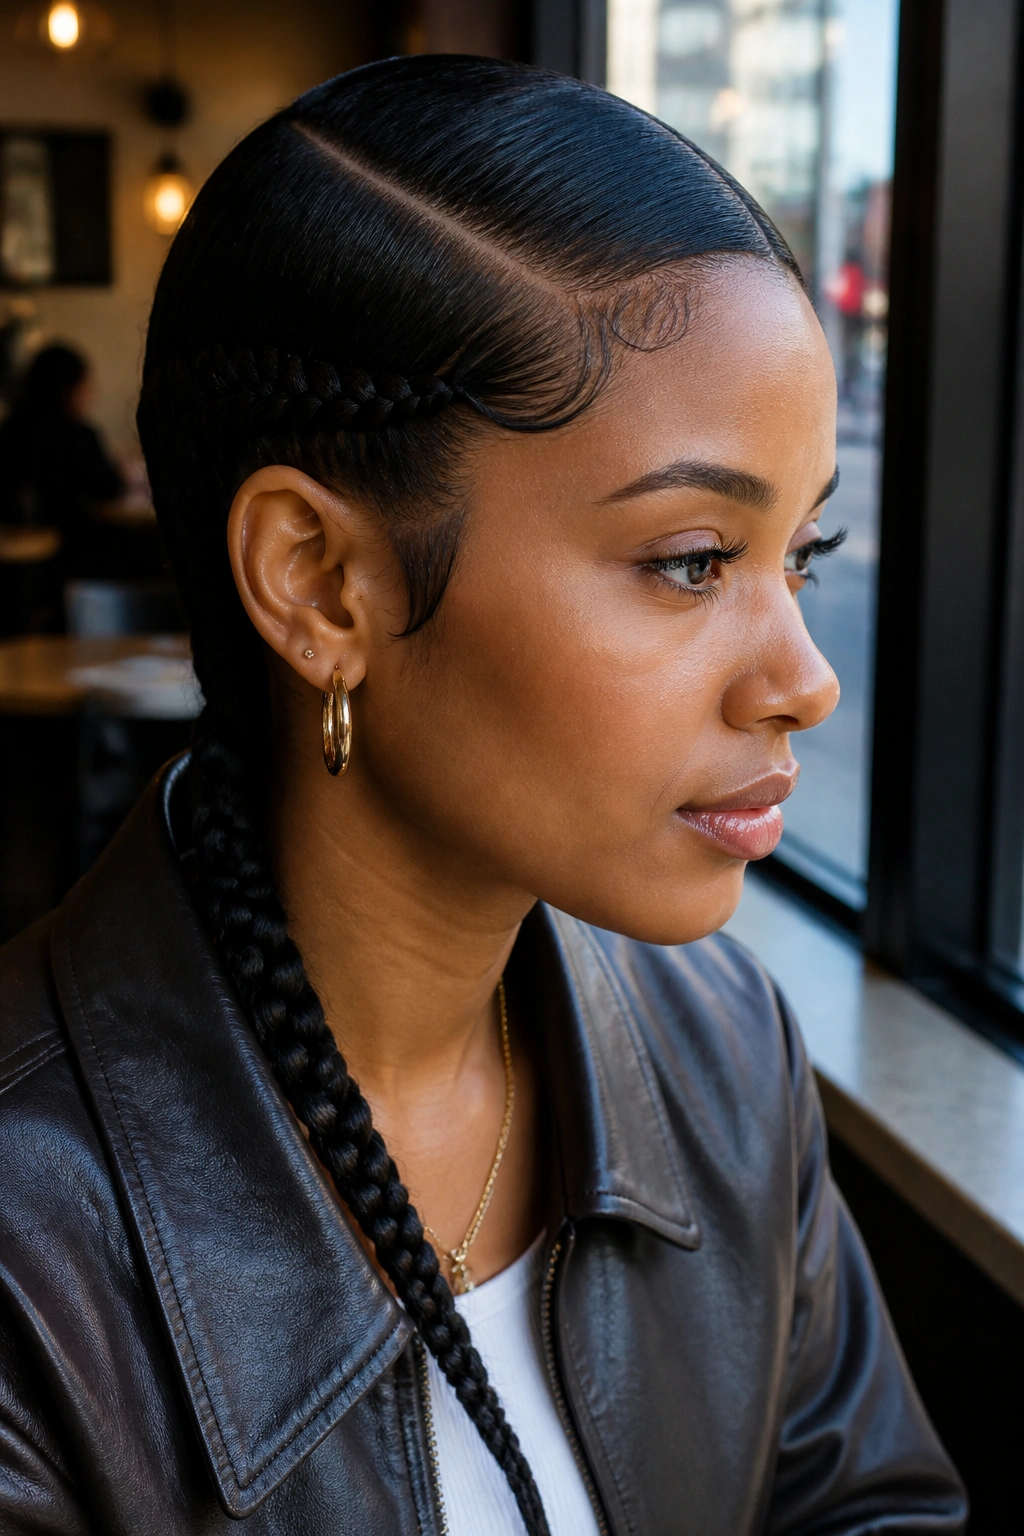
A center part is classic, but a deep diagonal part adds a level of sophistication and can actually help keep the hair flatter. By shifting the bulk of the hair to one side, you can “wrap” it more tightly across the forehead.
The “Swoop” Technique
This style relies on a “swoop” where the hair is brushed across the forehead and tucked behind the ear. To make this stay, you need to use a blow dryer on a cool setting to “set” the gel in that specific shape before you start braiding.
Asymmetrical Tension
When braiding from a diagonal part, the tension is uneven. You’ll find one side is much tighter than the other. To compensate, I always start the braid on the “heavy” side of the part. This allows you to use the weight of the hair to your advantage, pulling everything down and back toward the opposite ear.
10. Wrapped Base Ponytail Braid
This is a variation of the high-tension classic, but with a structural “wrap” at the base that hides the hair tie and adds an extra layer of security.
The “Hair Tie” Anchor
Instead of just one hair tie, use two. This creates a longer “base” for the ponytail. Take a small section of hair from the bottom of the ponytail, coat it in a firm-hold gel, and wrap it tightly around the hair ties until they are completely covered.
Why the Wrap Matters
The wrap acts as a compression sleeve for the base of the braid. It prevents the braid from “wobbling” at the root, which is usually how flyaways start. Secure the end of the wrap with a small bobby pin pushed vertically down into the center of the ponytail.
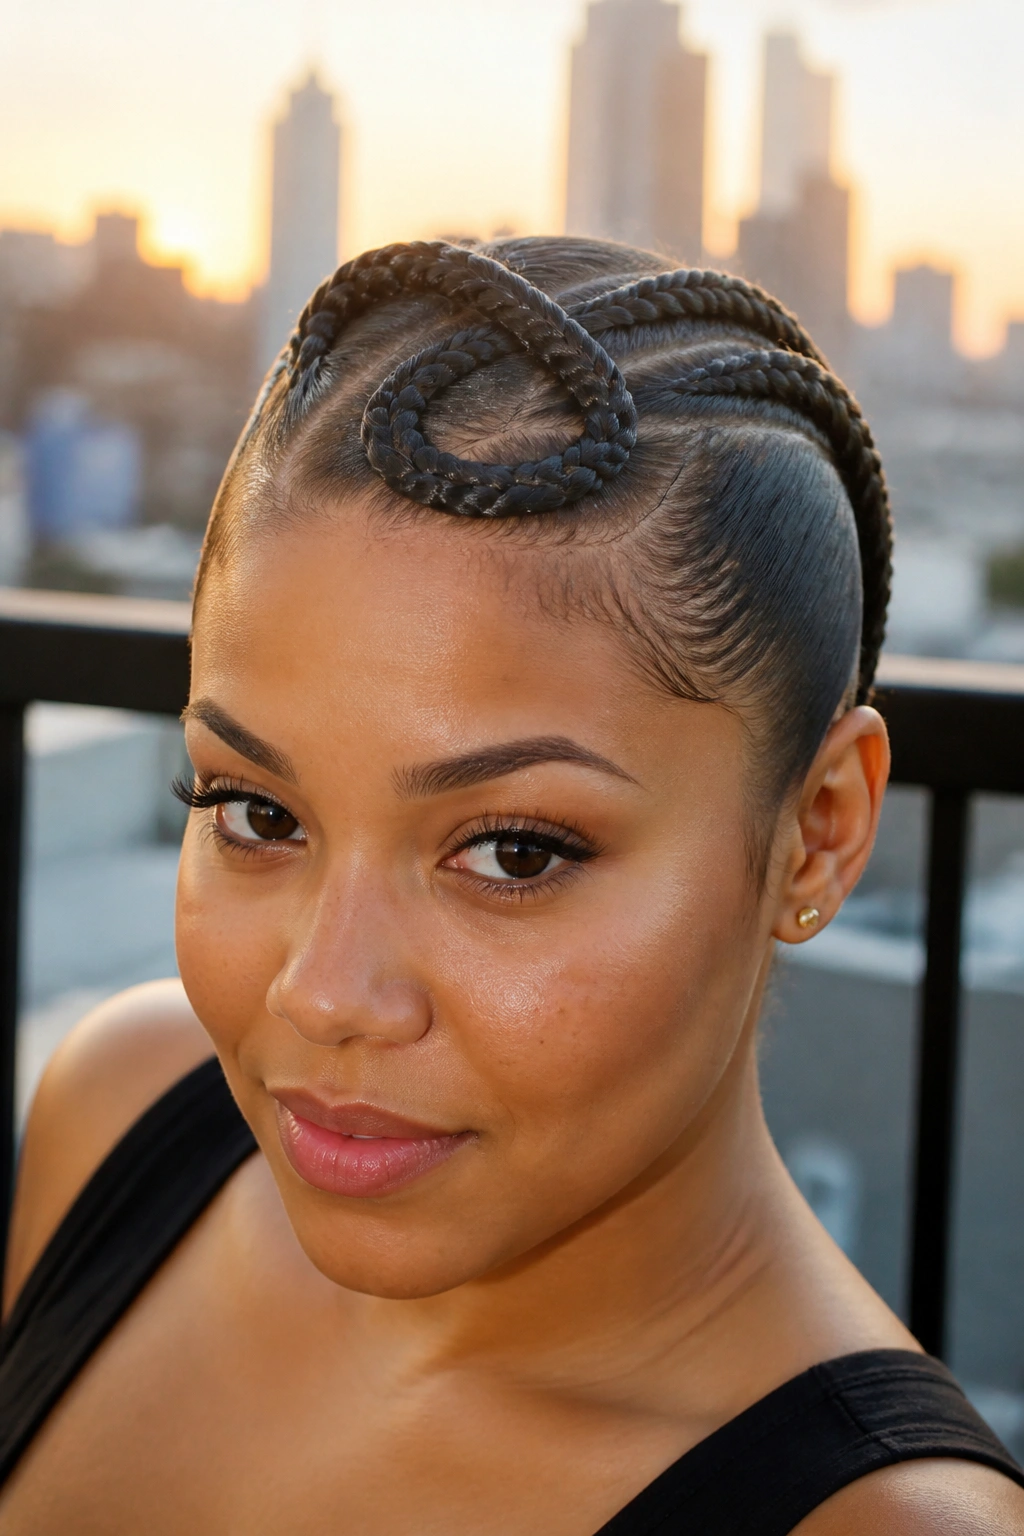
11. Snake Braids with Maximum Shine
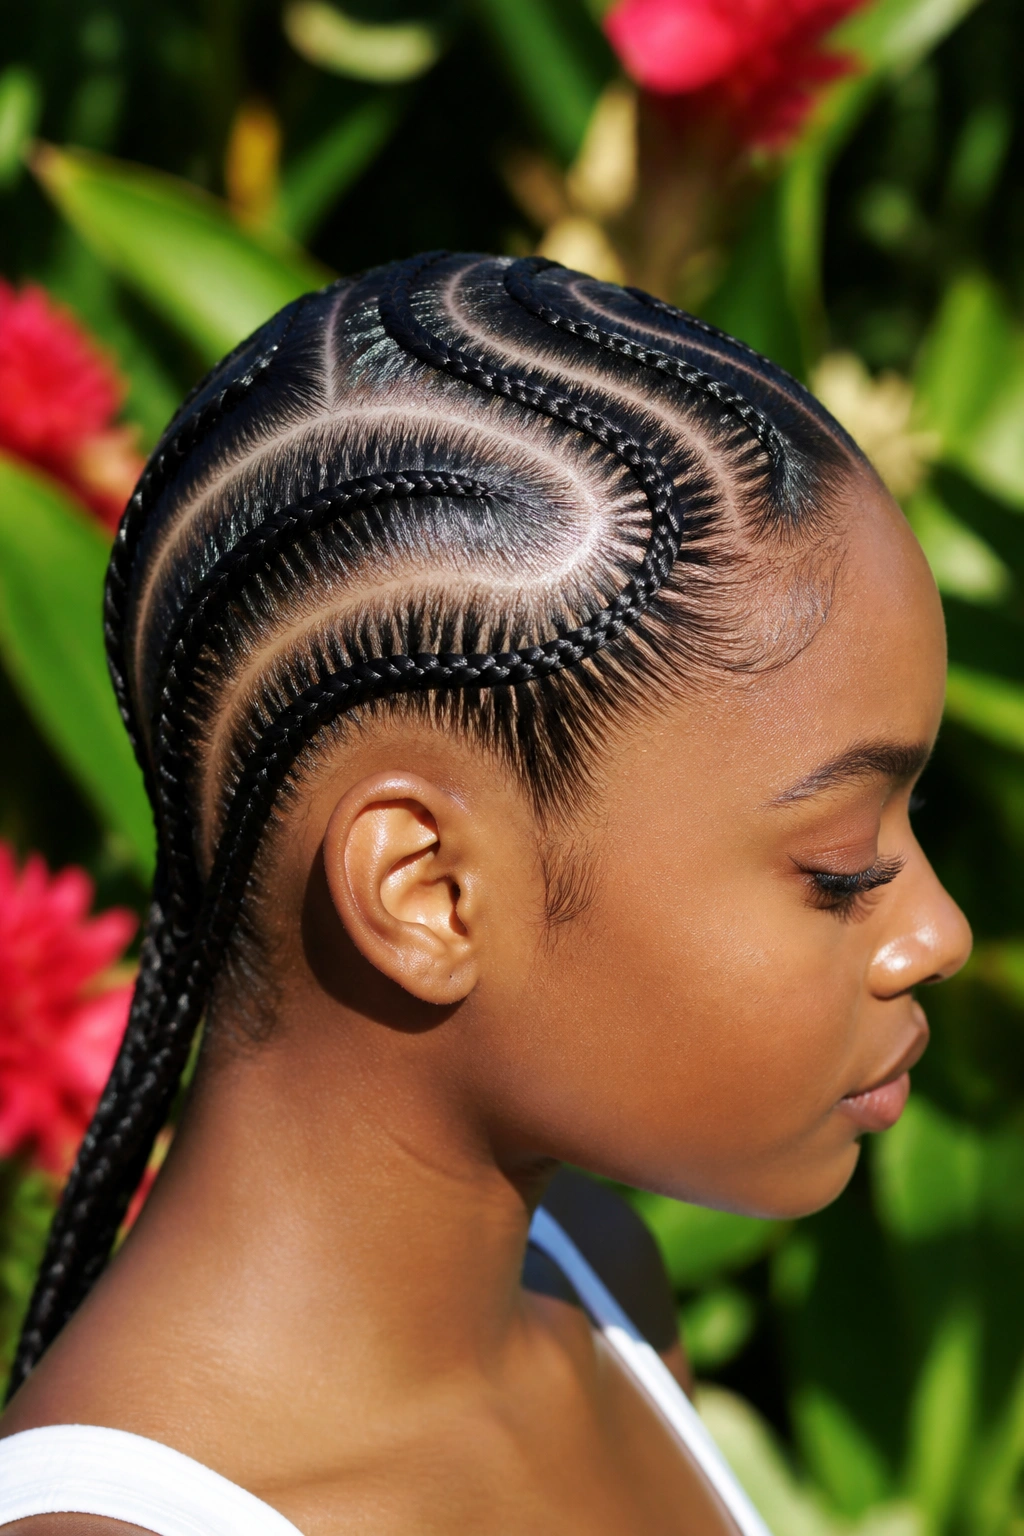
Snake braids are a form of cornrow that curves across the head in an “S” shape. Because the path of the braid is curved, it naturally holds the hair in a way that resists the “popping out” that happens with straight-back braids.
The Path of Least Resistance
By following a curved path, the braid captures hair from different angles of the scalp. This creates a very stable “mesh” of hair. To get the “maximum shine” look, use a pomade that contains shea butter or jojoba oil.
Keeping the Curves Sharp
The hardest part of a snake braid is keeping the curves looking crisp. Use a metal-tipped rat-tail comb to “draw” the S-shape in the gel on your scalp before you start. This acts as a map for your fingers to follow.
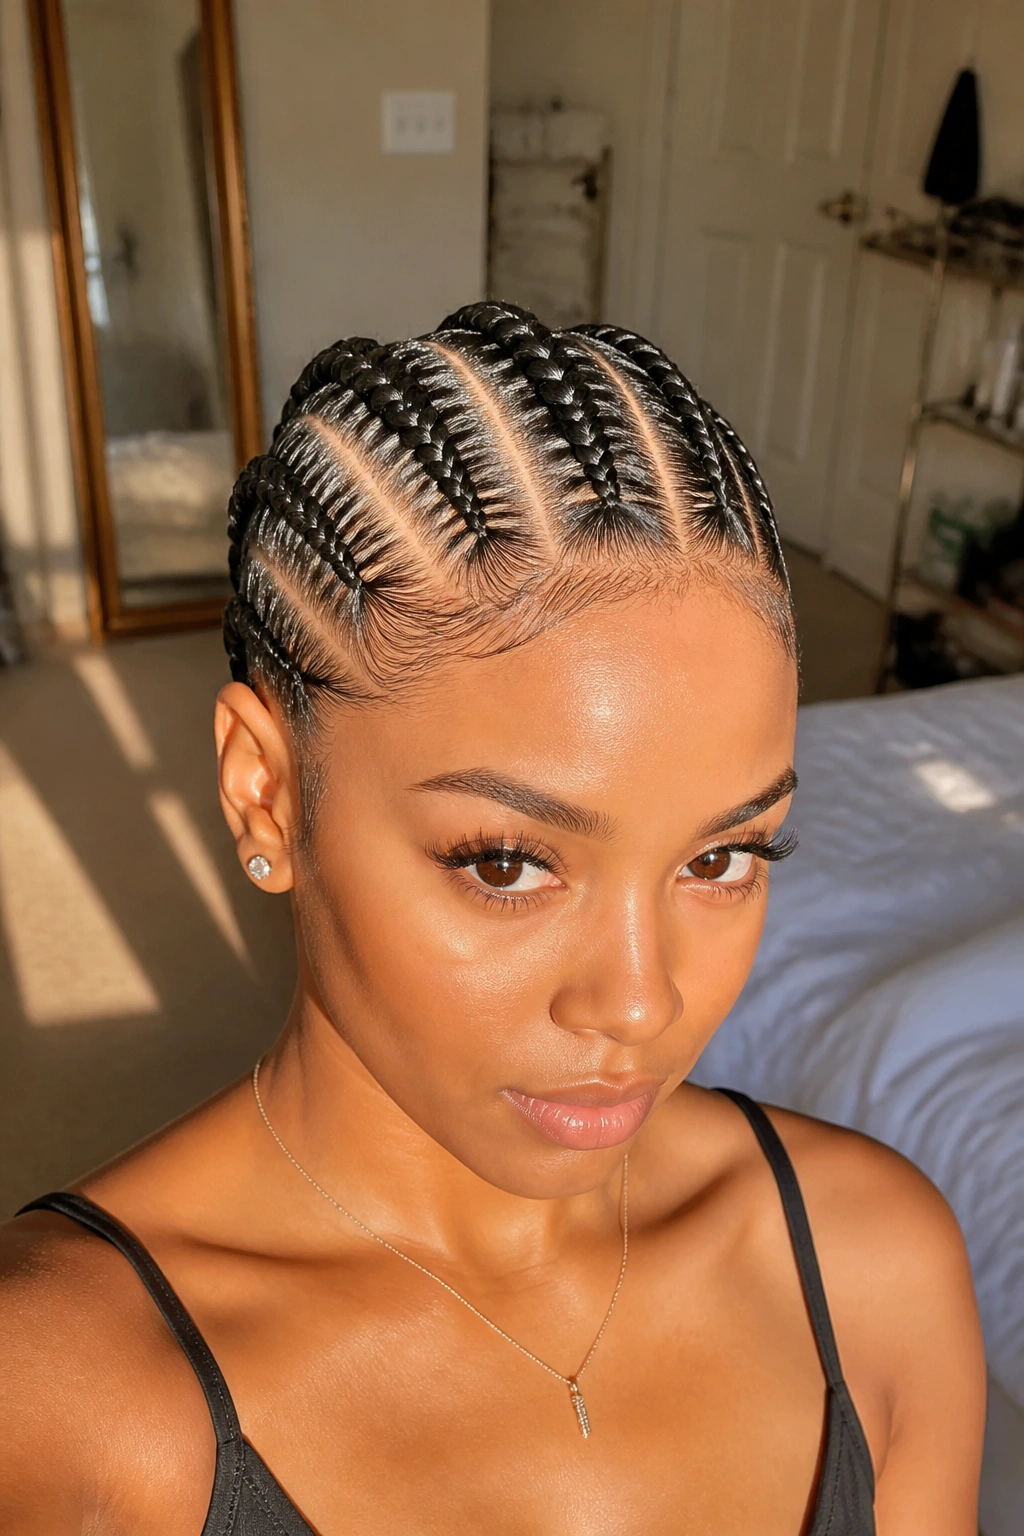
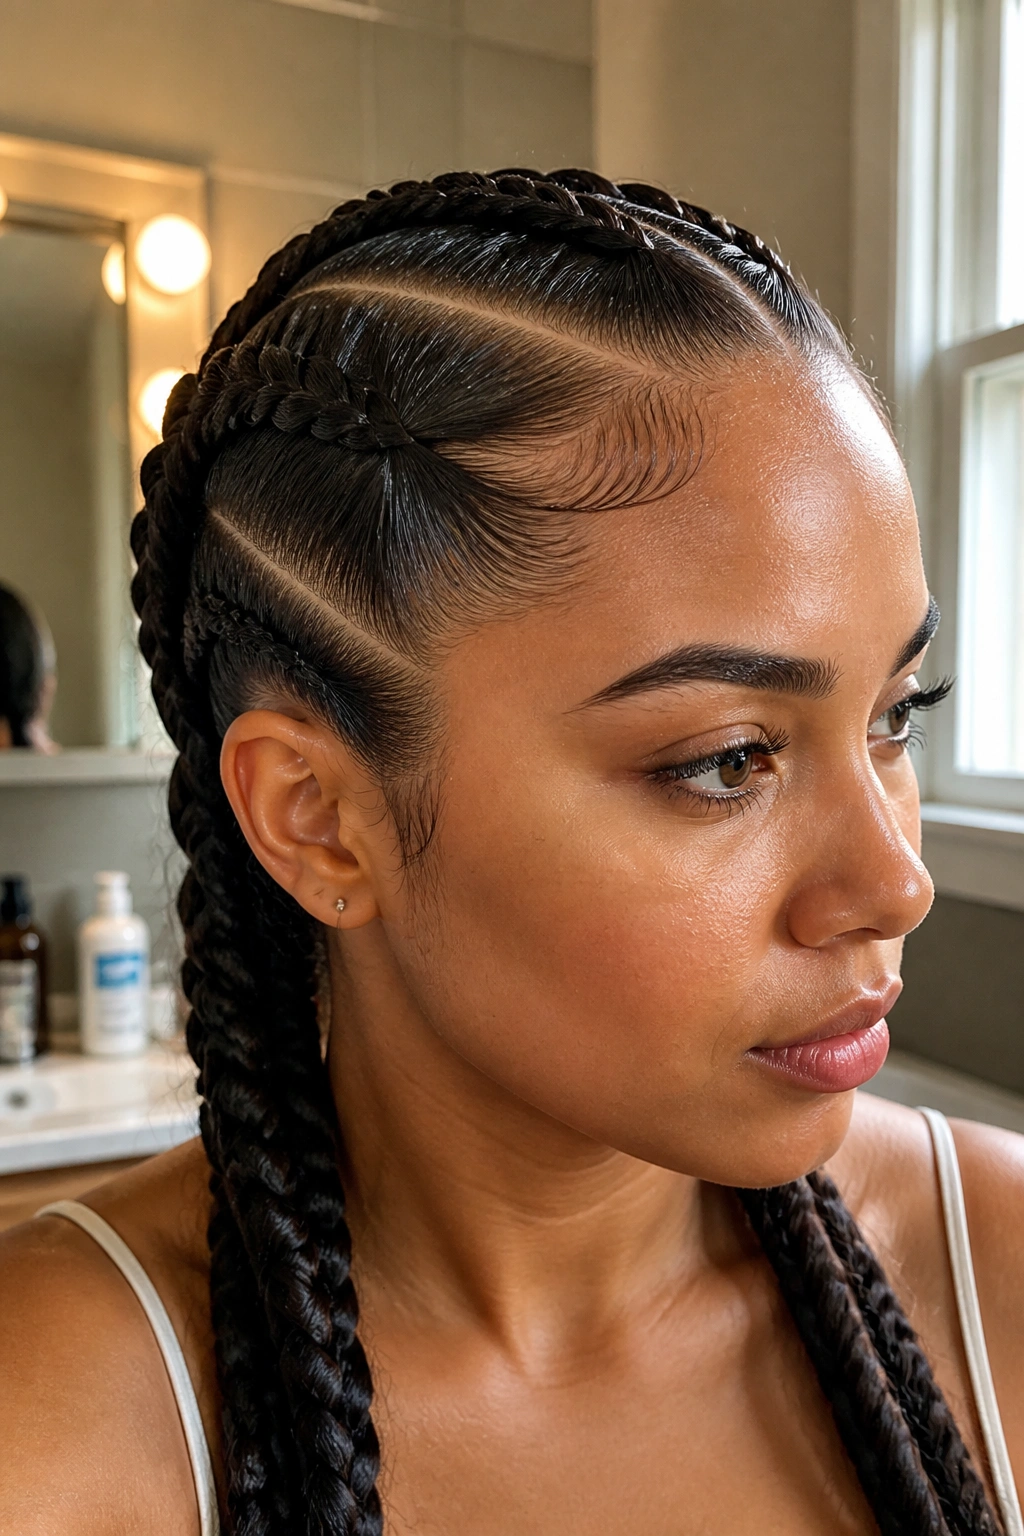
12. Symmetrical Cornrows into a Single Braid
This is a hybrid style that combines the security of cornrows with the ease of a single braid. It’s often seen in equestrian circles or high-impact sports because it’s essentially double-locked.
The “Meeting Point”
You start with two or four cornrows that begin at the hairline. As you reach the back of the head, you merge all the strands into one large, thick braid. The transition point is where most people fail. You must maintain the same tension during the merge as you did during the individual rows.
Strategic Product Placement
Focus your heaviest product application at the “merge” point. This area at the back of the head is a high-movement zone, so it needs extra reinforcement. Use a dab of wax right where the braids join to ensure no strands slip out during the transition.
13. High-Shine Rope Twist Braid
Sometimes, a three-strand braid isn’t the best option for your hair texture. A rope twist (two strands twisted in one direction and then wrapped around each other in the opposite direction) can actually stay “slicker” for longer because there are fewer “intersections” for hair to escape from.
The Tension Paradox
The secret to a rope twist that stays down is the “counter-twist.” If you twist both strands to the right, you must wrap them around each other to the left. This creates a mechanical lock that keeps the braid from unraveling.
Finishing with a Sealant
Because rope twists have a smoother surface area than three-strand braids, they show off shine exceptionally well. I like to finish this style with a high-gloss laminating spray. It creates a thin, flexible film over the hair that locks out humidity and keeps the twist looking “wet” all day.
14. Criss-Cross Slicked Back Cornrows
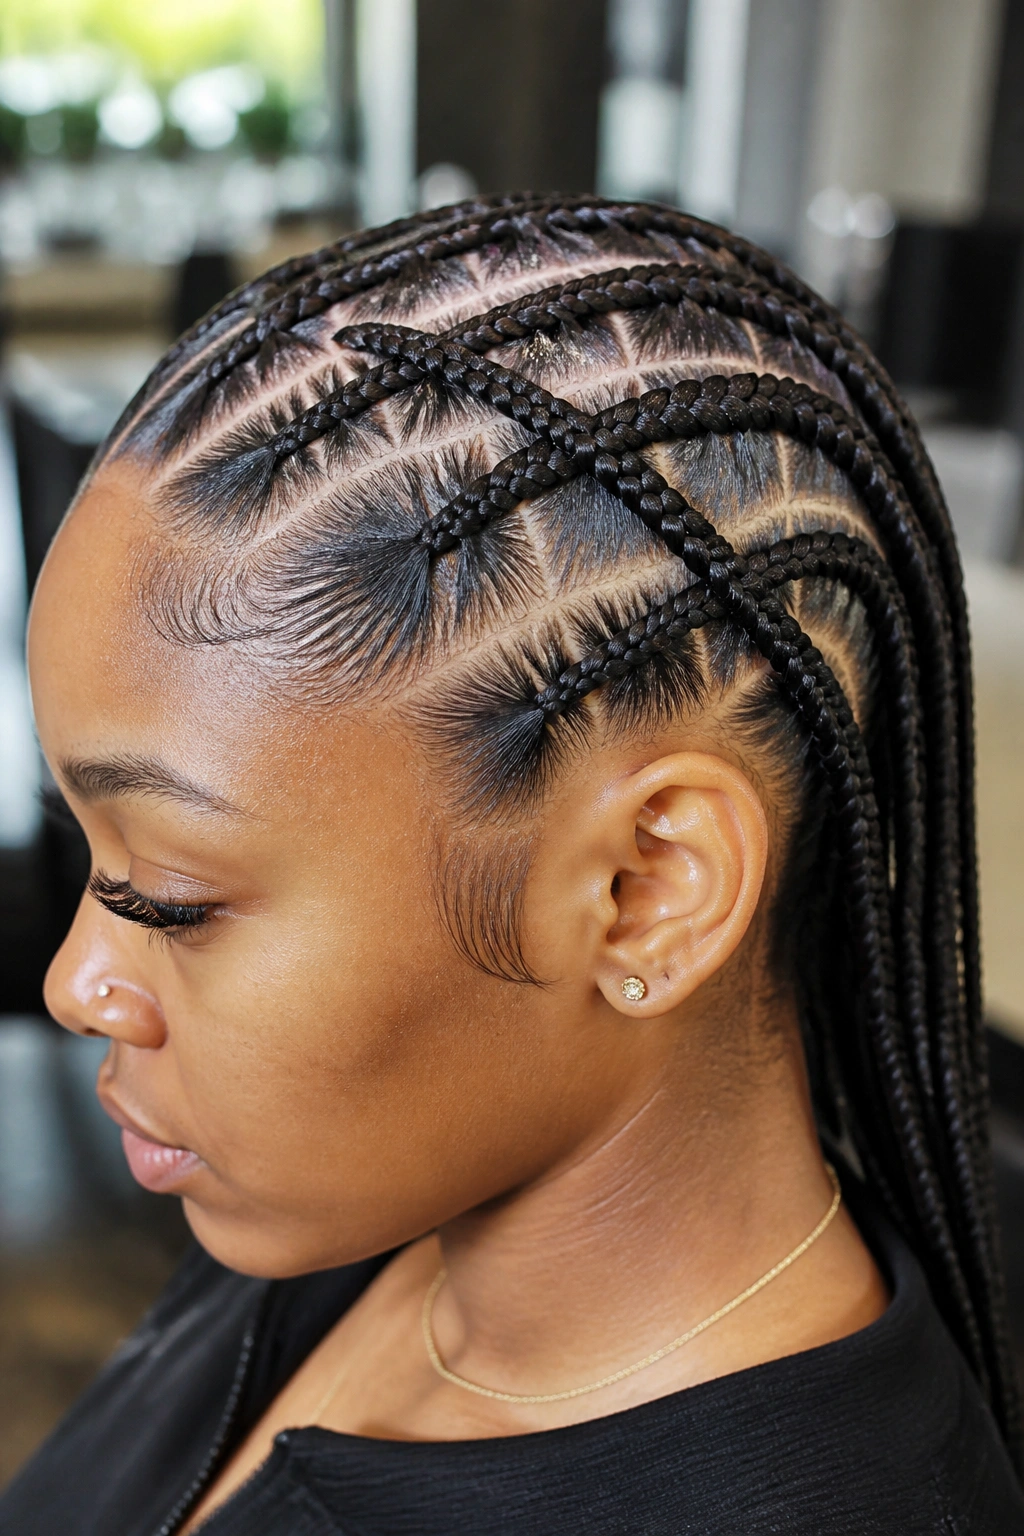
This is a more advanced style where the braids cross over each other like laces on a shoe. It is visually striking and, due to the overlapping layers, it is incredibly secure.
The “Locking” Effect
Every time one braid crosses over another, it pins the hair beneath it down. This creates a literal “web” of hair that is impossible for flyaways to penetrate.
Execution Tips
- Map out your sections with a white eyeliner pencil on the scalp if you’re a beginner—it washes right off and ensures your “X” shapes are even.
- Keep your fingers as close to the scalp as possible. If you lift your hands, you create “bubbles” in the braid.
- Use a light-hold gel on the lengths of the hair to keep the strands together as they cross over.
15. The Half-Up Slicked Braid Combo
For those who don’t want all their hair up but still need the front to stay down, the half-up slicked braid is the perfect compromise. It keeps the hair out of your face while allowing the length to show.
Securing the “Half-Moon” Section
The “half-up” section should follow a “U” shape from temple to temple. This is the area most prone to frizz. Slick this section back with a firm-hold mousse and a boar bristle brush before braiding it into a tight center plait.
Preventing the “Slide”
Half-up styles often slide down the back of the head as the day goes on. To prevent this, anchor the braid with two small bobby pins crossed in an “X” shape at the very base of the braid. This gives the hair tie something to “sit” on, preventing gravity from doing its work.
16. Multi-Braid Low Chignon
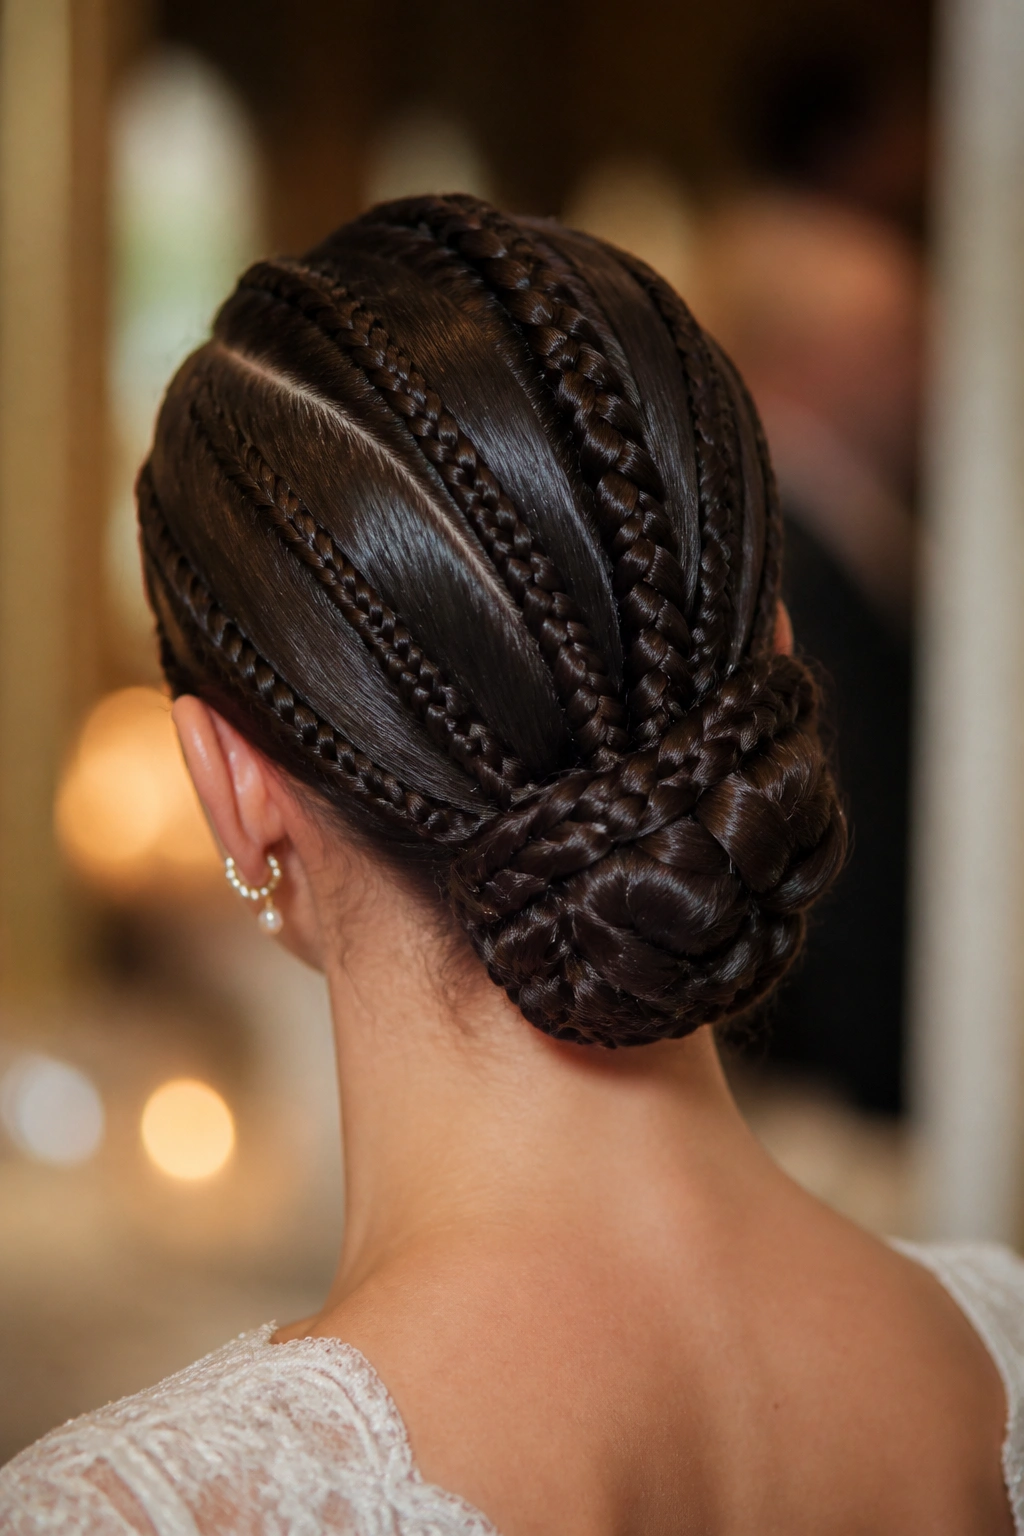
If you’re heading to a wedding or a formal event, this style is unbeatable. It involves multiple small, slicked braids that are gathered and pinned into a low, intricate bun.
The Power of Multiples
By breaking the hair into four or five braids, you ensure that no single section is too heavy. This makes the “slicking” process much easier to manage. Once the braids are done, you can weave them together to create a bun that looks far more complicated than it actually is.
Long-Term Security
Since this is a formal look, you want it to survive hours of dancing. After the braids are pinned into the chignon, use a “firm-freeze” hairspray. Hold the bottle about 10 inches away and mist the entire head. This creates a “shell” that protects the style from wind and movement.
17. The Sleek Infinity Braid
The infinity braid (or figure-eight braid) uses one strand that wraps around two stationary pillars of hair. It is very flat and very wide, making it perfect for a “slick” aesthetic.
Why It Stays Flat
Because the infinity braid doesn’t “stack” hair the way a three-strand braid does, it sits very close to the scalp. It’s almost like a ribbon of hair.
The Product Layering Trick
Apply a smoothing serum to the two “pillar” strands and a high-hold gel to the “wrapping” strand. This ensures that the anchor of the braid is smooth while the part that does all the work is locked in place.
18. Side-Swept Heavy Braid
A side-swept braid is a great way to handle very thick or very long hair. By bringing all the weight to one side, you can use the shoulder to help support the braid, reducing the pull on the scalp.
The “Ear-Tuck” Anchor
To keep the opposite side of the head slicked down, you need to use a “secret” bobby pin. Slick the hair back behind the ear on the “empty” side and pin it there. Then, bring the rest of the hair over the top of the pin to start the braid. This ensures that even if you move your head quickly, the “slicked” side won’t bag out.
Managing the Volume
For a heavy braid, use the “pancaking” technique only on the very outer edges of the loops. Keep the core of the braid tight. This gives you the visual volume of a large braid without sacrificing the structural integrity that keeps the hair from falling out.
Essential Tools for the Perfect Slick

You can’t build a house without the right hammer, and you can’t get a “stay-down” braid without the right kit. Over the years, I’ve found that these four items are non-negotiable for anyone serious about the slick-back look.
The Boar Bristle Brush
As mentioned earlier, nothing lays hair flatter than boar bristles. They distribute the natural oils (and your styling products) more evenly than nylon. If you have very thick hair, look for a “reinforced” boar brush that has a few nylon pins to help penetrate the layers.
The Metal Rat-Tail Comb
Plastic combs are fine for basic detangling, but for a slick-back, you need the precision of a metal tail. It allows you to create sections without snagging the hair you’ve already slicked down. It’s also the perfect tool for “tucking” in any stray hairs that try to escape from a finished braid.
Non-Snag Elastics
Nothing ruins a slick-back faster than a broken hair tie. I prefer the “polyband” style elastics that are coated in a slight silicone finish. They don’t pull on the hair, but they also don’t slide. If you’re doing a high-tension style, these are your best friend.
Silk or Satin Scarf
This is the “secret weapon” of the professional stylist. Once the braid is finished and the gel is still slightly damp, tie a scarf tightly over the head. Leave it on for at least 15 to 20 minutes (or while you do your makeup). When you take it off, the hair will be “pressed” flat, creating that “clean girl” aesthetic that looks like it was done in a salon.
Common Mistakes That Lead to Frizz
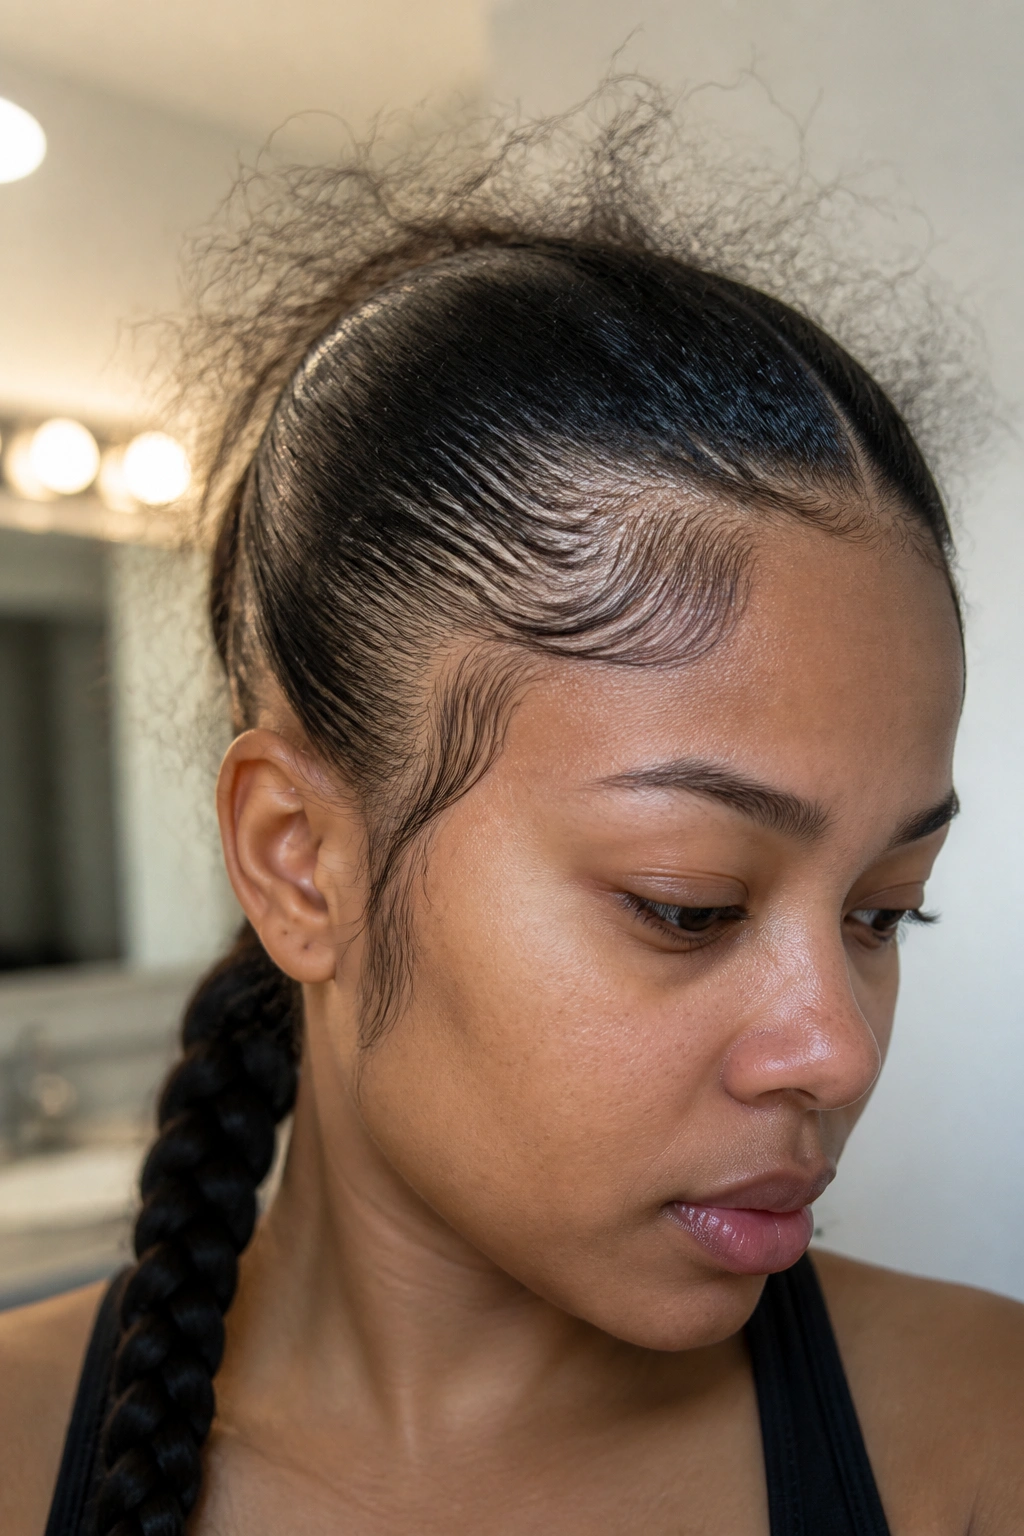
Even with the best style, a few simple errors can cause your braid to fail before the day is over. Most of these happen during the first ten minutes of the process.
Braiding on Bone-Dry Hair
If your hair is completely dry, it has more “memory” and will want to return to its natural shape. While you don’t necessarily want your hair soaking wet (which can cause breakage when pulled tight), a slight dampness makes the hair more “plastic” and easier to mold into a slick shape.
Using Too Much Water-Based Product
It seems counterintuitive, but too much water-based gel can actually cause frizz in certain hair types. As the water evaporates, the hair can “swell,” which pushes the strands out of the braid. If you notice this happening, try switching to a hybrid wax-gel or a pomade.
Neglecting the Nape
We often focus so much on the hairline at the forehead that we forget the hair at the base of the neck. This is the area that experiences the most friction from clothing. Always apply extra product to the nape and brush it upward with the same intensity as the front.
Troubleshooting Your Slick-Back Mid-Day
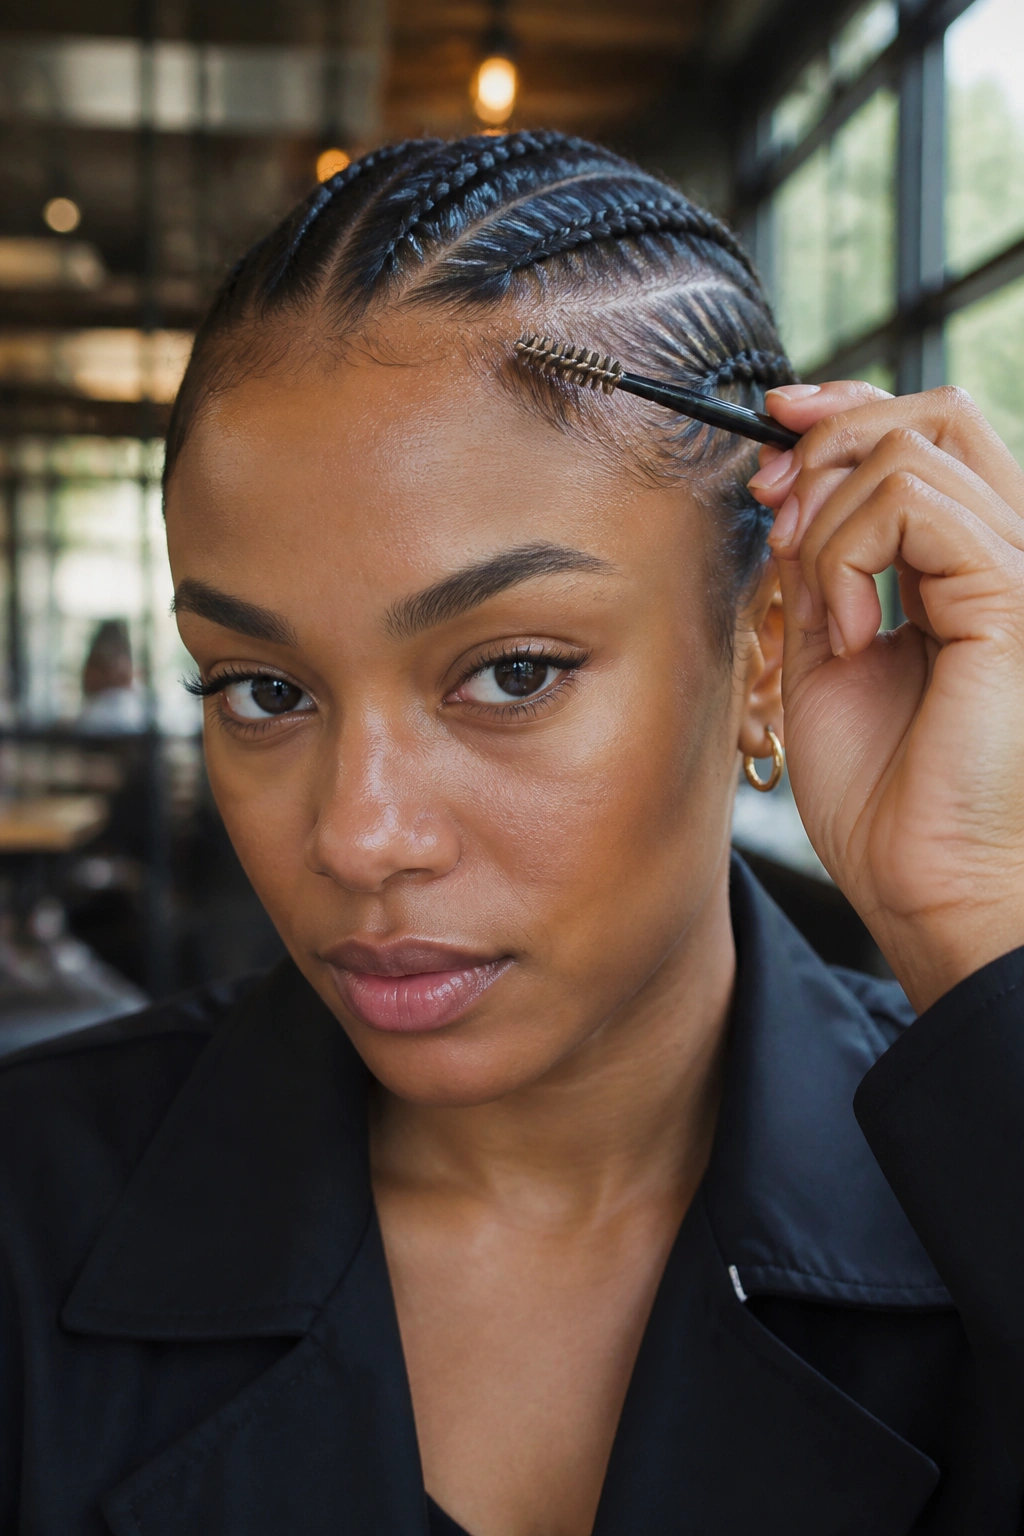
Sometimes, despite our best efforts, a stray hair escapes. Instead of taking the whole thing down, there are a few “emergency” fixes you can use to get back on track.
The Spoolie Trick
Keep a clean mascara wand (a spoolie) in your bag. If you see a flyaway, spray a little bit of hairspray on the spoolie and “comb” the hair back into the braid. It’s much more precise than using your fingers, which often just makes the frizz worse.
The Clear Brow Gel Save
If you don’t have hairspray, a clear brow gel works in a pinch. They are designed for high-hold on small hairs, making them the perfect “on-the-go” edge control.
The Bobby Pin “Tuck”
If a whole chunk of hair slips out of the braid, don’t try to shove it back in with your finger. Use a bobby pin to “hook” the hair and slide it horizontally into the center of the braid. It will be hidden by the surrounding hair and will stay secure for the rest of the afternoon.
The Bottom Line
A slick-back braid is more than just a hairstyle; it’s a structural feat. By choosing the right pattern for your hair type and being meticulous with your prep work, you can achieve a look that survives everything from a morning commute to an evening dinner. The key is tension, the right tools, and a refusal to settle for “good enough” when it comes to the base of the style. Once you master the art of the “press” and the “anchor,” you’ll find that these 18 styles aren’t just suggestions—they are your new daily staples.