A wedding braid that survives dinner, speeches, and a packed dance floor has a different job from the soft, floaty styles that live on mood boards. The best wedding braids are built with grip, not wishful thinking. They need to look pretty at the altar and still look like themselves after the first slow song, the second slice of cake, and a few too many hugs.
There’s a simple reason some braided styles fall apart while others stay neat for hours: the ones that last are anchored close to the scalp, pinned where the braid crosses itself, and shaped to move without sliding. That sounds technical because it is. Bridal hair always looks effortless from the front, but the styles that hold are doing a fair bit of work underneath.
Fine hair needs one kind of support. Thick hair needs another. Veils, hairpieces, and heavy earrings all change the game too. I’ve always had a soft spot for braids that feel elegant without needing a rescue trip to the mirror between the ceremony and the first dance.
The 21 styles below lean toward the ones that behave under pressure—tight enough to stay put, soft enough to feel bridal, and smart enough not to collapse the second someone gives you a hug from the side. Some are classic, some feel more modern, and a few are the sort of thing a stylist reaches for when the bride says, “I want it to last.”
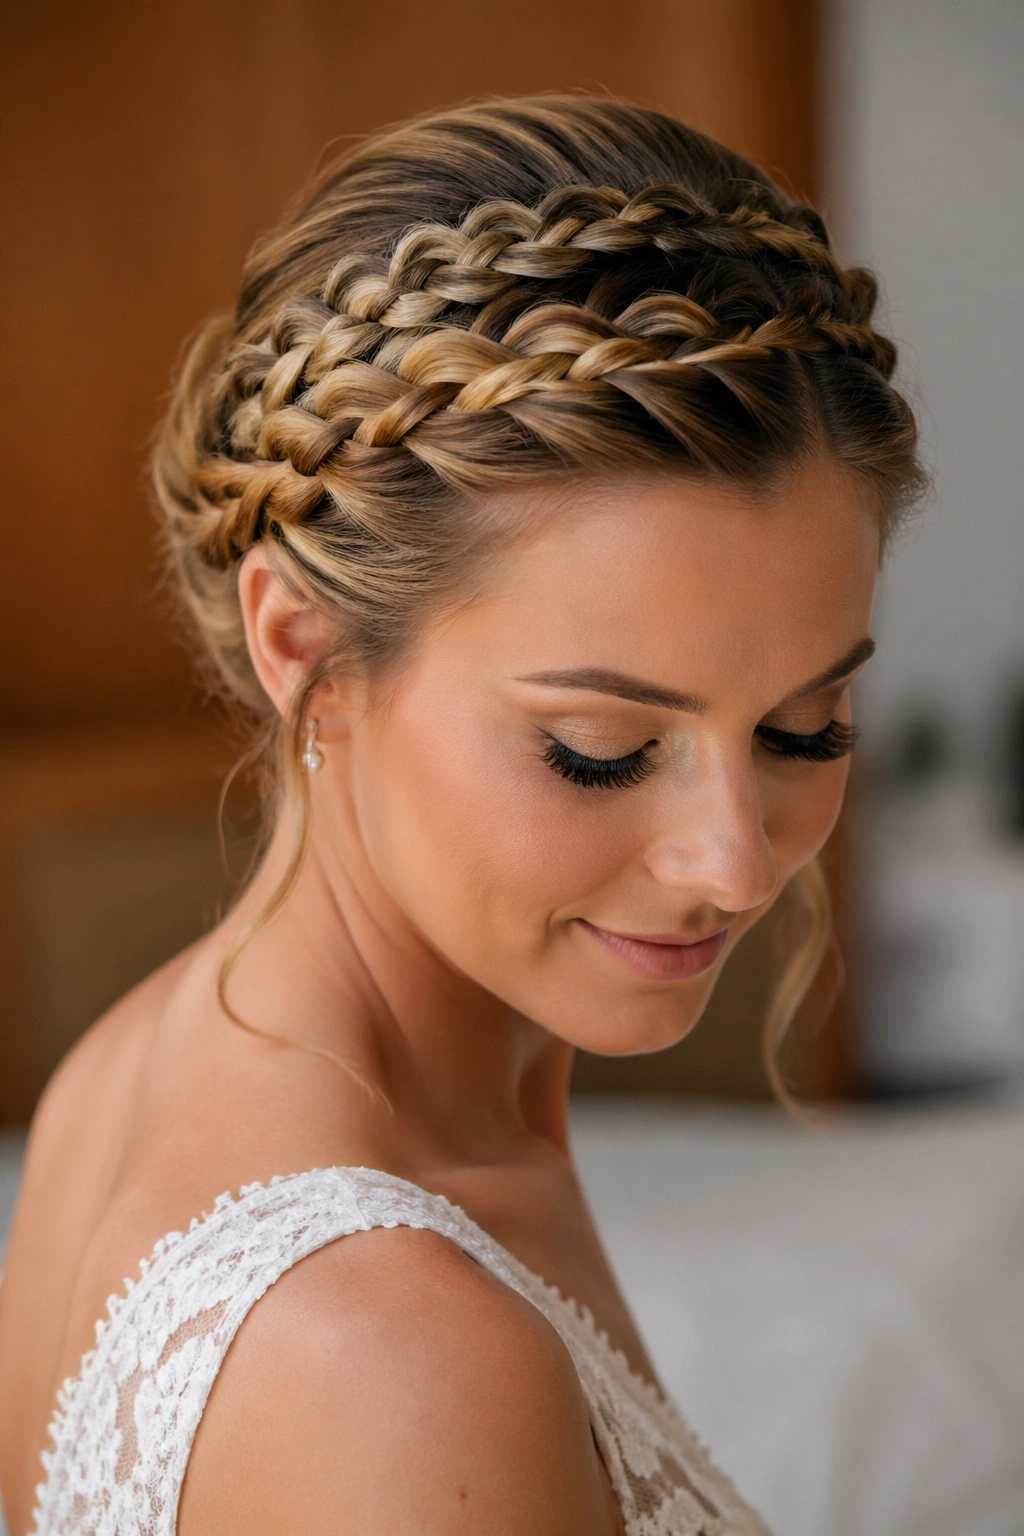
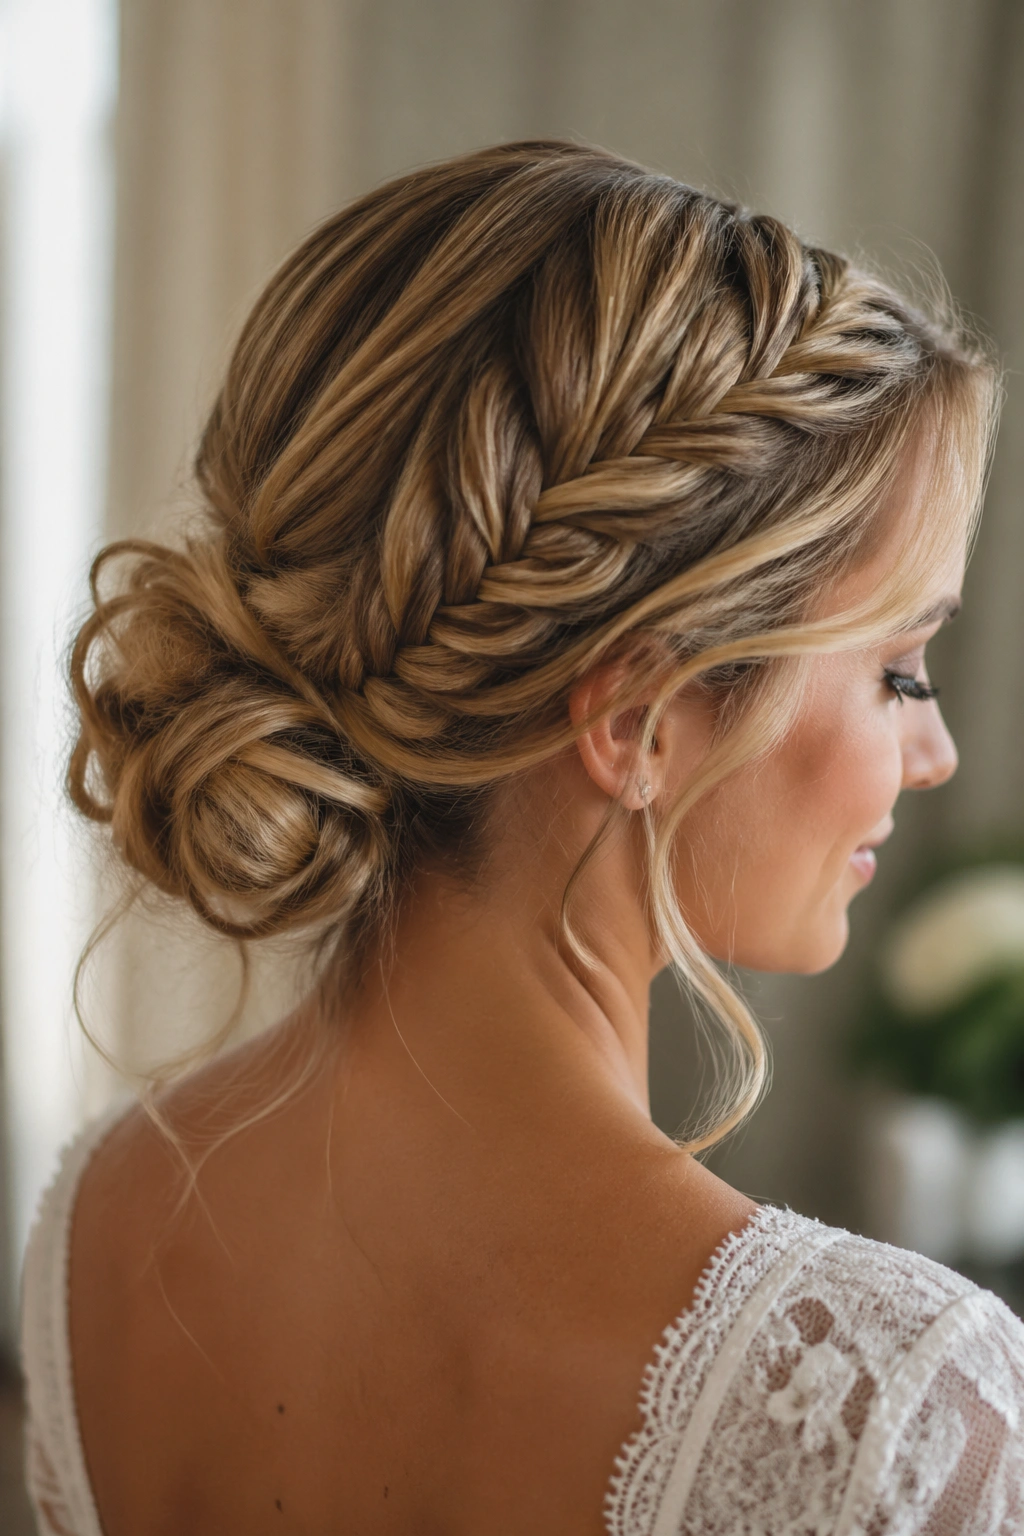
1. Sleek Dutch Crown With Tucked Ends
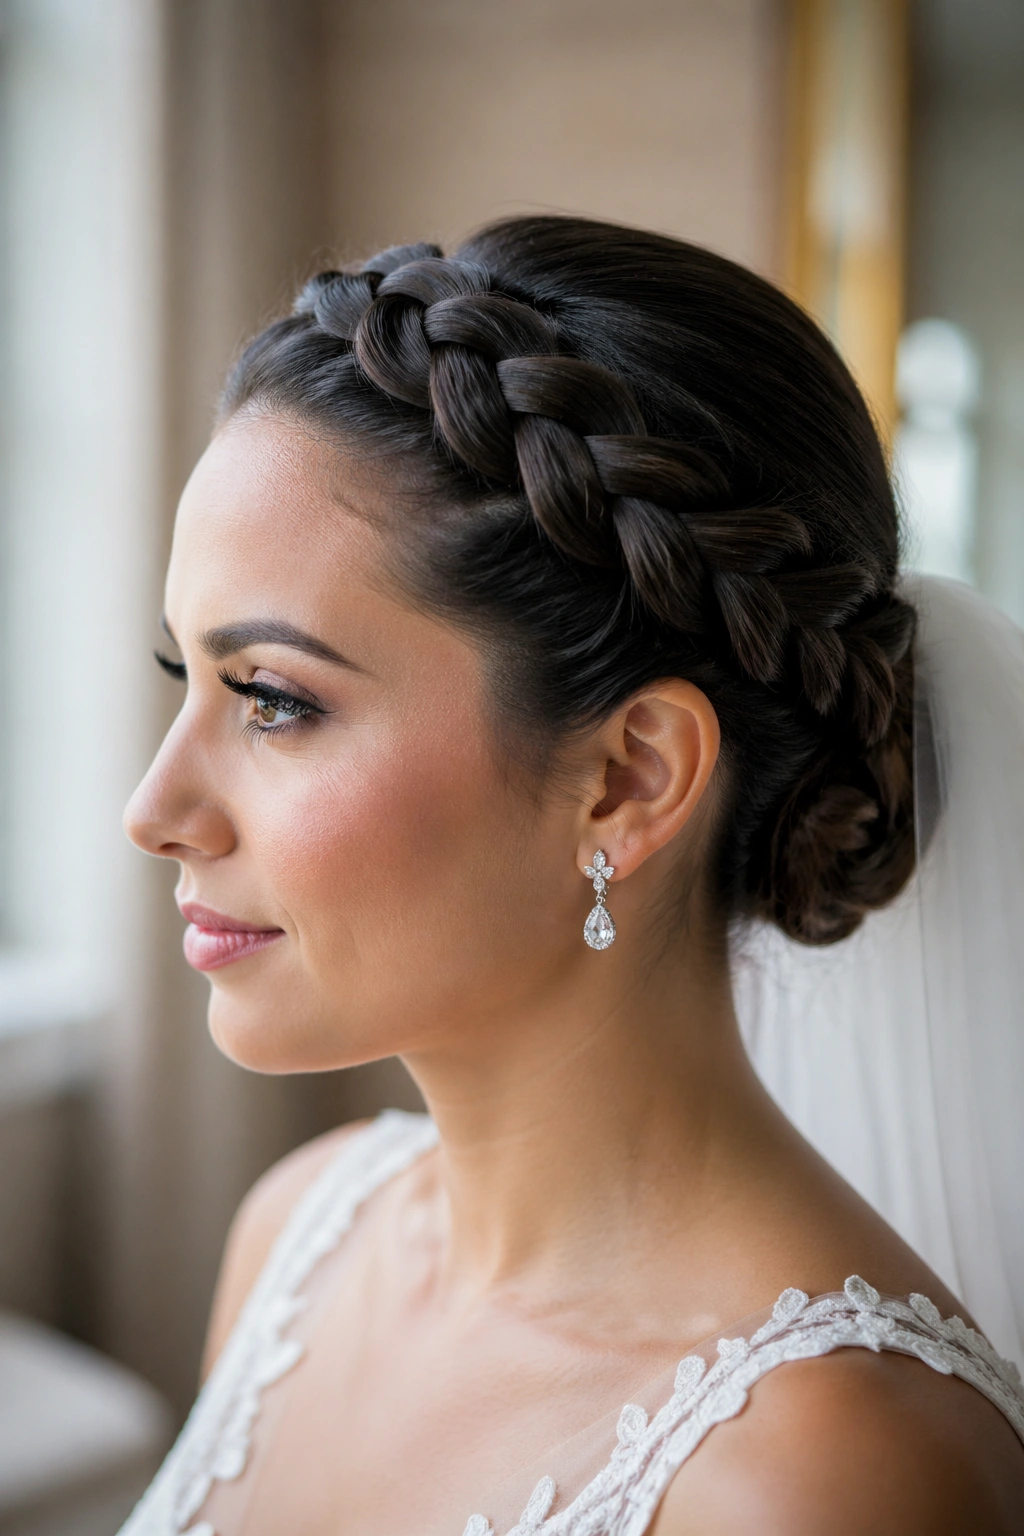
A Dutch crown braid earns its place because it grips the head instead of sitting on top of the hair like a decoration. That close contact is doing the heavy lifting. The braid wraps the hairline, then the ends disappear into a tucked finish at the nape, which means there’s less loose length waiting to fray apart by dessert.
I like this style for brides who want their face open and their veil placement clean. It also handles earrings well, which sounds small until you’re actually wearing them for six hours and want the whole look to feel balanced. A soft mist of texturizing spray at the roots helps the braid hold its shape without turning crunchy.
One thing people miss: the crown should sit snug, but not pulled so tight that the braid looks pinched. If the weave is too loose, it starts puffing in odd places. If it’s too tight, the whole thing can look stiff and flat. The sweet spot is a braid that feels secure the minute it’s finished.
Best for: medium to long hair, veils, and dresses with open necklines.
2. French Braid Folded Into a Low Chignon
Why does this style keep showing up at weddings? Because a French braid folded into a chignon solves two problems at once: it keeps the top of the hair controlled and it gives the bun something to lock into. The braid acts like a spine. The bun is the shell around it.
How to Pin the Fold
Start the braid high enough to lift the crown a little, then keep the sections even as you braid down the back of the head. When you twist the tail into a bun, pin from different angles so the pins cross under the knot. That cross-pinning is the part that matters. A single pin on one side can slide when the bride turns her head or takes off a veil.
This is one of those styles that looks calm from the outside and a little busy inside, which I mean as a compliment. It stays neat because the braid keeps feeding into the bun instead of ending abruptly. If you’ve got fine hair, this is a strong pick because it makes the bun look fuller without relying on a giant sock bun or extra padding.
3. Side Fishtail With Soft Volume at the Crown
A side fishtail braid has a softer mood than a straight-down braid, and that matters when the dress already has structure. Strapless bodices, one-shoulder gowns, and high lace necklines all handle this style well because the braid doesn’t fight the neckline. It drapes instead of marching down the back in a hard line.
The trick is to build a little lift at the crown before the braid starts. Not a mountain. Just enough. A gentle backcomb at the roots and a touch of powder give the braid something to grip, which keeps the top from going flat halfway through the reception. A fishtail that starts too slick will slip sooner than you want.
I also like the way a side fishtail lets you tuck in tiny floral pins or a comb without the whole style feeling crowded. It’s romantic, but not fussy. That’s harder to pull off than people think.
- Keep the braid wide by pulling the outer edges apart after you finish.
- Secure the end with a clear elastic, then wrap a small hair strand around it.
- Pin the braid against the shoulder so it doesn’t swing loose while dancing.
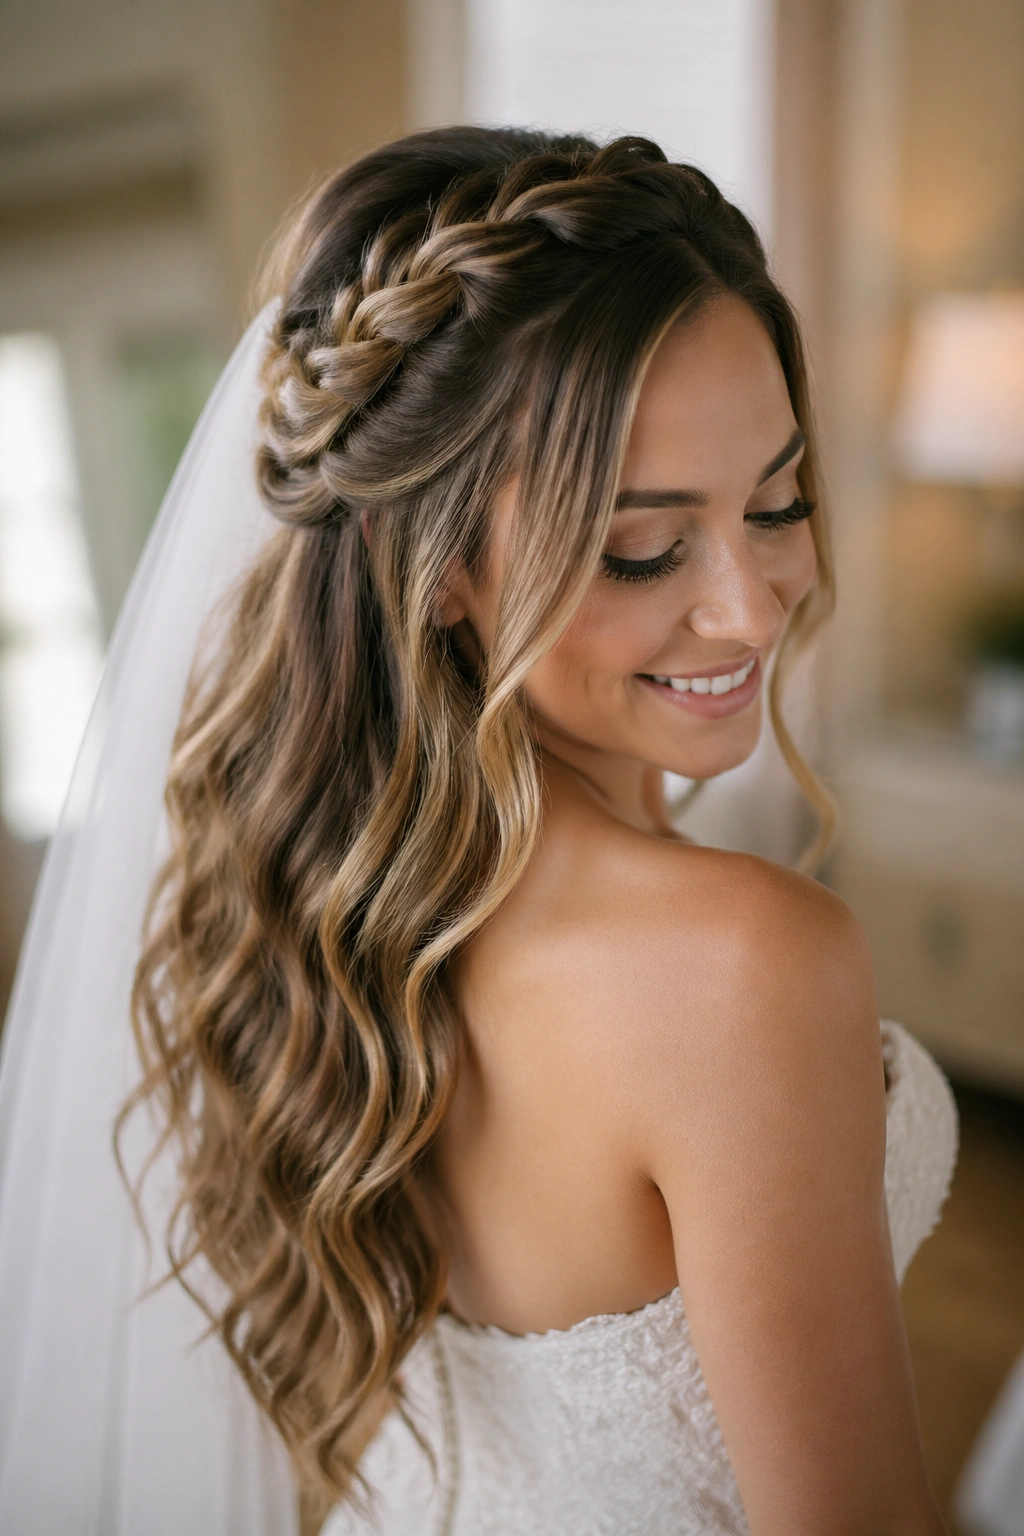
4. Halo Braid That Sits Close for Veils
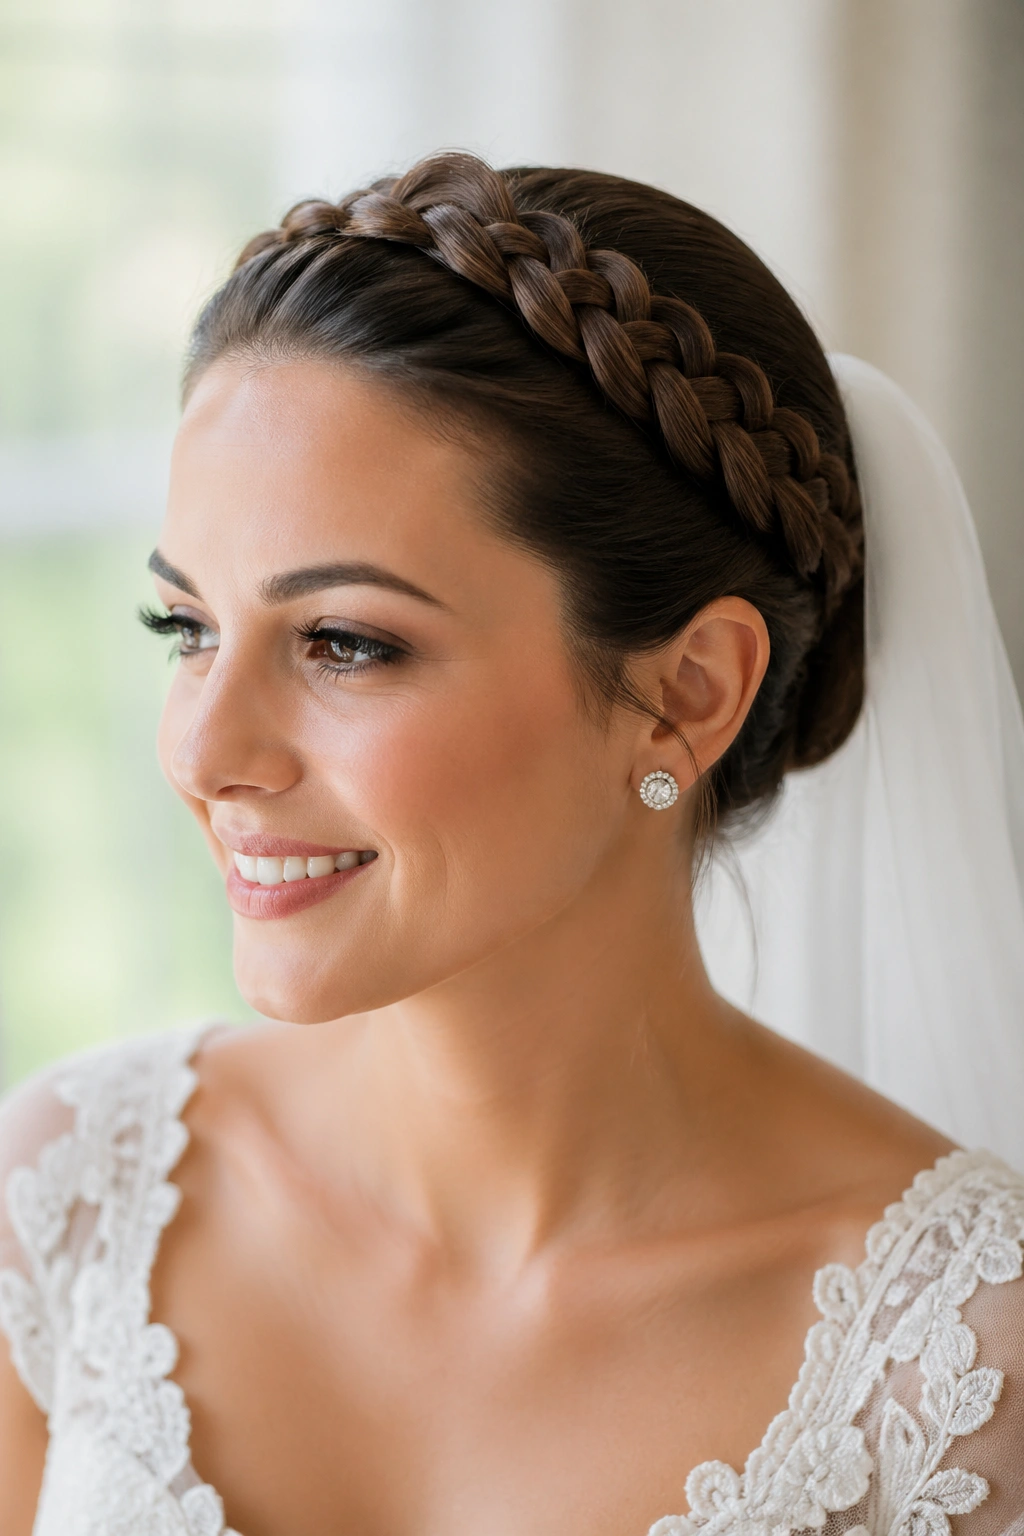
A halo braid works best when it hugs the head closely. That flat fit is what keeps it from puffing out under a veil or losing shape when the weather turns warm and the day gets long. Loose halos can be pretty in photos and annoying in real life. Tight halos do the job.
There’s also a nice practical bonus: a halo braid keeps the back of the neck clean. If you’re planning to dance a lot, or you know your ceremony is outdoors and the air might be damp, this style behaves better than one with a lot of free-hanging pieces. The braid should look woven into the hair, not perched on top of it.
I usually prefer this with a little shine spray at the very end rather than anything heavy earlier on. Too much product at the start can make the braid slippery, which is the last thing you want when the whole style depends on staying close to the scalp.
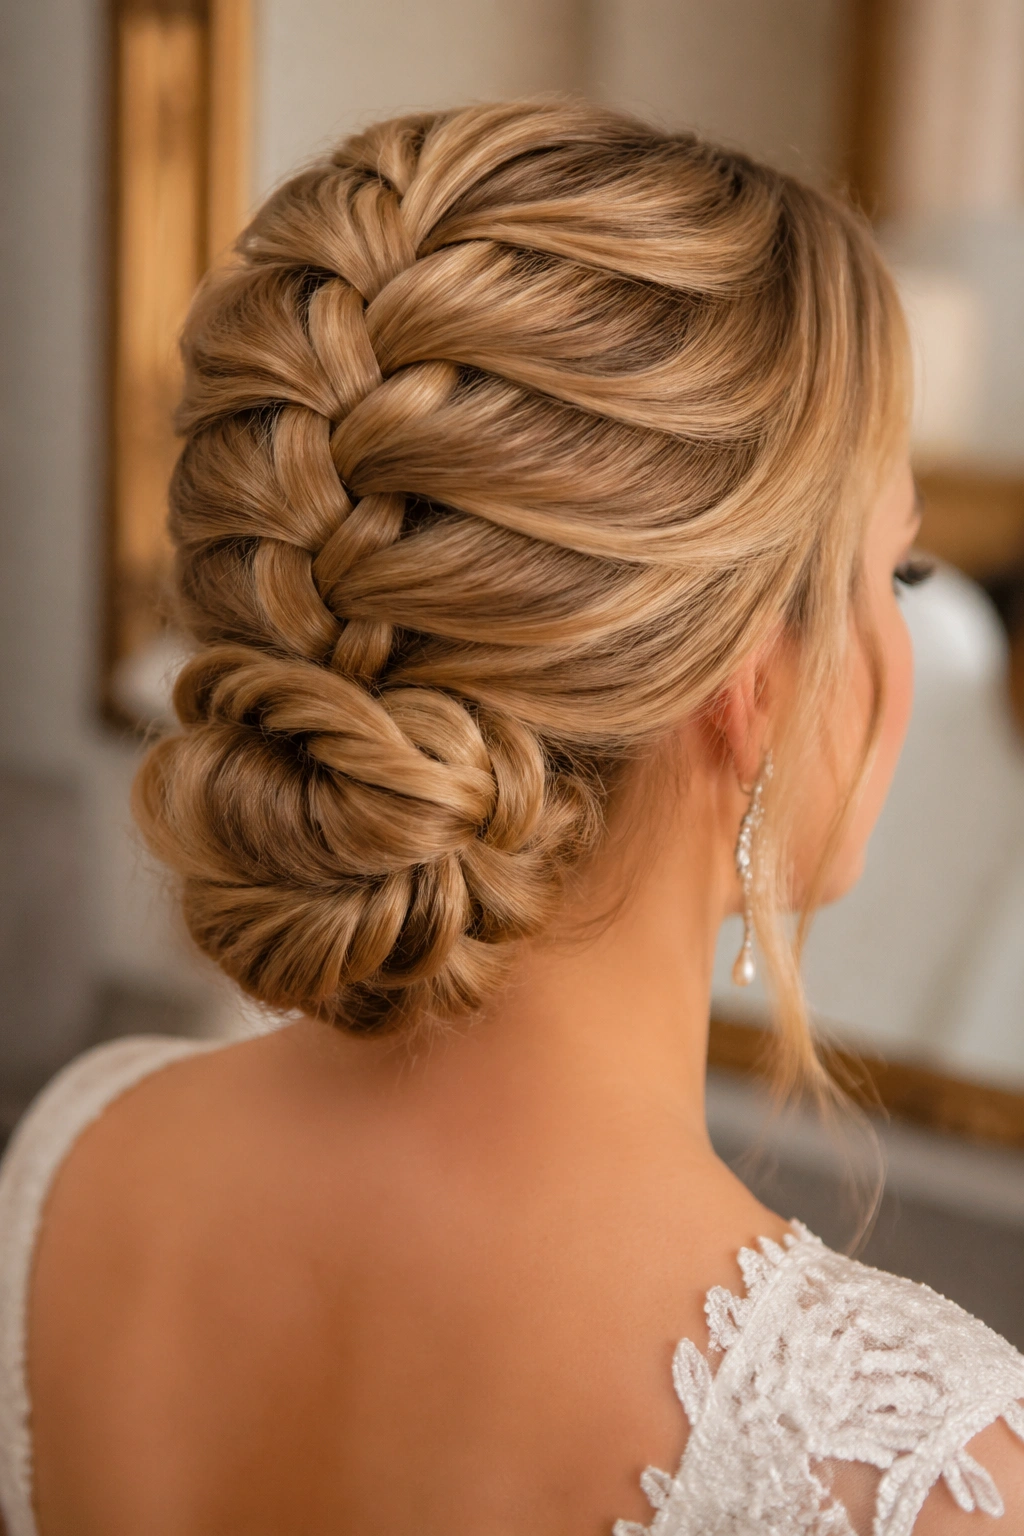
5. Double Dutch Braids Rolled Into One Bun
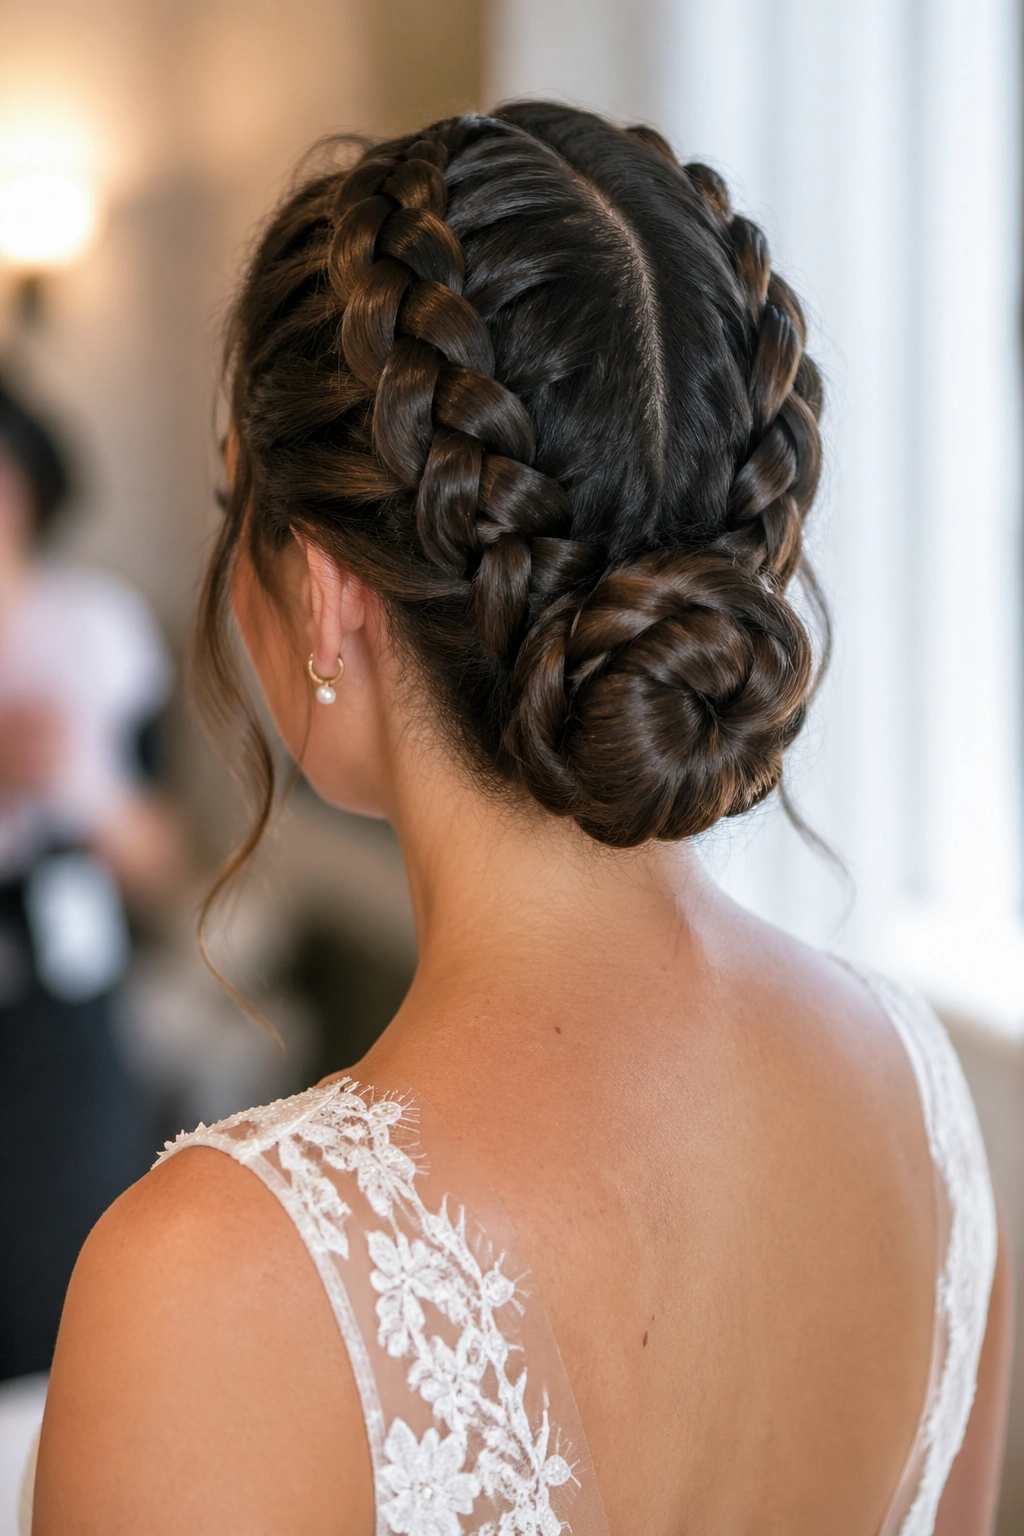
Unlike a single braid, this one gives you two anchor points before everything gets folded into the bun. That’s why it lasts so well. Each braid feeds into the same finish, so the structure has a built-in backup plan if one side shifts a little during the night.
This is a strong choice for thick hair because it keeps the bulk under control. It also works for brides who want something a little stronger-looking than a soft chignon. You get clean lines from the parting, then a fuller bun at the back that doesn’t collapse into a flat lump halfway through the reception.
I’d hand this to someone who likes a sharper look but still wants softness around the face. It can take a pearl comb, a small veil, or nothing at all and still look finished. That versatility earns its keep.
- Start with a centered or slightly off-center part.
- Braid each side tightly enough to hold, then pancake only the outer edges.
- Roll both braids into the same knot and pin through the base, not just the surface.
6. Waterfall Braid With a Pinned Back Panel
Can a waterfall braid hold through a wedding reception? Yes, if it isn’t doing the job alone. The visible waterfall section gives the pretty movement, but the back panel has to be pinned into a solid base so the style doesn’t slip apart while people are taking photos and leaning in for hugs.
This is one of those braids that looks delicate but needs a firm hand backstage. I like it for brides who want hair down without leaving everything loose. The waterfall gives you that soft cascade around the face, while the pinned section behind it keeps the whole shape from falling too far away from the head.
A stylist’s trick that makes a real difference: keep the dropped strands small and even. Big dropped sections can start to separate and tangle with the rest of the hair. Tiny, neat sections look cleaner and stay put longer.
The Hidden Support
The support is usually a second braid, a twist, or a low pinned section sitting just behind the waterfall. Without that anchor, the style turns fussy fast.
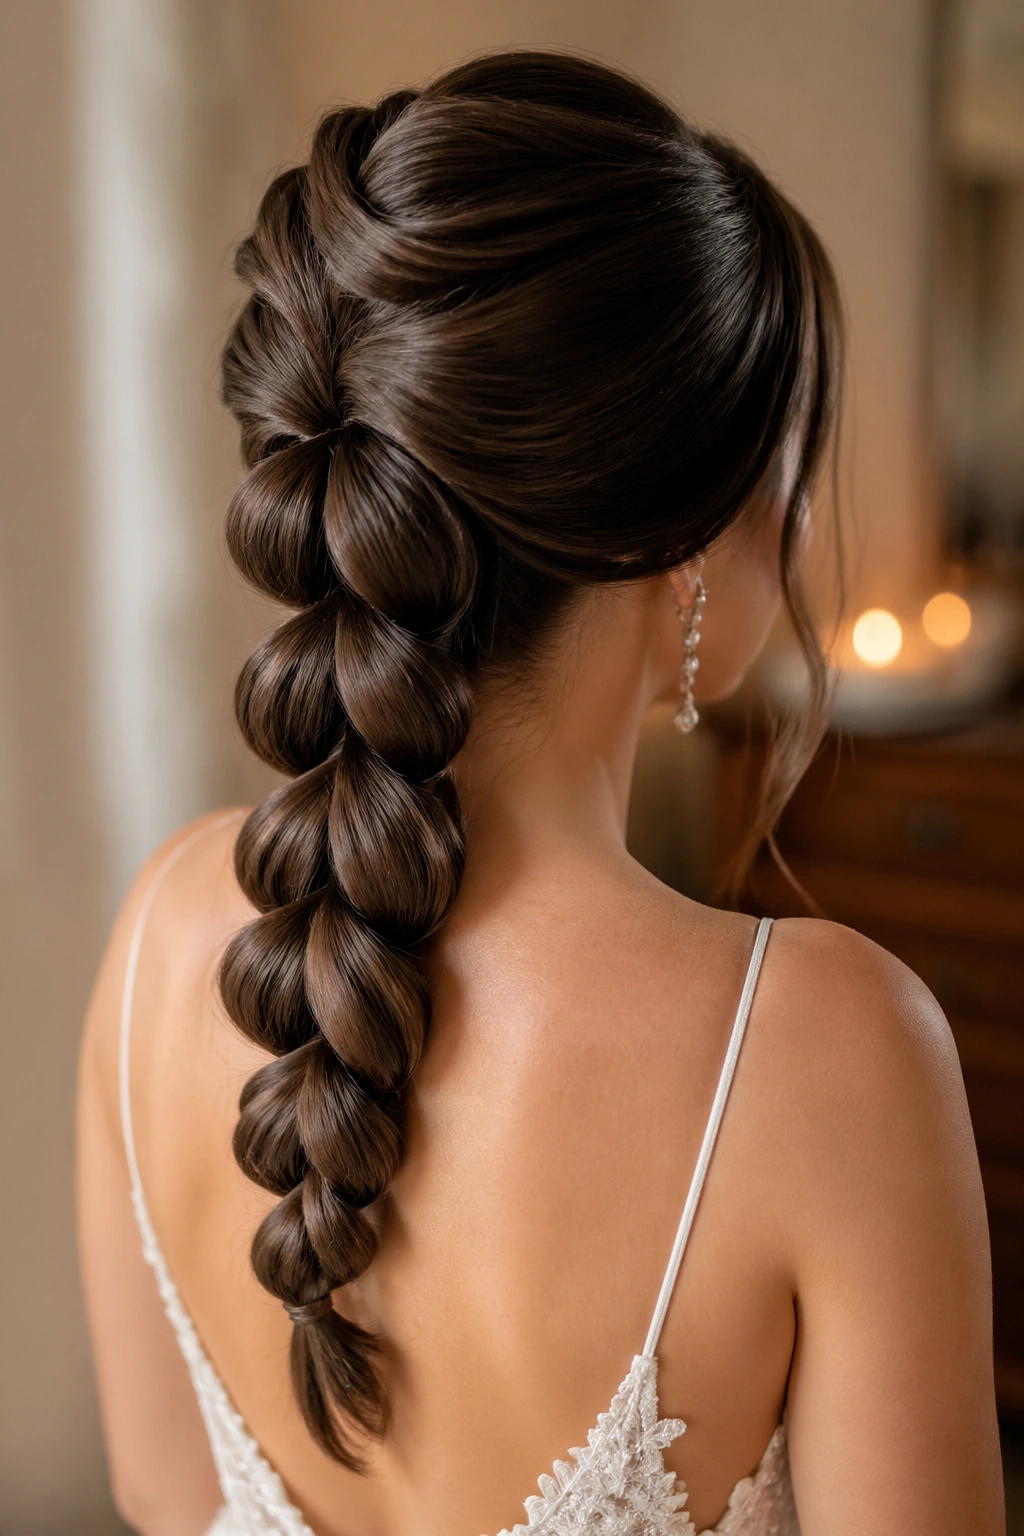
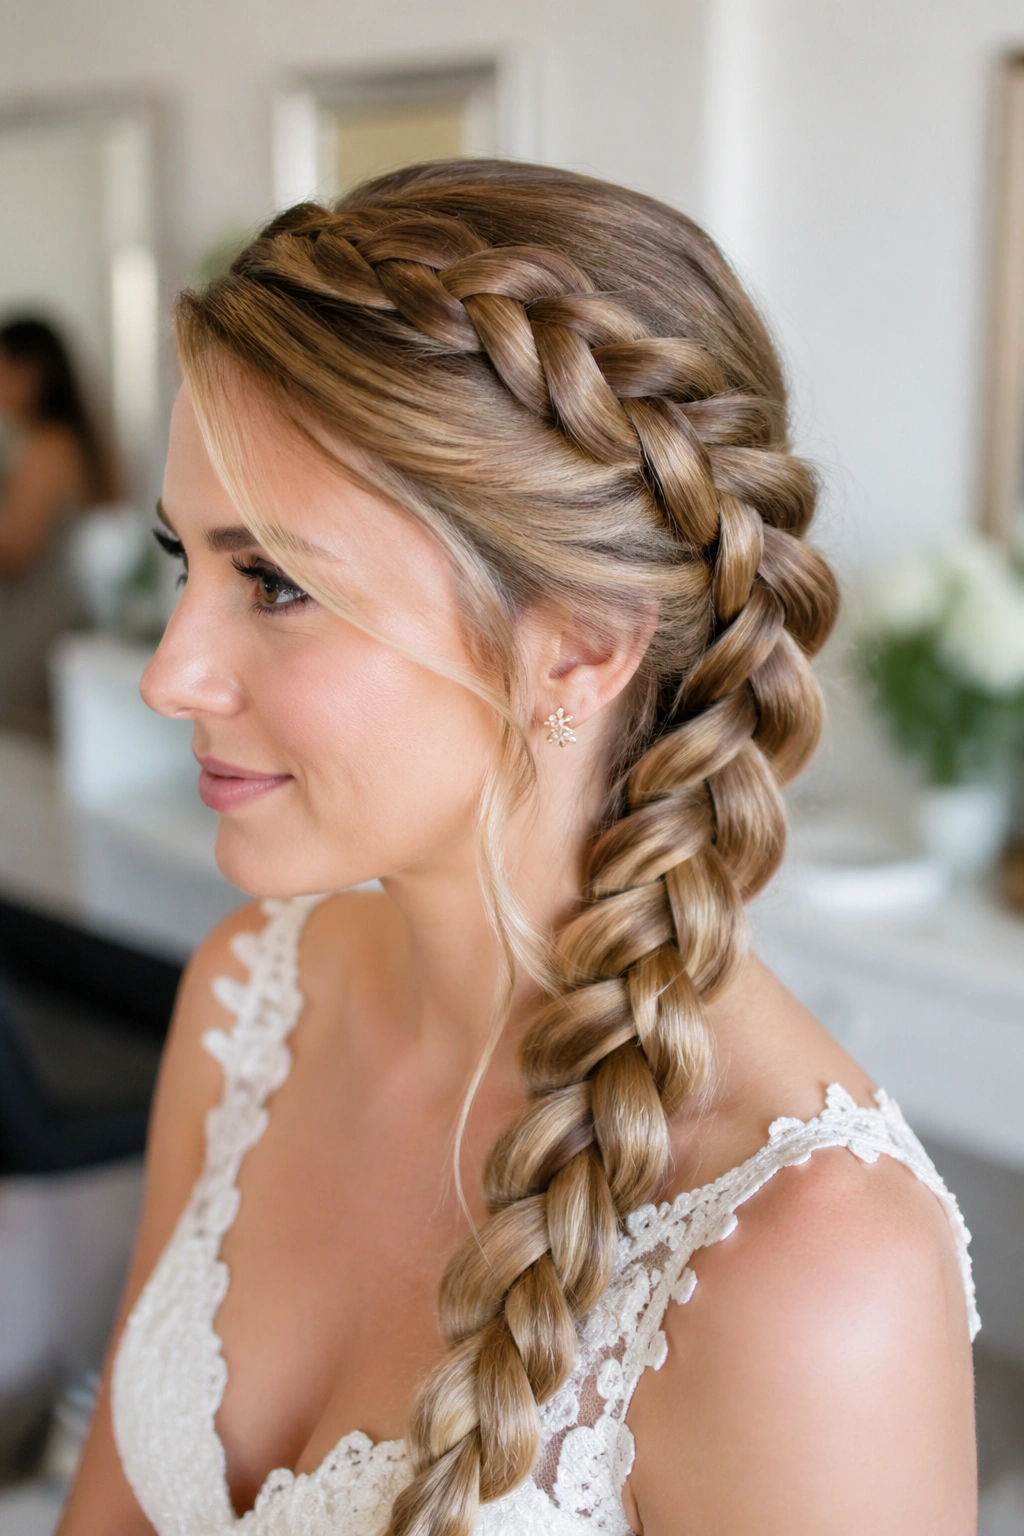
7. Rope-Braid Ponytail Wrapped at the Base
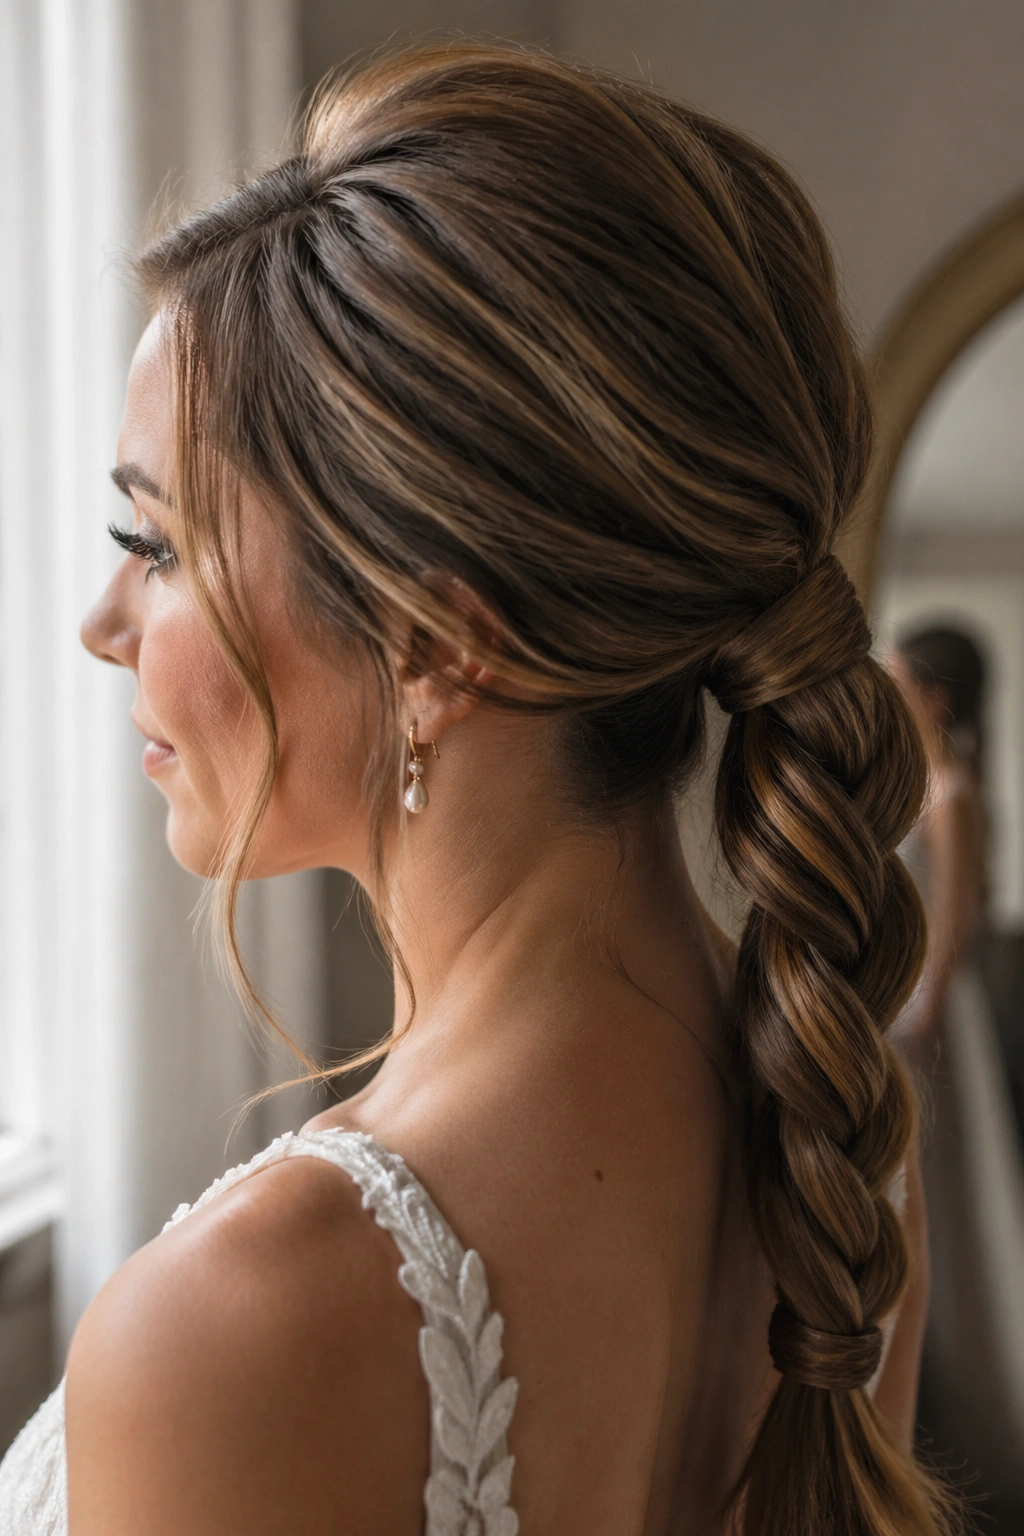
A rope-braid ponytail is one of the easiest ways to make a ponytail feel bridal instead of casual. Two twisted sections wrapped around each other create a strong, rope-like line, and the wrapped base hides the elastic so the whole thing reads as intentional.
What makes this one hold is the twist. A rope braid has less chance of loosening into wisps than a plain ponytail because the sections are literally locking into each other. It’s a smart choice for brides who want movement in the length but don’t want hair sticking to the neckline every time they turn.
I like it with a little volume at the crown and a clean, wrapped base at the nape. Add one small comb or a few pins at the base if the hair is heavy. That’s usually enough. A rope braid that starts with a firm elastic and a bit of root texture will outlast a loose, silky ponytail by a mile.
8. Center-Part Braided Low Bun
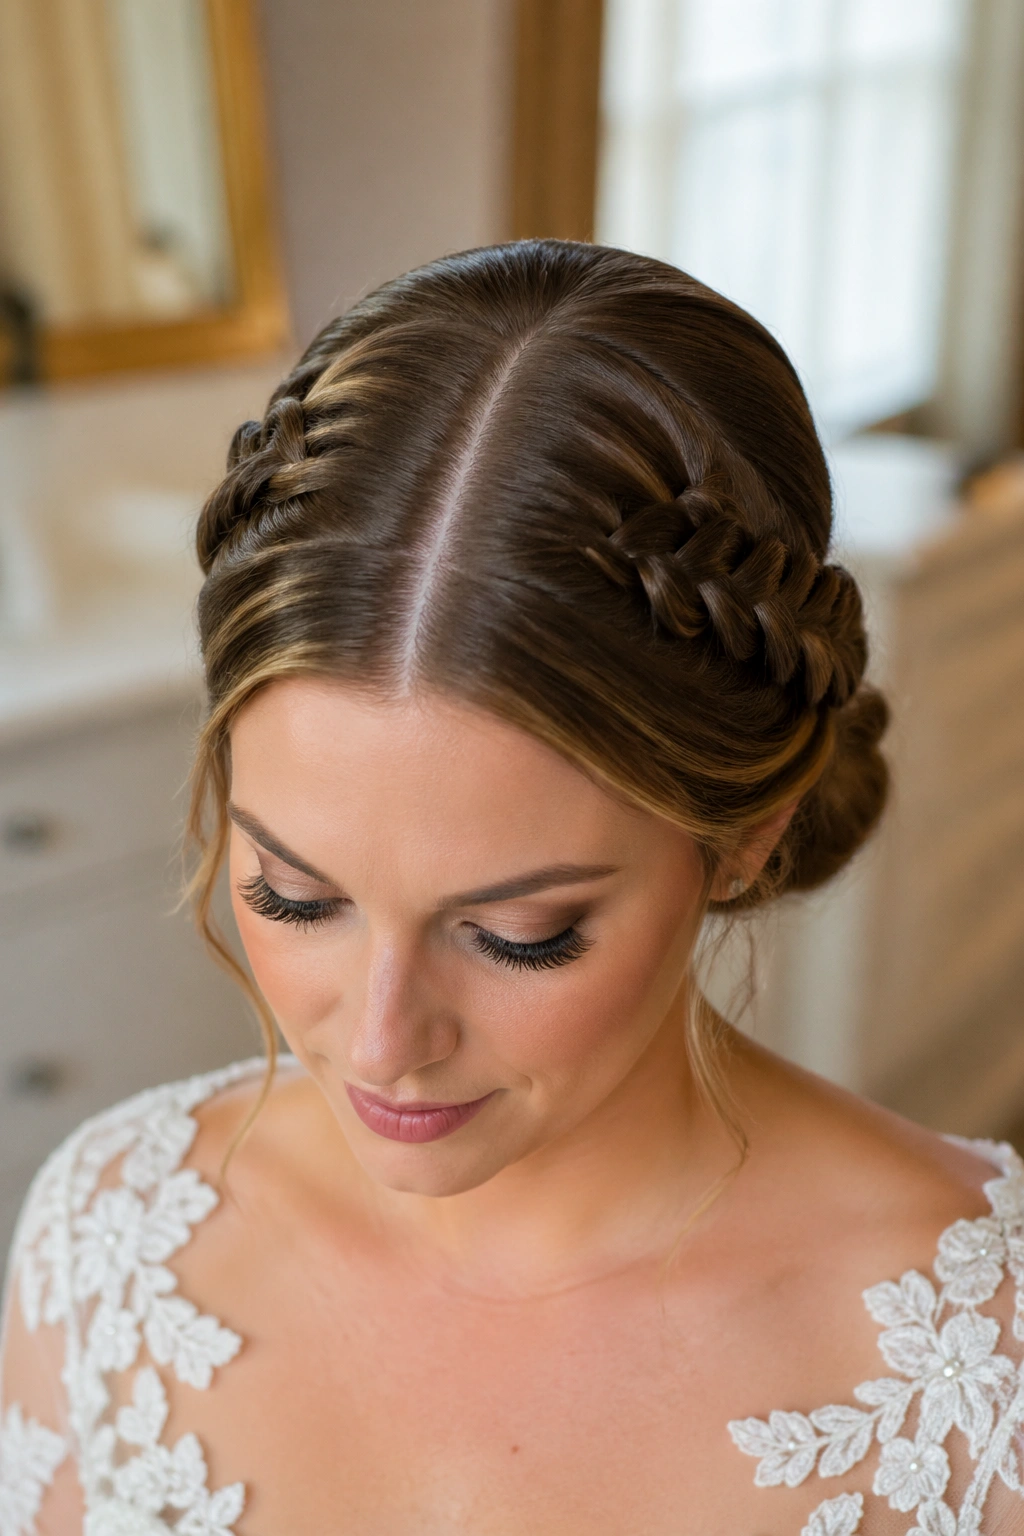
A center part gives this style a clean, almost architectural feel, which sounds formal because it is. The braid lines on each side act like guides leading into the bun, and that symmetry makes the whole look feel calm. It’s a nice match for sleek dresses, square necklines, and bold earrings.
This is one of the easier styles to keep looking neat because every piece has a clear job. The side braids stop the front from puffing around the face, and the low bun collects the rest without looking bulky. If you’ve ever had your hair expand behind your ears halfway through a long event, you know why this matters.
I’d keep the finish polished but not lacquered. A little sheen goes a long way here. Too much shine spray can flatten the braid detail, and then you lose the point of having the braid in the first place.
9. Milkmaid Braids With Clean Anchors
Milkmaid braids can be dreamy, but only if they’re pinned properly. Loose versions tend to slide because the braid is sitting across the head rather than melting into it. The answer is clean anchors: tiny elastics, hidden pins, and a braid that’s flat enough to stay where you place it.
This style has a sweet, almost old-fashioned feel that works best when the braid lines are tidy. I’m not a fan of the overly messy version for weddings. It can look cute in a quick photo and then feel messy in person. The cleaner version holds shape better and feels more grown-up.
- Braid each side before wrapping.
- Use two or three pins at each crossing point.
- Tuck the ends under the braid instead of letting them stick out.
The best milkmaid braids look easy, but they are built like little bridges. That’s why they survive the long part of the day.
10. Pull-Through Braid With a Satin Finish
A pull-through braid has a different kind of staying power because it’s built from ponytail sections rather than a classic three-strand braid. That means the shape stays bold and full, even if the hair itself is fine. If you want volume that still looks controlled, this is a good place to start.
It also photographs with a strong, clean line from top to bottom, which can be useful if the dress is simple and you want the hair to carry some of the detail. The style does need a bit more elastics and a little patience, but the payoff is a braid that doesn’t slump the way a softer braid sometimes can.
I like this one when the bride wants texture without a messy finish. The satin sheen comes from smooth prep, not from drowning the hair in product. Keep the crown neat, wrap the elastics carefully, and stop once the braid looks full enough. Pushing it too far makes it bulky in a bad way.
11. Side-Swept Braid With Textured Ends
What if you want one braid and a bit of drama? A side-swept braid does that without asking for much. It moves the weight of the hair over one shoulder, which opens the neckline and makes the profile look softer. It’s a strong pick for brides who don’t want a pinned-up style but still need a shape that stays put.
The holding power comes from the temple area. A small pin hidden near the front keeps the braid from drifting forward, and a little texture powder at the roots helps the whole style grip instead of sliding. If the hair is slippery, this one can fall apart faster than people expect, so prep matters.
I also like it because it gives the photographer a nice side angle. The braid sits where the camera can see it. That sounds small, but small things matter when the style has to work from ceremony to last dance.
12. Feed-In Braids Coiled Into a Formal Bun
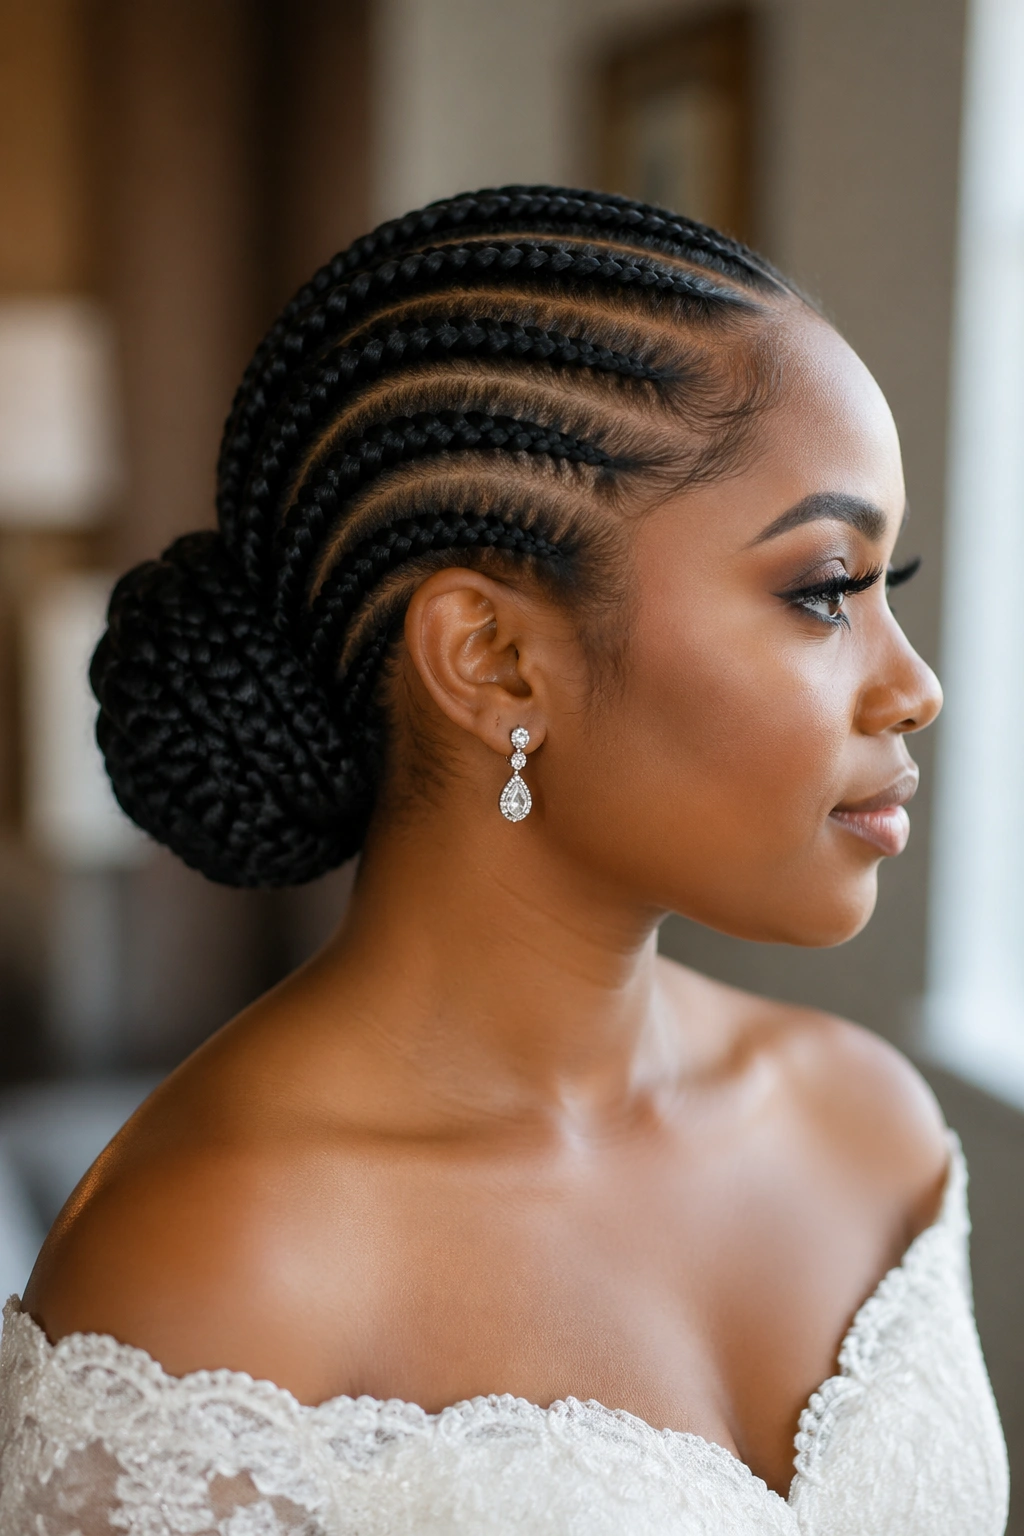
Feed-in braids make sense for wedding hair because they build structure from the start. Each section grows into the next, which gives the braid a neat base and a clean finish around the hairline. Coiled into a bun, the effect is elegant and secure without feeling stiff.
This style is especially good for natural textures and thicker hair, where trying to smooth everything into one slick shape can turn into a fight. Feed-in braids can reduce bulk at the top while still giving the bun enough body at the back. The result feels balanced.
A stylist will usually keep the front sections tidy and use gel or edge control sparingly, not heavily. Too much product can make the hair look wet for too long. A clean part, steady tension, and well-placed pins do more for longevity than a thick layer of anything.
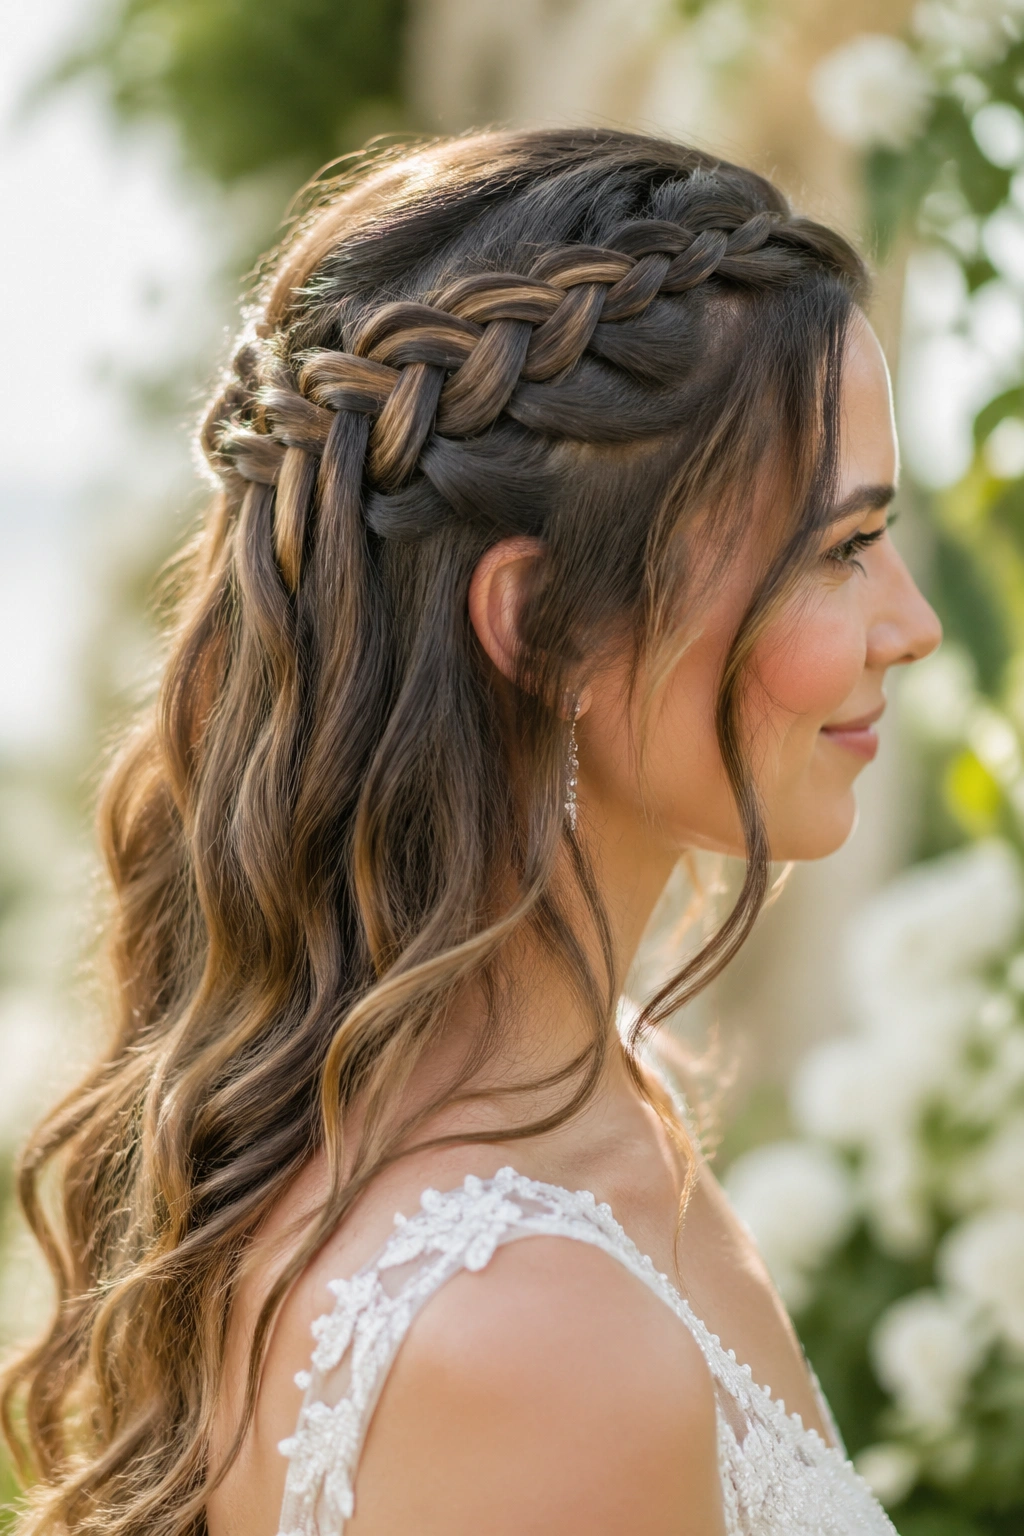
13. Half-Up Braided Twist for Long Lengths
There’s a nice middle ground between wearing it up and wearing it down, and this is it. A braided twist at the crown pulls the front away from the face, while the rest of the length stays free enough to feel soft. Brides with long hair often love this because it gives shape without hiding the hair they worked hard to grow.
The key is to keep the top half controlled. If the braid or twist sits too loosely, the front starts slipping forward, and then the style looks unfinished. A small hidden elastic under the twist and two pins crossed behind it usually solve the problem. That’s the unglamorous part, but it’s the part that matters.
I’d keep the loose length waved, not curled into tight ringlets. Tight curls can fight the braid and make the whole style feel busy. Gentle bends look calmer and hold up better once the dress, earrings, and veil are all in the mix.
Best Way to Secure the Split
Keep the dividing line between the top and bottom sections clean. Once it fuzzes up, the style loses its shape fast.
14. Four-Strand Braid With a Smooth Sheen
A four-strand braid has a more woven look than a standard braid, and that extra detail can make a simple hairstyle feel expensive without trying too hard. It also tends to hold its shape well because the structure is denser. The braid sits with more body and less wobble.
This is a style for someone who likes clean craftsmanship. It doesn’t rely on loose flyaways or a messy finish to seem romantic. The pattern itself does the work. If you’re pairing it with a simple dress, the braid becomes one of the main visual features instead of just a side note.
The only real caution is smooth hair. If the strands are too slick, the weave can slide and the braid loses its definition. A touch of mousse or a light texturizing mist at the roots helps. That little bit of grip makes the difference between a braid that holds its lines and one that softens too soon.
15. Infinity Braid Tied Into a Low Knot
An infinity braid looks intricate because the sections loop over each other in a repeating pattern that feels almost sculpted. Tied into a low knot, it becomes a wedding style with staying power. The repeated loops create their own structure, which means the braid doesn’t unravel the way a looser plait can.
I like this one for brides who want something that feels a little special without adding decoration. The braid itself is the decoration. It’s the kind of style that rewards a close look, which makes it satisfying in photos and in person.
What to Watch For
Start with hair that has some grip. Freshly washed, super-slippery hair makes this braid harder to hold, and the weave can slip out of shape while you’re working.
A low knot at the end keeps the braid from swinging around too much. That makes it a practical choice for dancing, too. Not every ornate braid can say that.
16. Braided Bun With Pearl Pins
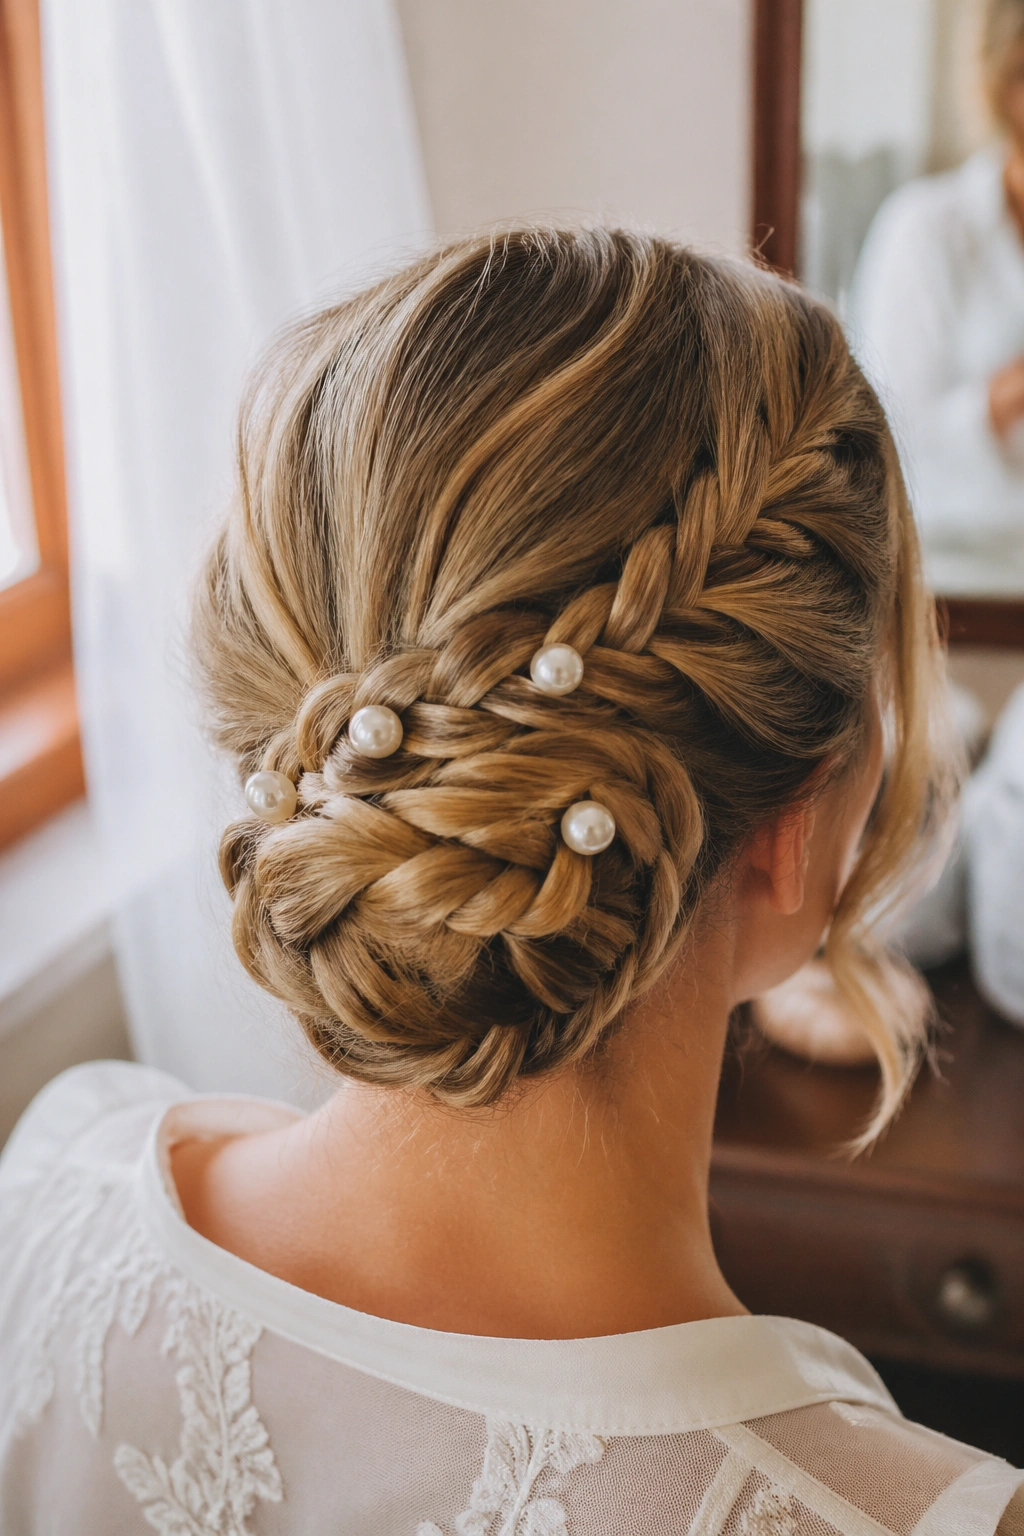
A braided bun with pearl pins can look delicate while still being one of the more secure bridal styles on this list. The braid creates the foundation, and the bun wraps that foundation into a shape that stays in place. The pearl pins come last, which matters. If you place the ornamentation too early, you end up shifting pieces around and loosening the structure.
I like pearl pins better than a heavy hair comb in a lot of cases. They spread out across the bun, catch the light in small spots, and don’t drag the style down on one side. That’s handy if the hair is fine or if the veil comes off after the ceremony and you want the bun to stand on its own.
Keep the braid tight enough to hold but not so tight that the bun feels hard. There should still be a little softness in the edges. The bun can be neat and still feel like a wedding style, not a business meeting.
- Insert pearl pins after the bun is fully secured.
- Place them near the braid’s curves, not in random open spaces.
- Use three to five pins, not ten. Too many turns it crowded.
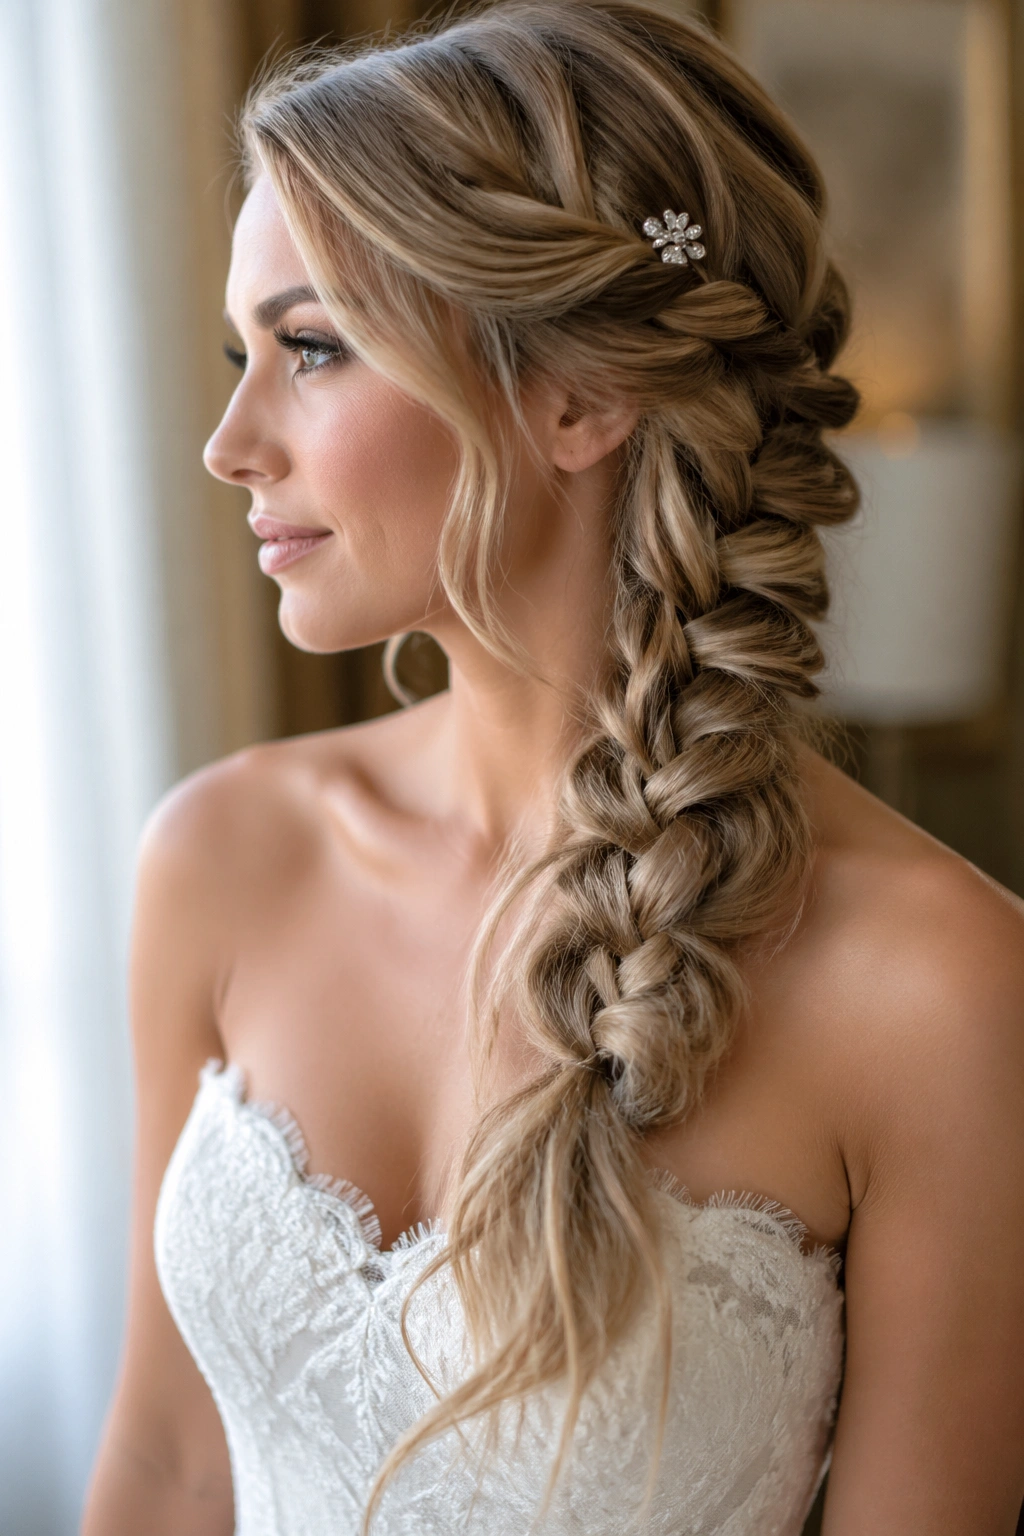
17. Loose Fishtail Chignon
A loose fishtail chignon has one of the nicest wedding textures because it gives you movement and control at the same time. The fishtail part brings detail, then the chignon pulls everything into a low, secure finish. It’s softer than a sleek bun and safer than wearing the braid loose.
This works especially well when the dress has lace or a softer neckline. The hair echoes that texture without matching it too closely. I’ve always liked styles like this for brides who want to look romantic without looking over-styled. There’s a difference, and people feel it.
The trick is not to loosen the braid so much that it starts falling apart. “Loose” should mean relaxed at the edges, not undone in the middle. Once the chignon is pinned, the braid should still read as a braid.
18. Braided Crown With a Low Knot
A braided crown with a low knot gives you the clean frame of a crown braid and the practical finish of a bun. That low knot matters because it keeps the weight centered and leaves the top of the head free for a veil or a small accessory. The whole style feels secure without becoming heavy.
This is one of the prettiest options for brides who want to keep hair off the face all day. The crown shape does the framing, while the knot at the nape keeps the style grounded. If you’ve got a long ceremony, a long dinner, and a long dance floor ahead, that combination helps a lot.
I like to see this style with a bit of softness around the temples. Too much pulling can make the crown look severe. A few gentler pieces around the face soften the edges without weakening the braid itself.
19. Braided Updo for Short Hair

Short hair can absolutely do wedding braids. It just needs a different plan. Instead of chasing a long, single plait, the braid usually becomes part of the architecture—small braids near the hairline, tiny twists tucked into the back, or clip-in pieces used to give the style enough length to grip.
That’s why this is one of the smartest options for bobs and shoulder-length cuts. It doesn’t pretend the hair is longer than it is. It works with what’s there. The result can feel modern and clean, especially when the braid is paired with a low knot or a pinned twist in the back.
- Use texturizing spray before sectioning.
- Add a small clip-in piece only where the braid needs length.
- Finish with bobby pins crossed under the fold so the style doesn’t shift.
Short hair needs structure, not excess. That’s the whole game here.
20. Twist-and-Braid Updo for Thick Hair
Thick hair looks lovely in braids, but it can also turn bulky fast. That’s why a twist-and-braid updo works so well. The twists reduce some of the weight near the scalp, and the braid organizes the length into a shape that sits close to the head instead of puffing outward.
This style is a good answer when someone says their hair “won’t stay down” or “won’t stay up.” Thick hair needs a middle path. A little twist controls the sides, a braid controls the length, and a low pinned finish keeps the back comfortable. That last part matters more than people admit, especially if the celebration runs late and the hairstyle has to survive hours of wear.
I’d lean into strong pins and a firm base here. Thick hair can hold a lot, but it can also pull apart lighter styles. The solution is to pin through layers, not just the top.
Why Thick Hair Needs This Split
Two textures do better than one here. The twist softens bulk; the braid locks the shape.
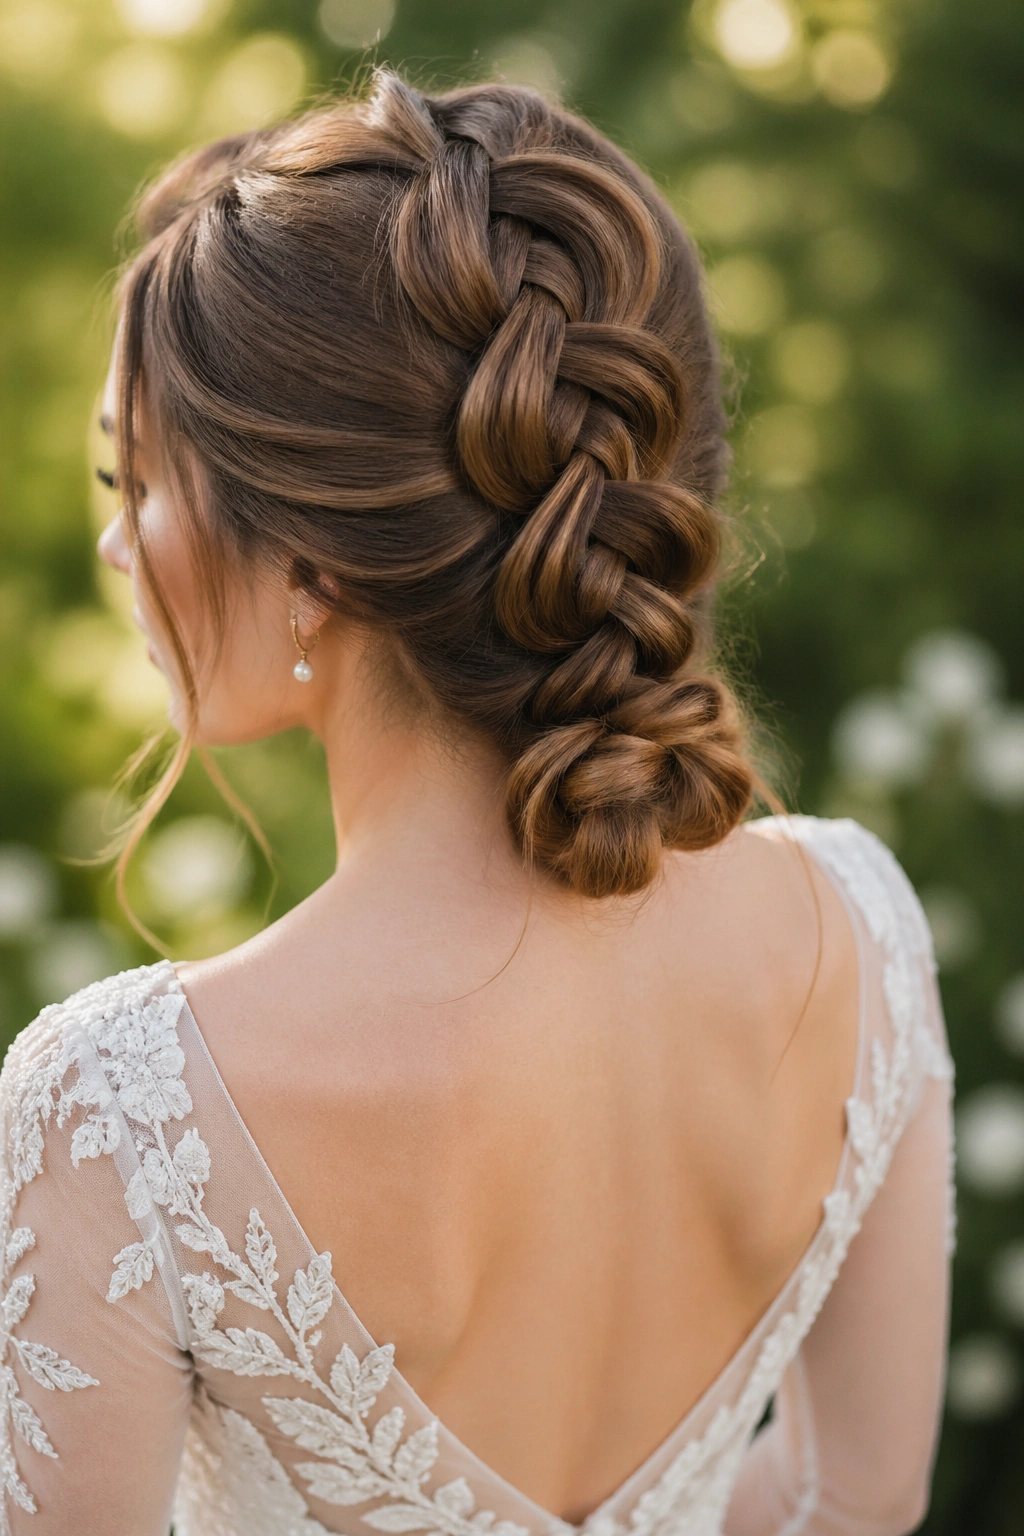
21. Reception-Proof Braided Low Bun
If I had to hand one style to a bride who wants to dance, eat, hug, and not think about her hair for the rest of the night, this would be it. A braided low bun gives you the security of a tucked finish and the polish of visible braid detail. It does not ask for much once it’s built correctly.
The braid should feed directly into the bun so there’s no loose tail hanging around to frizz out or slip. I also like a slightly off-center placement when the dress has a strong neckline, because it keeps the look from feeling too rigid. Add a few pins where the bun meets the braid, not just around the outside, and the style stays locked in place.
A tiny bit of movement around the face helps, but the base should feel firm when you touch it. That’s the difference between a pretty updo and one you trust through the last song.
This is the braid I’d pick for the bride who wants to stop worrying and start enjoying the party. And honestly, that’s the whole point.