Salt air is rude to hair.
A rope braid is one of the few styles that can take wind, sunscreen, a quick dip, and a long walk back to the car without turning into a frizzy apology. It starts with two sections instead of three, which sounds simple until you notice how much cleaner the shape stays when the air gets damp and sticky.
The trick is grip. Freshly washed hair slides, fine hair slips even faster, and beach humidity will expose every weak spot in your sectioning. A little dry shampoo, a touch of mousse, or even the roughness of day-two hair makes a bigger difference than people expect.
Pick the right version and the braid does half the work for you. Pick the wrong one and you spend the afternoon redoing something that should have been easy in the first place.
1. The Classic Low Rope Braid That Stays Put
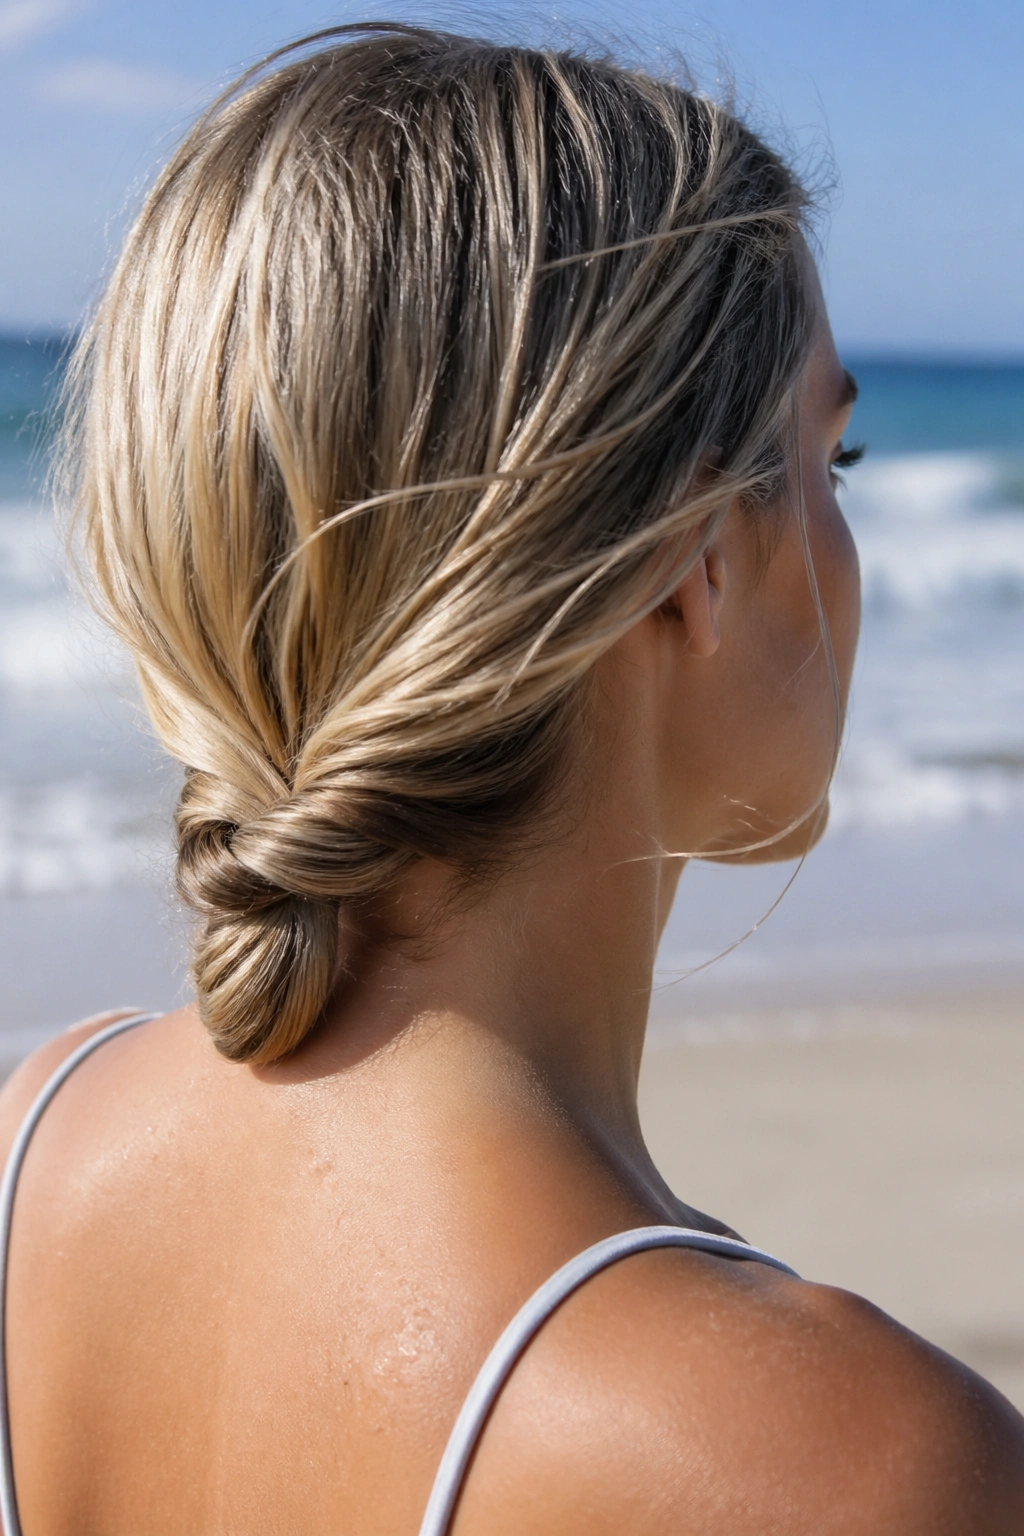
The low rope braid is the one I’d trust first. It sits close to the neck, which means the wind has less to grab, and it doesn’t fight with sunglasses, tote straps, or the back of a floppy hat.
Start at the nape with two even sections. Twist each section in the same direction, then wrap them around each other in the opposite direction. That opposite motion matters more than people realize. If both moves go the same way, the braid loosens faster and looks fuzzy before lunch.
- Best for: shoulder-length hair and longer
- Works well when: hair is a little dirty or textured
- Looks neat under: hats, clips, and sunscreen-slicked skin
- Holds better if: the elastic sits about 1/2 inch from the ends
Small detail, big payoff: wrap a thin strand around the elastic and pin it underneath. It makes the whole braid look finished even if the rest of the day gets messy.
2. The High Rope Braid Ponytail That Keeps Your Neck Cool
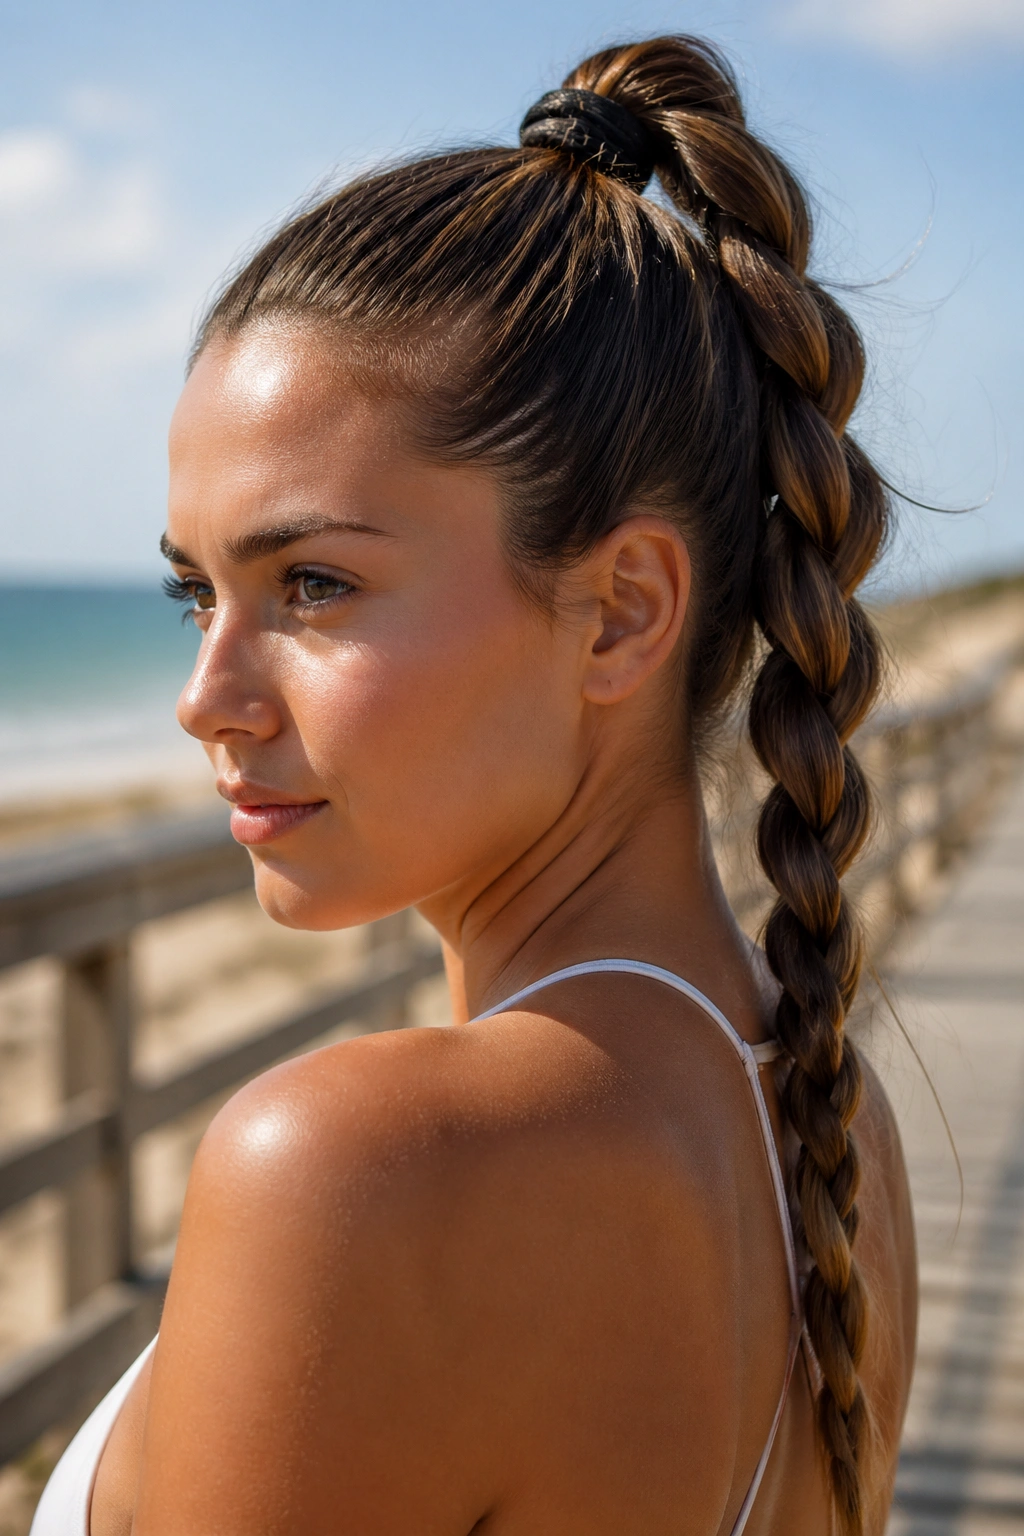
Want the braid that still looks awake after a windy walk on the boardwalk? Put it high. A high rope braid ponytail keeps the hair off your neck, dries faster after a swim, and feels lighter when the heat starts building.
The key is the anchor at the crown. Tease a 1-inch section at the base just enough to give the elastic something to hold on to, then smooth the top layer over it. If the roots are glassy and slippery, the braid starts sliding within an hour.
How to stop the base from sagging
A high rope braid needs a firm first tie, not a death grip on the rest of the hair.
- Use a strong elastic for the first tie.
- Mist the crown with texturizing spray before you start.
- Pin one bobby pin under the base so the ponytail cannot slip downward.
If you want extra hold, twist the rope braid a little tighter for the first 3 inches and relax it farther down. That keeps the lift without making your scalp feel boxed in. It is a tiny thing. It matters.
3. The Side-Swept Rope Braid That Handles Wind Better Than You’d Think
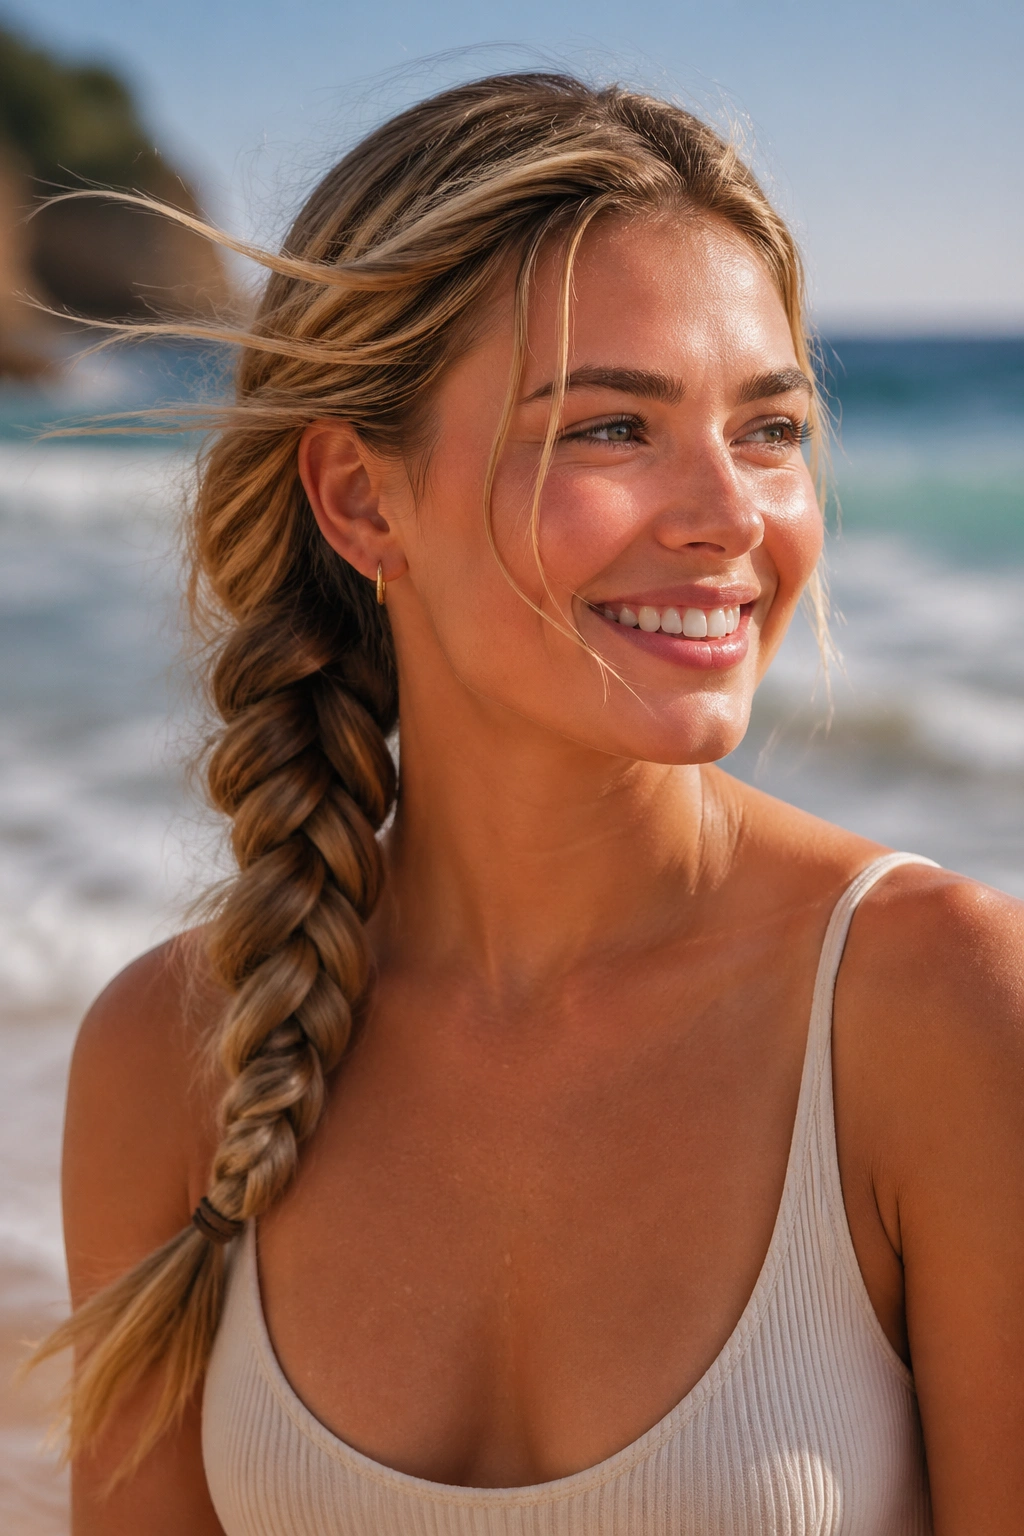
A side braid sounds fussy on paper. In real life, it’s one of the easiest ways to keep hair from blowing straight into your lip balm.
Pull the braid over one shoulder and start the twist just behind the ear. Keeping the braid to one side gives the wind a single direction to deal with, which sounds like a small advantage until you spend an hour near open water. The braid also looks softer when the ends loosen, because the asymmetry reads intentional.
If your hair is layered, leave the shortest face-framing pieces loose. That keeps the braid from looking overworked and gives the whole style a little movement. A side-swept rope braid is especially good if you wear one-shoulder swimsuits or you hate hair touching a sunburned back.
One quiet trick: keep the first two twists tight, then ease off. The braid will keep its shape longer, and the end won’t look like it was yanked through a bottleneck.
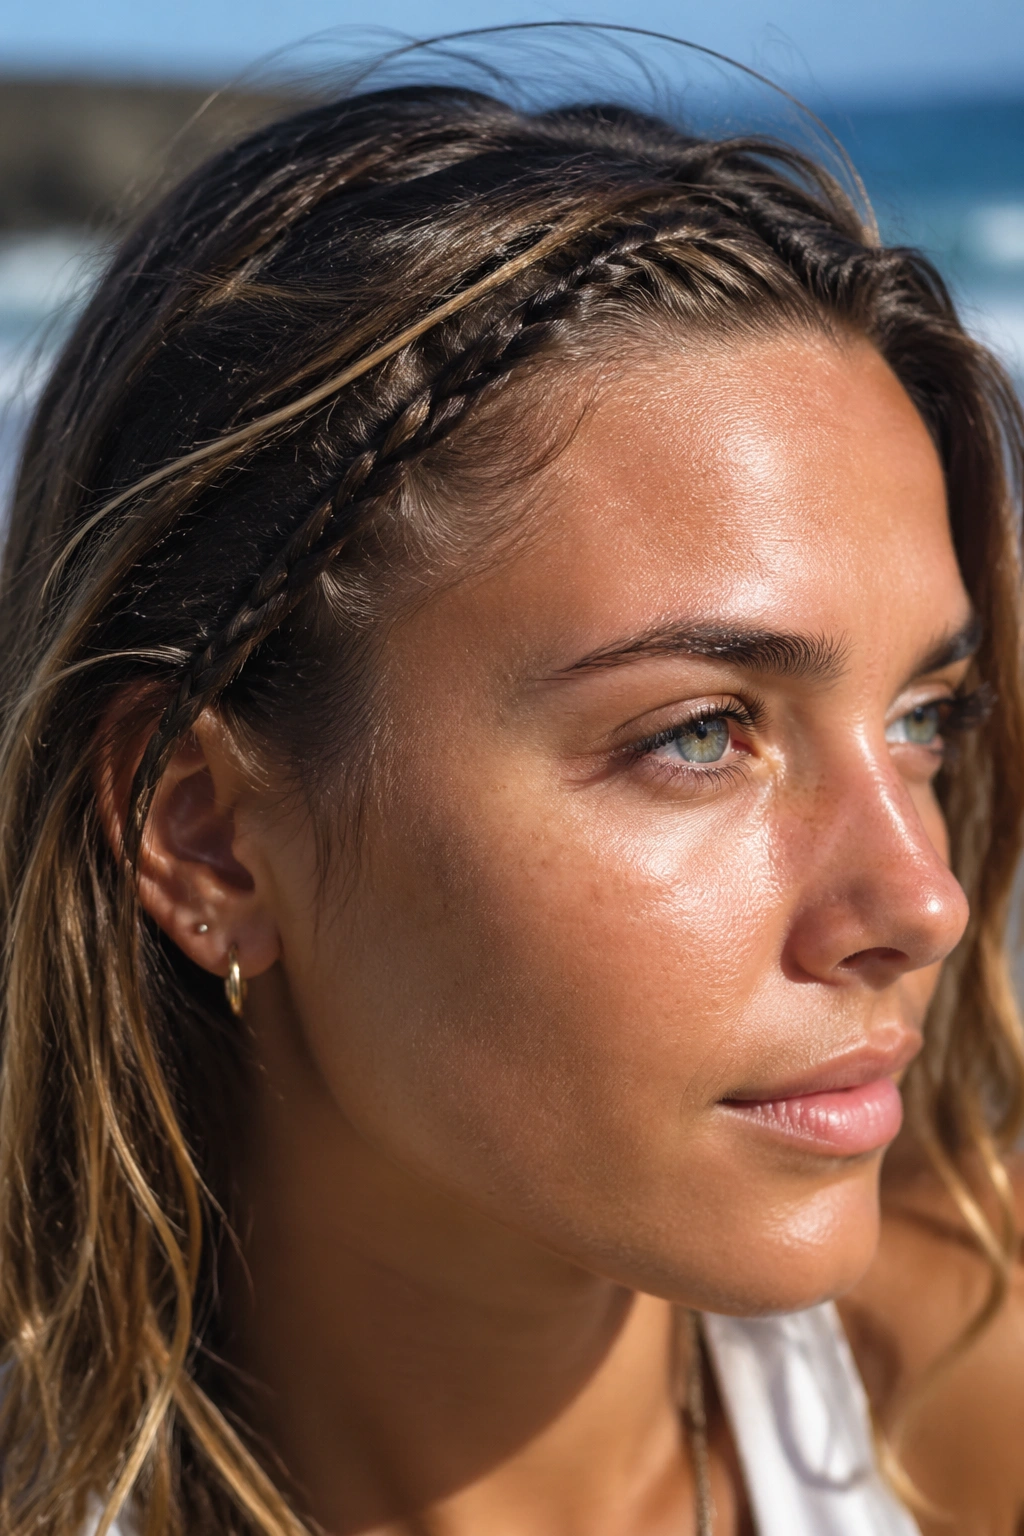
4. The French Rope Braid Starting at the Hairline
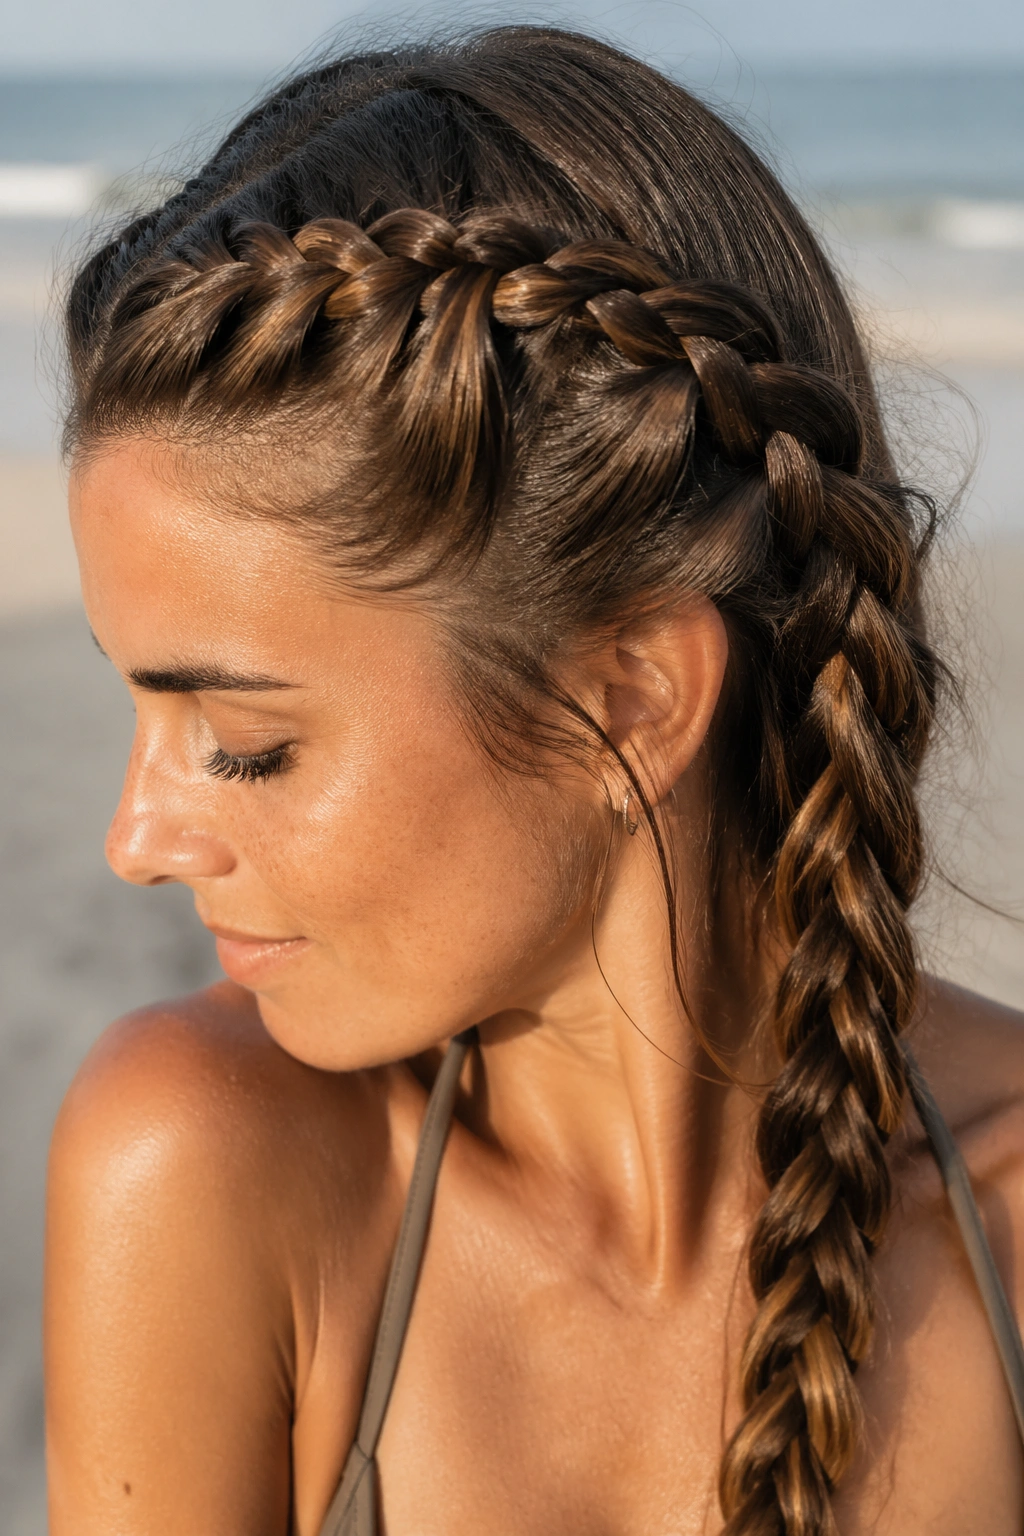
If you’ve ever tried to braid damp hair in the car mirror, you already know why this one earns its keep. A French rope braid starts at the hairline and gathers more hair as it moves down, which means shorter pieces get trapped before they can escape.
The part that matters most is where you add hair. Feed small, even sections into the outer strands before each twist, not after. If you add too much at once, the braid starts bulging on one side and the whole thing feels off-balance.
The part that makes or breaks it
Small sections at the crown are worth the trouble.
- Take more hair into the braid only after the first 2 or 3 passes.
- Keep the added sections the same size on both sides.
- Slow down near the ears, where layers slip free fastest.
This style is a good pick for medium to long hair that needs to stay tidy through the day. It can look polished enough for dinner, then loosen into a softer shape later. That’s not a bad beach-day trade.
5. The Dutch Rope Braid With a Raised Ridge
A Dutch rope braid sits higher than a French one, and that little lift changes everything. The braid stands out more against wet or dark hair, so the shape does not disappear the moment your waves start to puff up.
Think of it as the rope braid that shows off a little. Instead of letting the braid blend into the base of the hair, you keep it riding on top, which gives coarse, curly, or thick hair a stronger outline. If you have hair that tends to vanish into itself after a salty breeze, this version holds the line.
The braid also helps when you want texture without a lot of fuss. A raised ridge reads as deliberate even if the bottom half gets a little imperfect. And frankly, that is the whole mood of a decent beach style.
Use a light cream on the lengths before braiding, not at the root. Too much product at the scalp makes the braid slide. A touch on the ends is enough.
6. The Half-Up Rope Braid for Long Hair
You get out of the water, shake your hair once, and realize you do not want anything touching your neck. That is the moment for a half-up rope braid.
Pull back the top section from temple to temple, twist it into a rope braid, and stop when you hit the back of the crown. Let the rest stay loose. The style keeps the face clear while leaving length and movement below, which is useful if you want some softness around your shoulders.
This is one of the easiest styles to live in for a full beach day because the braid does not have to carry all the hair. The lower section can frizz a little and still look fine. In fact, it often looks better when it loosens. That is half the appeal.
When to stop braiding
Stop sooner than you think.
If you braid all the way down, the style can look stiff and pull too much weight from the top. Ending the rope at the back of the crown lets the loose hair breathe and keeps the braid from feeling like a helmet.
7. Two Rope Braids That Meet in the Back
Two ropes are better than one when the breeze won’t quit. This version starts with a center part or a soft off-center part, then builds two rope braids from the temples back toward the middle, where they meet and secure into one low tail.
The advantage is balance. One braid never bears all the weight, so the scalp feels calmer and the style stays centered instead of drifting to one side. It’s also a good choice for anyone who likes symmetry but does not want a super formal look.
A few practical details make the difference:
- Keep both sides the same thickness.
- Tie the braids together with one elastic at the meeting point.
- Use two bobby pins crossed under the join if the hair is slippery.
This style holds up well if you are in and out of the water, because each side can loosen a little without taking the whole shape down with it. That is useful. Nobody wants to rebuild a braid after every swim.
8. The Rope Braid Crown That Clears the Part Line

A crown braid changes the temperature at your temples. It also keeps the top of your hair from flopping into your face every time the wind kicks up.
Build the rope braid along the perimeter of the head, following the hairline or sitting just above it. The shape should feel secure, not tight. If it pulls at the temples, it will start to ache, and that ends the fun part of the afternoon fast.
Where the pins go
Pin the crown in small intervals rather than waiting until the whole braid is finished.
- Place a bobby pin every 1 to 1½ inches.
- Slide each pin in with the wavy side facing the scalp.
- Hide the last pin under the first loop of the braid.
This style is smart with earrings, sunglasses, and big collars because the hair stays off the sides of the face. It also handles a hat better than you’d expect, as long as the crown sits low enough to hide under the brim.
9. The Chunky Rope Braid for Thick Hair
Chunky rope braids are the easiest way to make thick hair behave. Use larger sections, keep the tension even, and do not try to polish every bump out of existence. The braid will look better if it keeps a little texture.
A lot of people with heavy hair make the mistake of over-smoothing first. That sounds neat, but it usually makes the braid too slippery to survive heat and sea spray. A small amount of mousse through the mid-lengths gives the sections enough grip without turning them crunchy.
This is the braid I’d pick for hair that swells in humidity. It can take more volume without looking sloppy, and the larger twists mean the shape reads from a distance. That matters when the hair is half hidden by a towel or sunhat.
Use a wide-tooth comb before you start, not a brush. Brushes can make thick hair puff at the root, which is the exact opposite of what you want here.
10. The Micro Rope Accent Braids Near the Temple
What if you want the rope braid look without pulling all your hair back? Micro rope accent braids handle that nicely.
These are tiny twists placed near the part, at the temples, or just behind the front hairline. They keep short pieces out of your face and add interest without taking over the whole head. On a beach day, that’s useful because you still get movement and air around the hair.
How to place them
A few inches change the whole effect.
- One tiny rope braid on each temple gives a balanced look.
- Two or three narrow twists along the part line feel more playful.
- A single braid tucked behind one ear looks clean and a little unexpected.
This style works well for short hair, layered cuts, and anyone who wants a fast fix before heading out the door. Tiny braids also dry quickly after a swim, which means less waiting around with wet strands stuck to your neck.
11. Rope Braid Pigtails That Actually Stay Comfortable
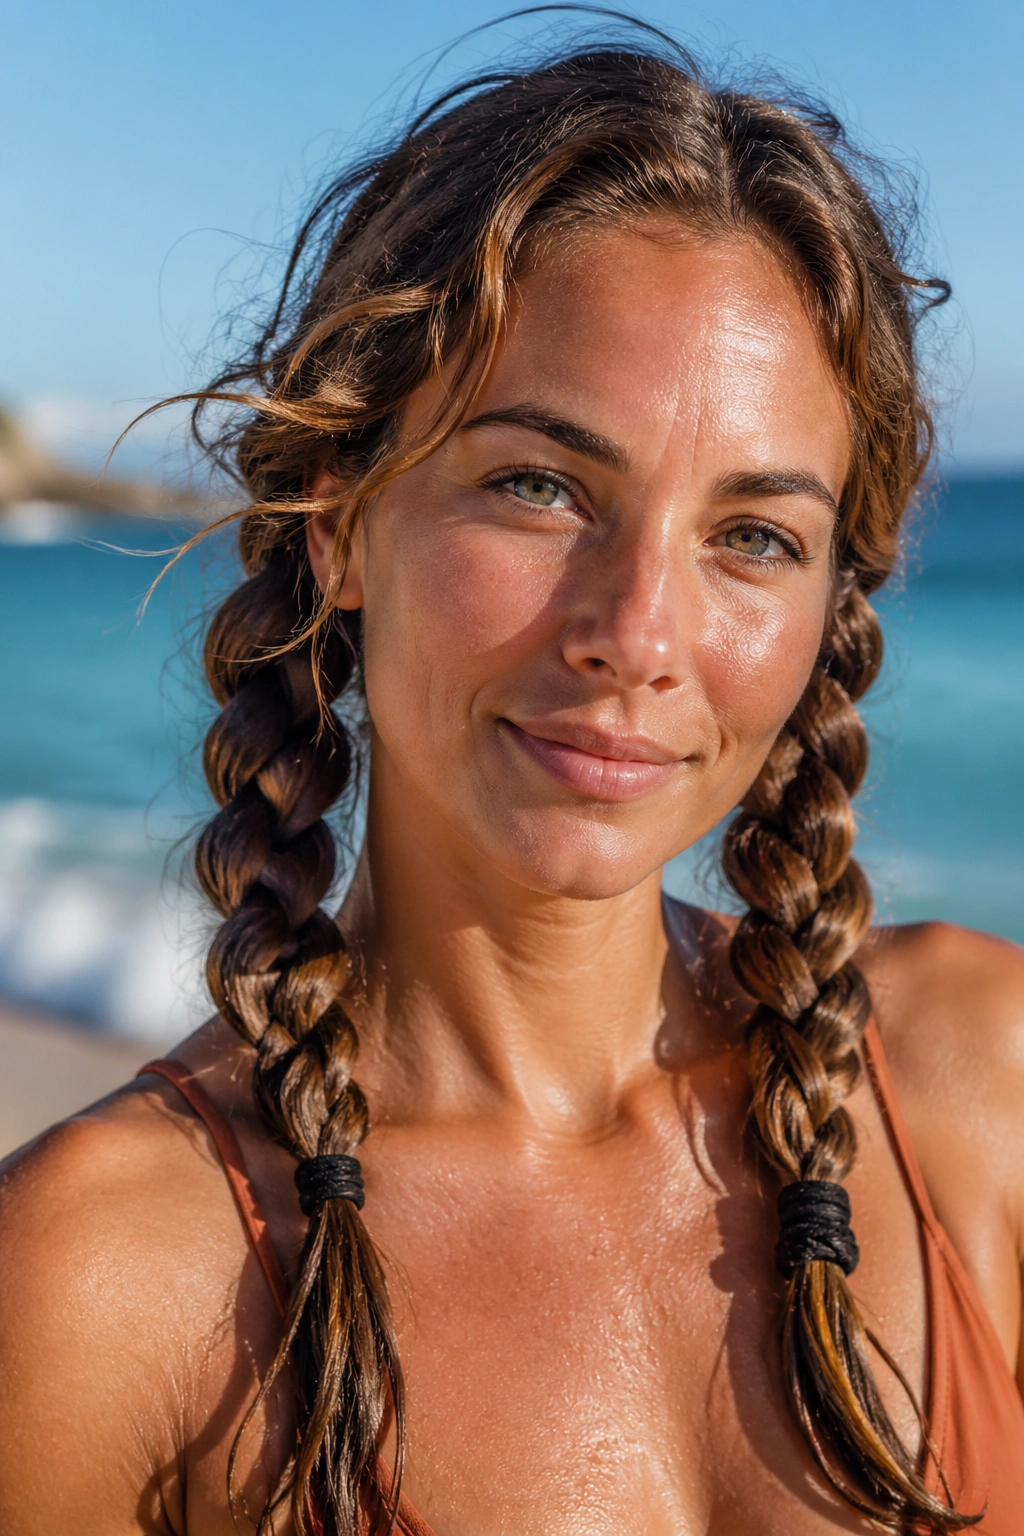
Kids wear them. Athletes wear them. On a beach day, that is not a bad crowd to borrow from.
Rope braid pigtails split the hair into two equal sections and keep the weight spread across both sides, which makes the scalp feel lighter. They are especially good for long hair that gets heavy once it’s damp. The style also keeps the braids from rubbing hard against one shoulder, which matters more than people think after a few hours.
If you want them to look less childish, keep the part clean and place the ties low, just behind the ears. The ropes can hang straight down or be brought a little forward over the shoulders. Either way, the balance stays intact.
A soft off-center part gives the style a calmer feel. A dead-center part makes it sharper. Pick the one that fits the rest of your day, because this braid can swing either way.
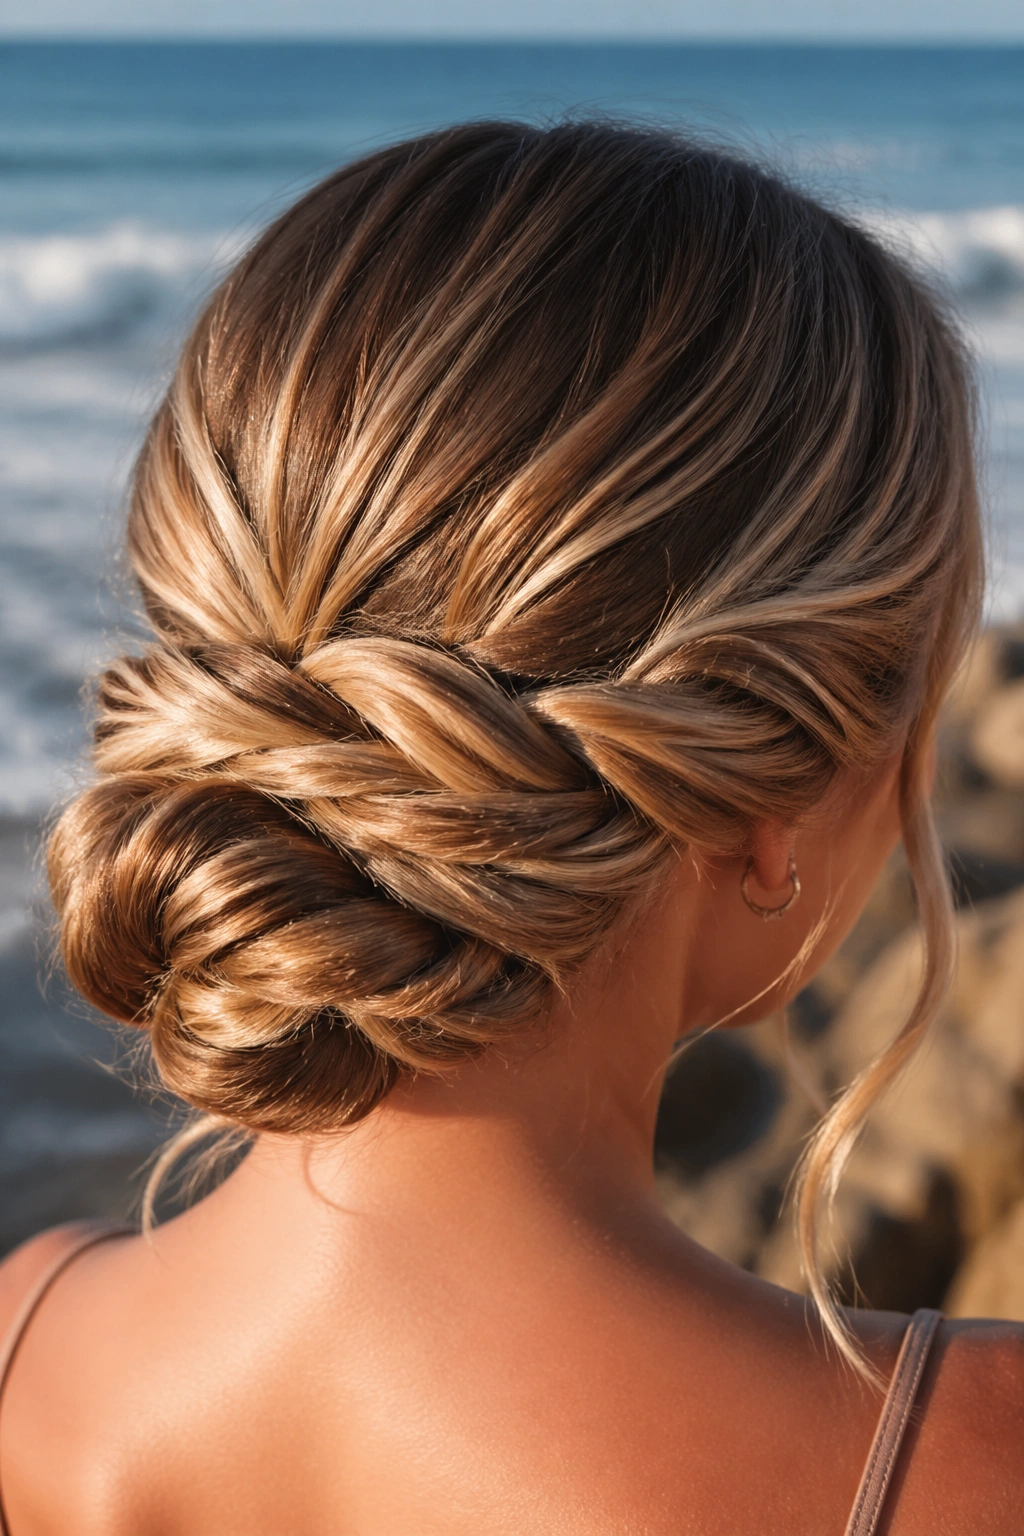
12. The Rope Braid Bun at the Nape
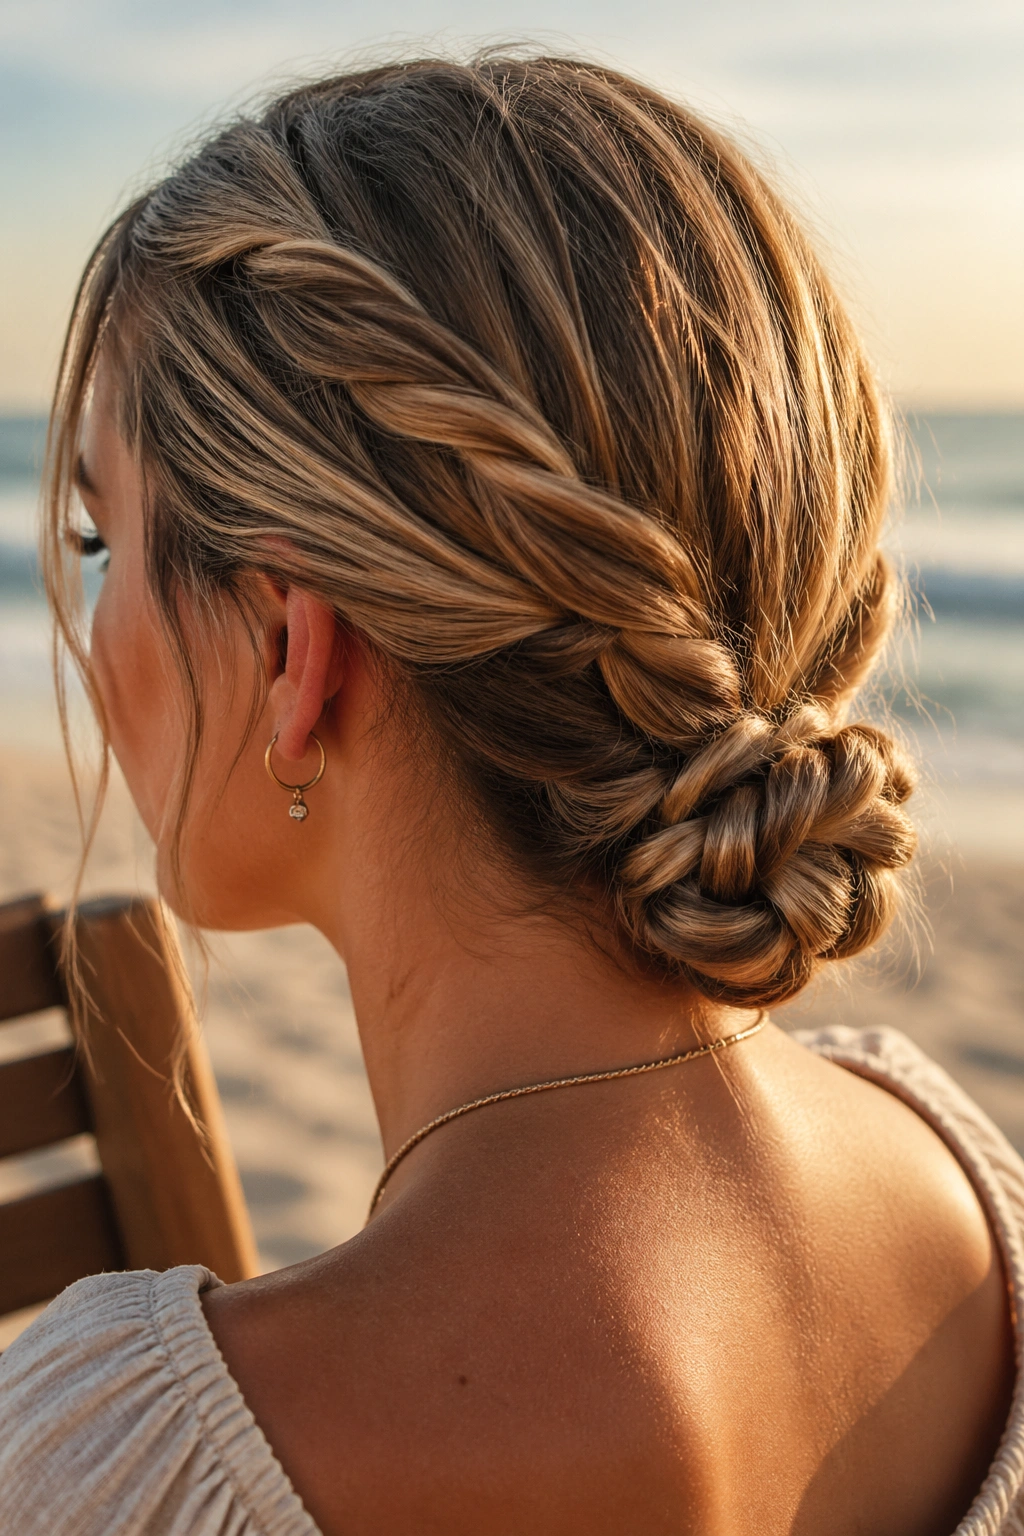
A rope braid bun is tidier than a knot and softer than a shellacked ballerina bun. That middle ground is exactly why it works so well when the wind keeps changing direction.
Start with a low rope braid at the nape, then coil the length into a bun and pin it from underneath. The braid gives the bun enough structure that it does not sag as the day goes on. Without that braided base, a bun can go loose in weird places and start to look tired.
Pinning order matters
Build it in layers, not all at once.
- Secure the braid first with one elastic.
- Wrap it around the base in a flat coil.
- Cross two bobby pins in an X to hold the center.
- Add one more pin where the coil wants to lift.
This style is smart if you plan to sit in a beach chair, wear a backless top, or spend time with a towel around your shoulders. Nothing bangs against your neck, and the whole thing feels calm. That matters more than looking precise.
13. The Rope Braid Chignon With Hidden Pins
This one looks fussy from a distance and is oddly easy once you’ve done it once or twice. A rope braid chignon sits low, folds into itself, and hides the pins inside the curve of the knot.
The polished top makes it a nice choice if beach day runs straight into dinner. Smooth the top section with a little cream, keep the twist close to the head, and tuck the ends under so they do not poke out. If the hair is very silky, rough the inside of the braid with dry shampoo before you coil it. That gives the pins something to grab.
The best part is how little it moves once it’s set. You can lean back, toss on a hat, or change into a dress without the braid shifting all over the place. It is a quiet style, but it holds its shape.
Use more pins than you think you need. Four is often not enough. Six is usually safer.
14. The Rope Braid Headband Around Loose Waves
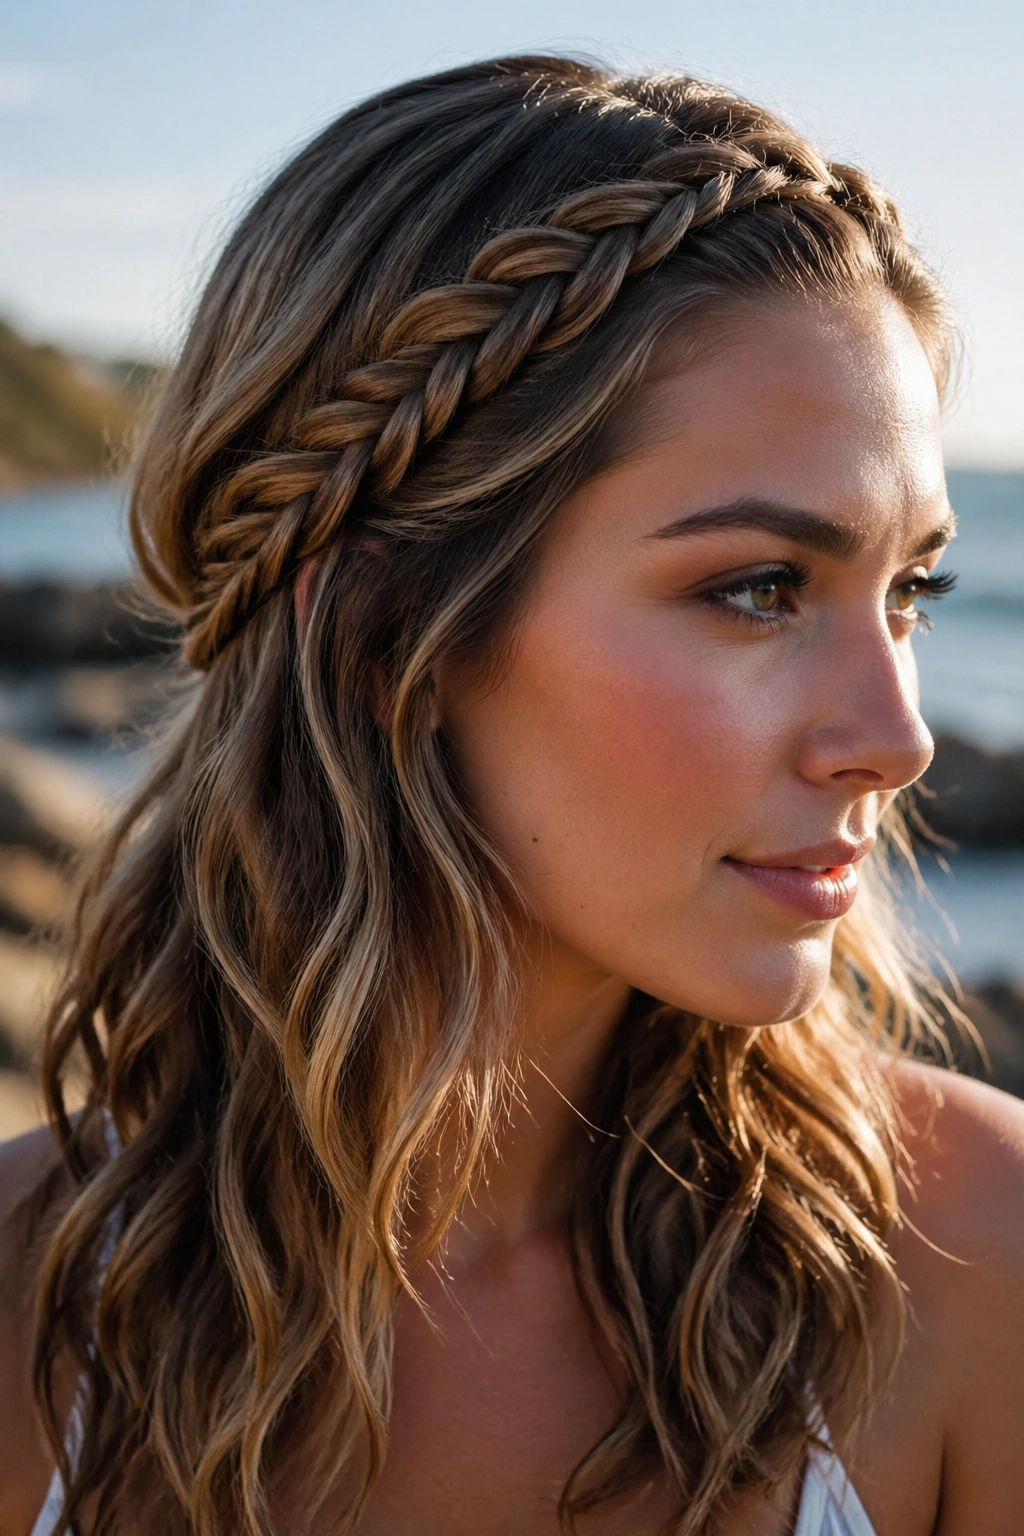
A rope braid headband solves the awkward front-section problem. It sweeps the hair off your face while leaving the rest loose, which is ideal when you want to keep your length visible but stop the bangs from sticking to sunscreen.
Build a braid from behind one ear, across the top of the head, and tuck it behind the other ear. The braid should sit like a band, not a crown. That lower placement keeps the shape relaxed and makes it easier to wear with loose waves or curls.
How to anchor it behind the ears
A few hidden fixes help a lot.
- Pin the braid just behind each ear.
- Push the pins in at a slight angle so they grip the scalp.
- Leave the loose hair underneath untouched unless it needs a little mist of texture spray.
This is one of the best rope braid ideas for shorter lengths that still reach the ears and collarbone. It gives you the feeling of an updo without asking your whole head to participate.
15. The Rope Braid With a Scarf Woven In
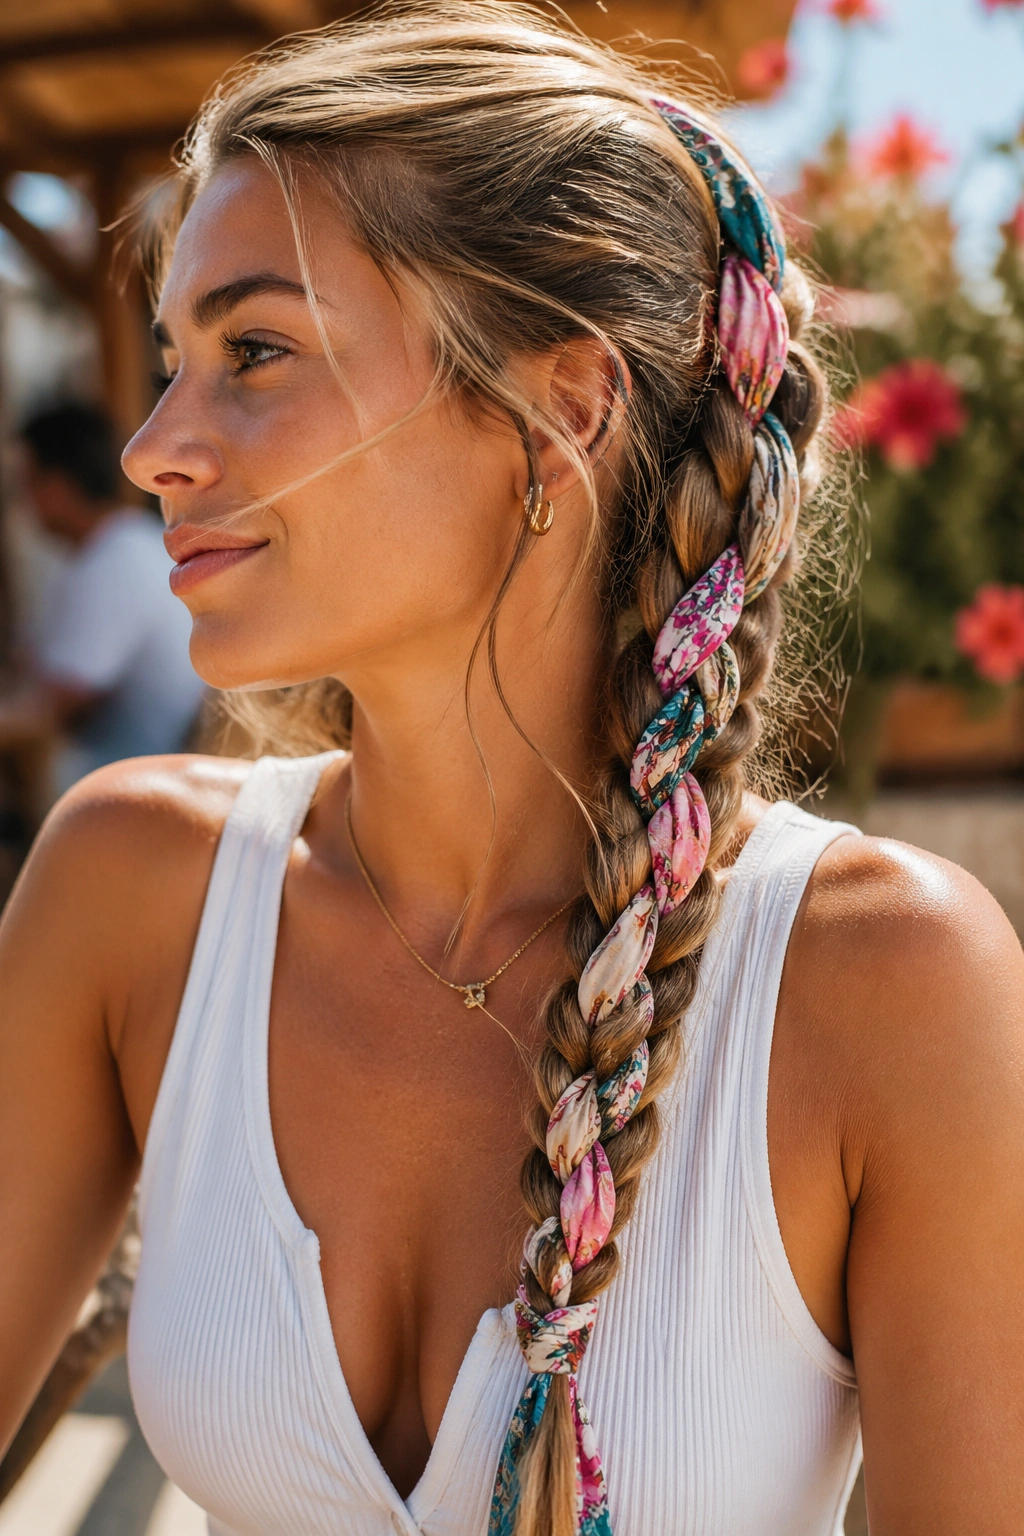
Want the braid to do double duty as an accessory? Add a scarf. A thin cotton bandana or a lightweight scarf woven into a rope braid adds color, covers frizz, and gives the braid a little more body.
The easiest way is to fold the scarf into a narrow strip and hold it with one section of the braid as you twist. Keep the fabric flat so it does not bunch. A bulky knot near the scalp can make the braid sit crooked, and that is harder to fix than it sounds.
Best fabrics to reach for
- Cotton: grips well and stays put
- Linen: light, airy, and not too slippery
- Thin viscose or rayon: soft, but check that it does not slide
Tie the loose ends under the braid or at the nape so they do not flap around. This style feels a little more styled than a plain braid, but it still survives sun, sand, and the walk back to the car.
16. The Rope Braid With Ribbon Ends
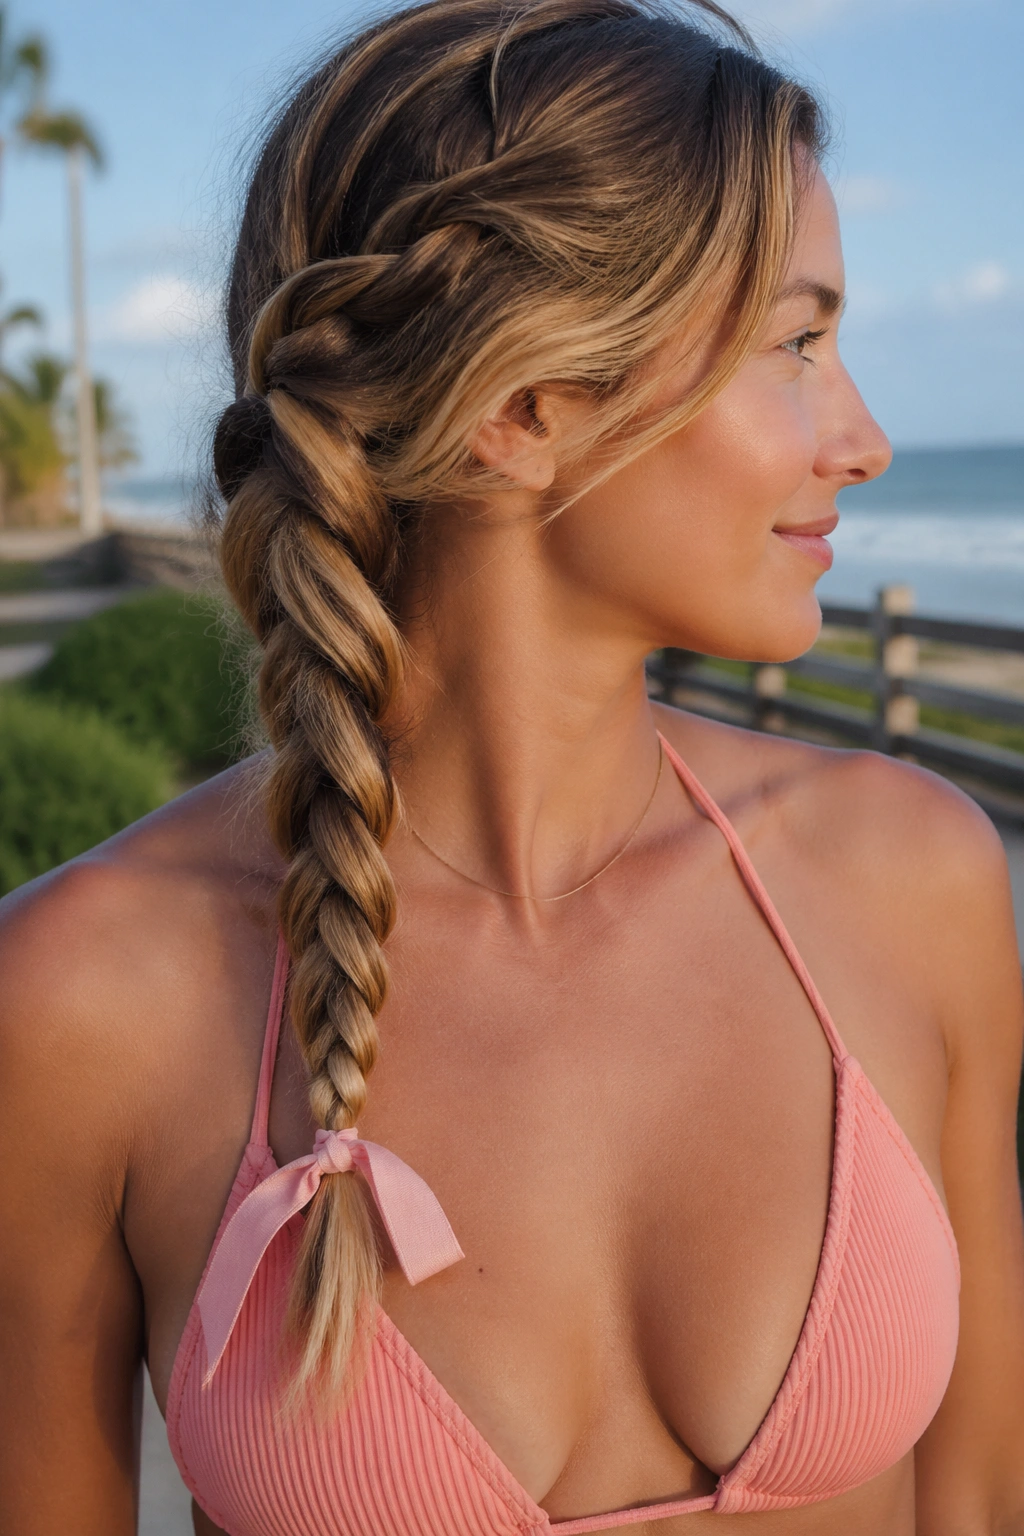
Ribbon changes the mood fast. It gives a rope braid a cleaner finish than a scarf and feels a little more deliberate, especially when you want the braid to look neat without looking severe.
Choose a narrow ribbon with some grip. Grosgrain is better than slippery satin because it stays put when the air gets damp. Weave it in from the start or tie it around the base and let the tails follow the braid down. Either method works; the cleanest option depends on how long your hair is and how visible you want the ribbon to be.
This version is nice when you want the braid to coordinate with a swimsuit, a cover-up, or a dress later in the day. It is also a sneaky way to make a simple braid look more styled without adding a lot of time.
Keep the ribbon tails short enough that they don’t tangle in wind. Long tails look cute in photos and annoying in real life. Short is safer.
17. The Wet-Look Rope Braid That Forgives a Little Surf
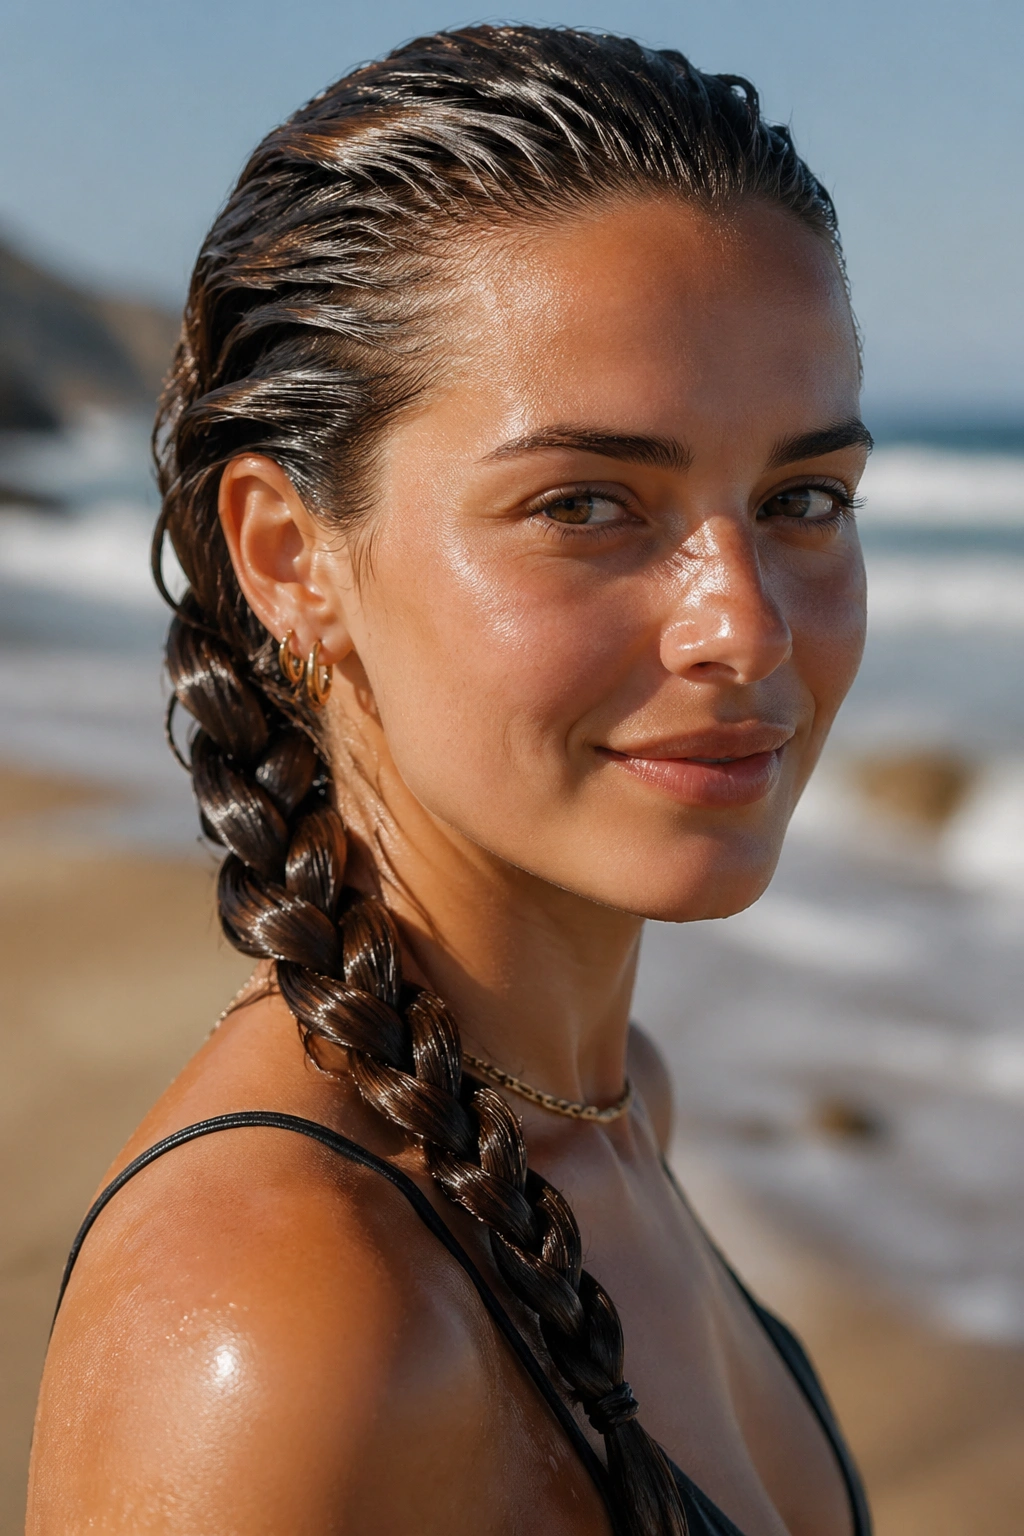
The wet-look rope braid is the one that forgives a little surf. It starts on damp hair, uses product for hold, and accepts that the beach is going to rough up the finish anyway.
Work in a leave-in conditioner first, then smooth a light gel through the lengths. Comb it evenly before braiding. If the hair is very wet, squeeze out extra water with a microfiber towel so the product does not thin out and slide off the strands.
What not to do
A heavy hand here is a mistake.
- Do not pile on too much gel; it gets sticky fast.
- Do not braid tangled hair and hope it sorts itself out later.
- Do not use a brush that makes the roots puff before you start.
Once the braid is set, smooth the surface with your palms. A tiny bit of shine cream on the hands is enough. This style works best when you lean into the sleek look instead of fighting it.
18. The Rope Braid Mohawk for a Little Edge
Shorter hair does not have to sit this one out. A rope braid mohawk keeps the center section braided while the sides stay slicked or pinned close, which gives the whole style a stronger outline.
It’s a smart choice for curly, coily, or thick hair that likes to expand in humidity. The raised center gives the shape some attitude, and the sides stay controlled enough to survive wind. If you like a little edge, this is the braid that brings it without asking for a lot of tools.
Use a bit of gel or edge control on the sides before you start. That keeps flyaways from puffing out around the braid and makes the center line look cleaner. The braid itself can be tight and narrow or broad and chunky depending on the amount of hair you want to leave loose.
This style also works well with earrings and sunglasses because the hair stays away from the ears. Small thing. Useful thing.
19. The Diagonal Rope Braid Over One Shoulder
A diagonal rope braid gives you the calm of a side style without pinning everything to one shoulder from the start. It begins near one temple, angles across the back, and lands over the opposite shoulder in a line that feels relaxed but not lazy.
This is a good choice if you plan to lie on a towel, wear a one-shoulder top, or keep one ear free for sunglasses. The diagonal line also keeps the braid from getting trapped under backpack straps and beach bags, which is a nuisance nobody needs.
The angle hides a little frizz better than a straight-down braid because the eye reads the line, not every strand. That is useful on days when the salt spray wins part of the battle.
Keep the first twist slightly tighter than the rest. The braid will hold the route you set for it, and the ends can stay softer without losing the shape.
20. The Bubble-Rope Hybrid That Takes Real Wear and Tear
What if you want a braid that can survive a whole day plus sand? A bubble-rope hybrid is a smart answer. Start with a rope braid, then add small clear elastics every 2 inches and gently tug each section into a bubble.
The bubbles keep the braid visually locked in place, so even if one part loosens a little, the style still reads as intentional. That makes it useful for long hair, layered hair, and kids who run, jump, and never sit still for long. It is also a nice fix when the lower half of the braid keeps collapsing.
Spacing the bubbles
Keep the gaps even enough to look deliberate.
- Place the elastics about 2 inches apart.
- Puff the hair between elastics with your fingertips only.
- Stop tugging once each section looks rounded, not stretched thin.
The base should be snug before you start puffing. If the first tie is weak, the bubbles slide and the whole thing loses shape.
21. The Loose, Undone Rope Braid You Can Shake Out Later
Not every beach braid has to behave like a drill sergeant. A loose rope braid can start the day neat and end it in soft waves, which is a nice little trick if you like your hair to change with the mood of the day.
Braid from the nape or just off-center, keep the tension relaxed, and stop before the very ends if you want a softer finish later. Use a light elastic and resist the urge to smooth every flyaway. A few loose pieces around the face make the style feel less rigid, especially when the wind has already done part of the styling for you.
This is the version I’d choose if I wanted one style that could handle breakfast, the beach, and a late stop for cold drinks without looking overthought. It does not need perfect lines. It needs a little grip, a little patience, and the willingness to look better after it loosens a bit.