A good half-up rope braid can rescue a whole outfit. It keeps hair off your face, shows off your neckline, and still feels softer than a tight ponytail or a full-up style that looks like it’s trying too hard. On brunch tables, in car selfies, at garden cafes, these twists do exactly what you want: they look deliberate from the front and relaxed from the back.
The trick is tension. Too loose, and the braid slips before the coffee arrives. Too tight, and it starts to look stern, which is not the mood for mimosas, pancakes, or a day date that runs into late afternoon. A rope braid also loves second-day hair, a little texture spray, and a few smart pins tucked where nobody can see them.
There’s a nice thing about rope braids that three-strand braids don’t always give you. The twist pattern reads clearly from a distance, so even a small section looks styled. That means you can keep the rest of your hair soft, wavy, or straight and still get a finished result. I also like that rope twists forgive imperfect hands; if your part isn’t ruler-straight, the style still works.
Start with the version that frames the face cleanly, because once you’ve got that one down, the rest make a lot more sense.
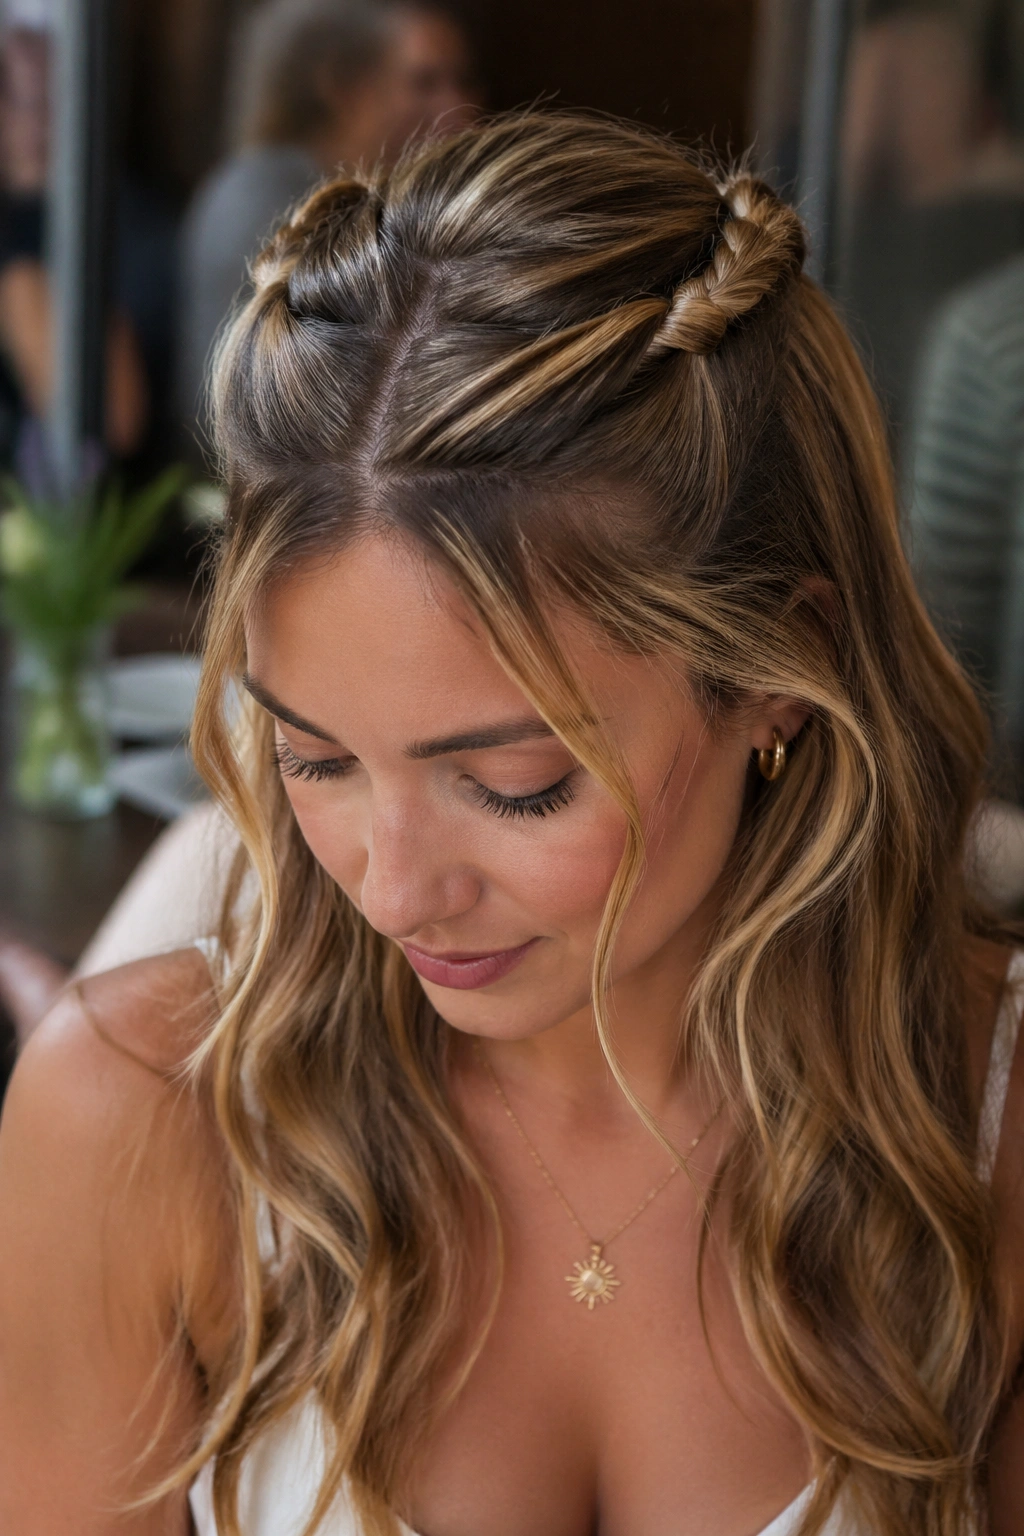
1. The Clean Center Rope Twist
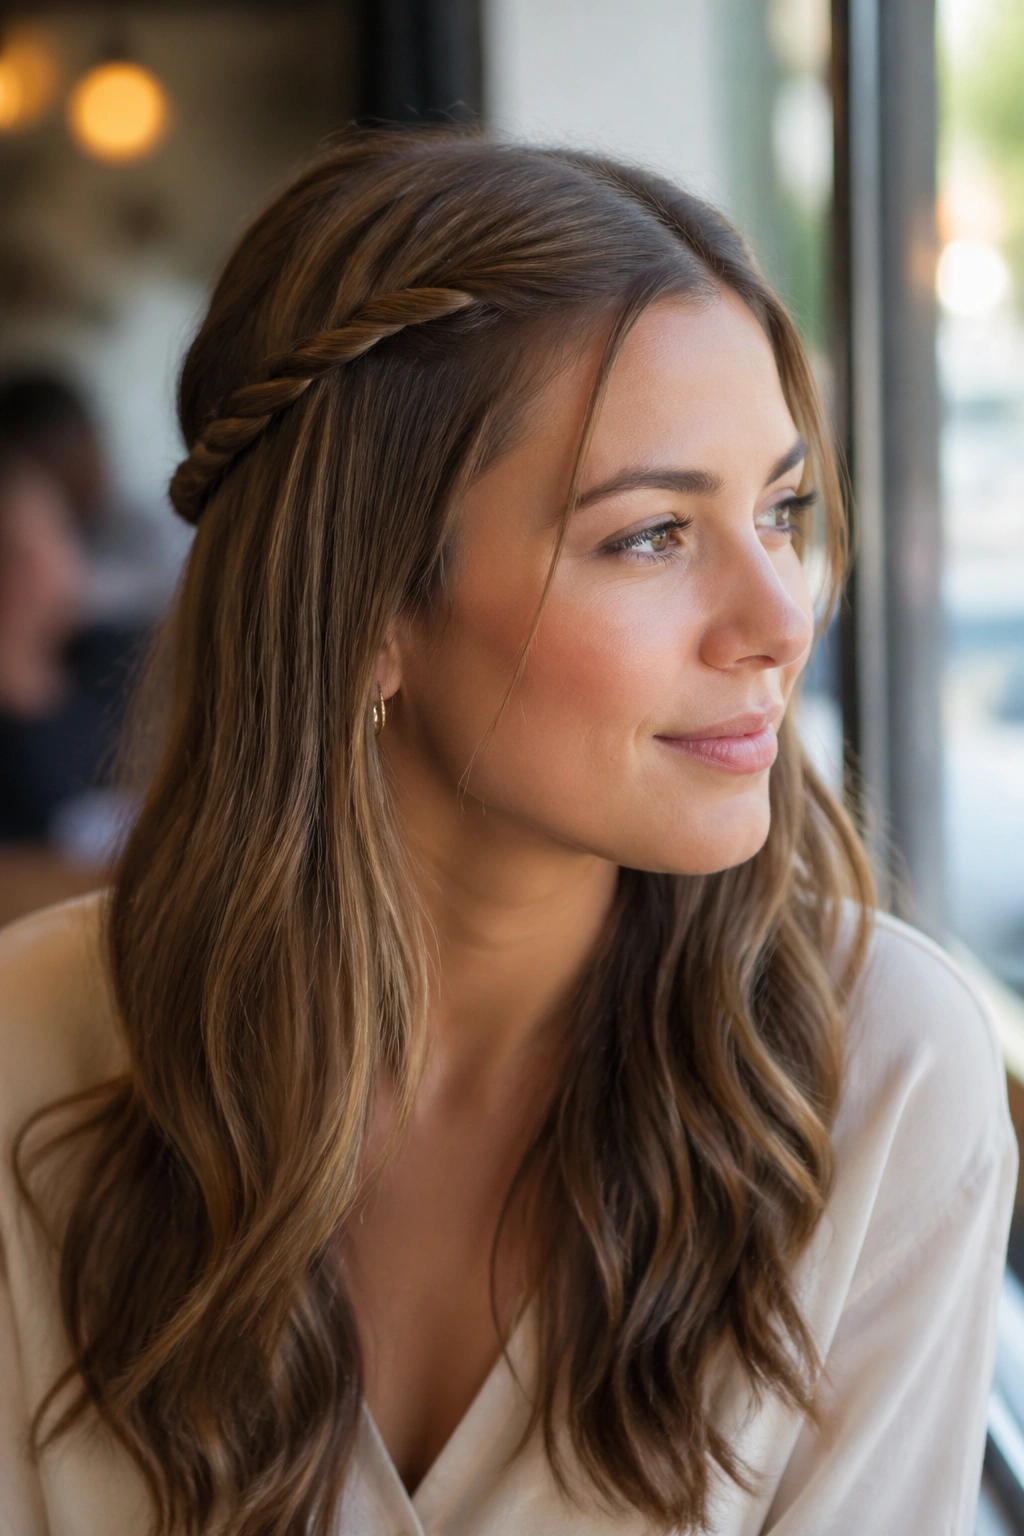
A center rope twist is the most straightforward half-up version, and that is exactly why it works so well. Split the front of your hair with a center part, take one small section from each temple, and twist both pieces away from your face before crossing them at the back. It’s neat, balanced, and good at making earrings, collars, and lip color do a little more work.
The best part is how little hair you need. Two sections about 1 to 1½ inches wide are enough for most lengths, and you do not need to drag the braid all the way down the head. Stop at the crown or just below it, secure with a small clear elastic, and let the rest of your hair stay loose. That contrast is what gives the style its brunch-friendly feel.
Twist both sides in the same direction before you cross them. If one side twists forward and the other twists backward, the braid starts to puff out and unravel in an annoying way. A light mist of texture spray helps if your hair is slippery, but don’t drown it. You want grip, not crunch.
A center rope twist is also the best place to start if you wear glasses. The symmetry keeps the style from fighting with the frames, and the front pieces stay out of your eyes during a long lunch or a walk afterward. Simple. Clean. No drama.
2. The Soft Side-Swept Rope Braid
Why does a side-swept rope braid look so soft? Because it breaks the head shape in a flattering way. Instead of splitting the front into two equal pieces, you pull more hair from one side and direct the twist across the crown toward the opposite ear. The movement feels a little more romantic, a little less school-picture-day.
Where the shape matters most
The braid should start just behind the heavier side of your part, not from the very front hairline. That small shift keeps the style from collapsing your forehead area and gives the front a nice sweep. Pin it low and slightly off-center, then let the rest of the hair fall over one shoulder or down your back.
This version is especially good on round faces, square jawlines, and blunt haircuts that need a little softness near the top. It also sits nicely with bigger earrings because the asymmetry leaves one ear more visible. I like this one on hair that has a bend in it already; straight hair can wear it too, but a loose wave gives the braid a better body.
- Take a side part that feels natural, not forced.
- Keep the front sections medium, around 1 inch wide.
- Twist gently so the braid stays soft at the roots.
- Secure with a discreet pin or elastic just behind the crown.
Leave one thin face-framing piece out if the look feels too tidy. That small strand breaks the line in a good way.
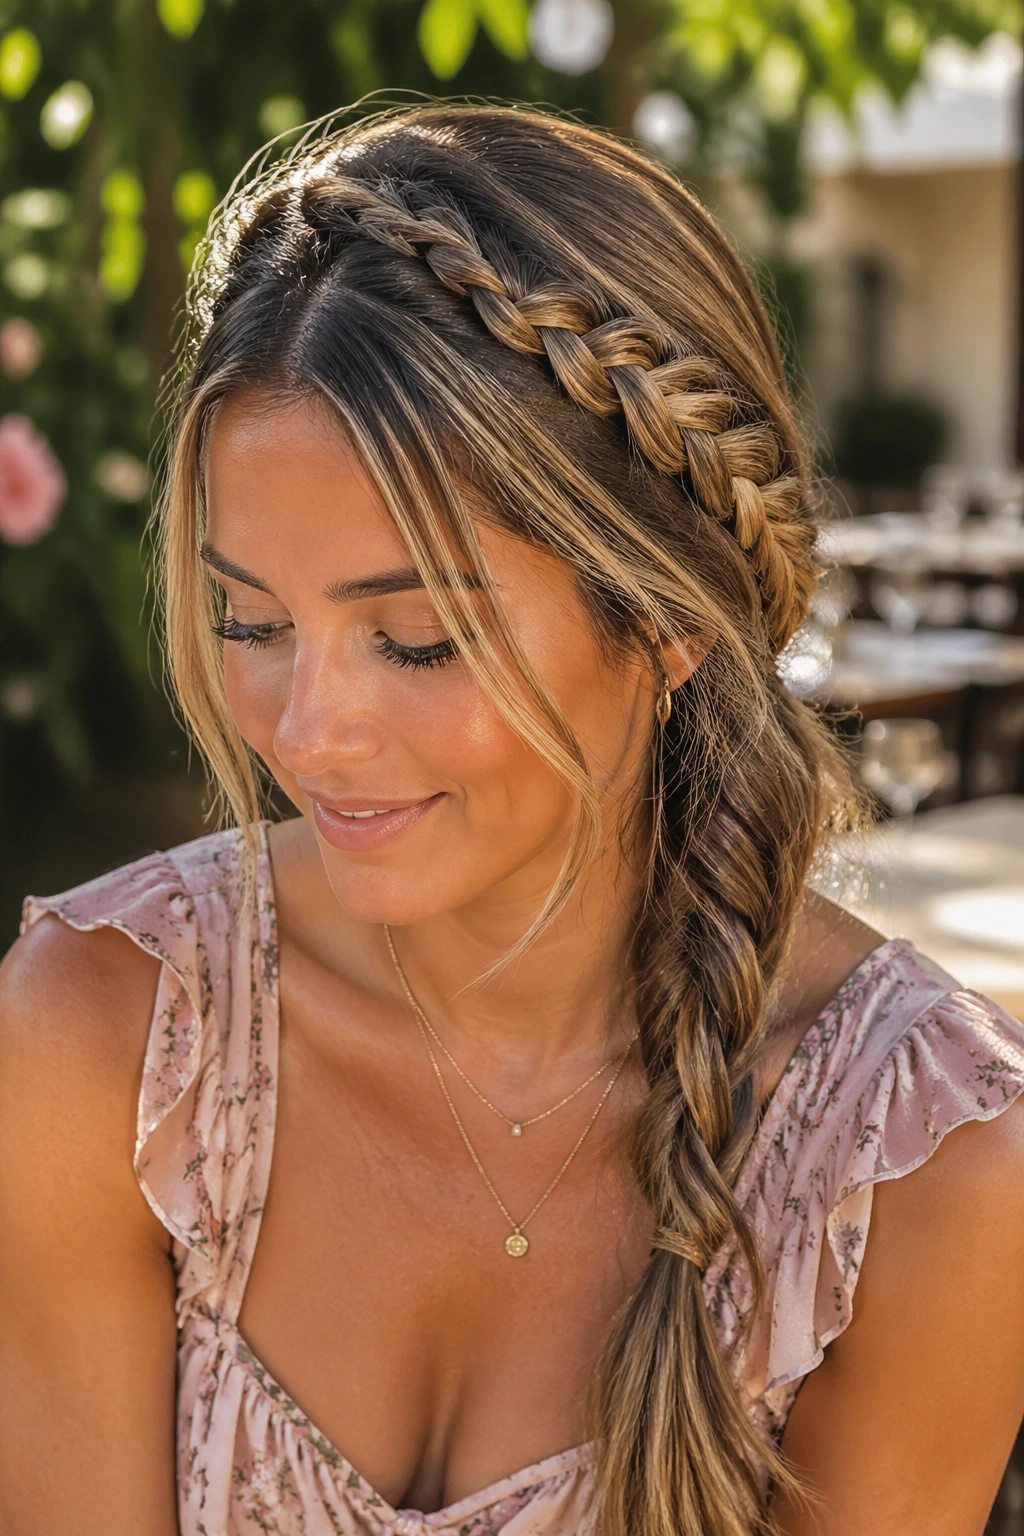
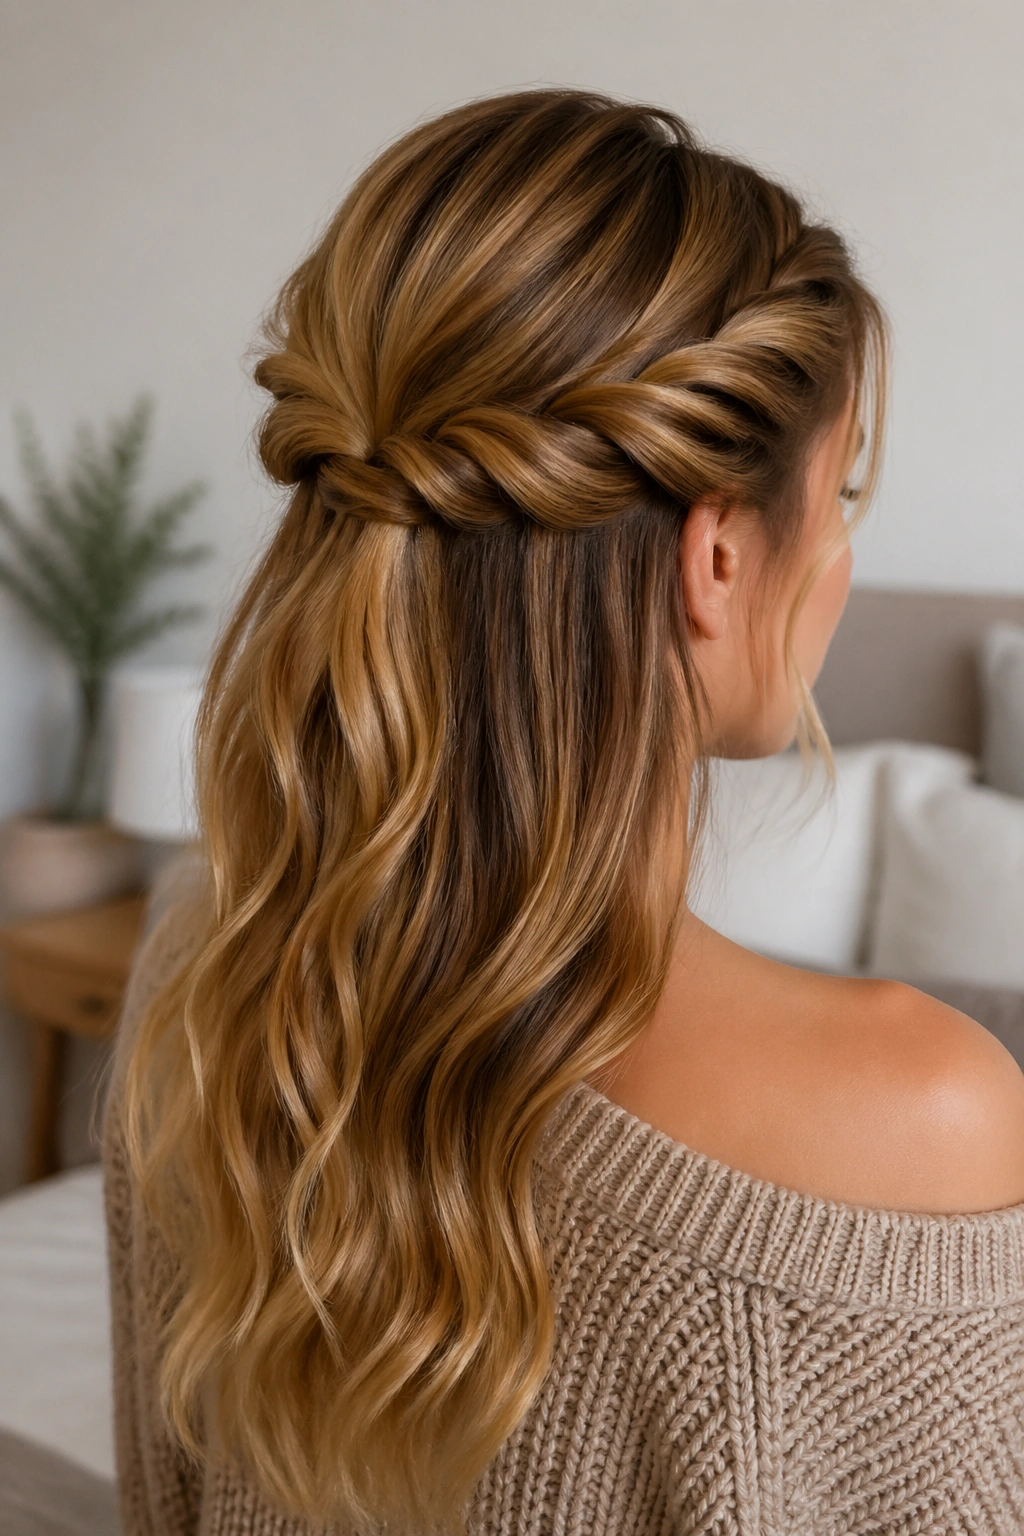
3. Twin Rope Twists with Loose Waves
Two thin rope twists at the front can do a lot of quiet work. They pull the hair away from your face, but they still leave enough movement around the length that the whole look feels easy, not styled within an inch of its life. This is the version I’d reach for if I were wearing jeans, a crisp shirt, and shoes I planned to walk in.
The setup is simple. Take one small section from each side, twist them back separately, then pin or tie them together at the back of the head. The loose waves underneath matter more than people think. If the hair is too flat, the twists can look pasted on. If it has a little bend, they blend in and look like they belong there.
How to keep the waves soft
- Use a 1-inch curling iron or wand on mid-lengths only.
- Curl away from the face for a smoother front.
- Brush the curls out once they cool.
- Add a pea-sized amount of mousse or a light cream through the ends.
A quick detail that helps: twist the front sections with the same hand pressure on both sides. One side tighter than the other makes the whole style look lopsided, and that’s harder to ignore than you’d expect. If your hair is fine, a little dry shampoo at the roots gives the twists something to hold onto.
This one is unfussy and charming. That matters more than people admit.
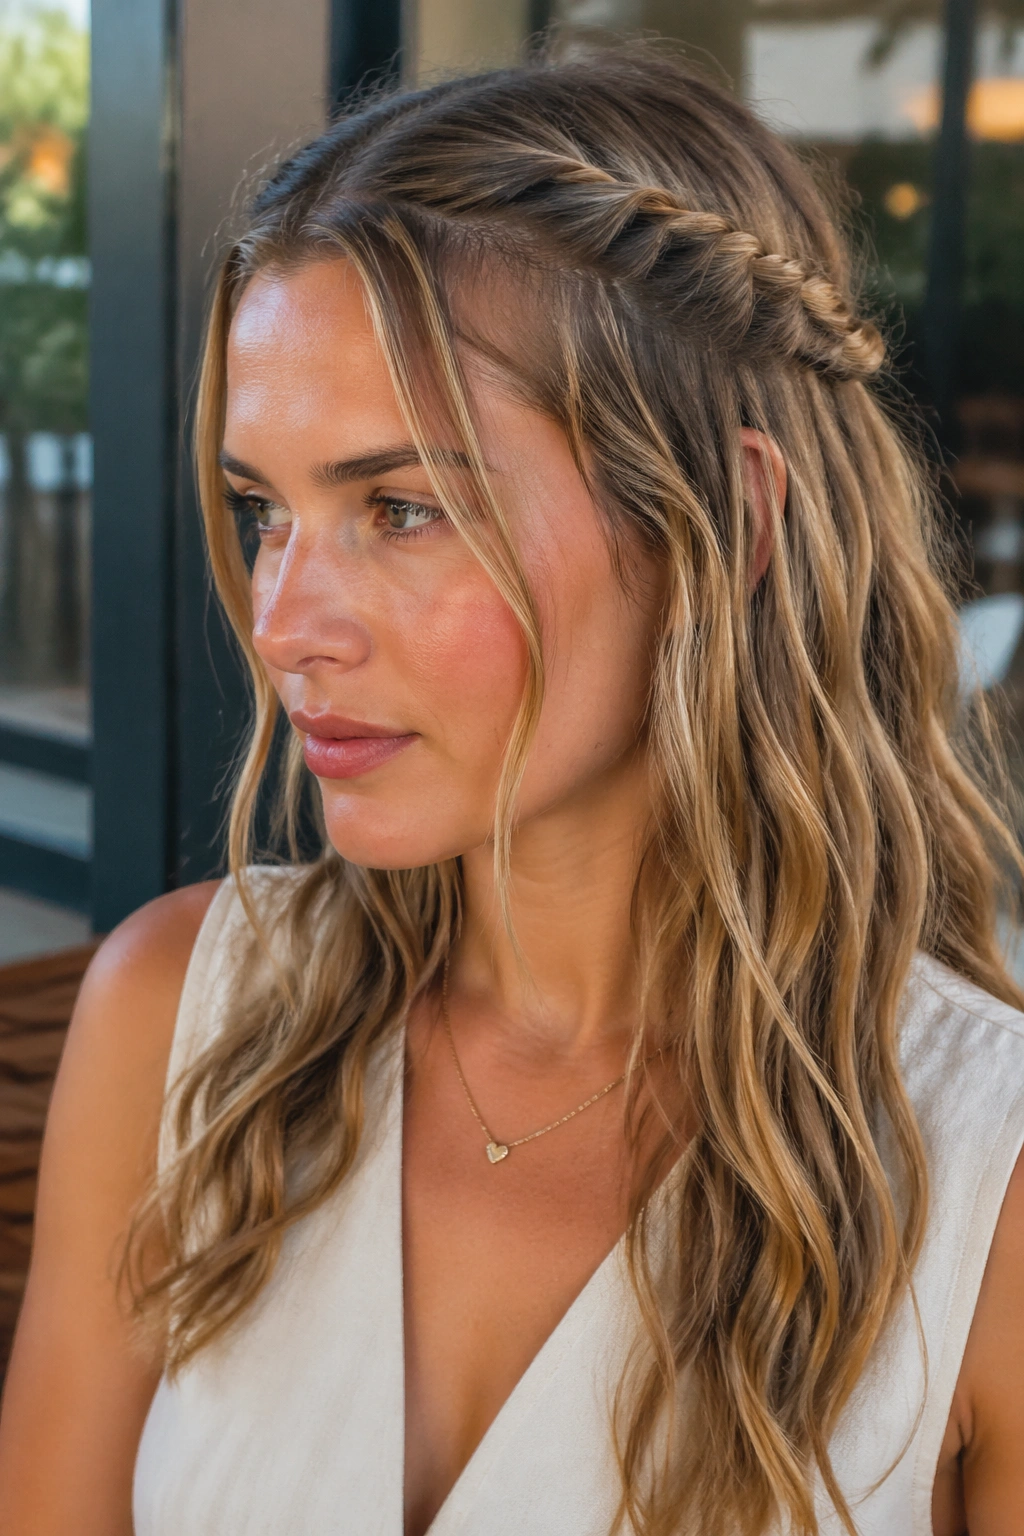
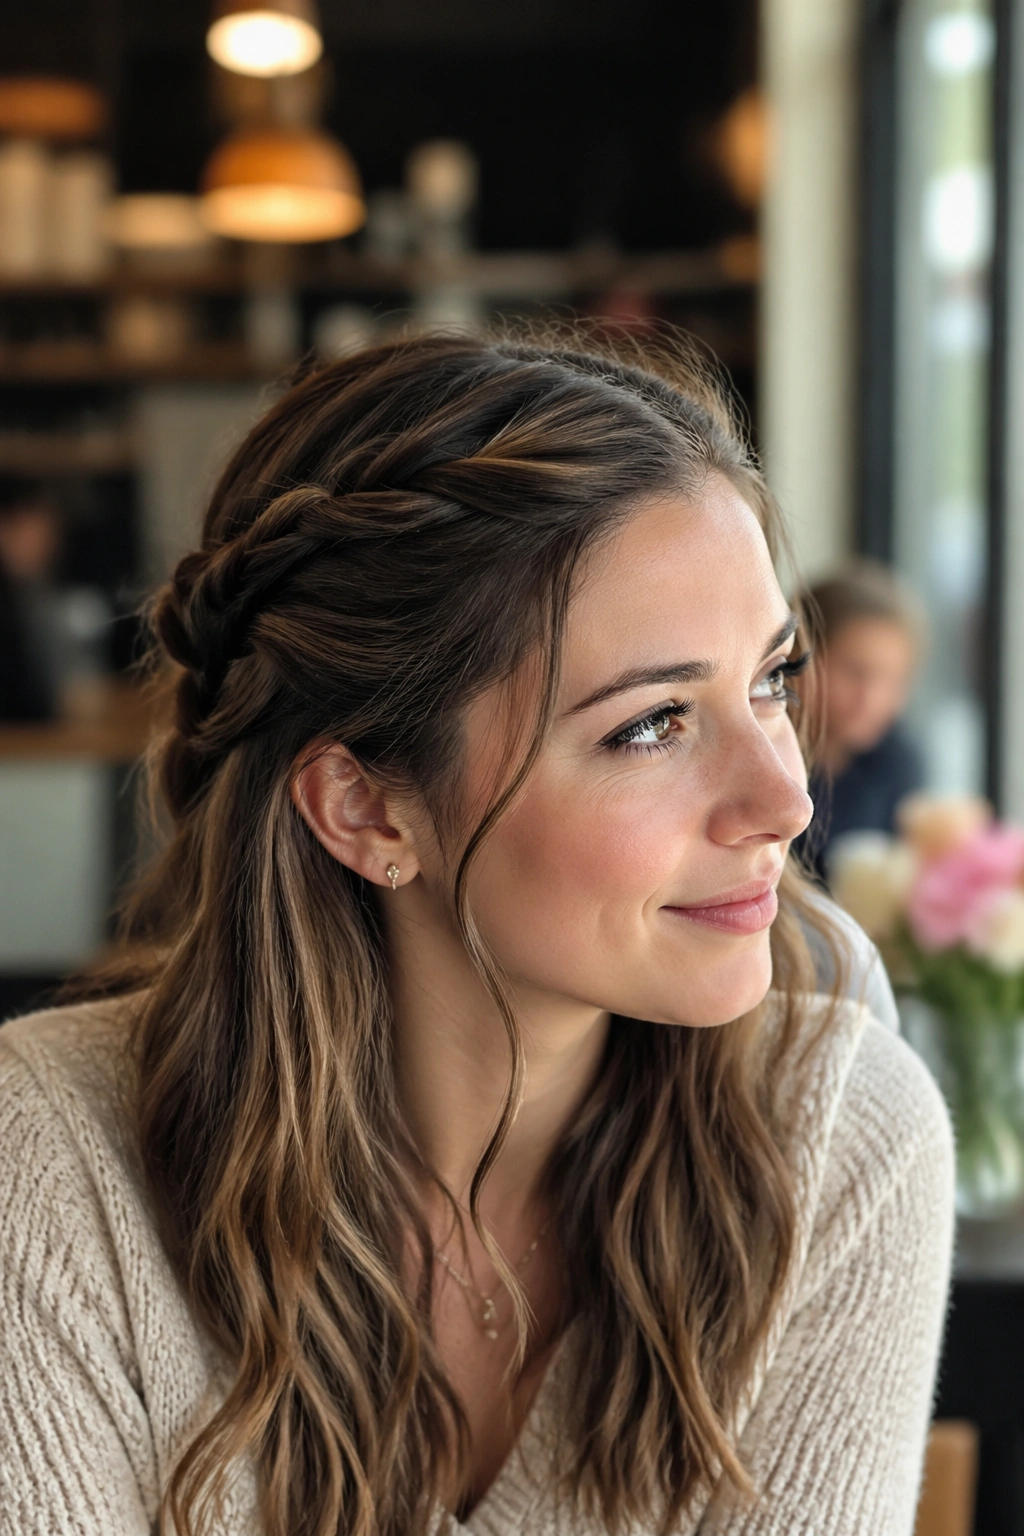
4. The Crown Rope Braid Across the Hairline
A crown rope braid gives half-up hair a little architecture. Not stiff architecture. Just enough shape to make it look like you planned the whole thing before leaving the house. The braid travels across the top of the head, near the hairline, and stops on the other side with a pin or tiny elastic hidden underneath.
This style works especially well when you want your hair to stay away from your face for a long meal or an outdoor event. It also plays nicely with a deep side part. The twist creates a frame at the top, which makes cheekbones and brows stand out more than a simple back twist does.
The braid should be thin. That’s the part people mess up. If it gets too wide, it turns heavy and starts to pull the front of the hair downward. Keep the section around 1/2 inch to 3/4 inch wide, twist it tightly at the roots, then ease the tension a little as you move across the head. A small pin behind the ear usually holds it better than a thick clip.
I like this one best on hair that has a little grip already. Freshly washed, silky hair can slide around and need extra pins. Day-old hair? Much easier. There’s less slipping, less fuss, less swearing in the mirror.
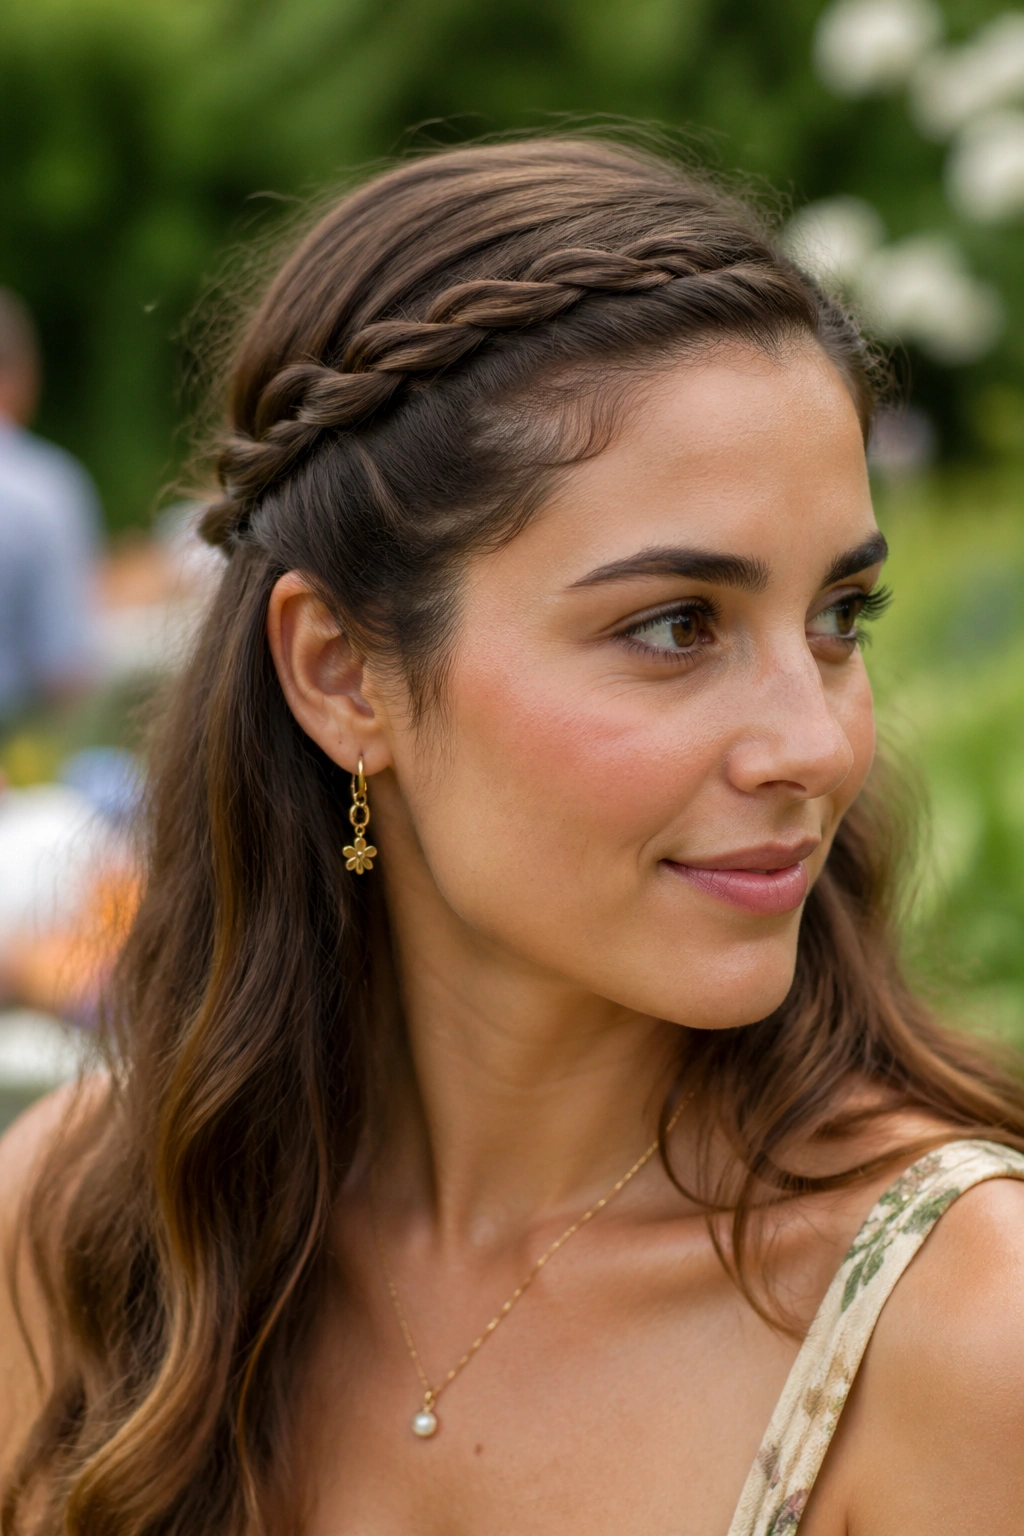
5. Rope Braids Pulled Into a Mini Knot
This one feels sculptural in a good way. You twist two side sections back, join them at the crown, and then loop the ends into a tiny knot or knot-like tuck instead of a flat tie-off. It gives the half-up style a little visual weight, which makes it nice for a lunch date when you want the hair to look finished from every angle.
The knot doesn’t need to be perfect. In fact, if it is too neat, it can look a bit severe. A slightly uneven tuck is better. Secure the knot with two crossed bobby pins underneath, not on top, so the hardware disappears into the hair. If your ends are blunt, tuck them under and pin them flat. If they’re layered, leave a few short pieces loose. That softness makes the whole thing feel less fixed.
A mini knot works well when you’re wearing a collared shirt, a knit dress, or anything with a neckline that would compete with a bigger updo. It sits high enough to show the shape, but not so high that it turns formal. Nice middle ground. Very useful ground.
- Use two sections of equal width.
- Twist each side all the way down before knotting.
- Pin the knot from underneath.
- Mist with flexible hold spray, not stiff lacquer.
If the knot feels bulky, loosen it and start again. Piling hair into a thicker knot usually makes the back stick out in a weird way.
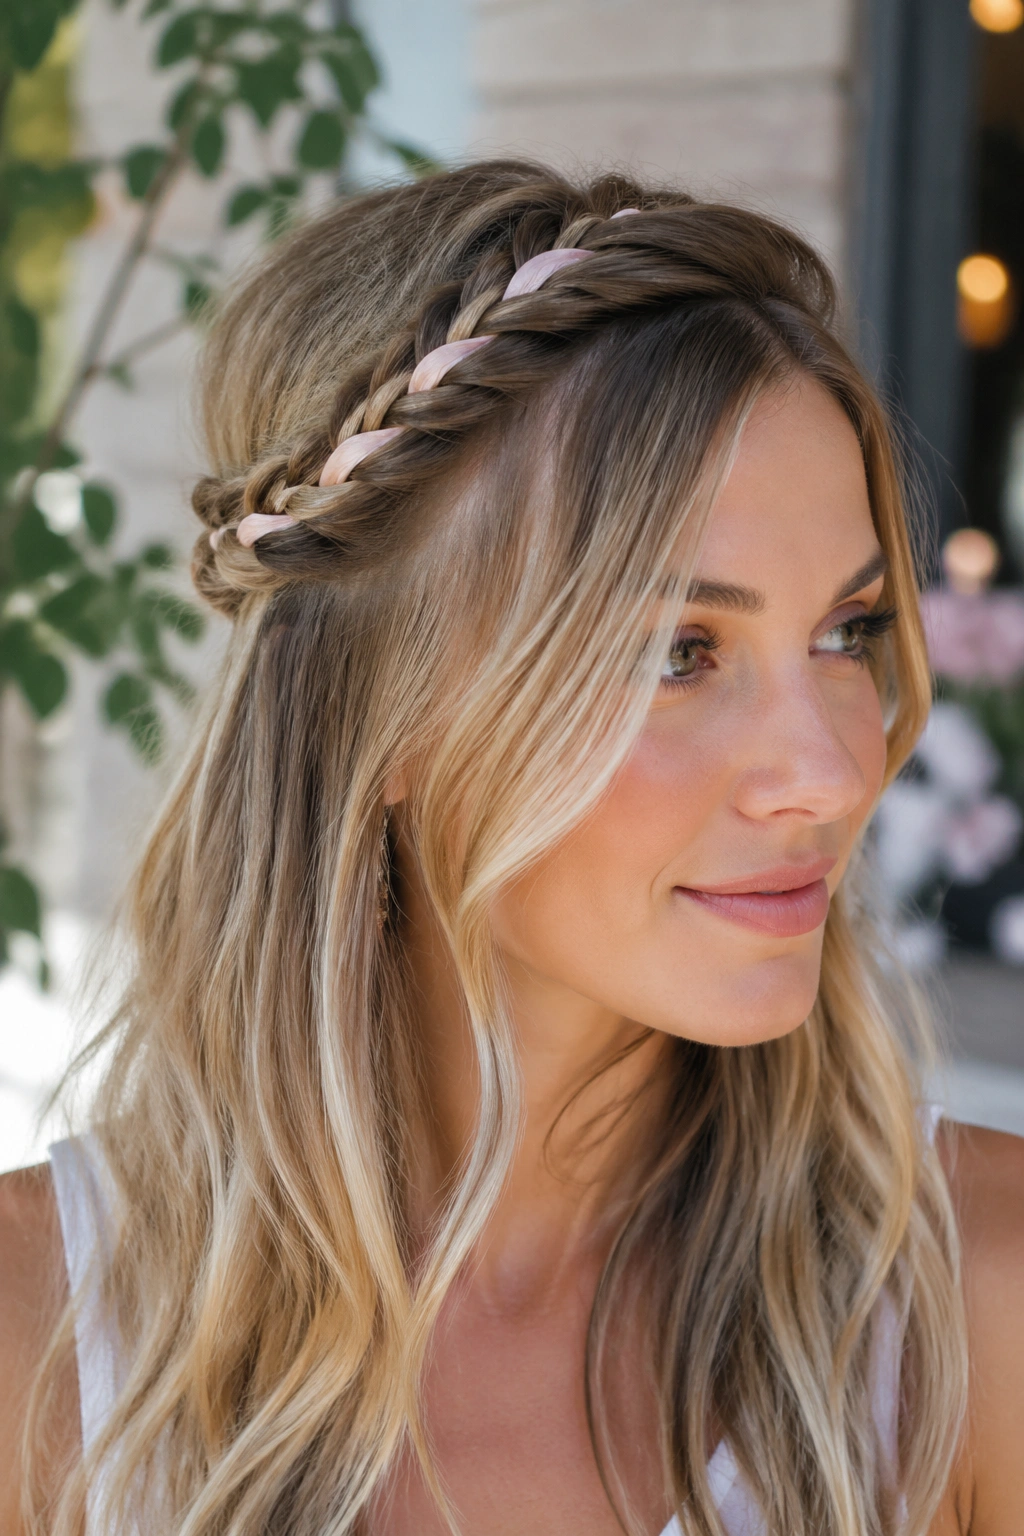
6. The Ribbon-Woven Rope Braid
A ribbon-woven rope braid changes the mood fast. Same basic twist, different attitude. Add a narrow ribbon through one side of the braid, and the whole thing starts to feel more dressed up, which is exactly why this version works for brunch tables, birthday lunches, and day dates that begin with coffee and end with dessert.
Choose the ribbon first
Thin ribbon works best here. Think around 1/4 inch wide, maybe a little less if your hair is fine. Satin glides easily, but grosgrain has more grip and stays put better if your hair is very smooth. A matte finish usually looks less fussy than a shiny one, and that matters when the braid is supposed to feel relaxed.
Thread the ribbon into the front section before you begin twisting, then twist the hair and ribbon together as though they were one strand. Keep the ribbon flat. If it folds and twists over itself, the braid starts to look lumpy. I’d avoid overly thick ribbon unless your hair is very long and dense, because the extra bulk can crowd the braid.
A ribbon also gives you an easy color accent without changing the whole outfit. Cream ribbon against brown hair looks classic. Black ribbon against blond hair gives a stronger line. One reason I like this style is that it feels intentional even when the rest of the hair is plain.
If you want the cleanest finish, tie the ribbon off at the back and trim the tails to about 4 inches. Long enough to be pretty. Short enough not to get caught in your coat zipper. Annoying problem. Real problem.
7. The Claw-Clip Rope Twist
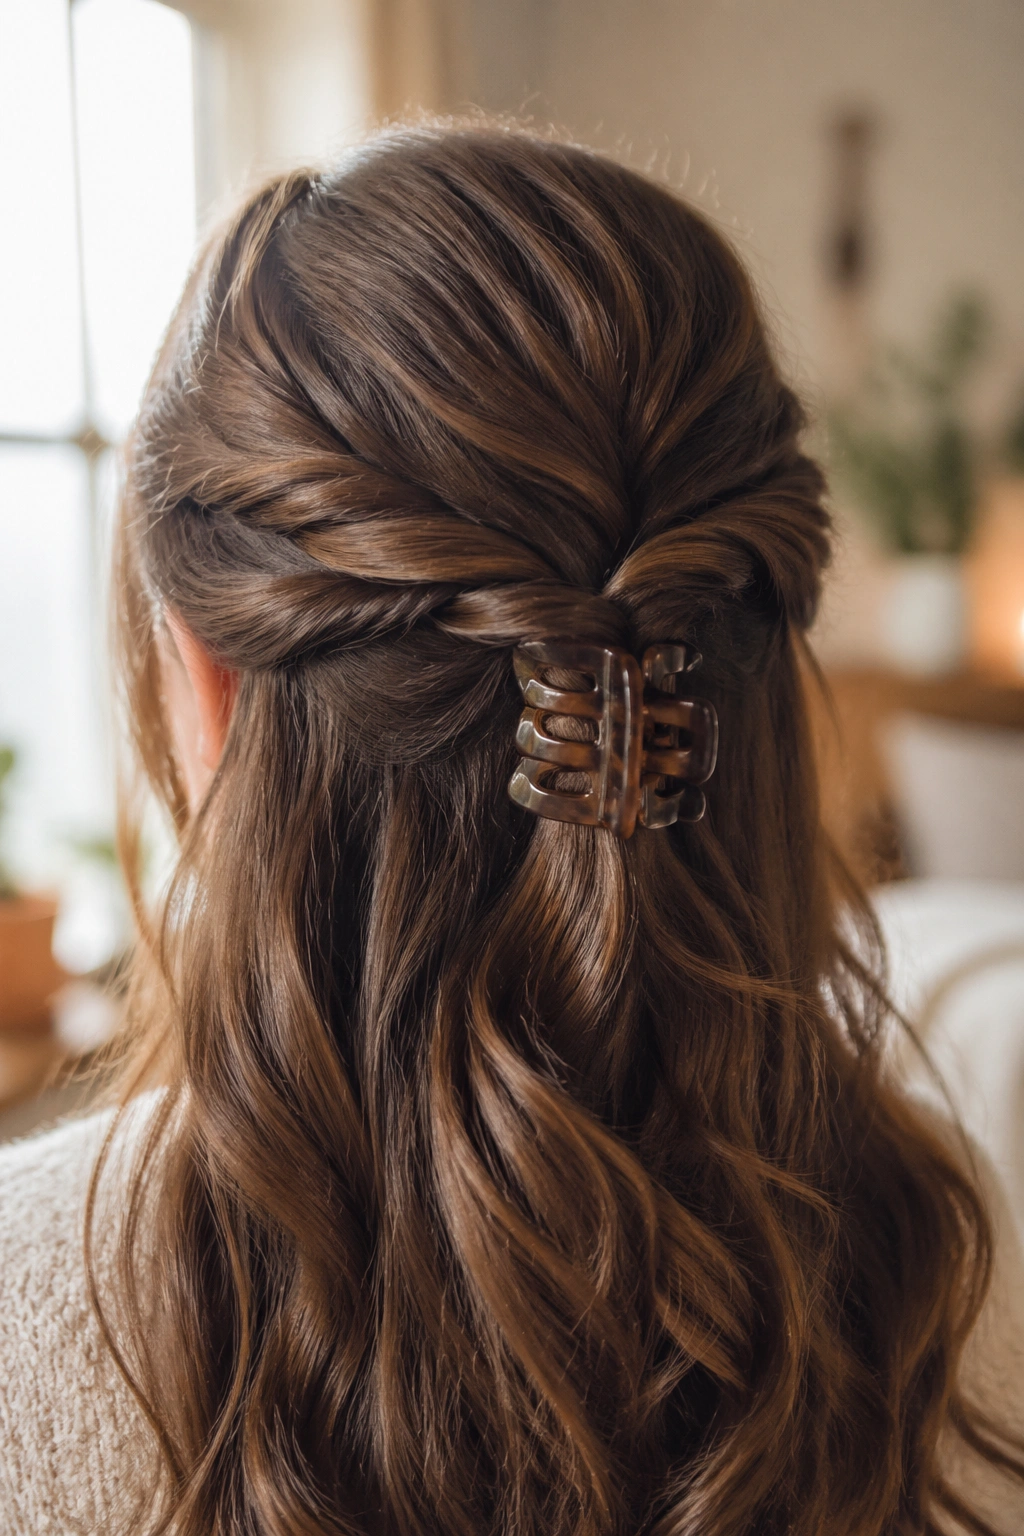
A claw clip can make a rope braid look less precious. That’s the appeal. You twist the side sections back, bring them together, and clamp the finished twist with a medium clip at the back of the head. No tiny pins. No elaborate tuck. It’s fast, and it still looks like you thought about it.
The clip placement matters more than the clip itself. Put it too high and the twist sticks up like a handle. Too low, and the braid collapses under the weight of the hair. The sweet spot is just above the occipital bone — the bumpy part at the back of the skull. That gives the clip something firm to bite into.
What the clip should do
A good clip should hold the twist without crushing it flat. Teeth that are too short slide out of silky hair, while oversized clips can overpower fine strands. If your hair is thick, twist the rope sections a touch tighter before clamping. If it is fine, pinch the twist in the middle with one hand while you open the clip with the other. That tiny bit of control saves the style.
This version is a favorite for days when you want the front of your hair off your face but still want movement at the ends. It is casual, yes, but not sloppy. There’s a difference, and the clip version gets that right when it’s done well.
One sentence is enough here: Pick a clip that fits your hair, not your mood board.
8. Half-Up Rope Braids with a Bubble Tail
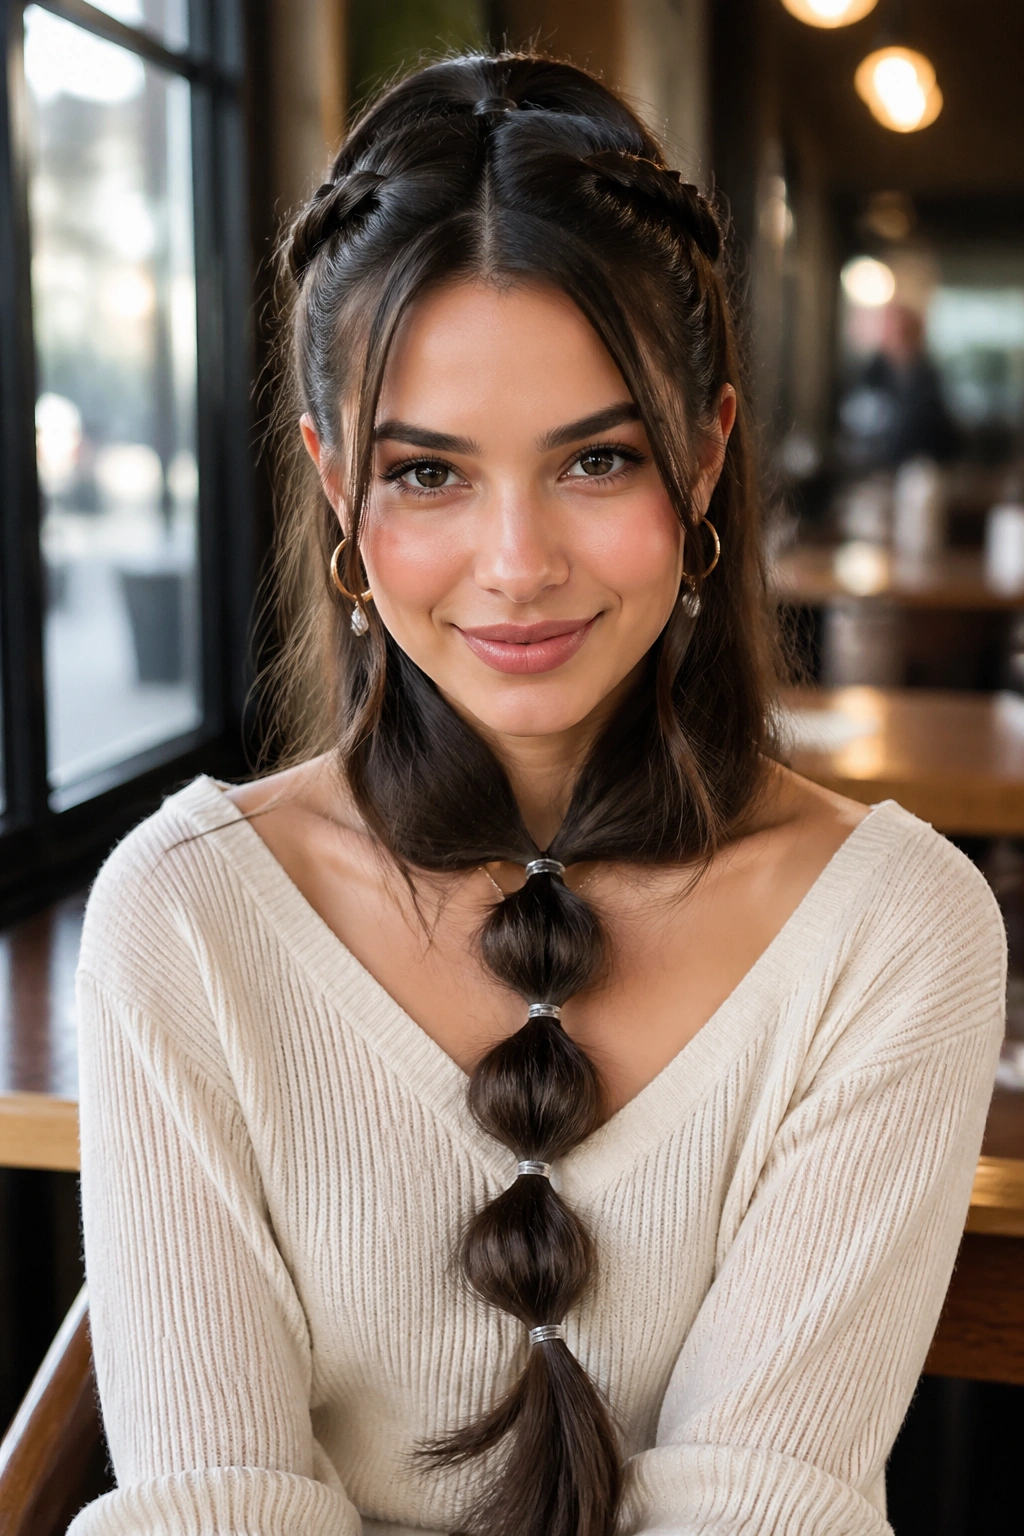
This style has a little more play in it. You start with two rope twists from the front, meet them at the crown, then gather the loose ends into a half-up ponytail and segment that tail with clear elastics every 1½ inches. The result looks a bit like a rope braid that decided to keep going. It moves well, and movement matters on day dates.
The bubble tail is especially nice if your hair is layered or has a blunt cut at the ends. Instead of trying to force a perfect braid all the way down, you let the texture do some of the work. After each elastic, tug the section gently on both sides to widen the bubble. Don’t yank. You want rounded volume, not a puffy mess.
- Space the elastics evenly, about 1½ inches apart.
- Use small clear bands so they disappear.
- Pull each bubble outward with two fingers.
- Leave the ends slightly tapered instead of pin-straight.
This one handles longer hair well, but it also works on medium lengths if the tail is not too short. If your hair is thick, keep the bubbles a little larger so the style does not feel crowded. Fine hair can take smaller, tighter bubbles and still look full.
It has a bit of a young, easy energy without tipping into childish. That balance is hard to fake, and this style gets there fast.
9. The Volumized Crown Rope Twist
Can a rope braid look airy instead of tight? Absolutely. The trick is volume at the root, not just in the twist itself. Start by lifting the hair at the crown with a tail comb or a few tiny backcombed strokes, then create two rope sections from just behind the front hairline and bring them together in the center back. The lift does the flattering work.
How to fake fullness
The crown needs a little grip, especially if your hair is very fine or freshly washed. A dusting of texturizing powder at the roots can help, though a light dry shampoo works too if that’s what you already have. Work it into the underside of the part so the top still looks clean. You want support, not chalk.
Once the braid is secured, pinch the twist gently near the top and tug it outward by a few millimeters. Not much. Just enough to soften the line. Too much stretching makes the braid lose its shape, and then it starts to look unfinished. I prefer this version with a medium wave through the ends because the contrast between lifted crown and soft length feels very balanced.
A volumized crown twist is one of those styles that reads as polished in photos and stays comfortable in real life. The roots don’t feel pulled, and the back still has enough give to sit against a chair or jacket collar without annoyance.
10. Rope Braids That Work on Shorter Hair

Shorter hair can absolutely wear half-up rope braids. The mistake is trying to use sections that are too large. Small hair needs smaller pieces, plain and simple. Take 1/2-inch sections from the front, twist them tightly, and pin them a little higher than you would on longer hair so the style has room to show.
This is a good option for chin-length bobs, collarbone cuts, and layered lobs where the front pieces fall out easily. A few hidden bobby pins matter more here than a single elastic. The pins keep the twist close to the head and stop shorter layers from sliding loose before you leave the mirror.
Things that help on shorter cuts
- Use a fine-tooth comb only at the part.
- Spray the first 2 inches of hair with light-hold spray.
- Secure the twist with crossed pins, not one pin alone.
- Tuck short ends under the twist instead of chasing them.
I also like a mini rope braid on shorter hair because it gives shape without needing length. That sounds obvious, but it matters. Some styles depend on long hair to look finished. This one does not. It looks cute, useful, and a little sharper than the usual half-up clip.
If your layers are extra slippery around the face, a dab of styling cream on just the ends helps them stay where you put them. Tiny amount. Seriously. Too much cream turns the front into a slide.
11. Sleek Rope Braids on Straight Hair
Straight hair can wear rope braids with a clean, glossy finish that feels much more polished than messy texture styles. The catch is control. A sleek version needs smoothing at the roots and a firm twist through the front sections, or the braid starts to sag before the second coffee.
Product choices that actually help
- Use a pea-sized amount of smoothing cream on damp hair before drying.
- Run a tiny bit of serum through the ends only.
- Finish with a flexible hairspray from about 10 inches away.
- Keep oil away from the roots unless your hair is coarse and dry.
The rope braid itself should be tight at the beginning and slightly softer as it reaches the back. That keeps the top looking deliberate and the end from feeling hard. Straight hair tends to show every line, which is good when the braid is clean and bad when it is uneven. Take your time with the first twist. The rest follows from that.
I like this version with sharper clothes: button-downs, structured blazers, neat knit tops, things like that. It can handle a brighter lip or a bigger hoop earring without fighting either one. And if your hair is pin-straight, don’t try to make it look wavy just for the sake of it. Let the shine do the talking.
One short sentence: Straight hair makes a rope braid look crisp.
12. Rope Braids for Natural Texture

Wavy and curly hair makes rope braids feel richer. The twist doesn’t have to fake smoothness, and that’s a relief. Let the texture stay visible. The half-up rope braid sits on top of the pattern instead of trying to erase it, which gives the style a more relaxed, lived-in feel.
The best approach is usually dry hair with a little leave-in cream or curl cream worked through the front and mid-lengths. Wet hair can shrink too much and make the braid smaller than you planned. Dry hair also grips better, especially around the front sections where curls like to spring free. If your hair is very dense, take slightly larger sections — about 1½ inches wide — so the braid doesn’t disappear into the texture.
The fun part is that flyaways don’t ruin this style. A few loose curls around the temples can make the braid look soft and flattering. I would not plaster them down with heavy gel unless you want a stricter finish. Day-date hair should move a little when you turn your head.
Place the braid higher than you think if your curls shrink a lot. That one detail saves the style from sitting too low and getting lost in the rest of the hair. I keep coming back to that because it matters more on textured hair than people expect.
This version has warmth. It feels easy in the best way.
13. The Five-Minute Rope Braid That Never Looks Rushed
When the morning is moving too fast, this is the one to grab. Take two sections from the front, twist them back, secure them with a small elastic, and then tuck the join under a clip or pin if you want the finish to feel cleaner. That’s the whole backbone of it. Fast, neat, and good enough to wear out the door with sunglasses and a decent lipstick.
What makes it work is not complicated technique. It’s clean sectioning and one smart finishing move. If the front is a little flat, lift the twist at the crown with your fingers before you pin it. If the ends look too plain, wrap a small strand around the elastic and pin it underneath. That small cover-up matters more than people think. Exposed elastics can make even a pretty braid feel unfinished.
- Keep a small elastic in your bag.
- Use your thumb to flatten any bumpy spots before pinning.
- Pull out one thin piece at the front if the style feels too tight.
- Stop fussing once the braid sits evenly on both sides.
I like this version because it gives you options. Wear it with a trench coat, a knit top, a cotton sundress, whatever. It does not need a fancy outfit to make sense. And if you learn only one half-up rope braid, this is the one that will save you on the mornings when your hair refuses to cooperate and the clock is doing that rude little thing it does.
It’s quick. It’s tidy. It gets the job done.