Day three curls are where braid hairstyles stop being cute in theory and start being useful in real life. The curl pattern still has shape, but the roots have usually lost their shine, the canopy may have puffed up, and the front pieces have opinions of their own. That’s exactly why half-up braids for day three curls work so well: they tame the top without flattening the parts you still want to show off.
A little roughness helps. Freshly washed hair can be too slippery for a braid to hold, while older curls have enough grit that small sections stay put and the shape lasts longer. You do not need perfect ringlets for any of this; in fact, a bit of frizz often makes the braid look softer and more believable than a tight, overworked style ever could.
Keep a rat-tail comb, a few clear elastics, and more bobby pins than you think you’ll need within reach. Some looks take two minutes, some take ten, and a few need a little finger-twisting at the end to loosen the braid and make it sit right. Start with the style that matches how cooperative your curls feel, then go from there.
1. Halo Crown Braid
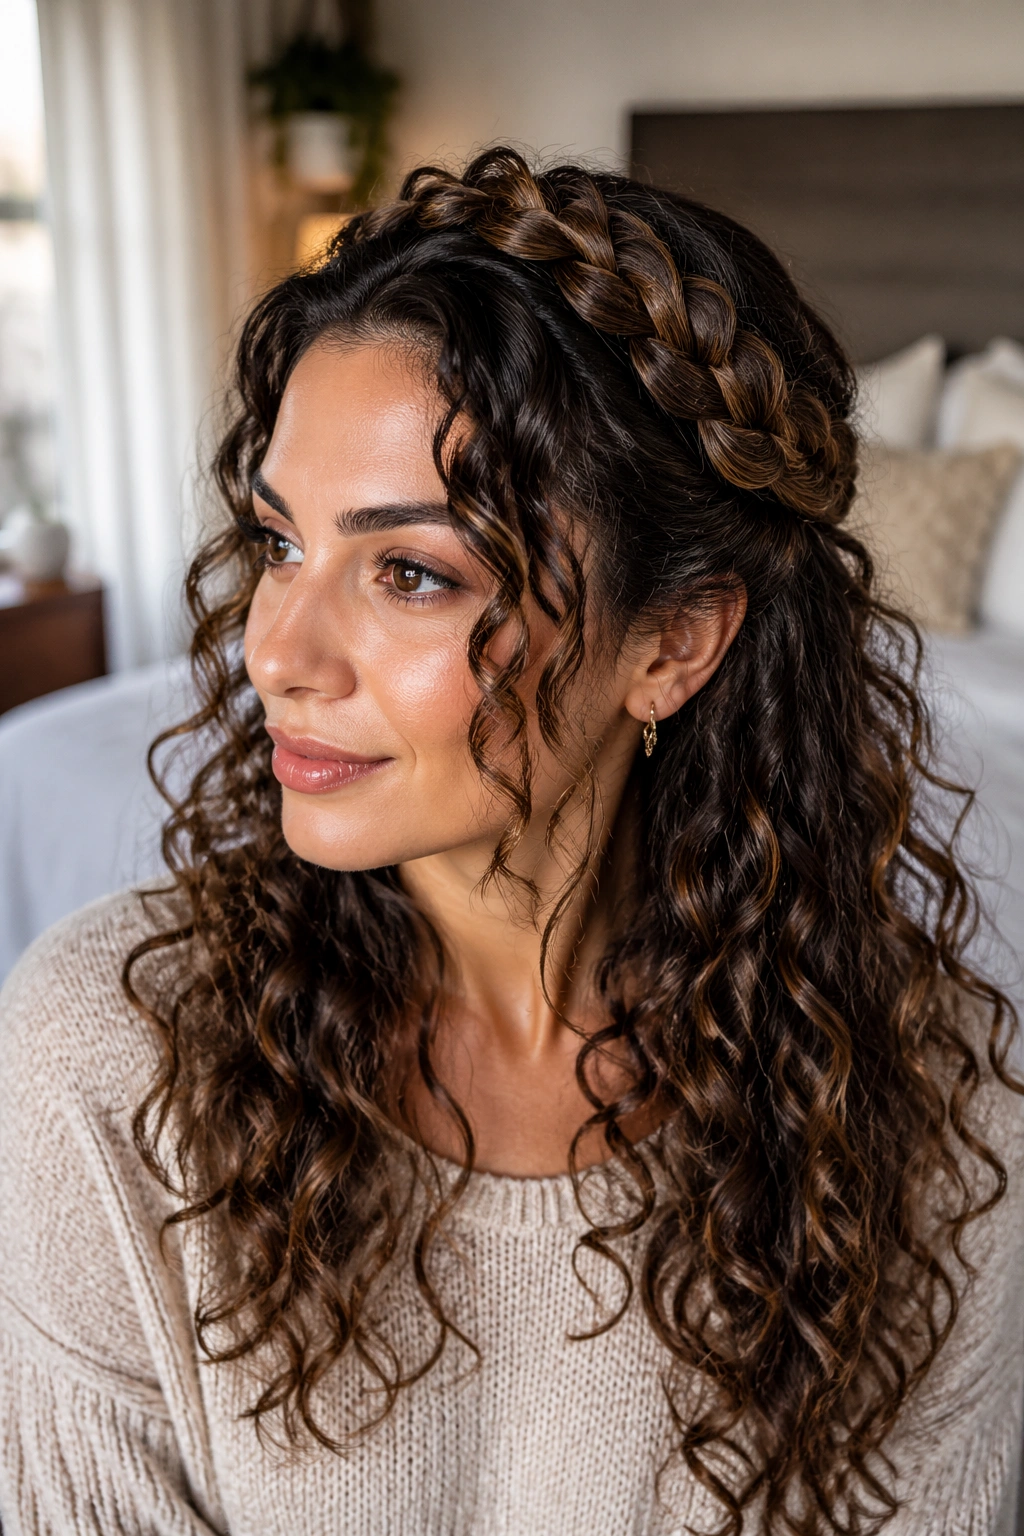
A halo braid earns its keep on day three. It pulls the hair away from the face, hides roots that have gone a little flat, and keeps the rest of the curl pattern free to do its own thing.
I like this one when the crown looks puffier than the ends. Take a 2-inch section from behind one ear, braid it across the top of the head, then pin it behind the other ear with two crossed bobby pins. Leave the lower curls loose and let the braid sit a little soft, not tight and shiny. That little looseness matters. A braid that’s too neat can make day-three hair look stiff, and that’s usually not the goal.
If your hair is thick, braid only the upper third of the section so the plait stays slim enough to wrap comfortably. If it’s finer, a little dry shampoo at the root can help the braid grip.
Best part: it looks finished even when the bottom half is doing a messy, fluffy curl thing.
- Works well on medium to long curls
- Needs 4 to 6 bobby pins
- Looks best with a middle or soft side part
Tip: tug the outer braid loops once it’s pinned so the halo looks full instead of tight.
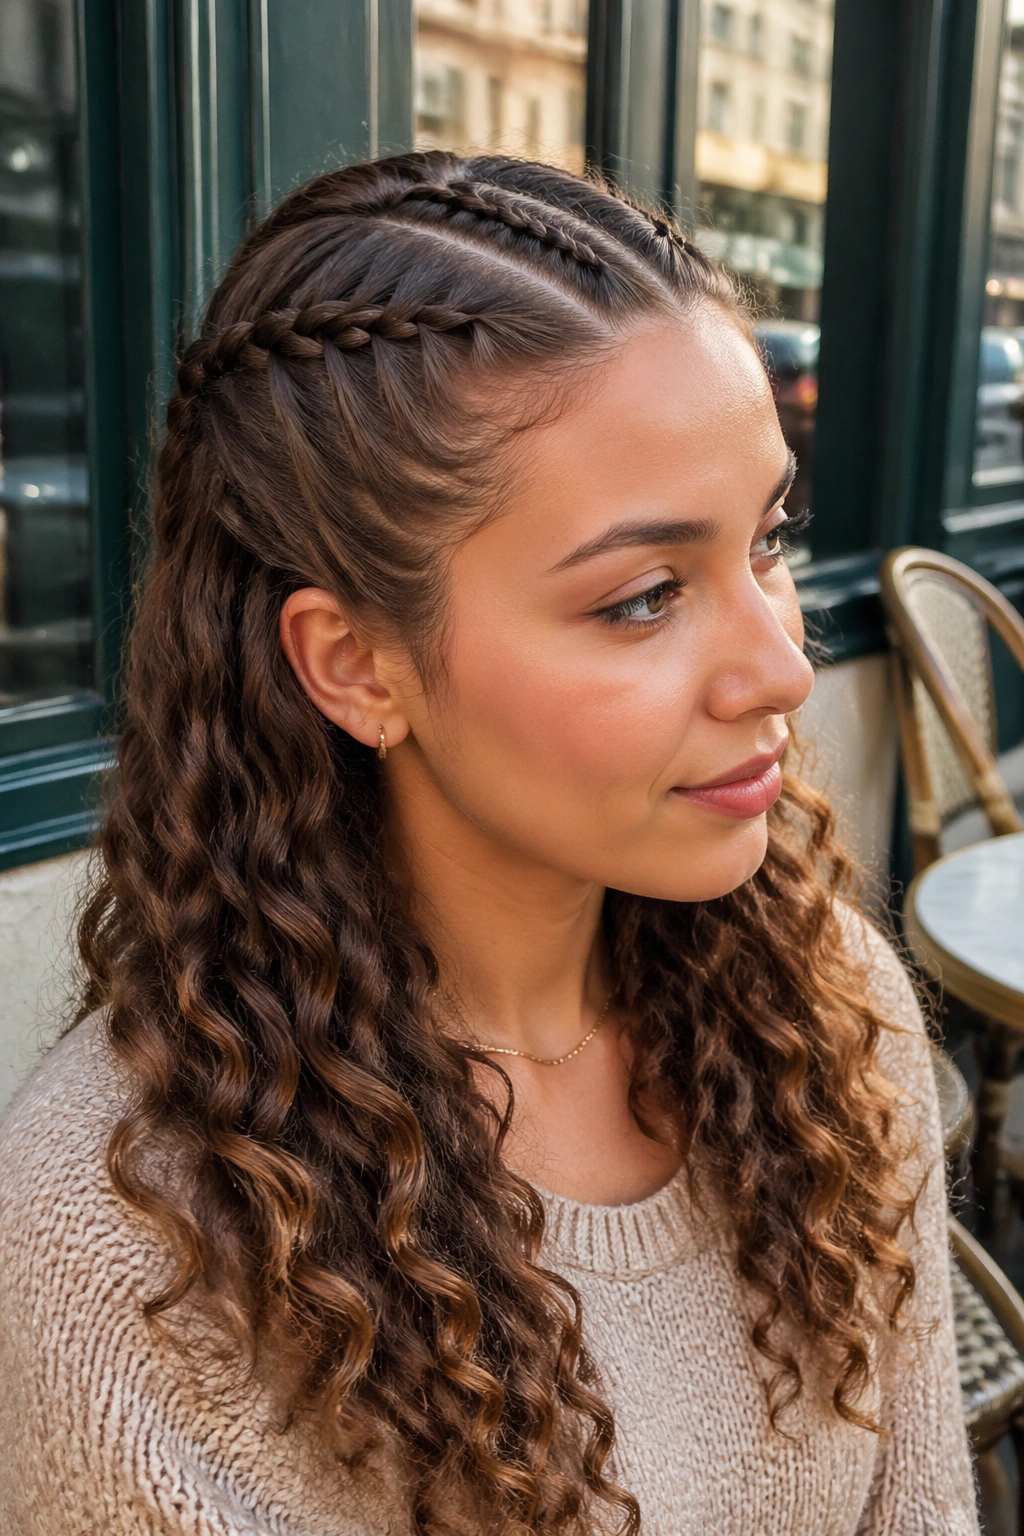
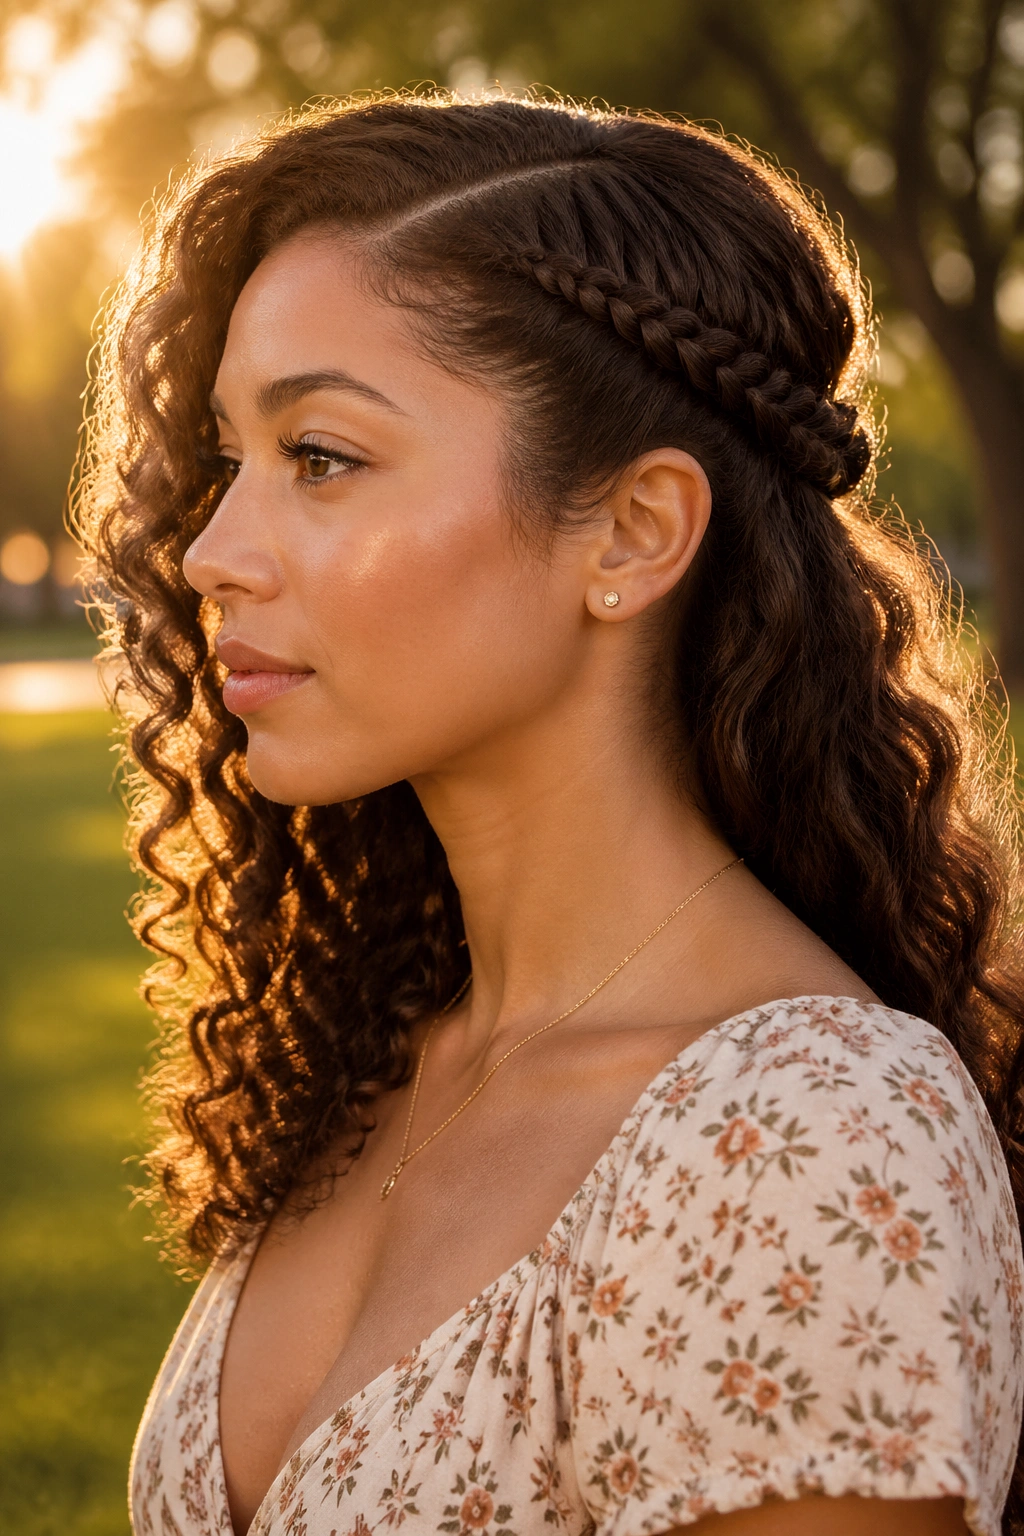
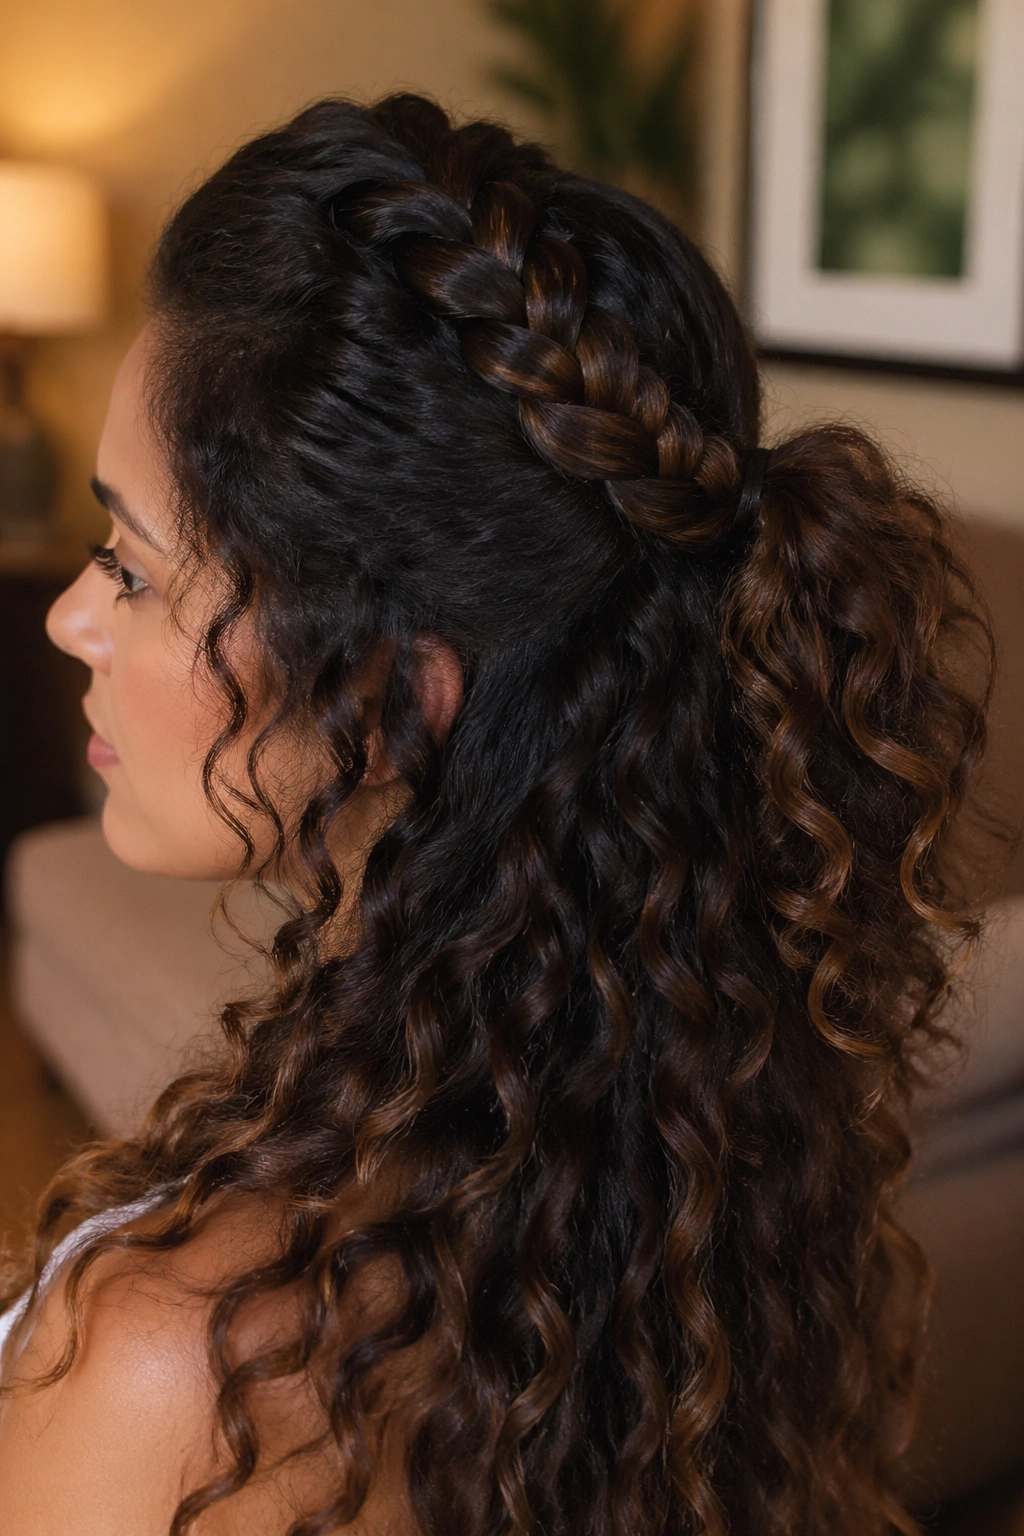
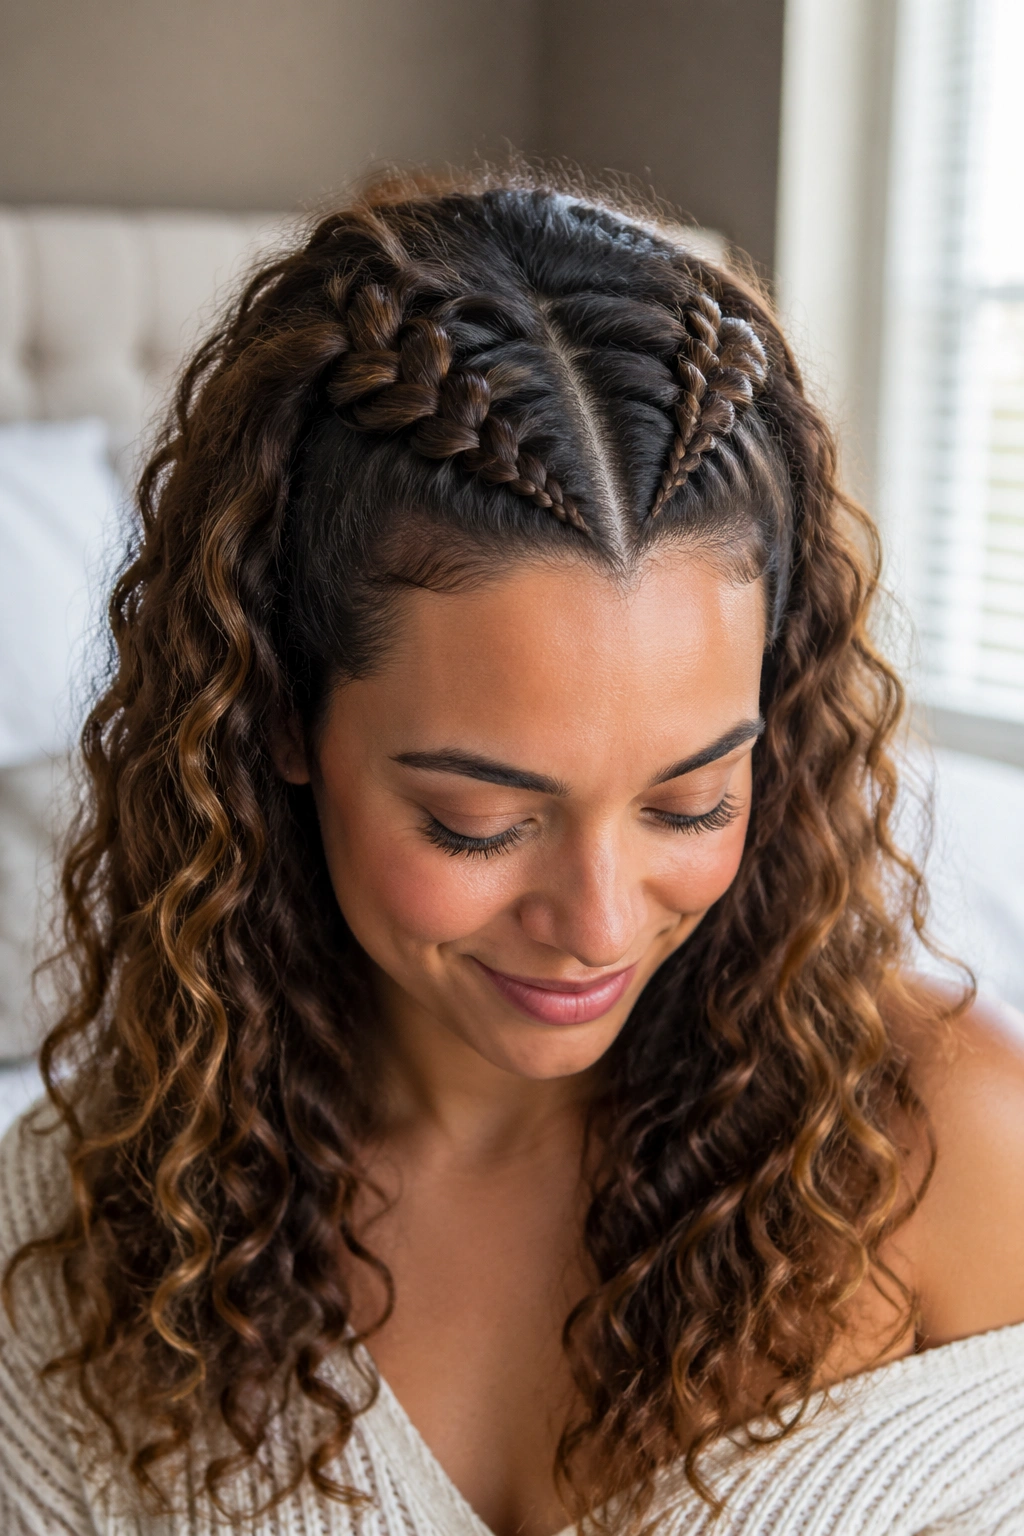
2. Dutch Braid With Lifted Roots
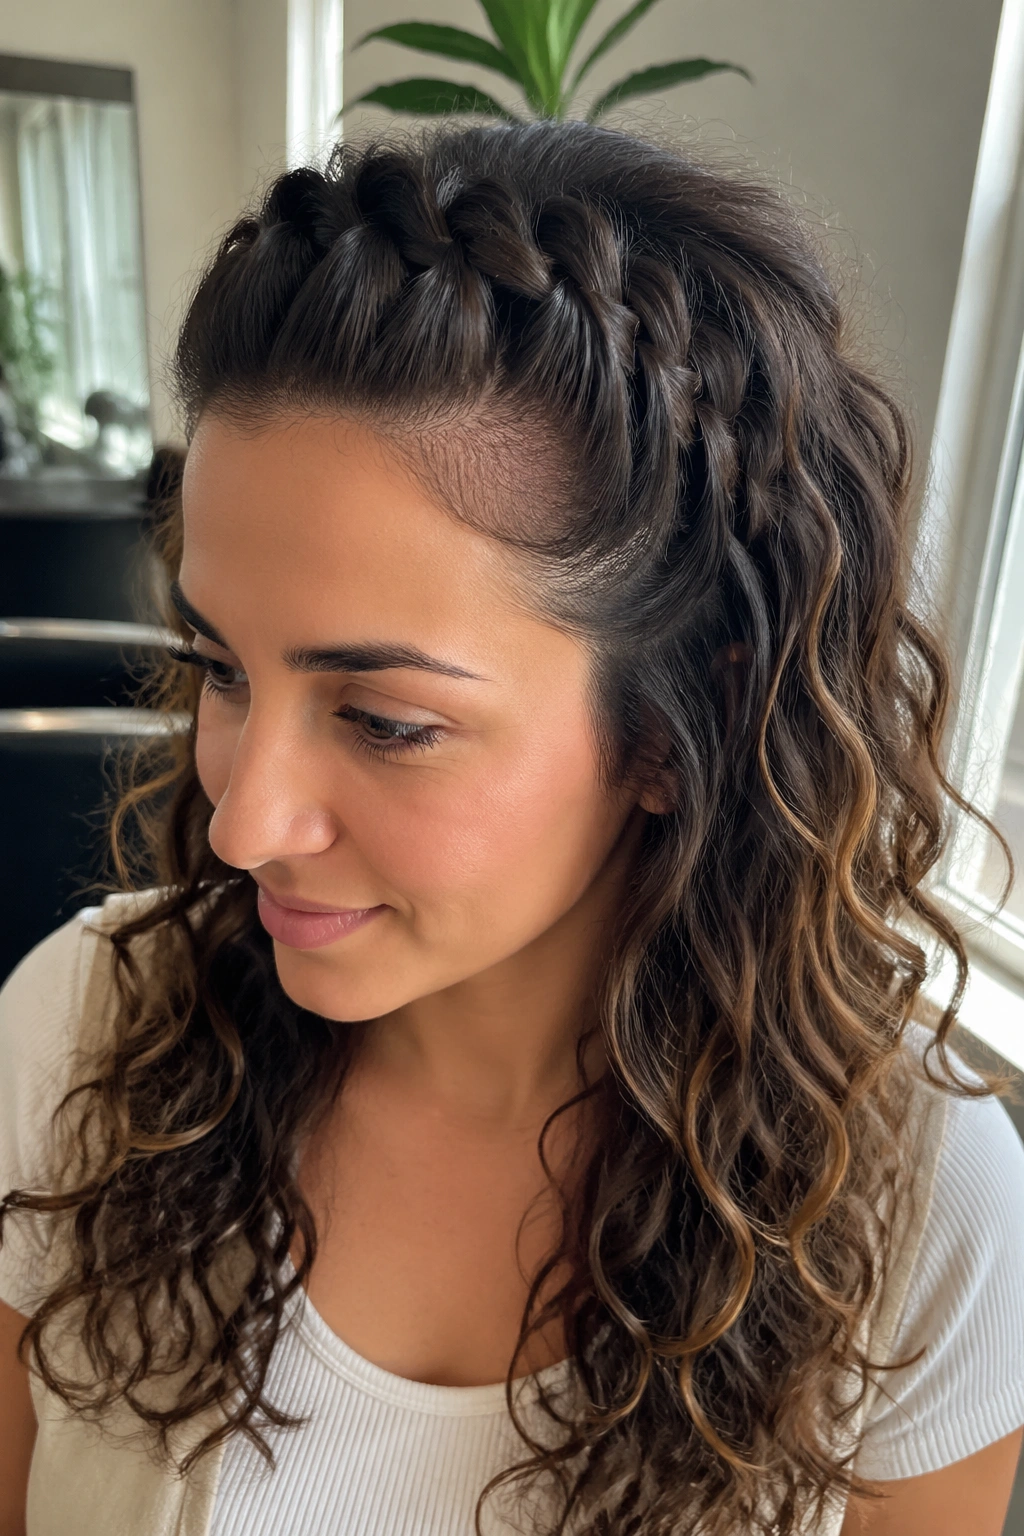
A Dutch braid along the hairline gives day-three curls a clean frame without flattening the rest of the head. It’s one of those styles that makes slightly tired curls look intentional.
Why It Works
The braid sits on top of the hair instead of disappearing into it, so the texture reads clearly even when the curls underneath have loosened. That makes it a smart choice if your roots are oily but the lengths still have shape. You get control up top and bounce everywhere else.
Start with a 1 to 1½-inch section at the front hairline, braid back toward the crown, and stop once you reach the top of the ear. Pin the end flat and let the remaining curls fall loose. If the braid feels too heavy, split it into two thinner Dutch braids on each side and meet them in the back.
- Great for curls that still have spring
- Needs a rat-tail comb for clean parting
- Holds better with a light mist of flexible-hold spray
Tip: braid with your fingers, not a death grip. A little softness keeps the style from looking dated or too school-uniform neat.
3. Fishtail Pullback at the Temple
Why does a fishtail braid look so good on second- or third-day curls? Because the texture does half the work for you.
A fishtail wants tiny, uneven pieces, and curly hair already has that kind of natural variation built in. Grab a section from one temple, split it into two, and keep crossing the smallest bits you can manage from the outside edge to the opposite side. Stop when the braid reaches the top of the ear, then secure it with a clear elastic and pin it back behind the head.
How to Wear It
This works best when you keep the fishtail narrow and let the rest of the curls stay loose. If you make the braid too thick, it can start to fight the curl pattern instead of blending with it. A thin fishtail reads polished; a chunky one can feel overdone on day-three hair.
If your curls are stretched or frizzy near the front, leave a few baby hairs out on purpose. That softens the shape and keeps the braid from looking pasted down.
One tiny braid, one loose side, done.
4. Braided Top Knot Over Loose Curls
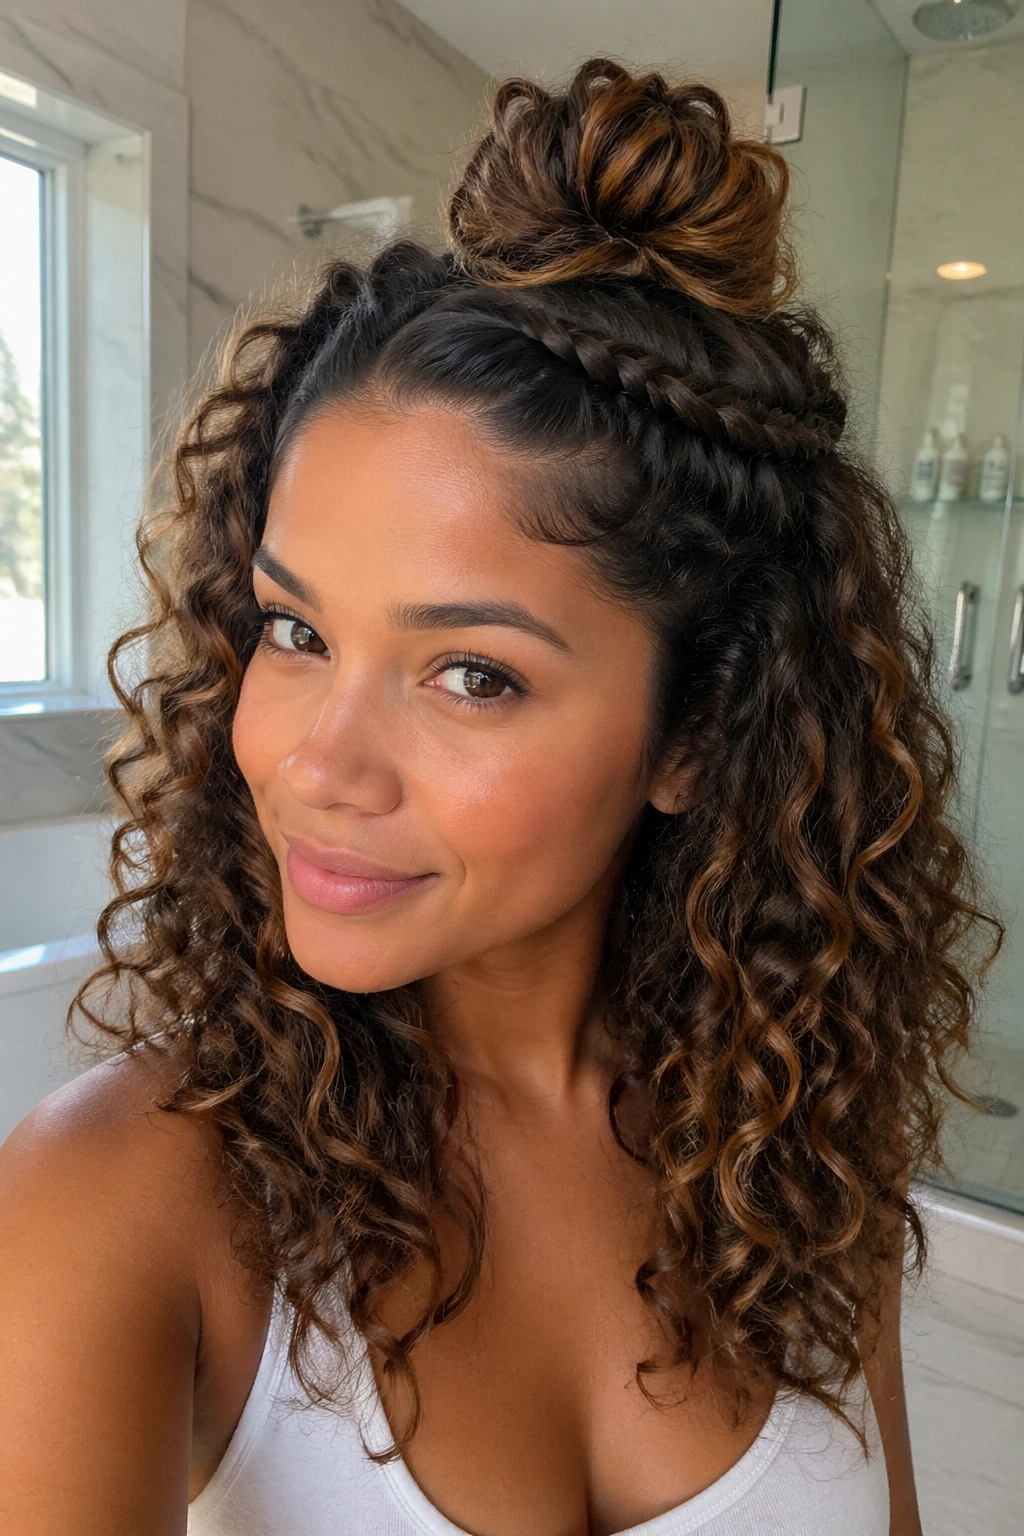
A braided top knot is the rescue style I’d choose when the crown is flat and the ends still look good. It keeps the lift where you need it and leaves the rest of the curl pattern visible.
Picture this: the top section is braided from temple to temple, then twisted into a small knot or bun at the crown while the lower curls hang free. That split is what makes it useful. The braid handles the roots, the bun adds height, and the loose lengths make the whole thing feel less formal.
You do not need a huge bun here. Small is better. A compact knot sits cleaner on curly hair and holds with two pins or a small claw clip much more easily than a bulky twist. If the bun starts to sag, wrap the base once with a tiny clear elastic before pinning.
- Best for hair that has lost crown volume
- Works on shoulder-length curls and longer
- Hides root oil better than a plain half pony
The thing to watch: if you braid too much hair into the knot, the top can look heavy. Keep it narrow, and let the curls be the main event.
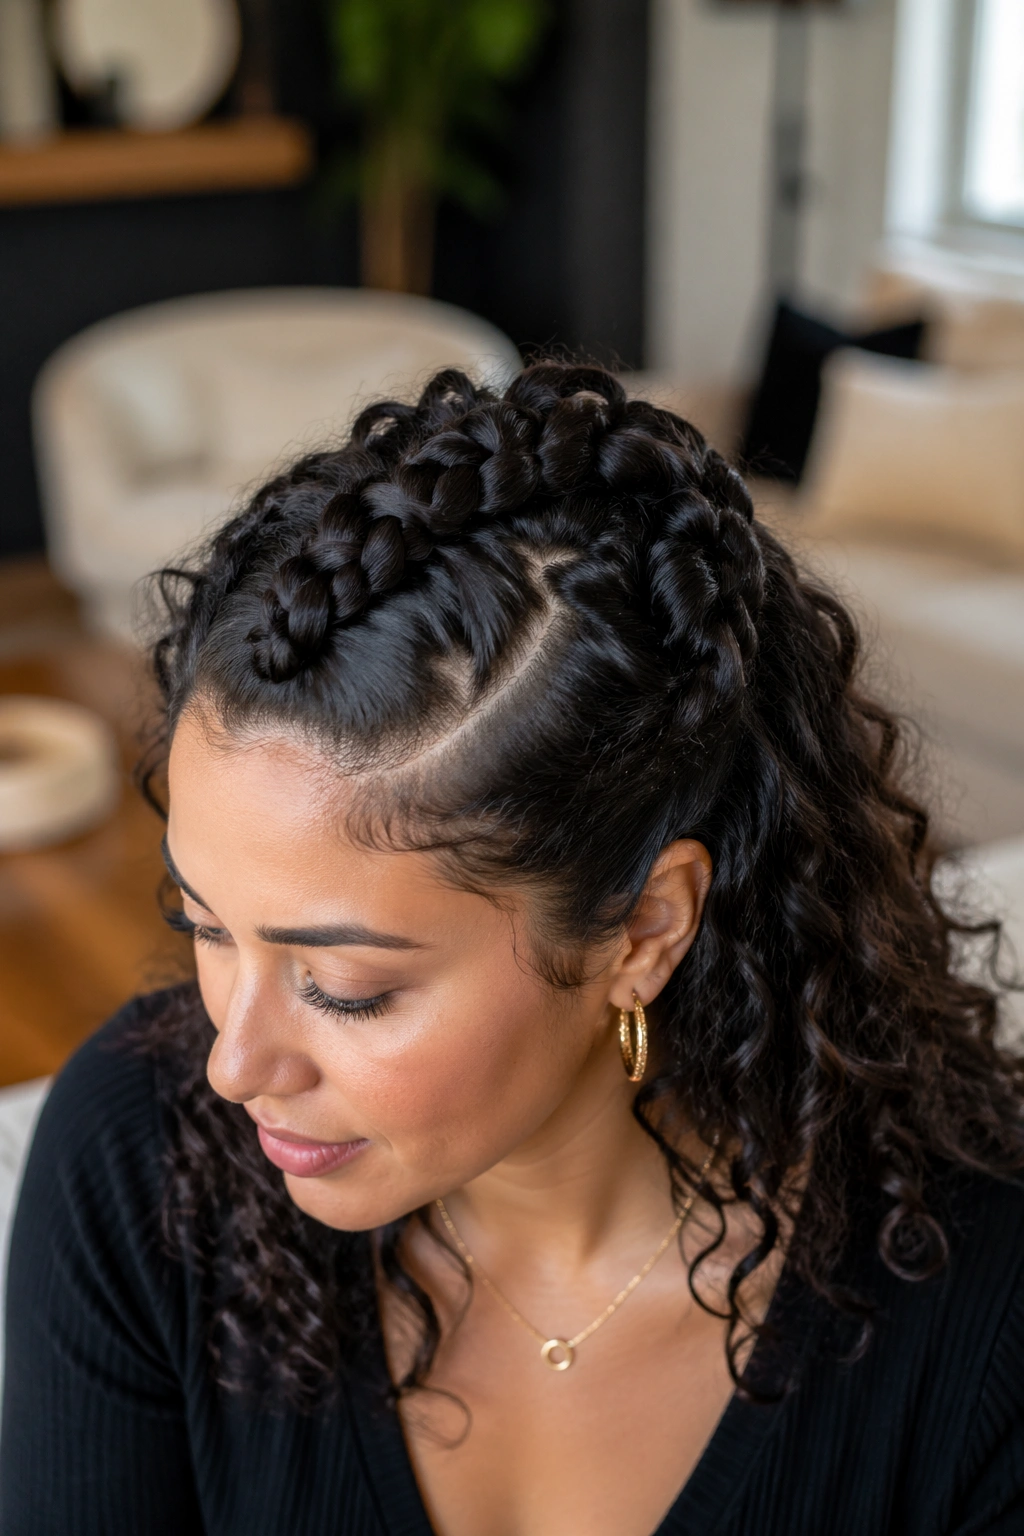
5. Two Skinny Dutch Braids to the Back
Two skinny Dutch braids are the style I reach for when the front needs order but the rest of the hair still has life. They sit close to the head, move the eye back, and leave the curl pattern below untouched.
Part the hair down the middle, then take a thin section from each front side and Dutch braid back toward the crown. Stop each braid near the top of the ear or just behind it, then secure them separately or join them with a clear elastic at the center. The goal is not perfect symmetry. It’s balance. On curly hair, a slight difference between the two sides often looks better than a rigid match.
This style holds especially well on coarse or dense curls because the texture gives the braid something to grip. If your hair is fine, rough up the roots first with a dry texture spray or even a little powder at the part. That makes a bigger difference than people expect.
The lower curls stay free, so the style still feels like half-up hair, not a full updo pretending to be casual. That’s the charm.
6. Side Sweep Braid for One-Eared Drama
Unlike a plain side ponytail, a side sweep braid gives you shape at the face and softness everywhere else. It feels more finished, and it handles day-three frizz without asking the curls to behave.
Start with a deep side part. Take the heavier front side and braid a medium-thin section back toward the opposite ear, then pin the end behind the head so it disappears into the loose curls. The braid should skim the hairline, not hug it too tightly. That little lift keeps the style from looking flat against the head.
This one is especially nice if your curls puff up at the temples or if your part has started to wander by the end of day three. The braid acts like a reset button. It also works well with off-the-shoulder tops, large earrings, or anything that benefits from one side being a little more exposed.
If you want more shape, loosen the braid edges with your thumb after pinning. If you want more hold, set the front section with a tiny mist of water before braiding.
My take: this is one of the fastest styles here, and it looks like you tried harder than you did.
7. Waterfall Braid Over Defined Ends
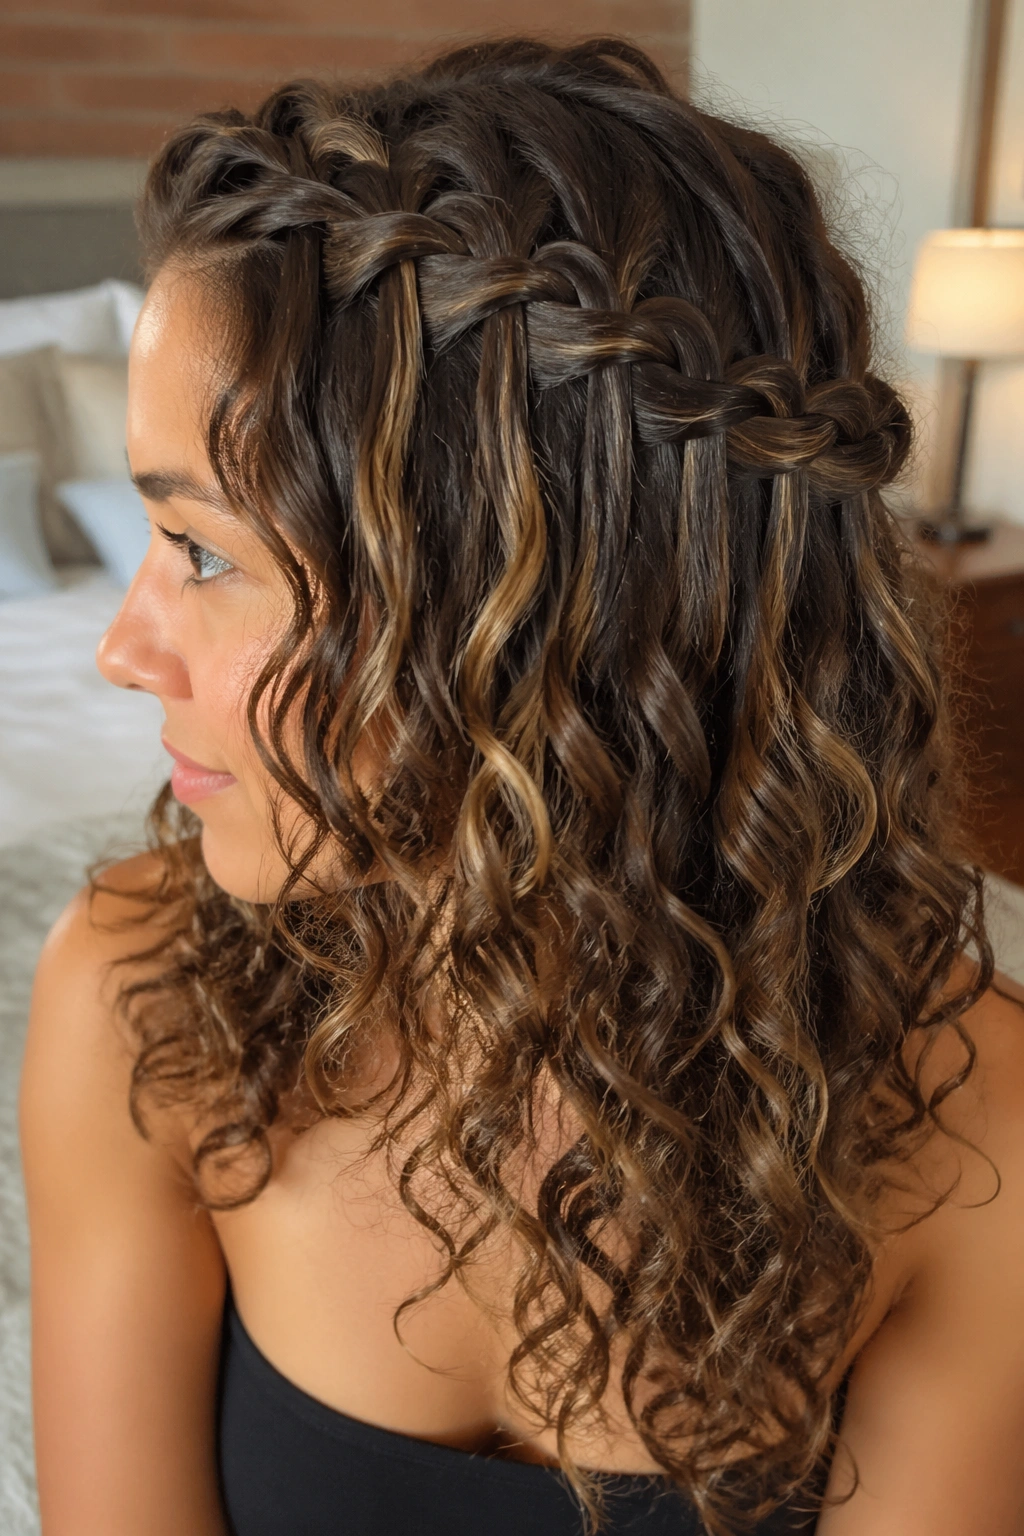
A waterfall braid is one of the few braid styles that actually likes hair with a bit of frizz. The dropped sections blend into the texture instead of exposing it.
Take a front section, braid once, then let the bottom strand fall each time you cross so it creates that flowing, tiered look across the top of the head. Keep feeding in small pieces from the crown as you move toward the opposite side. Once the braid reaches the back of the head, pin it discreetly and leave the rest of the curls loose.
The trick with day-three curls is to keep the tension light. If you pull too hard, the braid can carve a line through the hair that looks too sharp next to the fluffy curl pattern. Soft tension lets the braid sit on top like a pretty frame.
This style works especially well when the ends still have definition and the roots need help. It also shows off highlights or dimension nicely because the braid creates little openings that let the curl texture peek through.
If your hair tangles easily, use your fingers instead of a fine-tooth comb while you’re braiding. That alone saves a lot of pulling.
8. Front French Braid Into a Half Pony
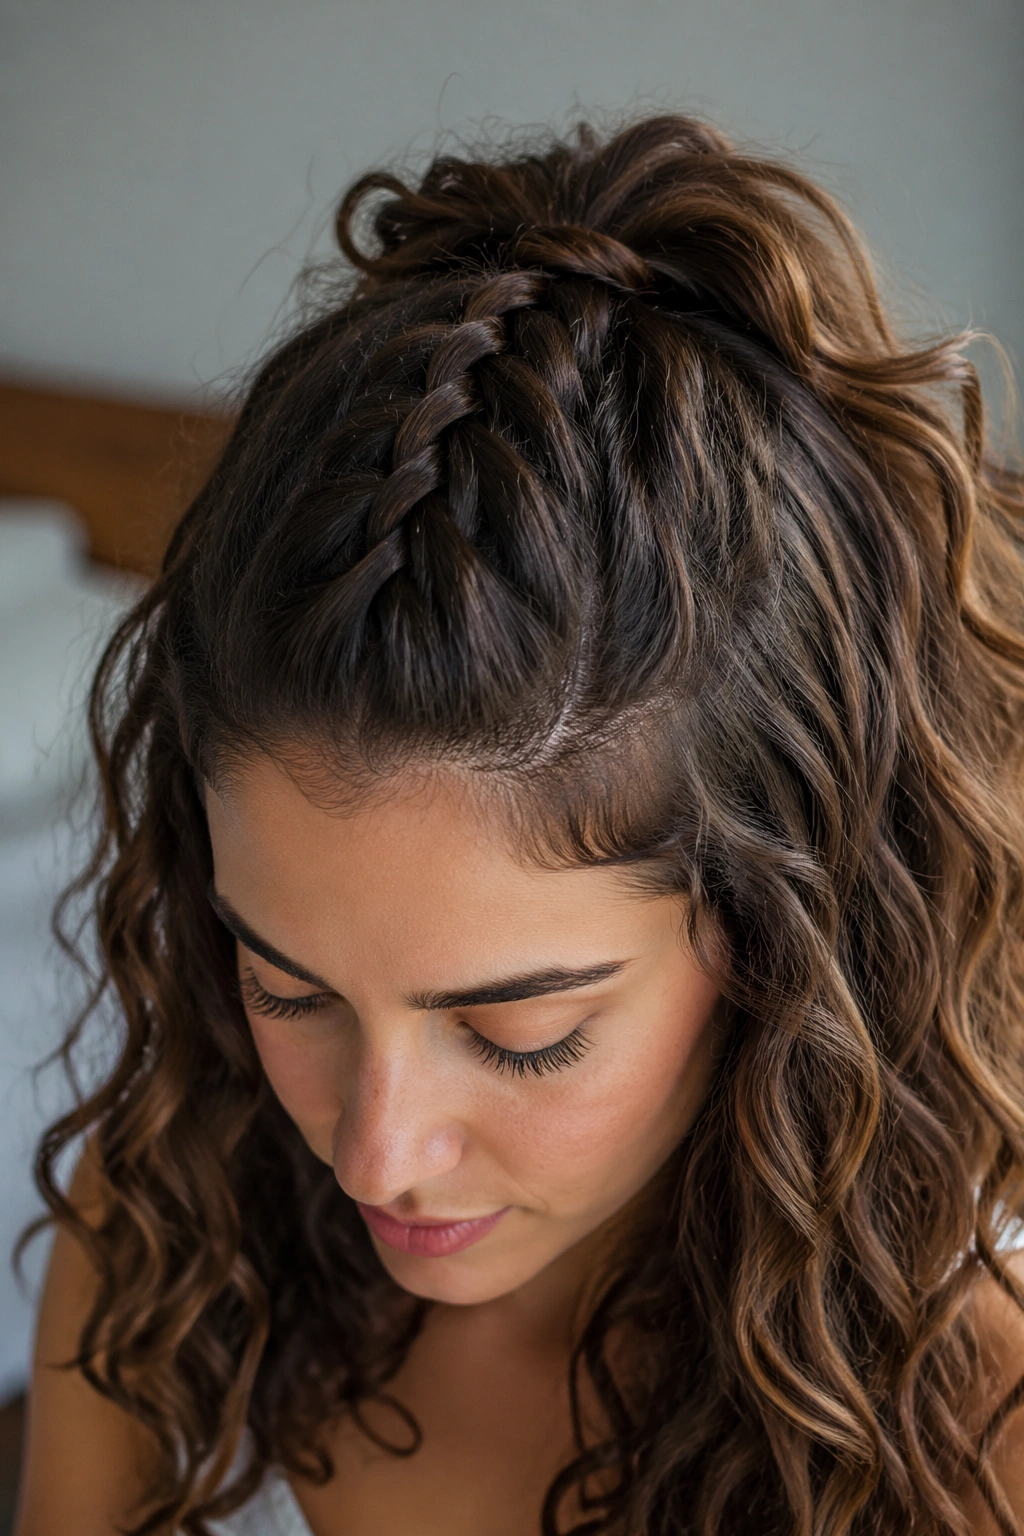
This is the braid I recommend when you want a clean front section without committing to a full braided look. It’s practical, fast, and hard to mess up.
Keep It Soft
Start a French braid at the front hairline and move straight back toward the crown, adding hair from both sides as you go. Stop after 3 to 4 inches, or once the braid reaches the highest point of the head, then secure it into a half pony with a clear elastic or small clip.
The half pony part matters. It gives the braid a place to land so the style feels deliberate instead of unfinished. For curly hair, that transition also keeps the top from puffing out too much near the ends of the braid.
What You Need
- A rat-tail comb for clean parting
- One clear elastic
- Two bobby pins if the braid slips
- A small mist bottle for reactivating stubborn curls
This look is especially good on medium-length hair because it keeps the braid visible without eating up all the volume. A braid that stops too low can disappear into the curl cloud. One that stops too high can feel disconnected. Right in the middle is the sweet spot.
9. Three-Strand Braid Into a Half Pony
A simple three-strand braid is underrated on day-three curls. It doesn’t fight the texture, and it gives you a sturdier shape than loose twisting ever will.
Take the center section at the crown, braid it with a normal three-strand plait, and stop when you reach the back of the head. Then gather the braid with the loose top curls into a half pony and secure the whole thing with one elastic. That keeps the braid visible while still letting the rest of the hair drop around it.
This one is good when the curls are still soft but not perfectly shaped. You do not need polished ringlets. The braid actually looks better when a few tendrils spill out around it, because the style gets that lived-in feel people always try to fake with curl spray later.
If you want more volume, gently pull the braid apart once it’s secured. If you want more lift, braid the top section a little higher and anchor it with a pin under the elastic. Small change, big difference.
And yes, this is one of the easier options. There’s no fancy weaving to manage. Just a clean section, a steady hand, and a little patience.
10. Tiny Accent Braid Under a Claw Clip
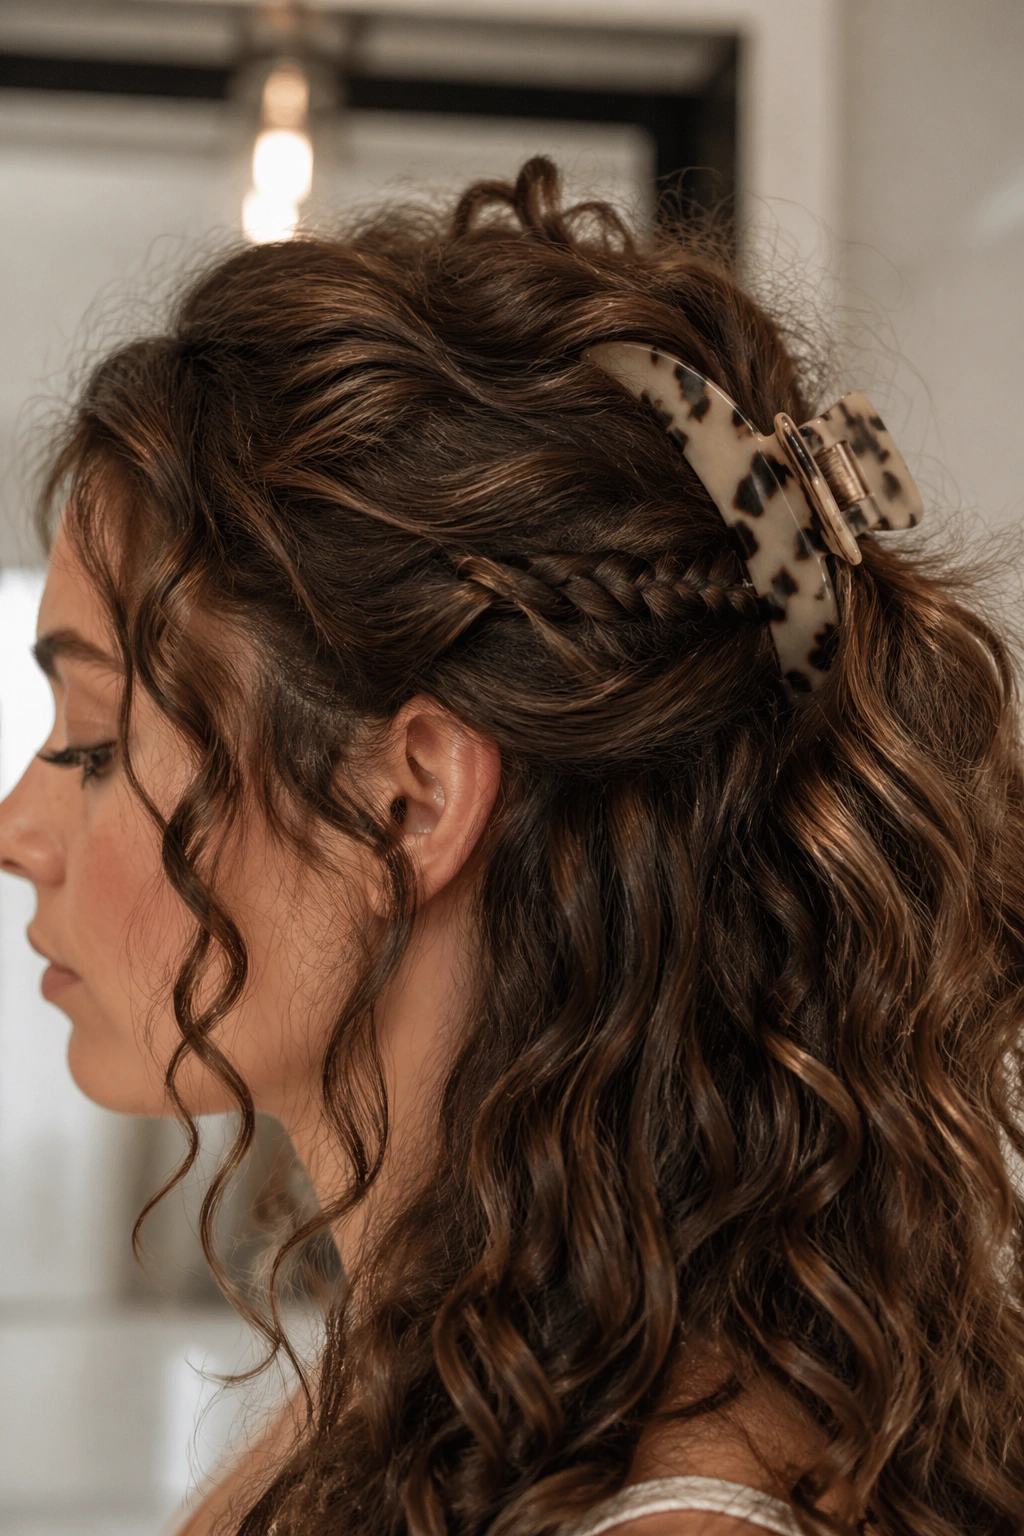
Sometimes the smartest move is the smallest one. A tiny accent braid under a claw clip can make day-three curls look styled without taking apart the whole pattern.
Here’s how it works: braid a narrow section from the front hairline, then tuck it back and let a claw clip hold the top half of the hair. The braid peeks out under the clip like a detail, not a statement. That’s the appeal. It gives the eye something to land on while the clip does the heavy lifting.
This style is excellent when your curls are loose enough to need control but not flat enough to justify a full updo. It’s also one of the best options for thick hair, because the clip can carry some of the weight while the braid keeps the front pieces from falling into your face.
- Use a clip with a wide jaw if your hair is dense
- Keep the braid thin so it lies flat
- Pin the braid end before clipping if the section is slippery
The braid should feel like a small detail, not the whole show. If it starts pulling the clip sideways, it’s too thick.
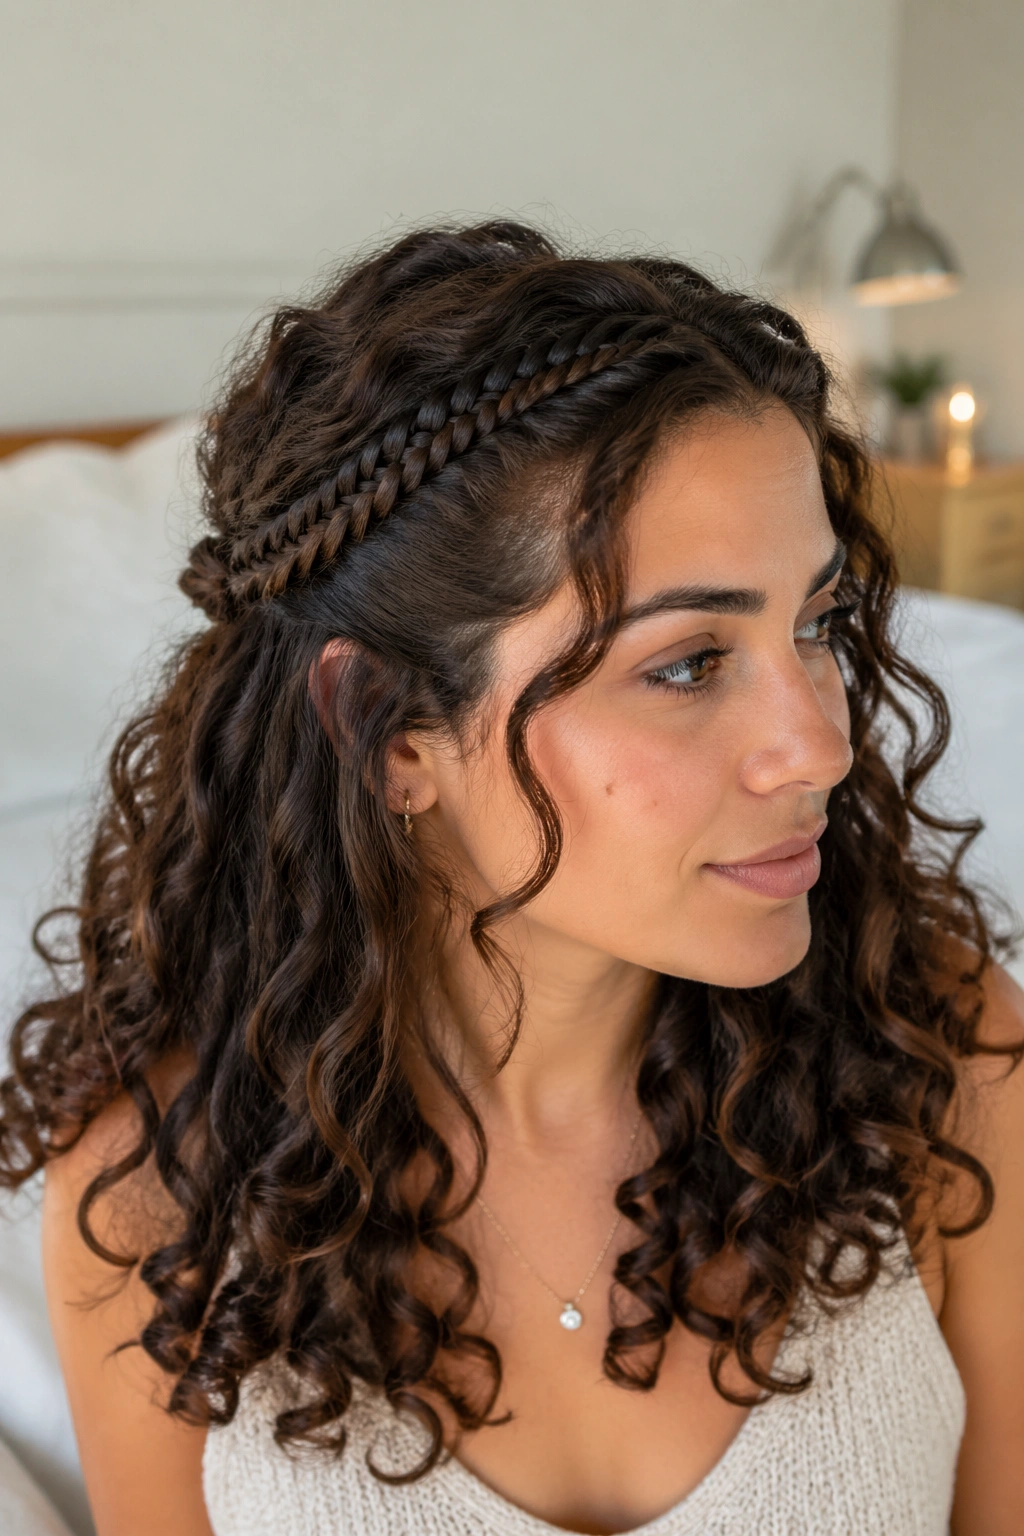
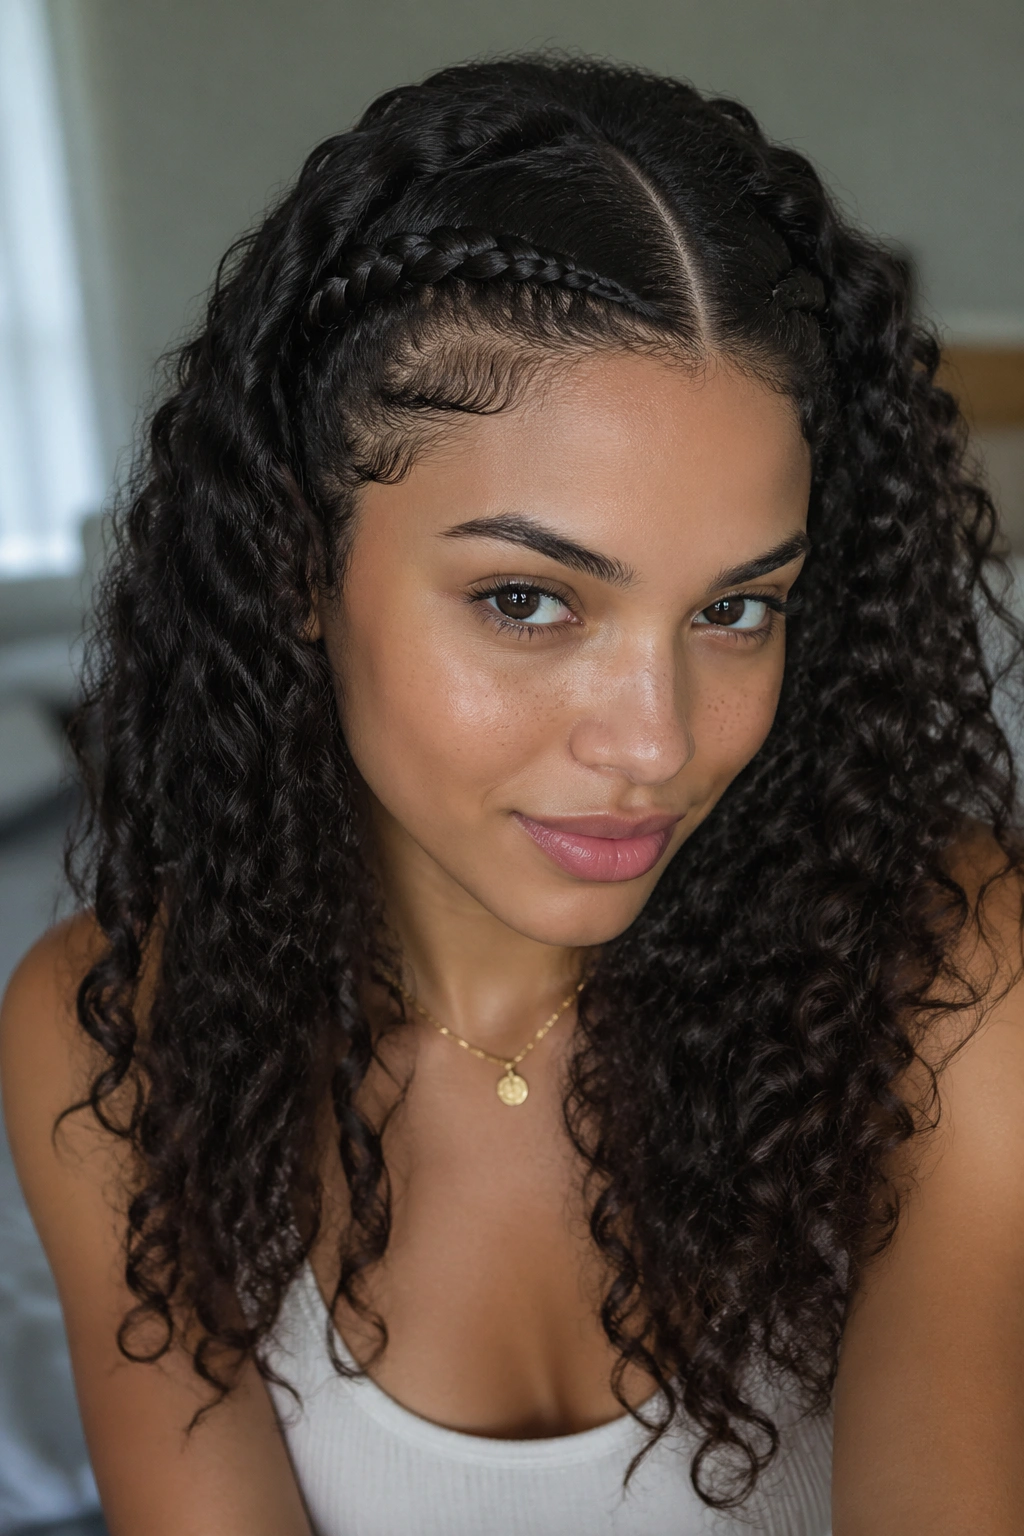
11. Braided Headband Across a Middle Part
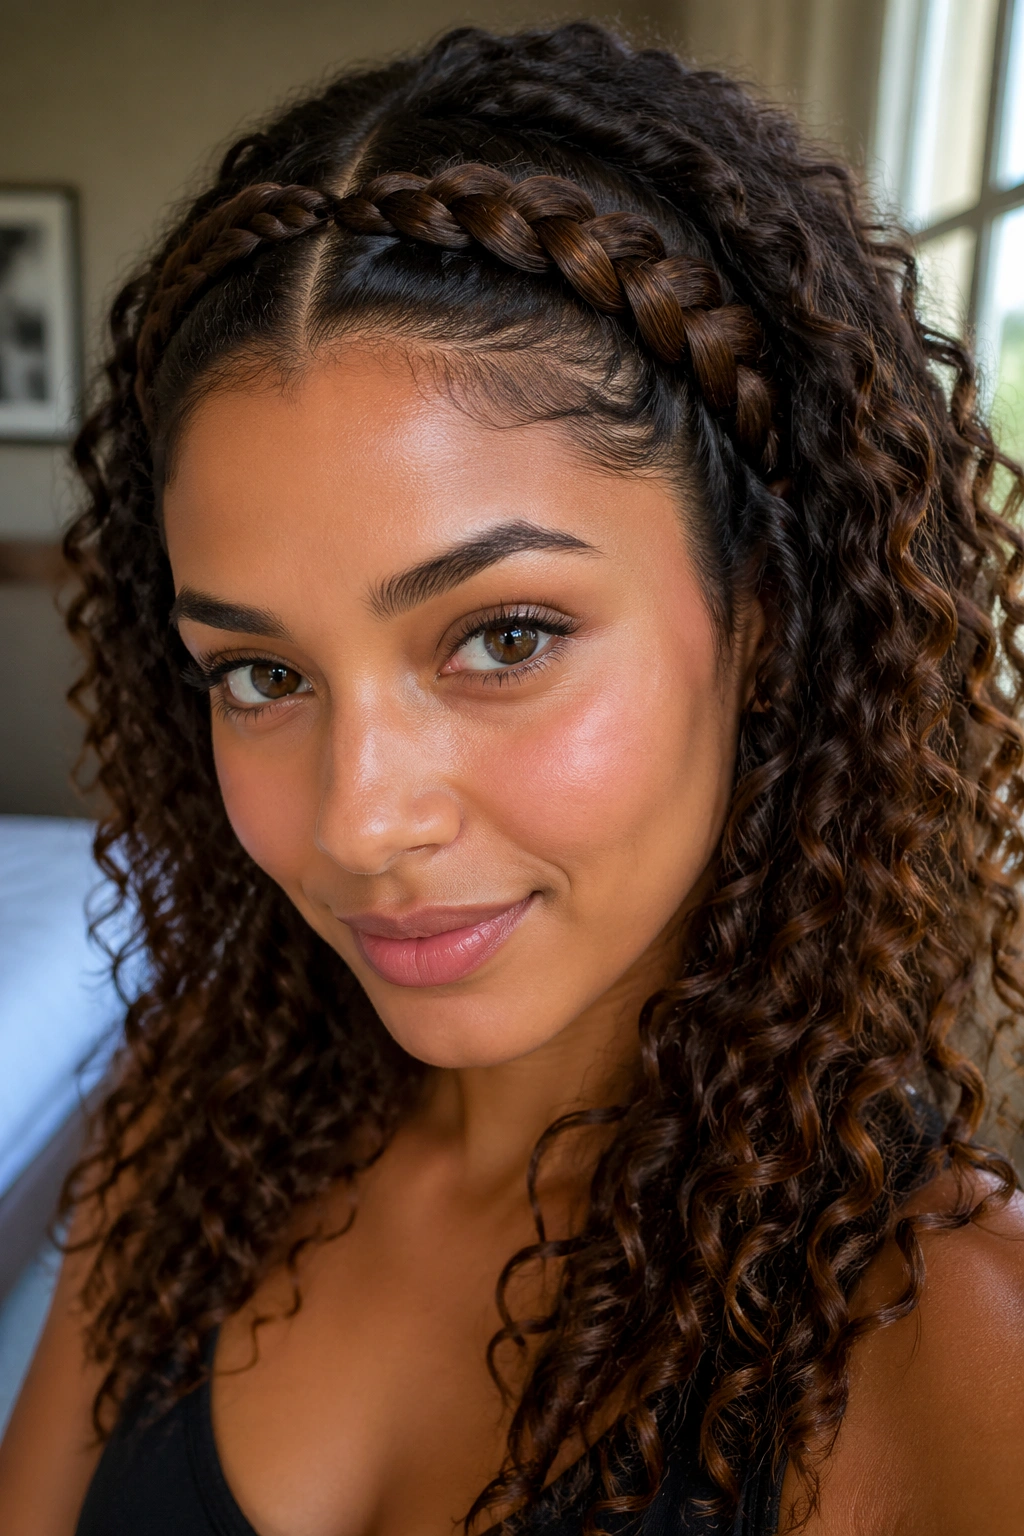
A braided headband look is the cleanest fix for curls that have gone a little wild around the face. It keeps the part visible, the crown soft, and the front pieces out of your eyes.
Start with a middle part, then take a section from one temple and braid it across the front of the head like a headband. Pin it behind the opposite ear. Do the same on the other side if you want a fuller look, or leave one side bare if you prefer a lighter frame. The braid sits right where day-three frizz tends to gather, which is part of why it works so well.
There’s a nice contrast here: the braid looks controlled, while the curls underneath keep their body. That balance is what makes it flattering on curly hair. A headband braid can feel a little fussy on straight hair, but on curls it reads softer and more natural.
I’d keep the braid loose at the front and slightly tighter at the nape so it stays put. If the ends poke out, hide them under a pin instead of trimming the style short. Short ends can look choppy, and nobody needs that.
A little face framing helps too. Leave two small curls in front and let them do what they want.
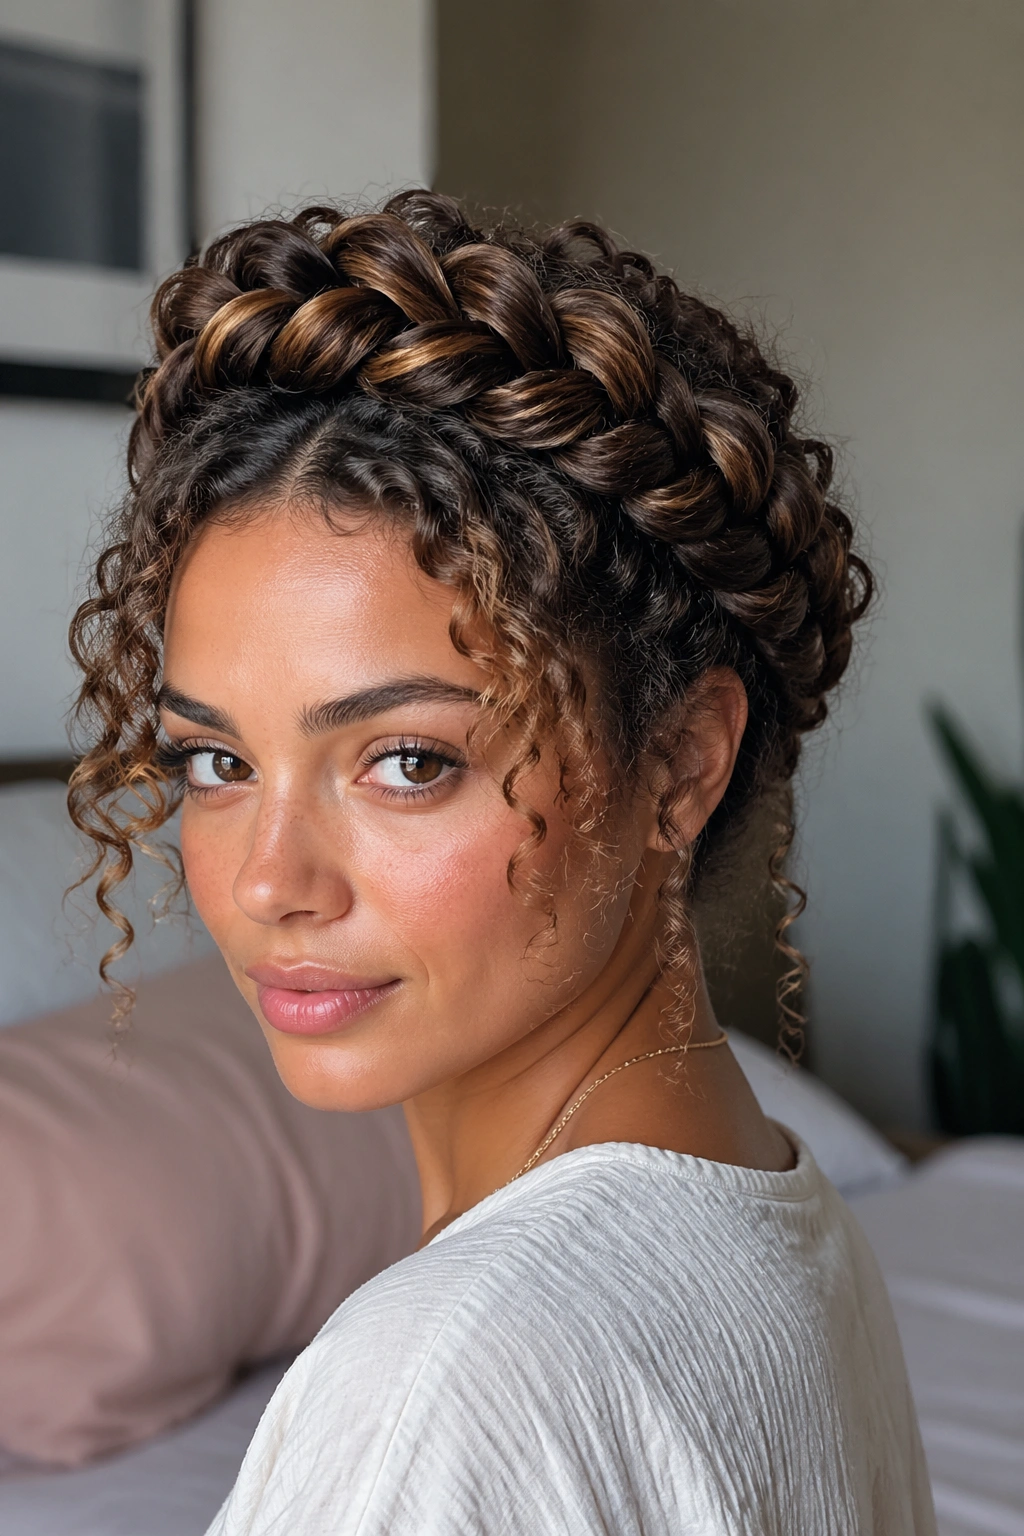
12. Inside-Out Braid With Big Texture
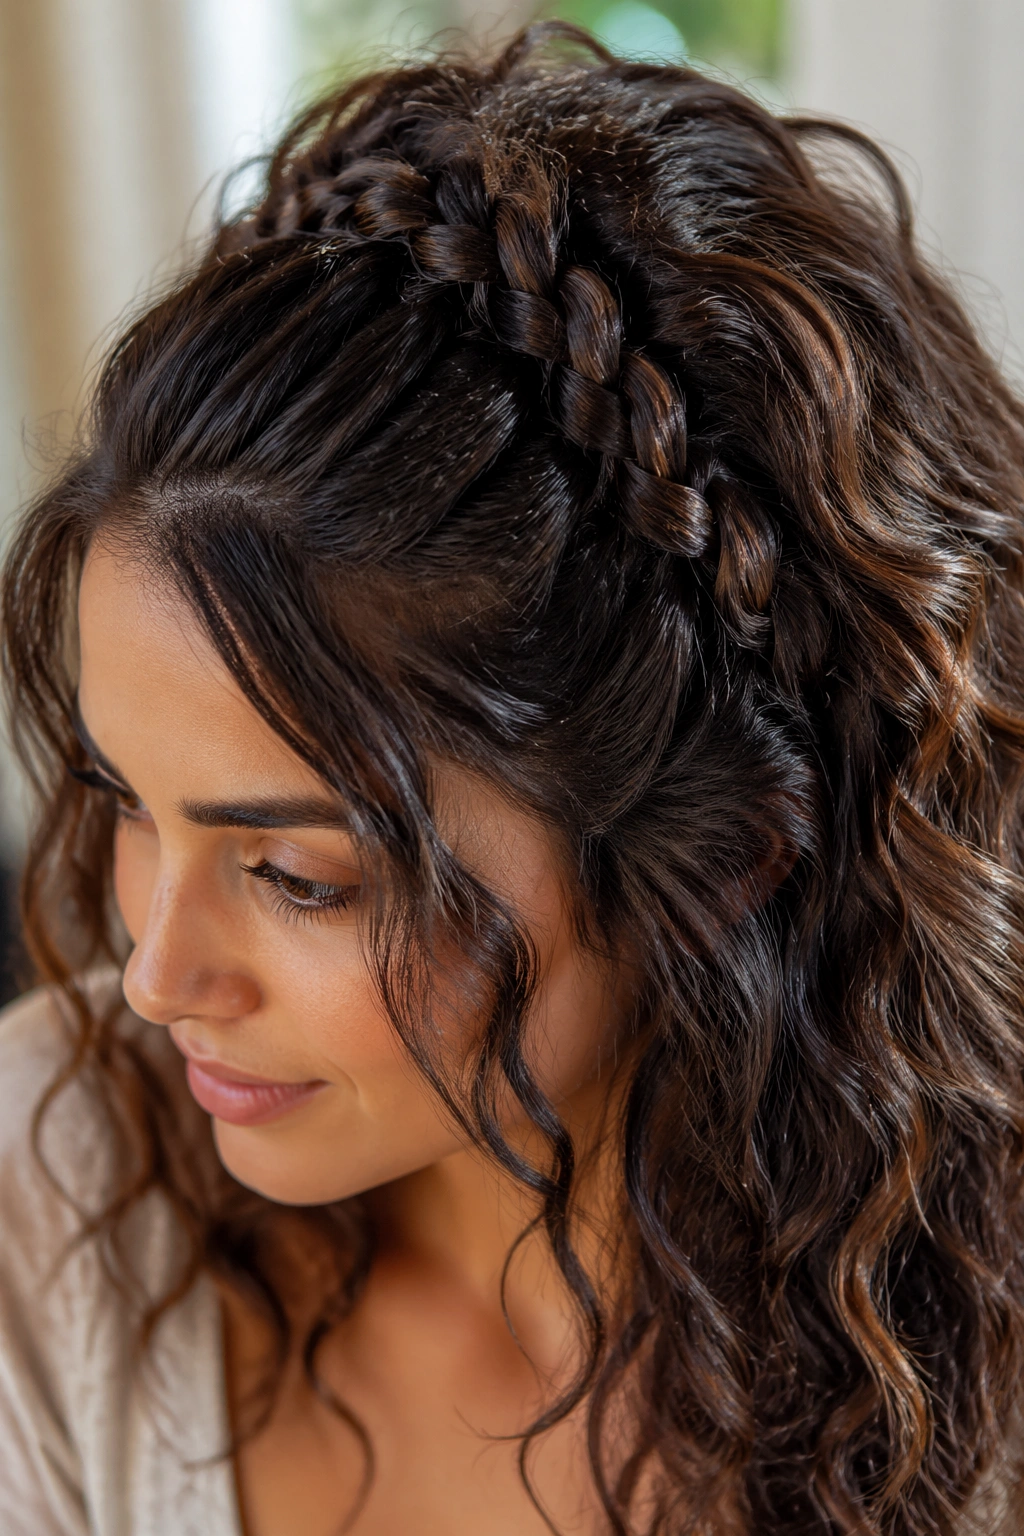
An inside-out braid, also called a reverse braid, looks fuller than a standard braid because the sections sit on top instead of sinking inward. On day-three curls, that extra height is a gift.
Why is it flattering here? Because curly texture already has volume, and the braid adds another layer of it without making the roots look smashed. The style reads bold but not slick. That’s a rare combination, and I’m fond of it.
Work with a front-to-back section along the crown, cross the strands under each other instead of over, and keep the tension light. Once the braid is secured, tug gently at the sides so the plait opens up. Don’t rush this part. The shape gets better after a minute of loosening with your fingertips.
This version suits thicker curls especially well, since there’s enough hair to build the braid without it disappearing. On finer curls, I’d keep the section narrow so the style doesn’t overwhelm the rest of the head.
If you want the braid to sit softer, spray the lengths lightly with water before you start. If you want more grip, work it on hair that’s fully dry. The difference is noticeable.
13. Twin Braids Meeting at the Center
What if you want something symmetrical but not severe? Twin braids meeting at the center give you that middle ground.
Take two sections from the temples, braid each one back toward the crown, and tie them together where they meet. The loose curls stay down, but the front gets pulled away from the face in a way that looks clean and a little playful. It’s a nice fit for day-three hair because the braid lines up with the areas that usually start to puff out first.
How to Keep the Meeting Point Neat
Use a small clear elastic to join the braids, then hide the elastic with a bobby pin or a small wrapped curl if the hair is long enough. If one braid looks thinner than the other, loosen the thicker one slightly instead of tightening the smaller one. That keeps the balance from looking accidental.
This style is useful for school, errands, and any day when you want your curls contained without looking overdone. It also works on shorter curls that can’t quite make it into a full braid crown. The side sections do enough to make the style feel finished.
I like it because it feels practical. No drama. Just two braids, a center point, and the rest of the hair doing its curly thing.
14. Braided Mohawk Through the Crown
A braided mohawk half-up style brings a little edge to day-three curls without sacrificing softness where it counts.
The braid runs through the center of the crown, usually starting near the front hairline and moving straight back in a raised line. The sides stay loose or are pinned back lightly, which gives the top all the visual interest. On curls, that raised center strip looks especially good because the braid has volume baked into it already.
I’d call this the most assertive style in the bunch. It works when the roots are a little flat but the lengths still have bounce. It also solves the classic problem of curls that are too pretty to hide but too unruly to leave alone.
Keep the side sections smooth with your palms, not a stiff brush. A brush can puff the curl pattern in the wrong places and make the style look uneven. A few bobby pins behind the ears usually do the job.
If you want it softer, pull a few curls out near the temples. If you want more edge, braid the center section a bit tighter and let the sides stay rough.
One style. Two moods.
15. Pull-Through Braid Halo
A pull-through braid is a cheat code for anyone who wants braid volume without having to do tiny, perfect weaving. On curly hair, that’s a relief.
Where This One Helps Most
Use it when the hair is dense, when your fingers are tired, or when you want a braid that looks thick enough to hold its own against big curls. The style is built from small ponytail sections stacked along the crown, then split and flipped through each other to create a faux-braid look.
Because the structure is looser, it stays forgiving on day-three texture. You do not have to fight the curl pattern so much. A few clear elastics placed about 1½ to 2 inches apart are usually enough to build the shape.
What to Watch For
- Keep each section about the same size so the braid doesn’t wobble
- Don’t over-tighten the elastics or the braid will look stiff
- Gently widen each loop after it’s finished for a fuller shape
This is one of the best styles if your curls are thick and you want the braid to show from across the room. It’s also handy when a normal braid keeps slipping apart because the hair is too layered. The pull-through method has a little more structure, which is exactly the point.
16. Fine Cornrow-Style Braids at the Hairline
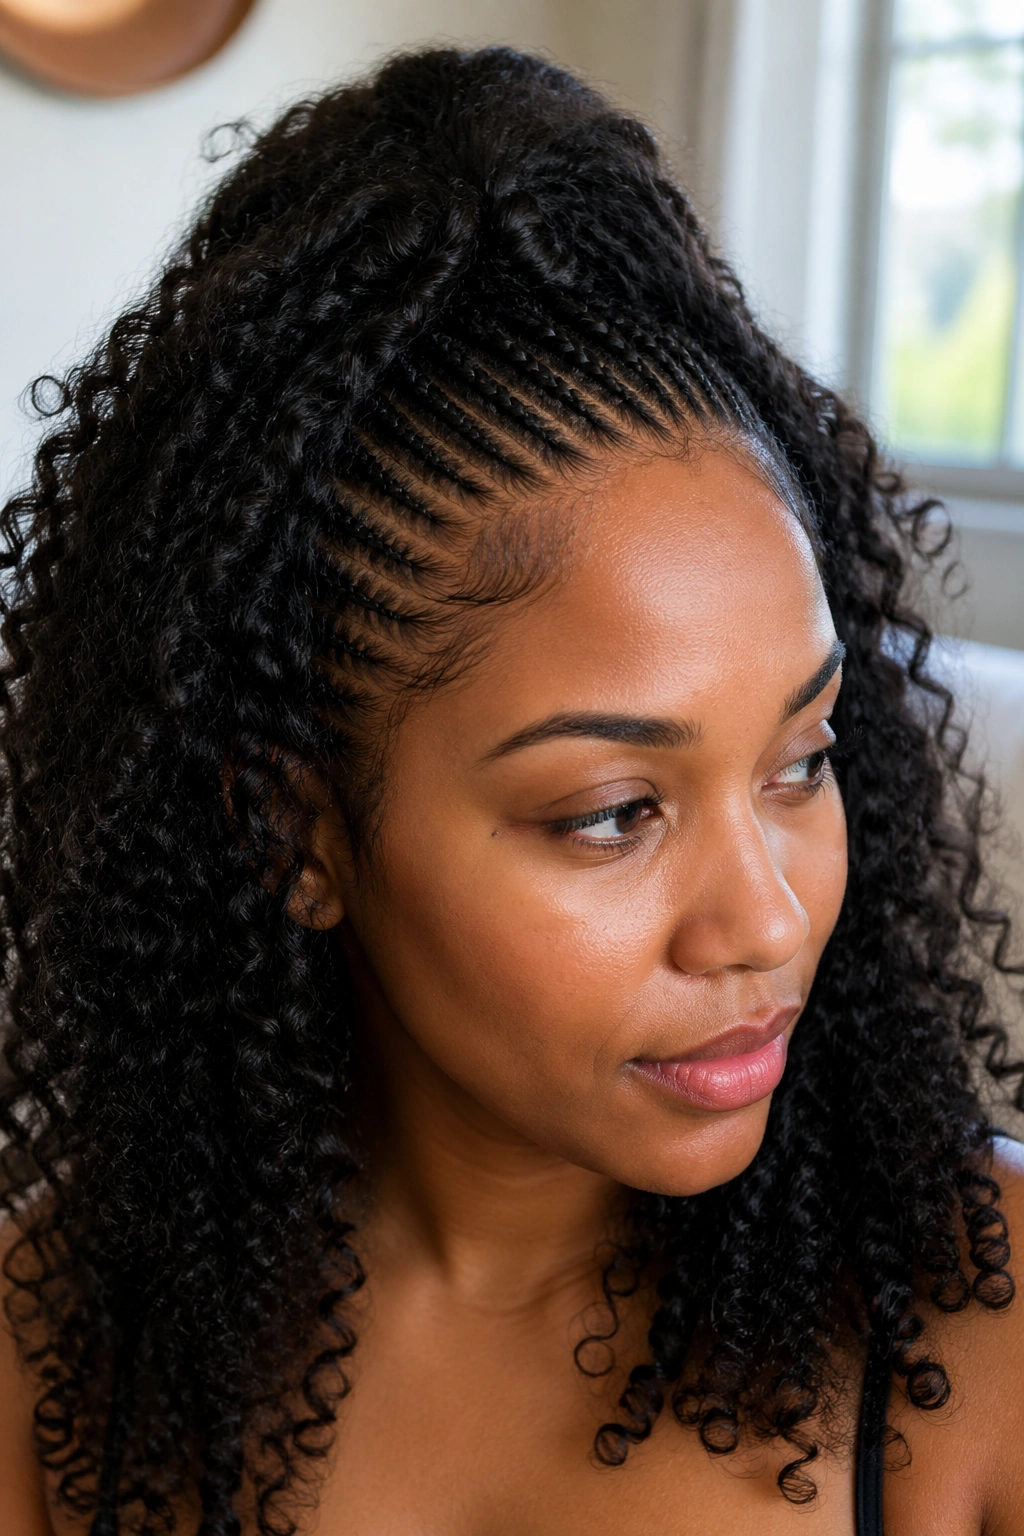
If the front pieces are the problem, deal with the front pieces. Fine cornrow-style braids at the hairline do exactly that, and they look sharp on textured hair.
You’re not braiding the whole head here. Just the edge. Take one or two tiny sections right at the hairline, braid them close to the scalp, and stop once you’ve moved a few inches back. Pin the ends out of sight or tuck them under the next curl. The rest of the hair stays loose, which keeps the style in half-up territory.
This works beautifully when your curls are trying to fall into your eyes or when the front layers have lost their shape by the third day. The braids act like little anchors. They can also help if you’re growing out bangs, which is a whole separate headache and not one I’ll pretend doesn’t exist.
Keep the sections small and even. Big front braids can swallow the face; tiny ones frame it. That detail makes all the difference here.
I’d pair this with defined curls rather than brushed-out waves. The contrast between the neat front braid and the soft lengths gives the style real character.
17. Lace Braid With a Clean Part
A lace braid is the more graceful cousin of a waterfall braid. Instead of dropping strands through, you keep adding hair from just one side as you move back, which makes the braid hug the head a little more closely.
That makes it a smart choice for day-three curls that still have a defined part. A clean middle part or side part gives the lace braid a clear line to follow, and the braid itself helps keep the part from drifting by midday. Nice little bonus.
This style is especially good on long curls because the braid has room to travel before it gets pinned. On shorter hair, it can still work, but you’ll want to stop earlier and tuck the end under the top layers with a pin. The braid should feel like a frame, not a fence.
If your curls are layered, use those shorter pieces to your advantage. Let a few slip out near the front so the braid doesn’t look too hard against the rest of the hair. That tiny bit of softness is what saves it from feeling formal.
I tend to think of this as the braid for people who like their hair to look calm. Not flat. Calm.
18. Braided Knot with Ribbon or Scarf
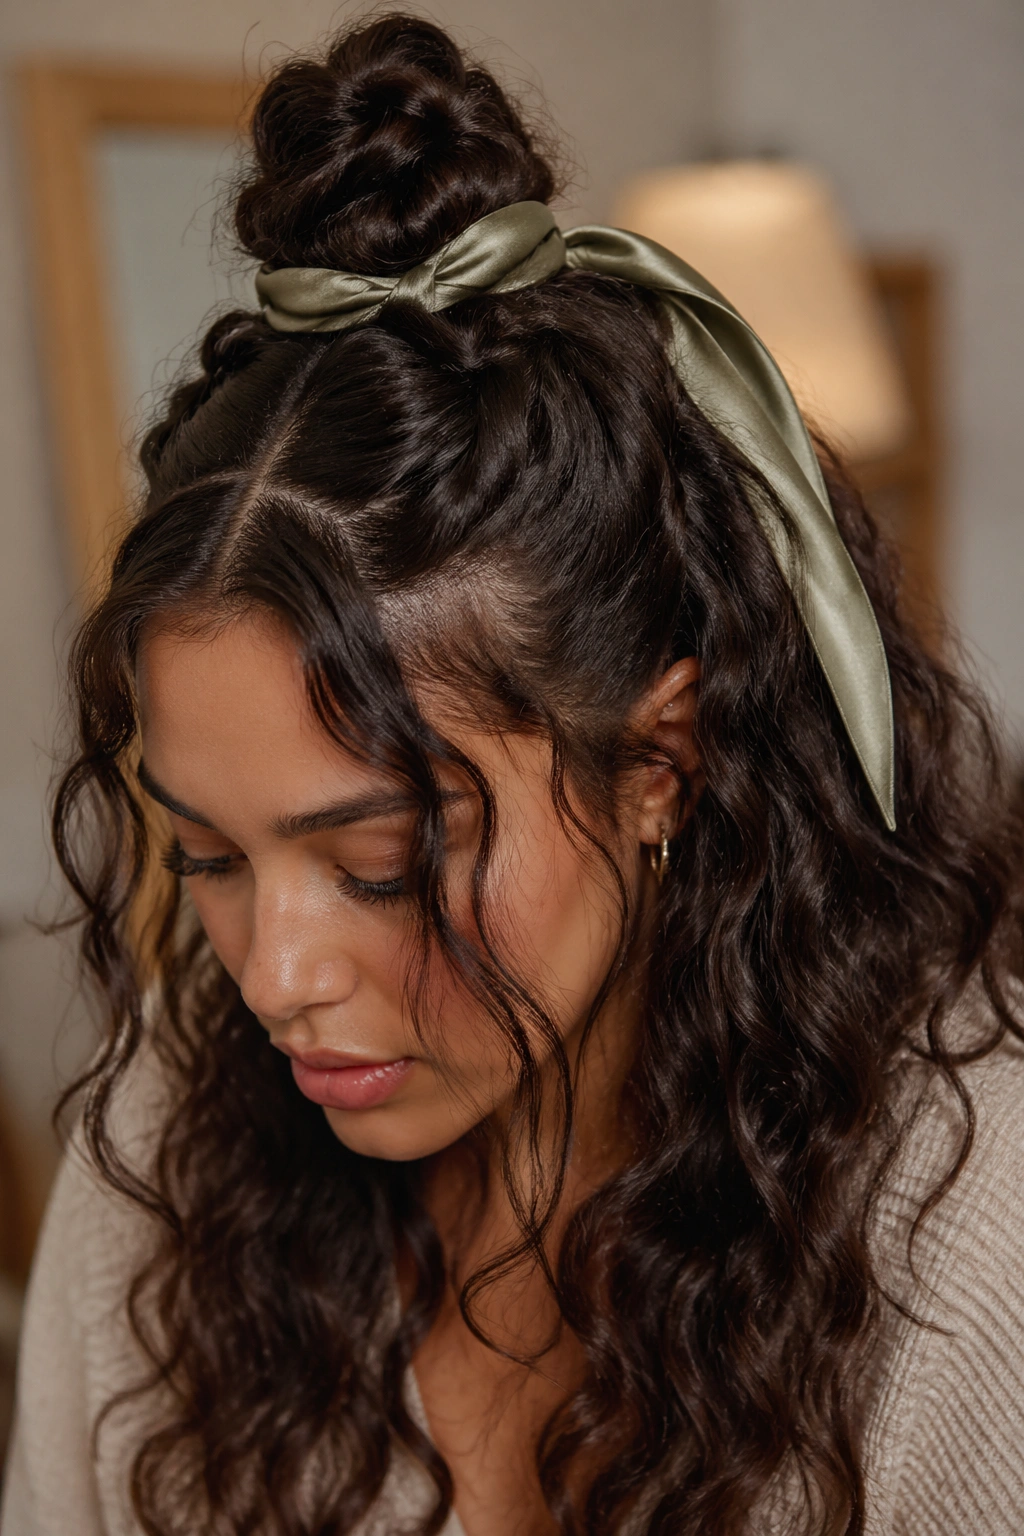
A braided knot with a ribbon or scarf is the one I’d choose when the curls are uneven but still too good to hide. The fabric gives the style a little lift, and the braid makes the whole thing look planned.
Start with a half-up braid at the crown, tie it off, then coil the end into a small knot or twist. Wrap a narrow ribbon, silk scarf, or fabric strip around the base and let the tails fall into the loose curls. If the hair is very textured, the ribbon helps disguise any spots where the braid shifts or loosens during the day.
This is a good style for second- or third-day hair that has gone fluffy around the edges. The ribbon pulls the eye upward, away from any root frizz, while the braid keeps the upper half under control. It also lets you make the look softer or dressier without changing the braid itself. One scarf changes the whole mood.
A plain braid can look a little same-y after a while. A knot and a ribbon break that up fast.
Use a ribbon that isn’t too slick if your hair is very thick; satin can slide. A cotton or matte fabric tends to stay put better. And if the curl pattern at the back is still strong, leave it alone. That contrast between a tidy top and free curls below is the whole point, and it’s usually the part that makes people ask where you got your hair done.