A closure wig only lays as well as the braid pattern underneath it. Get the base wrong, and the lace starts fighting you—lifting near the front, bulking at the nape, or sitting a little too high no matter how carefully you melt it down.
People talk a lot about glue, bands, spray, and baby hairs. Those matter. The braid pattern matters more than most people want to admit, because it decides where the cap sits, how flat the closure lies, and whether the install feels light after six hours or like a helmet by lunchtime.
A 4×4 closure, a 5×5 closure, and a 6×6 closure do not want the same foundation. A middle part needs a different map than a side part. If your hair is thick, the wrong braid size leaves ridges; if it’s fine, oversized braids make the cap shift around. Annoying. Also fixable.
The patterns below are the ones that actually earn their keep under a closure wig install. Some are quick, some take more patience, and a few are the kind of neat, flat foundation that makes the whole install look better before the wig even goes on.
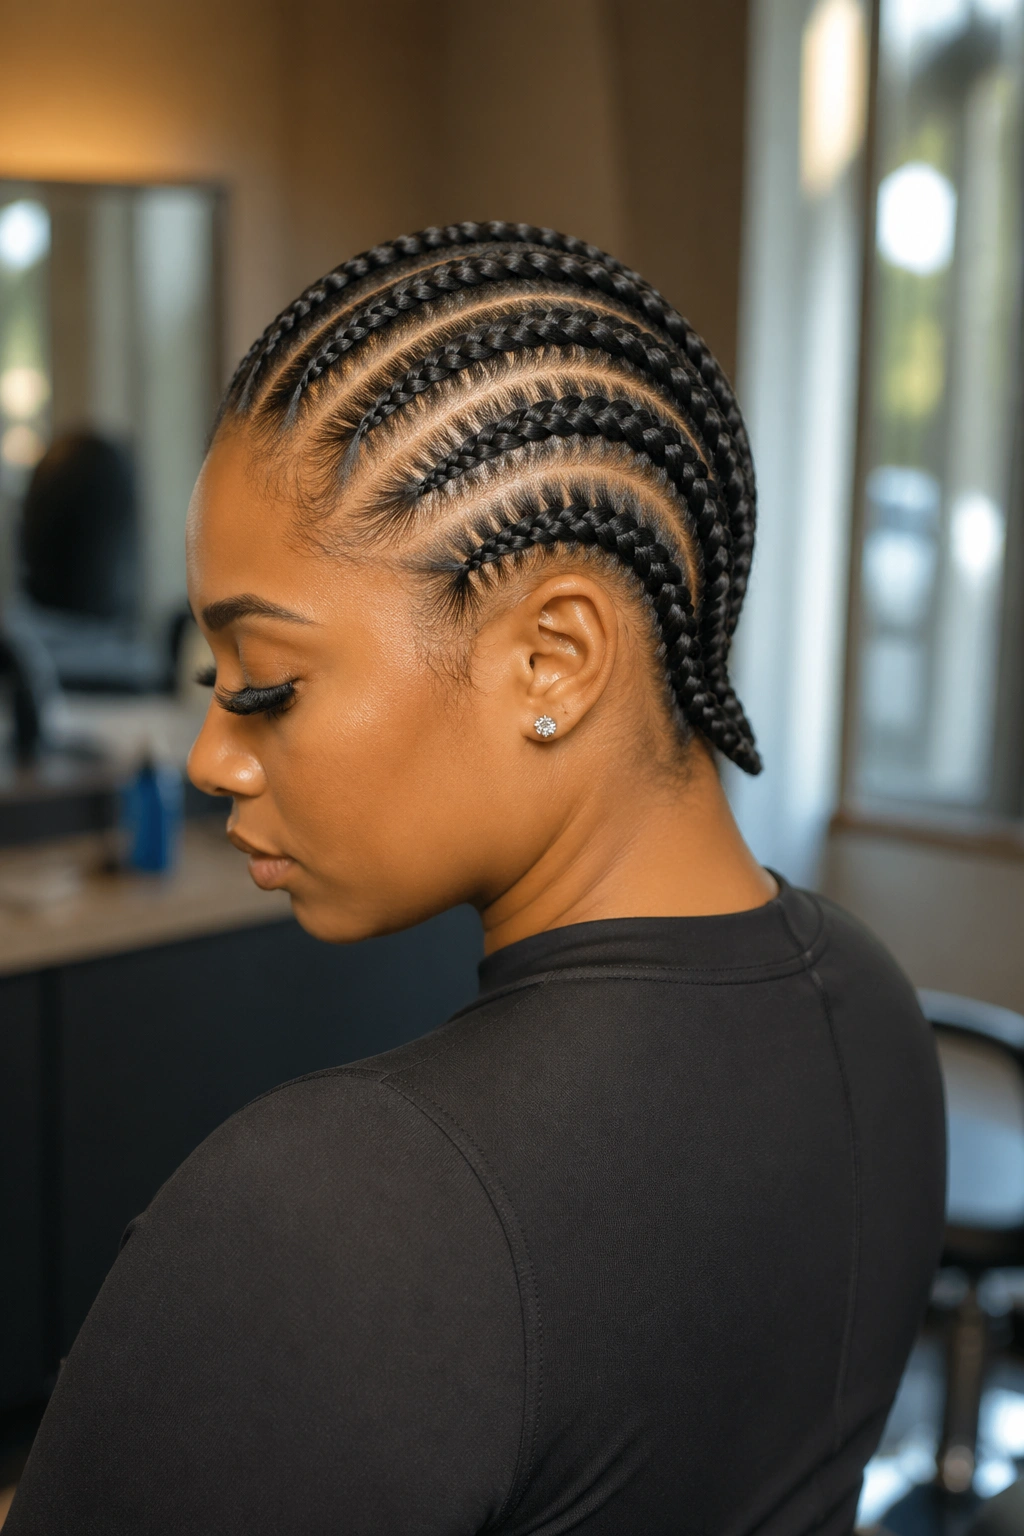
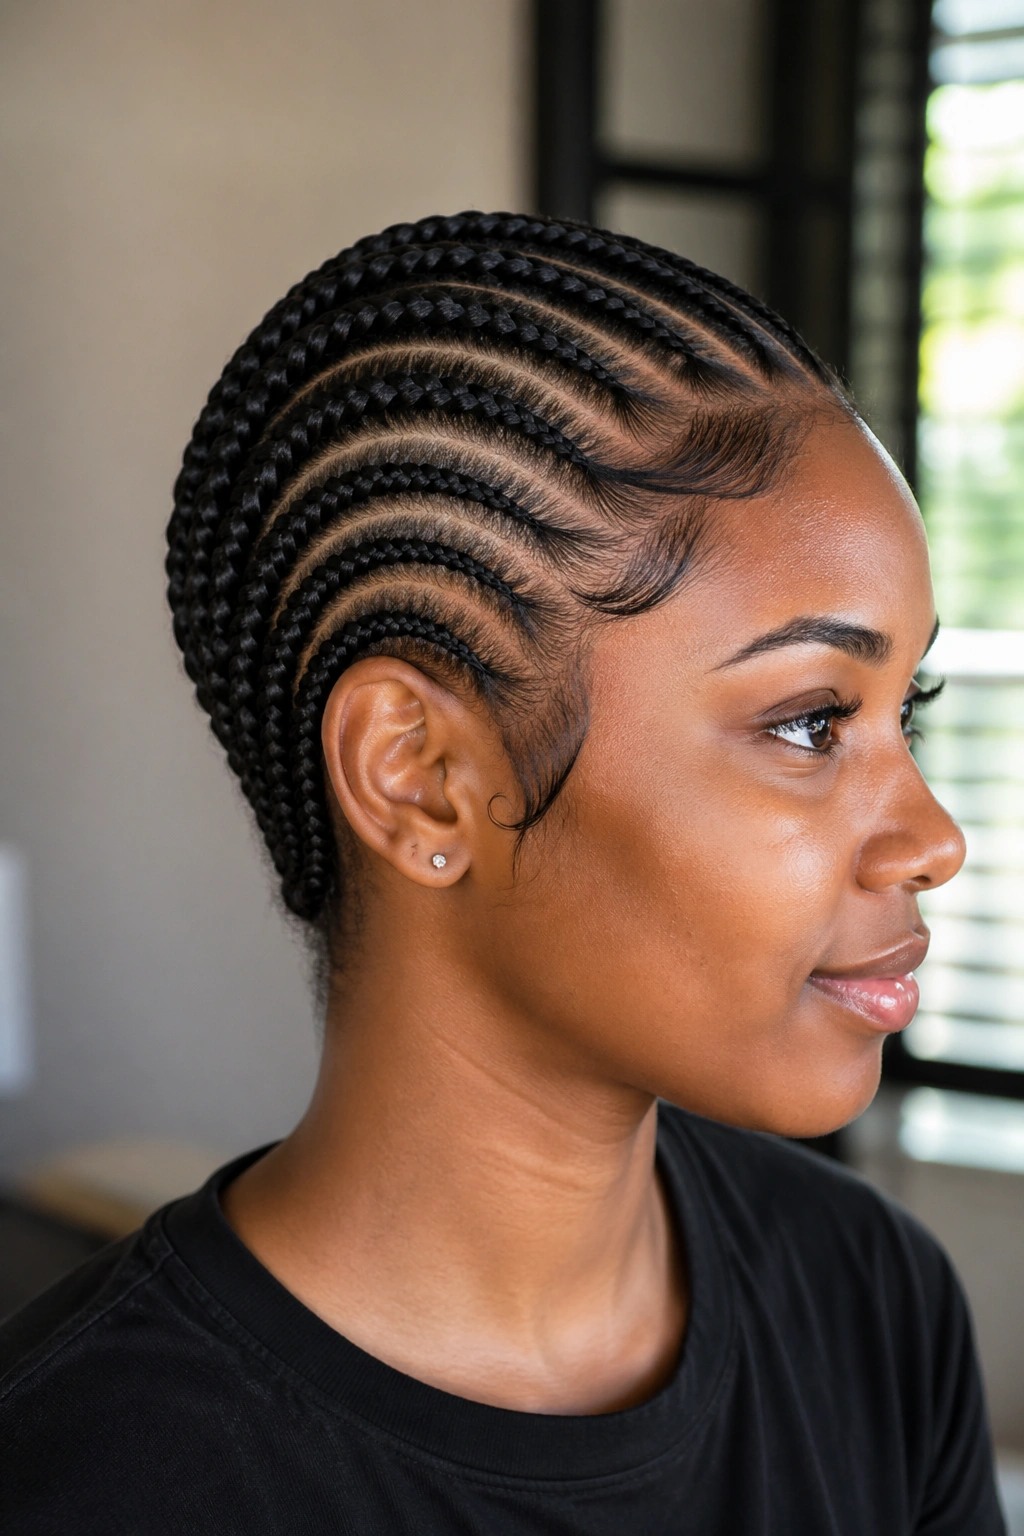
1. Straight-Back Cornrows for a Closure Wig Install
Straight-back cornrows are the plain white T-shirt of a closure wig install. Not flashy. Extremely useful.
Why It Works
I reach for straight backs when the closure is small, the hair density is even, and the goal is a clean install without a long braiding session. The braids travel from the hairline straight toward the nape, which keeps the cap lying in one direction instead of twisting across the head.
That matters more than people think. A closure wig does not need a dramatic braid map; it needs a flat, predictable base that lets the lace sit down without bumps.
- Best with 4×4, 5×5, and many 6×6 closures
- Usually needs 6 to 8 braids on medium-density hair
- Works fast on thick, cooperative hair
- Can feel bulky if the rows are too wide
Keep the front row low and clean. The closure can hide a lot, but it cannot hide a bump sitting right under the part.
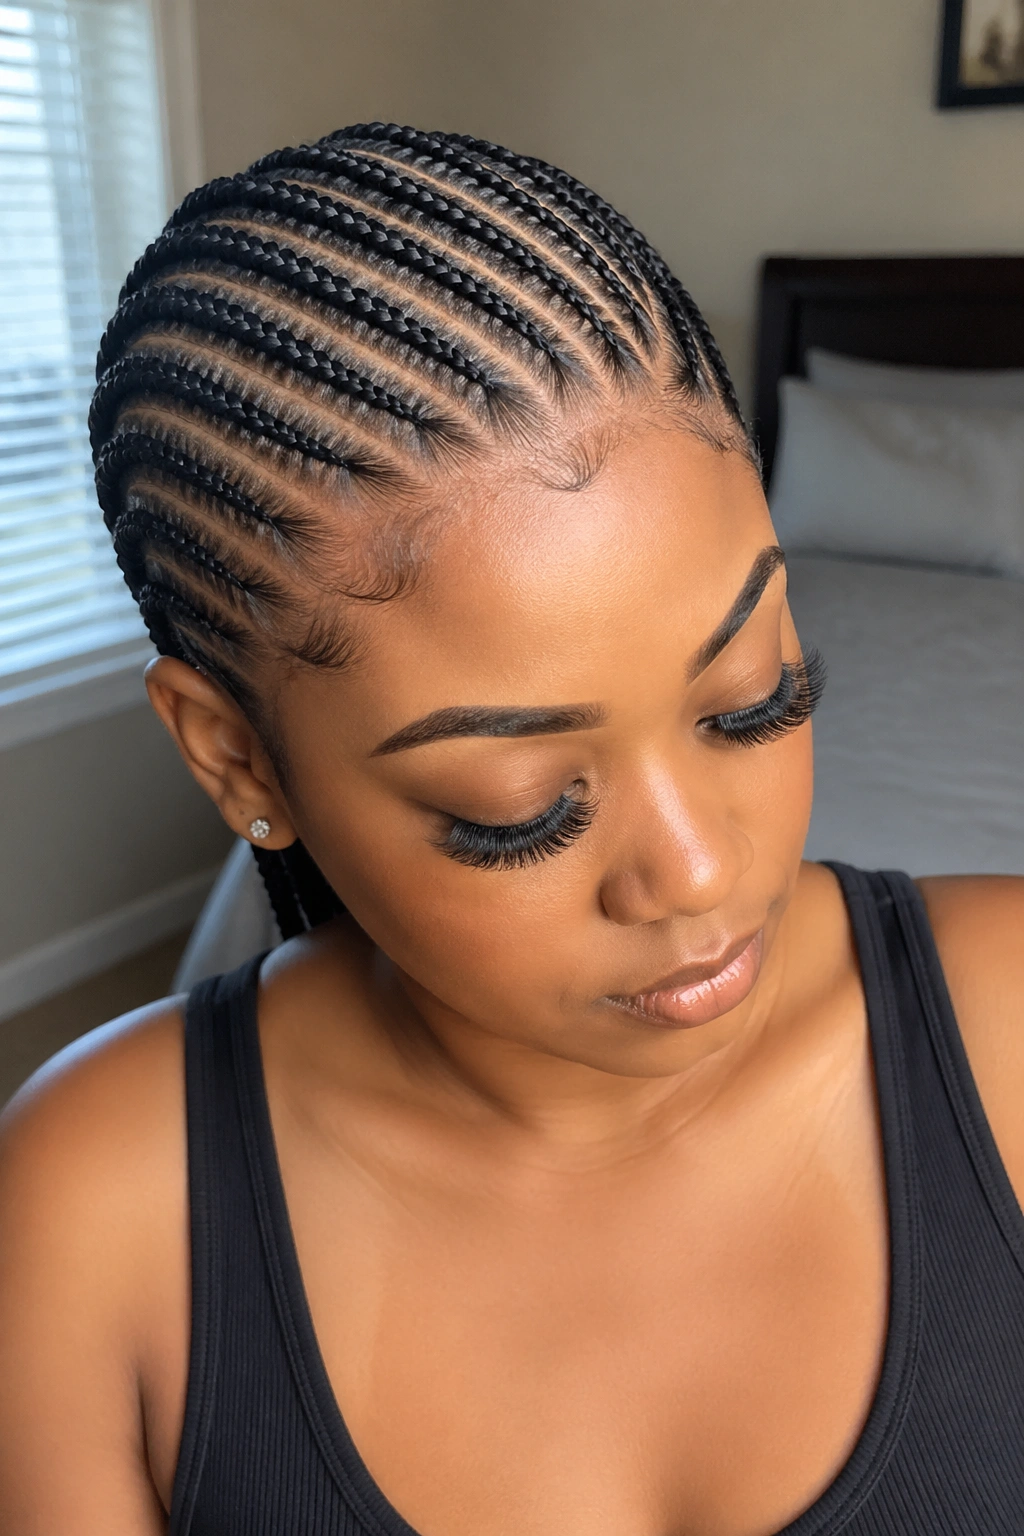
2. Off-Center Straight Backs for a Side-Part Closure
If you wear a side part nine times out of ten, a dead-center braid map is working against you.
Off-center straight backs follow the same basic logic as regular straight backs, but the sectioning leans toward the side where the part will live. That small shift helps the closure sit the way your own hair would sit if it naturally grew that way. The result is less fighting, less lifting, and less awkward space between the lace and the scalp.
This pattern is one of the easiest ways to make a side-part closure look believable without forcing the lace to bend into place. The braid lines are still neat. They just respect the part instead of pretending everyone wants a middle part forever.
A good off-center base also helps the front corners lie flatter. That is the part most people notice first, even when they say they don’t. If the closure is a free-part unit, this pattern gives you room to switch directions later without tearing down the whole install.
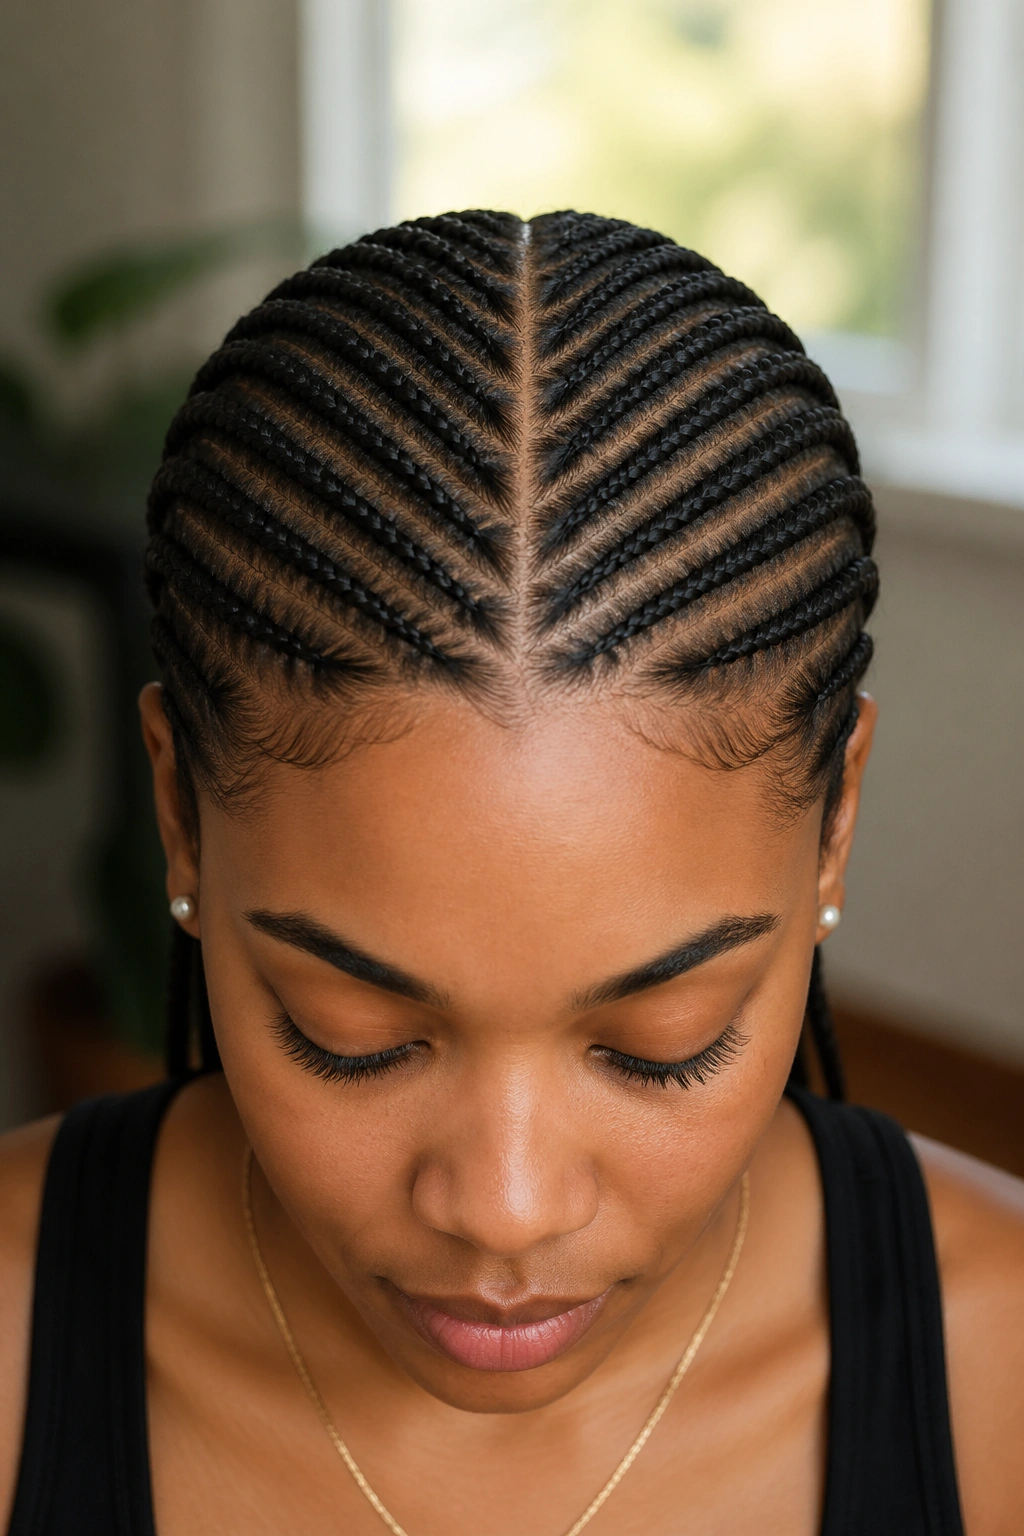
3. Center-Part Braid Map for a Closure Wig Install
Does your closure keep drifting away from the middle part you want?
Then the braid map underneath probably needs to be more deliberate. A center-part foundation splits the head into two mirrored sides, with a clean line running from the front to the crown. That line doesn’t have to be visible after the wig goes on, but it does need to exist clearly enough that the closure can sit right where your part will be.
How to Map the Middle Line
Start by parting the hair in a straight line from the forehead back toward the crown. Then build the braid rows on each side so they angle away from that center strip instead of crowding it. The middle braid should stay narrow and flat. The rows beside it can carry the bulk.
- Works best with middle-part closures and free-part closures
- Keeps the part looking centered once the wig is installed
- Helps the lace lie flat at the top of the head
- Needs careful tension near the front so the part doesn’t look bulky
A center-part braid map is tidy, but it is not the fastest choice if the hair is very thick. Still, when the style calls for a center part, this is the pattern that makes the closure look like it belongs there.
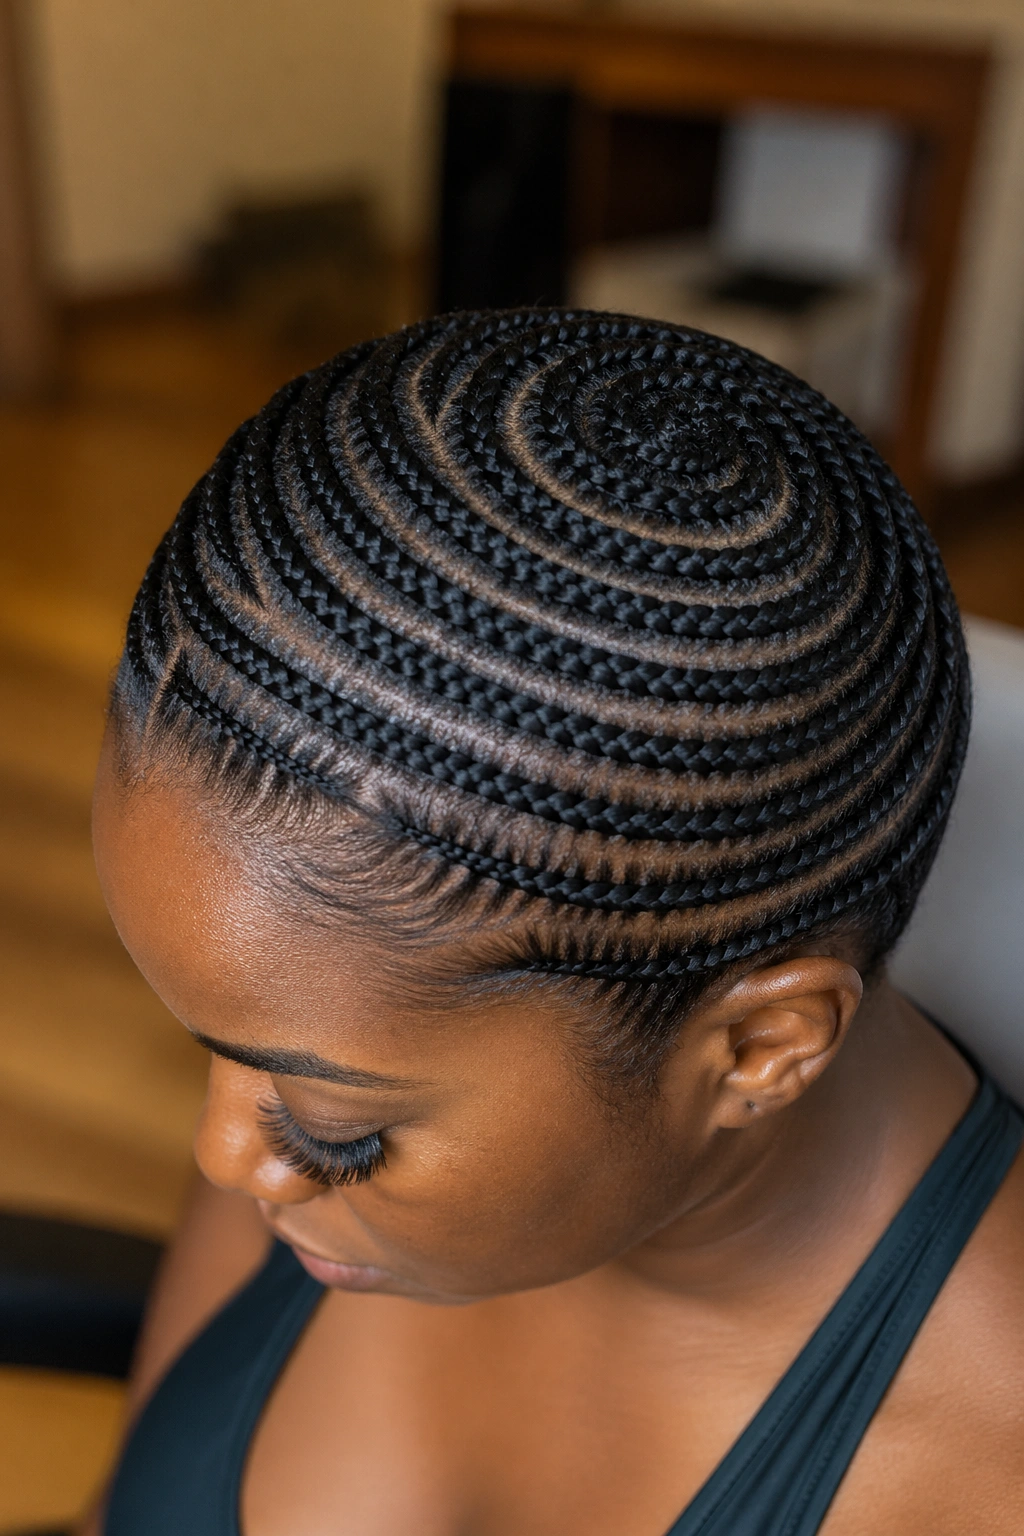
4. Beehive Cornrows Around the Crown
The first time I saw a beehive base under a closure, it looked fussy before the wig went on—and then the whole install sat like it had been pressed into place.
Beehive braids curve around the head in a circular path instead of running straight back. That curved layout keeps the bulk moving in one direction, which is why the crown tends to lay flatter than it does with stacked straight rows. It also keeps the braid ends from bunching in one spot at the back of the head.
This pattern has a polished, rounded shape that works well when the closure is larger or when the wearer wants the wig to sit close to the scalp without a thick ridge under the crown. It takes more patience than straight backs, no question. You have to keep the spacing even as the rows turn.
- Good for long-wear installs
- Helps a larger closure sit flush
- Can feel more comfortable at the nape
- Takes longer than simple straight backs
The beehive is one of those braid patterns that looks like overkill until you see the install in motion. Then it makes sense.
5. Curved C-Shape Braids That Follow the Head
Curved C-shape braids are the quiet workhorse pattern I wish more people used.
Instead of pushing every braid straight back, the rows bend in a soft arc that follows the shape of the head. That sounds small. It isn’t. The curve helps the cap settle more naturally around the temples and behind the ears, which is where a lot of closure installs start to feel tight or lumpy.
The big advantage here is comfort. A braid that turns with the head is less likely to dig into one spot by the end of the day. The install also tends to look smoother along the sides because the pattern does not force a sharp turn right where the head narrows.
This is a nice choice for clients who hate that stretched feeling behind the ear. It also plays well with glueless installs, since the cap and elastic band have a cleaner surface to sit on. The lace still does the visual work. The braid pattern just stops the scalp from complaining.
I like this one when the closure is free-part and the wearer likes a soft side sweep. It has a little more flexibility than a rigid straight-back base, and that matters after the wig has been on for a while.
6. Diagonal Feed-In Braids That Angle Under the Closure
Straight-back is tidy. Diagonal feed-ins are smarter when the closure sits off-center or the head dips at the temples.
The difference is simple enough: instead of running the braids straight toward the nape, each row angles across the scalp. That diagonal movement spreads tension more evenly and helps the wig cap follow the natural slopes of the head. It’s a good move when the crown is round, the forehead is narrow, or the closure looks better slightly off the middle.
Diagonal rows also do a nice job of reducing visible ridges under thin lace. The braid direction avoids stacking the bulk in one lane, which makes the top sit lower. If you’ve ever had a closure that looked flat in the package and puffy on the head, this is one reason why.
Best use? Side parts, free parts, and closures that need a little shape without a lot of extra height. I would choose this over straight backs whenever the style needs a softer fall instead of a strict center line.
7. Zigzag Parting That Softens a Braided Base
Why make the parts zigzag when nobody sees them?
Because the scalp feels the tension even when nobody else sees the map. Zigzag parting breaks up straight lines, so the pull doesn’t ride the same track all the way back. That can help when the hair is dense in one area and finer in another, or when the head has a cowlick that refuses to behave.
What It Solves
A zigzag braid base is handy when a traditional grid feels too stiff. The sectioning can dodge tight spots, and that keeps the install from feeling overly rigid under the closure.
- Helps spread tension across uneven density
- Makes it easier to work around cowlicks
- Softens the look of the base under larger closures
- Can reduce the “same old braid lines” effect on the scalp
Use this one when the install needs some give. It is a little less predictable than straight backs, which is exactly why it works on heads that are not perfectly cooperative. Hair rarely is.
8. Crisscross Braids for a Locked-In Fit
A crisscross base is not the quickest pattern, but it can make a closure wig feel anchored without piling hair in one spot.
The braids cross over each other in a way that distributes bulk across more of the head. That helps when the closure unit is heavier, the client plans to wear it for long stretches, or the hair underneath is too slippery for a simple straight-back layout. The pattern is neat when it’s done well. When it’s sloppy, it looks cluttered fast.
I’m selective with this one. It’s not my first choice for a thin lace unit, because extra intersections can create little pressure points if the braids are too thick. But on dense hair, especially when the install needs extra security, the crisscross can feel stable in a way simpler rows do not.
The best versions stay low at the scalp and keep the crossovers small. Big crossovers are where the trouble starts.
9. Triangle-Part Sections for a Rounder, Flatter Lay
Why triangles?
Because square sections are not the only way to build a base, and sometimes they create more stacking than you want. Triangle parting breaks the scalp into angled sections that let the braids sit in different directions without forming a stiff grid. The result is a base that can move a little with the head instead of acting like it was drawn with a ruler.
How to Use It
Triangle sections are especially useful on fuller hair textures and on heads that have more curve at the crown. They give each braid a little room to settle without crowding the next row.
- Great for free-part closures
- Helps reduce ridge lines under the cap
- Works well on round or oval head shapes
- Takes careful parting, or the rows look uneven fast
A triangle base is one of those patterns that rewards patience. If the sections are clean, the install looks balanced. If they’re rushed, the closure sits on top of a shape that feels lumpy in the wrong places. I’d use it when a client wants a soft, flat lay and doesn’t mind spending a little more time in the chair.
10. Brick-Lay Cornrows for Dense Hair
If you have ever seen a braid base that looked stacked like little roof shingles, that’s the brick-lay pattern.
The rows don’t line up directly on top of one another. They stagger, like bricks in a wall. That stagger keeps the weight from lining up across the scalp, which is a real help when the hair is dense and the closure needs a broad, stable surface. It also makes the install look less rigid once the wig is on, because the braid ends are not all fighting for the same line.
This pattern shines on fuller heads and wider closures. A 6×6 or a deep middle-part closure can sit nicely over brick-lay rows because the base spreads the load instead of concentrating it in the center.
- Good for thick, dense hair
- Useful with larger closures
- Helps stagger pressure points
- Takes longer than straight-back rows
The downside is time. This pattern asks for precision, and precision takes minutes. Rush it, and the whole thing looks busy instead of clean.
11. Mohawk Center Ridge Braids for Fast Installs
Some installs need speed more than drama.
A mohawk center-ridge pattern keeps the braid work concentrated down the middle of the head, with the sides laid low and clean toward that central strip. It is a smart option when the closure is going to sit near the center and the wearer wants a base that feels light at the temples. There’s less hair packed into the sides, which can make the cap feel less tight around the perimeter.
This pattern is useful on shorter hair too. When the nape and sides don’t have a lot of length, a center ridge can be easier to manage than a full beehive or a heavy brick layout. The middle carries the structure. The sides stay flat and out of the way.
It is not the fanciest pattern in the bunch. That’s fine. Fancy isn’t the point here. The point is a clean install that does its job without asking for a half-hour of extra sculpting once the closure is in place.
If I’m trying to move quickly and the closure will cover most of the top anyway, this is one of the first patterns I think about.
12. Horseshoe Braids for a Deep Closure
Unlike a center-ridge pattern, a horseshoe base wraps around the head in a soft arc and leaves a broad open area where the closure can settle.
That shape matters when the closure is deeper or when the wearer wants more room to shift the part without exposing too much of the base. The braid path follows the curve of the skull, then bends around the crown like a horseshoe. It’s a little more sculpted than a straight-back pattern, and it gives the wig a more natural landing zone.
I like horseshoe patterns for 5×5 and 6×6 closures, especially when the front needs to look very flat. The curve keeps the front from sitting too high, and the sides have a way of disappearing under the cap instead of poking up at the temple.
This is one of those patterns that feels more expensive in the chair, even though the final look is subtle. The extra shaping shows up in how the wig moves, not in some dramatic braid display nobody sees.
13. Perimeter Anchor Braids for a Glueless Closure Wig

A glueless closure wig has one job: stay put without chewing up the hairline. Perimeter anchor braids help more than people think.
These are slim braids placed just inside the hairline and around the temples, acting like rails for the wig cap, band, or elastic. They are not meant to be bulky. They’re there to give the install a clean edge to grip against so the unit doesn’t creep back during the day.
Why It Helps the Install Stay Put
A perimeter anchor pattern is useful when the wig will be removed often or when the wearer prefers a banded glueless install. The braids create a steadier frame, which keeps the cap from sliding around on smooth hair.
- Good for daily wear glueless installs
- Helps with wig grip bands and elastic bands
- Keeps the cap from shifting at the temples
- Must stay just inside the hairline, not on top of it
The one mistake people make here is braiding too close to the edge. That defeats the whole point. Leave the hairline soft, keep the tension moderate, and let the closure do the visible work.
14. Small-Section Cornrows for Fine or Short Hair
Small sections are not about being fancy; they’re about spreading tension across more points.
On fine or short hair, a few big braids can feel loose and lumpy under a closure wig. Smaller cornrows sit closer to the scalp and make the cap less likely to drift. They also help short nape hair stay tucked down instead of kicking out from under the wig line.
This pattern takes patience, and I would never pretend otherwise. More sections mean more parting, more braiding, and more time. Still, the payoff is a base that feels controlled and balanced, especially when the hair underneath is too short to support wide rows.
Do not make the mistake of thinking small equals tight. It doesn’t. Tight just means sore. The goal is more points of support, not more force at the scalp. If the roots are pulling, the braid pattern has already gone too far.
15. Crown Braids That Circle Ear to Ear
What if the closure needs a soft arch instead of straight lines?
That’s where crown braids come in. The sections move from one ear toward the other in a gentle sweep over the top of the head, which leaves the center of the scalp with a rounded, low base. It can look almost halo-like when the hair is sectioned, though the closure hides most of that shape once it’s installed.
I like this one when the wig will be worn with a center or free part and the wearer wants the sides to stay calm and low. The crown shape keeps weight from settling at the temples, and it can feel nicer under hats or scarves because the sides aren’t stacked up with heavy rows.
There’s a real comfort benefit here. The head has curves, and a braid pattern that respects those curves usually wears better over a long day. Not glamorous. Just practical. And practicality is often the difference between an install you like and an install you keep fiddling with in the mirror.
16. Minimal Tension Braids for Fragile Edges
If the temples are a little thin or the hair has been through too much slick styling, the braid pattern has to get gentler.
Minimal tension braids use fewer, wider rows and keep the front and sides from carrying unnecessary pressure. The idea is not to load the scalp with tiny, tight sections just because the wig will hide them later. The wig may hide the base, but the scalp still knows what happened.
What to Watch For
This pattern works best when comfort matters more than dramatic parting flexibility.
- Use wider, softer rows
- Keep the first braid slightly back from the hairline
- Avoid tiny sections at the edges
- Choose a light cap and a lighter closure unit if possible
The trick is restraint. A lot of braid patterns fail because somebody tries to make the base look too neat and ends up making it too tight. That’s a bad trade. A closure wig should sit on the hair, not fight it.
17. Hybrid Braids for a Switchable Part
This is the pattern I reach for when a client wants the option to wear the closure two ways without tearing everything apart.
A hybrid base usually mixes straight-back rows in the center with diagonal or curved rows at the sides. That gives the part area a clean path while still letting the perimeter follow the shape of the head. It’s a practical middle ground, and I mean that in the best way. Some installs need a signature look. Others need room to change their mind on Thursday.
The hybrid pattern works especially well with free-part closures, because the base underneath can support a middle part one day and a slight side flip the next. You still need to respect the closure size and the head shape, but you are not locking yourself into one rigid lane.
If I had to leave you with one plain piece of advice, it would be this: build the braid pattern for the part you wear most, then soften the edges of the base so the closure can move a little. That keeps the install natural, comfortable, and easier to live with. Which is the whole point, really.