Two-day-old hair is your friend.
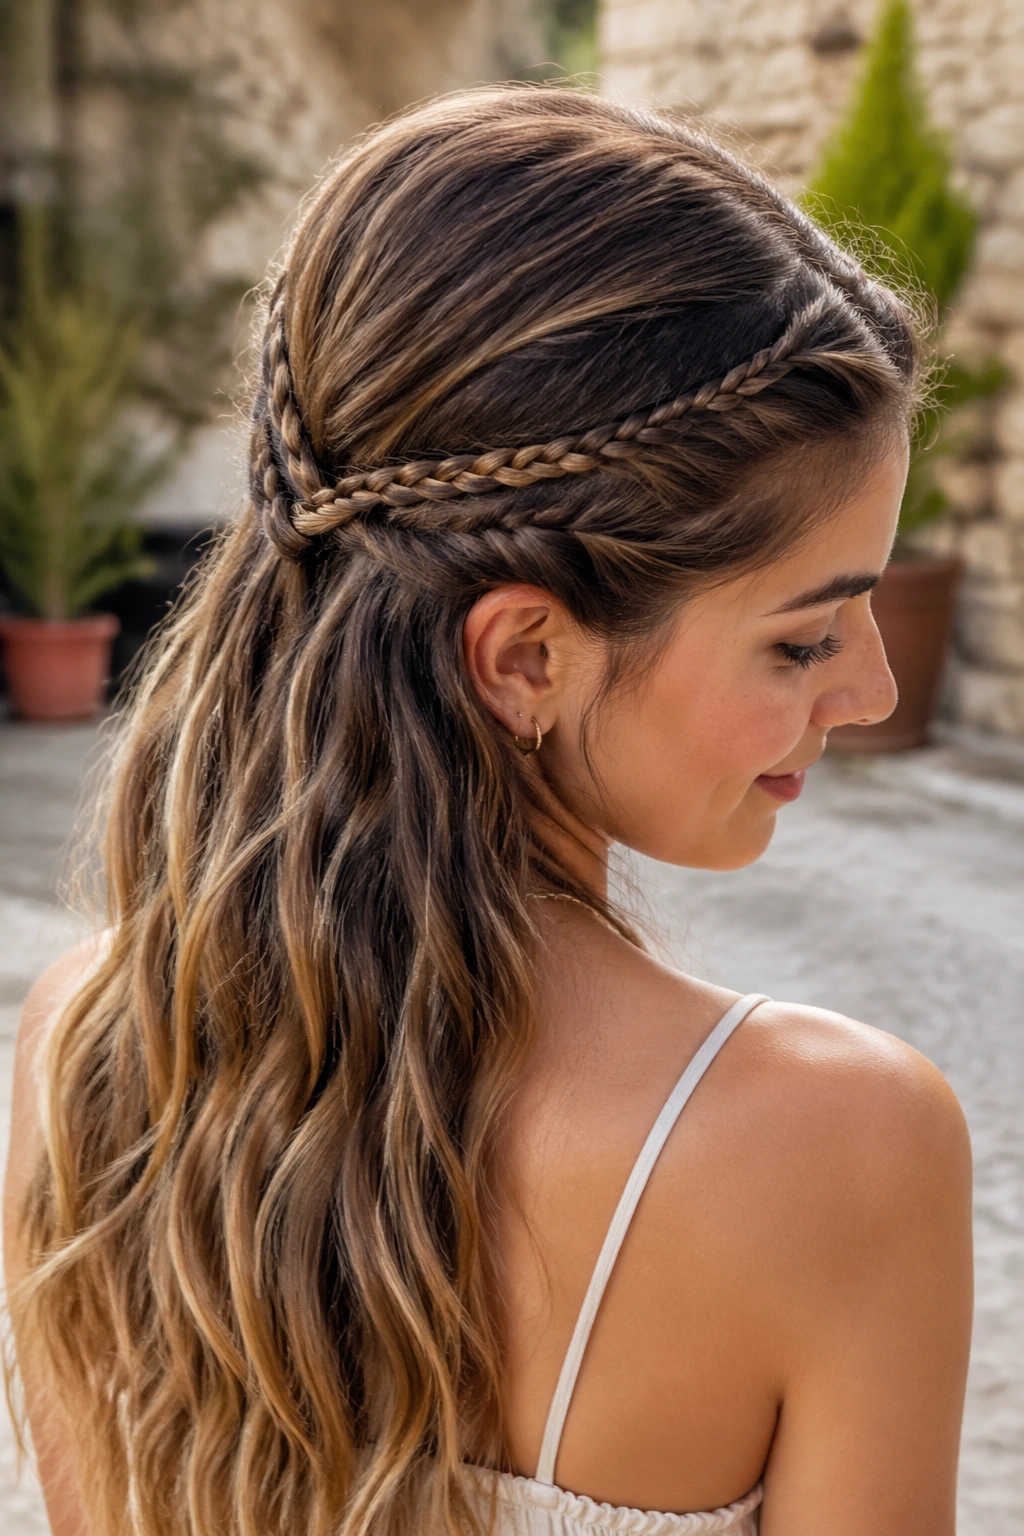
Half-up braids are the fastest way to make hair look done when your mirror time is measured in minutes, not patience. They tame the front, keep length down, and still leave the style soft enough to wear to work, school, dinner, or a weekend errand run.
The trick is not braided perfection. It’s small sections, clean part lines, and knowing which braid pattern gives the most payoff for the least finger work. A 1-inch braid at the crown can look more finished than a full head of elaborate plaits if the shape is right.
A tail comb, 4 mini elastics, and 6 bobby pins are usually enough. Add dry shampoo if your roots are silky, and keep a little texture spray nearby if your hair tends to slip. After that, it’s mostly about choosing the style that fits your hair length and your mood.
1. The Twist-Back Crown Braid
This is the one I reach for when I want the illusion of a braid without the hand gymnastics. It starts like a simple twist, moves across the crown, and gets pinned where the two sides meet. From the front, it reads polished. From the back, it took about as long as tying a shoelace.
Why It Works
The braid sits high enough to frame the face, which means you get shape right away. You also avoid the fussy part of braiding all the way through long lengths, which is where time disappears.
Use two front sections, each about 1 to 1.5 inches wide, starting at the temples. Twist each section away from the face, bring them toward the back of the head, and secure with one clear elastic or two crossed bobby pins.
- Best on medium to long hair
- Takes about 3 minutes once the sections are even
- Works well with side parts or center parts
- Hides grown-out bangs nicely
If the twists keep splitting, mist your fingertips with water before you start. That tiny bit of control matters more than people think.
2. Tiny Accent Braids Pulled Back
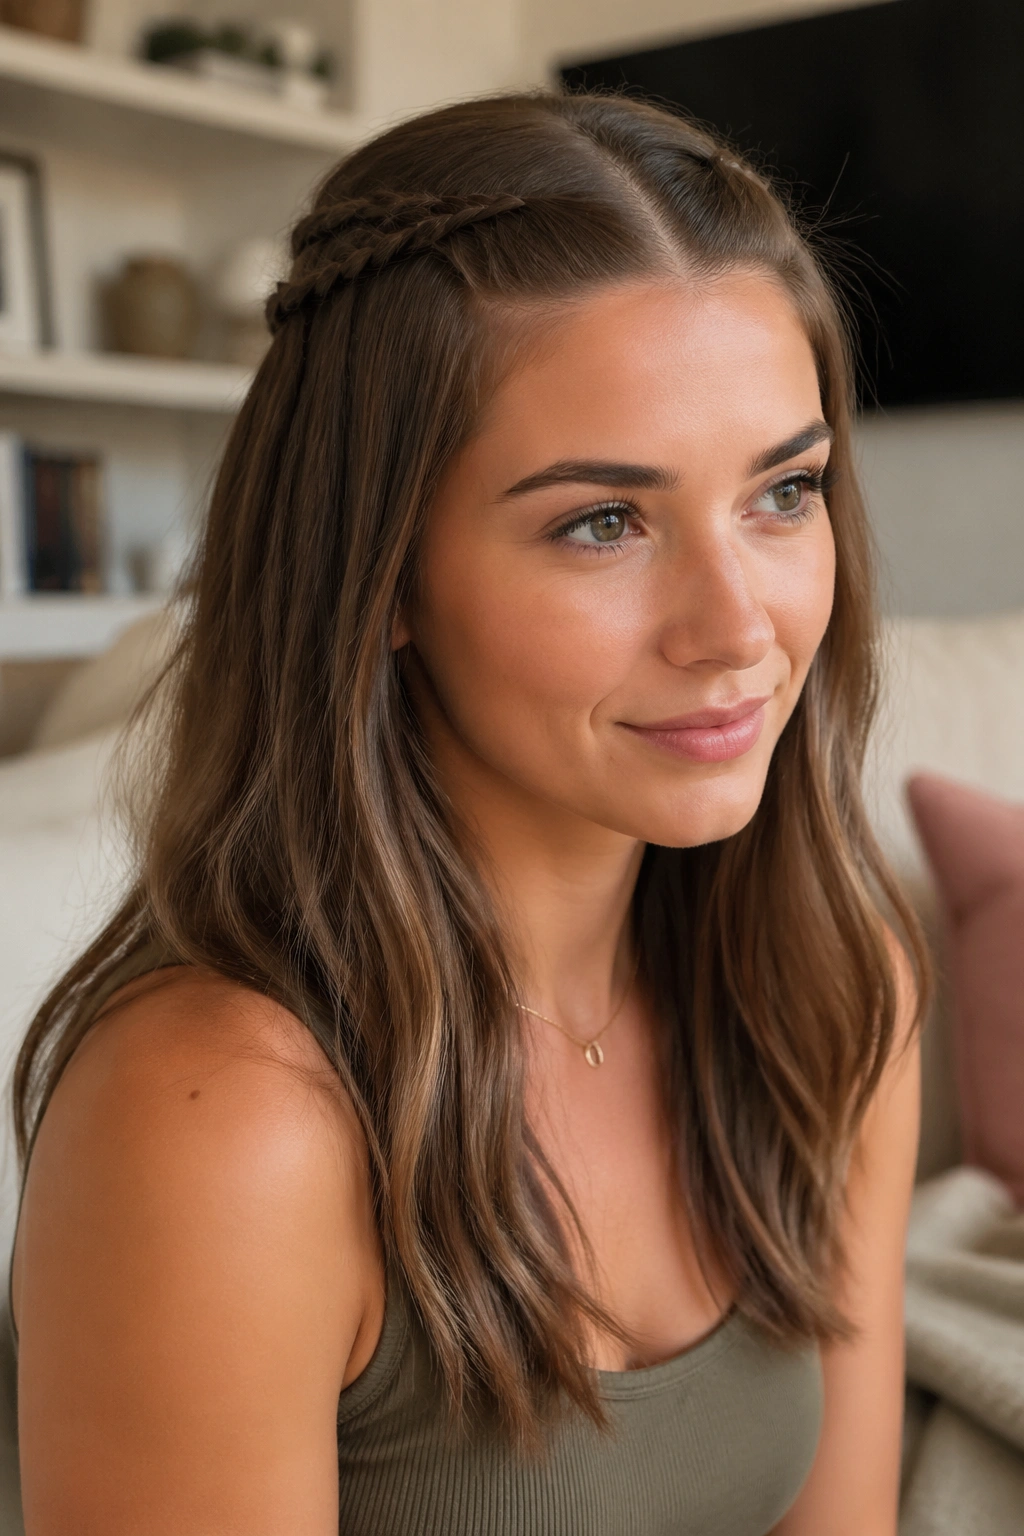
This is the fastest style in the group, and it still looks intentional. Two skinny braids at the front, pulled together at the back, can make hair feel styled even when the rest is doing its own thing.
I like this on hair that needs a little order but not a full-updo attitude. Think of it as the braid version of a white T-shirt and good earrings. Not fussy. Still finished.
Start with one thin section from each side of the part, about 1/4 to 1/2 inch wide. Braid each one with a tight three-strand weave, then tie them together behind the crown and let the rest hang loose. The clean part is doing a lot of the work here, so take 20 extra seconds to make it straight.
Use this on short layers, lob-length hair, or second-day curls. The ends can stay messy. That’s part of the charm.
3. The Skinny Fishtail Half-Up
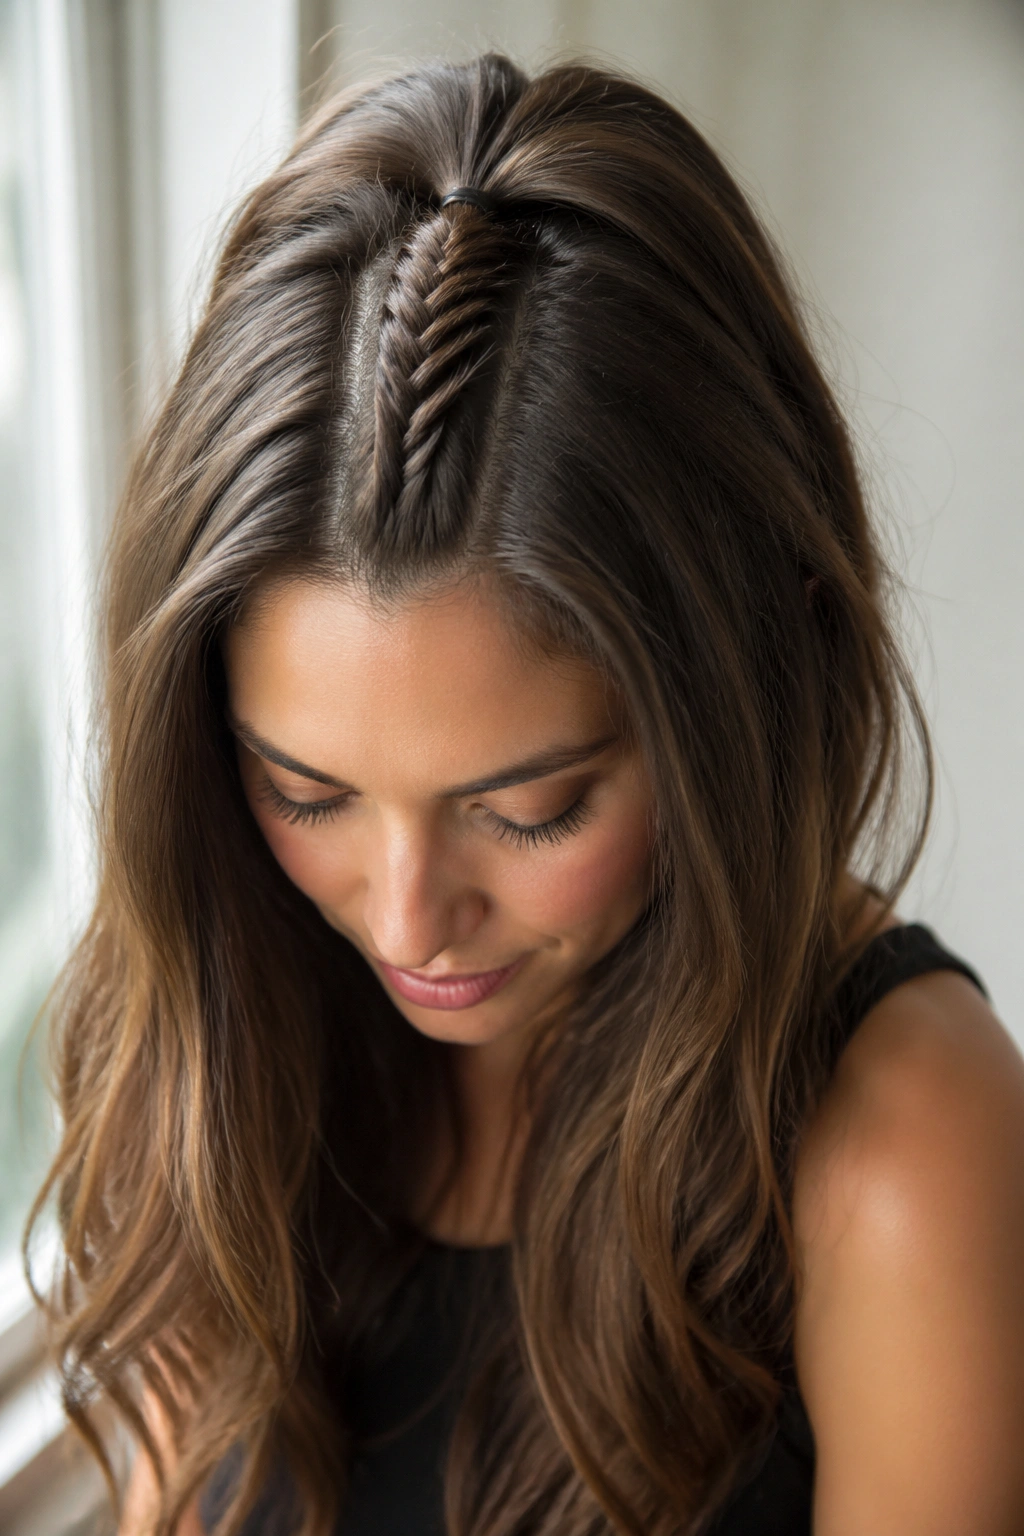
Can a fishtail really be fast? Yes, if you keep it tiny.
A full fishtail looks like it belongs in a tutorial video with dramatic music. A half-up fishtail, on the other hand, can be made from a 2-inch section at the top of the head and finished in a few quick passes. You only need enough length to show the pattern, not enough to braid the whole back of your hair.
How to Wear It
Take a small section from the center top, split it into two, then alternate tiny outer pieces from one side to the other. Stop after 6 to 8 passes and secure with a small elastic. You want a compact braid, not a rope that hangs halfway down your back.
This one looks especially good on straight or softly waved hair because the edge of the fishtail stays visible. If your hair is thick, keep the section narrow or the braid will swell and slow you down. If it’s fine, tug the edges lightly once you secure it. That little bit of width makes a big difference.
A clean fishtail near the crown can also hide a rough blow-dry. Handy. Very handy.
4. The Rope-Braid Half-Up Pony
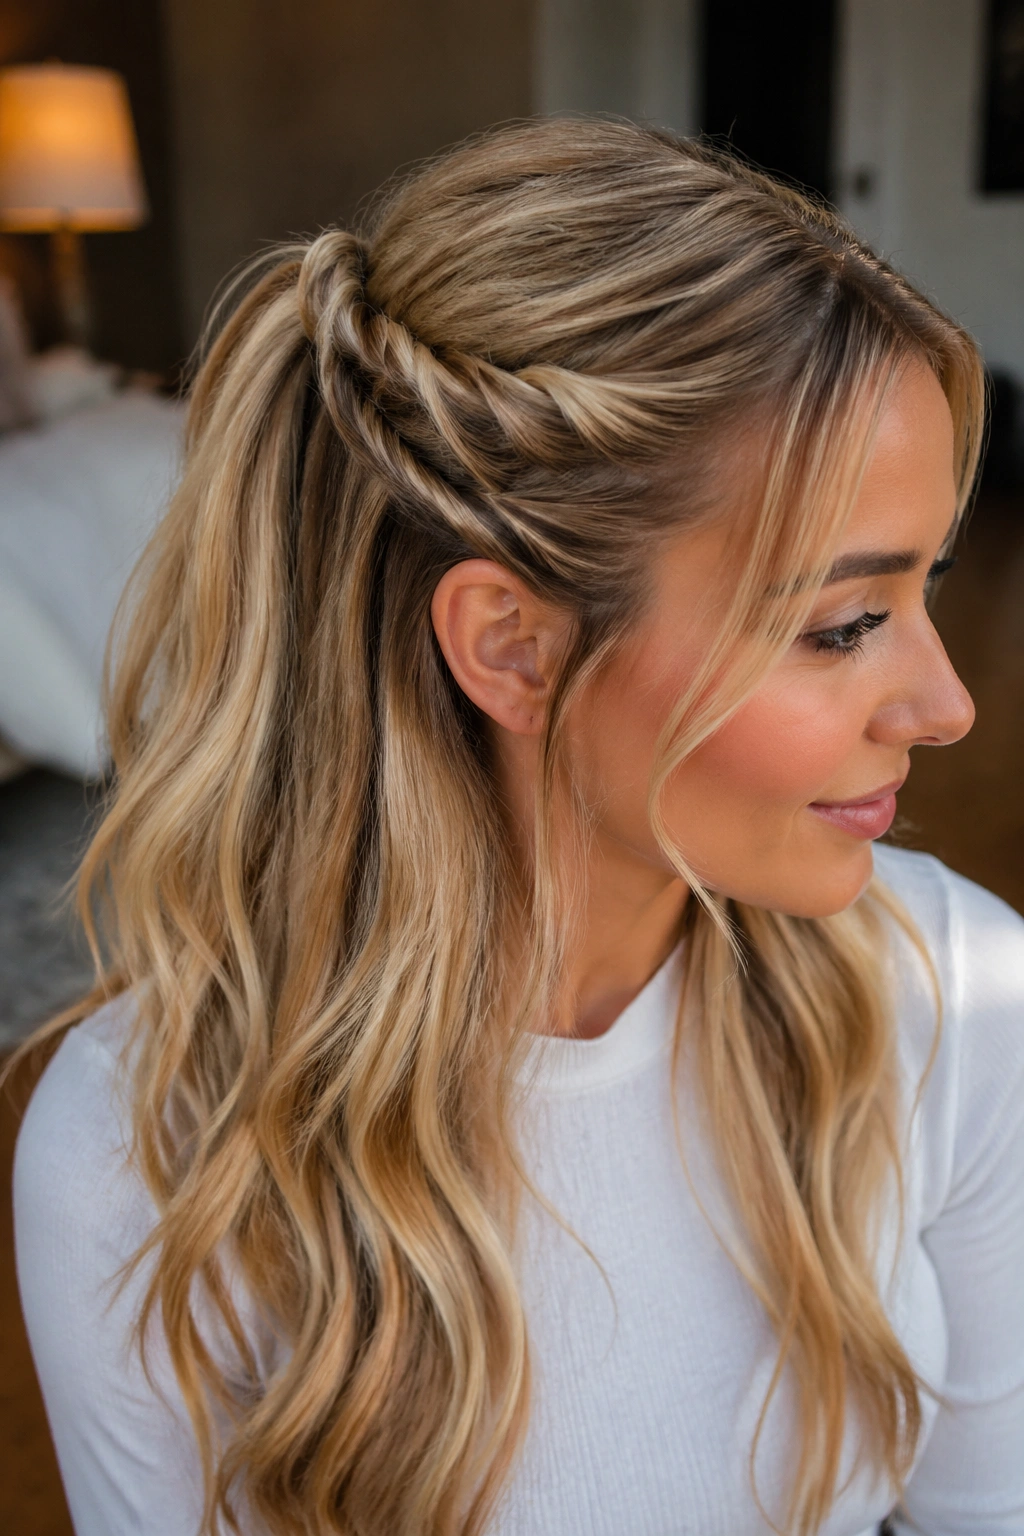
If your hair slips out of clips by lunchtime, this is the style I’d send you to first.
A rope braid is made with two sections instead of three, so the hand movement is simpler. The twist gives the hair grip, and the finished shape looks crisp even when the rest of the style stays loose. It’s a good choice when you want the half-up section to feel tighter and more controlled.
- Use two 1-inch sections from just above each ear
- Twist each section in the same direction
- Wrap them around each other in the opposite direction
- Secure the ends with a small elastic
- Pin the finished braid flat if you want a sleeker look
The best part is the speed. Once your hands know the motion, this takes about 2 minutes. It also works well on hair that’s a little oily at the roots, because the twist clings better than a loose braid.
A rope braid can feel sharper than a classic braid, almost cleaner around the face. I like that. It doesn’t try to be soft and romantic. It just works.
5. The Half-Up Waterfall Braid
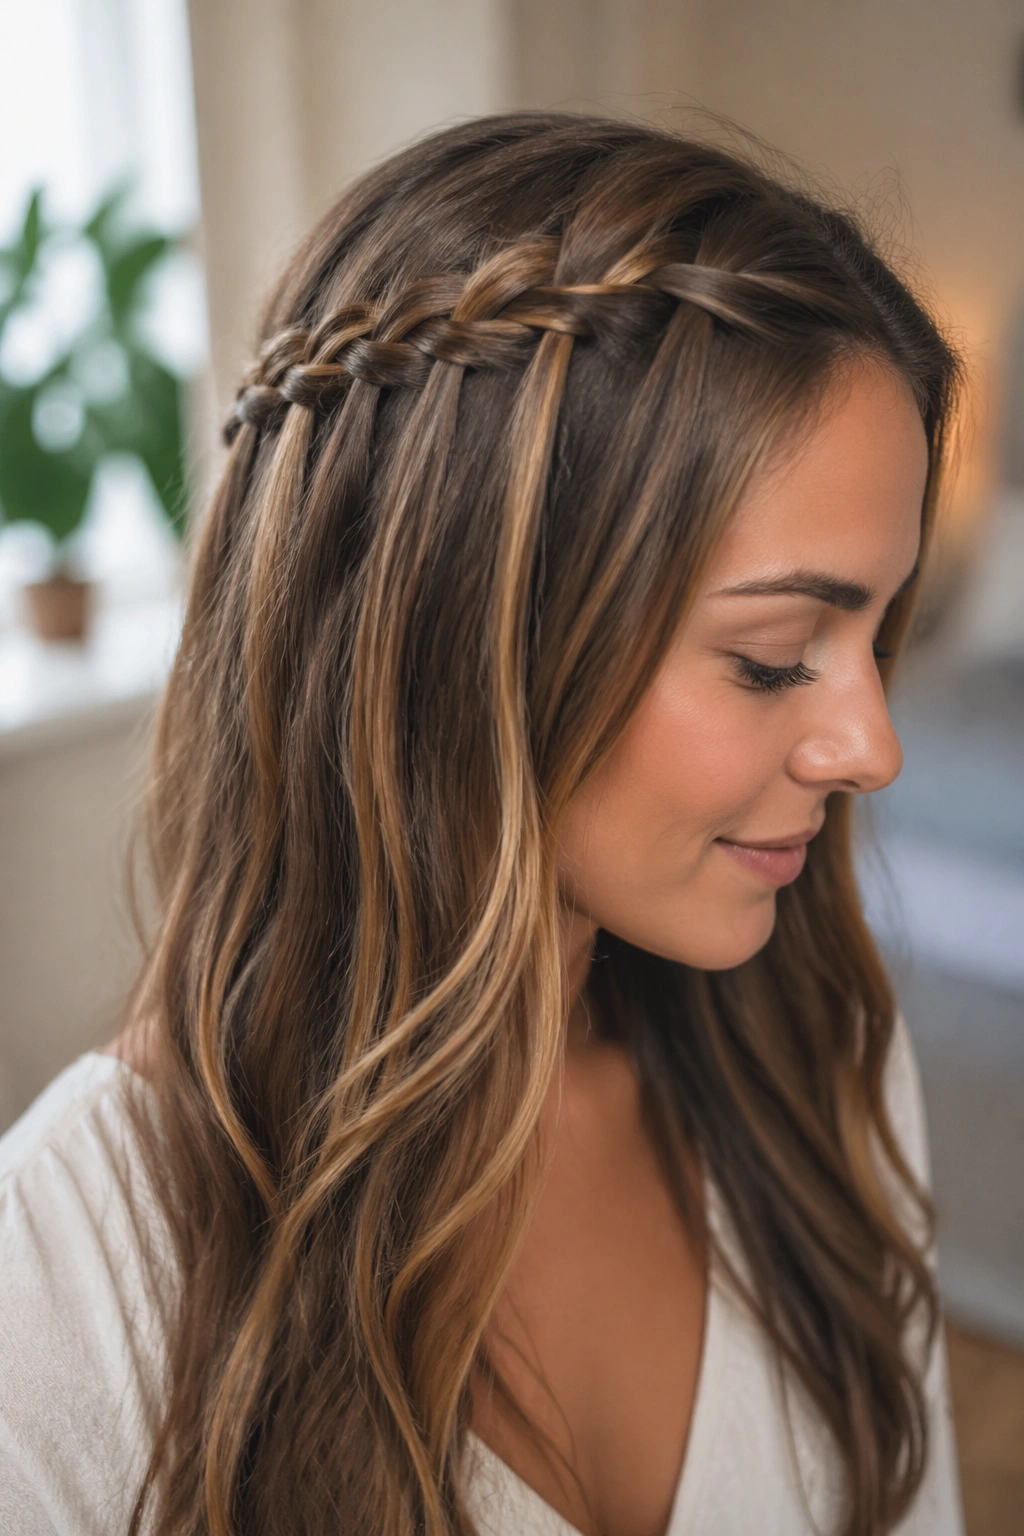
A waterfall braid sounds like a style that belongs in a salon chair with someone else doing the work. It isn’t. If you keep it small, it’s one of the prettiest half-up braids you can do in under 5 minutes.
The trick is to braid only along the crown, usually from one side toward the other, and drop one strand as you go. That dropped strand is what creates the little cascading effect. You do not need to braid the whole head. Please do not. That is how a quick style becomes a long one.
The easiest version starts with a 1/2-inch section near one temple. Make three braid passes, then let the bottom piece fall before replacing it with a new strand from above. Keep the braid close to the hairline and stop once you reach the back of the head. Pin it there and leave the rest loose.
It looks best on straight or softly wavy hair, where the drop pieces show clearly. Thick hair can work too, but narrow sections matter. Wide sections make the braid bulky and slow. Small sections keep it neat and fast.
6. The Dutch Half-Up Braid
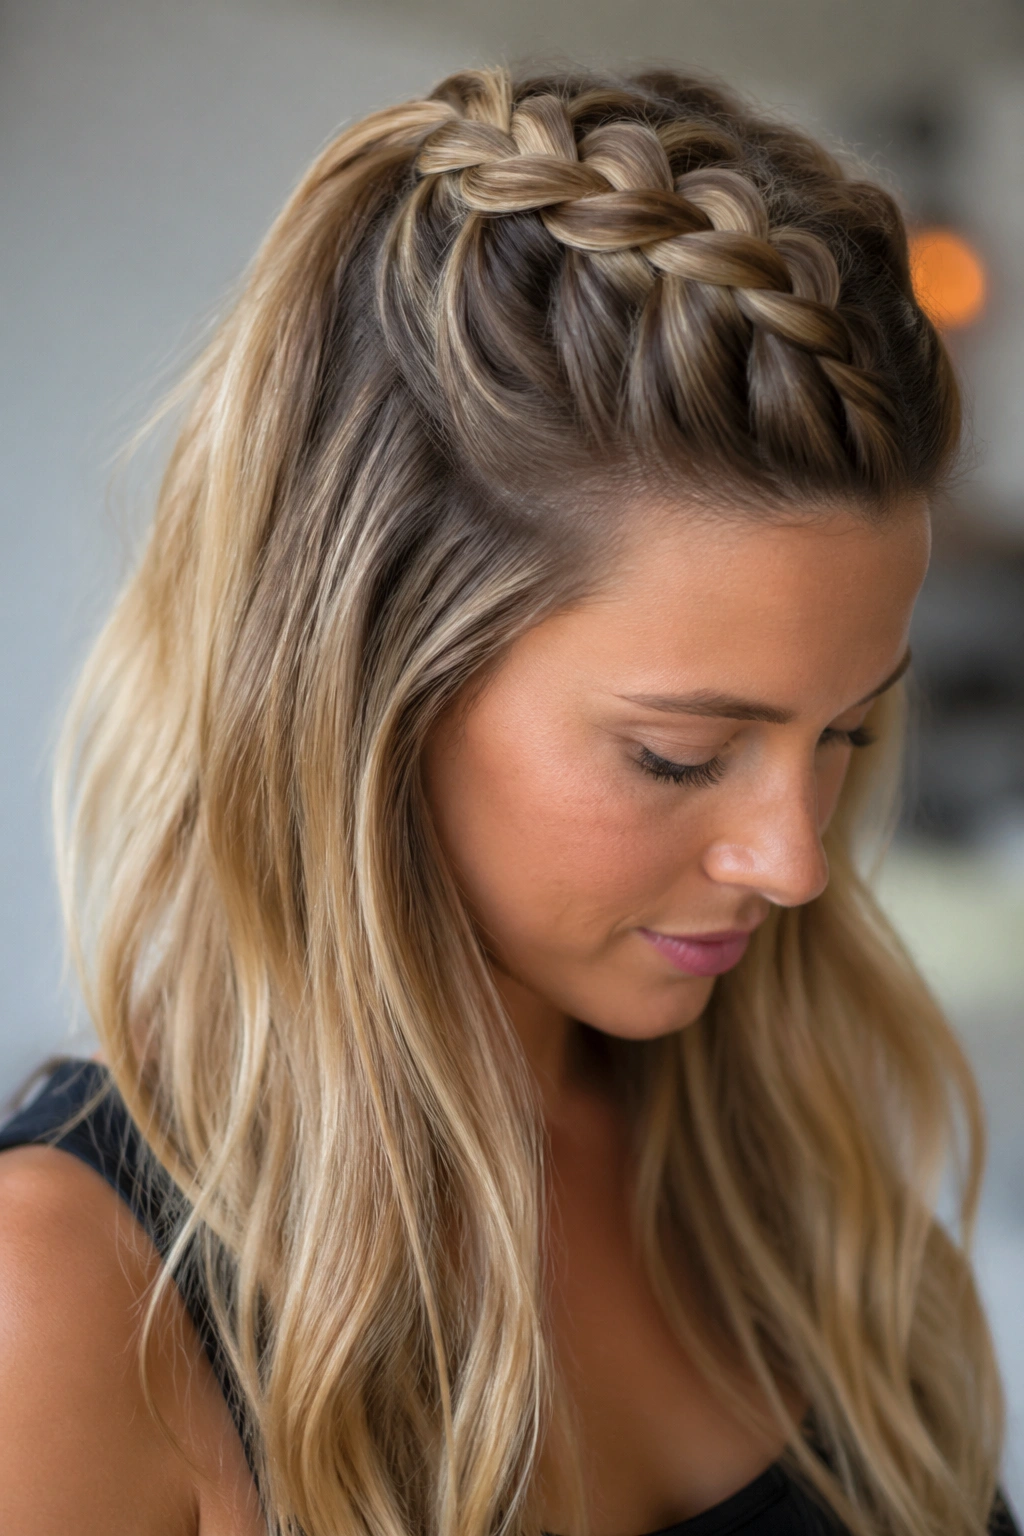
Unlike a flat braid that melts into the hair, a Dutch braid sits on top and gives the crown more lift. That difference matters a lot on fine hair, because you get visible shape without having to tease the roots into a cloud.
The motion is the same as a regular braid except the outer strands go under instead of over. Start at the front hairline with a section about 2 inches wide, divide it into three pieces, and braid back toward the crown. Stop around the midpoint of the head, then tie it off and let the rest fall.
What Makes It Different
The braid looks thicker than it really is. That’s the whole appeal. On medium hair, it creates a little ridge that reads polished from across the room. On thicker hair, it keeps the top from puffing out in awkward places.
Who It Suits Best
- Fine hair that needs height
- Straight hair that falls flat
- Medium-length cuts with layers around the face
- Anyone who wants a braid with a bit more edge
If you already know how to braid, this style is easy. If you do not, the only thing to watch is tension. Keep it firm enough to stay in place, but not so tight that the front pulls. Tight braids at the hairline can look harsh fast.
7. The Side-Swept Half-Up Braid
Some mornings call for hair that stays out of your eyes but doesn’t look like you spent a full hour on it. This is the answer.
A side-swept half-up braid starts at one temple and moves diagonally toward the opposite side of the back of the head. The angle does a lot of visual work. It softens the face, hides uneven layers, and makes the style look a touch more considered than a straight-back braid.
Use a section about 1.5 inches wide near your part, braid across the top of the head, and pin the end behind the far ear. If you want it softer, pull one or two face-framing pieces loose after you secure it. That tiny bit of looseness changes the whole feel.
This style is especially kind to side parts. It also works when one side of your hair behaves better than the other. We all have one of those sides.
8. The Braided Top Knot Half-Up
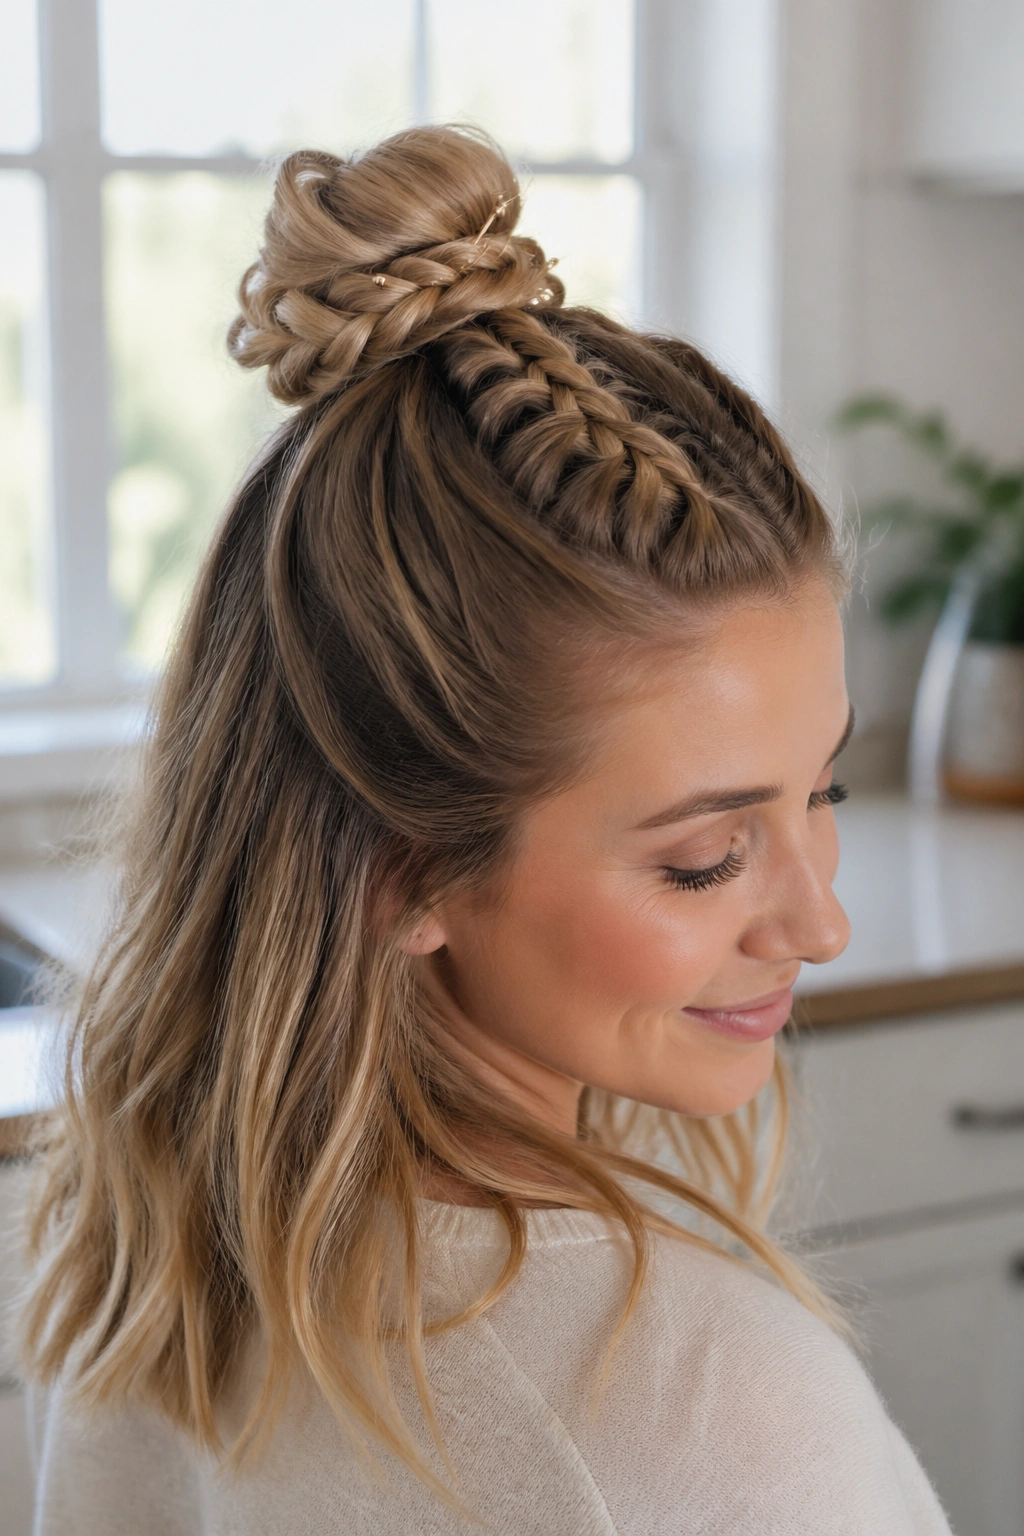
Braiding the ponytail before you knot it is the cheat code. The braid gives the bun more grip, and the top knot ends up looking like you meant to be neat instead of accidentally grabbing the nearest elastic.
Start with a half-up ponytail at the crown, about 3 inches back from the hairline. Braid the ponytail all the way to the ends, then wrap it around the base into a small knot and pin it with 3 bobby pins. If your hair is thick, use 4 pins and place them in a crisscross pattern so the knot does not sag.
This style is good for greasy roots, gym hair, or the day after a blowout when the top has gone limp but the lengths still look decent. It also keeps volume at the crown, which is useful if your hair sits flat on top.
Fastest Way to Get It Done
- Make the half-up pony a little tighter than usual
- Braid the tail before it starts slipping
- Wrap the braid while it still has some shape
- Pin under the knot, not through the top
The result is neat without being stiff. That balance is the part people usually miss.
9. The Pull-Through Half-Up Braid

Want a braid that looks complicated without asking much from your fingers? Pull-through braids were made for that exact problem.
In the half-up version, you only need the top section of hair, plus 3 or 4 tiny elastics. Tie a small ponytail, split it, pull a second ponytail through the middle, and keep stacking. It creates the look of a thick braid without any over-under weaving. The shape is especially useful if your hands get tired from regular braiding.
How to Get the Shape Right
Keep each ponytail small, about 1 inch wide, and make the sections even. If one bubble is bigger than the next, the braid starts to look lopsided fast. After the last loop, tug the sides outward a little so the braid reads fuller.
This style loves thick hair, but it works on medium hair too if you pancake the loops gently. Fine hair can wear it, yet you may need one extra elastic to keep the shape from sliding.
It’s a good choice when you want volume at the crown without teasing. That alone makes it worth knowing.
10. Mini Boxer Braids Meeting at the Back
Two small Dutch braids can be faster than one larger braid if your hands like repetition. Start with one skinny braid on each side, braid back 2 or 3 passes, and connect them at the middle of the head. Leave the lengths down.
This style looks sporty, clean, and a little sharper than softer half-up options. It’s also useful on curly or coily hair because the crown gets control without flattening the whole head. If you’ve got a lot of texture, this one holds better than styles that depend on soft twists.
Key Details
- Use 1/2-inch sections at the temples
- Keep the braid tight against the scalp
- Stop once the braid reaches the crown
- Secure both ends together with one elastic or two pins
A lot of people braid too far down for this look. Don’t. The whole point is to keep the work concentrated at the top. Once the braid passes the ear line, the style stops reading as quick.
The finished result has a little attitude. Not a bad thing.
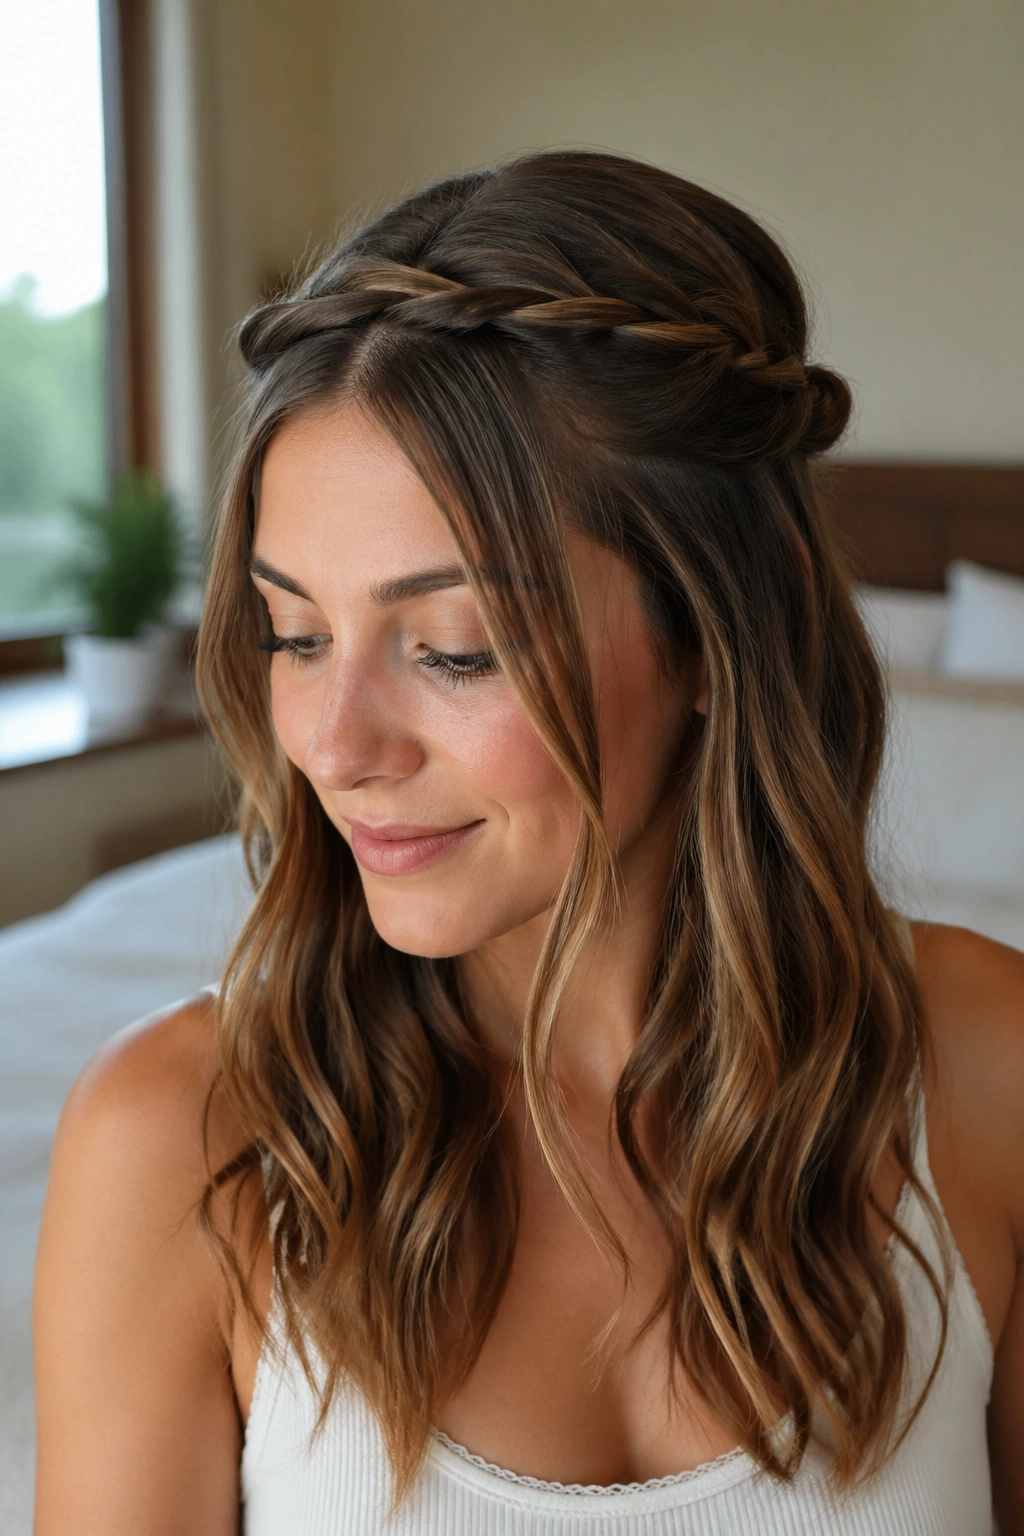
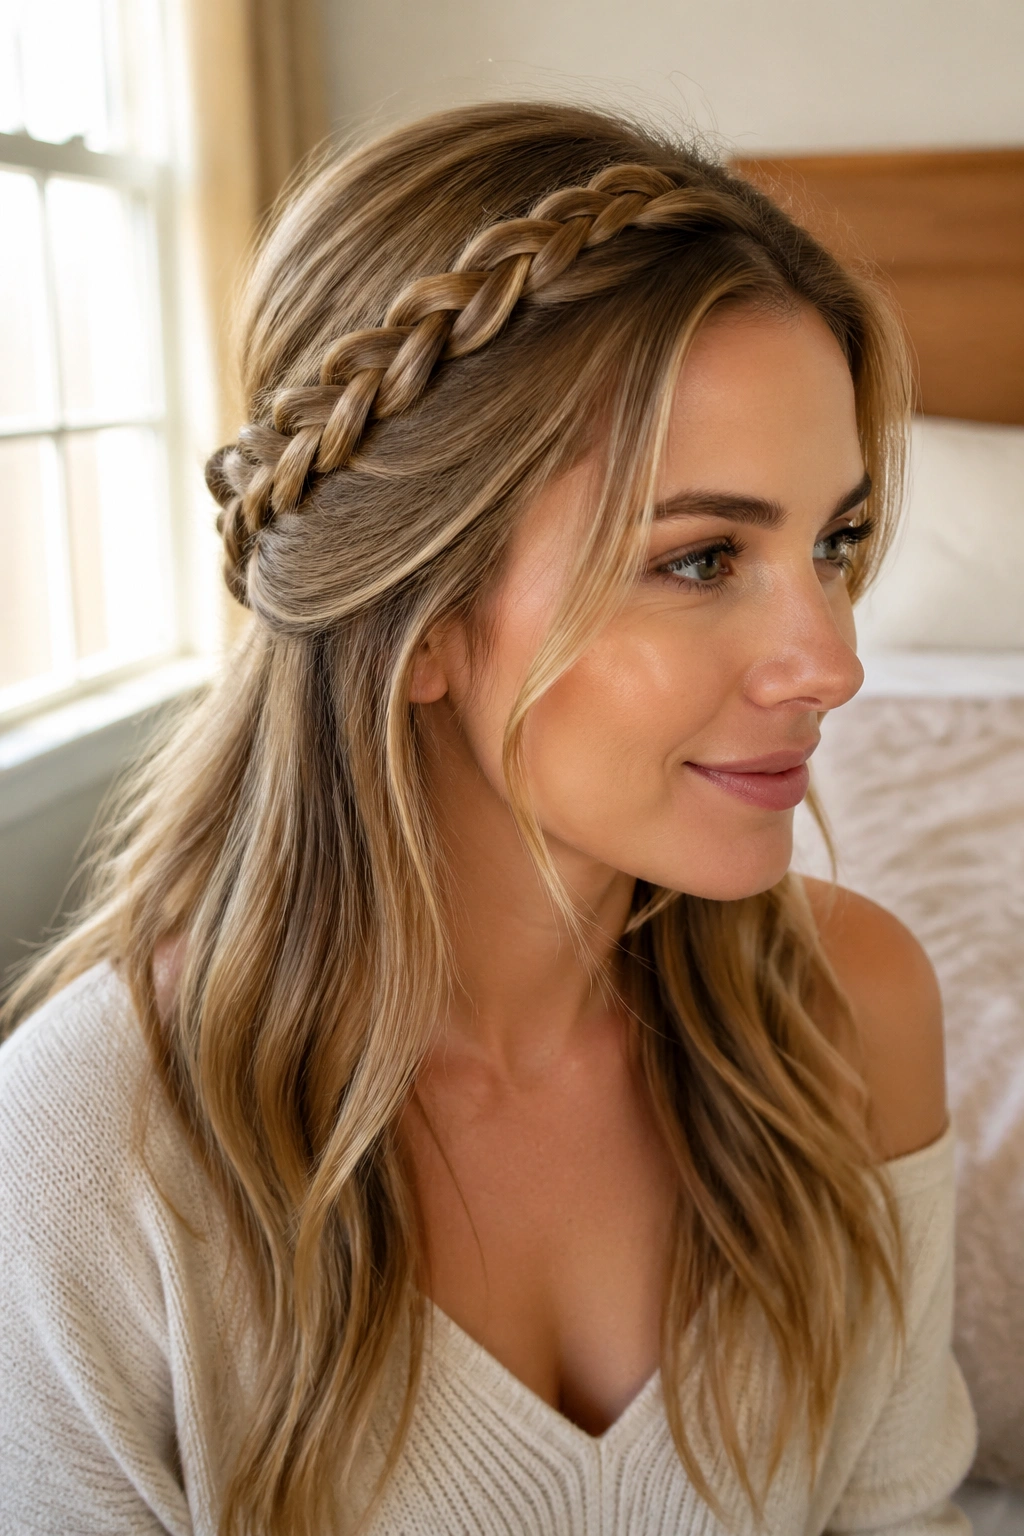
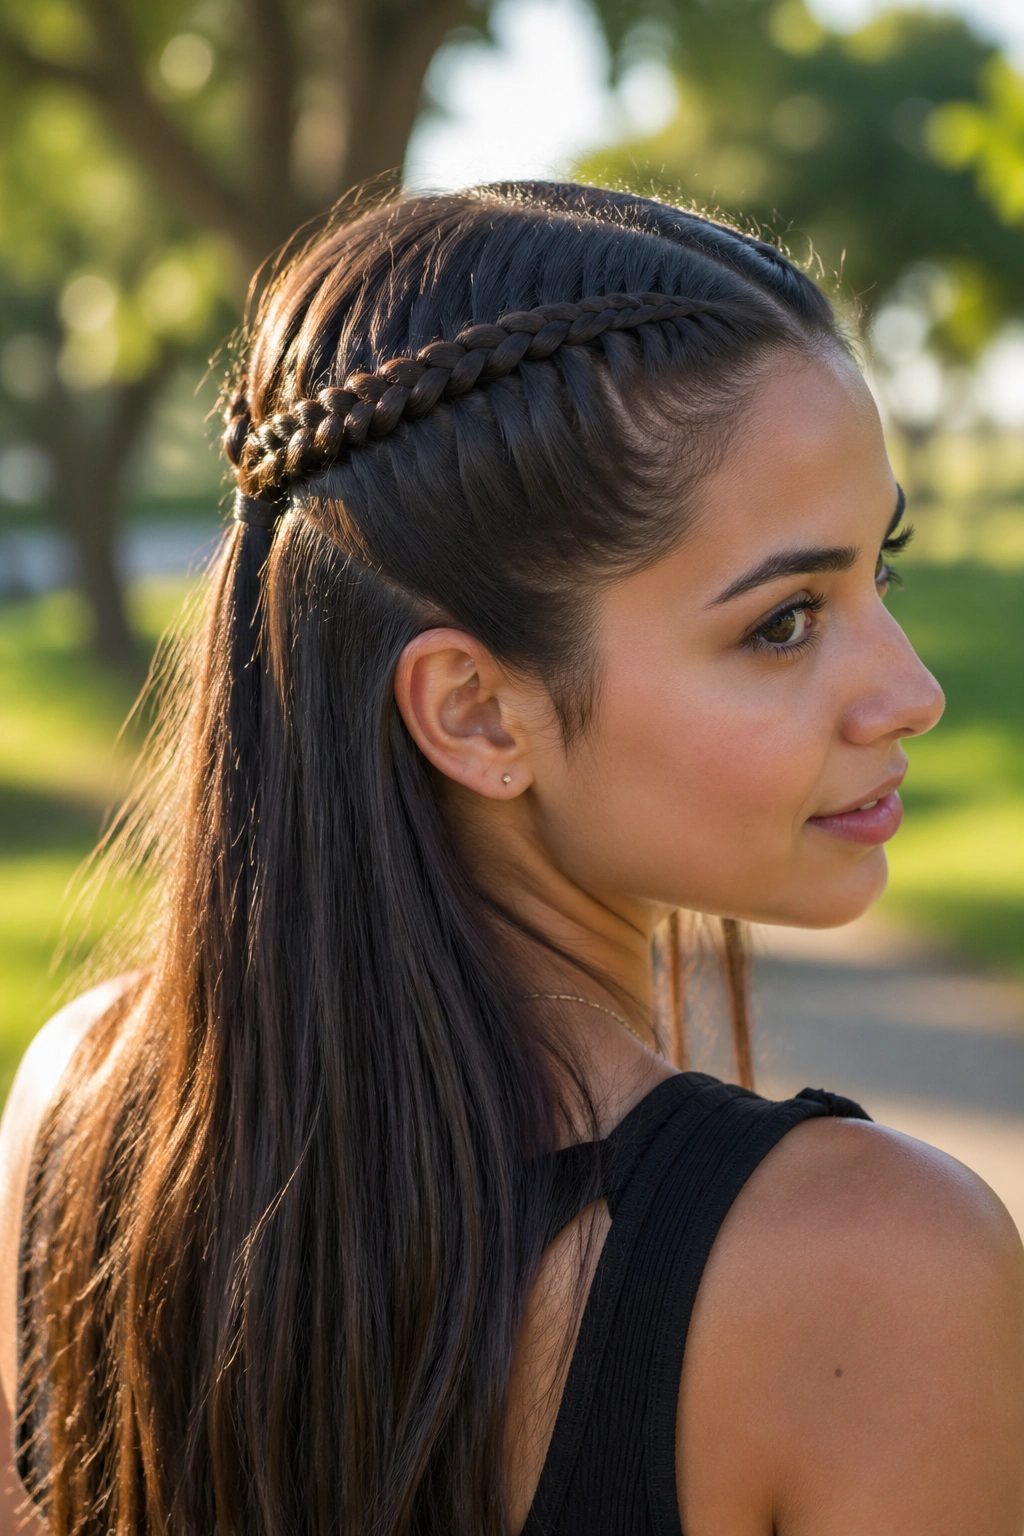
11. The Braided Headband Half-Up

A braided headband is what I call the style for grown-out bangs, awkward front layers, and days when your hairline needs a little mercy.
Take a section from behind one ear, braid it across the crown like a headband, then pin it behind the other ear. The rest of the hair stays down. That’s it. One braid, a few pins, and you’ve got a frame around the face that looks intentional rather than improvised.
What Makes It Work
The braid crosses the head in a clean line, so it gives shape without needing much volume. You can keep it thin and neat for a tidy look, or widen it slightly by tugging the edges once it’s pinned. If you want more fullness, do that after the braid is secure, not before.
This style is especially kind to bangs that are between lengths. It lets them disappear into the braid or sit softly beside it, depending on what you want. On wavy hair, the headband braid can blend right into the texture. On straight hair, it gives a bit more contrast.
Use two bobby pins in an X behind the ear. That tiny detail keeps the braid from sliding out while you move around.
12. The Crisscross Half-Up Braid
If your layers are too short for one long braid, try two small braids that cross each other at the back. It’s a smart fix, and it looks more considered than it should for the time involved.
Braid one section from the left temple and another from the right temple, keeping each one narrow. Bring them back, cross them over each other, and pin where they overlap. The crisscross gives the style a little architecture, which is useful when the hair itself is too slippery to hold a single braid neatly.
This works well on straight hair and shoulder-length cuts. It can also hide the fact that your layers won’t stay tucked into a longer braid. That’s the kind of problem this style solves without making a fuss about it.
The overlap point should sit just below the crown. Too high, and the style starts to look cramped. Too low, and it loses the half-up shape. Middle ground is the sweet spot here. Not fancy. Just balanced.
13. The Bubble Braid With a Braided Base
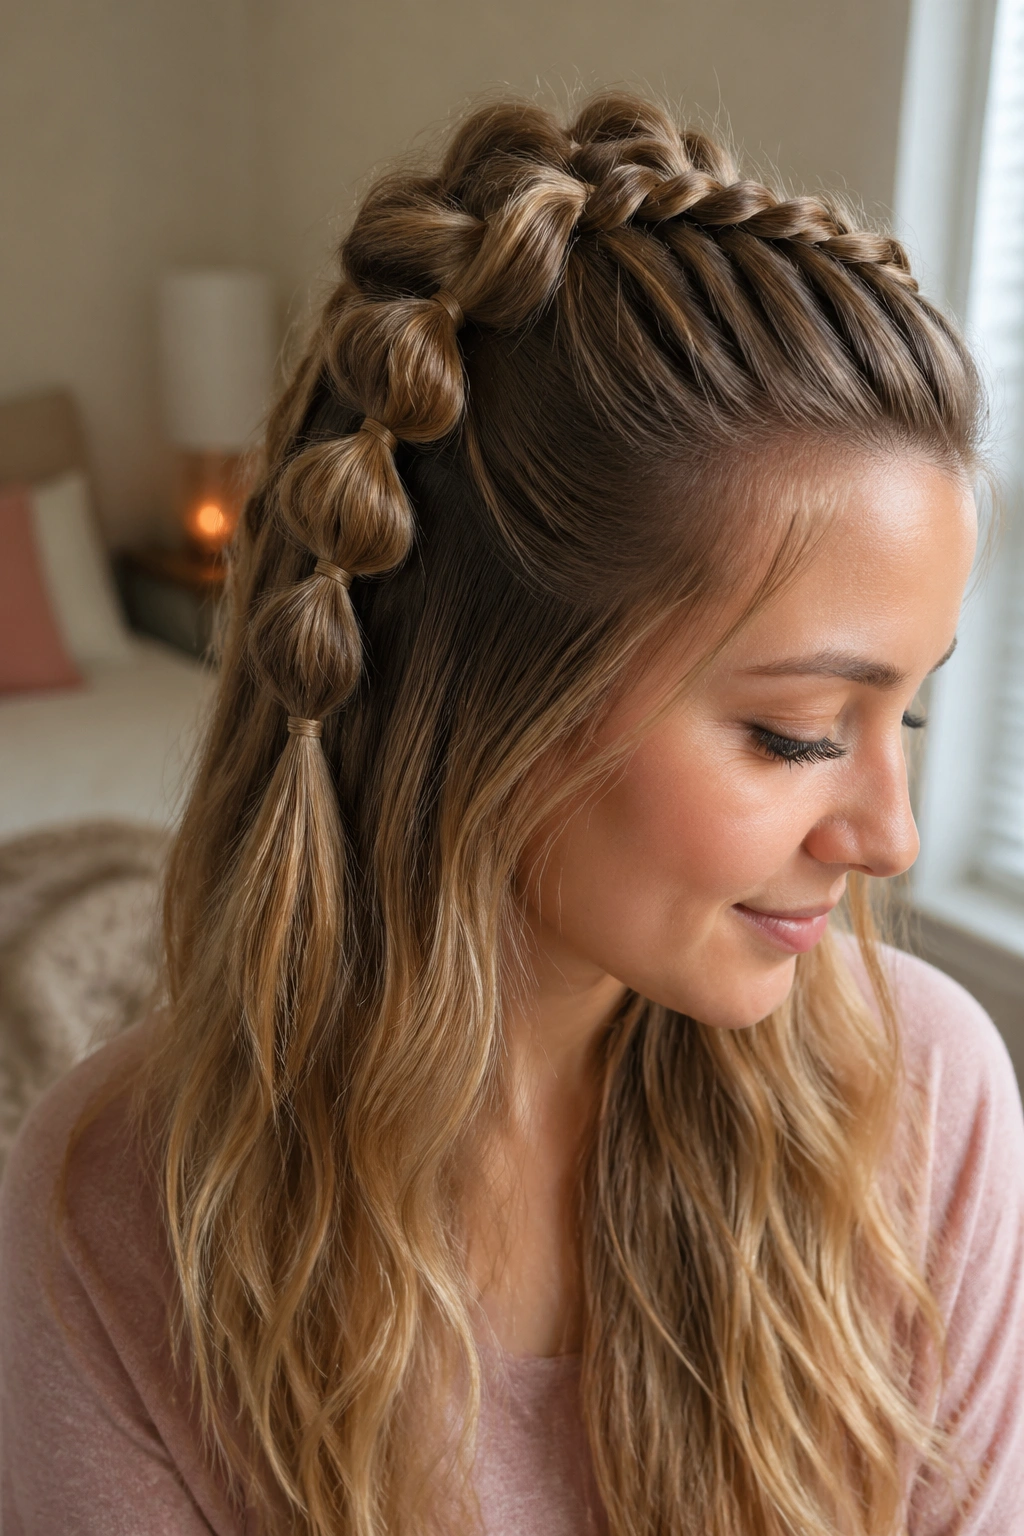
A bubble braid gets more polished when you start it with an actual braid at the crown. That tiny braided base keeps the front from looking too casual, while the bubbles do the heavier visual lifting.
Start with a 3-strand braid for about 1.5 inches, secure it with a small elastic, then add more elastics every 1 to 1.5 inches down the half-up section. Gently tug each pocket between the elastics until it puffs into a rounded shape. Don’t overdo the pulling or the bubbles will sag into lumps.
What to Watch For
The spacing between elastics changes the whole shape. Closer elastics create smaller bubbles, which work better on short to medium hair. Wider spacing gives larger bubbles, better for long hair that has enough length to show the shape.
This style is a favorite on thick hair because the volume does some of the work for you. It also handles wavy hair well, since the natural movement makes the bubbles look less stiff. If your hair is fine, tease the first inch of the crown braid a little before adding elastics. That gives the style a base to sit on.
It’s playful, but not childish. That matters.
14. The Four-Strand Half-Up Braid
If a three-strand braid feels a little too familiar, a four-strand braid gives you a richer pattern without adding much time once your fingers know the sequence.
Keep the section small. That’s the whole secret. A 1.5-inch wide section at the crown is enough to show off the weave. Split it into four strands, braid back a few inches, and secure it before it starts to get slow or messy. The shorter length keeps the braid from turning into a project.
This braid lies flatter than a fishtail and looks denser than a standard braid. On straight hair, the pattern shows up cleanly. On wavy hair, it has a softer texture that looks nice with loose lengths.
A Small Honest Warning
The first time you try this, your fingers may feel a little confused. Fine. Use it on a day when you have 90 seconds to practice and no one is watching you. After two or three tries, the hand motion settles in, and the style becomes much faster.
Start with a tiny section. Bigger sections make the braid bulky and harder to finish before you lose patience.
15. The Twisted Rope-and-Braid Combo
What if your hair is too short for a long braid but too long for a plain twist? This style lives in that middle space.
Begin with two twisted sections from each side of the front, then join them into a short three-strand braid at the back of the crown. It gives you a mix of textures: smooth at the front, woven at the center, loose at the back. That mix looks deliberate, even when the braid itself is only a few inches long.
How to Get the Most From It
Use 1-inch sections for the twists and keep the braid tiny, around 2 to 3 inches long. If the braid is too long, the whole thing starts taking more time than it should. Pin the transition point carefully, because that’s where the style can loosen.
This is one of the best half-up braids for lob lengths and shoulder-length cuts. It also works on layered hair, where a full braid can fall apart before the ends.
I like this one when I want hair that looks styled but not precious. There’s a difference, and this one lands on the right side of it.
16. The Double Ribbon Half-Up Braid
A thin ribbon can make a simple half-up braid feel special without adding much time. The trick is to use it as part of the braid, not as a separate decoration that fights the hair.
Take two skinny front sections, braid them back, and weave a slim ribbon through one of the strands or tie it around the base where the braids meet. Satin, velvet, or even a narrow grosgrain ribbon all work if the width stays around 1/4 inch. Anything wider starts stealing the show.
This is the style I’d pick for a dinner, a party, or any day when you want the braid to look a little dressed up. The ribbon also helps hide small mistakes. If one braid cross sits a little crooked, the eye goes to the color instead.
A Few Practical Notes
- Use a ribbon with a little weight so it stays put
- Tie the ribbon after the braid is secured
- Trim the ends at an angle if they fray
- Keep the ribbon short enough that it doesn’t catch in your coat or bag
A narrow ribbon works better than a shiny wide one. It blends into the braid instead of sitting on top of it like a decoration from a gift box.
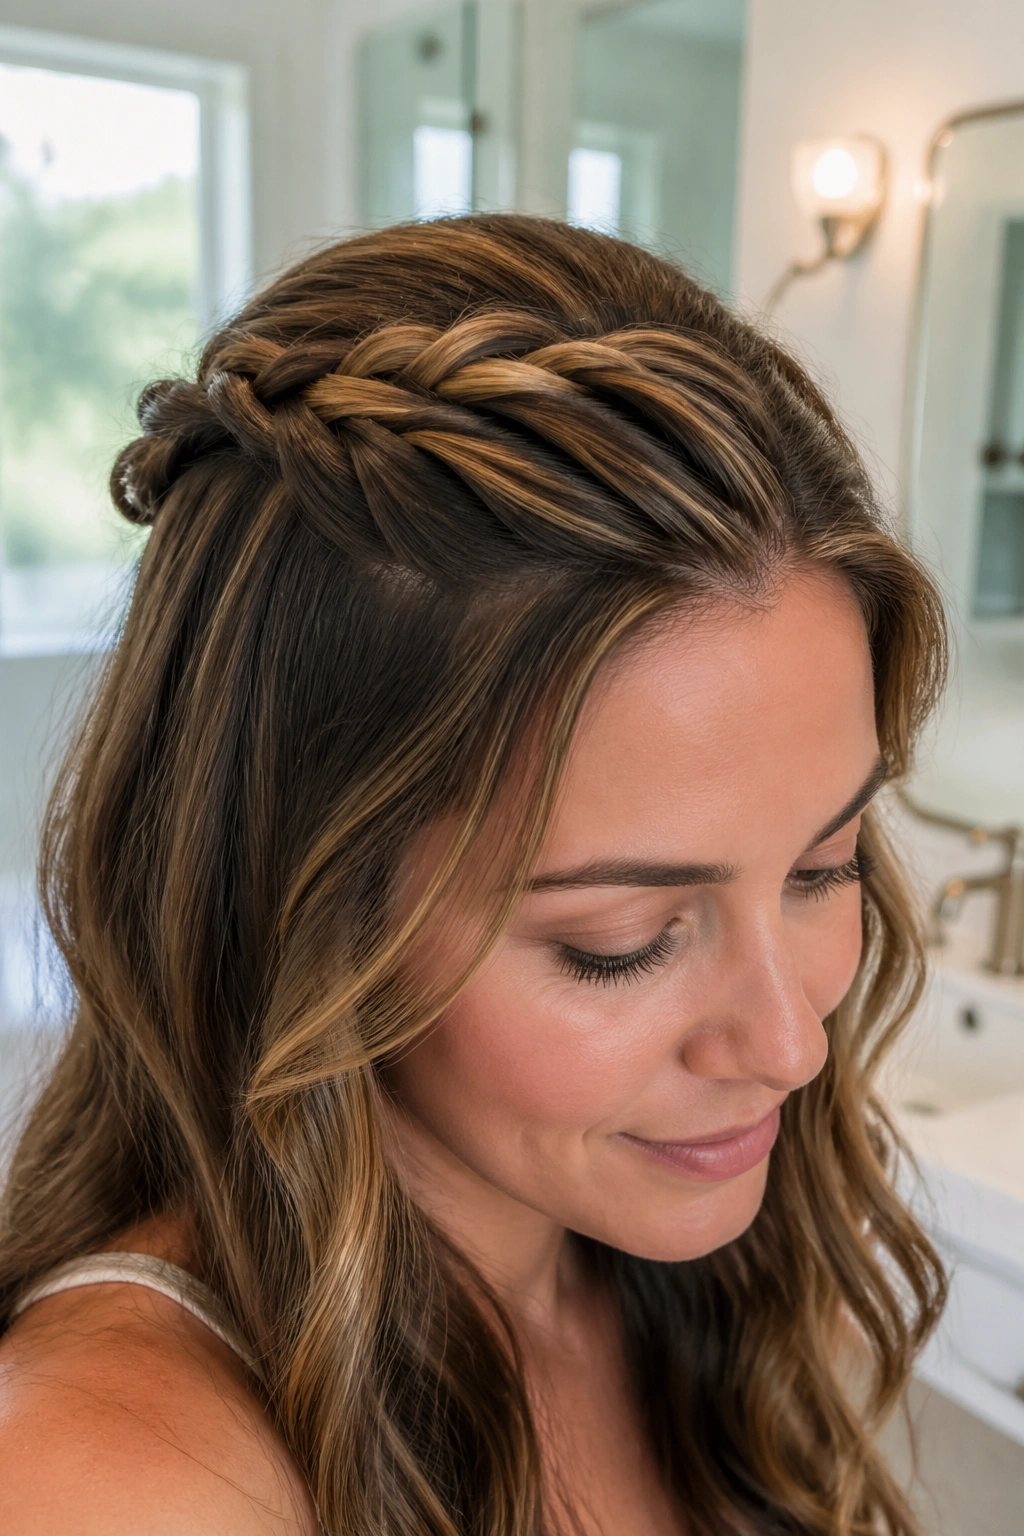
Half-up braids are at their best when they look like a good decision made quickly. Not rushed. Just smart. Keep the sections small, choose the braid that fits your hair texture, and stop before the whole thing turns fussy. The fastest styles are usually the ones that understand that rule, and your mirror time gets a lot easier when you do too.