Wavy hair has this beautiful natural texture that deserves more credit than it gets. While straight-haired friends debate the merits of their sleek styles and curly-haired folks celebrate their defined spirals, wavy hair sits in this gorgeous middle ground—full of movement, texture, and dimension without requiring quite as much styling effort. The challenge? Finding ponytail styles that actually work with your waves instead of fighting against them or flattening them into submission.
Here’s what most people get wrong about wavy hair ponytails: they either pull the style too tight (which kills your waves and creates frizz), use methods designed for straight hair (which just don’t suit the texture), or end up with a messy result that looks unintentional rather than intentional. The sweet spot is choosing ponytail styles that embrace your natural texture, let those waves show through, and actually look better with the movement that wavy hair naturally brings to the table.
The good news? Wavy hair is incredibly versatile for ponytails when you know which styles play to its strengths. This article walks through 15 different ponytail options specifically designed for wavy hair—from casual styles that take five minutes to more polished looks for special occasions. Each one works with your waves, not against them, and most importantly, they all look intentional and put-together rather than like you just threw your hair up because you were running late (even though you might have been).
Why Wavy Hair Deserves Specific Ponytail Strategies

Wavy hair behaves differently than straight or curly hair, and your ponytail technique needs to account for that. Straight hair holds its shape predictably, and curly hair has defined patterns to work with, but wavy hair creates this flowing, textured foundation that requires a slightly different approach to look its absolute best.
The Texture Advantage You’re Not Using Yet
Your waves are an asset, not something to smooth down and ignore. When you choose the right ponytail style, those waves become the visual interest that makes your ponytail look intentional, dimensional, and far more interesting than a sleek, flat version. The texture catches light, creates movement even when you’re standing still, and gives your overall look more personality. This is why wavy hair can actually pull off ponytails that might look boring on straight hair—your texture does half the work for you.
How to Secure Waves Without Flattening Them
The biggest mistake people make with wavy hair ponytails is pulling too tight, which flattens the wave pattern and kills the texture before you even finish styling. Instead of gathering your hair straight back into a tight hold, you’re aiming for a more relaxed gathering that preserves the wave pattern throughout the ponytail. Think of it as “securing without strangling”—your hair tie should hold everything in place without creating tension that makes the waves go flat.
Products and Prep That Actually Work
Before you even start styling, your prep matters enormously. A lightweight texturizing spray, salt spray, or even a light mousse applied to damp waves before blow-drying helps define and hold the wave pattern. Skip heavy products that weigh down your hair—you want texture, not slickness. When you’re building your ponytail, a matte finish hair tie (cloth-covered or velvet) grips better than slippery elastic and causes less breakage, which is especially important since wavy hair is often finer and more prone to frizz than straight hair.
The Difference Between Intentional Waves and Accidental Mess
Here’s the distinction that changes everything: there’s a huge difference between a styled wave ponytail that looks polished and intentional, and a lazy frizzy ponytail that just looks undone. The difference isn’t actually the waves—it’s the technique and the intention behind the style.
An intentional wave ponytail has definition. Your waves are visible but controlled. The front sections frame your face in a purposeful way. Your texture is clearly meant to be there, not an accident. Achieving this means starting with waves that are actually styled (not just naturally wavy out of bed), using the right securing techniques, and potentially adding textural elements like braids, twists, or strategic pieces pulled out to add dimension.
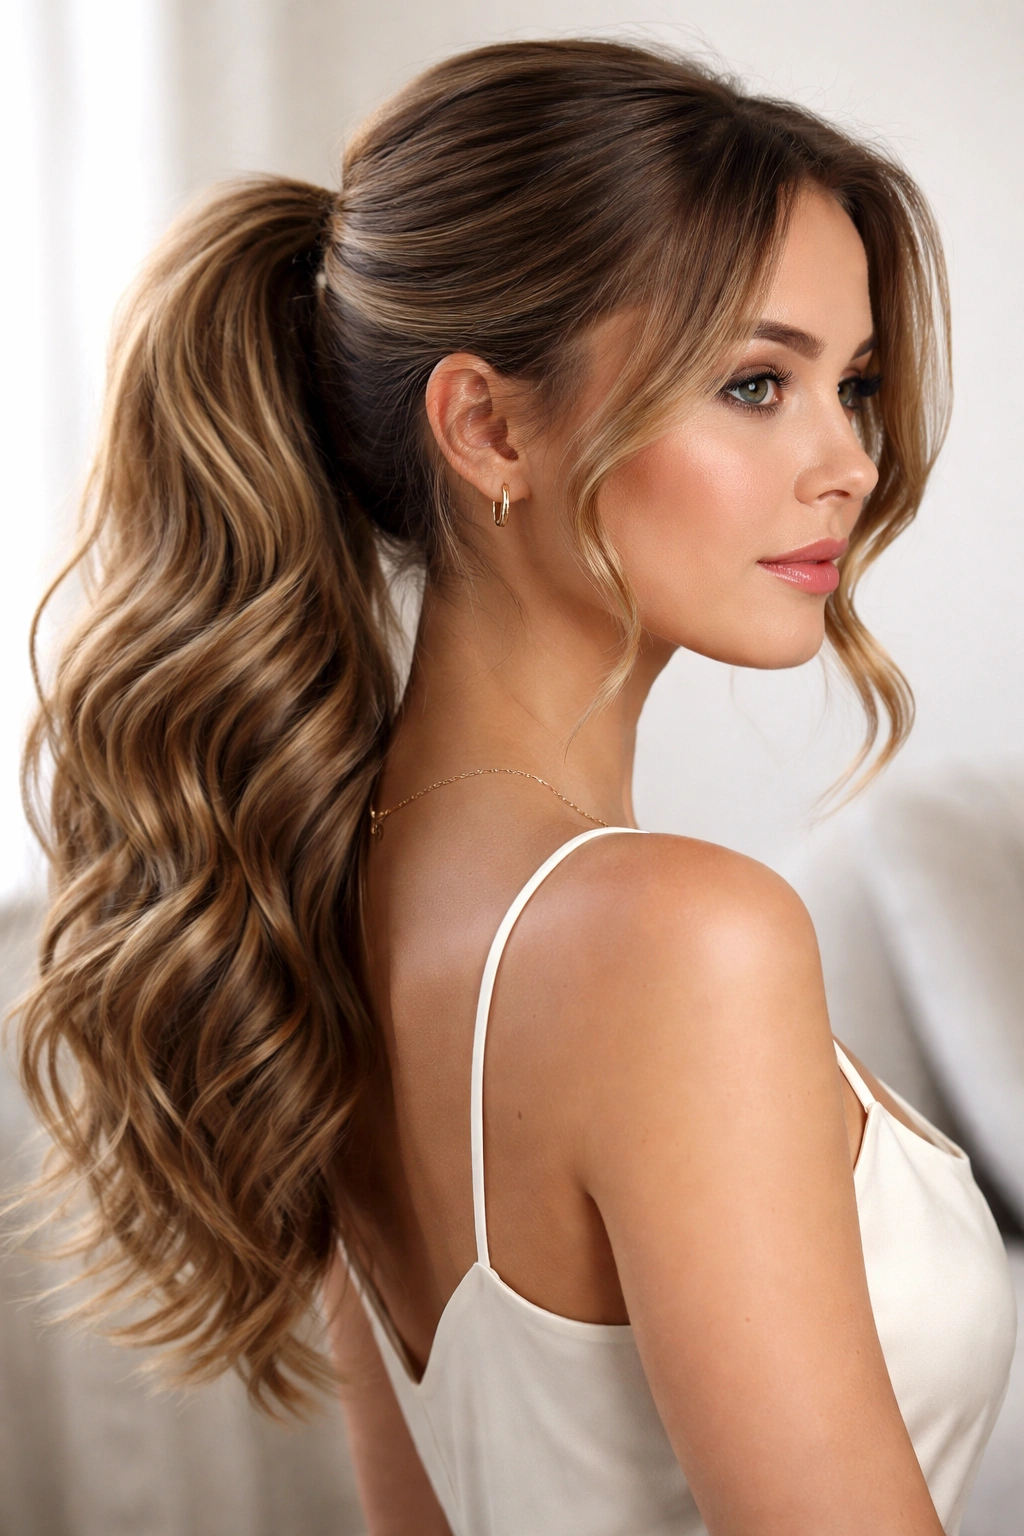
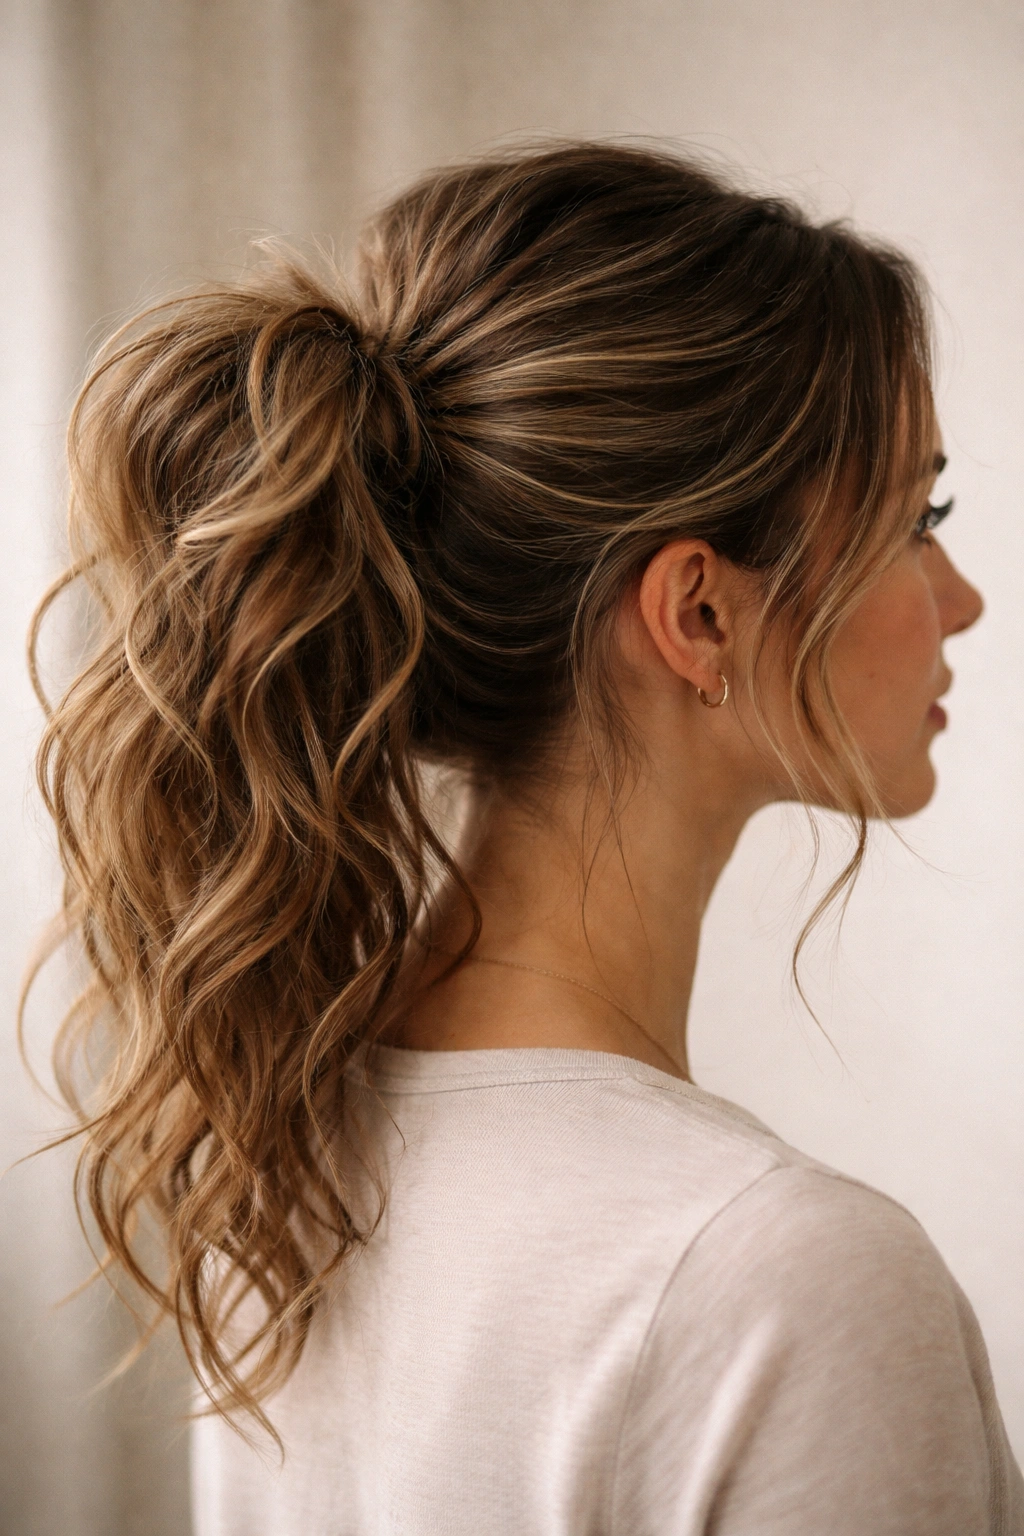
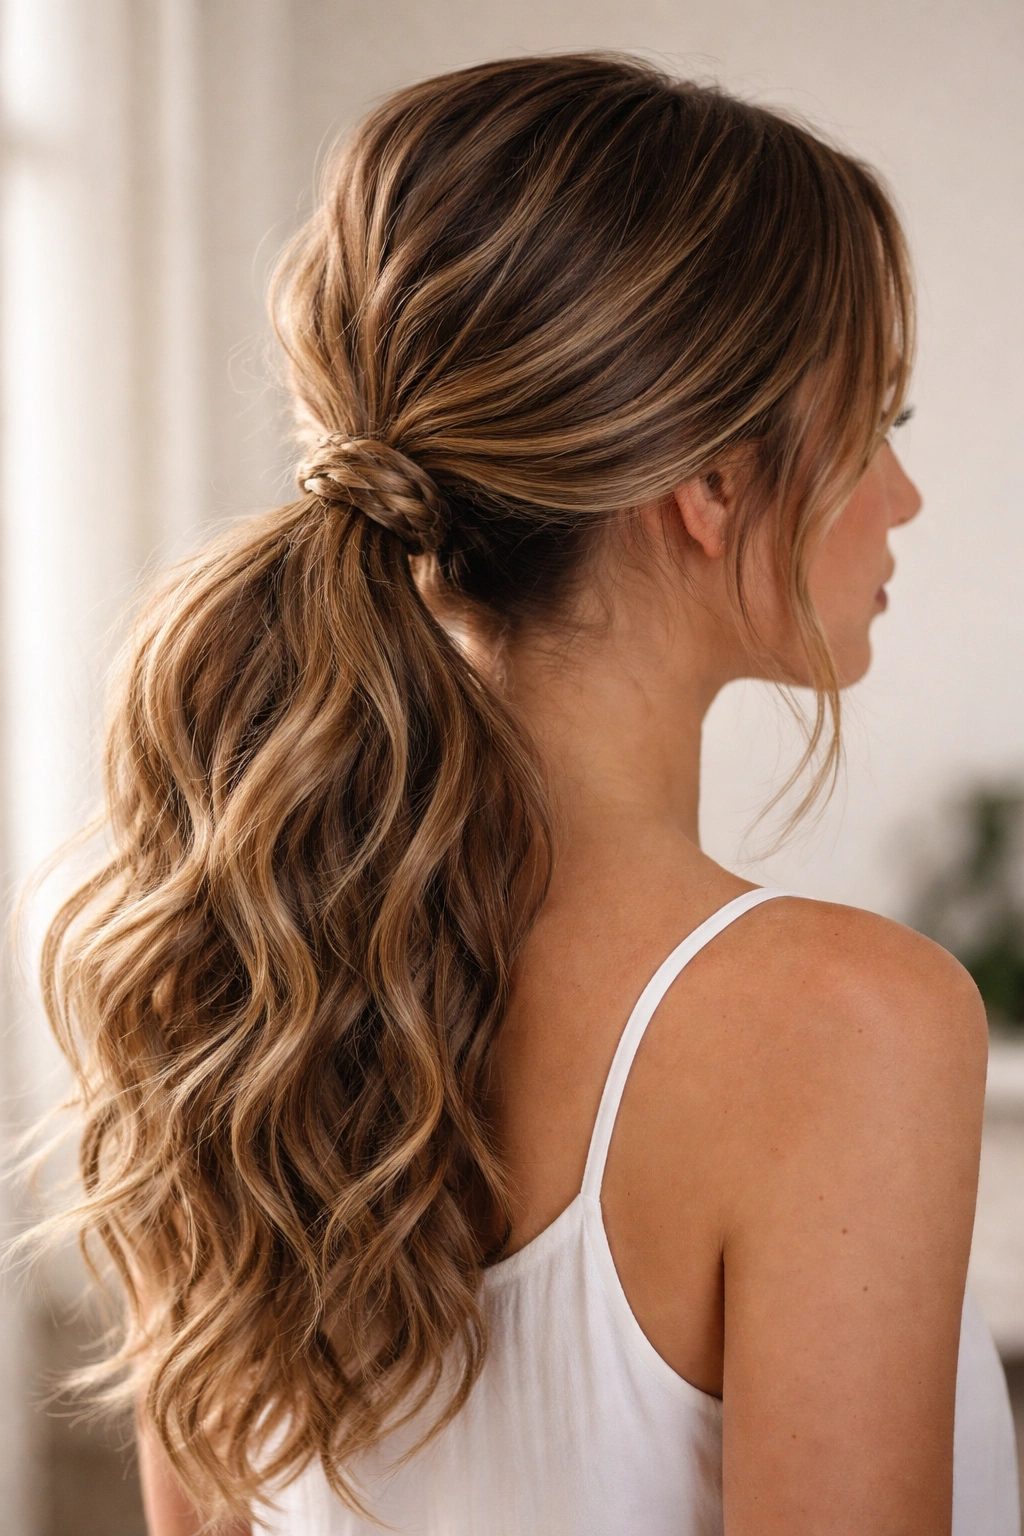
1. The Soft Low Ponytail With Face-Framing Waves
This is the everyday style that works whether you’ve got five minutes or twenty. The key is letting your waves live their best life while keeping them out of your face and off your neck without making it look like you tried too hard. It’s the “I naturally have good hair” ponytail, even if you very much needed to put effort into it.
Why It Works for Wavy Hair
The soft low ponytail takes advantage of the fact that wavy hair already has movement built in. Because you’re gathering the ponytail lower and leaving it intentionally loose rather than sleek, the waves have room to move and flow naturally. This style also gives you the benefit of that face-framing action that wavy hair naturally creates—those pieces that fall around your face aren’t a styling mistake; they’re part of the intentional design. The softness of the style plays beautifully with the texture of wavy hair, creating a cohesive look rather than a contrast between smooth and textured.
How to Build It
Start with waves that are already styled—either air-dried with product, blow-dried with a diffuser, or gently wave-styled with a curling iron or wand. At the crown, use your fingers to gather hair loosely, not from the very root but about an inch or two down. This creates that soft, undone texture at the crown rather than pulling everything flat against your scalp. Gather everything into a low ponytail at the nape of your neck, but don’t pull it tight. Leave some texture and movement in the base. Secure with a matte elastic, then gently pull out a few face-framing pieces in the front and around your ears. Use a texturizing spray or light hairspray to encourage those pieces to wave naturally around your face.
Pro Tip
Don’t gather everything super precisely—let some pieces fall out naturally before you even secure the ponytail. The slight imperfection is exactly what makes this look intentional and polished rather than trying-too-hard.
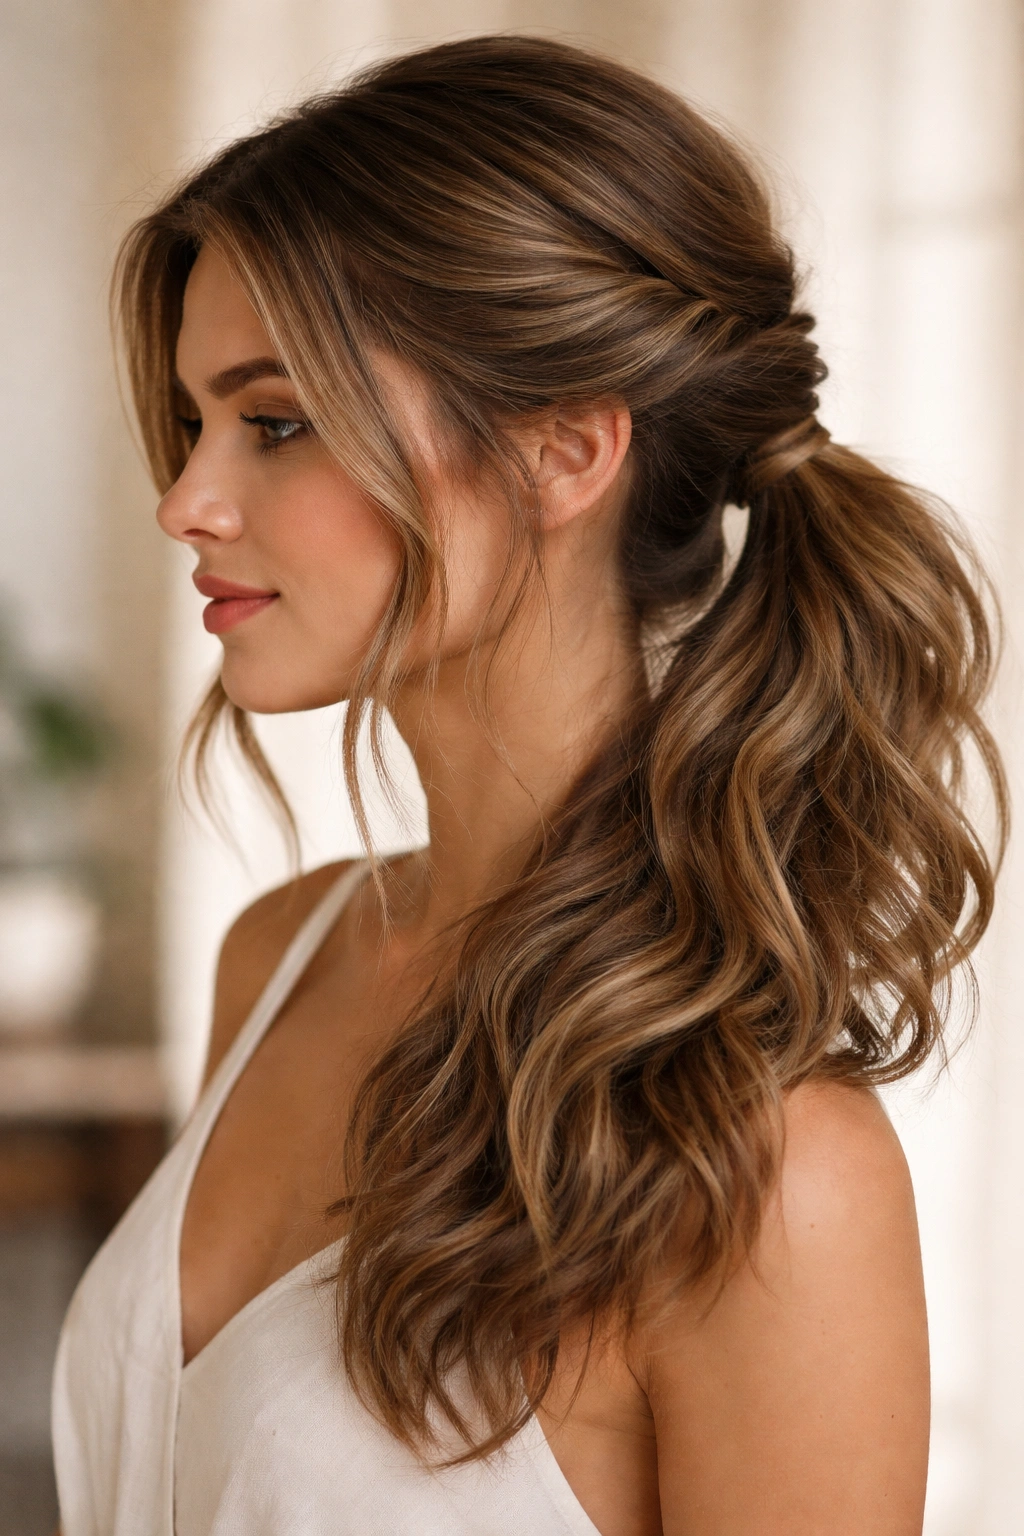
2. The Half-Up Ponytail With Twisted Crown
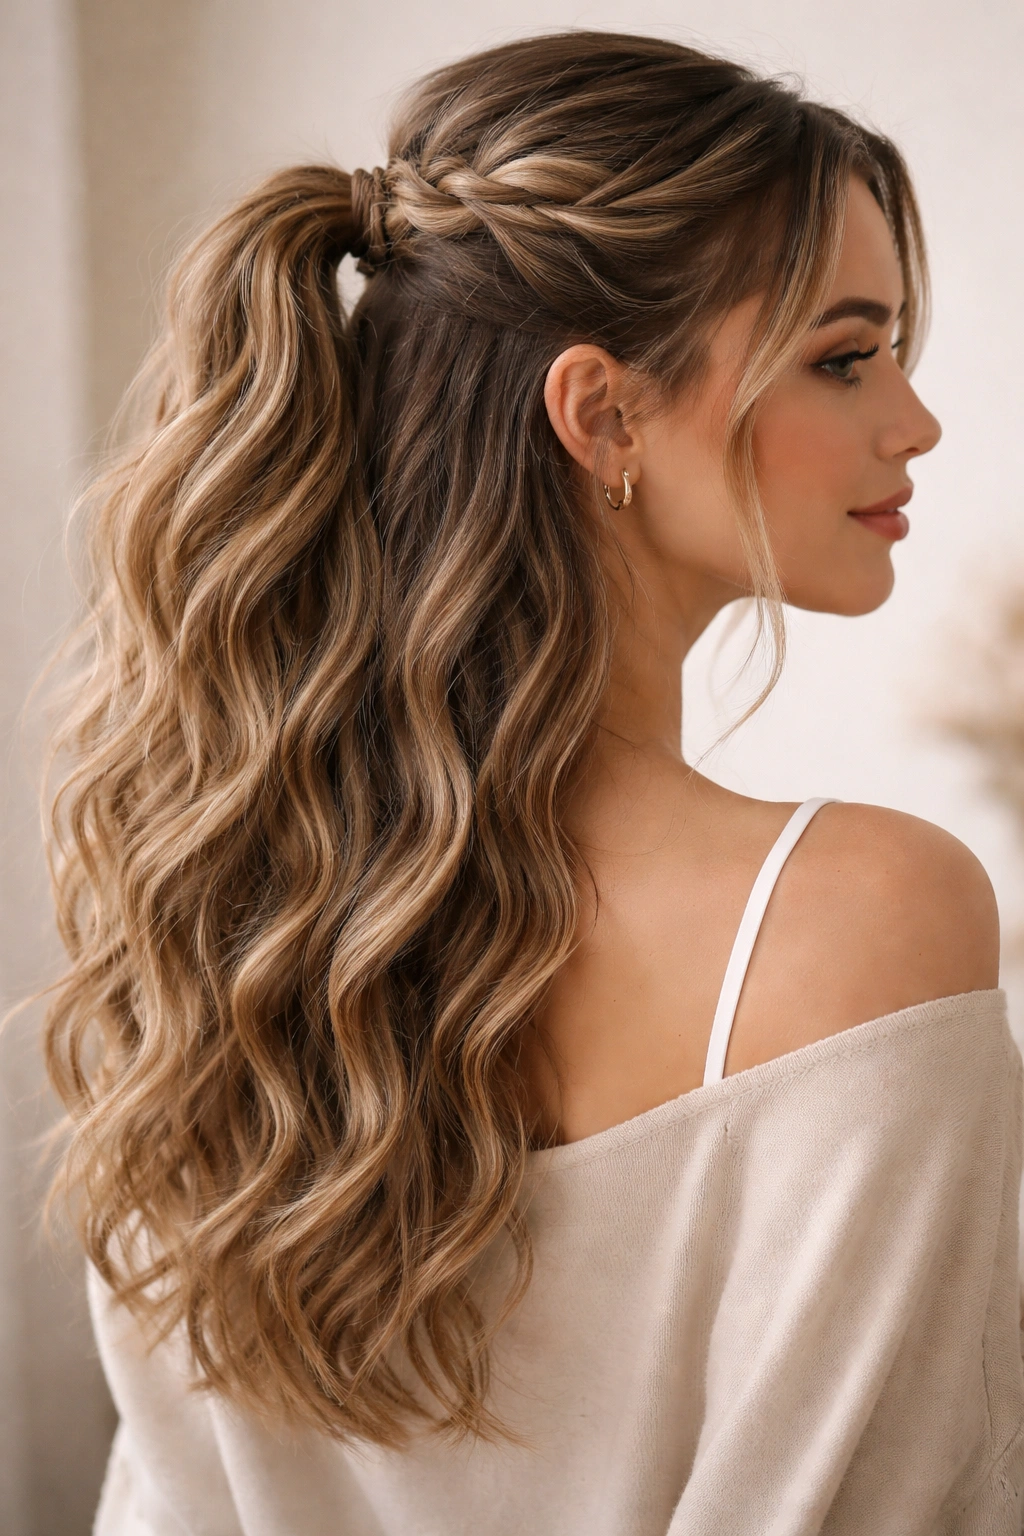
The half-up style is genuinely one of the most universally flattering options for wavy hair, because it shows off your texture where it matters most—right around your face and shoulders—while still keeping hair off your neck and creating a polished silhouette.
Why It Works for Wavy Hair
You’re getting the best of both worlds here: the texture and movement of down hair where people can actually see it, combined with the functionality of a secured ponytail. Because you’re only pulling up the top half, you’re not fighting against your natural wave pattern, and the lower waves get to flow freely. The twisted crown element adds visual interest and a crafted feel that elevates this from casual to “I definitely styled my hair this morning.”
How to Build It
Section out the top half of your hair—imagine drawing a line from ear to ear across the crown. Gather this section loosely (same principle as the soft low ponytail), and gently twist it. You’re not aiming for a tight, controlled twist; you want a loose, slightly textured twist that shows your wave pattern. Once twisted, wrap it around into a small ponytail at the crown and secure it with a small matte elastic or a small clip. The lower half of your hair stays down, falling in waves around your shoulders. Pull out a few face-framing pieces from the back section to soften the overall look. The contrast between the polished twisted crown and the flowing waves below creates a really balanced, intentional aesthetic.
Quick Styling Notes
- Use a texturizing spray on damp hair before blow-drying to help the twist hold better
- The twist doesn’t have to be perfectly symmetrical—slight imperfection actually looks more intentional on wavy hair
- You can secure the half-up with either a small elastic, a small clip, or even a decorative pin that matches your hair color
3. The Bubble Ponytail With Layered Waves
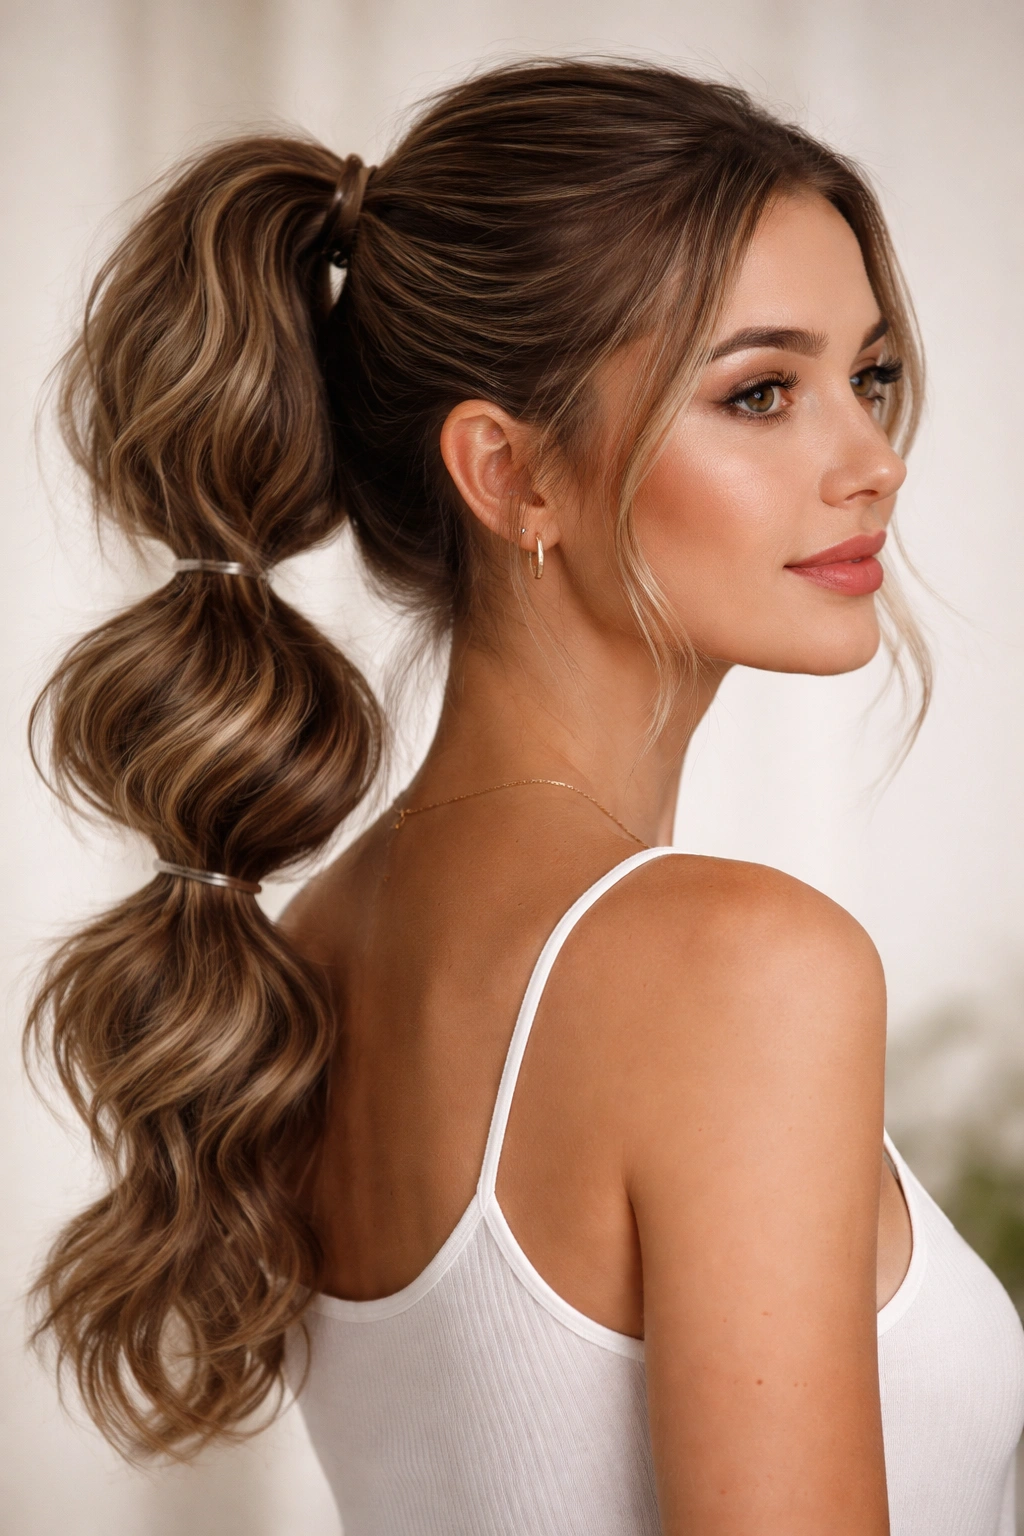
This playful style adds dimension and visual interest by creating “bubbles” down the length of your ponytail, and wavy hair makes these bubbles look way more textured and intentional than they would on straight hair.
Why It Works for Wavy Hair
The bubble effect relies on creating sections with visible separation, and because your hair already has texture and dimension, those bubbles become dimensional instead of looking flat. Each bubble shows off a different layer of your waves, creating this gorgeous cascading effect. The style walks the line between fun and polished—it’s obviously styled and intentional, but it doesn’t look overly formal or rigid.
How to Build It
Start with a standard ponytail gathered at whatever height feels comfortable—mid-height works beautifully. Secure it with an elastic. About two inches below the first elastic, pull another elastic tight to create the first “bubble.” Then inch down two more inches, pull another elastic, and repeat down the length of your ponytail. You’ll typically get 3-5 bubbles depending on your ponytail length. Now here’s the wave-specific part: gently pull and tease each bubble section outward and backward to create that dimensional poof. Because your hair is wavy, you don’t have to pull as hard as you might on straight hair—the texture gives you volume instantly. As you work down, rotate which direction you pull each bubble (one slightly backward and right, the next slightly backward and left) to create a cascading, wave-like effect down the length.
When to Wear It
This style is perfect for casual days, younger looks, or any time you want to inject some personality and fun into your ponytail game. It’s eye-catching without being formal.
4. The Messy Bun Ponytail Hybrid
Sometimes you want the polish of a ponytail but the texture and softness of a bun. This hybrid gives you both—it’s technically a ponytail that’s been looped and pinned to create a bun-like shape, but with way more dimension and movement than a traditional bun.
Why It Works for Wavy Hair
Traditional buns can sometimes look too polished and controlled, which can actually fight against wavy hair’s natural aesthetic. This hybrid keeps all that texture visible while creating a more cohesive shape. The looping technique means your waves stay relatively intact instead of being twisted and pinned into submission, and the overall effect is that you have a textured, intentional bun rather than a “I just threw my hair up” look.
How to Build It
Create a high or mid-height ponytail, secured loosely so you maintain some texture. Rather than tying it off completely, loop the ponytail (the same way you might make a simple topknot) and pin it at the base with bobby pins that match your hair color. The key difference from a regular bun is that you’re not trying to create a perfectly smooth, compact shape. Instead, leave some bumps, some pieces of wave visible, and let some of the ponytail piece escape gently from the base of the bun. The texture and waves should be partially visible, creating that “intentional undone texture” rather than a sleek bun. You can pull out a few face-framing pieces in the front to soften the look even more.
Pro Tip
The looser you keep this style, the better it works with wavy hair. Aim for about 60% polished and 40% texture—you want it to look intentional but not controlled.
5. The Low Side Ponytail With Wave-Emphasis Waves

Side ponytails can sometimes look dated or overly playful, but when you intentionally emphasize and style your waves to work with the side placement, you get a genuinely striking look that feels modern and polished.
Why It Works for Wavy Hair
The asymmetry of a side ponytail actually flatters wavy hair beautifully because it shows off the texture on one side of your face and neck. Because you’re placing it to the side rather than centered, you’re drawing attention to the individual waves and dimension in your hair. The wave pattern becomes the visual interest, not just texture—it’s meant to be there.
How to Build It
Gather your hair loosely to one side, placing the ponytail low—near the base of your neck, just off to the side rather than completely to the side. The key is securing it loosely enough that you maintain the wave pattern throughout. Use a matte elastic and don’t pull tight. Once secured, take a section from the top of the ponytail (about a 1-inch section) and gently twist or braid it, then wrap it around the base of the ponytail to cover the elastic. This adds a polished element while maintaining texture. Let the ponytail itself fall gently over your shoulder—the waves should be clearly visible and flowing. On the opposite side of your face, gently pull out a few strands to frame your face with waves.
Styling Tip
The side ponytail works best when your waves are clearly defined and styled. Use a wave cream or texturizing spray on damp hair before blow-drying with a diffuser, or style waves with a large-barrel curling iron before creating the ponytail.
6. The Twisted Side Ponytail With Layered Texture
This style combines the side placement you love with a twisted detail that adds visual interest and a more polished feel without requiring actual braiding skills.
Why It Works for Wavy Hair
Two twisted sections coming together create a frame for your face while the waves throughout the twists remain clearly visible. You’re not fighting against your texture; you’re incorporating it into the design. The twists add a handmade, artisanal quality that plays beautifully with wavy hair’s natural texture.
How to Build It
Create a deep side part, then take a section of hair from the front on the larger side of the part. Gently twist this section (not tightly—loose and slightly textured), and secure it temporarily with a small clip. Take another section from the opposite side of your part and twist that as well. Now bring these two twisted sections together at the side of your head (about ear level) and secure them together, adding more hair from the back as you go to create a side ponytail. The ponytail itself can be loose and textured, or you can braid the actual ponytail section for extra interest. Let the side waves fall naturally, and pull out a few pieces to frame your face.
Quick Note
This is one of those styles that looks complicated but is actually quite simple once you understand the structure—two twisted sections meeting into a side ponytail.
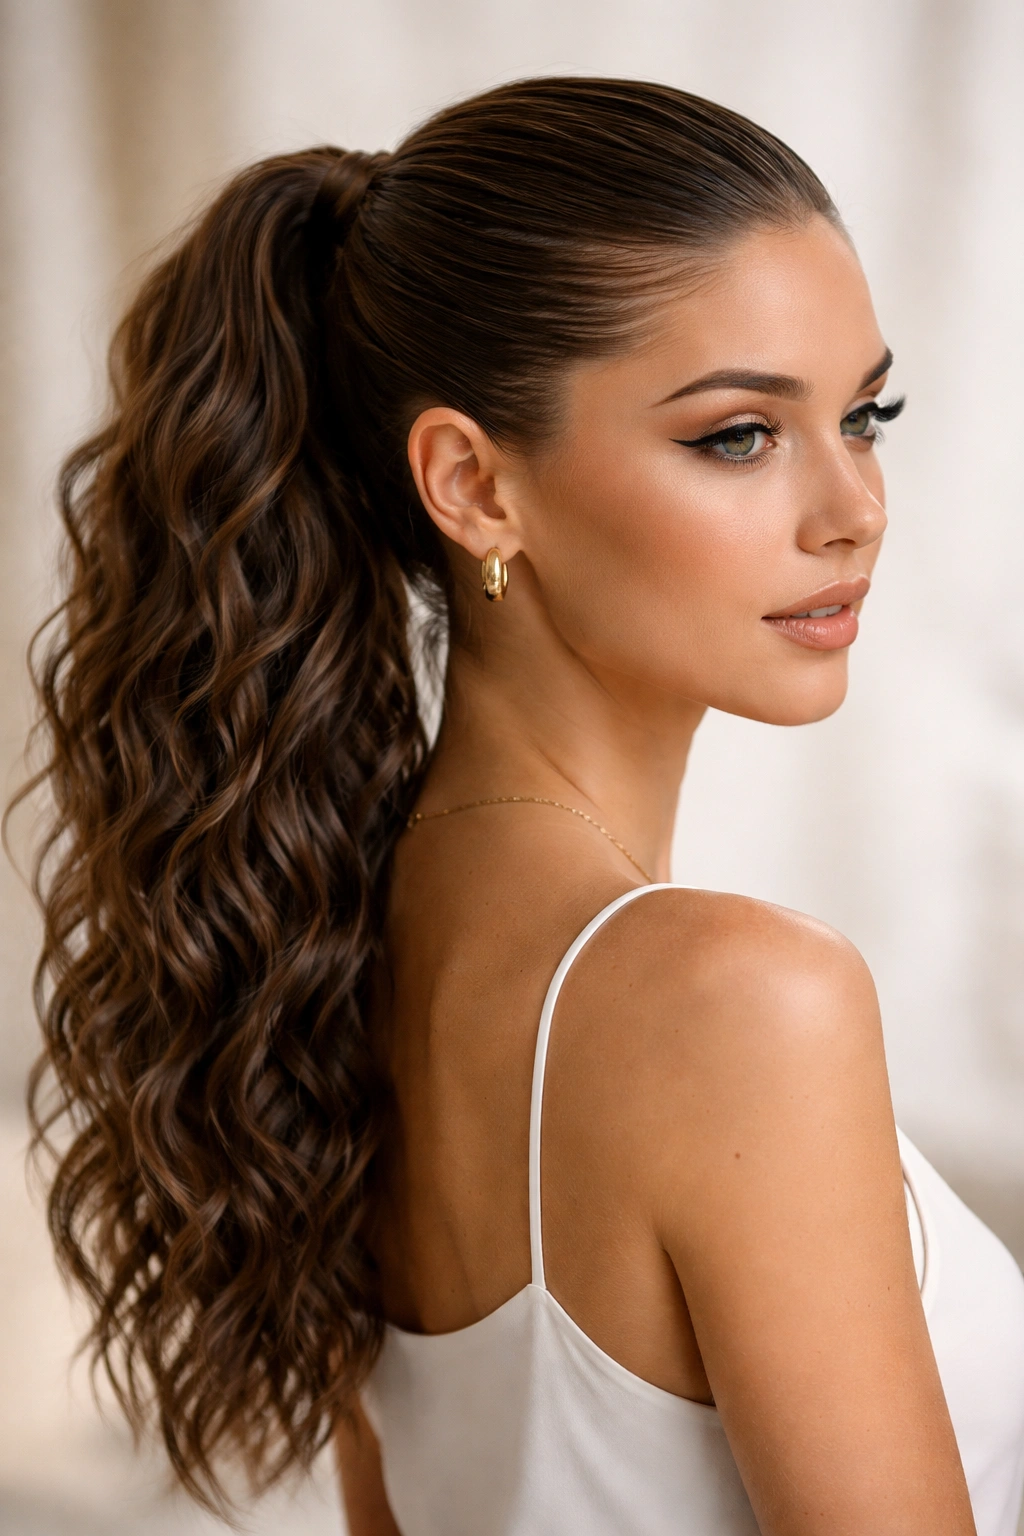
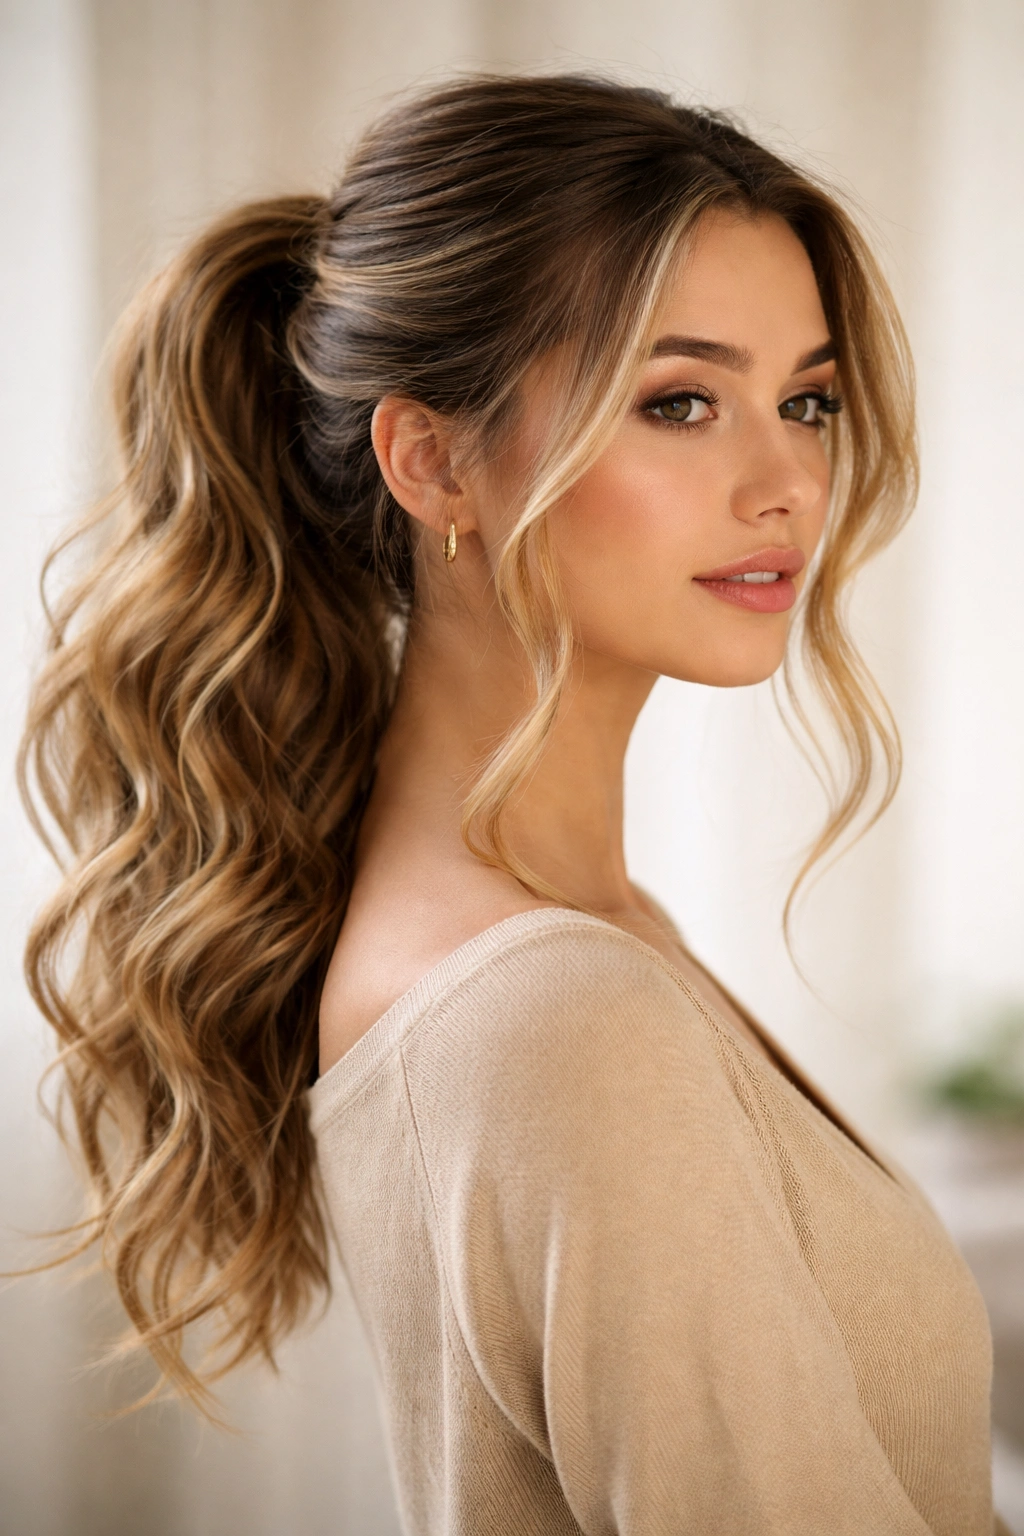
7. The High Voluminous Ponytail With Textured Teasing
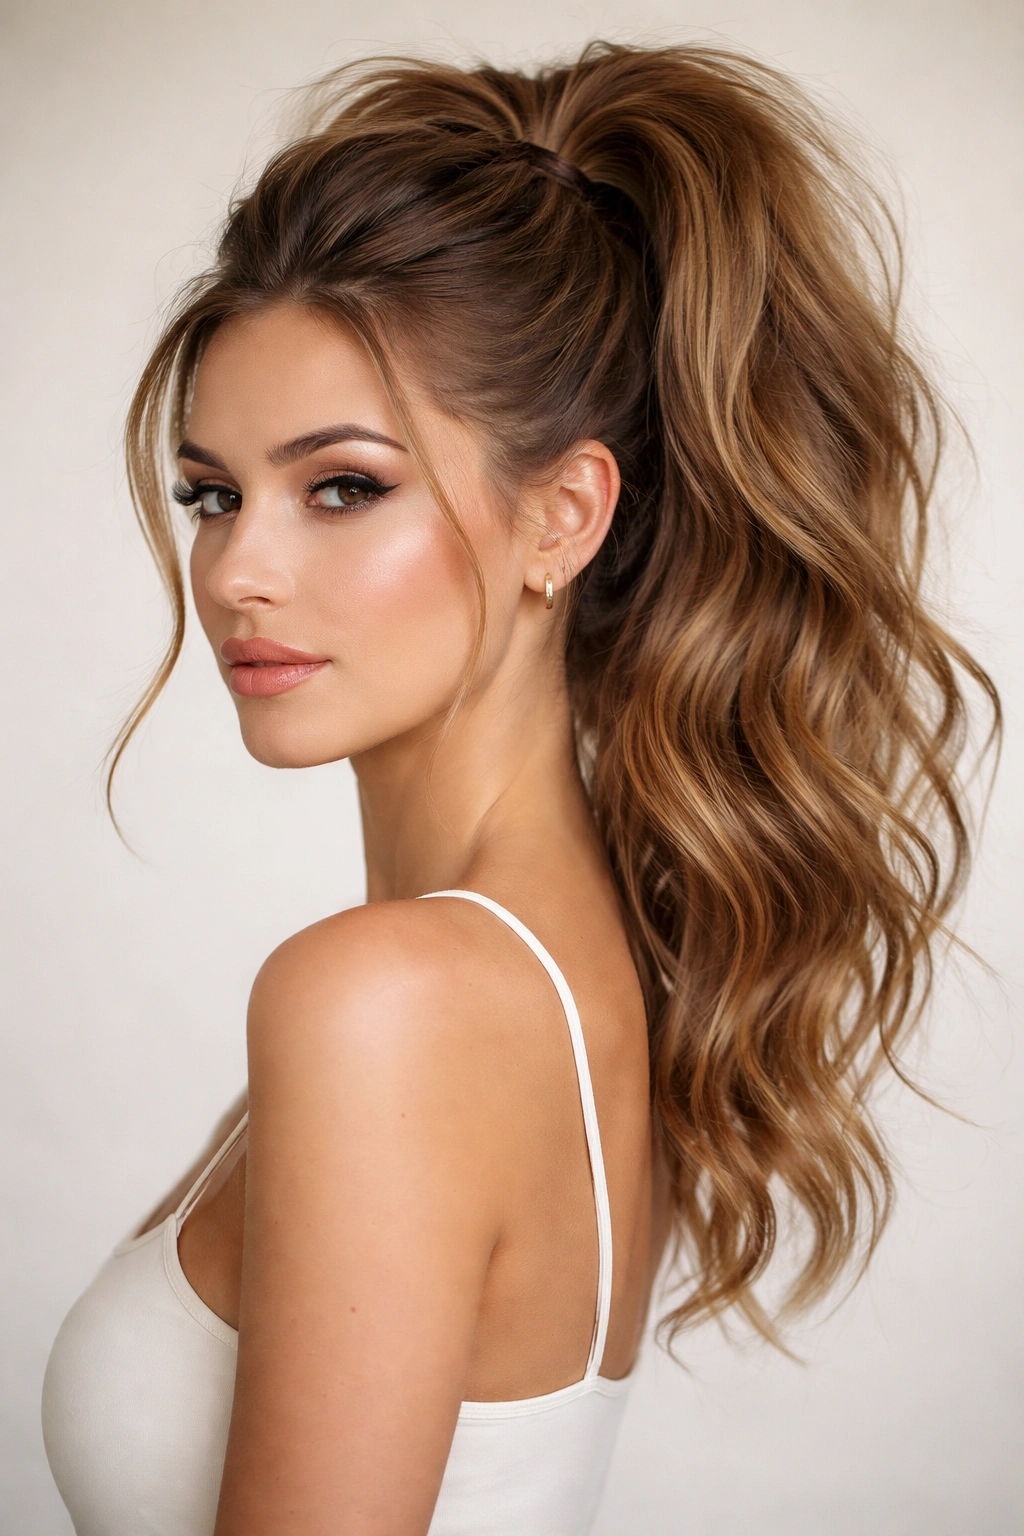
Sometimes you want height and volume, and wavy hair can absolutely deliver that when you use teasing strategically and work with your natural texture rather than flattening it.
Why It Works for Wavy Hair
Teasing works beautifully on wavy hair because the texture already catches and holds the teasing—you’re not starting from a slick straight base. The result is natural-looking volume that reads as intentional styling rather than just having big hair. The high placement combined with the volume creates a really strong, polished look that works for everything from everyday to special occasions.
How to Build It
Start with styled waves—blow-dry with a diffuser, or use a large-barrel curling iron to create loose waves before you begin. Section off the top portion of your hair (crown area). Using a fine-tooth brush or a teasing brush, gently backcomb this section at the roots. Because your hair is wavy, you don’t need to tease aggressively; light teasing creates plenty of volume. Smooth the top layer gently with your brush to create a polished surface over the teased base. Gather the entire crown section and the sides into a high ponytail, leaving some face-framing pieces. Secure with a matte elastic. Take a small section from the ponytail itself, twist it gently, and wrap it around the base of the ponytail to cover the elastic. The volume at the crown combined with the visible waves in the ponytail creates a really dimensional, polished look.
Pro Tip
Less is more with teasing on wavy hair—gentle backcombing that creates texture is more flattering than aggressive teasing that creates frizz.
8. The Sleek Wave Ponytail With Smoothed Crown
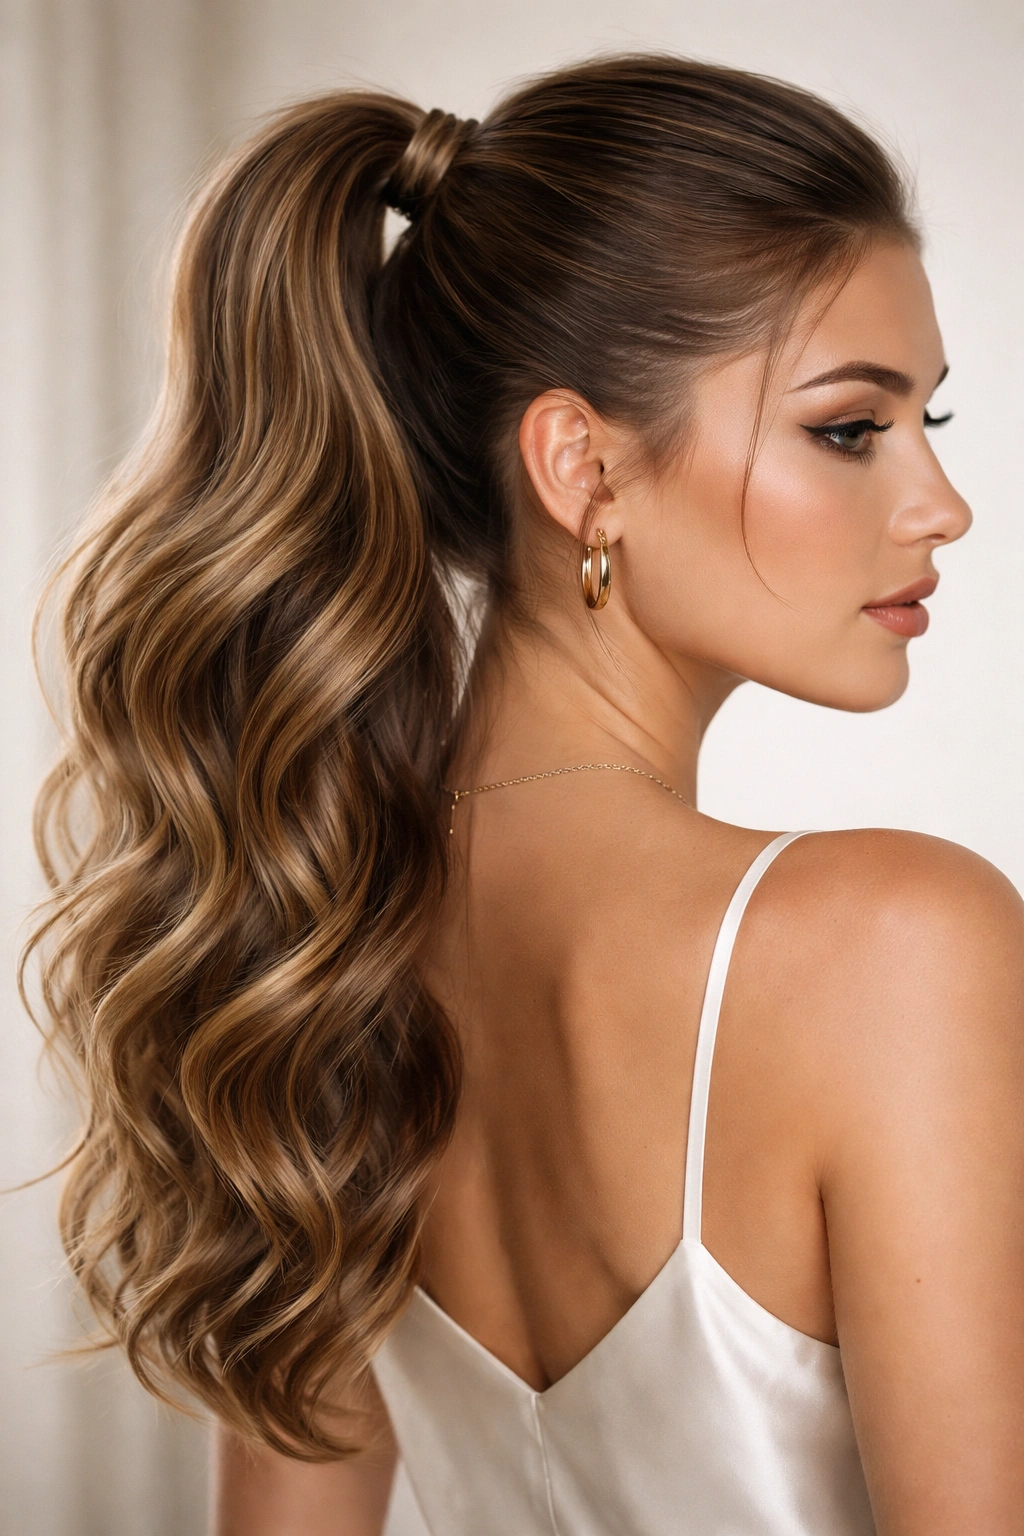
This is your “I look polished and professional” option that still celebrates your waves. The trick is smoothing just the crown while letting the waves show throughout the ponytail itself.
Why It Works for Wavy Hair
You’re getting the sleekness and polish of a smooth ponytail without completely sacrificing the texture and dimension that makes wavy hair special. By smoothing only the crown and leaving the ponytail textured, you’re creating a visual balance between control and texture. It’s sophisticated without looking stiff.
How to Build It
Start with styled waves. Apply a smoothing serum or light gel to the crown area only—not throughout your entire head. Using a fine-tooth comb or a paddle brush, smooth the crown section and create a sleek base. Gather this smoothed crown section and add hair from the sides, creating a smooth, sleek crown that transitions into waves as you move down toward the ponytail gathering point. Secure the ponytail at your desired height with a matte elastic. The ponytail itself shows all your wave texture—don’t smooth it or flatten it. You can use a texturizing spray on the ponytail to enhance the waves even more. The contrast between the smooth crown and the textured ponytail creates a really intentional, polished aesthetic.
When It Shines
This style works beautifully for work settings, formal events, or any time you want to look put-together without looking overly styled.
9. The Braided-Wrapped Low Ponytail
A simple three-strand braid wrapped around the base of a low ponytail adds craft and visual interest while keeping the focus on your waves throughout the style.
Why It Works for Wavy Hair
The braided element adds detail and intentionality, while the loose, textured ponytail below showcases your waves. The braid becomes a visual anchor that makes the entire style look more considered and less “I just threw my hair up.” Because you’re braiding just a small section for the wrap, you’re not fighting against your wave pattern—the braid itself looks textured and intentional.
How to Build It
Create a loose low ponytail, secured with a matte elastic. Take a small section from the top of the ponytail (about ¾ of an inch) and three-strand braid it. Keep the braid slightly loose and textured—you want it to show your wave pattern, not look like a perfect, tight braid. Wrap this small braid around the base of the ponytail, covering the elastic, and secure the end of the braid underneath the ponytail with a bobby pin that matches your hair color. The braided wrap adds visual interest and polish while the waves in both the braid and the ponytail itself create texture and dimension. This style takes about two minutes once you get the hang of it, making it perfect for everyday wear that still looks intentional.
Variation
Instead of a simple three-strand braid for the wrap, you can use a fishtail braid (smaller and more delicate) or a two-strand twist (easier and just as effective).
10. The Slicked-Back Ponytail With Defined Wave Texture
This is the style for when you want everything pulled back and secured but your waves clearly visible and textured throughout. It’s modern, clean, and intentional.
Why It Works for Wavy Hair
While “slicked back” might sound like it’s fighting against texture, you’re actually not smoothing your hair flat—you’re just creating a smooth canvas at the crown while your waves remain clearly defined throughout the length. The result is a modern, almost athletic-looking style that still celebrates your texture. It works beautifully on wavy hair because the waves provide visual interest that a completely slicked look might lack on straight hair.
How to Build It
Apply a gel or smoothing cream to damp hair, focusing on the crown and sides. Using a fine-tooth comb, smooth everything back away from your face—not flat against your head, but smooth and controlled. Gather hair into a high or mid-height ponytail and secure it. Here’s the texture part: on damp hair before applying the gel, use a diffuser on low heat to dry your waves, creating clear wave definition. Then apply the gel to smooth the crown and sides. The waves throughout the length remain textured and defined. You can mist the ponytail with texturizing spray to enhance the wave pattern. The overall effect is sleek and polished at the crown, with clear, defined waves throughout the ponytail.
Best For
This style is great for athletic activities, work, or any setting where you need everything pulled back but still want to show personality through texture.
11. The Looped Waves Ponytail With Decorative Pins
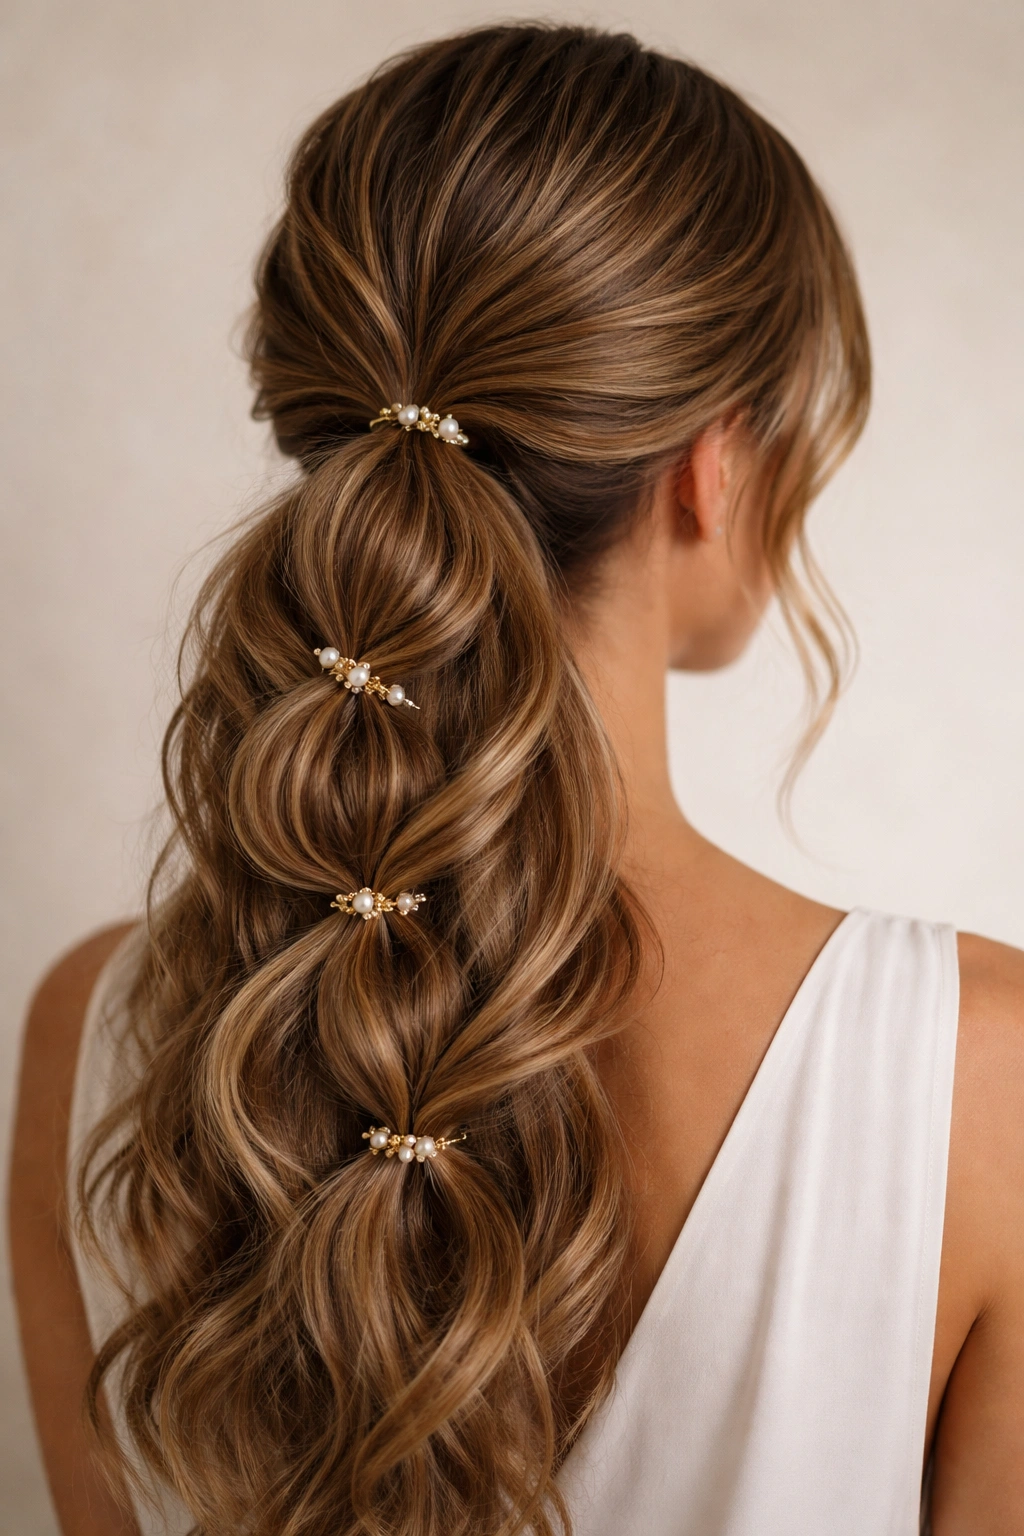
This style creates visual interest and a more artisanal feel by loosely looping sections of the ponytail and securing them with decorative pins or clips that complement your hair color or outfit.
Why It Works for Wavy Hair
The looping creates movement and dimension that plays beautifully with your waves. The decorative pins add a finishing detail that makes the style feel intentional and polished. Because your hair already has texture, the loops and curves look dimensional rather than flat.
How to Build It
Create a low or mid-height ponytail, secured loosely. Rather than letting the ponytail hang straight, take sections of it and create loose loops, pinning each loop in place with a decorative pin or clip. You might create 2-3 loops depending on your ponytail length. The loops don’t have to be perfect or symmetrical—intentional imperfection actually looks more sophisticated on wavy hair. The waves throughout the ponytail and in the loops should be clearly visible. The pins should be visible and intentional, not hidden. This creates a “I definitely spent time styling” look that’s appropriate for dates, nights out, or any event where you want to show off your styling effort.
Pro Tip
The pins don’t have to be expensive or fancy—even simple bobby pins or small clips in metallic finishes look polished and intentional when they’re placed visibly as part of the style design.
12. The Dutch Braid Crown With Low Ponytail
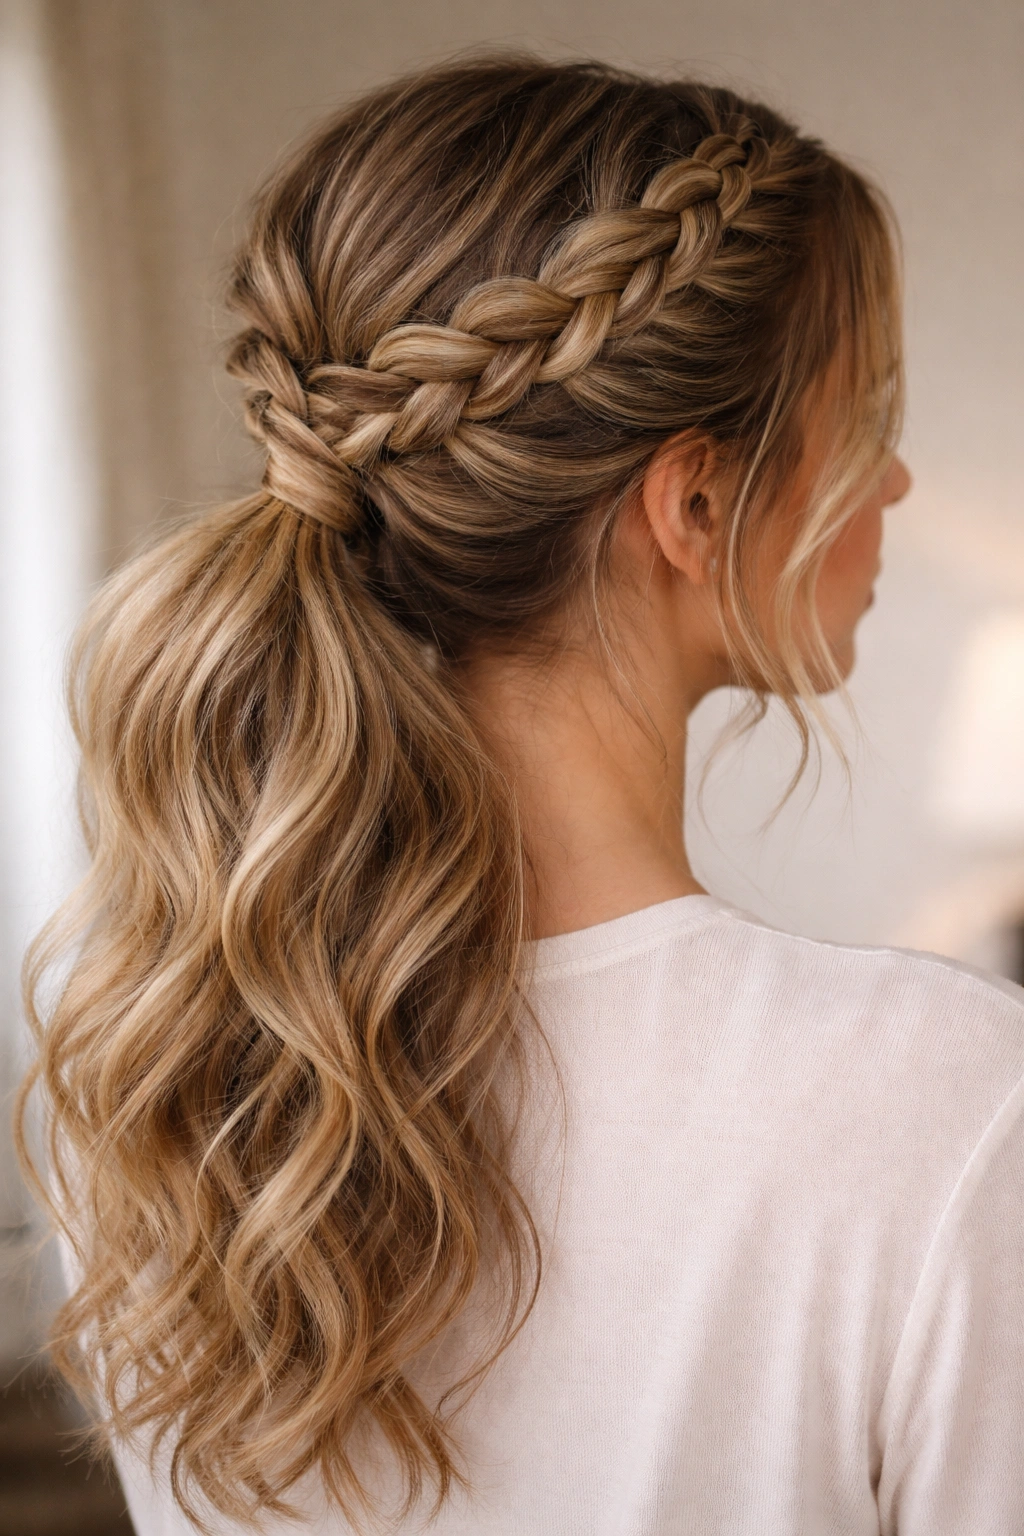
This is your special-occasion style that looks complicated but follows a simple structure: a Dutch braid creating a crown around the back of your head, with a low ponytail gathered underneath.
Why It Works for Wavy Hair
The Dutch braid (braiding under rather than over) creates beautiful texture and dimension that plays perfectly with wavy hair. The waves visible throughout the braid make it look more dimensional than it would on straight hair. The structure is polished and intentional, but the texture keeps it from looking overly formal or stiff.
How to Build It
Start with styled waves. Create a deep side part, then begin a Dutch braid at the front, right at your hairline on the deeper-parted side. Rather than braiding straight back, follow the shape of your head, creating a braid that curves around the back. As you braid, you’re incorporating hair from around your head to create a crown effect. The braid should follow your natural hairline and head shape. Once you reach the opposite side, continue the braid down that side toward your ear. Secure the end of the braid with a small elastic. Now gather the remaining hair (both the bottom section that wasn’t braided and any hair below the braid) into a low ponytail. The braid becomes a beautiful crown detail framing the ponytail. The waves visible throughout the braid add texture and dimension that makes this style feel intentional and special-occasion-worthy.
Difficulty Note
This takes practice, but once you understand the structure and technique, it becomes much easier. Starting with very clearly defined waves makes the braiding easier because you have natural texture to work with.
13. The Space-Bun Ponytail Double Take
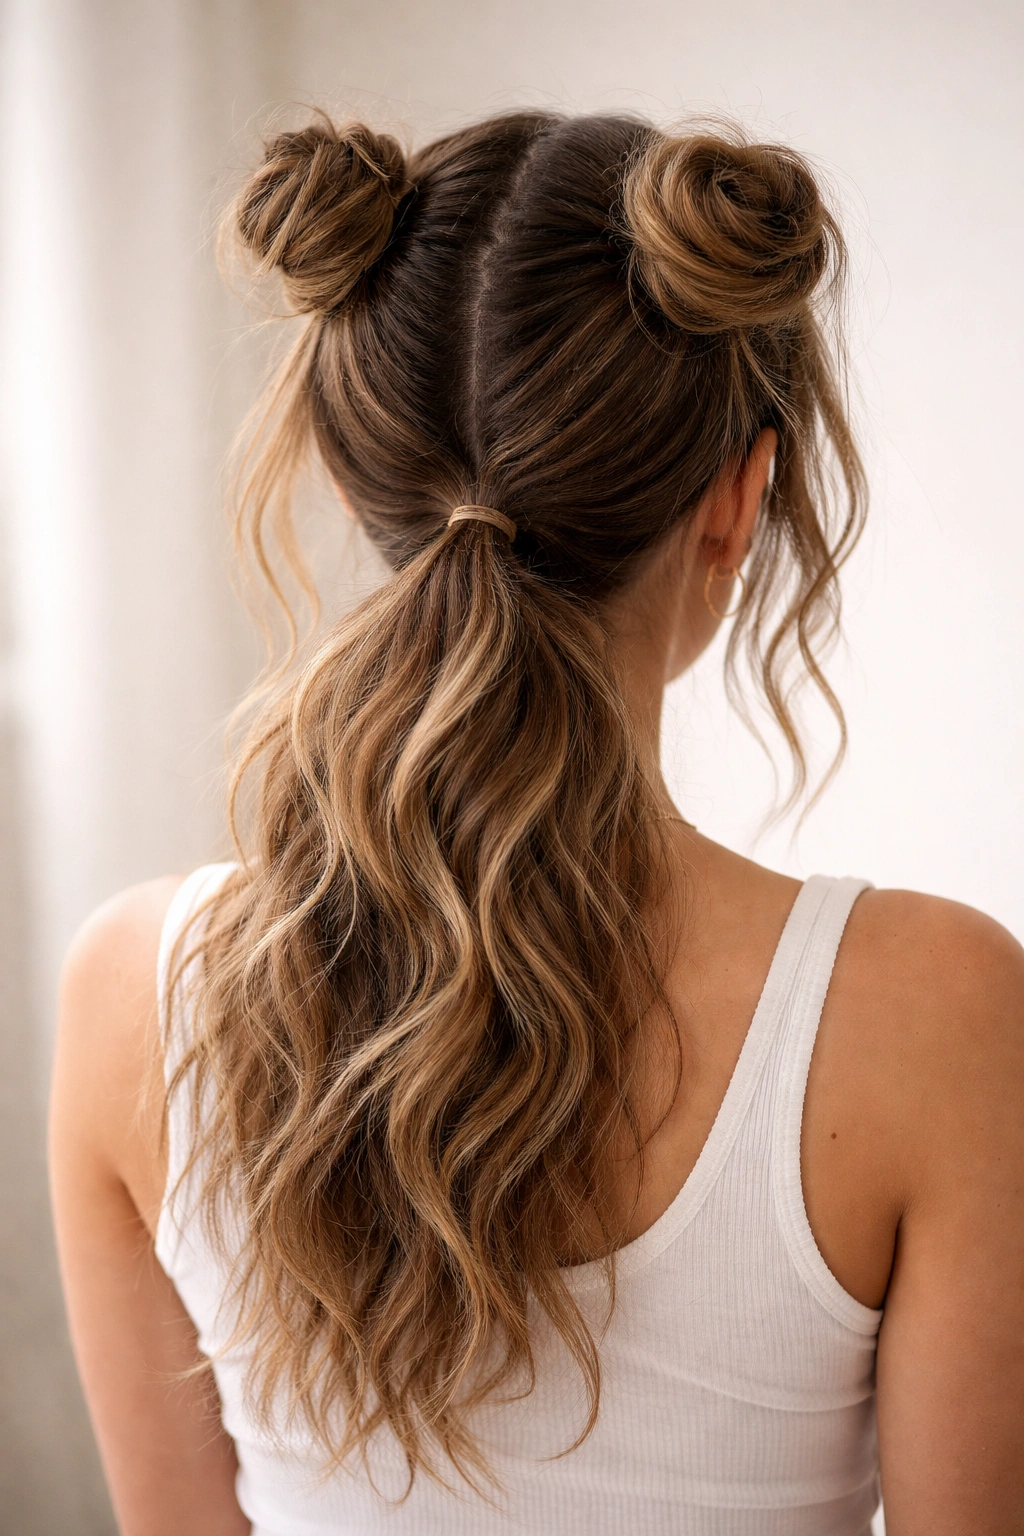
This playful style creates two small “buns” positioned on either side of the back of your head, secured to the sides of a loose wave ponytail. It’s fun, youthful, and surprisingly flattering on wavy hair.
Why It Works for Wavy Hair
The space-bun style relies on volume and texture to look good, and wavy hair delivers both naturally. The two buns are positioned so that the waves in the lower ponytail are the visual focus, with the buns adding a playful frame. This is a style that actually looks better on wavy hair than straight hair because the texture makes everything look more dimensional and intentional.
How to Build It
Create a center part, then section out the top half of your hair and temporarily clip it up. On one side of the lower half, gather hair into a small, loose ponytail about two inches from the part line. Create a loop ponytail (as if making a simple bun) and secure it with bobby pins. Repeat on the opposite side with the other section. Now release the top section and gather all of it (including the two small loops you created) into a larger, loose ponytail at the nape of your neck. The two small loops sit on either side of this larger ponytail, creating that space-bun effect, while the waves throughout the entire style create texture and dimension. The key is keeping everything loose and textured rather than smooth and controlled.
When to Wear It
This style is perfect for casual days, festival looks, or any time you want to inject personality and fun into your styling.
14. The Low Ponytail With Woven-Ribbon Detail
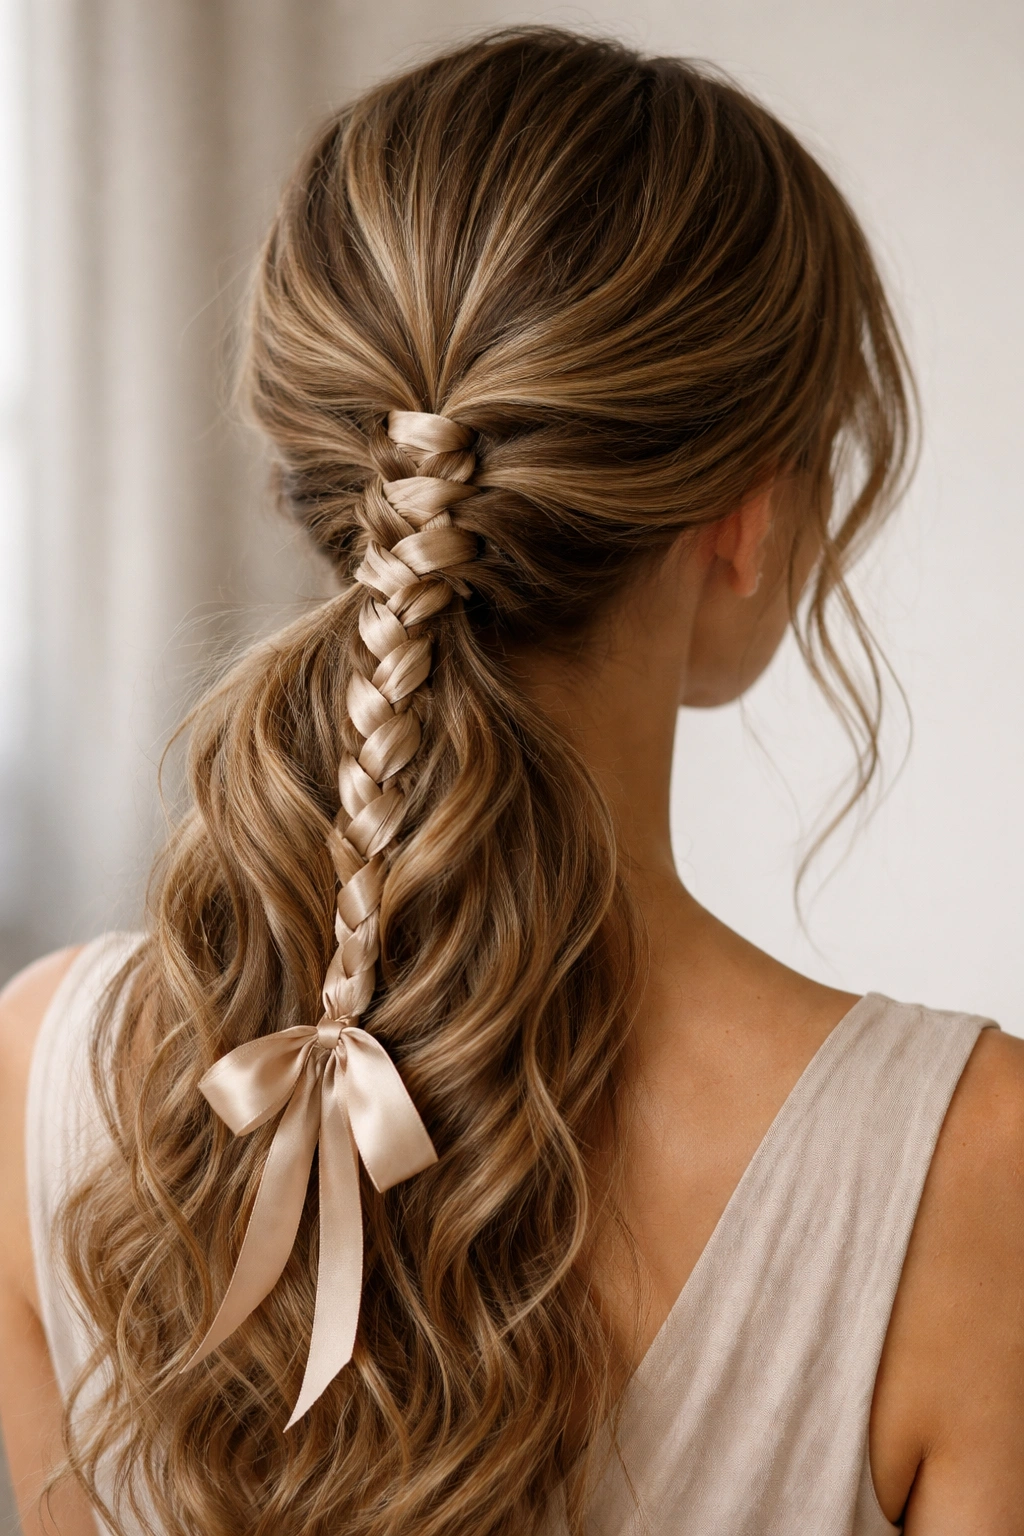
This elegant style incorporates a ribbon or decorative string woven through sections of your ponytail, creating a polished, finished look that’s perfect for special occasions without requiring complex braiding skills.
Why It Works for Wavy Hair
The ribbon adds a polished detail and visual interest without requiring you to manipulate your hair more than necessary. The waves remain visible throughout, and the ribbon becomes the detail that makes the style feel intentional and special. You’re not fighting against your texture; you’re just adding an embellishment that works with it.
How to Build It
Create a low ponytail with loose, wavy texture. Cut a length of ribbon (about 24-30 inches, depending on your hair length) and secure one end with a bobby pin hidden inside the base of the ponytail. Now thread the ribbon through sections of your ponytail by gently pulling the ribbon under and over different sections as you move down the length. The weaving pattern creates visual interest and texture. The ribbon becomes a delicate detail that frames the waves in your ponytail. You can use a thin silk ribbon, a decorative string, or even a thin scarf. The key is choosing something that complements your hair color and the occasion.
Pro Tip
If weaving the ribbon feels complicated, you can also simply wrap it around the base of the ponytail a few times, creating a crisscross pattern, for an equally polished effect.
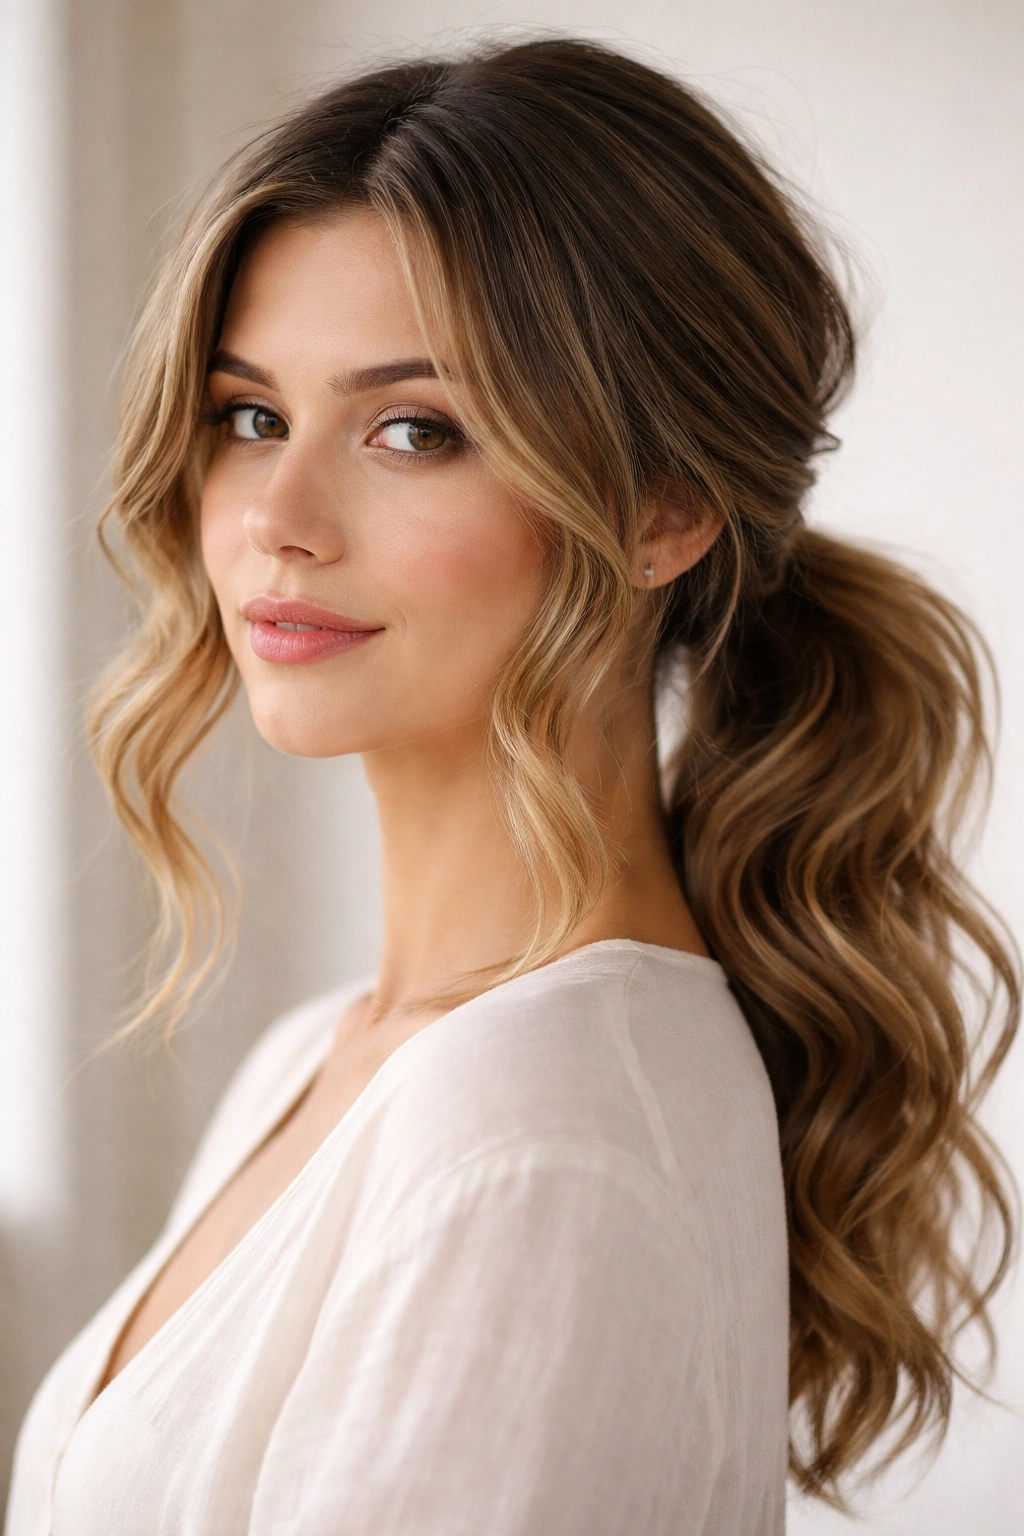
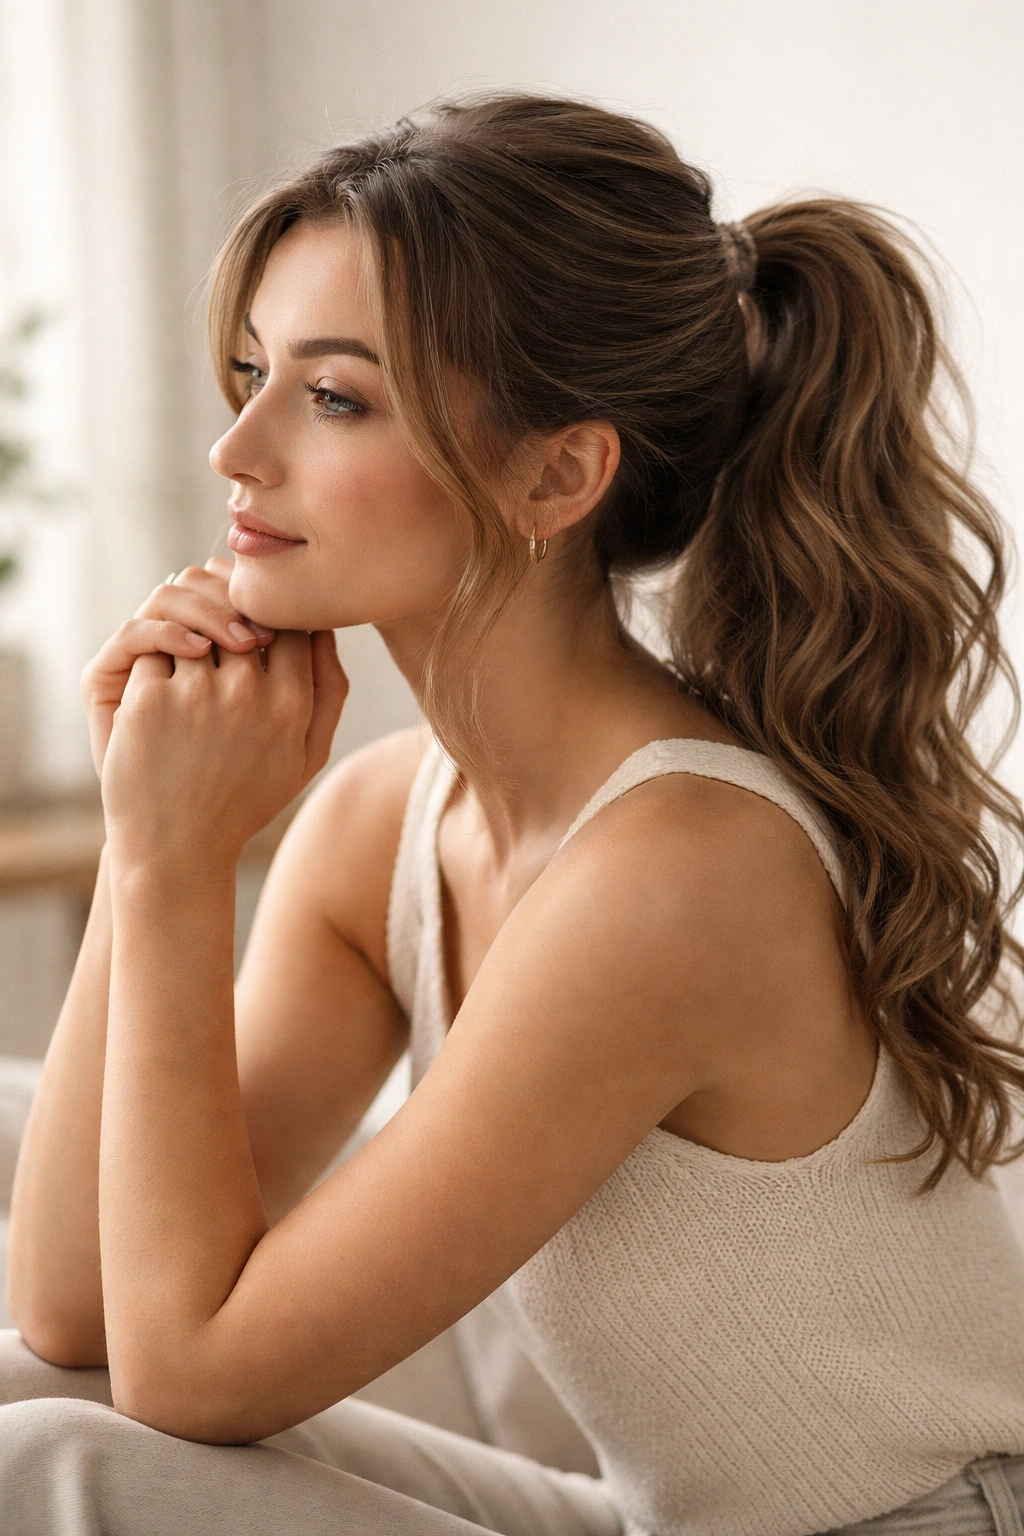
15. The Textured Wave Ponytail With Strategic Face-Framing
This is your everyday hero style—a ponytail that celebrates your waves throughout, with carefully strategic face-framing that creates a soft, flattering effect without looking undone.
Why It Works for Wavy Hair
This style basically says “I love my waves and I’m not apologizing for them.” The entire ponytail showcases your texture, and the face-framing is clearly intentional rather than accidental. It’s polished without being stiff, and it works for everything from casual to professional settings.
How to Build It
Start with styled waves—either air-dried with product, diffuser-dried, or wave-styled with a curling iron. Create a mid-height or low ponytail, gathered loosely so you maintain wave texture throughout. Don’t pull it tight; you want movement and texture to be visible. Now, deliberately pull out face-framing pieces—one or two from each side. These pieces should be chosen specifically to frame your face and soften the overall look. Gently wave these pieces or allow them to fall naturally in waves around your face and neck. The rest of the ponytail stays secured but textured, with the waves clearly visible. Use a texturizing spray or light hairspray to enhance the wave pattern and help keep those face-framing pieces falling naturally.
The Secret
The secret to this style is the intentionality of the face-framing. These pieces aren’t falling out by accident—you’ve placed them there deliberately to create a specific effect. That intention is what makes it look polished rather than undone.
Final Thoughts
Wavy hair is genuinely one of the most versatile textures to work with when it comes to ponytails, but only if you’re choosing styles and techniques that actually complement your texture rather than fight against it. The 15 styles above all share one thing in common: they respect and celebrate your waves instead of trying to erase them.
The best ponytail for your wavy hair is ultimately the one you’ll actually feel confident wearing. Some days that’s the soft, undone low ponytail. Other days it’s the Dutch braid crown for something special. The key is understanding that your waves are an asset, not an obstacle—they add dimension, texture, and visual interest that straight hair requires more effort to create. You’re literally starting with an advantage.
Start with one or two of these styles that resonate with you, practice them a couple of times, and let yourself get comfortable with the technique. Once you nail a couple of styles, your hair will cooperate more easily, and you’ll find yourself reaching for them again and again. Before long, you’ll probably start adapting and mixing elements from different styles to create your own signature ponytail look that feels uniquely you.