Prom is one of those nights where every detail matters—your dress, your makeup, and especially your hair. While up-dos get plenty of attention, a well-executed ponytail can be just as stunning and often more practical for a long evening of dancing. The beauty of a prom ponytail is that it can range from sleek and sophisticated to romantic and textured, giving you options that work with virtually any dress style or personal aesthetic.
A great prom ponytail does several things at once: it keeps hair off your face and neck so you’re comfortable throughout the night, it photographs beautifully from every angle, and it holds strong through hours of movement without falling apart. The key difference between a casual ponytail and a prom-worthy one lies in the preparation, the styling technique, and the thoughtful details—like strategic teasing for volume, careful placement for balance, or subtle accessories that elevate the overall look.
Whether you’re aiming for glamorous, romantic, modern, or classic elegance, there’s a ponytail style that will feel like the perfect finishing touch to your prom look. Many of these styles work equally well for other formal occasions like pageants, galas, weddings, or evening events. The styling principles remain the same: invest in proper preparation, don’t skip the texturing step, and choose placement and details that complement both your face shape and your outfit.
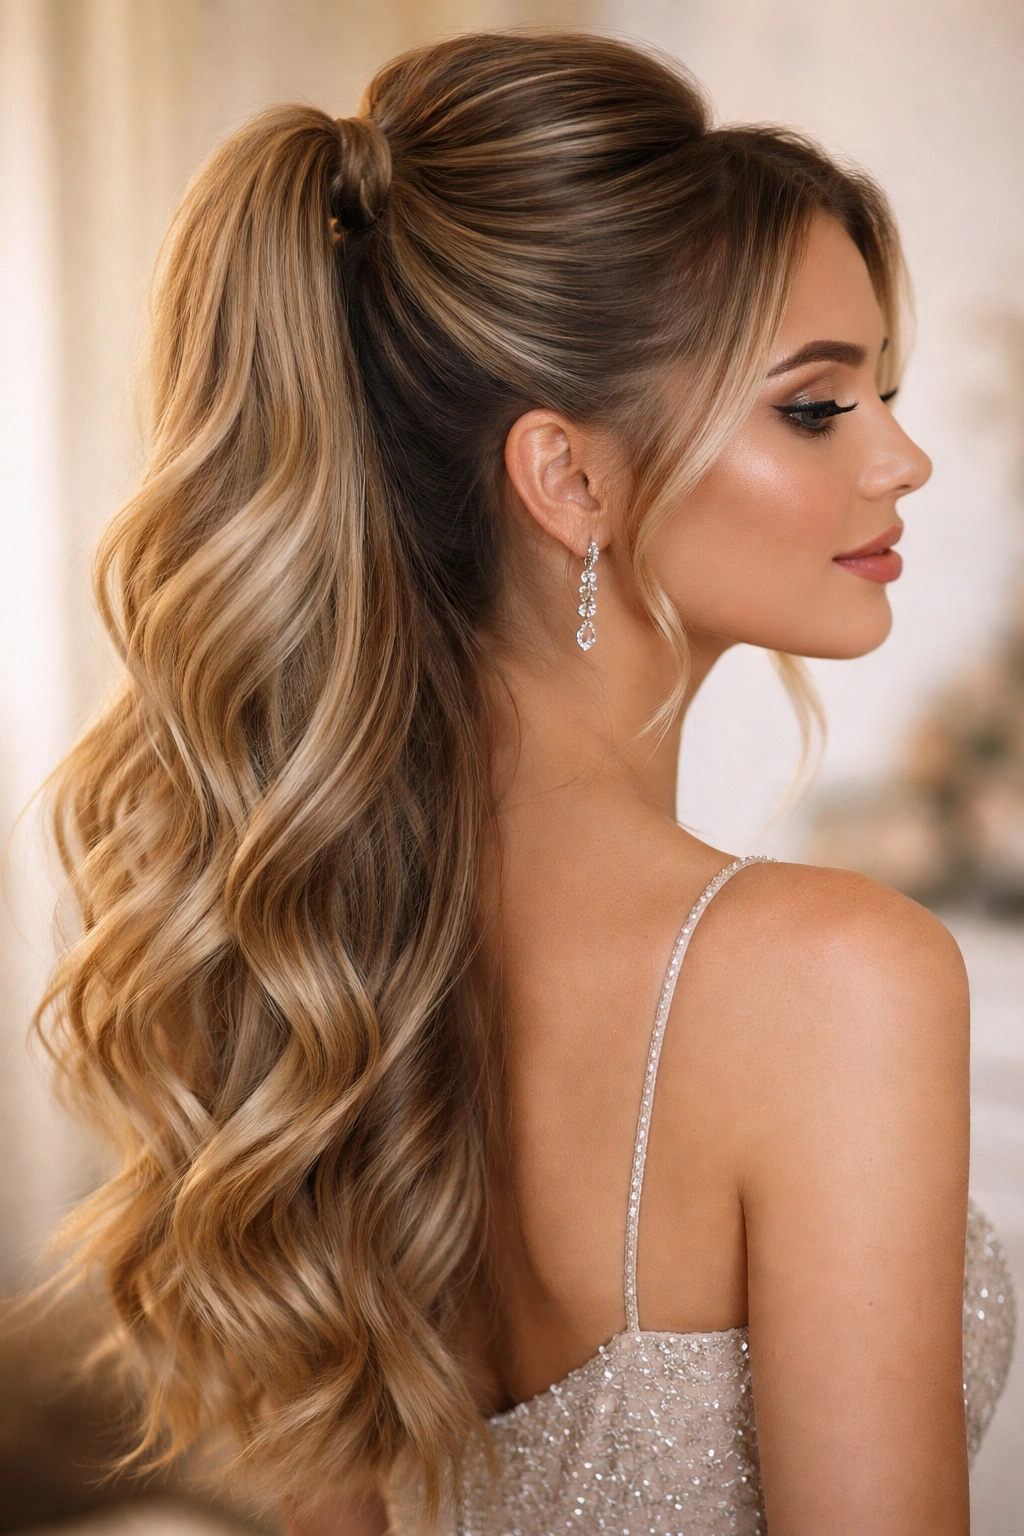
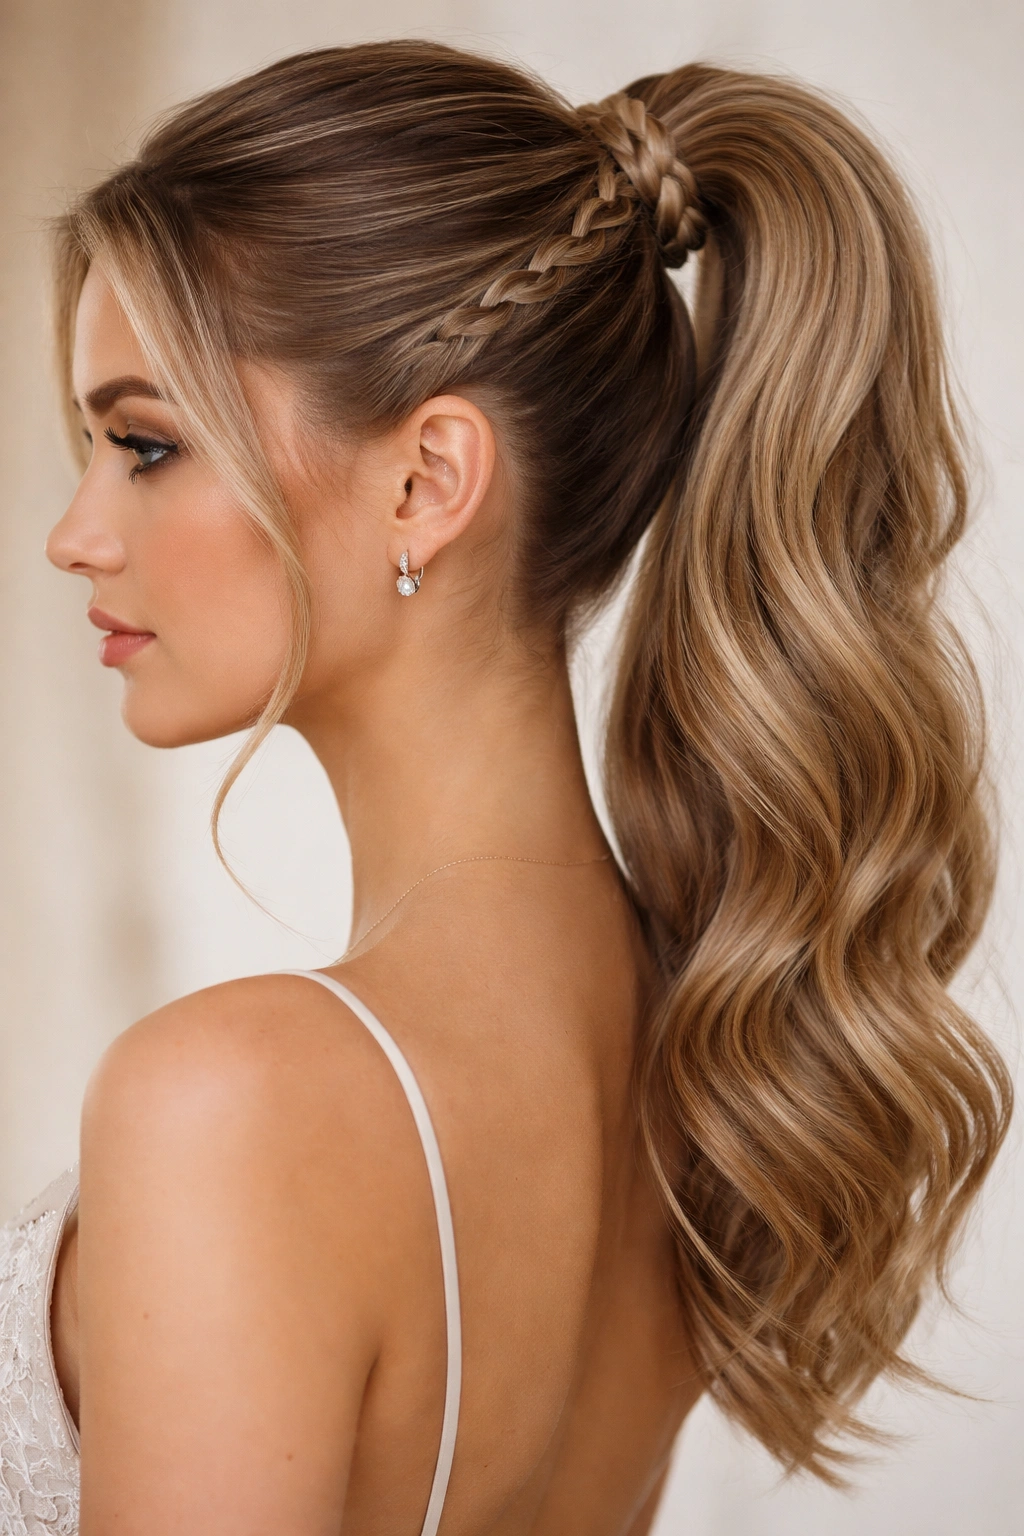
1. The Classic High Pony with Volume
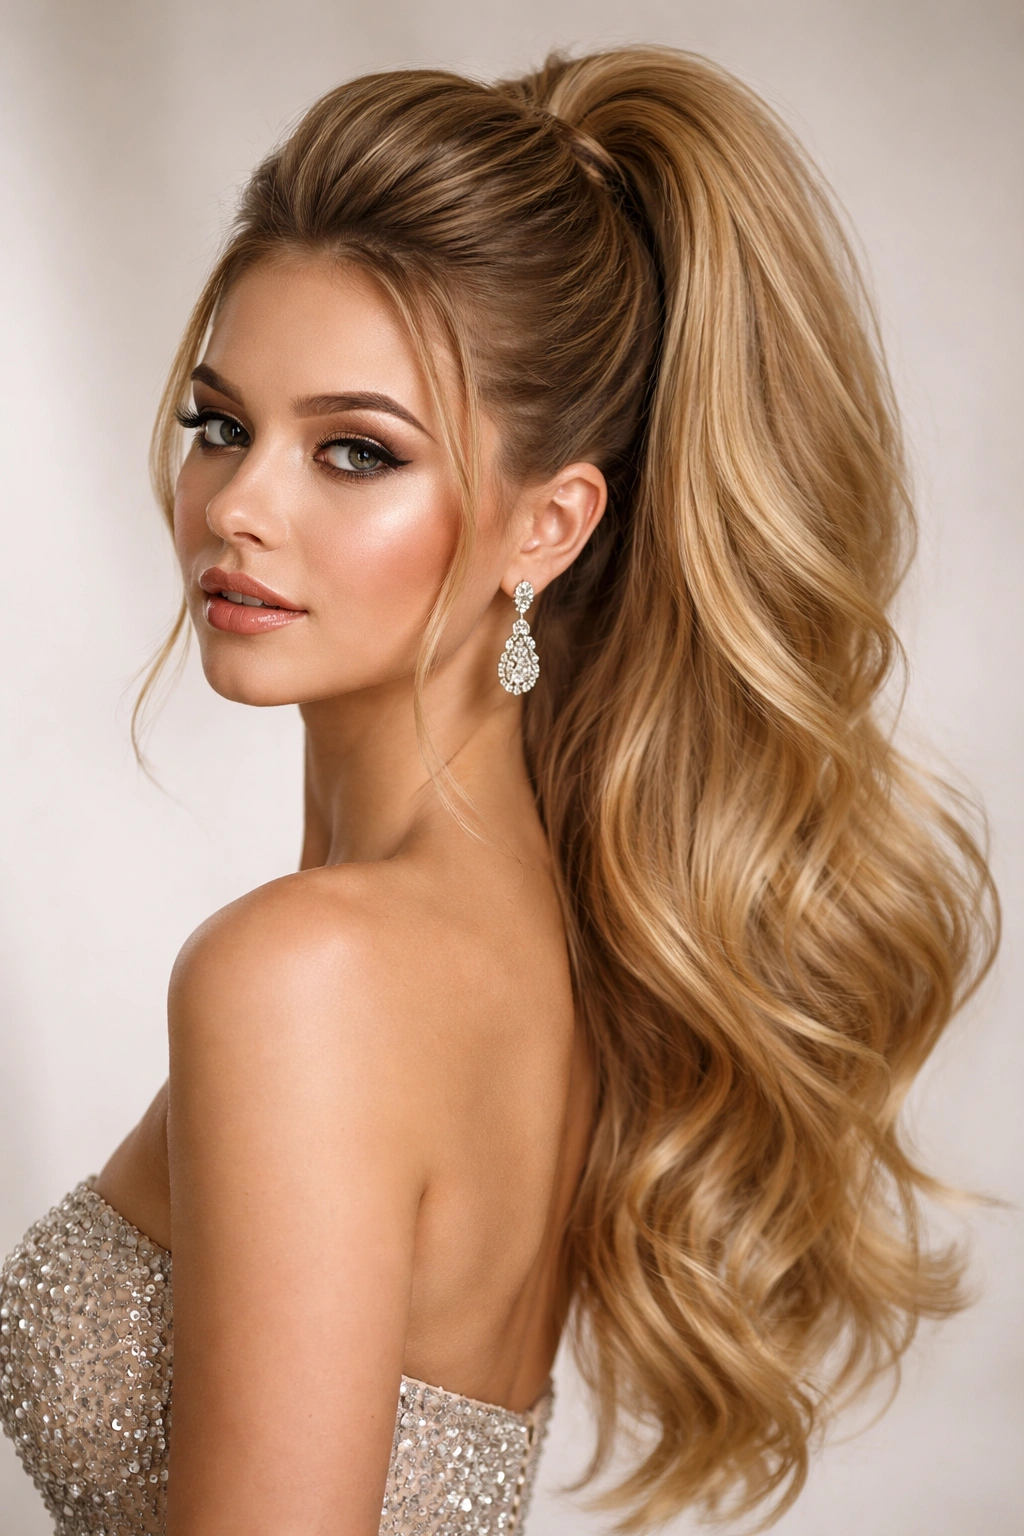
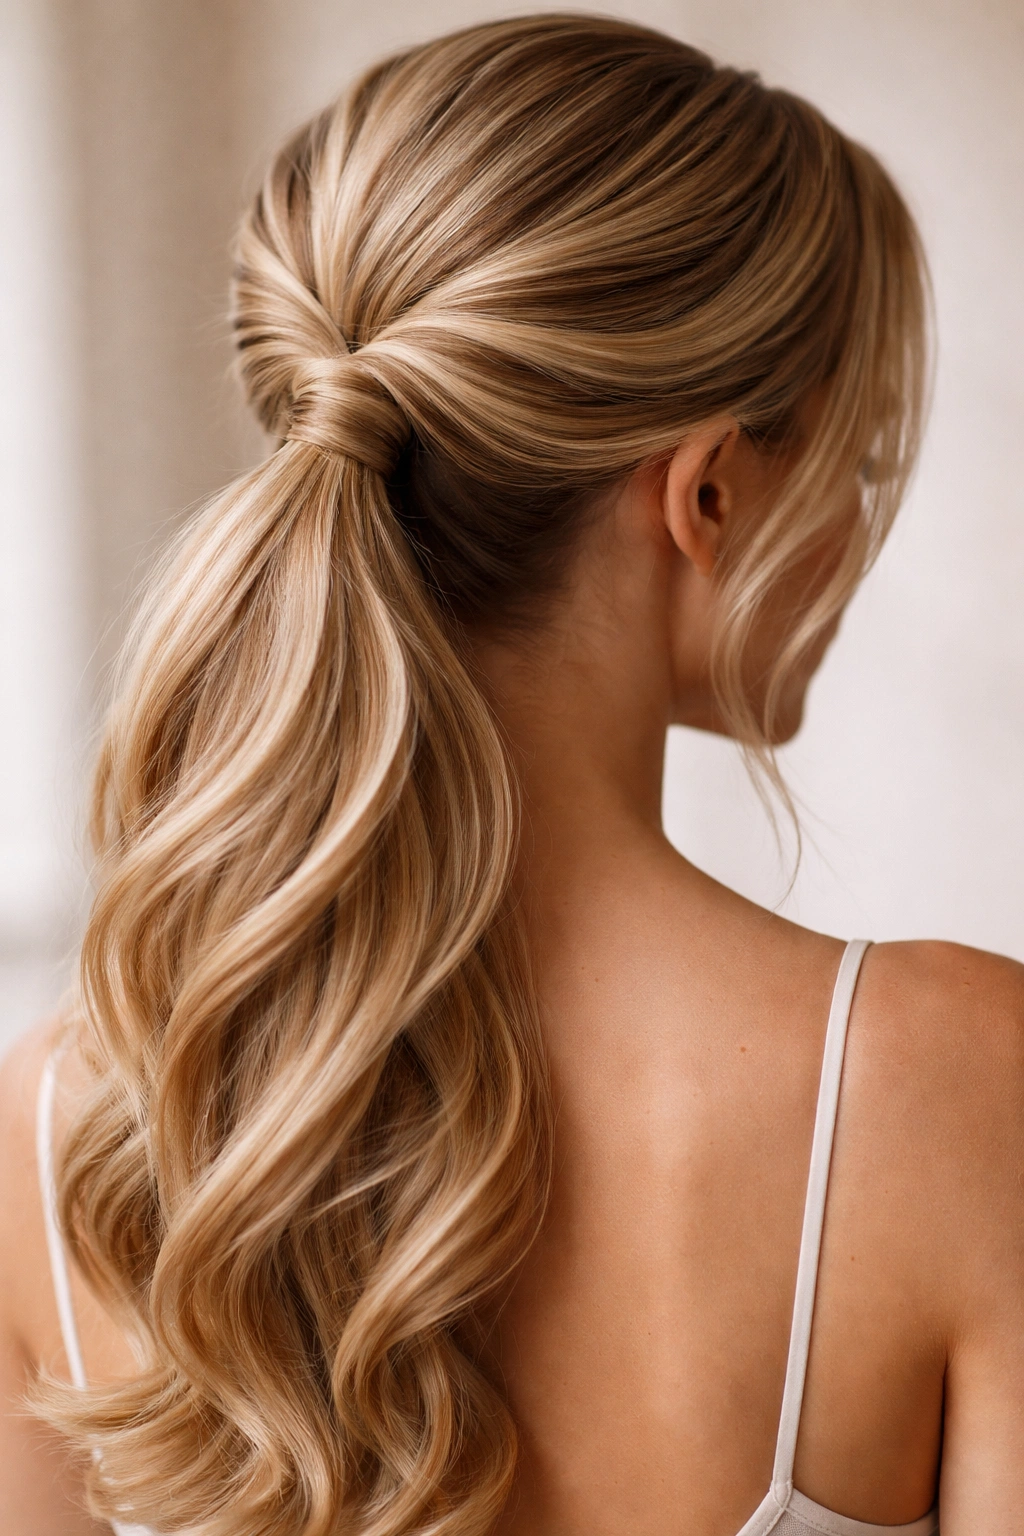
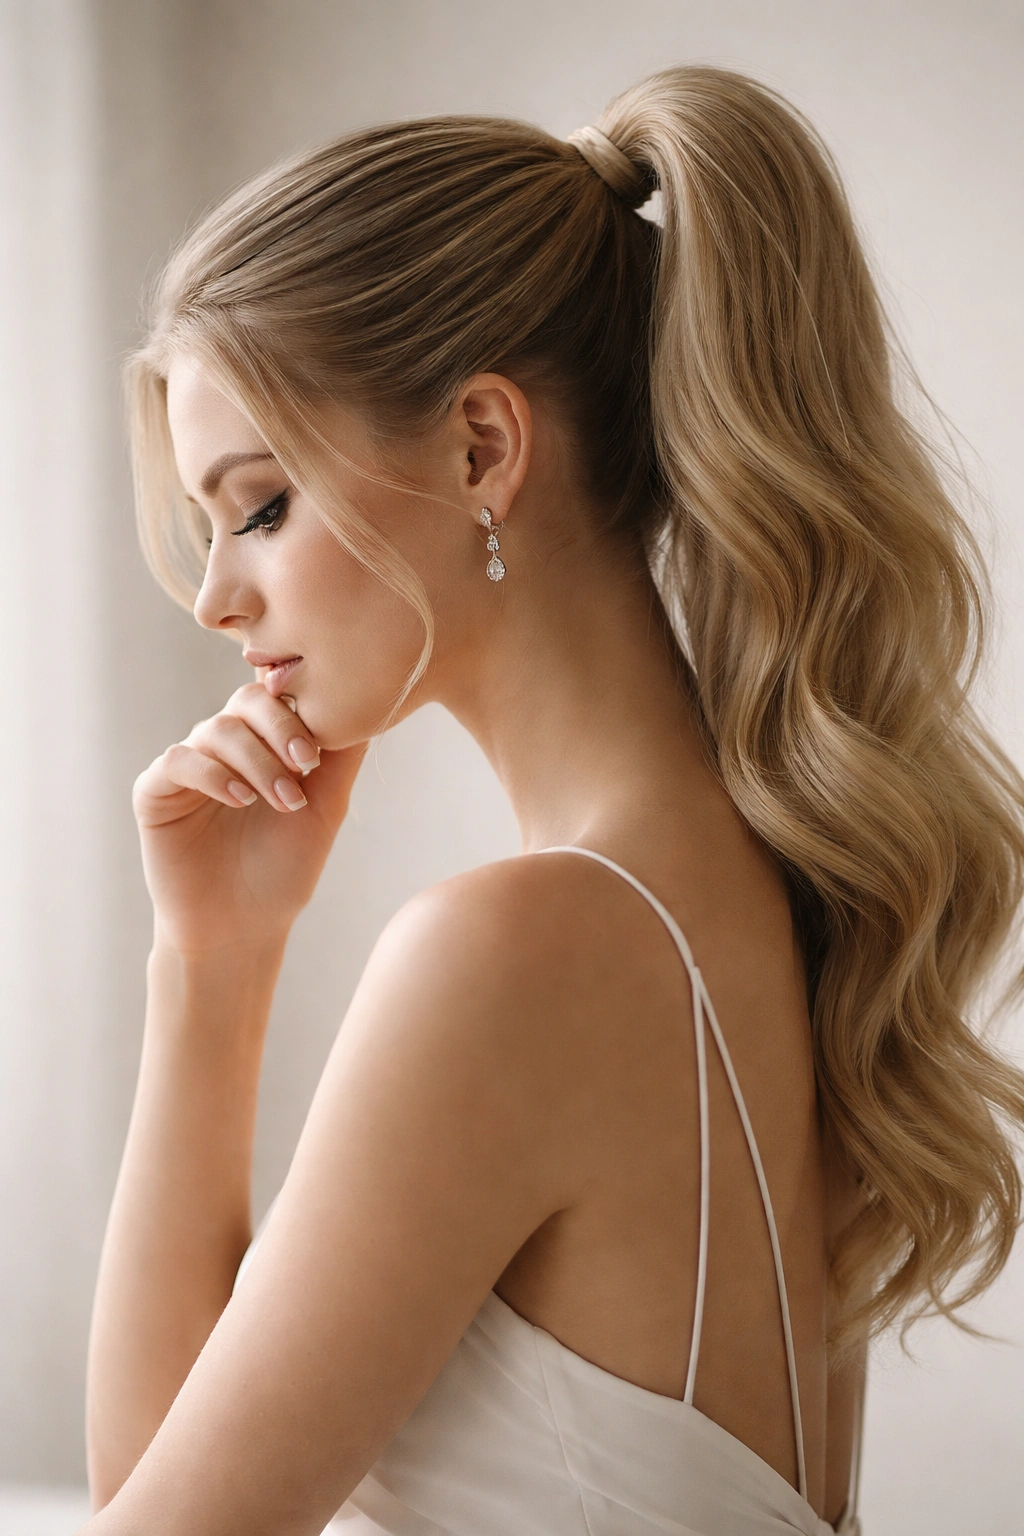
This is the go-to prom ponytail for a reason—it’s timelessly elegant, flattering on most face shapes, and absolutely photograph-ready. The magic happens in the execution: you’re aiming for a high placement (roughly at the crown of your head) combined with strategic teasing that creates a lifted, voluminous effect rather than a sleek flat style.
How to Build the Volume
Start with textured hair, either from a braid-out, waves, or lightweight mousse applied to damp hair before blow-drying. Blow-dry your hair in sections, focusing a blow dryer upward at the roots to encourage natural lift. Once fully dry, use a fine-tooth comb or teasing brush to backcomb the crown section, focusing on the area where your ponytail will sit. Tease gently but thoroughly—you want significant volume without creating a matted mess. Smooth the outer layer with your comb to create a polished surface while preserving the lift underneath.
Pro Styling Tips
- Apply a light hairspray before teasing to help the texture grab and hold longer
- Position your ponytail slightly back from the crown rather than directly on top—this creates a more flattering silhouette that works with your face shape
- Use a clear elastic or one that matches your hair color to keep focus on the ponytail itself
- Wrap a small section of hair around the elastic base to hide it completely—this instantly looks more finished and intentional
- Pin the wrapped section underneath with a bobby pin for security
Quick Facts
- Best hair length: shoulder length or longer
- Hold time: 6-8 hours with proper hairspray
- Skill level: Intermediate (the teasing technique takes practice)
- Works best with: Straight or mildly wavy hair that’s been blow-dried smooth
- Dress pairing: Any style, but especially stunning with open-back or sweetheart neckline dresses
2. Twisted Low Pony with Braided Detail
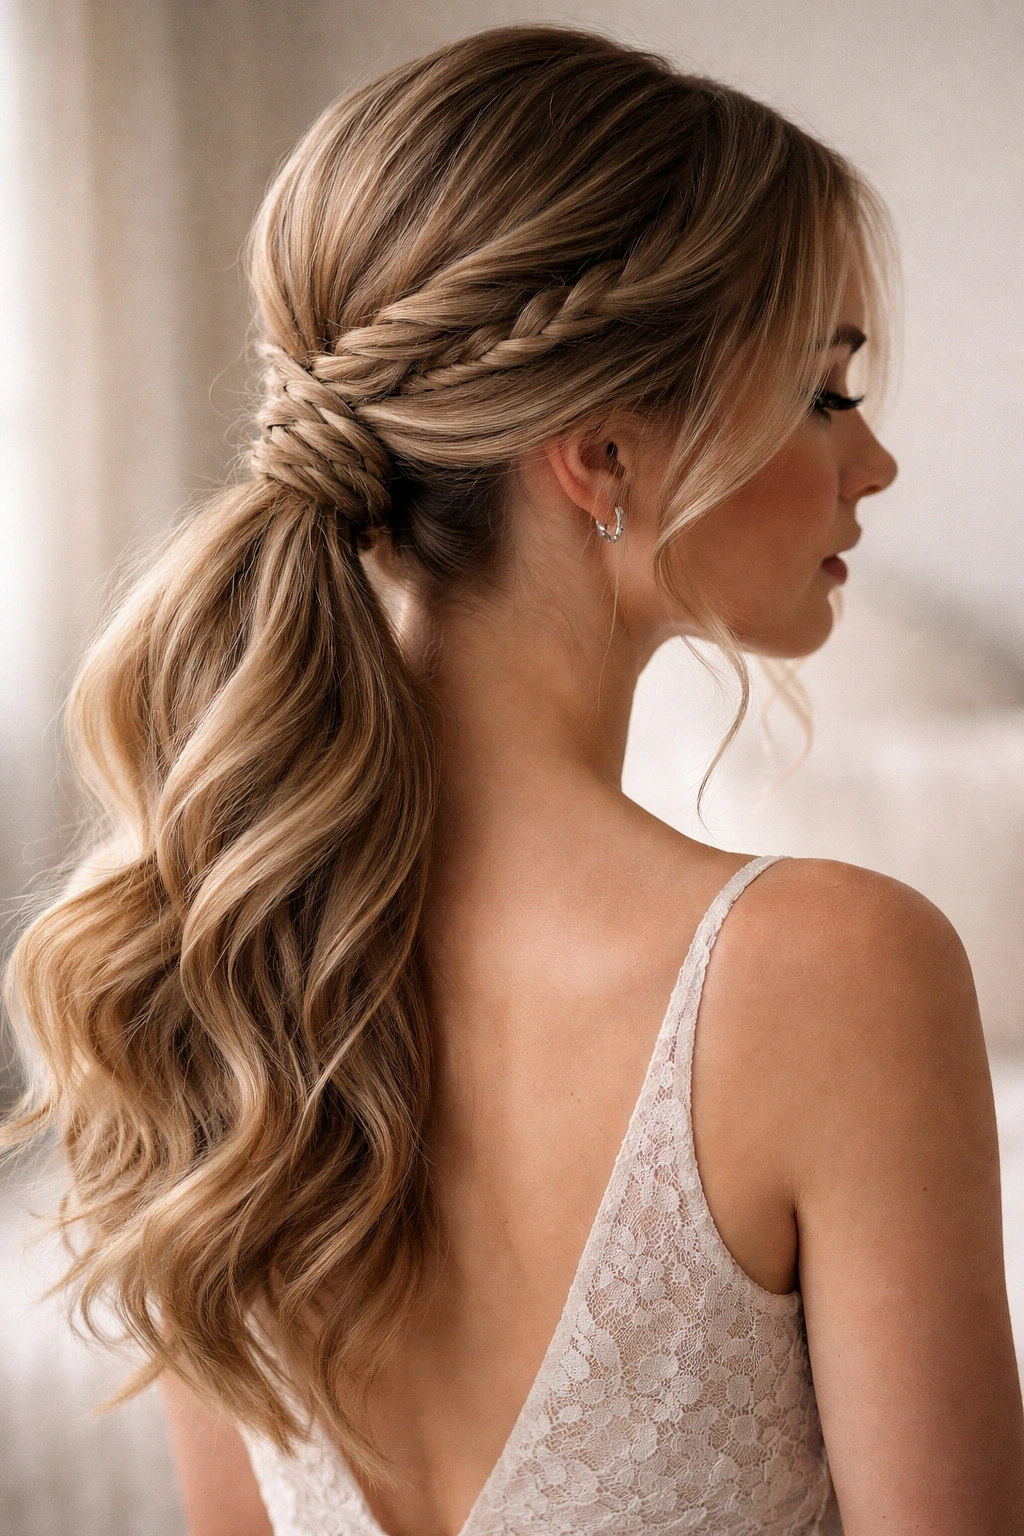
This style bridges the gap between romantic and sophisticated by combining a low ponytail placement with subtle braiding that adds visual interest and movement. It’s particularly flattering if you have a longer face shape, and it works beautifully with delicate updo accessories.
Creating the Twisted Elements
Begin with soft waves or curls throughout your hair—these give you texture to work with and make the twists hold better. Section your hair from one ear, taking a two-inch vertical section. Divide it in half and twist the two pieces around each other, moving toward the back of your head. As you twist, occasionally incorporate loose sections of hair from below, similar to how you’d braid, but keeping the twist motion consistent. Repeat on the other side, and allow both twists to meet at the nape of your neck where you’ll gather your full ponytail.
Securing the Look
Use a small clear elastic to gather the ponytail, positioned low at the back of your head—roughly where your natural hairline ends. The twists frame your face and draw attention toward it, which is why this works so well for prom photos. Smooth any flyaways with a fine-mist hairspray, and consider leaving one or two delicate face-framing pieces loose for a softer effect.
Quick Facts
- Texture requirement: Waves or loose curls (straight hair won’t hold the twists)
- Best accessory: Delicate pearl pins, small comb clips, or minimalist metal hair clips
- Ideal for: Heart-shaped or longer face shapes
- Hold time: 5-7 hours (the twists loosen slightly as you move)
- Styling time: 20-25 minutes including wave creation
3. Sleek Slicked-Back Pony
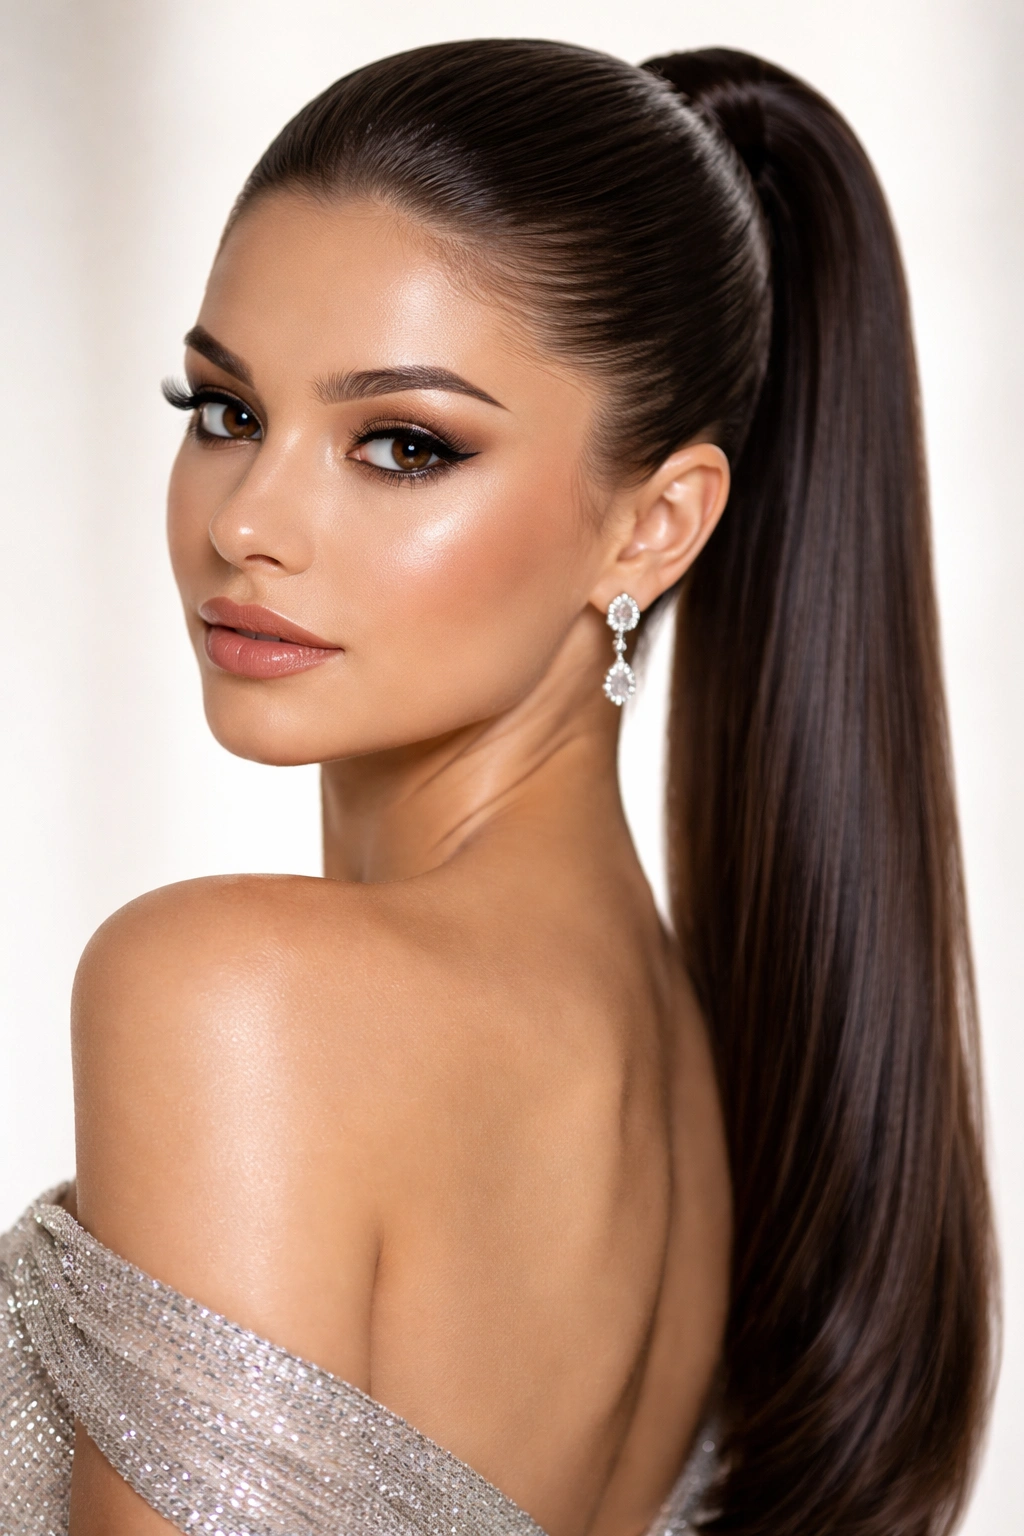
Sometimes elegance means simplicity. A sleek, high-gloss ponytail is striking, modern, and shows off your facial features beautifully. This style demands healthy, shiny hair and precision technique, but the payoff is undeniable drama and sophistication.
Achieving the Sleek Finish
Start with freshly washed hair that’s been blow-dried completely smooth—any moisture or texture will interfere with the sleek effect. Apply a smoothing serum or lightweight anti-frizz cream to damp hair before blow-drying for extra shine and frizz control. Once fully dry, use a fine-tooth comb or smoothing brush to brush hair straight back from your forehead, maintaining even tension as you move toward the back. The key is to pull everything back consistently without lumps or bumps.
Getting Maximum Shine
A gel-based edge control product (the kind typically used for smooth baby hairs) works wonders for getting a polished, glossy finish on the entire ponytail. Apply it sparingly to the hairline and smooth over the surface of the gathered ponytail with your brush or a small comb. This reflects light beautifully in photos and keeps the style looking intentional and finished. Finish with a strong-hold hairspray to lock everything in place.
Quick Facts
- Hair preparation: Must be completely smooth and frizz-free beforehand
- Products needed: Smoothing serum, gel-based edge control, strong-hold hairspray
- Ponytail placement: High or mid-level works equally well
- Face shape best for: Works beautifully on oval and oblong face shapes
- Styling difficulty: Intermediate (the technique is simple, but execution requires precision)
4. Romantic Side Ponytail
A side ponytail positioned just behind one ear creates an inherently romantic, slightly off-balance composition that photographs from angles that flatter most faces. This style is particularly stunning with soft curls and a slightly lower placement that feels more relaxed than a traditional high pony.
Building the Romantic Texture
Create loose, romantic curls throughout your entire head using a large-barrel curling iron or by braiding your hair overnight and releasing the braids in the morning. The curls should be soft, not tight ringlets—think of the texture you’d see in a romanticized period drama. Once your curls are set, run your fingers through them gently to break them up slightly and create a softer, more lived-in texture rather than a uniform spiral effect.
Positioning for Maximum Impact
Gather your ponytail to one side, positioning it just behind and slightly below your ear rather than at the very nape of your neck. This asymmetrical placement feels modern and romantic simultaneously. Leave a few thin strands loose around your face on both sides—these frame your features and soften the overall effect. Secure with a clear elastic and wrap a small strand of hair around the base.
Accessory Ideas
- Delicate flower pins or hair flowers tucked into the ponytail base
- A small pearl or crystal comb positioned just above the elastic
- Thin metallic ribbons woven throughout the curls
- Minimal accessories work best; let the curls be the star
Quick Facts
- Best hair length: Mid-back or longer (side pony looks fuller with more length)
- Texture: Soft, loose curls or waves (straight hair looks too modern for this romantic effect)
- Face-framing: Essential—always leave at least one piece loose on each side
- Ideal dress style: Romantic, ethereal, or vintage-inspired gowns
- Hold time: 6-8 hours with curling product and light hairspray
5. Double Bubble Ponytail

This playful, trendy style involves creating a single ponytail and then dividing it into sections that are gathered multiple times down the length, creating a bubble or stacked ball effect. It’s eye-catching, modern, and surprisingly elegant when done with polish and the right sizing.
Creating Perfectly Sized Bubbles
Gather your hair into a ponytail at your desired height and secure with a clear elastic. Now measure roughly three inches down from that elastic and create another section using a second clear elastic, gathering only the hair from the previous section (not additional hair from your head). Slide that second elastic down until it’s snug, creating a bubble of hair above it. Repeat this process down the entire length of your ponytail, spacing the bubbles evenly—typically 2.5 to 3 inches apart.
Making It Prom-Worthy
The difference between a cute bubble pony and a sophisticated prom version is in the finishing. Gently fluff each bubble by pulling the hair slightly outward and upward to create dimension and fullness. Use a fine-tooth comb to smooth the outer layer of each bubble while maintaining the volume underneath. A light mist of hairspray keeps the shape defined throughout your night.
Styling Variations
- Create larger bubbles with more space between elastics for a dramatic effect
- Tease inside each bubble before securing the next elastic for extra volume
- Wrap a thin strand of metallic ribbon around each elastic for a glamorous touch
- Position the first ponytail slightly off-center for a more interesting composition
Quick Facts
- Hair type: Works on straight, wavy, or curly hair
- Skill level: Beginner to Intermediate (the technique is straightforward but requires precision)
- Time required: 15-20 minutes
- Best paired with: Modern, architectural dress designs
- Longevity: 7-8 hours with proper hairspray and elastics that don’t slip
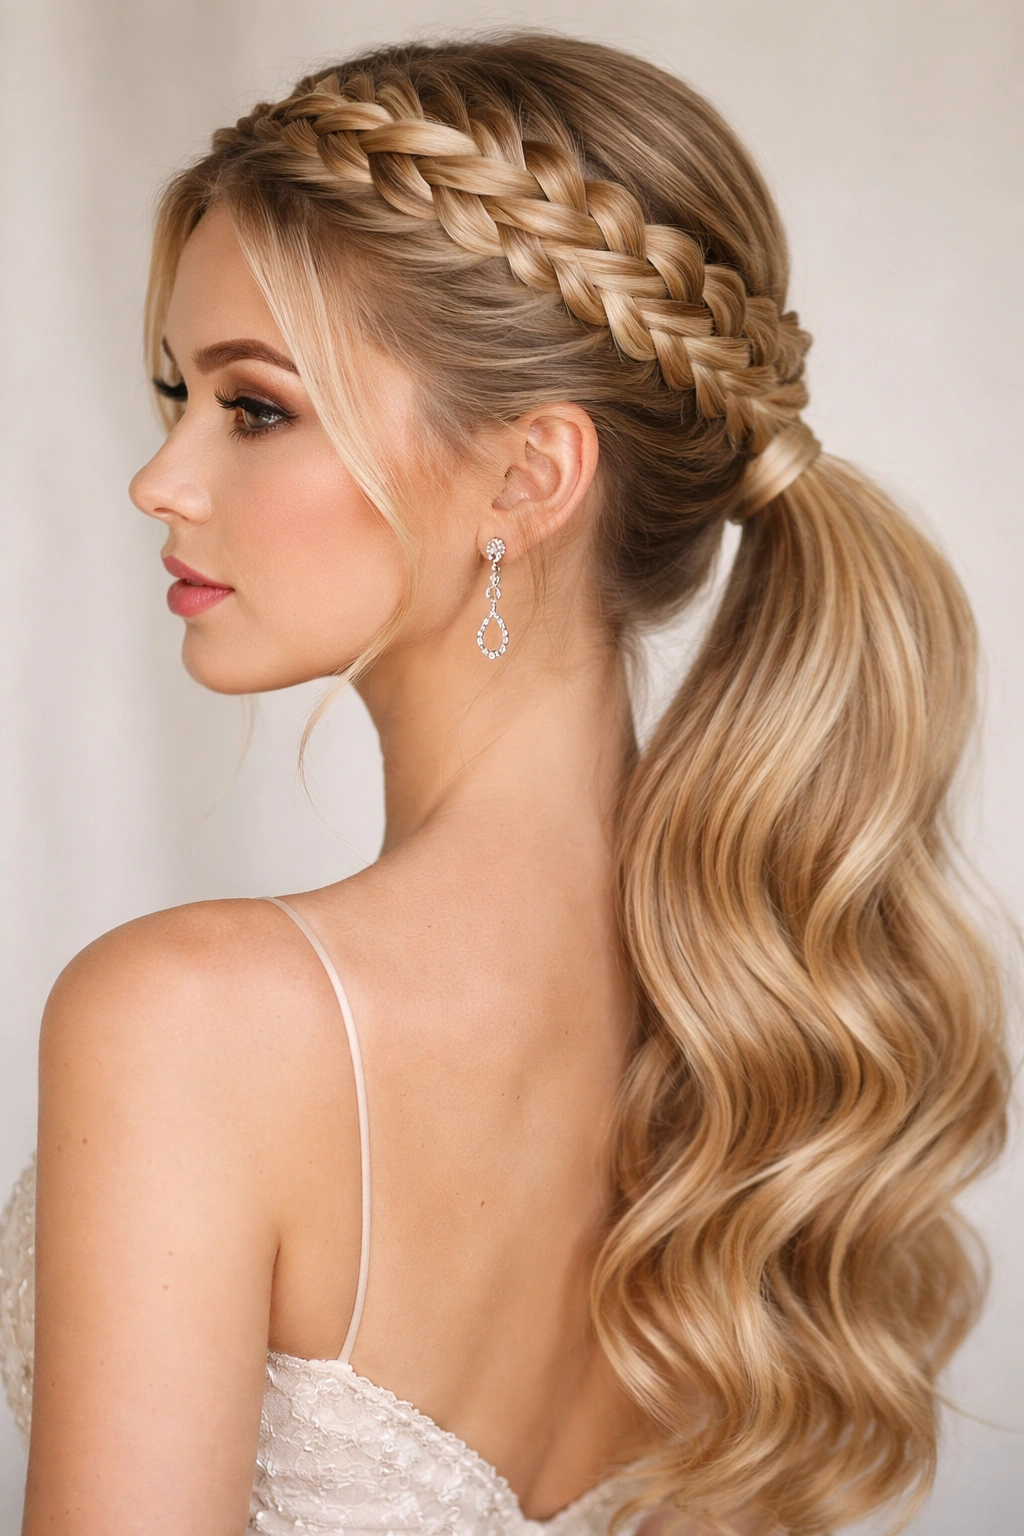
6. Braided Crown with Low Pony
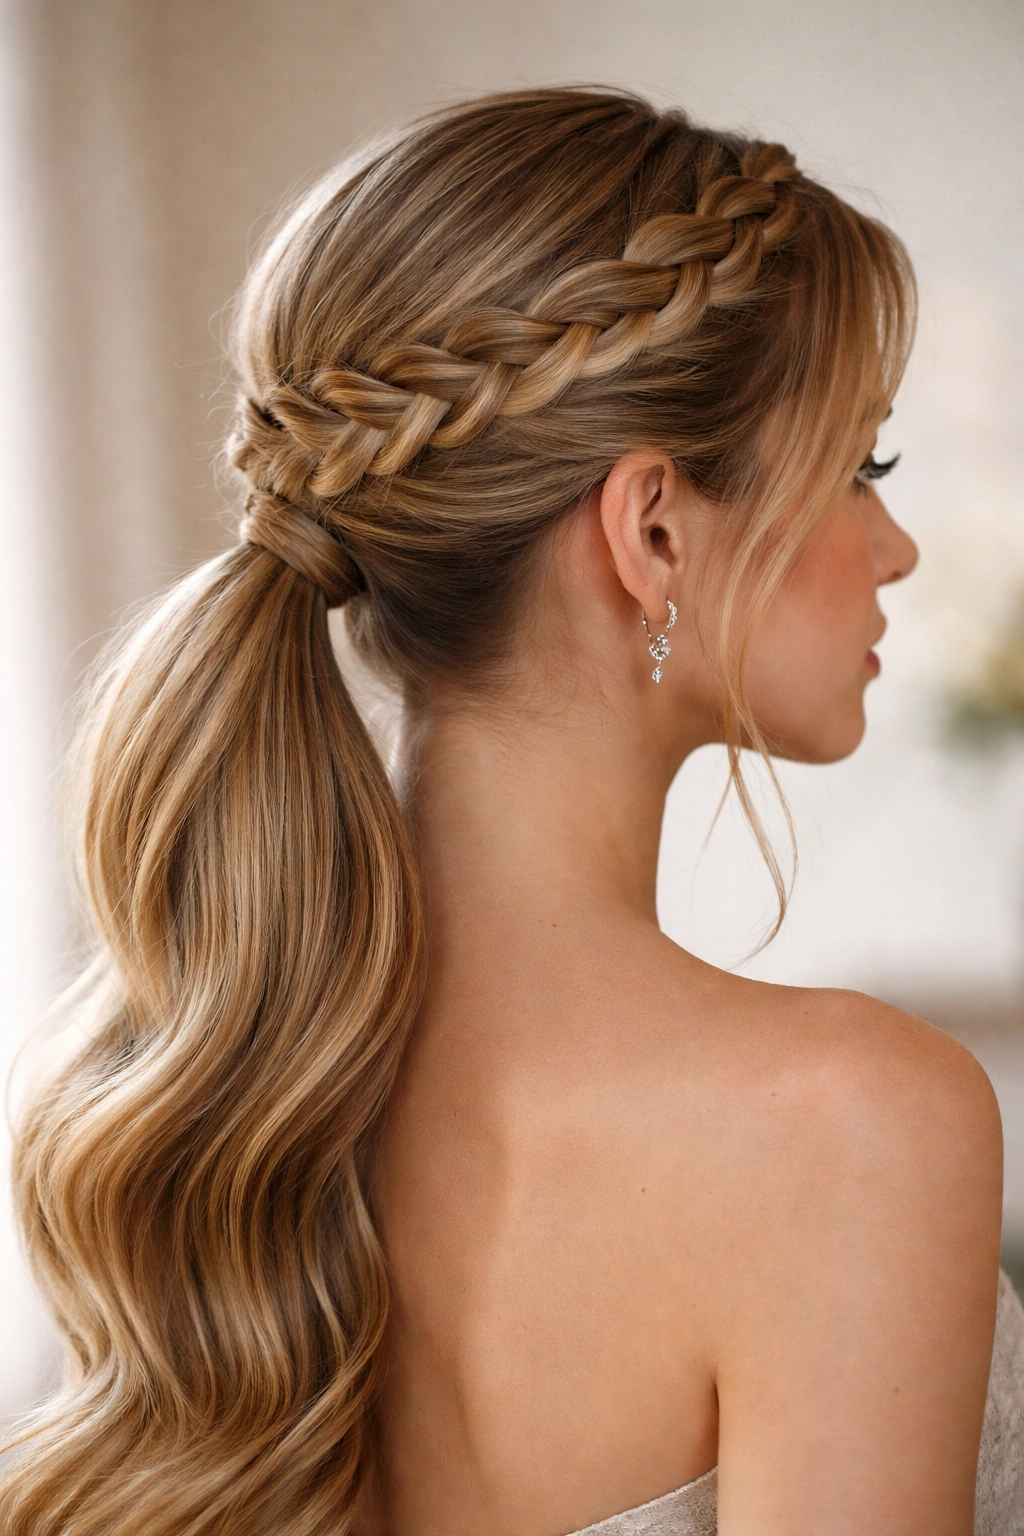
Combining a crown braid with a gathered low ponytail creates a style that’s both ornate and wearable—fancy enough for prom but not so elaborate that you’ll be uncomfortable dancing. The crown braid draws attention upward and creates a halo effect that’s deeply flattering.
Executing the Crown Braid
A crown braid runs from one side of your head to the other, positioned at the top and back of your head like an actual crown. Start by sectioning hair at your temple, divide into three strands, and begin a standard three-strand braid. As you braid, incorporate hair from both sides—from the section closest to your hairline and from the section below. Move the braid across the back of your head toward the opposite temple. The braid should sit against your head, not floating away from it.
Connecting to the Ponytail
Once your crown braid reaches the opposite side of your head, secure it with bobby pins hidden underneath. Now gather all your hair—including the braid—into a low ponytail at the nape of your neck. The braid becomes part of the ponytail’s composition, adding visual richness and dimension. Wrap a thin section of hair around the elastic base to hide it completely.
Styling Notes
- This works best with hair that has some natural texture or waves
- Tease your ponytail lightly before gathering to add volume and dimension
- Consider leaving thin, delicate face-framing pieces out on both sides
- The crown braid should be tight enough to hold all night but not so tight that it causes discomfort
Quick Facts
- Skill level: Intermediate to Advanced (crown braids take practice)
- Hair length needed: At least to shoulder length
- Best for: Oval or round face shapes
- Styling time: 25-35 minutes
- Accessories that work: Pearl or crystal pins through the braid, delicate comb clips
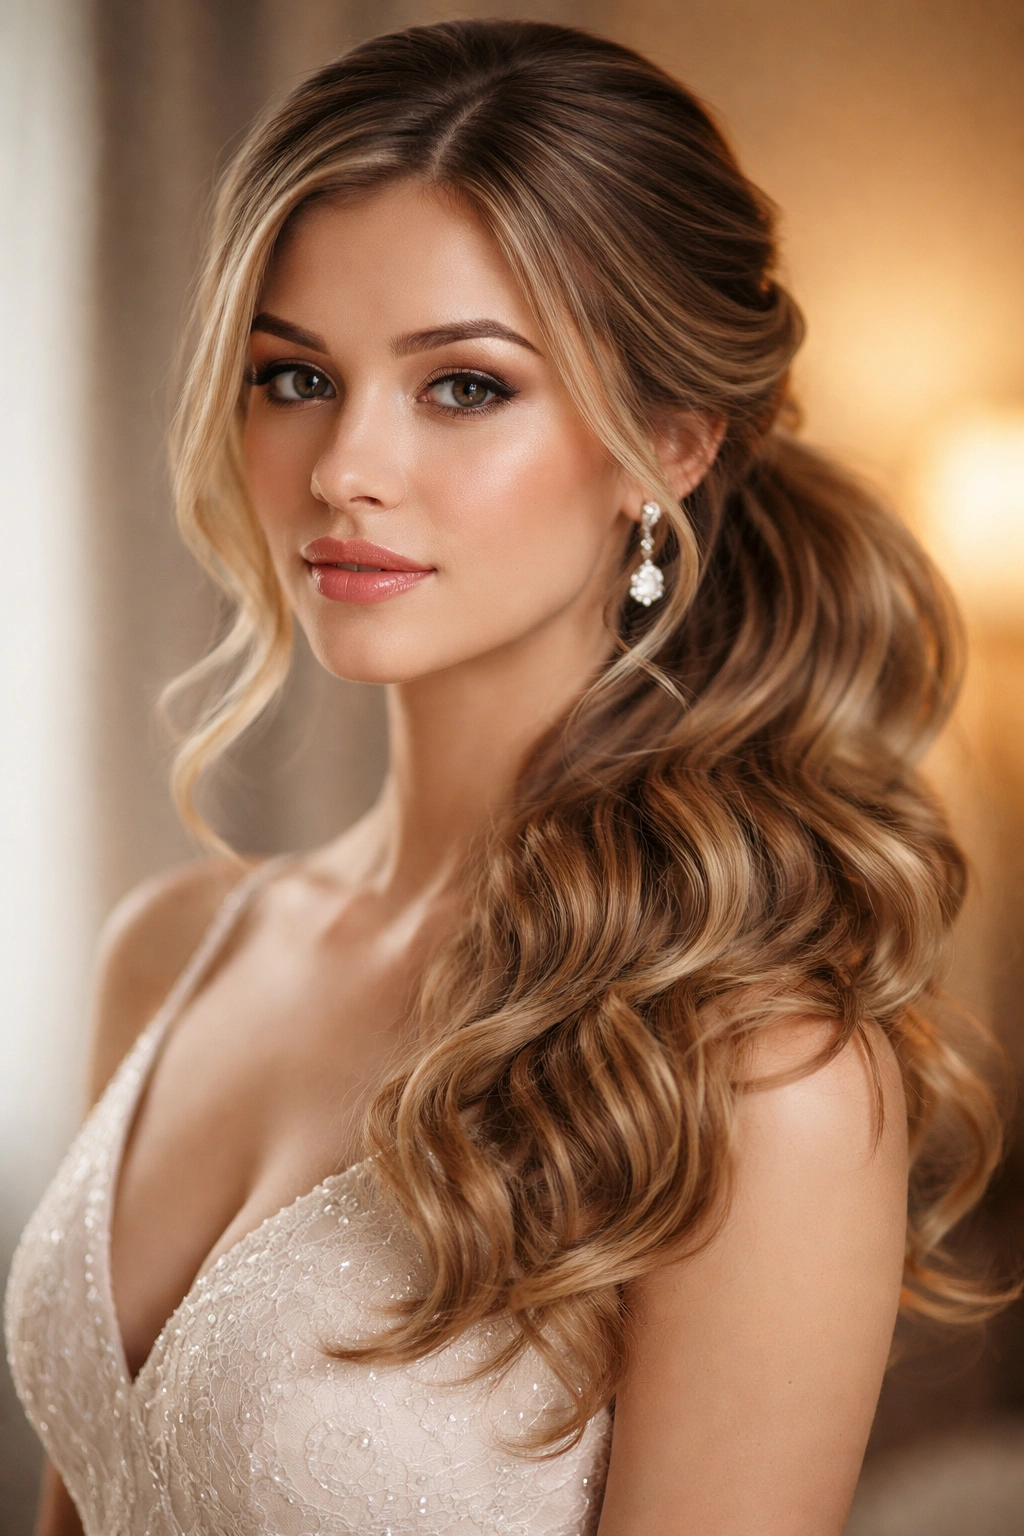
7. Half-Up Half-Down Pony
This style splits the difference between wearing your hair fully down and pulling it all up—you gather the top section into a ponytail while leaving the bottom half loose. It’s romantic, youthful, and incredibly practical for prom since you maintain the movement and volume of down hair while managing the hair off your face.
Creating the Perfect Half-Up Section
Section your hair horizontally from ear to ear across the top of your head, as if you’re creating a headband. This top section is what you’ll gather into a ponytail. The horizontal placement matters—too low and you’ve essentially pulled up half your hair; too high and you’re barely pulling anything back. Aim for a line roughly from the middle of one ear, across the crown, to the middle of the other ear.
Building Volume at the Crown
Backcomb the section you’re about to gather, focusing on the crown area where the ponytail will sit. This creates lift and makes the style feel fuller. Gather the teased section into a ponytail, positioning it slightly back from the crown rather than directly on top. Secure with a clear elastic and wrap a thin section of hair around the base. The bottom half of your hair remains completely down and loose.
Texture Combinations
The magic of this style is how you combine the textures. Consider:
- Smooth, sleek top section with soft waves in the bottom half
- Subtle braiding in the top section with curls throughout the bottom
- Straight top with voluminous waves below
- Teased, textured ponytail with straight hair below (for contrast)
Quick Facts
- Best hair length: At least mid-back (the down portion needs length to look substantial)
- Texture: Works with any hair texture when styled intentionally
- Styling time: 15-20 minutes
- Face shape: Flattering on most faces since hair frames them on both sides
- Ideal for: Romantic or bohemian-inspired prom dresses
8. Textured Teased Ponytail
This style prioritizes volume and dimension above all else—it’s the opposite of sleek. You’re creating a ponytail that looks full, slightly undone, and absolutely packed with texture from root to tip. It’s modern, slightly edgy, and incredibly flattering on most hair types.
The Teasing Foundation
Start with dry hair and section it into quadrants. Use a fine-tooth teasing brush or comb to backcomb each section systematically, building volume throughout your entire head. Don’t hold back—this style thrives on substantial teasing. The more texture you create, the fuller and more impressive your final ponytail will be. Smooth the outer layer gently with a comb so it looks intentional rather than matted, but leave significant texture and volume inside.
Gathering with Intention
Pull your hair back into a high or mid-level ponytail, but as you gather it, let some texture and volume escape slightly. You’re not aiming for perfectly smooth—you want a ponytail that looks like it’s barely contained, with texture radiating outward. Secure with an elastic and consider wrapping multiple thin strands of hair around the base rather than just one, which adds even more visual texture.
Finishing the Piece
Flip your head upside down and lightly mist the entire ponytail with medium-hold hairspray while your head is inverted—this adds lift and prevents the style from falling flat as the day progresses. Flip back upright, adjust any pieces that feel out of place, and do a final light spray. The goal is a ponytail that looks intentionally messy and effortlessly textured.
Quick Facts
- Best hair type: Medium to thick hair (fine hair can look thin when teased)
- Styling products needed: Teasing spray or mousse, medium to strong-hold hairspray
- Time commitment: 20-25 minutes
- Best hair texture: Works on straight, wavy, or naturally curly hair
- Face shape: Flattering because volume around the crown softens facial features
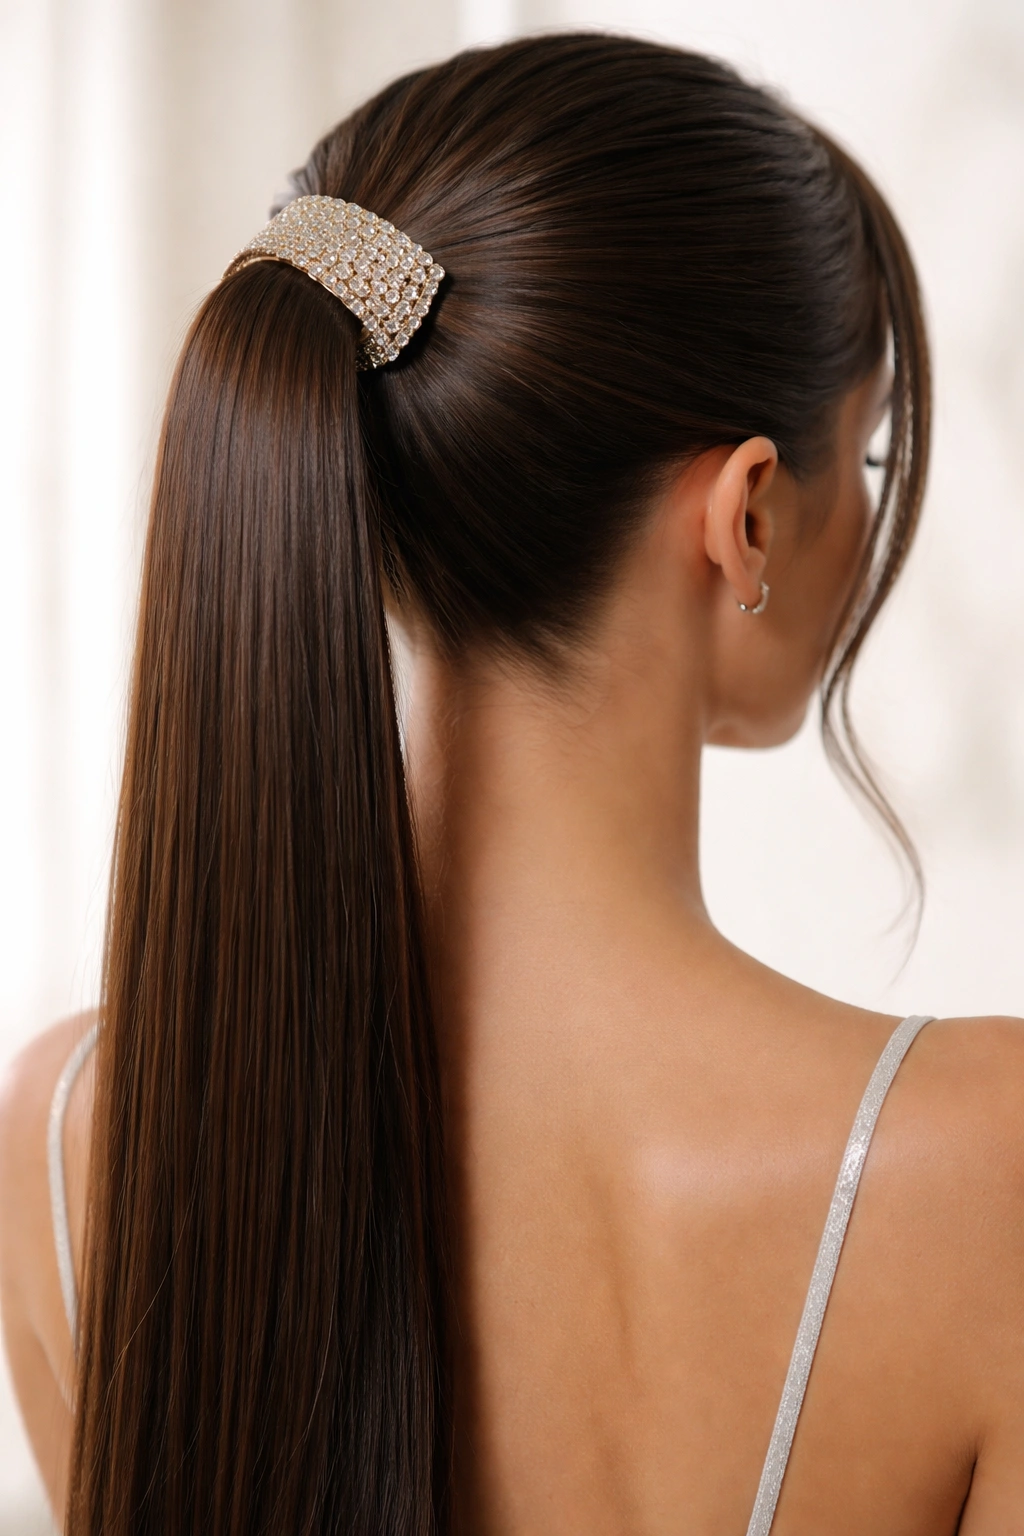
9. Sleek Lowball with Delicate Accessories
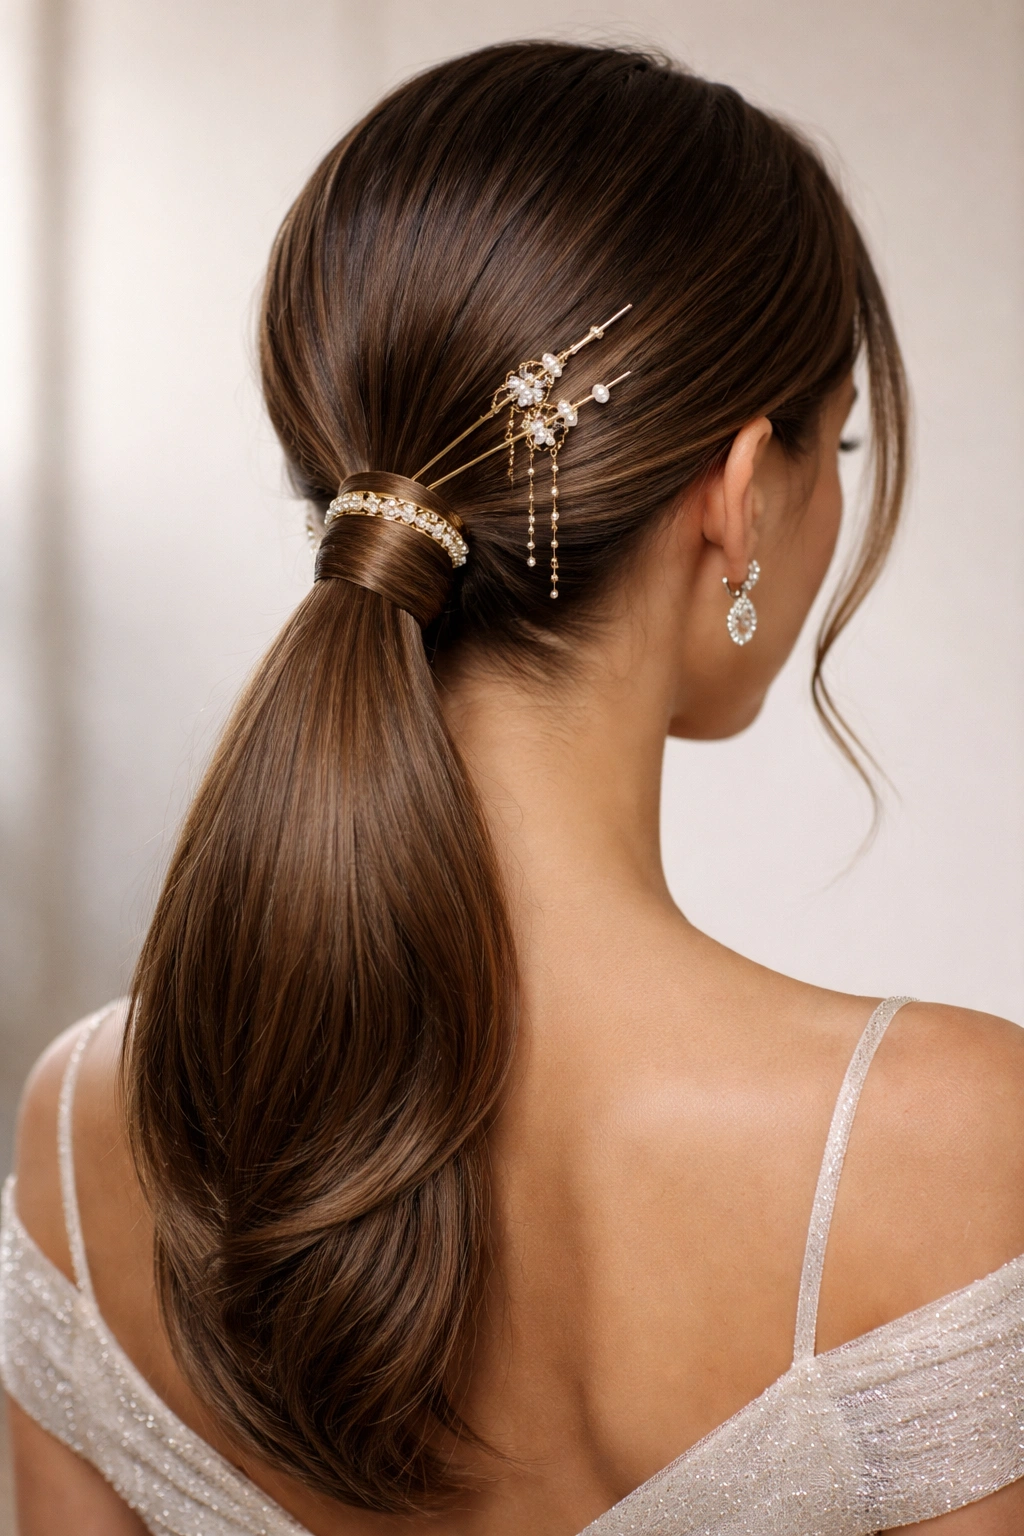
A low ponytail that sits at the nape of your neck, pulled sleek and smooth, becomes a sophisticated canvas for jewelry and hair accessories. The simplicity of the style means every accessory choice matters—this is where you really make it special for prom.
Creating the Sleek Base
Blow-dry your hair completely smooth using a paddle brush and a blow dryer on medium heat. Apply smoothing serum or anti-frizz cream to damp hair before blow-drying to minimize any potential frizz. Once fully dry, use a fine comb to brush all hair straight back toward the nape of your neck with even, consistent tension. Gather into a tight, low ponytail positioned at the base of your skull.
Securing with Precision
Use a smooth elastic that matches your hair color—this keeps attention on the accessories rather than the elastic itself. Wrap a small section of hair around the elastic base and secure underneath with bobby pins. The wrapped section should be sleek and smooth, not visible from the front or side.
Accessory Styling
This is where personality shines:
- A statement metal cuff or hair clip that covers the elastic entirely
- Delicate crystal or pearl hair sticks positioned through the ponytail base
- A thin metallic ribbon or fabric wrap around the elastic
- Multiple thin bobby pins with small crystals threaded through the ponytail at intervals
- A small silk scarf loosely wound around the base
The key is choosing one statement accessory rather than many small ones—let the ponytail itself be the focus, with the accessory adding just enough personality.
Quick Facts
- Skill level: Beginner (the technique is straightforward)
- Hair texture: Works best on straight or smoothed hair
- Best accessory: One statement piece rather than multiple small accessories
- Face-framing: Optional, but one or two loose pieces softens the look
- Styling time: 12-15 minutes
10. Side Braid Wrapped Pony
This sophisticated style weaves a braid from one side of your head, wraps it around the base of a ponytail, and secures it with pins for a look that’s ornate and put-together. It works beautifully with both romantic and modern dress styles.
Creating the Wrapped Braid
Gather your hair into a high or mid-level ponytail at your desired position. Secure with a clear elastic. Now take a section of hair from one side of your ponytail—roughly two inches wide—and divide it into three strands. Braid this section, keeping the braid tight so it holds its shape. As you braid, incorporate small pieces from the ponytail itself, which anchors the braid and makes it feel intentional.
Wrapping and Securing
Once your braid is long enough (roughly 8-12 inches), wrap it around the elastic base of your ponytail like you’re creating a spiral or rope effect. Use bobby pins hidden underneath to secure the end of the braid against the base. The wrapped braid hides the elastic entirely while adding visual interest and dimension.
Customization Options
- Create a thicker braid by starting with more hair and incorporating more strands as you go
- Wrap the braid multiple times around the elastic for a more dramatic effect
- Leave the wrapped braid loose and slightly undone for a romantic feel
- Create two braids on opposite sides and wrap them both around the base for maximum decoration
Quick Facts
- Hair length: Shoulder length or longer
- Best with: Wavy or textured hair (straight hair can look too stark for this style)
- Skill level: Intermediate (the wrapping technique takes practice)
- Styling time: 18-25 minutes
- Ideal dress pairing: Romantic, ethereal, or detailed gowns
11. Halo Braid with Elegant Pony
A halo braid circles your head like a crown before meeting a low, gathered ponytail. This style is inherently romantic and fairy-tale-like, making it perfect for prom. The halo creates a frame for your face while the ponytail keeps hair manageable.
Executing the Halo Braid
Start at one temple and create a Dutch braid (reverse braid, where strands go under rather than over) that circles your head, ending at the opposite temple. A Dutch braid sits slightly raised on your head rather than flat against it, creating that halo effect. As you braid, incorporate hair from the entire circumference of your head, maintaining even tension so the braid feels secure and intentional.
Anchoring to the Ponytail
Once your halo braid reaches the opposite temple, secure it temporarily with bobby pins. Now gather all your remaining hair—including the loose sections between the braid and your neck—into a low ponytail. The halo braid becomes part of the composition, framing the top while the ponytail handles the volume below.
Adding Dimension
- Gently pull the halo braid slightly outward to create a softer, more dimensional appearance
- Leave thin, delicate face-framing pieces loose on both sides of your face
- The halo should feel soft and romantic, not severe
- Use a light hairspray to maintain the braid’s shape without making it stiff
Quick Facts
- Hair length needed: At least shoulder length for the halo to be substantial
- Skill level: Advanced (halo braids require practice and spatial awareness)
- Best hair texture: Wavy or naturally textured hair (straight hair can look too sleek)
- Styling time: 30-40 minutes
- Ideal for: Romantic, bohemian, or princess-style prom dresses
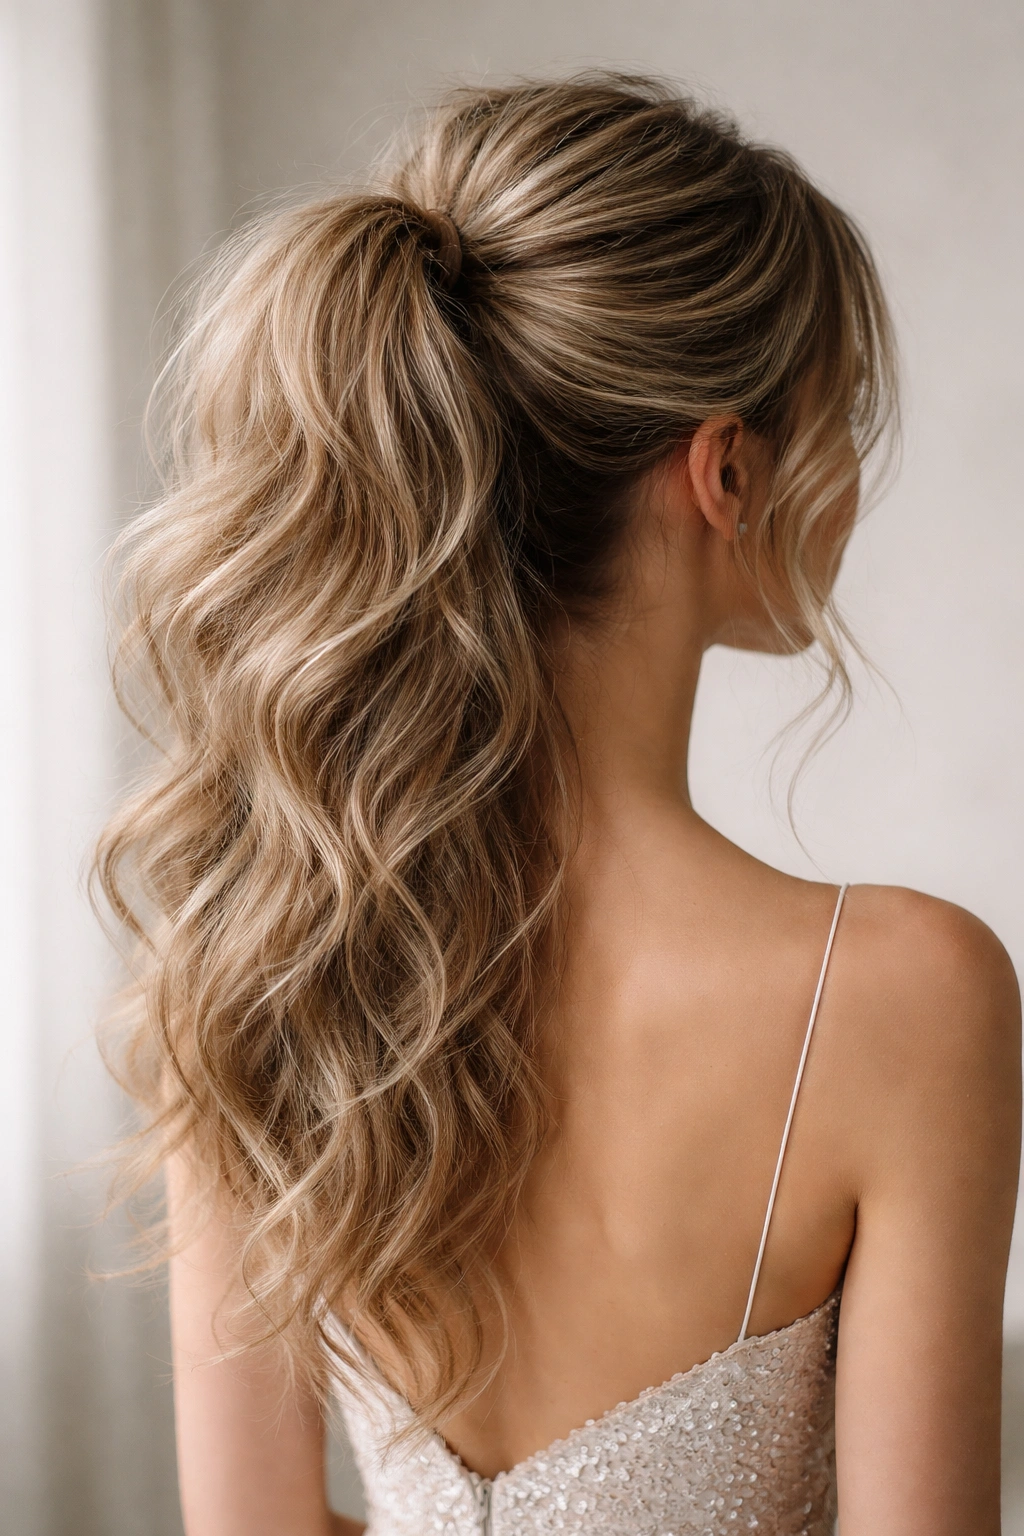
12. Messy Romantic Pony
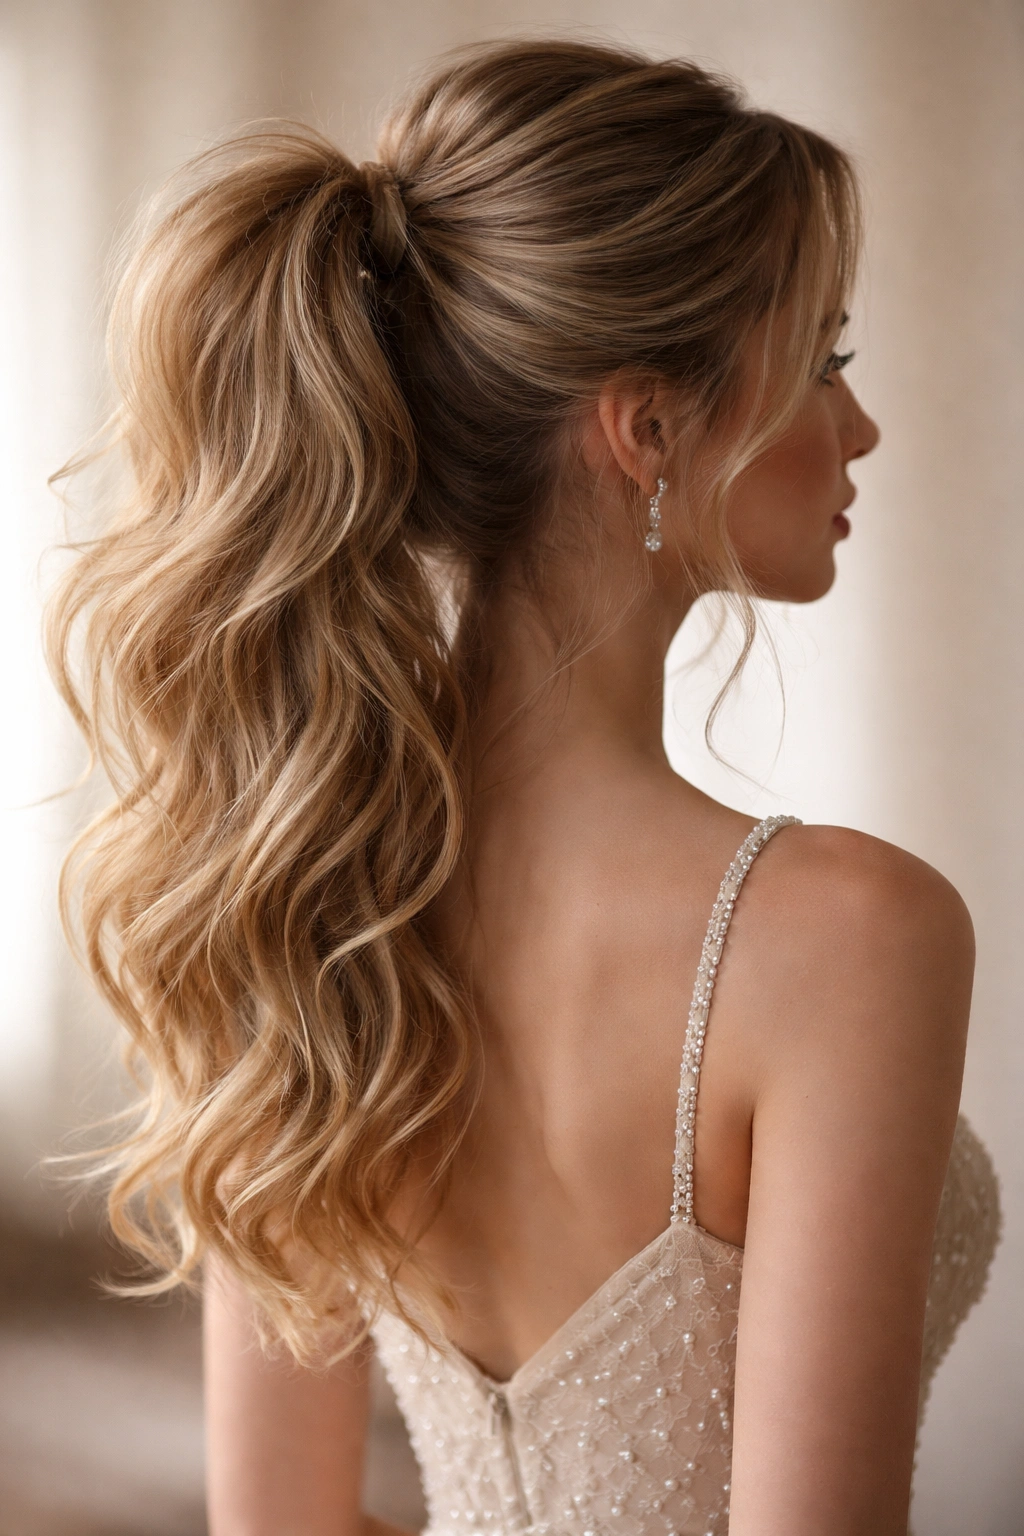
Sometimes the most elegant style looks slightly undone. A messy romantic ponytail combines soft curls, gentle texture, and intentional looseness to create a look that feels effortlessly beautiful rather than overly polished.
Building the Texture Base
Create soft, romantic curls throughout your entire head using a large-barrel curling iron or overnight braiding method. The curls should be loose and romantic, not tight ringlets. Once your curls are set, gently run your fingers through them to separate and break up the curls into softer, more naturalistic waves. You’re aiming for the texture of wind-blown waves rather than perfect spirals.
Gathering Loosely
Pull your hair back into a ponytail—high, mid-level, or low, depending on your preference—but don’t pull it tight. Allow some of the curls and texture to escape intentionally, creating a ponytail that looks like it might fall down at any moment but somehow stays in place. Secure with a clear elastic and wrap a thin strand around the base.
The Finishing Touch
Gently tease the ponytail itself to add volume and make sure it looks full and substantial. Use a fine-tooth comb to smooth the outer layer while maintaining all that gorgeous texture inside. A light-to-medium hold hairspray keeps the style in place throughout the night without making it feel stiff or crunchy.
What Makes It Work
- Leave multiple pieces loose around your face and neck for softness
- Ensure the ponytail sits slightly off-center rather than perfectly centered
- The beauty lies in controlled messiness—it should look intentional, not like you just rolled out of bed
- Curls should be the star; the ponytail is just the gathering mechanism
Quick Facts
- Hair texture: Curls or waves are essential
- Skill level: Beginner to Intermediate (curling is the main technique)
- Styling time: 20-30 minutes including curl creation
- Best for: Any face shape (the loose pieces frame most faces beautifully)
- Ideal dress: Romantic, ethereal, or vintage-inspired gowns
13. High Pony with Pearl Accent Strands
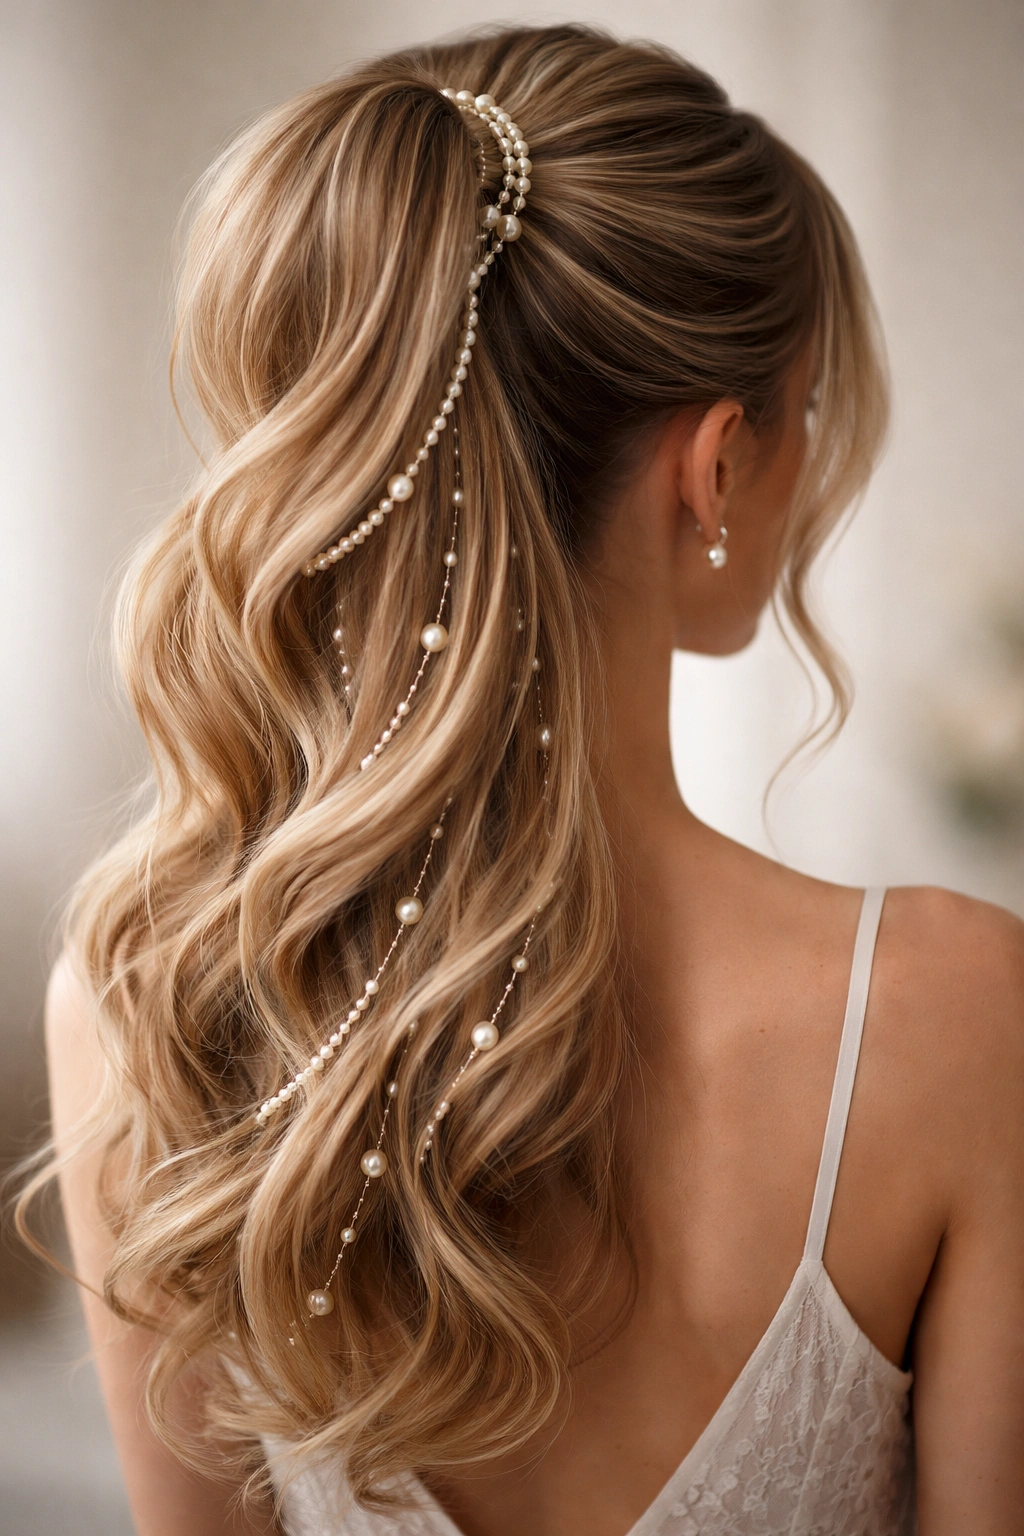
This elegant style gathers hair into a high, voluminous ponytail and then threads delicate pearl strands or pearl-adorned bobby pins throughout for a subtle but undeniably luxe effect. It’s modern, feminine, and photographs beautifully.
Building the Foundation
Create a high ponytail with volume by teasing the crown section and gathering hair into a high placement at the back of your head. Tease the ponytail itself lightly to add fullness and dimension. Secure with a clear elastic and wrap a thin section of hair around the base. This is your foundation—a beautiful, full, high ponytail.
Adding Pearl Details
Now comes the magic: thread delicate pearl strands through the ponytail at intervals, securing them with bobby pins. You might position pearl strands down the center of the ponytail, along one or both sides, or in a pattern that mirrors your dress design. Alternatively, use pearl-adorned bobby pins positioned throughout the ponytail base, catching both the elastic and the ponytail hair.
Accessory Considerations
- Use pearls that match the color of your dress or skin tone for cohesion
- Keep pearl strands delicate and thin—you’re adding subtle luxury, not overdoing it
- Position some pearl details lower in the ponytail where they’ll catch light as you move
- Consider whether your dress has pearl details and echo them in your hair
Quick Facts
- Best hair type: Medium to thick, straight or slightly wavy
- Pearl placement: Up to personal preference, but odd numbers (3, 5, 7) feel more sophisticated than even numbers
- Styling time: 15-20 minutes
- Best for: Formal, elegant, or classic prom dresses
- Accessories to avoid: Too many competing metallic elements; let the pearls be the statement
14. Twisted Wrap-Around Pony
This style creates visual interest by taking sections of hair from around your head and twisting them as they wind toward a central ponytail, creating a rope-like effect. It’s elegant, slightly intricate, and feels more formal than a simple gathered ponytail.
Creating the Twisted Sections
Gather your hair into a ponytail at your desired height. Now take a thin section from one side of your head—starting near your ear—and twist it gently as you bring it toward the back of your head, where it meets your ponytail. Secure this twisted section by wrapping it around your ponytail elastic and pinning it underneath. Repeat on the other side, creating a balanced, symmetrical effect.
Building on the Concept
For a more elaborate version, create three or four twisted sections coming from different parts of your head, all wrapping around the same ponytail base. Each twist adds a layer of detail and visual richness. Imagine spokes on a wheel, all meeting at a central hub—that’s the effect you’re creating.
Texture Considerations
- This works best with hair that has natural wave or texture (completely straight hair can look too sleek)
- Create loose, romantic twists rather than tight, severe ones
- Allow the twists to be slightly imperfect—controlled messiness looks intentional and elegant
- Light teasing inside the twists adds volume and makes them more substantial
Quick Facts
- Hair length: Shoulder length or longer
- Skill level: Intermediate (the technique is straightforward but requires spatial awareness)
- Styling time: 20-25 minutes
- Best with: Wavy or naturally textured hair
- Ideal for: Modern, architectural, or detailed prom dresses
15. Sleek Straight Pony with Statement Clip
The most minimalist option on this list, this style is a perfectly straight, smooth ponytail elevated entirely by a statement hair clip or cuff that becomes the focal point. It’s chic, modern, and lets your accessories and dress take the spotlight.
Creating Perfect Smoothness
Blow-dry your hair completely straight using a paddle brush and medium heat. Apply smoothing serum to damp hair before blow-drying to ensure maximum smoothness and shine. Once dry, use a fine-tooth comb to brush all hair straight back toward your desired ponytail position—high, mid-level, or low. Every strand should be perfectly smooth and in place.
Choosing Your Statement Clip
The entire success of this style depends on your clip choice. Opt for something bold and beautiful: a large metal cuff, an architectural claw clip in a striking color, a crystal or pearl-adorned clip, or an ornate vintage-inspired piece. Position it so it covers your elastic entirely and becomes the visual focal point of your entire hairstyle.
Styling Variations
- Sleek high pony with a sculptural metal cuff (modern elegance)
- Sleek low pony with an ornate vintage clip (classic sophistication)
- Sleek mid-level pony with a colorful or textured clip (contemporary twist)
- Multiple thin bobby pins with crystal details distributed throughout (understated luxury)
Securing Everything
Use a smooth elastic that matches your hair color. The clip or pins do the visual work, so the elastic should be invisible. Position your statement accessory so it’s visible from the front, back, and sides—it should be the first thing people notice about your hair after the ponytail itself.
Quick Facts
- Hair type: Works best on straight or smoothed hair
- Skill level: Beginner (technique is simple; accessory choice is the creative part)
- Styling time: 10-15 minutes
- Best for: Modern, architectural, or minimalist prom dresses
- Accessory quality: Invest in a beautiful clip—it’s doing all the visual heavy lifting
Final Thoughts
Choosing a prom ponytail comes down to three main considerations: your personal style, your hair type and length, and how the style complements your dress and overall look. Each of the styles above works beautifully in photographs, holds strong through hours of dancing and celebration, and feels comfortable enough that you’ll forget you’re wearing a formal hairstyle.
The most important part of any prom hairstyle is the preparation work. Invest time in blow-drying your hair smooth, applying the right products for texture or shine depending on your style choice, and practicing your technique if it’s something new. Many of these styles are worth trying a week or two before prom so you know exactly how long they take, what products work best, and how they look from all angles.
Remember that your prom ponytail doesn’t have to be complicated to be stunning. Sometimes the most memorable hairstyles are the ones that feel effortless and natural—even though they actually took significant skill and preparation to achieve. That’s the secret: looking like you barely tried while having invested real thought and technique into making it perfect.