There’s something inherently elegant about a well-executed ponytail. Unlike loose waves that require constant adjusting or intricate braids that demand hours of preparation, a polished ponytail strikes the perfect balance between sophistication and wearability — it’s the hairstyle that whispers refinement while you’re celebrating a milestone. Whether you’re attending a formal wedding, an upscale dinner party, a gala, or any special occasion where you want your hair to feel as significant as the moment, the right ponytail can completely elevate your look and give you that quiet confidence that comes from knowing you look genuinely stunning.
The magic of a special-occasion ponytail lies in the details. It’s not just about pulling your hair back — it’s about the intentional choices that transform a basic style into something worthy of a red carpet: the placement (high, low, or somewhere in between), the texture (sleek or voluminous), the finishing touches (braids, twists, jewels, or clever wrapping techniques), and the overall polish that tells people you’ve put thought into every element of your appearance. A ponytail that works for your everyday gym session is fundamentally different from one designed to frame your face beautifully while you’re dancing at a formal reception or standing for photographs.
What makes these 12 styles particularly special is that they each bring something unique to the table. Some are dripping with romantic details; others are boldly modern. Some require considerable skill with styling tools; others come together with surprisingly simple techniques. Some are best suited to certain face shapes or hair textures, while others are wonderfully versatile. The styles that follow aren’t just hairstyles — they’re solutions designed to help you feel radiant, composed, and utterly polished for whatever celebration brings you here.
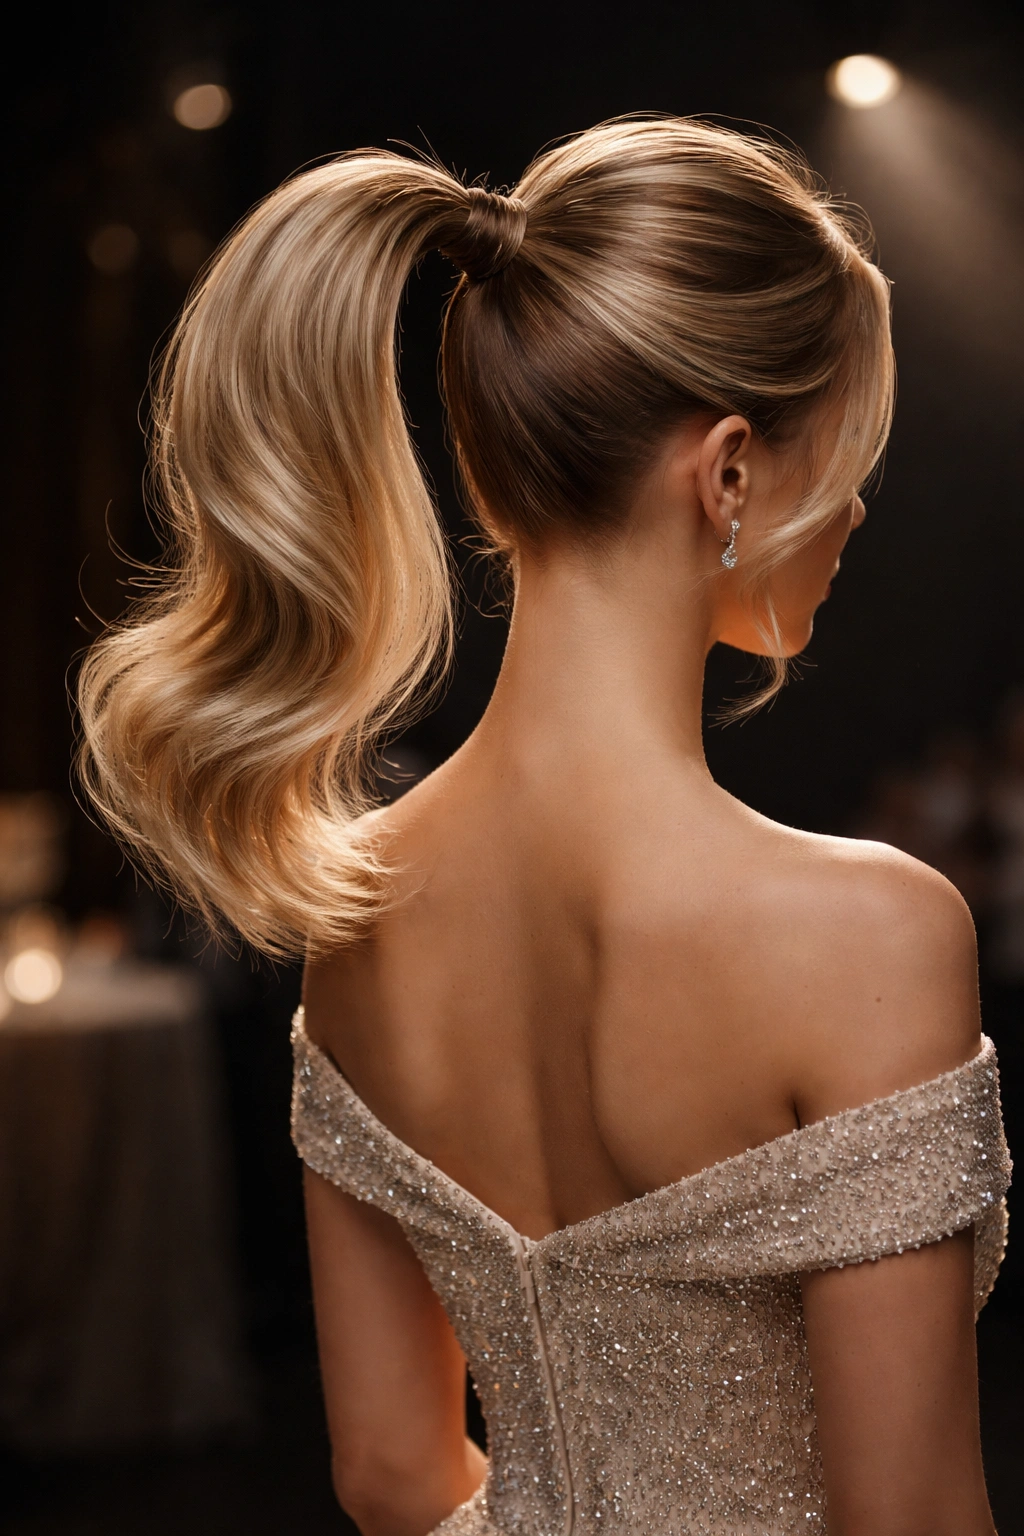
1. Classic High Ponytail with Sleek Finish
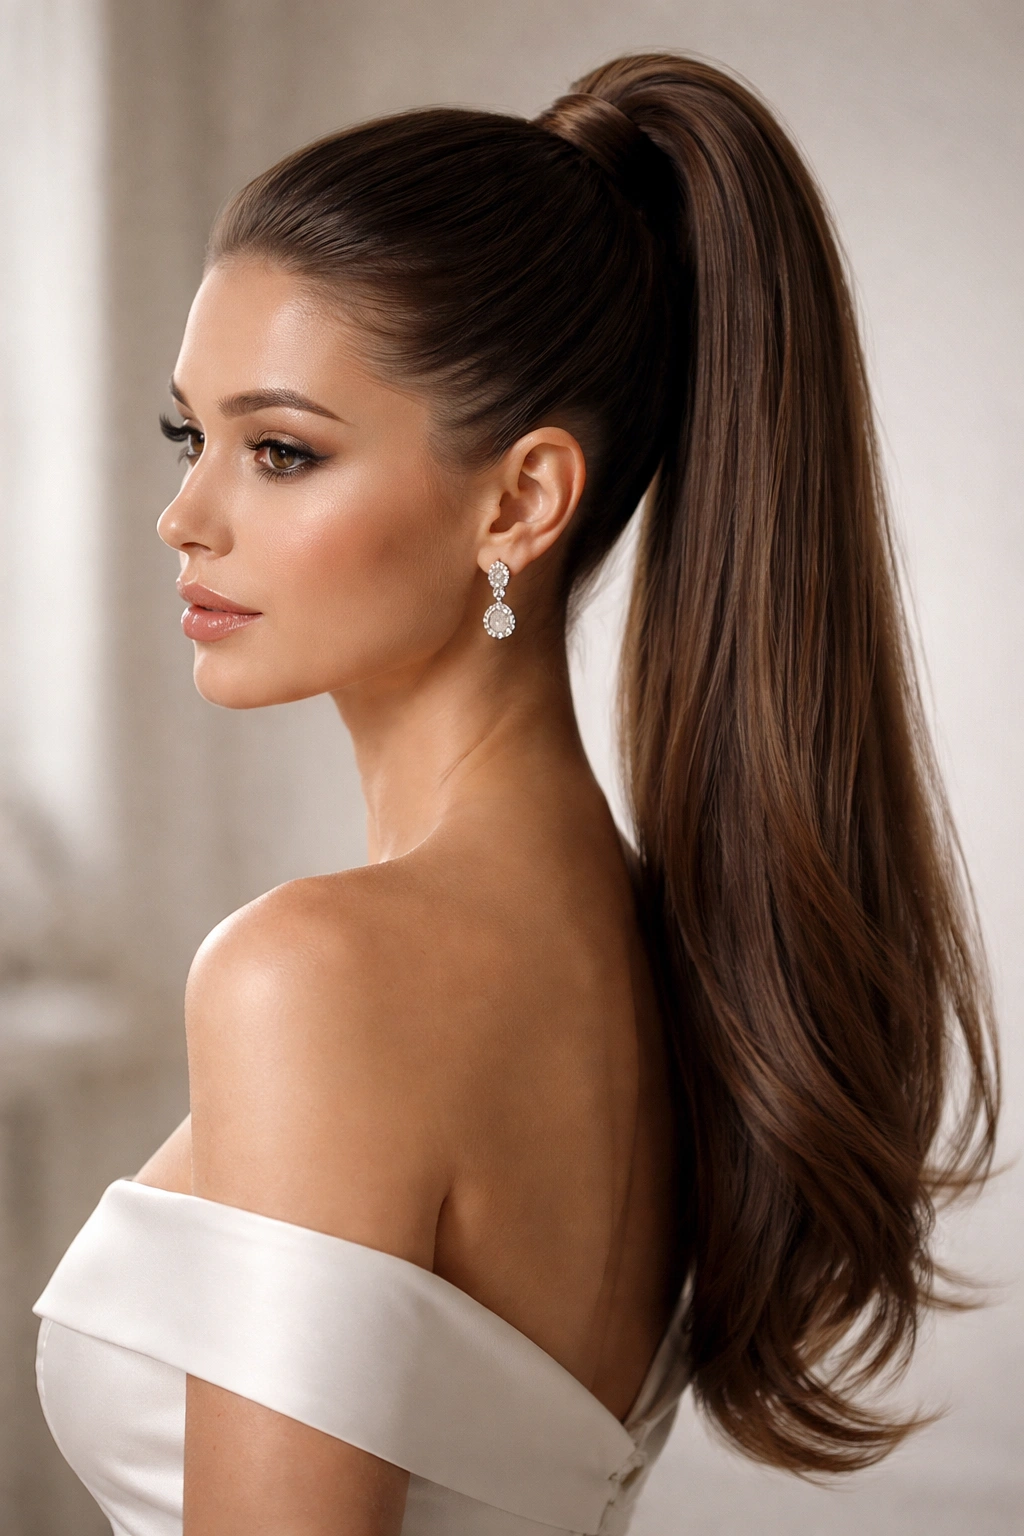
This is the style that defines understated luxury. A high ponytail positioned at the crown of your head carries inherent sophistication — it lifts your face, elongates your neck, and creates an instant impression of elegance and intention. The key to making this timeless style feel special-occasion appropriate is obsessive attention to smoothness and polish. Every strand must be sleek, every flyaway tamed, every section perfectly blended into the next.
Why This Style Commands Attention
The classic high ponytail works because it’s unfussy without looking careless. It says you’re confident enough to show your face completely and put-together enough to execute the style flawlessly. This style flatters most face shapes beautifully — it opens up your features, draws attention to your eyes and cheekbones, and works equally well whether you’re 5’2″ or 6′ tall. The vertical line created by a high ponytail is inherently slenderizing and lengthening, which is why it’s been a go-to for formal events, red carpets, and high-stakes occasions for decades.
Execution Details That Make the Difference
- Apply a smoothing serum or lightweight gel to damp hair before blow-drying to create a sleek base — this prevents frizz and gives you a canvas of smooth hair to work with
- Use a fine-tooth comb rather than a brush to gather hair backward, as this creates a smoother, less textured surface
- Secure the ponytail with a elastic covered in hair (matching your hair color) rather than a visible rubber band, which always looks unfinished
- Wrap a small section of hair around the base of the ponytail to hide the elastic entirely and create a polished, seamless look
- Finish with a light hairspray to tame any wispy baby hairs and lock everything in place for the entire event
Pro tip: If you struggle with pulling your hair back tightly without creating tension that becomes uncomfortable, try this trick: gather your hair gently at first, secure it loosely, then use a fine-tooth comb to smooth it tighter and re-secure with a tighter elastic. This two-step method feels more comfortable and looks better.
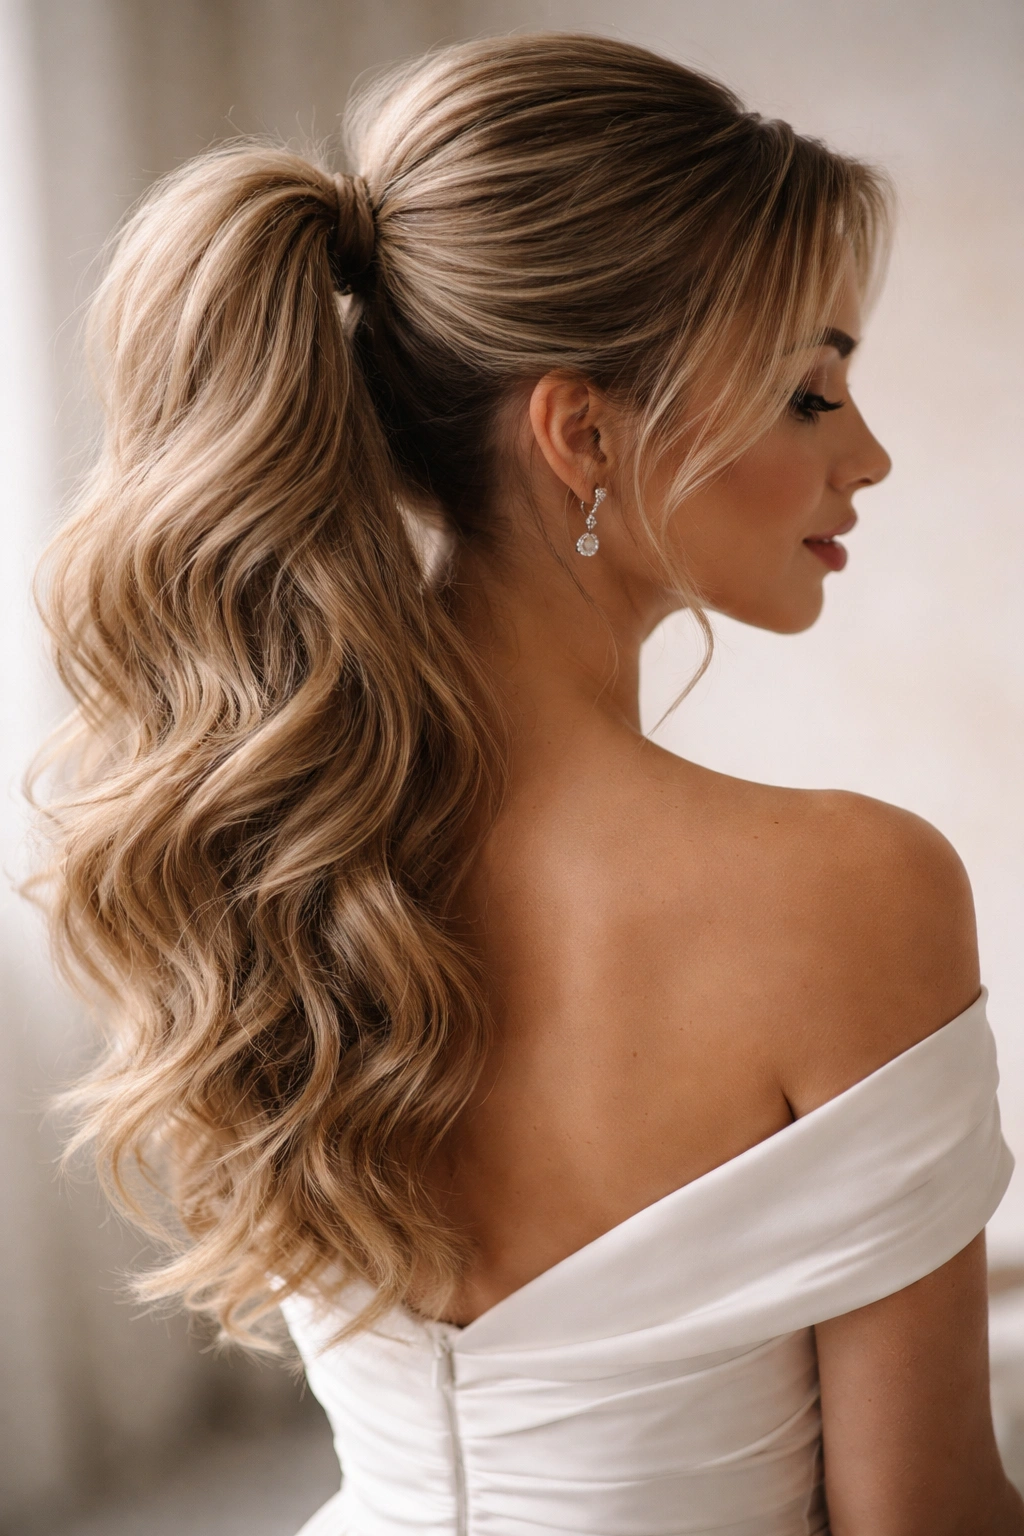
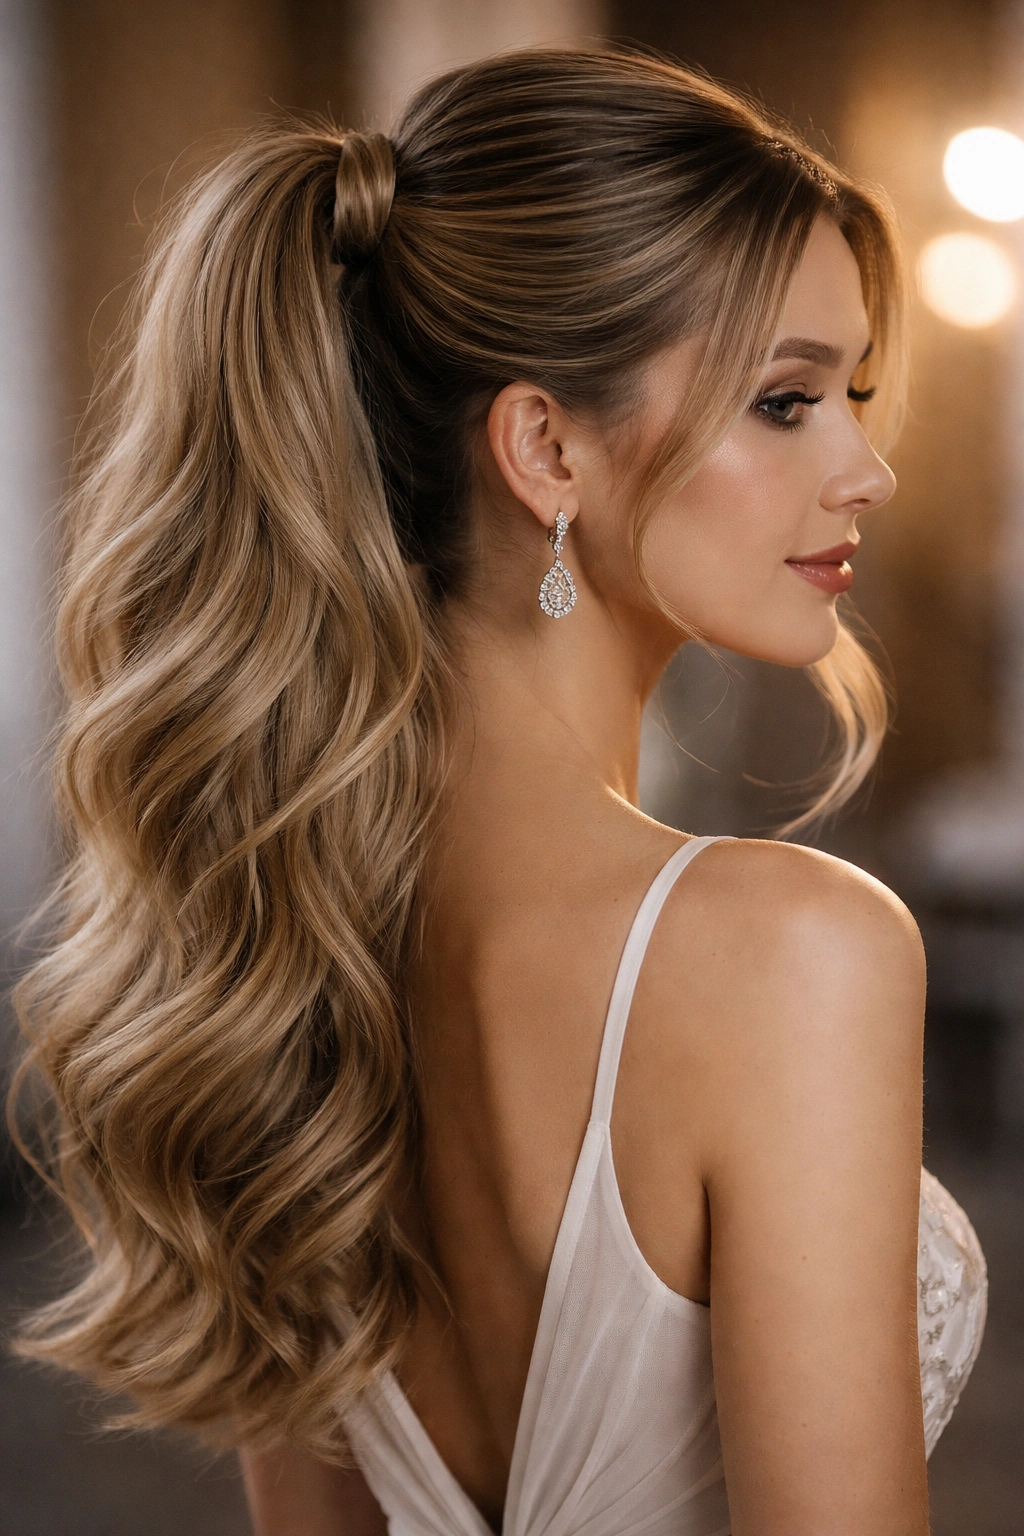
2. Romantic Curled Ponytail
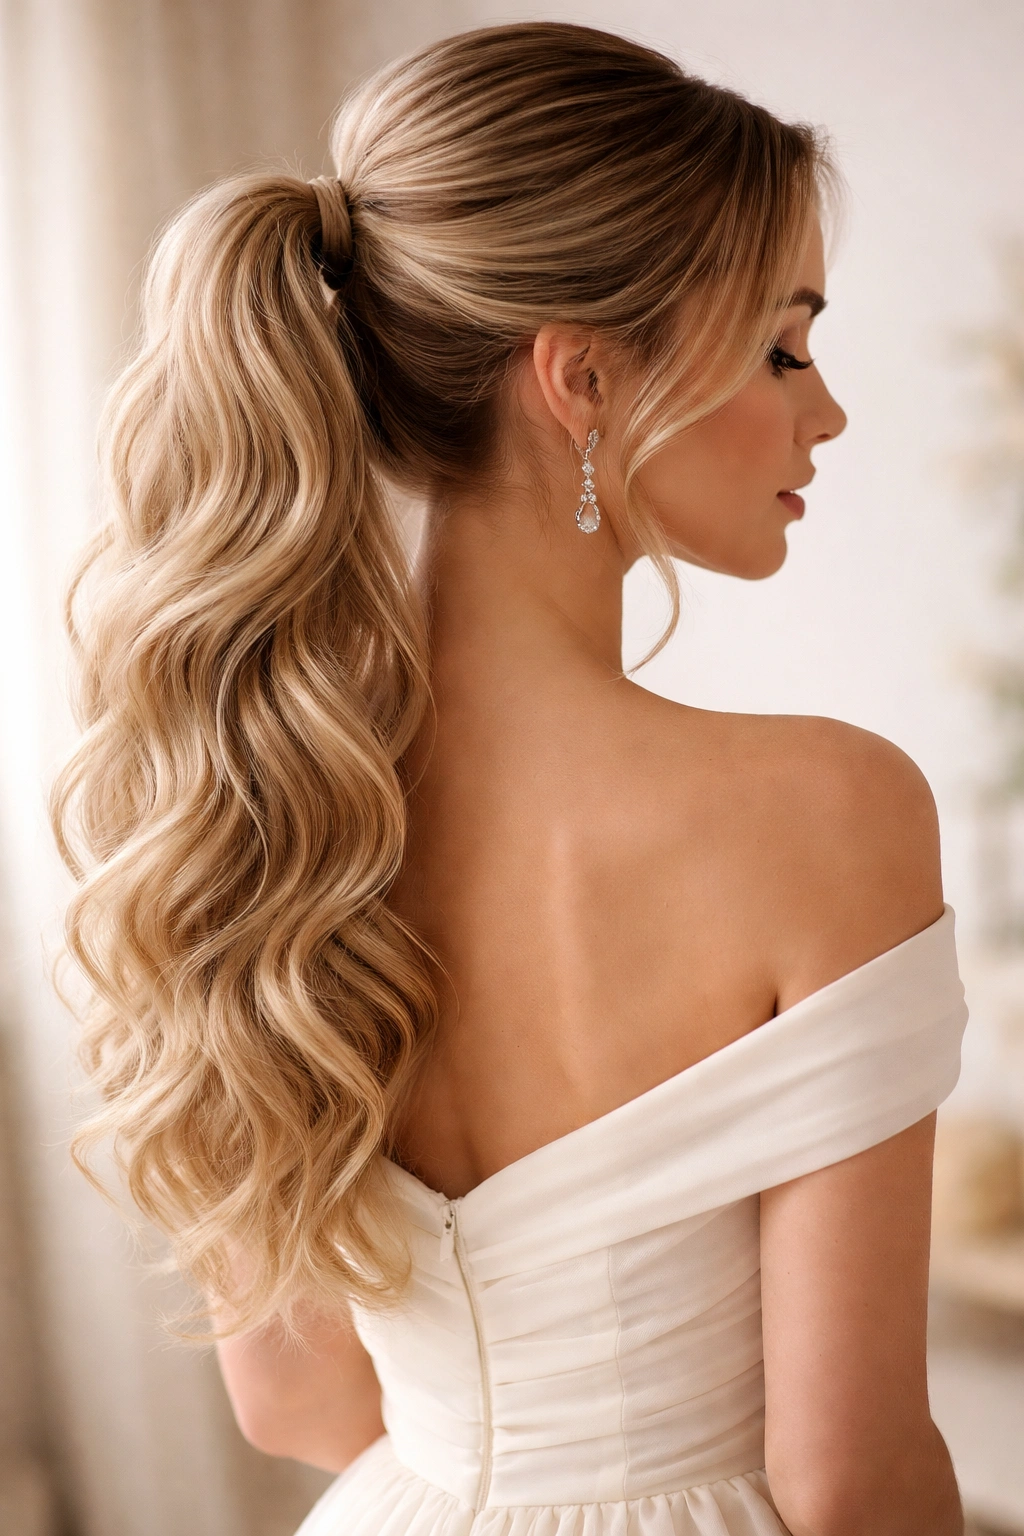
Where the classic high ponytail is sleek and architectural, the romantic curled ponytail is all movement and dimension. This style combines the polished structure of a ponytail with the softness of loose waves or ringlets, making it ideal for weddings, engagement parties, or any occasion where you want to feel feminine and graceful without looking overly formal or severe. The waves moving down from your ponytail create natural, beautiful flow that photographs gorgeously and feels luxurious to touch.
Creating Authentic Romantic Waves
This style hinges on creating waves that look effortless rather than artificially crimped. The goal is texture that looks like you spent a carefree day at the beach, even though you’ve actually spent time perfecting it. Start by creating texture in damp hair using a texturizing spray or lightweight salt spray, then blow-dry with a diffuser to encourage natural wave patterns. Once your ponytail is secured, run a 1.25-inch curling iron through sections of hair below the ponytail, wrapping the hair loosely around the barrel and sliding it down rather than clamping and holding, which creates that artificial spiral rather than a flowing wave.
Making Waves Last All Night
- Separate waves gently with your fingers rather than combing them, which breaks up the wave pattern
- Use a flexible-hold hairspray (not a firm-hold) that allows waves to move naturally without feeling stiff or crunchy
- Pin smaller sections of waves to the inside of your ponytail with bobby pins that match your hair color — this keeps waves from falling flat as the night goes on
- Consider adding a subtle pearl hair vine or delicate hair jewelry woven into sections of the waves for added dimension and special-occasion sparkle
Worth knowing: If your hair is naturally straight and resistant to waves, try sleeping in soft braids the night before your event, then spray with texturizing spray in the morning and blow-dry gently. This creates a more durable wave foundation than hot tools alone can provide.
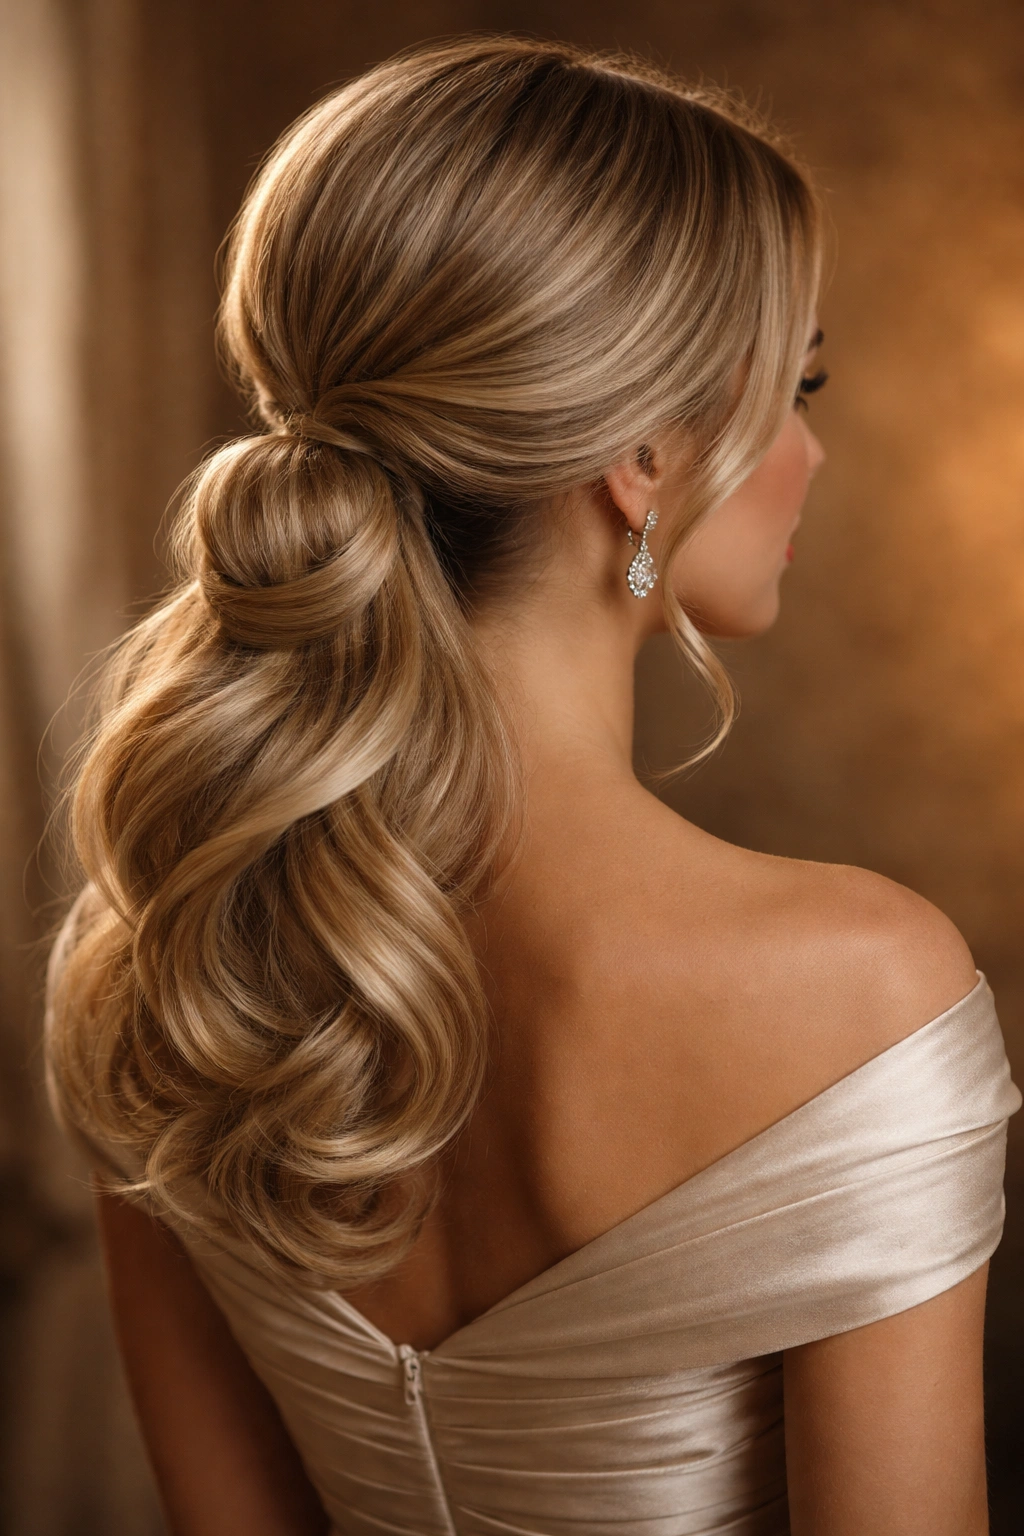
3. Low Side Ponytail with Twisted Detail
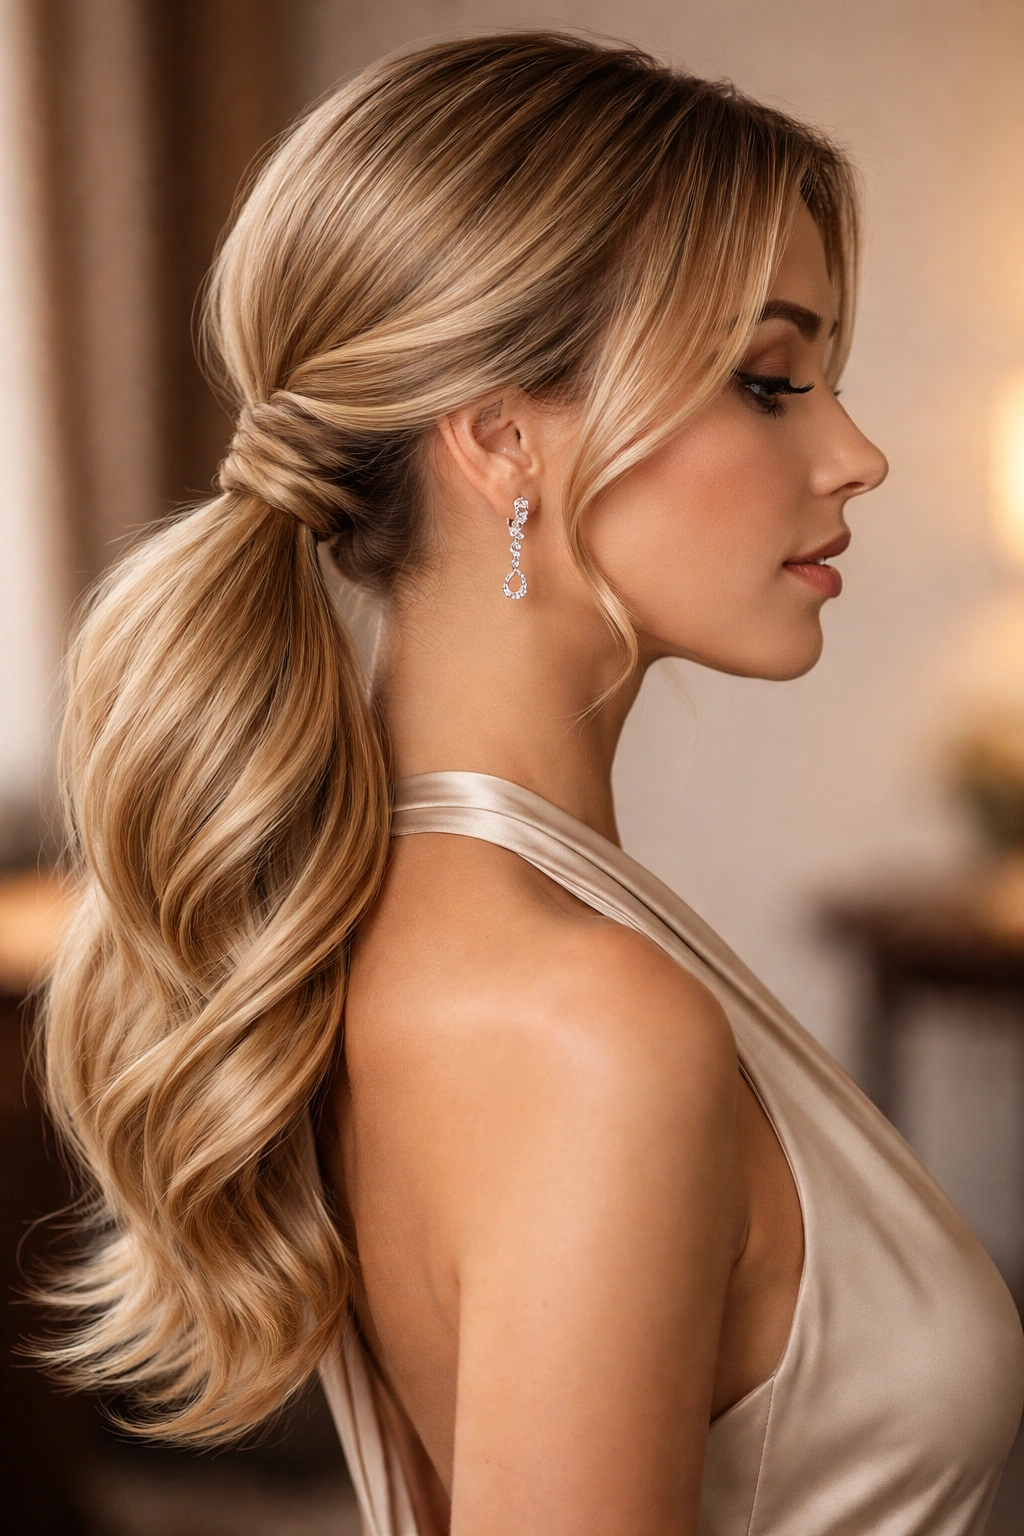
The low side ponytail is inherently sophisticated — it’s the style worn by people who feel beautiful without drawing attention to their face or creating the lifted effect of a high ponytail. When you add a twisted detail element, whether that’s a subtle single twist wrapping around the base or an intricate double twist woven through the ponytail itself, you transform a basic style into something that feels intentional and expertly executed. This works beautifully for formal dinners, cocktail parties, or events where you want to look polished but not overdone.
Mastering the Low Placement
The magic here is understanding where a low side ponytail should sit. Too low and it looks like you’re not trying; too high and it’s no longer a side ponytail at all. The sweet spot is typically one to two inches below your ear level, positioned slightly off-center so it sits at an angle rather than directly down the back. This placement creates an elongated, elegant line while still showing off your neck and shoulders beautifully. For a side ponytail to feel special-occasion worthy, side-part your hair deeply — this creates a natural flow that feels intentional rather than haphazard.
The Twisted Element
- Gather your ponytail at the desired low-side position and secure it loosely with an elastic
- Take a thin, pencil-width section of hair from one side of your face and twist it gently, then wrap this twist around the base of the ponytail, pinning it underneath
- Alternatively, after securing your ponytail, divide it into two sections and twist each section individually, then wrap these twists around the base in opposite directions for a more complex, visually interesting effect
- For a more dramatic approach, create two thicker twisted sections from the front of your hair and braid them together slightly before wrapping around the base
Pro tip: Twist in the direction that your hair naturally wants to twist — usually toward the back of your head. Fighting your hair’s natural texture wastes time and creates twists that unravel throughout the event.
4. Braided Crown Ponytail
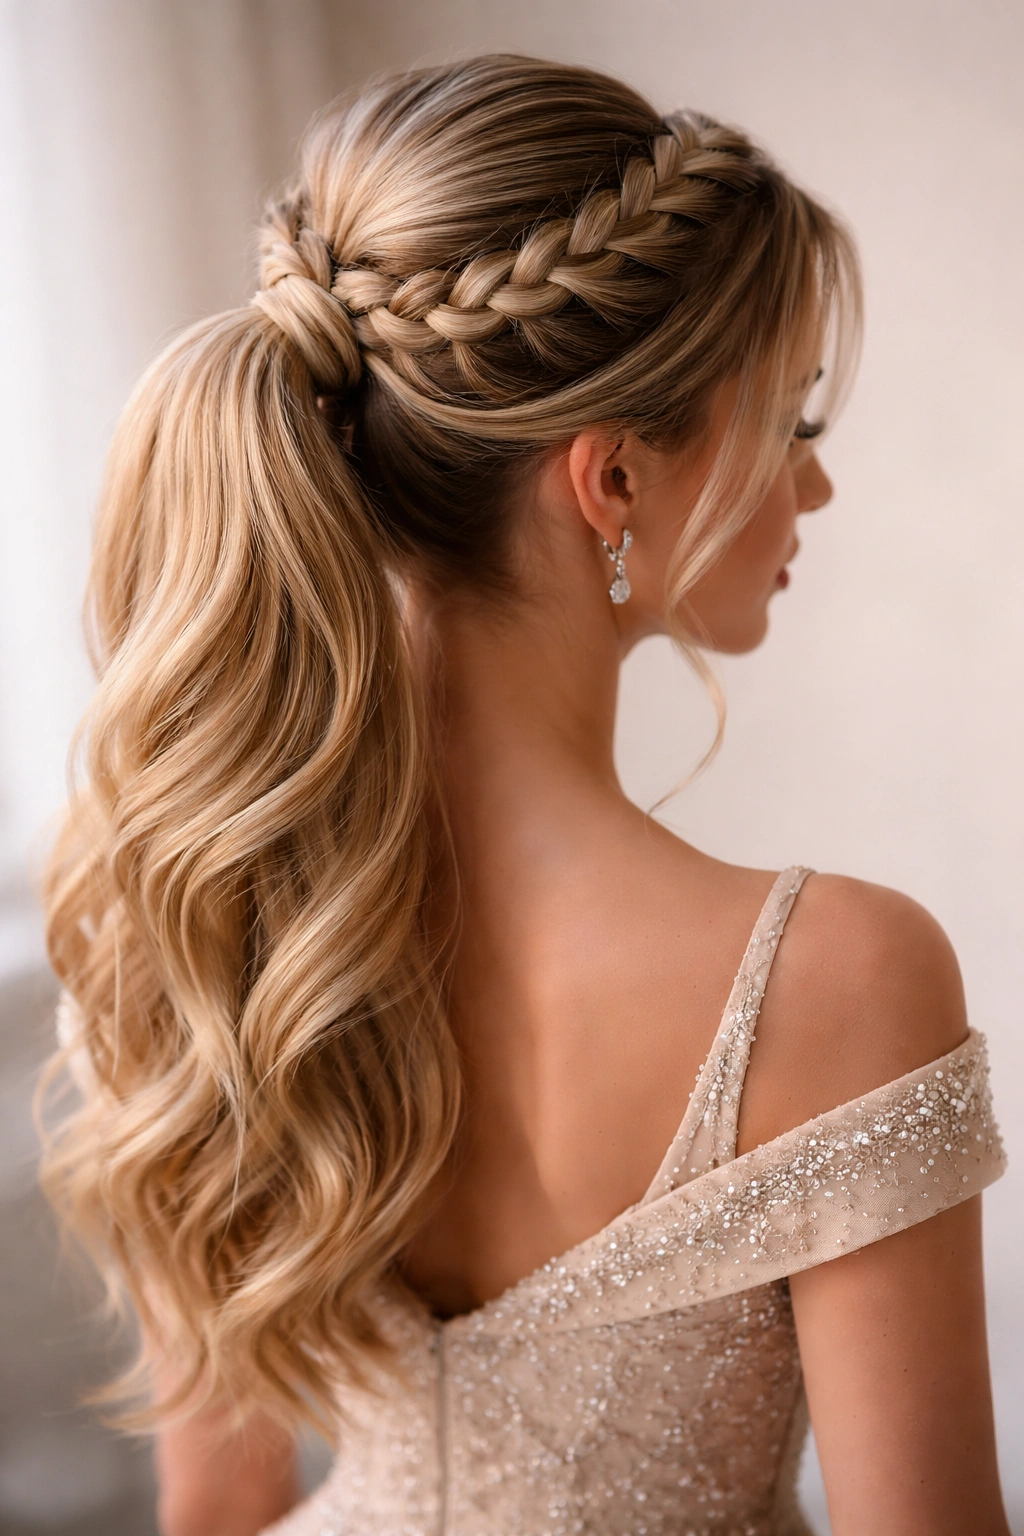
This style feels like royalty-approved elegance. A braided crown ponytail combines the structured beauty of a braid with the sophistication of a ponytail by running one or two braids from the front of your hair back toward a centered or side ponytail at the back. It’s the hairstyle equivalent of saying you’ve put genuine effort into your appearance — it clearly isn’t a style you woke up with, yet it doesn’t look overdone or costume-y. This works for garden weddings, formal brunches, celebrations with a romantic or vintage aesthetic, or any event where you want to communicate thoughtfulness and grace.
Braid Pattern Options
The versatility here is remarkable. You can create a single braid down the center of your head, starting at your forehead and ending where your ponytail begins. You can create two braids that frame your face on either side and converge into a center ponytail. You can do a Dutch braid (which sits slightly raised rather than flat against your scalp) for a more pronounced effect, or a regular three-strand braid for a softer look. You can even do a fishtail braid if you’re comfortable with that technique, which creates a delicate, lace-like appearance that photographs beautifully.
Execution Steps
- Start with slightly textured hair — if your hair is freshly washed and slippery, apply a light texturizing spray first so the braid grips better
- For a single center braid, start at your hairline and gather hair evenly on both sides as you braid backward
- For two side braids, create a deep side part and braid from the temple area back toward the ear, then secure both braids into a single ponytail
- Gently pull sections of each braid slightly outward once completed — this creates a thicker, more romantic braid that photographs much better than tight, precise braids
- Secure the ponytail at the base of where your braids meet, allowing the braid texture to frame the elastic
Worth knowing: If you’re braiding someone else’s hair or doing this yourself in a mirror, start your braid slightly in front of where you think you need to — braids sit lower than most people expect, and starting further forward ensures your braid sits at an attractive height.
5. Pearl-Adorned Ponytail

When you want your hair to catch light and reflect the elegance of your outfit or the significance of the occasion, a pearl-adorned ponytail is the answer. Pearl hair clips, delicate pearl bobby pins, pearl hair spirals, or even a pearl-studded elastic add a touch of refined luxury that feels special without being loud or costume-like. Pearls work for any hair color, complement virtually every skin tone, and add dimension and visual interest to even the simplest ponytail base. This approach elevates a basic high or low ponytail into something memorable and special-occasion appropriate.
Placement and Styling Considerations
The beauty of adding pearls is that you can customize exactly how much adornment you want. You might add a single pearl clip at the base of your ponytail for subtle elegance, or cluster 3-5 pearl bobby pins throughout the ponytail for more pronounced sparkle. You could wrap a delicate pearl hair spiral (also called a hair coil or hair twister) loosely around your entire ponytail, or position one across just the lower half. The key is balance — pearls should enhance the style, not overpower it or make you feel like you’re wearing a costume.
Pearl Accessory Ideas
- Pearl elastic: Secure your ponytail with an elastic studded with faux or real pearls for an elegant, cohesive look
- Pearl bobby pins: Cluster 3-4 pearl bobby pins at the base of your ponytail, securing any flyaways while adding intentional sparkle
- Pearl hair clip: Position a vintage-inspired or modern pearl hair clip horizontally across the base of your ponytail, or angle it slightly for a more dynamic look
- Pearl hair spiral: Wrap a delicate pearl-adorned spiral loosely around sections of your ponytail, creating a cascading effect
- Scattered pearl pins: Use individual pearl head pins throughout your ponytail, creating an organic, intentional-looking scatter rather than a uniform pattern
Pro tip: Fake pearls from quality accessories retailers often look more lustrous and elegant than you’d expect, and they’re far easier to style with than real pearls, which can feel heavy and slide around throughout an event.
6. Textured Volume Ponytail
Not everyone feels beautiful in a sleek style — some people come alive with texture, dimension, and movement. A textured volume ponytail maintains the polished structure of a secured ponytail while embracing fullness, body, and dimensional layers. This style works beautifully for people with naturally curly or wavy hair, for those who prefer the confidence of visible texture, or for anyone who finds sleek styles unflattering against their face or features. It’s also an excellent choice when you want your hair to feel like you, just elevated and extra-polished for the occasion.
Creating Strategic Volume
Start with dry texture rather than trying to create volume on freshly washed, smooth hair. If your hair is naturally curly, apply a lightweight curl-enhancing cream or mousse to damp hair, diffuse-dry it, and you’re already halfway there. If your hair is wavy or straight, create texture with braids overnight or use hot tools to add waves the day of your event. The key difference between everyday textured hair and special-occasion textured hair is the intentionality of the texture — it should look like you’ve enhanced and refined your natural texture, not just left your hair as-is.
Refining the Style
- Gather your textured hair into a ponytail, but don’t pull it as tightly as you would a sleek style — allow the texture to create natural fullness around your face and crown
- Use a rubber elastic (covered in your hair color) rather than a fabric elastic, which can flatten texture and look less polished
- After securing your ponytail, gently pull sections outward to create volume in the crown — this gives your style height and dimension
- Don’t brush or comb through your textured ponytail after securing it; instead, use your fingers to arrange texture and separate curls or waves
- Consider adding a delicate hair vine, pearl clip, or decorative elastic as a focal point within or at the base of your textured ponytail
Worth knowing: Textured ponytails actually photograph better than sleek ones in most lighting conditions because the texture reflects light differently, creating dimension that reads beautifully in photos.
7. Sleek Low Ponytail with Wrap
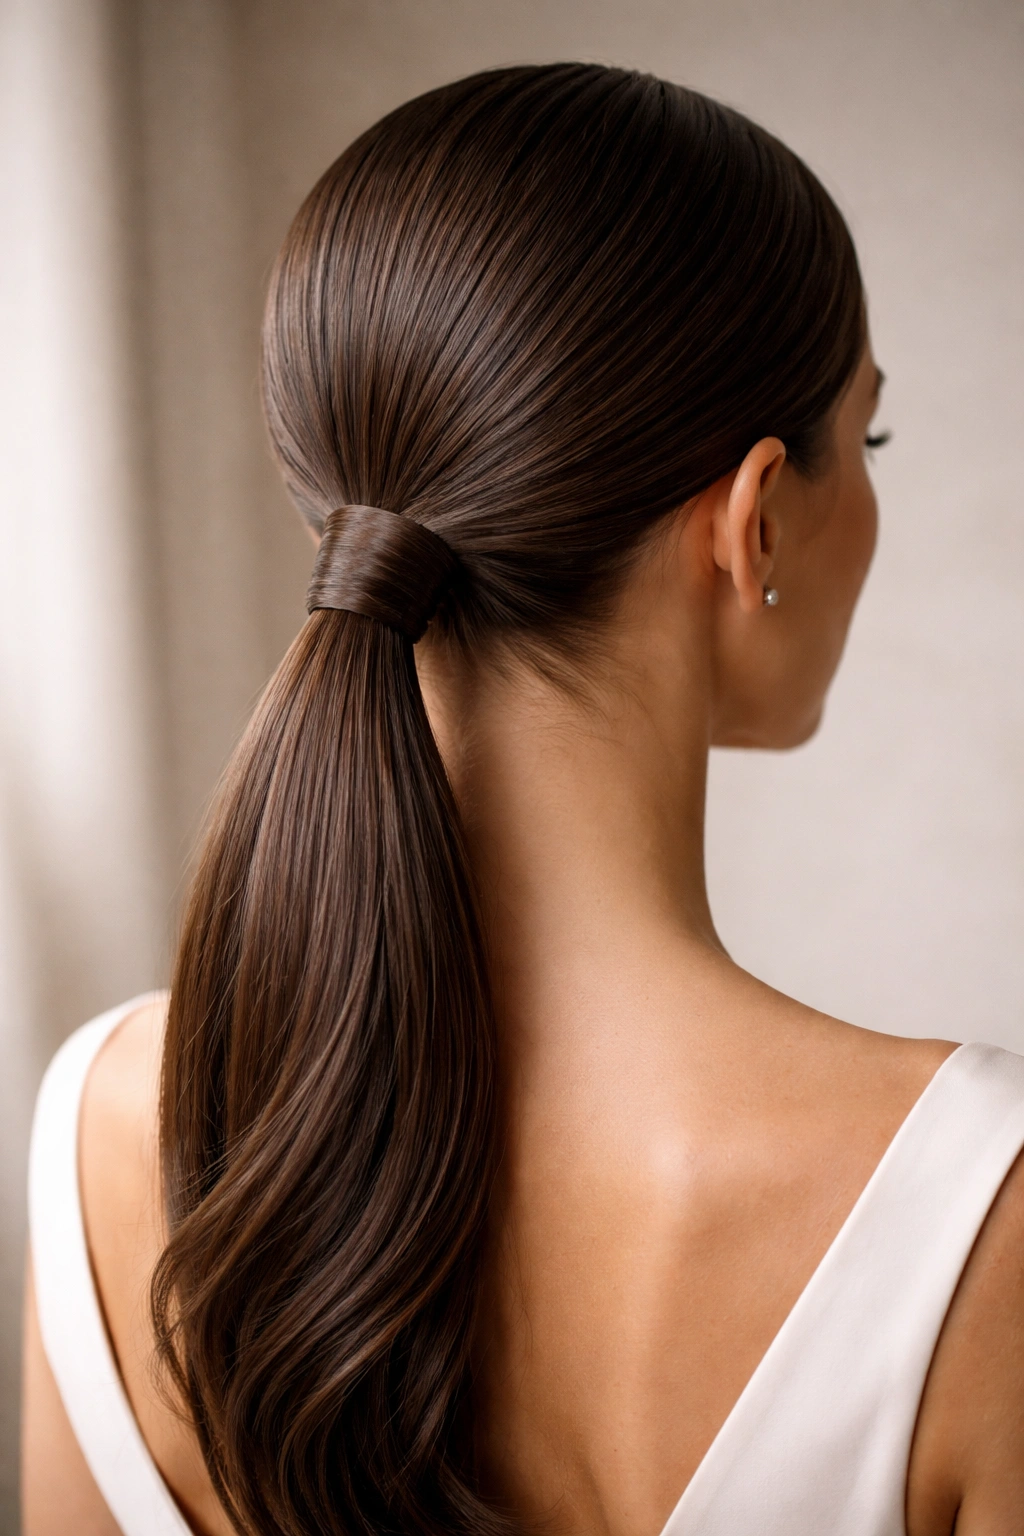
This is the style for people who appreciate minimalism and precision. A sleek low ponytail with an elegant wrap is beautifully simple — there’s nowhere for imperfection to hide, which means when it’s executed well, it looks effortlessly expensive and refined. The “wrap” element is typically a thin section of hair wound around the elastic at the base of your ponytail, or sometimes a delicate silk ribbon, a thin metallic band, or a carefully chosen decorative element that adds a single point of intentional detail to an otherwise unfussy style. This works for black-tie events, formal dinners, sophisticated galas, or any occasion where your outfit is statement-making enough that your hair should take a supporting, elegant role.
Achieving Absolute Sleekness
The challenge with a sleek low ponytail is that any imperfection — a flyaway, an uneven section, an elastic that’s slightly off-center — becomes visible. Start by applying a smoothing serum to damp hair before blow-drying with a paddle brush and nozzle attachment to create an entirely smooth base. Use a fine-tooth comb to gather your hair at the nape of your neck or slightly to the side, depending on whether you want a centered or side placement. Secure it with a covered elastic, then wrap a thin section of hair around the base to hide the elastic completely.
The Wrap Variations
- Hair wrap: Take a thin section from your ponytail and wrap it tightly around the base, pinning it underneath so the pin is invisible
- Silk ribbon wrap: Choose a thin silk ribbon in a color that complements your outfit or hair color, wrap it around the base, and secure with a bobby pin hidden underneath
- Metallic band: Use a delicate metallic cuff or hair band positioned at the base of your ponytail for subtle shine and modernity
- Jeweled clip: Position a delicate jeweled or pearl clip horizontally at the base, securing it as your wrap element
- Scarf wrap: For a more fashion-forward approach, tie a narrow scarf in your favorite pattern around the base and knot it decoratively underneath
Pro tip: If you’re using a ribbon or scarf wrap, apply a tiny bit of fashion tape to the underside where you’ll pin it — this prevents the wrap from shifting throughout your event.
8. Half-Up Half-Down Ponytail Hybrid
This style splits the difference between “my hair is down” and “my hair is up,” making it perfect for people who feel most beautiful with some hair framing their face but who want the polish and structure of a partial updo. The half-up hybrid is particularly flattering for people with longer face shapes (the framing softens the face), people with beautiful, healthy hair they want to show off, or anyone who finds fully-pulled-back styles too severe. It’s also an excellent choice for events where you want your hair to feel celebratory and special without looking overly formal or restricted.
Structure and Proportions
The key to pulling off a half-up hybrid is understanding the proportions. You want roughly the top third to half of your hair gathered and secured at the crown or back of the crown, while allowing the bottom half or two-thirds to fall freely. This creates a balanced look that feels intentional rather than half-finished. The secured section should be polished — sleek or gently textured — while the down section can be curled, waved, or kept relatively straight depending on your overall aesthetic and the formality of your event.
Building the Style
- Create texture in your full hair first — waves, curls, or texture spray — so the down portion has dimension and polish
- Take a horizontal section of hair from temple to temple at the back of the crown, gathering it as if you’re starting a high ponytail
- Secure this section with an elastic, then wrap hair around the base to hide the elastic
- Let the rest of your hair fall freely, and arrange the waves or curls with your fingers to create a polished, effortless-looking cascade
- Consider adding a delicate clip, pearl pins, or a thin braid within the secured section for added interest and dimensionality
Worth knowing: The half-up hybrid works beautifully with a side part — create a deep part on one side, secure the top section slightly off-center, and allow the front section on the deeper-parted side to remain down and frame your face beautifully.
9. Bubble Ponytail with Gems
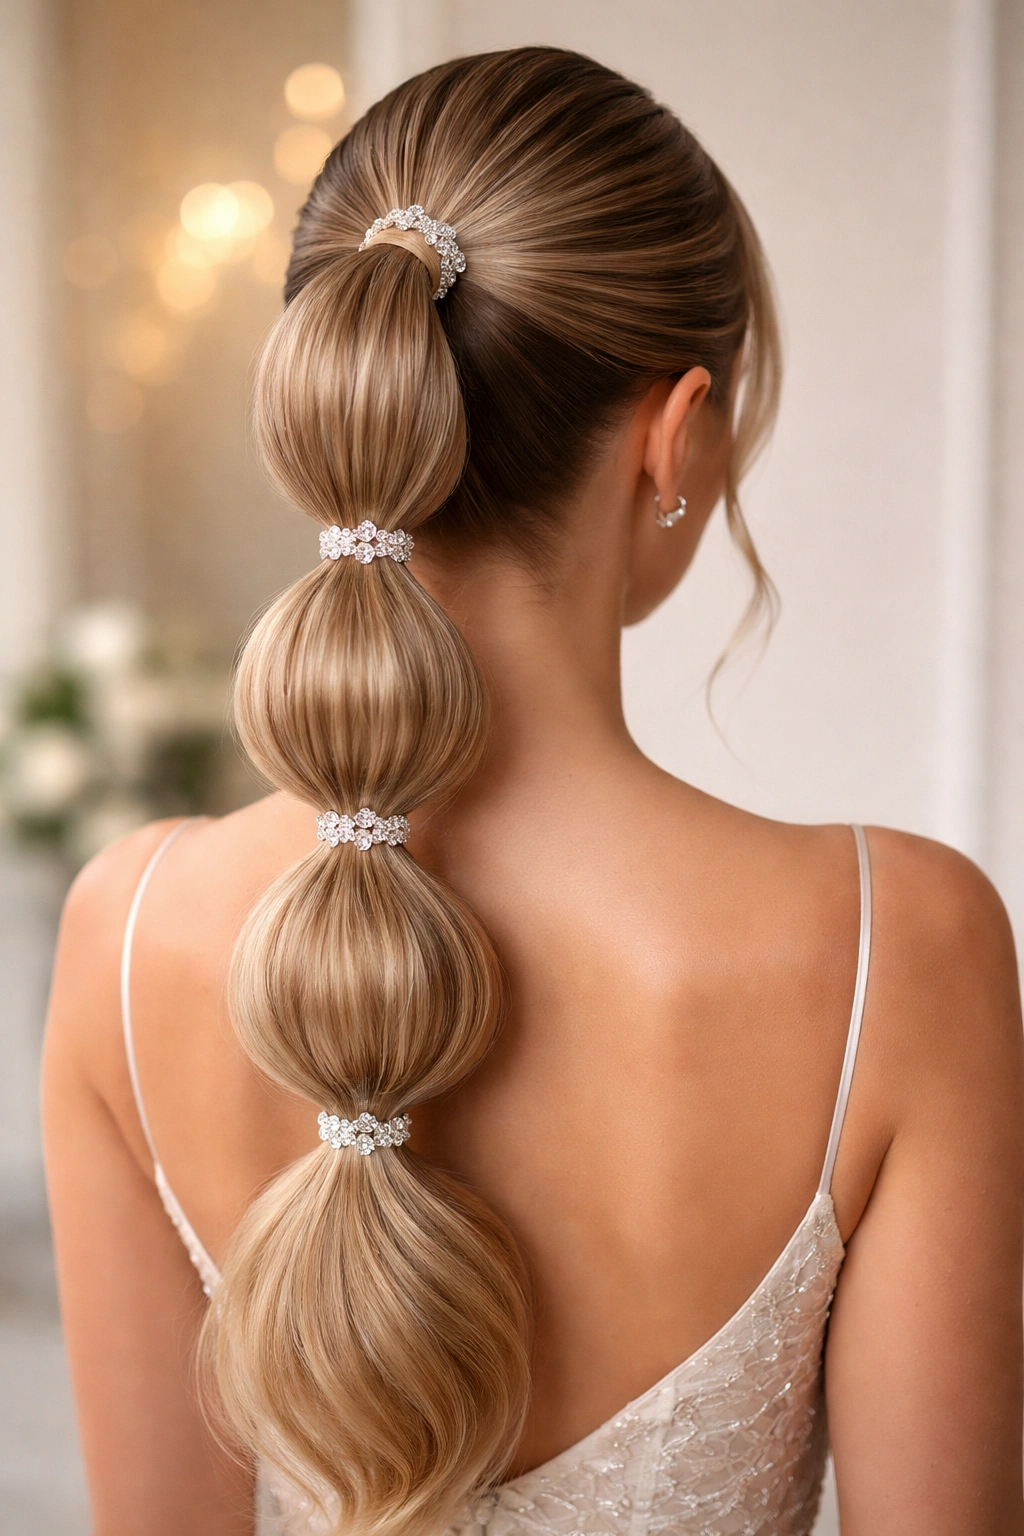
A bubble ponytail is playful enough to feel modern and fun, yet when executed with precision and embellished with gems or pearl details, it becomes undeniably elegant. Also called a stacked or segmented ponytail, this style involves dividing your secured ponytail into 3-5 sections and securing each section individually with small elastics, creating a “bubble” or tiered effect. The gems come in the form of small hair clips, decorative pins, or even tiny adhesive gems placed at each elastic for a subtle sparkle that catches light and draws the eye to your hair. This style is ideal for celebrations that feel more modern than traditional — fashion-forward weddings, upscale cocktail parties, galas with a contemporary aesthetic, or any event where you want to show personality while maintaining elegance.
Creating Defined Bubbles
The success of this style depends on even spacing and consistent bubble size. Secure your ponytail at your desired height — this works beautifully as both a high and a low ponytail. Measure approximately 1.5 to 2 inches down from your elastic and secure that section with another elastic, creating your first bubble. Continue down your ponytail, creating bubbles of consistent size until you reach the ends. For a more dramatic effect, gently pull each bubble outward slightly to create fullness and dimension within each section. This adds volume and makes the style feel more sophisticated than a tight, flat version would.
Gem and Sparkle Details
- Place a small pearl or jeweled hair clip at the base of each bubble, positioned where the elastic is, for a cohesive sparkly look
- Use individual pearl bobby pins inserted horizontally across each bubble for a more organic, less uniform sparkle
- Apply tiny adhesive gems directly at each elastic for ultra-precise, minimal sparkle that feels intentional
- Wrap a thin ribbon or decorative string around each elastic, tying it underneath into a delicate knot for color and texture without additional weight
Pro tip: Create this style on hair that’s been curled — the texture makes the bubbles look fuller and more intentional, and curls help disguise the elastics better than straight hair does.
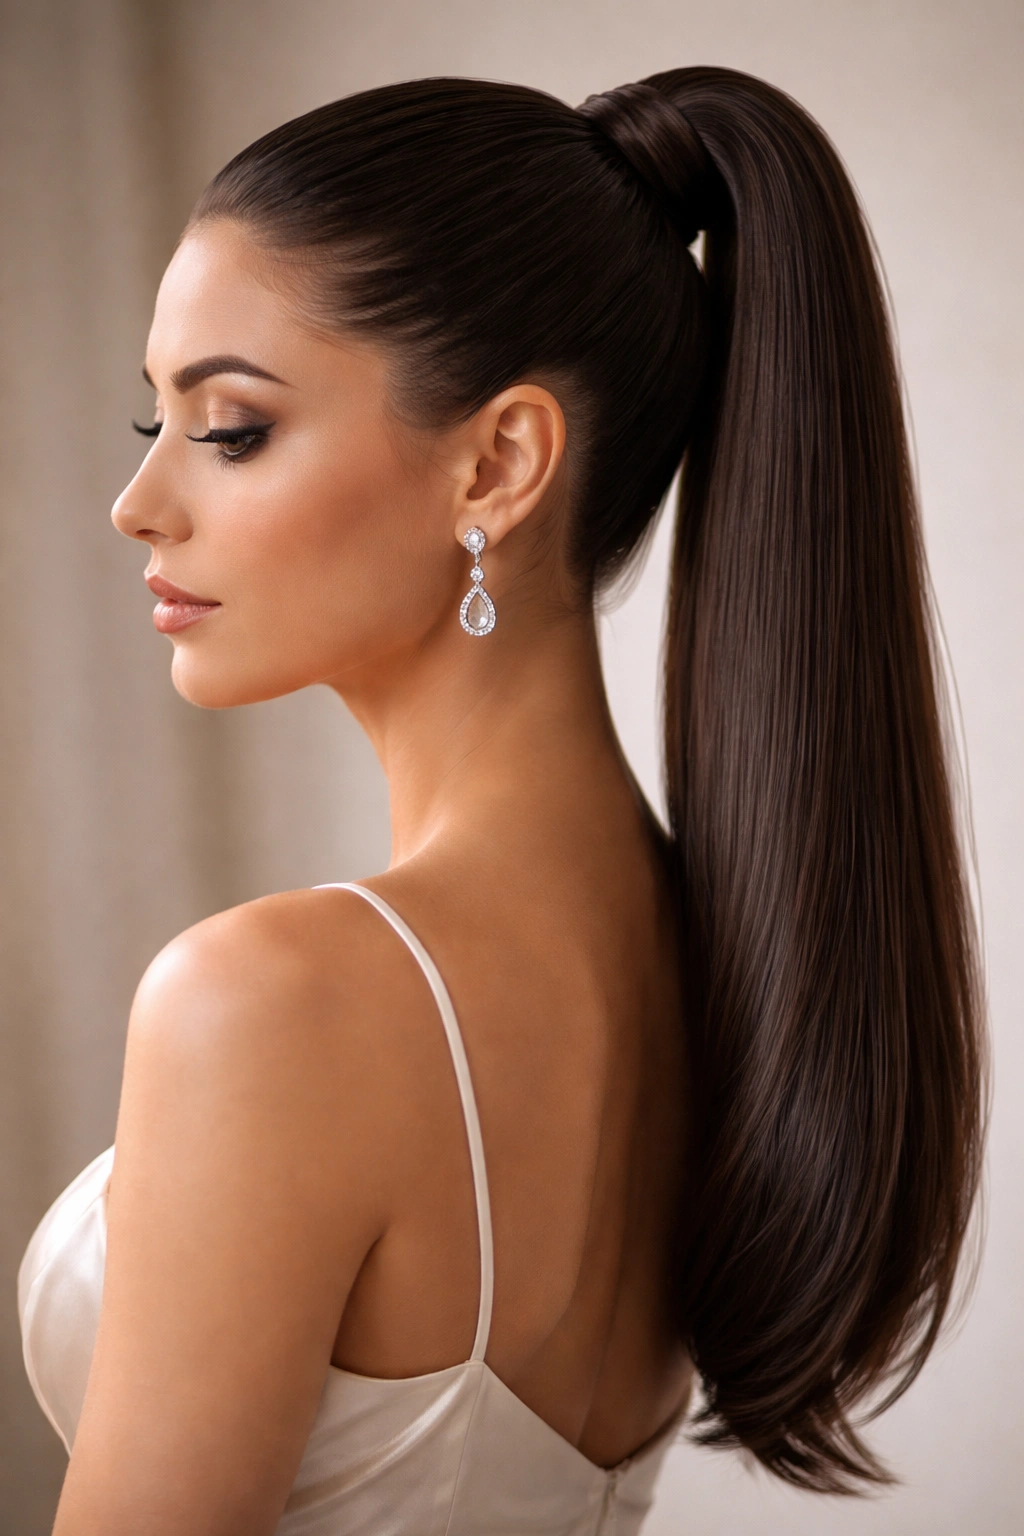
10. Smooth Glossy Ponytail

Sometimes the most elegant choice is the one that highlights the health and beauty of your actual hair. A smooth glossy ponytail requires impeccable hair condition and precision styling, but when executed well, it’s utterly luminous and conveys an impression of polish, health, and luxury. This style is ideal for people whose hair is naturally shiny, well-maintained, and strong (glossiness requires well-conditioned hair), or for anyone willing to invest in pre-event hair treatments. It pairs beautifully with formal evening wear, creating an almost mirror-like sheen that reflects light and photographs beautifully.
Achieving Genuine Gloss
True gloss isn’t a matte finish — it’s a luminous sheen that comes from healthy, well-conditioned hair combined with specific styling techniques. Start with a deep conditioning treatment or hair mask 24-48 hours before your event, then use a smoothing shampoo and conditioner the morning of. Apply a lightweight hair oil or serum to damp hair before blow-drying — this creates the foundation for gloss. Blow-dry with a nozzle attachment to smooth the hair cuticle and encourage shine, and finish by running cool air (the final pass of a blow dryer) over your hair to seal the cuticles completely, which maximizes shine.
Maintaining Gloss Throughout the Event
- Use a smoothing balm or anti-frizz serum to tame flyaways and maintain shine; avoid matte-finish hair products that dull shine
- Don’t touch your hair excessively throughout the event — each touch or adjustment disrupts the smooth surface and reduces gloss
- Carry a small cloth or microfiber hair towel to gently smooth hair if humidity threatens to disrupt your style
- Avoid hairspray if possible; if you must use it, choose a flexible-hold formula that doesn’t create a matte or sticky finish
- Position yourself for photos in lighting that will enhance your hair’s shine — natural light and warm indoor lighting both reflect beautifully off glossy hair
Worth knowing: The glossier your hair looks, the healthier and more expensive your entire appearance becomes. This is why many high-end stylists prioritize shine over other factors for formal events.
11. Vintage-Inspired Ponytail with Loops
This style draws from vintage aesthetics — think Old Hollywood glamour or 1960s elegance — while feeling utterly modern and special-occasion appropriate. A vintage-inspired ponytail often includes gentle waves or curls, a slightly lower placement than a purely modern style, and a signature loop or bow detail at the base created from sections of the ponytail itself. The loops create romance and dimension while maintaining the structured polish of a true ponytail. This works beautifully for retro-themed events, vintage-aesthetic weddings, formal garden parties, or any occasion where you want to communicate elegance with a touch of nostalgic femininity.
Creating Authentic Vintage Waves
Vintage-inspired hair requires texture that looks intentionally set rather than casually wavy. Create waves using hot tools — a 1.5-inch curling iron is ideal for creating the soft, defined waves that characterize this aesthetic. Curl sections of hair away from the face, then gently finger-comb waves to soften them slightly. The goal is waves that hold their shape without looking overly crispy or artificially textured. Set these waves with a flexible-hold hairspray before creating your ponytail — the waves should maintain their shape even after you’ve secured your hair.
Creating the Loop Detail
- Secure your ponytail at the back of your head, slightly lower than crown height
- Take a thin section of hair from your secured ponytail and loop it upward, pinning it to the back of your head just above where your elastic is
- Create a second loop on the opposite side, mirroring the first
- Allow the remaining length of your ponytail to flow down the back, or twist it gently and pin it up for a more secured look
- Use bobby pins that match your hair color to secure loops invisibly
Pro tip: If you’re uncomfortable creating perfect loops, an excellent alternative is to create a vintage-style bow from ribbon that you tie around the base of your ponytail — this achieves the same romantic, vintage aesthetic with less styling difficulty.
12. Floating Ponytail (Illusion or Inverted)
For a truly memorable, show-stopping special-occasion style, a floating or inverted ponytail is unmatched. This style creates the optical illusion that your hair is floating away from your head — the gathered section appears to be suspended mid-air rather than attached directly to your scalp. It’s an advanced styling technique that requires practice, but the result is so striking and unexpected that it immediately reads as special-occasion and expertly executed. This style works for galas, upscale events, fashion-forward celebrations, or any occasion where you want to make a genuine impact and demonstrate confidence and style sophistication.
How the Illusion Works
The floating ponytail works by securing the bulk of your hair into a ponytail at the back of your head, then using the hair on top of your head to create the illusion of a covering over the elastic. Take a thin horizontal section of hair from above where your elastic is, flatten it against your scalp, and bobby pin it over the elastic, essentially creating a hidden band of hair that covers where your real elastic is. This creates the visual effect that your ponytail is floating, when in reality it’s secured traditionally — you’ve just cleverly hidden the elastic with a strategic hair section.
Step-by-Step Execution
- Gather the bulk of your hair (leaving the top 1-2 inches) into a ponytail at the back of your head, securing it with an elastic
- Take a thin section of hair from the top of your head and bring it down over where your elastic is, securing it to the back of your head with bobby pins
- The pinned section should lie flat and cover the elastic completely
- The visual result is that your ponytail appears to float, with a gap between your head and the secured hair
- Tease the floating ponytail section gently to create volume and ensure it maintains its position throughout the event
- Wrap a thin section of hair around the base of your floating ponytail to add polish and hide any remaining elastic or pins
Worth knowing: This style photographs exceptionally well and creates a striking visual impact in person. It’s best suited to people with shoulder-length or longer hair and requires some practice — consider practicing once or twice before your event if this will be your first attempt.
Final Thoughts
The right ponytail transforms how you feel about your appearance and, by extension, how you move through your special occasion. Whether you gravitate toward sleek, architectural styles or romantic, textured approaches, understated elegance or intentional sparkle, the 12 styles above provide a comprehensive roadmap for creating ponytails that feel entirely worthy of the moment you’re celebrating.
The deeper wisdom here is that elegance isn’t about complexity — it’s about intention. Every one of these styles works because someone has made deliberate choices about placement, texture, finish, and finishing details. You’re not trying to impress people with difficulty or drama; you’re communicating that this event, and your appearance at it, matters enough that you’ve invested thought and care into how you present yourself.
Start by choosing a style that aligns with both the formality of your event and the way you genuinely feel most beautiful. Consider your hair type, the amount of time you’re willing to invest, your comfort level with advanced techniques, and whether you’ll be doing this yourself or working with a stylist. If you’re attempting a style you haven’t done before, practice once or twice beforehand — this removes anxiety and ensures you’ll feel confident and comfortable throughout your celebration rather than worrying about whether your hair will hold.
Most importantly, remember that the best ponytail is the one you feel genuinely radiant in. Confidence is the most elegant accessory you can wear, and when you know your hair looks beautiful and intentional, that confidence becomes visible. Walk into your special occasion secure in the knowledge that your hair reflects the care, thoughtfulness, and grace you bring to everything you do.