A braid bun that stays put without a single bobby pin feels a little like cheating. You twist, wrap, tuck, and somehow the whole thing stays in place through a commute, a long workday, or a dinner where you keep forgetting you even touched your hair.
The trick is never magic. It’s structure.
A good braid bun holds because the braid gives the hair something to grip against, the base sits in the right spot, and the elastic does more work than most people give it credit for. Bobby pins help, sure, but they are often doing damage-control work after the bun was built a little too loosely. If you start with the right braid pattern, you can skip them.
Hair texture matters here, too. Fine hair tends to slip if the braid is too smooth. Thick hair needs a bun shape that spreads the weight instead of collapsing into a lopsided knot. Layered cuts can be sneaky; the short pieces around the face will try to escape first, which is exactly why some braid buns hold better than others. A style that looks flimsy on the surface can be a stubborn little fortress when the braid direction is doing the heavy lifting.
So, the point isn’t just to make a bun. It’s to make a braid bun with enough grip, tension, and shape that the pins become optional. And some styles do that far better than others.
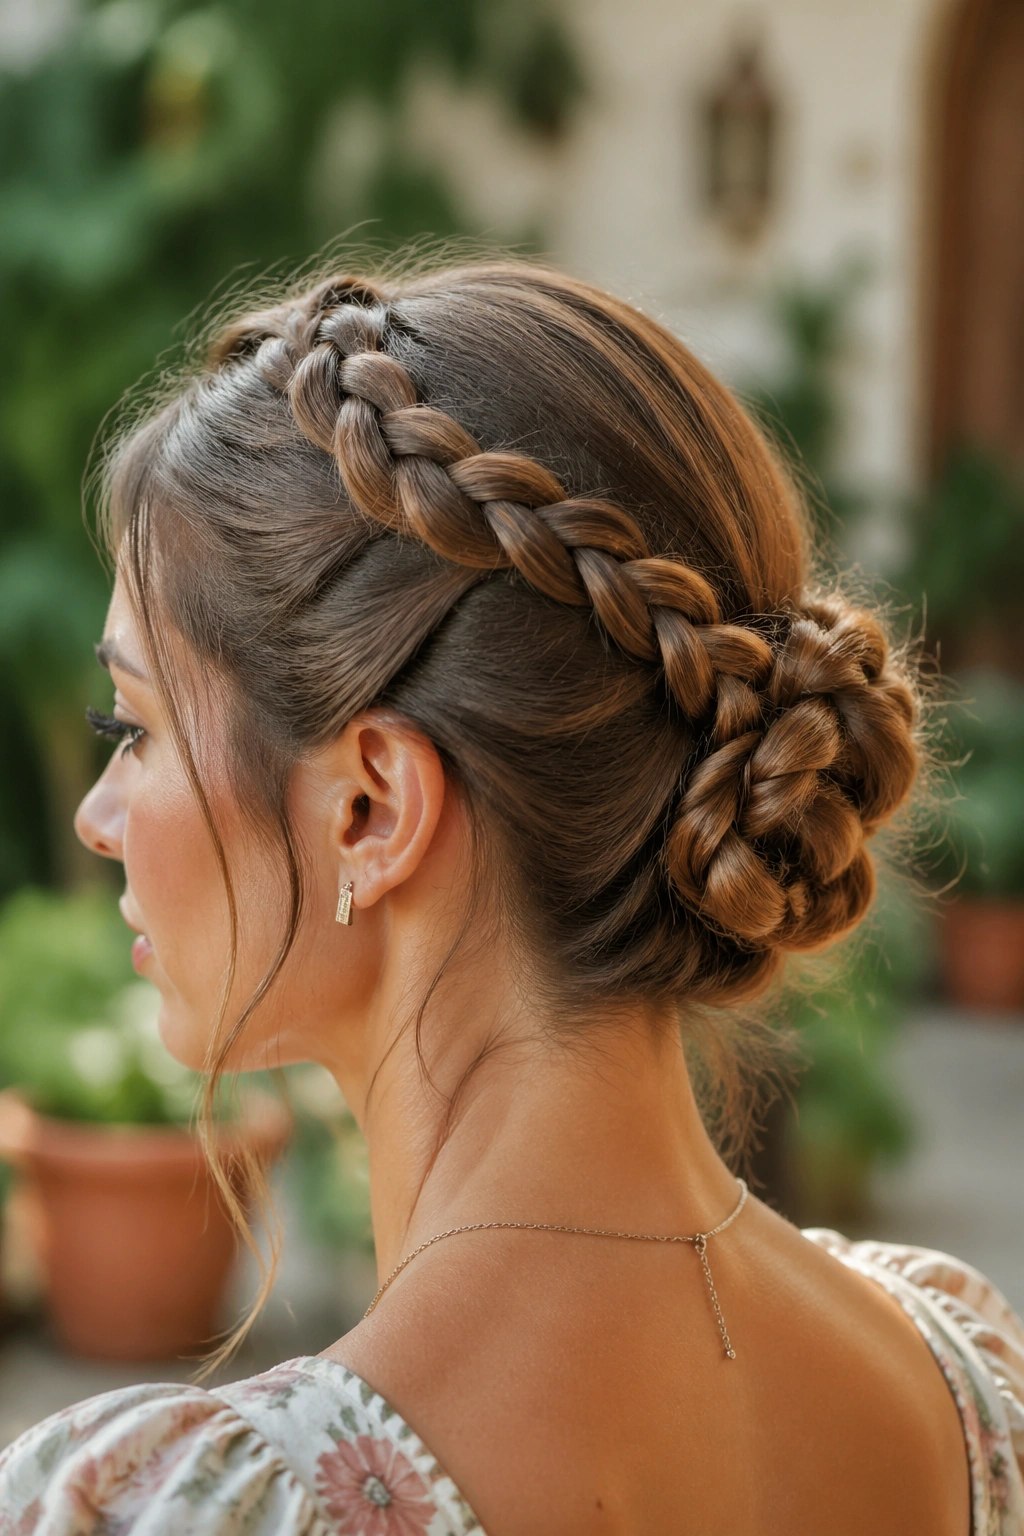
1. Rope Braid Topknot
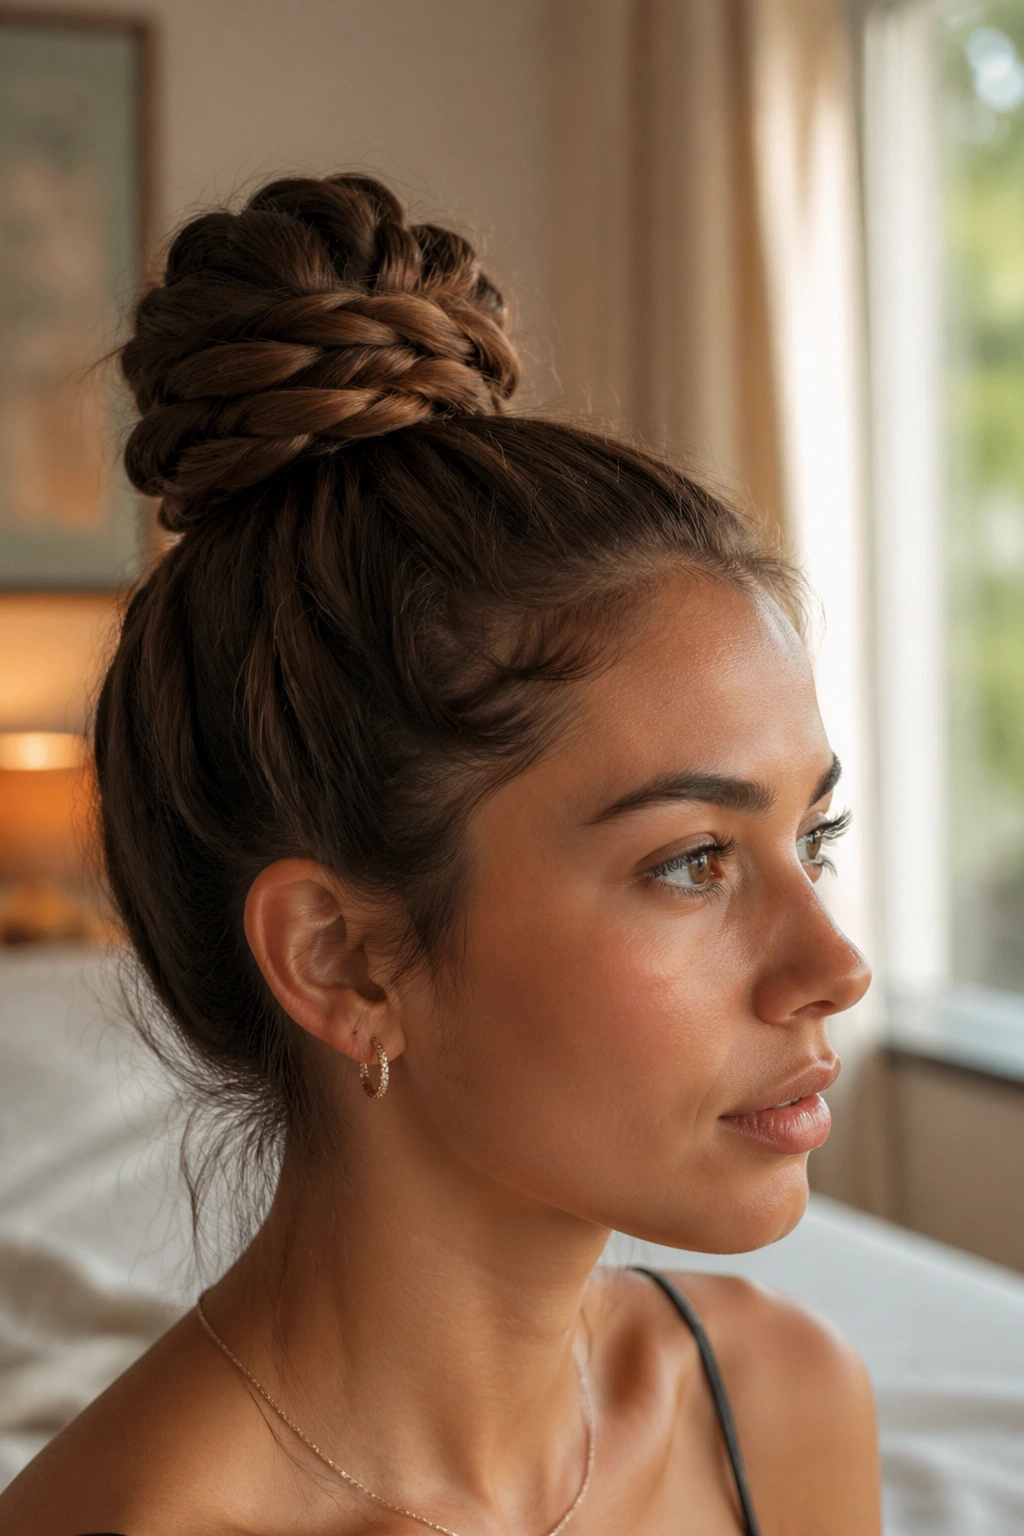
A rope braid topknot is one of those styles that looks simpler than it is. That’s the good news. The better news is that the twist pattern locks in on itself so well that it can hold with an elastic and a bit of careful wrapping, no bobby pins needed.
The reason it works is tension. Each two-strand twist pulls back against the other strand, so the braid gets tighter as you move down the length of the hair. Once you coil that rope braid into a bun, the twist wants to stay twisted. It is one of the cleanest choices for medium-length or long hair that tends to slip out of regular buns.
Why It Holds So Well
The structure is doing the job, not product overload. A rope braid has fewer loose crossover points than a standard three-strand braid, which means less puffing and fewer ends sticking out at the wrong angle. The bun sits best high on the crown or slightly behind it, where the weight is balanced and the twist can wrap snugly around its own base.
Quick Build Notes
- Start with dry or slightly textured hair so the braid has some bite.
- Secure the ponytail with a strong elastic at the crown.
- Twist the tail into a rope braid, then coil it around the base.
- Tuck the end underneath the first wrap and cinch the whole thing with the same elastic, if it stretches enough.
Best for: fine-to-medium hair, sleek office styles, and anyone who wants a bun that looks neat without looking stiff.
One thing to watch: if you twist the strands too tightly from the start, the bun can feel like a helmet by midday. Tight enough to hold, not so tight that your scalp starts complaining before lunch.
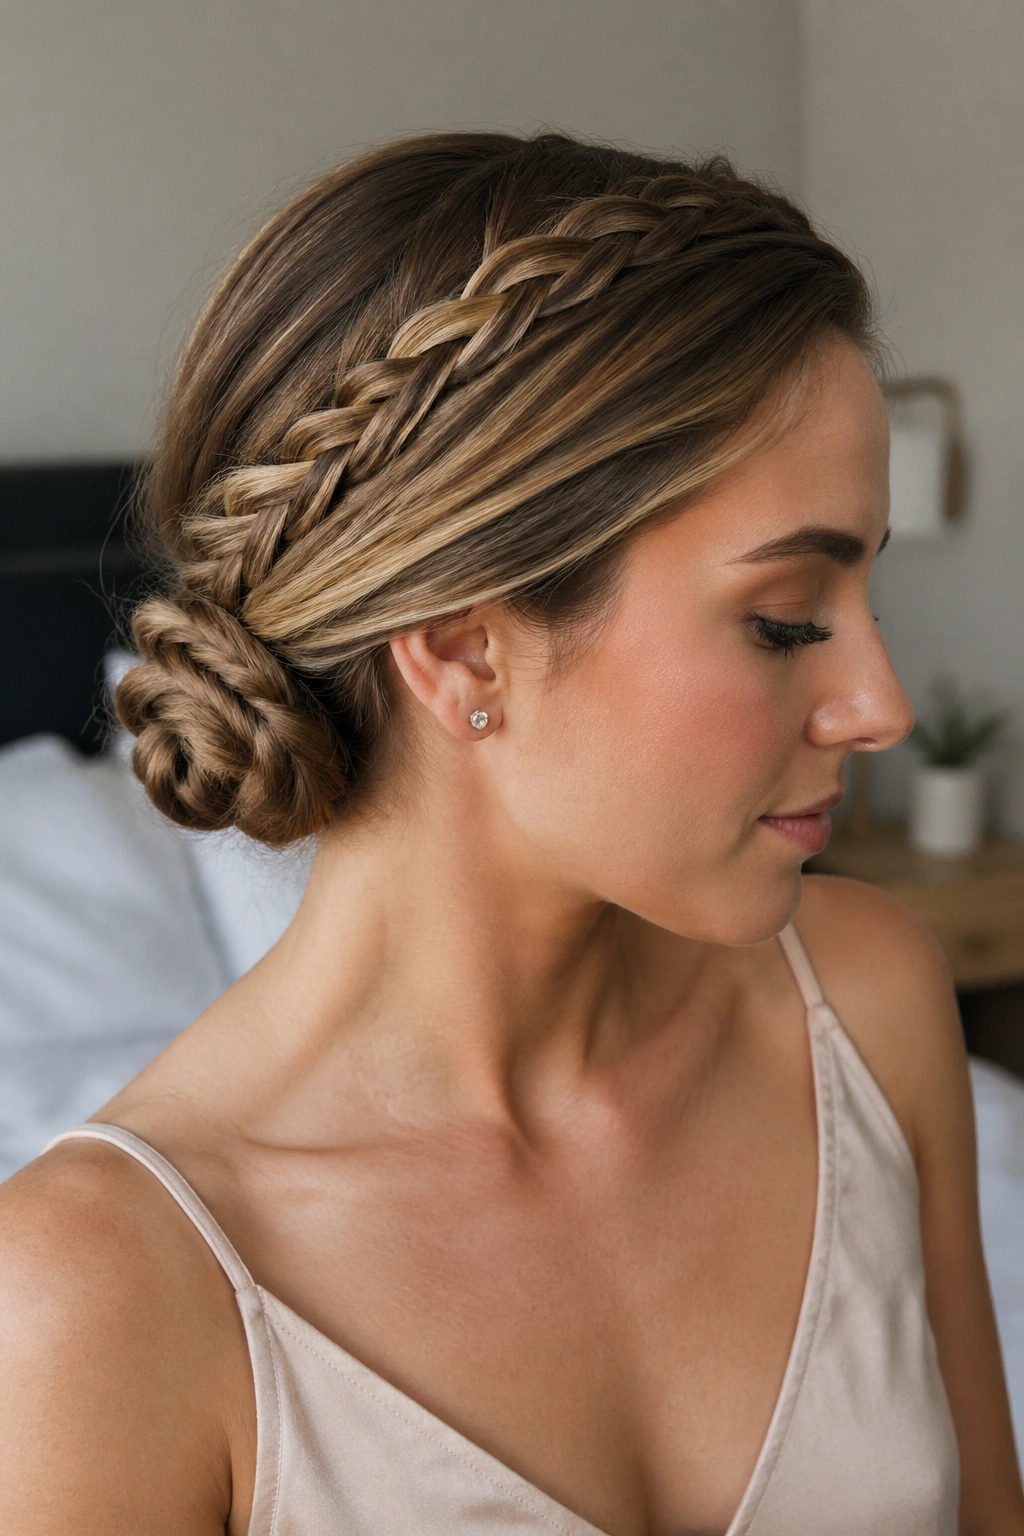
2. Dutch Braid Coil Bun
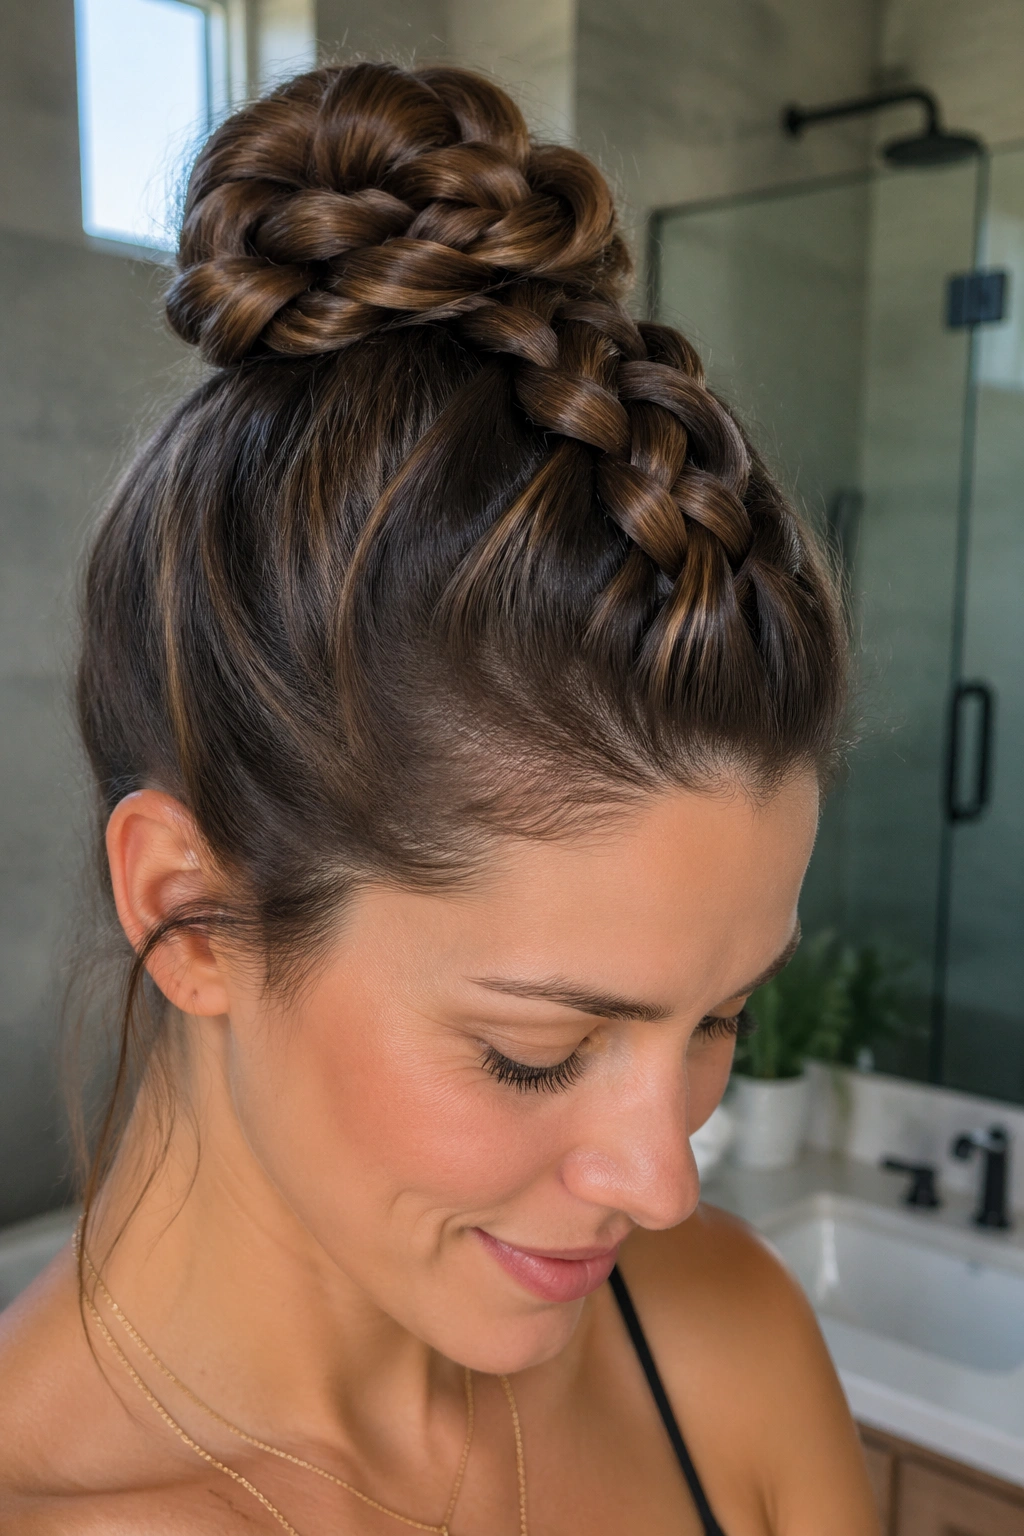
Why does a Dutch braid make such a stubborn bun? Because the braid sits on top of the hair instead of sinking into it, which gives the whole style a raised ridge and a lot more grip. That ridge is not just decorative. It gives the bun a built-in spine.
Start the Dutch braid near the hairline or at the nape, depending on where you want the finished bun to sit. Feed the sections under the center strand as you braid; that reverse pattern creates the raised texture people love in Dutch braids, and it also keeps the base from sliding around. Once you reach the end, wrap the braid into a coil and tuck the tail under the first loop.
How to Set the Braid Path
A centered braid makes the bun feel balanced. A slightly off-center braid gives a softer look and can help if one side of your hair is denser than the other. I usually like the bun to sit just below the crown when I want it to survive a busy day, because that position gives the braid enough room to flatten without pulling upward.
Best Hair Types
- Thick hair that usually makes buns sag.
- Layered hair that won’t stay inside a plain knot.
- Hair with natural texture, since the reverse braid grabs better.
Use a medium elastic at the base and let the braid do the rest. If you need a very polished finish, a drop of light pomade on the front sections can keep the flyaways from multiplying.
This is one of those styles that looks more complicated than it is. It isn’t hard. It just rewards a clean part and steady tension.
3. French Braid Cinnamon Roll
Picture the kind of morning when your hair looks like it has opinions. A French braid cinnamon roll fixes that fast, because the braid starts at the front and keeps gathering loose sections before they have a chance to escape. By the time you reach the nape, most of the work is already done.
The finished bun sits flat and round, like a classic cinnamon roll, which is why it feels polished without needing pins jammed all over your scalp. The braid itself is the anchor. When you wrap it into the bun, the layers already have nowhere to go.
What Makes It Different
The front hairline is the tricky part of any no-pin bun. French braids solve that by pulling the hair in as you move back, so the shorter front pieces get locked into the pattern early instead of hanging loose around your face. That makes this a smart choice for layered cuts and medium-density hair.
Good Habits That Help
- Start on hair that has a little grit.
- Keep the braid snug at the crown, but not painful.
- Wrap the braid flat, not piled high.
- Finish with one elastic around the bun itself if the braid is long enough to circle twice.
If you like a neat look for work, this is a strong pick. If you want something softer, gently pull a few loops of the braid apart after it is secured. That tiny move changes the whole mood. A little looser. A little less severe.
And honestly, this is one of the braid buns I trust most when the day will be long and boring and I do not want to think about my hair again.
4. Low Fishtail Bun
A low fishtail bun looks delicate from across the room, which is probably why people underestimate it. Bad move. The fishtail pattern creates a dense, compressed braid that folds into a low bun with a grip that surprises people the first time they wear it.
Unlike a regular three-strand braid, a fishtail uses tiny outer sections crossed over the center in alternating bites. That makes the braid thinner and flatter, but also packed with more interlocking pieces. When you coil it at the nape, the bun feels almost woven together. It doesn’t puff up as easily, and it tends to stay neat even when the rest of the hair is slippery.
A low placement helps more than people think. The bun sits in the natural dip at the back of the head, which means less movement and less pull. If your hair is fine, this is a very useful detail. High buns on silky hair often slide; low buns sit there and mind their business.
This one is especially good when you want a dressier shape without a lot of hardware. Keep the fishtail tight, coil it into a flat spiral, and secure the end under the base with the braid itself. If the tail is long enough, the weight of the braid can pin itself in place. That sounds odd. It works.
Best with a clean center part, a soft side part, or no part at all if you want the front to stay loose and easy.
5. Box Braid Wrapped Bun
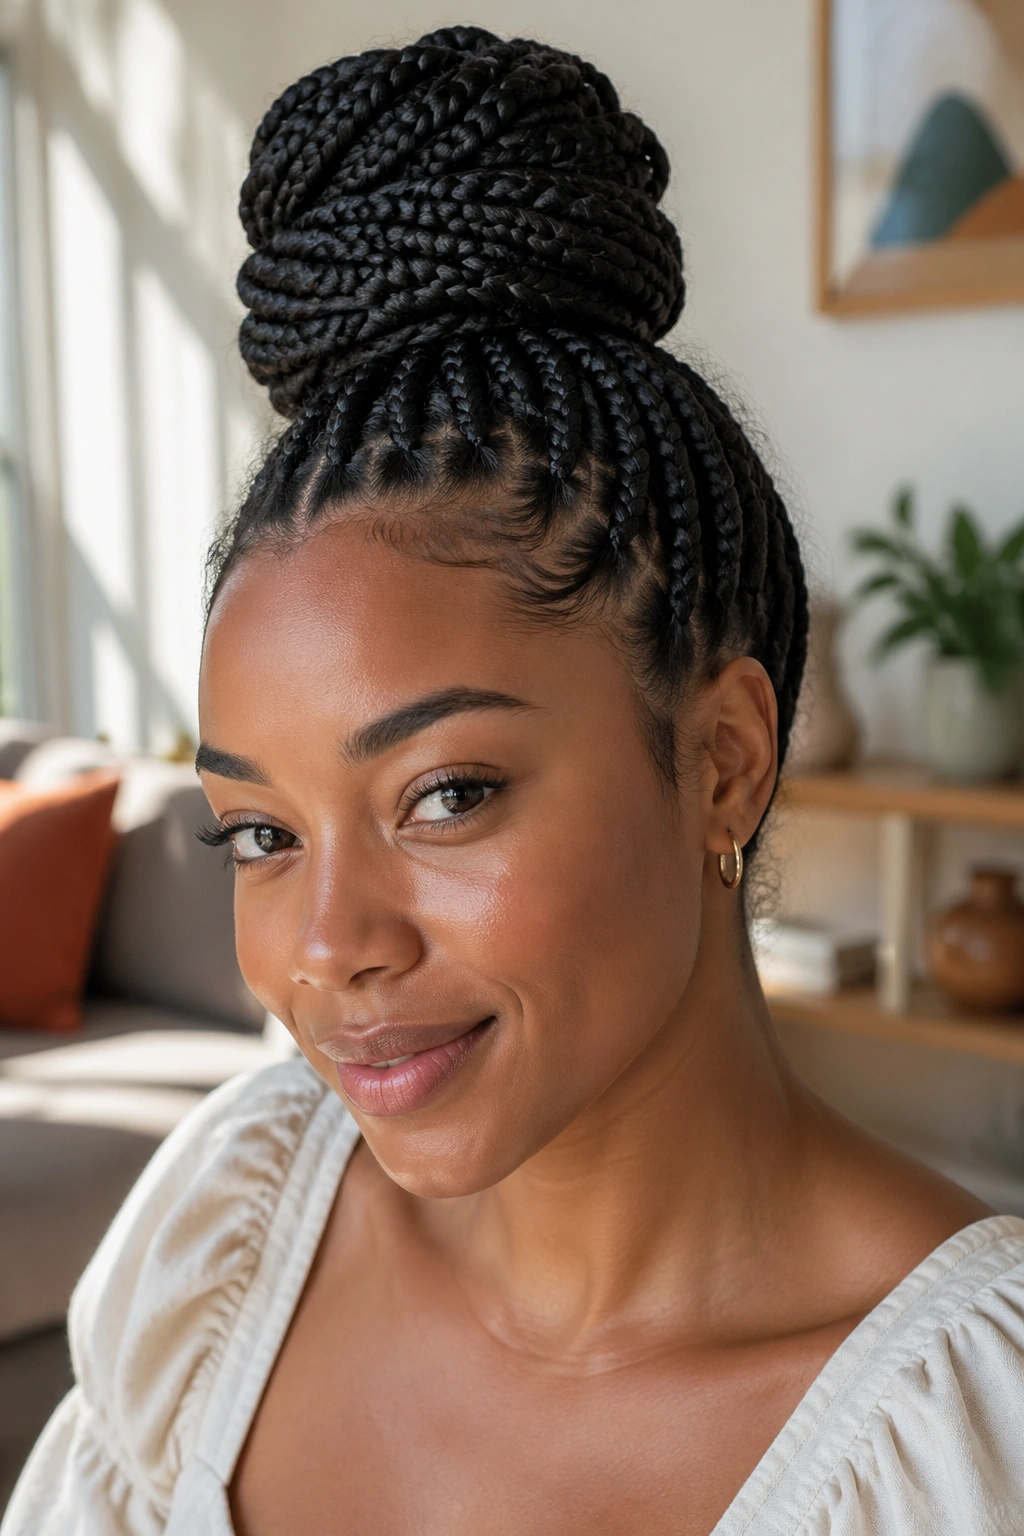
Box braids change the game because the hair is already sectioned, already weighted, and already giving you enough texture to build a bun that does not need rescue pins. If you wear extensions or natural box braids, this is one of the easiest styles to make secure with almost no extra effort.
The braid length wraps around the base like a rope, but the individual plaits bring their own grip. That means the bun can hold its shape on its own, especially if you stack the braids in the same direction instead of randomly looping them. A clean wrap around the ponytail base makes a big difference. Messy wrapping looks cute for about an hour. Neat wrapping lasts longer.
What Makes It Different
- The style is built from texture, so it does not depend on slippery strands.
- The bun can sit high, low, or centered without falling apart.
- It works well for protective styling because the ends are already contained.
- You can wear it with a scarf, a satin scrunchie, or a plain elastic and still get a finished look.
Who It Suits Best
This is the one I’d point to for thick hair, coily hair, or anyone who wants a style that can handle a little movement. Gym days. Warm weather. Long errands. A box braid wrapped bun is unfussy in the best way.
The one caution is edges. Tight pulling at the front can turn a useful style into a headache. Keep the base secure, but do not yank the roots. The bun should feel held, not locked in a head vice.
6. Two-Braid Twist Knot
Two braids give you more control than one. That’s the whole appeal here. Instead of relying on a single braid to carry all the weight, you split the hair into two sections, braid each one, and knot them together into a compact bun. It sounds a little old-school. It also holds well.
The balance is the trick. One braid on its own can sag to one side. Two braids can cross over each other, which spreads the weight and gives the bun a more stable center. If your hair is thick or uneven in texture, this style is a lifesaver because each braid can be tightened separately before the knot goes in.
You can build it low at the nape for a tidy look, or higher up if you want something more casual. Either way, the bun starts to feel secure as soon as the two braids are wrapped around each other. They brace one another. That’s the real advantage.
I like this style for days when I want the hair off my neck but don’t want a high bun sitting on my head like a ball. The two-braid knot stays flatter and feels less bulky than a single heavy twist.
A small elastic at the end of each braid helps a lot. After that, it’s just a matter of twisting the pair around each other until the knot looks centered and the ends disappear underneath. If the hair is slick, let the braids sit for ten minutes before adjusting. A little set time makes the bun less likely to unravel when you move.
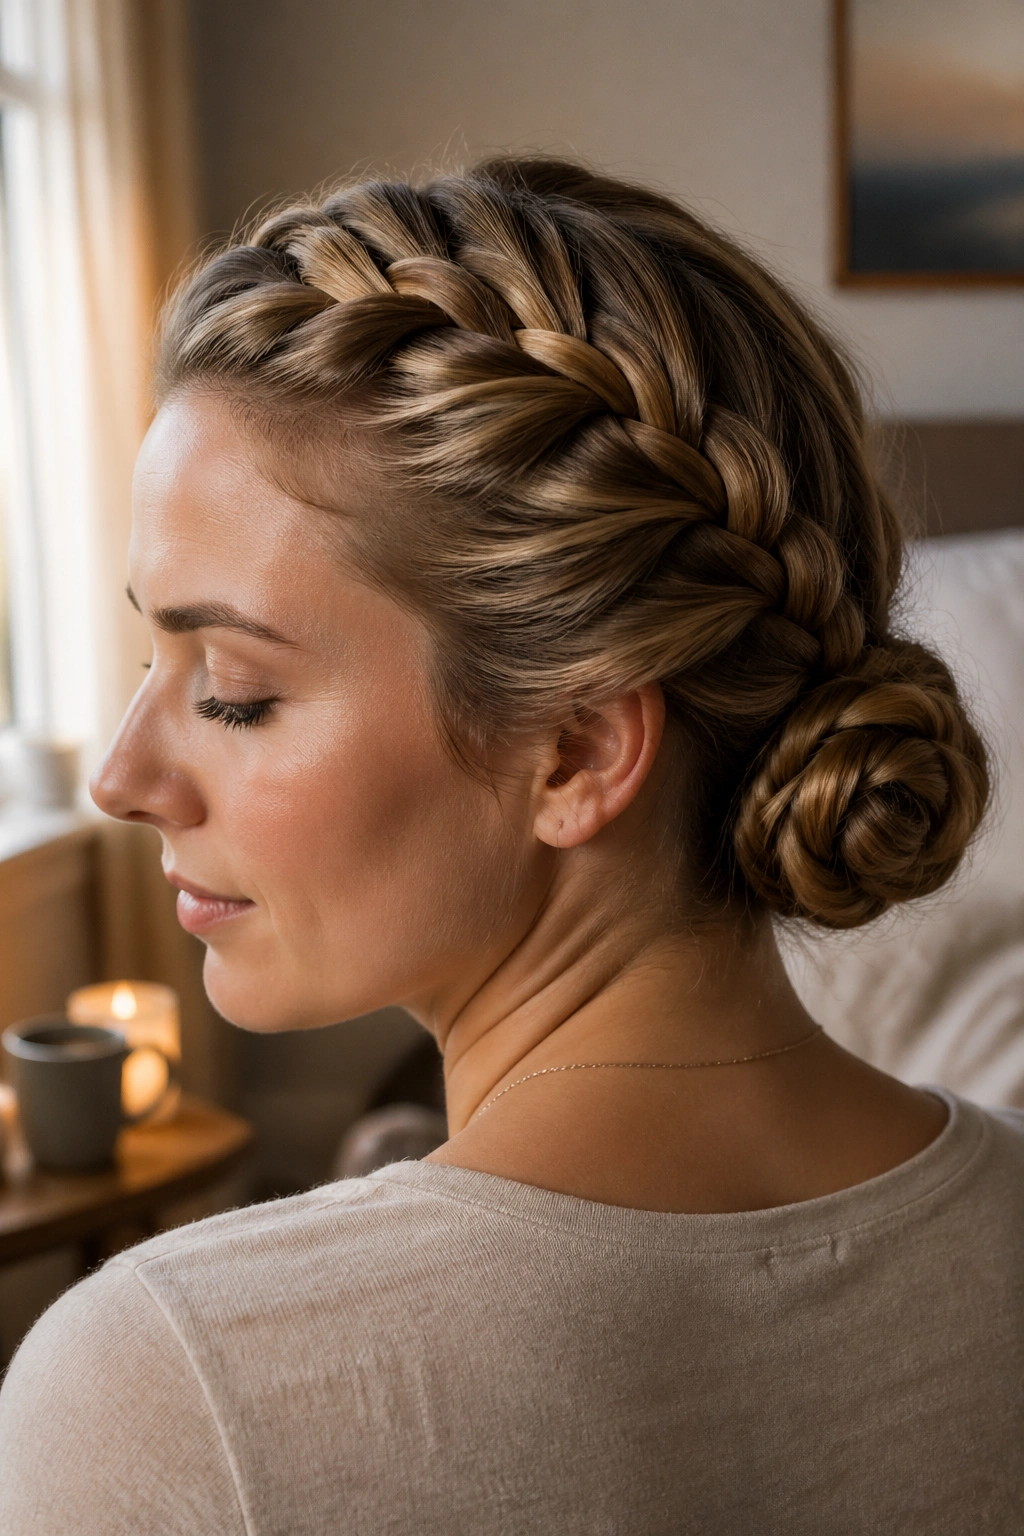
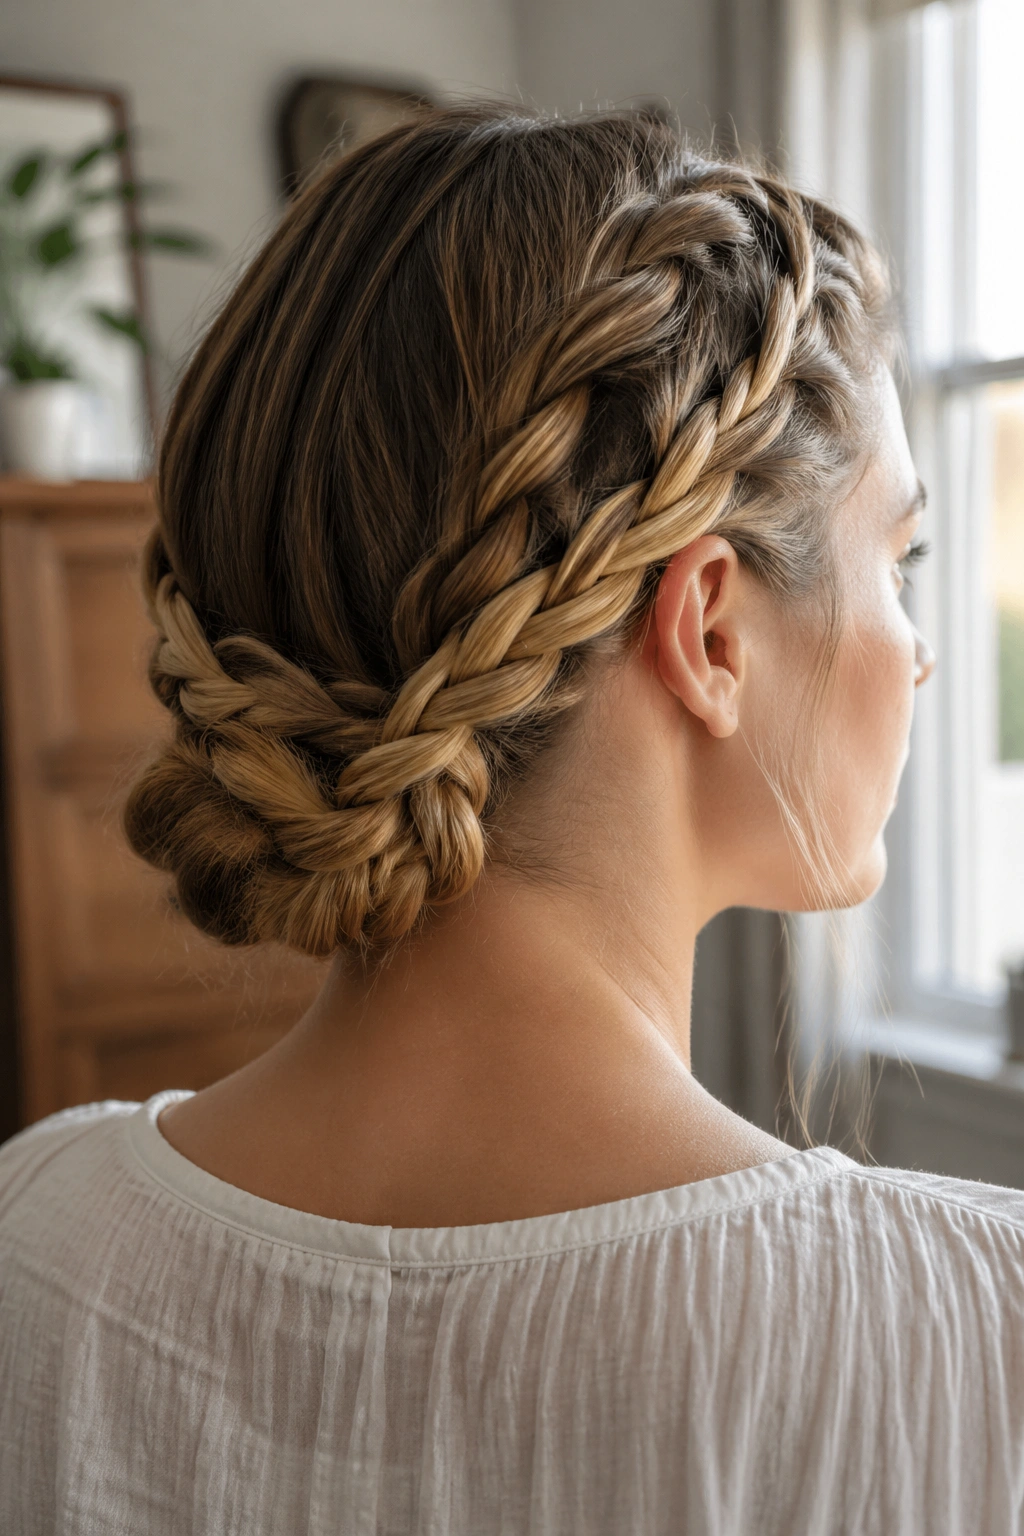
7. Crown Braid Tucked Bun
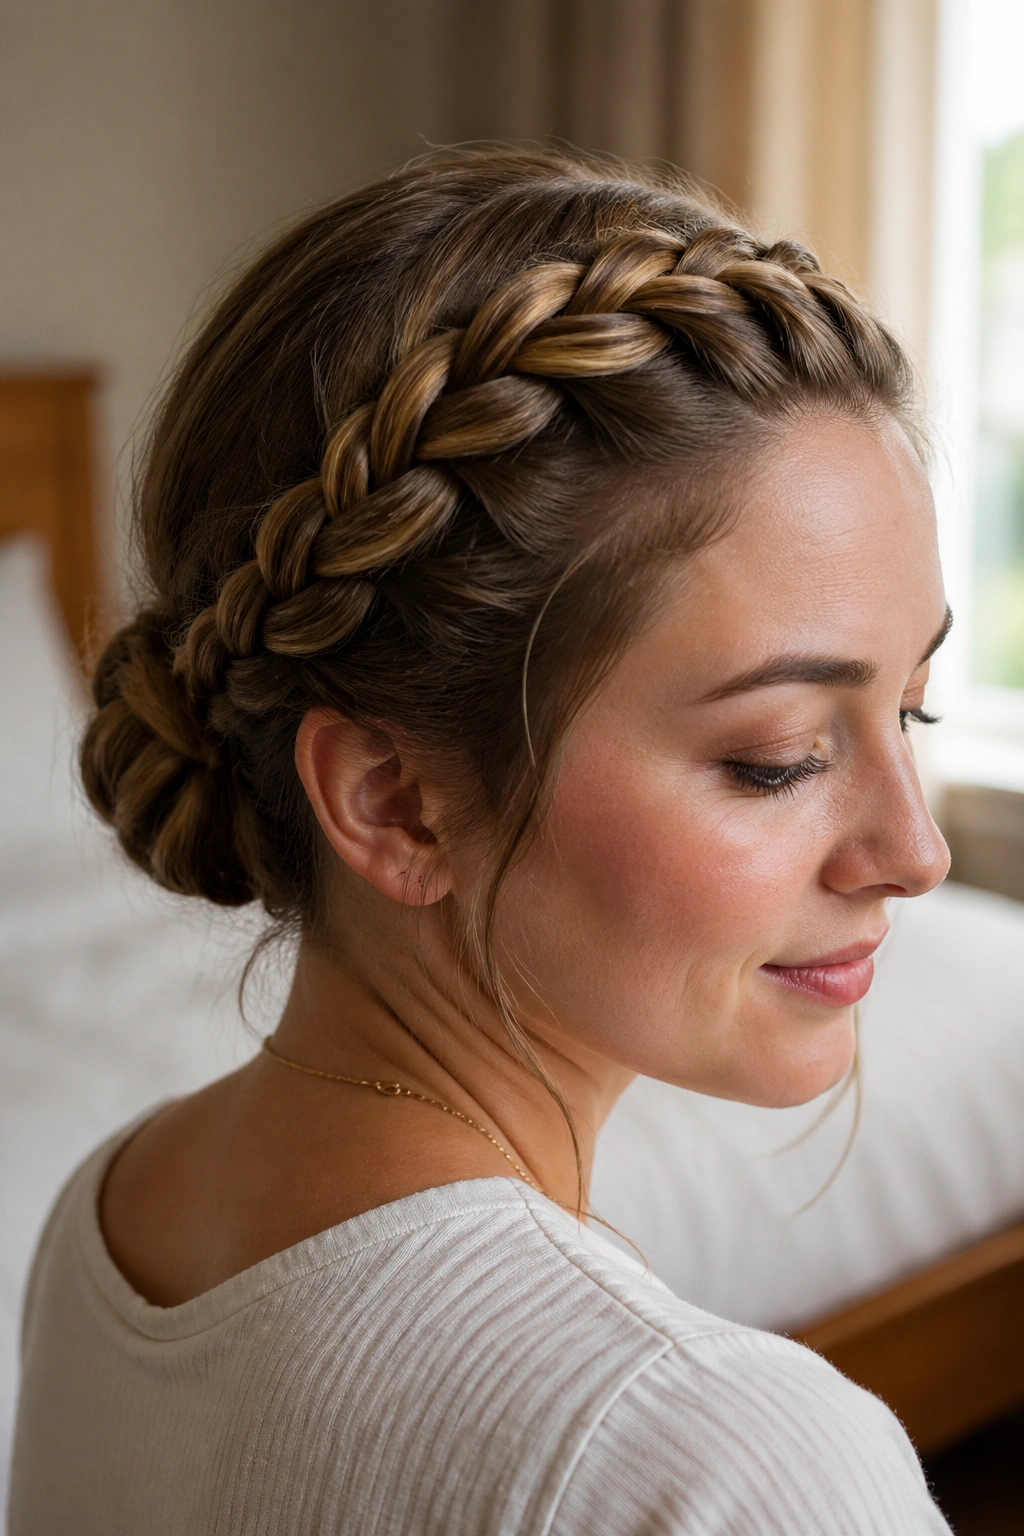
Can a halo-style braid really hold a bun without pins? Yes, if the braid is snug and the tucked bun sits where the braid wants to settle. This is one of the more elegant no-pin styles because the braid does most of the visual work before the bun even appears.
How to Keep the Halo Snug
The braid needs to hug the head closely, especially around the sides where slipping usually starts. A loose crown braid may look pretty in photos, but it will not support much once the bun is tucked. Keep the sections even and the braid anchored around the head like a narrow band. That tension matters more than length.
The Tucked Bun Part
When the braid reaches the opposite side, wrap the tail into a tucked bun near the nape or slightly off-center. The braid itself can act like a frame, which is what makes this style feel secure. If you have long hair, the tail can fold under itself once or twice before you finish. If the hair is shorter, make a smaller bun and let the braid finish the visual line around the head.
This style is a favorite for finer hair because the braid travels a long distance before the bun starts, so the hair has more opportunities to lock in. It’s also one of the few styles that can look formal without feeling fussy.
One warning. Keep the braid close to the scalp or it starts to drift, and once the drift begins, the bun follows. No mercy from gravity there.
8. Feed-In Braid Pineapple Bun

A feed-in braid pineapple bun is a smart answer for thick hair that tends to explode outward when you try to gather it into one spot. The gradual feed-in sections create a smooth base, and that base gives the bun a lot of staying power. You are not forcing all the hair into one giant knot at once, which is usually where the trouble starts.
This style works especially well if you like height. The pineapple placement keeps the bun high and buoyant, while the feed-in braid adds shape and direction. It also keeps the sides cleaner than a plain high bun, since the braid is guiding the hair instead of letting it puff up wherever it wants.
What to Watch For
- Start with sectioned hair that is detangled all the way through.
- Add hair in small, even pieces so the braid stays smooth.
- Keep the ponytail base firm, but not so tight that it dents the scalp.
- Wrap the braid upward rather than around and around flatly.
The bun looks especially good on coils, curls, and textured hair because the feed-in pattern respects the hair’s natural fullness instead of flattening it out. That matters. When a style works with the hair, it usually lasts longer and feels better.
If your ends are very layered, a little gel on the last two inches can keep the final tuck neat. If your hair is longer and heavier, double the elastic at the base before you wrap. That small move can stop the bun from sliding backward during the day.
9. Four-Strand Foldover Bun
Four-strand braids sound fussy until you wear one in a bun. Then the appeal clicks. The braid is flatter than a chunky three-strand version, which means the bun sits with less bulk and more structure. That makes it a nice choice when you want a secure shape that doesn’t look oversized.
The foldover motion creates a braid that feels almost like woven fabric. Once it is wrapped into a bun, the surface looks smooth and detailed at the same time. It can read polished, but not stiff. More like you planned your hair, rather than wrestled with it.
What Makes It Hold
The four-strand braid has more crossover points, which helps it stay compact. The bun benefits from that density because the strands lie close together instead of fanning out. If you’re used to buns collapsing at the second hair tie, this shape gives you a firmer core.
Best Use Cases
- Medium to long hair that needs a flatter bun.
- Straight or wavy hair that slips in a basic twist.
- Dressy settings where you want detail without extra accessories.
This is not the quickest braid bun on the list. It takes more attention, and the first attempt may feel clumsy. Fine. That’s normal. Once you know the rhythm, though, it becomes one of the neatest no-pin styles you can wear. The finished bun looks deliberate, which is a nice bonus when the rest of your day is not.
I’d use a strong elastic at the base and another one only if the tail is long enough to need help. Too much hardware kills the shape.
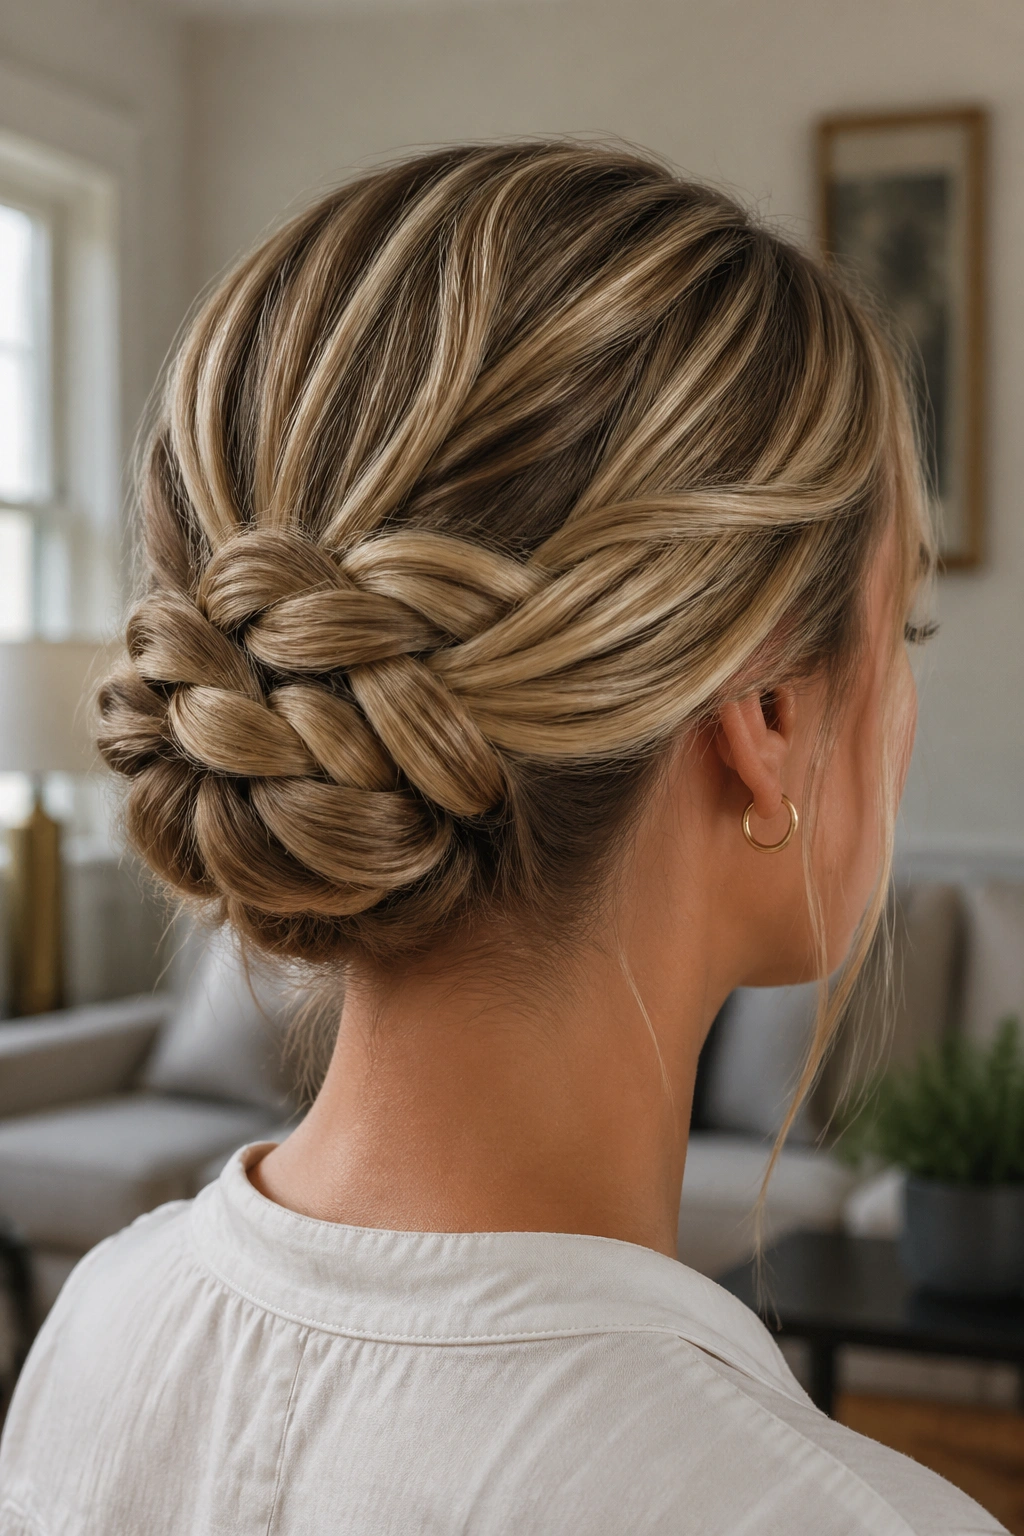
10. Milkmaid Braided Bun
A milkmaid braided bun has a built-in advantage: the braids cross the head and support each other before the bun is even finished. That means the style holds in a way that feels almost structural, not decorative. You are not relying on one coil to do all the work.
The look is softer than a tight ballerina bun, but it still stays put because the braids act like rails. If the hair is long enough, the ends can be folded under at the back and shaped into a compact knot. If it is medium length, the braids can be looped and hidden beneath themselves with a neat tuck.
This is one of my favorite braid buns for days when I want something feminine without losing hold. It sits well on hair that has a little texture, and it does not ask for perfect symmetry. In fact, it can look better when the two braids are not identical. Slight differences make the style feel less stiff.
You do need clean sectioning at the start. Uneven parts create bumps that the bun has to fight against later. Keep the braids snug around the head, then bring the ends together at the back and fold them in until the bun looks intentional, not stuffed.
A light mist of flexible-hold spray can tame the small hairs around the crown. That’s enough. Too much product makes the braids shiny in a way that can flatten all the texture you just built.
11. Cornrow Base Bun
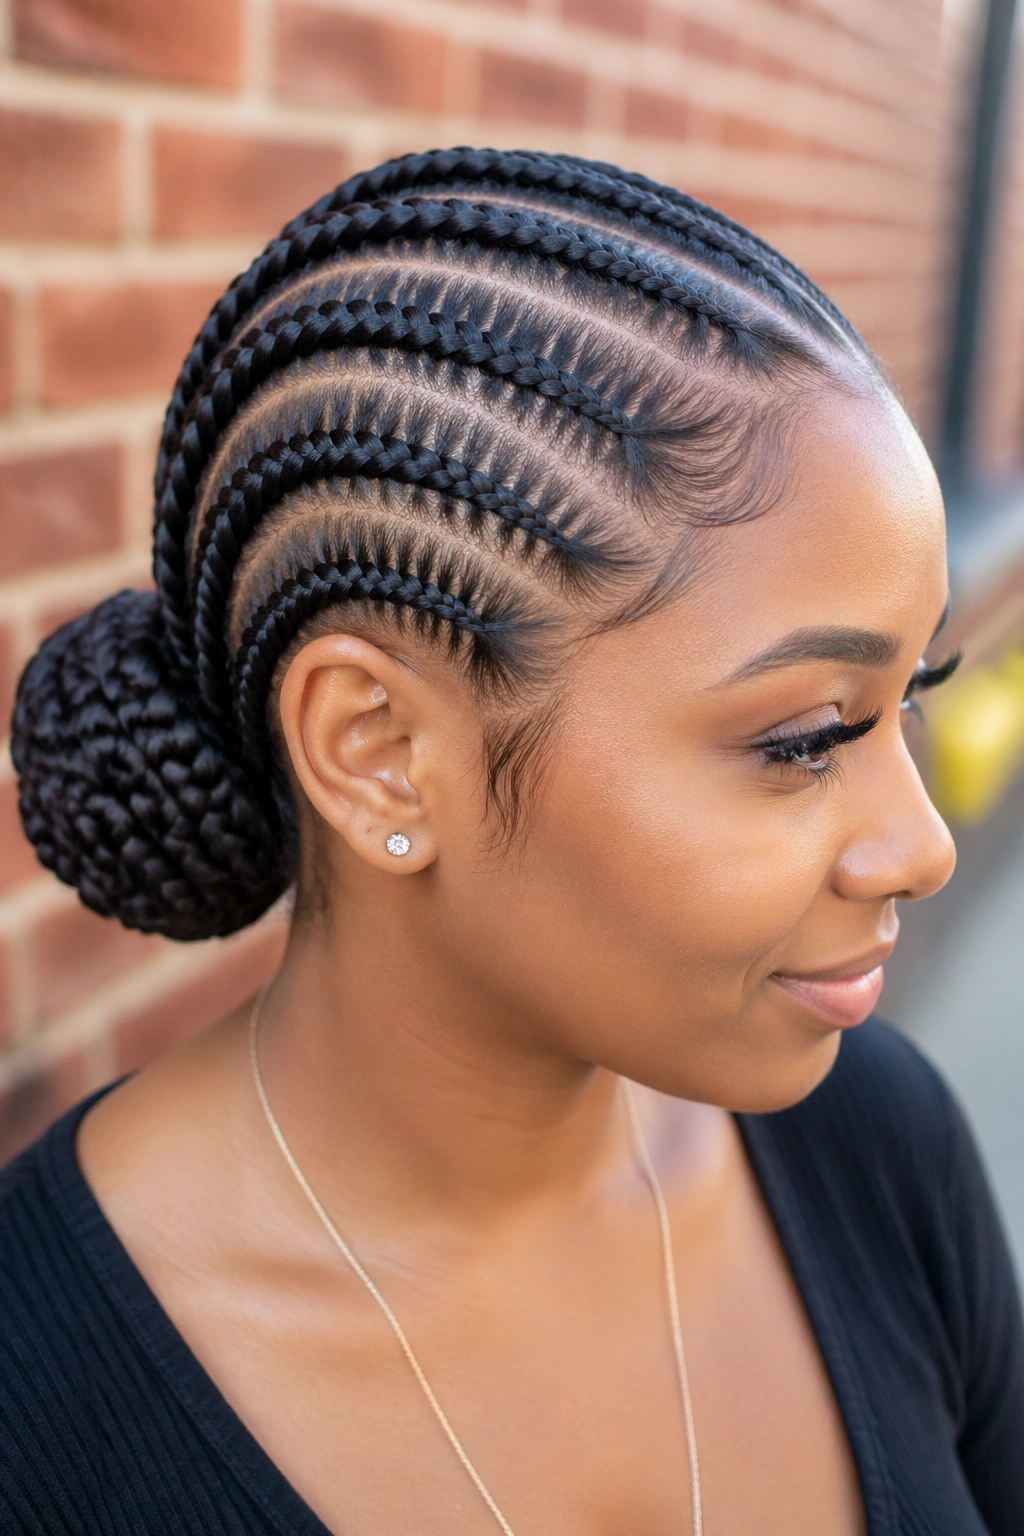
Cornrows do the hard part before the bun even begins. That’s why this style holds so well without bobby pins. The braid pattern lies close to the scalp, distributes tension across the head, and creates a base that does not shift around with every head turn.
Why the Base Matters
A bun built on loose hair depends on the surface of the ponytail to keep things in place. A cornrow base gives you a stronger starting point. The hair is already sectioned, already guided, already sitting in a direction that supports the final shape. That is a much better setup for a no-pin bun, especially if you have thick, coily, or highly textured hair.
How to Keep It Comfortable
- Keep the cornrows firm, not painful.
- Leave enough room at the hairline to avoid pulling.
- Use a secure elastic where the braids gather into the bun.
- Wrap the ends into a tight, low coil or a fuller top knot depending on the look you want.
The style is practical for active days because the braid base keeps the bun from wobbling around. It also lasts well in humidity, which is one reason people keep coming back to it. Hair that would puff up in a loose knot tends to behave better when it’s already braided flat against the scalp.
Do not pull the braids too tight just because you want extra hold. That is a bad trade. A secure style should stay comfortable for hours, not make you count the minutes until you can take it down.
12. Braided Space Bun Hybrid
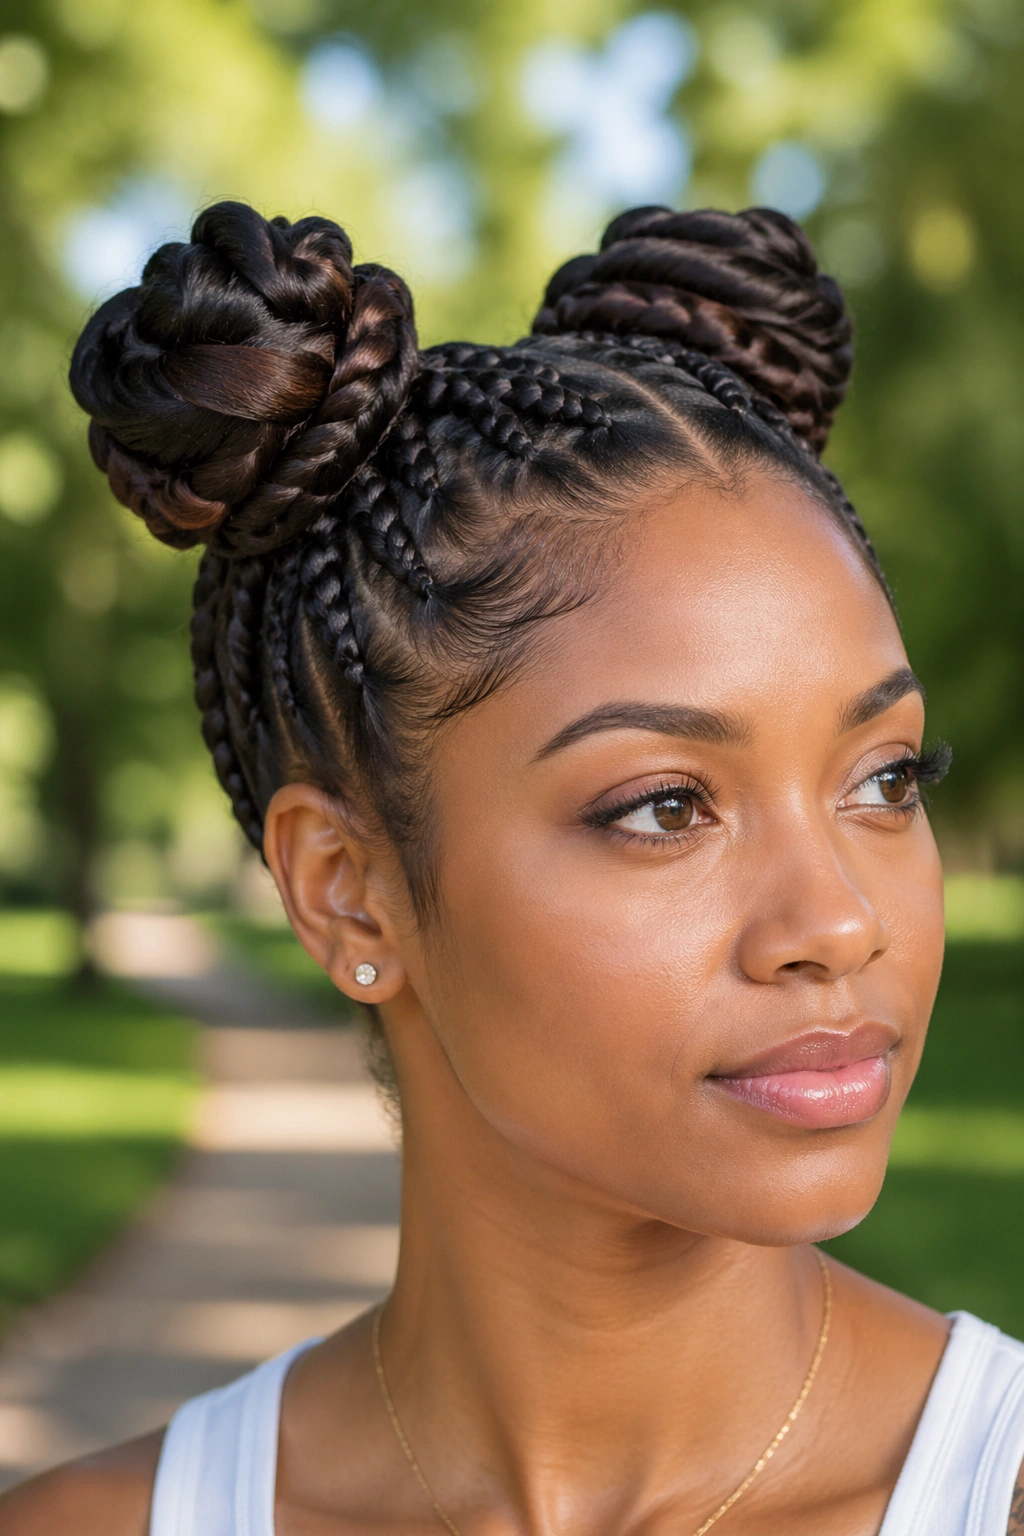
A braided space bun hybrid is playful, but don’t confuse playful with flimsy. Two buns can hold very well when each side is braided first and then wrapped into its own knot. The symmetry actually helps. One bun supports the shape of the other, and the paired balance keeps the style from leaning badly.
This is a great choice when you want something less formal than a single bun but still need the hair off your neck. It works on medium and long hair, and it is especially useful when the hair has different textures on each side, because you can adjust each braid independently before tying the buns.
The placement matters. Higher buns feel youthful and bouncy. Slightly lower buns feel calmer and more wearable if you’re not trying to make a scene. Either way, the braid base gives the bun more grip than a plain twist would. That matters a lot on hair that gets slippery after a few hours.
You can also make this style feel more secure by braiding the sections tightly at the roots and loosening only the outer loops of the bun. That keeps the shape soft without weakening the hold. If one side always escapes, make that side’s braid a little tighter and the bun a touch smaller. Tiny adjustments. Huge difference.
This is one of those styles that looks easier than it is. Once you get the balance right, though, it becomes oddly dependable.
13. Infinity Braid Bun
An infinity braid bun is for the person who likes a little more detail in the braid itself. The infinity pattern creates a looping visual line, and when that braid gets wrapped into a bun, the result feels controlled without looking plain. The braid keeps folding back on itself, which gives the bun an extra sense of lock.
Unlike a standard braid, the infinity pattern creates a rhythm that can hold a rounded bun shape without needing a mess of pins. It is especially useful when you want the style to sit in one place all day and still look interesting from the side. The braid line shows, but it does not compete with the bun.
Best for Hair That Behaves Better in Segments
If your hair is long enough to section neatly, this one is worth trying. The braid likes medium to long lengths, and it does best when the hair has a little texture or a small amount of product at the roots. Too much slip makes the loops harder to control.
You do not need to overbuild the bun. Keep the base small, wrap the braid in a tight circle, and let the pattern do the visual work. The shape should feel compact. If it starts to look puffy, you probably wrapped too loosely.
This is a good pick for evenings, events, or any time you want the bun to read a little more styled than your average quick twist. It is not the fastest option on this list. It is one of the prettiest, though, and sometimes that matters.
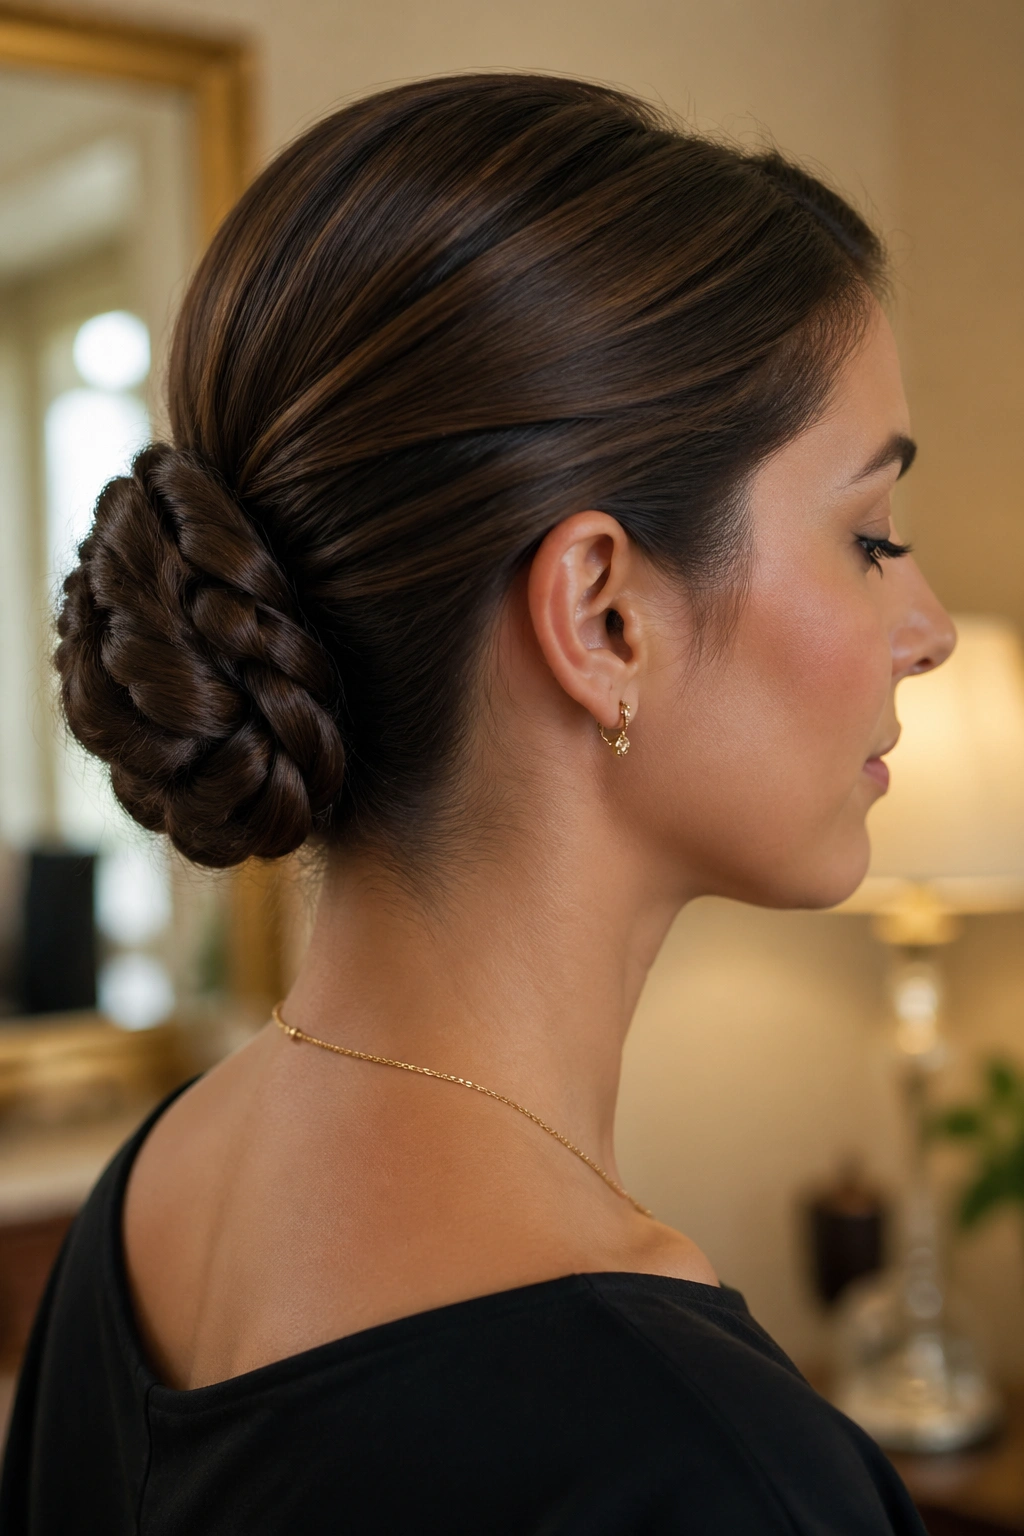
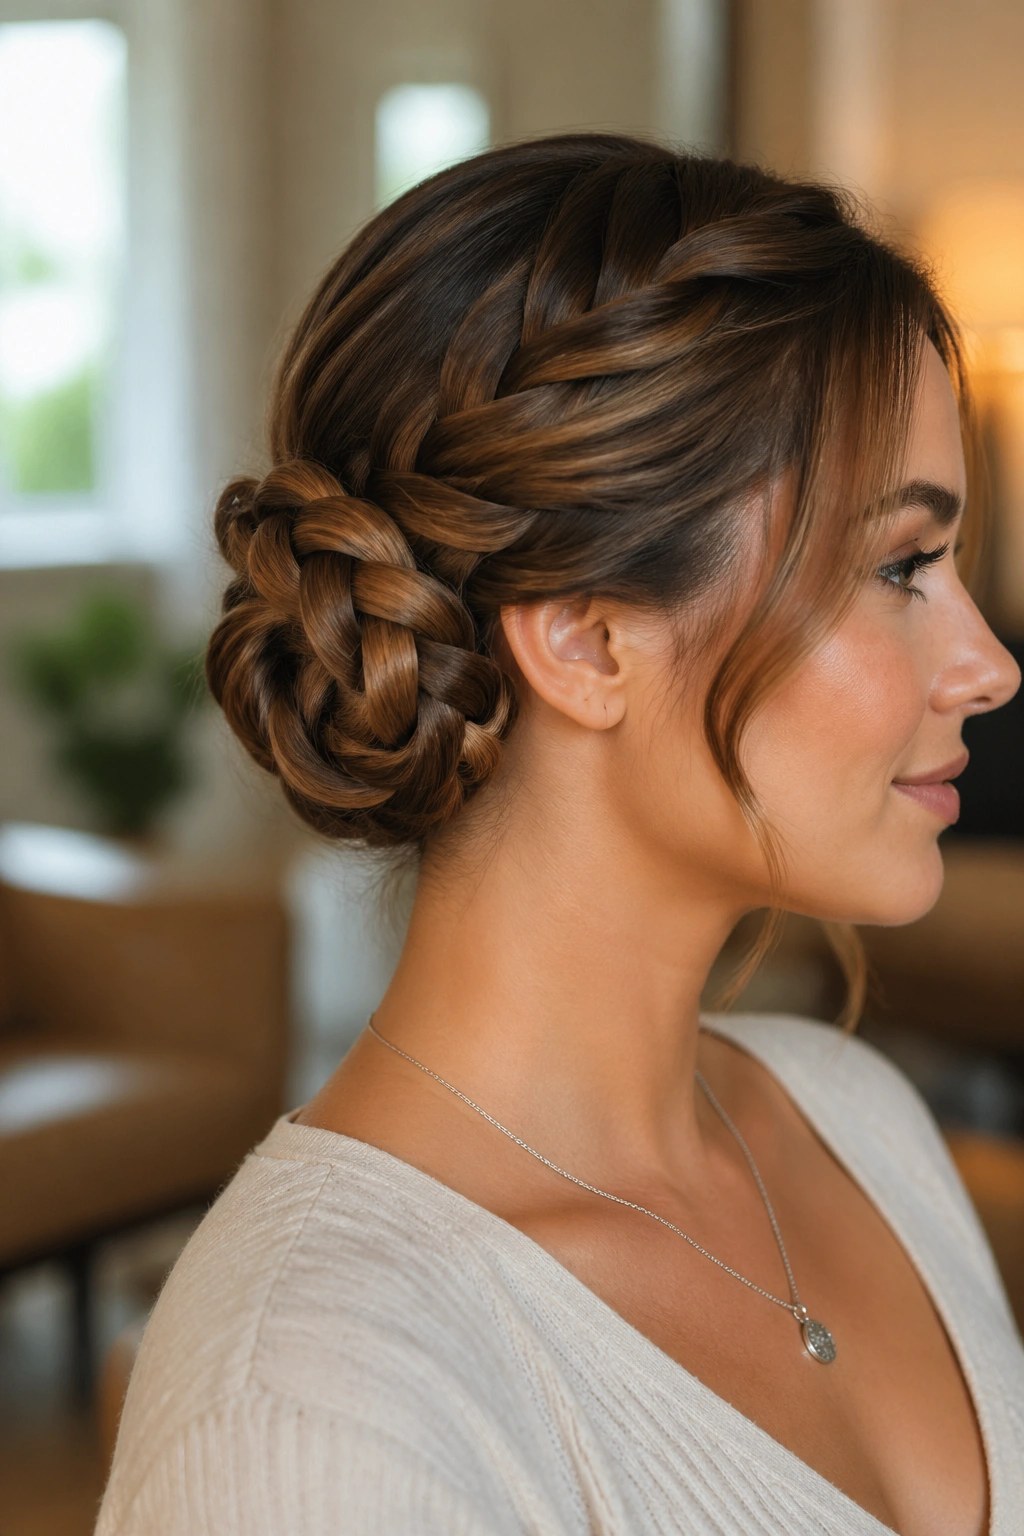
14. Braided Knot Chignon
The braided knot chignon is the style I reach for when I want the bun to look grown-up without turning it into a stiff formal knot. It sits low, stays compact, and holds because the braid is folded back into itself instead of just coiling and hoping for the best.
A chignon works well with long hair, but it can also be adapted to medium length if the braid is tight enough. The knot at the base is doing a lot of the heavy lifting. It helps the bun stay tucked close to the head, which makes it less likely to shift around during the day. That is the part people like most. It feels settled.
This one is especially nice with a side part or a deep center part, because the front shape sets the tone before the bun even begins. Keep the braid smooth, then fold the length under in a low knot and wrap the last bit around the base. The texture should look deliberate, not overworked.
My favorite thing about this style is how little touch-up it needs. You do the knot once, smooth the front, and stop fiddling with it. That restraint is part of the appeal. Too many braid buns get ruined because they are adjusted repeatedly after they’re already secure.
If you want one style that can move from office hours to dinner without a redo, this is a strong place to land. It’s calm, neat, and sturdy in the way good hairstyles ought to be.
A braid bun that holds without bobby pins usually comes down to one simple idea: let the braid do the anchoring before you ask the bun to carry anything. Once that clicks, the whole category gets easier. You stop fighting your hair and start working with its shape, which is honestly the difference between a bun that lasts and one that quietly gives up by lunchtime.