Garden weddings are beautiful until the hair starts fighting back. A little wind at the wrong moment, a warm shoulder, a veil comb that wants to slide, and suddenly the style that looked perfect in the mirror is clinging to your neck by cocktail hour. Dutch-style lace braids solve a lot of that mess without turning bridal hair into a hard, stiff shell. They hold. They soften. They keep their shape when the day gets lively.
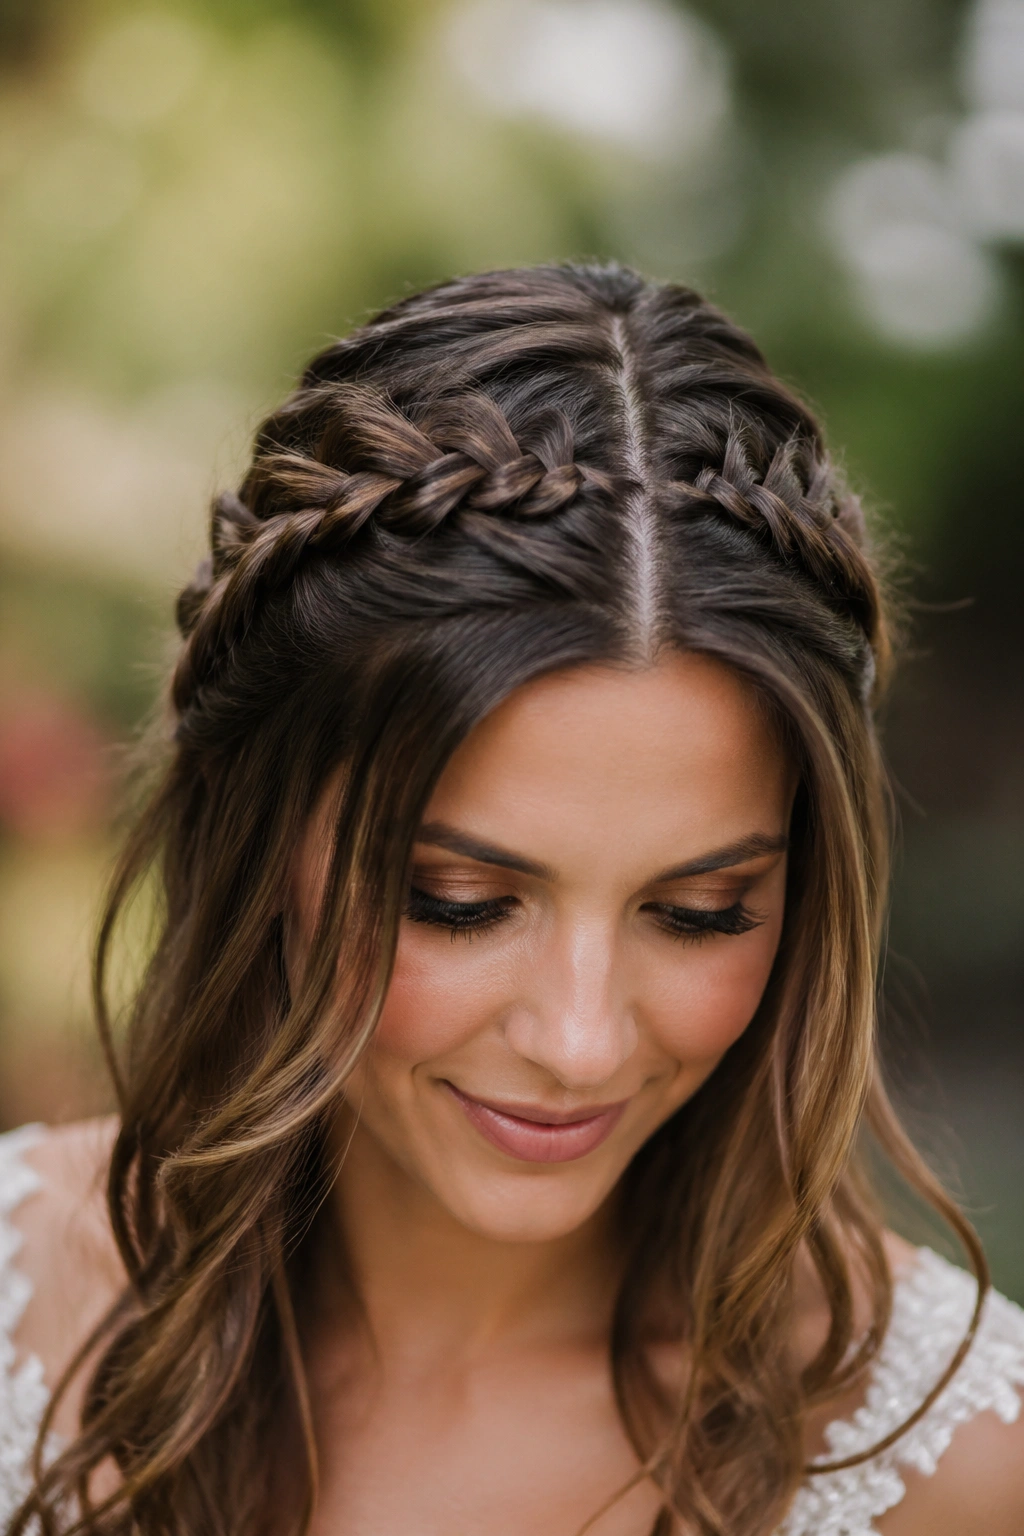
The part that makes a lace braid different is simple, and that simplicity is why it works so well for garden wedding brides. In a Dutch braid, the outer strands cross under instead of over, so the braid sits on top of the hair and shows up with more depth. A lace braid takes that same idea and feeds hair in from only one side as it travels. The result is a clean, elegant line that can curve around the head, sweep into a bun, or disappear into loose waves without looking busy.
I like bridal braid styles best when they look like they belong outdoors. Not overworked. Not shellacked. Hair should move a little when you turn your head. It should still feel secure when you hug your aunt, lean into a champagne toast, or stand under a floral arch while somebody cries during the vows.
A small amount of grit helps a lot here. Second-day hair, light mousse, a dry texture spray at the roots, and a few well-placed pins often matter more than fancy tools. Too silky and the braid slides. Too much product and the whole thing gets crunchy. The sweet spot is somewhere in the middle.
1. Side-Swept Dutch Lace Braid into a Low Chignon
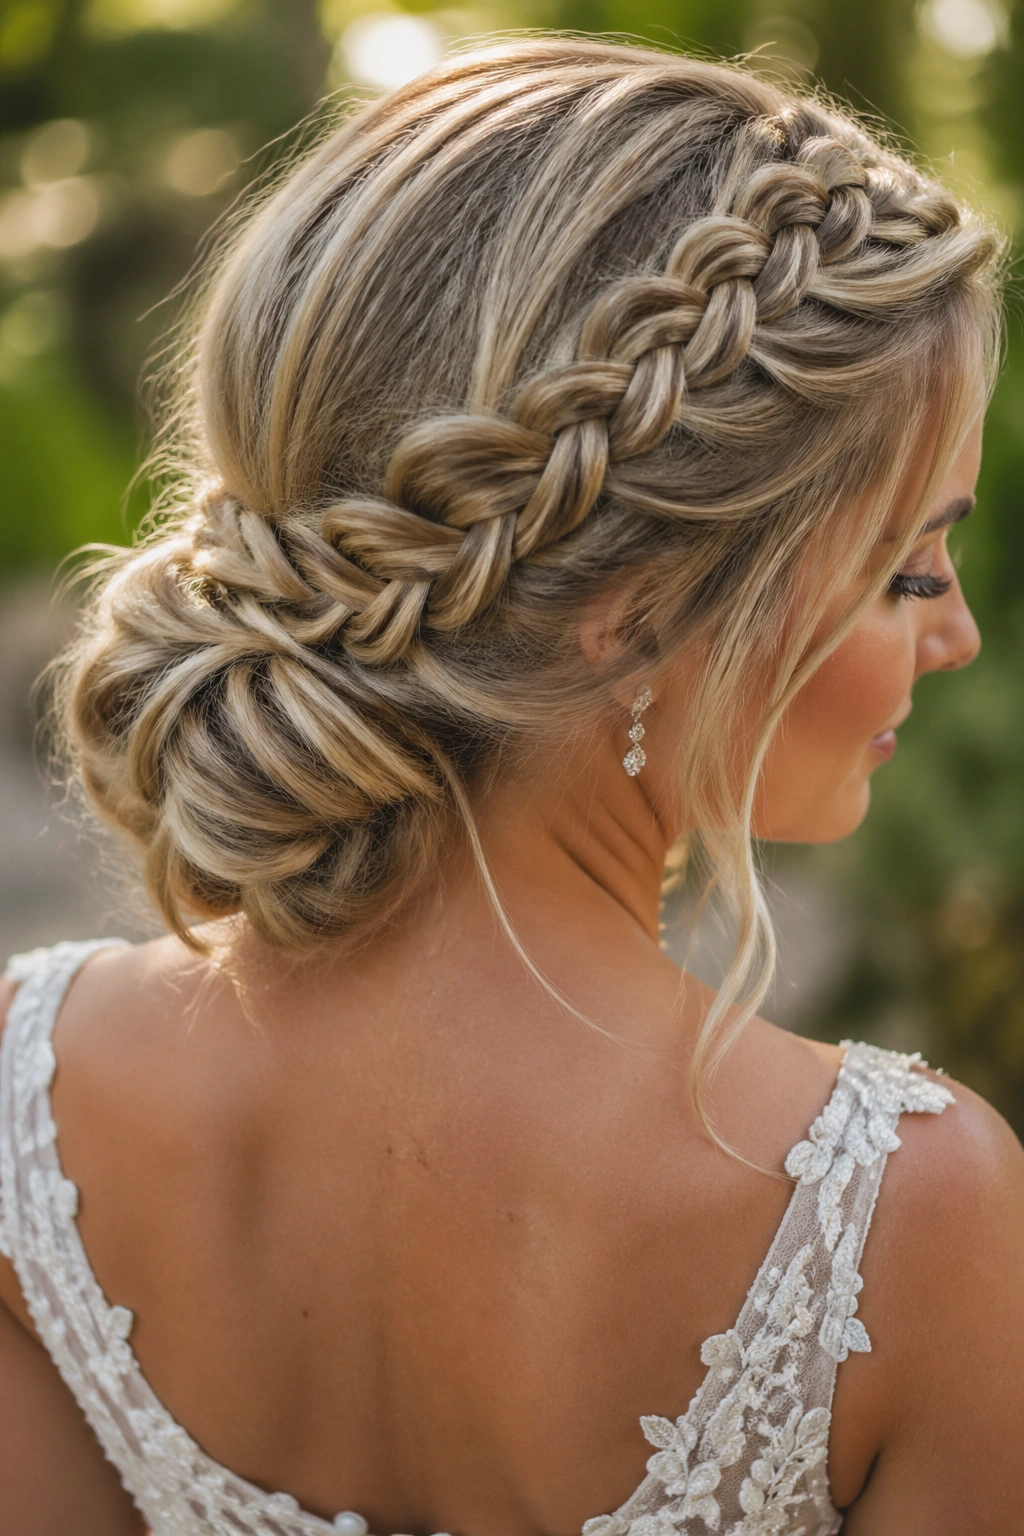
This is the style I reach for when the dress already has detail. Lace, embroidery, a dramatic back, even a high neckline — a side-swept Dutch lace braid keeps the hair graceful without competing with the gown. It starts at one temple, curves along the crown, and melts into a low chignon near the nape. Clean. Soft. Easy to love.
Why It Suits a Garden Aisle
The side sweep gives you movement without losing control. That matters in an outdoor ceremony, where hair that’s too loose can start puffing up at the sides before the ceremony even begins. The braid holds the front in place, and the chignon keeps the length tucked away so the silhouette stays neat from every angle.
- Best on medium to long hair, especially hair with a little bend or wave.
- Works well with pearl pins or one small floral comb placed above the bun.
- Sits nicely with a fingertip-length veil, since the braid gives the veil comb something solid to anchor to.
- Looks especially good on brides who want one shoulder and collarbone area open.
Pro tip: braid with a little tension at the crown and a softer hand near the bun. That keeps the front polished while the back still feels romantic, not stiff.
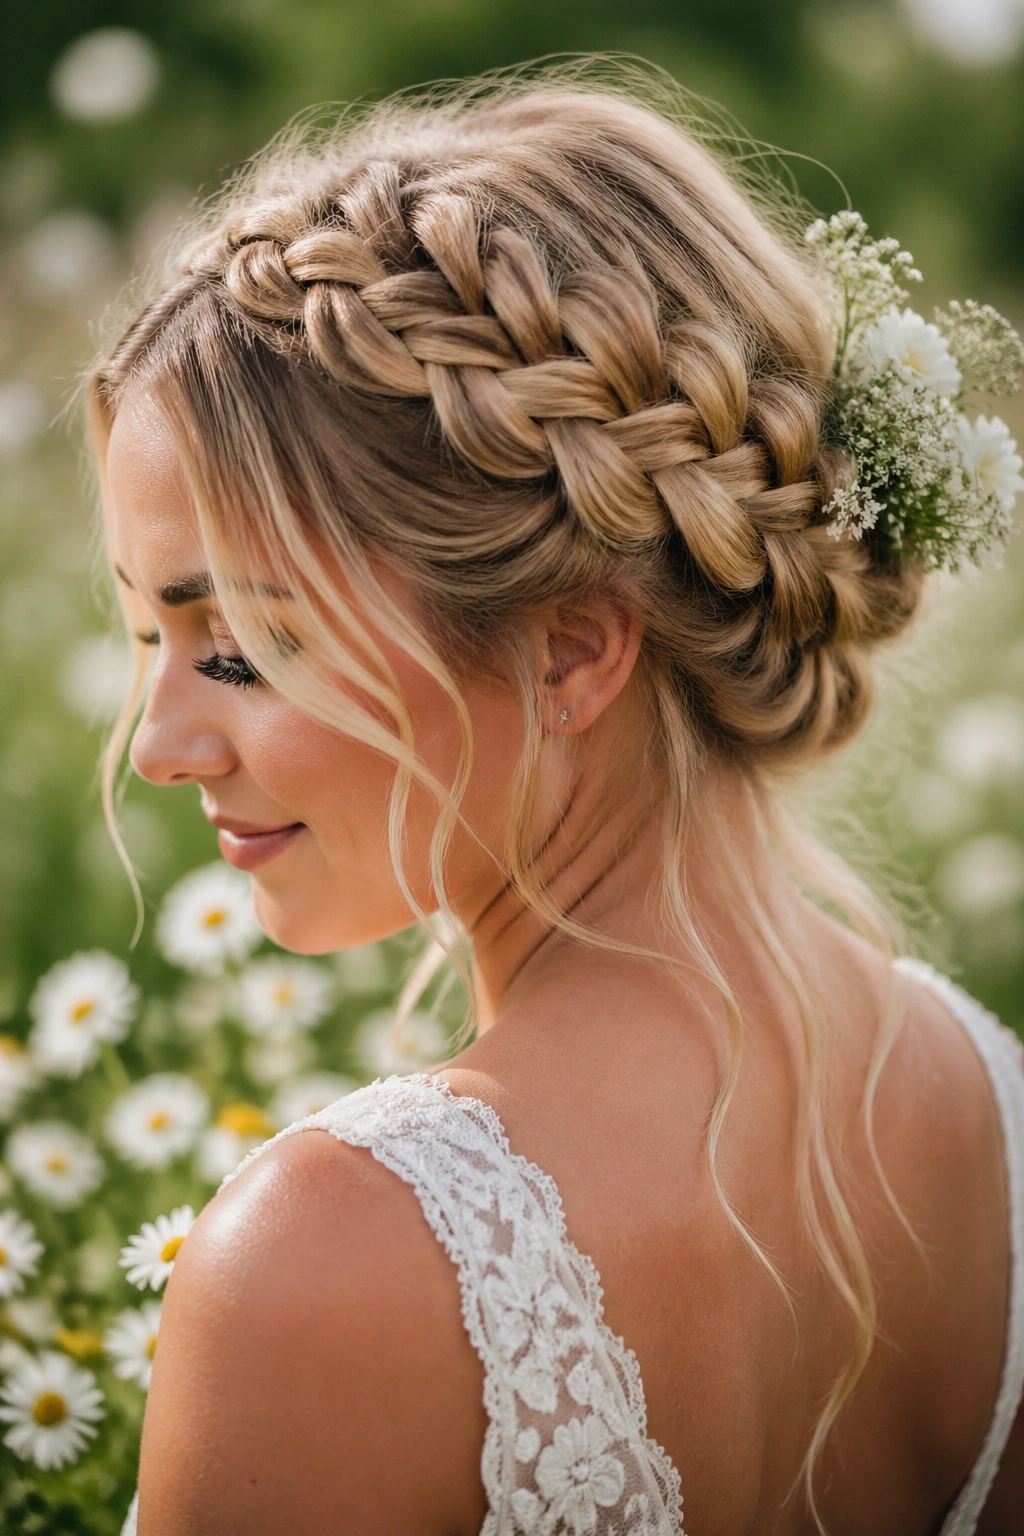
2. Crown-Frame Dutch Lace Braid with Loose Waves
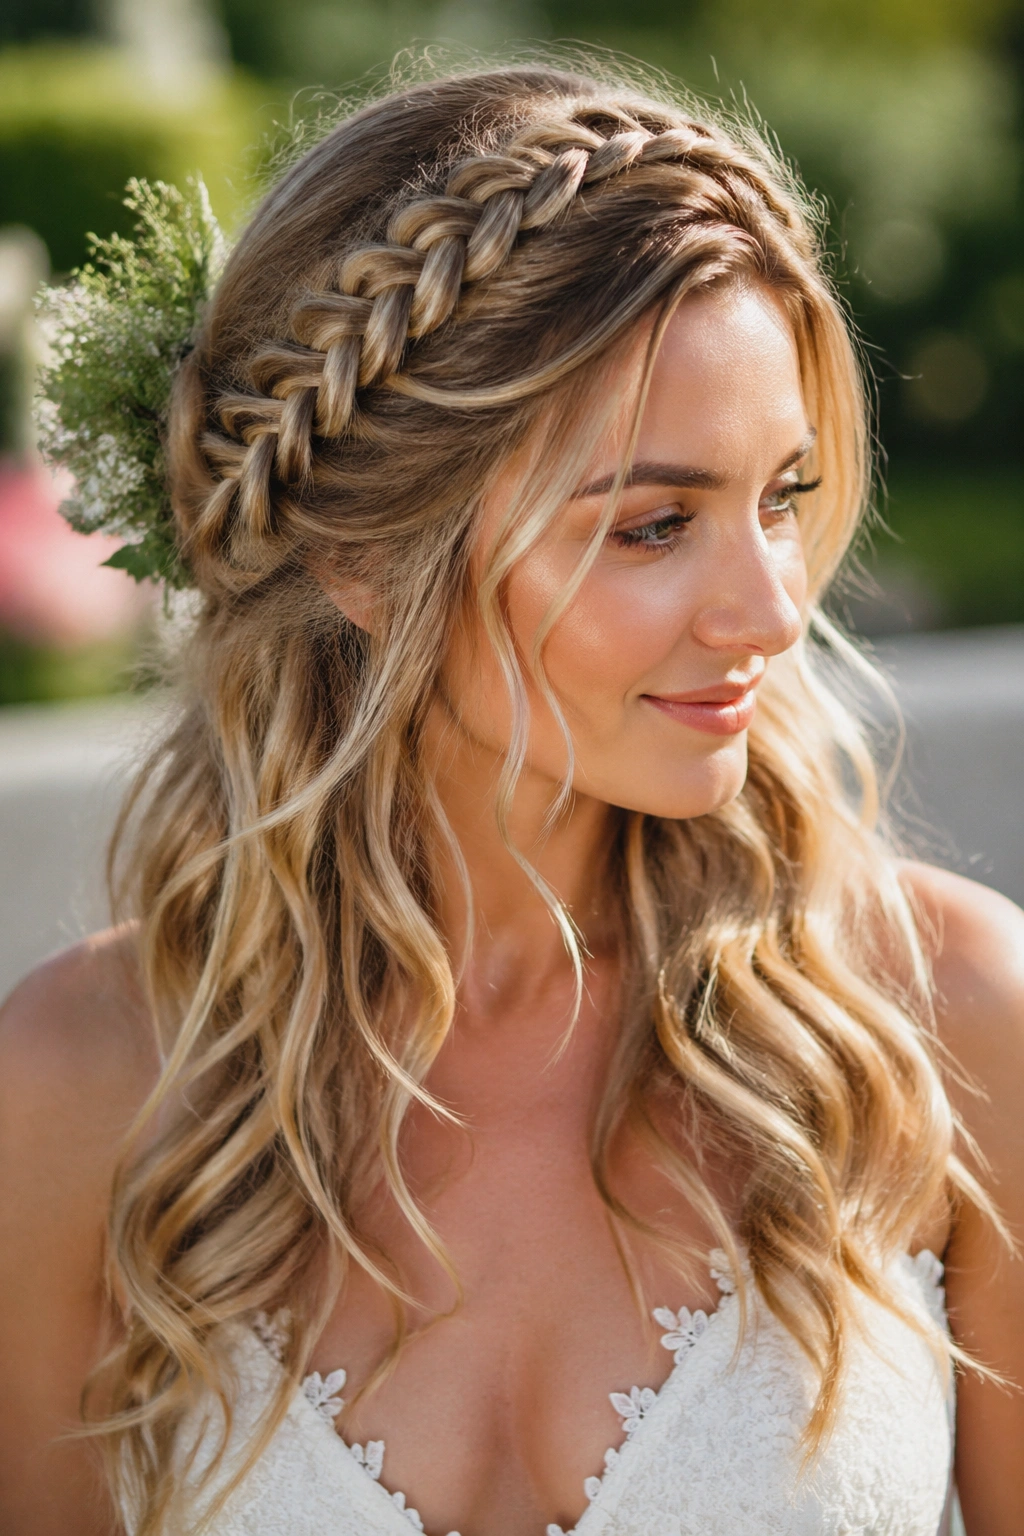
A lot of brides want the softness of hair down, but not the chaos that comes with hair fully down. This is the smarter version. A crown-frame Dutch lace braid arcs around the forehead and temples like a built-in headband, while the rest of the hair falls in loose waves below it. It keeps the face open and the lengths light.
The best part is the balance. You get structure where it matters most — around the hairline — and freedom everywhere else. For a garden setting, that combination is hard to beat, because loose waves move nicely in photos and the braid keeps the style from collapsing when the air turns humid.
I’d curl the loose lengths with a 1-inch wand and brush them out only after they cool fully. That gives you a softer wave pattern, not a ringlet look. A dab of lightweight serum on the ends helps, but keep it away from the braid itself or the weave can go flat. And if your hair is fine, a little backcombing at the crown gives the braid something to grip.
This one is lovely for brides who want to feel like themselves, just more finished. Not a helmet. Not a formal tower. Just a controlled, pretty frame.
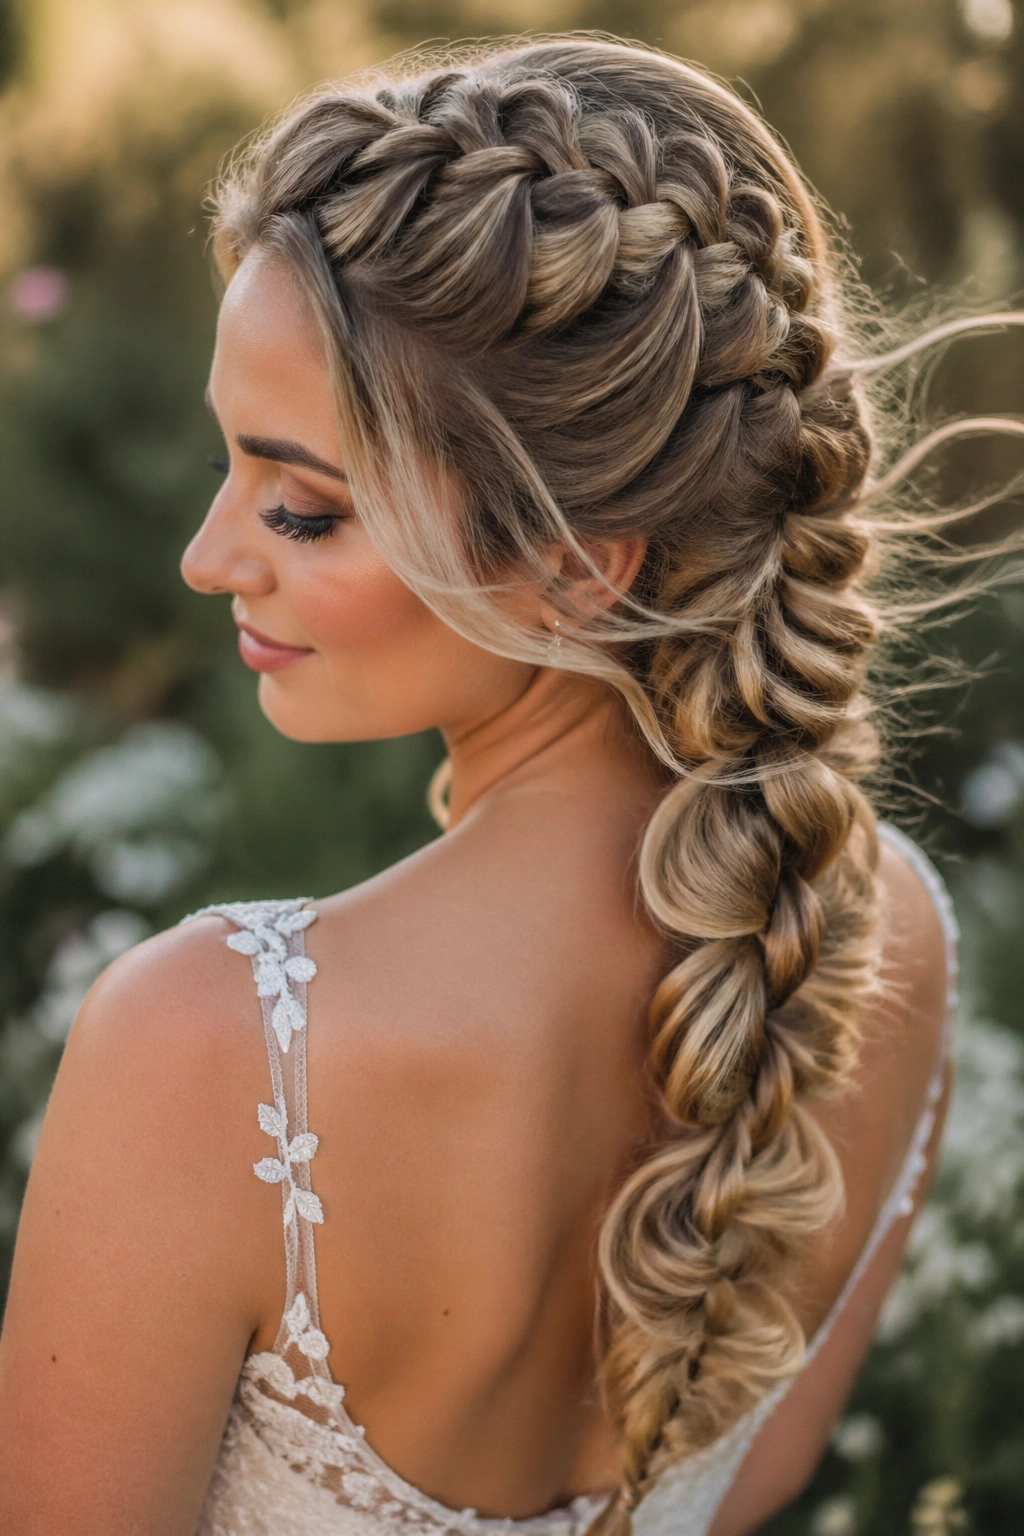
3. Double Dutch Lace Braids into a Low Bun
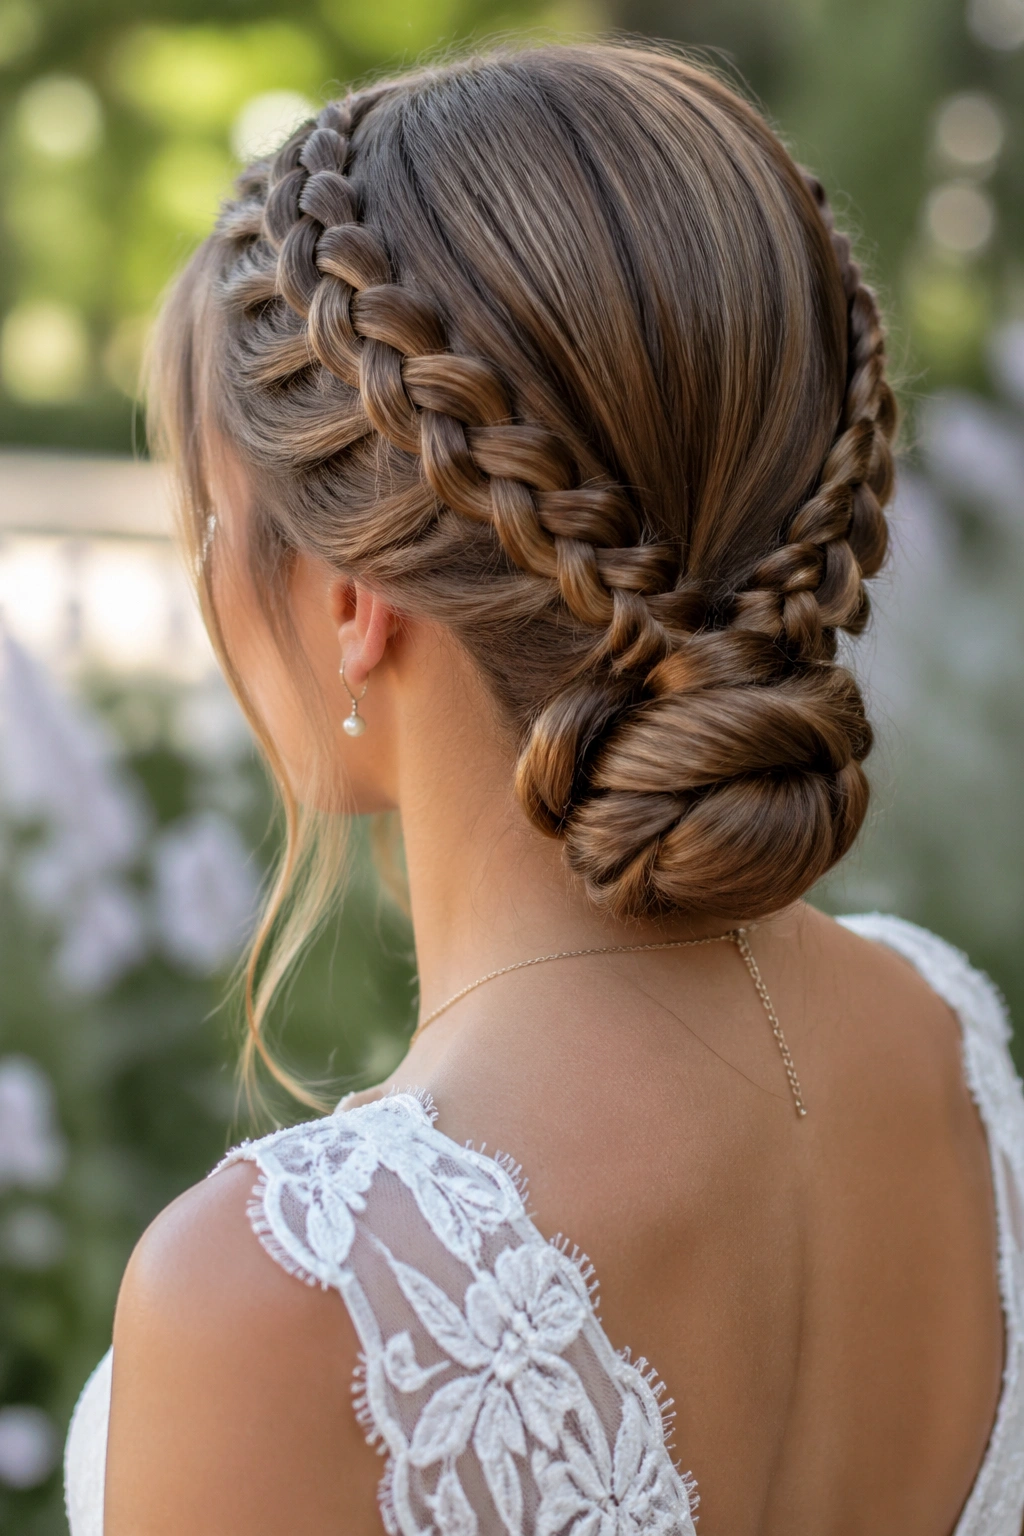
Why does this hold so well in a breeze? Because two braids give you twice the anchor points. A double Dutch lace braid starts near each temple and travels back toward the nape, where the sections meet and twist into a low bun. The structure is calm and secure, but it still has a soft bridal feel because the braids are lace braids, not tight athletic plaits.
How to Wear It With a Veil
The trick is to think about the veil placement before you pin the bun. If you want a veil, slide the comb just above the bun and slightly below the crown braids. That keeps the veil from sitting awkwardly on top of the weave. A heavier veil should be pinned with two combs or a comb plus a few discreet bobby pins.
This style also loves a center part. It makes the braid lines feel intentional, and it keeps the face framing balanced. If the bride has thick hair, I’d loosen the braid a touch after pinning the bun so the style doesn’t feel too dense. If the hair is finer, leave the braids a little tighter and let the bun carry the volume.
Strong, but not severe. That’s the point.
4. Waterfall-Like Dutch Lace Braid Half-Up
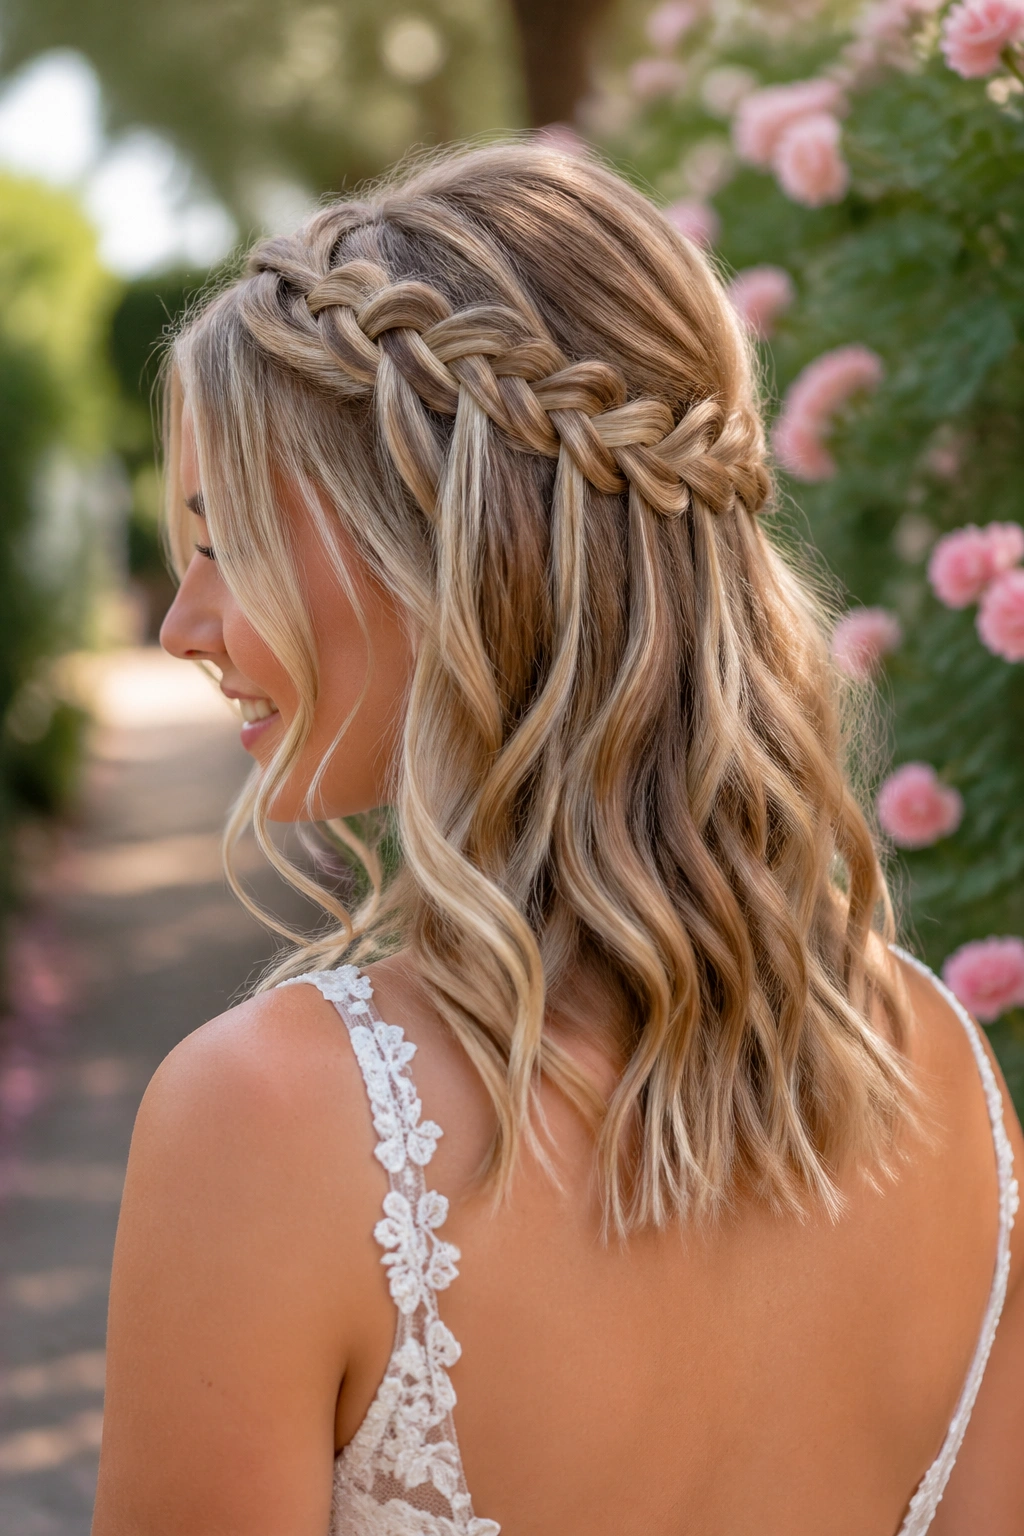
Picture this: you’re walking between rose bushes, and the breeze keeps lifting the ends of your hair just enough to show the curl. A waterfall-style Dutch lace braid is built for that exact kind of scene. It starts at one side of the head, feeds hair in along the top edge, and releases pieces as it moves so the lower lengths stay loose and airy.
This is the style for brides who want motion. Not all-up. Not all-down. The braid creates a visible path across the crown, but the dropped sections keep the whole thing feeling light. It’s a nice choice for shoulder-length hair too, which can be tricky when you want bridal polish without stuffing everything into a bun.
- Works best with soft curls or a blunt bend in the lower lengths.
- Looks best when the dropped sections are matched in thickness.
- Needs a few hidden pins at the back so the braid doesn’t sag over time.
- Pairs well with small buds or a thin ribbon woven through the finish.
What I like here is the ease. It feels less formal than a full updo, but it still looks finished enough for ceremony photos, even close-ups.
5. Braided Halo with Fresh Flowers
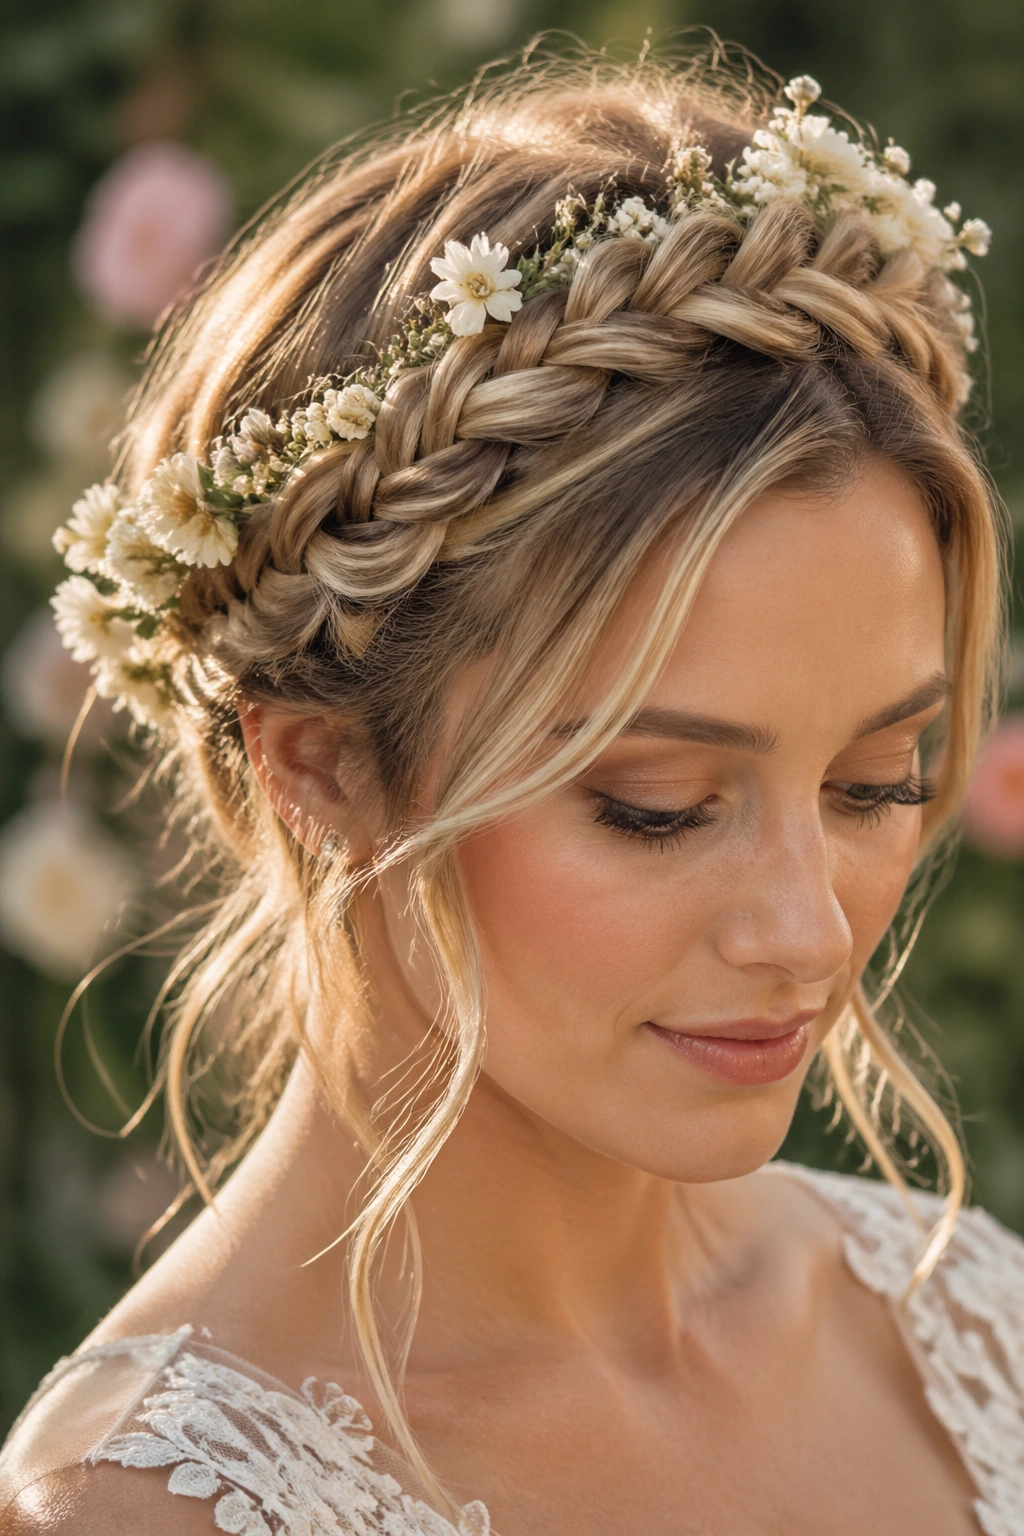
A braided halo can tip into costume if it’s too tight or too perfect. A Dutch-style lace braid halo avoids that by leaving just enough softness around the edges. The braid circles the head like a crown, but because it’s a lace braid, it can be looser on one side and slightly fuller on the other, which makes the whole shape feel more natural.
Fresh flowers are what take this from pretty to memorable. Tiny blooms work best — baby’s breath, spray roses, waxflower, miniature orchids, or even a few clipped garden sprigs. Big flowers can weigh the braid down and make the placement look clumsy. Small ones tuck into the braid more cleanly and let the shape stay visible.
I also like this style because it suits dresses with a simple neckline. The braid becomes the ornament. You do not need much else. A little glow at the skin, maybe a pair of small earrings, and the hair carries the rest.
If you want this look to last through a long ceremony and photos, place the flowers after the braid is pinned and the shape is fully set. Fresh stems should be short. Dry stems poke out. Nobody wants that.
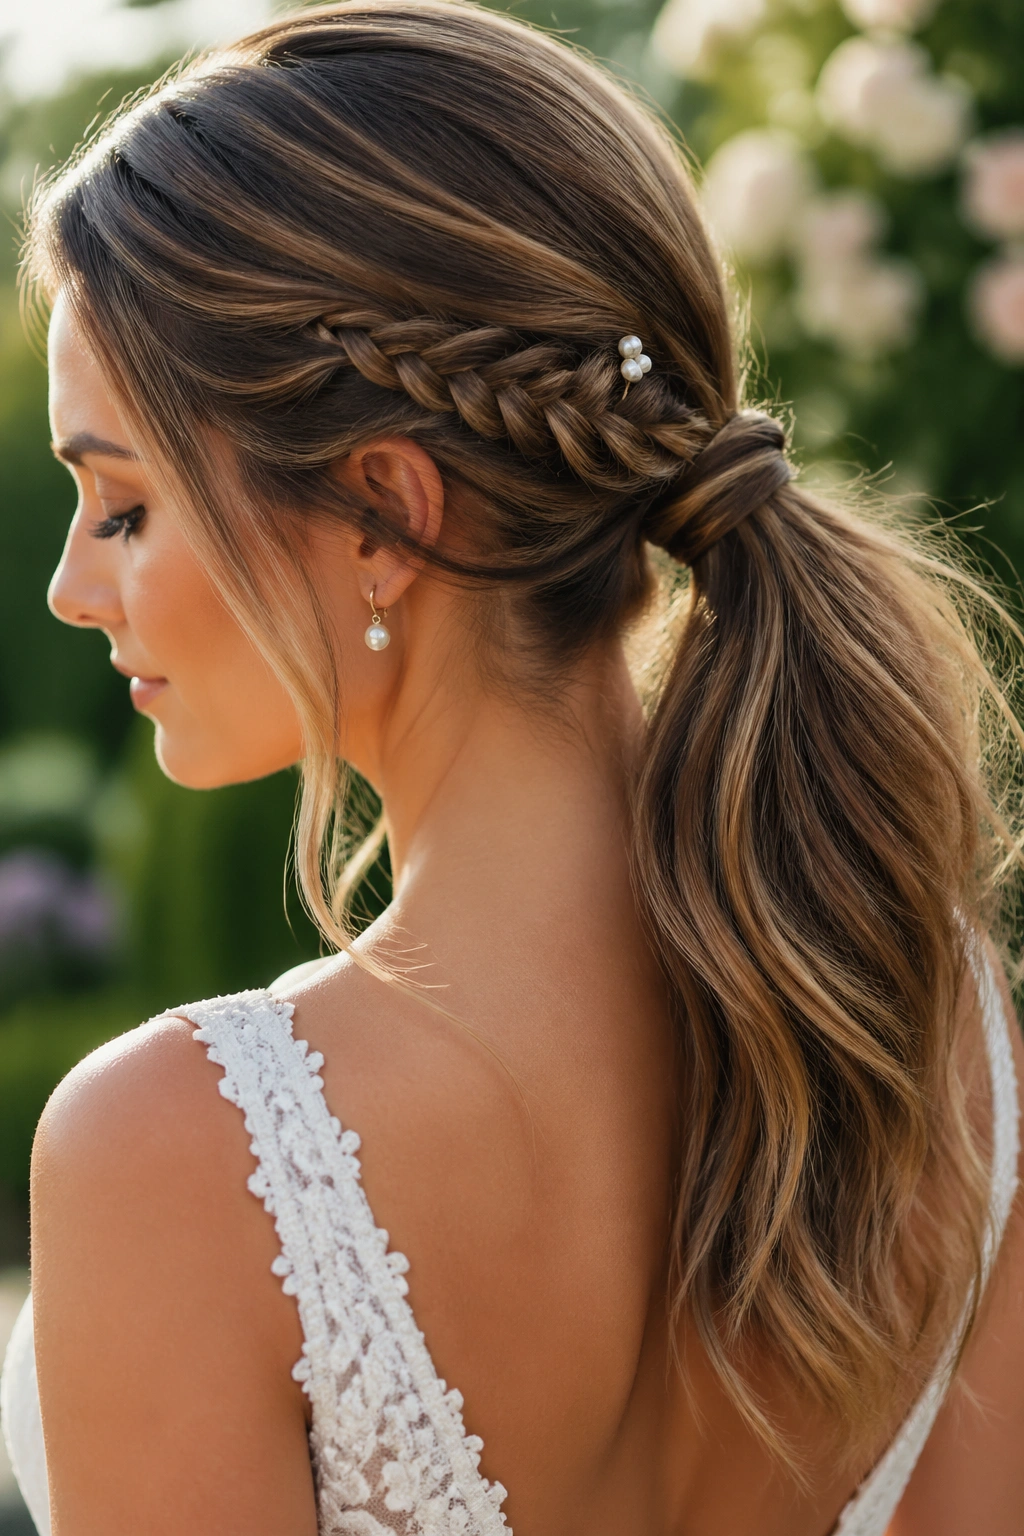
6. Low Textured Ponytail with a Lace-Braid Wrap

A plain low ponytail is fine. It’s also forgettable. A Dutch lace braid wrapped into a low ponytail gives you the same ease, but with shape and finish that feel made for a wedding. The braid travels from the front hairline or side part, then wraps into the ponytail base, hiding the elastic and giving the crown a little lift.
What Makes It Different
Unlike a standard ponytail, this version keeps the top of the head from looking flat in photos. The braid adds a visible line that guides the eye, and the wrap at the base makes the style feel finished from behind. That’s a big deal when the ceremony has lots of standing, turning, and hugging.
It’s also a good option for brides who want to dance. The ponytail moves. The braid keeps it from looking sloppy. That combination is hard to beat if you do not want to babysit your hair all evening.
Best on hair with natural body or a blowout that still has some bounce. On very sleek hair, I’d rough up the roots a little with powder or texture spray first, then braid before the hair has a chance to lie too flat. A single pearl pin at the wrap can be enough. Anything more starts to feel overdone.
7. Side Bun with a Rosette Braid Detail
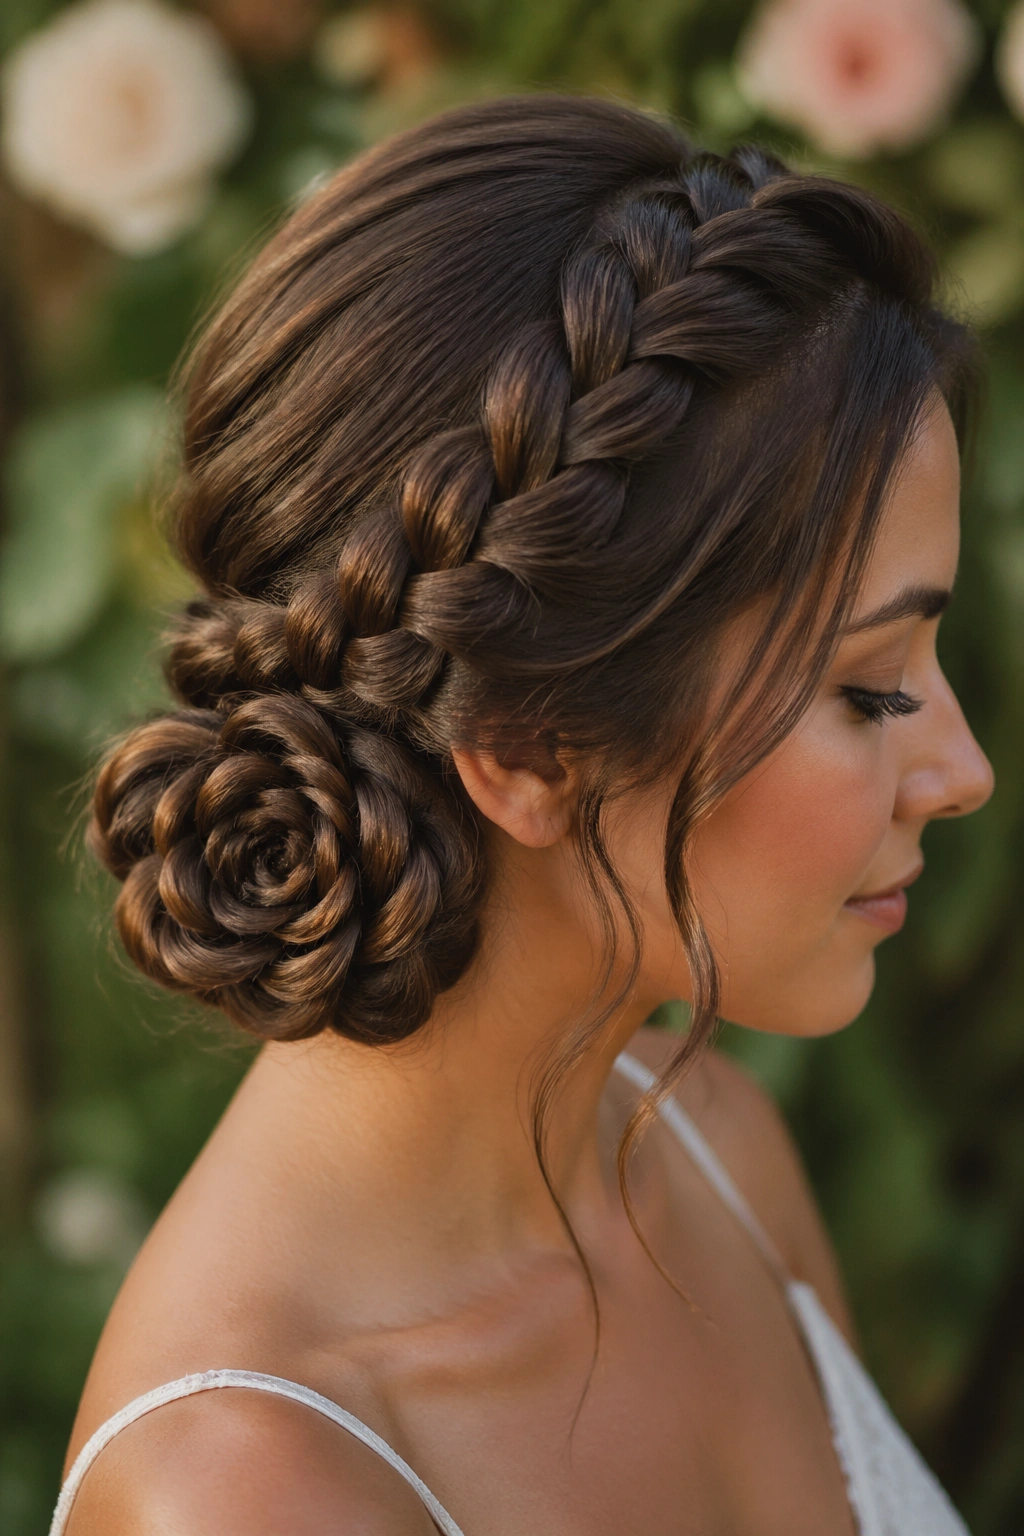
This is one of those styles that looks harder than it is. The braid begins as a Dutch lace braid along one side of the head, then the tail is curled into a rosette-like bun just behind the ear or slightly lower at the nape. The final shape feels floral, which is a nice fit for a garden ceremony without leaning into literal flower-child territory.
What the Rosette Does
The rosette gives the bun a softer edge than a plain coil. Instead of a tight knot, you get a round, petal-like shape that catches the light in little layers. It also makes the style look more custom, which is useful when the dress is simple and the bride wants the hair to carry some of the personality.
A few details matter here:
- Leave enough braid length to wrap into at least one full turn.
- Pin the rosette from underneath so the center stays smooth.
- Keep the front side slightly looser than the back for a softer face frame.
- Use matte pins if the dress fabric is delicate; shiny pins can look cheap in close photos.
This style is especially good with statement earrings because the bun sits off to one side and opens up the neckline. It feels a little old-world, but not costume-y. That line is worth protecting.
8. Diagonal Dutch Lace Braid into a Fishtail Tail
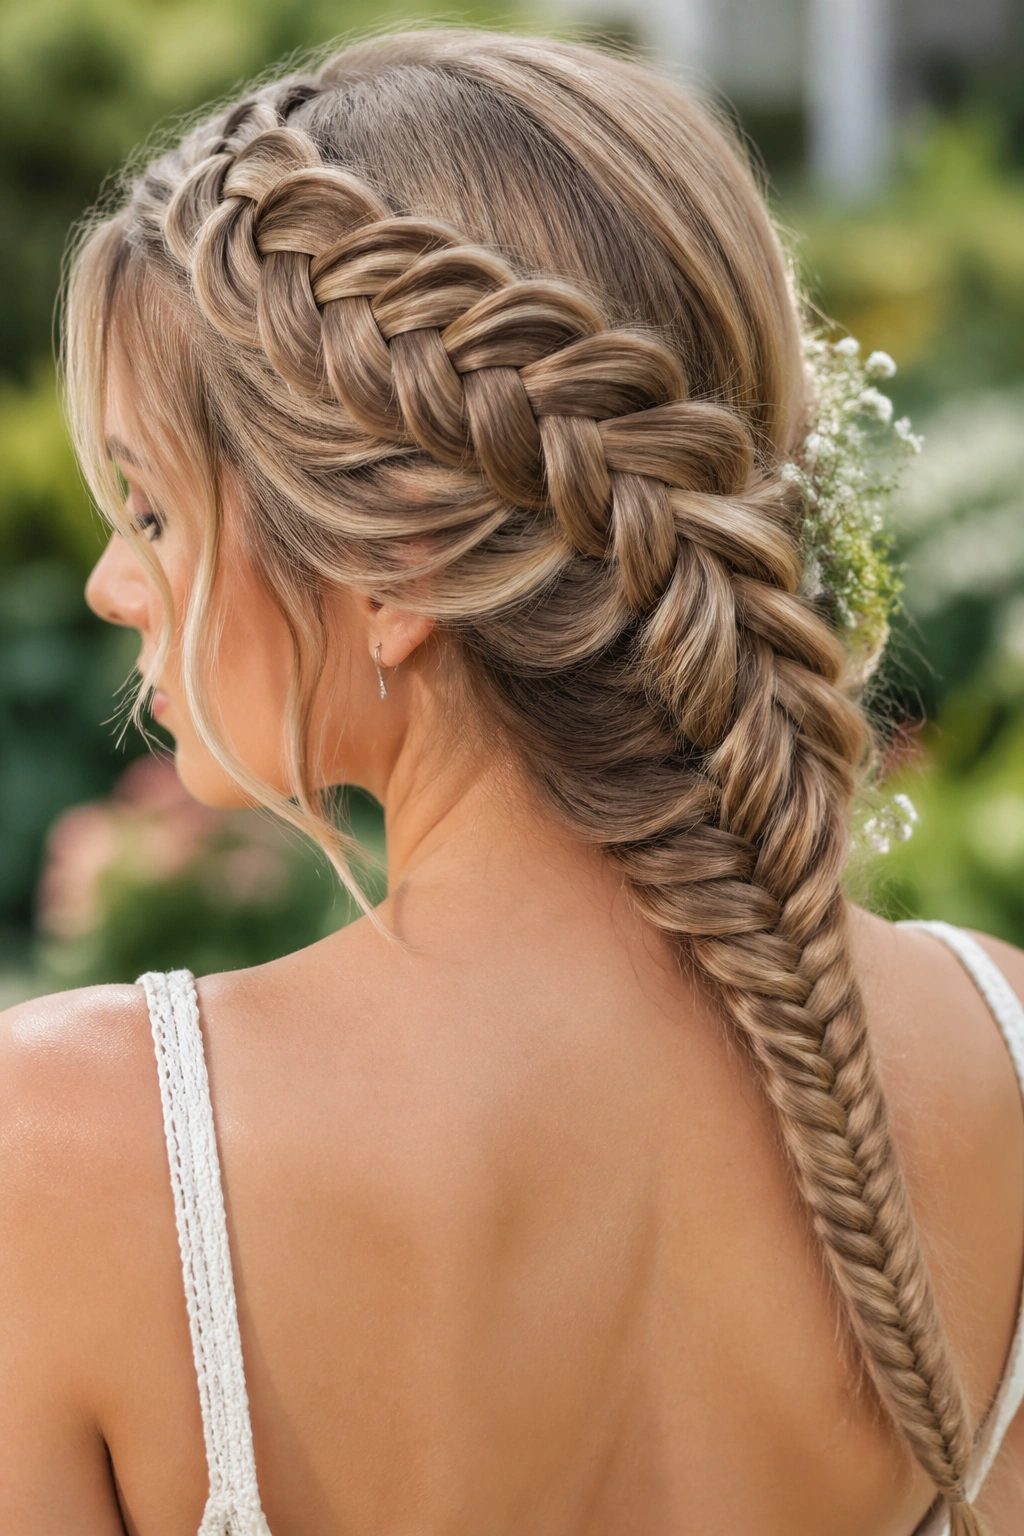
A straight braid is safe. A diagonal braid has character. Starting a Dutch lace braid on a diagonal — from above one ear toward the opposite shoulder — gives the whole hairstyle a sense of movement before the ceremony even starts. Then the tail can switch into a fishtail, which adds a different texture and keeps the finish from feeling too repetitive.
The diagonal line is flattering on a lot of face shapes because it softens the symmetry just enough. It also works well with dresses that have a square neckline or a one-shoulder cut, since the braid echoes the angle of the fabric instead of fighting it. That kind of coordination looks thoughtful without trying too hard.
I like the fishtail transition once the braid reaches the shoulder blade area. Any earlier and the style can get bulky at the crown. Any later and you lose the nice contrast. The switch gives the eye something new, which matters in long hair. Long braids can start looking like one note if you don’t break them up.
A little tip I use often: pancake the fishtail only at the outer edges, not the whole braid. That keeps it full while still holding a defined shape.
9. Crown-to-Nape Dutch Lace Braid with Veil Anchor

How do you wear a veil without crushing the braid? You anchor the veil to the braid’s path, not on top of it. A crown-to-nape Dutch lace braid is ideal for that because it gives you a clean line from the top of the head down to the center back, where the veil comb can sit securely.
Where the Comb Should Sit
The veil comb works best just beneath the braid’s finish point, with a couple of pins catching the braid above it. That way the braid stays visible and the veil doesn’t pull on the weave. If the veil is heavier than a simple tulle layer, two tiny combs can distribute the weight better than one.
This style feels particularly good for brides who want a more formal silhouette while still keeping a garden-friendly softness. The braid can be tight at the crown and a touch looser as it drops, which keeps the head shape elegant. A few face-framing pieces around the temples stop it from looking severe.
There’s a nice little bonus here: once the veil comes off, the braid still holds its own. You’re not left with a flattened patch of hair and a handful of pins to explain. That alone makes this style worth a serious look.
10. Soft Milkmaid Dutch Lace Braids with Tendrils
A milkmaid braid can get old-fashioned fast if the execution is too neat. Softening it with Dutch lace braids and loose tendrils keeps it bridal instead of costume-heavy. The braids wrap across the crown, usually from each side, and meet near the opposite ear or at the back, but the edges are left a little airy.
This is one of the easiest styles to make feel romantic because the tendrils around the face do so much work. A few wispy pieces at the temples, maybe one soft curve near the jawline, and suddenly the whole look loosens up. Too many tendrils turns messy. Too few makes it stiff. The middle ground wins.
- Best for brides who want a rustic, outdoor feel.
- Works nicely with pressed wildflowers or a thin vine-style hairpiece.
- Holds well on medium-density hair, though thick hair gives the braids more shape.
- Looks strongest when the braids are pinned in a slightly imperfect overlap.
I like this one for a ceremony that feels relaxed but still cared for. It has charm. That matters more than precision here.
11. Braided Headband with a Center Part
A Dutch lace braid headband is the sort of style that quietly does its job and then keeps doing it through the reception. The braid starts near one temple, crosses the crown like a headband, and is pinned near the opposite side, while the rest of the hair hangs loose or is tucked into a low knot. A center part keeps the whole thing balanced and gives the face a clear frame.
This style is especially good when the dress neckline has already done the heavy lifting. If the gown has beading, a dramatic back, or a strong silhouette, the hair doesn’t need to shout. It just needs to hold the shape and give the bride something clean around the face. That’s where the headband braid shines.
I also like it because it plays well with small accessories. A comb behind one ear, a few tiny pearls along the braid line, or a single fresh sprig tucked at the temple can be enough. No need to pile on more. The braid already does the visual work.
For brides with very long hair, this can be a little faster than a full braided updo. And yes, that matters when there’s a makeup artist waiting and the photographer has already started hunting for light.
12. Voluminous Pull-Through Dutch Lace Braid Hybrid
A pull-through braid is not the same thing as a classic braid, and that’s why it’s useful. A Dutch lace braid hybrid with pull-through sections gives you huge visual volume without asking the hair to do impossible things. Each section is secured, then gently opened, which creates a fuller, thicker look that reads beautifully in long hair and extensions.
Unlike a standard braid, this one is less about delicacy and more about shape. That makes it a strong choice for brides who want a big braid but do not want it to feel heavy at the scalp. The lace braid at the front keeps the hairline neat, and the pull-through length takes over once the style moves past the crown.
Who It’s Best For
This is the style for brides with thick hair, long extensions, or a dress that can handle some visual drama. It’s also useful if you want the braid to stay full in humidity, since the sections are built to keep their size even when the air gets damp.
A few practical notes help a lot:
- Use clear elastics and hide them with a small hair wrap.
- Open each pulled section evenly, not wildly.
- Secure the braid every few inches so it doesn’t start to slide.
- Finish with a medium-hold spray rather than a stiff one.
It’s a bit more work than a classic braid. Worth it, though.
13. Hidden Lace Braid Pony for the Minimalist Garden Bride
Not every garden bride wants flowers in her hair or a big woven crown. Some want clean lines and a little surprise in the back. A hidden lace braid pony gives you exactly that: a polished low ponytail with a Dutch lace braid tucked along one side or just under the surface, so the structure is there without screaming for attention.
Why I Keep Coming Back to It
The front stays calm. The back gets a little detail. That’s a smart trade when the dress is elegant and the bride wants the hair to support the look, not compete with it. From the front, it can read almost simple. From the side, there’s enough braid to make people look twice.
This style is also kinder to brides who don’t want their hair fully pinned up. The ponytail gives movement, which feels right for an outdoor setting, but the braid keeps the shape from collapsing into plainness. If the ceremony runs long or the air gets warm, that combination tends to behave better than loose waves alone.
I’d finish it with a wrapped section of hair around the elastic and maybe one slim pearl pin near the braid start. Nothing fussy. Nothing that needs constant fixing. If I had to pick one style for a bride who wants the safest balance of comfort, polish, and garden softness, this would be very near the top of my list.