Your hair can look fine in the mirror and still betray you by lunch. Roots go slick, the front falls flat, one side bends weird from sleep, and suddenly the whole day feels like it started with a minor insult. That is exactly where braid headband styles for bad hair days earn their keep: they fix the part you can see first, and they do it without forcing your whole head into a tight, overworked updo.
I like braid headbands because they solve a specific problem instead of pretending every hair day needs a full reinvention. You keep length, movement, and a little softness around the face, while the front section gets pulled into something neat enough to look deliberate. If your hair is oily, frizzy, fine, puffy, or flattened at the crown, a braid across the hairline can hide the worst of it fast. It also works with second-day texture better than freshly washed hair ever will.
A small trick makes a big difference. Second-day hair usually gives better grip than squeaky-clean hair, and a mist of dry shampoo or texture spray at the roots helps the braid stay put instead of sliding loose by noon. A tail comb, two or three bobby pins, and a clear elastic can carry you through almost every style here. You do not need salon-level neatness. You need enough control to make the braid look intentional.
The styles below move from simple to more dressed up, from low-effort fixes to braids that look like you spent a little time on them—even when you absolutely didn’t. Start with the one that matches your hair’s mood, not your idealized version of it, and you’ll probably find the whole bad-hair-day thing gets a lot easier.
1. Classic French Braid Headband
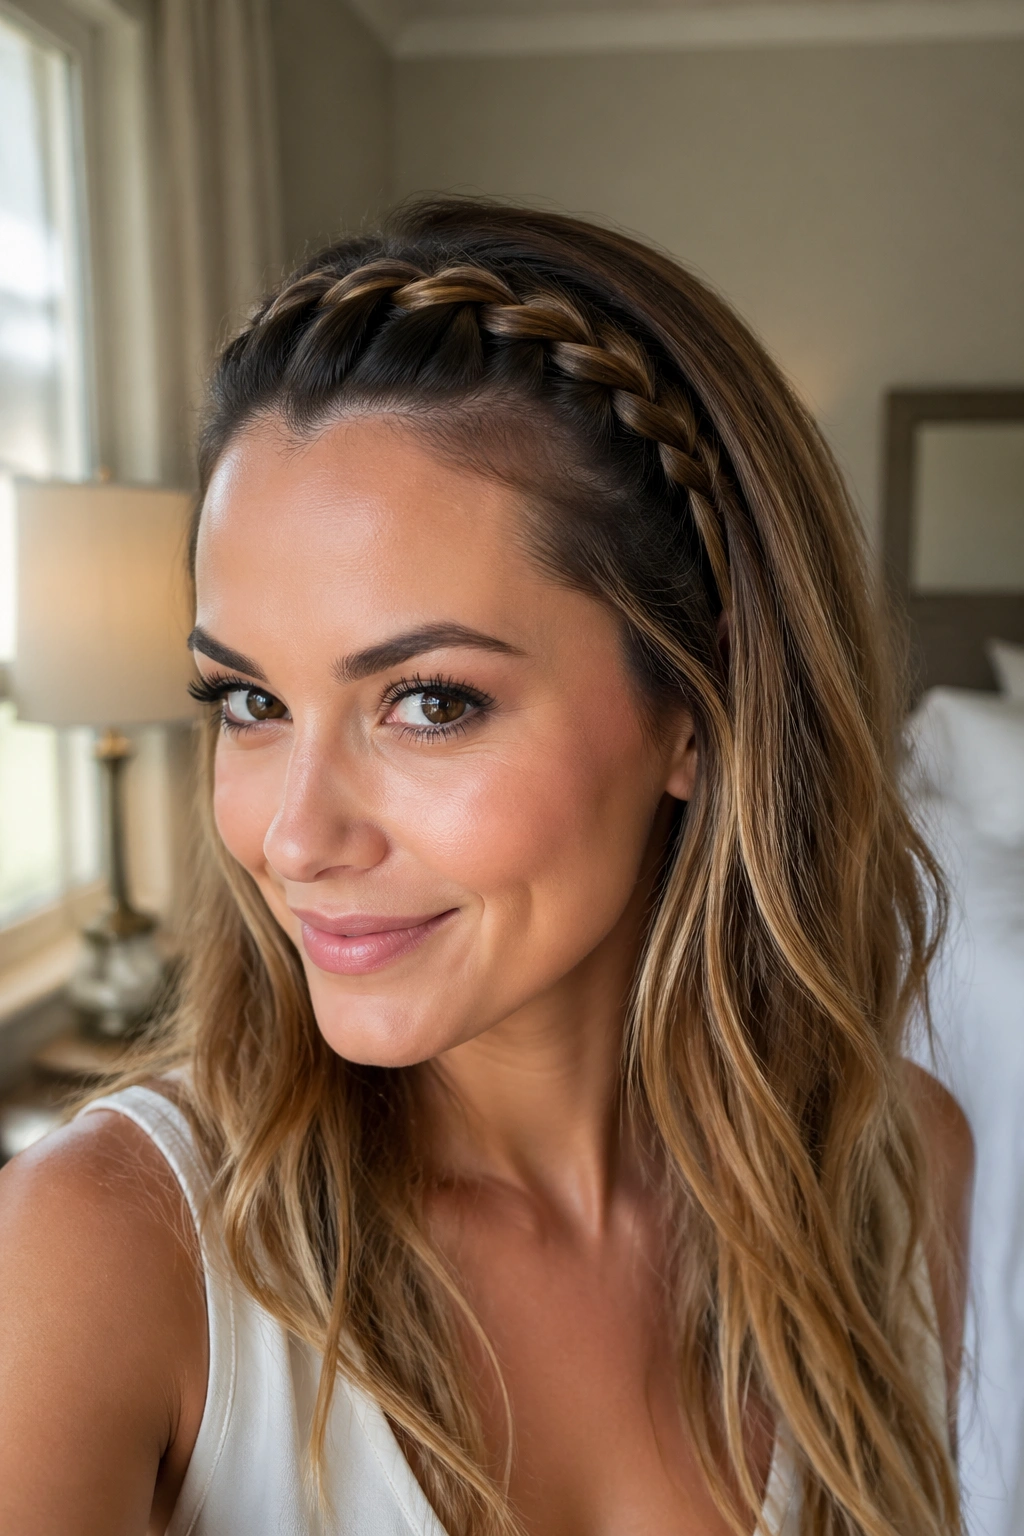
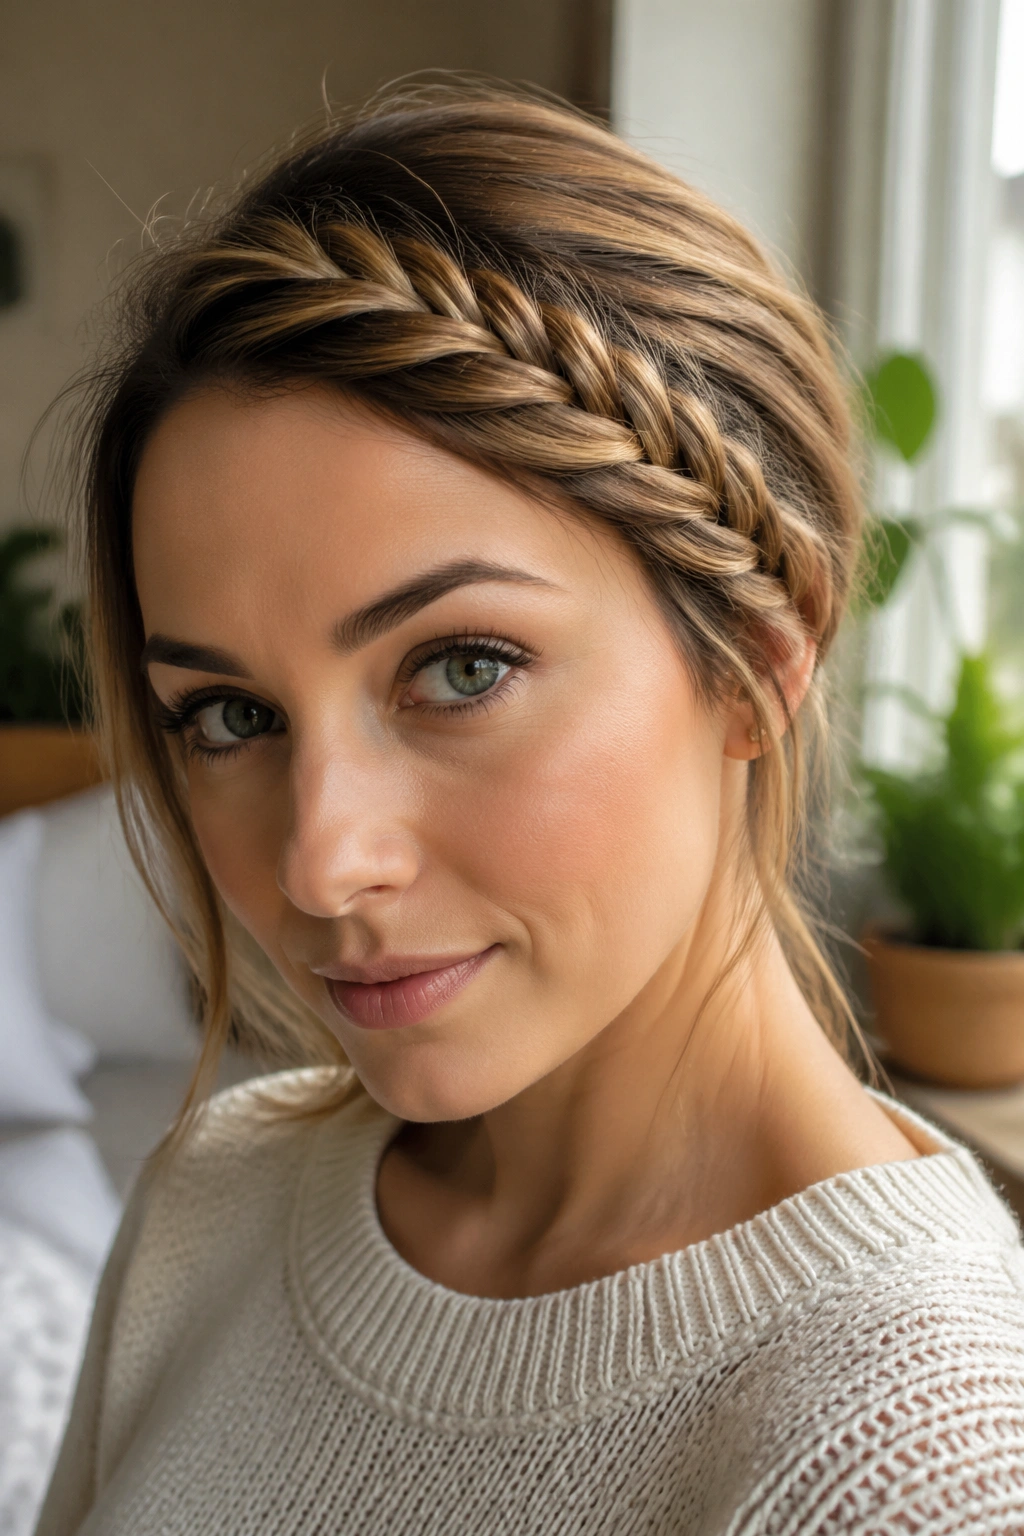
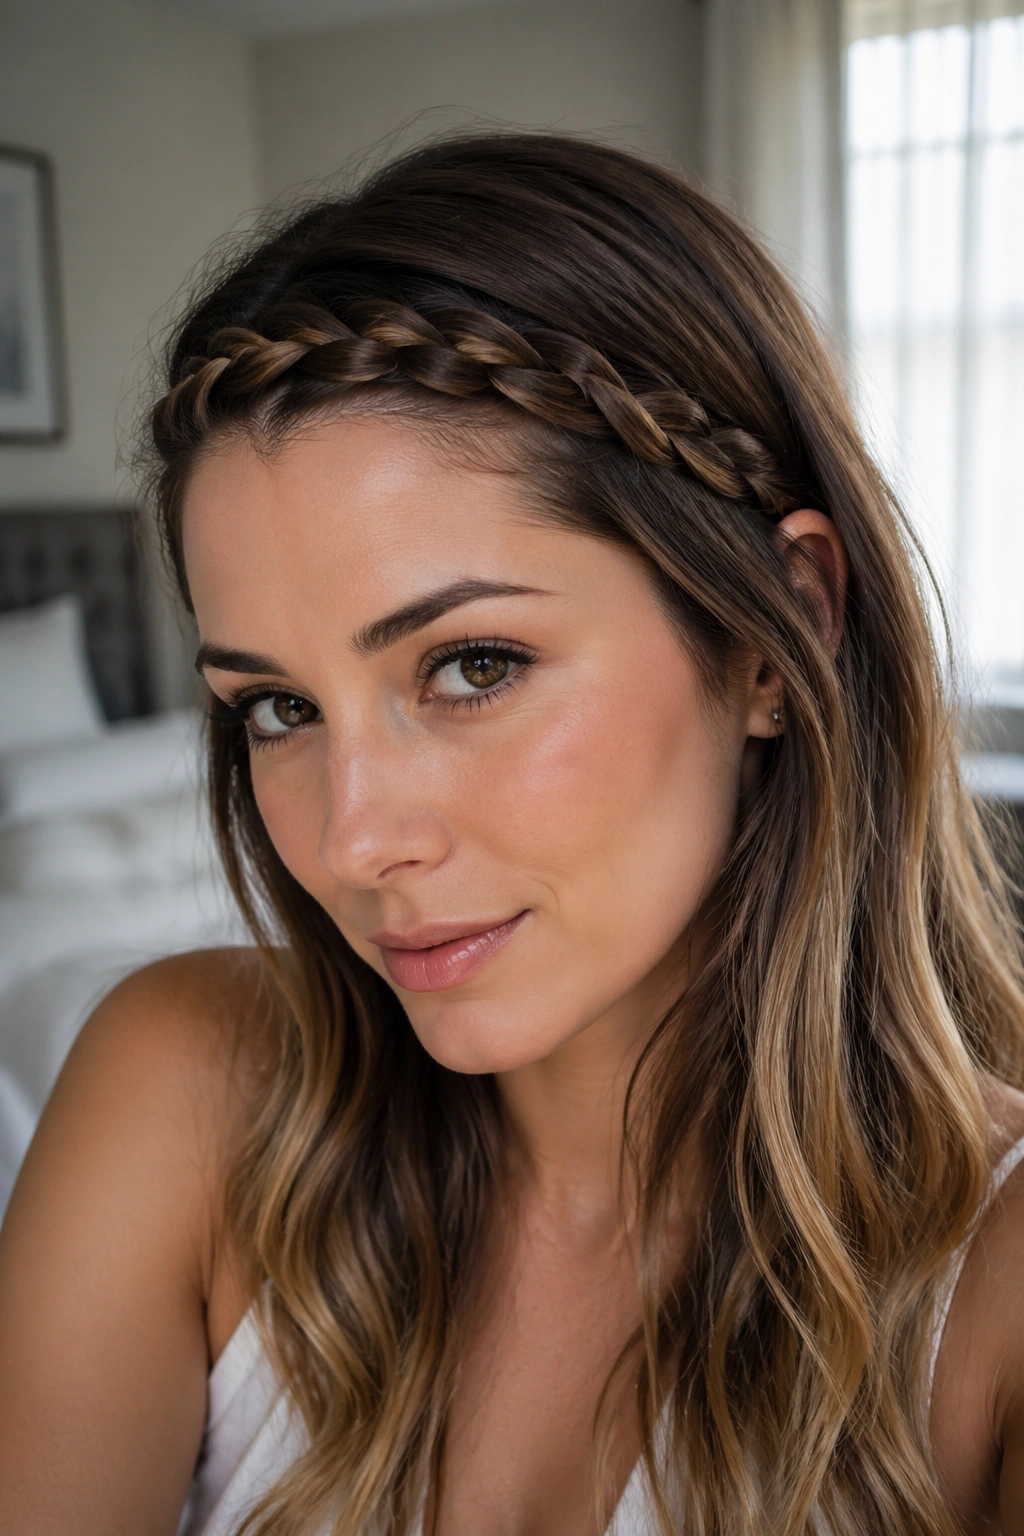
The classic French braid headband is the one I reach for when I want the front of my hair to stop acting up and still look soft. It starts near the temple, follows the hairline, and sweeps across the forehead like a narrow woven band. On medium to long hair, it gives you that clean, practical look without making the rest of your hair feel trapped.
Why It Earns Its Place
A French braid pulls in new sections as it moves, which means the braid stays snug against the head instead of floating away from it. That makes it a good choice for greasy roots, grown-out bangs, and those mornings when one side of your hair refuses to cooperate. It also looks neat from the front and tidy from the side, which matters more than people admit.
The trick is to keep the braid narrow. If you keep taking huge sections, it stops looking like a headband and starts looking like a side braid that took a wrong turn. Small pieces, even tension, and a few bobby pins behind the ear are usually enough.
- Works best on hair with some grip, not glass-slick roots.
- Looks cleaner when the braid follows the curve of the hairline.
- Holds better if you mist the front section with texture spray first.
- Hides a messy part without needing a full updo.
If you want a style that feels reliable instead of fussy, this is the one.
2. Dutch Braid Headband
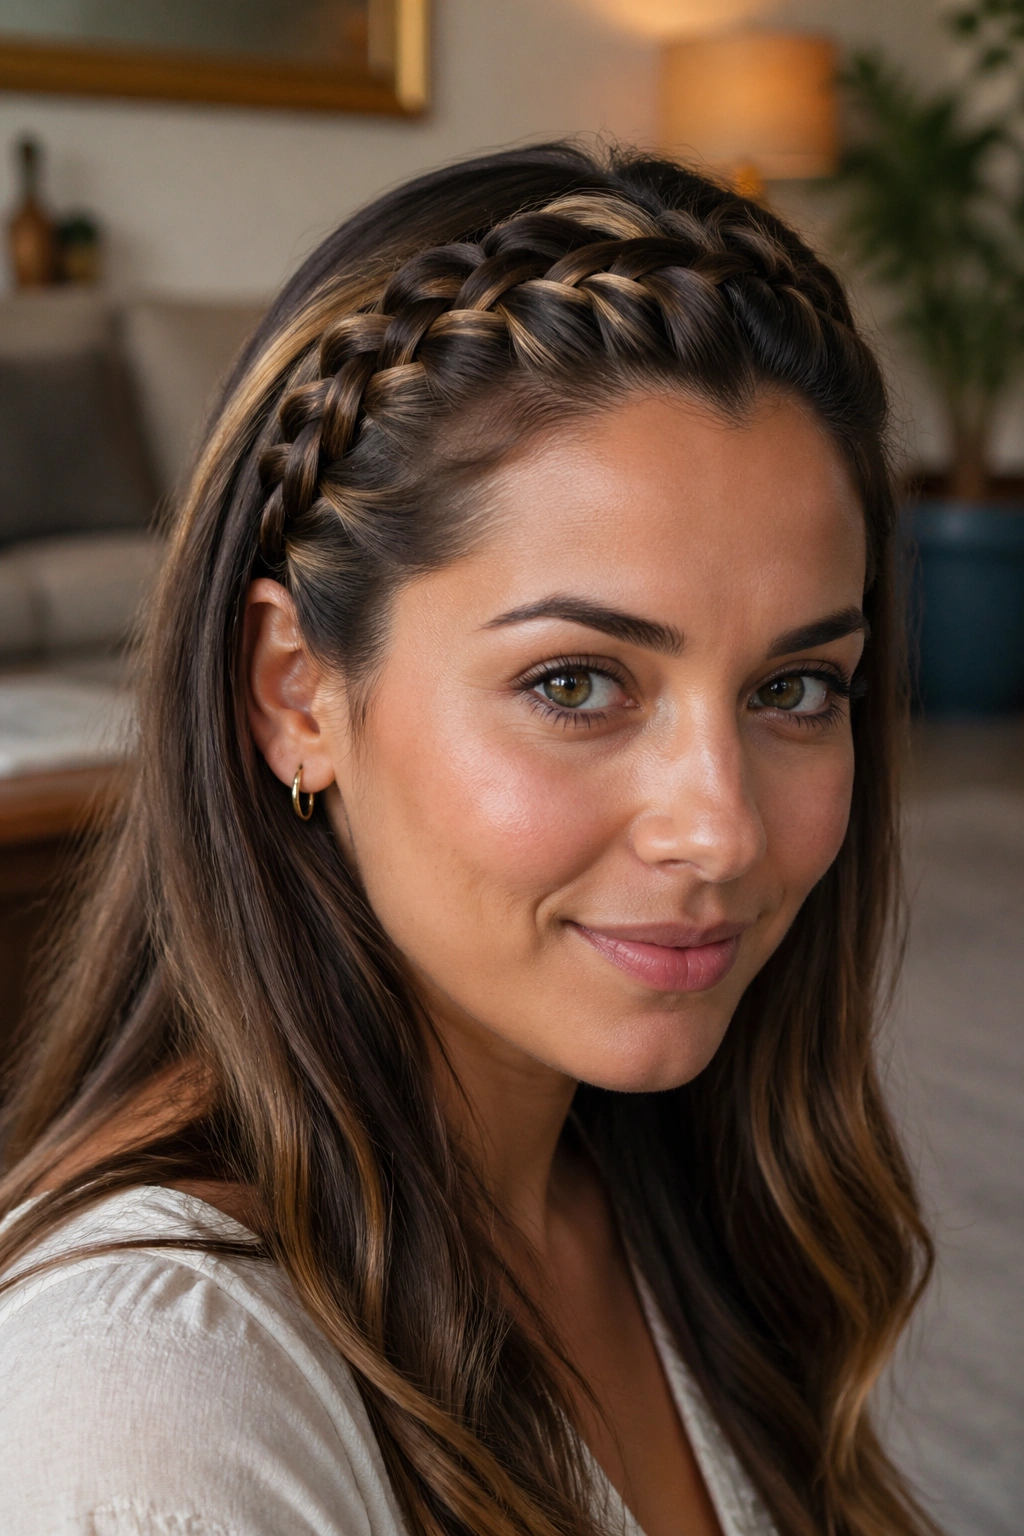
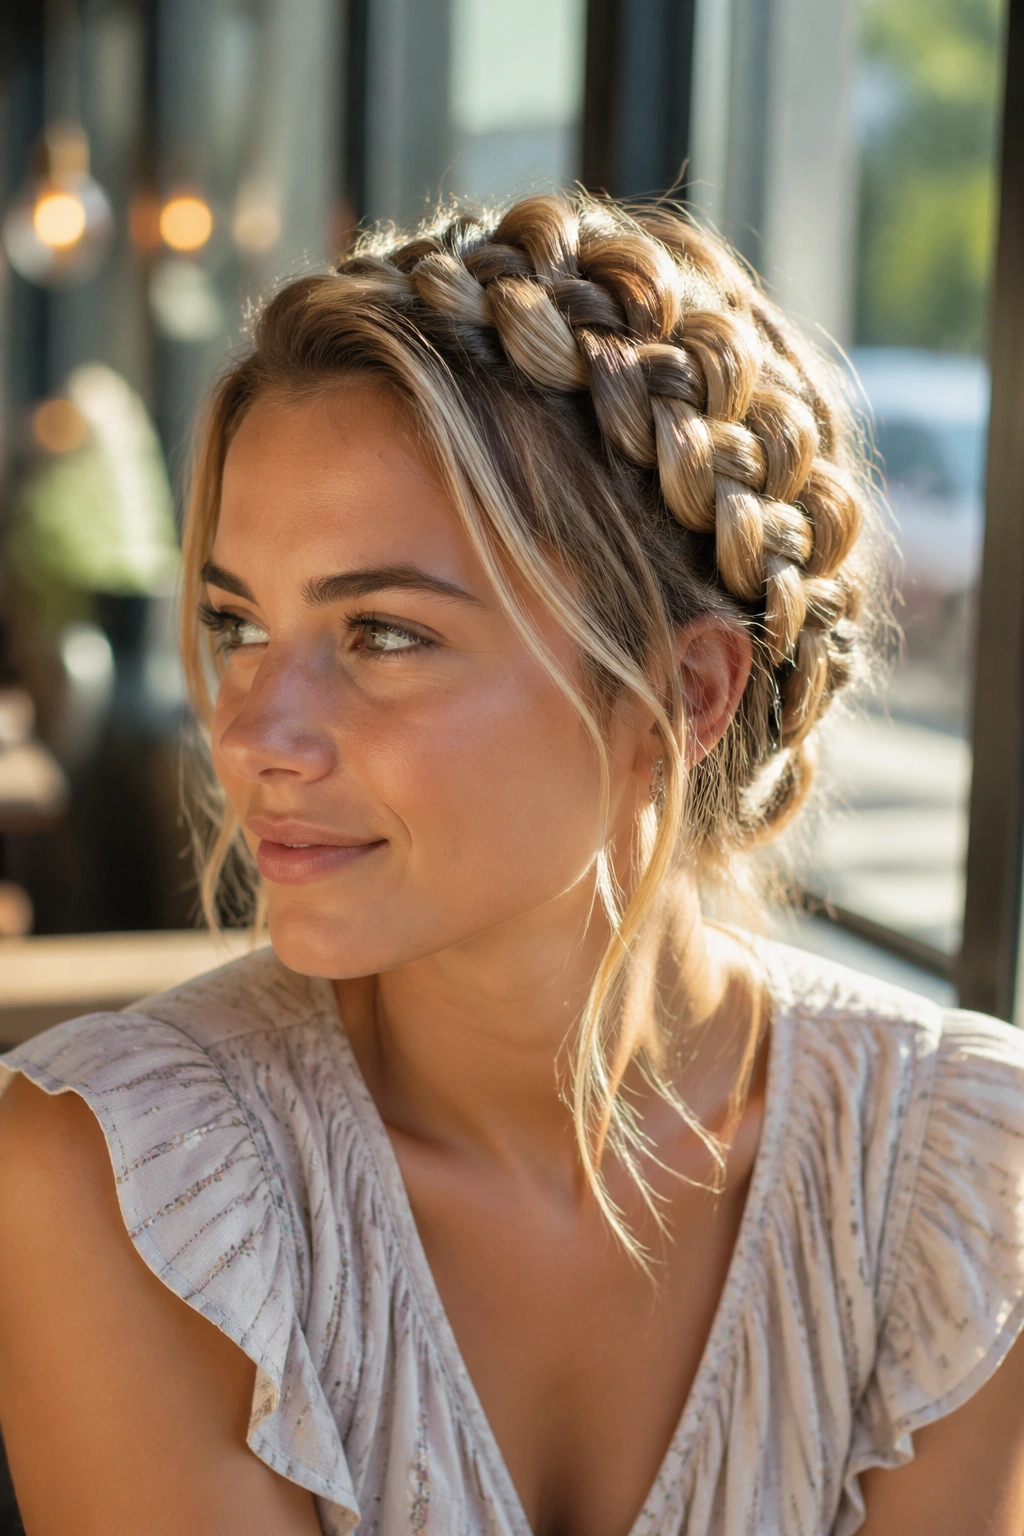
If you want the braid to stand out, pick the Dutch braid headband. It sits raised off the scalp instead of blending into it, which gives the front of the style a thicker, more obvious look. On dark hair, fine hair, or hair with not much shine, that extra height helps the braid read clearly from a distance.
The biggest difference is the direction of the weave. Instead of crossing sections over the middle like a French braid, you cross them under, which makes the braid pop forward. It sounds like a tiny change. It isn’t. The whole texture changes.
This style is a smart pick when your hair is flat at the crown and you need some structure fast. It also helps if your face-framing pieces are growing out and refusing to behave. Secure the braid with pins that match your hair color, then loosen only the outer edges a little. Leave the center intact. That keeps the braid from collapsing into a mushy strip by the time you leave the house.
Honestly, this one has a little more presence than the French version. Good. Some days need that.
3. Fishtail Braid Headband
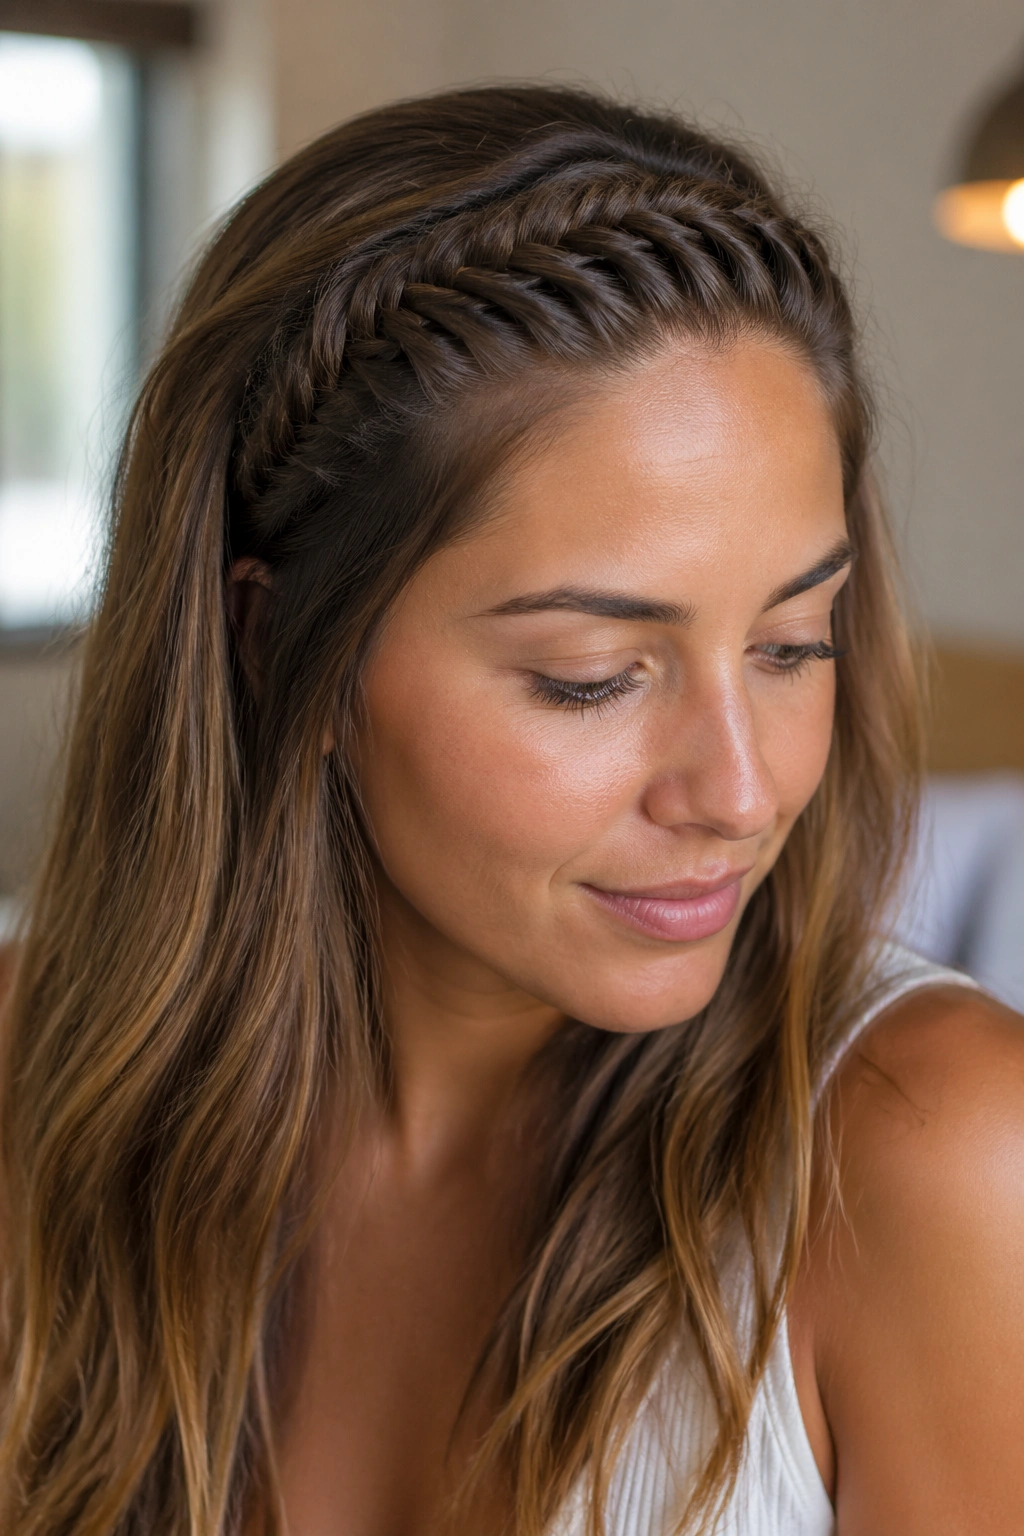
Why does a fishtail braid headband look polished even when the rest of the hair is a mess? Because the tiny sections create a tight, detailed pattern that reads as deliberate right away. It has that neat, woven look that makes a sloppy crown or sleepy roots seem like part of the plan.
How to Wear It
Start with two sections near the temple and keep the braid close to the hairline. The fishtail pattern can get bulky fast if you pull too much hair into each pass, so use thin pieces and keep your fingers close to your head. On fine hair, that detail matters even more because the braid can get too heavy and slip.
This style is especially good when you want something a little prettier than the everyday braid but not so ornate that it turns into a project. It pairs well with loose waves, soft straight hair, and even low ponytails. If you have layers, tuck the shortest ends behind the ear with a pin before they start poking loose.
A fishtail headband is not the fastest option. It is the one you choose when you want the front to look cared for. There’s a difference.
4. Double Mini Braid Headband

Two slim braids across the front can do more than one thick braid ever will, especially on mornings when the top layer of your hair looks tired. A double mini braid headband gives you a little symmetry and a lot of control. It’s practical, but it doesn’t feel stiff.
Think of it as a split fix. One braid can cover the left temple, and the second can mirror it on the right, with a small gap or a soft part in the middle. That works well if your hair tends to puff up at the sides or if one temple gets flat while the other flips outward. It also gives you a cleaner edge if you like wearing the rest of your hair down.
Quick Details That Matter
- Use two clear elastics or tiny pins to hold each braid in place.
- Keep the braids thin so they sit like a headband instead of two random side braids.
- Try this on shoulder-length hair when a full crown braid feels like too much.
- Add a bit of dry shampoo at the roots before braiding for grip.
This style feels especially good on days when you want a little structure without giving away how little effort you had left.
5. Rope Twist Headband
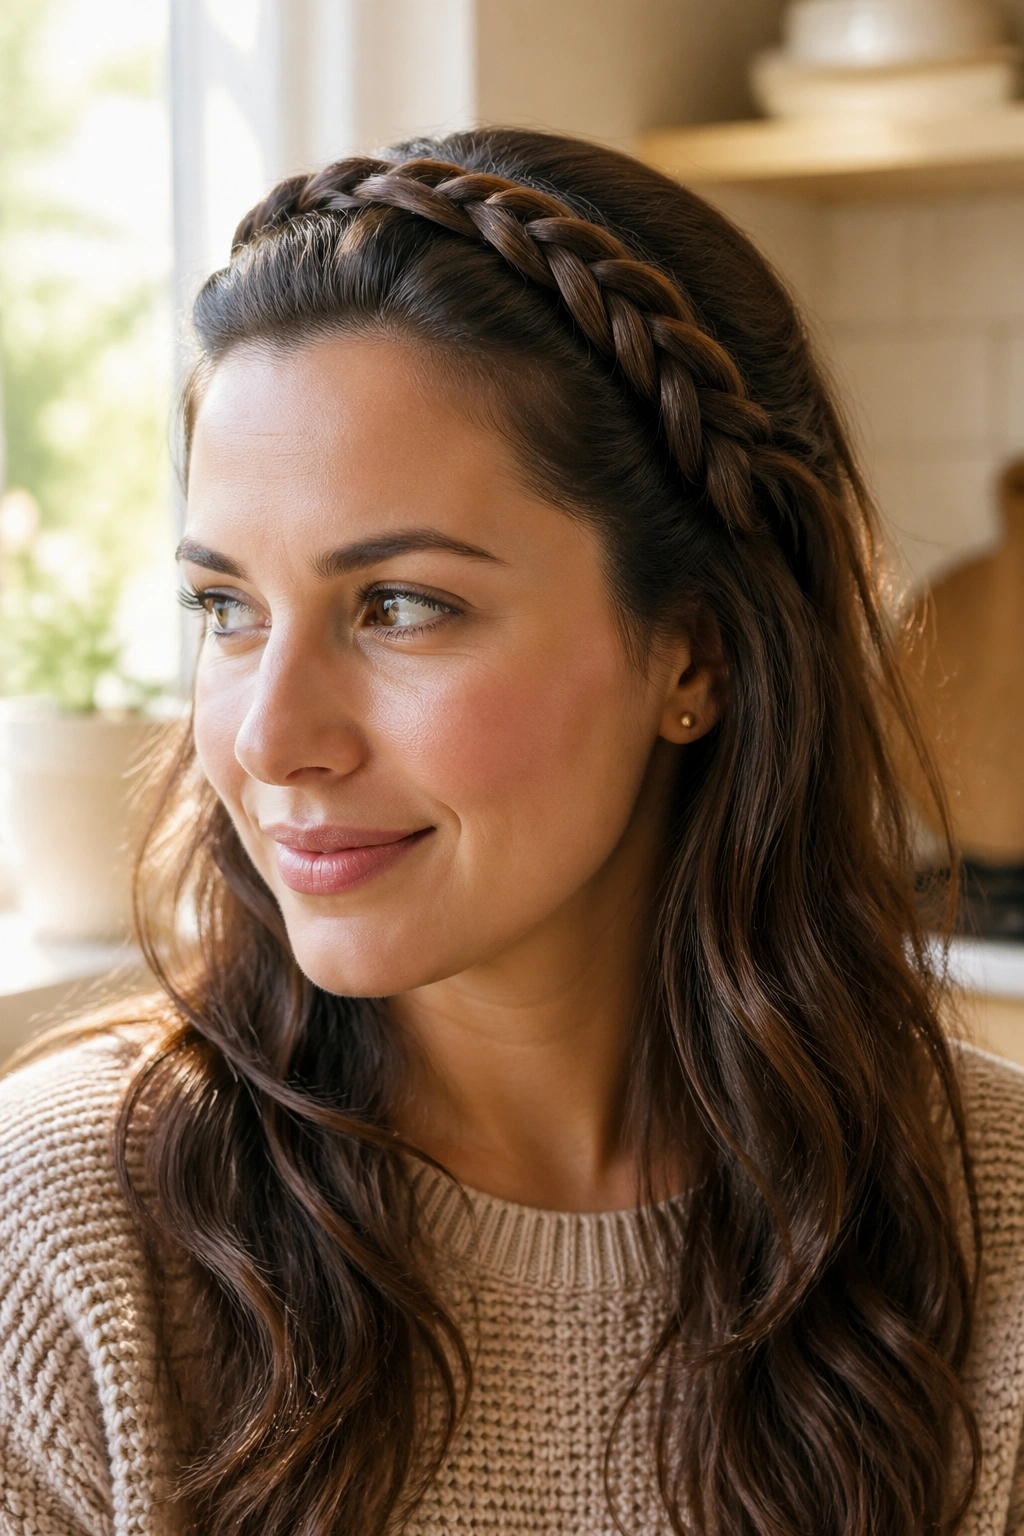
Not every headband needs a three-strand braid. A rope twist uses just two sections, which makes it faster and cleaner for days when your patience is about six minutes long. It gives the front of the hair a neat twisted line that sits close to the scalp and stays flatter than a braided band.
That flatness is the appeal. If your hair is thick or puffy, a rope twist can tame the front without adding too much bulk around your face. It also works well on straight hair that slips out of regular braids because the twist pattern grips differently. You twist each section in the same direction, then wrap them around each other in the opposite direction. Simple. Almost annoyingly simple.
This one is also kind to short layers. A lot of braid styles fight with shorter pieces near the temples. A rope twist usually handles them better because the twist line is smaller and less fussy. Pin the finished twist just behind the ear, and do not over-loosen it. If you pull it apart too much, it loses the clean ribbon look that makes it useful in the first place.
When time is tight, this is the style I’d call first.
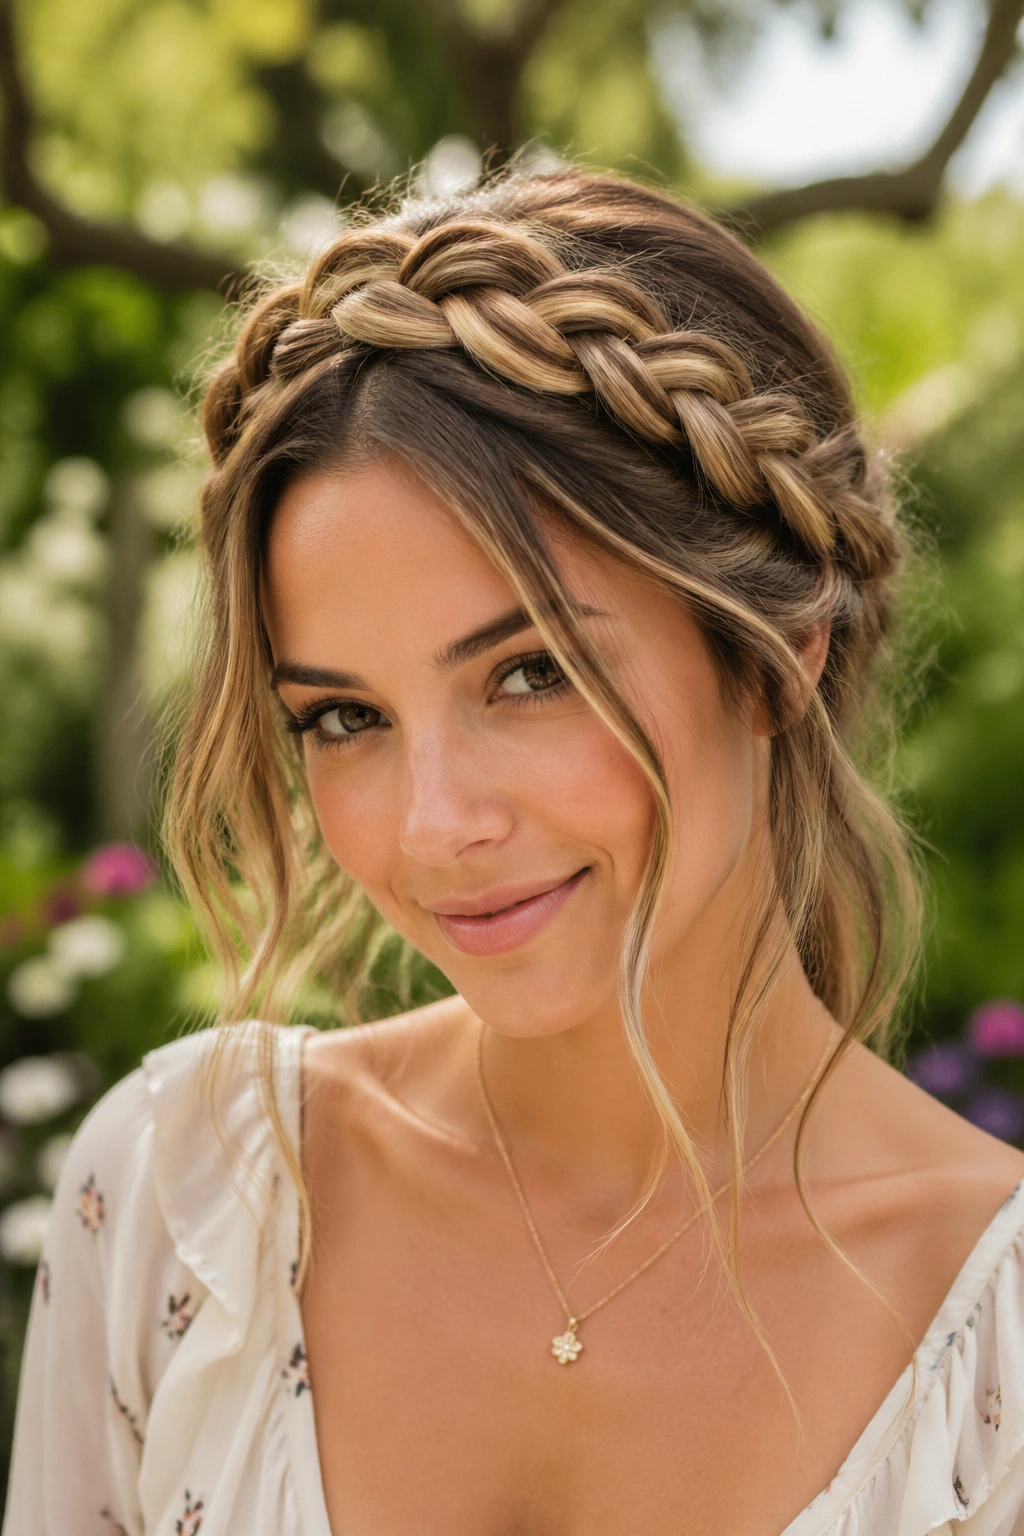
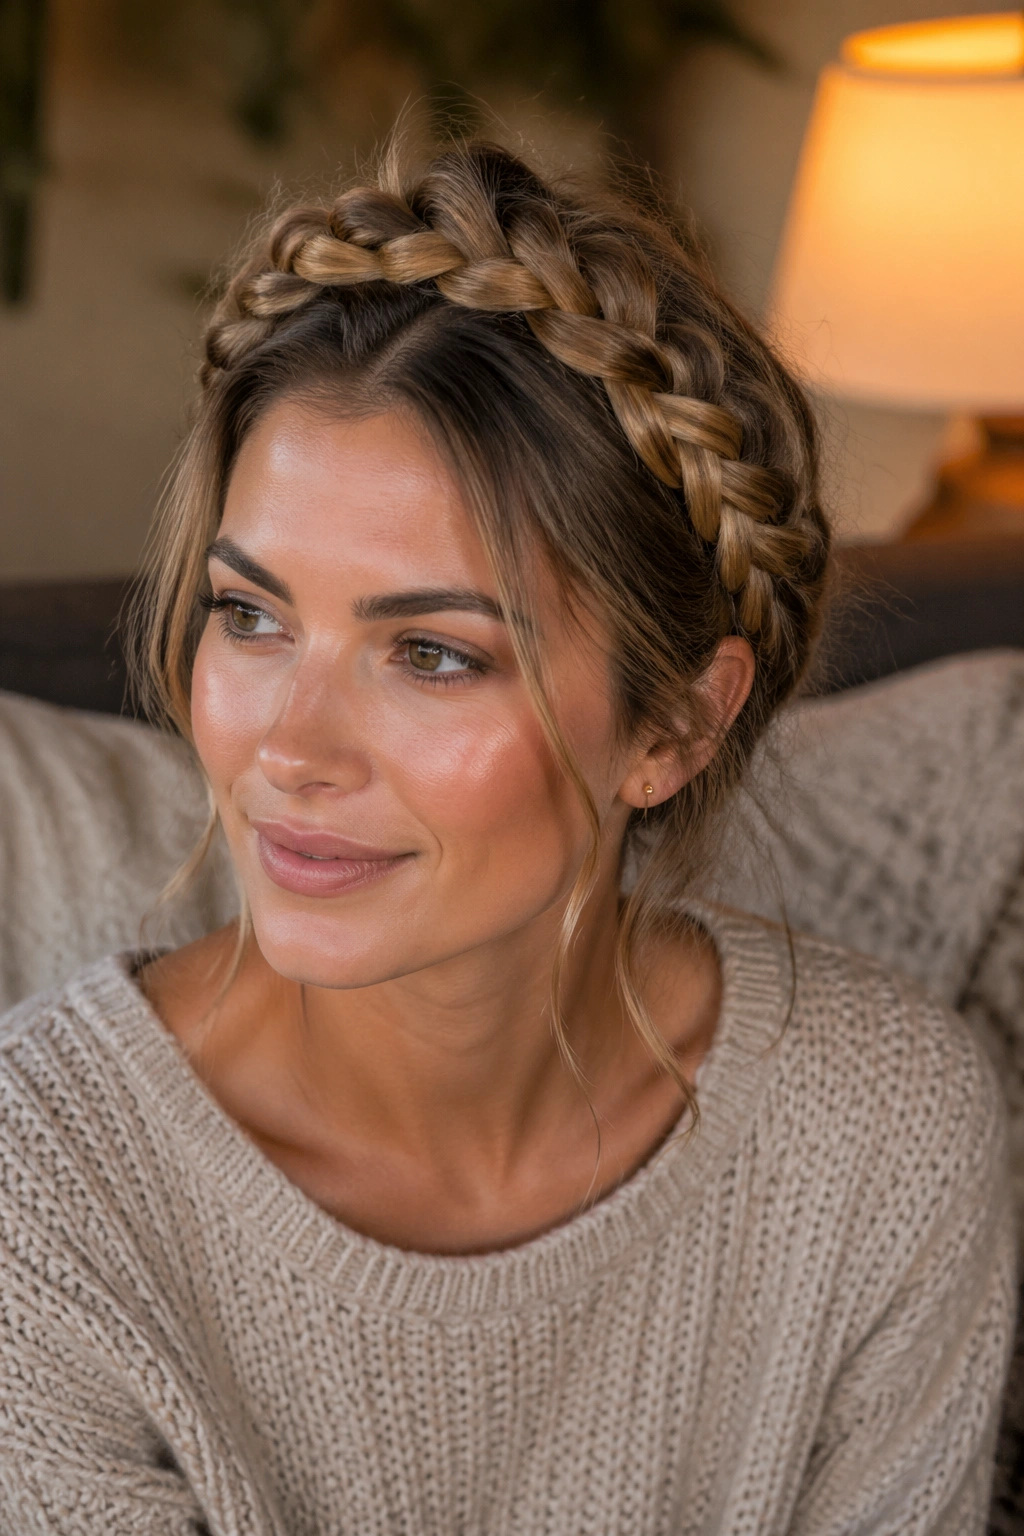
6. Crown Braid Headband
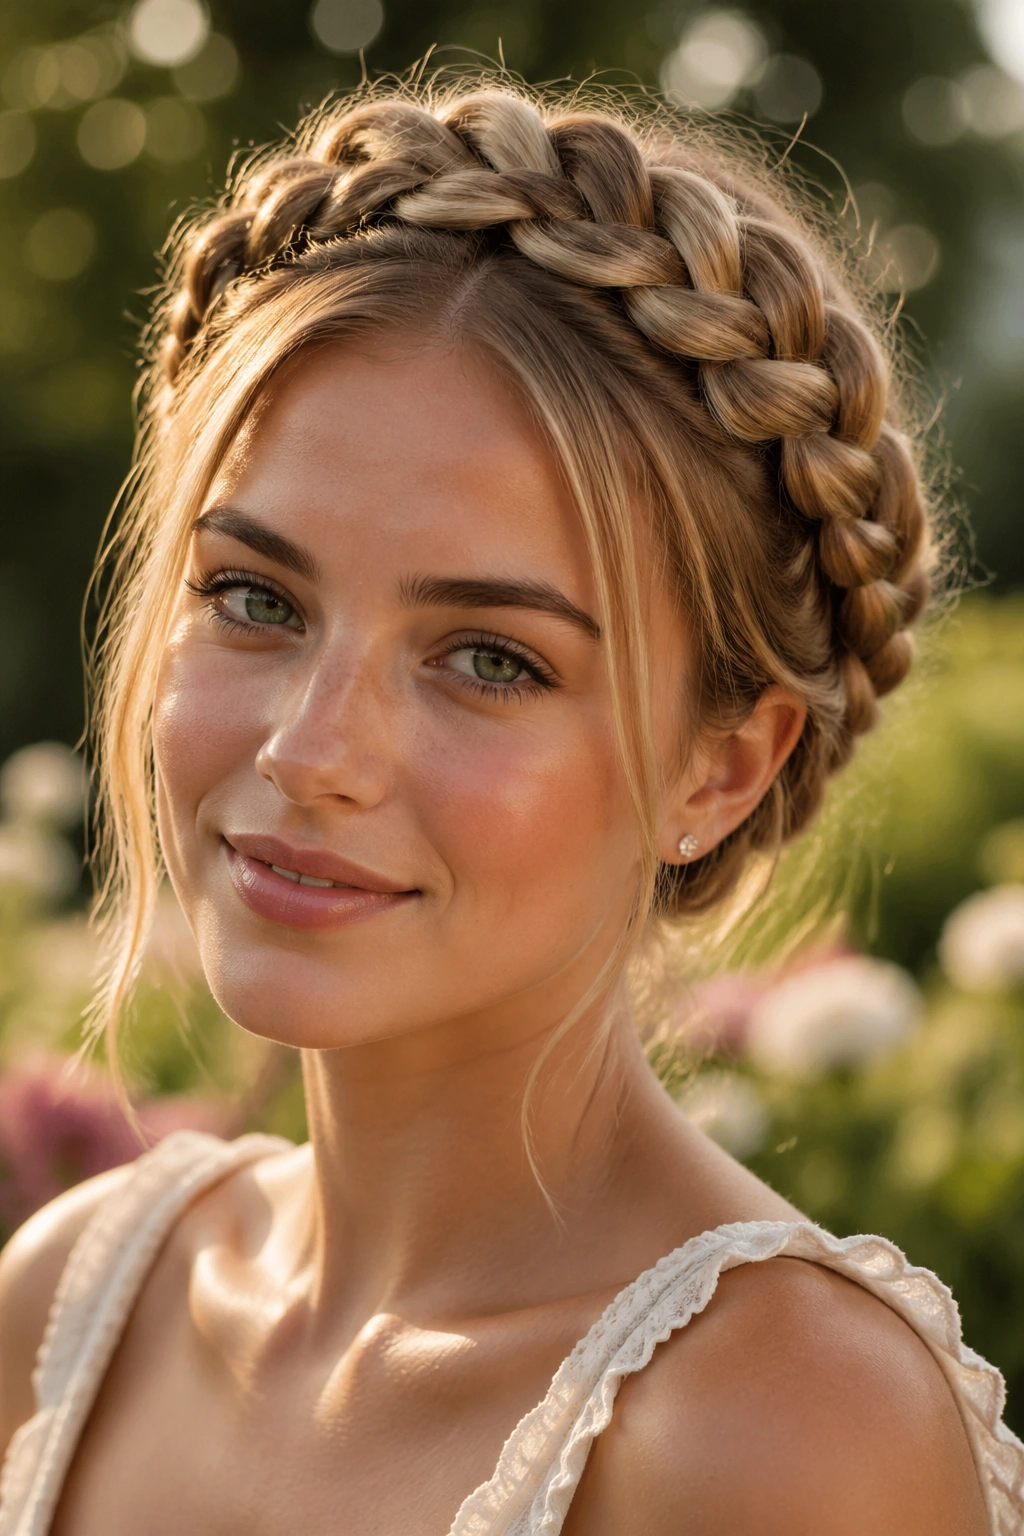
A crown braid headband is the dramatic option, but it does not have to feel formal. It wraps around the head like a halo, which means it’s useful when the whole top layer looks rough, not just one side. If the front is flat and the back is frizzy, a crown braid can make both problems disappear into the same style.
The key is balance. Keep the braid snug enough to stay in place, then loosen the outer edges just a touch so it feels soft around the head. Too tight and it starts to look severe. Too loose and it falls apart at the back where nobody can see it until the pins start sliding. That back section matters more than people think.
When to Pick It
A crown braid works well for weddings, dinners, interviews, and any day when your hair needs to look more intentional than casual. It also hides grown-out roots nicely because the braid itself becomes the focal point. If your hair is long enough to wrap fully around, great. If not, you can fake the finish by pinning the end under a loose section at the back.
One good crown braid can carry a whole outfit. Not an exaggeration.
7. Side-Swept Braid Headband
A side-swept braid headband is the style I’d choose for bangs that won’t sit right or for a heavy front section that keeps falling into your eyes. It starts on one side, usually near the temple, and travels across the forehead at a slight angle instead of straight around the head. That diagonal line makes the style feel softer and a little less rigid.
The angle matters because it changes the whole mood. A straight headband braid can look tidy. A side-swept one looks a bit more relaxed, especially if you leave a few shorter pieces loose near the hairline. It’s a nice choice for layered cuts because it lets the natural shape of the haircut show through instead of fighting it.
How to Make It Work
Use a tail comb to part the front section cleanly if you want a neat finish. If you want something looser, skip the perfect part and finger-comb the front pieces instead. Braid toward the opposite ear, pin the end underneath, and let the rest of your hair fall over one shoulder or down your back.
This style is especially helpful when one side of your hair cooperates and the other side absolutely does not. Which, frankly, is most days.
8. Pull-Through Braid Headband
Thin hair loves a pull-through braid because it fakes bulk. That is the whole selling point. Instead of relying on traditional braiding, you build a stacked looped shape with small ponytails, and the result looks fuller than the hair actually is.
It also gives you more control over the silhouette. A regular braid can disappear if your hair is very fine or very straight. A pull-through braid stays chunky and visible, which makes it a smart fix for limp roots or hair that went flat after a hat, scarf, or long commute. Use tiny elastics, keep each section even, and tug the loops gently only after the structure is secure.
The style does take a little more setup than a standard braid. Worth it. Especially if you need the front of your hair to look deliberate and you do not have enough density for a classic braid to hold its shape. Once the loops are in place, you can pancake the braid a bit to make it wider, but stop before it turns floppy. The line should still have definition.
If your hair always feels too thin for braids, this one usually changes the conversation.
9. Loose Boho Braid Headband
A few escaped pieces near the temple can save a style that looks too stiff. The loose boho braid headband leans into that softness on purpose, which is why it works so well for frizz, second-day waves, and hair that has lost its original polish by noon. It feels relaxed without looking unfinished.
The braid itself can be French, Dutch, or even a simple three-strand braid, but the finish changes the whole thing. You leave a little height at the crown, pull the braid apart just enough to soften the edges, and let a few wisps frame the face. That little bit of imperfection keeps the style from looking like a school recital braid.
What Makes It Different
This one is better when you want movement more than precision. If your hair is naturally wavy or curly, don’t fight every flyaway. Smooth the roots, yes. Leave some texture in the lengths. The braid should feel like it belongs to the hair, not like it was pasted on top of it.
Loose boho braid styles are forgiving. That’s the real reason people keep coming back to them.
10. Braided Bang Band
If your problem is only the front section, do not braid more hair than you need. A braided bang band keeps the focus right where the trouble starts: bangs, fringe, short layers, and those little front pieces that separate from the rest of your hair and create chaos. It is a small fix with a big visual payoff.
This style works best when you want to keep the rest of your hair down. Pull just the front strip back from one side or both sides, braid it into a narrow band, then pin it so it disappears into the side of your head. The braid should sit low enough to control the fringe but high enough to avoid looking like a kindergarten hairstyle. That balance is touchier than it sounds.
When It Saves the Day
- Growing-out bangs that split in the middle.
- Short face-framing layers that keep falling into your eyes.
- Sweaty roots near the hairline.
- Days when you want your face fully open.
A small braid across the front can do more than a full head of styling. It keeps the focus on your eyes and cheekbones, which is useful when the rest of your hair is not worth arguing with.
11. Scarf-Woven Braid Headband

A scarf changes the whole mood in one move. Tie it into a braid headband, and the style stops looking like damage control and starts looking chosen. That makes the scarf-woven braid headband a strong option for bad hair days when you still want color, pattern, or a little personality near the face.
You can weave a thin scarf through a braid, wrap it around the braid after it’s finished, or even use the scarf as the third strand in a simple plait. Each method gives a different finish. Weaving it through creates a softer line. Wrapping it gives a fuller band. Using it as a strand makes the whole thing look more intentional, almost like a head wrap disguised as a braid.
How to Weave the Scarf
Pick a scarf that’s narrow and not too slippery. Silk looks nice, but cotton or viscose usually stays in place better if you’re moving around. Keep the knot hidden under the hair at the back or tuck it under one of the pinned sections near the ear. If the scarf is too bulky, the braid can start sliding. That’s the one headache you do not need.
This style works especially well with plain outfits because the scarf does the visual work for you.
12. Messy Halo Braid Headband
Messy does not mean careless. A messy halo braid headband can look more flattering than a perfectly tight braid because it softens the face and hides the little things that make hair look tired—flat roots, rough ends, uneven texture. The trick is to braid with control first, then soften after the structure is secure.
Start the braid around the head like a halo, but don’t chase perfection at every section. Leave a few face-framing pieces out. Pull the braid apart lightly once it is pinned so the shape becomes wider and less rigid. If the crown feels too flat, lift it a little with your fingers before the final pins go in. That tiny lift keeps the style from sitting too close to the scalp.
This one is particularly good for thick hair that wants to expand on its own. A rigid halo can feel heavy. A messy version feels easier to wear for a long day. It also pairs nicely with soft waves or a low bun at the nape if you want the back to look finished without too much work.
Messy halo braids work because they look like you meant to be a little undone. That’s a useful lie.
13. Tucked-End Braid Headband
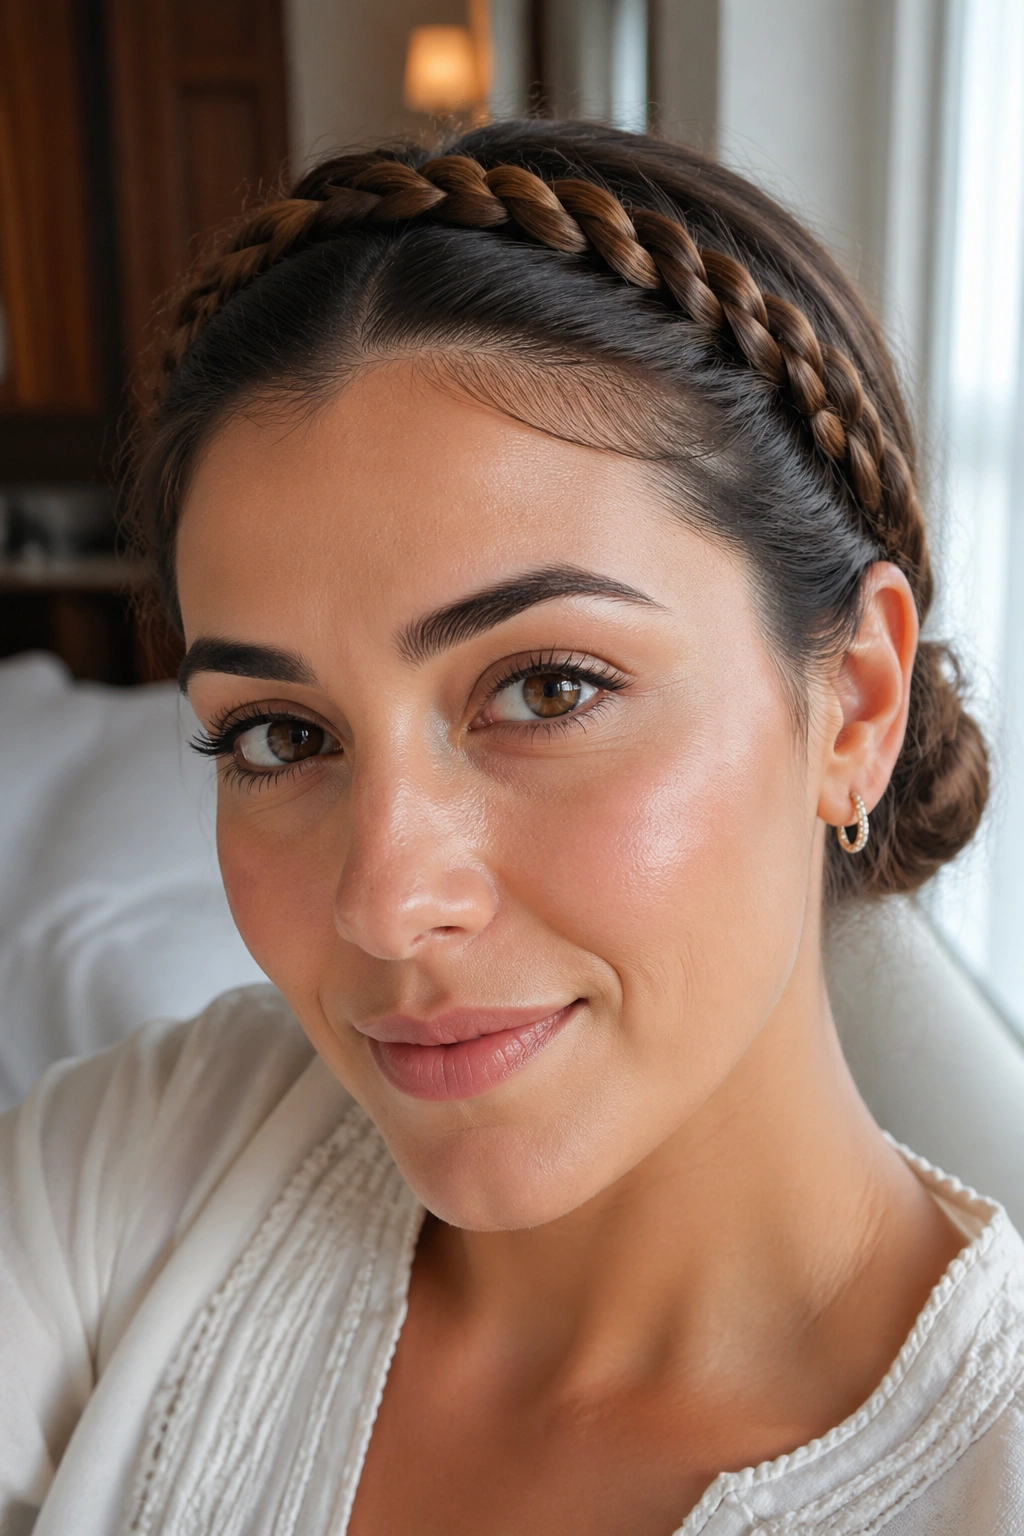
This is the one I reach for when I need the front fixed and the rest of my hair hidden from view. The tucked-end braid headband starts like a regular braid across the hairline, then the ends disappear under a layer of hair, a bun, or a low ponytail so nothing dangles where it can fray out by afternoon.
That tucked finish makes the style cleaner than a lot of looser braid headbands. It is especially useful if your hair has layers that slip free easily or if you want the braid to blend into the rest of the style instead of standing out on its own. Pin the end under the back section with two crossed bobby pins, and check from the side before you leave the mirror. Side views catch bad pinning faster than front views do.
Why It Works So Well on Rough Hair Days
It keeps the braid contained. No tail to unravel, no thin end poking loose, no awkward half-finished look at the nape. If your hair is oily at the roots and a little wild at the ends, this style gives you a clean front and a calmer silhouette in one move.
Some days, that is enough. Pull the braid tight, tuck the end, and stop fussing.