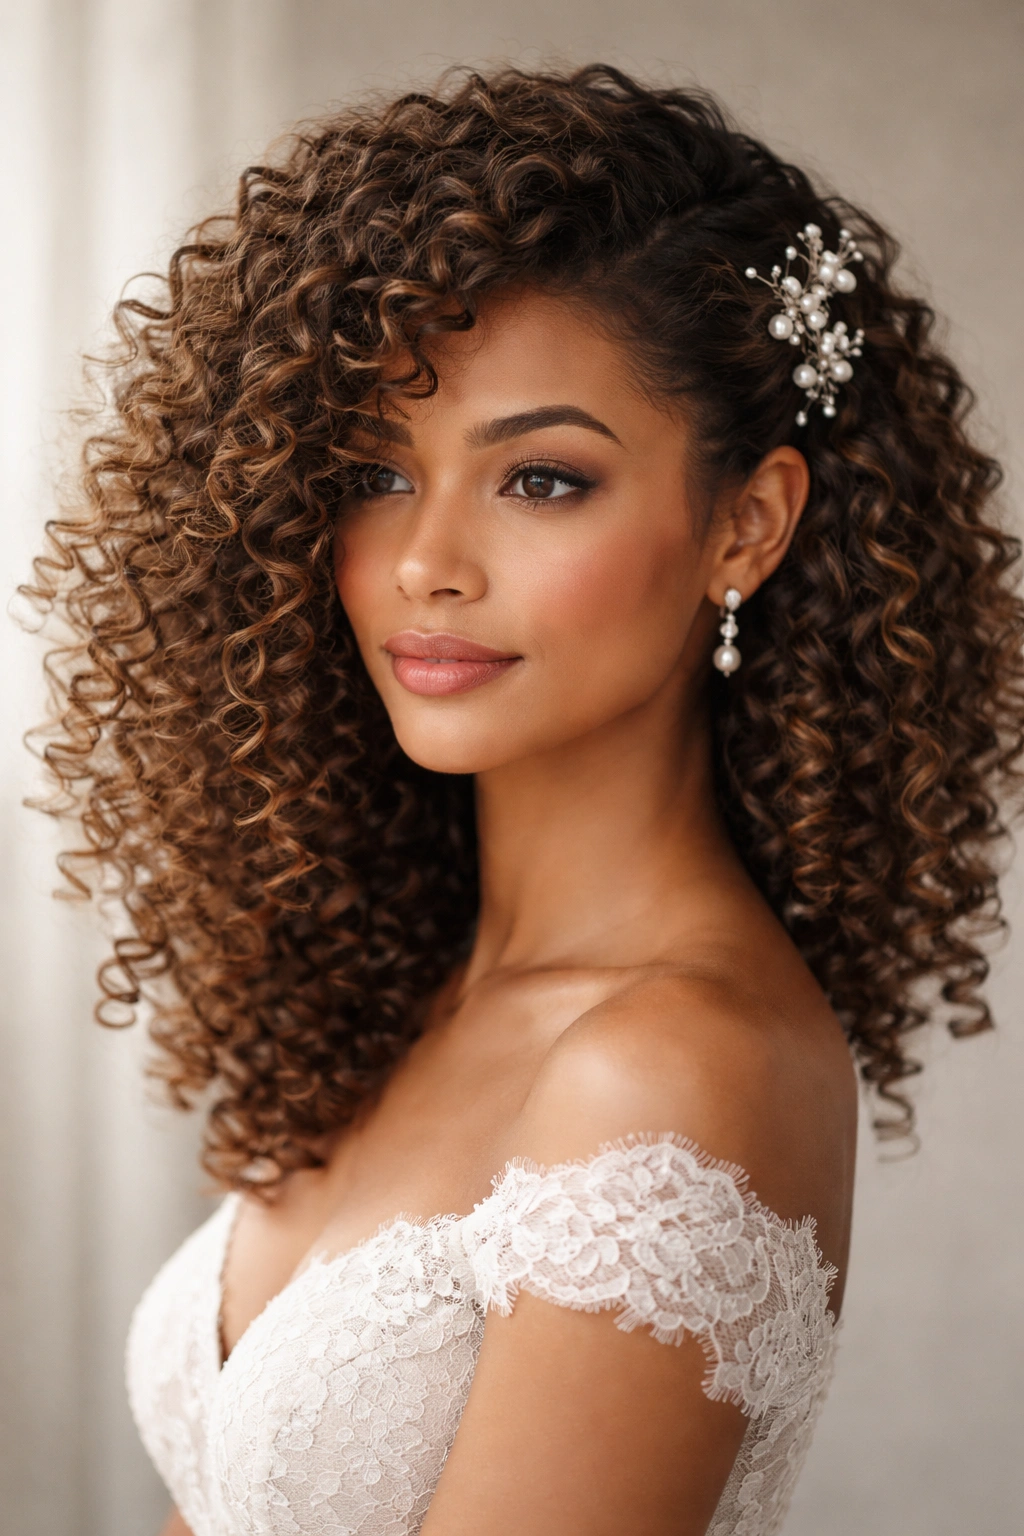
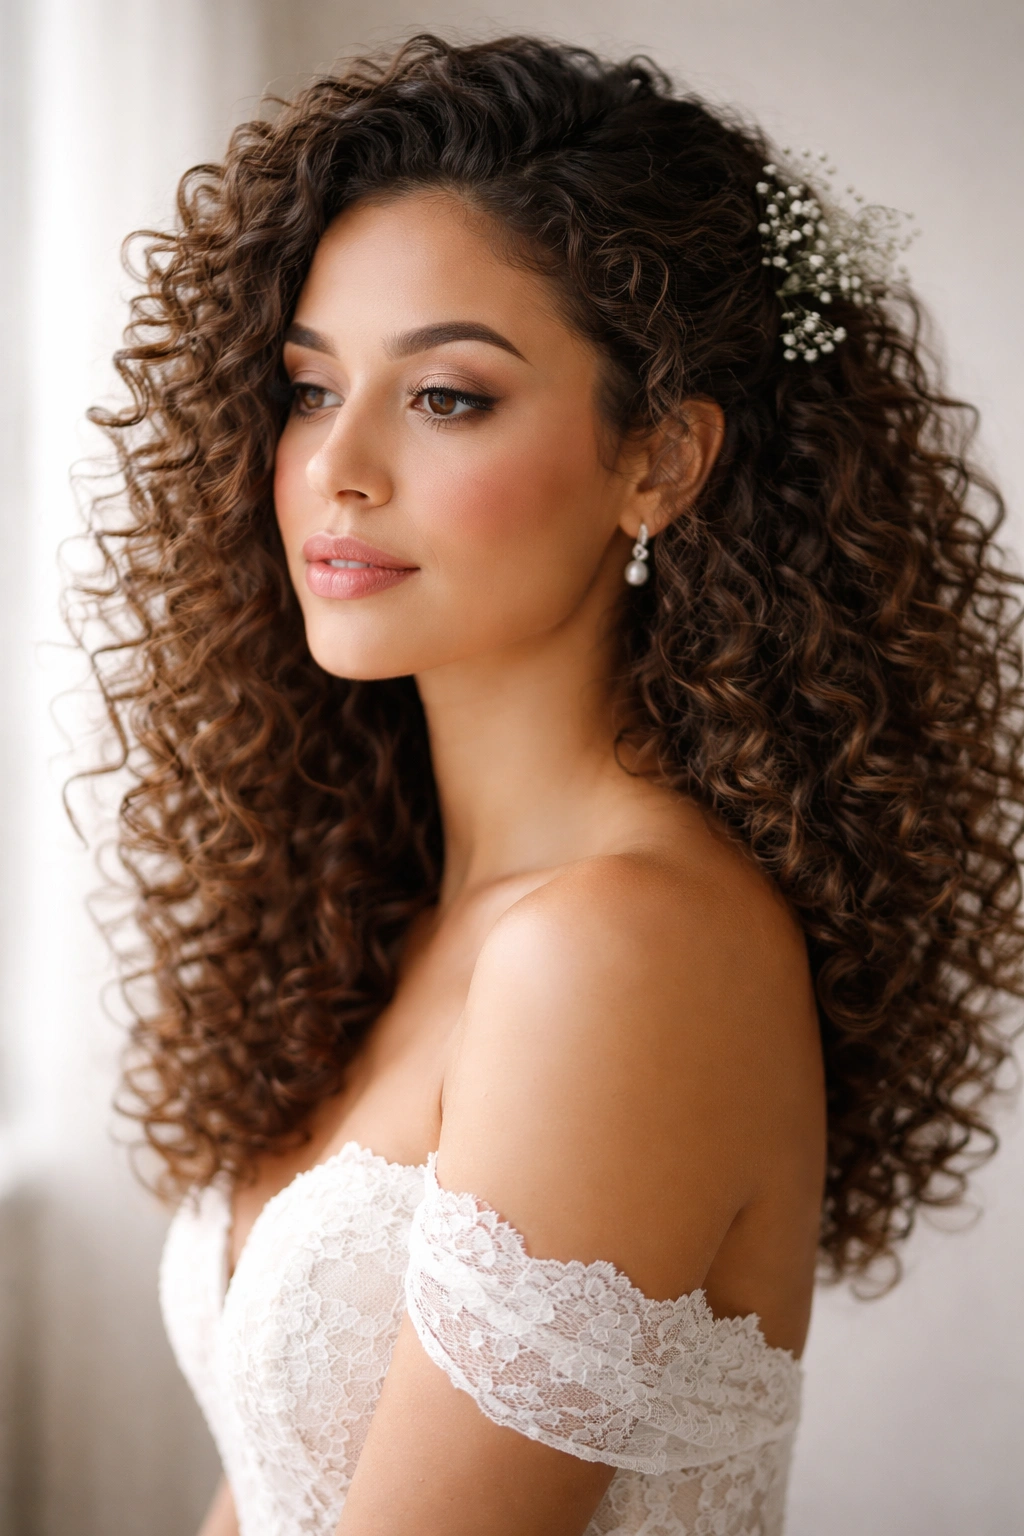
Natural curly hair has a stunning ability to command attention and exude romance on your wedding day—if you style it right. The texture, volume, and movement that come naturally with curls offer countless possibilities that straight-haired brides simply can’t access, and that’s something worth celebrating rather than fighting against.
The challenge isn’t finding options; it’s choosing the right style that balances your personal aesthetic, the formality of your celebration, and the practical reality of how your curls behave under pressure, humidity, and hours of celebration. A style that looks breathtaking in the bridal salon might lose definition by the reception if you haven’t thought through how it’ll hold. The most successful wedding curls combine a clear structural strategy (what’s pinned where, what’s loose, what’s supported) with products and techniques that actually preserve curl integrity throughout the day.
Whether you’re imagining cascading ringlets, a sculpted updo, or something that celebrates your curls in their most natural form, the key is understanding how different styles interact with your specific curl pattern, density, and lifestyle. This guide walks you through twelve wedding hairstyles that work beautifully with natural curly hair—each with the technical details and real-world considerations that make the difference between a style that photographs like a dream and one that deflates by the first dance.
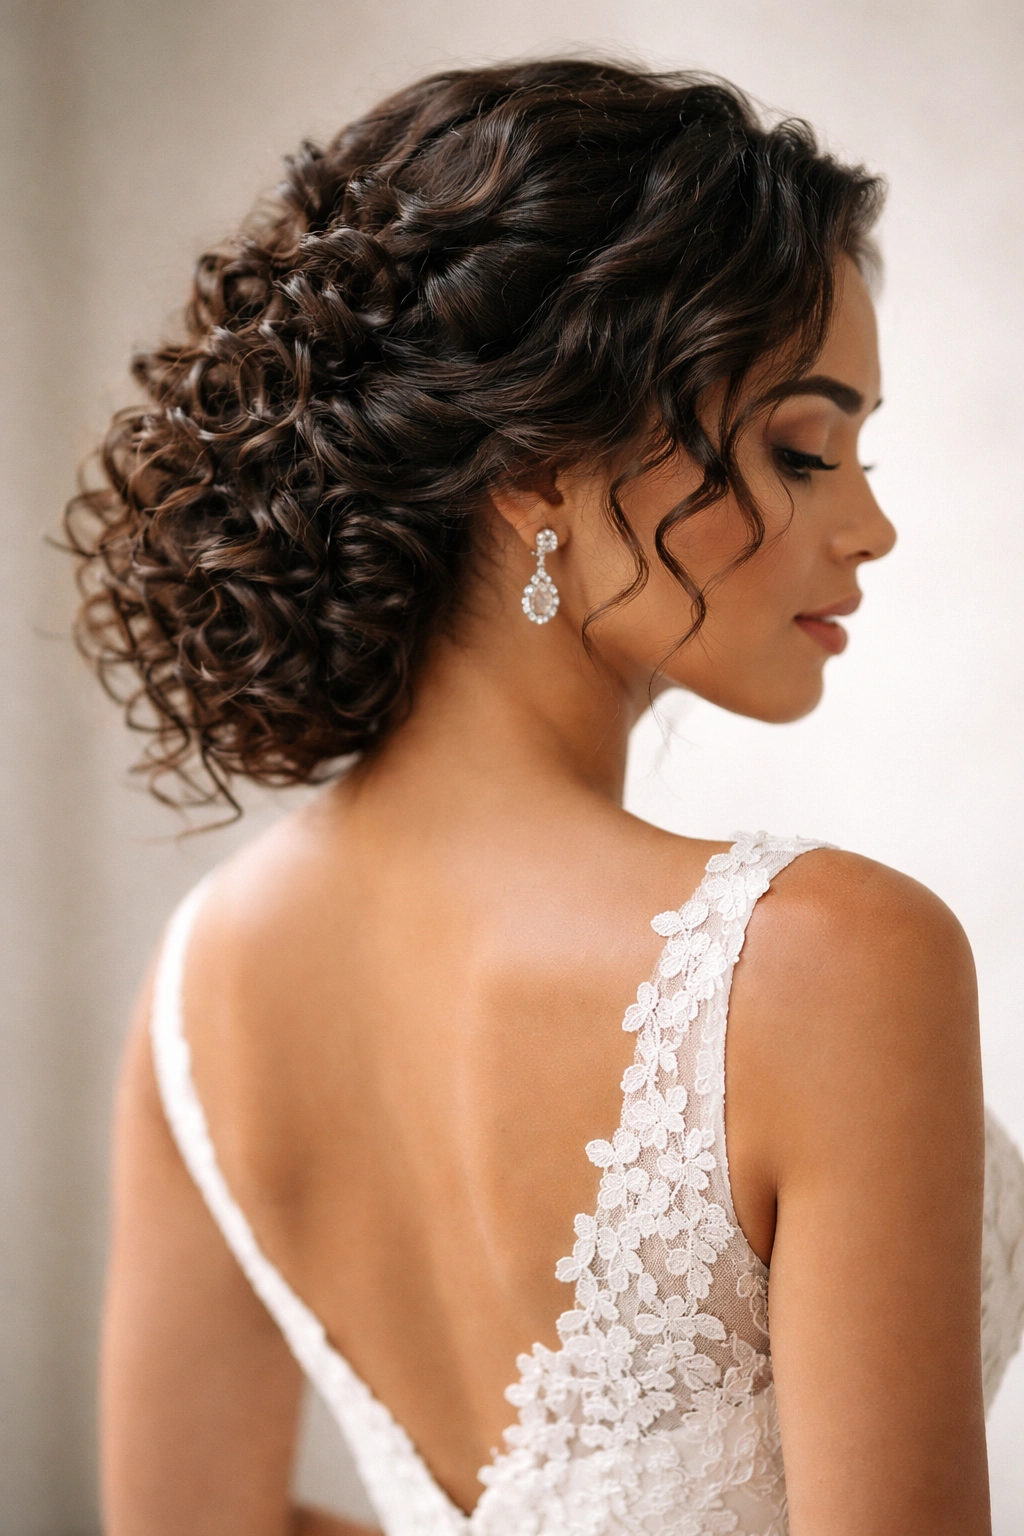
1. Romantic Half-Up, Half-Down with Curl Definition
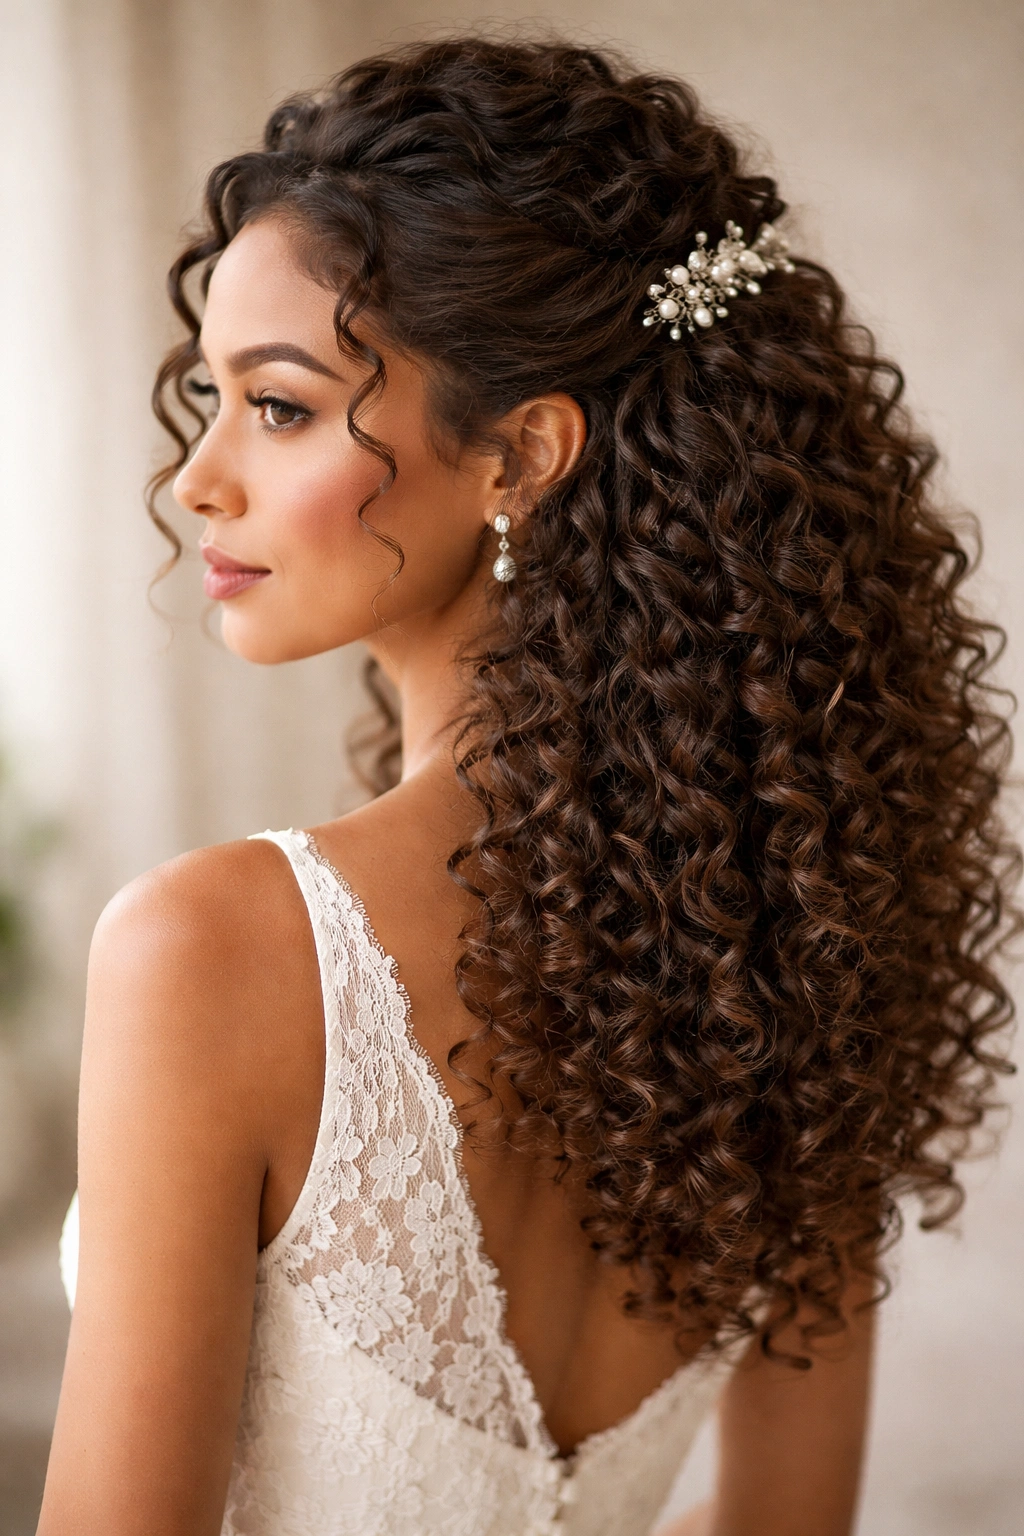
This timeless style lets your curls take center stage while keeping hair away from your face and shoulders—the ideal balance for brides who want movement without obstruction. The top half is gently gathered and secured with a decorative clip or low-key bobby pins, while the bottom half falls freely, creating a softly framed effect that’s both romantic and practical.
Why It’s Perfect for Curly Hair
Half-up styles work exceptionally well with natural curls because they maintain the texture and bounce that make curls beautiful while solving the very real problem of hair falling in your face during vows and photos. You’re not fighting your hair’s natural tendencies—you’re working with them. The gathered section adds a touch of intentional styling without the commitment of a full updo, which appeals to brides who’ve spent years embracing their texture and don’t want to abandon it on their wedding day.
How to Execute It
- Start with freshly scrunched and defined curls—use a curl-defining cream or gel while hair is damp, then air-dry or diffuse for maximum definition
- Flip your head upside down and lightly flip back; this gives you a sense of where the fullest part of your curl pattern sits
- Take a horizontal section from ear to ear across the crown, gathering curls gently between your fingers (not smoothing them down)
- Secure with a claw clip, silk-covered elastic, or vintage-inspired clip positioned just behind the crown
- Leave the gathered section slightly textured rather than polished for an intentional, romantic feel
- Mist with a light hold spray that won’t weigh down your curls or create crunchiness
Pro tip: Have your stylist do a practice run and note exactly where the gathering point sits on your specific head shape—that one measurement becomes the map for your wedding day.
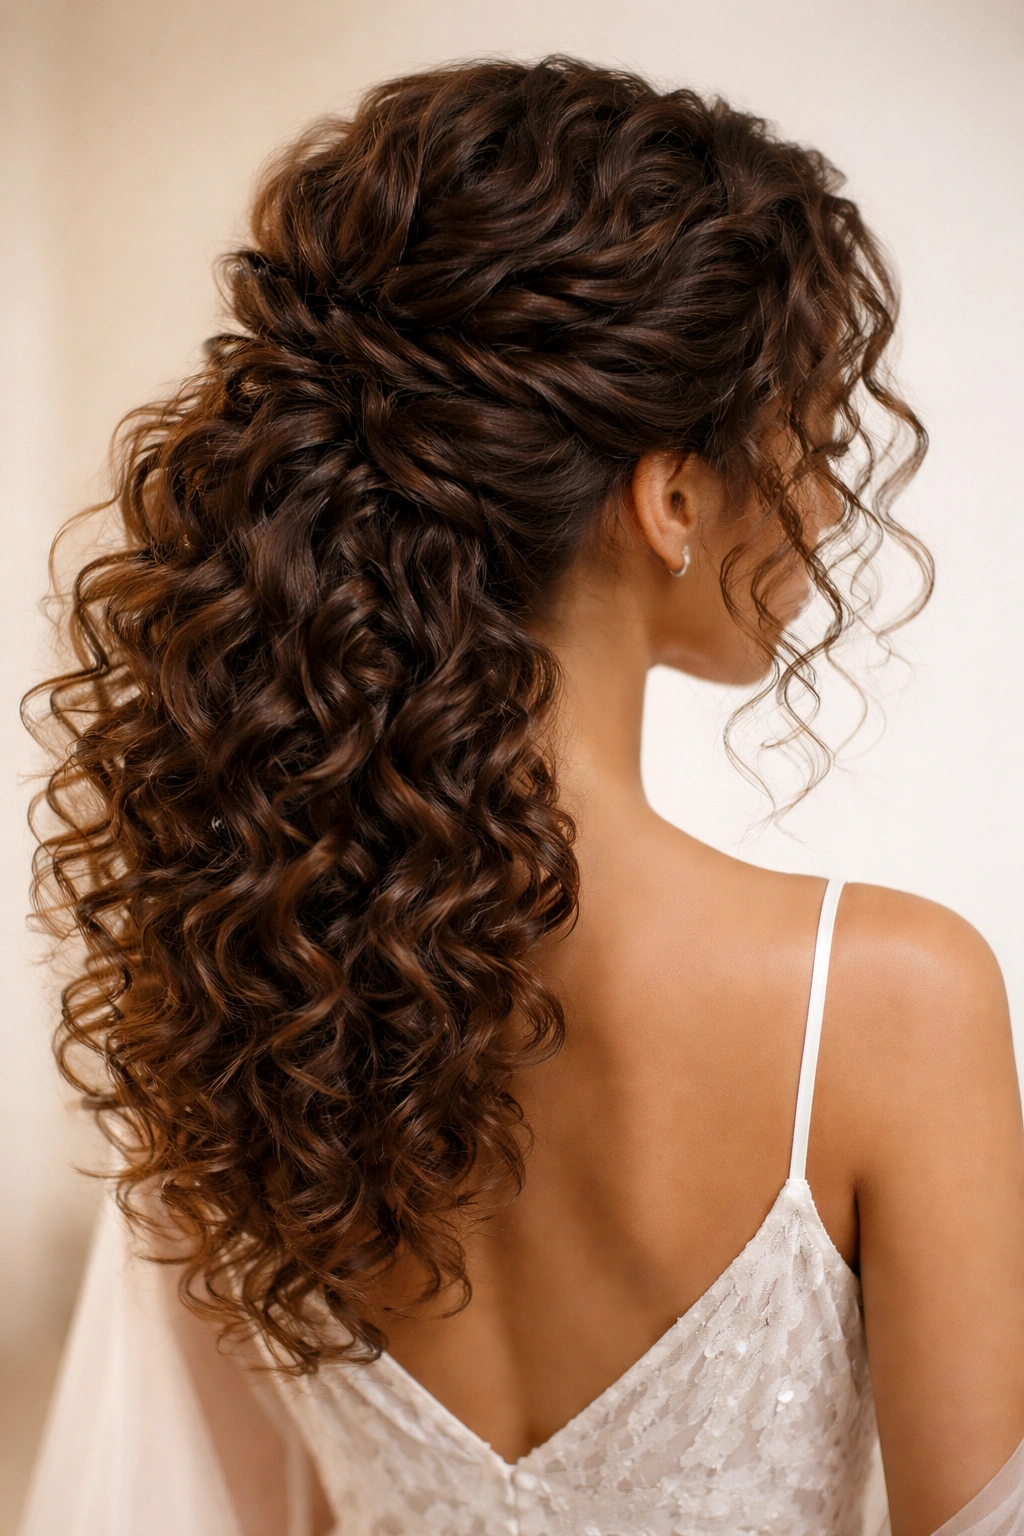
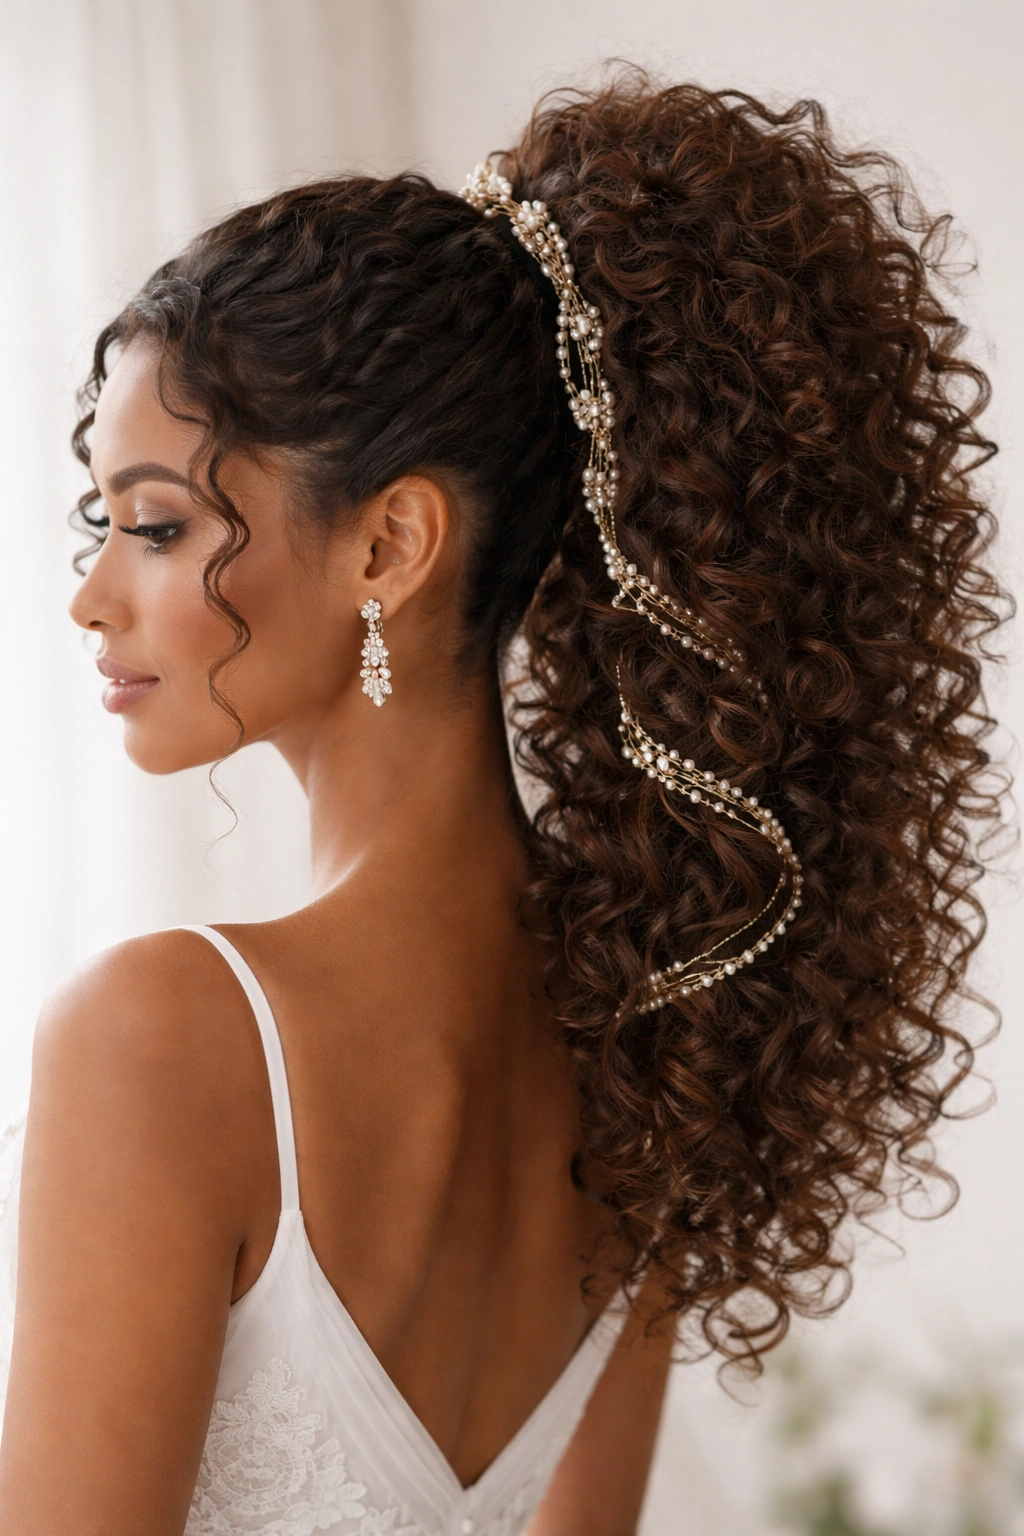
2. High Curly Ponytail with Flowing Ringlets
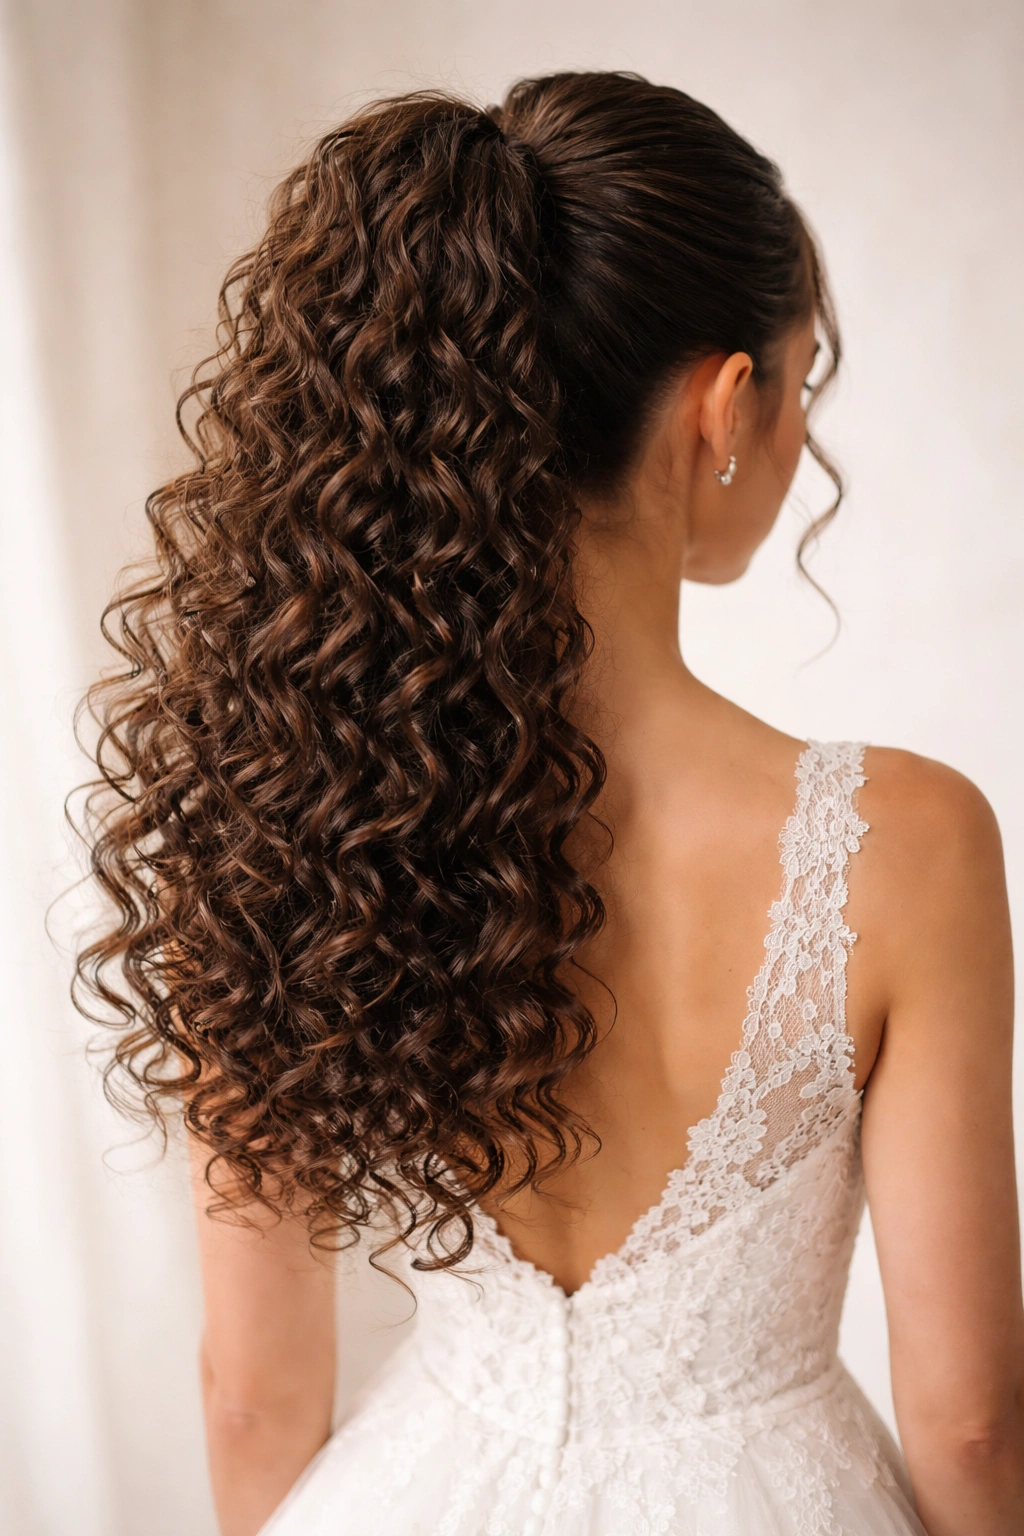
A sleek, polished high ponytail gathered at the crown gives you the sophisticated styling of a structured updo while releasing the lower portion of your curls into long, flowing ringlets. This style reads formal and put-together, yet celebrates the movement and volume that natural curls provide.
Why It’s Stunning on Curly Hair
High ponytails leverage the natural fullness at the crown that curly hair creates so easily, and the contrast between the smooth gathered section and the free-flowing curls below is visually striking. The style elongates your face and neck, flatters most face shapes, and the gathered ponytail sits high enough that you can actually feel the curls moving as you walk—a sensation many curly-haired brides specifically want on their wedding day.
What Makes This Work
- Use a moisturizing anti-frizz primer before styling to smooth the outer layer of curls without flattening structure
- Create a smooth base by applying a light gel to the section you’ll gather, using a soft brush to smooth hairs gently back
- Gather the ponytail very high on the crown (this prevents it from looking dowdy or pulled-tight)
- Use a silk-covered elastic that won’t create creases or damage curls
- Leave some face-framing pieces loose if you prefer softness, or gather everything for a cleaner line
- Tousle the ponytail section gently with your fingers after securing to re-introduce texture and prevent a sleek, overly styled appearance
Insider note: Wrap a small section of curl around the elastic to hide it—this small detail elevates the look from casual to bridal automatically.
3. Curly Crown Braid with Loose Curls Below
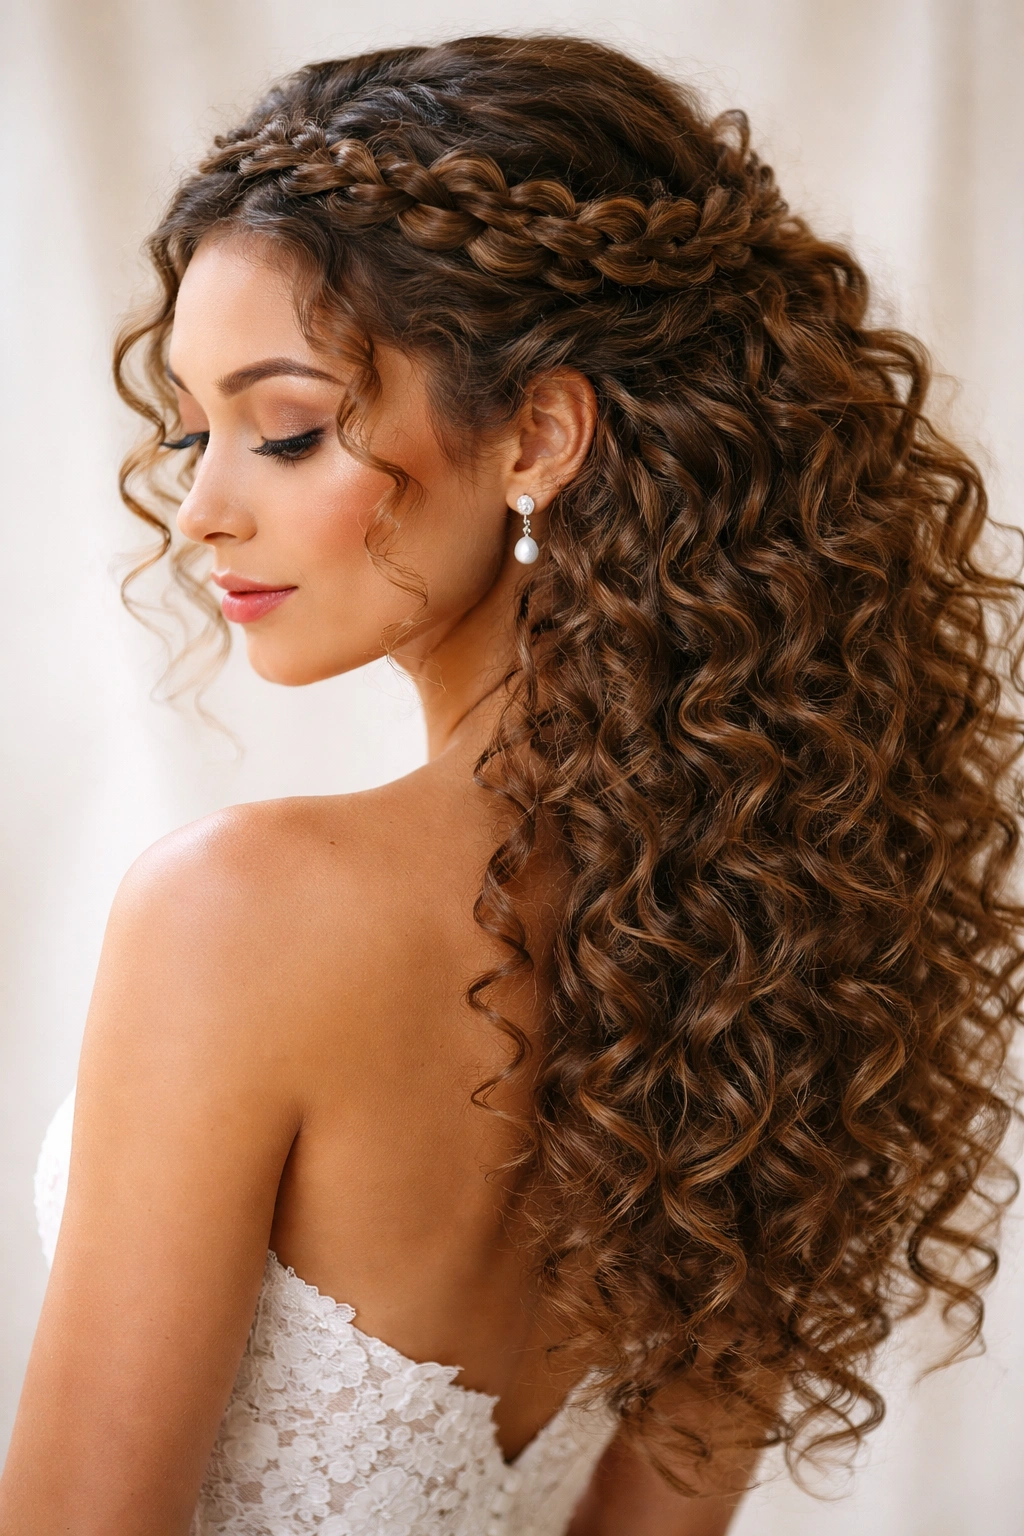
A braid that sits along the crown of your head (rather than down the back) creates an intricate, romantic focal point while keeping hair off your face and shoulders. The braid winds through your curl pattern, incorporating curls as you go, and releases into loose waves and ringlets below.
Why Braids Love Curly Hair
Braids and curly hair are made for each other—the texture of curls fills in the braid beautifully and creates dimension that straight-haired braids simply can’t achieve. A crown braid becomes a sculptural element on curly hair rather than just a functional style. The natural curl pattern also means the braid holds beautifully throughout the day without the need for excessive product or tension.
Execution Details
- Prep curls with a lightweight mousse and light gel for definition without stiffness
- Section hair from one temple around the back of the head to the other temple
- Begin braiding at the temple on one side, incorporating curls into the braid as you move backward
- Braid loosely and deliberately—tight braiding flattens curls and defeats the purpose
- Once you reach the opposite temple, secure the braid end with a small elastic or bobby pins hidden within curls
- Leave the lower portion of curls completely free; these fall into natural waves and ringlets
- Pin small sprigs of flowers, pearl pins, or baby’s breath into the braid for bridal detail
Worth knowing: Practice this braid multiple times beforehand—finding the right tension (loose enough to look romantic, tight enough to hold) takes practice.
4. Voluminous Low Bun with Curly Tendrils
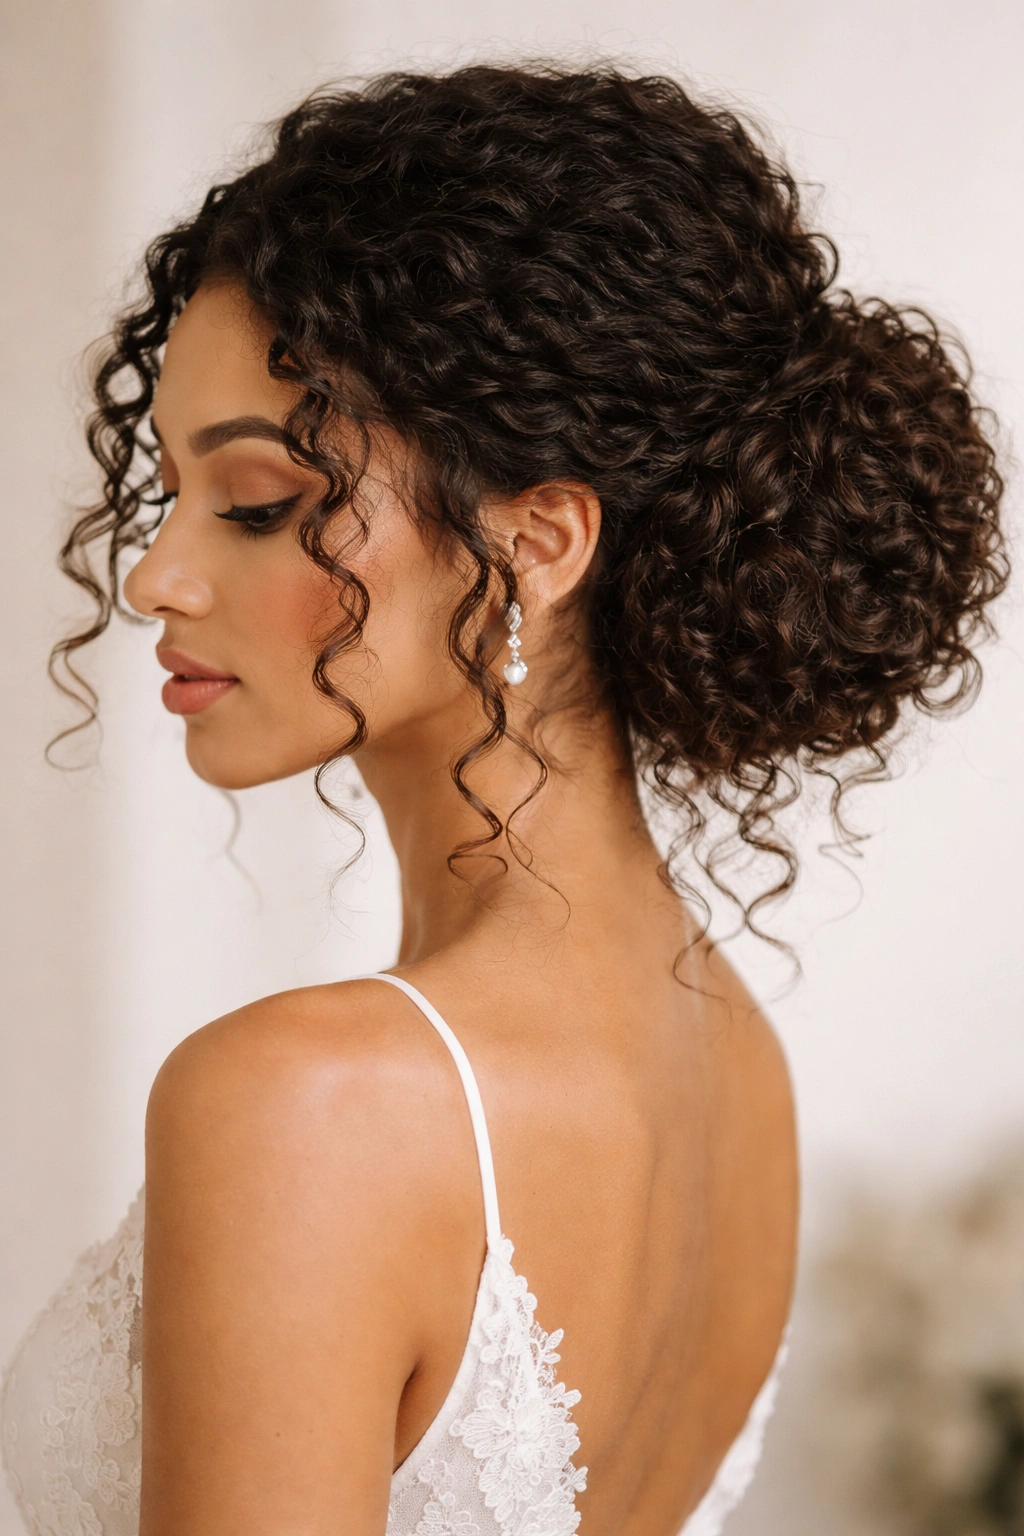
A low bun positioned at the nape of the neck combines the formality and elegance of an updo with the texture and softness that curly tendrils create. Rather than slicking curls back into a tight, structured bun, this version loosely gathers curls and lets individual ringlets escape around the face and nape for intentional softness.
Why This Works for Curly Brides
This style gives you the refinement of a bridal updo without requiring you to surrender your curls’ natural texture and personality. The gathered bun is structured enough for formal photography, but the loose tendrils remind everyone (including you) that this is a naturally curly bride. It’s the perfect middle ground for brides who feel most like themselves with curls visible but want the elegance of an updo.
How to Create It
- Start with fresh, well-defined curls—don’t try to smooth them down or make them sleek
- Gather curls at the nape loosely using your fingers rather than a brush (brushing curls straight defeats the point)
- Twist or fold the gathered section gently and secure with bobby pins placed throughout the bun, not just at the base
- Leave 3-5 small sections of curl loose around the face and nape—intentionally separate these before finishing
- Gently re-shape the bun to look organic and full rather than tight and polished
- Mist lightly with a flexible hold spray that keeps the bun intact without making it look stiff
Pro tip: The difference between “elegant” and “messy” often comes down to bobby pin placement and the amount of intentional loose curl left out—show your stylist a photo of the exact vibe you want.
5. Soft Curly Waves with Floral Crown and Pins
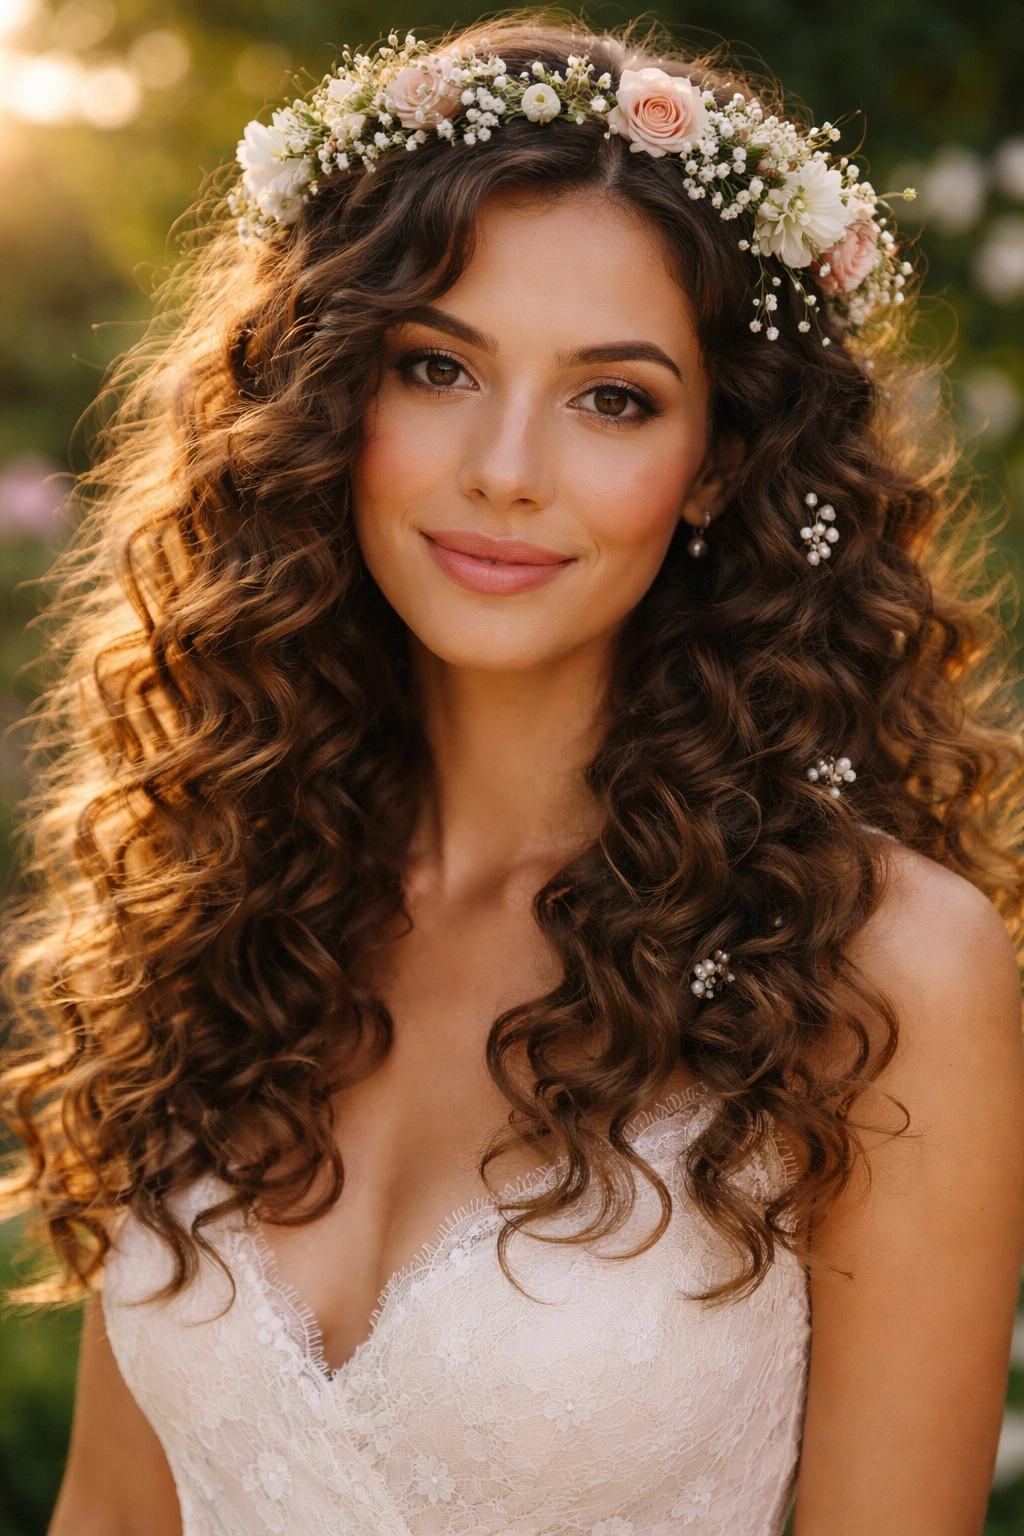
Celebrate your natural curl pattern in its most authentic form—soft, voluminous, and gloriously three-dimensional—with minimal styling intervention. Your curls cascade freely over your shoulders with a floral crown as your only formal touch, proving that “styled” doesn’t require a strict updo or complicated structure.
Why Natural Curls Deserve This Moment
This is the style for brides whose curls are their signature feature and who’ve spent years loving and maintaining them. On your wedding day, why hide that beauty? Soft, flowing curls create a romantic, ethereal aesthetic that’s distinctly different from any straight-haired styling option. They photograph beautifully, move with grace when you walk, and feel completely authentic to who you are.
Making Curls Look Intentionally Styled
- Use a leave-in conditioner and curl cream while hair is damp; apply generously and scrunch curls upward
- Diffuse curls dry or allow them to air-dry completely for maximum definition and bounce
- Once dry, use a lightweight, flexible hold spray and a wide-tooth comb to gently separate and shape curls into looser waves without disrupting pattern
- Add a floral crown, pearl pins scattered throughout, or a delicate chain hair accessory
- Frame your face with slightly looser, softer curl sections to create intentionality
- Keep makeup and jewelry simpler so curls remain the focal point
Insider note: This style requires the most maintenance throughout the day—have a flexible hold spray and a soft brush handy to re-separate curls and revive definition between events.
6. Twisted Updo with Cascading Curls
Two or more sections of curls are twisted (not braided) and pinned at the back of the head, creating a structured yet romantic updo that releases long, free-flowing curls below. The twists add visual interest and sculptural detail while maintaining the beauty of your full curl pattern.
Why Twists Are Better Than Braids for Certain Curls
Twists require less manipulation of curls than braids—you’re not threading curls through other curls, which means less frizz and less disruption to your curl pattern. Twists feel softer and more romantic than braids, and they’re actually easier to execute on curly hair because the curl pattern itself adds depth and texture. For brides with tighter, more fragile curls, twists are often the gentler choice.
Technical Breakdown
- Create 2-3 sections of curls depending on hair density and desired fullness
- Begin twisting each section loosely from the side temple or crown toward the back
- As you twist, gently pull apart the twist slightly to create a looser, more romantic appearance
- Secure each twisted section at the back with bobby pins, layering them so the pins are hidden within curls
- Let the remainder of curls below the twists fall freely—these don’t need additional styling
- Smooth any flyaways with a small amount of edge control cream applied with a soft brush
- Decorate the pin area with pearl pins, flowers, or a decorative comb
Worth knowing: The difference between a twisted updo that looks polished and one that looks undone comes down to how loosely you twist and how much you gently pull the twist apart—tighter twists look severe on curly hair.
7. Spiral Curls Pinned into an Asymmetrical Style
Emphasize your natural curl pattern by enhancing spirals and pinning them into an asymmetrical arrangement where one side is gently gathered and the other remains free. This style celebrates individual curls as design elements rather than trying to unify them into a cohesive shape.
Why Asymmetry Flatters Curly Texture
Asymmetrical styling allows you to showcase curl variation—different curl patterns, different sizes, different spirals all working together create visual richness that symmetrical styles sometimes flatten. Asymmetry also feels modern and intentional rather than “I just didn’t finish styling the other side.”
Creating Intentional Spiral Curls
- Apply a curl-enhancing cream or gel to damp hair, concentrating on individual curl sections
- Use a diffuser on your blow dryer or air-dry for maximum spiral definition
- Once completely dry, gently separate curls with your fingers to enhance individual spirals—never brush curly hair once dry
- Identify the side you want to gather (typically the opposite side of where your hair naturally parts)
- Gently gather curls on that side and pin them back using bobby pins secured close to the scalp
- Leave the other side completely free with curls spiraling down over your shoulder
- Add pearl pins, flower sprigs, or delicate accessories to the gathered side to give it intentional detail
Pro tip: Take photos from both angles before deciding which side to pin—asymmetrical styles need to work with your face shape and the side you’re most comfortable showing the camera.
8. High Top Knot with Defined Curls Framing the Face
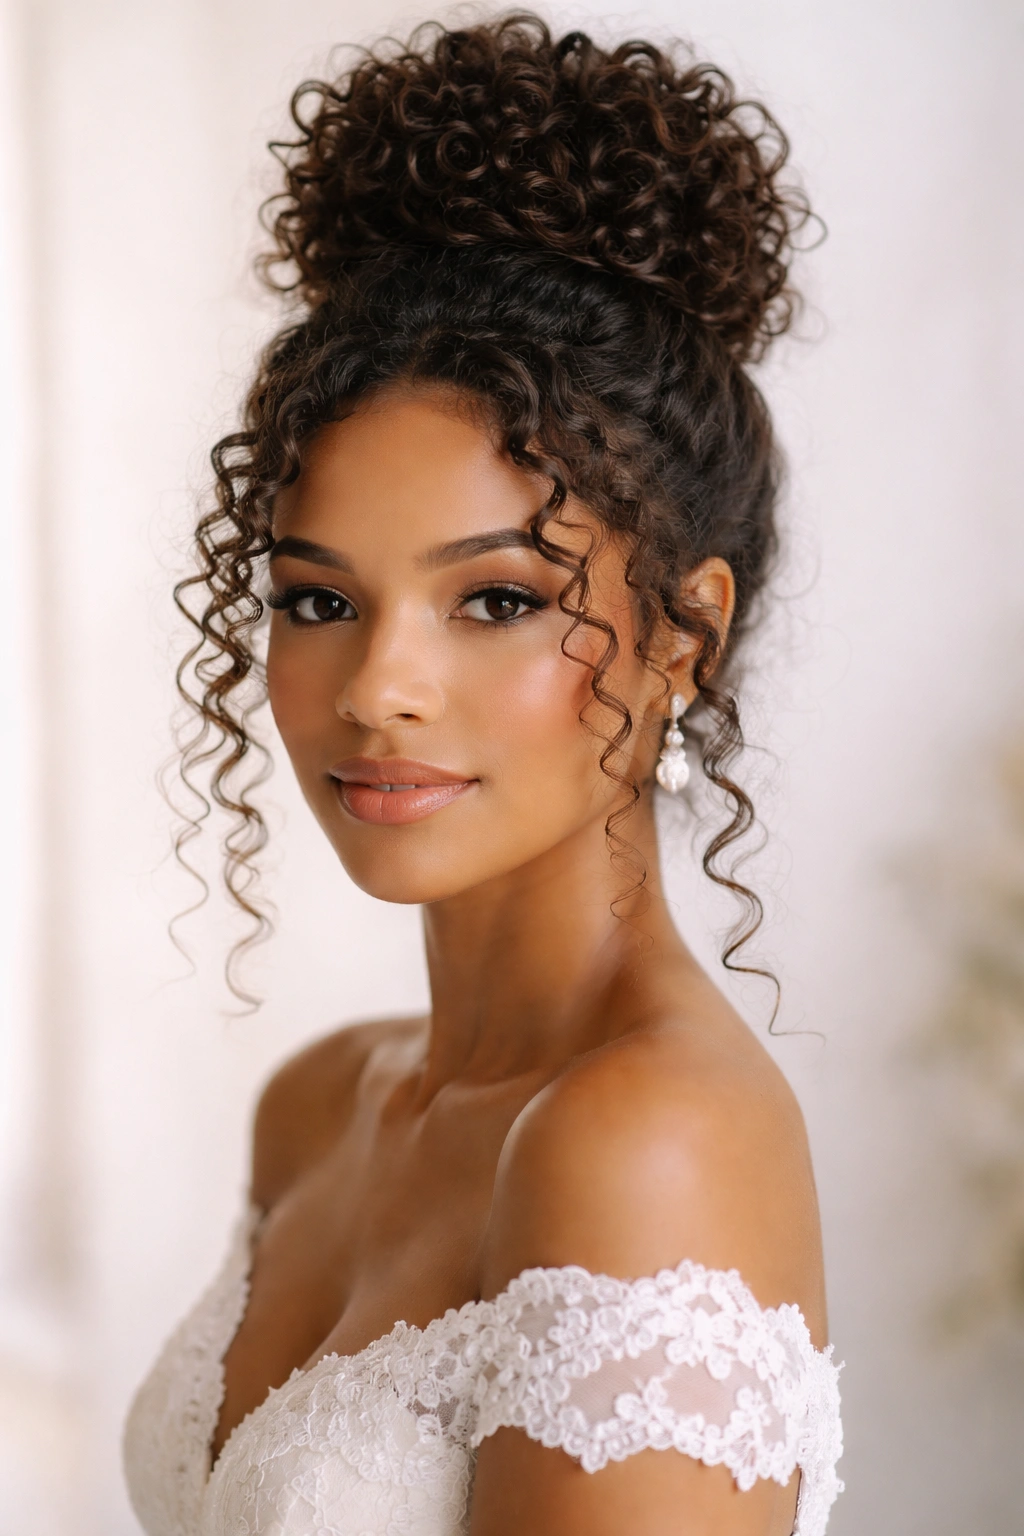
A modern, playful alternative to traditional bridal updos, a high top knot gathers curls into a sculpted knot at the very crown while allowing face-framing curls and waves to flow freely. This style works beautifully for casual and semi-formal weddings and for brides who want something less traditional.
Why This Modern Approach Works
The high top knot is sleek enough for formal photography but loose enough to feel youthful and authentic. It keeps hair off your shoulders and neck while maintaining the romantic movement of curls framing your face. For curly-haired brides who love a modern aesthetic, this hits the sweet spot between “styled” and “authentically me.”
How to Build It
- Gather curls at the very crown of your head—as high as you can while maintaining a secure hold
- Twist the gathered section and wrap it around the base, securing with multiple bobby pins
- Don’t aim for a tight, structured knot—let it be slightly loose and textured
- Intentionally separate 3-4 face-framing sections and let them fall naturally into waves or spirals
- These face-framing pieces should look intentional, not accidental, so take time shaping them
- Finish with a flexible hold spray that keeps the knot intact without making it look stiff
- Add small pearl pins throughout the knot for bridal detail
Insider note: A high top knot photographs beautifully from above and behind but can feel casual from the front—make sure your photographer captures your best angles.
9. Side-Swept Low Updo with Exposed Curls
Gather your curls toward one side of the head at the nape, creating a low, off-center updo that exposes a beautiful curved line of curls along the opposite side of your head. This dramatically asymmetrical style is romantic, modern, and flattering from multiple angles.
Why This Style Stuns in Photos
The exposed curve of curls along one side of your head creates a visual focal point that photographs gorgeously. The style is complicated enough to read as formal and intentional, yet soft enough to feel romantic. From the front, side, and back, this style offers different visual interest—crucial for a wedding with multiple photography angles and must-have shots.
Execution Strategy
- Determine which side you want to sweep curls toward (usually opposite your natural part)
- Apply a lightweight curl cream and flexible hold spray to prep curls
- Gather curls loosely on your chosen side and secure at the nape with bobby pins
- The gathered section should sit low and slightly toward the back, not at the very crown
- Leave the opposite side of your head completely exposed, with curls framing that side
- Enhance the exposed curls by gently separating them and shaping them to fall in flattering waves down that side
- Pin small flowers or pearl pins into the gathered section on the opposite side
- Use a boar bristle brush gently to shape the exposed curls without disrupting their pattern
Worth knowing: This style requires more bobby pins than you’d expect—curly hair holds better when distributed across multiple pins rather than concentrated in one spot.
10. Curly Half-Up Twisted Back with Pearl or Crystal Details
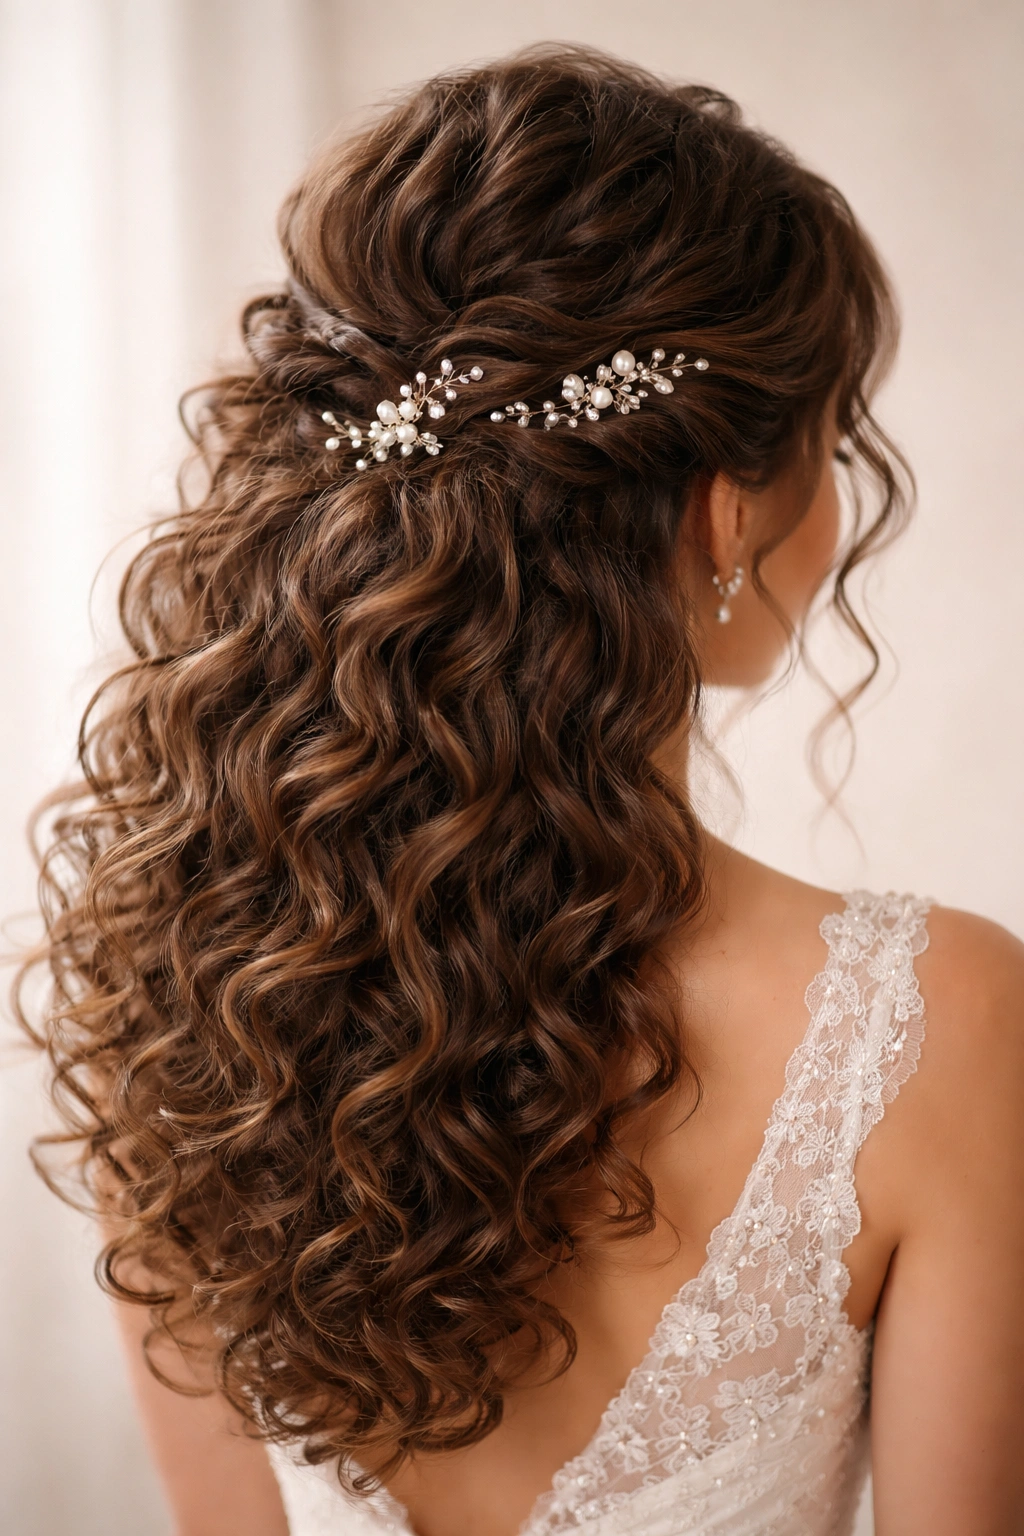
A more elaborate version of the half-up style, this version features twisted sections gathered at the back, multiple layers of twisting, and decorative hair jewels or pearl pins woven throughout for bridal sparkle. It’s romantic and polished while maintaining your curl’s full volume and movement.
Why Layered Details Elevate Simple Styles
Adding multiple layers of twists and distributed decorative pins transforms a basic half-up into something noticeably more formal and bridal. The details tell the eye that this is an intentionally styled look, not just “curls with something in them.” Each twist, each pin placement, and each exposed curl becomes part of the overall design.
Building the Look
- Section hair from temple to temple across the crown
- Create 2-3 twisted sections within this gathered area, twisting each loosely and slightly pulling apart for texture
- Secure all twists together at the back with bobby pins, layering them so pins are hidden
- The key is making it look like one gathered style with multiple details, not multiple separate twists
- Weave pearl pins, crystal hair clips, or delicate flower sprigs throughout the gathered section
- Pin details in a loose pattern—vertical line down the center, scattered throughout, or in a small cluster depending on your aesthetic
- Leave the lower portion of curls completely free to flow
- Ensure loose curls frame your face intentionally
Pro tip: Practice pin placement beforehand and have your stylist photograph the exact placement so it can be recreated identically on your wedding day.
11. Curly Ponytail with Wrapped Sections and Jewelry
A polished, modern style where curls are gathered into a high or mid-height ponytail, then wrapped with a decorative element (silk ribbon, another curl section, or delicate chains), creating a sculptural, jewelry-like focal point. The ponytail itself remains full and textured, maintaining curl definition throughout.
Why This Style Reads Bridal and Modern
The wrapped detail transforms a simple ponytail into something noticeably special and intentional. It’s less formal than a full updo, which appeals to brides having casual weddings, but structured enough for formal occasions. The wrapping detail gives you a place to add sparkle, color, or texture that makes the style distinctly bridal.
Technical Details
- Gather curls into a high or mid-height ponytail using a silk-covered elastic
- Prepare a wrapping element: a thin silk ribbon, a curled section of your own hair, a delicate chain, or a decorative hair cuff
- Wrap your chosen element around the elastic 2-3 times, securing with bobby pins hidden underneath
- Gently tousle the ponytail section to restore texture after gathering
- Use a flexible hold spray to keep everything in place
- Consider leaving 1-2 face-framing sections loose for softness
- Add a pearl pin or small flower to the wrapped section if desired
Insider note: The wrapping material should complement your overall aesthetic—metallic chains feel modern and edgy, silk ribbons feel romantic, while a wrapped curl section feels classic and intentional.
12. Defined Curls Styled into Low, Loose Waves with Side Part
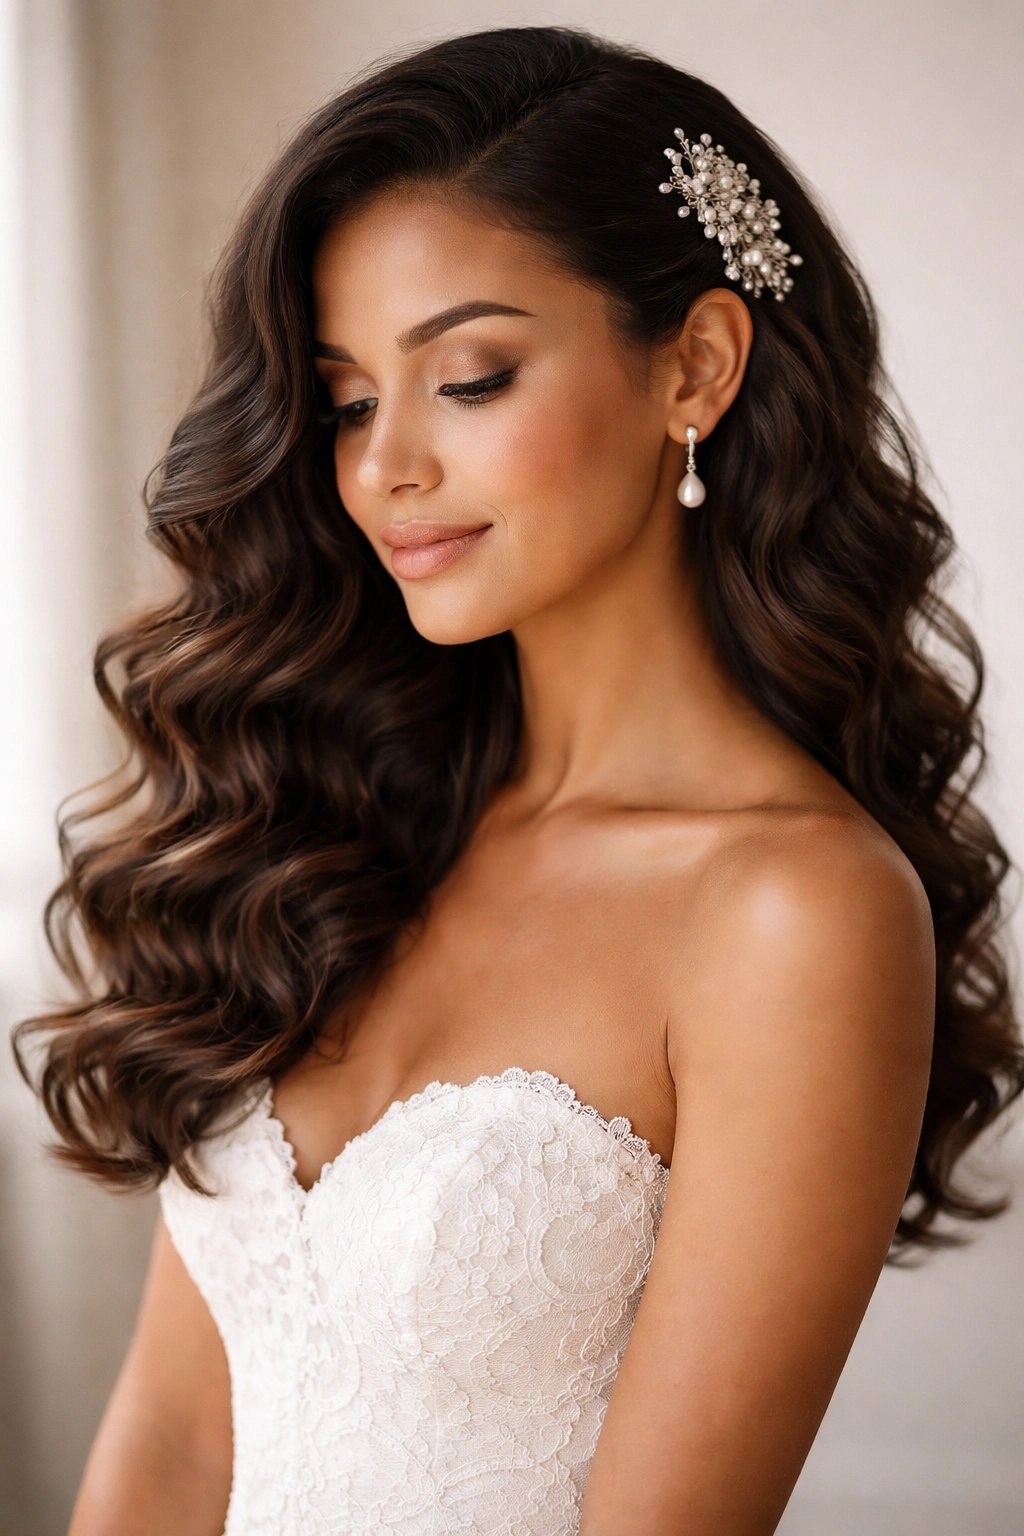
For brides who want to avoid pinning and gathering altogether, this style celebrates your natural curl pattern in its most authentic form, gently styled into slightly looser waves with a deep side part. The waves cascade freely, creating romantic volume and movement while still reading as intentionally styled for a formal occasion.
Why Authenticity Is Bridal
This style trusts your curl pattern completely—no manipulation, no pinning, just definition enhancement and gentle shaping. For brides who’ve spent years embracing their natural hair, this represents the ultimate celebration: “This is me on my most important day, and I’m not changing a fundamental thing about it.” The result is romantic, effortless-looking, and profoundly authentic.
Making It Feel Intentional and Polished
- Wash hair the night before using a sulfate-free, curl-friendly shampoo and deep conditioner
- Apply a leave-in conditioner and curl-defining cream while hair is damp
- Use a diffuser to dry curls completely, allowing them to set in their natural pattern
- Once completely dry, use a microfiber towel or t-shirt to gently enhance curl definition
- Create a deep side part by sectioning hair dramatically from temple to ear on one side
- Use a flexible hold spray very sparingly—curly hair needs to move, so don’t over-product
- Gently shape loose waves with your fingers, encouraging slightly larger waves than your natural curl pattern
- Add pearl clips, flower sprigs, or delicate hair jewelry scattered throughout for bridal detail
- Consider a lightweight edge control on just the hairline to create a polished frame
Worth knowing: This style changes throughout the day as curls settle and adjust to temperature and humidity—that’s not a problem, it’s part of the beauty. Have bobby pins and flexible hold spray handy to touch up if needed.
Final Thoughts
The most beautiful wedding hairstyle for your natural curly hair is one that makes you feel like yourself—just elevated and celebrated. Whether you choose a romantic updo, a modern ponytail, or your curls in their most authentic form, the key is working with your curl pattern rather than against it.
Your curls have texture, dimension, and movement that straight hair simply cannot replicate, and that’s your superpower on your wedding day. The styles that will photograph best, hold up throughout your celebration, and feel most authentically you are the ones that honor your natural texture while adding intentional styling details that make you feel bridal.
Invest in a few quality practice sessions with a stylist who genuinely understands curly hair—not someone who wants to smooth it or change it, but someone who sees your curl pattern and thinks about how to enhance it. Bring reference photos, take notes on products and techniques, and ask specific questions about how your hair behaves and what that means for wedding-day hold. This preparation transforms your wedding hairstyle from something you’re nervous about into something you’re genuinely excited to show off.