There’s something about a side ponytail that just hits different. Maybe it’s the way it catches light from an unexpected angle, or how it softens your face while still keeping hair completely out of the way. A well-executed side pony can look effortlessly polished at a wedding, playfully flirty on a casual Friday, or impossibly chic at a night out—without requiring you to have salon-perfect hair or spend an hour perfecting your technique.
The trick is knowing which side ponytail style actually works for your hair type, face shape, and the vibe you’re going for. Not all side ponytails are created equal. Some sit low and romantic, others perch higher with attitude. Some are deliberately tousled and textured, while others go sleek and sophisticated. A few are adorned with details that elevate them from basic to genuinely memorable.
If you’ve ever looked at a side ponytail and thought it looked cute but weren’t quite sure how to make one yourself—or didn’t know the specific style even had a name—you’re about to change that. Below are twelve side ponytail styles that actually deliver on the promise of being cute. Each one comes with the details you need to understand what makes it work, which hair type it suits best, and exactly how to recreate it.
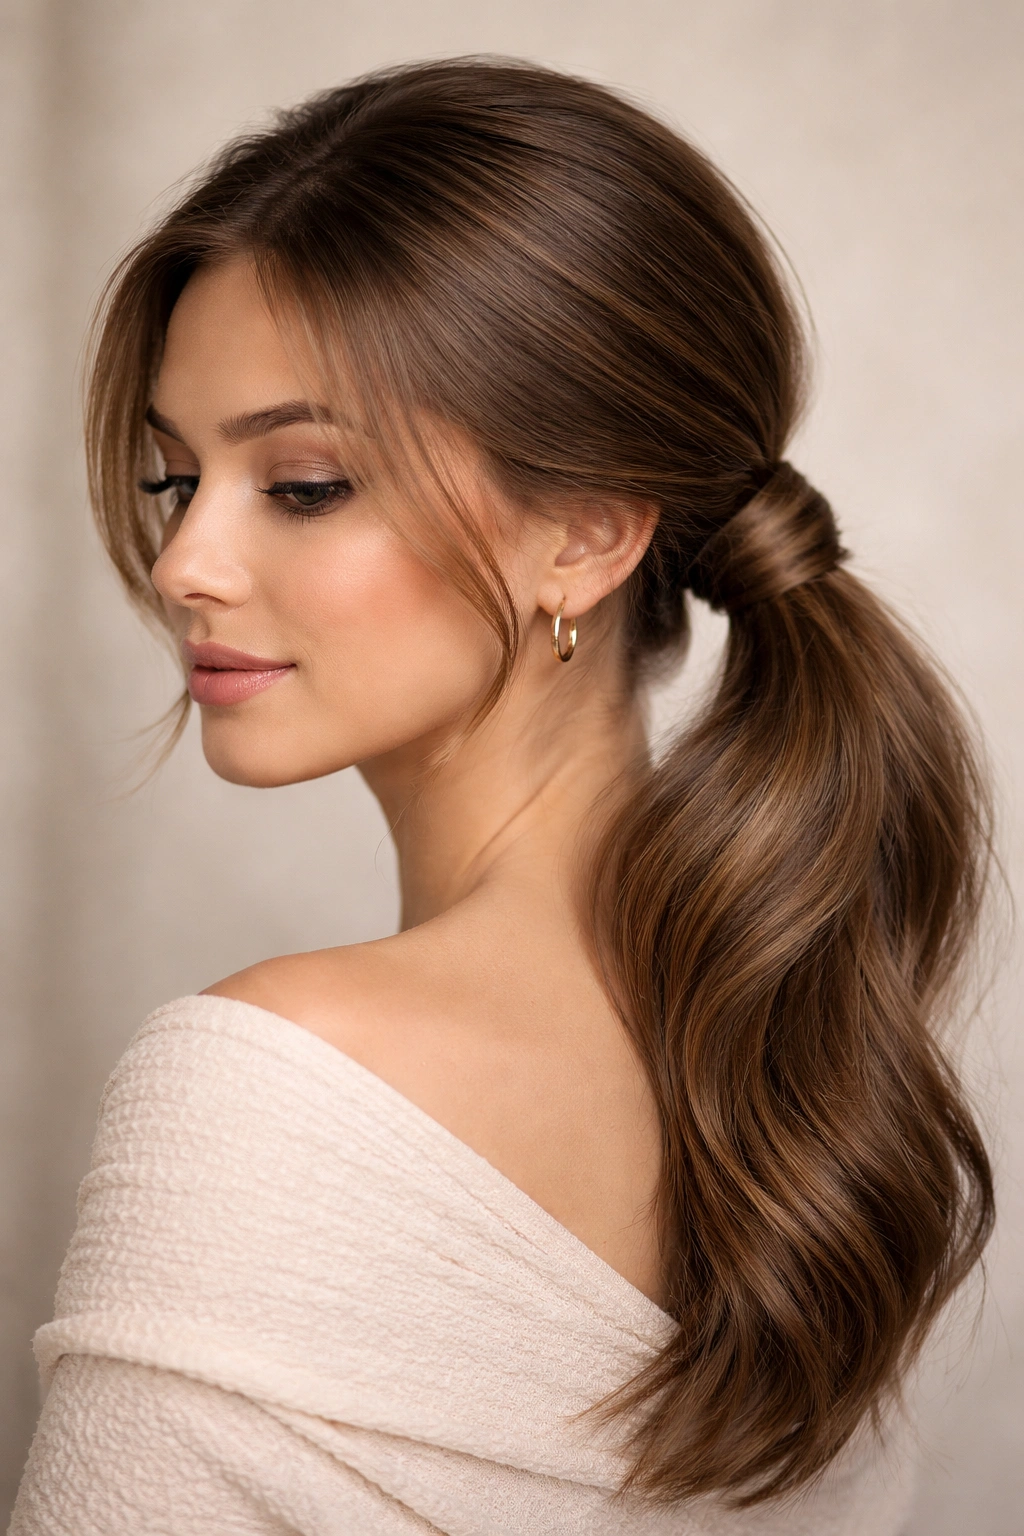
1. The Sleek Low Side Pony
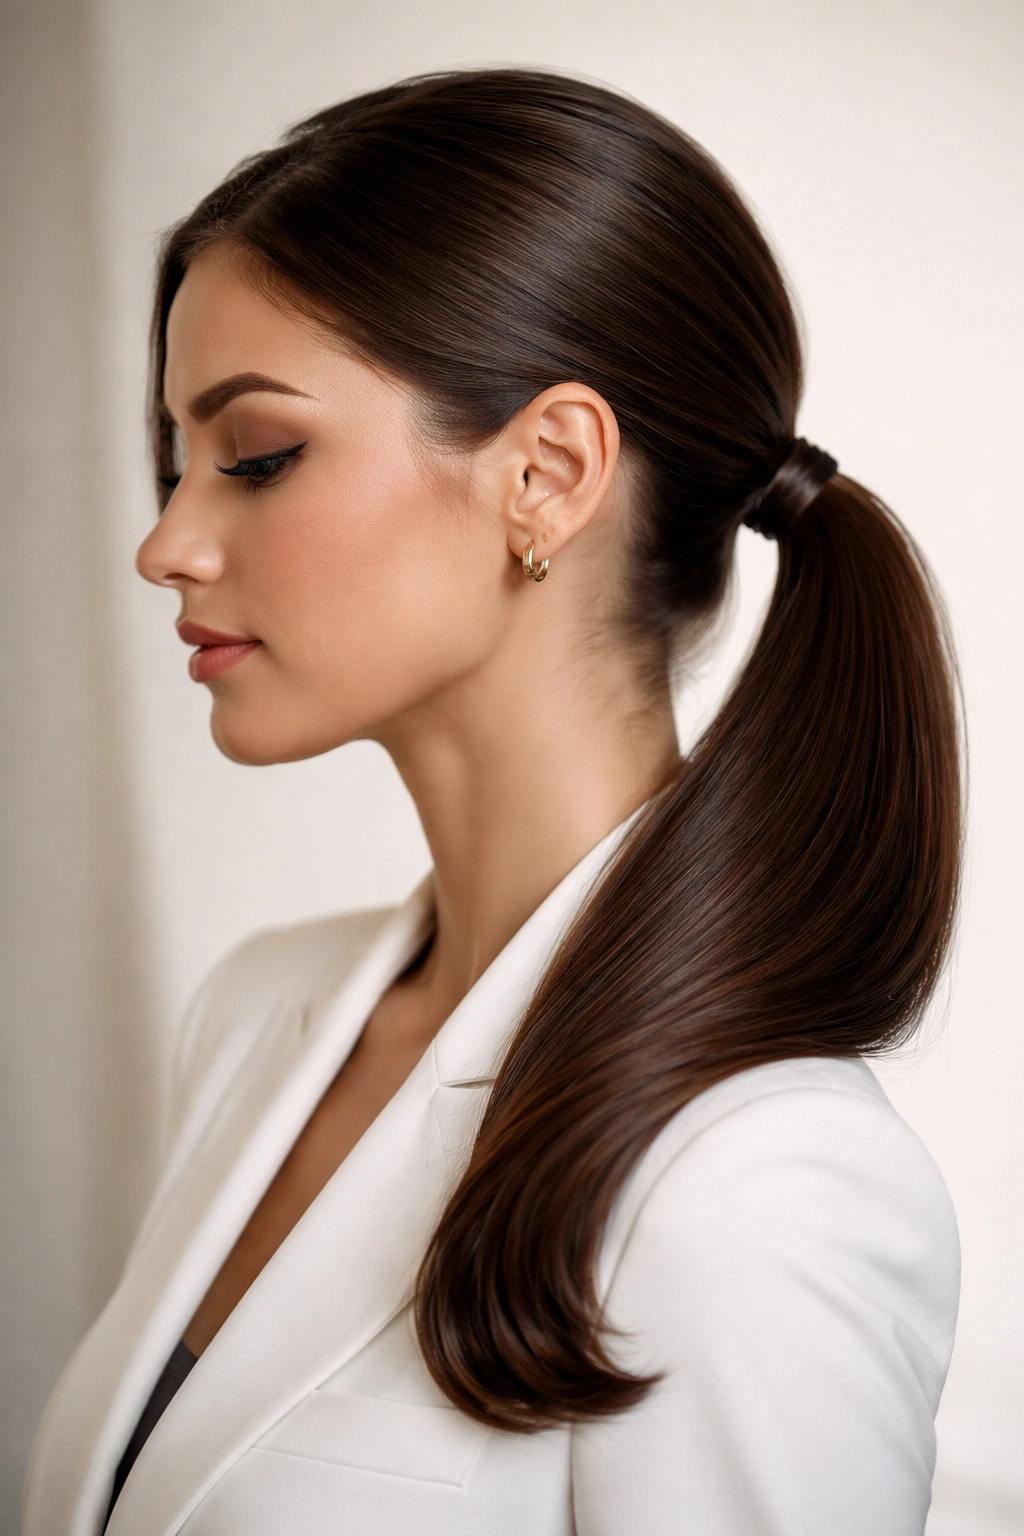
This is the grown-up version of the side ponytail, the one that works in a boardroom, at brunch, or on a date without looking try-hard. Everything about it is smooth and polished—your hair is tightly gathered to one side, typically low and behind the ear, then pulled into a secure but elegant base.
What Makes It Work
The sleek low side pony succeeds because it combines restraint with refinement. You’re not piling hair high or adding texture; you’re letting the smoothness itself be the statement. It works on straight hair, wavy hair, and textured hair that’s been blown out or straightened first. The key is that the hair needs to be pulled taut enough that every strand sits exactly where you’ve placed it, creating clean lines from root to tail.
How to Create It
- Use a fine-tooth comb to brush your hair backward and to one side, positioning it low—roughly around ear level or slightly below
- Smooth down any flyaways with a lightweight smoothing serum or edge control cream
- Secure the base with a thin elastic band that matches your hair color, gathering only the side section without disturbing the opposite side
- For maximum polish, wrap a small section of hair around the base of the elastic to hide it completely
- Finish with light hairspray to lock flyaways in place without creating crunch
Who Should Wear It
This style reads as intentional and elegant on everyone, but it particularly shines on people with naturally straight hair, fine to medium texture, and face shapes that aren’t overwhelmed by slicked-back styling. If your hair has significant natural curl or wave, you’ll want to blow it out straight first for the smoothest effect.
Pro tip: The lower you position the ponytail, the more elegant and mature it reads. Aim for ear level or below rather than higher on the crown.
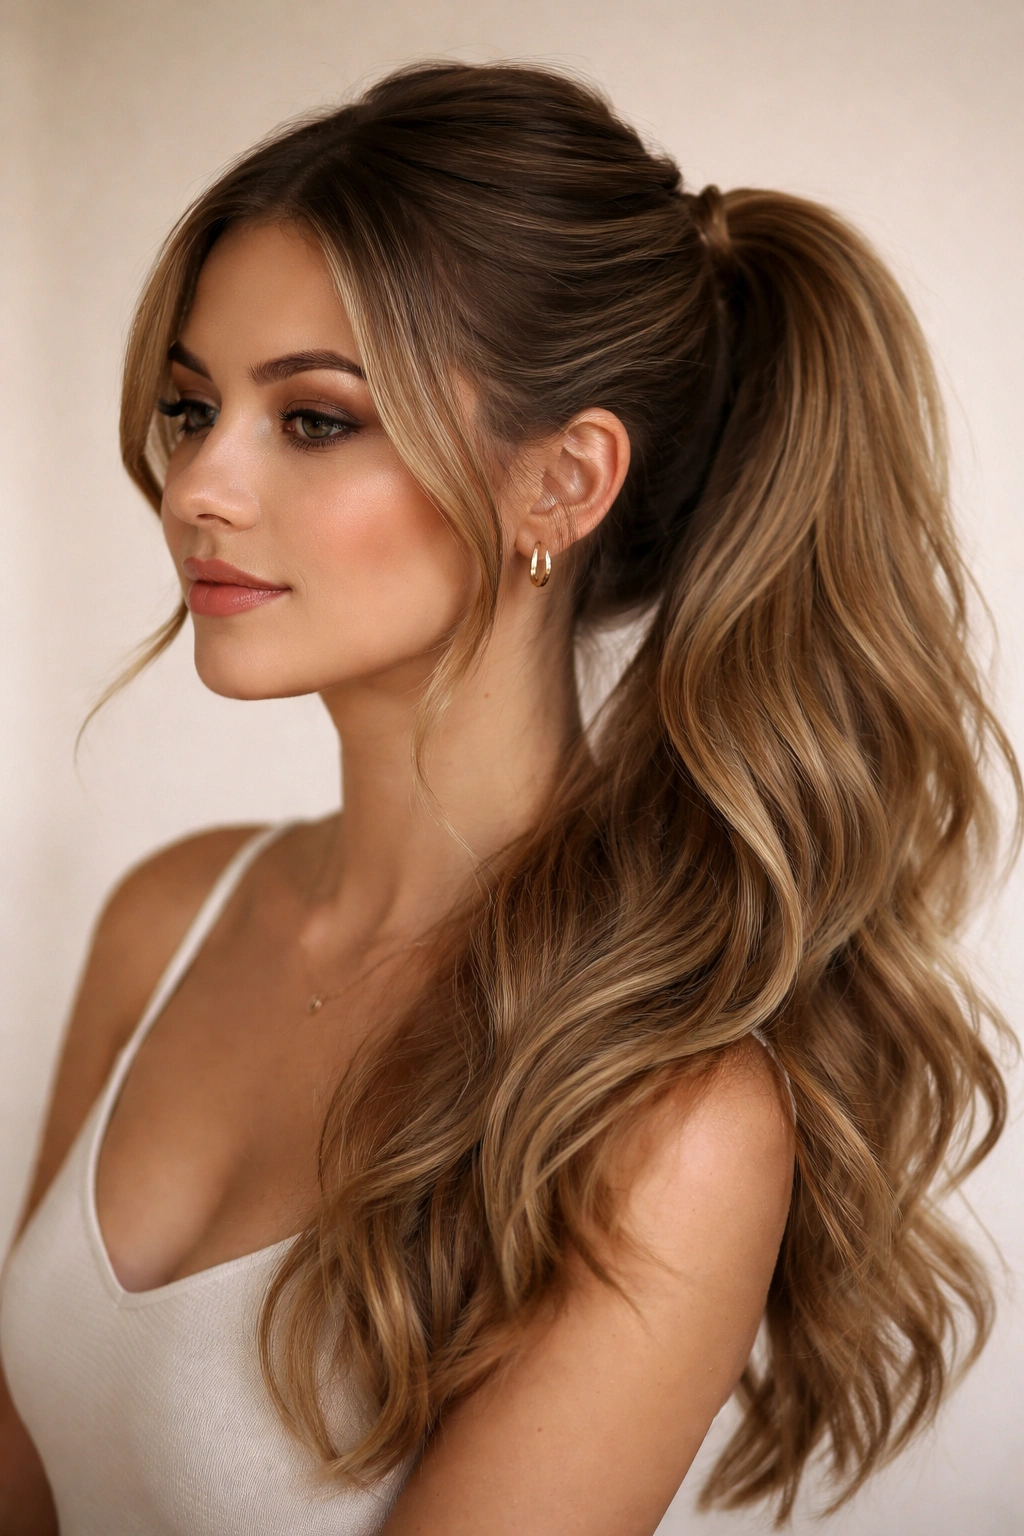
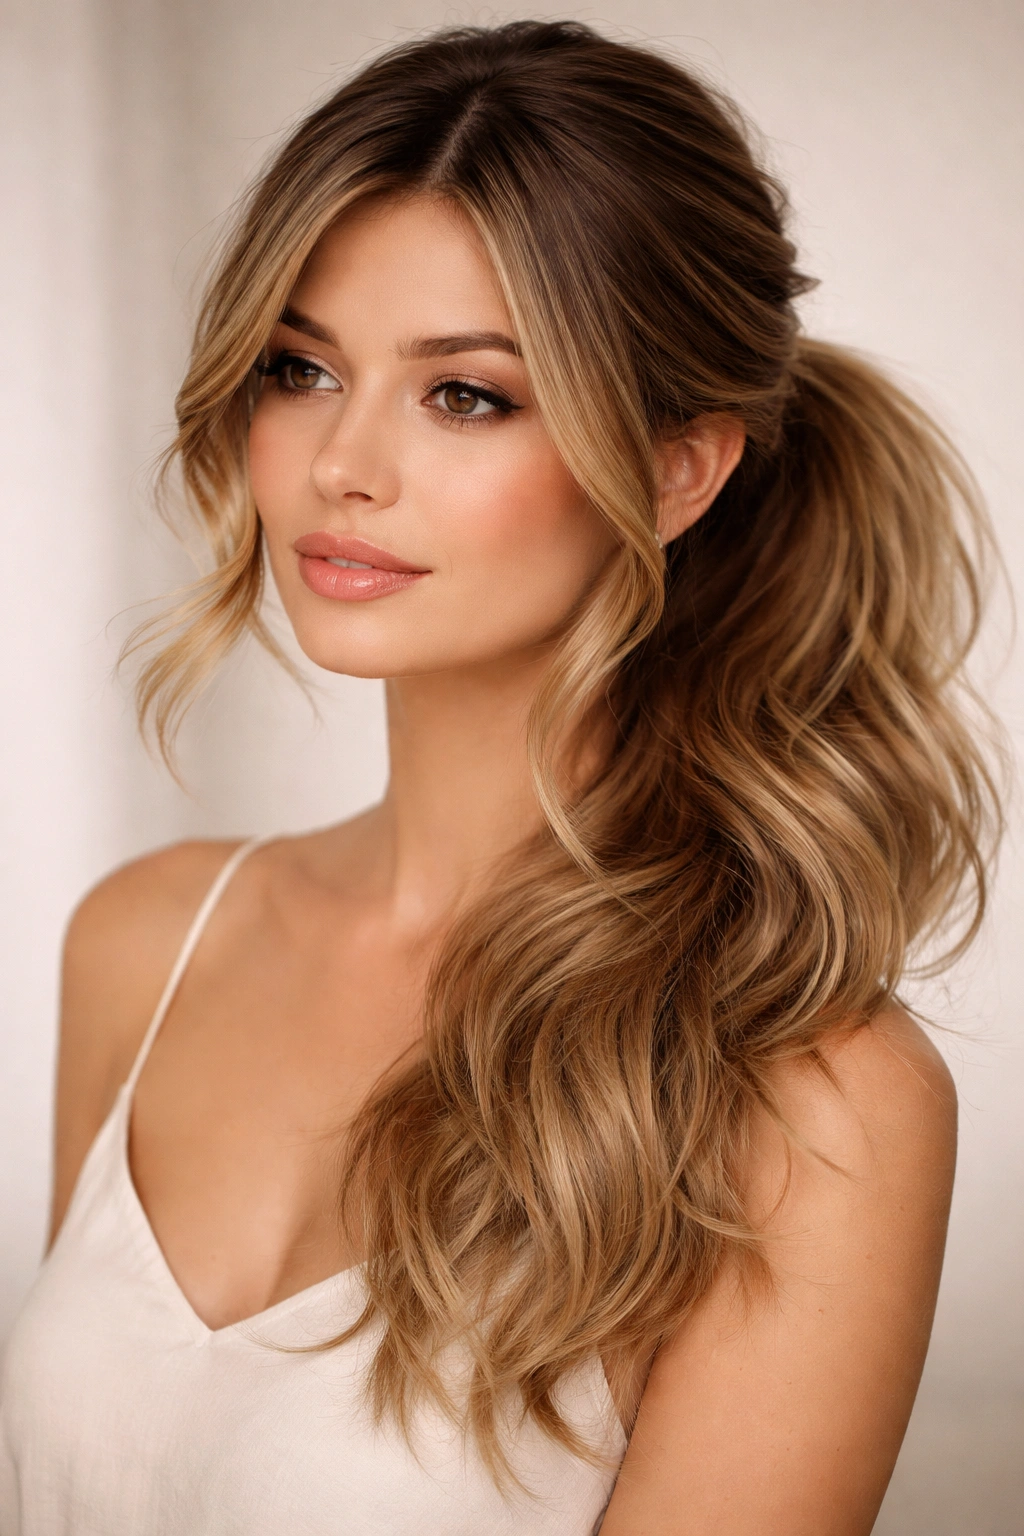
2. The Textured Messy Side Pony

Here’s where the side ponytail goes intentionally imperfect—and becomes infinitely more interesting. This version celebrates texture, movement, and a carefully crafted “I just threw this together” aesthetic that actually takes more skill to execute than it looks.
What Makes It Cute
The textured messy side pony works because imperfection is honestly more relatable than perfection. It has volume, personality, and a relaxed quality that makes you look easygoing and confident. The loose waves, the pieces that escape around your face, the slightly undone gathering—they all combine to create something that feels modern and authentically you.
Creating Texture First
The foundation for this style starts before you even pull your hair back. Create waves or texture throughout your entire head using one of these methods:
- Blow dry your hair with your head tipped upside down, scrunching waves in as you go
- Sleep in loose braids overnight for natural-looking waves (works especially well if you braid damp hair)
- Use a curling iron to create loose 1.5-inch waves throughout, holding the iron vertically and only curling the mid-lengths and ends
- Apply a salt spray to damp hair and scrunch with your hands as you air dry
Once your hair has good texture, gather it loosely to one side, letting some shorter pieces and face-framing sections escape naturally. Secure with an elastic, then gently pull sections of the ponytail tail itself to add extra fullness and movement. The goal is purposeful messiness, not actually careless hair.
Best For
This style suits nearly every hair type and length, from shoulder-length to long. It works particularly well on people who have naturally wavy or curly hair, since the texture is already built in—you’re just redirecting it. But even straight-haired people can create this look by adding waves first.
Pro tip: The imperfect effect is easier to achieve on day-two or day-three hair that has some natural texture from previous styling. Fresh-out-of-the-shower hair can be trickier to manage.
3. The Half-Up Side Pony
This hybrid style takes the security of a ponytail and the softness of down-and-out hair, meeting perfectly in the middle. Only the top section of your hair is pulled back into a side pony, while the bottom half flows freely down your back.
Why It’s Universally Flattering
The half-up version eliminates the concern that a full side ponytail might be too severe for your face shape, because you’re still framing your face with loose hair around it. You get the practical benefit of hair off your neck and shoulders without committing to a full pull-back. It works beautifully on fine, thin hair (because you’re only gathering half the volume) and on thick, heavy hair (because it distributes the weight).
Building the Look
Start by identifying your “top section”—this is roughly everything above your ears. Brush this section to your preferred side, gathering it with your fingers into a loose ponytail shape. Secure it with a thin elastic. The hair below this point stays down, creating a soft, flowing bottom half.
For extra interest, you can braid just the top section before wrapping it into a side pony, or twist it gently before securing. Some people add a decorative clip or small hair jewelry at the base of the top ponytail to create a focal point.
When to Wear It
Half-up side ponies are endlessly versatile. Wear them casually with jeans and a t-shirt, dressed up with a slip dress, or even to the gym where you need some hair out of your face but want to maintain a softer look. The partial pull-back gives you a “tried” vibe without appearing overly formal or structured.
Worth knowing: This style holds better on second-day hair or with some texture already in place. On freshly washed, pin-straight hair, you might need a light texturizing spray to give the style some grip.
4. The Braided Side Pony
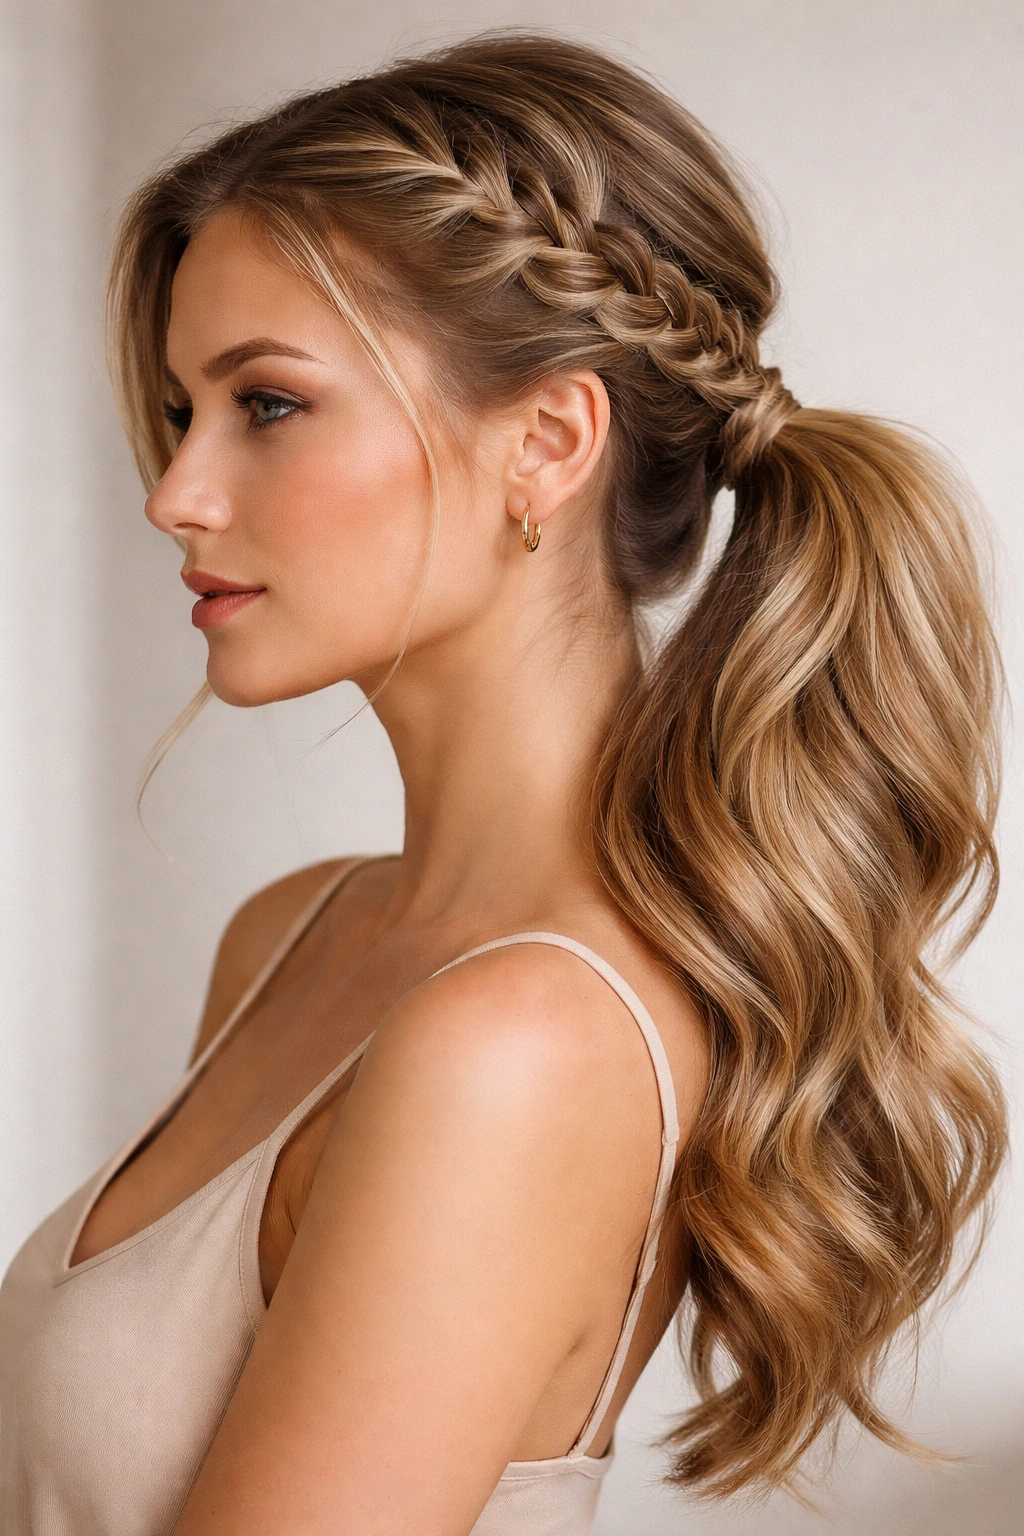
Braiding a section of hair before gathering it into a side ponytail adds visual interest and a crafted quality that reads as genuinely thoughtful. You’re not just moving hair out of the way—you’re creating an actual design element.
Different Braiding Options
The beauty of the braided side pony is that you can customize the braid to match your skill level and desired look. A simple three-strand braid along the side of your head creates a clean, classic effect. A looser Dutch braid (braided away from your scalp rather than toward it) creates more volume and a slightly boho feel. If you’re comfortable with it, you can do a side-swept French braid that travels from one side of your head to the other, which you then secure into a ponytail on the opposite side.
How to Execute It
Decide where your braid starts—at your temple, at your ear, or further back. Section off enough hair to braid comfortably (about the width of your three fingers). Braid down toward the bottom of that section, then gather all your hair (braid included) into a side ponytail at your chosen location. The braid acts as both a design element and a secure anchor for the ponytail itself.
The looser you make the braid, the softer and more romantic it appears. Gently pull the braid sections to add texture and volume if you want a more dramatic effect.
Flatters Whom
Braided side ponies work on all hair types and textures. They’re especially stunning on people with longer hair (braids need at least 8-10 inches to look intentional), and they’re a perfect choice when you want something that looks more “done” without being overly formal. This style suits both sleek, polished aesthetics and relaxed, boho vibes depending on how you execute the braid and secure the ponytail.
Quick fact: A braided section actually helps secure the whole ponytail better, so this isn’t just a style choice—it’s a practical one too.
5. The Bubble Ponytail Side Pony
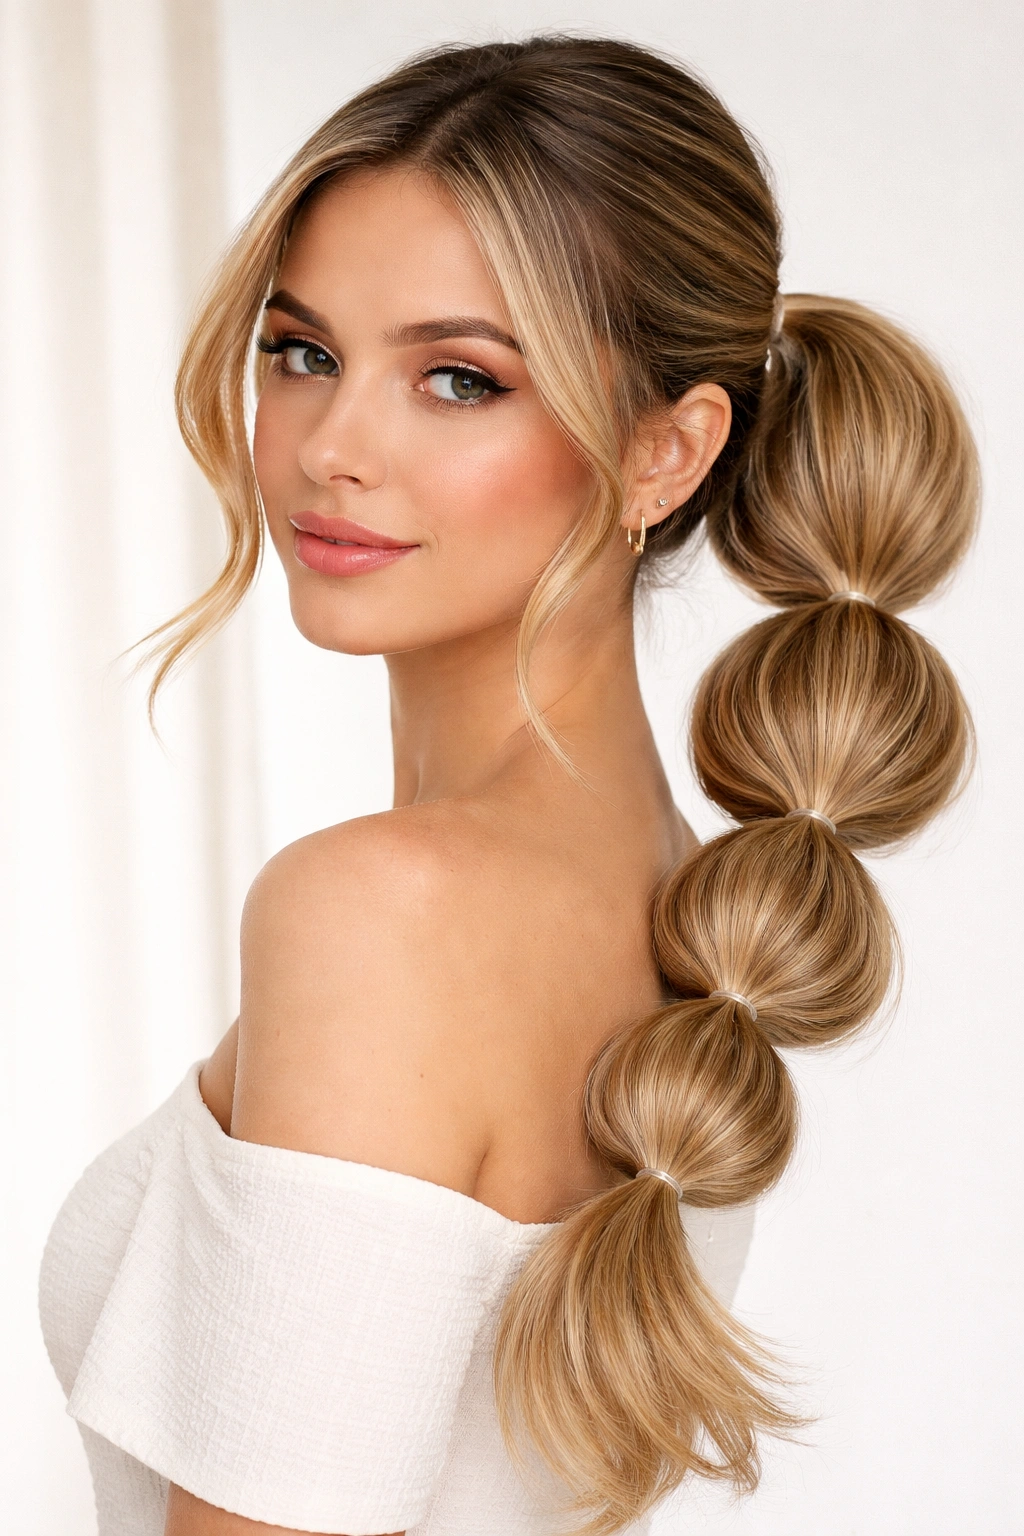
This playful variation divides your side ponytail into sections, securing each section with its own tiny elastic band, creating a series of “bubbles” down the length of the tail. It’s fun, youthful, and genuinely cute.
Why It Works
The bubble effect creates volume, visual rhythm, and a bouncy quality that catches movement. Each bubble puffs out slightly, making even fine hair look fuller. It reads as intentionally playful rather than lazy, and it’s a great way to add personality to an otherwise simple side pony. The repetition of the bubbles is visually interesting enough that the style doesn’t need to be paired with anything fancy—it stands on its own.
Creating the Bubbles
Gather your hair into a basic side ponytail at your preferred height. Secure it with a standard elastic. Then, roughly 2 inches down from the base, add another tiny elastic band, pulling gently to create the first bubble of fullness. Continue down the length of your ponytail, spacing each elastic 2-3 inches apart and creating bubbles as you go. Between each elastic, gently pull the hair section sideways and upward to create the bubble effect.
Experiment with the distance between elastics—closer spacing creates a more playful, youthful vibe, while spacing them further apart creates a more sophisticated look.
Best For This Style
Bubble side ponies work great on people with medium to longer hair (you need length for the bubbles to be visible and distinct). They suit casual occasions, fun events, younger styling, and any time you want to inject personality without being too formal. This is an excellent choice for beach days, casual hangouts, or any scenario where you want to look approachable and fun.
Pro tip: Matching your elastics to your hair color makes the bubbles look intentional rather than like you used whatever you found in the junk drawer.
6. The Twisted Side Pony

Instead of a braid, a twisted side pony gathers and twists a section of hair before securing it all into a ponytail. The twist creates a sophisticated texture and a more polished appearance than a simple smooth side pony.
How the Twist Adds Dimension
When you twist a section of hair, you’re creating visual depth and texture without the intricate work of a full braid. The twisted section spirals, catching light differently than smooth hair would, and it adds a subtle luxe quality that works equally well on polished occasions and casual days. It’s the Goldilocks option—more interesting than sleek, but less elaborate than braided.
Building Your Twisted Side Pony
Section off the hair you want to twist (this can be a section from the side of your head, or just the front face-framing section, depending on where you want the twist to be). Twist this section tightly or loosely depending on how defined you want the spiral to look. Continue twisting as you gather your hair toward your intended ponytail location. Once you reach the back, secure everything together with an elastic band. You can wrap a small piece of twisted hair around the elastic’s base to hide it.
Timeframe and Skill
This technique is significantly easier than braiding but still gives you a crafted, intentional appearance. It takes about the same time as a basic side pony but reads as more polished. If you can twist your hair (which most people learn by age ten), you can create this style.
Pro tip: A tighter twist reads as more formal and structured; a loose, relaxed twist reads as more casual and romantic.
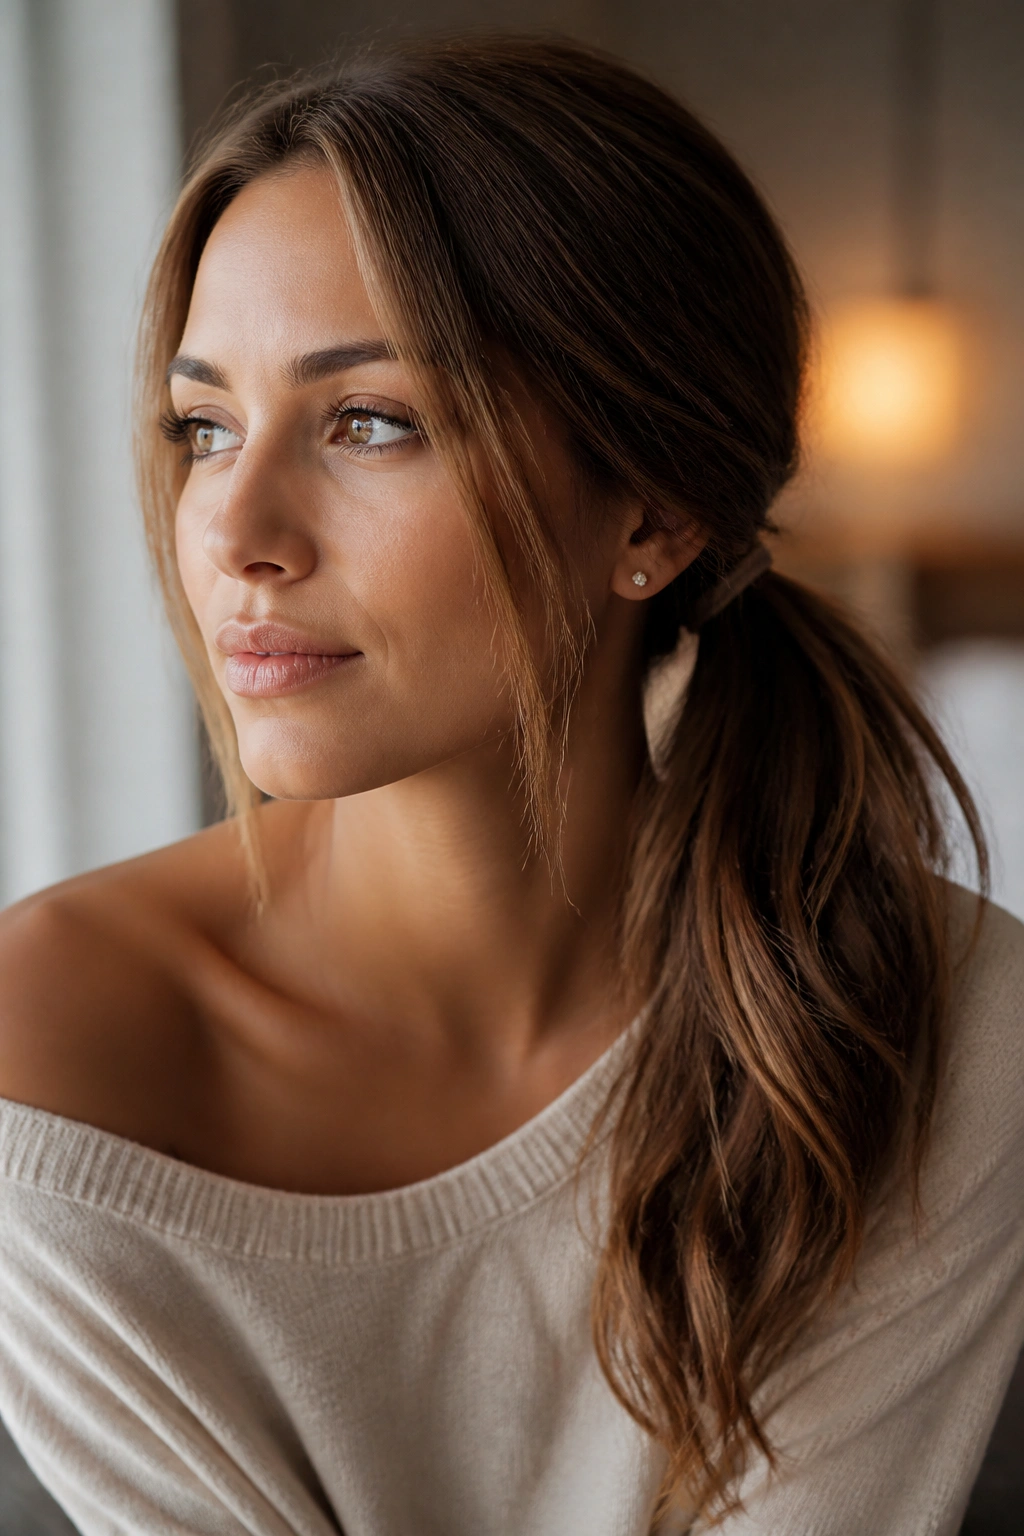
7. The Sleek High Side Pony
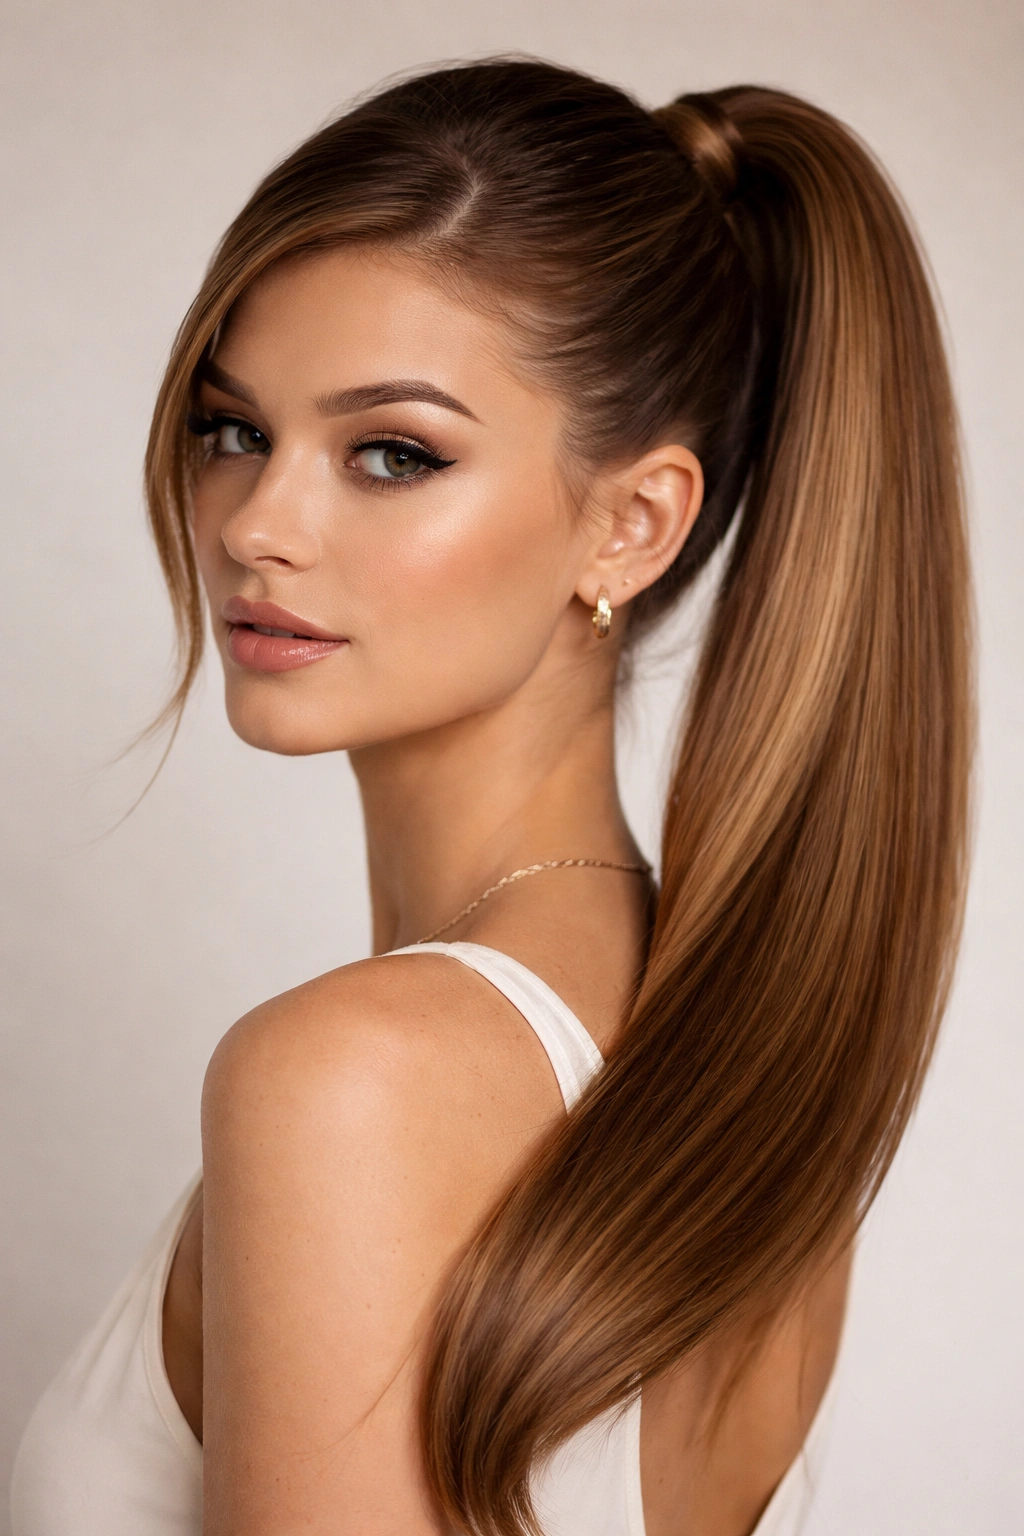
Instead of gathering hair low behind the ear, the high side pony sits up at the crown level but positioned to one side rather than centered. This version reads as younger, more energetic, and more fashion-forward than the low side pony.
When High Works Better Than Low
A high side pony works beautifully if you have a longer face shape (it balances vertical lines), fine hair that needs the illusion of volume on top, or if you simply prefer the perky energy of a higher placement. It’s also the better choice if you’re wearing certain necklines—a high side pony looks especially chic with off-the-shoulder tops, boat necks, or anything that showcases your shoulders and neck.
Achieving the High Placement
Start by teasing or backcombing at your crown level to create a light cushion of volume. This helps the ponytail sit exactly where you position it rather than sliding down. Brush the crown area gently (you don’t want to flatten the teasing completely), then gather your hair to one side at crown height. Secure with an elastic band, and smooth the gathered section if you’re going for sleek, or leave the teased texture if you’re going for volume.
This version works particularly well sleek and polished, but it’s equally stunning with loose waves and texture. A high side pony reads as more intentional and styled than low versions, so it suits occasions where you want to look like you’ve made an effort.
Versatility
You can dress this style up or down extensively. Pair it with edge control and a bejeweled clip for evening events, or wear it casual with a messy texture for everyday looks. The high placement is forgiving on most face shapes when executed well.
Worth knowing: Hair that’s teased at the crown is easier to work with and holds the high placement more securely than unteased hair.
8. The Claw-Clip Side Pony
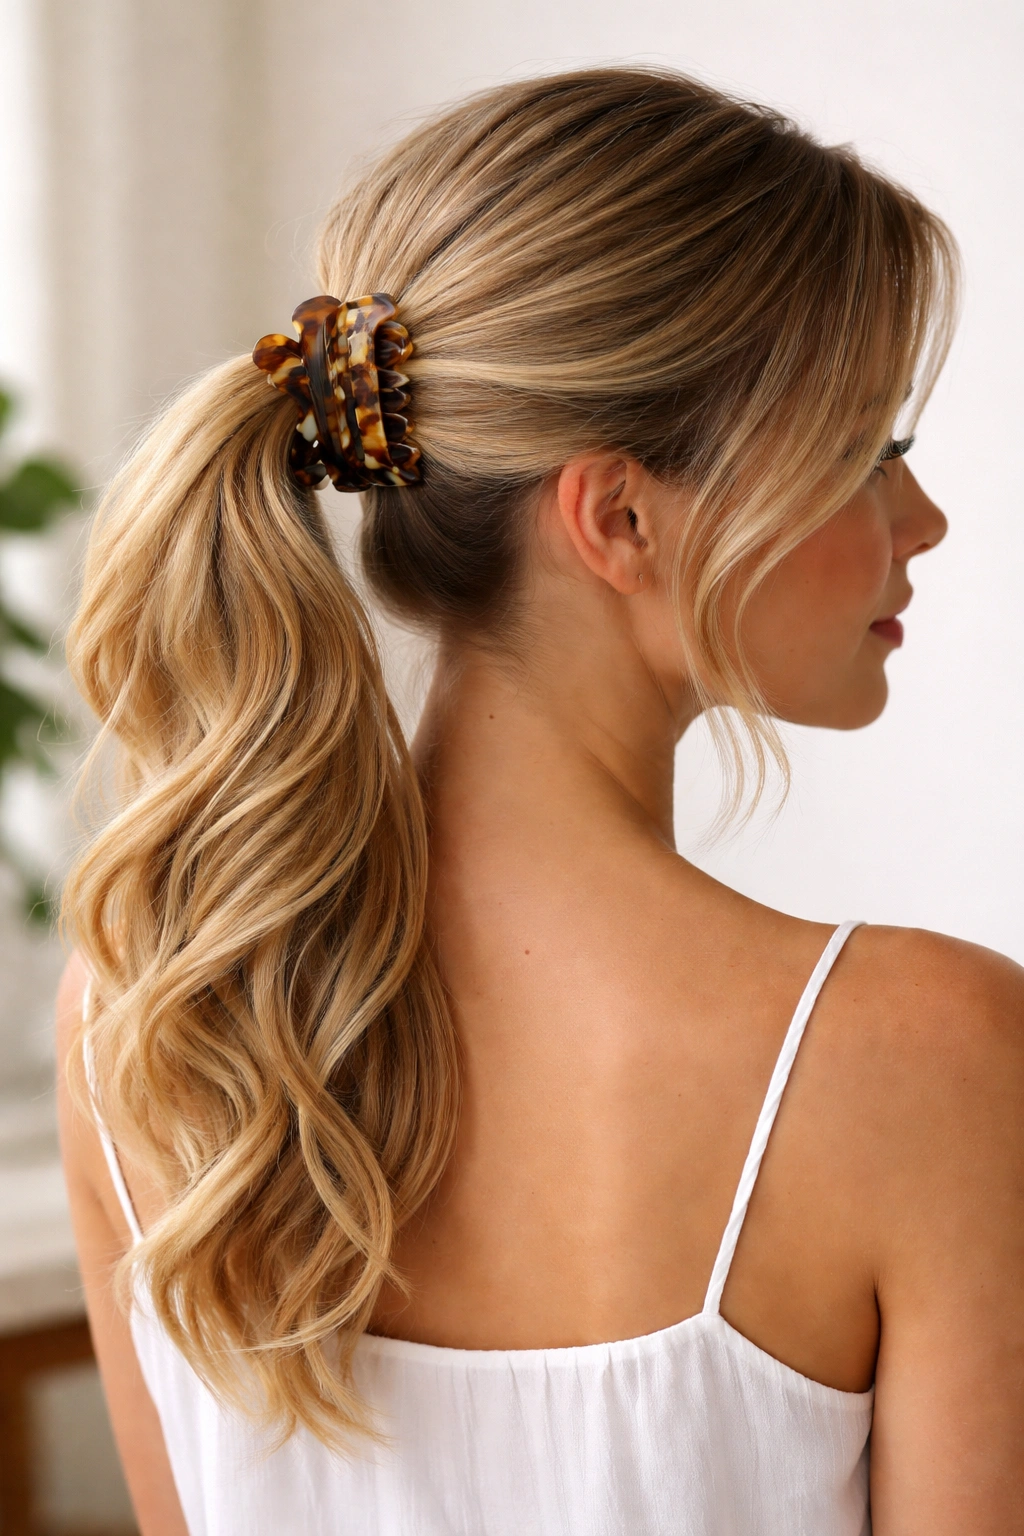
This modern take on the side ponytail uses a claw clip instead of a traditional elastic band to gather and secure the hair. The claw clip serves both as a functional hair holder and a decorative accessory, making the ponytail itself a statement piece.
Why Claw Clips Are Game-Changing
A quality claw clip holds hair at least as securely as a traditional elastic (often more securely), but it creates a different aesthetic entirely. The visible clip becomes part of your style rather than something you want to hide. You can choose a clip that matches your hair color for subtlety, or select one in a contrasting color or pattern for impact. Tortoiseshell, metallics, pastels, or jeweled clips all create completely different moods.
Gathering Your Hair with a Claw Clip
Brush your hair to your preferred side and gather it with your hands at your chosen height (low, medium, or high—claw clips work with all placements). Open your claw clip and position it so the clip holds all your gathered hair securely. Close the claw carefully to make sure it grips all the hair without pinching. The beauty of a claw clip is that it doesn’t require you to be surgical about gathering every single strand—some loose, wispy pieces actually add to the appeal.
Aesthetic Flexibility
This style adapts beautifully from casual (tiny, clear claw clip holding a messy side pony) to elevated (a tortoiseshell or gold claw clip holding a sleek side pony). You can change your clip to match your outfit or mood while keeping the basic hairstyle exactly the same. It’s also a fantastic option if you’re worried about elastic bands damaging your hair or causing breakage.
Quick fact: Claw clips tend to slip slightly on very fine or very short hair, so this style works best on people with medium-textured hair or those with enough length and density to create secure grip.
9. The Sleek Ponytail with Face-Framing Layers

This refined version of a side pony combines a sleek gathered base with intentional wisps of hair left out to frame your face. The escaped pieces create softness and dimension while everything else is smooth and secured.
The Strategic Escape
Rather than having flyaways accidentally escape, you’re deliberately leaving face-framing sections loose from the beginning. This requires more intention than a basic side pony, but it creates a markedly softer, more feminine result. The loose pieces fall naturally around your cheekbones and temples, creating a flattering frame without requiring you to style them separately.
How to Execute It
Before you gather your main ponytail, identify and section off the face-framing pieces you want to keep out. These typically run along your temples and forward of your ears—anywhere a piece would naturally fall and frame your face. Use clips to hold these sections back temporarily. Then gather everything else (the back and sides minus the frame-pieces) into your side ponytail, securing tightly and sleekly. Remove the clips from your face-framing pieces, and allow them to fall naturally. You can leave them completely straight, curl them gently, or create soft waves.
Who It Flatters
This style works on virtually everyone because the escaping pieces soften any face shape. It’s especially flattering on people with longer faces (the frame pieces break up vertical lines) and on people who find full pull-backs too severe. It’s also practical for people with shorter hair—if your hair isn’t quite long enough for a full side pony, face-framing layers can make it work anyway.
Pro tip: Using the same serum or product on your face-framing pieces that you use on your ponytail ensures everything has consistent shine and movement.
10. The Twisted Wrap-Around Side Pony
This elegant variation takes a simple side ponytail and elevates it by wrapping a twisted section of hair around the elastic base, completely hiding it and adding visual interest.
Why the Wrap-Around Matters
A visible elastic band reads as casual and functional. Hiding it under a wrapped section of twisted hair elevates the entire look instantly. You’re taking something simple and giving it a finished, polished appearance that suggests more effort and intention than was actually required. It’s a small detail, but it completely changes the vibe from “quick ponytail” to “styled hair.”
Creating the Wrap
Gather your hair into a basic side ponytail at your preferred height and secure with an elastic band. Then, take a thin section of hair from underneath the ponytail (or from the ponytail tail itself if needed) and twist it tightly. Wrap this twisted section around the elastic band at the base of the ponytail, positioning the wrap so it completely hides the elastic. Secure the twisted wrap with a tiny bobby pin tucked underneath, hidden from view.
Finishing Details
Once you’ve wrapped and pinned, you can pull gently on the ponytail tail to create a bit of texture and fullness, which makes the entire style look more polished and intentional. This wrap technique works beautifully with both sleek and textured ponytails, elevating either style.
Best For
This is the ideal technique when you want a side pony that looks carefully styled and finished. It works on medium to long hair and suits everything from casual-chic to completely formal occasions. The visible twisted wrap adds just enough detail that people assume you spent more time on your hair than you actually did.
Worth knowing: Thin hair can sometimes show the elastic even with a wrap, so if you have fine hair, use a very small elastic band as your base and ensure your wrapping section has enough volume to fully conceal it.
11. The Accessorized Side Pony with Ribbons or Pearls
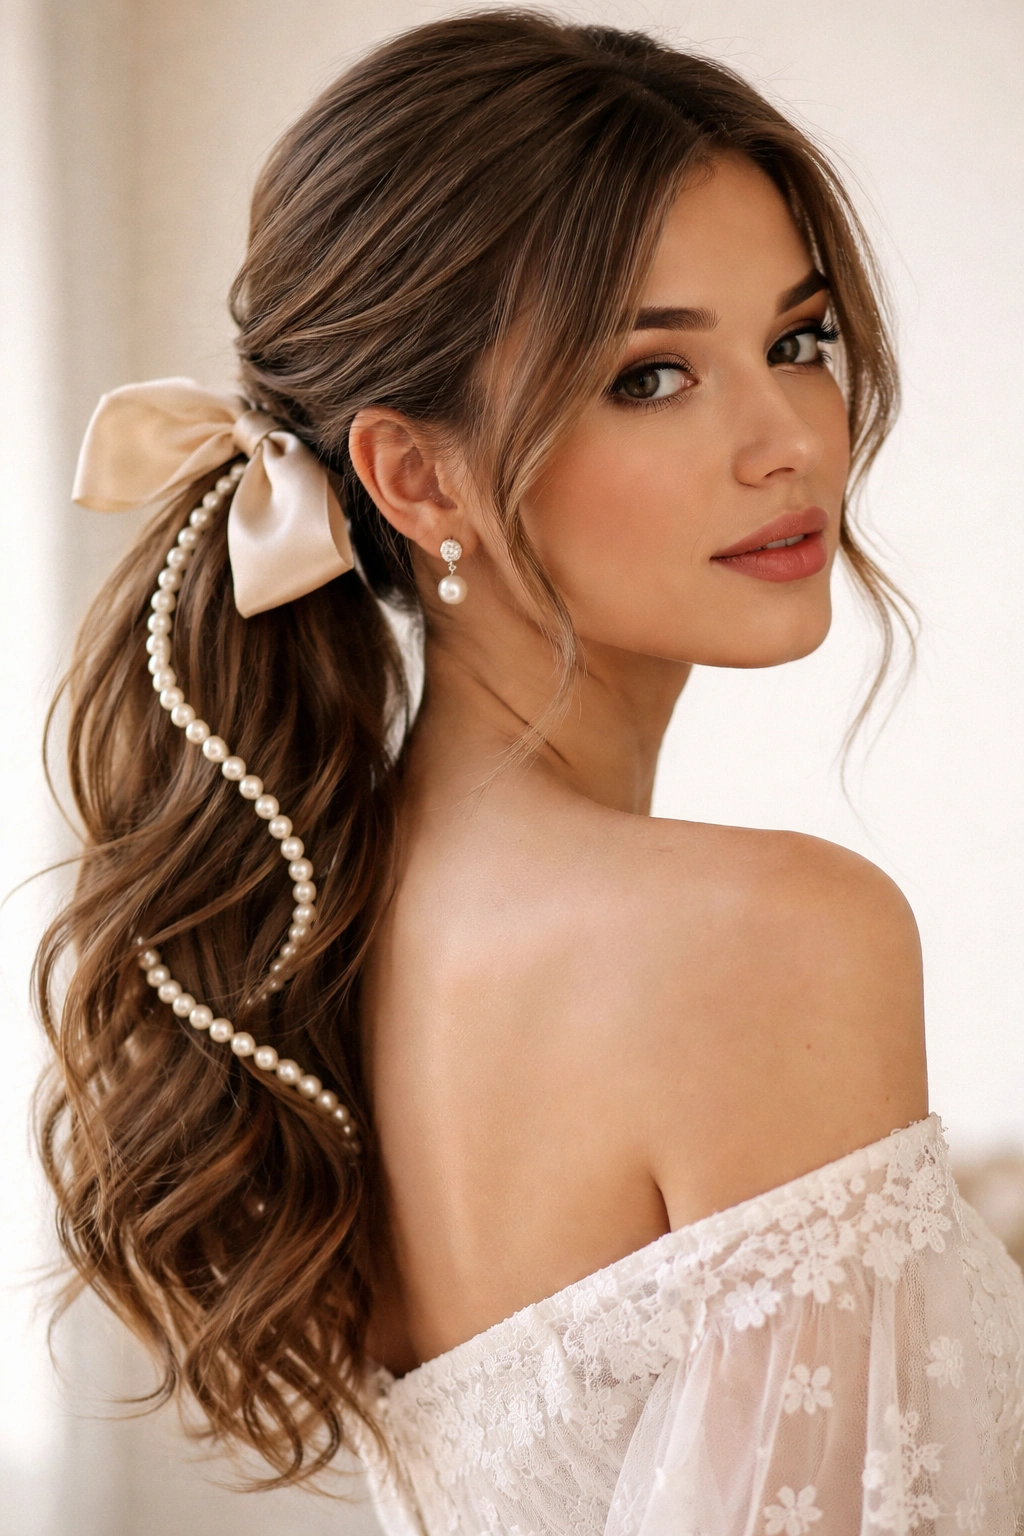
This decorative version of the side ponytail incorporates ribbons, pearl-studded bands, delicate chains, or other embellishments woven through or wrapped around the base and sometimes continuing down the ponytail length.
Why Accessories Transform the Look
A simple side pony becomes instantly elevated, playful, or romantic depending on which accessory you choose. A silk ribbon creates a sweet, feminine vibe. Pearl detailing reads as elegant and refined. A chain reads as edgy and modern. The same basic side pony becomes completely different depending on what you add, making this style incredibly versatile and reusable.
How to Incorporate Accessories
For wrapped accessories: Secure your ponytail with a standard elastic first, then wrap your chosen ribbon, chain, or beaded band around the base, using bobby pins to secure the ends. You can wrap just once, or spiral the accessory down partway through the ponytail tail for more impact.
For woven accessories: You can weave a thin ribbon or chain through the ponytail tail by threading it under and over sections as you go, creating an intentional pattern.
For clipped accessories: Use a decorative clip to hold the ponytail instead of a traditional elastic, allowing the clip itself to be the main accessory.
Style Compatibility
Accessories work beautifully on both sleek and textured side ponies. They add visual interest and sophistication to otherwise simple styles. A beaded or pearled accessory on a low, sleek side pony reads as genuinely elegant. The same accessory on a high, slightly messy side pony reads as youthful and fun.
Pro tip: Match metallic tones when combining accessories with other jewelry—gold accents with gold clips, silver with silver, rose gold with rose gold.
12. The Soft Side Pony with Layers and Texture
This final variation focuses on creating a side ponytail that’s simultaneously polished and relaxed, achieved through intentional layers and strategically placed texture throughout the entire style.
The Layering Philosophy
A layered side ponytail has dimension and movement. Some sections of the ponytail will be longer than others (if your hair has layers), creating visual depth. The texture throughout—waves, curls, or texture-spray-enhanced texture—means the ponytail doesn’t sit like a solid column but rather has movement and bounce within it.
Building the Texture and Dimension
Start by creating loose waves or curls throughout your entire head using a curling iron, heat styling, or texture spray. These waves should be relaxed and touchable, not tight ringlets. Then gather your hair to one side, allowing some of the shorter layers to escape naturally around your face. Secure with an elastic band. Gently pull and tousle the sections of the ponytail tail itself, teasing tiny sections to add volume and texture. The goal is that the ponytail looks full, dimensional, and effortlessly beautiful.
Finishing and Styling
You can leave this look natural and undone, or add a light hairspray to lock the texture and texture-spray waves in place. A light hand with products is key—you want soft texture, not crunchy hair. This style suits everyone and works for nearly every occasion, from casual to semi-formal.
Universal Appeal
This is genuinely one of the most universally flattering side pony variations because the layers and texture soften everything, the escaped pieces frame your face, and the gathered portion keeps hair out of the way. It works on most hair types (though it requires some wave or curl to be most effective), and it reads as carefully styled without being overly formal or severe.
Worth knowing: This style often looks even better on day-two hair than freshly washed hair, because day-two hair already has natural texture and grip.
Final Thoughts
A side ponytail might seem like a simple hairstyle, but the reality is that the right side ponytail—the one that matches your hair type, works with your face shape, and suits the occasion—can make you feel genuinely put-together and confident. The twelve styles above represent different moods, occasions, and aesthetic directions you can take with this one basic formula.
Start by experimenting with placement: find whether you prefer your side ponytail low, medium, or high, because that single choice affects the entire vibe. Once you’ve found your preferred height, you can rotate through different textures and details—sleek one day, braided the next, wrapped with an accessory the next. Each variation gives you a completely different look from the same basic technique.
The other thing worth knowing is that side ponytails are wonderfully forgiving. A slightly imperfect side pony is actually more interesting than a perfect one. Some escaped pieces, a bit of undone texture, strategically messy placement—these are features, not flaws. Perfect is boring. Side ponytails succeed specifically because they balance polish with approachability, effort with ease, and structure with softness. Pick the variation that calls to you, commit to the technique, and trust that a side ponytail—whatever version you choose—will work.