Wind ruins good hair fast.
So does sweat, dust, and the simple fact that a festival day can stretch from noon light to neon-dark without giving your style a single easy break. That is why braids for Coachella and music festival season keep coming back: they hold shape, keep hair off your face, and leave room for cuffs, ribbons, glitter gel, or nothing at all if you want the braid to do the talking.
The best festival braid is never the fanciest one on a mood board. It’s the one that still looks intentional after a hot walk, a line for water, and three sets of sunglasses. Tight roots matter. So does texture. And if your hair slips out of everything by hour two, you need a braid that grips hard at the crown and stays calm at the ends.
A lot of people overcomplicate festival hair. They chase volume first and structure later, then spend the rest of the day fixing flyaways with sticky hands and a dead battery in their phone. A little dry shampoo near the roots, a clean part, and the right braid pattern usually do more than a basket full of accessories ever will.
These 11 looks run from sleek and sturdy to soft and decorative, because festival hair should fit the person wearing it, not the other way around. Some are quick. Some need a rat-tail comb and a bit of patience. A few work best on day-old hair. And one or two are the kind of styles that look casual until you realize they took some real skill.
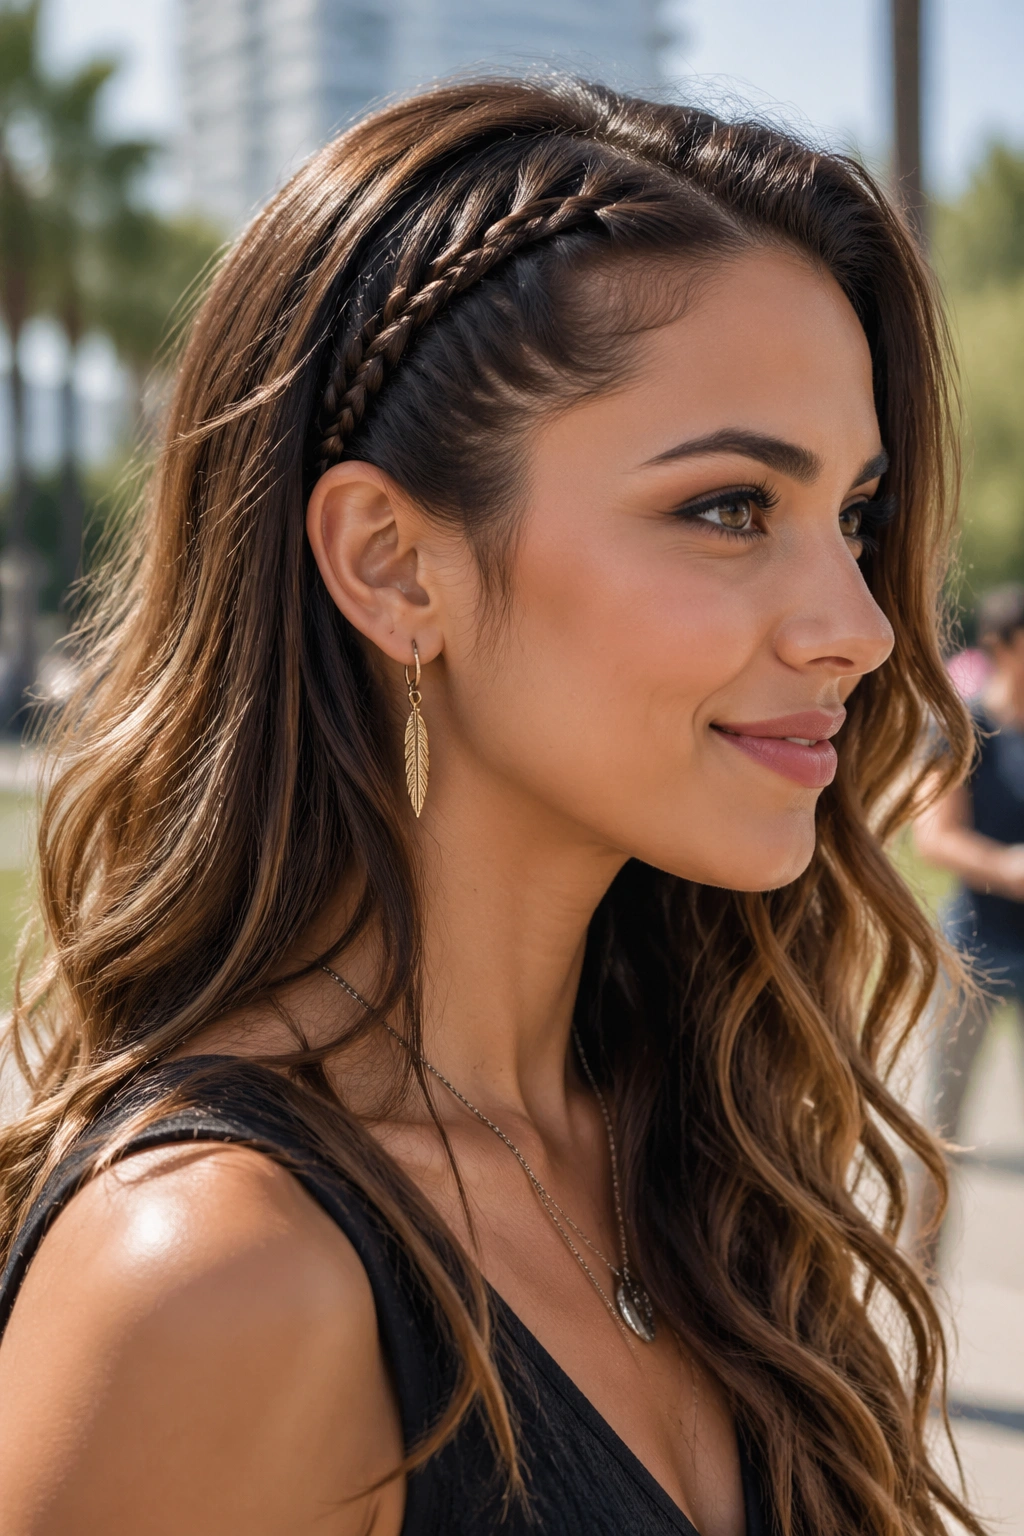
1. Coachella Boxer Braids with a Sharp Center Part
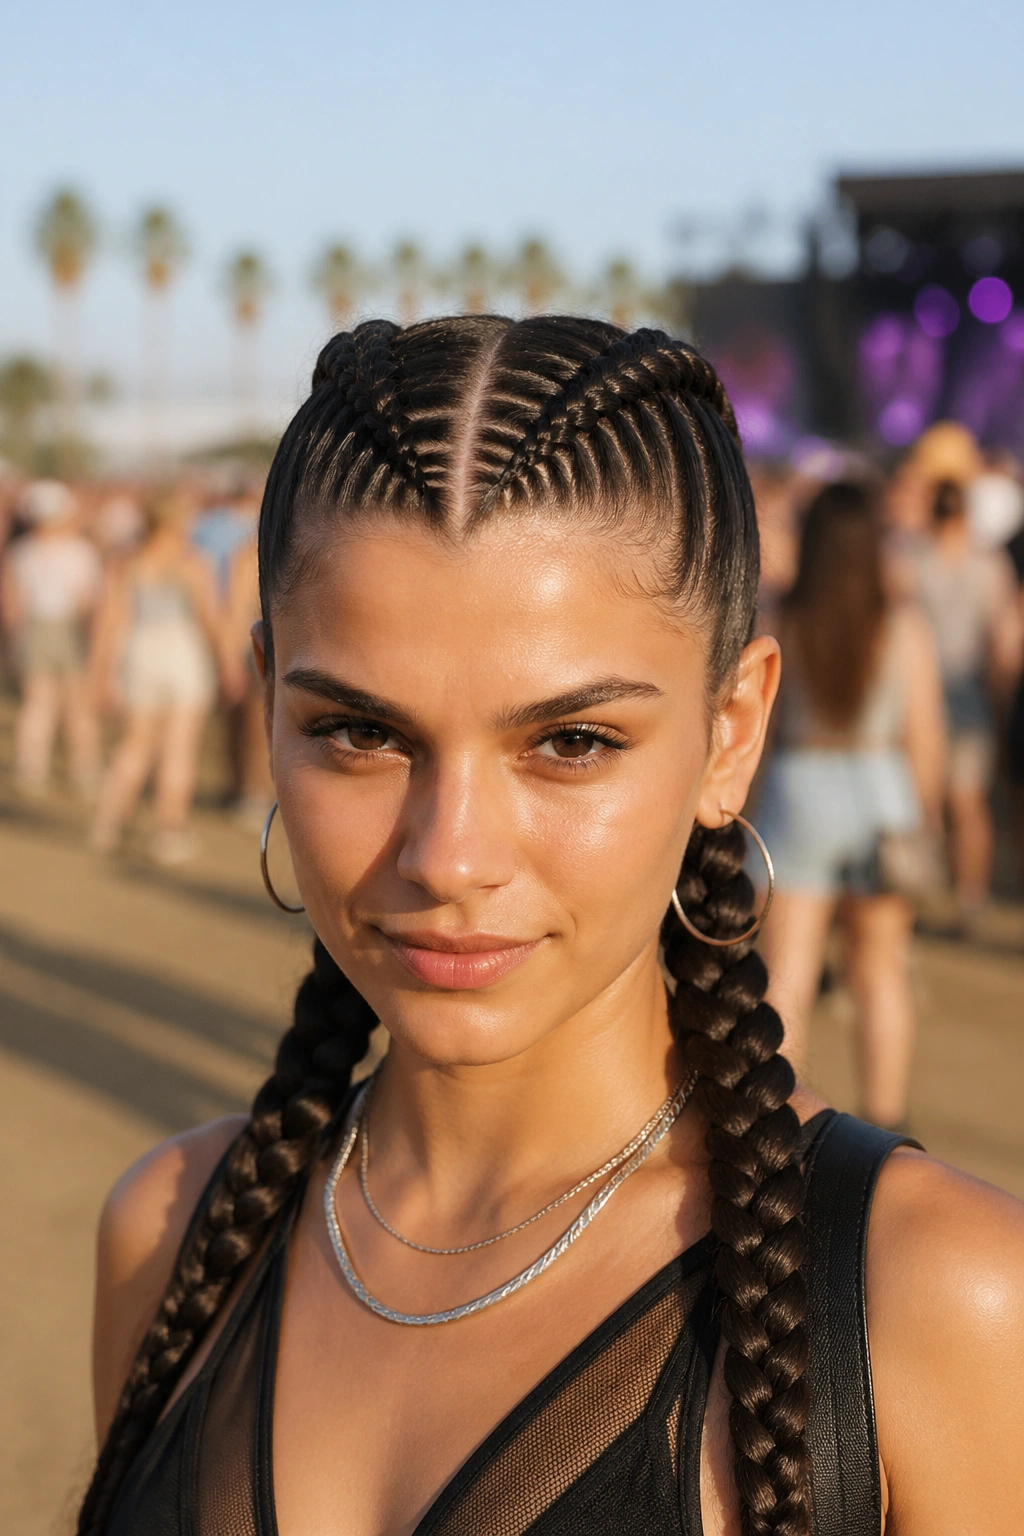
Tight boxer braids are the style I reach for when I know the day will run long. They keep the hairline clean, stay close to the head, and don’t puff up the second the air gets dry or the bass starts hitting. If your version of festival style leans practical, this is a hard braid to beat.
Why They Hold Up
The shape matters more than people think. A clean center part and two Dutch braids that sit flush against the scalp give you control from the first inch, which is why boxer braids survive heat better than loose plaits. They also sit nicely under hats, bandanas, and even a wide headscarf if you need a quick reset between sets.
The trick is tension, but not the painful kind. You want the first 2 inches near the hairline secure enough to stop slipping, then a steady rhythm down the lengths. Use a pea-sized amount of gel along each part line, smooth the roots with a fine-tooth comb, and braid while the hair still has a little grip from the product.
Quick details:
- Best for medium to long hair
- Works on straight, wavy, or stretched curly hair
- Use 2 clear elastics at the ends
- A little texture spray helps if hair is silky
- Satin tie at night keeps the braid tidy if you’re wearing it more than one day
Tip: If your crown sheds flyaways fast, mist the top layer with light-hold hairspray before you start braiding. It keeps the section from fuzzing up while your hands move down the length.
2. Bubble Braid Pigtails with Mini Elastics
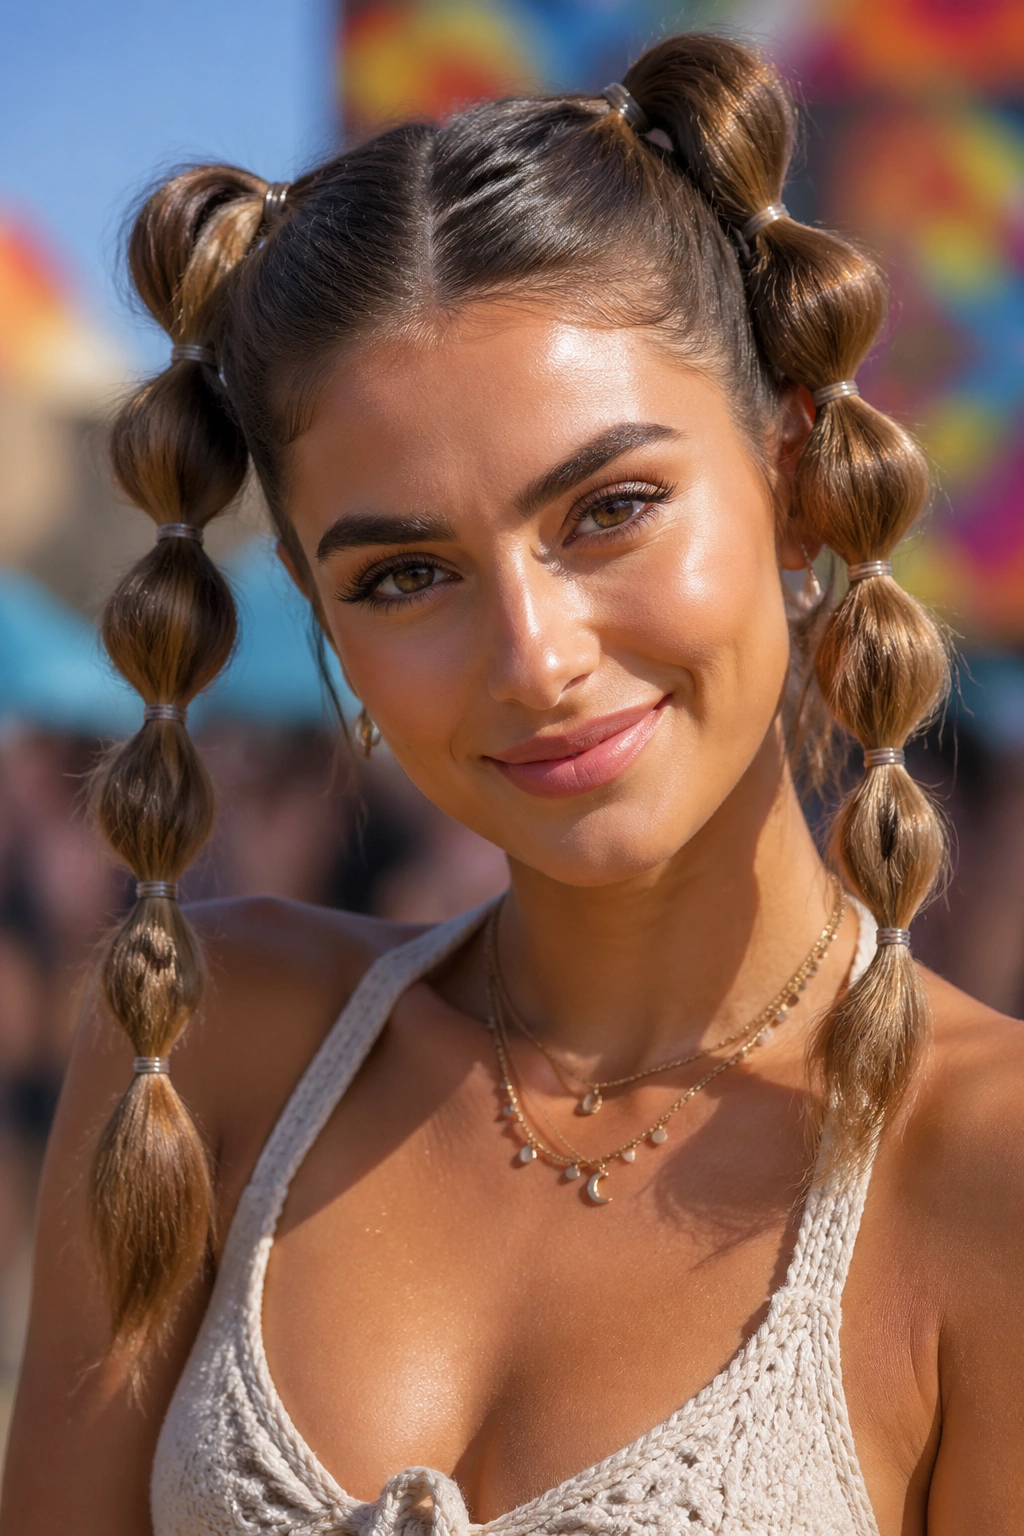
Want something playful that does not demand perfect braid fingers? Bubble braid pigtails are the move. They read as high-effort from a few feet away, which is exactly what you want when you’re trying to look styled without spending forty minutes wrestling your own hair in a mirror.
What Makes Them Easier Than They Look
A bubble braid is built with elastics, not a traditional weave, so the pressure is lower and the steps are easier to control. Start with two low or mid-height ponytails, then place small clear elastics every 1½ to 2 inches down each tail. After each elastic, gently tug the hair between bands until it puffs into a rounded bubble.
That puffing part is where the shape happens. Don’t yank. Hold the elastic with one hand and pull the outer edges of the section with the other so the braid keeps its structure. If you want a softer finish, leave the top a little loose and pull out two small face-framing pieces.
How I’d Wear It
- Best on shoulder-length hair and longer
- Great for extensions or thick hair
- Use 6 to 10 mini elastics total, depending on length
- Wrap a ribbon through the last bubble if you want a more dressed-up finish
The nice thing is that this style looks good on hair that is not freshly washed. A tiny bit of grip helps the bubbles stay round. If your ends are dry, smooth a drop of serum only on the last inch; too much slip will make the whole tail sag by the end of the day.
3. Dutch Halo Braid with Loose Face Frames
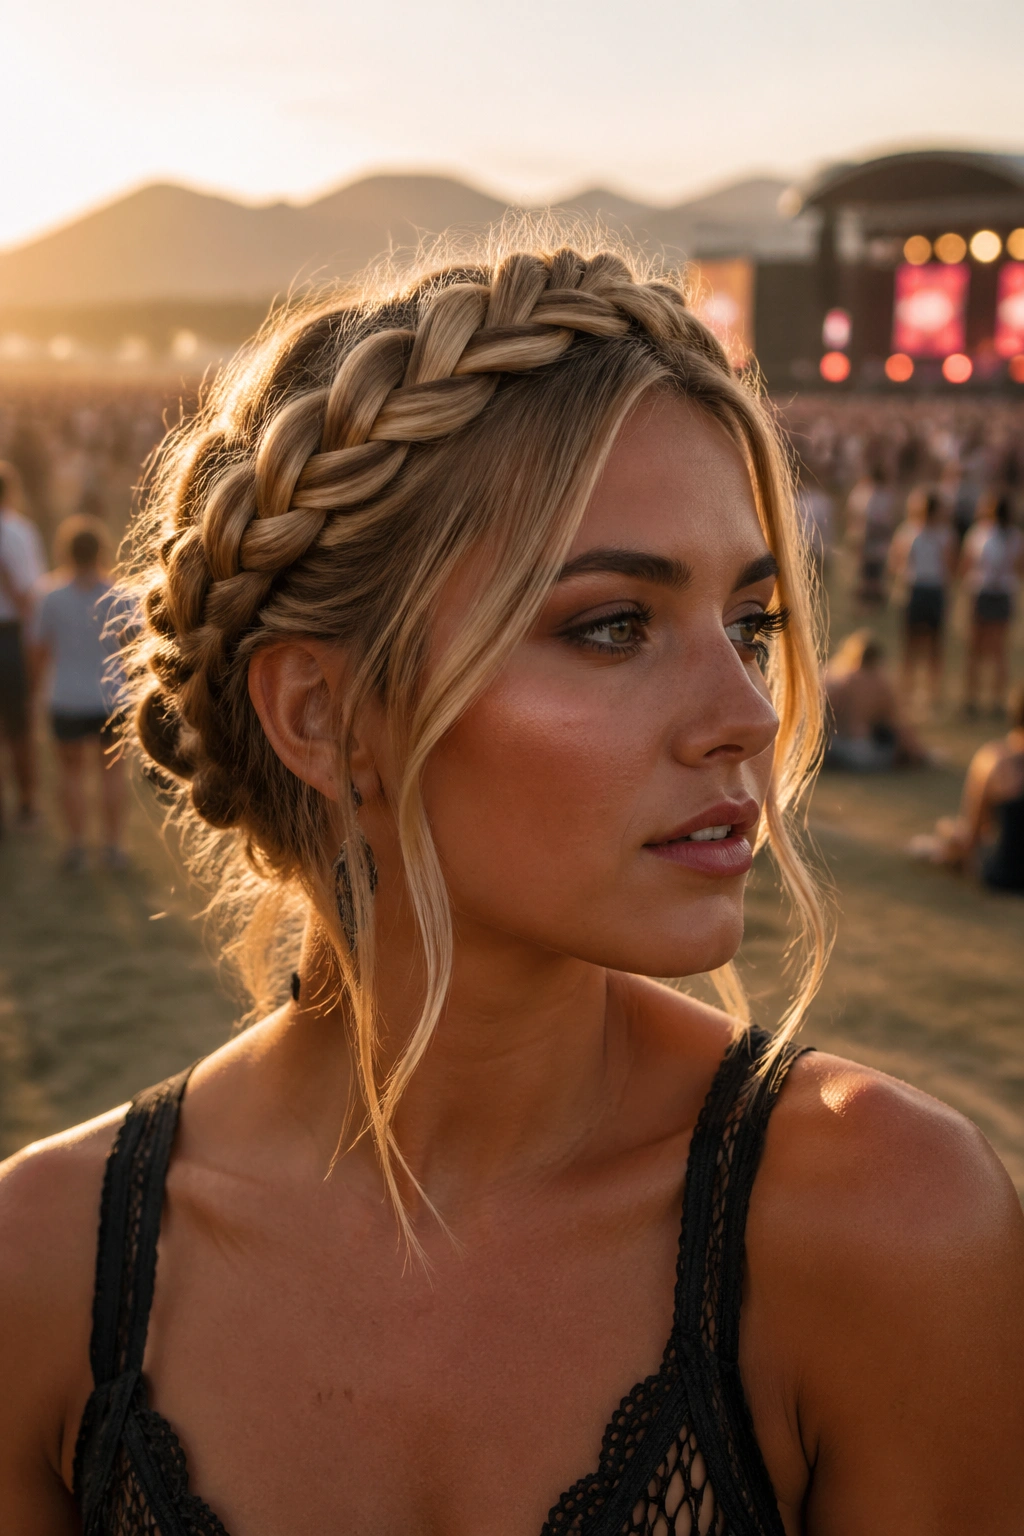
A halo braid can look polished in a way that still feels relaxed, and that balance matters at a festival. It keeps the neck open, shows off earrings, and gives you one clean shape instead of a dozen tiny pieces fighting for attention in the wind.
The style starts with a deep side or center part, then a Dutch braid that travels around the hairline from one side of the head to the other. The braid sits on top of the hair instead of tucking under it, which gives the crown more lift and makes the finished shape easier to see from the front. That little bit of height is why the style feels so good with sunglasses.
Loose face frames change the whole mood. If you leave a few tendrils at the temples and near the ears, the braid stops looking severe. I like to curl those pieces with a small barrel iron, maybe ¾ inch, then break the curl apart with fingers so it doesn’t feel too formal. You can leave the rest straight, wavy, or softly bent.
This is also a good choice if your hair has layers that won’t behave in a low braid. The halo shape pulls those shorter pieces into the design instead of asking them to lie flat all day. That’s the kind of practical detail people forget, and it makes a big difference once you’re outdoors for hours.
4. Micro Braids into Space Buns
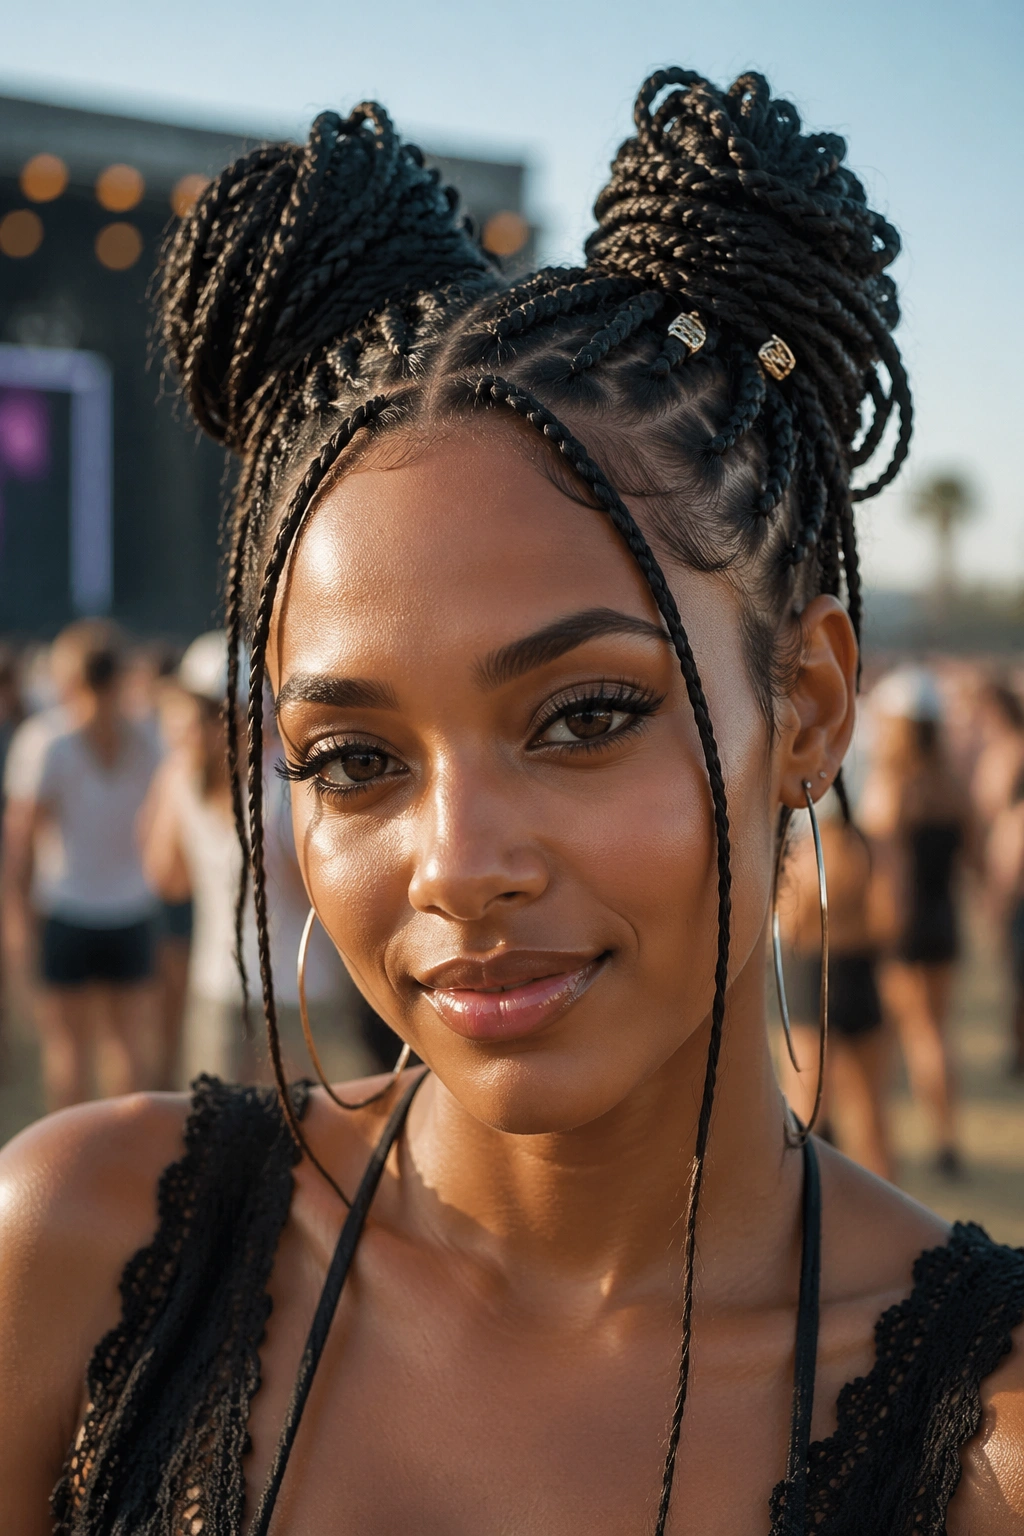
Micro braids into space buns are for the person who wants a little chaos in the best way. The look has energy, and it handles heat well because the hair is divided into smaller sections before it gets pinned up. That means less weight sitting on your neck and fewer loose bits slipping out while you move.
Sectioning Makes or Breaks It
Start by parting the hair into two halves from forehead to nape. Then take small front sections on each side and braid them back toward the crown before gathering the rest into two buns. The tiny braids near the hairline are not there just for decoration; they anchor the style and keep the buns from looking too plain.
You do not need every braid to be the same size. In fact, a little unevenness makes the style feel less stiff. Two braids on one side and three on the other can look better than a perfectly mirrored set, especially if you want the buns to feel a touch messy. That’s one of the few times I’d say imperfection helps.
A Few Good Add-Ons
- Use mini claw clips to hold the buns before pinning
- Secure the ends with small clear elastics first
- Add tiny braid rings near the front section
- Keep a few bobby pins in your bag for the second half of the day
Space buns can start to tilt if they’re too heavy, so don’t overload them with extensions or giant accessories. If you want sparkle, put it at the roots or inside the part line instead. It stays cleaner and looks better in person.
5. Half-Up Fishtail Crown with Soft Waves
A half-up fishtail crown gives you detail up top and movement down below, and that combination is hard to mess up. It feels softer than boxer braids, but it still keeps the front of the hair under control. If you like the idea of a braid that frames the face instead of locking everything down, this is the one.
The fishtail part is what makes people pause. It looks intricate because the pieces are tiny, but the actual motion is simple once your hands settle in. You split the section into two pieces, then keep crossing small outer bits from one side to the other until the braid builds out. Pull it loose at the end if you want a fuller crown.
This style shines when the rest of the hair has a little bend to it. Straight hair can work too, but a soft wave underneath keeps the look from falling flat against the head. A light mist of texture spray before braiding gives the section something to hold onto. That matters more than people admit.
If your hair is layered, start the braid a little farther back from the temples so the shorter pieces at the front do not escape immediately. Then pin the crown with two or three bobby pins that cross each other. A braid that slips down by noon is annoying. One that stays put and still feels easy is worth the effort.
6. Pull-Through Braid Ponytail
The pull-through braid is one of those styles that looks like you spent forever on it, even though it’s built from a series of ponytails and split loops. I like it because it gives you that big braid look without requiring three hands and a prayer. It also adds length and drama fast.
How to Build It Fast
Begin with a high ponytail or a mid ponytail, depending on where you want the weight to sit. Separate a small top section, clip it out of the way, and create a second ponytail underneath. Then split the top ponytail in two, bring the lower ponytail up through the middle, and clip the two top sections out of the way again. Repeat that pattern down the tail.
The cleanest version uses 4 to 6 small elastics, spaced evenly so each loop has the same size. If you want a chunkier braid, pull each loop outward after you secure it. That gives the braid a fuller shape, but do it gently or the elastics will twist.
Where It Works Best
- Thick hair that needs structure
- Long hair that you want off your neck
- Extensions that hold a ponytail well
- A festival day when you want drama without a lot of scalp tension
This style can get heavy if you pile on too much hair at the crown, so don’t yank the first ponytail too tight. A little lift at the roots is enough. If you see the top flattening before you’re done, stop and loosen it before the whole thing starts looking pulled back in a bad way. That tiny adjustment saves the whole style.
7. Feed-In Cornrows with Loose Ends
Feed-in cornrows are one of the smartest festival braids if you want a style that lasts and still feels personal. The braid starts small at the hairline, then gradually picks up more hair as it moves back, which makes the lines look smooth instead of bulky. On coily or curly hair, that finish is clean and elegant without trying too hard.
Best for Curly and Coily Hair
If your hair texture holds a braid well, this style is a gift. The feed-in method reduces tension at the scalp because the braid does not begin with a giant lump of hair all at once. That means the front looks neater and often feels more comfortable after a long day of wearing it.
You can go with straight-back rows, curved parts, or a center part with four braids that end in loose lengths. The loose ends are the fun part. They give you movement and let you add beads, wraps, or cuffs without making the style feel stiff. I like the balance of tight root work and freer ends.
What to Ask For at the Salon
- Small, clean part lines
- Gradual feed-in at the root
- Loose ends left at shoulder length or longer
- Lightweight extensions if you want more length
- A finish that sits close to the scalp but does not feel painful
If you wear this style for more than one day, a silk scarf at night is worth it. You can also rub a tiny bit of scalp oil between braids if your skin gets dry from dust or sun. The style itself is strong. The edges around it still need care.
8. Rope Braid Buns with Gold Cuffs
Rope braid buns have a clean, almost sculptural look that feels right when the rest of the outfit is loud. They’re built from two strands twisted in the same direction, then wrapped into buns or knots. The shape is simple, but the texture catches the eye because it sits tighter and smoother than a regular three-strand braid.
The biggest mistake people make is twisting both sections in different directions. Don’t. If the strands fight each other, the braid loosens fast and the whole thing starts to sag. Twist each section in the same direction first, then wrap them around one another in the opposite direction. That’s the trick that keeps the rope from unwinding.
Gold cuffs help here, but keep them light. A pair of small cuffs near the base of each bun is enough. Too many metal pieces and the style starts to drag. I’d rather see two clean cuffs than six random rings rattling around. One strong idea beats a crowded one.
This braid is also kind to hair that frizzes at the ends. The twist hides a lot. If your hair has layers or fine pieces that usually escape, smooth them with a little cream before you start and pin the ends under the bun. The final shape should look deliberate, not overworked.
9. Side-Swept Accent Braids with Loose Waves
Not every festival braid needs to take over the whole head. Sometimes the smartest move is one clean accent braid along the temple or part line, with the rest of the hair left in waves. That little braid gives you detail without locking you into a style that feels heavy by midafternoon.
This is the braid I’d point to for shorter hair, shoulder-length cuts, or anyone who wants something quick. A single side braid pinned near the ear can keep one side of the face open while still giving the hair a styled edge. If your bangs are growing out, even better. The braid can tuck them back without making you feel trapped.
Where to Place It
- At the temple for a soft, face-framing look
- Above the ear for a cleaner side sweep
- Under the top layer if you want the braid to surprise people when the hair moves
- Along the part line for a more graphic finish
The braid works best when the waves underneath have a little grit. Freshly brushed hair can make the accent look flat. I’d use a texture spray, braid the front section, then bend the loose lengths with a curling iron or flat iron if needed. You’re aiming for movement, not polished stiffness. A festival braid should feel like it can survive a breeze and still look fine.
10. Box Braids Styled with Charms and Scarf Wraps
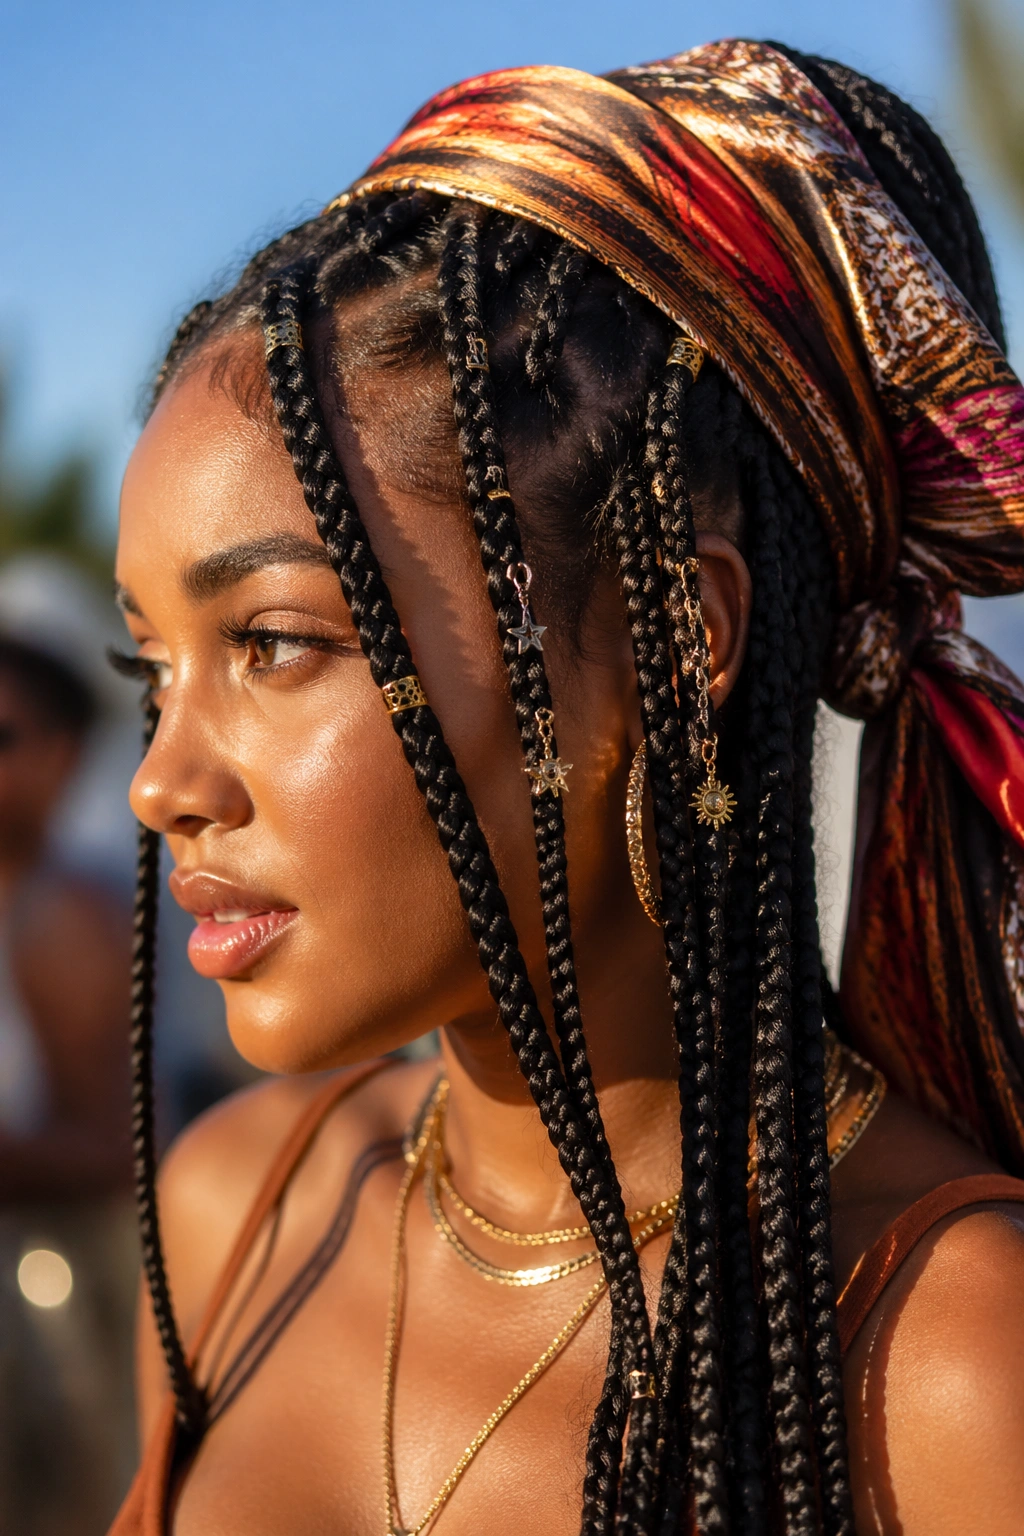
If you already wear box braids, festival styling is less about re-braiding and more about changing the shape. That is the good part. You’re not starting from scratch. You’re taking a style that already works and giving it a little extra edge with accessories that show up well in sunlight and stage light.
A half-up bun with a scarf tied around the base is an easy place to start. You can also separate the braids into two high puffs, twist a few front braids into a crown, or gather one side back with a wide ribbon. The charm is in the details. Gold rings, tiny shells, and smooth beads all work, but keep the count modest so the style doesn’t get noisy.
Easy Add-Ons That Actually Help
- Lightweight gold cuffs near the front pieces
- A silk scarf folded into a 2-inch band
- Small shell beads on 4 to 6 braids, not all of them
- One or two statement clips instead of a dozen tiny ones
Be careful with heavy accessories near the hairline. A pretty braid can turn into an annoying one if the front starts pulling by the second hour. I also like scarf wraps because they can hide day-two frizz without pretending the braid is brand new. That’s practical, not lazy. There’s a difference.
11. Knotless Braids with Colored Thread Ends

Knotless braids with colored thread ends are one of the easiest ways to make a protective style feel festival-ready. The base stays soft on the scalp, which matters if you’re wearing the braids for more than one day, and the thread gives you color without dye or chalk. It’s a clean way to get a custom look.
The thread should be smooth, not scratchy. Soft embroidery thread or thin yarn works better than rough craft string because it slides around the braid without snagging. Wrap it around the last 2 to 4 inches of the braid, or farther up if you want the color to stand out from a distance. Bright pink, cobalt, lime, silver, and orange all read well against natural hair.
How the Thread Changes the Look
Thread does two jobs at once. It adds color, and it changes the shape of the end so the braid feels a little more finished. A plain braid end can disappear into the rest of the hair. A wrapped end gives you a clear finish line, which looks tidy in photos and in real life.
A few details matter here:
- Keep the thread wraps snug, but not tight enough to dig in
- Use clear elastics first if your ends are slippery
- Match the thread color to one outfit piece if you want the whole look to feel tied together
- Limit heavy wraps on fine hair so the braids do not feel weighed down
Knotless braids are already a comfortable choice, and the thread makes them feel more personal without adding much weight. If you want one style that can handle dust, dancing, and a very long line for drinks, this is the one I’d trust most.