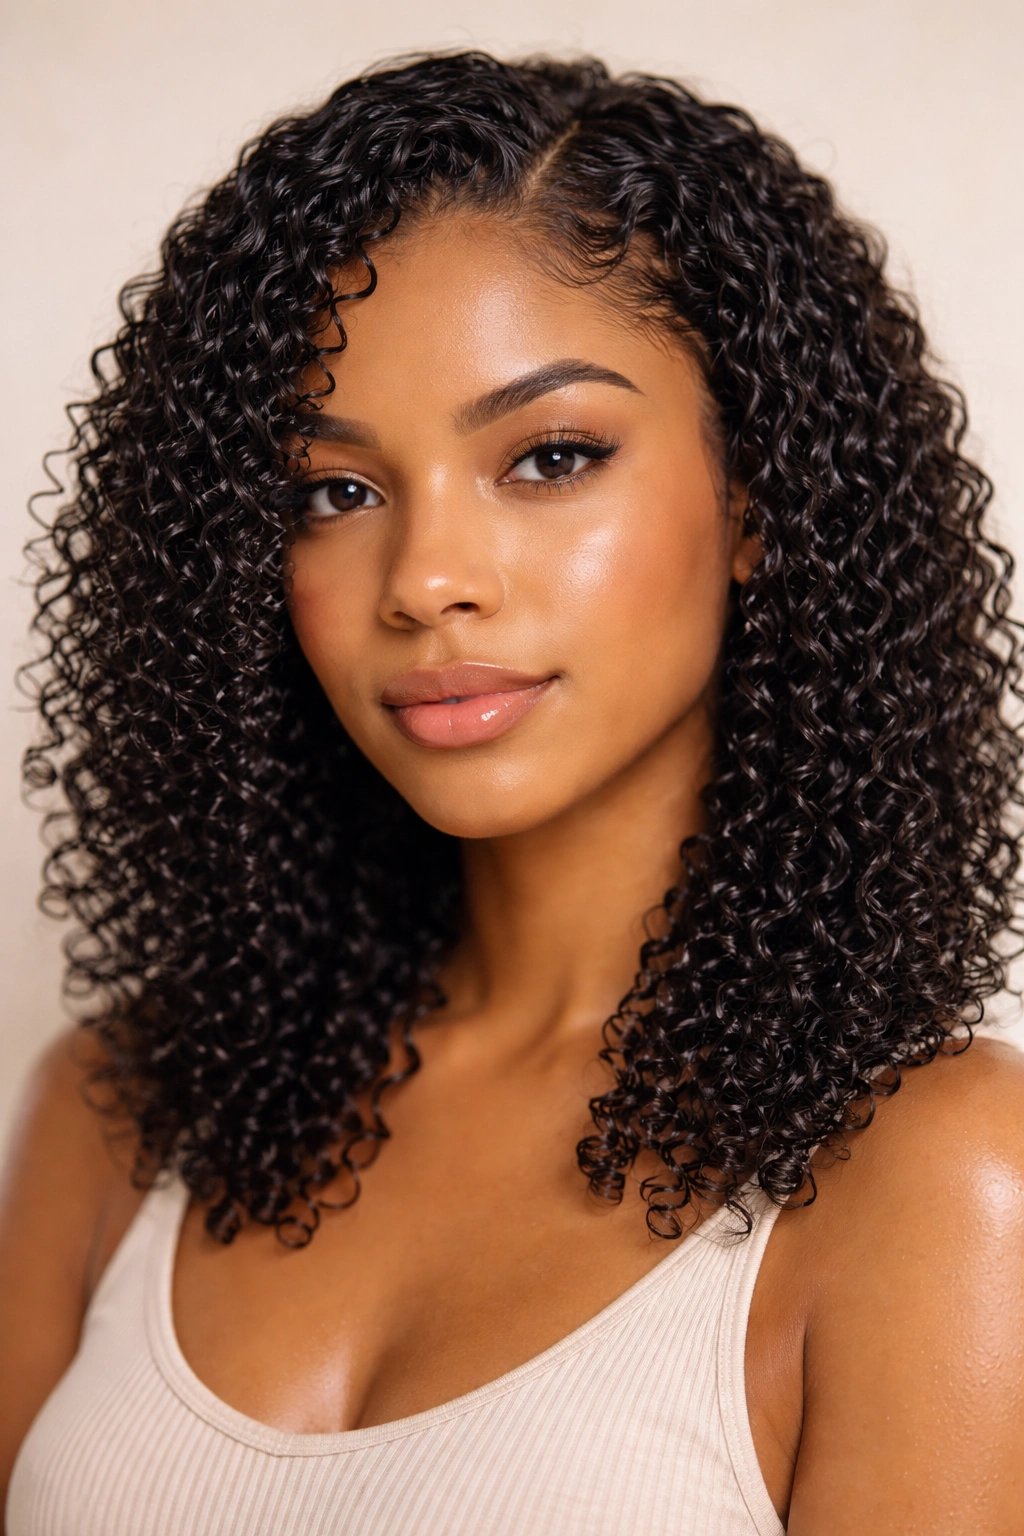
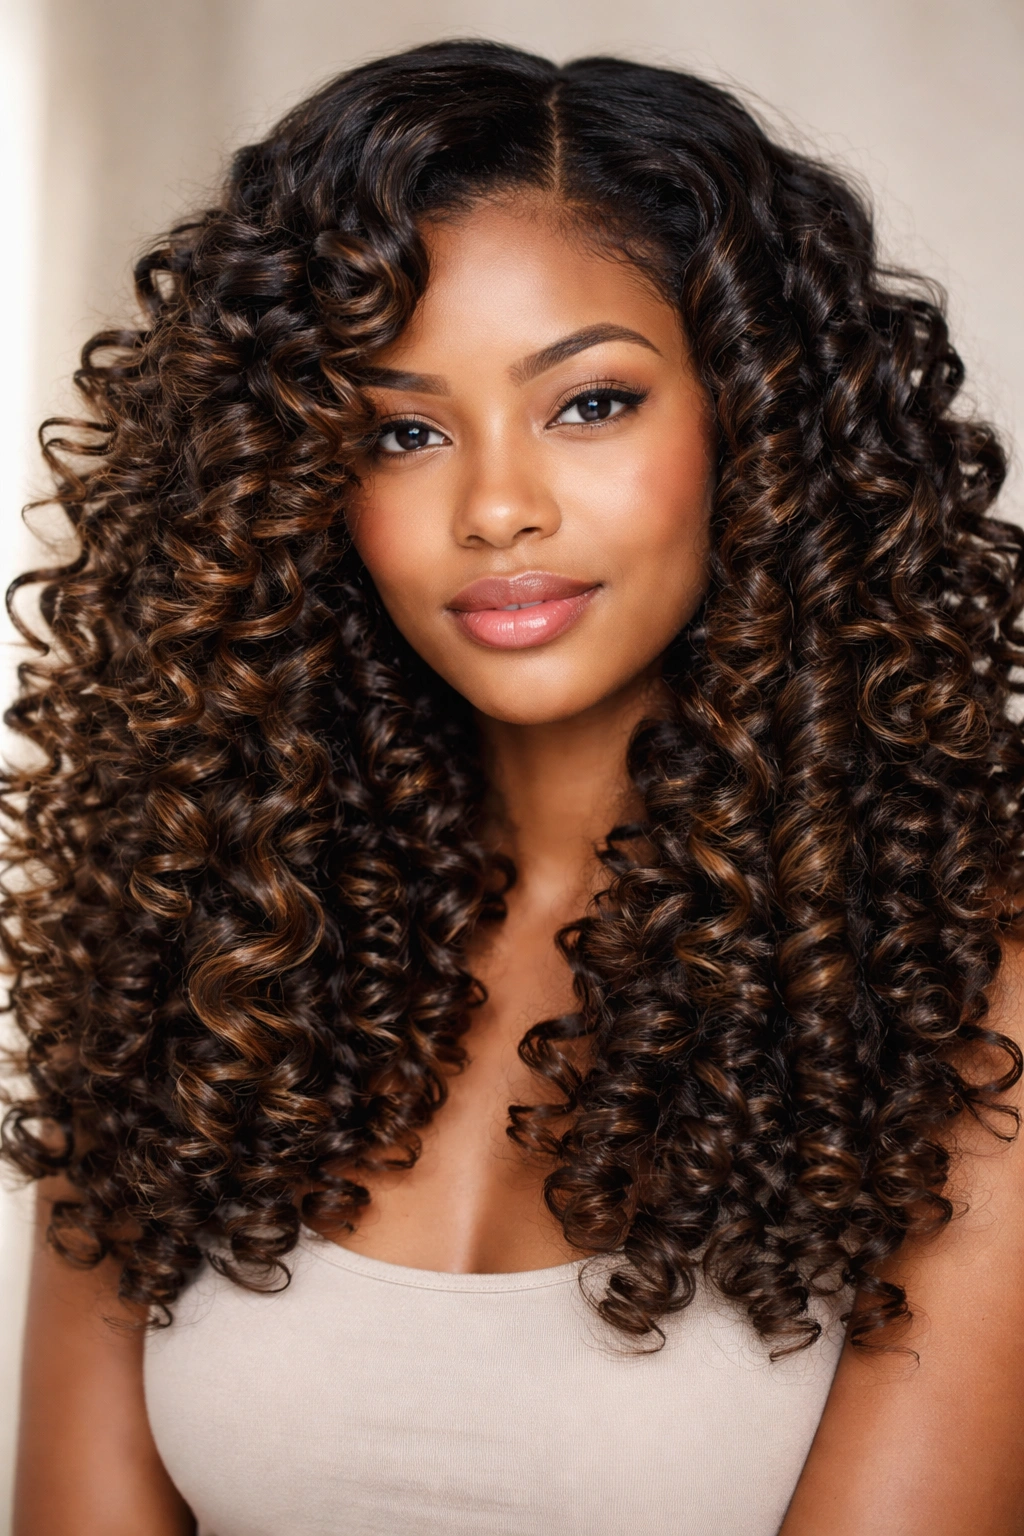
Curly hair in the 3c to 4a range sits in that beautiful sweet spot where you’ve got serious curl definition but plenty of room for creative styling options. The truth is, most mainstream hairstyle advice skips right past your curl pattern—it’s either straight-hair tutorials or vague “embrace your curls” inspiration that doesn’t actually show you how to style what you’ve got. The styles that work best for your texture aren’t just about looking good; they’re about working with your hair’s natural structure, respecting moisture needs, and giving you options that feel manageable and intentional.
Your curl pattern has enough body and spring that you can stack multiple styling techniques in one look, layer textures, and create real dimension. This is genuinely enviable. The 3c curls are tight enough to hold definition while the 4a texture brings thickness and shrinkage that can make a simple style look dramatically fuller and more polished. That means you’re not limited to loose waves or ultra-defined ringlets—you can play in the middle ground where most of the best curly hair inspiration actually lives.
What makes a hairstyle work at your texture is understanding how moisture, product weight, styling tools, and hold time interact with your specific curl pattern. A style that looks perfect on a 3c curl might slide out of a 4a texture within hours, or vice versa. The best approach is learning the foundational techniques—two-strand twists, pineappling, finger coils, braid-outs—and then mixing them to create looks that feel fresh and are actually sustainable between wash days. Here are the ten hairstyles that consistently deliver both style and practicality for 3c to 4a curls.
1. The Defined Wash and Go
A wash and go is the OG low-maintenance style, but it only works on your texture when you approach it with intention. This isn’t about letting your hair air-dry bare—it’s about applying the right combination of products while your hair is soaking wet, then either air-drying or diffuser-drying for a look that feels intentional and polished rather than just… wet. The magic happens in the product layering: a leave-in conditioner that’s lightweight enough not to weigh down your curl, followed by a curl cream or gel that provides hold without crunch.
How to Layer Products for Maximum Definition
Start with hair that’s freshly washed and dripping wet. Apply your leave-in conditioner to soaking-wet hair in sections—don’t be shy with it. Then, while your hair is still saturated, apply your curl cream or gel using the praying hands method or scrunching it in from the ends toward the roots. The key is applying product to wet hair rather than damp hair; if your hair is already drying, you’ll get frizz and definition loss. For 3c curls, a lighter gel often works better than heavy creams. For 4a textures, you might layer a cream under a gel for better hold and moisture.
Drying Methods That Preserve Definition
Diffusing on low-medium heat gives you more defined curls and faster drying than air-drying alone, but it requires patience—don’t hover and shake the diffuser around, which breaks curl clumps. Cup the diffuser against your scalp section by section and hold it steady for 30-45 seconds per section, letting gravity work with your curl pattern. Air-drying gives you softer, more natural-looking definition but takes 6-8 hours depending on your curl density and hair thickness. Plopping (wrapping your hair in a microfiber towel or t-shirt) while you apply products helps reduce frizz and encourages curl clumping.
Pro tip: Refresh your wash and go on day two or three by lightly spritzing with water mixed with a tiny drop of leave-in conditioner and re-scrunching. You’ll restore definition and add moisture without doing a full wash.
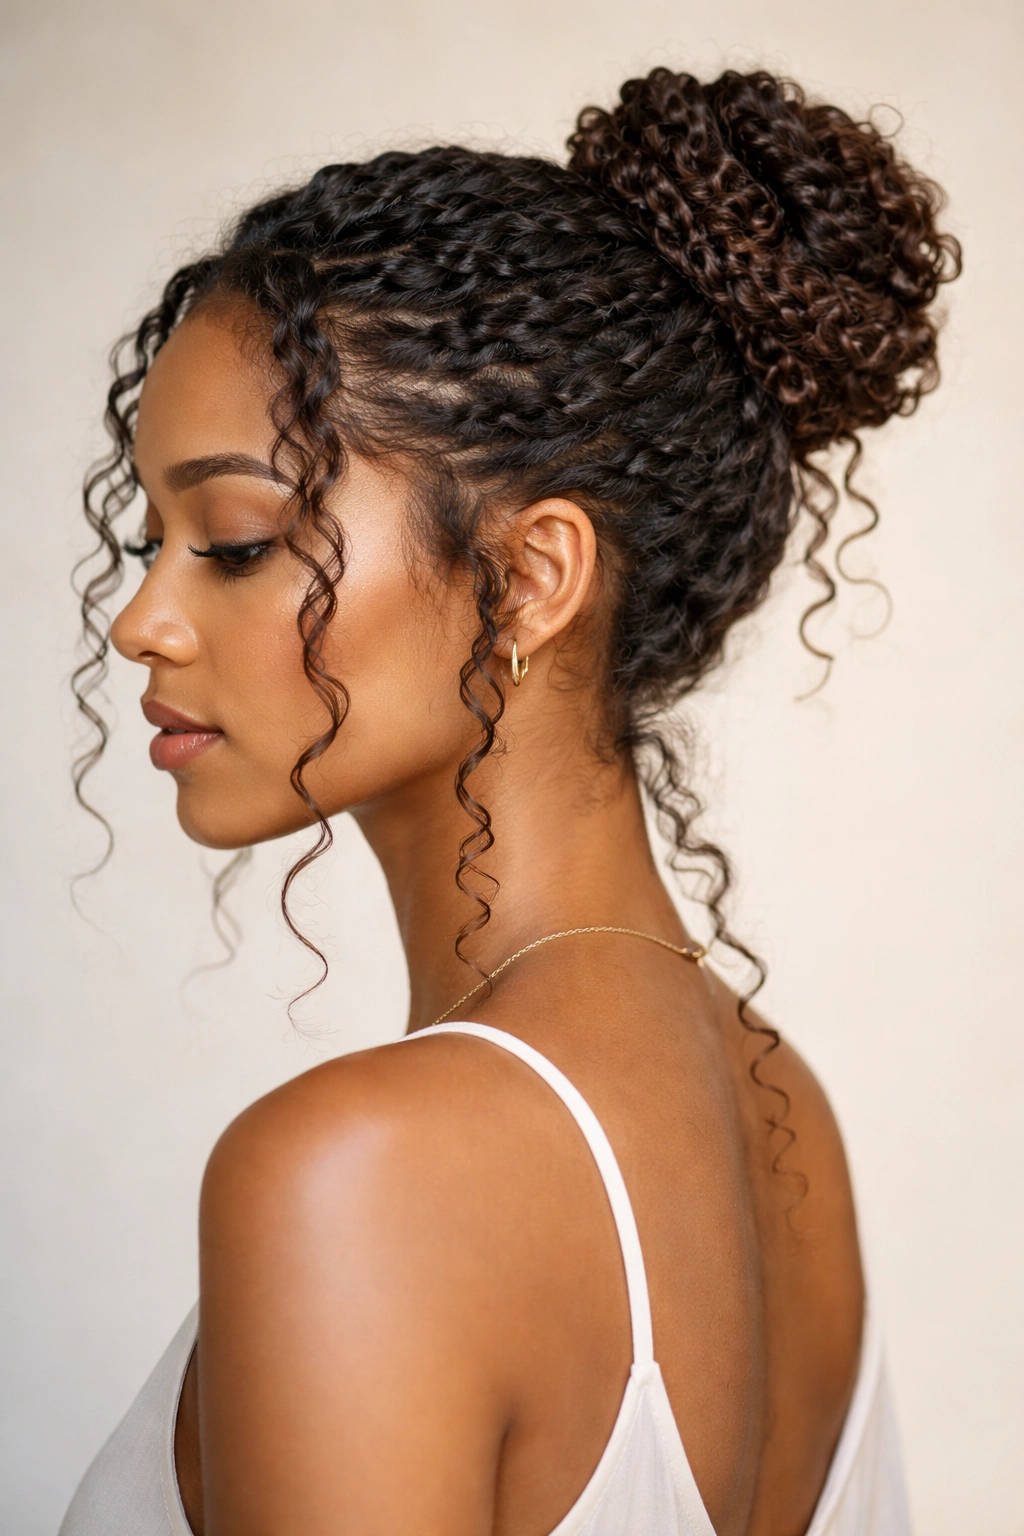
2. High Ponytail with Braid Details
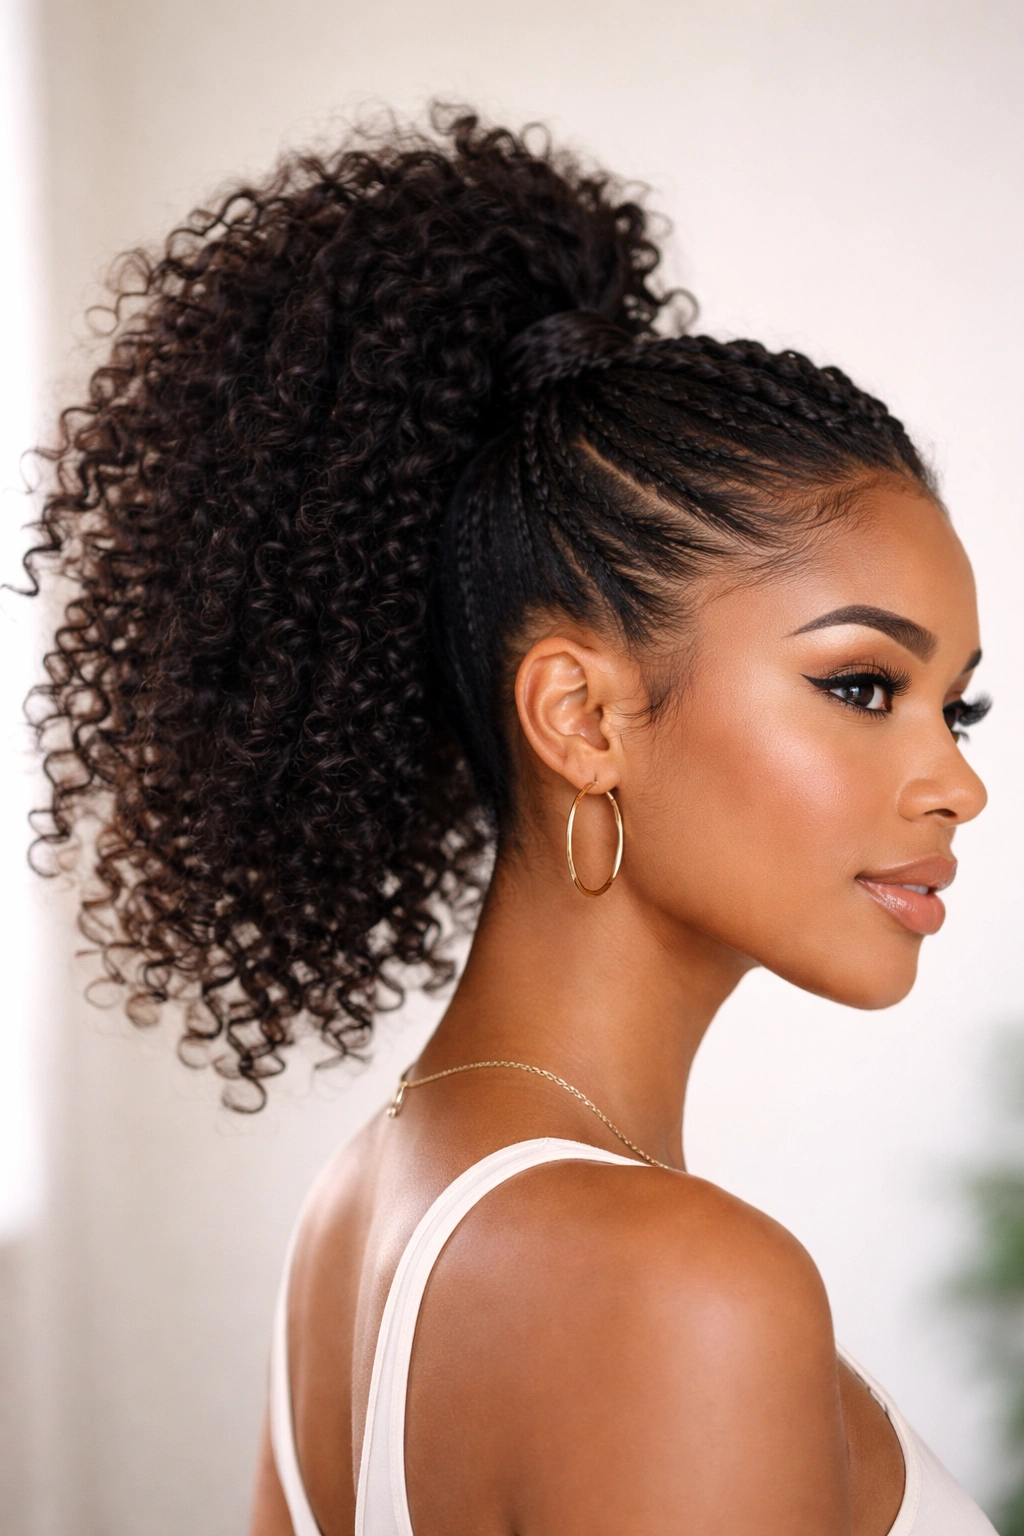
A high ponytail is deceptively elegant because it plays to your curl pattern’s strengths—the fullness and volume that comes naturally with 3c-4a texture. But the details matter. Rather than a sleek pony that requires smoothing products and tension that can stress your hairline, go for a ponytail that celebrates your curl pattern by leaving texture visible at the crown and incorporating small braids around the elastic for visual interest. This transforms a basic style into something editorial and intentional.
Technique for Voluminous Crown Section
Create volume at the crown by gently flipping your head forward, gathering the top section of hair at the base of where you want your ponytail, and flipping back upright while holding that section. This natural lift looks much more modern and forgiving than pulling hair tightly back. Take a small section from the side (around your temple) and French-braid it toward the back, where your main ponytail gathering point is. Repeat on the other side. This creates a face-framing effect and gives the style dimension that a flat ponytail lacks.
Securing Without Breakage
Use a coated elastic (silk or satin-covered) rather than standard rubber bands, which snag and break curls. Wrap a small section of hair from your ponytail around the base of the elastic to cover it—this hides the elastic and protects hair at the pressure point. The wrap should be loose enough that you can slide a finger under it; if it’s tight, it’ll cause breakage and damage to the hair wrapped around the elastic.
Styling the Ponytail Itself
Let your curls sit naturally in the ponytail without pulling them tight or trying to make them uniform. They’ll cascade naturally with their own texture, which is the whole point. If you want extra definition, apply a light gel or edge control to any flyaways around the ponytail gathering point, but leave the bulk of the ponytail unstyled so your curl pattern reads clearly.
Worth knowing: This style holds best on days three through five after washing, when your curls have set into their pattern but still have good definition. Trying it on fresh wash day will result in shifting throughout the day as the curls settle.
3. Side Swept Curls with Undercut
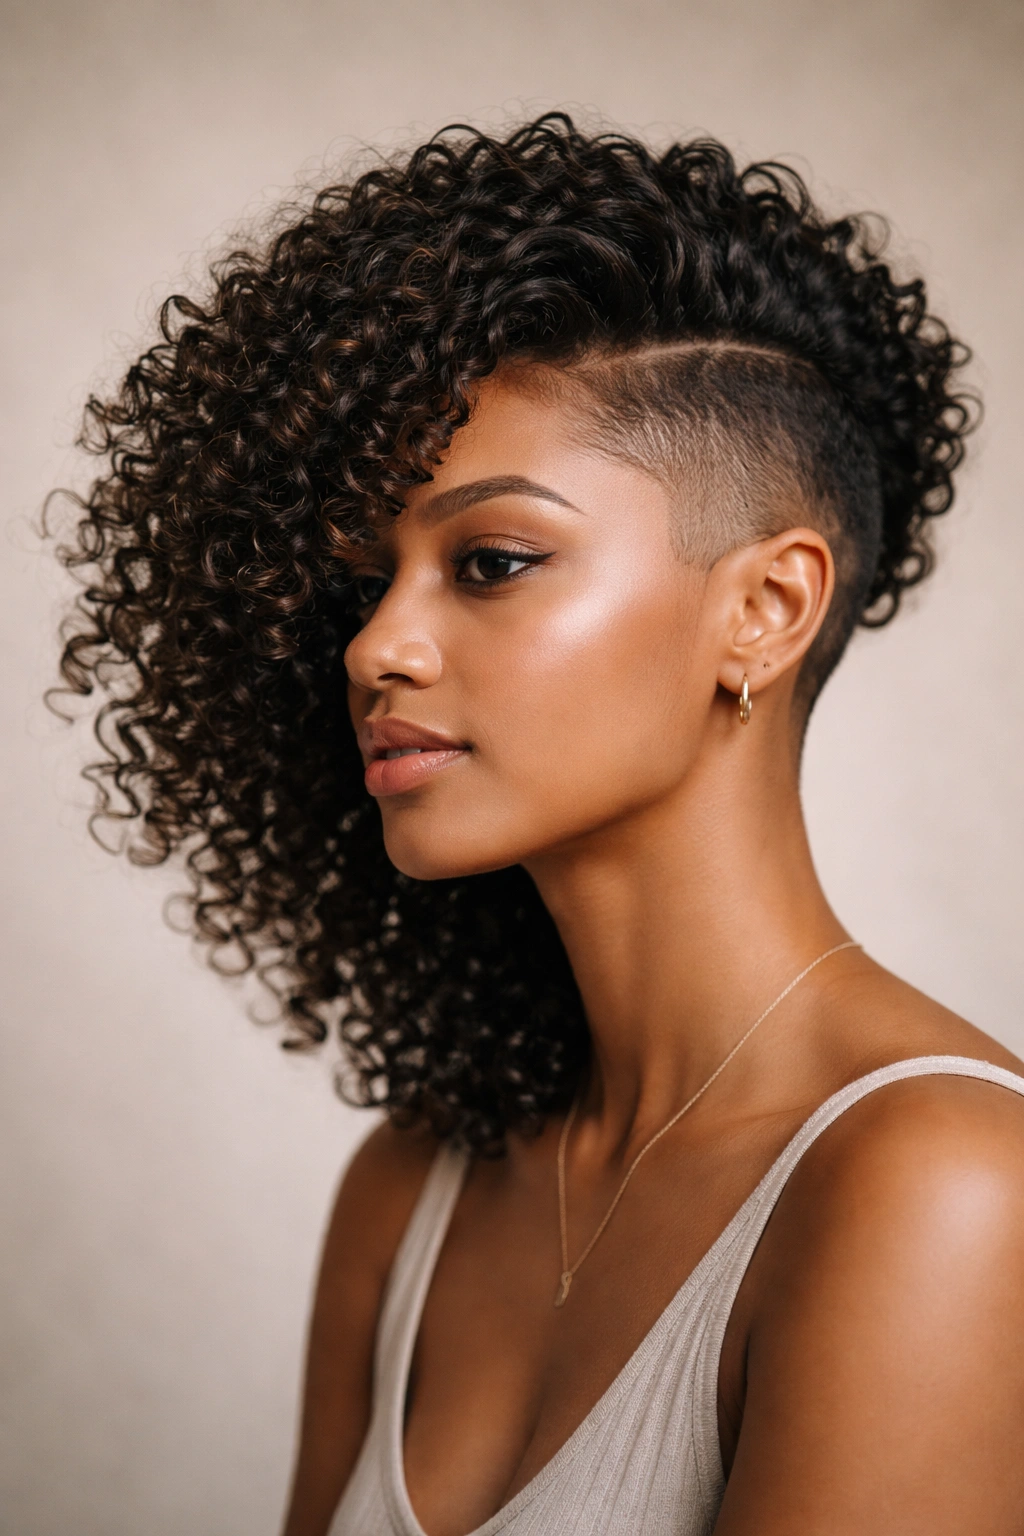
This is the style for when you want dramatic dimension and a modern edge. An undercut—either tapered or closely faded underneath—creates visual contrast that makes the curls on top look even fuller and more intentional. The side-swept element means your curls fall over one side of your head, creating an asymmetrical silhouette that photographs beautifully and feels intentional. It’s also genuinely practical because it moves your hair away from one side of your face while keeping fullness where you want it.
Creating the Right Contrast Length
An undercut works best when there’s real contrast between the shaved or very closely faded underneath section and your curl length on top. If your undercut is too long, it defeats the purpose visually. A good guideline is to fade underneath to about a quarter-inch, while maintaining at least 3-4 inches of length on top to show off your curl pattern. The fade should be gradual enough that it doesn’t look jarring, but distinct enough that there’s visible difference in texture and volume.
Styling Curls to Fall Over One Side
Determine which side you want the sweep on, then use a side part and let your curls naturally fall that direction. You can enhance this by side-sweeping your curls and securing them loosely with bobby pins hidden underneath the curl clumps. The goal isn’t a slicked-down side-swept look; it’s curls that fall naturally over one side and frame your face. Use a lightweight mousse or curl cream rather than gel on the sweep side to keep it looking soft rather than structured.
Maintaining the Undercut
The undercut requires a touch-up every 3-4 weeks to maintain the contrast and keep the edges sharp. Between cuts, you can trim the top section every 8-10 weeks to maintain shape, but avoid cutting too much length off at once, which disrupts curl pattern flow.
Insider note: Photography and mirrors reverse each other—what looks like a left-side sweep in the mirror is a right-side sweep in photos. Be intentional about which side you choose based on which side you think looks better in selfies.
4. Pineapple Updo for Volume
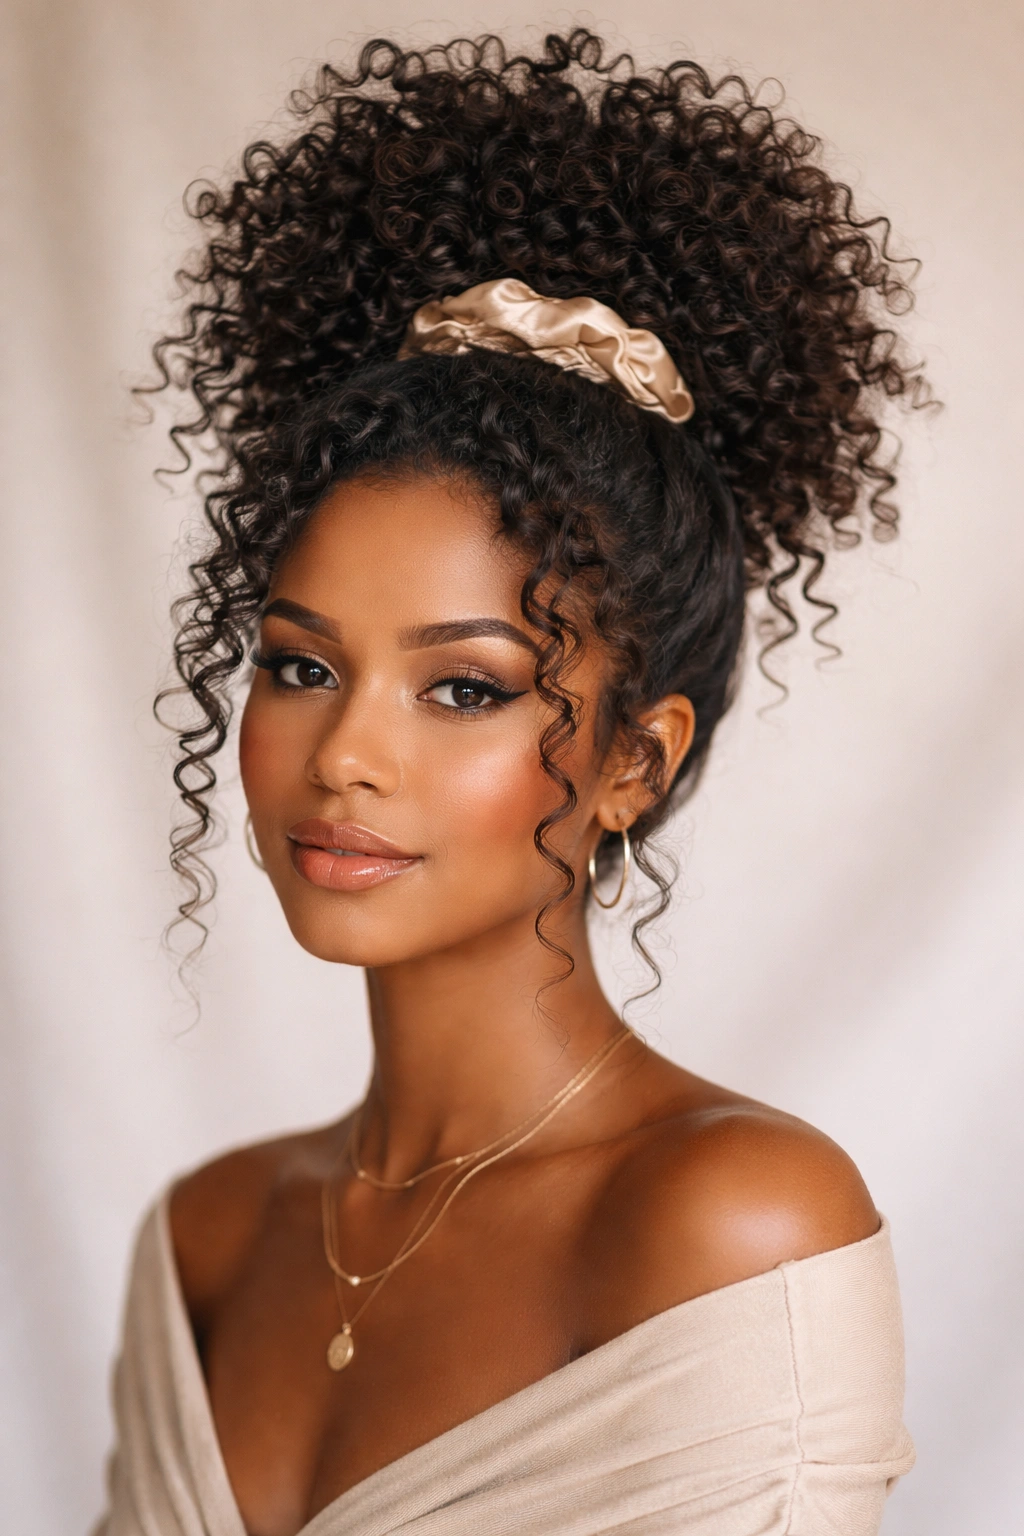
The pineapple is technically a method for preserving curls overnight, but styled correctly, it’s a genuinely beautiful, voluminous updo. Your 3c-4a curls bunch together at the crown in a naturally full shape that, when secured with a silk scrunchie and paired with loose tendrils, reads as an intentional, dressed-up style rather than a protective technique. This works beautifully for low-commitment styles on days when you want something that looks put-together but doesn’t require significant styling effort.
Gathering Hair for Maximum Crown Volume
Flip your head forward and gather all your hair into a very high gathering point at the crown—you want the base of the ponytail at the very top of your head, not at the back of your crown. As you flip back upright, let your hands guide the curls into a rounded, voluminous shape. Secure loosely with a silk or satin scrunchie; if it’s too tight, you’ll flatten the crown and lose the visual impact. The curls should sit in a large, defined cluster on top of your head, almost mushroom-shaped.
Styling the Top Section
Rather than hiding all your curls inside the scrunchie, intentionally leave a section of curls loose around your face and ears—at least two or three curl clumps on each side. These frame your face and keep the style from looking unfinished or sleep-time. Apply a light curl cream to the loose tendrils to define them separately from the main bunch.
Reinforcing the Look
Once you’ve gathered and secured your hair, gently tousle the top bunch of curls to make sure they’re not compressed flat against each other. You want visible individual curl clumps within the pineapple, not a single matted mass. A light spritz of hairspray helps the shape hold throughout the day.
Pro tip: Sleep in your pineapple updo (with a silk bonnet over top) to refresh your curls for a second day of wear without restyling. In the morning, just loosen the scrunchie, tousle, and go.
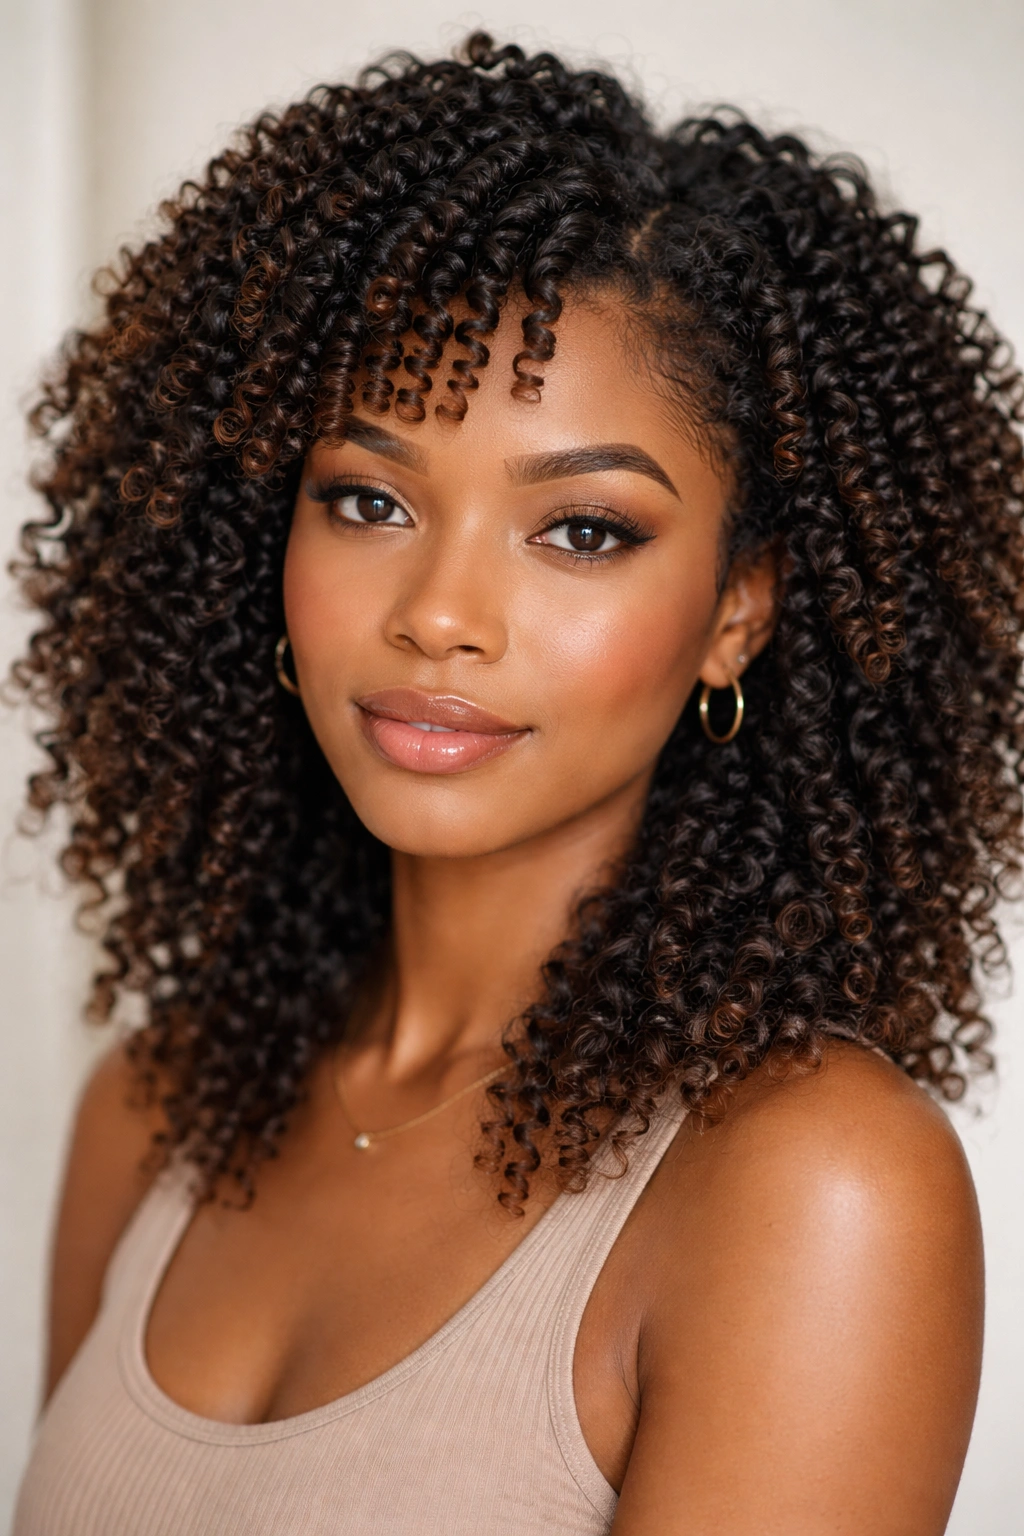
5. Two-Strand Twist Out
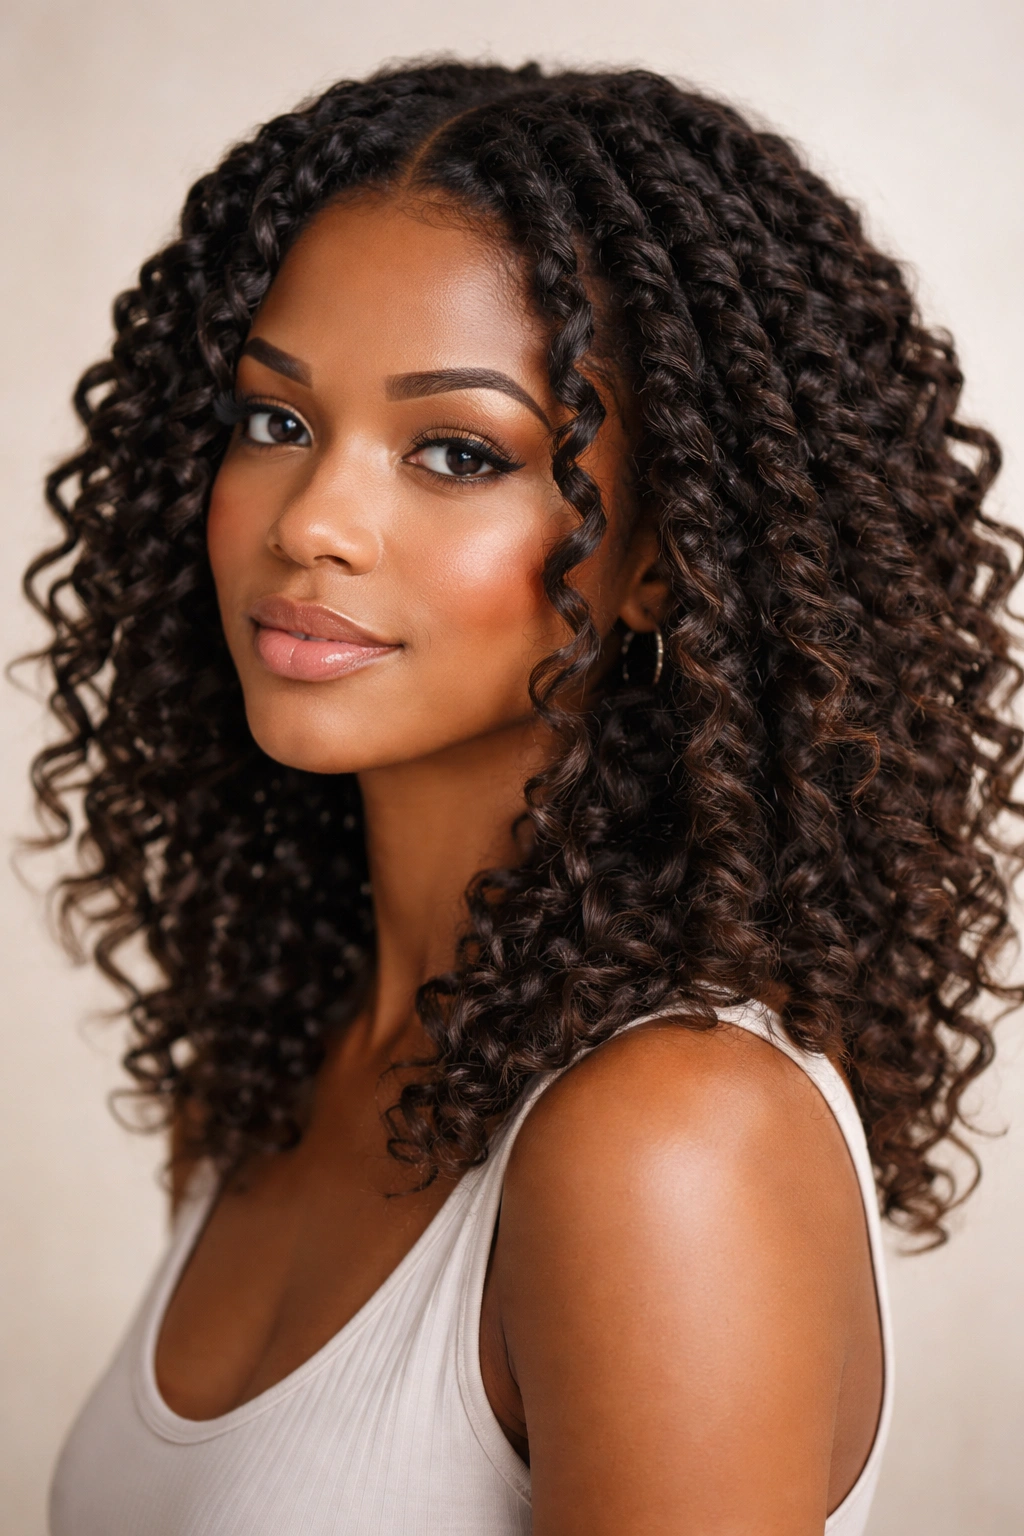
A two-strand twist out is the styling technique that works for almost every curl pattern, but it’s especially effective for 3c to 4a curls because your texture has enough body to hold a defined twist pattern while the curl spring relaxes into waves and ripples that look intentional. The result is a style that’s fuller and wavier than your natural curl pattern but still clearly textured—it’s the middle ground between loose waves and tight curls. You can wear it smooth for several days, and it actually looks better on days two through four as the pattern sets and the curls loosen slightly.
The Twisting Technique for Definition
Separate your hair into sections using clips to create manageable working areas. A good starting size is somewhere between the size of your index finger and your thumb—each twist should be thick enough to show movement but not so thick that it won’t set properly. Take two strands and twist them tightly around each other from root to tip, making sure to keep consistent tension throughout. For 4a texture, you might twist slightly tighter than for 3c to ensure the pattern sets. Once you’ve twisted all of your hair, you can either air-dry or use a diffuser—twists set faster than loose curls because the hair is already in a twisted formation.
Unraveling for Maximum Definition
The real payoff happens when you unravel the twists. Wait until your hair is completely dry (this is non-negotiable—damp twists will not give you definition). Unravel each twist slowly and deliberately, starting from the bottom and working upward. Don’t rush this step; carefully separated twists create larger, more defined waves, while pulling twists apart quickly creates frizz. Separate the unraveled twists gently with your fingers to create volume at the roots and encourage the waves to cascade rather than compress down on your head.
Styling the Twist Out
Once unraveled, you can leave the twist out as-is, or lightly smooth the waves with a curl cream or moisturizing product to define them further. Many people add a light gel to the roots for extra hold and definition. The beauty of this style is that it holds for 4-7 days with minimal maintenance; you can refresh with a light spritz of water and product on day three if needed.
Worth knowing: Twist outs look even more dramatic on second and third-day hair because the pattern loosens into softer, more structured waves. Fresh twists sometimes look too defined or wiry; give it a day for the texture to settle into something more relaxed.
6. Bantu Knots Set
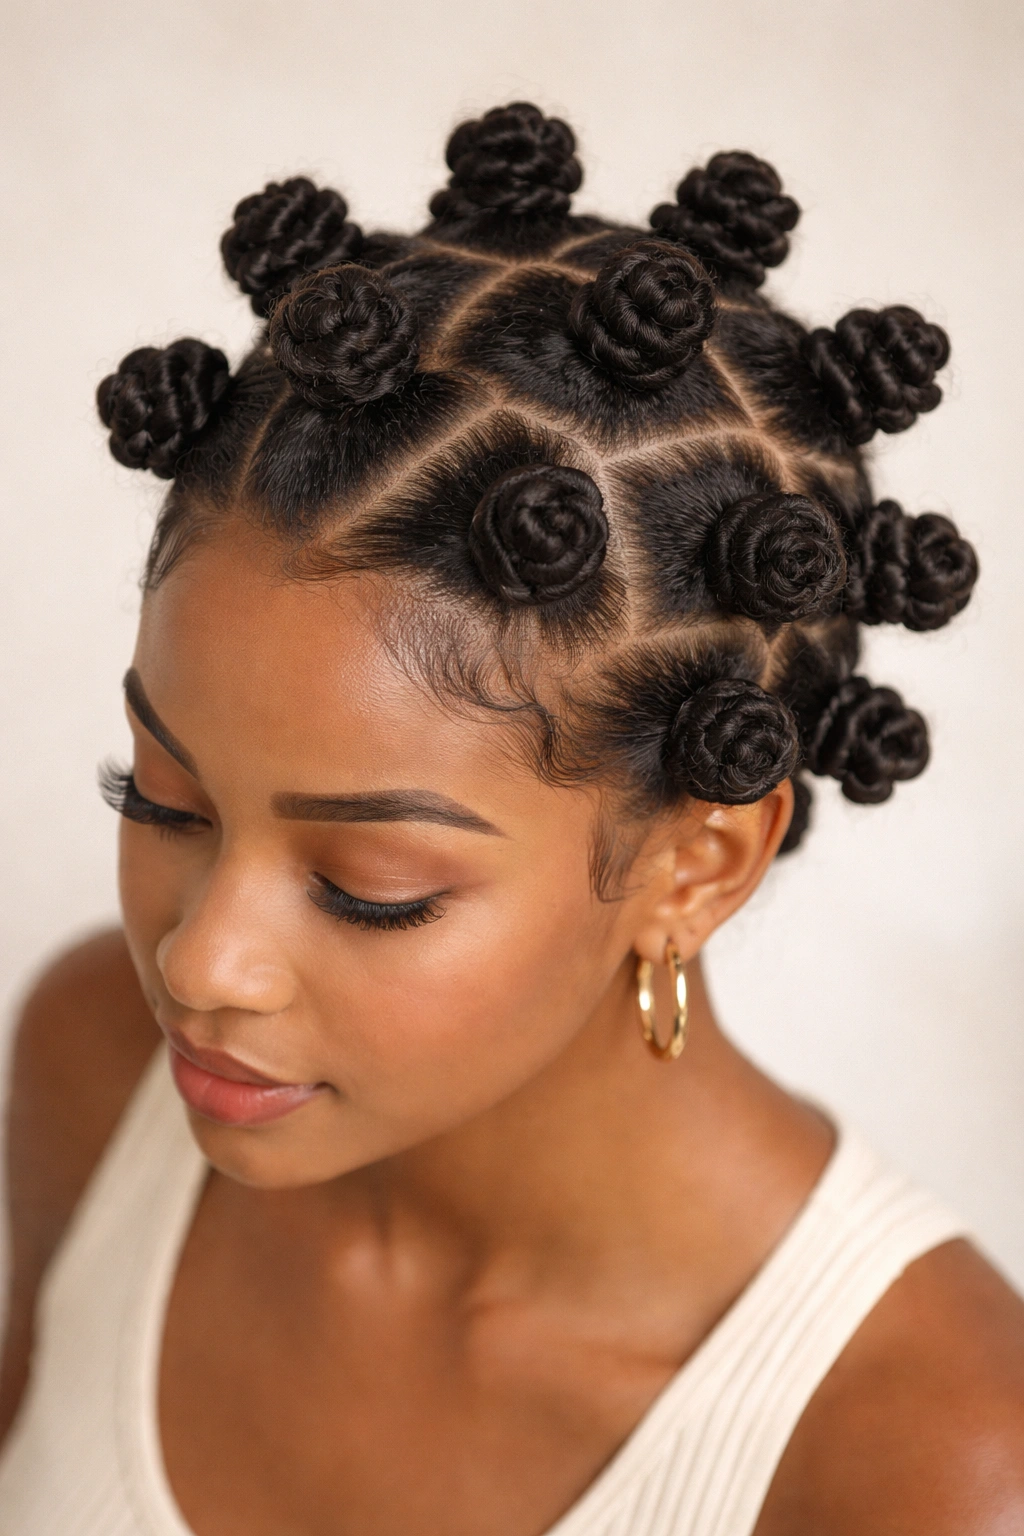
Bantu knots are a protective styling technique that creates the most beautifully defined curls when you unset them. Unlike twists, which create a wave pattern, bantu knots produce tight, consistent curl definition that often looks even more structured than your natural curl pattern. The technique involves wrapping small sections of hair around themselves to create a knot, then either air-drying or diffusing. When you unset the knots, you’re left with hair that’s curled to perfection with zero heat tools involved. This style takes time to set but rewards that effort with multiple days of flawless curl definition.
Creating Uniform Knot Sections
Divide your hair into even sections using clips—this ensures that all your knots will be roughly the same size, creating a cohesive look when you unset them. The size depends on how tight you want your curls; smaller knots create tighter curls, larger knots create looser curls. For 3c-4a texture, a section about the size of a dime usually works well. Spray each section lightly with water or a light mousse to give the hair grip as you wrap it.
The Wrapping Technique
Take a section and wrap it around your index finger (or around itself if you prefer not to use your finger), tightly wrapping the hair around the base until you’ve wrapped all the way to the ends. Secure the end by wrapping it around the knot and tucking it in. The knot should sit close to your scalp; loose knots that sit far from the scalp won’t produce curl definition at the roots. Once you’ve created all your knots, either air-dry completely (overnight) or diffuse on low heat for 1-2 hours.
Unraveling for Perfect Curls
Wait until your hair is completely dry, then gently unwrap each knot, working carefully to avoid disturbing the curl pattern you’ve created. As you unwrap, the hair naturally springs into a curl shape. Release the knot slowly rather than pulling it apart, which can create frizz. Once all knots are unwrapped, separate gently with your fingers if you want more volume, or leave untouched if you prefer a more defined, tighter curl look.
Pro tip: Apply a light gel or curl cream to each section before wrapping the knot to lock in extra definition and moisture. This helps the curls hold their shape throughout the wear period.
7. Flexi-Rod Bouncy Curls
Flexi-rods (also called spiral rods or foam rollers) create the bounciest, most uniform curls possible on your texture. Unlike bantu knots, which produce tighter curls, or twist outs, which create waves, flexi-rods deliver large, defined spirals that have real movement and spring. This is the technique for when you want glamorous, bouncy curls that look almost like they’ve been permed—except they’re entirely heat-free and far less damaging. The curls hold for days and actually improve as they set and loosen slightly into softer spirals.
Choosing the Right Rod Size
Flexi-rod size determines your final curl size: small rods (about a pencil width) create tight curls, medium rods (about your thumb width) create bouncy, defined curls that still have movement, and large rods create loose waves. For 3c-4a hair that you want to showcase, medium rods usually hit the sweet spot. Larger rods work if you want a wavier rather than curly final result.
The Rolling Technique
Section your hair into manageable pieces using clips. Take a section and apply a light gel or mousse to damp (not soaking wet, but not dry either) hair. Roll the section upward onto a flexi-rod, starting from the ends and rolling toward the roots. The section should be wrapped tightly around the rod, but not so tight that it crimps or damages the hair. Secure the rod by bending the ends together. Continue rolling sections all over your head, keeping them level with each other for consistency.
Setting for Perfect Curls
Once all rods are in place, air-dry completely (this takes 6-8 hours or overnight) or diffuse on low heat. Air-drying produces softer, more natural curls; diffusing produces faster drying with slightly tighter curl definition. Don’t remove the rods until your hair is completely dry; removing them while damp will cause the curls to relax before they’re set.
Unrolling and Styling
Gently unroll each rod, starting from the bottom of your head and working upward. The curls will spring free in a spiral formation. Separate gently with your fingers or a wide-tooth comb to create more volume and movement. Apply a light curl cream or gel if desired to enhance definition, but these curls often look best with minimal product since the rod-set creates such clean definition.
Insider note: Flexi-rod curls peak on day two after setting, when they’ve relaxed just slightly into softer spirals. Fresh rods sometimes look almost too perfect and defined; give it a day for them to settle into something with more movement.
8. Half-Up Crown Braid
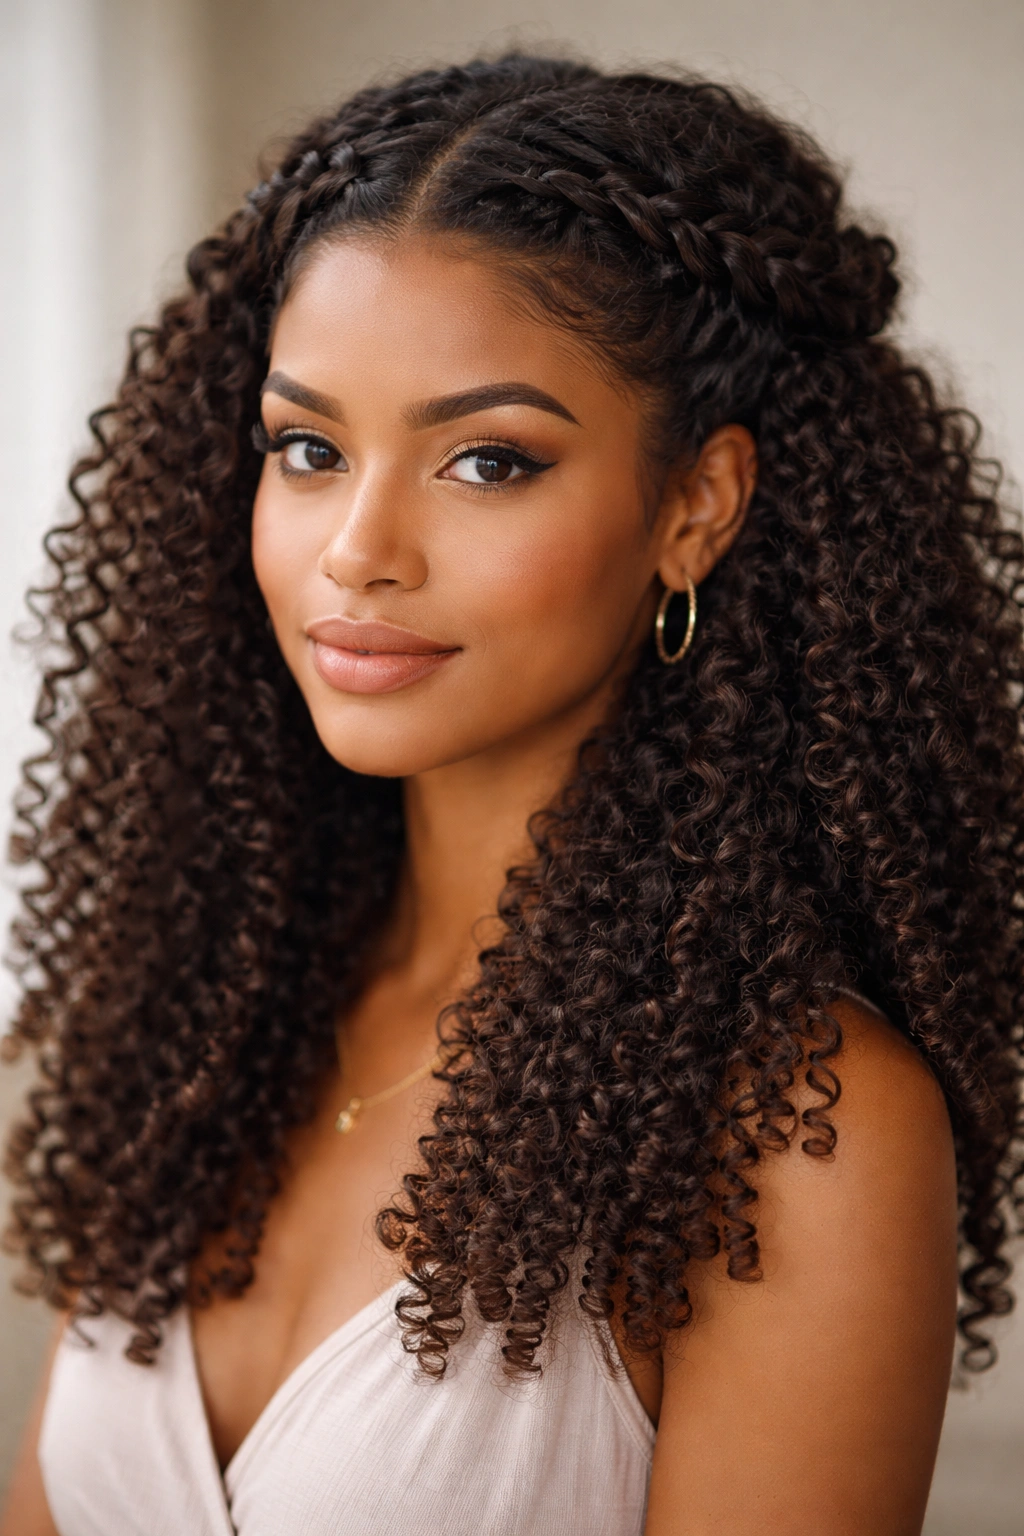
A half-up crown braid combines the sophistication of a braided style with the statement of your natural curl texture. The braid frames your face and creates an intentional polished look, while your full curls cascade down below, showing off your pattern and volume. This style works for virtually every occasion—casual, professional, date night, special events—and it’s versatile enough to wear with your curls as-is or styled with additional definition via gel or curl cream.
Creating a Seamless Crown Braid
Start with clean, moisturized curls with product already applied for definition. Create a deep side part on whichever side you prefer. Begin a Dutch or French braid (whichever you’re more comfortable with) starting at the hairline on one side of your head, braiding along the crown toward the other side. For a half-up style, braid only the top portion of your hair; braid until you reach the opposite temple, then stop.
Securing the Braid Invisibly
Gather the tail of the braid and the bulk of your loose curls at the crown into a low gathering point using a coated elastic. The braid tail and loose curls should mix together so it’s not obvious where the braid ends and the loose hair begins. This creates a soft, intentional look rather than a structured style. You can also skip the elastic and simply tuck the braid tail into the loose curls below, securing with bobby pins hidden underneath the curl clumps.
Styling the Loose Curls
The curls beneath the braid should look natural and full, not constrained. Let them cascade freely, and only add product if you want extra definition. The contrast between the structured braid and the loose, textured curls is what makes this style visually interesting. If you want more definition in your loose curls, apply a light gel or curl cream to them before creating the braid.
Worth knowing: This style holds best on second or third-day hair when your curls have settled into their pattern and your crown has some texture. Fresh wash-day curls might be too bouncy and may shift the braid position throughout the day.
9. Twisted Bun with Loose Tendrils
A twisted bun is the elevated version of a casual bun—instead of a messy topknot, you’re creating a bun using two-strand twists, which gives structure and visual interest while still looking intentional rather than hastily thrown together. The loose tendrils around your face and neck soften the look and frame your features, while the twisted bun keeps hair off your shoulders and neck. This is perfect for when you want something that’s polished enough for a professional setting but relaxed enough for weekend wear.
Creating a Twisted Base
Flip your head forward and gather your hair into a very high ponytail at the crown. Take the gathered ponytail and divide it into two thick sections. Two-strand twist these sections together tightly, wrapping them around each other all the way to the ends. Once you’ve created your twisted ponytail, wrap it around itself at the base to create a bun shape, tucking the twisted ends underneath and securing them with bobby pins.
Defining Your Tendrils
Before securing the final bun, pull out several small curl clumps around your hairline—around your temples, at the nape of your neck, and at your ears. These loose tendrils will frame your face. Apply a light curl cream or gel to these tendrils to define them separately from the main bun. The contrast between the defined, structured bun and the soft, loosely falling tendrils is what makes this style visually interesting.
Reinforcing the Bun Structure
Once you’ve secured the bun and positioned your tendrils, gently tousle the bun itself to make sure it’s not compressed flat. You want visible texture within the bun—individual curl clumps or the twist pattern showing through. A light spritz of hairspray helps it hold, but be careful not to oversaturate, which would flatten the texture.
Pro tip: Sleep in your twisted bun with a silk bonnet to refresh the style and preserve your tendrils for a second day of wear.
10. Finger Coils on Twist Out
Finger coils—individual curls created by wrapping hair around your finger—are the most defined curl method available, and they create the tightest, most structured curls possible on your texture. Combining finger coils with a twist-out base creates a hybrid style: the bottom sections are unraveled twists that create waves and dimension, while the top sections are finger-coiled for ultra-defined curls. This creates visual interest and texture variation that’s genuinely stunning, though it’s more time-intensive than other styling methods.
Creating the Twist-Out Base
Start by creating two-strand twists all over your head (using the technique described in the two-strand twist-out section). Allow twists to dry completely, then unravel them to create your wave pattern. This forms the base texture for your entire style.
Adding Strategic Finger Coils
Once your twist-out is complete, take small sections around your crown, temple, and face-framing areas and create finger coils. Dampen each section with a light misting of water mixed with leave-in conditioner, then wrap it tightly around your index finger from root to tip. Slide your finger out carefully, and the hair should spring into a tight coil shape. Secure the coil by tucking the end under and applying a tiny dab of gel. The finger coils create ultra-defined curls that contrast with the softer waves of the unraveled twists.
Setting and Styling
Allow coiled sections to dry completely (either air-dry or diffuse). Once dry, gently separate the unraveled twists with your fingers for volume and movement. The finger coils should remain relatively undisturbed; they’re the defined focal points of the style. Apply a light curl cream to the coiled sections only to enhance their definition, leaving the wave sections more natural.
Worth knowing: This style is genuinely beautiful but takes 2-3 hours to create. It’s best reserved for occasions when you have time to invest in your styling or for regular style refreshes when you want something visually different from your usual look.
Key Takeaways
The best hairstyle for your 3c to 4a curls is the one you can actually maintain between styling sessions and that makes you feel confident when you wear it. These ten styles represent different levels of styling commitment and different occasions, so mix and match techniques based on what works for your schedule, hair goals, and personal style. The foundational techniques—twists, coils, and product layering—are the real skills worth mastering; once you understand how these work on your specific curl pattern, you can combine and adapt them endlessly to create styles that are uniquely yours.
Your curl pattern is genuinely versatile. You’ve got enough spring and structure to hold defined patterns but enough softness to create waves and texture variation. That’s the sweet spot where most of the most interesting curl styling happens. The key is respecting what your hair naturally wants to do, working with that rather than against it, and giving yourself permission to try different techniques to find what resonates with your hair, your lifestyle, and your aesthetic. The investment in learning these techniques pays dividends—you’ll have go-to styles for literally any occasion, and you’ll never be stuck feeling like there’s nothing you can do with your hair.