Natural curly hair possesses an inherent elegance that makes formal events an opportunity to showcase texture, dimension, and personality—not something to hide or straighten away. The challenge many curly-haired individuals face isn’t whether their texture works for formal occasions; it’s discovering which styling techniques actually hold throughout an evening of dancing, celebrating, or sitting through a long ceremony. A style that drops halfway through the reception or loses its shape under humid conditions defeats the entire purpose, no matter how stunning it looked in the mirror that morning.
The good news? Natural curls are remarkably versatile when you understand how to work with their structure rather than against it. Formal doesn’t mean boring or flat—it means intentional, polished, and strategically shaped. The styles that photograph beautifully, last from ceremony to dancing, and make you feel genuinely confident are the ones that respect your curl pattern while providing enough hold and definition to elevate your look. Whether you’re drawn to sleek, structured updos or romantic styles that celebrate your coils, there’s a formal option that feels authentically you.
This guide walks through ten proven formal styles specifically designed for natural curly hair. Each style includes the exact technique to set your curls, the products that make the difference between a style lasting two hours versus all night, and honest troubleshooting for the specific challenges curly hair presents at formal events. You’ll also discover which styles work best for different face shapes, hair densities, and curl patterns—because what works beautifully on someone with thick 3B curls might need adjusting for fine 2C waves or dense 4C coils.
1. Sleek Low Bun with Softened Edges
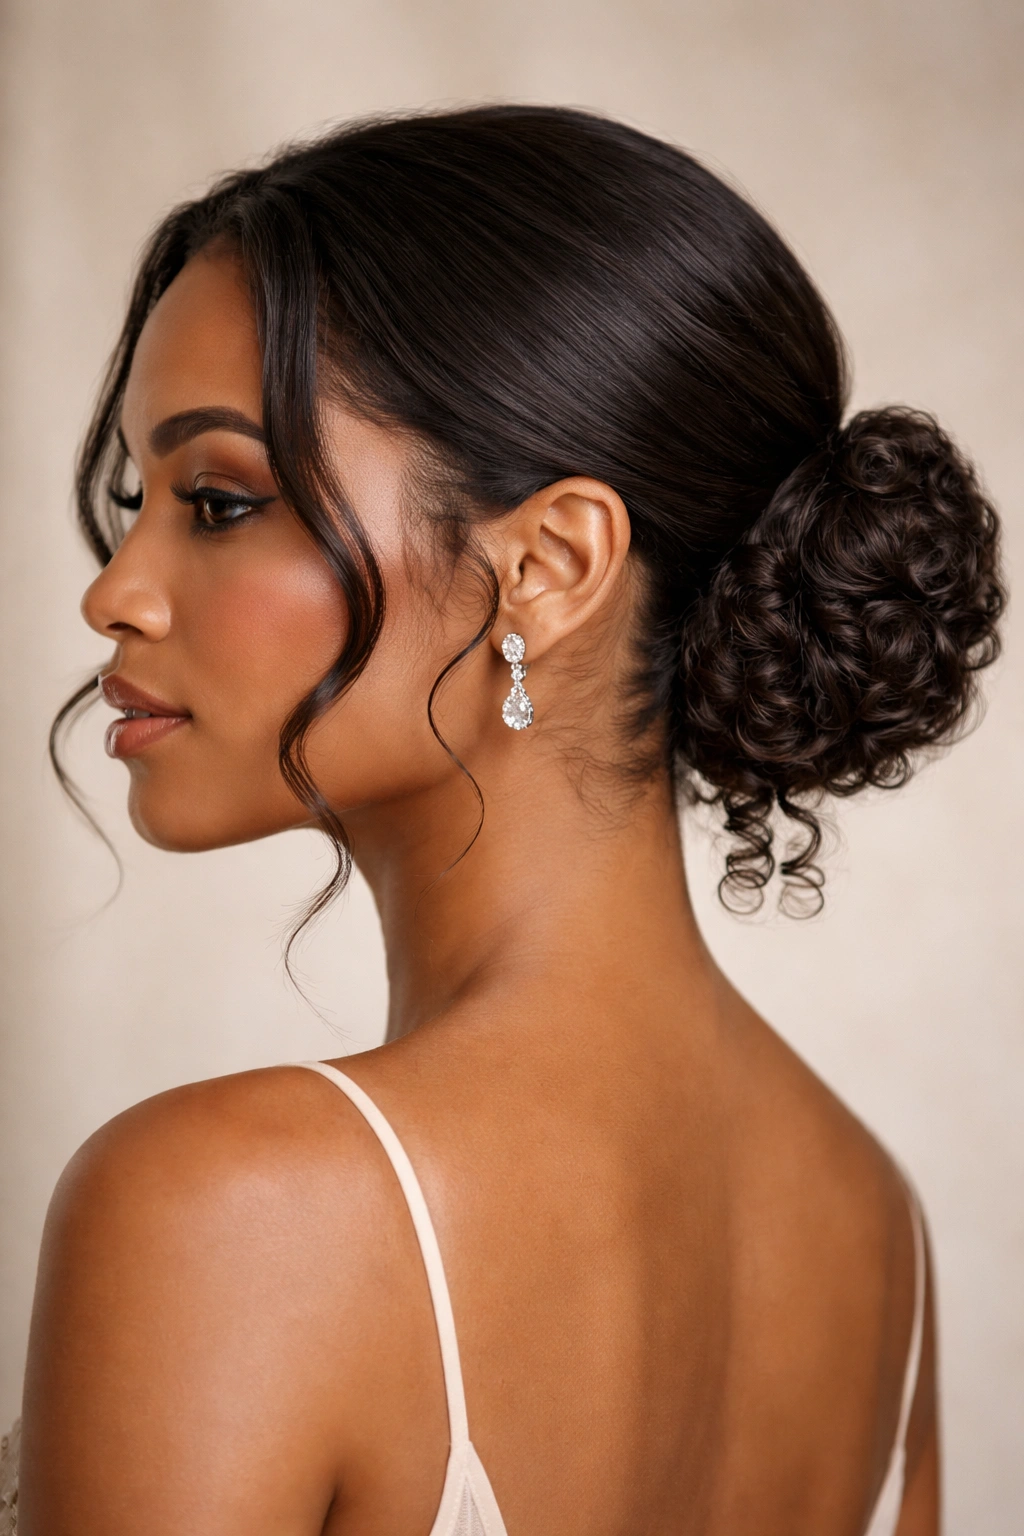
A sleek low bun communicates polish and sophistication while keeping curly hair structured enough to last through an entire formal event. The key to making this work on natural curls—rather than looking harsh or severe—is softening the front hairline with intentional face-framing pieces and allowing a few defined coils to escape at the nape, creating an intentional, romantic contrast to the sleekness.
Why This Works for Formal Elegance
This style transforms curly hair into a canvas that puts your face, jewelry, and attire front and center. By smoothing the hair into a low bun, you eliminate the visual bulk that sometimes overwhelms formal clothing, creating a clean neck line that pairs beautifully with strapless or backless dresses. The softened edges prevent the style from reading as overly severe—a problem many curly-haired people encounter when attempting sleek styles on textured hair.
Step-by-Step Technique for Maximum Hold
- Start with damp hair — slightly damp (not soaking) curls smooth more effectively than bone-dry texture and hold the style longer without frizz
- Apply a lightweight smoothing cream — work it through from roots to ends, focusing on the sections you’ll be sleeking back; this reduces frizz while maintaining definition in your coils
- Blow-dry your curls with a concentrator nozzle while scrunching gently to create defined coils; this step is crucial because it sets the curl structure before you smooth anything back
- Use a fine-tooth comb and edge control gel to smooth hair back into a low ponytail at the nape of your neck, working in small sections and laying the baby hairs around your hairline smoothly but not severely
- Twist the ponytail loosely and wrap it around the base to form the bun, securing with bobby pins placed horizontally (not vertically) for maximum hold
- Smooth any flyaways with edge control, then set everything with a flexible-hold hairspray—not a stiff, crunchy formula that makes curls look plastered
Pro Tip
Secure your low bun the night before a major formal event and sleep on it to test whether it stays put overnight. This real-world test reveals whether your gel, product combination, and pin placement will actually survive eight hours of wear.
2. Romantic Half-Up Crown with Defined Curls
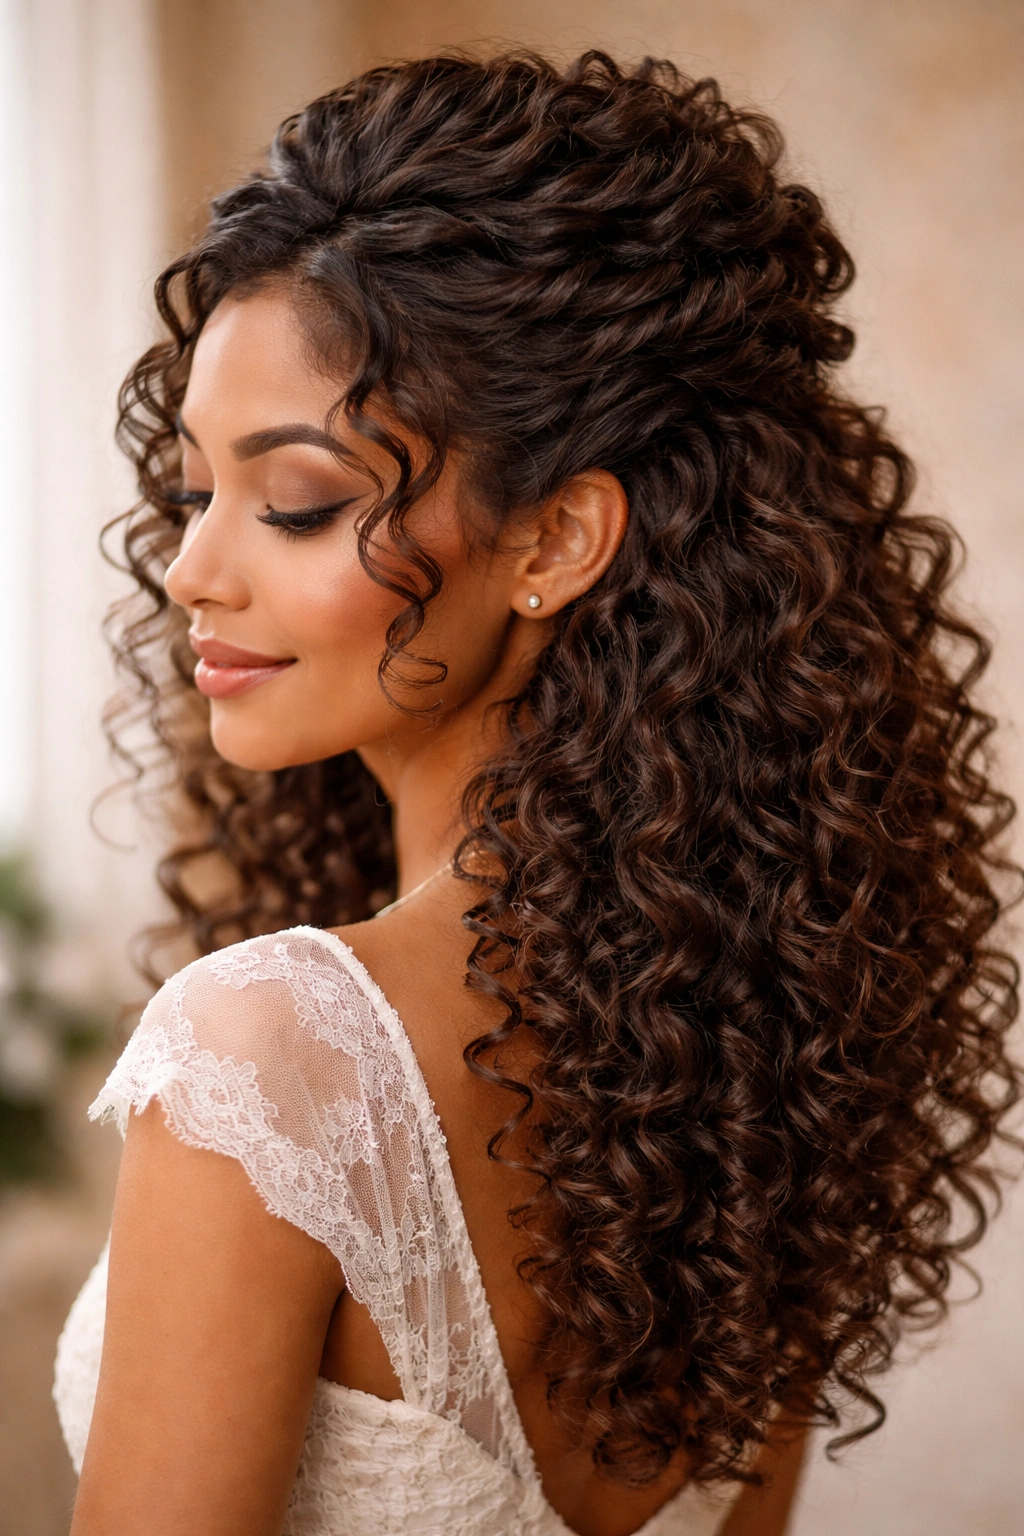
This style celebrates your natural curl pattern while creating an elevated, intentional look that photographs beautifully. A half-up crown on curly hair reads as effortlessly romantic rather than trying-too-hard—especially when the curls are visibly defined and separated, creating movement and dimension down your back.
How Texture Becomes Your Greatest Asset
Half-up styles work exceptionally well on curly hair because they create height and structure at the crown (which photographs beautifully and looks polished) while leaving the bottom half of your curls loose to showcase their natural beauty. The contrast between controlled and free, sleek and textured, is exactly what makes this style feel formal enough for a gala while remaining true to your natural texture.
Achieving Definition That Lasts All Evening
- Define your curls the morning of your event — use a curl-defining cream or gel applied to soaking-wet hair, then diffuse-dry to activate the curl pattern fully; this creates the foundation for all-day hold
- Create clean sections by using clips to divide your hair into a half-up section and a half-down section, making sure your half-up portion includes hair from both sides of your head at temple level
- Twist or braid the half-up section loosely (avoid tight tension, which creates breakage and a severe appearance) and secure it at the back of your head with bobby pins and a flexible-hold hairspray
- Separate and define individual curls on the bottom half using your fingers or a wide-tooth comb once the style is complete; this transforms a flat half-up into a dimensional, intentional look
- Refresh curls with a lightweight curl cream or re-moisturizer right before the event to boost definition and separation without weighing curls down
What Elevates This From Casual to Formal
The difference between a casual half-up and a formal one is intentionality in the details: precise parting, clearly defined curls rather than a blob of texture, and polished securing that looks secured-on-purpose rather than accidentally held together. Add a delicate hair pin or small comb clip for extra polish if the occasion calls for it.
3. Twisted Side Ponytail with Wrapped Base

A side ponytail on curly hair has inherent drama and movement, especially when you create twisted sections that add visual interest and appear more intricate than the time required to execute. The wrapped base transforms a simple ponytail into something sophisticated and formal-appropriate.
Why Side Placement Changes Everything
A centered ponytail on curly hair can sometimes look plain or emphasize a top-heavy curl pattern. Moving your ponytail to the side immediately creates asymmetry and visual interest, making the style feel more deliberate and editorial. This placement also photographs beautifully over either shoulder and flatters most face shapes.
Creating Defined Twists Without Crunchiness
- Work with damp, freshly-curled hair — blow-dry curls fully defined, then lightly mist the sections you’ll be twisting to make them pliable without creating frizz
- Divide hair into 3-4 sections on one side of your head (the side your ponytail will sit on) and twist each section loosely, maintaining visible texture within each twist rather than making them sleek and sealed
- Gather the twisted sections along with loose hair on that side into a side ponytail at about ear level, securing with a elastic that matches your hair color
- Wrap a small section of hair around the base of the ponytail to hide the elastic, pinning it underneath; this detail elevates the entire look
- Mist the twists and ponytail lightly with a humidity-resistant hairspray to keep definition sharp without the ponytail looking wet or sticky
- Separate curls in the ponytail tail to add movement and dimension, preventing it from reading as one solid mass
The Hold-All-Night Secret
Twist your ponytail slightly tighter than feels natural—it will loosen slightly as the night goes on, reaching the perfect balance of “held together” and “romantically tousled” by the time you’re dancing. A looser initial twist means you’ll be readjusting by hour three.
4. Polished High Knot with Strategically Placed Face-Framers
A high knot (not quite a bun, more of a gathered, twisted knot at the crown) creates height and drama on curly hair while keeping your look feeling modern and fashion-forward rather than matronly or dated. The key to making this work formally is strategic placement of smooth face-framing pieces that soften the look.
Building Structure at the Crown
High placements immediately make you look taller and draw the eye upward, which is why this style works beautifully for formal photos and occasions where you want to feel elongated and elegant. On curly hair, where texture can sometimes feel heavy or bottom-heavy, this upward emphasis becomes even more valuable.
Technique for a Knot That Holds Twelve Hours
- Blow-dry curls fully with a concentrator nozzle, scrunching for definition; skip the diffuser for this style since you want smoother curls at the crown
- Use a fine-tooth comb and smoothing cream to comb the top third of your hair backward toward the crown, creating a smooth base without slicking it completely flat (a tiny bit of volume matters here)
- Gather hair at the crown and twist it in one direction tightly, then wrap the twisted section around itself to form a knot, securing with multiple bobby pins placed in different directions
- Leave 2-3 face-framing pieces untwisted by clipping them out of the way before you start twisting; these should frame your face loosely, with visible curl definition
- Apply a strong-hold gel underneath the knot base where it connects to your scalp, then seal everything with a flexible hairspray; this prevents the knot from loosening as you move throughout the evening
- Smooth flyaways around the face-framing pieces and hairline with a light edge control, maintaining natural texture rather than making them look plastered
Pro Tip
Practice this style at least twice before your formal event. The knot-wrapping technique feels awkward the first time; by your second attempt, you’ll know exactly how tight to twist and how many bobby pins you actually need.
5. Braided Updo with Defined Curls Cascading Down
Braiding curly hair for formal occasions creates a sophisticated, textured alternative to smooth updos. Rather than braiding the curls away entirely, this style braids sections strategically while allowing defined curls to cascade loose, creating a balance between structure and celebration of your natural texture.
Why Curls in Braids Look More Intentional Than Smooth Braids
A braid made from smooth, straightened hair can sometimes read as trying-too-hard-to-contain texture. A braid woven through defined curls, on the other hand, reads as intentional and editorial—you’re working with your hair’s natural movement, not against it. The contrast between the structured braid and the free curls below creates visual interest that photographs beautifully.
Building a Braid System That Doesn’t Unravel
- Define your curls first with a curl cream or gel, blow-dry them fully, then gently separate individual coils with your fingers to maximize dimension
- Create 2-3 Dutch or French braids (depending on your hair density and how dramatic you want the style) starting at the sides or back of your head, keeping the braids loose enough that you can see the curl texture within them
- Braid only to about ear level, then gather all hair (braided and loose curls) into a low ponytail or bun at the nape
- Secure braids into the base with bobby pins in multiple directions; braids loosen more quickly than twisted sections, so take extra time here
- Fluff and separate the cascading curls below the gathered base, using your fingers or a wide-tooth comb to create definition and movement
- Mist everything with a curl-specific, humidity-resistant hairspray that won’t make the braids look wet or the curls look crunchy
The Visual Impact
This style works beautifully for outdoor formal events (garden parties, destination weddings) where the play of light on textured braids and defined curls creates dimension you can’t achieve with smooth styles.
6. Low Twisted Bun with Face-Framing Curls
This style bridges the gap between sleek and romantic—offering the polish and control of a bun while keeping your curl pattern visible and intentional. The face-framing curls prevent the style from feeling severe, making it appropriate for formal occasions where you want to look polished without looking severe.
When Simplicity Photographs Best
Sometimes the most elegant formal styles are the simplest ones executed with precision. A low twisted bun is a timeless style that photographs beautifully, feels secure and comfortable (important when you’re sitting through a ceremony), and allows your face and features to take center stage.
The Twist Technique That Survives Humidity
- Apply a lightweight curl-defining cream to damp hair and blow-dry curls with a concentrator nozzle, scrunching for definition; this creates the texture foundation
- Leave out face-framing pieces (about 1-1.5 inches on each side of your face) by clipping them away from the rest of your hair
- Gather the remaining hair into a low ponytail at the nape, securing with an elastic; this is your base
- Divide the ponytail into two sections and twist each one tightly in the same direction (both clockwise or both counterclockwise), then wrap the two twisted sections around each other to form the bun
- Secure the bun with multiple bobby pins inserted horizontally, then wrap a small section of hair around the base to hide the elastic
- Release face-framing curls and ensure they have visible definition and separation; re-define them with a light curl cream if they’ve lost shape
- Set with a flexible-hold hairspray that won’t make the style feel stiff or crunchy
Professional Polish Detail
Smooth the bun base with a light smoothing cream before twisting, but don’t over-smooth—you want a polished finish, not a plasticky, heavily-gelled appearance.
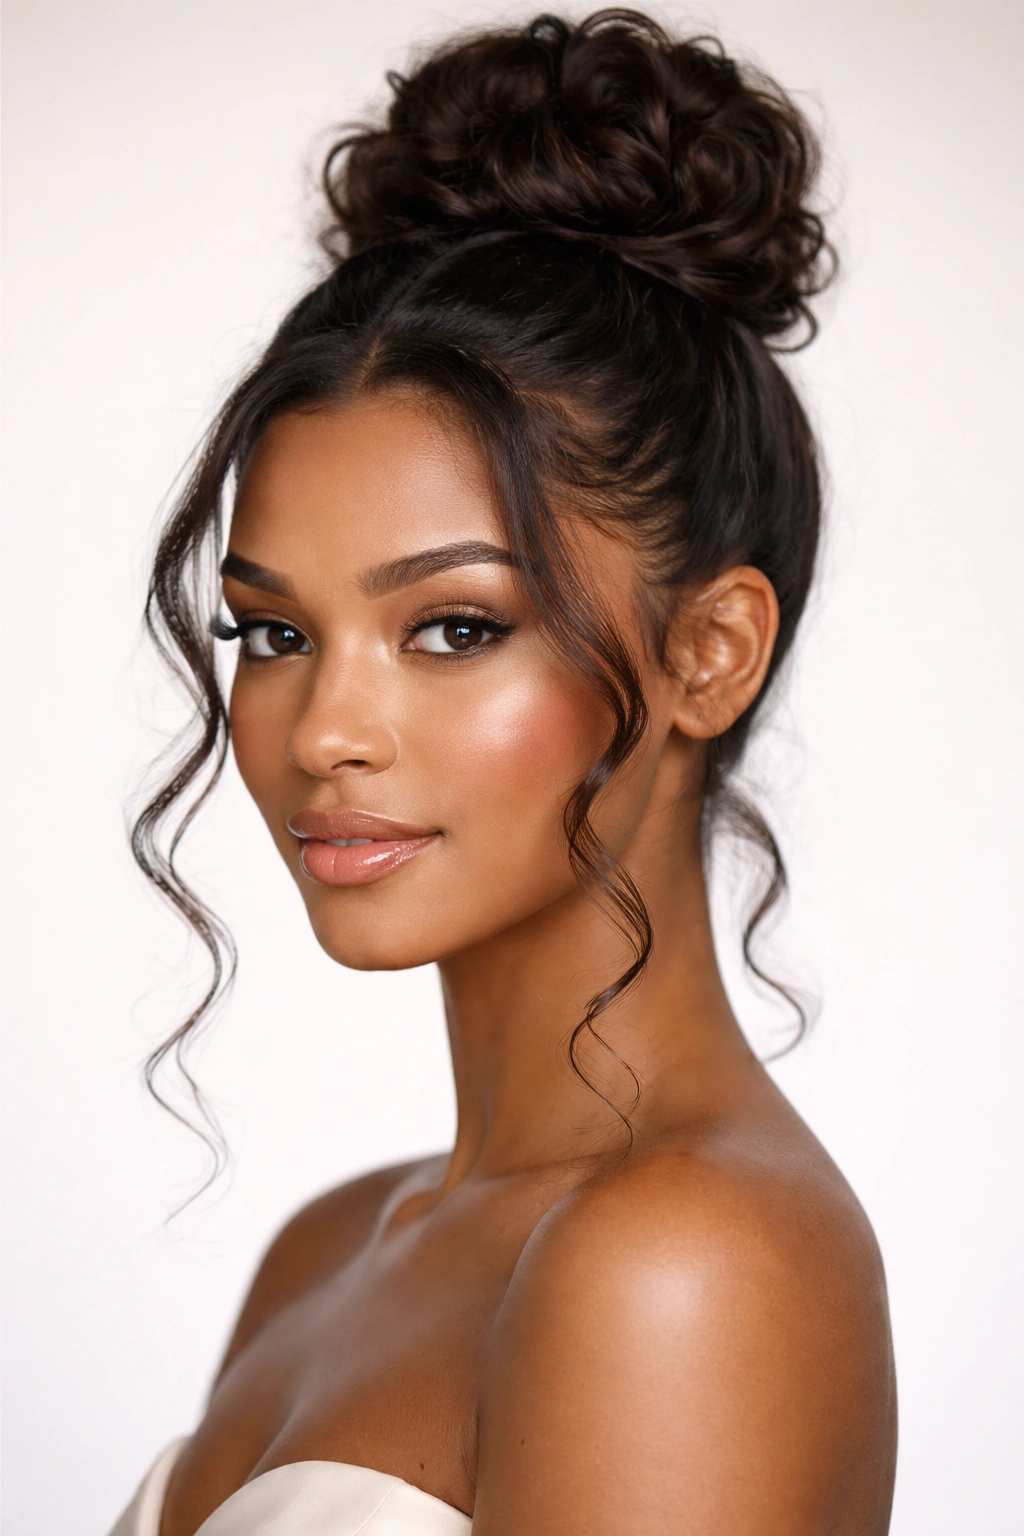
7. Structured Puff with Wrapped Crown Detail
A puff (a gathered, voluminous updo at the crown) on natural curly hair is a statement style that reads formal, powerful, and intentional. Unlike casual puffs, a formal puff requires strategic smoothing at the base and decorative wrapping to elevate it beyond everyday styling.
How Crown Puffs Complement Curly Hair
Puffs showcase the volume and dimension that natural curls provide, making them look spectacular—but they require more structural support than looser curl styles for formal wear. The wrapped crown detail transforms a basic puff into something polished and occasion-appropriate.
Building a Puff With Architectural Support
- Blow-dry curls fully to maximize volume and set the curl pattern in place; dampness will cause the puff to deflate as the night goes on
- Apply a light smoothing product to the hair at your crown and smooth it upward with a fine-tooth comb, creating a flat base without eliminating all texture
- Gather hair at the crown into a high ponytail, securing tightly with a strong elastic; this base must be secure enough to support several hours of wear
- Fluff the ponytail upward and outward to create a full, rounded puff, using your fingers to separate curls and create dimension
- Wrap a decorative section of hair (or a coordinating ribbon, silk cord, or hair jewelry) around the base of the puff, securing it with bobby pins; this adds polish and hides the elastic
- Define individual curls within the puff using your fingers, creating intentional texture rather than a blob of frizz
- Smooth the hairline around the base of the puff with edge control, then set everything with a strong-hold hairspray
Why Puffs Photograph So Well
The height and volume of a puff creates a stunning silhouette in photos, especially from the side or back—which is why this style works beautifully for formal photos and weddings where you’ll be photographed from multiple angles.
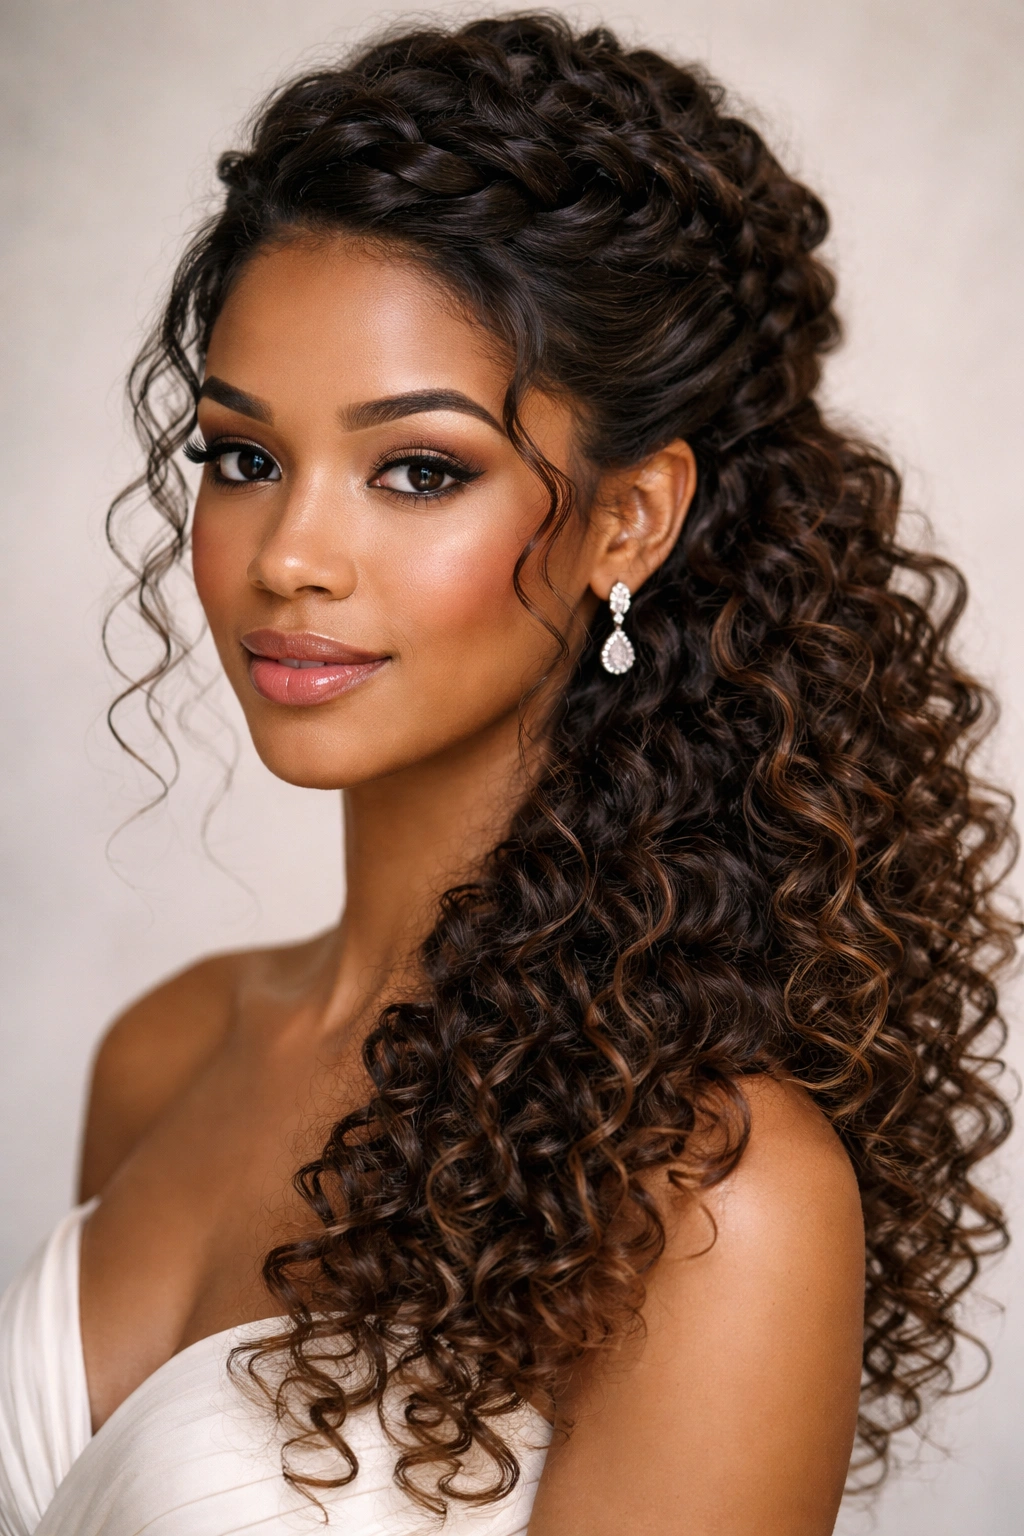
8. Double-Twisted Crown with Cascading Curls
This style creates the visual impact of an intricate updo while using a simple two-twist technique. The twists form a crown across the back of your head, while curls cascade down, creating romance and movement that balances the structured crown.
Creating Asymmetrical Elegance
Unlike styles that feel symmetrical and centered, a double-twisted crown reads as more editorial and fashion-forward—especially when the twists aren’t perfectly identical and the cascading curls have visible movement and dimension.
The Two-Twist Method for All-Night Wear
- Define your curls fully with a curl cream or gel, blow-dry, and separate individual coils for maximum dimension
- Take a section of hair from one side of your head (at temple level) and twist it loosely backward, maintaining visible curl texture within the twist
- Take a corresponding section from the other side of your head and twist it in the same direction, meeting the first twist at the back of your head
- Overlap the two twists slightly and secure them together with bobby pins, creating a crown effect across the back; the pins should be invisible when viewed from behind
- Leave the lower half of your hair loose, with defined curls cascading down your back; separate these curls with your fingers to maximize movement
- Mist the twists with a lightweight hairspray that won’t make them look wet or heavy; you want them to look soft and intentional, not plastered
- Refresh cascading curls right before the event with a light curl-defining cream to ensure they have separation and shine
The Occasion Upgrade
This style works beautifully for both formal celebrations (galas, award ceremonies) and romantic occasions (rehearsal dinners, engagement parties) because it balances sophistication with femininity.
9. Elegant Coil-Out Formal Style with Defined Separation
Not every formal style requires an updo. An intentionally styled coil-out—where individual curls are defined, separated, and styled with precision—can be just as formal and elegant as any bun, especially when paired with strategic smoothing and polished accessories.
When Wearing Your Curls Down Reads as Sophisticated
A coil-out becomes formal when the curls are visibly intentional: each coil separated, shaped, and defined rather than appearing as one mass of texture. This requires more styling effort than an updo, but the payoff is a style that feels uniquely you while still reading as polished and occasion-appropriate.
Sculpting Individual Curls for Maximum Impact
- Start with freshly-cleansed hair, ideally in its most defined state (freshly washed and deep-conditioned curls hold shape better than day-old curls)
- Apply a curl-defining gel or cream to soaking-wet hair in sections, working it through from root to tip
- Diffuse-dry each section completely, allowing the curl pattern to set fully; partially-dried curls will relax and lose definition as the day goes on
- Separate individual curls with your fingers or a fine-tooth comb, creating intentional coils rather than a clumpy texture
- Use a light smoothing cream on your hairline and baby hairs, smoothing them down without eliminating all texture; this creates a polished frame for your face
- Shape curls as needed with a small curling brush or your fingers, re-activating them with a curl cream if they’ve lost their shape during diffusing
- Mist everything with a humidity-resistant, flexible-hold hairspray that will hold definition without making curls look crunchy or stiff
Accessory Elevation
A formal coil-out becomes even more occasion-appropriate when paired with a delicate hair comb, small barrette, or wrapped section at one side—these details signal that you’ve intentionally styled your hair for the occasion.
10. Sculpted Side Sweep with Volume and Movement
This style creates dramatic side-swept movement while maintaining the definition and volume that makes curly hair visually striking. The sculpted elements (smooth side-swept sections) contrast with loose, defined curls, creating an editorial, fashion-forward formal look.
Why Side Sweeps Photograph Beautifully
A side-swept hairstyle creates asymmetry that’s inherently flattering and photographs beautifully from the opposite side of the sweep. The movement created by the sweep, combined with cascading defined curls, reads as dynamic and polished rather than static or severe.
Building Dramatic Movement Without Frizz
- Define your curls fully with a curl-defining product and blow-dry with a concentrator nozzle, scrunching for texture
- Apply a lightweight smoothing cream to the sections you’ll be sweeping (typically one entire side of your head), working it through smoothly without eliminating all texture
- Blow-dry the smooth sections with a paddle brush, directing hair toward the side you want it to sweep, creating a smooth base
- Secure the swept sections on the opposite side of your head with bobby pins placed underneath the smooth hair (so they’re invisible), creating a subtle hold that allows the sweep to feel natural rather than forced
- Leave the back and other side loose with visible curl definition; separate these curls with your fingers to maximize dimension
- Shape and fluff the loose curls into the back and sides, creating volume that balances the smooth-swept side
- Finish with a humidity-resistant hairspray, applying more heavily to the swept sections to ensure they maintain their shape
- Add a decorative pin, comb, or small clip where the swept section is secured, turning the functional pin into a style detail
The Confidence Factor
This style works best when you commit to the sweep—half-hearted smoothing and unsecure pinning will leave you readjusting your hair throughout the event. One good practice run before the actual occasion builds the confidence to execute it flawlessly.
Final Thoughts
Formal styling for natural curly hair isn’t about choosing between your curl pattern and looking polished—it’s about understanding which techniques honor your texture while providing the structure and intentionality that formal occasions demand. Each of these ten styles works with curly hair’s natural properties rather than fighting them: the grip that allows twists to hold without slipping, the volume that creates impact in updos, the individual curl definition that photographs beautifully.
The common thread running through every formal curly hairstyle is definition before styling. Whether you’re creating a sleek bun or a romantic coil-out, the first step is always fully defining your curl pattern—with product, with heat, with intentional separation—so that every style you build on that foundation starts from a place of strength. Curls that are properly defined hold their shape, avoid frizz, and remain visibly beautiful throughout an entire evening.
Practice matters more with curly hair than with straight hair because texture responds differently to technique each time. A twist that feels perfect at practice might need slightly tighter securing on the actual day based on humidity, your hair’s moisture level, or the products you’re using. Building muscle memory through trial runs means you’ll execute your chosen style with confidence when it genuinely matters, resulting in a look that feels authentically you—polished, powerful, and ready to celebrate.