There’s something magical about claw clips—they’ve become the unofficial hero of the modern hair drawer, and honestly, they deserve the hype. Unlike elastic bands that create that telltale crease and leave your hair kinked, claw clips grip your hair gently while maintaining movement and texture. Combine that with a ponytail base, and you’ve got a styling tool that transforms your whole look in a matter of seconds. Whether you’re rushing out the door, dealing with a bad hair day, or just want a polished style that doesn’t feel fussy, a claw clip ponytail is the answer. The best part? These styles work whether your hair is fresh, textured, curly, wavy, or straight—and they actually look better when your hair isn’t perfectly smooth and pristine.
The styles below aren’t complicated or overly trendy. They’re the kind of ponytails you’ll actually reach for repeatedly because they’re quick, they look intentional, and they genuinely work with the way your hair naturally falls. Each one takes under two minutes once you understand the core technique, so let’s walk through them one by one.
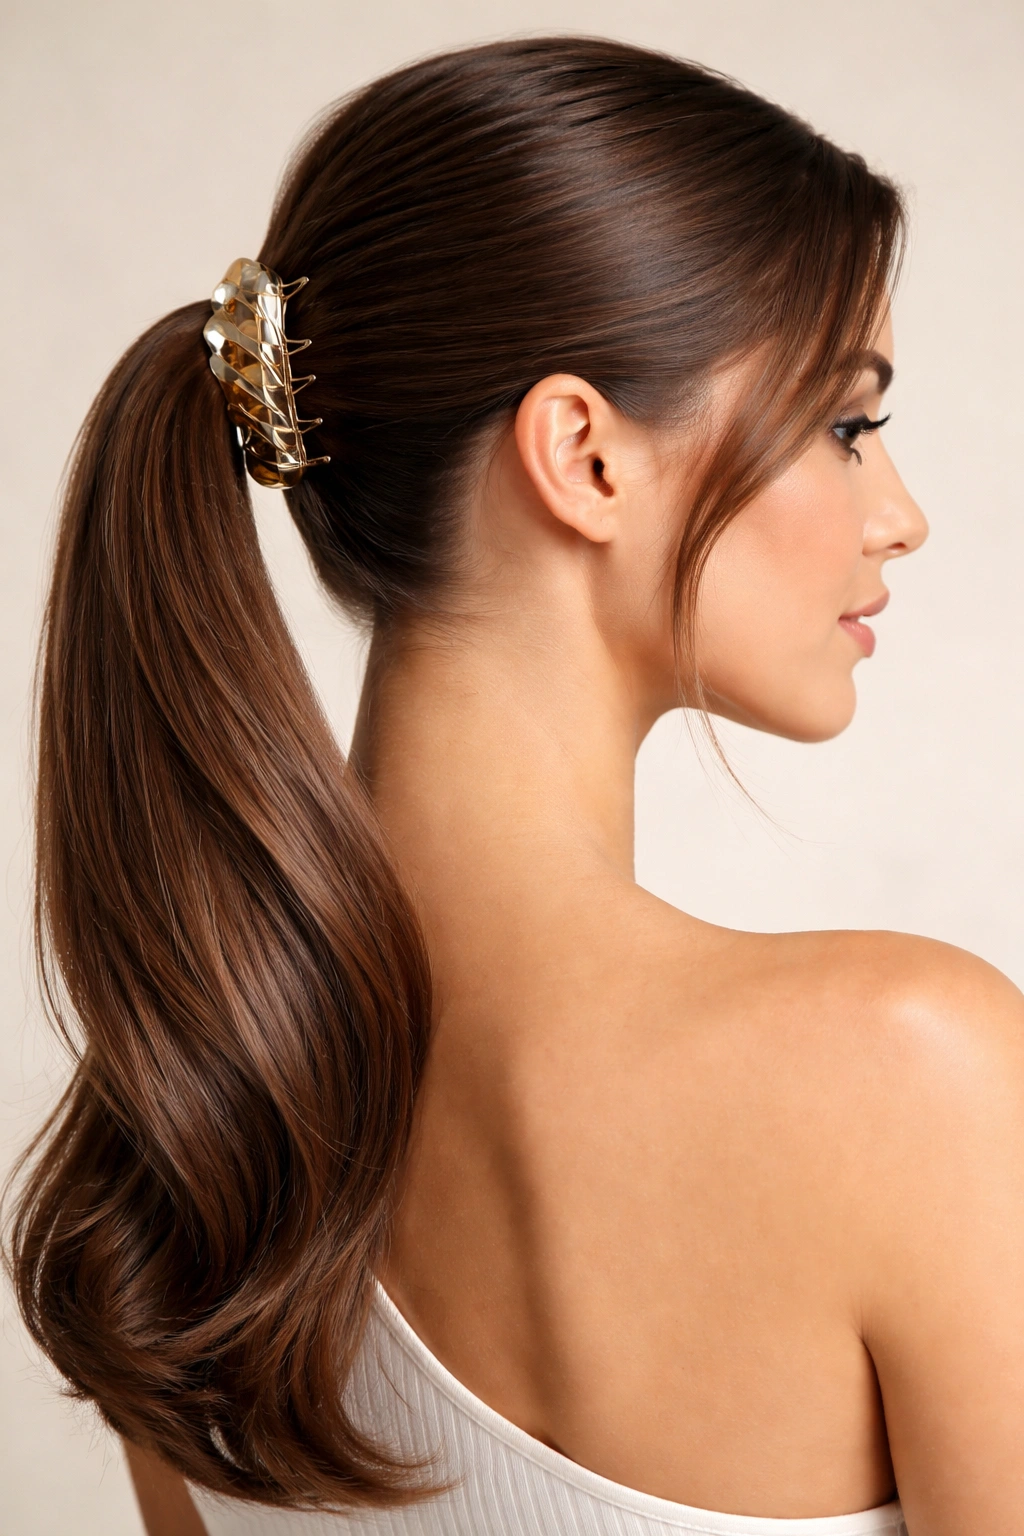
1. Classic Sleek High Claw Clip Ponytail
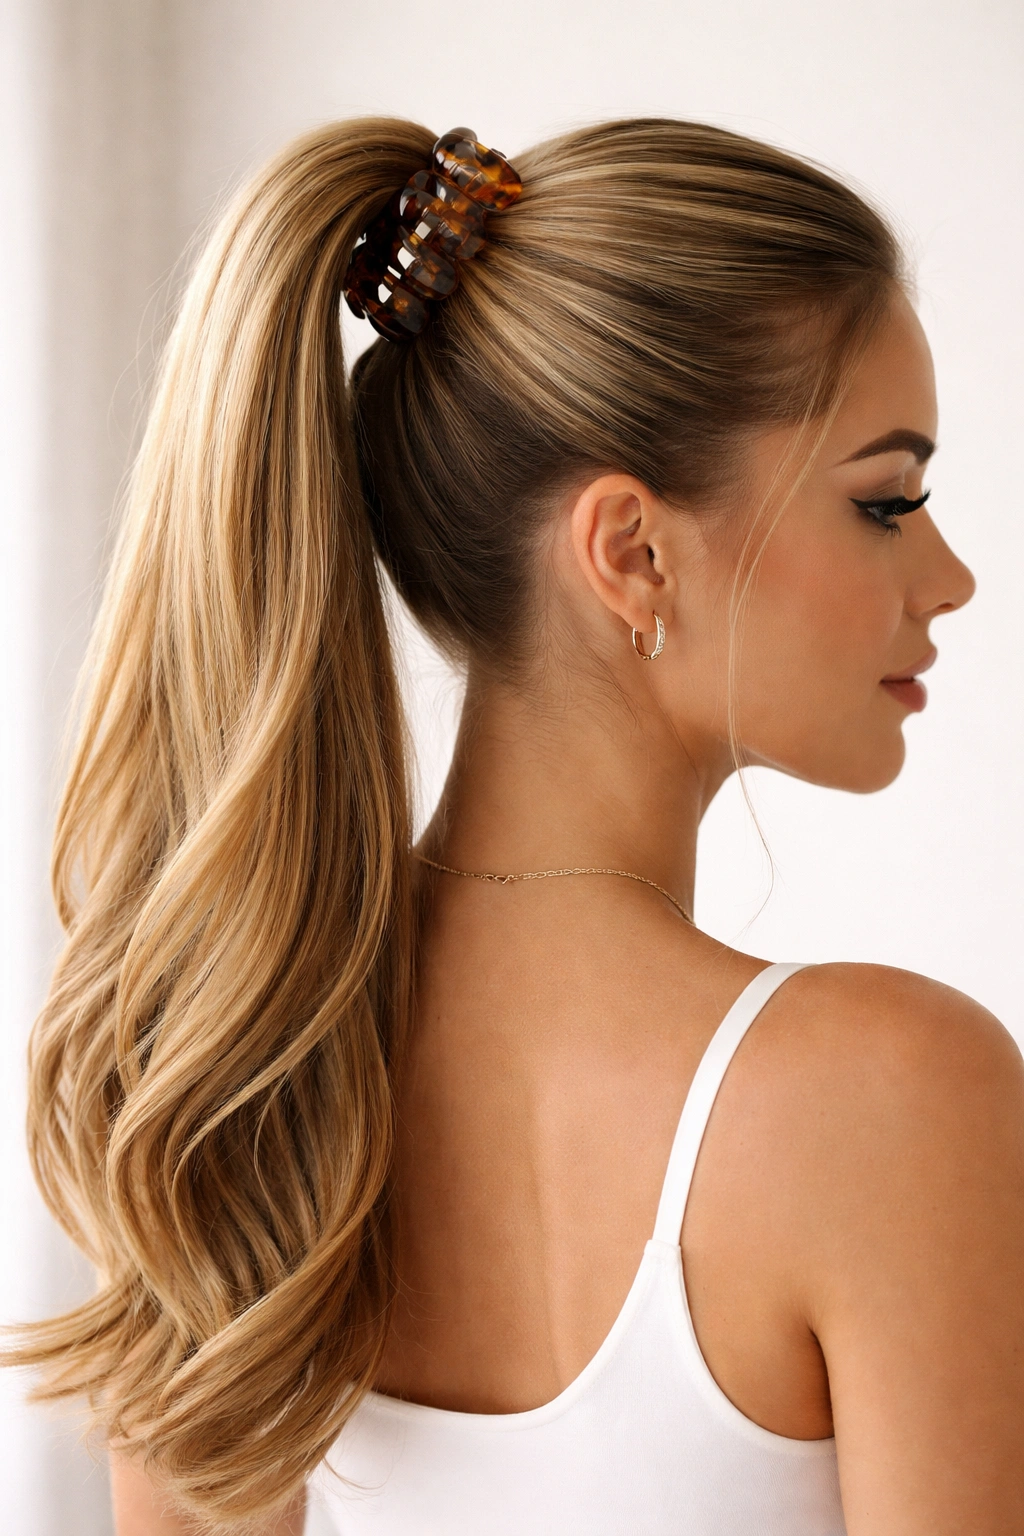
This is the foundational claw clip ponytail—clean, polished, and works for everything from a casual day to a professional setting. The key is getting genuine tension without actually pulling your scalp tight, which sounds like a contradiction but isn’t. You’re aiming for that effortless-looking hold that somehow looks intentional rather than accidental.
Start with dry or slightly damp hair. Brush everything straight back from your hairline and gather it into a high ponytail position, roughly where your ears meet the back of your head. The gather should feel snug but not painful. Hold the base of your ponytail with one hand—this is crucial—and open your claw clip with the other. Position the clip so that the hinged part rests against your scalp at the base of the ponytail, with the teeth pointing downward. Snap it closed, and immediately check that it’s not slipping. If it is, that means you didn’t gather enough tension, so release it, re-gather slightly tighter, and try again.
The Tension-Hold Trick
The magic isn’t in clamping down harder—it’s in how much hair you’re gathering. A thick ponytail base holds better than a thin one, so don’t be stingy with the section you’re working with. Gather from temple to temple, really pulling from those side sections that often get left behind. Your finished ponytail should feel secure without any sliding or creeping downward as you move. This is also the style where a larger clip works better than a small one; size matters for distribution.
Quick Styling Notes
- Placement precision: Position the clip so that the hinge sits flush against your scalp. Even a quarter-inch gap will cause slipping.
- Grip check: Gently tug down on your finished ponytail. It shouldn’t budge. If it does, re-clip it.
- Sleekness hack: After clipping, smooth any flyaways with a small amount of smoothing serum or gel along your hairline and around the base.
This ponytail is your daily workhorse. It stays put through a full day of moving and sitting, and it looks polished enough for meetings or photos.
2. Textured Messy Low Claw Clip Ponytail
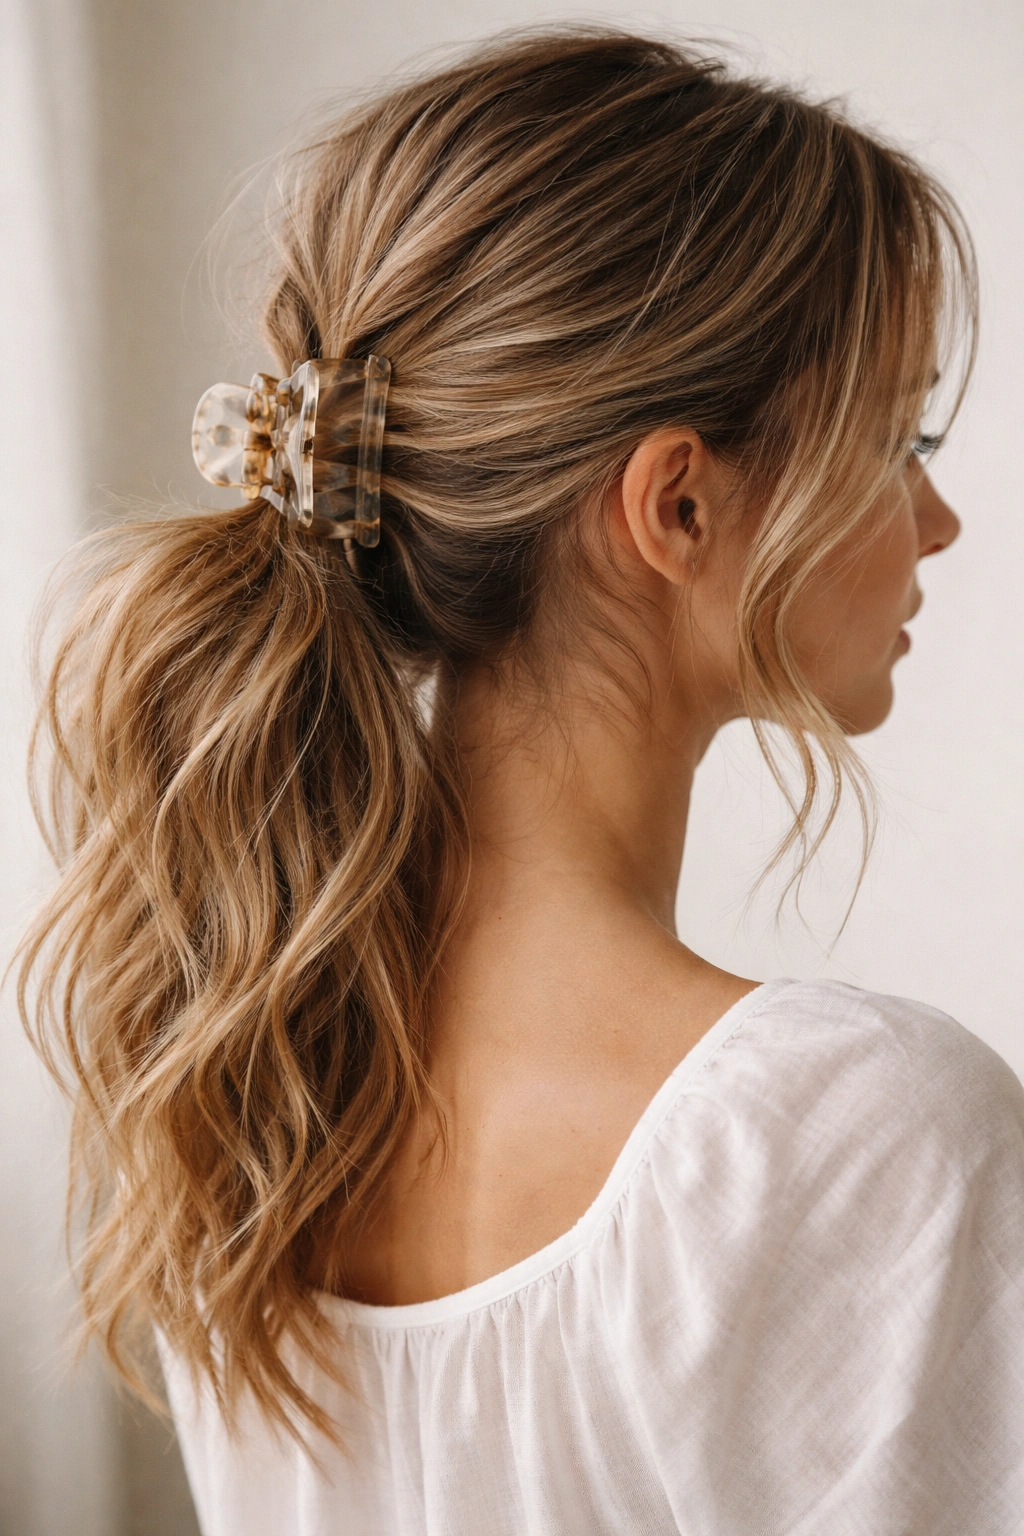
This is the style you reach for when you want to look intentionally effortless—the kind of ponytail that says you just pulled your hair back without thinking about it, even though you actually did think about it just the right amount. The difference between “messy in a good way” and “messy because I didn’t try” is in the texture and the placement.
Use hair that already has some texture or movement—either naturally wavy, freshly waved with a curling iron, or second-day hair that’s picked up some volume. If your hair is completely straight, take three minutes to add some loose waves by curling sections away from your face. Gather your hair lower than the classic ponytail—think the nape of your neck or just slightly above it—but keep your gather a bit more relaxed. Don’t pull everything perfectly smooth; leave a few face-framing pieces around your temples and cheekbones.
Position your claw clip at the base of this lower ponytail, securing it firmly the same way you would with the sleek version. The difference here is what happens after: gently tug at the base of the ponytail to create a slightly puffed, undone effect. Take a few pieces from inside the secured ponytail and pull them out slightly, creating gentle volume around the clip. You’re not untucking full sections—just creating subtle texture and dimension.
The Texture Foundation
The whole appeal of this style hinges on your hair having movement to begin with. Straight hair can pull off this look, but it requires either a pre-wave or the willingness to accept it looking more severe than you might want. If you’re working with wavy or curly hair, this style becomes almost effortless—just gather and clip, and the texture does the work for you.
Quick Styling Notes
- Selective face-framing: Deliberately leave 1-2 thin pieces around your face rather than tucking everything back. This softens the overall look and adds intentional variation.
- Ponytail puffing: After clipping, use your fingers to gently lift and separate the ponytail at the base, creating subtle volume that frames your face.
- Finishing touch: A light spritz of texture spray adds hold to those gently pulled pieces and enhances the effortless vibe.
This ponytail is your confidence style. It looks like you have your life together while also communicating that you don’t take yourself too seriously.
3. Twisted Half-Up Claw Clip Pony

The half-up ponytail is a chameleon—it can look preppy or romantic or modern depending on how you execute it, and adding a twist transforms it from basic to genuinely sophisticated. This style bridges the gap between keeping your hair down and putting it entirely up, which makes it perfect for days when you want versatility.
Start with your hair down and either straight or textured. Take a section from one side of your head—starting at your temple and working back toward your ear—and twist it loosely away from your face. This twist should be relaxed and slightly loose, not tight and formal. As you twist, gradually incorporate more hair from the crown area, building the twist as you move backward. Keep the twist rotating at roughly the same angle, aiming toward the back-center of your head.
When you’ve twisted back to roughly where your ear ends, secure that twist at the back with a claw clip positioned horizontally across the back of your head. The clip should sit at the base of your half-up section, securing the twist and catching additional hair to create a subtle ponytail effect.
The Twist Technique
The twist itself is the star here—it should look organic and slightly undone, not perfectly sculptured. Let it be slightly loose and wobbly; that’s what makes it look intentional rather than technical. As you’re twisting, occasionally gently tug the outer edge of the twist to add a bit of volume and make it look less like a tight rope and more like a casual spiral of hair.
Quick Styling Notes
- Twist looseness: Your twist should be loose enough that individual pieces of hair are visible within it, creating dimension rather than a solid line.
- Clip positioning: Place your clip so that it crosses the twist securely while also catching a small amount of additional hair below, anchoring everything in place.
- Opposite side: For balance, you can gently pull a matching thin piece of hair from the opposite side and tuck it behind your ear, creating visual symmetry.
This ponytail is your “I got dressed up but I’m not overdoing it” style. It’s sophisticated enough for a date or an event but casual enough for brunch or running errands.
4. Double Claw Clip Ponytail
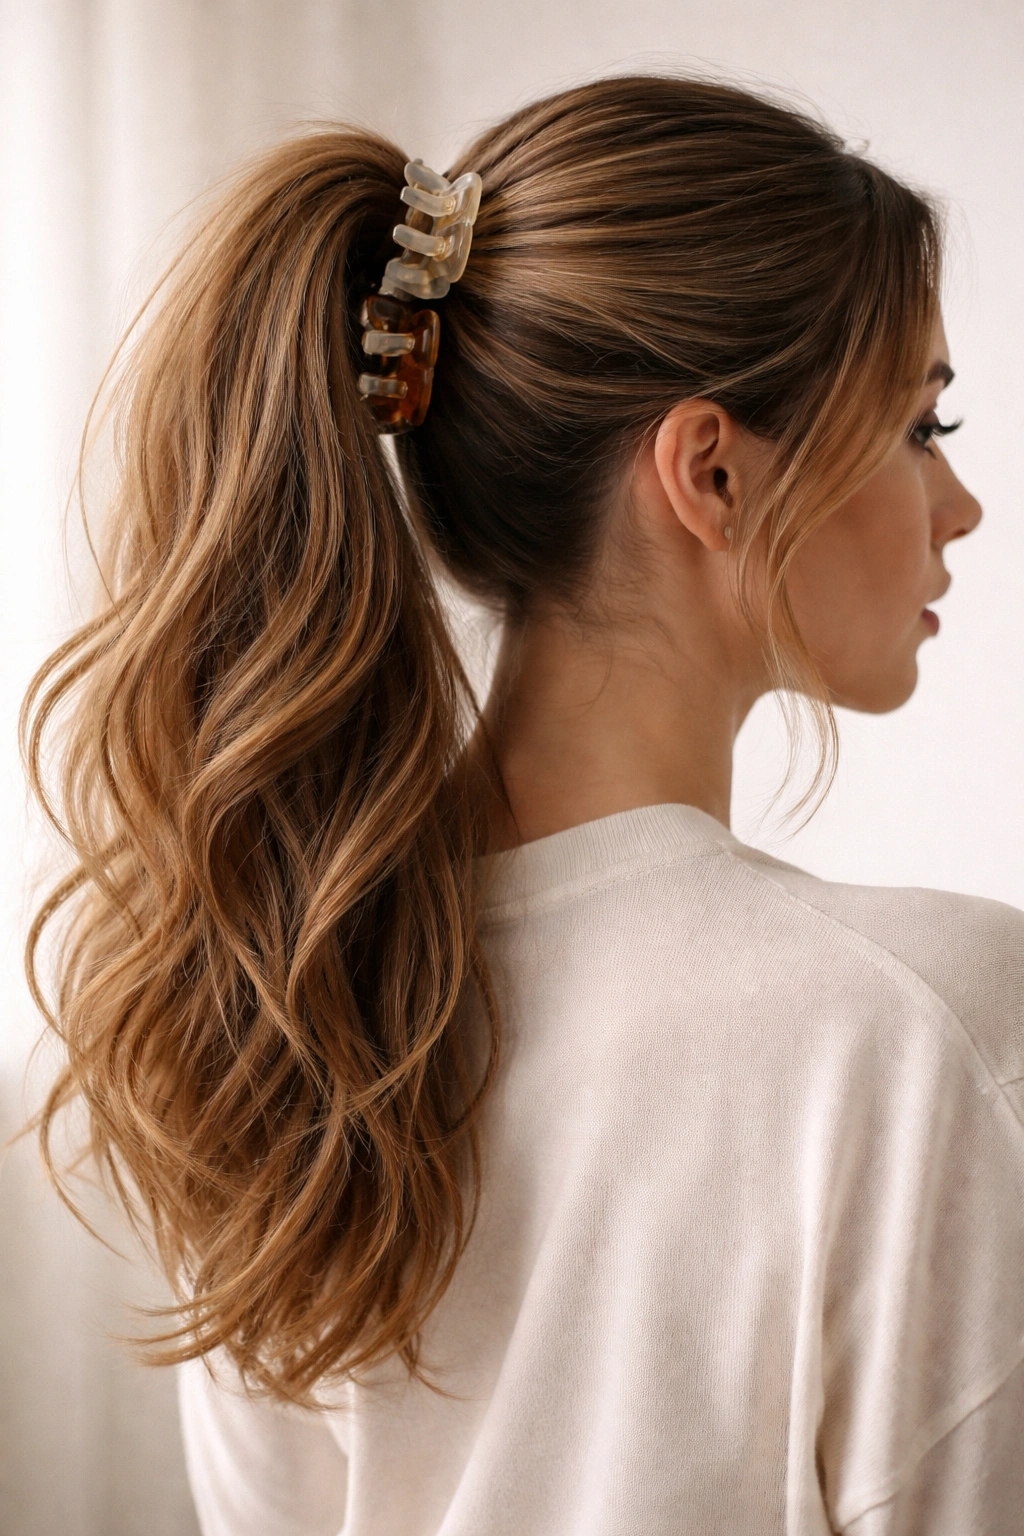
Double clipping has become a secret weapon for creating the illusion of thicker, more voluminous ponytails—and it actually holds better than using a single clip. The technique sounds complicated but is genuinely faster once you’ve done it twice.
Gather your hair into a high ponytail position and secure it with your first claw clip the same way you would for a classic sleek ponytail. Make sure this initial clip is positioned with the hinge right against your scalp. Now, open your second claw clip and position it directly above the first one, roughly half an inch higher on your ponytail base. This upper clip should angle slightly forward, overlapping with the lower clip while both are closed and secure.
The effect is that you now have two overlapping clips creating maximum grip, and the visual result is a ponytail that looks thicker and fuller at the base. This is especially useful if you have fine or medium-density hair, or if you’re styling a ponytail that needs to hold through several hours of movement.
The Overlap Strategy
The real trick here is the overlap angle. If your second clip angles slightly forward while your first clip faces backward or straight, they lock together and create a fail-safe security system. You’ll notice this ponytail simply doesn’t slip—the dual-clip system distributes pressure across a wider area of your scalp.
Quick Styling Notes
- Clip size coordination: If you have small clips, use two small ones. If you have large clips, use two large ones. Mismatched sizes look unintentional and can create gaps.
- Visual stacking: The two clips together create a visual statement at the base of your ponytail, so this style works especially well if your clips are a fun color or finish.
- Ponytail thickness perception: Because of the dual-clip visual, even medium-thickness ponytails will appear noticeably fuller.
This ponytail is for days when you need absolute security—workouts, outdoor activities, or just when you’re tired of adjusting your hair throughout the day.
5. Side-Swept High Ponytail

This is the ponytail that photographs well and looks genuinely editorial—the kind of style that seems more complicated than it actually is. The side-swept technique creates an asymmetrical, modern feeling that’s different from your standard center-back ponytail while using the exact same securing method.
Sweep all your hair to one side of your head, gathering it toward the side of your head rather than the back. The ponytail base should sit roughly at temple level on the side you’re sweeping toward, creating an angled line that flows from ear to nape. Pull the ponytail slightly higher than you might naturally—this is an intentional style, so the positioning matters. Secure it with your claw clip, positioning the clip so that it holds the gathered ponytail securely while allowing some softness around the sides.
The beauty of this style is what happens to your opposite side—you’re showing off more of your neck and face, creating an asymmetrical silhouette that’s visually interesting. This works especially well if you have face-framing layers or a side part that you can emphasize.
The Sweep and Gather
As you sweep your hair to the side, don’t pull it completely straight across—give it a gentle, organic flow. You want some movement in the sweep itself, not a rigid side part. The ponytail base should gather hair from the entire back half of your head, not just the side, creating fullness and dimension.
Quick Styling Notes
- Face exposure: Show off the side of your face and neck by sweeping completely—don’t leave pieces trailing; commit to the side direction fully.
- Volume at the base: Gently tease or backcomb the crown area slightly before sweeping, creating volume that supports the side ponytail visually.
- Clip direction: Position your clip so it’s visible or cleverly hidden—both options look intentional depending on whether you’re going for statement or subtle.
This ponytail is your style-conscious option. It reads as put-together and intentional while still taking under two minutes.
6. Voluminous Crown Ponytail with Claw Clip
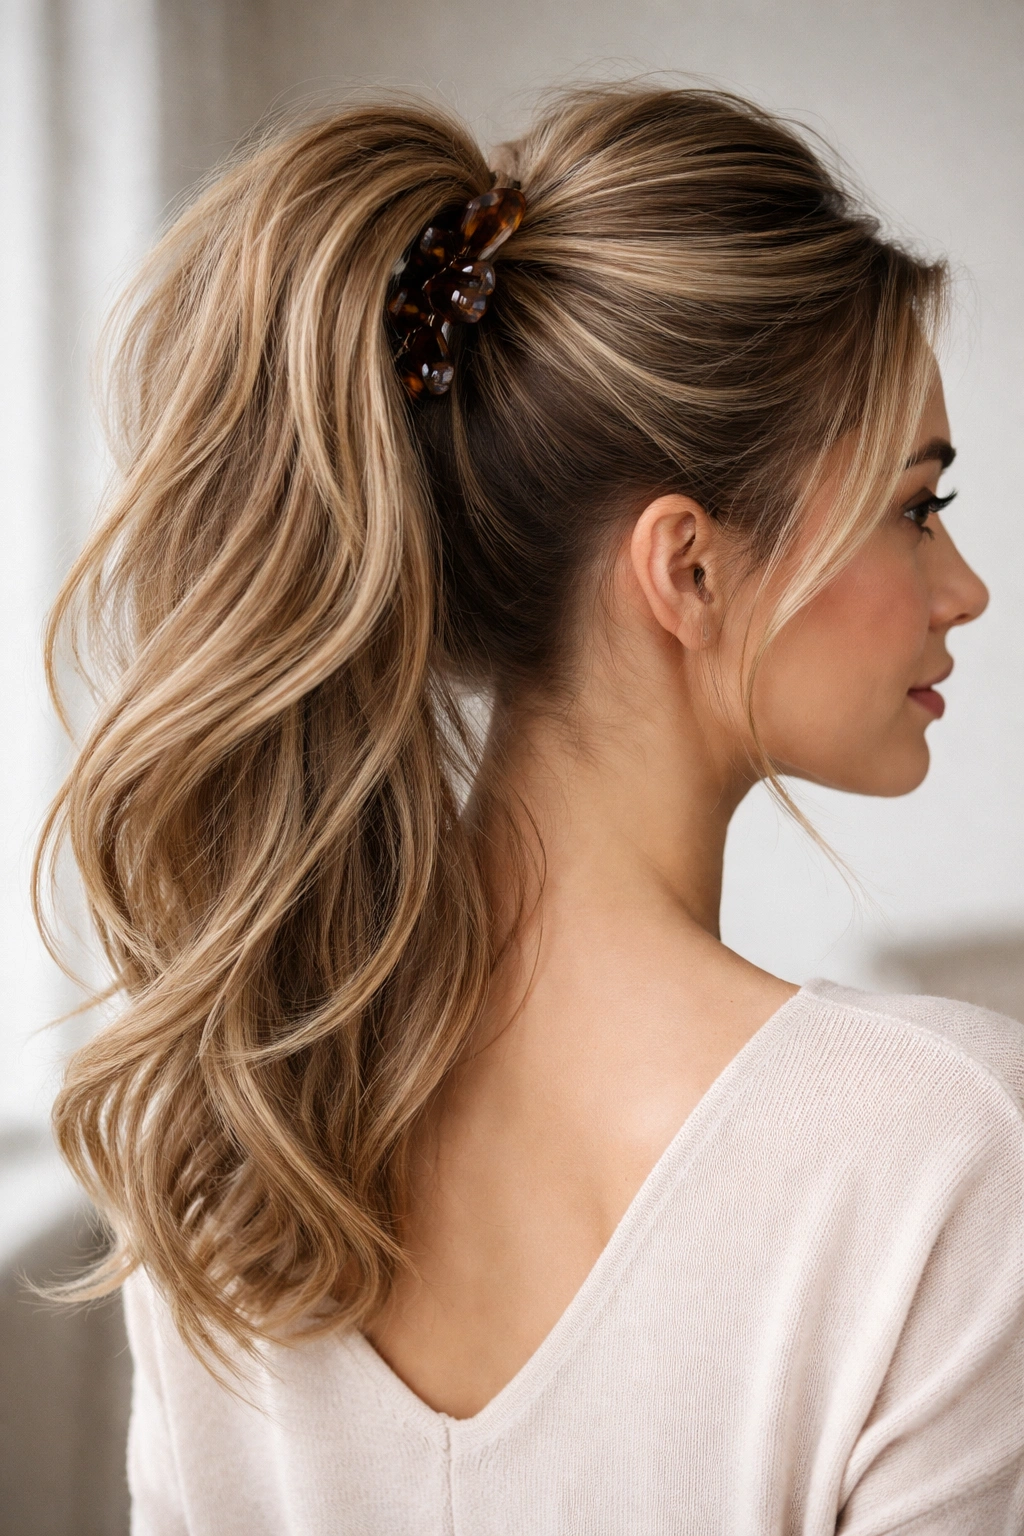
This is the style that makes you look like you actually know how to do hair, even if you just discovered claw clips last month. The crown ponytail is positioned high and back, creating significant visual volume through placement and a simple backtease technique.
Begin by flipping your head forward at the waist so all your hair is hanging down. Lightly backcomb or tease the crown section—the area from your forehead back to the crown of your head—using a fine-tooth comb or teasing brush. You don’t need aggressive backcombing; gentle texture is enough. Flip back upright and check your volume in the mirror. You should see noticeable height at the crown.
Now gather everything back into a high ponytail position, positioning the base high enough that it’s at the crown level you’ve just created. The gathering should include your teased section, so your ponytail base sits on top of that volume rather than compressing it. Secure with your claw clip and allow some of that crown volume to frame your ponytail base, creating a full, dimensional look. Gently separate a few small pieces at the very crown to enhance the voluminous effect.
The Volume Foundation
Backteasing works best when you’re strategic about placement. You only need to tease the crown and upper back section—not your entire head. This concentrated teasing creates height where you need it without making your ponytail thick and difficult to secure. Fine hair may only need gentle backcombing in one direction; thicker hair can handle more aggressive teasing.
Quick Styling Notes
- Flip-teasing method: Teasing while your head is flipped creates more volume than teasing with your head upright, and you’ll see immediate results.
- Holding spray: A light hairspray before teasing helps the texture hold longer throughout the day.
- Crown separation: After clipping, gently pull a few small sections from the crown area slightly outward, creating dimension around your ponytail base.
This ponytail is for days when you want to look extra polished and put-together. The volume reads as intentional and sophisticated.
7. Sleek Side Ponytail with Clip
The side ponytail is an elegant style that works whether your hair is textured or completely smooth. Using a claw clip for a side ponytail actually holds better than elastic because the clip grips at an angle, and the leverage of the side position distributes pressure more evenly across your scalp.
Brush your hair completely smooth and sweep it to one side—the same direction you’d sweep for the side-swept ponytail, but with the ponytail gathering more toward the back. The ponytail base should sit roughly at your shoulder height when you measure the side, creating a dramatic, swooping silhouette. Pull your hair back firmly and gather it so your ponytail feels substantial and secure. Position your claw clip at the gathered base, making sure it’s angled correctly for a side hold—the clip should angle slightly forward to grip properly.
Check the clip’s security by gently tugging down. With a side ponytail, the weight distribution is different, so make sure your clip isn’t slipping before you finalize the style. Smooth any flyaways with serum or gel, and you’re done.
The Side Positioning Strategy
Side ponytails have a romantic, elegant quality that makes them feel more formal than center-back ponytails. For this reason, they photograph exceptionally well and read as intentional. The clip placement matters more here because gravity is working differently than it does with a back ponytail—make sure your clip is positioned where the gathered hair is thickest and most secure.
Quick Styling Notes
- Ponytail thickness: Since a side ponytail is more exposed, make sure you’re incorporating all your hair into the gather—thin side ponytails can look wispy.
- Smoothness check: Run your hands along the gathered section before clipping to ensure no pieces are sticking out awkwardly.
- Clip angle: The clip should angle slightly into the ponytail gather to grip securely despite the side positioning.
This ponytail is your elegant option. It’s the style you’d wear to a nice dinner or an event where you want to look put-together without appearing overly formal.
8. Artfully Messy Bubble Ponytail with Claw Clips
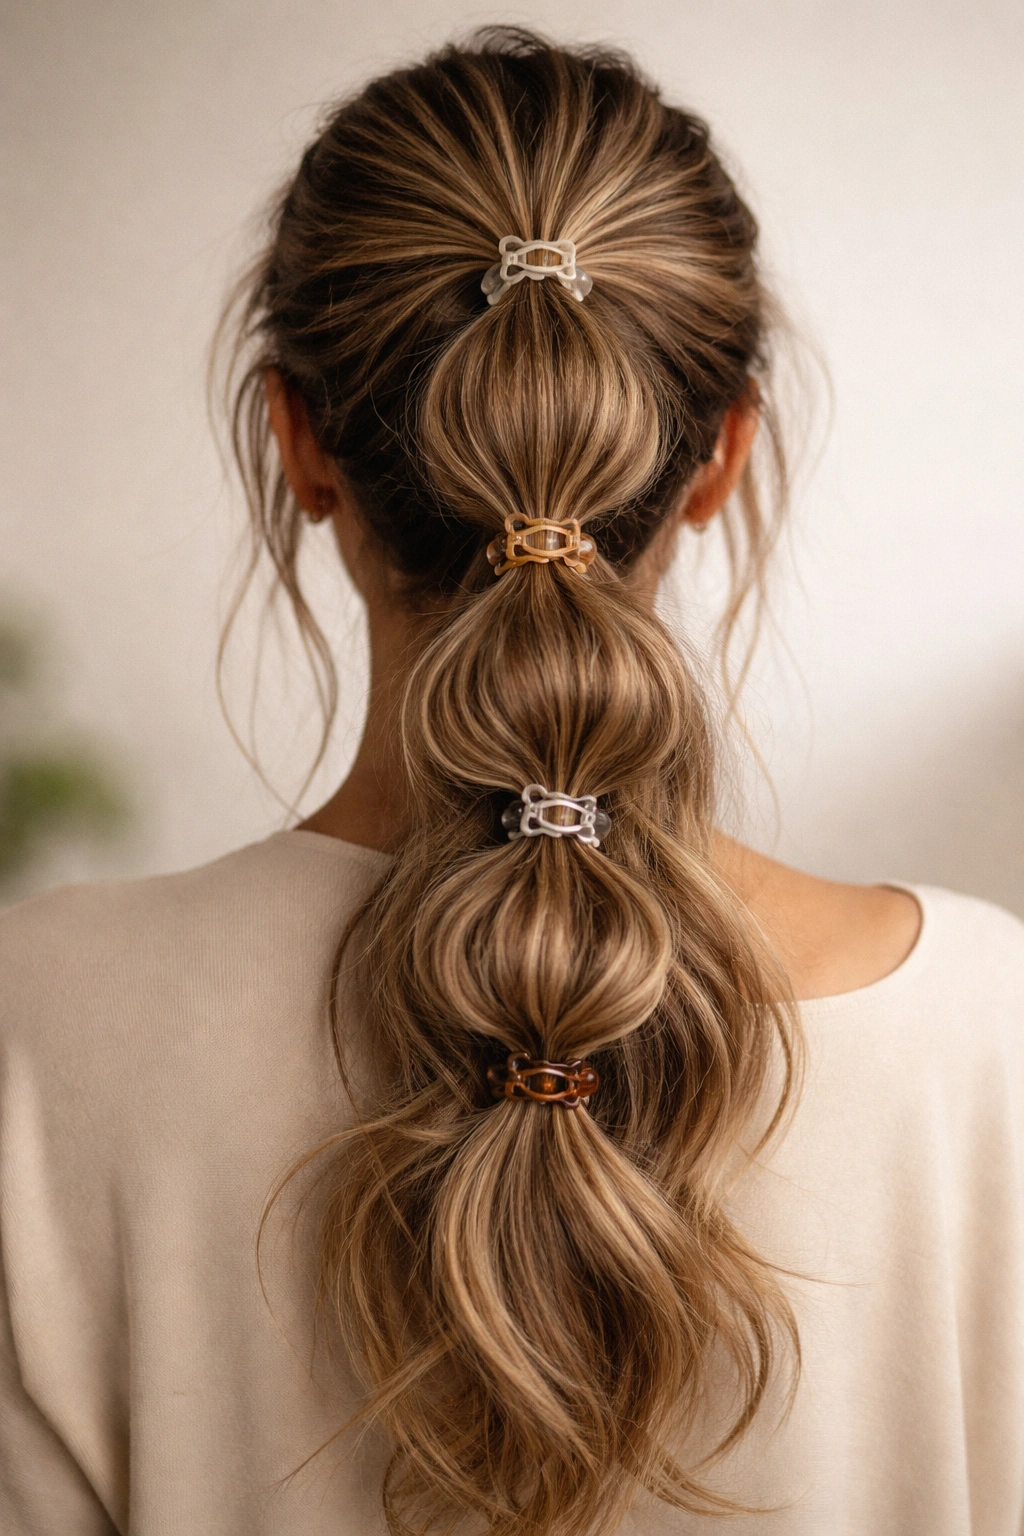
The bubble ponytail has been hugely popular, and using claw clips instead of elastics to create the “bubbles” actually works even better—you get more dimension and less creasing. This style looks playful and intricate while being surprisingly fast to create.
Start with a textured or wavy base. Gather your hair into a high ponytail and secure it with a claw clip as you would for a classic ponytail. Now, here’s where the magic happens: divide your secured ponytail into two or three sections vertically (imagine slicing the ponytail from top to bottom). You’re not actually separating the sections completely; you’re just mentally dividing your ponytail into columnar sections.
Take the first section (usually the outermost pieces) and pull it slightly away from the center ponytail, then secure it with a second, smaller claw clip positioned directly below your first clip. This creates the first “bubble.” Repeat with your second section, securing it with another clip positioned below the previous one. If you have a third section, do the same. The result is a ponytail that looks segmented and playful, with each “bubble” puffing outward slightly.
The Bubble Definition Method
What makes bubble ponytails look cohesive rather than chaotic is the angle and positioning of your clips. Each clip should sit directly below the previous one, creating a vertical line down the center of your ponytail. The “bubbles” form naturally between the clips as the hair puffs outward from the gathered sections.
Quick Styling Notes
- Clip color coordination: Since you’re using multiple clips, matching colors or tones creates a more intentional look than mismatched clips.
- Bubble fullness: After creating all your bubbles, gently tug each section outward to enhance the puffed effect and add dimension.
- Starting ponytail texture: Wavy or textured hair makes bubble ponytails look effortlessly cool; straight hair can look a bit too structured unless you add wave first.
This ponytail is your playful, creative option. It’s the style for days when you want to have fun with your hair and aren’t worried about looking overly formal or serious.
9. Sleek Tight Low Ponytail with Claw Clip Accent
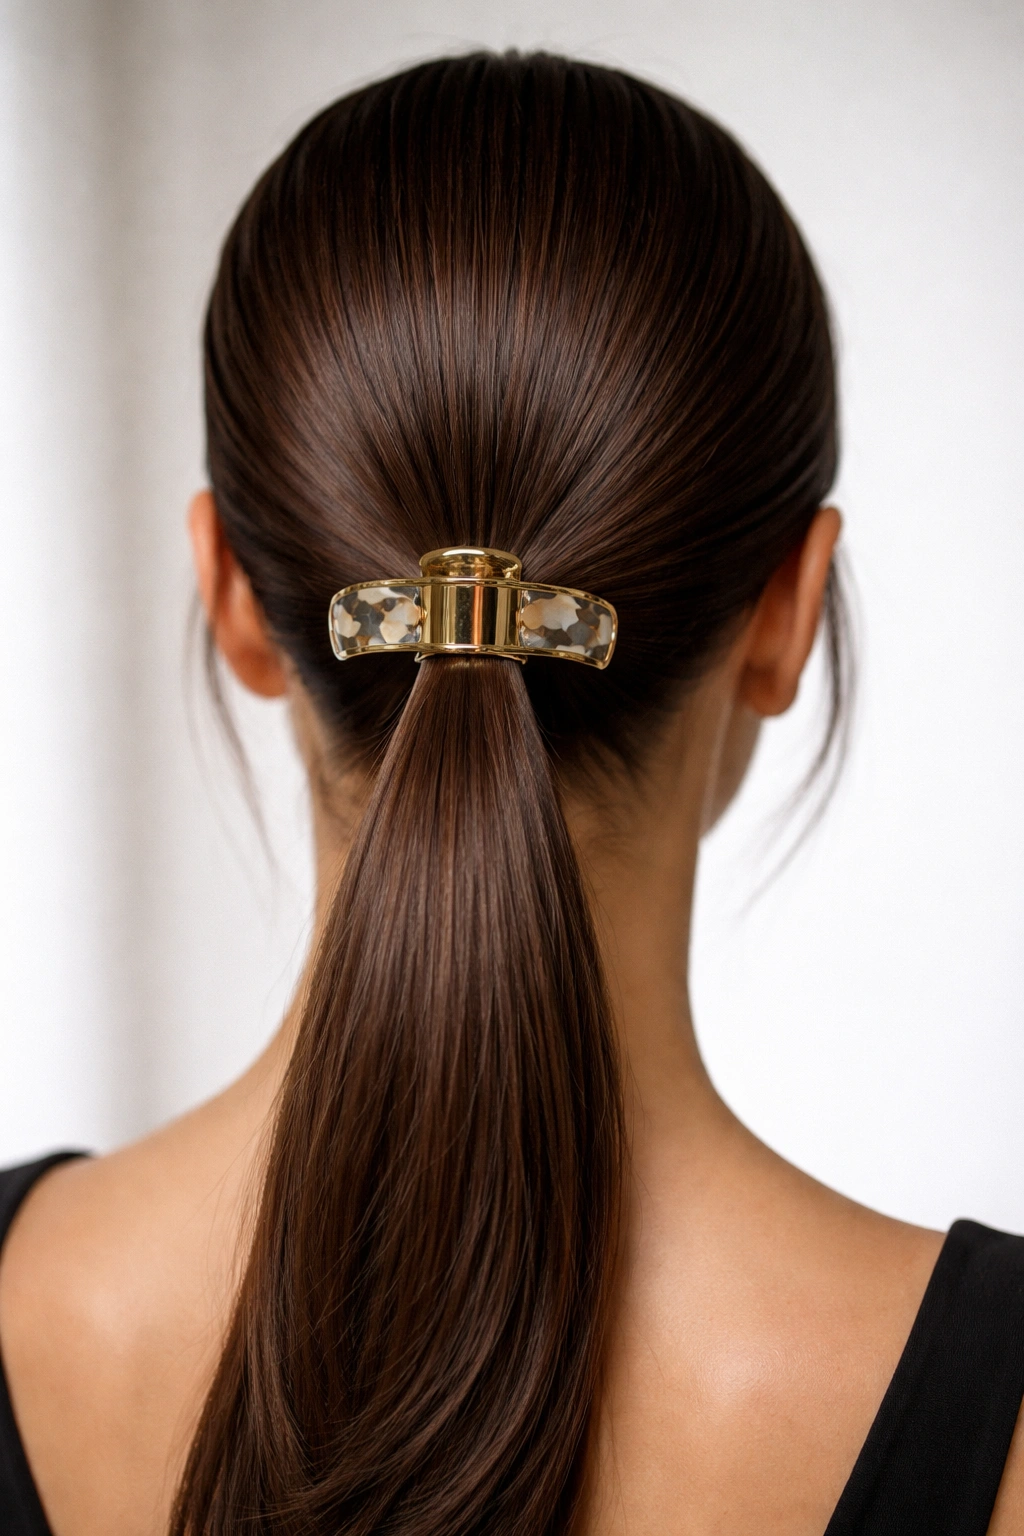
This is the minimalist’s ponytail—sleek, tight, and modern with an understated claw clip that serves both function and style. The low placement and tight gathering create a polished, almost architectural look that works especially well if your hair is shiny or if you have a bold claw clip color you want to feature.
Brush your hair back and gather it at the nape of your neck or just above—lower than a traditional ponytail but not so low that it’s at your collar. Pull the gathering very tight, creating a smooth, taut base. Secure it with a claw clip, and here’s the key: position the clip so that it’s visible and centered on your ponytail base. This isn’t about hiding the clip; it’s about making the clip part of the style itself.
The finished look is streamlined and sleek with an almost geometric quality. If your claw clip has a distinctive color, finish, or design, that becomes a visible design element rather than something hidden. This is the ponytail to choose if you’ve got a beautiful tortoiseshell, metallic, or colored claw clip that you actually want people to notice.
The Visibility Factor
Standard ponytail wisdom says to hide your securing device, but that’s when you’re using basic elastics. With a beautiful claw clip, putting it on display becomes a style choice. This works best if your clip is actually attractive—spare yourself this styling method if you’re using a boring or beat-up clip.
Quick Styling Notes
- Tight gathering: This style requires genuine tension, so pull firmly as you gather. The smooth, tight appearance is the whole appeal.
- Sleekness maintenance: Use smoothing serum or anti-frizz cream on the gathered ponytail to keep everything sleek throughout the day.
- Clip choice: This is the moment to use your favorite or most statement clip—gold, tortoiseshell, pearl, enamel-painted, whatever.
This ponytail is your modern, minimalist option. It reads as intentional and fashion-forward while being genuinely practical and secure.
10. Effortless Beach Waves Claw Clip Ponytail
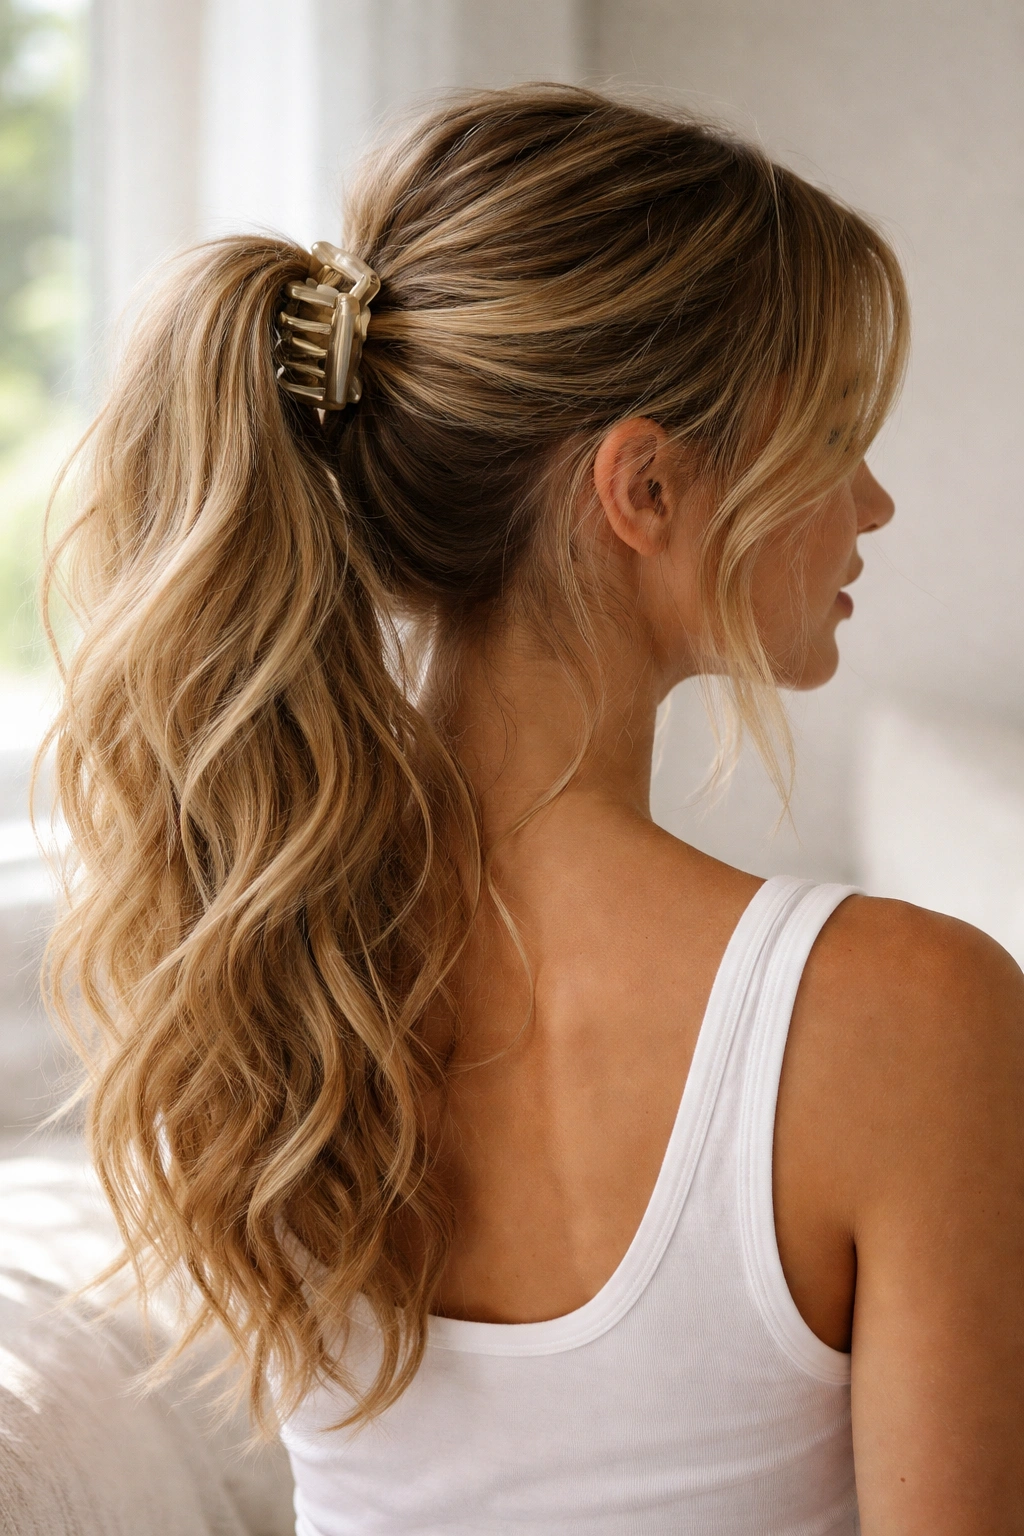
This is the ponytail that makes your hair look like you just came from the beach or got a professional blow-dry—bouncy, dimensional, and textured without being fussy. The technique hinges on creating loose waves before ponytail-ing, then positioning your clip to enhance rather than compress that texture.
Prep your hair with loose waves. Use a large-barrel curling iron, a waving iron, or a salt-spray method to create soft, relaxed waves throughout your hair. These don’t need to be perfect spirals; they can be slightly messy and undone. Gather your hair into a mid-height ponytail position—not too high, not too low—keeping the gathering slightly relaxed to preserve wave texture. Don’t smooth and tighten as you gather; let the waves flow naturally into the ponytail base.
Secure with your claw clip, positioning it so it holds the ponytail securely but doesn’t compress all your wave texture. After clipping, gently tug your ponytail base to create volume and allow some wave separation. Pull a couple of thin pieces from around your face and let them frame your features. The finished ponytail should look like windblown, textured hair that happened to be gathered up—casual, touchable, and effortlessly beautiful.
The Wave Preparation
The wave quality matters here. Tight, perfect spirals will look too formal for this style; you want loose, slightly imperfect texture. If you’re air-drying waves, sea salt spray applied to damp hair and then left to dry creates this exact aesthetic. Alternatively, a large-barrel curling iron with a slightly looser curling technique creates the right wave looseness.
Quick Styling Notes
- Wave preservation: Don’t brush your waves smooth before ponytail-ing; this destroys the texture you’ve worked to create.
- Light gathering: Keep your ponytail gather slightly looser than you would for a sleek style, preserving wave dimension.
- Texture spray finish: A light texture spray enhances the effortless, beachy vibe and helps waves hold throughout the day.
This ponytail is your “I woke up like this” option. It’s the style that makes you look like you’re naturally beautiful and effortlessly cool, even when you absolutely spent time creating the wave texture.
Final Thoughts
The magic of claw clip ponytails is that they work with your hair rather than against it. Unlike elastic-based ponytails that require tension and heat to hide creases, claw clip styles actually look better with texture, movement, and a slightly undone quality. Once you’ve mastered these ten approaches, you’ll find yourself reaching for them on days when you want to look intentional but not overdone, polished but not stiff.
The real game-changer is understanding that each of these styles serves a different purpose and mood. You’re not choosing between one good ponytail and nine others—you’re building a toolkit. When you’re in a rush, the sleek high ponytail gets the job done in forty-five seconds. When you want to look editorial and put-together, the side-swept high ponytail makes an impression. When you want to have fun, the bubble ponytail turns your hair into a creative statement.
The other thing worth noting: these styles genuinely do take under two minutes once you understand the mechanics. The first time through, sure, you might spend three minutes figuring out clip positioning or wave placement. But within a handful of repetitions, your hands know exactly what to do. You’ll be able to create any of these styles without thinking, which means you’ve expanded your daily hair options exponentially—and that’s where the real confidence comes from.