A ponytail is one of the quickest, most versatile hairstyles you can create for your kid — whether you’re running late for school, heading to the playground, or getting ready for a special event. The beauty of ponytails is that they keep hair out of the face, require minimal styling products, and can be customized in countless ways depending on your child’s hair type, length, and personality. Some styles take literally two minutes, while others become a fun bonding activity you can do together on lazy weekend mornings.
What makes ponytails perfect for kids is their staying power. A well-secured ponytail can withstand running, jumping, playing sports, and a full day of activity without falling apart. At the same time, they’re gentle enough on the hair that you’re not causing damage like you would with tight styles worn every single day. The key is knowing which style works best for different hair types, ages, and occasions — and understanding the simple techniques that make the difference between a ponytail that stays put and one that slides out by mid-morning.
This guide covers 15 distinct ponytail styles that range from simple everyday options to more creative looks that turn heads. Each style includes exactly how to create it, what hair type works best, how long it takes, and the tricks that actually make the difference. You’ll find something here whether your kid has thick curly hair, thin straight hair, or anything in between.
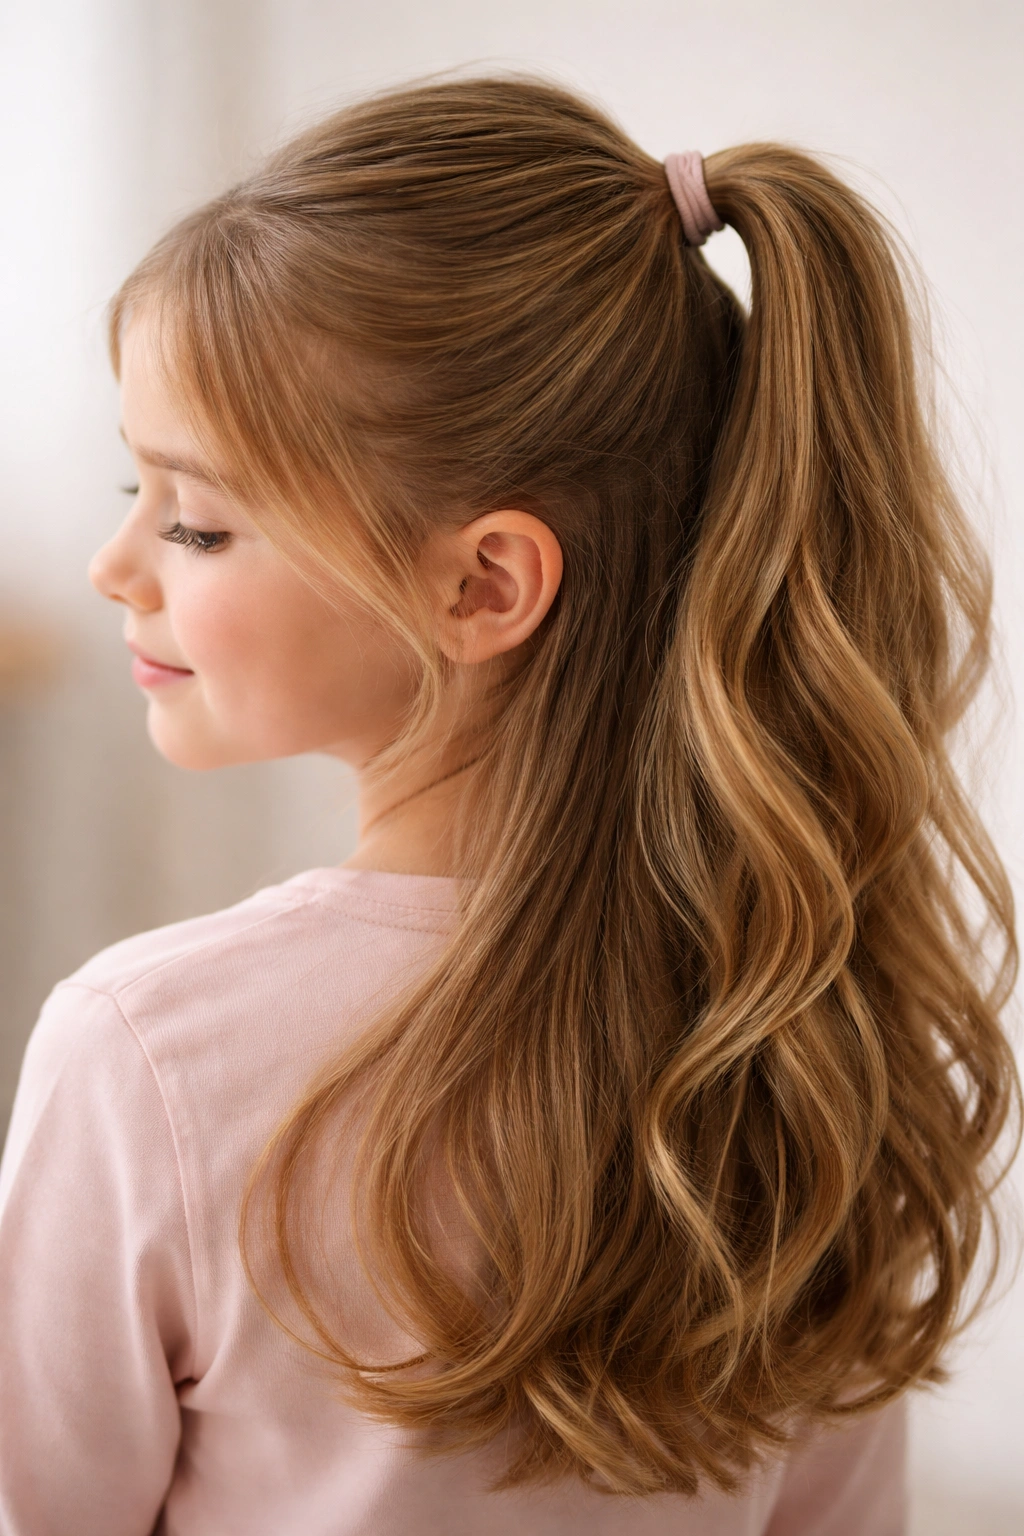
1. Classic High Ponytail
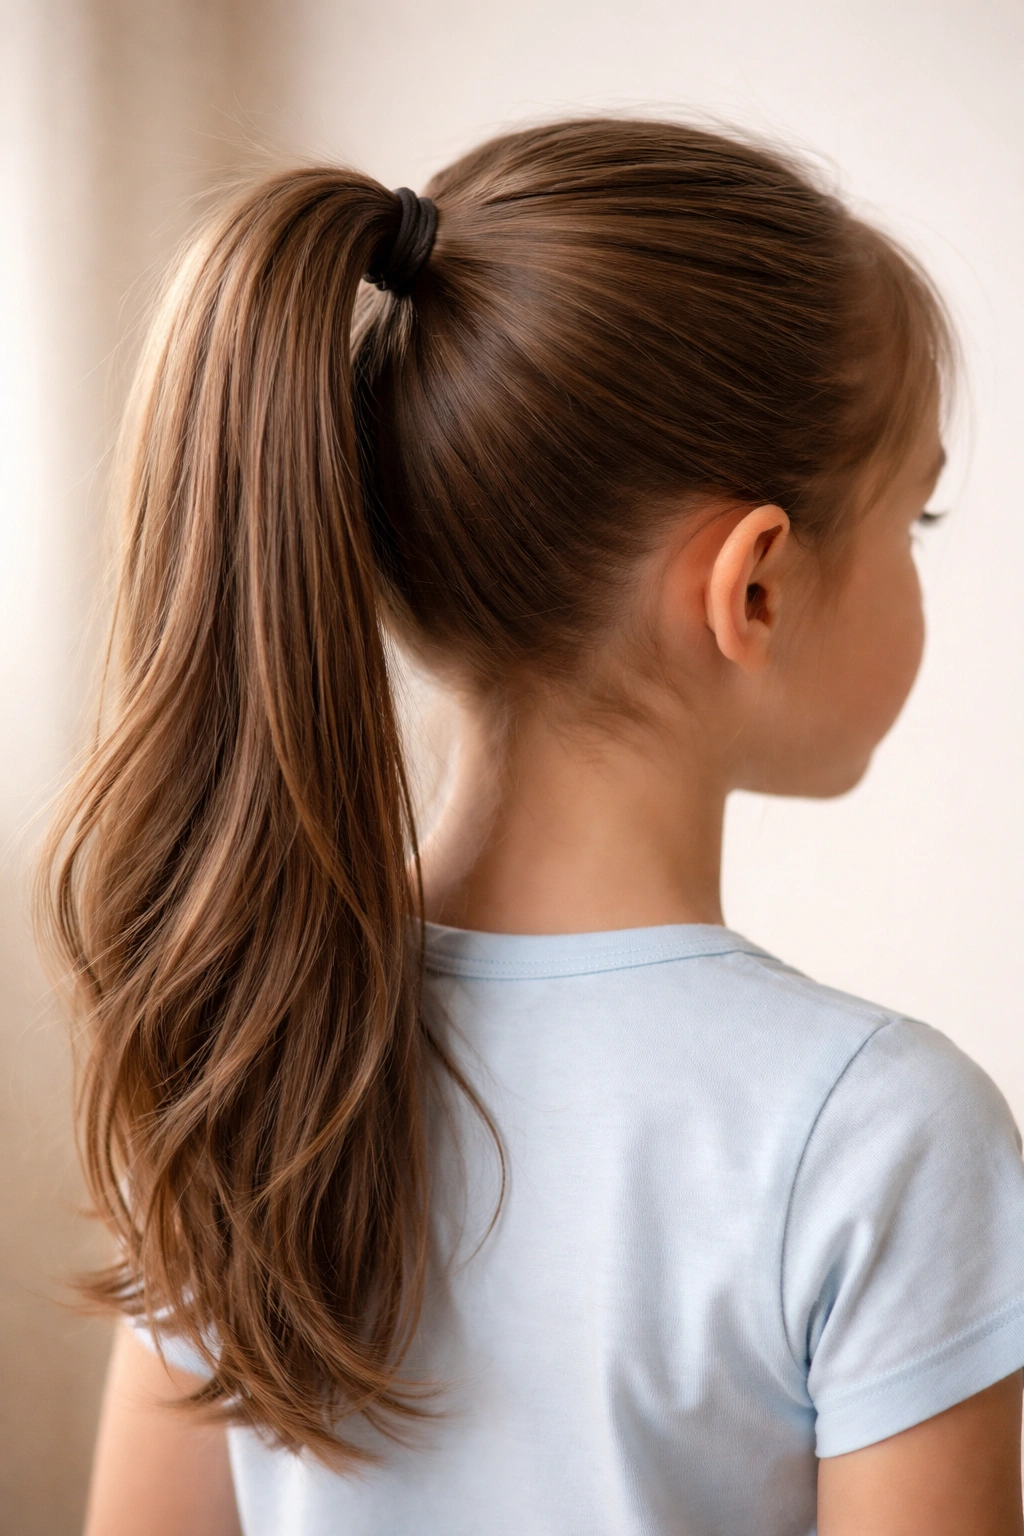
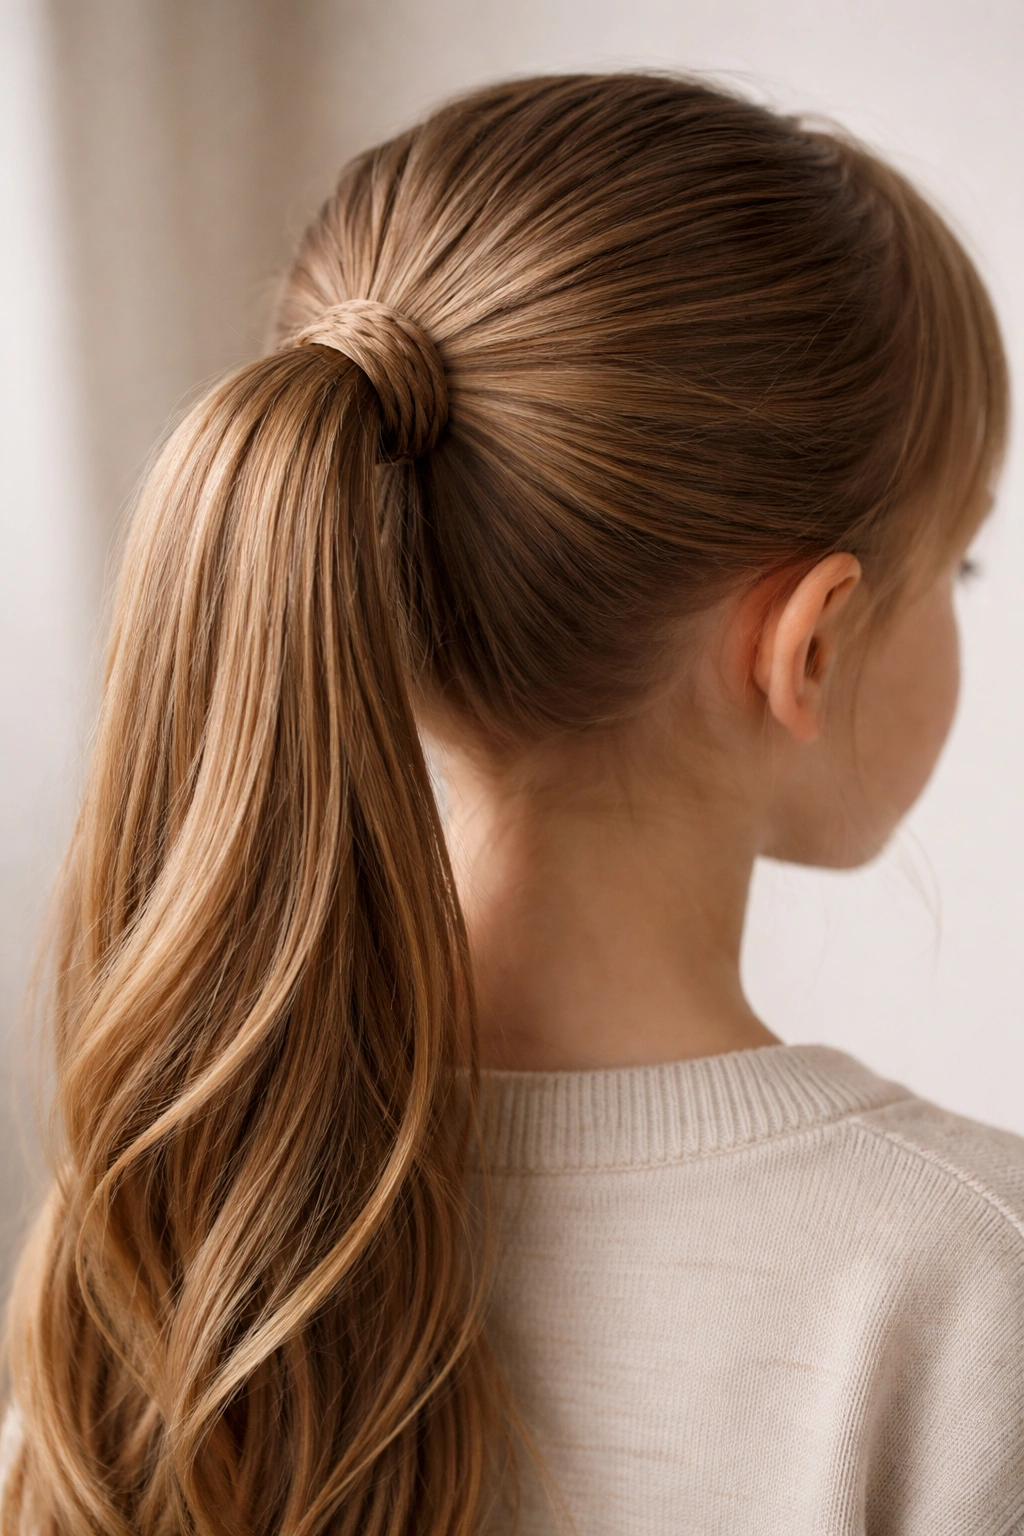
The classic high ponytail is the foundation style that every parent and kid should know — it’s the fastest, most reliable option when you’re pressed for time, and it works for nearly every hair type and length. This ponytail sits on the crown of the head, creating a polished, put-together look that works for school, sports, or casual days at home.
Why It’s a Go-To Choice
A high ponytail keeps hair completely off the face and neck, making it the perfect style when your child is playing sports, doing physical activity, or needs their hair out of the way for concentration. The elevated position also makes it work well photographically — the ponytail frames the face beautifully and looks neat and intentional. This style is also incredibly forgiving because it doesn’t require precision; a slightly messy high ponytail still looks intentional and cute.
How to Create It
Start with dry or lightly damp hair and use a brush to smooth it back from the face. Gather the hair at the crown of the head — imagine the highest point where you’d place a tiara — and hold it firmly in one hand. Use your other hand to secure it with a hair elastic, wrapping the elastic around the gathered hair 2-3 times until it feels snug but not painfully tight. If you want a polished finish, smooth any flyaways with a small dab of gel or smoothing cream on your fingertips. You can also wrap a small section of hair from the base of the ponytail around the elastic to hide it and create a more finished look.
Best for and Quick Facts
- Hair type: Works beautifully on all hair types — straight, wavy, curly, thick, or fine
- Best age: Any age from toddler through preteen and beyond
- Time required: 2-3 minutes
- Holds well: Yes, stays put all day with a secure elastic
- Special occasion ready: Yes, especially with the wrapped base technique
- Heat or products needed: None, though smoothing cream helps tame flyaways
Pro tip: If your child’s hair is very fine or slippery, use a textured elastic (like a spiral hair tie) instead of a smooth one — it grips better and won’t slip out as easily.
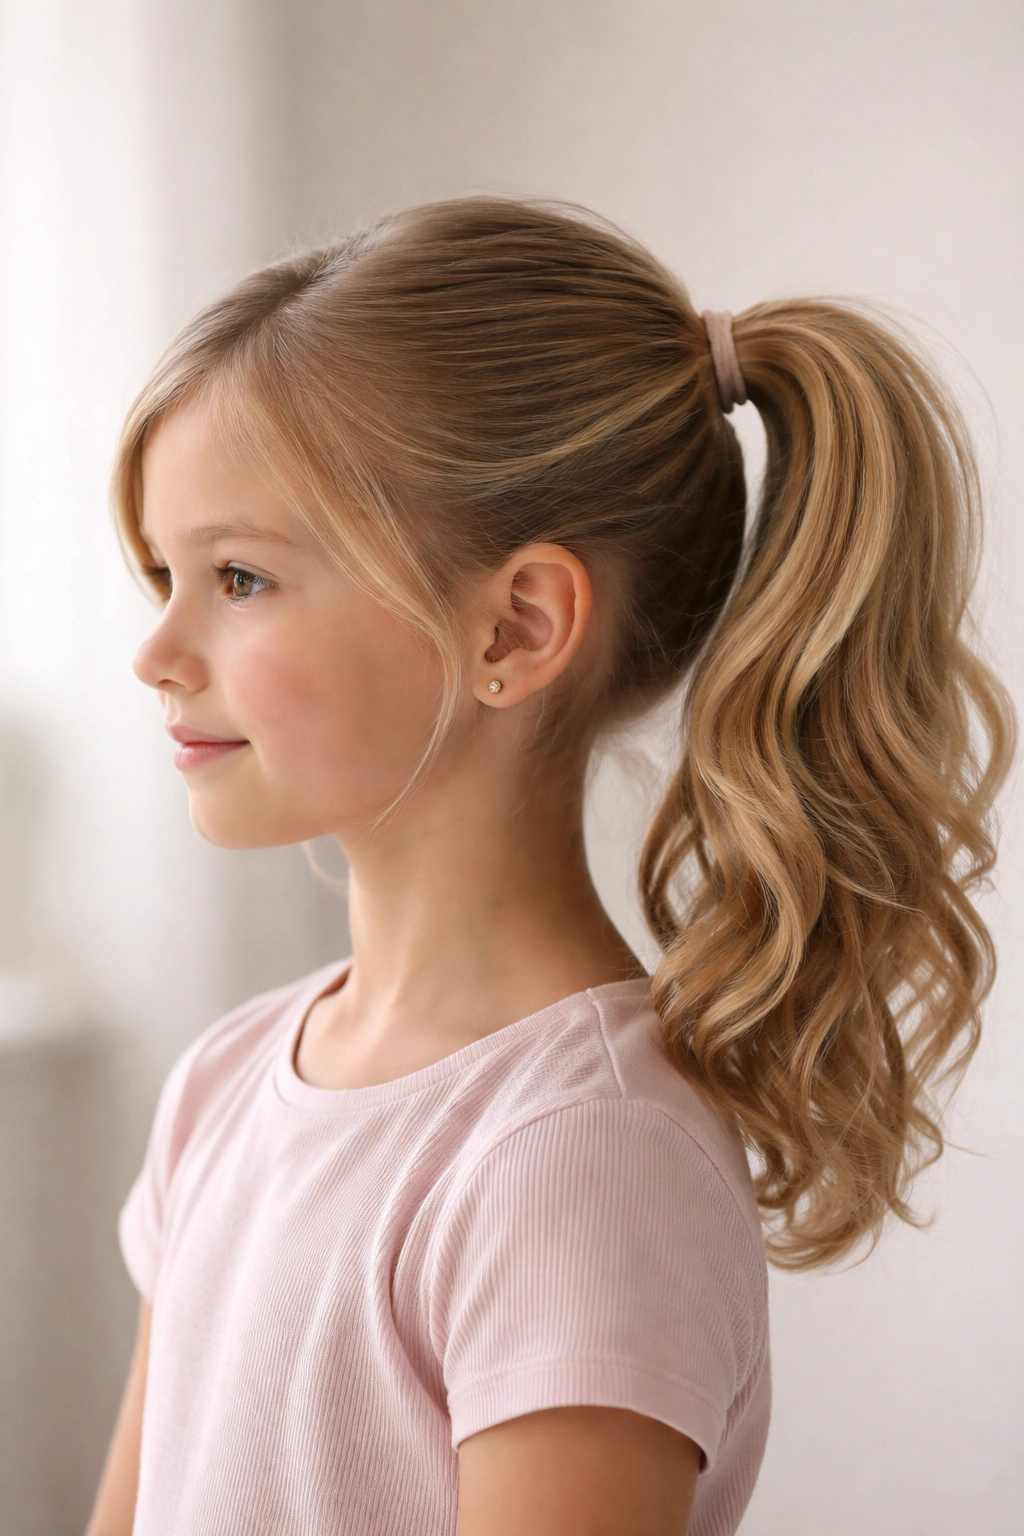
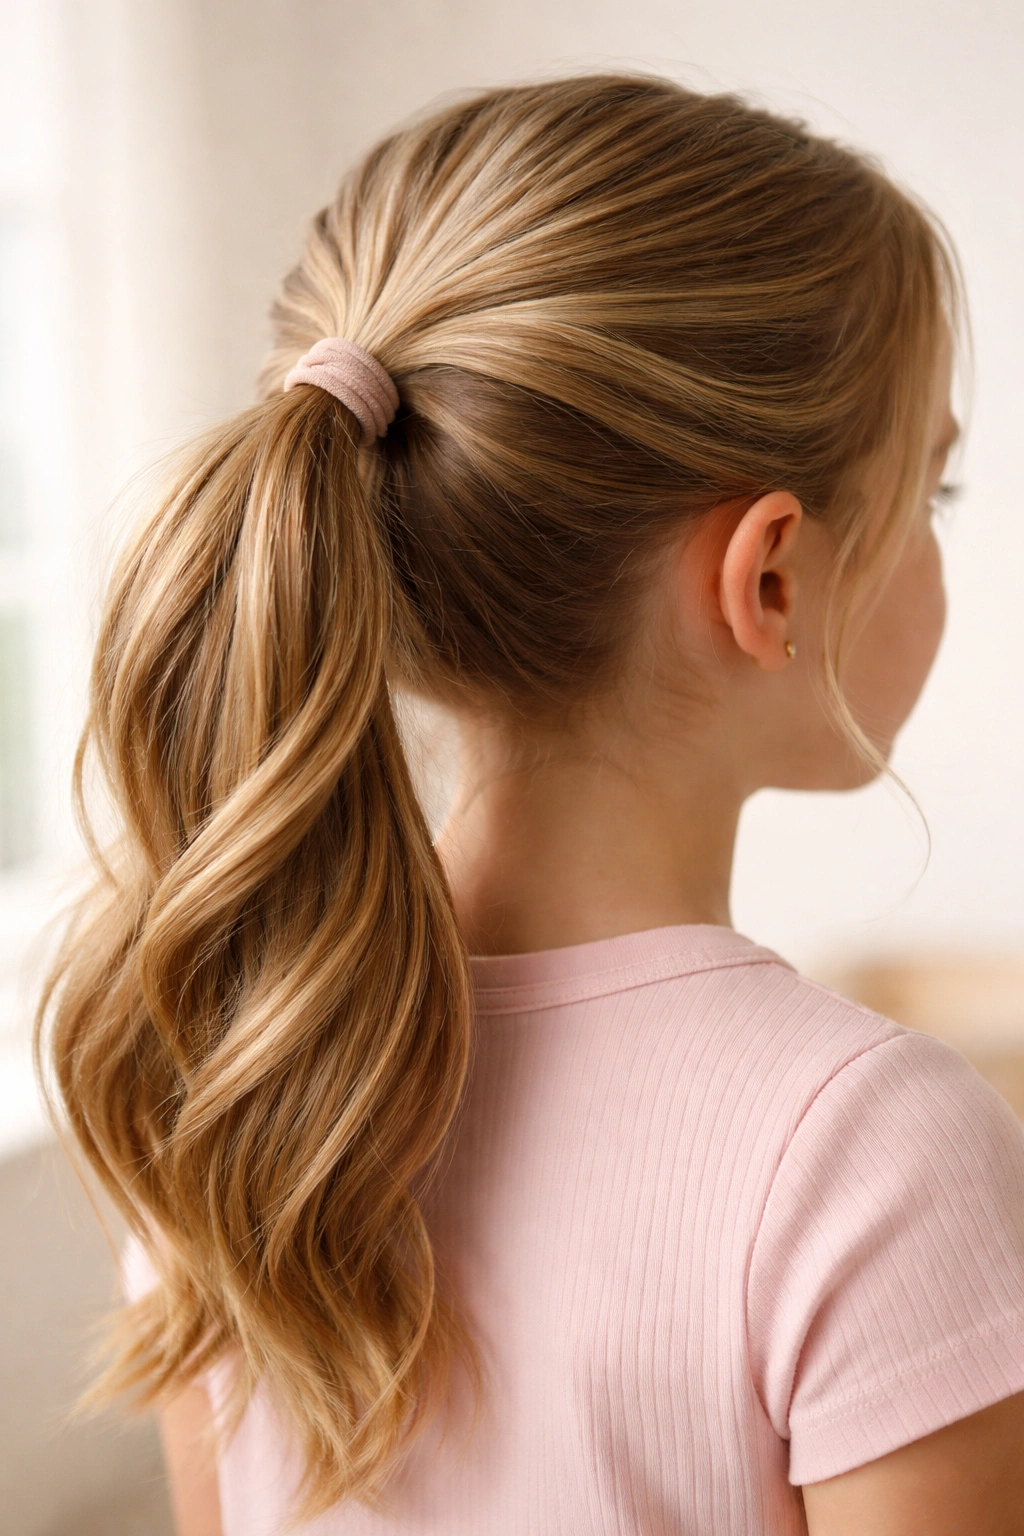
2. Low Sleek Ponytail
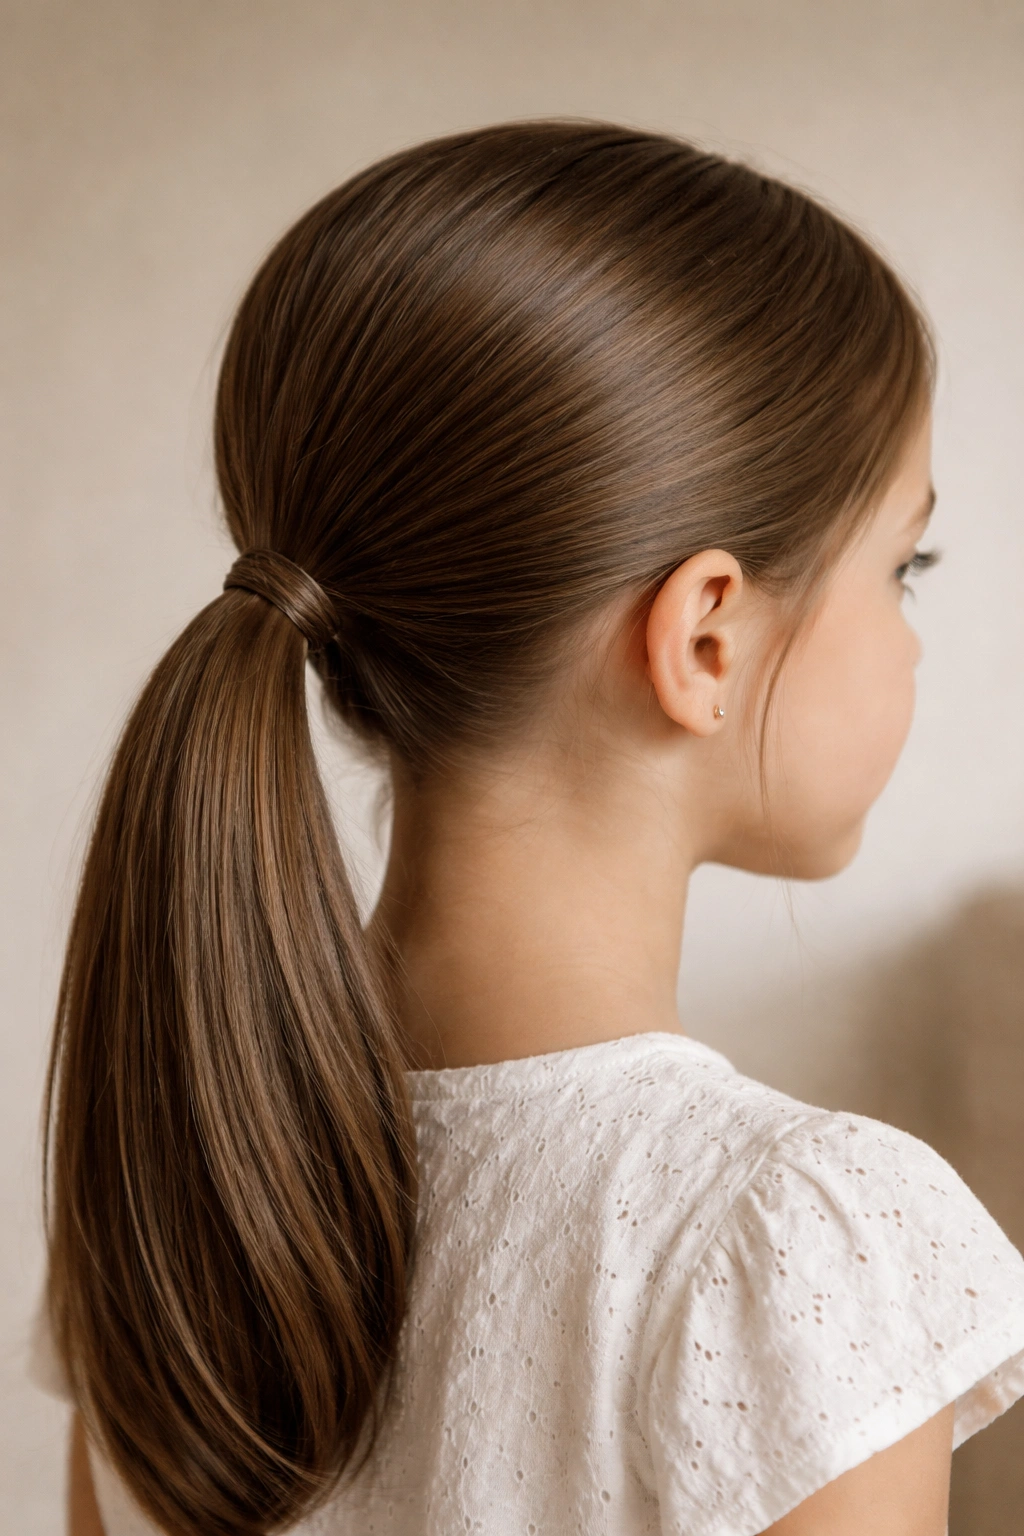
The low sleek ponytail is the more sophisticated cousin of the classic high ponytail — it sits at the nape of the neck and has a polished, controlled appearance that works beautifully for special occasions, school photos, or when you want a more elegant everyday look. This style requires a bit more attention to detail than a casual high ponytail, but the result is worth the extra effort.
Why This Style Works
A low ponytail projects a polished, put-together appearance without looking fussy or overdone. It’s the hairstyle equivalent of a neat sweater and clean sneakers — clearly cared for, but still practical and comfortable for a kid. The lower placement also makes it feel a bit more sophisticated, which kids love as they get older and start caring more about looking “grown up.” Because the ponytail sits closer to the scalp, it also creates less tension and is gentler on the hairline, especially for kids with fine or curly hair.
How to Create It
Brush the hair thoroughly and smooth it down with your fingers or a fine-tooth comb. Start at the very bottom of the head, right at the base of the neck, and gather all the hair into your hands. Hold it firmly and secure with an elastic, wrapping multiple times until it’s snug. The key to making this look sleek is the smoothing step: use a fine-tooth comb or a small brush dampened slightly with water or smoothing serum to smooth down any bumps or flyaways. Go over the entire head from the crown down, creating a smooth surface from root to tip. For an extra polished look, wrap a small section of hair around the elastic to hide it, or use a decorative hair clip at the base.
Best for and Quick Facts
- Hair type: Best on straight or wavy hair; works on curly hair if you use styling cream
- Best age: Works well for kids age 5 and up, especially those who appreciate a more refined look
- Time required: 4-5 minutes (includes smoothing)
- Holds well: Excellent — the lower weight and secure technique mean this ponytail lasts all day
- Special occasion ready: Yes, this is a go-to for photos and events
- Heat or products needed: Smoothing serum or styling cream helps; water works for basic smoothing
Worth knowing: A low ponytail with slight wrinkles or bumps isn’t the same as a sleek low ponytail. The smoothing step is what takes this from casual to polished, so don’t skip it.
3. Bubble Ponytail
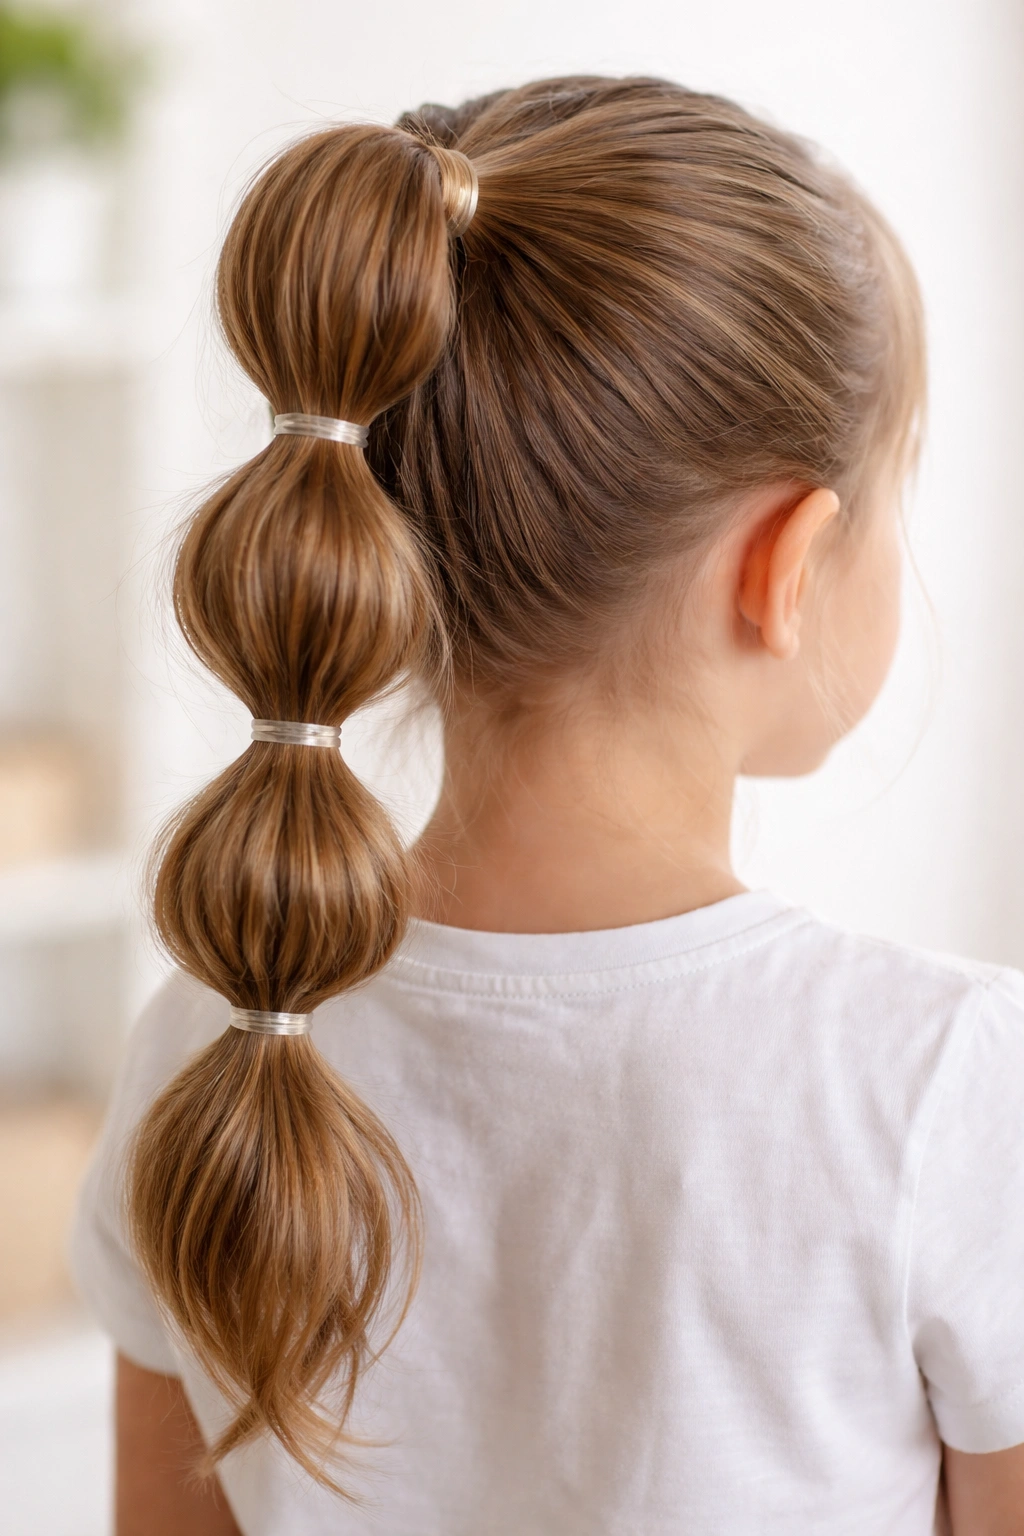
The bubble ponytail is a fun, playful style that looks way more complicated than it actually is — it’s a single ponytail divided into sections with smaller elastics creating a “bubble” effect that kids absolutely love. This style is Instagram-famous for good reason: it’s visually interesting, takes only about five minutes, and works on all hair types.
Why Kids Love It
A bubble ponytail transforms an ordinary ponytail into something that looks special and thoughtful. The individual bubbles catch the light differently, creating texture and movement even when the hair is completely still. Kids love the visual interest, and older kids appreciate that it looks more sophisticated than a basic ponytail despite being simple to create. This style also works beautifully with hair accessories — you can weave ribbons through the bubbles or add small clips at each section.
How to Create It
Start with a basic high or mid-height ponytail secured with an elastic. Take a small section of hair from the top of the ponytail (about an inch) and divide it into two halves, creating a small opening. Gently pull the entire ponytail up through this opening, flipping it underneath and then up through the gap — this creates the first “bubble.” Immediately below where you flipped, place another elastic snugly around the ponytail to lock the bubble in place. Repeat this process down the entire length of the ponytail: take another small section of hair just below the second elastic, create another opening, flip the ponytail section through it, and secure with a new elastic. Continue until you reach the end or the ponytail becomes too short to create another bubble.
Best for and Quick Facts
- Hair type: Works beautifully on all hair types, but shows best on longer hair (10+ inches)
- Best age: Ages 4-12; it’s fun and whimsical enough for younger kids, sophisticated enough for older kids
- Time required: 5-7 minutes
- Holds well: Excellent, as long as you use secure elastics
- Special occasion ready: Absolutely — it’s eye-catching and clearly deliberate
- Heat or products needed: None, though adding light hairspray helps keep flyaways in place
Insider note: The size of your bubbles and the distance between elastics matters. Smaller, tighter bubbles look more controlled and polished; larger, looser bubbles look bouncier and more fun. Choose based on your kid’s preference.
4. Braided Wrap Ponytail
The braided wrap ponytail is an elegant option where you create a standard ponytail and then wrap a thin braid around the base to hide the elastic and add visual interest. It’s the perfect style when you want something that looks intentional and put-together without requiring complex braiding skills throughout the entire hair.
Why This Technique Elevates a Ponytail
A braided wrap transforms an ordinary ponytail into something that looks like you spent considerably more time on it than you actually did. The braid-wrapped base draws the eye and creates a focal point, making the whole style feel more polished and intentional. This technique also serves a practical purpose: it hides the hair elastic completely, which instantly makes any ponytail look more finished and salon-quality. It’s a game-changer for school photos or any time you want your kid to look extra put-together.
How to Create It
First, create a secure high or mid-height ponytail using a clear elastic. Take a small section of hair from the underside of the ponytail base (about the thickness of a pencil) and create a simple three-strand braid. Braid this section until it’s long enough to wrap completely around the base of the ponytail, covering the elastic. Wrap the braid around the elastic and secure the end of the braid with a tiny clear elastic or by tucking it underneath and pinning it in place with a bobby pin. The beauty of this technique is that any bumps or imperfections in the braid are hidden by the wrapping, so perfection isn’t necessary.
Best for and Quick Facts
- Hair type: Works on all hair types; shows beautifully on straight or wavy hair
- Best age: Ages 5 and up, depending on hair length (need minimum 6 inches)
- Time required: 5-6 minutes
- Holds well: Excellent — the wrap adds security to the entire ponytail
- Special occasion ready: Yes, this is a go-to for events and photos
- Heat or products needed: None, though smoothing the braid section helps it look neater
Pro tip: If the braid section isn’t long enough to wrap all the way around, don’t panic — wrap it as far as it goes and secure with a bobby pin. You can also use a decorative hair clip to cover where the braid ends, turning a potential problem into an intentional design element.
5. Half-Up Ponytail
The half-up ponytail is the perfect compromise between leaving hair fully down and pulling it all back — it keeps hair out of the face while maintaining the softness and length of an open style. This is an excellent option for kids who like the feeling of having their hair down but need it controlled enough for school or activity.
Why It’s Perfect for Practical Elegance
A half-up style gives you the best of both worlds: the hair is controlled and off the face, but it still flows down the back, maintaining that longer-hair aesthetic kids often prefer. This style also feels less severe than a full ponytail, making it a good option for younger kids who find full ponytails uncomfortable. The half-up ponytail is also incredibly forgiving — it doesn’t require precision sectioning, and slightly messier versions still look intentional and cute.
How to Create It
Brush the hair and divide it mentally into two halves: the top half (from the crown to about mid-ear on each side) and the bottom half. Gather the top section at the crown of the head, just like you would for a standard ponytail, but only pull the upper portion of hair. Secure this with an elastic. Leave all the bottom hair down. You can make this style more interesting by adding a second, smaller ponytail below the first (creating a two-layer half-up), or by curling the bottom section to add texture and contrast to the controlled top section. Some kids love adding a decorative clip or bow at the base of the half-up section to draw attention to the style.
Best for and Quick Facts
- Hair type: Works beautifully on all hair types
- Best age: Ages 3 and up
- Time required: 3-4 minutes
- Holds well: Good to excellent, depending on hair density
- Special occasion ready: Yes, especially with a bow or decorative clip
- Heat or products needed: None required; styling cream helps if you want waves in the bottom section
Worth knowing: The size of your “half” matters. If you take too little hair, the ponytail looks skimpy; if you take too much, it defeats the purpose of the half-up style. Aim to gather just the hair that naturally sits above the ears and across the crown.
6. Side Ponytail
The side ponytail is a playful, asymmetrical style where the ponytail is pulled to one side of the head rather than centered. This style is perfect for kids who want something different from the standard looks and works beautifully for adding personality and fun to an everyday hairstyle.
Why Kids Love the Side Ponytail
A side ponytail immediately looks more interesting and intentional than a centered one — it’s the kind of small detail that makes kids feel like they’re wearing something special. The asymmetrical placement also frames the face differently, which can be flattering and is definitely fun. This style also works well for kids who have a hair part they prefer on one side, or who like the feeling of hair flowing over one shoulder. Side ponytails photograph beautifully and often look softer and more relaxed than centered styles.
How to Create It
Brush the hair and decide which side you want the ponytail on. Gather the hair slightly to one side of center — imagine you’re creating a ponytail positioned about two inches to the left or right of where a standard centered ponytail would sit. Hold the gathered hair firmly and secure with an elastic. The key to making this look intentional rather than accidental is the placement: you want it clearly off-center, not just slightly shifted from center. You can enhance this style by creating loose waves in the ponytail section, adding a decorative clip or ribbon at the base, or leaving some face-framing pieces slightly loose around the temples.
Best for and Quick Facts
- Hair type: Works on all hair types; waves and curls add beautiful texture
- Best age: Ages 4 and up
- Time required: 3-4 minutes
- Holds well: Good, though side ponytails shift slightly throughout the day due to gravity
- Special occasion ready: Yes, especially with waves added
- Heat or products needed: None required; a light styling cream helps waves hold longer
Insider note: If you want the side ponytail to stay in place throughout the day, secure it slightly tighter than a standard ponytail, or use two elastics placed very close together for extra security.
7. Messy Bun Ponytail
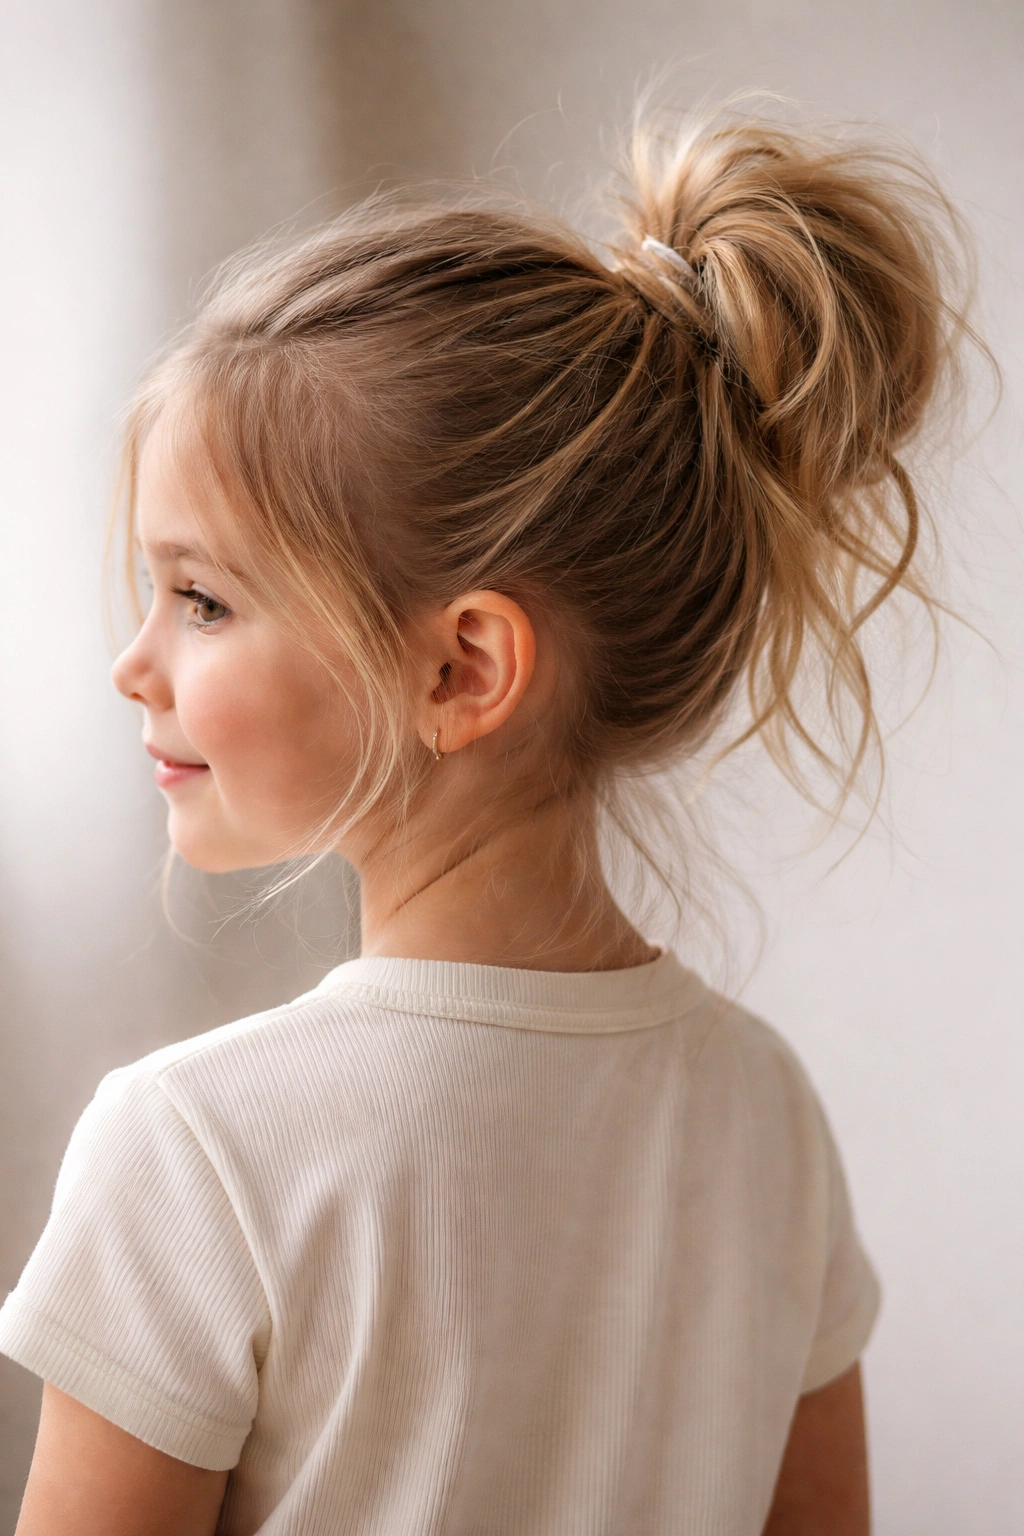
The messy bun ponytail combines the practicality of a ponytail with the fun, relaxed vibe of a bun — it’s textured, interesting, and requires less perfection than other styles, making it perfect for days when you’re going for “effortlessly cute” rather than polished. This is also the go-to style when your kid’s hair is having an off day or isn’t cooperating with smooth styles.
Why Messy Actually Works
Contrary to what the name suggests, a messy bun ponytail isn’t actually sloppy — it’s intentionally textured and relaxed. The beauty of this style is that it hides imperfections beautifully. A slightly bumpy section, some flyaways, or uneven smoothness doesn’t matter because the whole aesthetic is supposed to look casual and lived-in. This makes the messy bun ponytail perfect for kids with curly hair, fine hair that won’t smooth down, or any hair type that doesn’t cooperate with more structured styles.
How to Create It
Create a high or mid-height ponytail using a regular elastic. Twist the ponytail loosely or braid it lightly — you’re not aiming for perfection here. Once the ponytail is twisted or braided, wrap it loosely around the base to create a bun shape, securing the end with bobby pins. The key is keeping it loose and relaxed; don’t pull tight or try to make it neat. Gently pull some strands out of the bun to create texture and a more deliberately undone appearance. You can also lightly backcomb small sections of the ponytail before twisting to add extra texture and volume to the bun. A light spritz of hairspray helps hold everything in place without making it look stiff.
Best for and Quick Facts
- Hair type: Works beautifully on all hair types, especially curly and textured hair
- Best age: Ages 4 and up
- Time required: 4-5 minutes
- Holds well: Good, though the textured nature means it naturally relaxes throughout the day
- Special occasion ready: Yes, if styled with intention (not just thrown together)
- Heat or products needed: Light hairspray helps; texturizing spray adds volume
Pro tip: If your kid has fine or slippery hair, backcomb the ponytail section lightly before twisting — this gives the bun extra grip and makes it stay put much better.
8. Two Ponytails
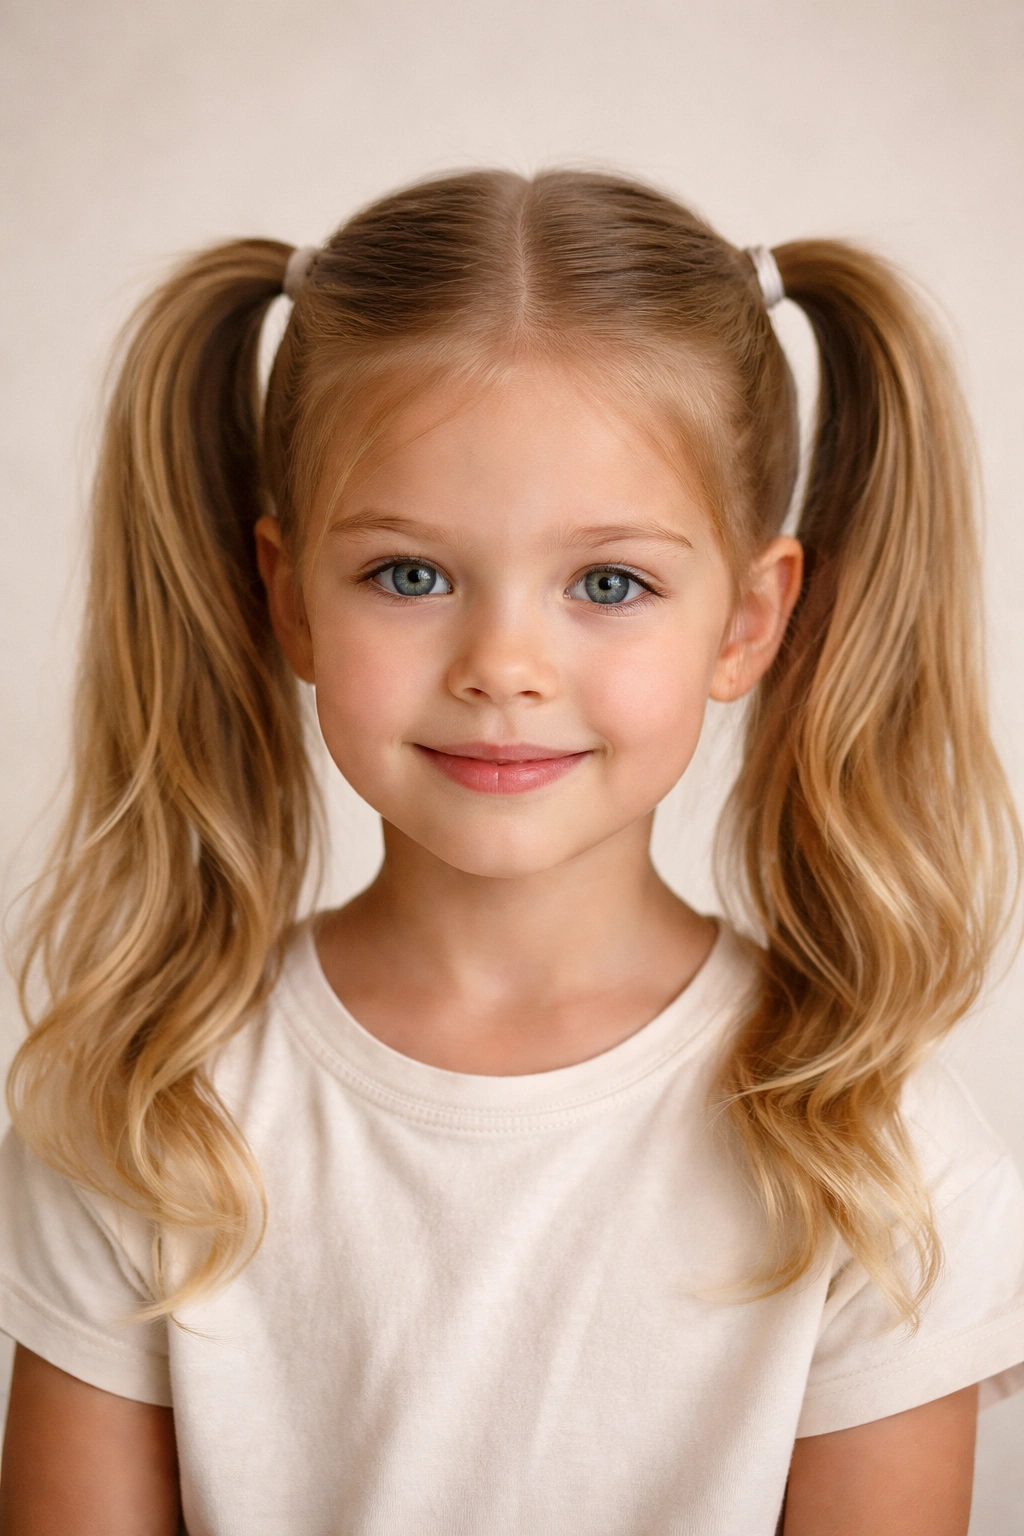
Two ponytails are the classic pigtail-style option that works beautifully for younger kids and creates an adorable, playful appearance. This style is practical (it keeps all the hair controlled and organized), cute, and surprisingly versatile depending on where you place the ponytails and how you style them.
Why Two Ponytails Never Go Out of Style
Two ponytails work for kids from toddlers through age 8 or 9, creating an instantly cute appearance that’s hard to beat. The style is also incredibly practical: the hair is completely controlled, stays in place during activity, and is easy to maintain throughout the day. Two ponytails also create visual balance on the head and distribute the weight of the hair evenly, making them more comfortable than a single ponytail for many kids. The classic placement (high on each side of the head) is timeless, but you can also place two ponytails lower or use different styling on each one for more creative variations.
How to Create It
Divide the hair down the center from the crown to the nape of the neck, creating two equal sections. Gather one section at the desired height (high for classic pigtails, lower for a more mature two-ponytail look) and secure with an elastic. Repeat on the other side, making sure both ponytails are at the same height and have approximately the same amount of hair for balance. The key to neat two ponytails is a straight center part and gathering each side precisely so they’re symmetrical. If your kid’s hair is fine or slippery, use textured elastics on each side for better grip.
Best for and Quick Facts
- Hair type: Works on all hair types
- Best age: Ages 2-9 (can work for older kids who want the style, but it’s primarily a younger-kid look)
- Time required: 3-4 minutes
- Holds well: Excellent — two ponytails are very secure
- Special occasion ready: Yes, definitely cute for photos and events
- Heat or products needed: None required; a spritz of water helps straighten the part
Worth knowing: The height and thickness of two ponytails changes the entire vibe of the style. High, thick ponytails look playful and little-kid cute; lower, thinner ponytails positioned more toward the sides look more mature and can work for older kids.
9. Twisted Ponytail
The twisted ponytail is a simple variation on the basic ponytail where you twist sections of hair before gathering them into the ponytail, creating subtle texture and visual interest without the complexity of actual braiding. This style works beautifully as an everyday look that feels special without requiring much extra effort.
Why Twisted Details Matter
A twisted ponytail looks noticeably different from a basic ponytail while still being incredibly simple to create — you’re not braiding, just gently twisting. The twists catch light differently than straight hair, creating the illusion of texture and dimension. This style is also perfect for hair that’s slightly limp or needs visual interest added to it. The twisted details make a basic ponytail feel more intentional and polished, which is why it works beautifully for both everyday wear and slightly more dressy occasions.
How to Create It
Brush the hair and divide it into two or three sections (depending on how much texture you want). Starting with one section, gently twist it from the roots to the ends, keeping the twist relatively loose so it doesn’t kink the hair. Once all sections are twisted, gather them together at the desired ponytail height and secure with an elastic. The twists will naturally blend into the gathered ponytail, creating a subtle textured effect. For more pronounced texture, you can loosely braid each section before twisting, though simple twisting works beautifully on its own.
Best for and Quick Facts
- Hair type: Works on all hair types; shows best on straight or wavy hair
- Best age: Any age from 4 and up
- Time required: 4-5 minutes
- Holds well: Good to excellent, depending on how tightly you twist
- Special occasion ready: Yes, it’s elegant and polished
- Heat or products needed: None; light hairspray helps hold twists longer
Pro tip: Twist toward the outside of the head (away from the center) on each side — this creates a flattering frame around the face and makes the twists look more intentional.
10. Curly Ponytail
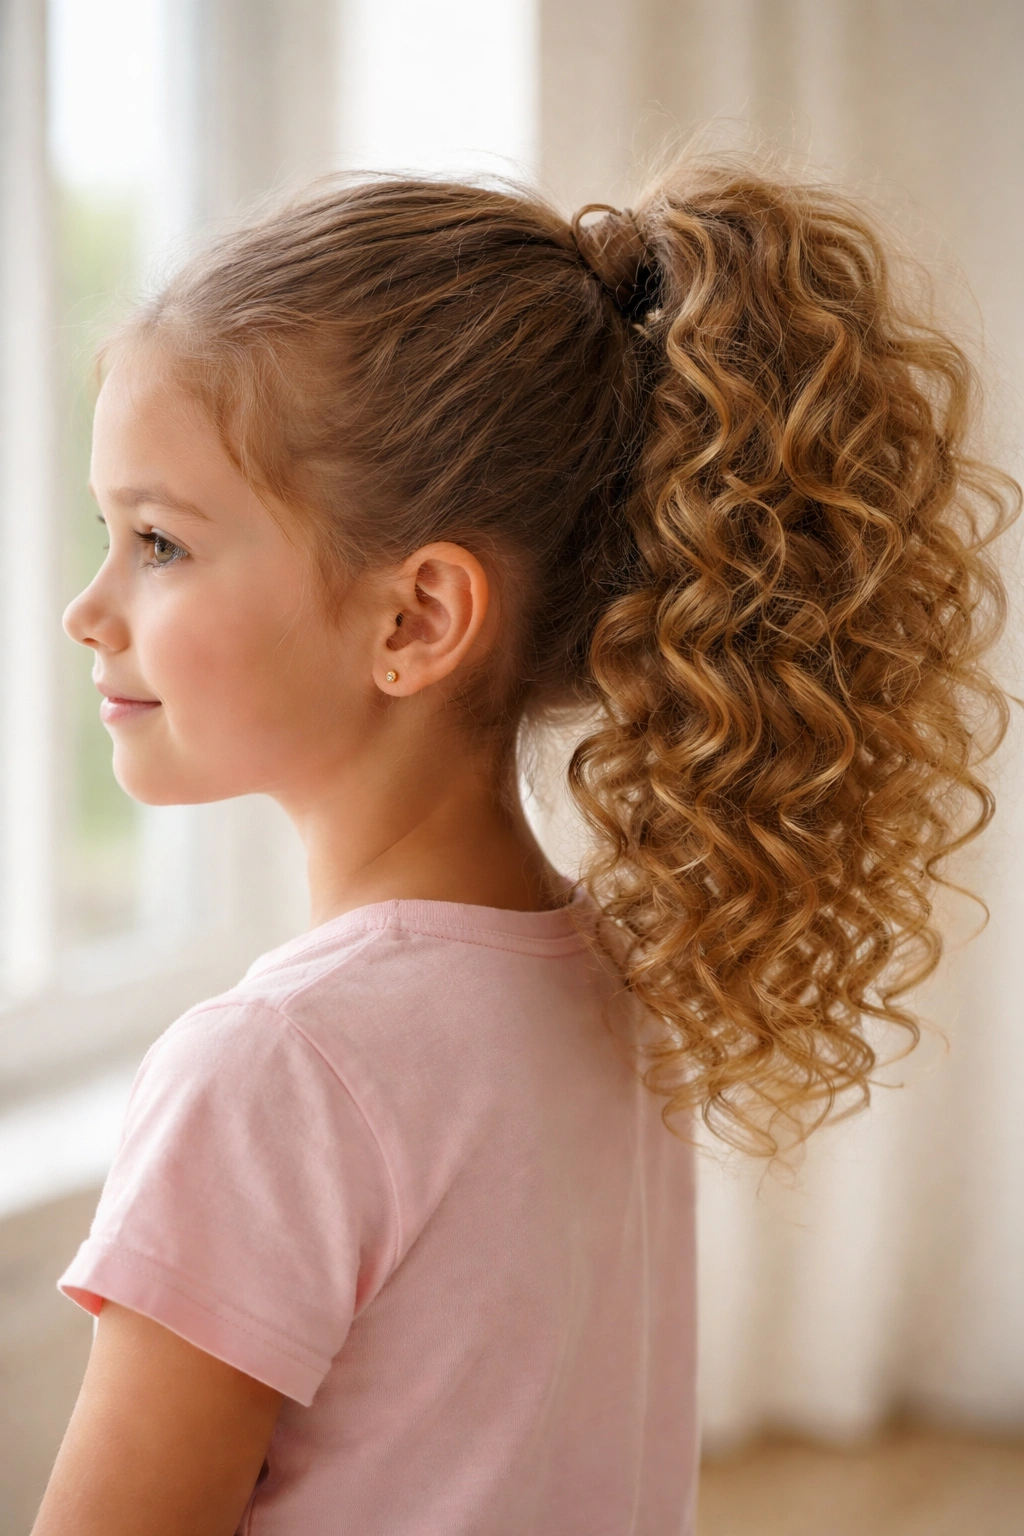
A curly ponytail is simply a ponytail created with curled hair, transforming the entire appearance from smooth and sleek to bouncy and textured. This works beautifully on all hair types and is particularly stunning on fine, thin, or limp hair where curls add volume and movement.
Why Curls Transform a Ponytail
Straight hair in a ponytail can look sleek but thin; the same ponytail with curls in it looks full, bouncy, and much more interesting. Curls also add visible texture, which creates dimension and catches light beautifully. This style works especially well for kids who feel self-conscious about having thin hair, as the curls create the illusion of much more volume. A curly ponytail is also more forgiving than a straight one — slight messiness in the curls looks intentional rather than sloppy.
How to Create It
There are several ways to create curls in a ponytail, depending on your kid’s hair type and your tools. If you have a heat tool like a curling iron or wand, curl the entire length of hair in sections before gathering it into a ponytail. If you prefer heat-free methods, you can braid damp hair overnight and release the braids in the morning for natural waves and curls. You can also use curl-setting cream on damp hair, section it, and let it air-dry, or use flexi-rods or foam rollers overnight. Once the curls are set, gather the curled hair into your chosen ponytail style and secure with an elastic. Don’t brush the curls smooth — use your fingers to gently separate and arrange the curls, which keeps them bouncy and defined.
Best for and Quick Facts
- Hair type: Works on all hair types; creates beautiful results on fine or straight hair
- Best age: Any age (though heat tools require adult handling)
- Time required: 5-8 minutes (plus curl creation time, which varies by method)
- Holds well: Good to excellent, depending on the curl-setting method
- Special occasion ready: Absolutely — curly ponytails are glamorous and eye-catching
- Heat or products needed: Curl-setting cream, curl-defining gel, or light hairspray helps; heat tools optional
Insider note: If you’re curling with heat tools, work in small sections and focus the curls on the ends and midlengths rather than all the way to the roots — this creates a more natural, bouncy effect than curling everything tightly.
11. Zigzag Ponytail
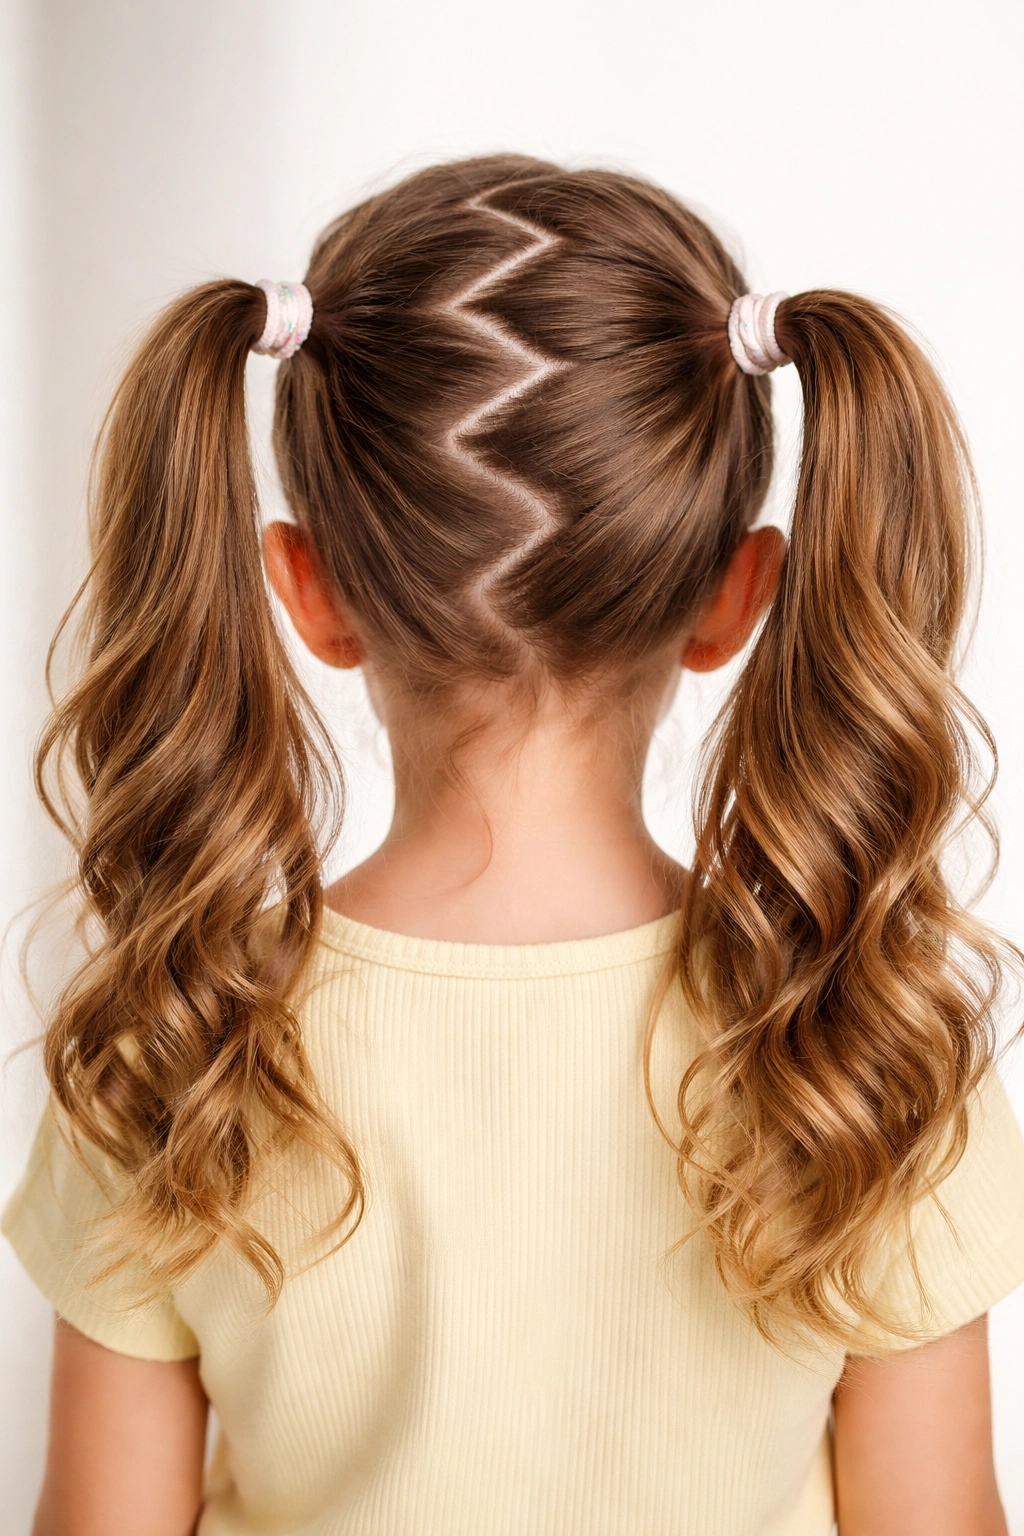
The zigzag ponytail is a fun, playful style where you part the hair in a zigzag pattern down the center of the head, then create two ponytails or buns that follow the zigzag path. This style is eye-catching, creative, and works beautifully for kids who love something different and visually interesting.
Why Zigzag Parting Is Such a Game-Changer
A simple zigzag part transforms a basic two-ponytail style into something that looks way more intentional and creative. Kids absolutely love the visual interest of a zigzag part — it’s the kind of detail that looks complicated but is surprisingly simple to create. This style also works beautifully in photos, as the zigzag draws the eye and creates visual movement. It’s perfect for kids who want to look like they put extra thought into their hairstyle without it actually requiring much additional skill or time.
How to Create It
Start at the top center of the head, near the hairline. Using a rat-tail comb or the pointed end of a regular comb, create a small zigzag pattern down the center of the head to the nape of the neck. The zigzag should be noticeable but not so exaggerated that it looks sloppy — aim for roughly 1-inch angles that go left, then right, then left again. Once your zigzag part is clear, divide the hair on either side of the zigzag and create two ponytails or buns at the appropriate height. You can make each ponytail follow the natural curve of the head, or keep them at identical heights for a more balanced look. Some kids love having different styles on each side — one ponytail and one bun, for example — for extra creativity.
Best for and Quick Facts
- Hair type: Works on all hair types; shows particularly well on straight or wavy hair with good contrast
- Best age: Ages 4 and up (younger kids love the visual uniqueness)
- Time required: 4-6 minutes
- Holds well: Good, especially if both ponytails are secure
- Special occasion ready: Yes, it’s creative and memorable
- Heat or products needed: None; wet hair makes the part clearer and more defined
Pro tip: Use a fine-tooth comb and either water or a light smoothing spray to create a crisp, clear zigzag part — this makes the style look more intentional and polished.
12. Looped Ponytail
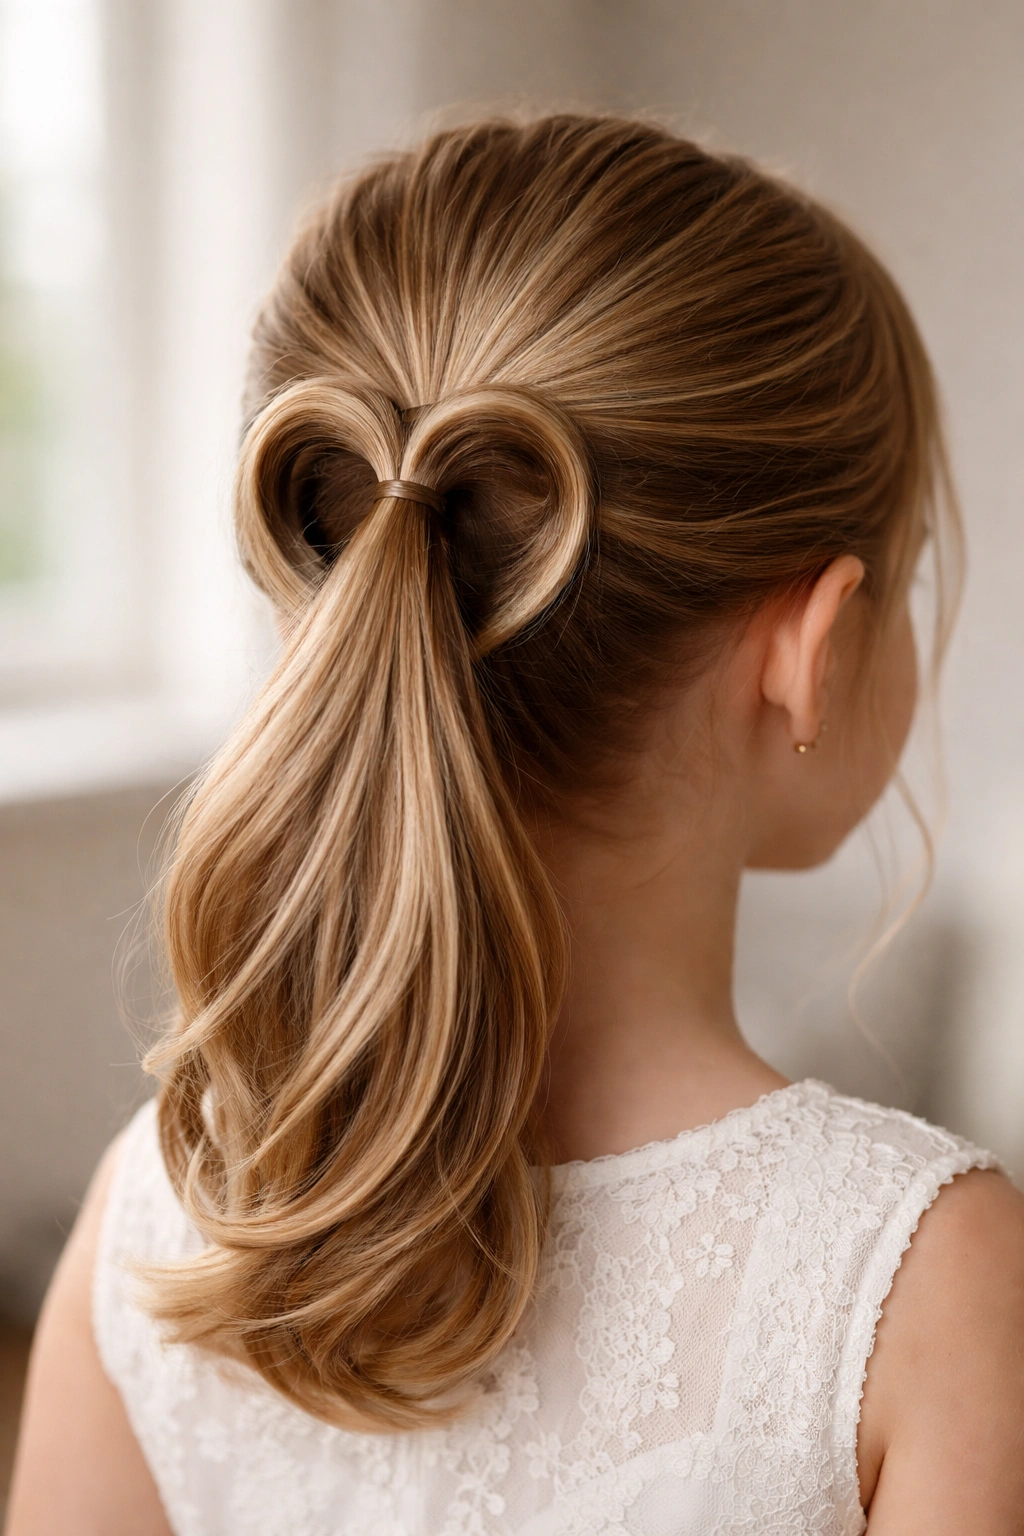
The looped ponytail is a charming style where the ponytail is folded in half and secured at the base, creating a looped or heart-shaped effect. This style is elegant, visually interesting, and works beautifully for special occasions or any time you want something that looks thoughtfully styled.
Why Looped Ponytails Feel Special
A looped ponytail looks intricate and intentional, making it feel like a special-occasion style even though it’s quite simple to create. The looped effect creates visual movement and catches light in an interesting way, making the hairstyle feel dynamic. This style also works beautifully with hair accessories like ribbons or decorative clips woven through the loop. It’s perfect for kids who want something that looks sophisticated and put-together without requiring braiding or complex techniques.
How to Create It
Start with a mid-height or low ponytail secured with an elastic. Gather the ponytail in your hand and fold it upward, creating a loop where the ends of the hair face toward the back of the head. Pin the looped section in place using bobby pins inserted at the base of the ponytail, just above the original elastic. Adjust the loop to your desired size and shape — you can create a large, loose loop for an elegant look or a tighter, more compact loop for a neater appearance. Smooth any flyaways and secure with a light hairspray if needed.
Best for and Quick Facts
- Hair type: Works beautifully on all hair types; longer, thicker hair makes more pronounced loops
- Best age: Ages 5 and up
- Time required: 4-5 minutes
- Holds well: Good, as long as you use secure bobby pins
- Special occasion ready: Absolutely — it’s elegant and clearly intentional
- Heat or products needed: Light hairspray helps; bobby pins essential
Worth knowing: The length of your ponytail determines the size of your loop. Longer ponytails create bigger, looser loops; shorter ponytails create tighter loops. Either works beautifully — it just depends on the look you’re going for.
13. Fishtail Braided Ponytail
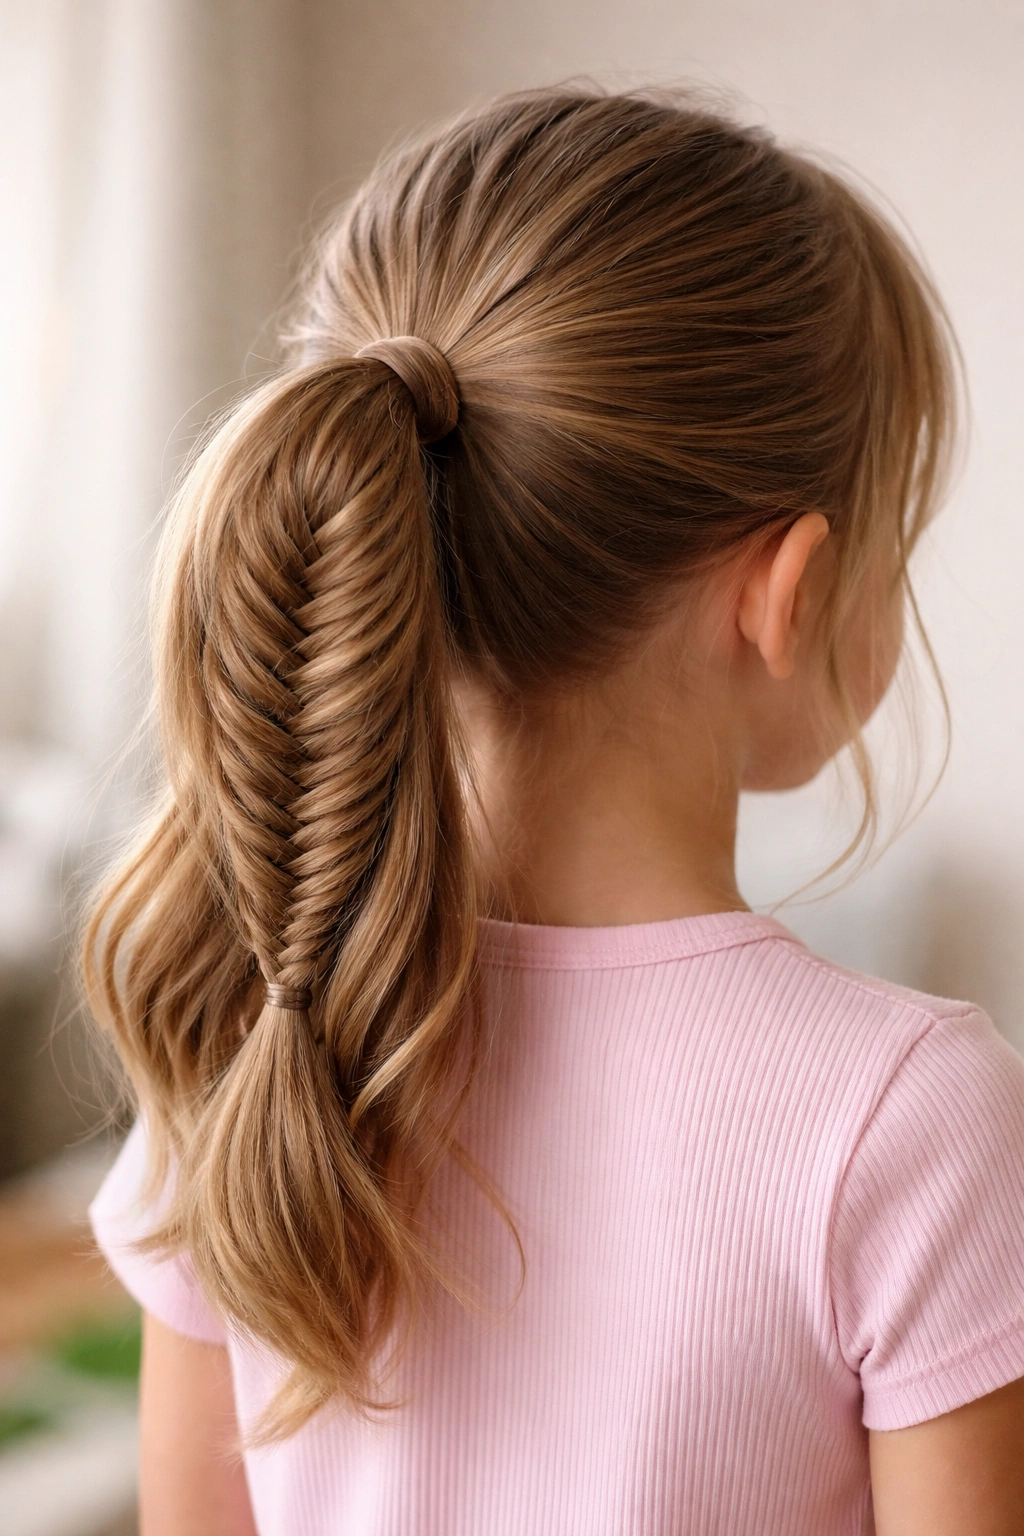
The fishtail braided ponytail combines the simplicity of a basic ponytail with the visual texture of a fishtail braid — you create a standard ponytail and then braid the ponytail section using the fishtail braid technique, creating an intricate-looking style that’s actually quite straightforward to create.
Why Fishtail Braids Look Intricate
A fishtail braid looks far more complicated than it actually is. Unlike a traditional three-strand braid that reads as obviously braided, a fishtail braid creates a delicate, intricate appearance with lots of fine detail. The fishtail technique also creates a very textured look, which works beautifully for kids with thinner hair — it creates the illusion of much more volume and density. This style works perfectly for kids who want something special and intentional-looking without the actual complexity of traditional braiding.
How to Create It
Create a mid-height or high ponytail using a secure elastic. Once the ponytail is secured, begin a fishtail braid: take a small strand of hair from the outside of the left side of the ponytail and cross it over to the inside of the right side. Repeat on the right side — take a small strand from the outside right and cross it to the inside left. Continue alternating in this pattern all the way down the ponytail. The fishtail braid will naturally have a woven, intricate appearance. Secure the end with a small clear elastic. For extra texture and a more intentional messy look, gently pull the sides of the braid outward to loosen it slightly.
Best for and Quick Facts
- Hair type: Works on all hair types; shows beautifully on straight, wavy, and curly hair
- Best age: Ages 6 and up (requires patience and still fingers)
- Time required: 6-8 minutes
- Holds well: Excellent — the braided section keeps everything secure
- Special occasion ready: Yes, it’s elegant and visually striking
- Heat or products needed: None; light hairspray helps hold the braid’s shape
Pro tip: Fishtail braiding is easier to learn by practicing on yourself first — the motion becomes intuitive once you’ve done it a few times, and then teaching it to your kid becomes much easier.
14. Spiky Ponytail
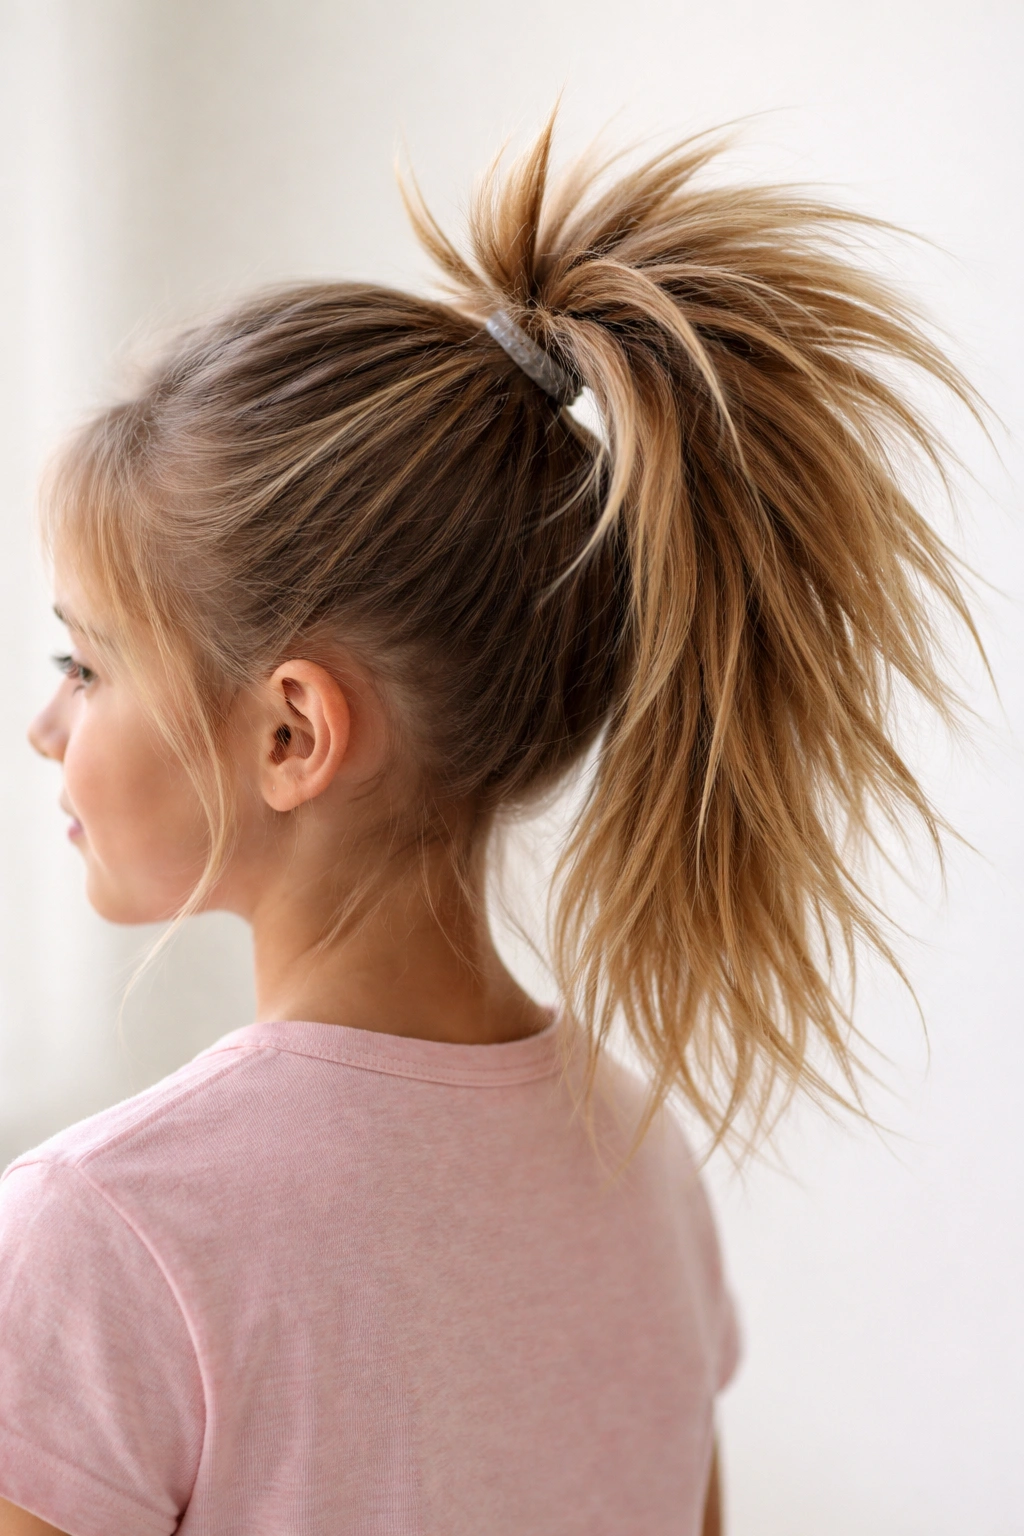
The spiky ponytail is a fun, edgy variation where you backcomb or tease sections of the ponytail to create spiky texture and volume throughout. This style is perfect for kids who love bold, statement-making looks and works beautifully for adding personality to an everyday ponytail.
Why Spiky Texture Stands Out
A spiky ponytail immediately looks different and more interesting than a smooth one. The backcombingcreates volume throughout the length of the ponytail, which is especially flattering for kids with fine or thin hair. The textured, slightly wild appearance makes this style feel fun and youthful, perfect for kids who want their hairstyle to reflect their personality. A spiky ponytail also photographs beautifully, as the texture catches light and creates visual movement.
How to Create It
Create a high or mid-height ponytail secured with an elastic. Using a fine-tooth comb or backcombing brush, gently backcomb small sections of the ponytail throughout its length. Start near the roots and comb backward toward the ponytail base, creating a tangled, fuzzy texture. Don’t backcomb too aggressively — you want texture and volume, not a matted appearance. Once you’ve backcombed your desired sections, gently smooth the outermost layer of hair with your fingers or a comb to create a polished exterior while maintaining the spiky texture underneath. You can also flip the ponytail upside-down and backcomb for extra volume, then flip it back. Finish with a light hairspray to hold the texture.
Best for and Quick Facts
- Hair type: Works beautifully on all hair types; creates most dramatic effect on straight or wavy hair
- Best age: Ages 4 and up
- Time required: 4-6 minutes
- Holds well: Good, especially with hairspray
- Special occasion ready: Yes, for creative or casual special occasions
- Heat or products needed: Light hairspray helps; backcombing brush or fine-tooth comb essential
Insider note: Backcombing is temporary and will brush out during washing, so don’t worry about damaging the hair — it’s a quick, easy way to add dramatic volume without heat tools.
15. Space Buns Ponytails
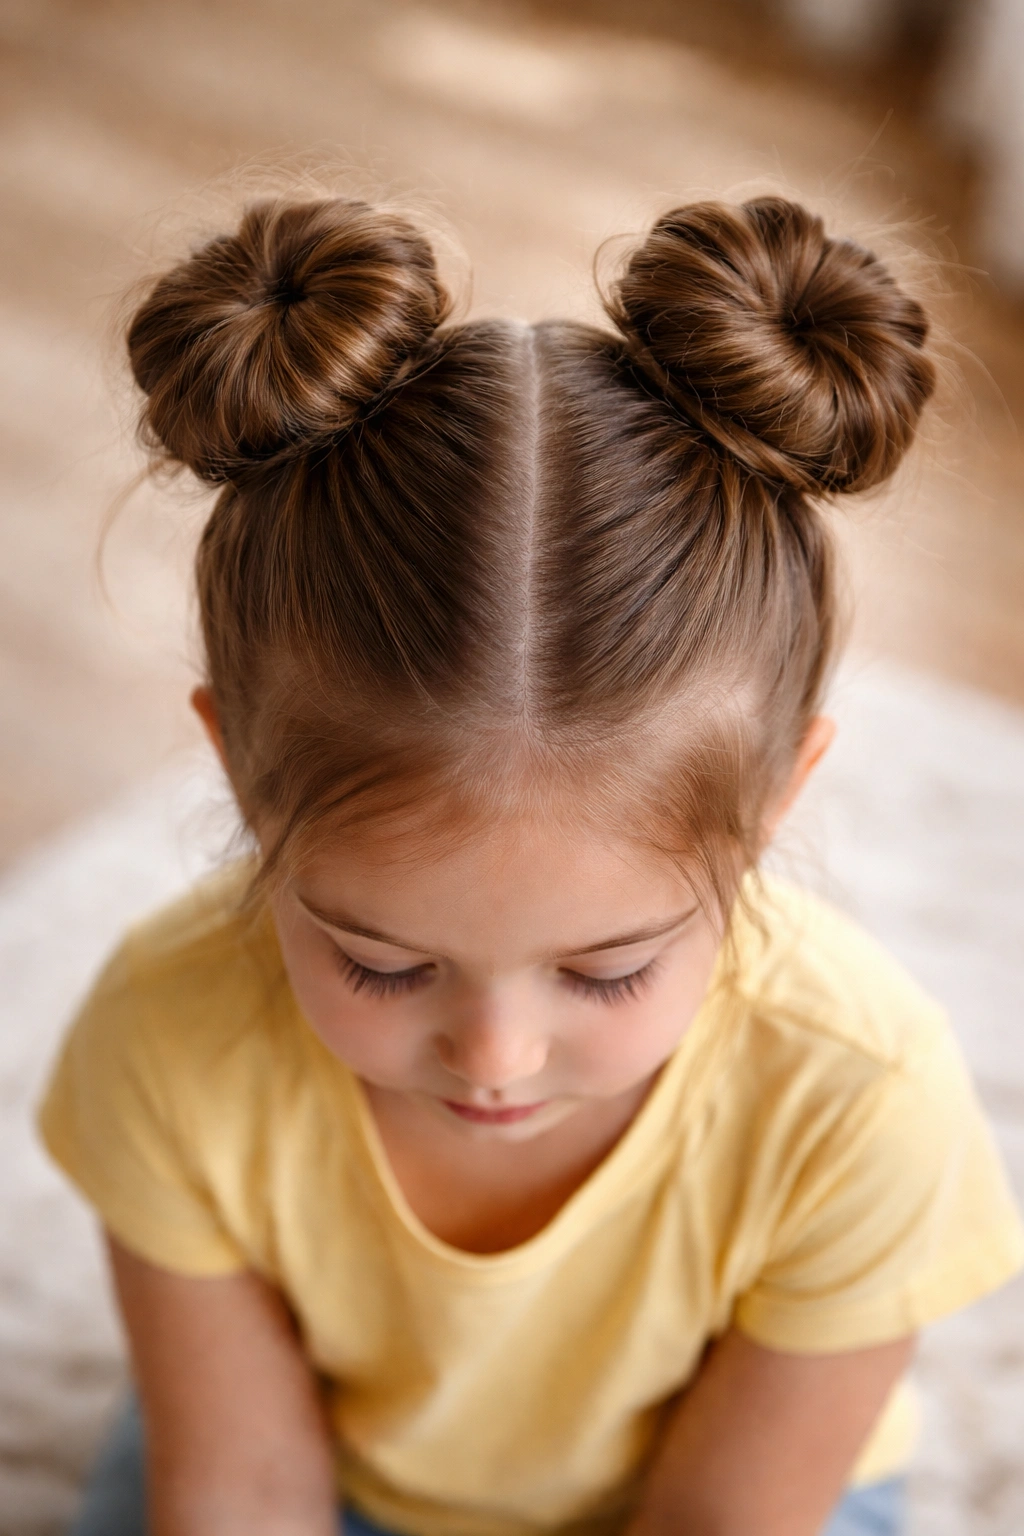
Space buns, often called pigtail buns or double buns, are two buns positioned on the top of the head (one on each side) creating a playful, whimsical look that’s beloved by kids everywhere. This is the ultimate fun, statement-making style that works beautifully for playdates, casual outings, or any time your kid wants to look extra playful and creative.
Why Space Buns Are Pure Joy
Space buns are the epitome of fun hairstyles — they’re instantly recognizable, impossible to miss, and make any kid feel like they’re wearing something special and creative. The style is also incredibly practical: all the hair is completely controlled and secured, making it perfect for active play or sports. The double bun setup also distributes the weight of the hair evenly, making it comfortable even for kids with longer, heavier hair. Plus, space buns are just undeniably cute and photograph beautifully.
How to Create It
Divide the hair down the center from the crown to the nape of the neck, creating two equal sections. Gather one section at the crown (high and centered on that side of the head) and secure with an elastic. Twist or braid this section, then wrap it around the base to create a bun, securing with bobby pins. Repeat on the other side, creating a matching bun. The buns should be positioned symmetrically on the crown, roughly two to three inches from the center part on each side. For extra fun and visual interest, you can add ribbons woven through the buns, or leave some hair loose around the face. Some kids love having one bun smooth and one bun textured or curly for creative variation.
Best for and Quick Facts
- Hair type: Works on all hair types; looks adorable on straight, wavy, and curly hair
- Best age: Ages 2-10 (works for any age, but primarily a kid and young preteen style)
- Time required: 5-7 minutes
- Holds well: Excellent — space buns are very secure
- Special occasion ready: Yes, for casual fun occasions (less appropriate for formal events)
- Heat or products needed: None; light hairspray helps hold the buns throughout the day
Pro tip: Don’t make the buns too tight — you want them to be secure, but overly tight buns can give your kid a headache. Aim for snug but comfortable, and check in after a few minutes to make sure the style feels okay.
Final Thoughts
Ponytails are one of the most versatile, kid-friendly hairstyles available, and the 15 styles covered here represent the full spectrum from quick everyday options to more creative, special-occasion looks. Whether you’re working with a few minutes before school or have time to try something more elaborate on a weekend morning, there’s a ponytail style here that fits your situation and your kid’s hair type.
The key to success with any ponytail is using a secure elastic, taking the time to smooth flyaways if you want a polished look, and remembering that slightly imperfect styles often look more intentional and cute than overly rigid ones. Start with the classic high ponytail or low sleek ponytail until you feel comfortable, then experiment with the more creative variations as you gain confidence. Most importantly, let your kid have input on the style — kids are much more likely to keep a ponytail in place throughout the day if they love how it looks and feel excited about wearing it.