A ponytail with a bow is one of the most versatile and elegant ways to finish any look, whether you’re heading to a formal event, a casual brunch, or just a regular day at the office. The beauty of this combination is that it transforms from polished and refined to playful and whimsical depending on the bow style you choose — a silk ribbon creates understated elegance, while a velvet bow adds vintage charm, and an oversized statement bow brings pure confidence and personality to even the simplest hairstyle.
What makes ponytails with bows so special is that they bridge formality levels beautifully. You can wear the exact same ponytail structure to a garden wedding by adding a delicate satin bow, then rewear it on a weekend errand day with a casual printed bow instead. The hairstyle itself becomes a canvas, and the bow is the finishing touch that signals the occasion, your mood, and your personal style all at once.
The versatility doesn’t stop there — the way you position the bow, the texture of your ponytail base, the placement of the tail itself, and even how many bows you use all create completely different effects. A high ponytail feels youthful and energetic; a low one feels sophisticated and intentional. Smooth and sleek reads formal; textured and voluminous feels approachable and fun.
Whether you have long hair, shoulder-length hair, fine texture, or thick waves, there’s a ponytail-with-bow style that’ll work for your hair type and your life. Let’s explore 15 distinct approaches, each with its own vibe, execution tricks, and perfect occasions.
1. Classic High Ponytail with Silk Bow
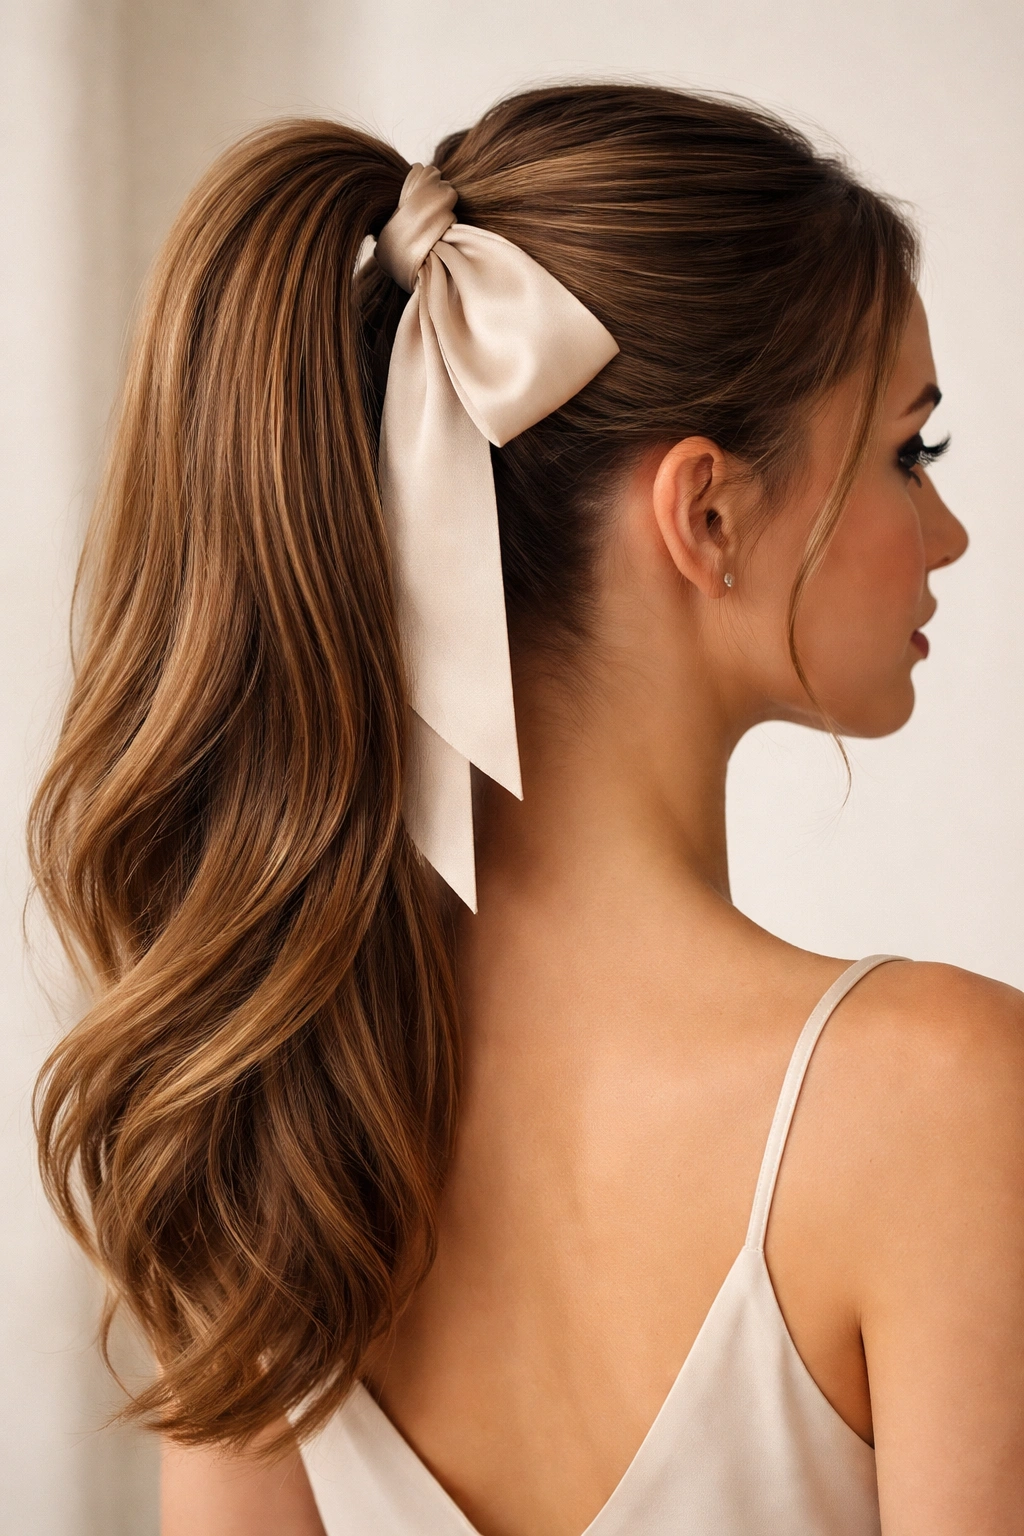
The quintessential high ponytail paired with a simple silk bow is an absolute powerhouse combination that works from the boardroom to the ball. Start by smoothing your hair back with a light-hold gel or smoothing serum, brushing everything straight back without a center or side part, and securing it high on the crown with a clear elastic band. The silk bow — whether in a matching shade or a complementary color — sits perfectly at the base of the elastic, covering it completely while adding an unexpected touch of elegance.
This style works beautifully on every hair texture because the simplicity of the execution means the focus stays on the proportions and the bow itself. The higher the ponytail sits on your head, the more lifted and energetic the overall look becomes. If you clip the bow slightly forward on the elastic rather than straight back, it creates a chic sideways tilt that feels deliberately styled rather than accidental.
Why It Never Goes Out of Style
A silk bow against a smooth, high ponytail is genuinely timeless — it’s the combination that appears in fashion editorials, red carpet events, and classic films alike. The smoothness against the texture of quality silk creates a subtle luxe feeling that reads as put-together without being costume-like. This isn’t a trendy style that’ll date your photos; it’s a foundational approach that feels refined no matter the year.
How to Perfect It
- Smooth your base thoroughly: Use a fine-tooth comb and a light smoothing product to eliminate flyaways; this style lives or dies on sleekness
- Secure the elastic firmly: Twist the elastic around your ponytail at least three times so it absolutely won’t slip, then adjust the bow placement over the elastic
- Choose an appropriate bow scale: For a high ponytail, a medium-sized bow (roughly 3-4 inches wide) looks proportional; an oversized bow can overwhelm a high placement
- Consider the bow knot placement: A bow with the knot centered at the back reads formal; a bow with the knot slightly off to the side feels more modern and playful
- Finish with a light hairspray: Mist the finished style with flexible hold spray so no flyaways emerge as the day goes on
Insider tip: For maximum elegance, choose a silk bow in a jewel tone (emerald, sapphire, burgundy) that contrasts subtly with your hair color rather than matching it exactly — the contrast creates visual interest without feeling matchy-matchy.
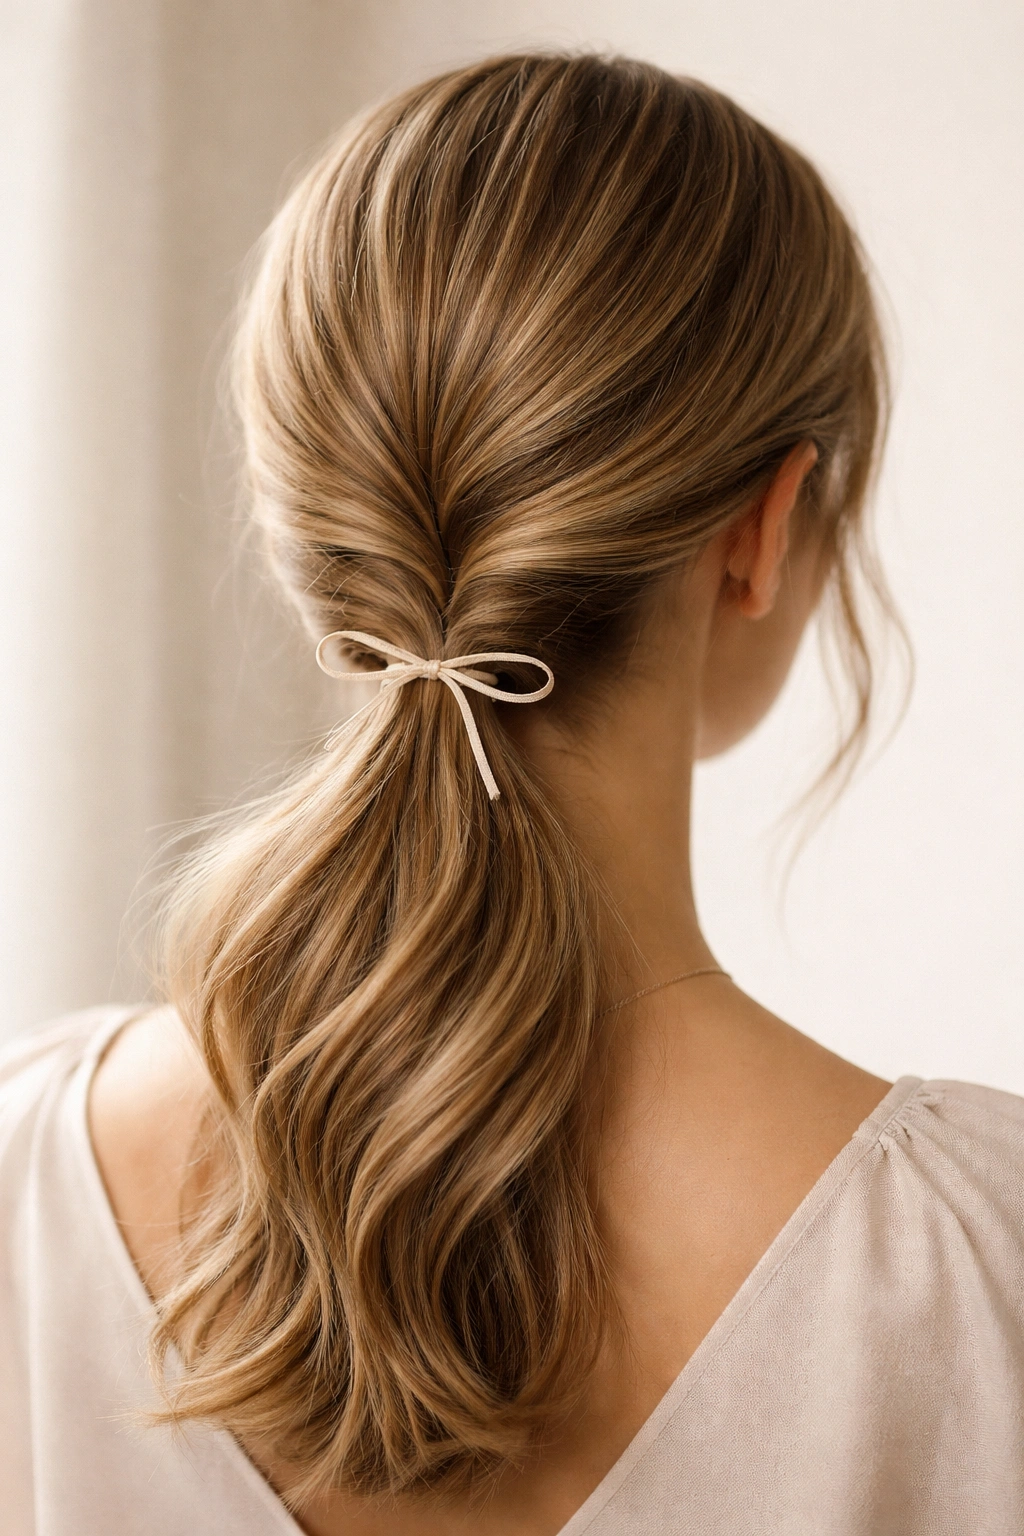
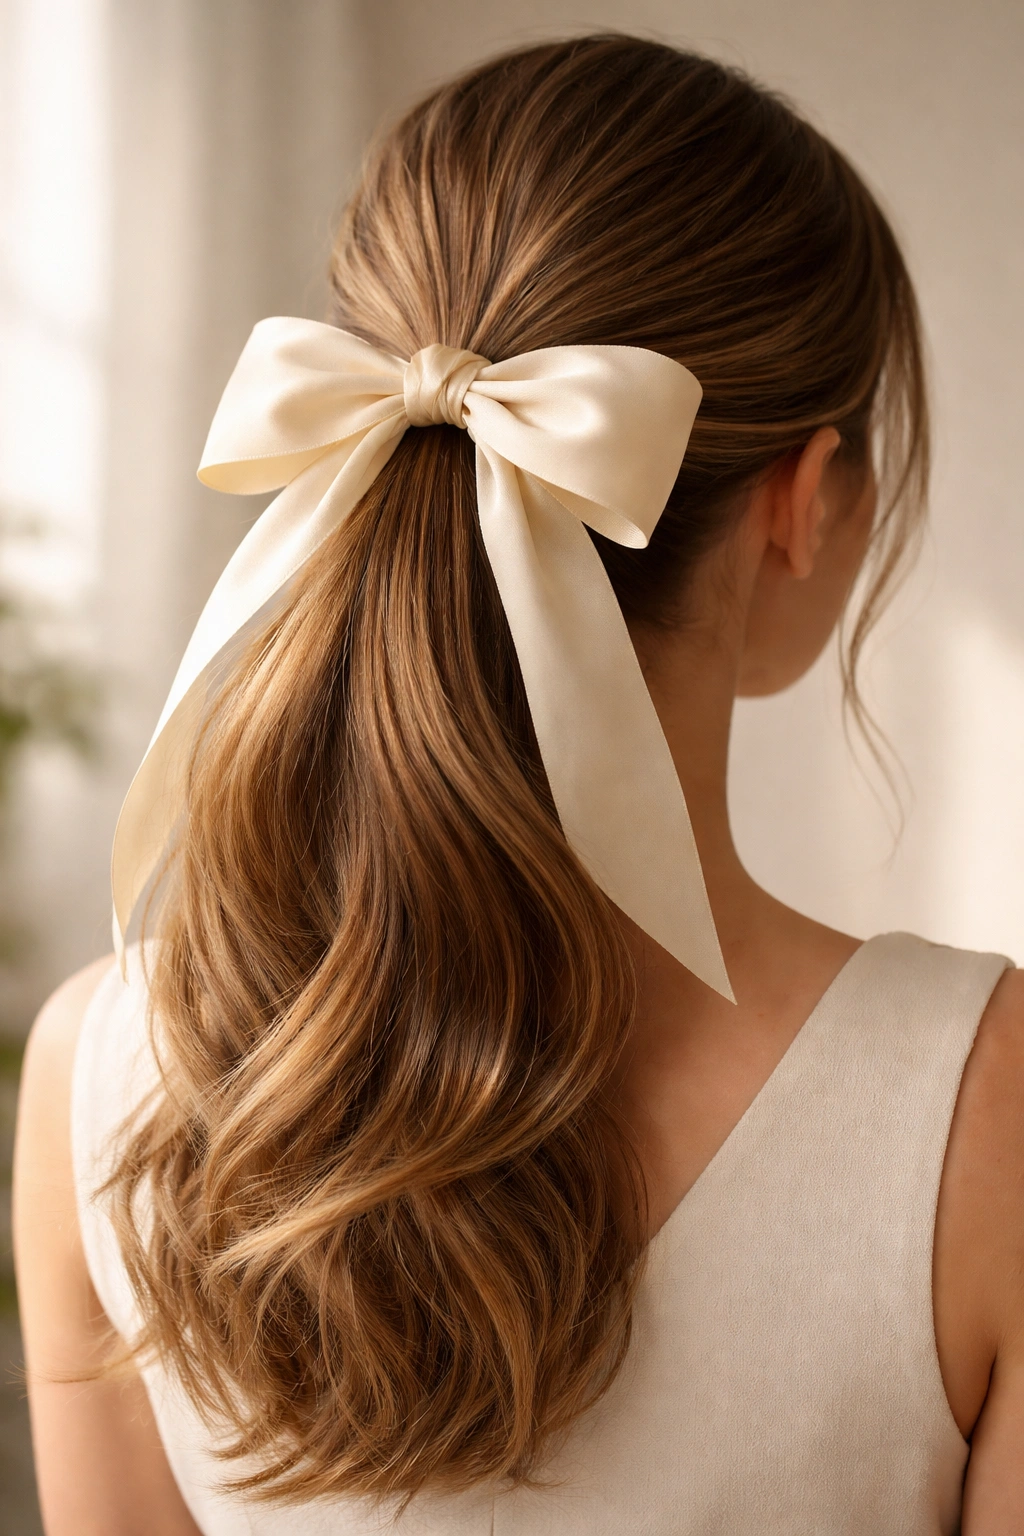
2. Sleek Low Ponytail with Velvet Bow
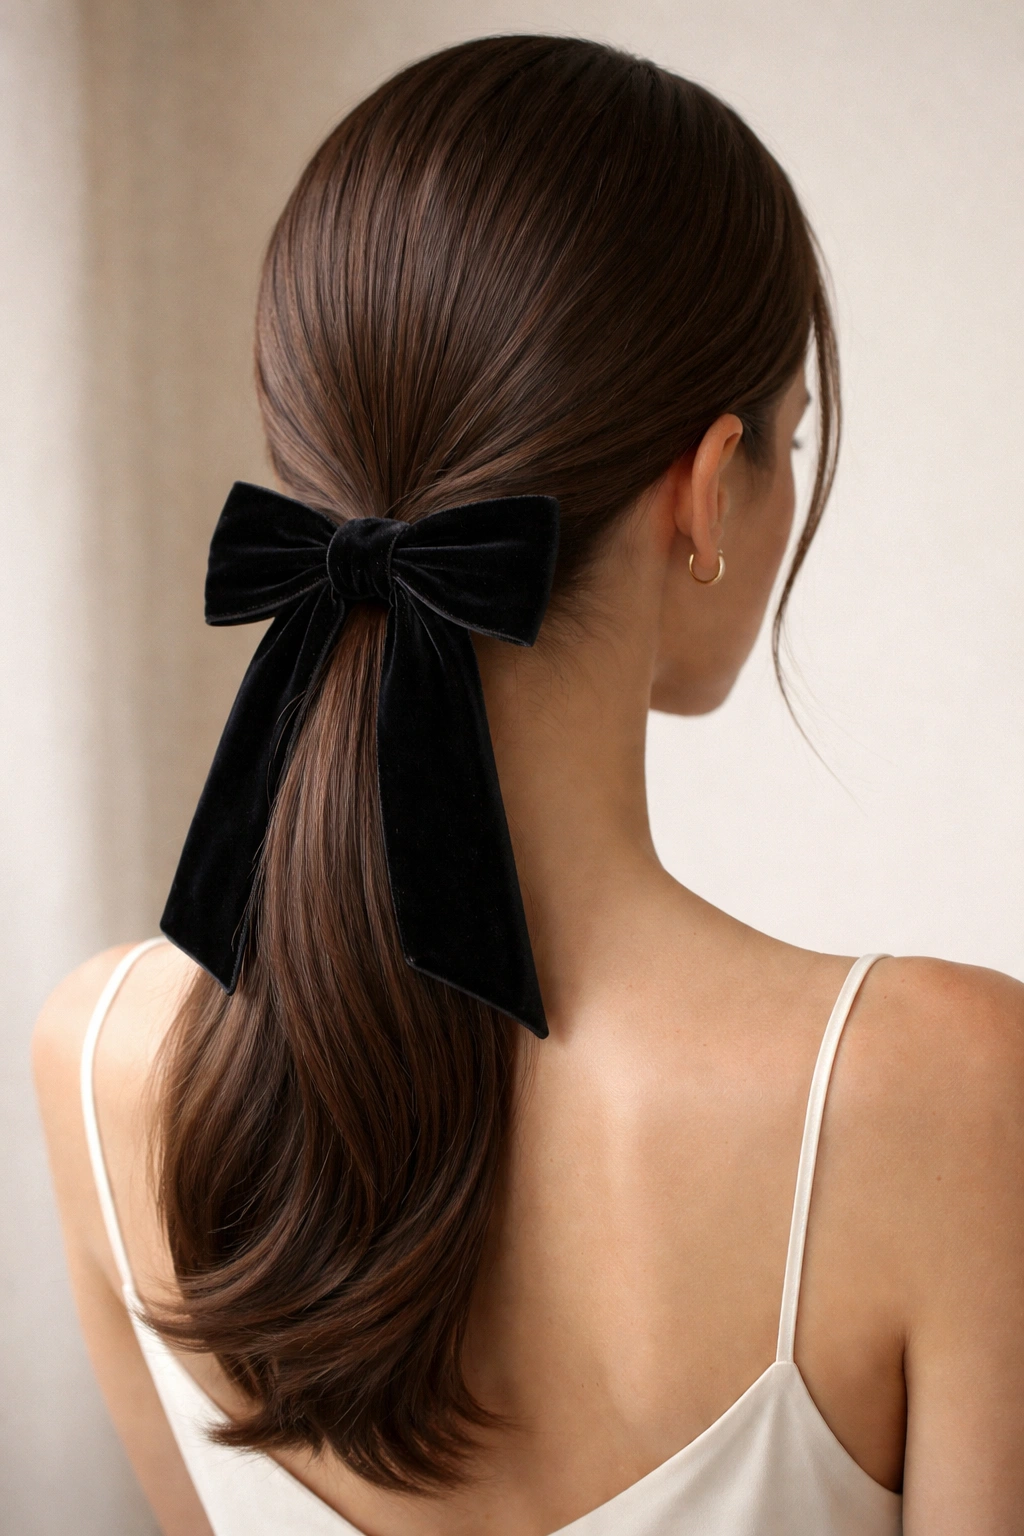
A low, sleek ponytail finished with a rich velvet bow is the height of understated sophistication — it’s the hairstyle that says you know exactly who you are and don’t need to shout about it. Position your ponytail at the nape of your neck, roughly two inches above the base of your hairline, and smooth everything back with a polishing cream or shine serum so the surface is completely glossy. Velvet bows work magic with this placement because the texture of the velvet contrasts beautifully against the smooth hair, creating a subtle depth and richness that feels genuinely luxe.
The low placement is actually more flattering on most face shapes than you might think — it elongates the neck, draws attention to the collarbone and jawline, and feels sophisticated without the severity of a very high style. The velvet bow adds a touch of texture and visual weight at the nape, which keeps the overall look from feeling too stark or severe.
The Velvet Difference
Velvet is a game-changer with low ponytails because the plush texture catches light differently than satin or silk, creating dimension and visual interest. A velvet bow also tends to feel more autumn and winter appropriate, which makes this a particularly perfect style for those seasons. The tactile richness of velvet signals that you’ve put genuine thought into your finishing touches — this isn’t a rushed hairstyle, it’s one you’ve taken time with.
Making It Work For Your Hair Type
- Pre-style your hair lightly: Smooth hair works best, but you don’t need perfectly straight hair — even gentle waves look polished with the right smoothing product
- Position the elastic precisely: Measure roughly two inches from your hairline at the nape to find the sweet spot for a formal low ponytail
- Use a velvet bow in jewel or rich tones: Deep burgundy, forest green, navy, or charcoal velvet works beautifully for formal occasions; blush velvet or champagne velvet work for softer events
- Secure flyaways with bobby pins: At the nape, a few strategic bobby pins hidden underneath keep loose pieces in place all day
- Soften with a few face-framing pieces: If your style feels too severe, gently release one or two small pieces at your temples to frame the face
Pro tip: When you tie your low ponytail, leave it slightly loose — not limp, but with some give — so it sits naturally at the nape without pulling. A ponytail that feels tight always looks uncomfortable, even if it’s perfectly secure.
3. Textured High Ponytail with Ribbon Bow
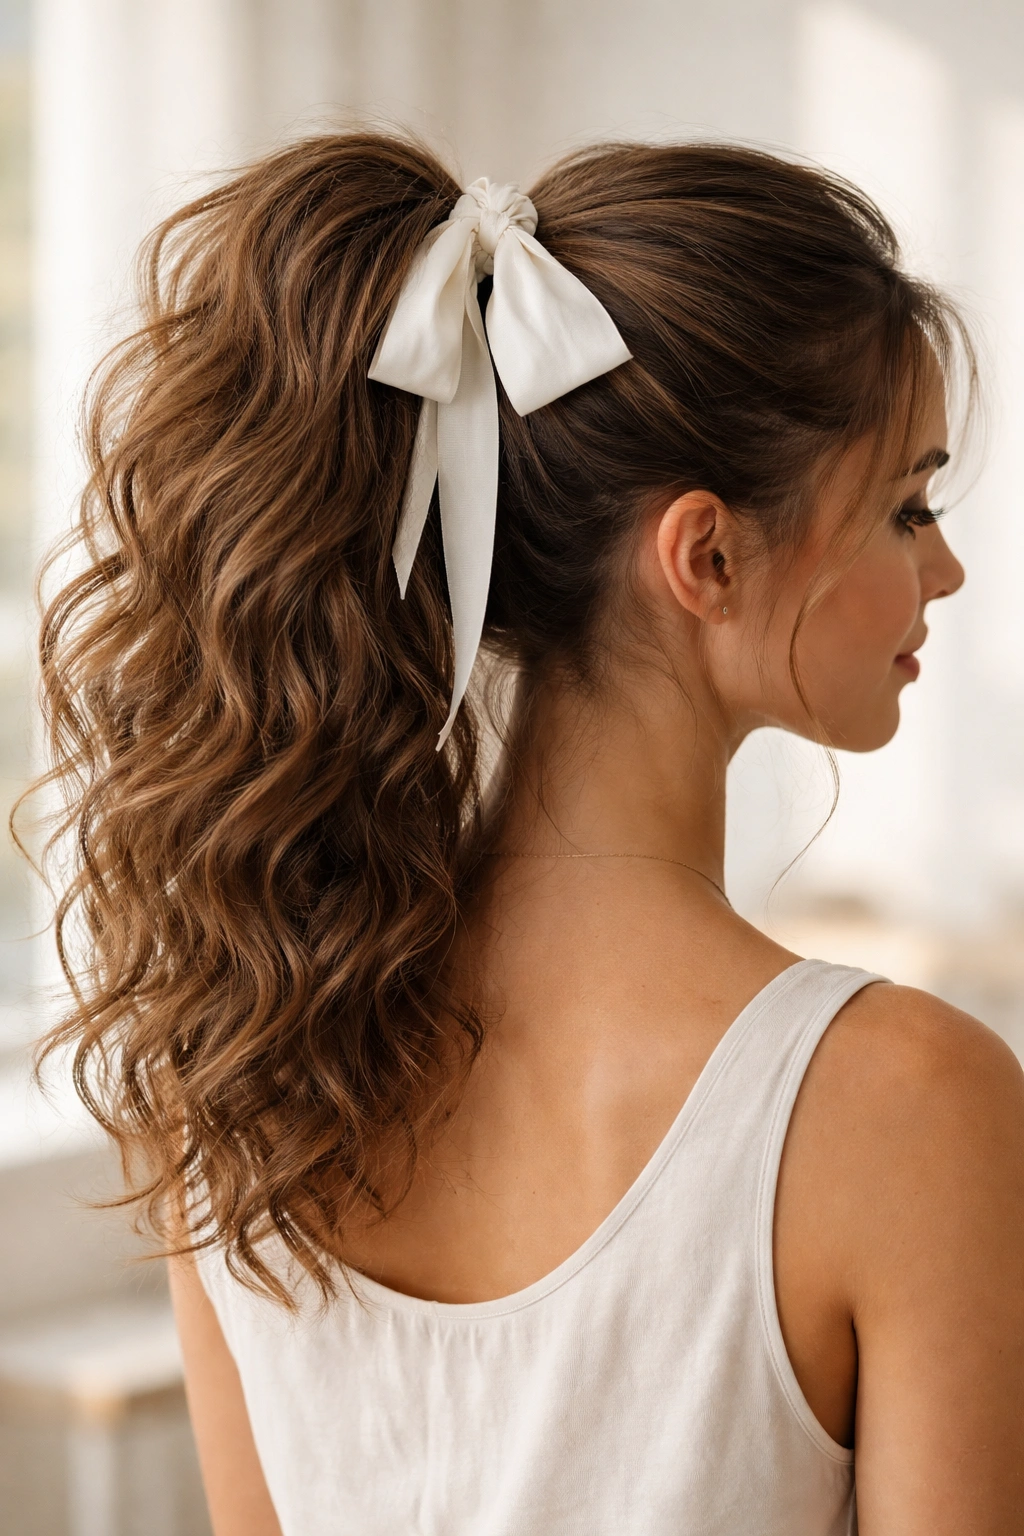
If your hair naturally holds texture, curls, or waves, a textured high ponytail with a coordinating ribbon bow gives you that effortlessly polished energy that makes people ask if you hired a stylist. Don’t smooth your texture flat — instead, gather your hair at the crown and secure it into a high ponytail while your natural pattern is still visible. Use a satin or grosgrain ribbon as your bow, weaving it through the elastic and tying it into a loose knot rather than pinning a pre-made bow, which gives a more integrated, artisan feeling.
The combination of textured hair with a ribbon bow feels collected and intentional — like you’ve styled your natural texture and added a thoughtful finishing touch rather than smoothing everything to an artificial shine. This approach works especially well with curly, wavy, or textured hair types because it celebrates the texture rather than fighting against it.
The Appeal of Textured Hair
Textured ponytails automatically look fuller and more voluminous than smooth ones, which is why they photograph beautifully and look consistently polished throughout the day. Texture also tends to grip your ribbon or bow better, so it stays securely in place without constantly shifting. The casualness of texture paired with a ribbon creates a balanced aesthetic — polished but not rigid, styled but not over-done.
Styling Steps for Natural Texture
- Apply a curl or texture cream before gathering: Work a curl-defining cream or texture mousse through damp hair, then let it air dry or diffuse dry for optimal hold
- Gather at the high crown: Use your fingers rather than a comb to gather your textured hair, which helps preserve the pattern and volume
- Secure with a textured elastic or fabric band: Metal-edged elastics can catch and break textured hair; choose a fabric-lined or cloth band instead
- Weave a ribbon through the elastic: For a custom look, thread a ribbon (satin, grosgrain, or cotton) through your hair elastic, wrap it around the base of the ponytail, and tie a loose bow
- Adjust individual pieces for shape: Let a few pieces fall softly around your face and temples to soften the overall effect
Worth knowing: Textured ponytails actually look better after they’ve been in for an hour or so — the hair settles and the texture melds together, creating an intentional, polished appearance. This is the opposite of smooth ponytails, which look best immediately after styling.
4. Side-Swept Ponytail with Pearl-Adorned Bow
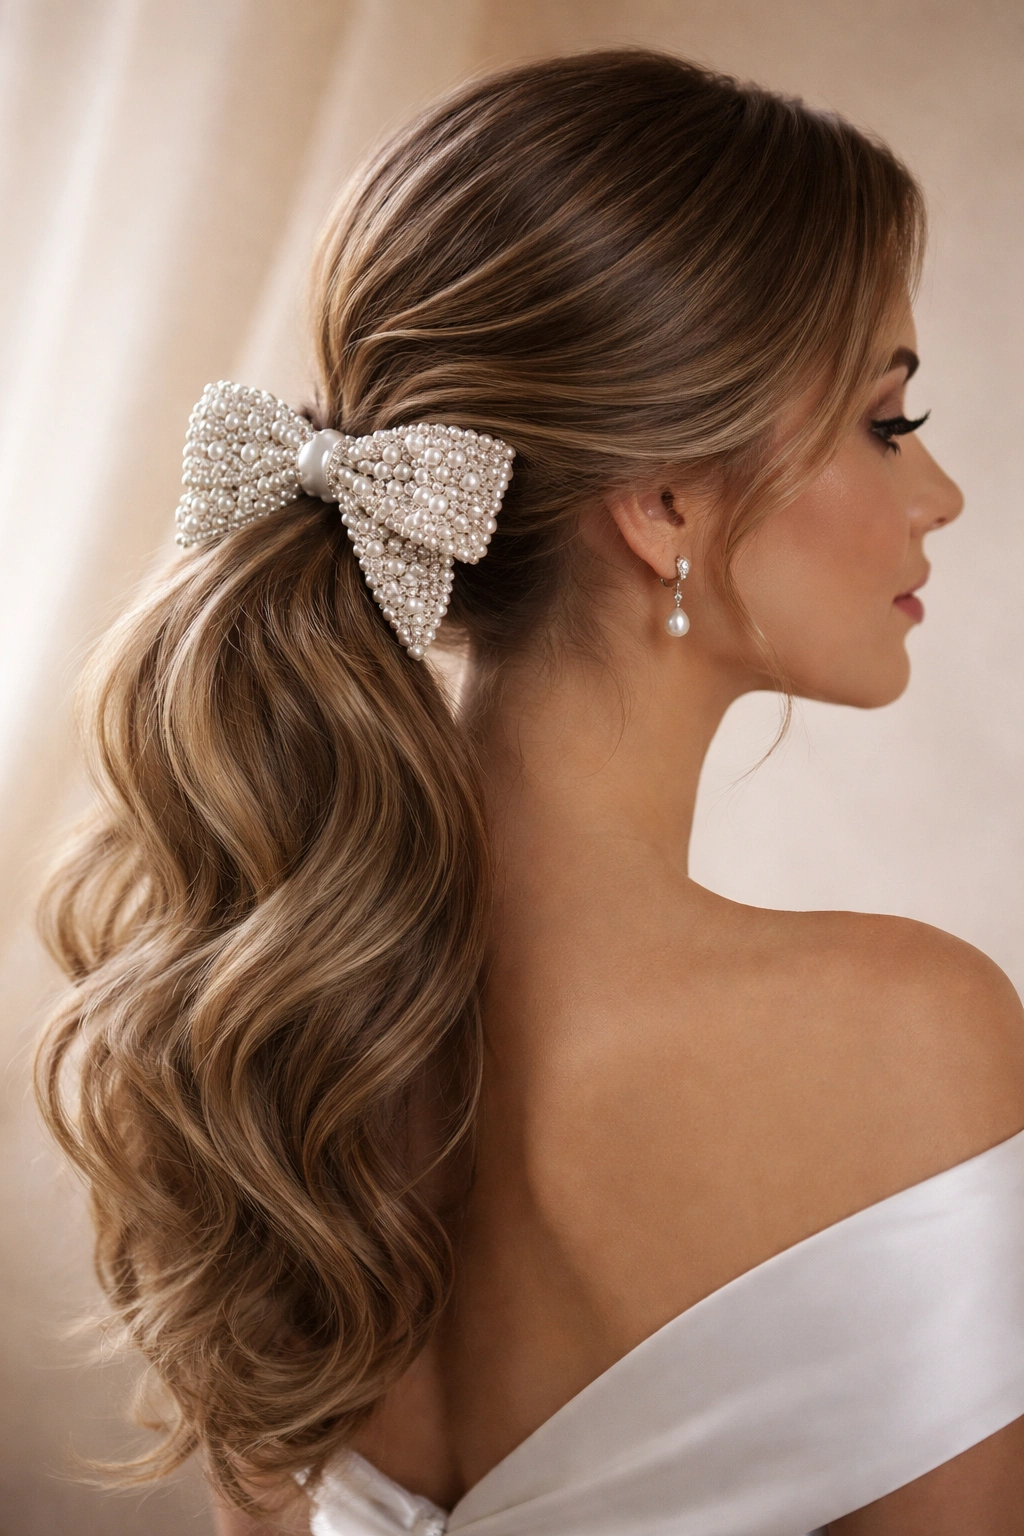
A side-swept ponytail creates natural movement and a softer silhouette than a centered tail, and when you add a bow adorned with pearls or pearl details, you’ve got an outfit-elevating hairstyle that’s both romantic and architectural. Brush all your hair to one side — typically your left side, which photographs better — and gather it into a ponytail positioned slightly lower than crown height but higher than the nape. Secure it with an elastic, then position a pearl-adorned bow at the base. The pearls catch light as you move, creating sparkle and dimension without the intensity of traditional gems.
The side-swept placement is inherently flattering because it frames one side of your face while the other side stays open. This asymmetry is naturally interesting and dynamic, which is why this style photographs beautifully and feels fresh without being trendy. The pearls add a delicate, luxe finish that works for everything from garden parties to engagement celebrations.
What Makes Pearl Bows Special
Pearls are subtle luxury — they add visual interest and sophistication without screaming for attention. Pearl bows work across seasons and formality levels because pearls pair beautifully with everything from casual denim to formal gowns. A bow adorned with small freshwater pearls feels organic and elegant; one with larger baroque pearls feels more statement-making.
Creating Perfect Side Sweep
- Brush hair thoroughly to one side: Use a fine-tooth comb and brush all hair to your chosen side, securing flyaways with a light smoothing product
- Create a lower ponytail: Gather the hair into a ponytail positioned at ear level or slightly lower, which balances the asymmetrical placement
- Pin the side with small bobby pins: Secure a few bobby pins horizontally on the swept side underneath where the ponytail will be, creating an anchor point
- Choose a delicate pearl bow: A bow roughly 2.5-3 inches wide looks proportional for this style; the pearls should be visible but not overwhelming
- Release softly on the open side: On the side of your face that’s exposed, gently release one or two small wisps to soften the line
Insider note: If you have thinner hair, adding a small bump or tease at the crown before sweeping everything to the side gives your ponytail more fullness and prevents it from looking wispy or scraggly.
5. Bubble Ponytail with Graduated Bows

A bubble ponytail — where you section your main ponytail into stacked “bubbles” using multiple elastics — becomes sculptural and playful when you add a small bow at each elastic. Start with one high ponytail, then place a second elastic roughly three inches down the tail, creating your first bubble. Continue this process down the length of your ponytail, placing elastics three to four inches apart. Then, at each elastic, tie a small bow — the bows can be the same color or in graduated colors, which creates a stunning visual effect.
This style is a genuine head-turner because it’s unexpected and obviously intentional. The bubbles add height and dimension to your silhouette, and the graduated bows (especially in coordinating but distinct colors) create an almost artistic, fashion-forward vibe. This works beautifully for events where you want to be memorable, for creative industries, or for anyone who loves standing out.
The Sculptural Appeal
Bubble ponytails with graduated bows create vertical interest and movement that keeps your look from feeling static or flat. The repetition of bows down the length of the ponytail creates a visual rhythm that’s genuinely compelling. This style also photographs exceptionally well because the bubbles and bows create clear visual interest from every angle.
Step-by-Step Execution
- Start with a gathered high ponytail: Smooth your hair back and secure with a clear elastic at the crown height
- Section the tail into equal parts: Measure your ponytail length and decide how many bubbles you want (usually 3-5), then mark those points mentally
- Place elastics at each marked section: Slide a new elastic down to your first mark and secure it tightly; repeat for each subsequent bubble
- Create distinct bubble shapes: Between each elastic, gently pull the hair outward (slightly up and away from the head) to create a full, rounded bubble shape
- Add small bows at each elastic: Tie coordinating bows at each elastic point; for color graduation, you might go from deepest shade at top to lightest at the bottom
Pro tip: Use clear elastics instead of colored ones so they’re less visible and don’t compete with your bows. For maximum impact, choose bows in a color sequence — perhaps rose, blush, and cream, or navy, teal, and white.
6. Dutch Braided Ponytail with Bow
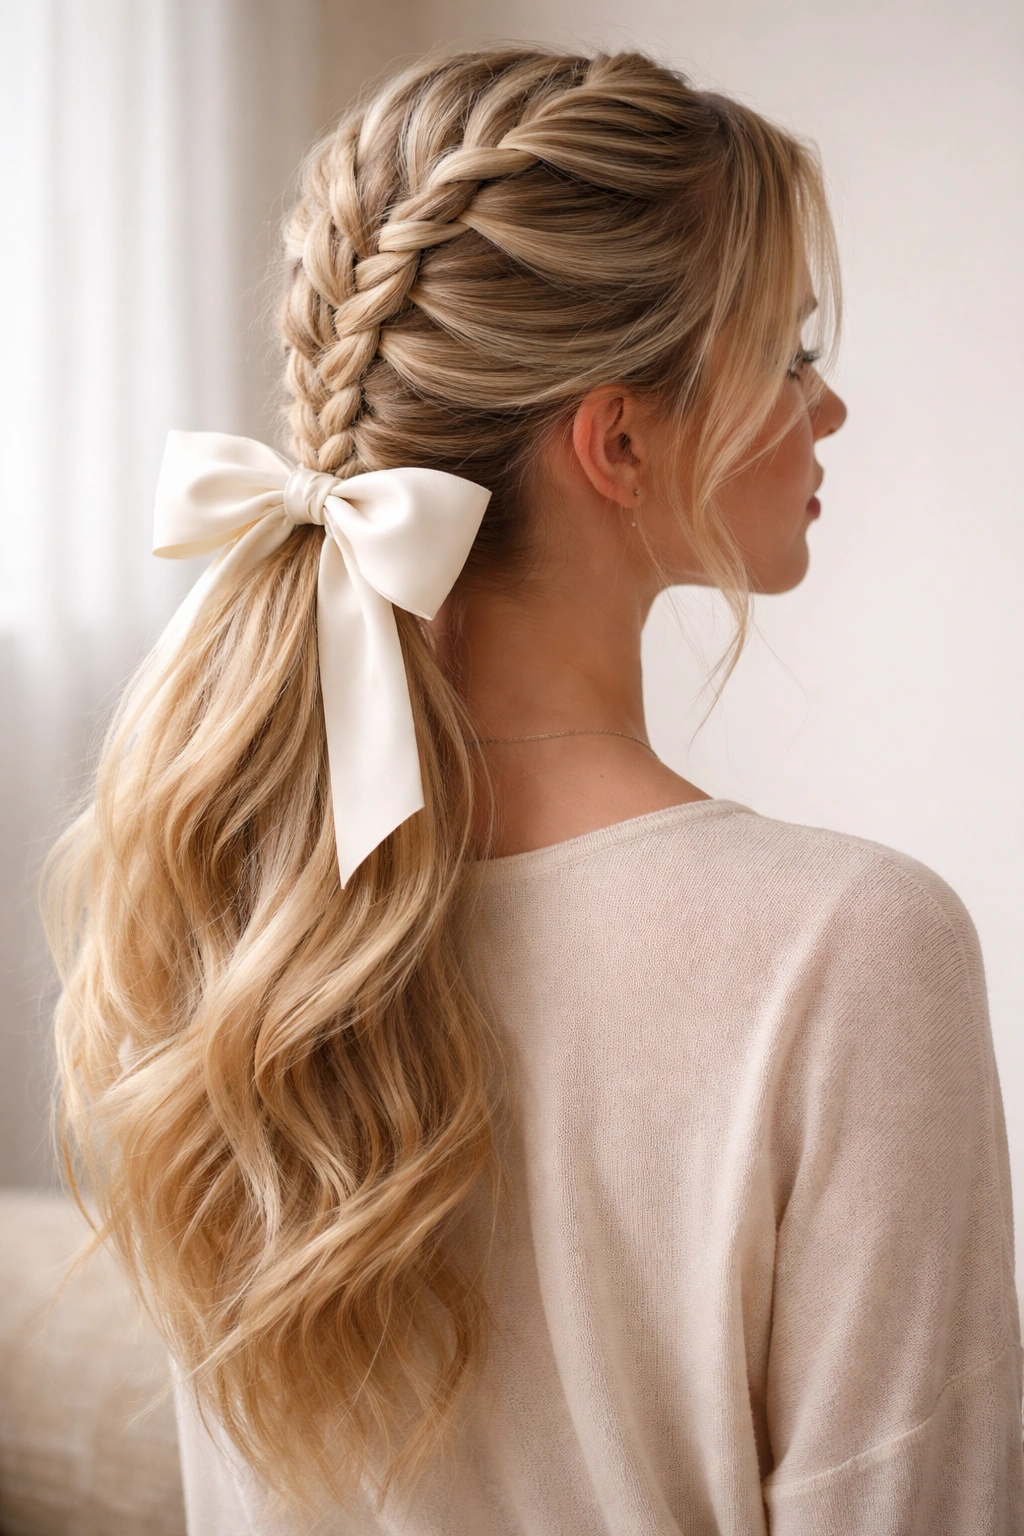
A Dutch braid that leads into a ponytail base creates architectural detail and visual depth that feels significantly more sophisticated than a simple gathered tail. Start by creating a Dutch braid (where you weave sections under rather than over each other, creating an inverted-looking braid) starting at your hairline and running down the back center of your head toward your crown. Where the braid naturally ends — usually at the crown or slightly lower — transition into a gathered ponytail with the remaining hair. Secure the whole thing with one elastic at the base of the braided section, then tie a bow over that elastic.
The Dutch braid adds a crafted, intentional element that makes this style feel elevated and special. The braid is visible from the front and side, which means people see the work you’ve put into your hair, and the bow becomes the natural finishing touch rather than the primary styling element. This works beautifully for semi-formal occasions and for anyone who wants a hairstyle that tells a story of effort and care.
Why Braids Matter
A braid transforms a basic ponytail into something architecturally interesting and visually substantive. The braid also adds grip and structure to your finished style, meaning your ponytail stays securely in place throughout the day without requiring constant adjustment. Braid + bow is a naturally harmonious combination because the craftsmanship of the braid pairs beautifully with the finished bow at the base.
Braiding and Ponytail Assembly
- Section your hair for the braid: Take a section at the center of your hairline roughly 2 inches wide; this becomes your starting section for the Dutch braid
- Execute the Dutch braid carefully: Weave the side sections under the center section in an alternating pattern; take your time and keep tension even so the braid looks neat
- Braid down toward the crown: Continue the braid until roughly half of your hair is incorporated into the braid pattern; the remaining hair will form your ponytail
- Transition to the ponytail: Gather all remaining hair — both the end of the braid and the loose hair below it — into one ponytail elastic
- Position your bow: Choose a bow that complements rather than overshadows the braid; a ribbon bow often works beautifully here
Worth knowing: Dutch braids look better slightly loose and relaxed than perfectly tight. Loosen the braid gently after you’ve finished braiding by pulling out small wisps along each segment — this creates a romantic, less rigid appearance.
7. Half-Up Ponytail with Statement Bow
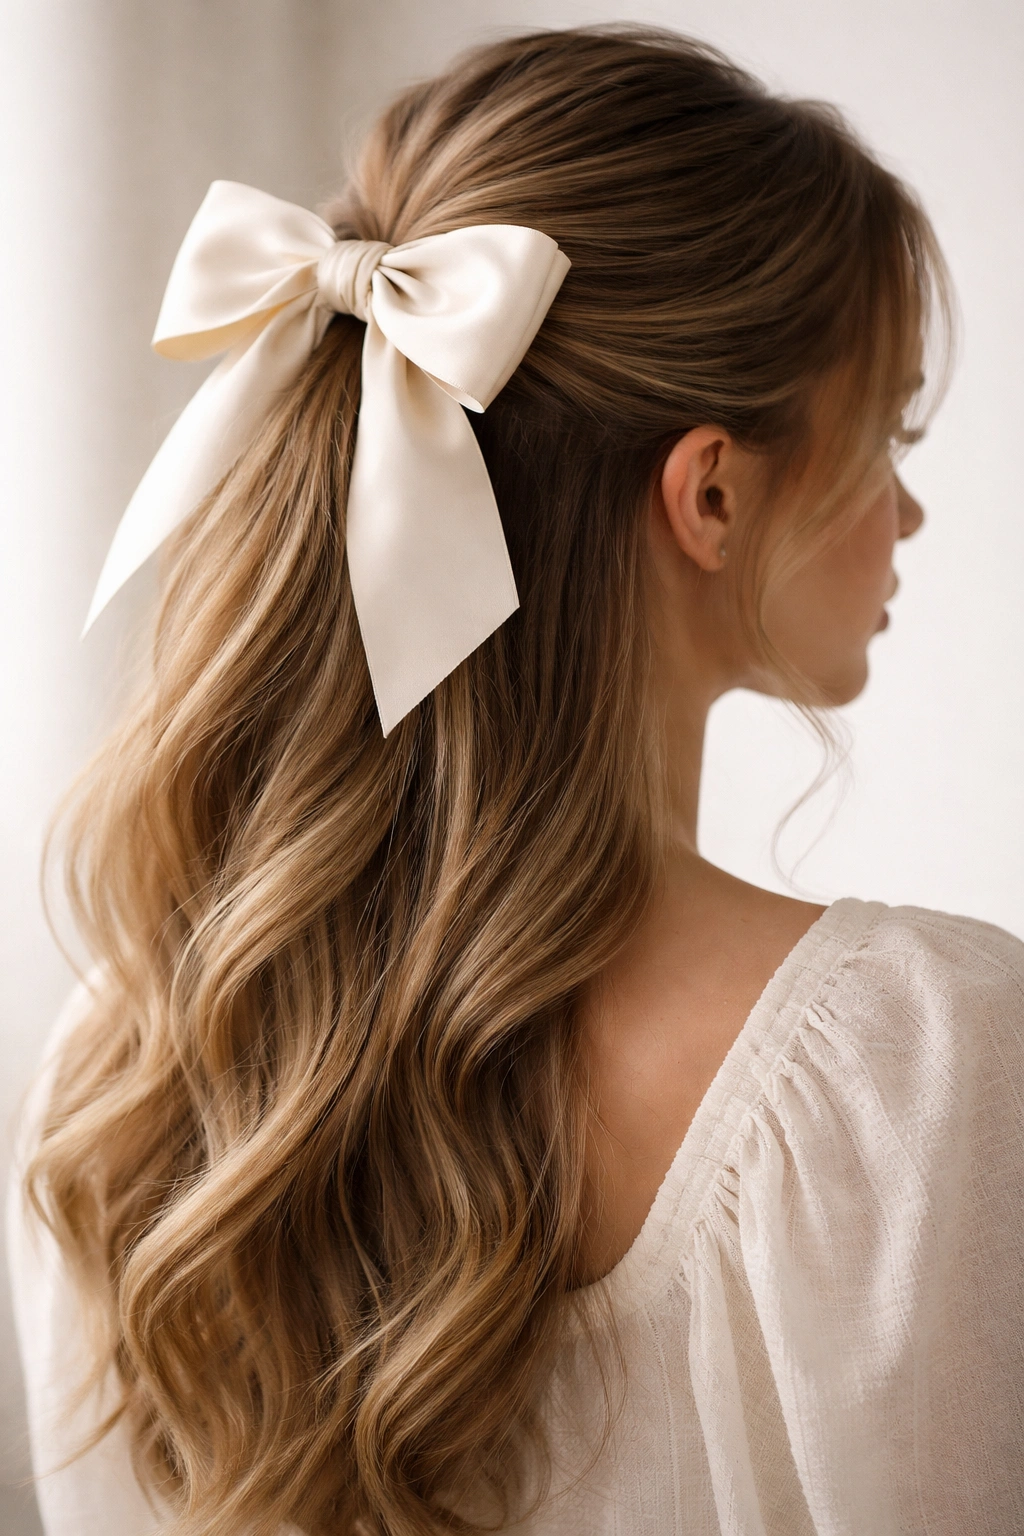
A half-up, half-down style with the upper section secured into a small ponytail and finished with a statement bow gives you the best of both worlds — the polished structure of a ponytail with the soft, romantic flow of loose hair below. Gather the hair from your temples and crown, leaving the lower section down, and secure that upper section with an elastic at the crown. Then top it with a bold, oversized bow in a statement color or print. The oversized bow becomes the focal point of the entire look, drawing attention to the top half of your head and creating drama without requiring a full formal hairstyle.
This style is perfect for anyone who wants to feel polished and special but isn’t ready for (or doesn’t want) a full ponytail. The ease of a half-up style combined with the impact of a statement bow gives you maximum effect with moderate effort. The loose hair below the half-up section can be straight, wavy, or curled, and it works beautifully with all of those textures.
The Power of Statement Bows
A true statement bow — whether oversized, in a bold print, or in an unexpected color — instantly elevates your entire appearance and becomes a conversation piece. A statement bow says you’ve made a choice, a decision to express yourself through your styling. This style works for anyone with a bold personal style who likes being noticed and remembered.
Achieving Perfect Proportions
- Determine your half-up section: This should include hair from your temples up to your crown; a good guideline is gathering roughly the top quarter to third of your hair
- Smooth and secure the upper section: Brush the gathered hair smooth and secure it with a clear or fabric-lined elastic
- Add a small tease or bump: Before securing, gently backcomb the gathered section to add height and dimension at the crown
- Select a truly statement-making bow: Go bigger than you think — a bow that’s 4-5 inches wide feels proportional for a half-up style with impact
- Leave the lower hair down and textured: Straighten, curl, or wave the remaining hair for the contrast you want; texture works beautifully here
Pro tip: Clip your bow slightly off-center rather than directly centered — slightly toward one side creates a more fashion-forward, intentional look than perfect centering.
8. Sleek Side Ponytail with Metallic Bow
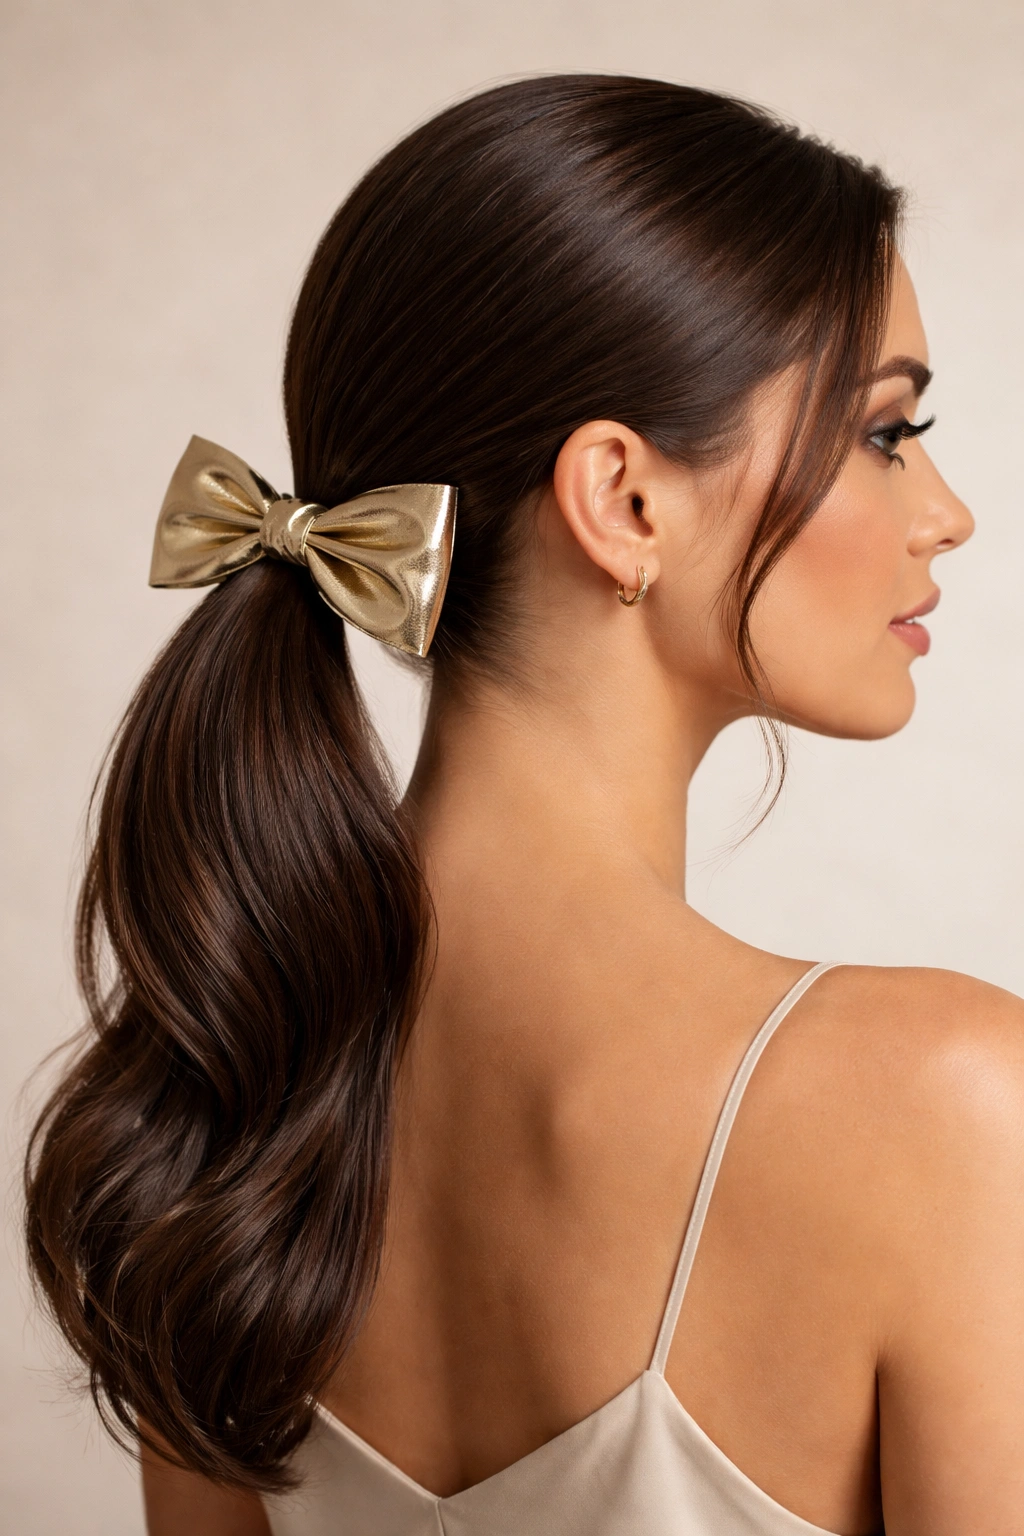
A low side ponytail created with smoothing cream and finished with a metallic bow creates a compelling balance of modern and luxe. Position your ponytail extremely low, at the nape of your neck on one side, then smooth every piece down with a polishing product so your hair has an almost wet-look shine. Top it with a metallic bow in gold, silver, or copper — the metallic sheen plays beautifully against the smooth shine of your hair, creating a cohesive, intentional aesthetic that feels contemporary and polished.
The metallic bow works because it reflects light the same way your smoothed hair does, creating a unified, sophisticated appearance. This is the hairstyle for someone who appreciates modern minimalism with just enough shimmer to feel special. The side placement makes this style feel modern and asymmetrical, not historical or costume-like.
The Magic of Metallic Details
Metallic bows are inherently chic because they complement every skin tone and work across seasons and occasions. Gold metallics feel warm and luxe; silver feels cool and modern; copper feels earthy and statement-making. A metallic bow is the perfect finishing touch when you want your style to read as intentional and elevated without being fussy or overly embellished.
Creating the Sleek Base
- Apply smoothing product to damp hair: Work a polishing cream or smoothing serum through towel-dried hair, distributing it evenly
- Blow-dry with a paddle brush: Dry your hair smooth using a paddle brush to maximize shine and eliminate any texture
- Brush everything to one side: Use a fine-tooth comb to brush all hair to your chosen side
- Create the low, side ponytail: Gather your hair low at the nape on the side you’ve brushed to; position it roughly two inches above your hairline or lower
- Add your metallic bow: Position the bow so it covers the elastic completely and the metallic sheen is visible and catching light
Insider note: For maximum shine, use a smoothing spray or light hairspray with a luminizing ingredient over your finished ponytail — this amplifies the glossy effect and makes your metallic bow look even more striking.
9. Wispy High Ponytail with Oversized Bow
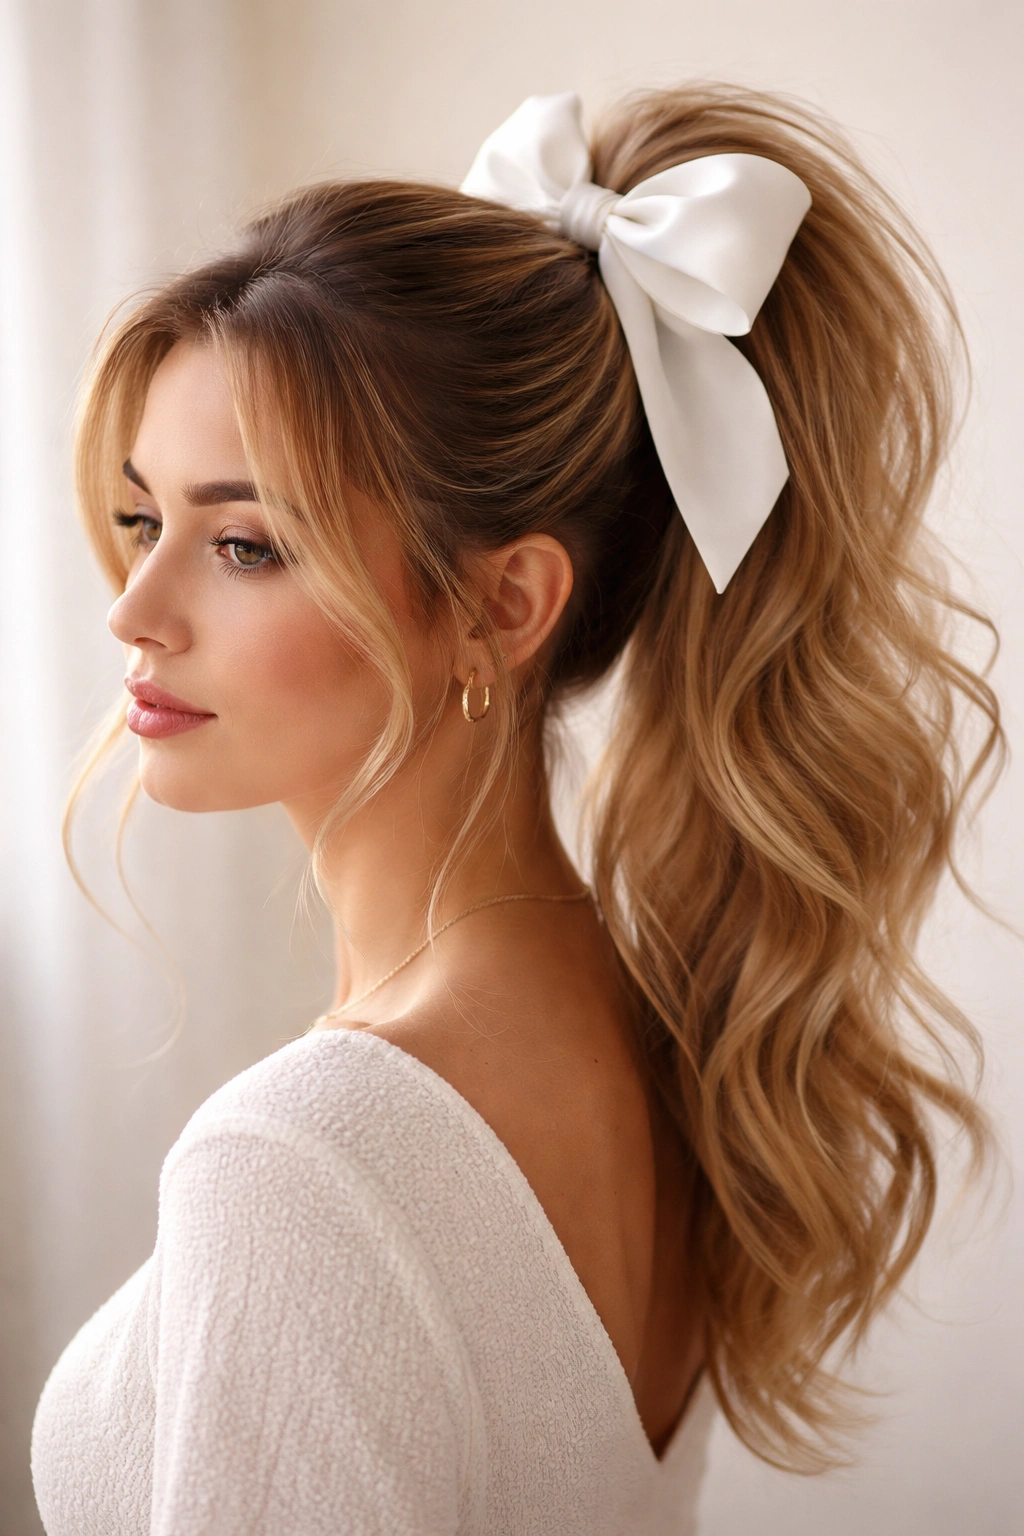
A high ponytail with intentionally softened, wispy pieces around your face creates a romantic, elevated look that feels both polished and approachable. Gather your hair into a high ponytail at the crown, then gently release a few small wisps around your temples and cheekbones — these pieces should frame your face softly without looking like accidental escapes. Top it with an oversized bow that’s dimensional and eye-catching. The wisps soften what could otherwise feel formal, while the oversized bow keeps the whole look from becoming too delicate or costume-like.
This is the style for someone who wants polish with personality, someone who isn’t afraid of a statement bow but also wants their hairstyle to feel wearable and friendly. The wisps make this appropriate for a wider range of settings than a completely slicked-back ponytail might be, and they’re flattering on virtually every face shape because they create softness around the features.
Balancing Softness and Drama
Wispy pieces + oversized bow is a genuinely winning combination because you get the romantic, pretty element from the wisps without sacrificing the intentional style statement from the dramatic bow. This prevents the overall look from reading as costume or overly precious, which can happen when you soften every element too much.
Creating Intentional Wisps
- Secure your high ponytail: Gather hair at the crown with a clear elastic; tighten it securely before releasing wisps
- Release specific pieces: Take one piece from your right temple and one from your left, pulling them downward and slightly backward to frame your face
- Backcomb for hold: Gently backcomb the wisps so they hold in place without looking perfectly smooth or deliberately styled; they should look almost accidental
- Finish with flexible hairspray: Mist the wisps with a light, flexible-hold spray so they last all day without feeling stiff
- Choose a proportional oversized bow: A bow that’s 4-5 inches wide looks balanced with the height of a high ponytail; anything smaller might look lost
Worth knowing: The best wisps are created by taking small sections — not huge chunks of hair. Two or three pieces on each side, each no thicker than your pinky finger, creates the perfect softening effect without looking like your hairstyle is falling apart.
10. Twisted Low Ponytail with Minimalist Bow
A low ponytail created by twisting hair rather than straightening it creates subtle texture and visual interest without the formality of an actual braid, and a minimal, delicate bow keeps the overall effect refined and understated. Divide your hair into two sections and twist each section individually, then twist the two strands around each other, gathering the twisted bundle into a low ponytail at the nape. Secure it with an elastic, then top it with a thin, delicate bow — perhaps a silk ribbon bow, a thin grosgrain bow, or a bow with minimal width. The twisted base adds depth and interest, while the minimal bow feels elegant rather than playful.
This is the style for someone with a modern sensibility who appreciates subtle craftsmanship over obvious statement-making. The twisted detail is visible if you know where to look but doesn’t announce itself loudly — it’s the kind of thing someone might notice and comment on if they’re paying close attention, which makes it feel sophisticated and intentional rather than showy.
The Elegance of Minimalism
A minimal bow paired with textured hair creates genuine luxury because it feels confident and understated. You’re not trying to impress anyone with drama; you’re simply styling yourself in a way that feels considered and refined. This approach works beautifully for professional settings, intimate events, and anyone who prefers quiet elegance to bold statements.
Executing Twisted Placement
- Divide your hair into two sections: Part your hair down the center from your crown to your nape, creating two equal sections
- Twist each section tightly: Take each section and twist it tightly from your crown downward, pinning or holding the twist as you go
- Intertwine the twisted sections: Once both sections are twisted, wind them around each other, continuing the intertwining motion down the length
- Gather at the nape: Bring the intertwined twists together at your nape and secure with a clear elastic
- Add a minimal, delicate bow: Choose a thin ribbon bow or a bow with a narrow width; thin satin ribbons work beautifully here
Pro tip: Keep your twists slightly loose rather than pulling them tight — a relaxed twist looks more elegant and creates better texture definition than a tight, structured twist.
11. Voluminous Curled Ponytail with Decorative Bow
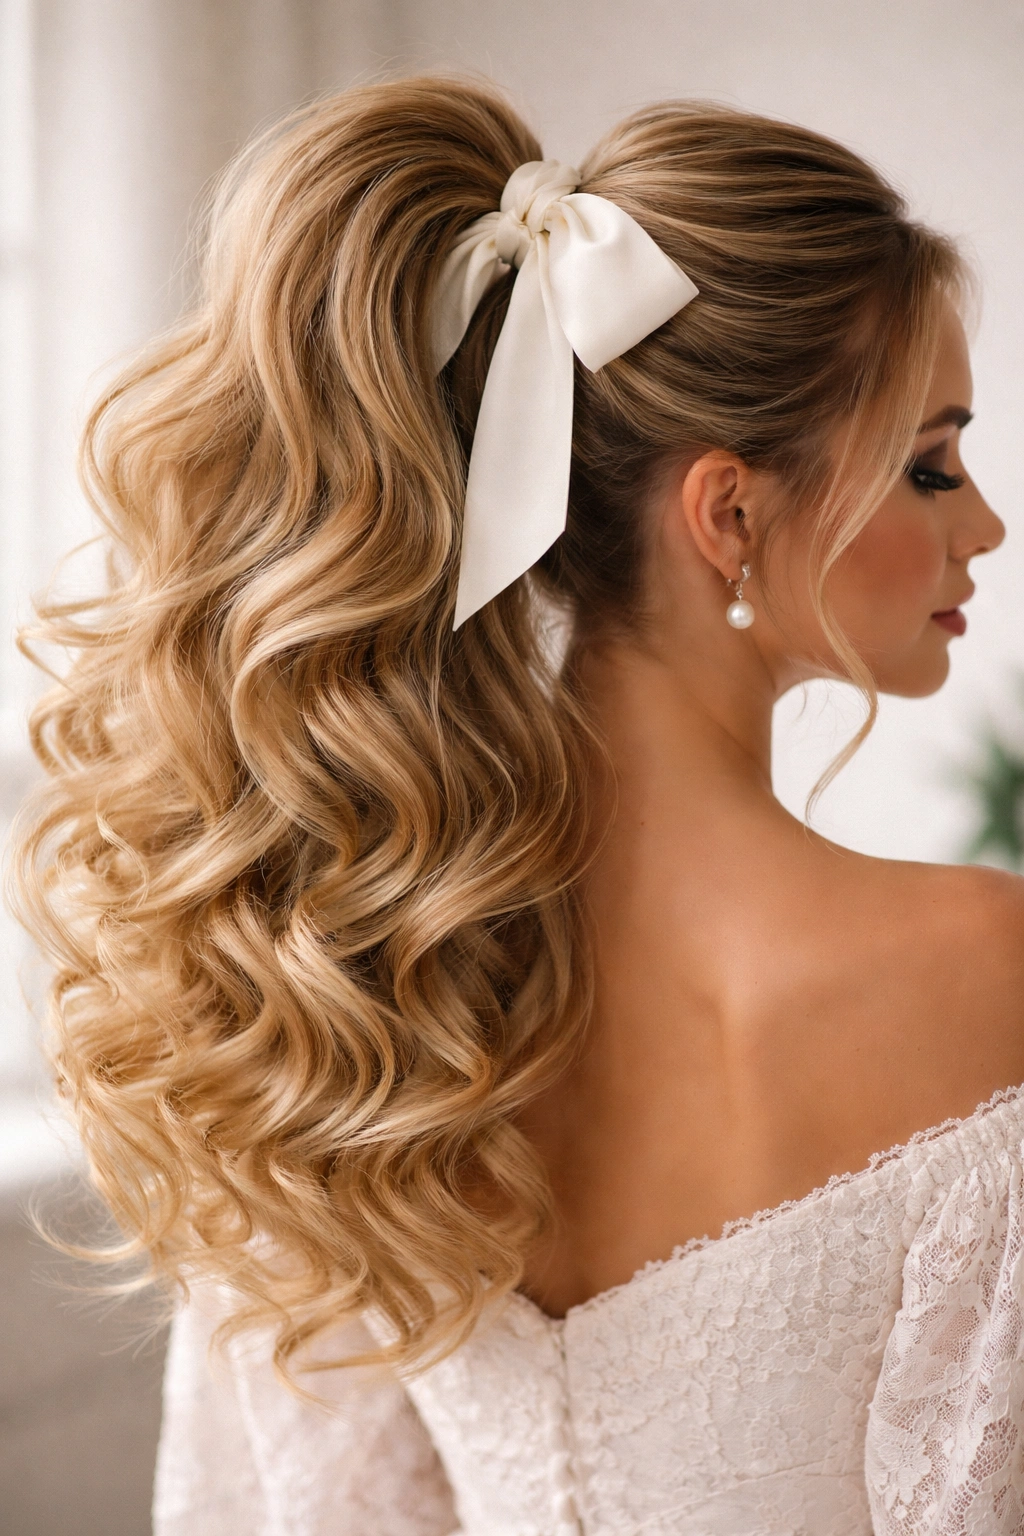
If you’re willing to put in the curling effort, a high ponytail created with bouncy curls or waves and finished with a decorative bow is absolutely gorgeous and creates serious presence. Curl your entire head using a curling iron or wand, creating loose, flowing waves from roots to ends. Gather those curls into a high ponytail at the crown — don’t smooth them down, let them maintain their texture and fullness. The result is a voluminous, bouncy tail that feels playful, confident, and undeniably eye-catching. Top it with a decorative bow in a complementary color or print. The curls create their own kind of glamour, and the bow simply points out that you’ve made an effort.
This style is genuinely show-stopping and works beautifully for any occasion where you want to feel special and confident. The volume reads as special-occasion appropriate, but the playfulness of the curls keeps it from feeling overly formal or costume-like. This is the hairstyle that makes people ask if you have a special event coming up.
Why Curls Work With Bows
Curled hair has inherent movement and vitality that plays beautifully with a bow. Where a smooth ponytail with a bow might read as formal and traditional, a curled ponytail with a bow reads as celebratory and confident. The texture of curls combined with the femininity of a bow creates a look that’s genuinely hard to achieve any other way.
Curling and Gathering Technique
- Prepare your hair with heat protectant: Apply a heat protectant spray to damp hair before you begin curling
- Curl the entire head: Using a 1.5-inch curling iron or wand, curl sections away from your face, holding each curl for 8-10 seconds
- Finger-comb the curls loosely: Once all curls are set and cooled, run your fingers through them gently to break them up and create flowing waves
- Gather at the high crown: Bring all hair together at the crown, allowing the curls to maintain their volume and texture
- Secure and position your bow: Use a clear elastic to secure the ponytail, then position a decorative bow at the base
Insider note: For longer-lasting curls, use a lightweight curling mousse before you curl, and finish the entire style with a strong-hold hairspray. This keeps curls bouncy all day rather than relaxing into waves.
12. Textured Braid-Out Ponytail with Bow
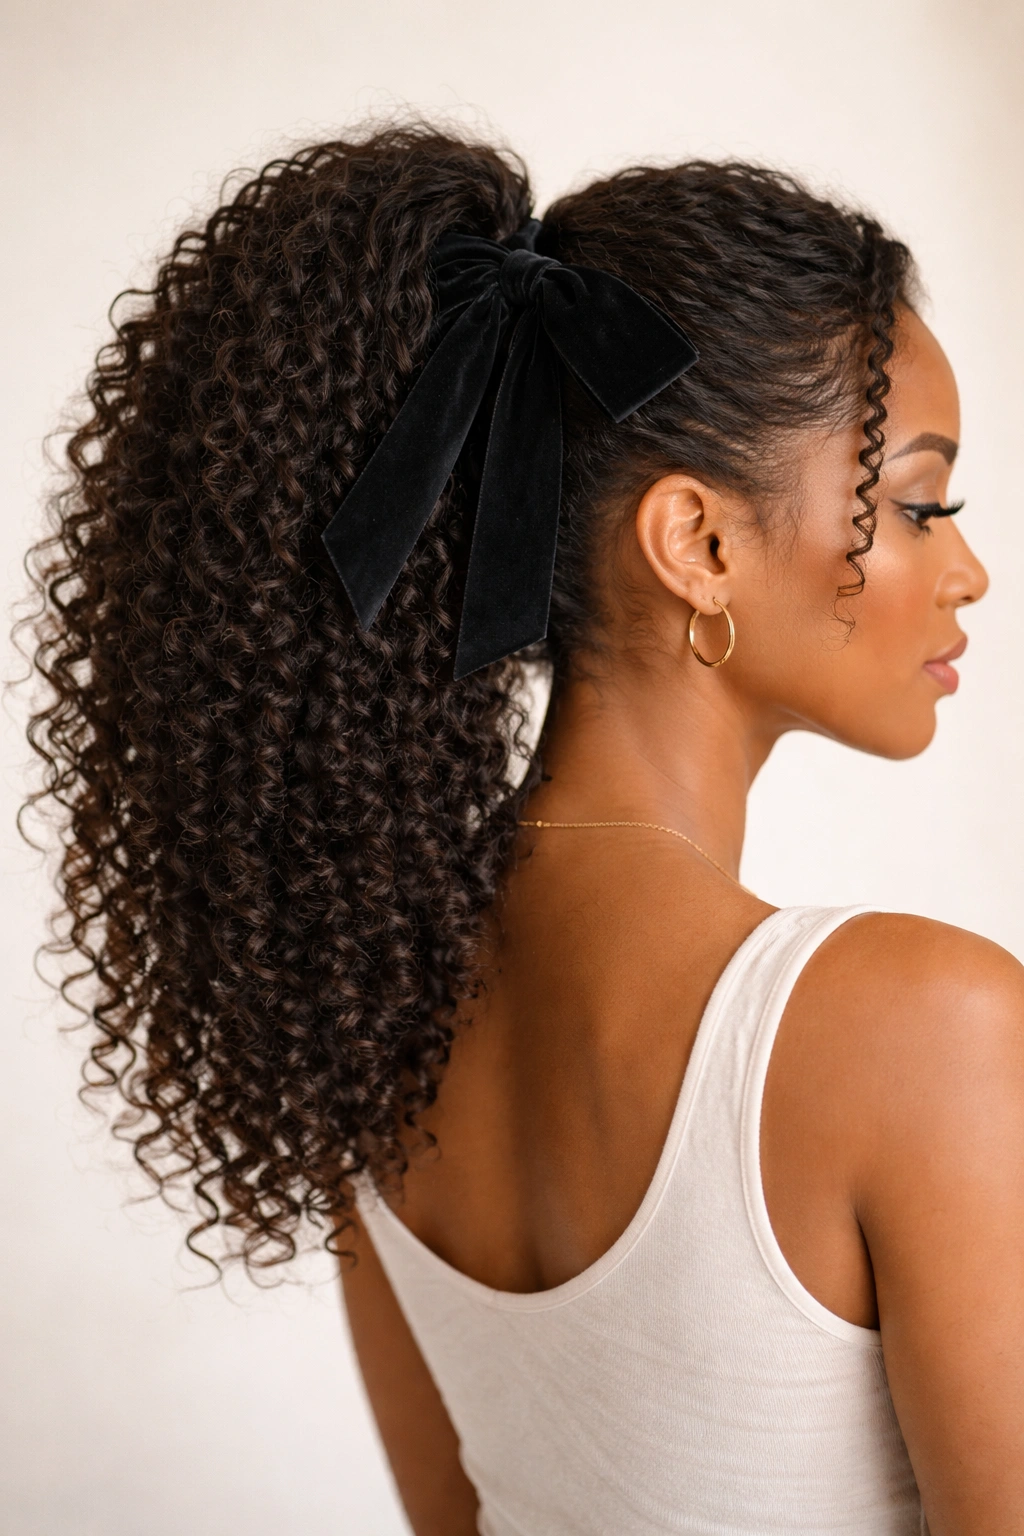
A braid-out creates beautifully defined waves and texture without heat, and when you gather that textured hair into a ponytail and finish with a bow, you’ve got a style that feels effortless but intentional. Section dry or damp hair into 4-6 braids, let them dry overnight (or use a heat tool to speed the process), then unbraid the hair, which creates gorgeous waves and texture. Gather that textured, wavy hair into a high or mid-height ponytail and secure it with an elastic, then top with a bow that complements your natural texture. The braid-out creates its own visual interest, so a simpler bow often works better than an overly decorative one.
This style celebrates your natural texture and creates a look that feels organic and low-stress while still being clearly styled. The braid-out approach is perfect for anyone with naturally textured hair or anyone who wants to achieve texture without heat damage. This is the rare hairstyle that looks intentional and polished but also genuinely easy to execute.
The Ease of Braid-Out Texture
A braid-out requires zero heat styling and minimal products, making it genuinely sustainable as a regular style. The waves created by a braid-out also last longer than waves created with heat tools, which means your ponytail stays textured and interesting throughout the day. This is the style for someone who wants to look polished without spending significant time on their hair daily.
Creating Your Braid-Out Base
- Section your hair strategically: Create 4-6 braids depending on your hair thickness and desired wave intensity; more braids create finer waves, fewer braids create chunkier texture
- Braid slightly loosely: Braids that are relaxed rather than tight create softer, more romantic waves
- Let braids set overnight: For best results, braid damp hair and let it dry overnight; the longer the braids stay in, the more defined the texture
- Unbraid gently: Carefully unbraid, finger-combing as you go to release the waves fully
- Gather and secure: Bring the textured hair together into a high ponytail and secure with a fabric-lined elastic
- Choose a complementary bow: A simple ribbon bow or a bow in a solid complementary color works beautifully without competing with your texture
Worth knowing: A braid-out actually looks better on day two than on day one, so don’t worry if your texture isn’t perfectly defined immediately after unbraiding — it’ll refine and tighten as it sits.
13. Sleek High Ponytail with Bow and Face-Framing Pieces
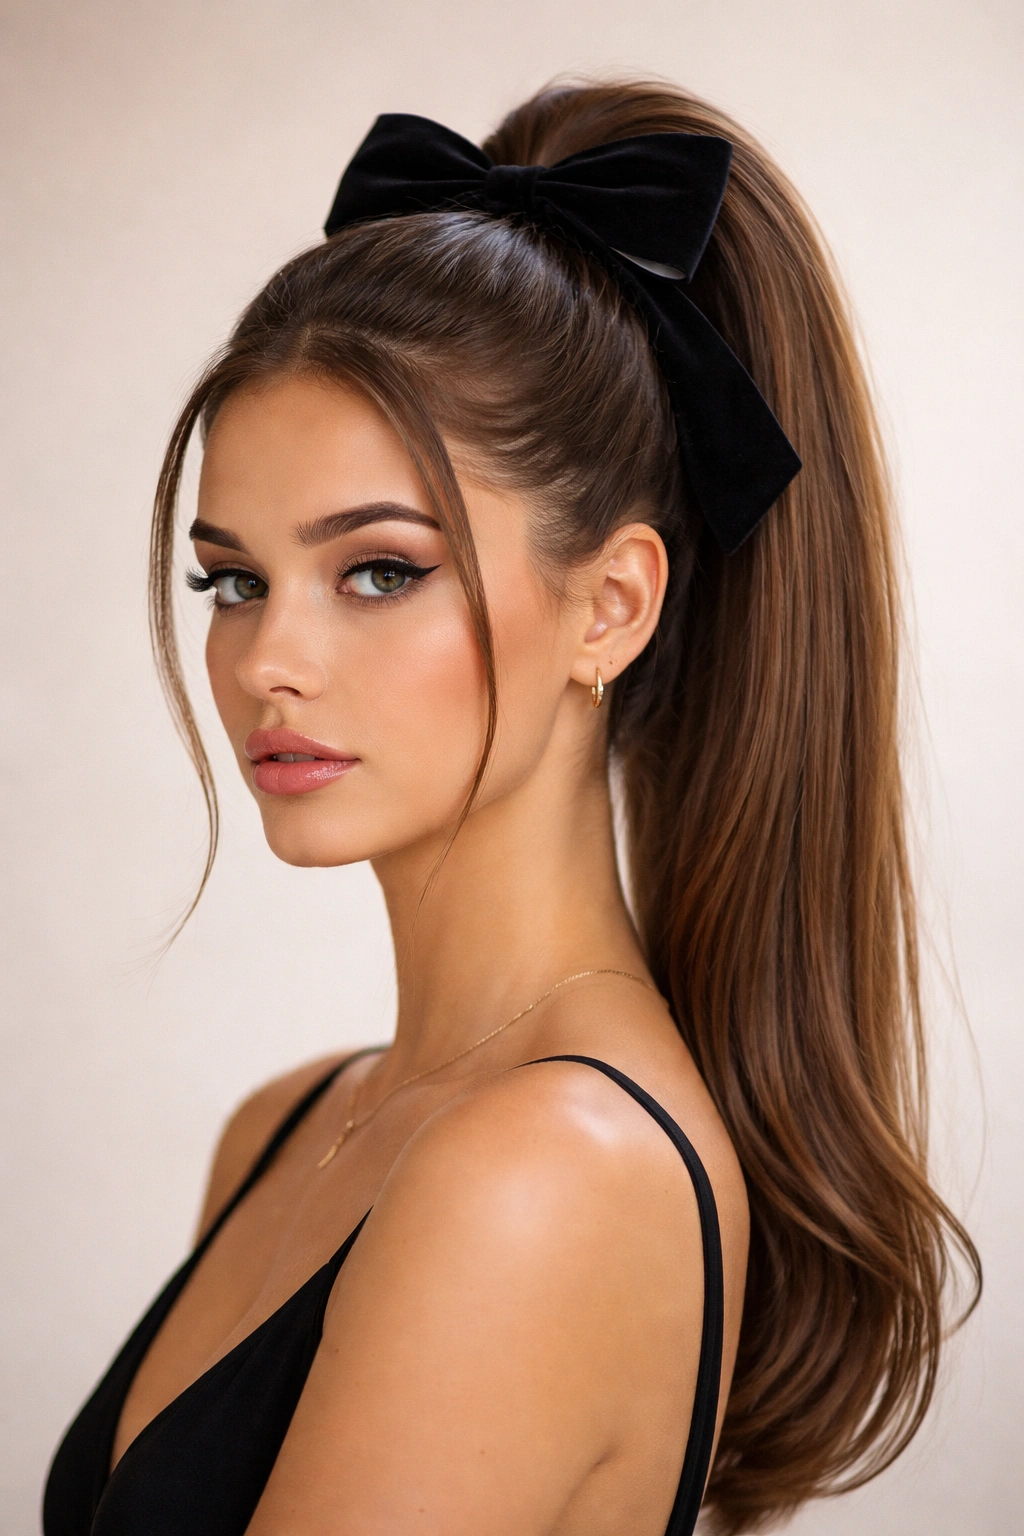
A high ponytail smoothed to perfection, topped with a bow, and softened with strategically placed face-framing pieces creates a look that’s simultaneously polished and approachable. Create your smooth, high ponytail using smoothing cream and a fine-tooth comb, securing it tightly with a clear elastic. Before finishing, gently pull out a single small piece from each temple, creating delicate face-framing wisps. Then top the ponytail with your bow. The wisps prevent the slicked-back look from feeling harsh or overly severe, while the smooth ponytail maintains the polished feel you’re going for.
This is genuinely one of the most flattering ponytail variations because the combination of polish + softness works on virtually every face shape and hair type. The wisps take what could otherwise feel severe and make it wearable for everything from professional settings to social events. This is the style that walks the perfect line between put-together and approachable.
Balancing Sleekness and Softness
The key to this style is restraint — you want just enough wisps to soften, not so many that you’ve undermined the sleek effect. Two small pieces, one on each side, is usually perfect. They should frame your face without being noticeable unless someone is looking directly at you. This creates an unconscious feeling of softness and approachability while maintaining the intentional sleekness everywhere else.
Achieving the Perfect Face Framing
- Create your sleek base first: Smooth all hair back firmly and secure your high ponytail completely before adding wisps
- Select your framing pieces carefully: Choose small, thin sections from just in front of your temples; each piece should be no thicker than your pinky finger
- Tease the wisps gently: Backcomb each small piece lightly so it catches on itself and holds in place without looking perfectly smooth
- Allow pieces to fall naturally: These wisps should fall and frame your face organically, not be tucked or pinned in place
- Secure everything lightly: Use a flexible-hold hairspray that won’t make your wisps feel stiff or plastic
Pro tip: Pull your face-framing wisps out after your ponytail is completely secured and your bow is positioned, not before. This way, you’re not accidentally pulling them back in when you secure the main ponytail.
14. Romantic Loose Ponytail with Sheer Bow
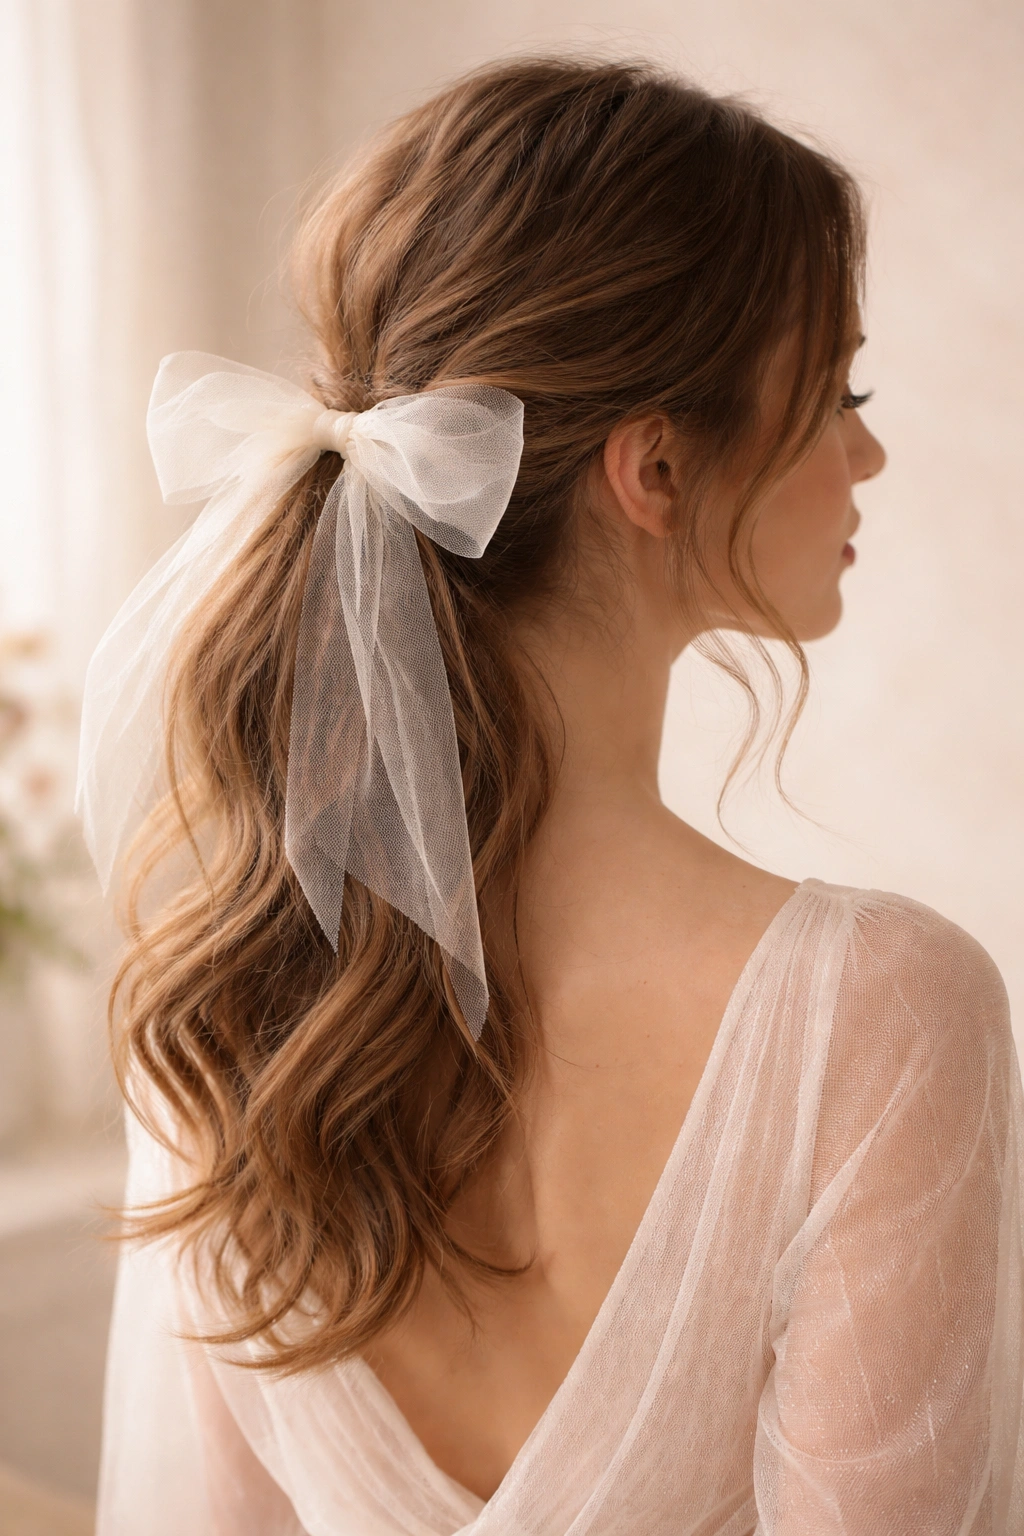
A loose, deliberately relaxed ponytail finished with a sheer or tulle bow creates an effortlessly romantic look that feels dreamy and special without being costume-like or over-the-top. Brush your hair back gently, gathering it into a ponytail positioned at mid-height or slightly lower without pulling it tight. Leave it intentionally loose and soft, with plenty of escape pieces around your face and neck. Then top it with a sheer bow made from tulle, organza, or other semi-transparent material — the sheer quality keeps it from feeling too saccharine and allows your hair texture to show through. The overall effect is romantic, soft, and surprisingly sophisticated.
This style is perfect for someone who loves vintage and romantic aesthetics but wants to feel modern and wearable. The looseness prevents the sheer bow from reading as costume, while the sheer material itself is inherently feminine and pretty. This is the hairstyle that makes people think you’re effortlessly romantic and graceful.
The Power of Sheer Details
Sheer bows are inherently modern because they’re less expected than traditional satin or velvet bows, and they feel lighter and more delicate. A sheer bow paired with loose, relaxed hair creates a feeling of understated romance — you’re not trying too hard, you’re just naturally pretty. This approach works beautifully for intimate events, garden parties, or anyone who loves romantic styling but wants it to feel current.
Creating a Deliberately Loose Ponytail
- Gather hair gently: Brush hair back loosely without using smoothing products or excessive tightening; the gather should feel relaxed
- Position at mid-height: Gather your ponytail roughly at ear level or slightly lower, which is flattering and inherently softer than a high placement
- Secure with minimal tension: Wrap your elastic around gently; you want the ponytail to be secure but not pulled tight
- Release multiple wisps: Allow pieces to escape around your temples, cheekbones, and neck; these escapes are intentional, not accidents
- Add texture if desired: Gently wave or curl the ponytail itself to enhance the romantic effect
- Position your sheer bow: Let the sheer bow sit gently at the base of your ponytail, allowing it to blend with your hair rather than sitting stiffly on top
Insider note: This style actually looks better if it looks like it took you five minutes rather than thirty minutes. The key is making it look effortless even if you’ve spent time on it.
15. Sleek Wet-Look Ponytail with Bold Bow

A sleek, wet-look ponytail created with wet-look gel or pomade and topped with a bold, contrasting bow creates an undeniably modern, fashion-forward look that reads as intentional and confident. Apply wet-look product generously to your hair, combing it back and gathering it into a high or mid-height ponytail with a shiny, almost liquid appearance. Secure it firmly so it won’t slip, then top it with a bow in a bold color or print that contrasts beautifully against the slick appearance of your hair. The wet-look creates an almost architectural appearance, and the bold bow becomes the statement-making element against that structured base.
This is the style for someone with a truly bold, contemporary sensibility who isn’t afraid of being noticed. The wet-look has become increasingly fashionable in high fashion and editorial work, and when paired with a bold bow, it creates a look that’s undeniably current and intentional. This works beautifully for modern events, creative settings, or anywhere you want to signal that you have serious personal style.
Modern Styling With Wet-Look Products
Wet-look products range from gels to pomades to specialized wet-look pomades, and they’ve become increasingly sophisticated and less heavy than they were in the past. A modern wet-look product gives genuine shine and polish without making your hair feel weighed down or stiff. The wet-look aesthetic reads as editorial and intentional in a way that smoother, shinier finishes simply can’t match.
Executing the Wet-Look Ponytail
- Apply wet-look product generously: Use enough product that your hair genuinely looks slick and shiny; apply to damp or dry hair and comb through
- Brush everything back firmly: Use a fine-tooth comb to smooth every piece back with no bumps or irregularities; the smoothness is part of the aesthetic
- Gather at your chosen height: Position your ponytail where it feels most flattering; the wet-look works at any height
- Secure very tightly: Use multiple wraps of your elastic so the ponytail absolutely won’t slip; this style requires secure anchoring
- Choose a truly bold bow: A bow in a contrasting color or a statement print works beautifully here; the bold bow needs to balance the slickness of your hair
- Optional: add shine enhancer: For extra glossiness, you can finish with a light hairspray designed to enhance shine
Worth knowing: Wet-look products can sometimes feel heavy or greasy if you use too much, so start with less than you think you need — you can always add more, but it’s harder to tone down.
Final Thoughts
A ponytail with a bow is one of the most versatile, forgiving, and genuinely transformative hairstyles you can master — the combination works across hair textures, face shapes, formality levels, and personal styles. The ponytail provides the structure and polish, while the bow provides the personality and finishing touch that makes people notice and remember your look.
The beauty of all these variations is that you can adapt any of them based on your specific hair type, the occasion you’re dressing for, and the message you want to send. A sleek low ponytail with a velvet bow whispers sophistication; a voluminous curled ponytail with a decorative bow announces celebration; a twisted low ponytail with a minimal bow suggests quiet confidence. You have control over every element, which means you can create a look that feels genuinely, authentically like you.
Start by identifying which style resonates most with your personal aesthetic and lifestyle, then experiment with different bow fabrics, colors, and placements to make the style your own. The techniques are straightforward, the time investment is modest, and the impact is genuinely disproportionate to the effort — which is precisely why ponytails with bows have remained a beloved styling choice across generations and will continue to be for many years to come.