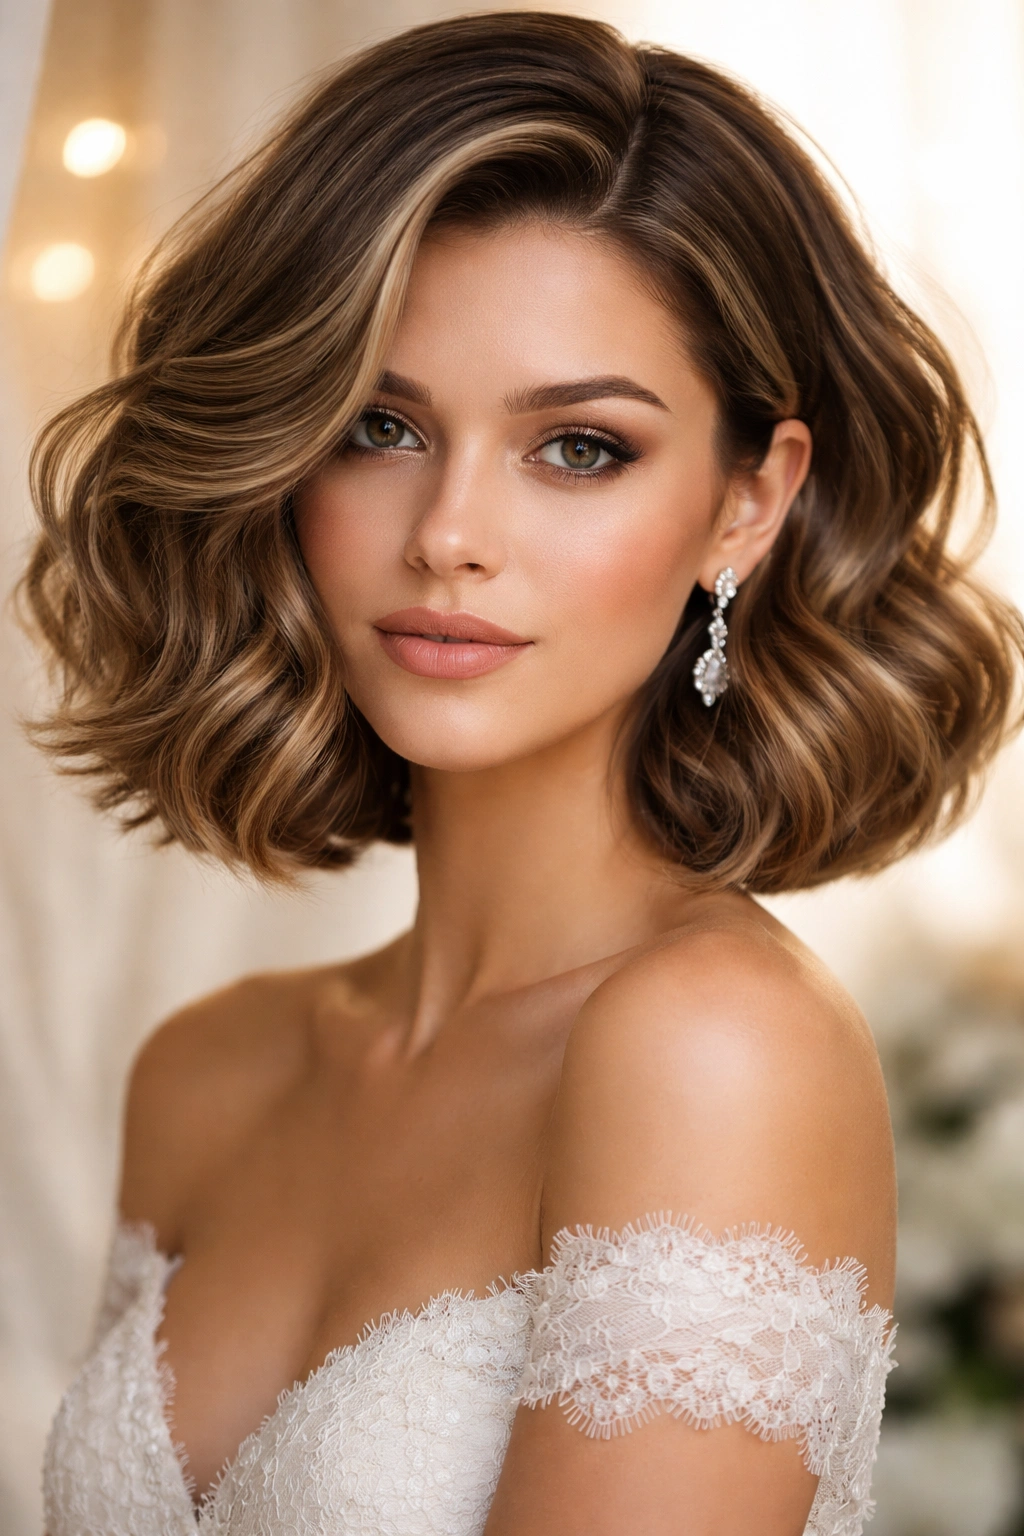
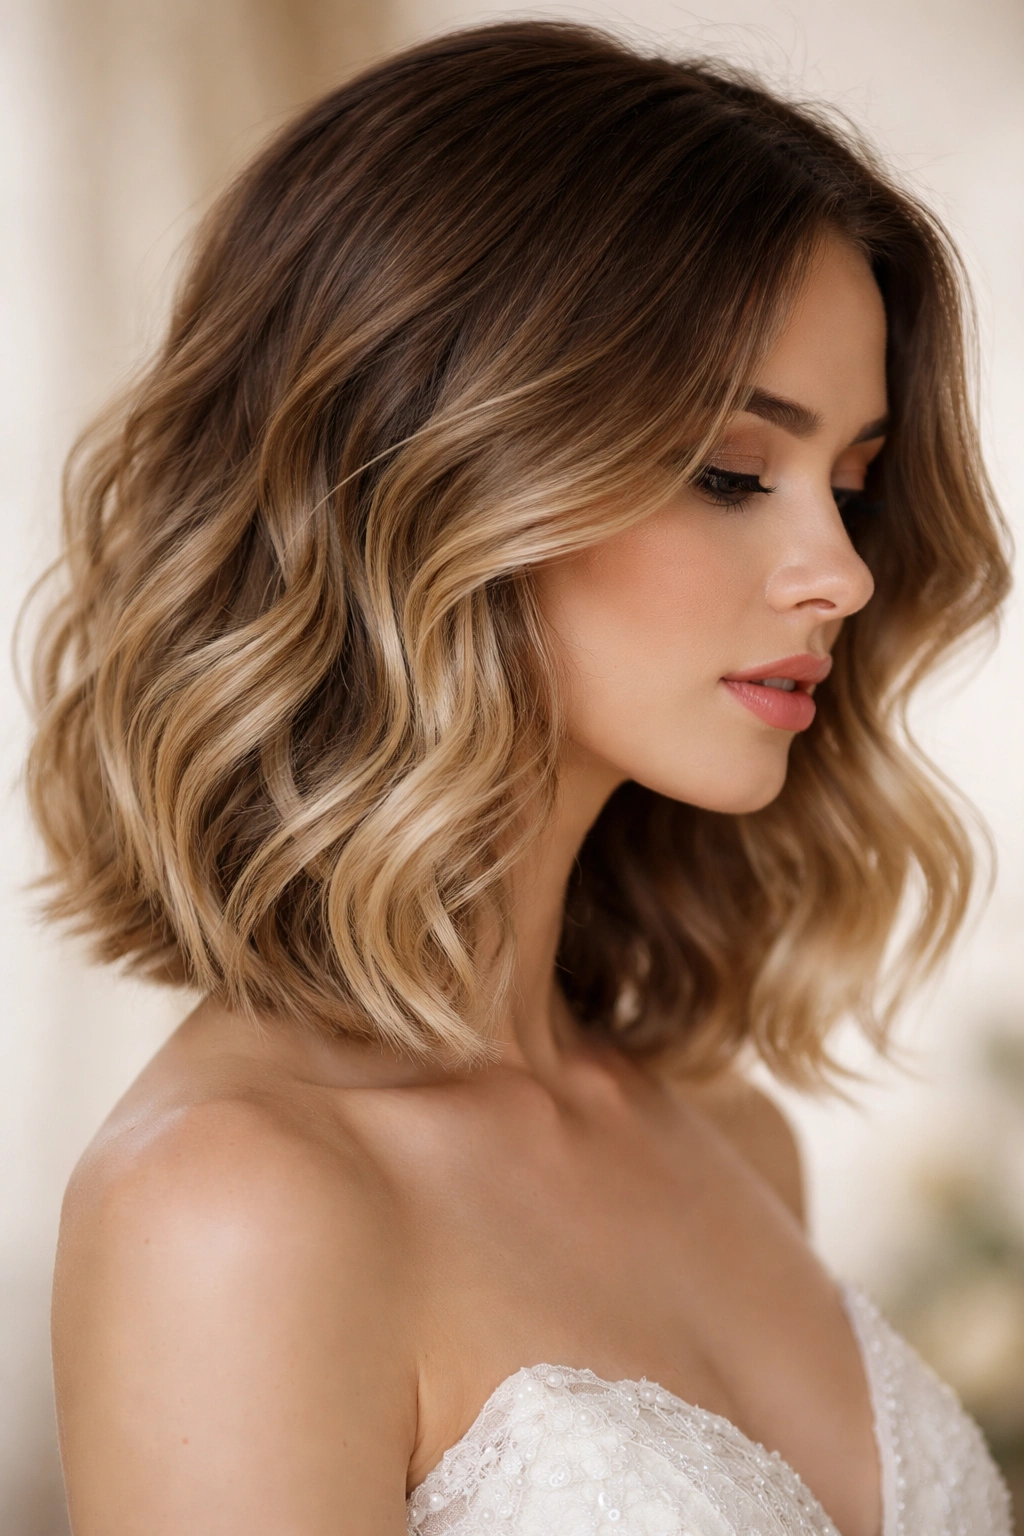
A wavy bob is one of the most versatile choices for a wedding guest—or bride. It strikes that perfect balance between polished and effortless, romantic yet modern, and works for nearly every face shape and hair texture. The beauty of a wavy bob at a wedding is that it moves and catches light in ways that longer styles often can’t, creating an elegant, dynamic look that photographs beautifully from every angle.
What makes a wavy bob particularly stunning for weddings is its inherent versatility. You can dress it up with accessories and strategic styling, or let it fall in soft, natural-looking waves if that suits the vibe better. Unlike a blunt, straight bob that requires precision-level straightening before an event, a wavy bob actually improves with a bit of texture and dimension. It’s forgiving, it’s flattering, and it’s the kind of hairstyle that makes you feel confident whether you’re sitting through a ceremony or dancing at the reception.
The variations are endless too. A wavy bob can be tailored to your specific wedding role, hair type, and personal aesthetic. Whether you’re drawn to romantic Old Hollywood waves, modern textured movement, sleek polished waves, or something more undone and beachy, there’s a wavy bob interpretation that will make you feel like the best version of yourself on the big day.
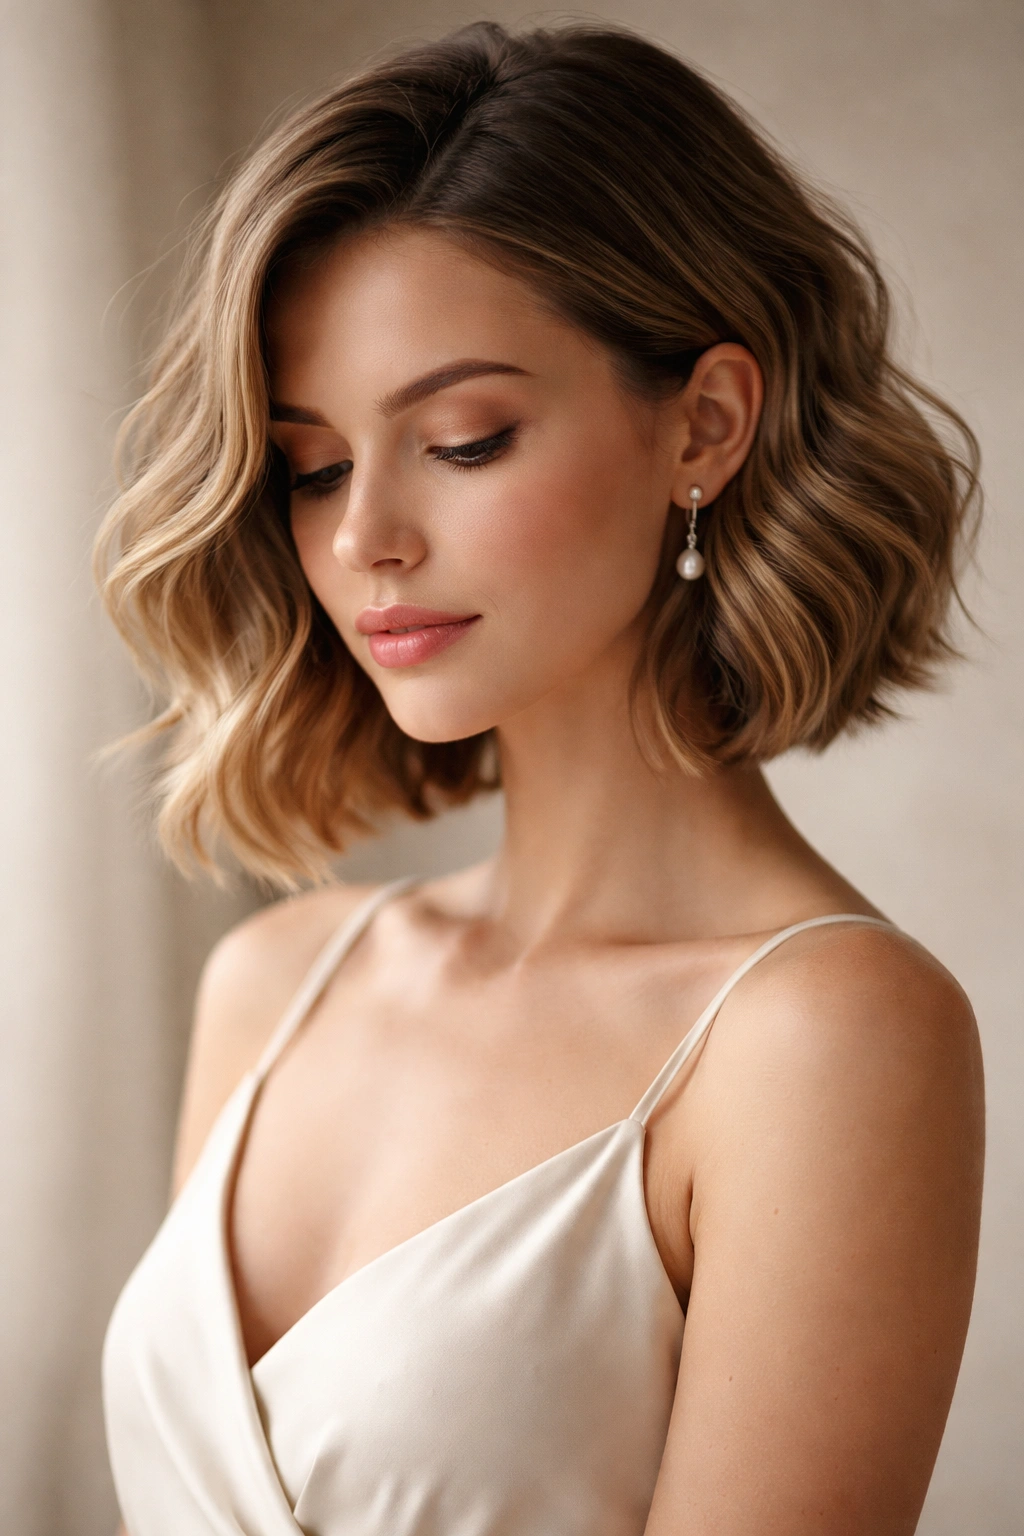
1. Soft Romantic Waves with Side Sweep
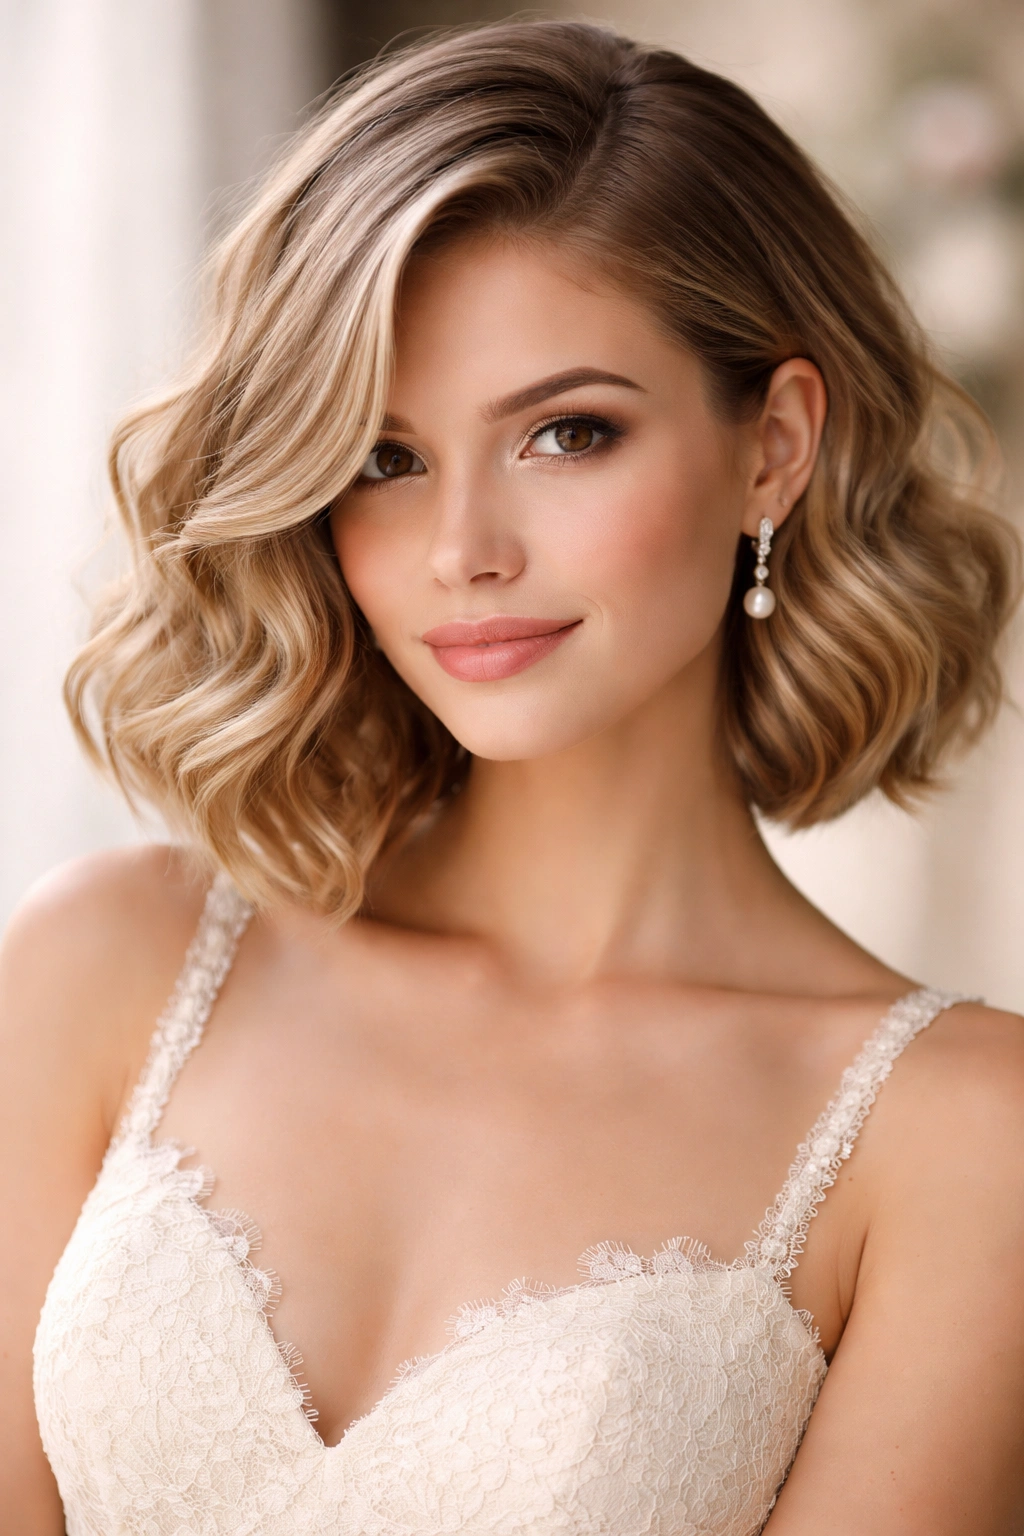
This is the wavy bob that channels timeless elegance and works beautifully for traditional or semi-formal weddings. The waves are loose and feminine rather than tight or sculptural, and the strategic side sweep adds an element of sophistication that frames the face beautifully. Think less “structured curl” and more “gently tousled waves that fell into place naturally.”
Why It Works for Weddings
This style is romantic without being overdone, polished without feeling costume-like. The soft waves catch light delicately and create movement that photographs gorgeously in both candid and posed shots. The side-swept element adds dimension and asymmetry, which is more interesting visually than a centered part. It’s also incredibly wearable—if you need to wear a veil or fascinator, the side sweep accommodates it easily, and the waves provide natural texture for anchoring any hair accessories without disrupting the overall look.
How to Create It
Start with a blow-dry using a round brush to add volume at the roots, then wave the mid-lengths and ends with a 1.5-inch curling iron, wrapping the iron away from your face for a softer, more relaxed effect. Instead of curling each section tightly, wrap hair loosely around the barrel and release it gently—the key is movement, not definition. Use a sea salt spray before blow-drying and again after curling to enhance texture and keep waves from looking too perfect. Brush through the waves lightly with your fingers or a wide-tooth comb to soften them into that effortlessly romantic vibe. Pin the side-swept section lightly with a few bobby pins at the back to hold the placement throughout the day without looking rigid.
Best Hair Types for This Look
This style works beautifully on straight to wavy hair that takes a curl easily, though it also looks lovely on naturally curly or coily hair if you piece through the curls to create more intentional wave shapes. Finer hair benefits from the tousled, broken-up texture because it creates the illusion of fuller volume. Thicker hair can handle the weight of longer waves and maintains the shape throughout the day without as much pinning.
Pro tip: Curl your hair the night before if possible, sleep gently on those waves, and refresh them the morning of the wedding with a curling iron and light hairspray. Fresh curls always look softer and more romantic than day-of styling.
2. Choppy Textured Wavy Bob with Tousled Layers
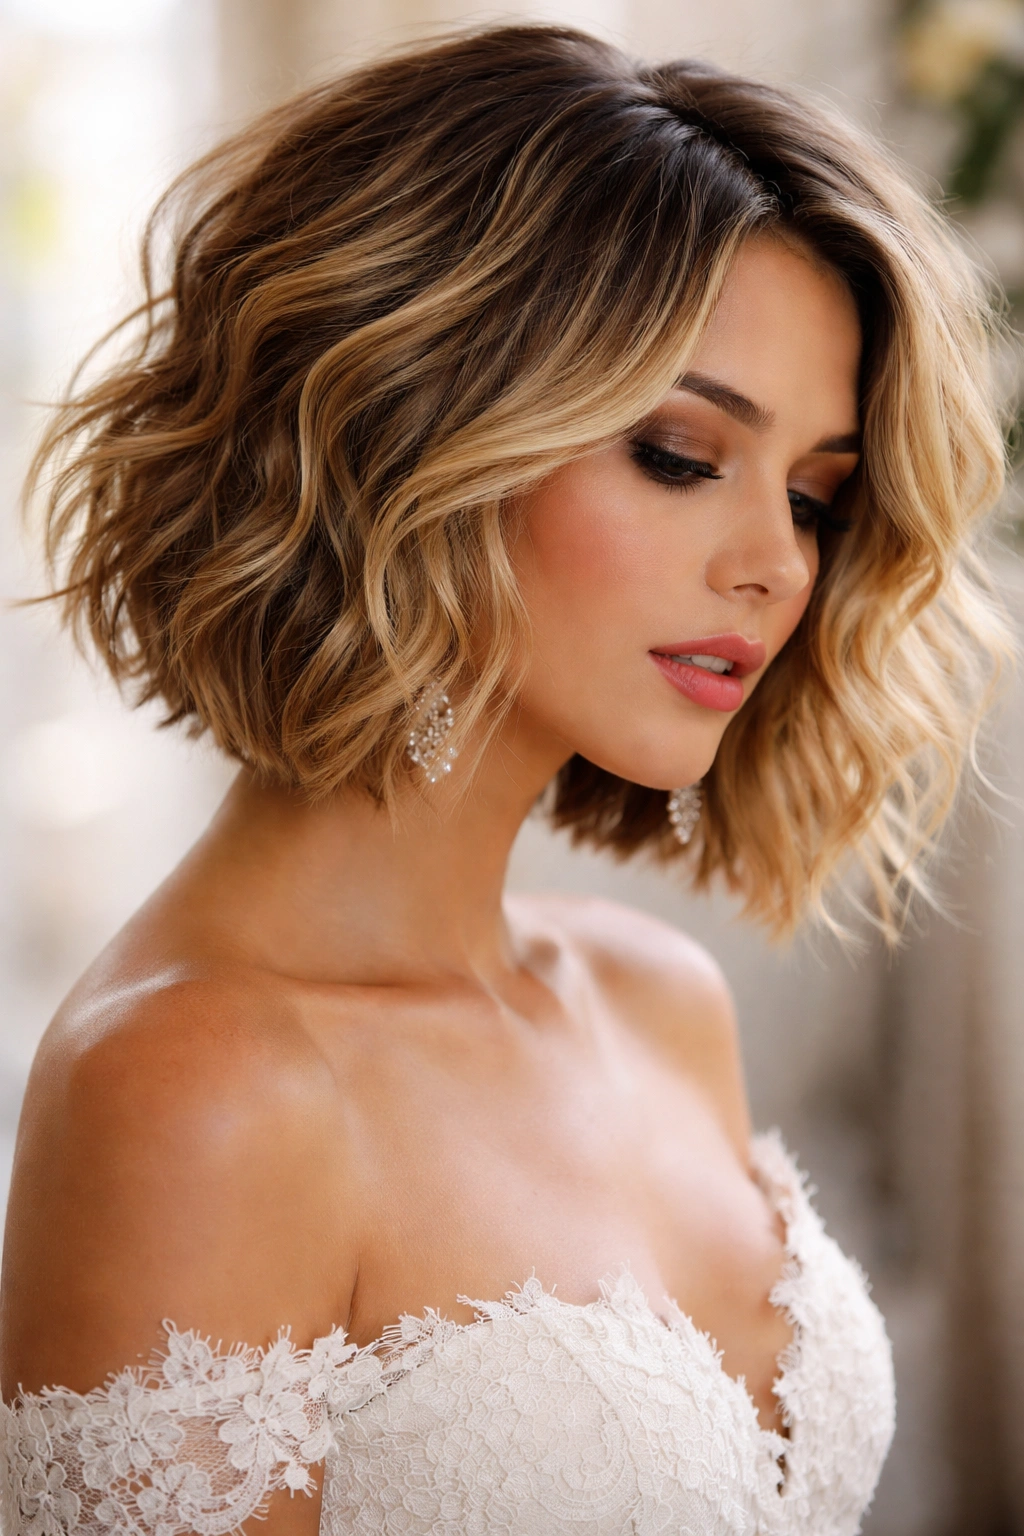
If you want a wavy bob with serious personality and movement, this is it. Choppy layers create the illusion of thicker hair while allowing waves to move independently throughout the cut. The pieces fall at slightly different lengths, which creates that coveted tousled effect—the look of waves that were intentionally textured, not just curled. This style reads as modern, fashion-forward, and definitely confident.
Why It Works for Weddings
The layered texture means your hair moves beautifully when you move, which is especially noticeable during first dances, walking down the aisle, or any moment caught on video. The choppy construction also means you don’t need perfectly uniform waves—in fact, slightly imperfect, piecey texture is exactly what this cut calls for. It’s an excellent choice if you have finer hair that struggles with weight, or if you want a bold, memorable look that stands apart from more traditional wedding hairstyles.
How to Create It
Ask your stylist for choppy, piece-y layers throughout the bob, keeping the front slightly longer for face-framing. When styling, blow-dry with texture—use a round brush or simply scrunch your hair while blow-drying to encourage wave formation. Apply sea salt spray while hair is still slightly damp, then wave sections with a 1.25-inch iron, but don’t worry about making waves uniform or perfect. The goal is intentional texture, not sleek waves. Once curled, scrunch and piece through the waves with your fingers, creating separation between pieces. Finish with a flexible-hold hairspray that doesn’t stiffen the style—you want waves that move with you, not waves that feel stiff or crunchy.
Best Hair Types for This Look
Naturally wavy or curly hair absolutely thrives with this cut because the layers work with your natural texture rather than fighting it. Straight hair can achieve this look but will need consistent heat styling throughout the day. Medium to thick hair handles the choppy layers beautifully, though fine hair can also work here if you ask your stylist for softer, less aggressive layers that won’t create the illusion of thinning.
Worth knowing: This style requires a skilled stylist who understands texture and movement. A mediocre choppy cut looks shaggy rather than intentional, so invest in someone with a strong portfolio of textured bobs.
3. Sleek Waves with Deep Side Part
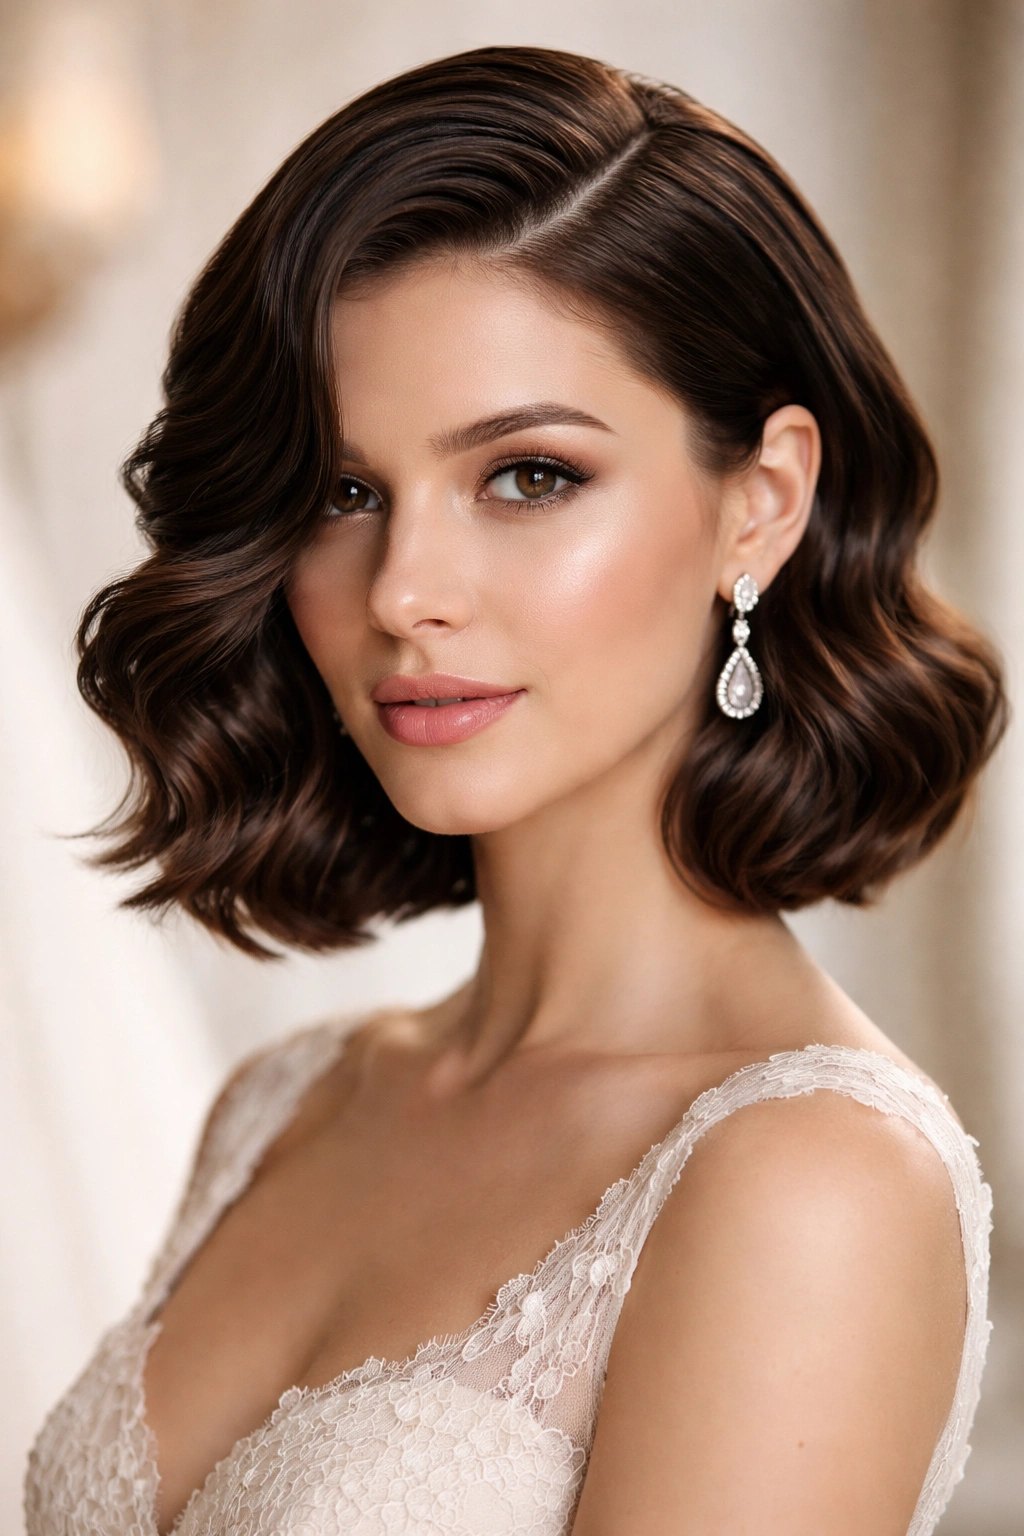
For a more polished, less whimsical take on the wavy bob, sleek waves with a deep side part deliver understated glamour. The waves here are more controlled and defined than soft romantic waves, almost resembling finger waves in their precision, but they maintain enough movement to feel modern rather than retro. The deep side part elongates the face and creates the opportunity for a dramatic sweep of hair that can accommodate veils, clips, or simply fall elegantly to one side.
Why It Works for Weddings
This interpretation of the wavy bob is perfect for formal weddings, black-tie events, or any situation where you want to look exceptionally polished and put-together. The sleek quality photographs beautifully in professional wedding photography, and the waves provide dimension without looking overly casual. The deep side part creates asymmetry and interest while remaining sophisticated—it’s modern enough for contemporary weddings but classic enough to feel timeless.
How to Create It
Start with a blow-dry where you establish your deep side part from the beginning. Blow-dry the hair that falls to the longer side slightly away from your face to create volume and movement. Once dry, use a 1.5-inch curling iron to create defined waves, but wrap each section tightly and hold the curl for a few seconds longer than you would for looser waves. This creates more defined wave shapes. For the sleek factor, apply a smoothing serum or lightweight cream to your waves while they’re still warm, running your fingers through them gently to blend them slightly—you want definition, not separated ringlets. Finish with a light hairspray that holds without creating shine-killing crunch.
Best Hair Types for This Look
Straight to wavy hair that holds a curl beautifully is ideal for sleek waves because you can create precise wave shapes that hold throughout the day. Fine to medium hair works best here—very thick hair might need a smaller curling iron to create defined waves without the style looking limp. This style also looks gorgeous on darker hair, where the wave definition and shine of the sleek product show off the color brilliantly.
Pro tip: Use a flat iron with rounded edges to refine your waves between curling sections. This blends the waves together slightly and creates that polished, intentional appearance rather than looser, more random curls.
4. Beach Waves with Curtain Bangs
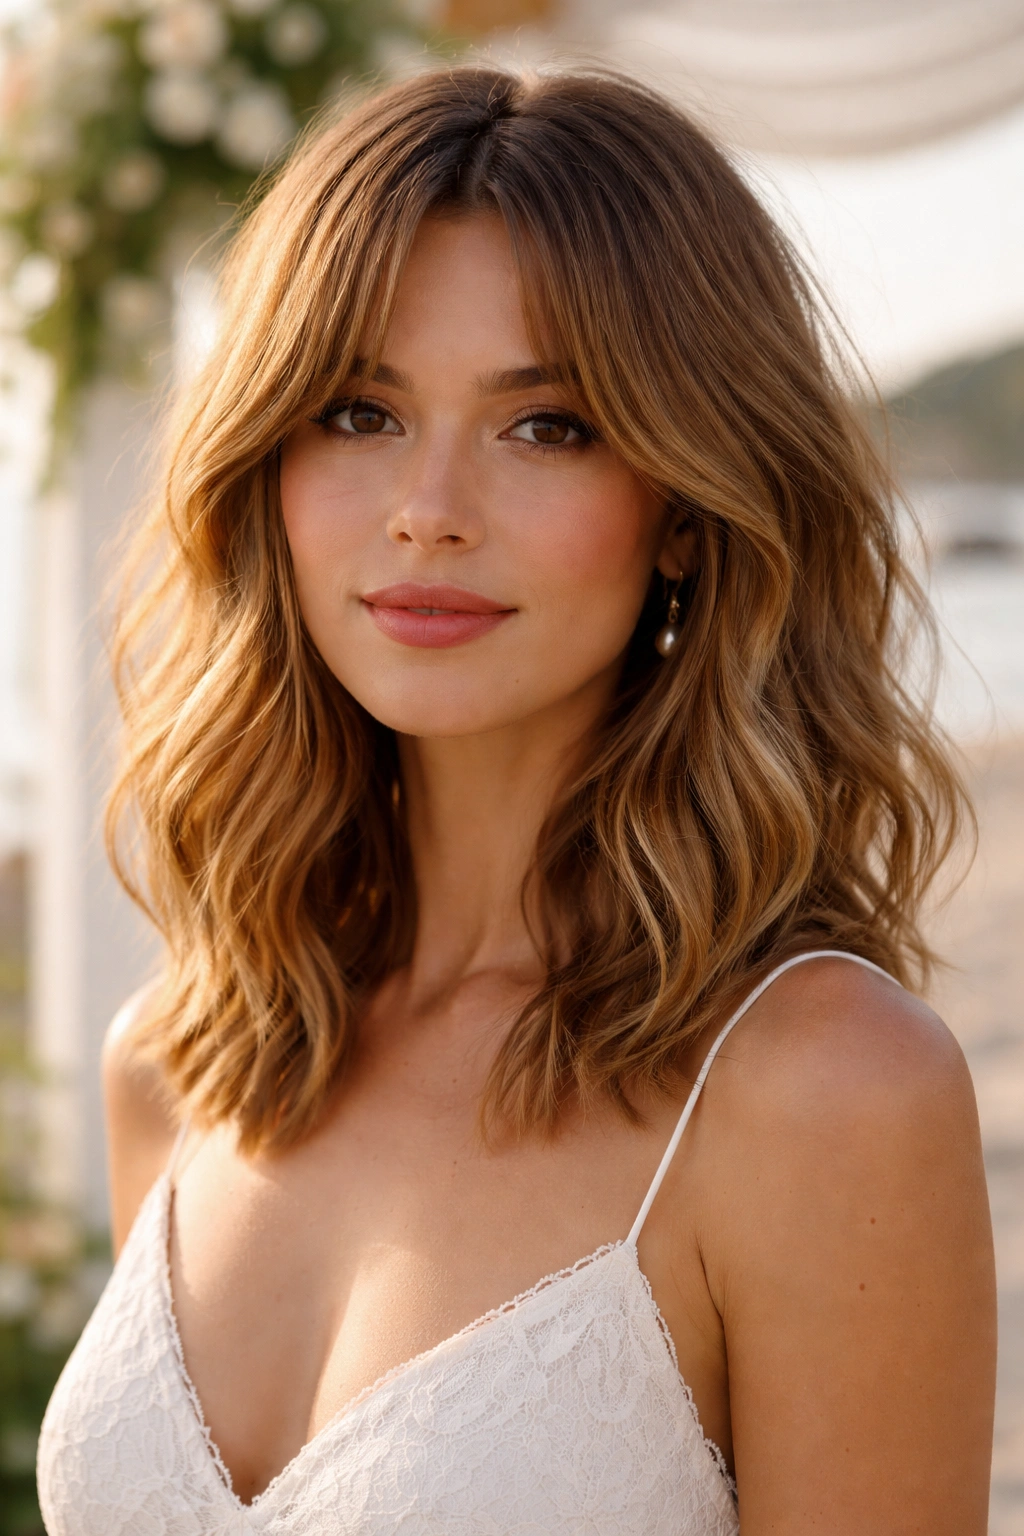
This wavy bob feels casual and effortless, as though you just returned from a breezy seaside wedding yourself. Beach waves are looser than traditional curls, with undulating texture rather than defined spirals. Curtain bangs—longer pieces that frame the face and sweep away from the center—add softness and a romantic, slightly bohemian touch that pairs perfectly with relaxed waves.
Why It Works for Weddings
This style is ideal for outdoor weddings, garden ceremonies, or any event with a more relaxed, less formal atmosphere. It’s youthful and approachable without sacrificing elegance, and it photographs beautifully in natural light. The curtain bangs create a flattering frame around the face and are particularly good at softening strong jawlines or wider face shapes. The beach wave texture also means you don’t need to be precious about perfection—a slightly messier, more lived-in quality is exactly what this style calls for.
How to Create It
Blow-dry your hair with a round brush to create volume, then use a 2-inch curling iron (larger barrel = looser waves) to create waves. Wrap sections loosely around the barrel and release—you’re aiming for gentle undulation, not tight curls. Focus the wave action on the mid-lengths and ends rather than from the roots, which keeps the style looking effortless and less “done.” Use a texturizing spray generously throughout to enhance the beach-worn quality. Finger-comb through your waves once they’ve cooled, breaking them apart and creating that tousled, undone appearance. For the curtain bangs, style them so they sweep naturally away from your face rather than falling straight down—you can do this by blow-drying with direction or lightly curling them inward.
Best Hair Types for This Look
Naturally wavy or curly hair is absolute heaven with beach waves because your natural texture does half the work. Straight hair can definitely achieve this look but will need consistent styling before the wedding to maintain waves throughout the event. Fine to medium hair is ideal—very thick hair might look heavy with very loose waves, though a stylist can thin and layer the cut to work with your texture.
Worth knowing: Beach waves look best when you don’t overthink them. If you find yourself meticulously arranging each wave, you’re trying too hard. The whole point is effortless-looking texture, so embrace a bit of asymmetry and imperfection.
5. Voluminous Waves with Blunt Ends
This wavy bob prioritizes drama and presence—the waves are full, bouncy, and unapologetically visible, while blunt, clean-cut ends give the style a modern edge. There’s nothing subtle about this look. The volume starts at the roots and continues through the ends, creating a rounded, almost helmet-like silhouette that’s striking and flattering on most face shapes. Blunt ends also make each wave more defined because the hair isn’t tapered away into wispy pieces.
Why It Works for Weddings
This is a power move of a hairstyle, ideal if you’re a bridesmaid who wants to stand out, a bride who wants high-impact glamour, or a guest who simply wants to look undeniably put-together. The volume and defined waves photograph beautifully, especially in professional photography where the dimension and movement are clearly visible. Blunt ends also photograph sharply and keep the style looking intentional rather than fuzzy or soft-edged. This look works particularly well if you have a smaller face because the voluminous hair frames it beautifully without overwhelming your features.
How to Create It
Ask your stylist for a blunt-cut bob with layers that support volume—you need shorter layers at the crown to create lift and longer layers through the mid-lengths and ends. Blow-dry with maximum volume, using a round brush at the roots and blow-drying your hair slightly upside down or at an angle to create height. Once volume is set, use a 1.5-inch curling iron to create waves throughout, making sure to include waves at the crown area so the volume doesn’t flatten. Waves should be medium-tight, almost sculptural. A volumizing mousse applied to damp roots before blow-drying helps maintain volume throughout the day. Finish with a medium-hold hairspray that doesn’t weigh down your volume.
Best Hair Types for This Look
Medium to thick hair absolutely shines with voluminous waves and blunt ends—your hair has enough weight to support the volume and make the waves look intentional rather than struggling to hold a curl. Fine hair can achieve this look with the right cut and styling, but you’ll need excellent product support and possibly even a volumizing powder at the roots to maintain volume through the day. This style is less ideal for very curly or coily hair unless you want a hybrid curly-wavy look, which can certainly work but requires more precision styling.
Pro tip: Schedule your wedding-day styling for voluminous waves in the morning or early afternoon. This style’s impact depends on fresh volume, and waves begin to relax as the day goes on. If you’re styling at home, consider a second pass with a curling iron a few hours before photos if the style needs a refresh.
6. Asymmetrical Wavy Bob with Hidden Undercut
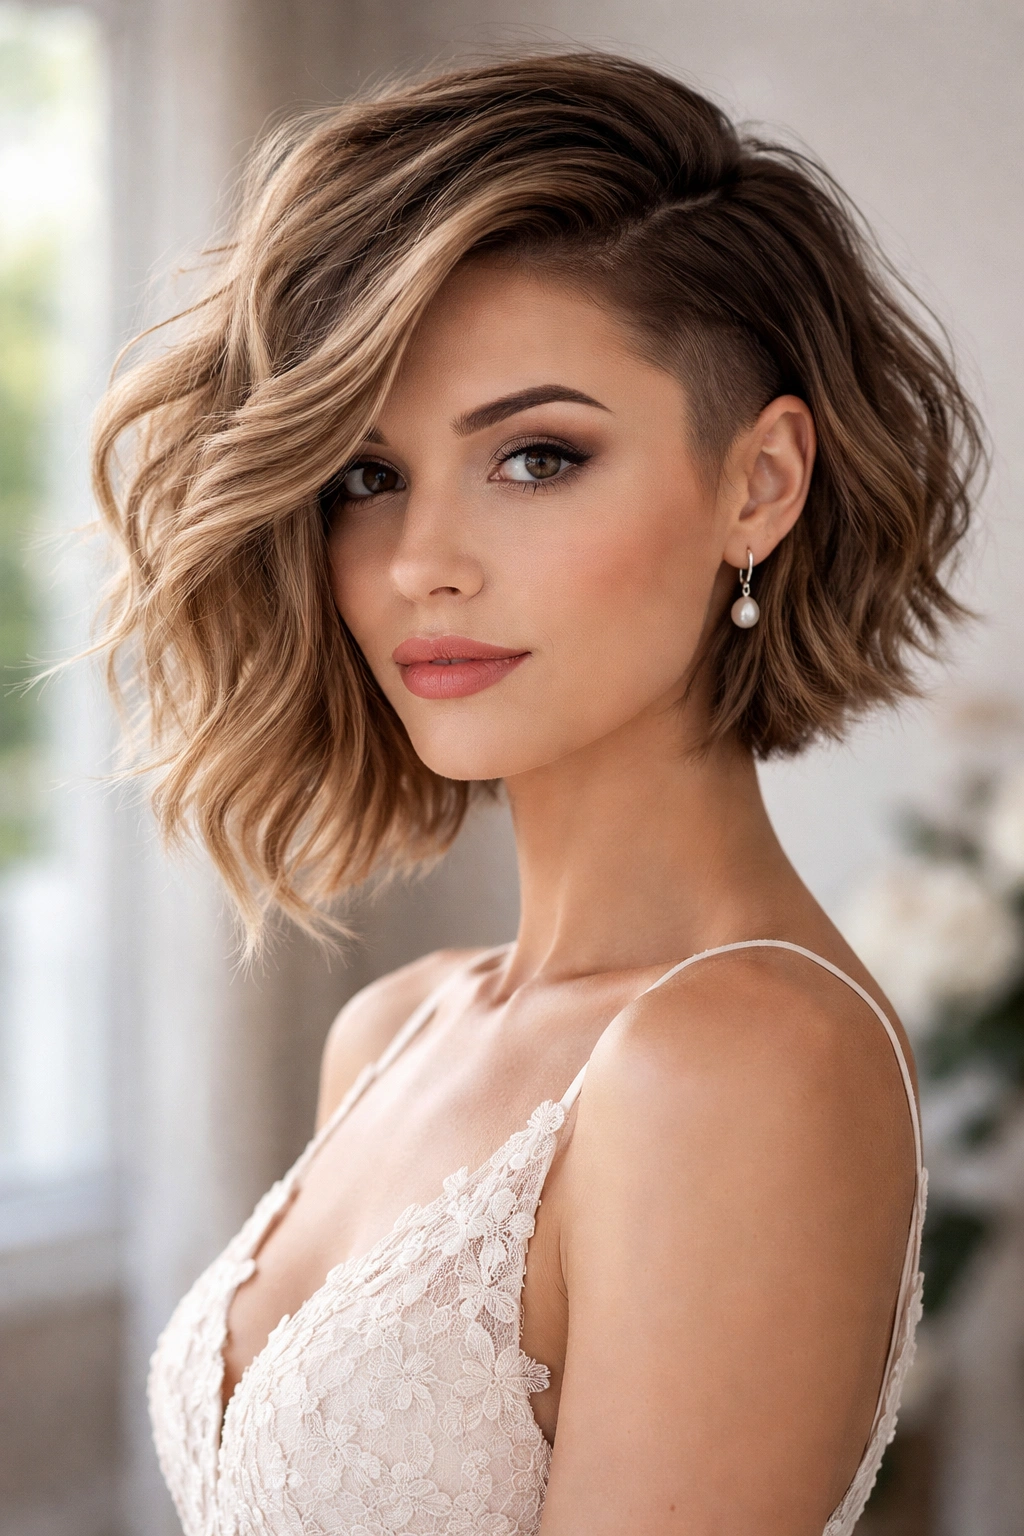
This is the wavy bob for someone who wants edge, sophistication, and a touch of hidden rebellion. The front of this bob is noticeably longer than the back—dramatically so—creating a diagonal line that’s modern and architectural. The hidden undercut (shorter layers or clipper work underneath the longer hair) adds texture and movement while remaining mostly concealed, giving you volume and shape without visible short layers. It’s a look that photographs beautifully from the front while remaining interesting and intricate from the sides and back.
Why It Works for Weddings
This style is perfect if you want a contemporary, fashion-forward look that still reads as appropriate for a formal event. The asymmetry is bold but not costume-like, and the undercut creates incredible movement in waves. This is also an excellent choice if you’re dealing with very thick hair—the undercut removes weight while maintaining length and elegance. It’s a look that shows intention and style without looking like you’re trying too hard to be rebellious or edgy.
How to Create It
Ask your stylist for an asymmetrical bob with the front noticeably longer (aim for 2-3 inches longer than the back) and a subtle undercut for texture and movement. The undercut should be thinned and layered rather than clippered short—you want it to be invisible unless you flip or style your hair specifically to show it. Styling this bob is straightforward: blow-dry with a round brush to create volume, especially at the crown, then wave the entire length with a 1.5-inch curling iron. The asymmetrical shape means waves look more dynamic on one side than the other, which is intentional. Don’t fight the asymmetry—lean into it by sweeping some waves forward on the long side and pinning or styling the back to show the texture from the undercut if you want to reveal that element.
Best Hair Types for This Look
Thick hair absolutely thrives with an asymmetrical wavy bob and undercut because the cut removes weight while the waves and asymmetry create dramatic movement. Straight to wavy hair that takes curls well is ideal. Medium to fine hair can work with this style if your stylist uses a sharp, precise cut and you style it carefully, but the geometric precision of the asymmetry might be less forgiving on very fine hair that struggles to hold a wave.
Worth knowing: The undercut on this style is subtle, so make sure your stylist understands you want the shorter layers to be mostly hidden, not to create an obviously shaved or clippered section. The artistry here is in making the cut look intentional but not severe.
7. Perfectly Coiled Finger Waves
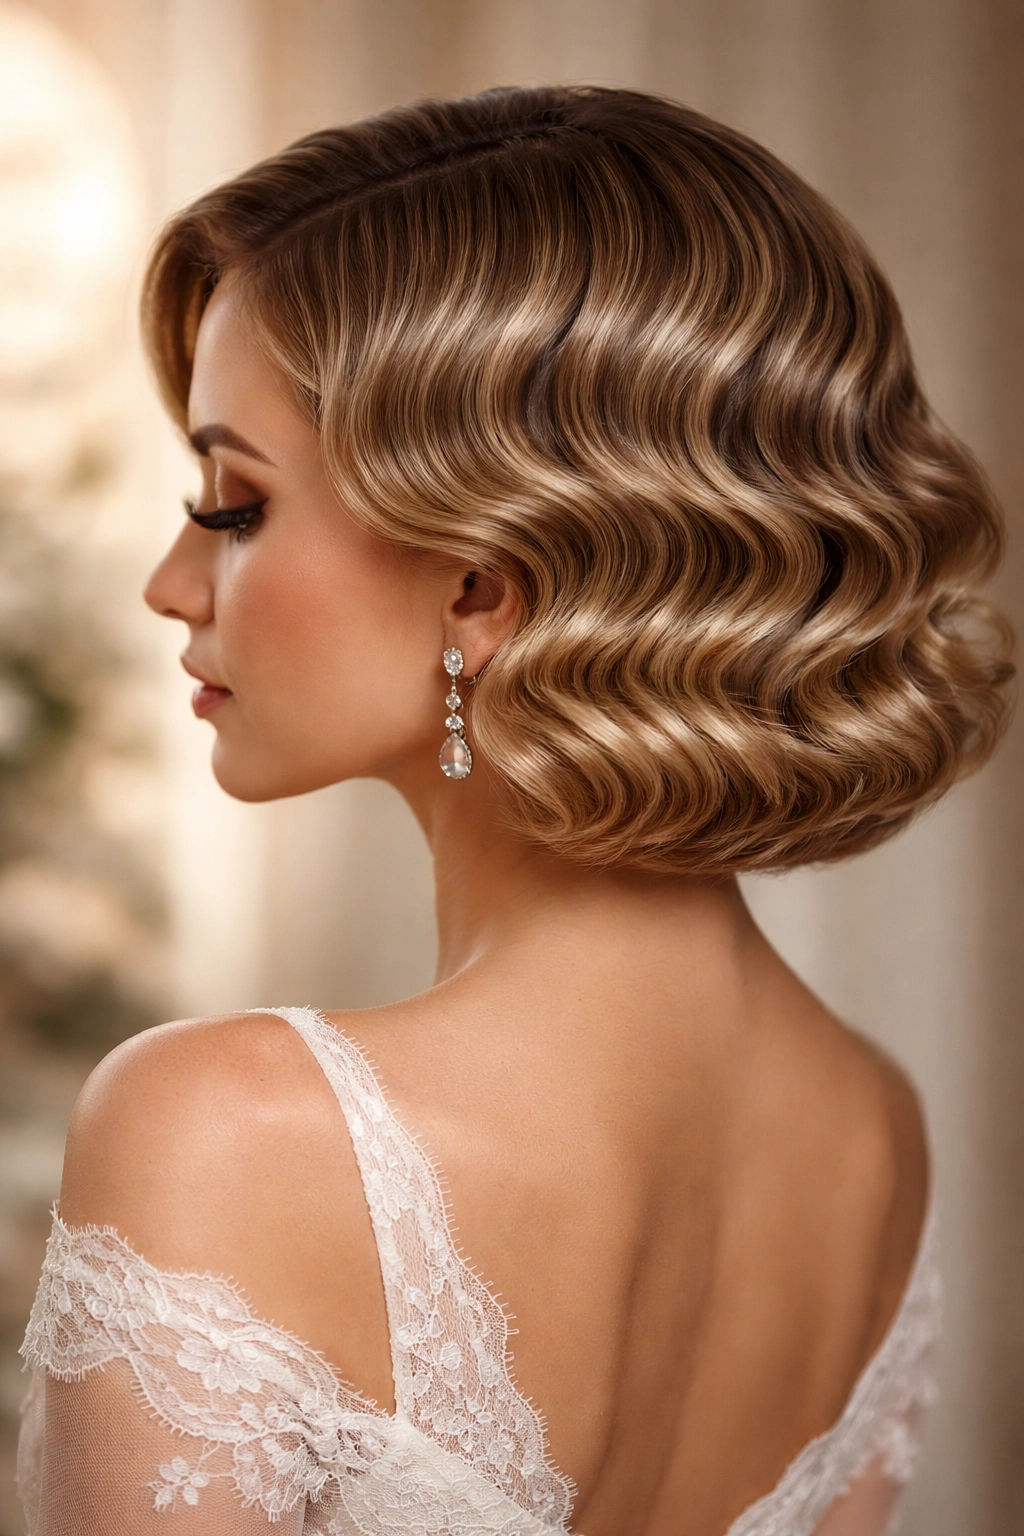
For a truly glamorous, vintage-inspired look that still reads as contemporary wedding-appropriate, perfectly coiled finger waves represent the height of polished elegance. Finger waves are created by pinning hair into S-curves while wet or damp, creating deeply defined, uniform wave patterns that look almost sculptural. This is a formal interpretation of the wavy bob—it’s dressy, intentional, and absolutely striking.
Why It Works for Weddings
Finger waves are the choice of someone who wants to look immaculate and deliberately styled. They photograph beautifully, with clear dimension and light-catching curves visible from every angle. This style is timeless—it feels vintage but not costume-y, and it’s sophisticated enough for the most formal black-tie weddings. Finger waves also tend to hold beautifully throughout a long day because the shape is set into the hair structure rather than relying solely on curl retention. If you want to look intentionally, meticulously groomed, finger waves deliver that effortlessly.
How to Create It
Finger waves should ideally be created by a professional stylist who specializes in formal waves, though experienced home stylists can execute them too. The basic process involves dampening hair, then using clips or bobby pins to pin hair into S-shaped curves, allowing it to dry (either air-dry or under a hood dryer), then carefully removing the pins to reveal deeply set waves. The precision here is important—the waves should be uniform, the curves should be tight, and the finished look should appear almost architectural in its precision. Once the waves are set, they can be softened slightly with fingertip styling or left exactly as pinned for maximum formality. Finish with a light hairspray that holds without creating visible crunch.
Best Hair Types for This Look
This style works on most hair types, though straight to wavy hair that doesn’t naturally resist holding a set is ideal. Medium to thick hair holds finger waves beautifully and the weight of the hair supports the sculptural wave shapes. Fine hair can achieve finger waves, but they may not hold as crisply throughout a very long day without periodic pin reinforcement. This style is particularly gorgeous on darker hair, where the wave definition and shine are clearly visible.
Pro tip: If you’re having finger waves done professionally for a wedding, book your appointment earlier in the day and ask to have the waves set in the morning rather than the night before. Finger waves hold better when fresh, and setting them the same day as your wedding ensures maximum crispness and definition throughout your event.
8. Wavy Lob with Subtle Ombre
A lob (long bob) sits right at the collarbone or slightly below, offering more length than a traditional bob while still maintaining the cropped, modern silhouette. Pairing loose waves with a subtle ombre (gradual color shift from darker roots to lighter ends) creates dimension that enhances the wave texture and adds visual interest throughout the length. This style is romantic, contemporary, and incredibly wearable for someone who wants more length but prefers the bob silhouette to longer, straight styles.
Why It Works for Weddings
The lob is forgiving for hair that’s in-between lengths, and waves add movement and softness to what could otherwise feel blunt or severe. The subtle ombre (if you have it) adds depth and photography-friendly dimension—waves catch light beautifully and the color shift enhances that effect. This style is elegant without being overly formal, making it perfect for semi-formal weddings, daytime events, or any situation where you want to look polished but approachable. The longer length also means you have versatility for styling—you can wear your hair down in waves, or pull it half-up with a small clip or barrette for variety throughout the day.
How to Create It
Ask your stylist for a lob that falls right around the collarbone with subtle layers throughout to support waves without looking too choppy. If you’re adding ombre, a professional colorist can create a gradual shift from your natural root color (or a darker shade if you want more contrast) to a lighter shade at the ends. The subtle aspect means the transition should be gradual and blend-able, not a harsh line. Styling involves blow-drying with a round brush for volume, then creating loose waves with a 1.5 to 2-inch curling iron depending on how loose you want the waves. The longer length of a lob means waves tend to relax and loosen slightly as the day goes on, which often works beautifully—by evening, loose waves look even more effortless and romantic. Use a wave-enhancing spray or sea salt spray to keep texture visible and waves from falling completely flat.
Best Hair Types for This Look
This style works beautifully on straight to wavy hair that takes a curl well. Naturally curly or coily hair can absolutely work with this length, though you might want to consult with a stylist about how to style natural texture into intentional waves rather than relying on heat styling. Fine hair looks lovely in a lob because the extra length distributes weight and reduces the blunt appearance of a shorter bob. Thick hair also thrives with this length—the waves move beautifully and the ombre (if added) creates visual lightness even if your hair has substantial density.
Worth knowing: If you’re adding ombre for a wedding, do the color work at least a week or two before the event rather than right before. This allows time for toning adjustments if the color isn’t exactly what you envisioned, and it means your hair has time to settle into its new color rather than looking freshly processed during your event.
Final Thoughts
Choosing a wavy bob for a wedding means you’re investing in a style that’s flattering, versatile, and inherently photogenic. Whether you go for soft romantic waves, modern choppy texture, sleek precision waves, beachy movement, dramatic volume, architectural asymmetry, vintage finger waves, or an elegant lob, you’re selecting a hairstyle that frames your face beautifully and moves with you throughout the day.
The most important thing is matching your wavy bob choice to your personal style, the formality of the event, and your hair’s natural texture and tendencies. A style that works gorgeously for someone with thick, naturally wavy hair might require different maintenance if you’re working with finer, straight hair—and that’s completely fine. The best wavy bob for a wedding is the one that makes you feel confident, comfortable, and genuinely like yourself, not a version of yourself trying to fit into a particular aesthetic.
Schedule your cut with a skilled stylist who understands movement and texture, not just precise lines. Have a consultation where you show inspiration photos and discuss your hair’s reality—what it naturally does, how much time you’re willing to spend styling, whether you need the style to work with hair accessories. Arrive for any blow-dry or wedding-day styling well-rested and with clean hair. And remember that your hair is one element of your overall look—the confidence and joy you bring to the event matter far more than achieving absolute perfection with your waves.