The Saturday morning ritual is a cornerstone of the childhood experience for many families with Type 4C natural hair. You know the scene: the kitchen stool or the cushioned chair in front of the television, a spray bottle filled with warm water and leave-in conditioner, and a collection of colorful beads and barrettes spread across the table. It is more than just hair maintenance; it is a time for bonding, patience, and artistic expression. For parents and stylists, working with the tight, zig-zag coils of 4C hair requires a specific set of skills and a deep understanding of how to manage shrinkage and moisture.
Kid braids on Type 4C natural hair offer a practical solution for active children who need a style that lasts through school days, playground sessions, and sleep. Because 4C hair is the most fragile of all hair types, characterized by its fine strands and high density, the approach to braiding must be gentle. We often hear the term “tender-headed,” but in reality, many children simply have sensitive scalps that react poorly to the high-tension techniques sometimes used in adult styling. The goal is always to create a look that is visually stunning without compromising the health of the hairline or the comfort of the child.
Finding the right style involves balancing longevity with hair health. A style that is too intricate might take six hours to install, which is a lifetime for a restless five-year-old. Conversely, a style that is too loose won’t survive the week. Over the years, the community of natural hair enthusiasts has developed a wide repertoire of techniques—from stitch braids to knotless methods—that cater specifically to the unique needs of 4C coils. These styles celebrate the versatility of the hair while providing a protective “shield” against the elements.
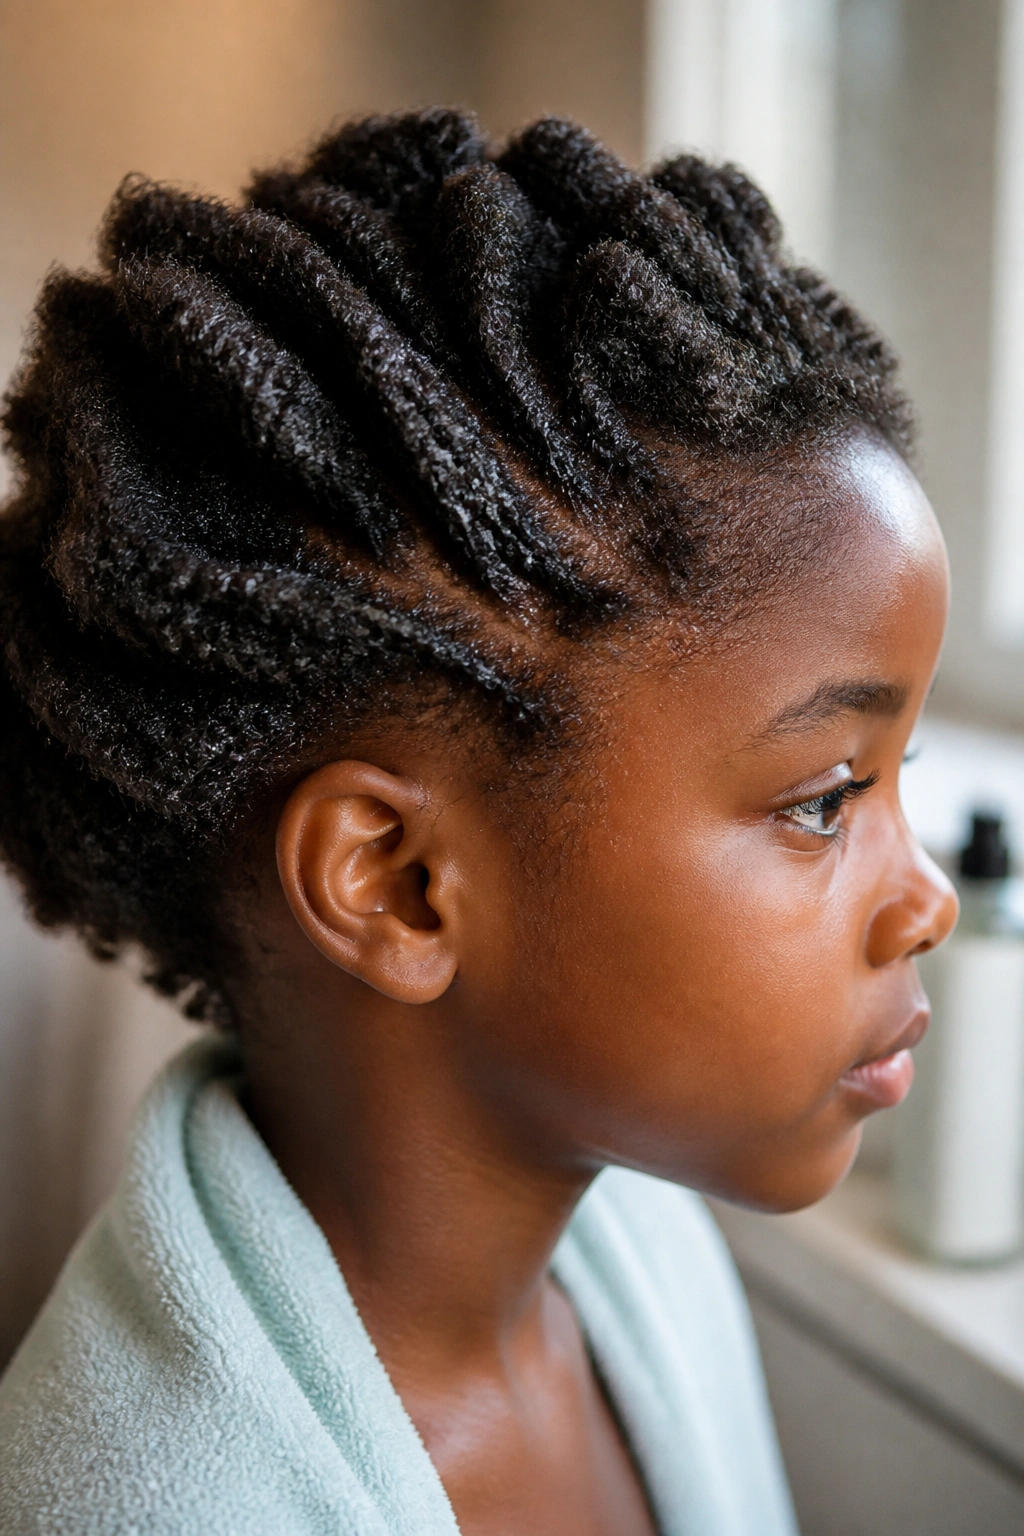
Before the comb even touches a part, the foundation must be laid. This means starting with hair that is thoroughly cleansed, deep-conditioned, and properly stretched. Shrinkage is a beautiful hallmark of 4C hair, but for braiding, stretching the hair slightly with a blow dryer on a cool setting or through heatless methods like African threading or banding makes the parting process much cleaner. This preparation ensures that the braids are uniform and that the tension is distributed evenly across the scalp, preventing the dreaded “bumps” that signify hair is being pulled too tight.
The Essential Pre-Braid Moisture Foundation
The success of any braided style on Type 4C natural hair depends entirely on what you do before the braiding begins. 4C hair is naturally prone to dryness because the scalp’s natural oils have a harder time traveling down the tight coils. If you braid dry hair, you are essentially sealing in breakage. I have found that a modified “LOC” (Liquid, Oil, Cream) or “LCO” method is the only way to ensure the hair remains supple inside the braid for two to three weeks.
Start with a water-based leave-in conditioner to provide the “Liquid” layer. Follow this with a lightweight “Oil,” such as jojoba or almond oil, which mimics the scalp’s natural sebum. Finally, seal it all in with a “Cream”—a thick, shea-butter-based product works wonders here. This triple-layer protection ensures the hair stays hydrated. When the hair is hydrated, it has more elasticity. Elasticity is your best friend when creating parts; it allows the hair to bend and flow into the braid without snapping.
Another pro tip: never use a fine-toothed comb to detangle 4C hair. Instead, use your fingers or a wide-toothed comb starting from the ends and working your way up to the roots. If you hit a knot, don’t yank. Apply a bit more conditioner and work it through slowly. For children, this step is where most of the “braid-time anxiety” stems from. If you make the detangling process painless, the rest of the styling session becomes a breeze.
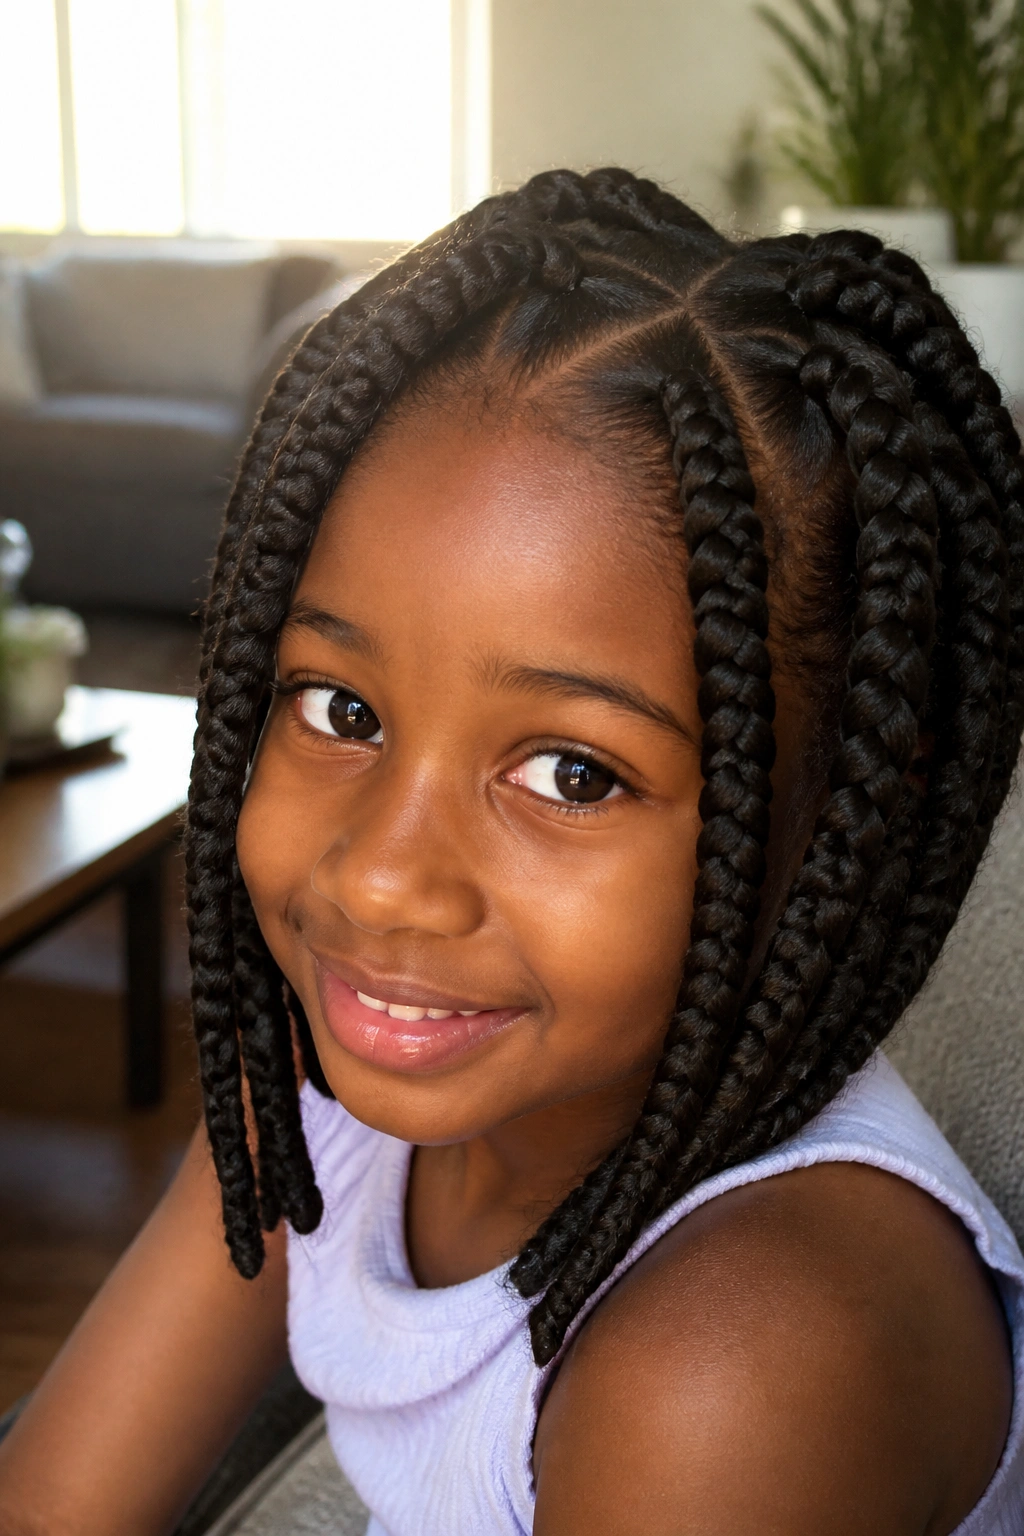
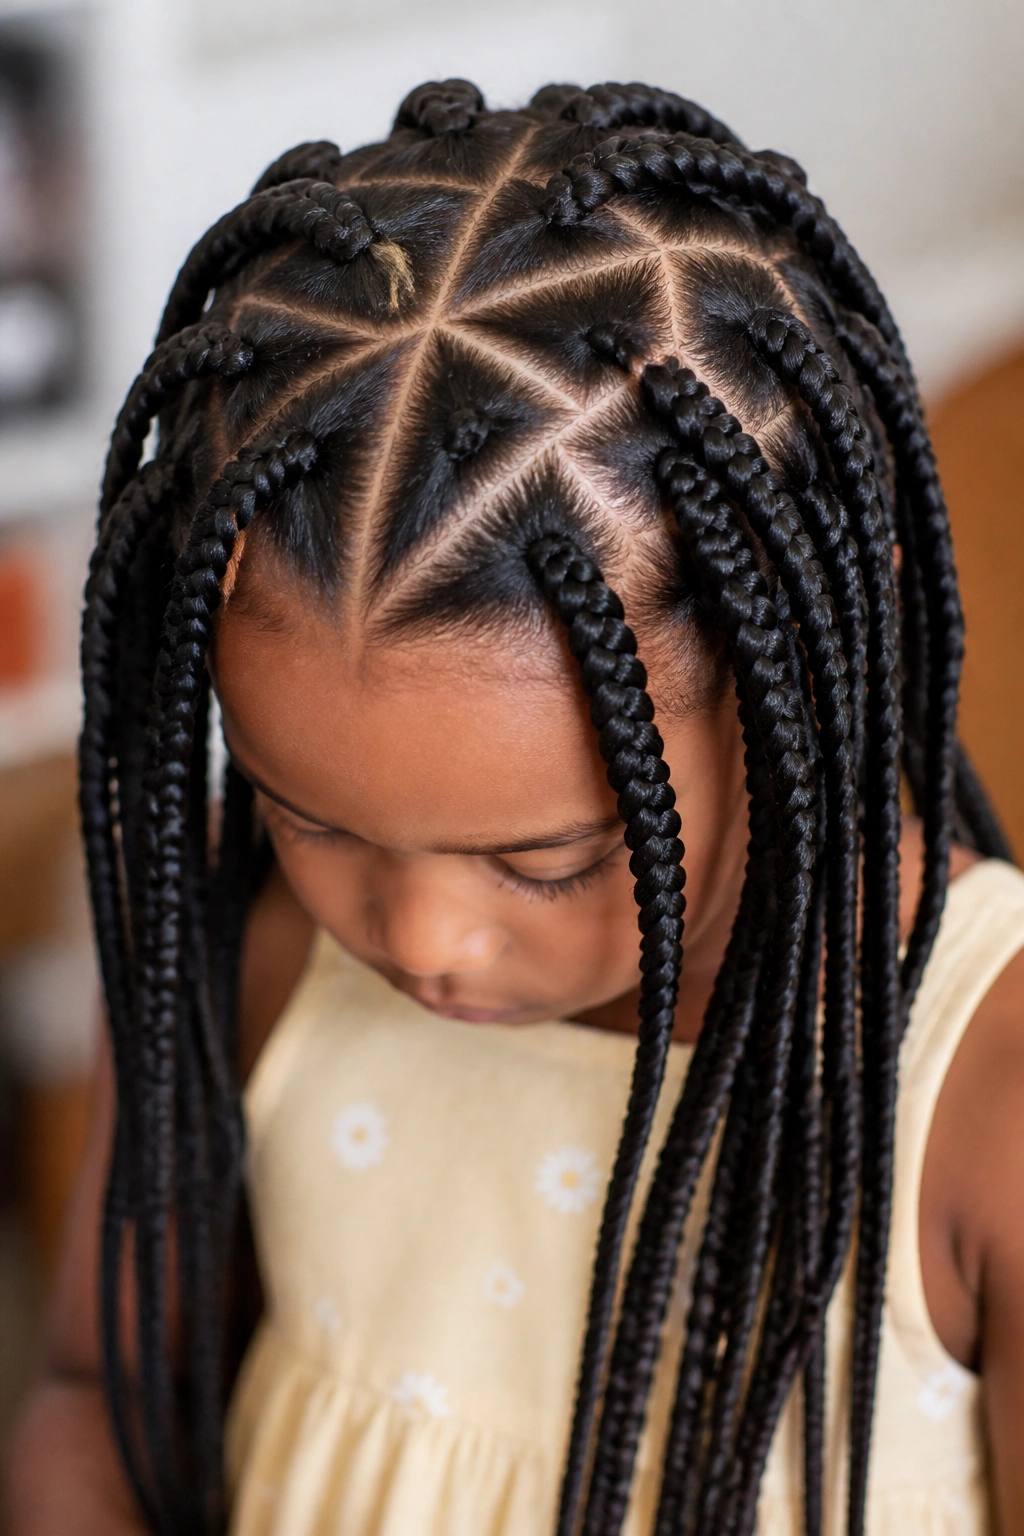
1. Classic Box Braids with Triangle Parting
Box braids are the quintessential protective style, but switching up the parting can turn a standard look into something much more modern. Triangle parting creates a geometric interest that catches the eye and breaks up the “grid” look of traditional square sections. For 4C hair, the density of the coils actually helps the base of the triangle stay firm and neat without needing excessive amounts of edge control or gel.
Why Geometric Parting Works for 4C Coils
The scalp is the canvas here. When you use triangle parts, you are effectively distributing the weight of the extension hair (if using) in a way that puts less stress on the corners of the section. Square sections have four corners that can be prone to pulling, whereas triangles only have three. This subtle shift can make a huge difference in the comfort level for a child over the course of a two-week wear.
Quick Facts for Installation
- Section Size: Aim for medium sections (about 1 inch wide) to balance weight and speed.
- Hair Type: Use kanekalon or pre-stretched braiding hair for a smooth finish.
- Time Commitment: Expect 3 to 5 hours depending on the length.
- Durability: This style easily lasts 3 to 4 weeks with proper scarf-wearing at night.
Pro tip: Use a “no-knot” or knotless start for these braids to reduce the initial tension on the child’s scalp and give the braids a more natural “grow-out” look from day one.
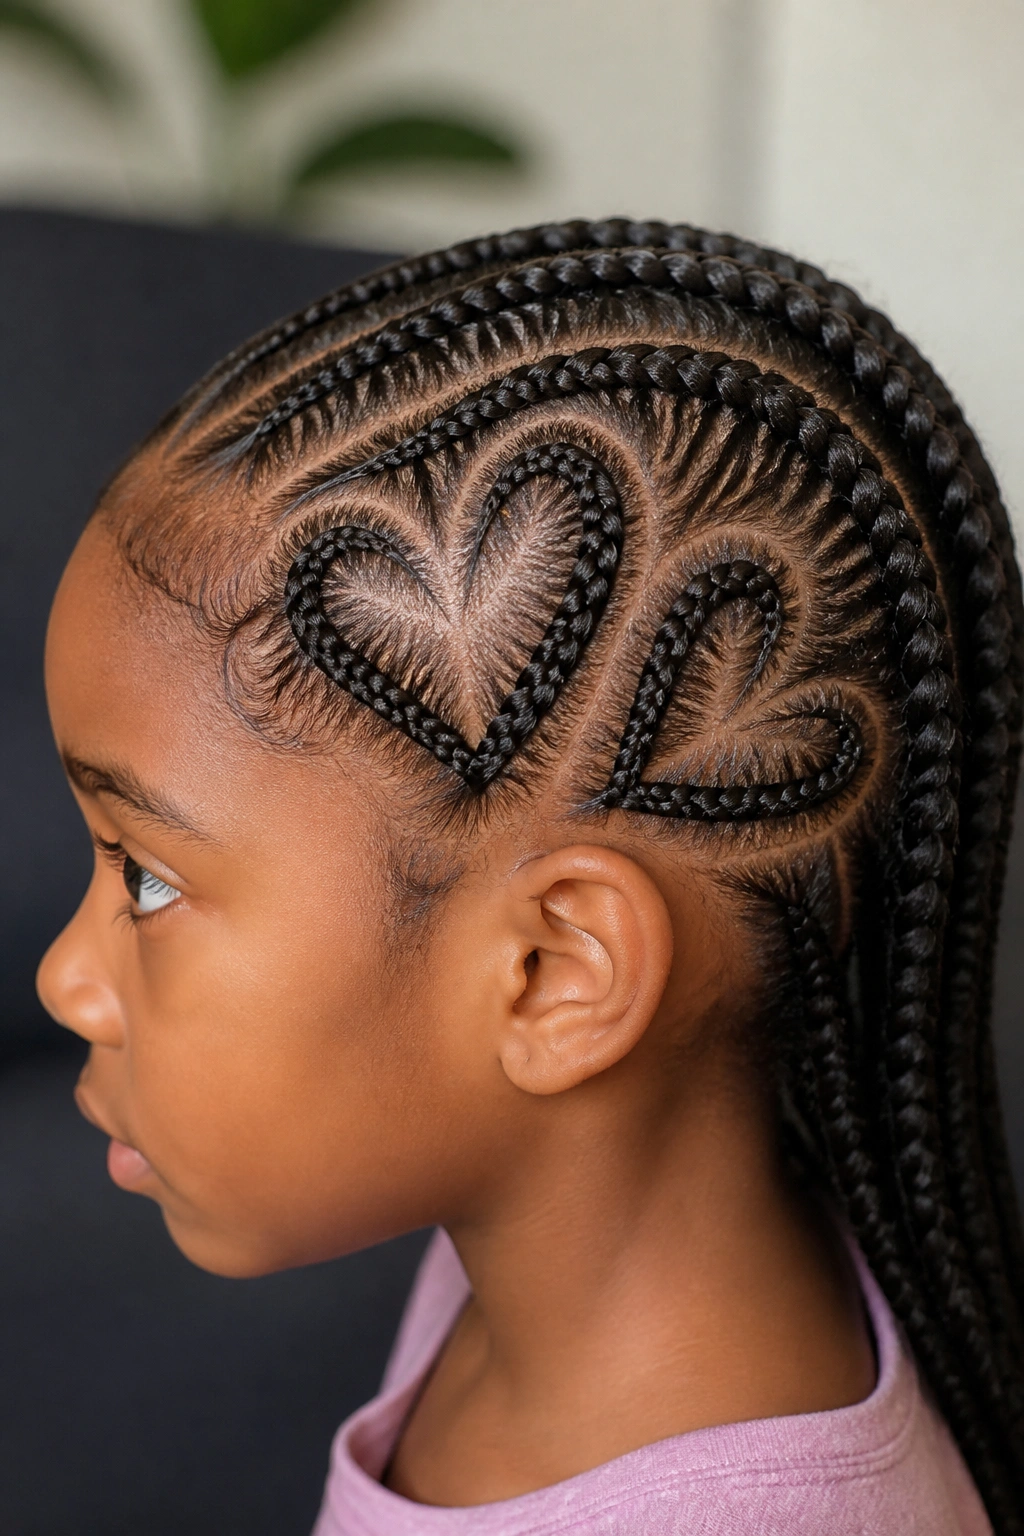
2. Heart-Shaped Accent Cornrows
Adding a heart shape into a cornrow pattern is a fantastic way to show off the precision of your parting. This style usually features one or two large hearts on the side of the head, with the rest of the hair flowing back into simple braids or a ponytail. It’s a favorite for birthdays or school events because it feels special without being overly complex.
Getting the heart shape right on 4C hair requires a steady hand and a very sharp rat-tail comb. Because 4C hair is so dense, the part needs to be “carved” clearly. You might want to use a small amount of clear, non-flaking braiding wax along the line of the heart to make it pop. This helps the tiny flyaways stay down so the shape remains crisp even after the child has been running around.
Once the heart is parted, you braid from the center of the “V” at the top, working your way around the curves. It’s essentially two curved cornrows that meet at the bottom point. It sounds tricky, but once you find the rhythm of the curve, it’s quite satisfying to execute. I always recommend doing the heart first while the child is still fresh and patient, then finishing the rest of the head with easier straight-back rows.
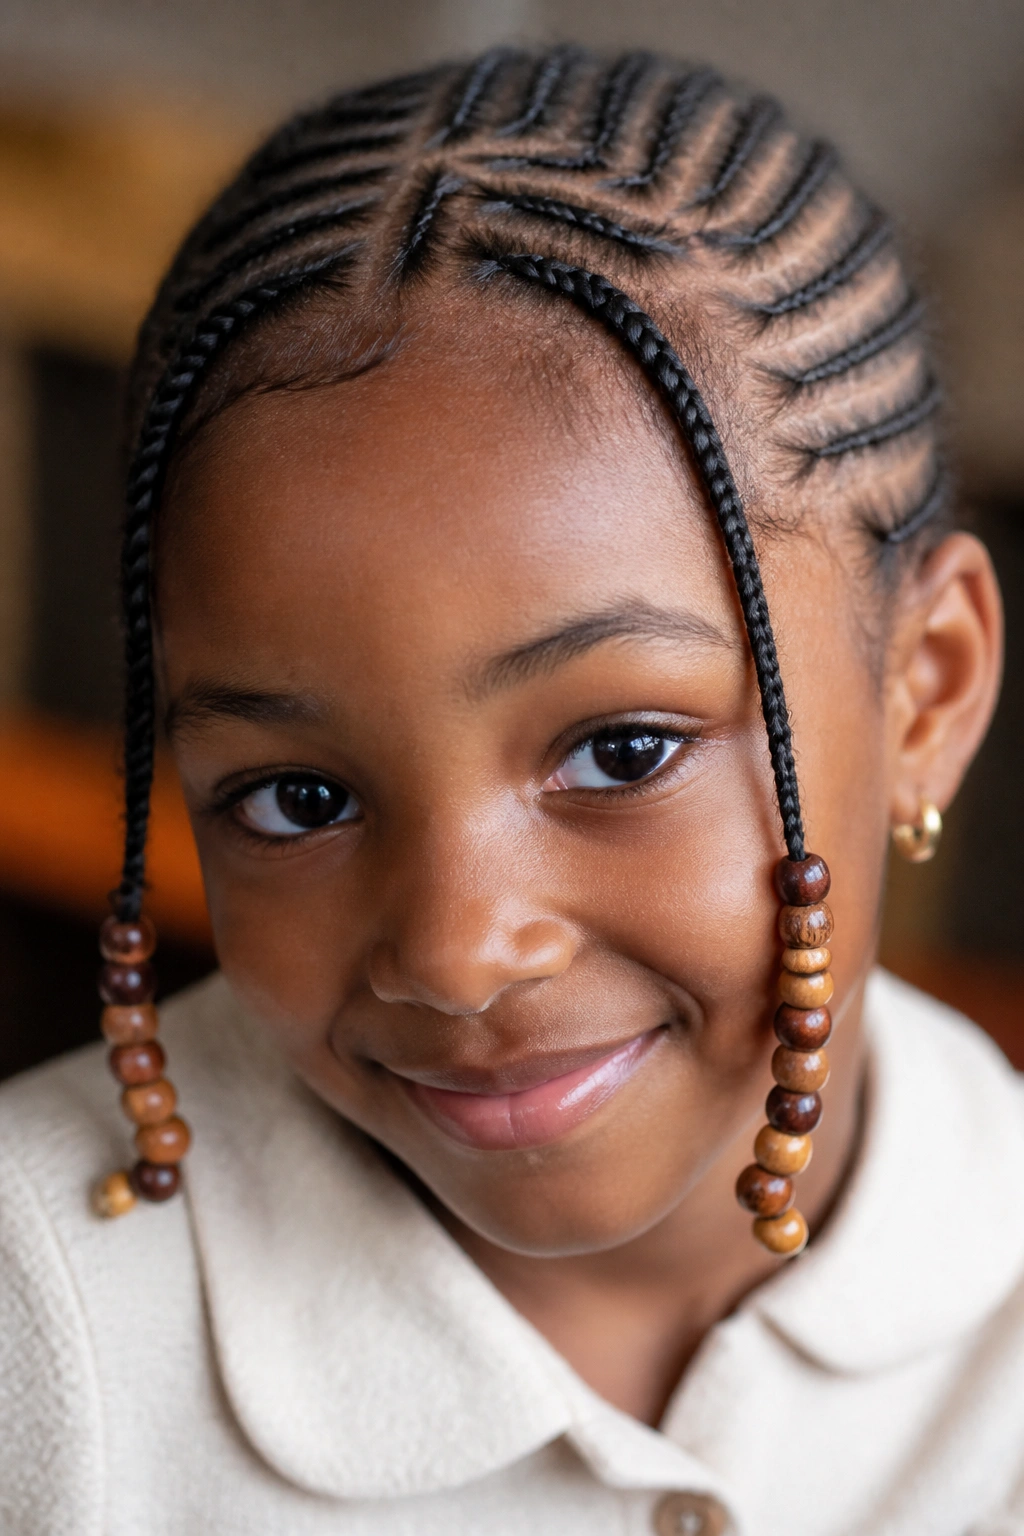
3. Fulani Braids with Wooden Beads
Fulani braids are inspired by the Fula people of West Africa and typically involve a central cornrow braided from front to back, with side braids braided toward the face or in a different direction. For children, this style is incredibly regal. It looks beautiful on 4C hair because the natural texture provides the grip needed to keep the intricate patterns from sliding.
What Makes This Style Different?
The defining feature is the symmetry and the accessories. Unlike standard cornrows, Fulani braids often incorporate a “criss-cross” or “opposite direction” element. For example, you might have two braids right at the temples that hang forward toward the chest, decorated with colorful beads. This adds a playful movement that kids love.
How to Get the Most From This Look
- Use a variety of bead sizes to add weight and “click” to the ends.
- Apply a light scalp oil between the rows every three days.
- Ensure the braids hanging forward aren’t too tight around the ears.
- Switch to silk or satin pillowcases if the child refuses to wear a bonnet.
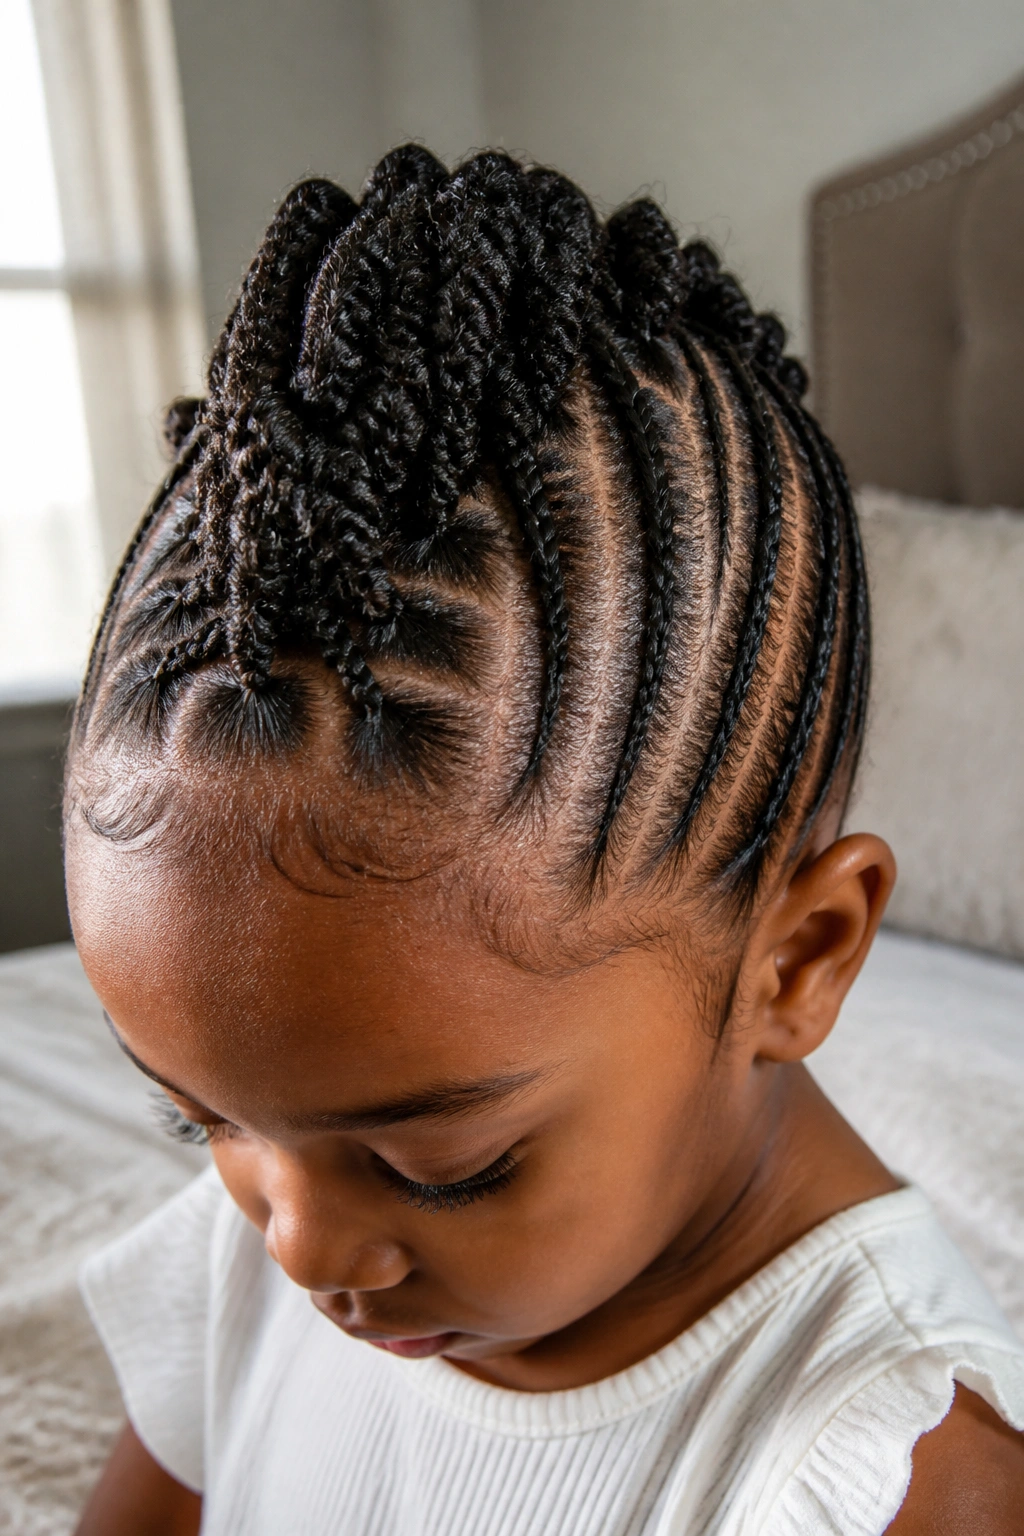
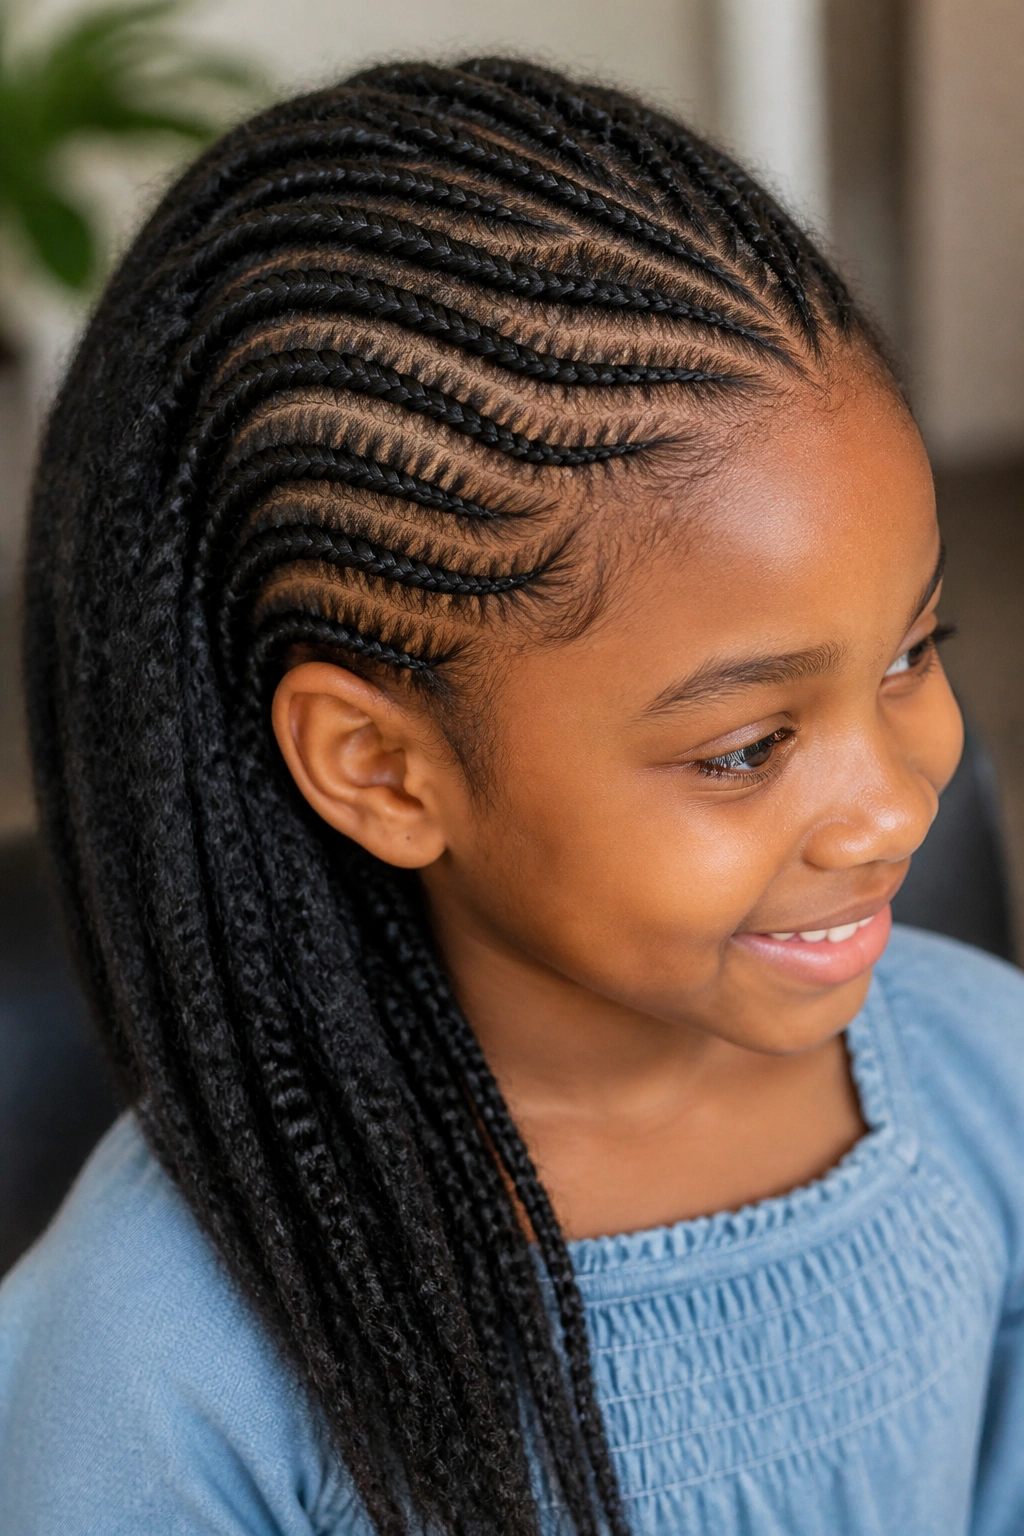
4. Stitch Braids with Curvy Feed-Ins
Stitch braids are a technique where the hair is parted into “horizontal” lines before being incorporated into the cornrow. This creates a “stitched” or “ladder” effect that looks incredibly professional. On 4C hair, the definition is unparalleled. The thickness of the hair makes the stitches look deep and textured, which is a look that is harder to achieve on finer hair types.
A common scenario I see is a parent trying to do stitch braids on hair that hasn’t been properly blown out. While you can do them on damp hair, the stitches will stay much more defined if the hair is stretched. Use the side of your pinky nail or the tip of a rat-tail comb to “hook” each section of the stitch. This creates that clean, ribbed appearance.
Because stitch braids usually involve feed-in hair (adding small bits of extensions as you go), they are very lightweight. This is ideal for children because you aren’t starting the braid with a big, heavy knot. The braid starts small and gradually gets thicker, mimicking the natural growth of the hair. It’s a sophisticated look that works for both boys and girls.
5. Bubble Braids with Colorful Elastic Ties
If you are short on time or haven’t mastered the art of French braiding yet, bubble braids are your best friend. They aren’t actually “braids” in the traditional sense. Instead, you create a series of small ponytails and then use elastics down the length of the hair to create “bubbles.” 4C hair is perfect for this because its natural volume makes the bubbles look full and round without any extra padding.
This style is a sensory delight for kids. You can use neon-colored elastics, glitter ties, or even small ribbons. To start, part the hair into four or six large sections. Create a ponytail at the front, then move back an inch, add the hair from the first ponytail into a second section, and secure it. Continue this until you reach the nape. Once the elastics are in, gently tug at the hair between the bands to “poof” it out.
The beauty of bubble braids on 4C hair is that they don’t require much tension. You aren’t weaving the hair tightly; you are simply gathering it. It’s a great “transition” style for when you need a break between more intensive braided looks. Just be sure to soak the elastics in a little oil before putting them in, or use “snag-free” bands. This prevents the rubber from snapping the delicate 4C strands when it’s time to take the style down.
6. Zig-Zag Parted Feed-In Braids
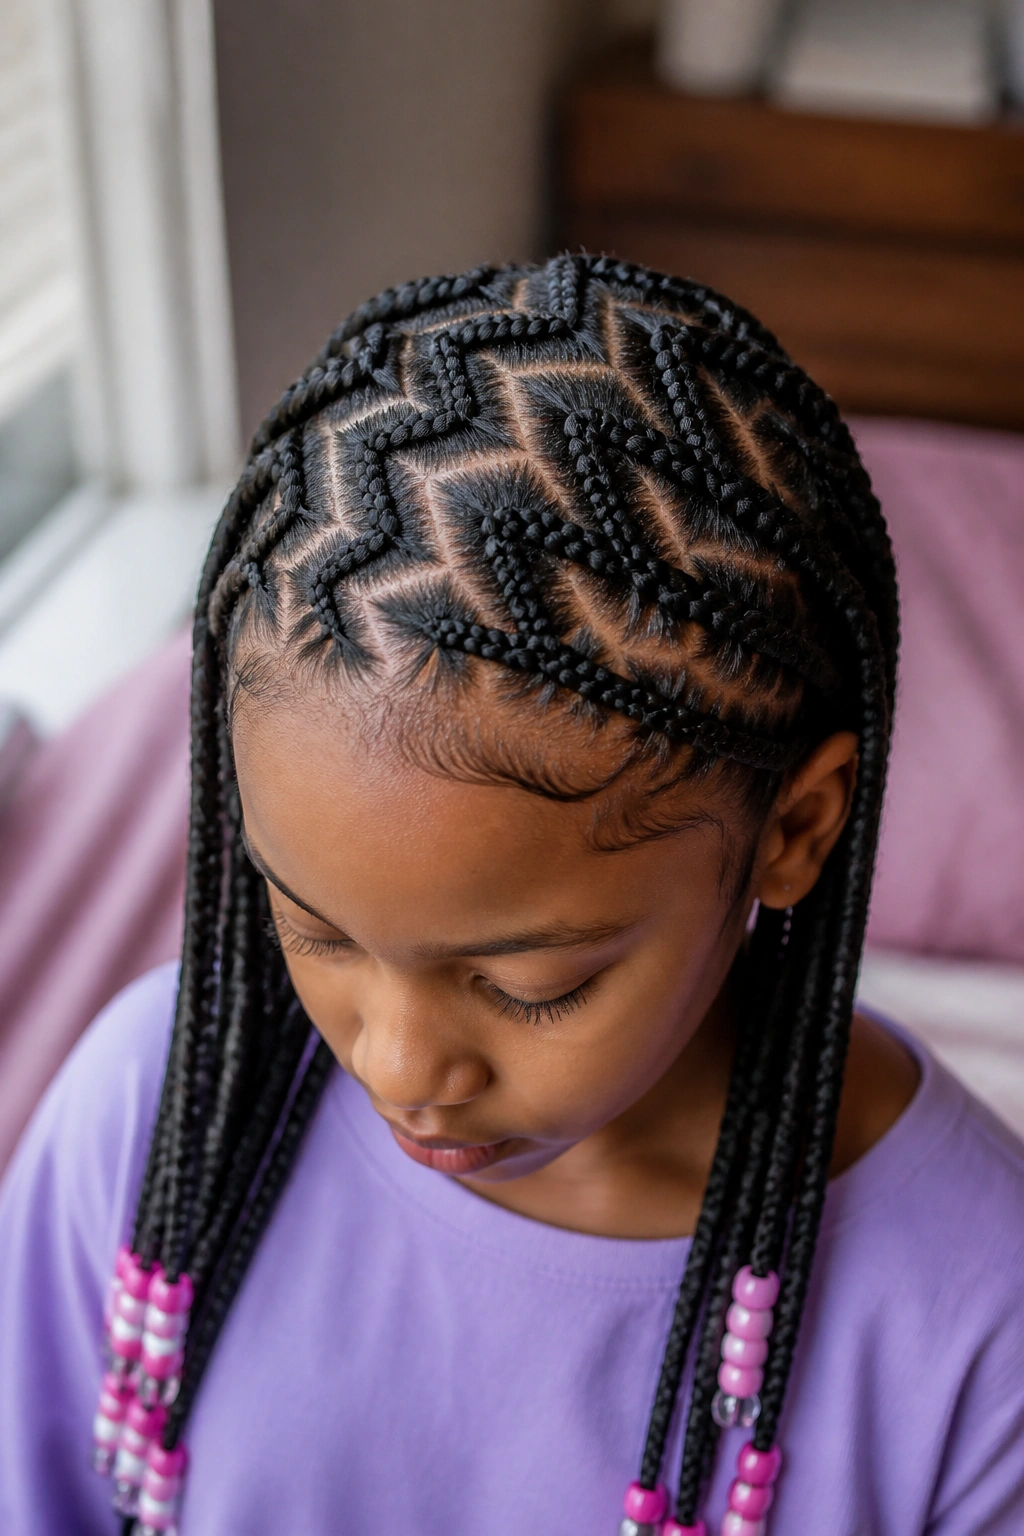
Zig-zag parts are a fun alternative to straight lines. They look like lightning bolts across the scalp and add a lot of energy to the hairstyle. Unlike adult zig-zag braids which can sometimes look a bit too “busy,” kid versions usually feature larger, bolder “zags” that are easier to maintain.
Unlike straight-back cornrows, zig-zags require you to constantly change the angle of your hands as you braid. This can be a bit of a workout for your wrists, but the result is worth it. The key to making these look good on 4C hair is to ensure that the “peaks” and “valleys” of the zig-zag are sharp.
This style is best for children who have a decent amount of hair length or those using extensions. The “feed-in” method is almost mandatory here because it allows you to build the braid’s thickness as you navigate the turns. Without the extra hair, the braid might look a bit thin at the “turns.” I recommend this for kids who have reached the age where they can sit still for about two hours, as the parting takes a bit more precision than usual.
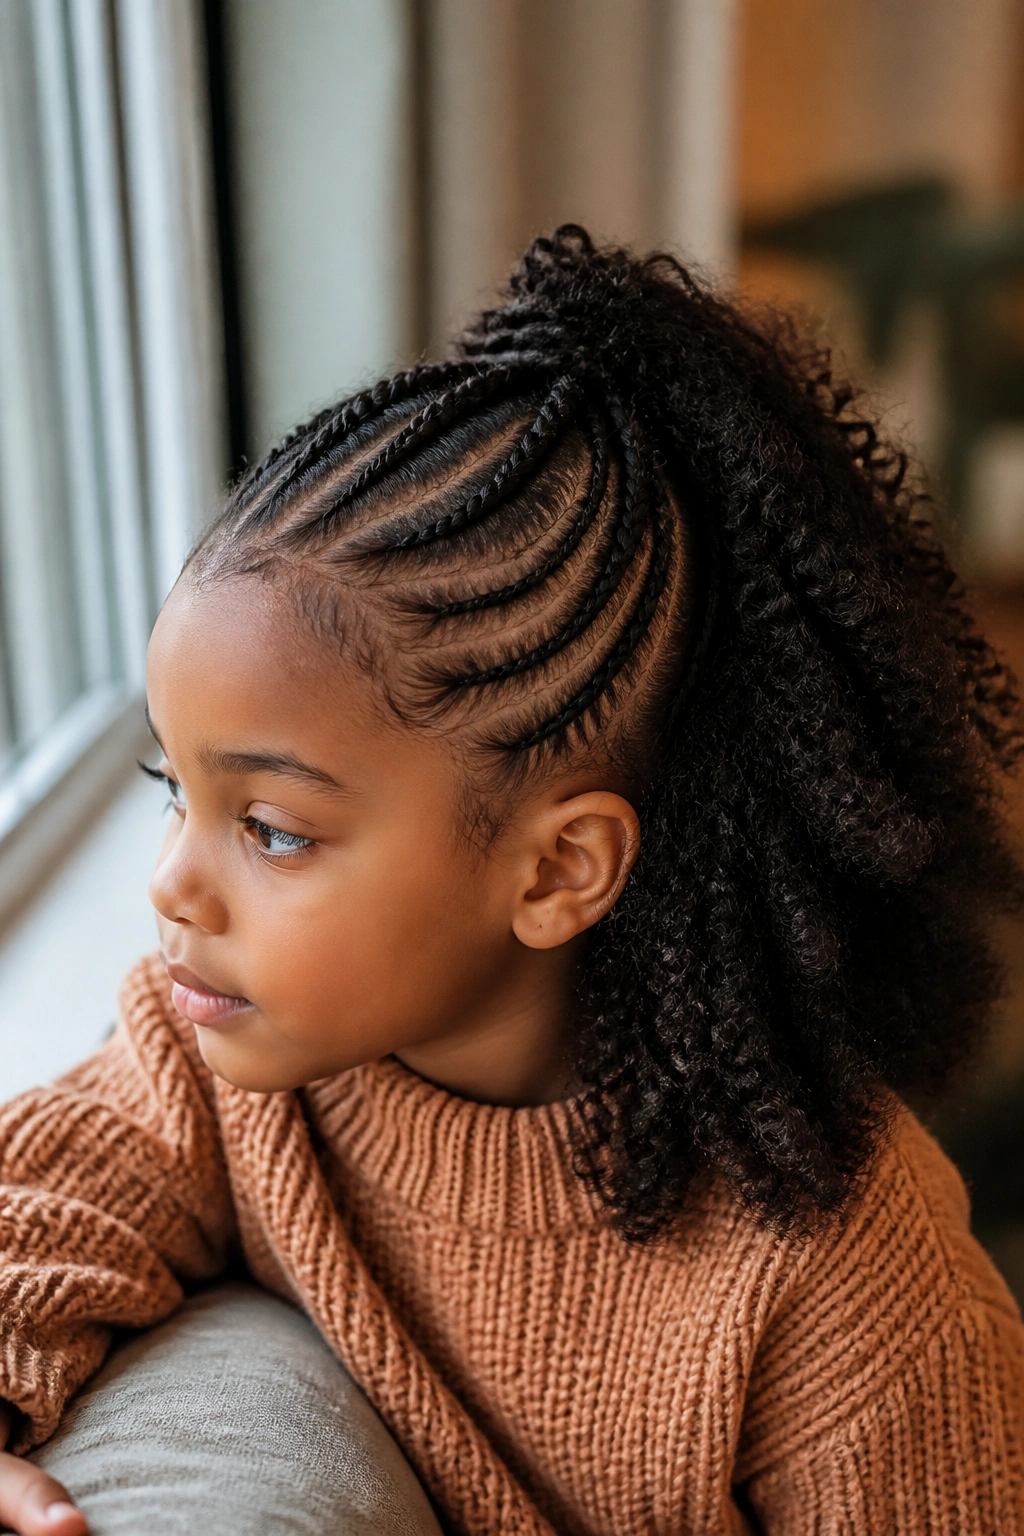
7. High Braided Ponytail with Curled Ends
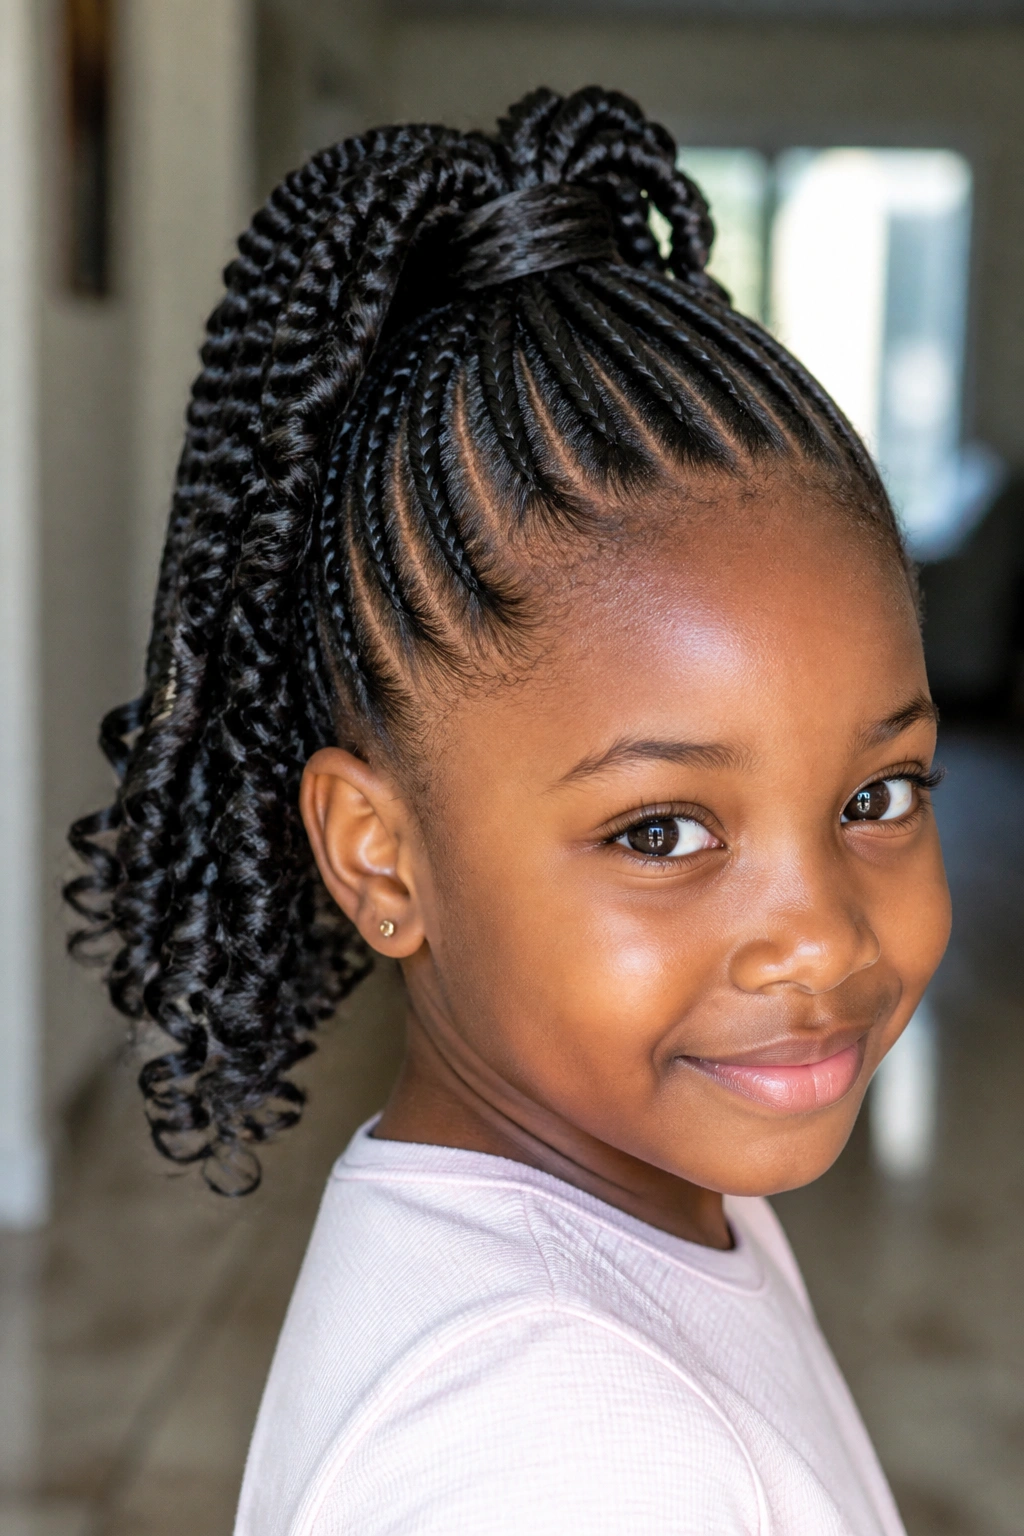
The high ponytail is a classic for a reason. It keeps the hair off the face and neck, making it the perfect choice for sports or warmer weather. By braiding the hair toward the crown and then finishing with loose, curled ends, you get a look that is both sporty and sweet. 4C hair holds curls exceptionally well, especially if you use the “perm rod” and hot water dipping method.
The Crown Construction
When braiding toward the center, you want to make sure the tension is even all around. If the back braids are tighter than the front, the ponytail will feel like it’s pulling. I like to start from the nape of the neck and work upward, then do the front and sides. This allows the center of the ponytail to act as the “anchor” for the entire style.
Quick Nutrition Facts for the Scalp
- Moisture: Use a spray-on braid sheen to keep the rows hydrated.
- Scalp Health: Apply peppermint oil to the crown to stimulate blood flow.
- Protection: Always use a silk scrunchie to secure the final ponytail to avoid breakage.
- Maintenance: Re-dip the curled ends in hot water (carefully!) every week to refresh the bounce.
Pro tip: For the loose ends, use a bit of setting mousse before rolling them on the rods. This gives the curls a “memory” so they don’t go limp after a few days of sleep.
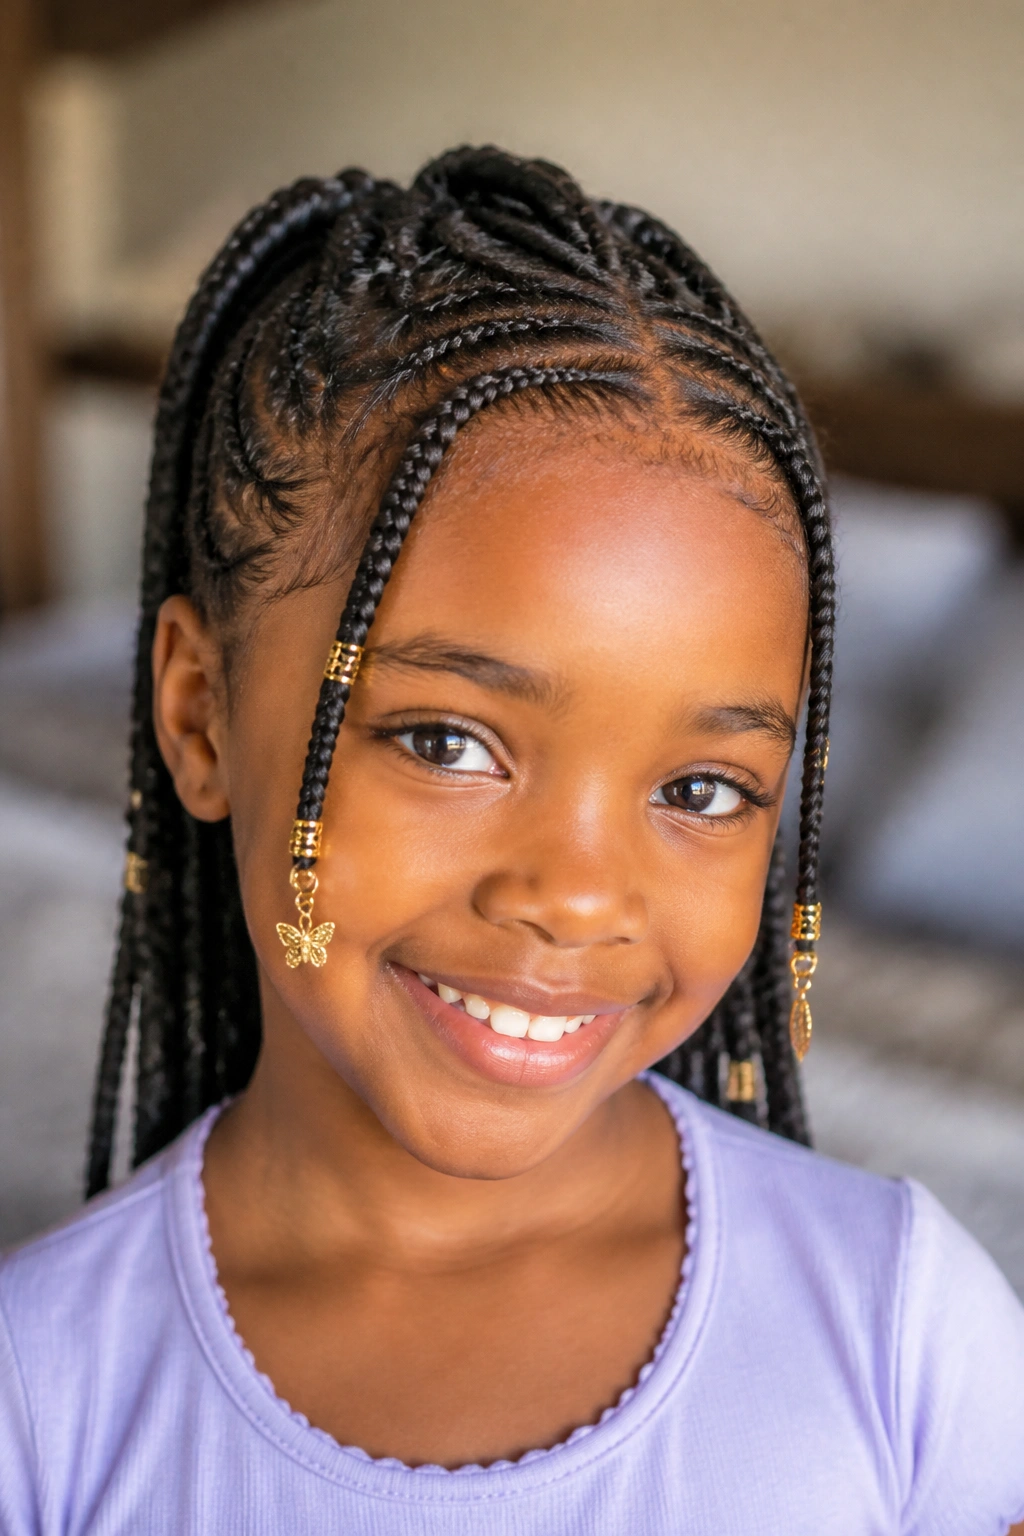
8. Knotless Box Braids with Mid-Length Taper
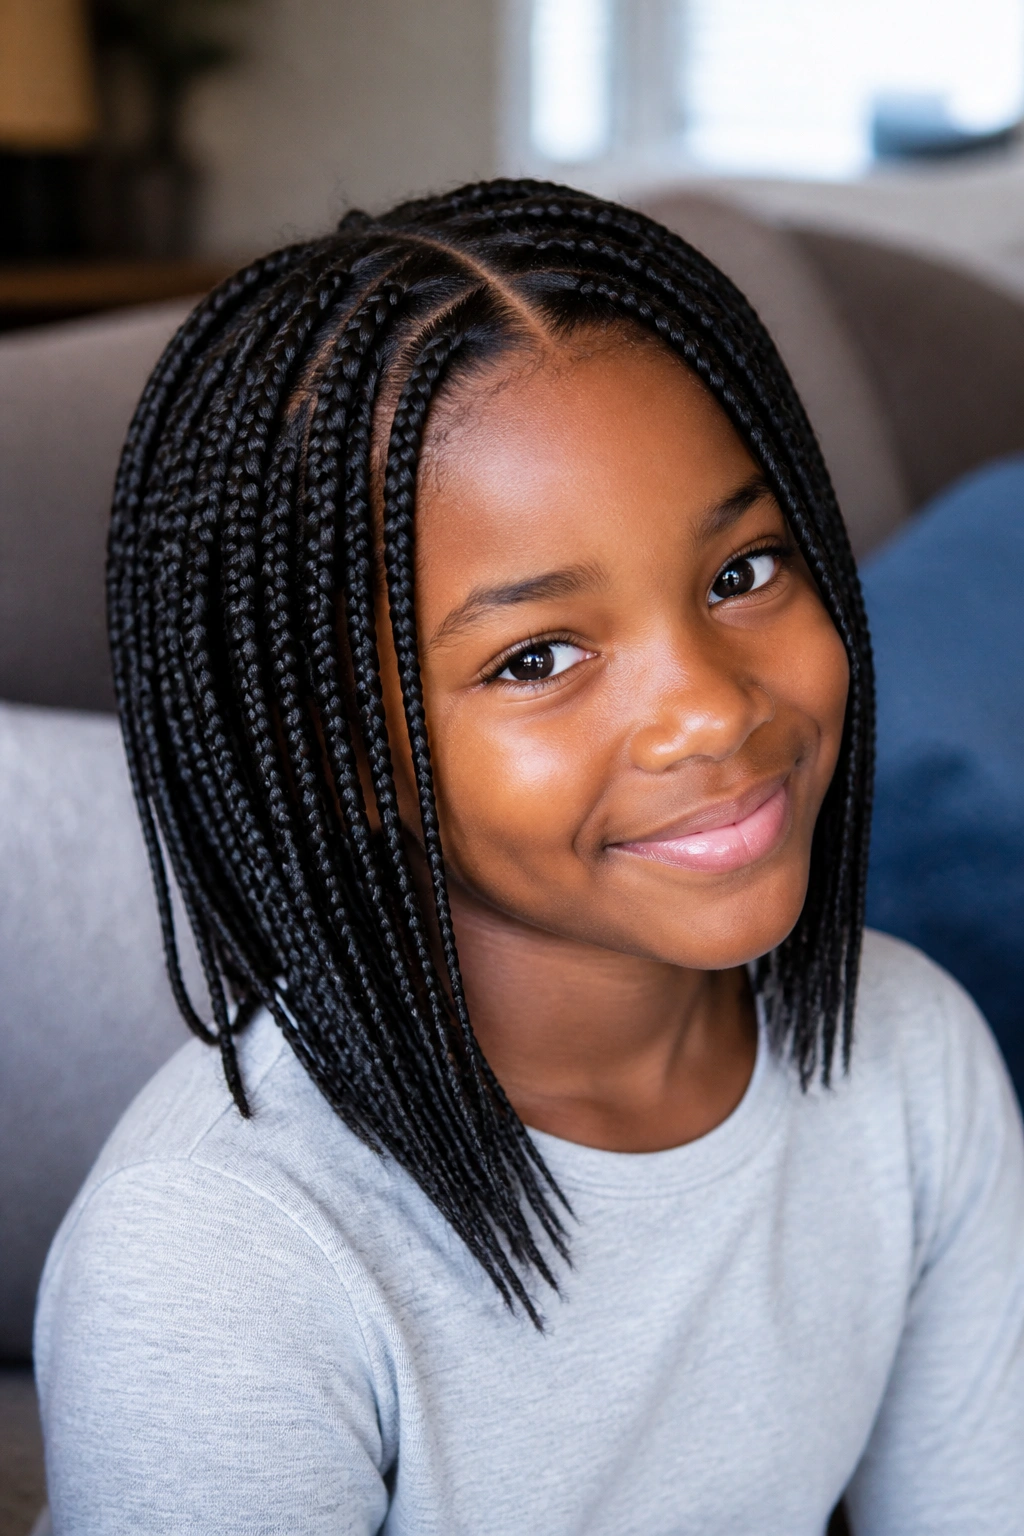
Knotless braids have revolutionized the way we think about kid braids on Type 4C natural hair. By starting the braid with the child’s own hair and gradually “feeding in” the extensions, you eliminate the heavy, tight knot at the scalp. This makes the style significantly more comfortable and reduces the risk of traction alopecia, which is a major concern for young, developing hairlines.
A bold claim I’ll make is that knotless braids are the “gold standard” for 4C hair. Because 4C hair can be prone to thinning at the temples, the knotless method provides a seamless transition that doesn’t put any weight on those delicate “baby hairs.” It allows the scalp to breathe and, most importantly, allows the braids to lay flat immediately. No more “stiff” braids for the first three days!
For a mid-length taper, have the braids end around the shoulders or mid-back. This is a manageable length for kids. They won’t get caught in backpack straps or zippers. To finish the look, you can taper the ends so they are thinner than the base, giving them a very natural, lightweight feel. It’s a chic look that makes any kid feel a bit more grown-up while still being age-appropriate.
9. Criss-Cross Frontal Cornrows
Why go straight back when you can cross over? Criss-cross cornrows involve taking two braids from the front and crossing them over each other before they continue toward the back. This creates an “X” pattern that looks like a beautiful woven basket. It’s a high-impact style that doesn’t actually take much longer than standard cornrows once you understand the “leapfrog” technique.
Why does this work so well for 4C hair? The texture of the hair provides a natural “lock” that keeps the crossed sections from slipping out of place. On silkier hair, the crossover point can sometimes look messy or loose, but on 4C hair, it looks like a solid, sculpted piece of art.
How to Style the Crossover
- Part the hair into four sections in the front.
- Braid the first section on the far left diagonally toward the right.
- Braid the section on the far right diagonally toward the left.
- Where they meet, literally “jump” the hair of one braid over the other and continue the pattern. Pro tip: Use a tiny bit of edge control at the intersection point to keep any stray hairs from poking out of the “X.”
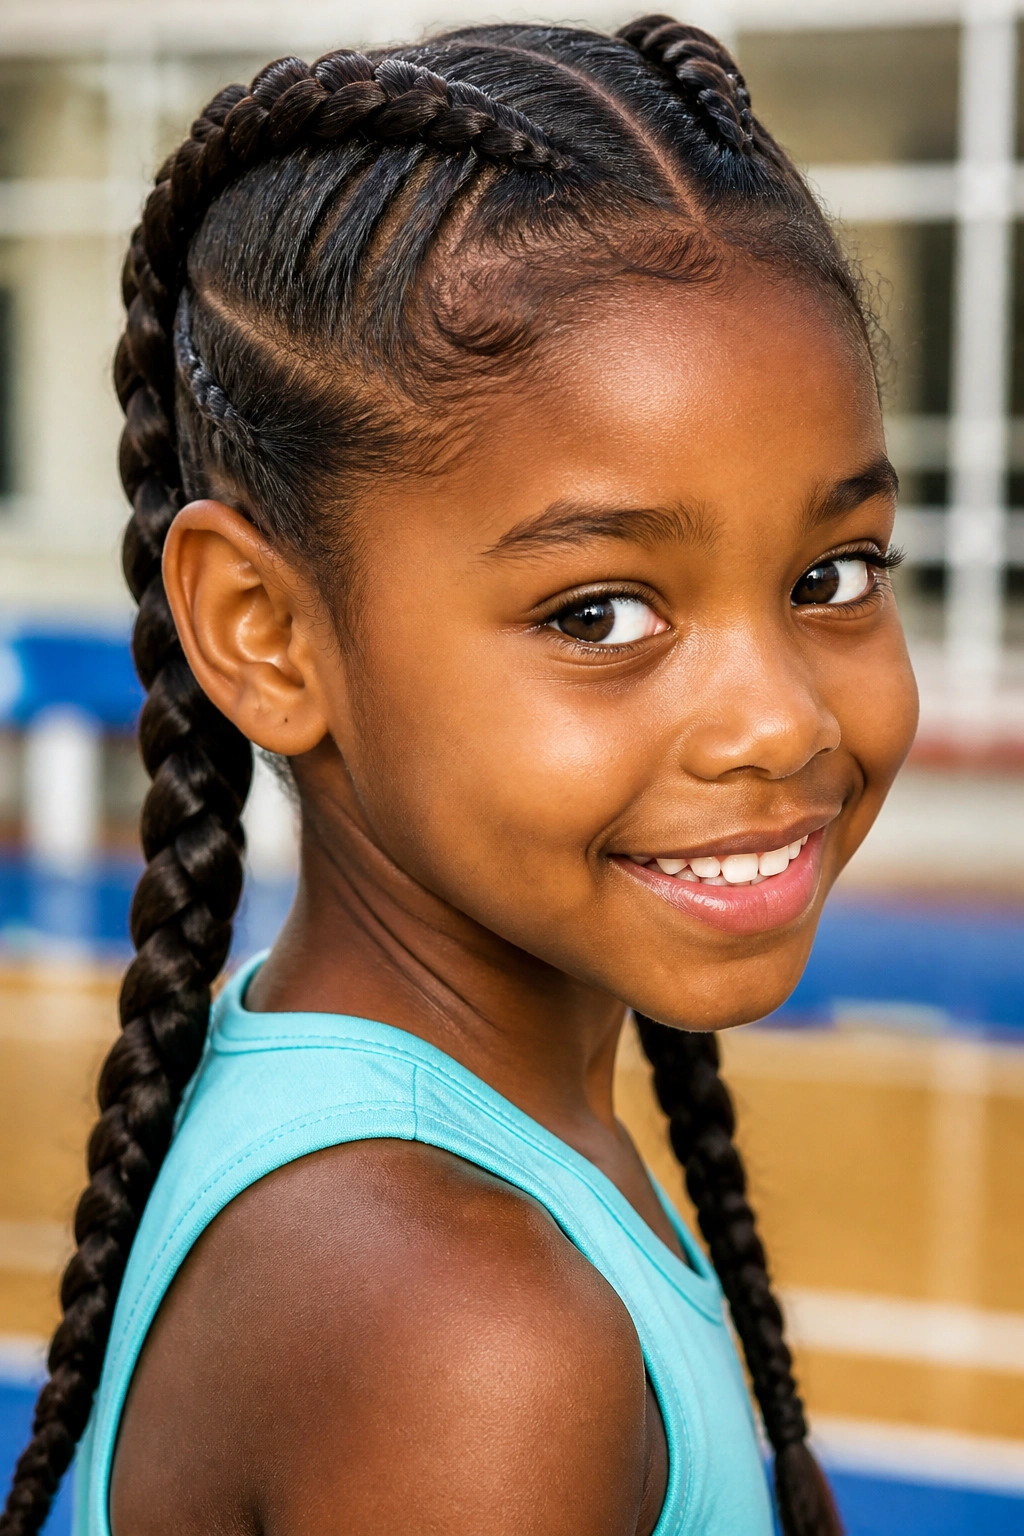
10. Side-Swept Lemonade Braids for Kids

Popularized over the years, these side-swept cornrows are often called “Lemonade Braids.” For kids, the side-swept look is incredibly flattering and provides a break from the usual “all-back” styles. It involves braiding the hair from one side of the head all the way across to the other, so the braids hang over one shoulder.
I once worked with a little girl who found that standard braids always got in her eyes when she was playing. The side-swept style was the perfect fix. It naturally directs the hair away from the face on one side and keeps it neatly gathered on the other. It’s a very “clean” look that stays tidy even after a long day at school.
The Science of the Side-Sweep
The challenge with side-swept braids on 4C hair is the “curving” of the parts. You aren’t drawing straight lines; you are drawing concentric arcs. Think of it like a rainbow starting at the ear and ending at the opposite shoulder.
- The Grip: 4C hair has “surface friction,” which is actually an advantage here. It keeps the arc of the braid from “sagging” down toward the face.
- The Ends: You can finish these with beads, shells, or simple knots.
- The Edges: Because one side of the head is very “exposed” with this style, pay extra attention to the edges. Use a soft-bristle brush and a moisturizing pomade to lay the baby hairs gently.
- The Verdict: It’s a high-style look that feels fancy but remains practical.
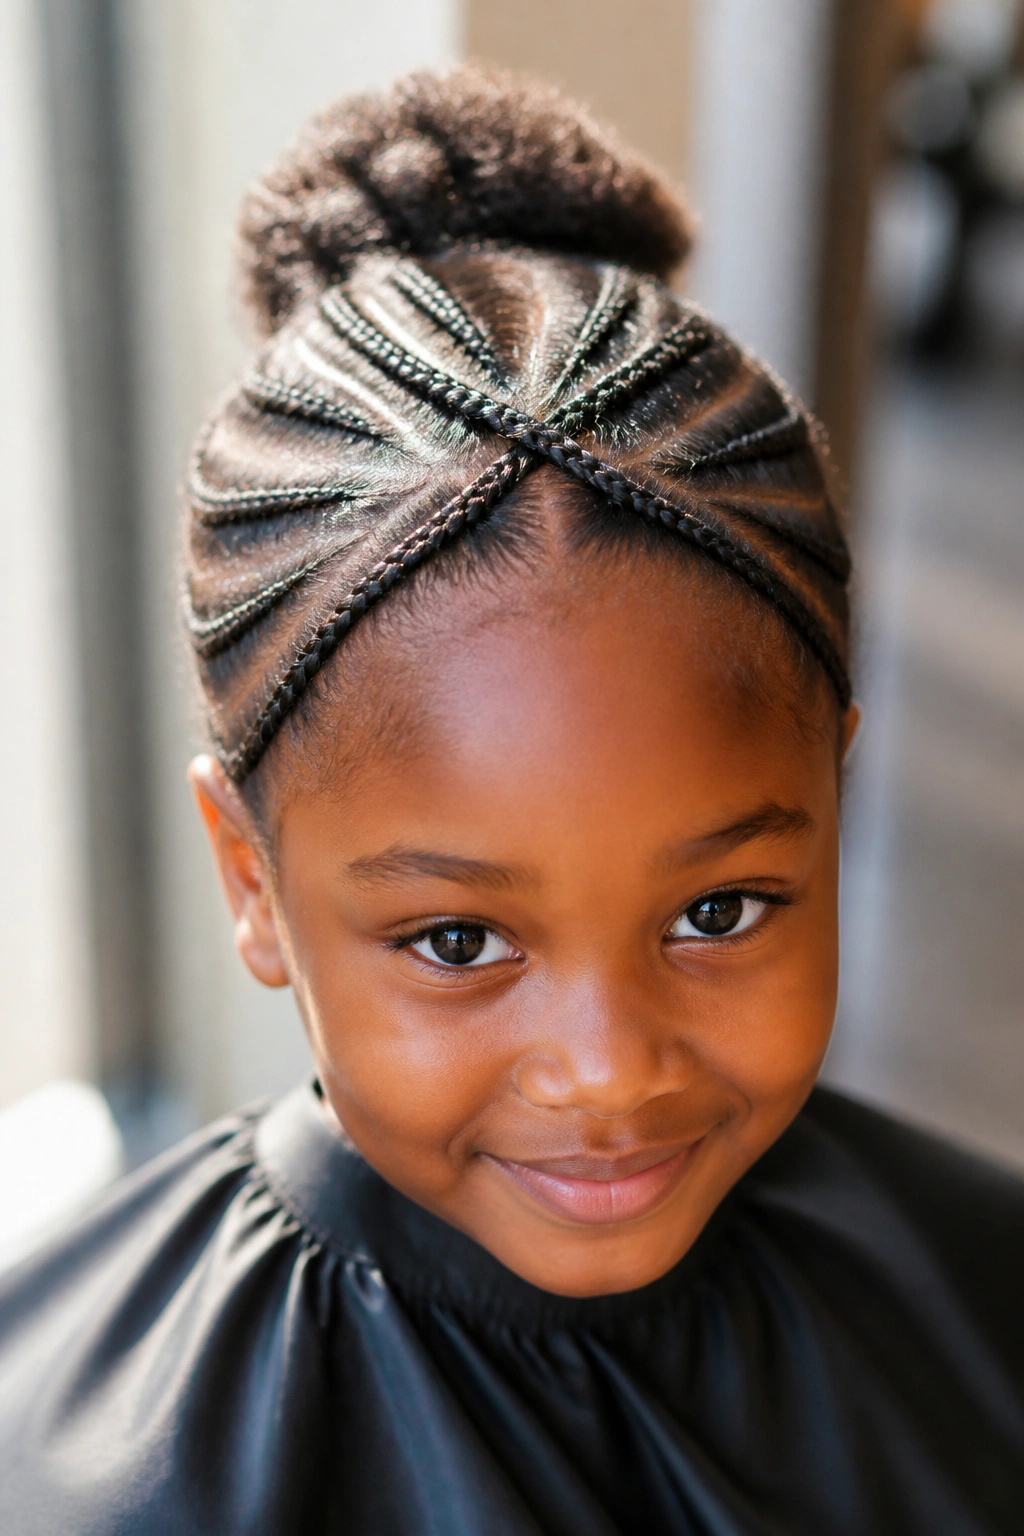
11. Braided Space Knots with Gold Cuffs
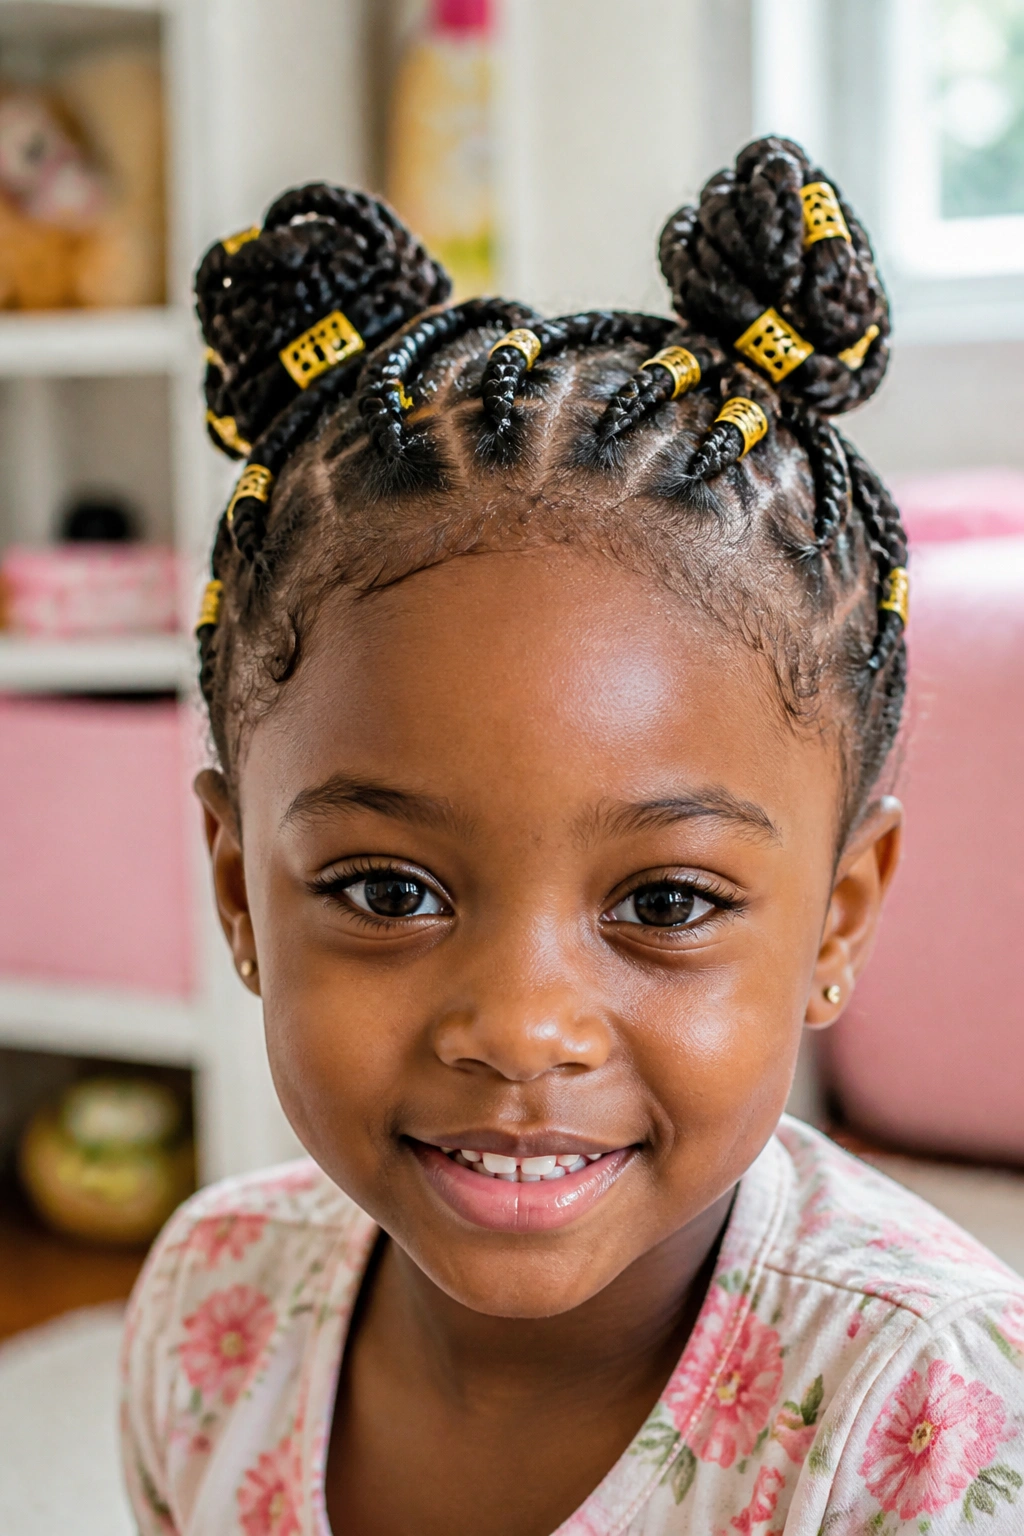
Space knots (or space buns) are a whimsical, fun style that kids absolutely adore. By braiding the hair first into several cornrows that lead into two large “buns” on top of the head, you create a look that is part-futuristic and part-classic. Adding gold cuffs or rings to the braids gives it a “royal” touch that stands out beautifully against 4C hair.
This style is pure prose in motion. The height of the knots draws the eye upward, celebrating the natural volume of the child’s hair. Even if you use extensions for the braids, the buns themselves can be a mix of the extension hair and the natural 4C puff. This “half-braided, half-puff” look is a great way to showcase the natural texture.
I find that space knots are particularly great for children who have a lot of energy. Since the hair is pinned up high, there is zero friction against the clothes, which means the ends of the hair are perfectly protected. The gold cuffs are the “icing on the cake.” They are easy to clip on and can be moved around whenever you want to change the look. It’s a style that feels like a costume in the best way possible.
12. Goddess Braids with Loose Spiral Ends
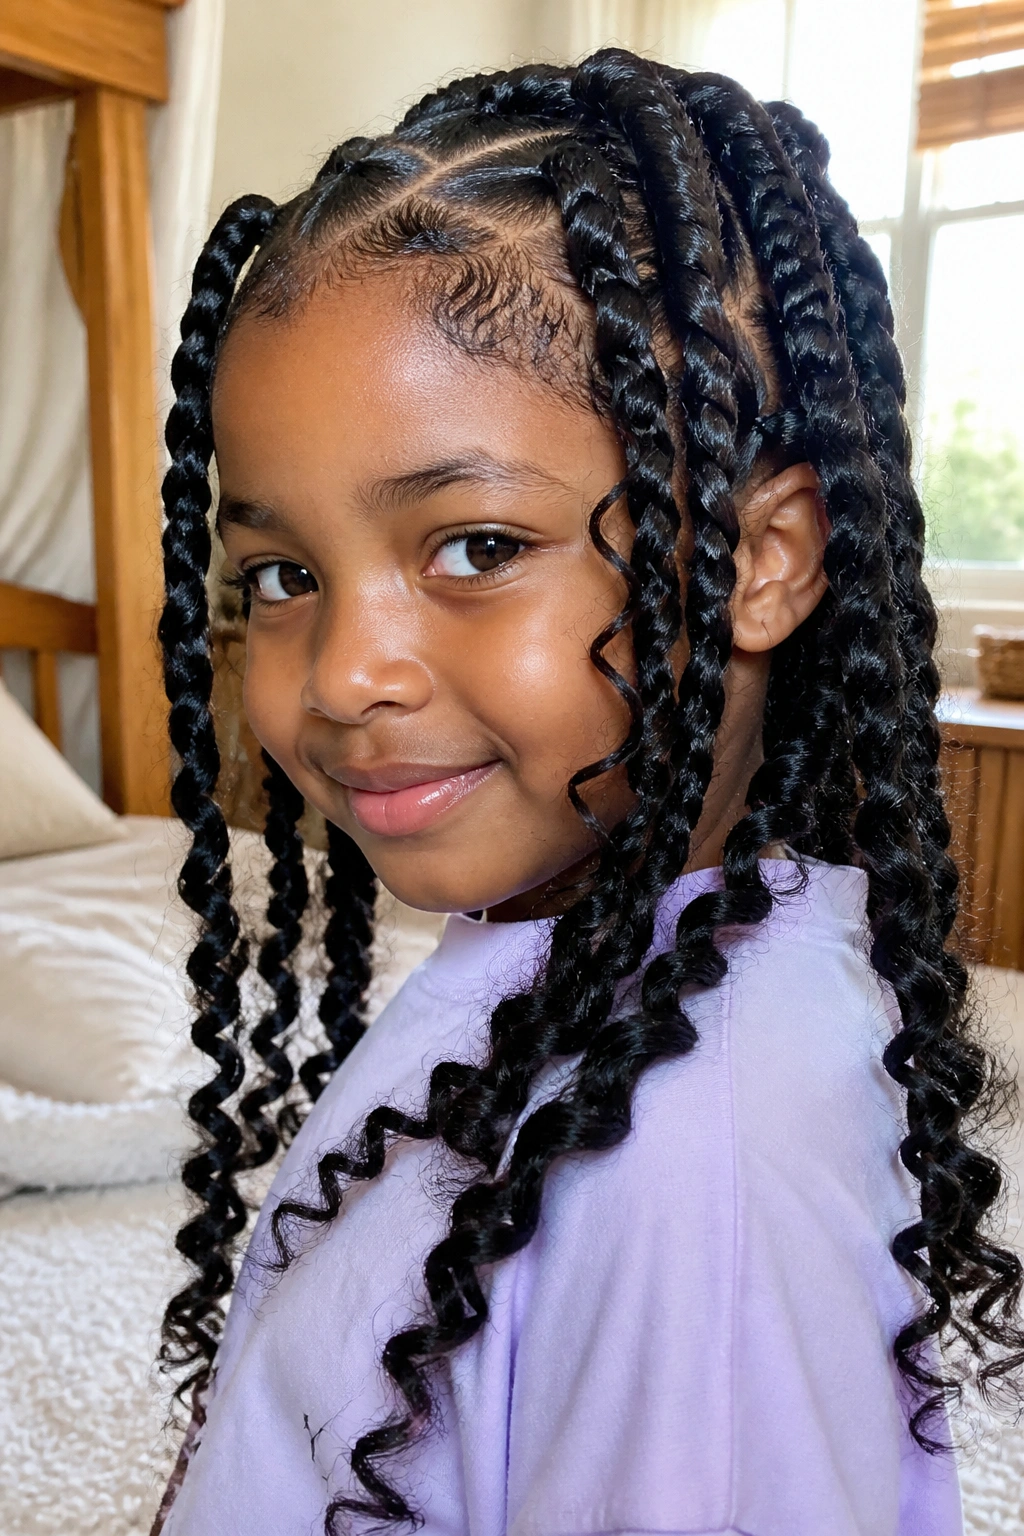
Goddess braids are essentially thicker, more elevated versions of cornrows. For kids, we usually do about four to six large braids. What makes them “Goddess” style is the inclusion of loose, curly tendrils that peek out from the braids or the addition of long, spiral curls at the very ends. It’s a soft, ethereal look.
Comparison: Standard Cornrows vs. Goddess Braids
Unlike standard cornrows which aim for a uniform, flat look, Goddess braids are meant to be 3D. They sit higher on the scalp and have more volume. On 4C hair, this is achieved by using a bit more “feed-in” hair to give the braid a “jumbo” appearance.
- The Texture: 4C hair provides the perfect “mat” for the braids to sit on, ensuring they don’t slide.
- The Maintenance: These are slightly more high-maintenance because the loose curls can tangle. You’ll need to apply a bit of mouse or oil to the curls every morning.
- The Best Fit: This is a perfect “special occasion” style—think weddings, holidays, or school pictures.
- The Recommendation: If your child is a very “rough” sleeper, skip the loose tendrils and just do the spiral ends. It’ll save you a lot of detangling time.
13. Fishbone Cornrows with Thick and Thin Patterns
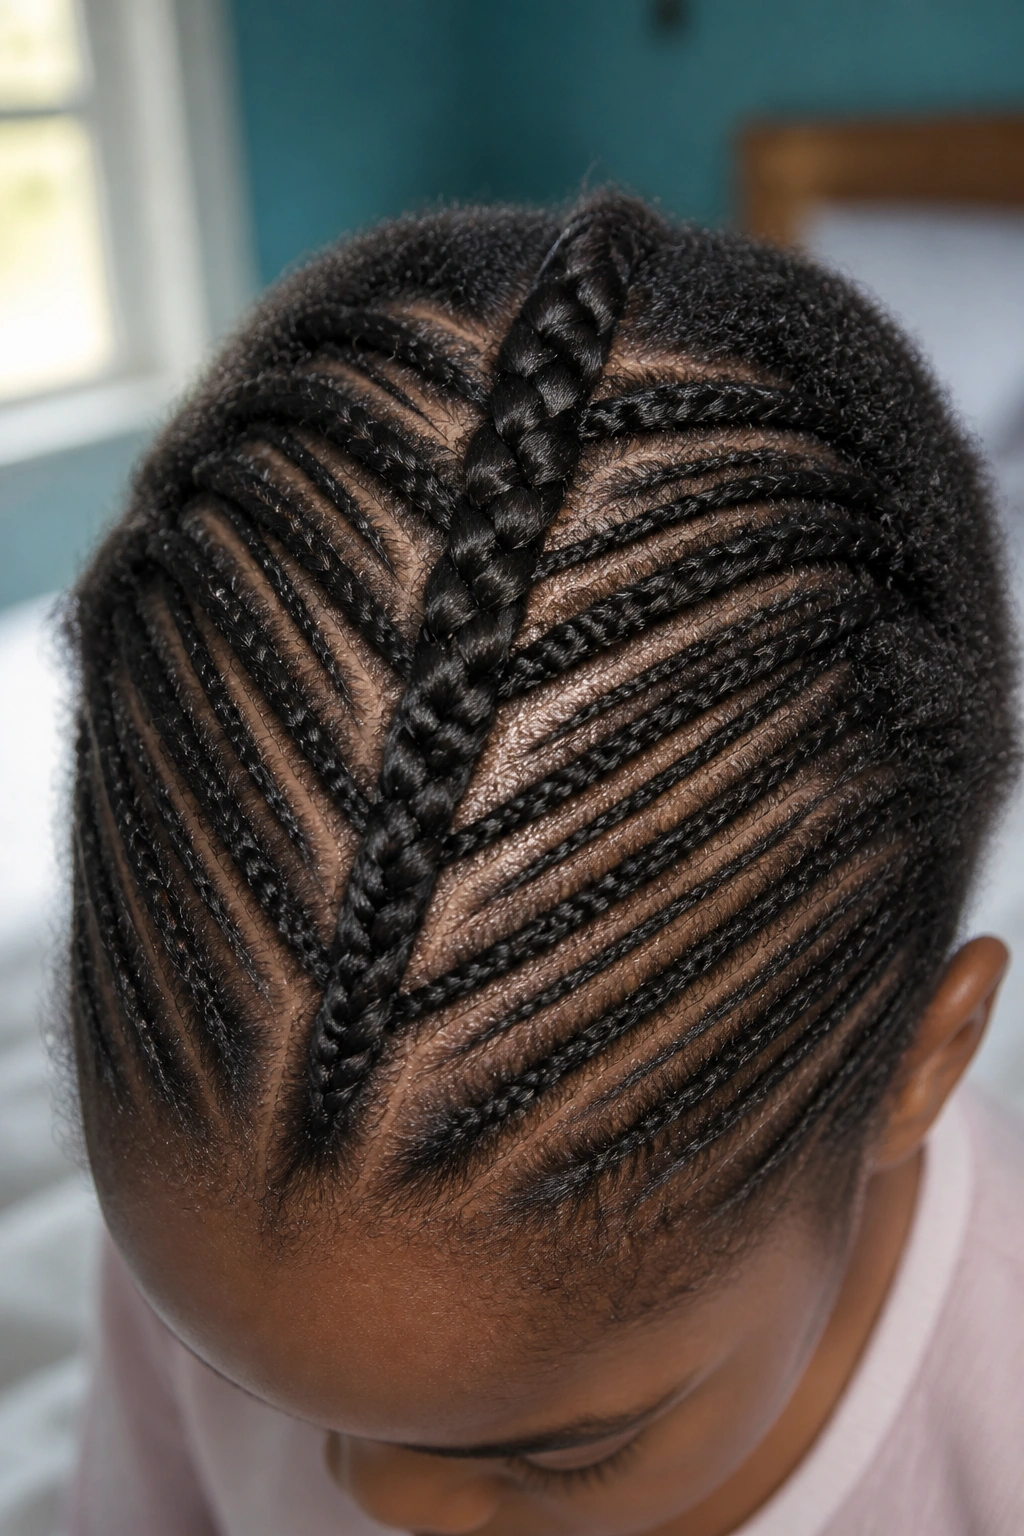
The fishbone technique is a masterpiece of geometry. It involves a main “central” braid with smaller, thinner braids feeding into it at an angle—much like the skeleton of a fish. For 4C hair, this is a fantastic way to manage high density. You are essentially taking many small sections and consolidating them into a few large, manageable braids.
The Rhythm of the Fishbone
The visual appeal here comes from the contrast. You have these tiny, intricate lines meeting a thick, bold braid. It creates a sense of depth and complexity. Because 4C hair is so “sturdy,” these patterns stay in place for a long time. You don’t have to worry about the thin braids becoming fuzzy or lost in the texture.
Quick Facts
- Complexity: High. This requires a bit of experience with parting.
- Tools: A metal-tipped rat-tail comb is non-negotiable for those tiny “fishbone” lines.
- Scalp Care: Because there are more parts, the scalp is more exposed. You must be diligent with sunscreen (yes, for the scalp!) if the child is playing outside for long periods.
- Weight: Surprisingly light, as the weight is distributed across many small braids before joining the big one.
Pro tip: When doing the “thin” braids, don’t use extensions. Use only the natural hair. Then, add the extension hair only to the “thick” main braid. This creates a beautiful, natural-looking contrast.
14. Jumbo Box Braids for Quick Styling
Sometimes, you just don’t have five hours to spend on hair. Enter: jumbo box braids. By taking much larger sections (about 2 inches square), you can finish a whole head in under two hours. For 4C hair, jumbo braids are a match made in heaven. The hair’s natural thickness fills out the base of the jumbo braid, making it look lush and full rather than “gappy.”
Is it true that jumbo braids are too heavy? Not if they are done correctly. The trick is to ensure the sections are clean and that you aren’t using too much extension hair. If the braid is thicker than the child’s wrist, it’s too big. You want a “chunky” look that still feels light.
Because there are fewer braids, you have more scalp access. This makes washing and moisturizing the scalp incredibly easy during the “on” time. I love jumbo braids for a quick vacation style or for the weeks leading up to a major holiday. They have a certain “cool factor” that older kids especially love, and they are the easiest style to take down.
15. Two Pigtail Braids with Zig-Zag Parting
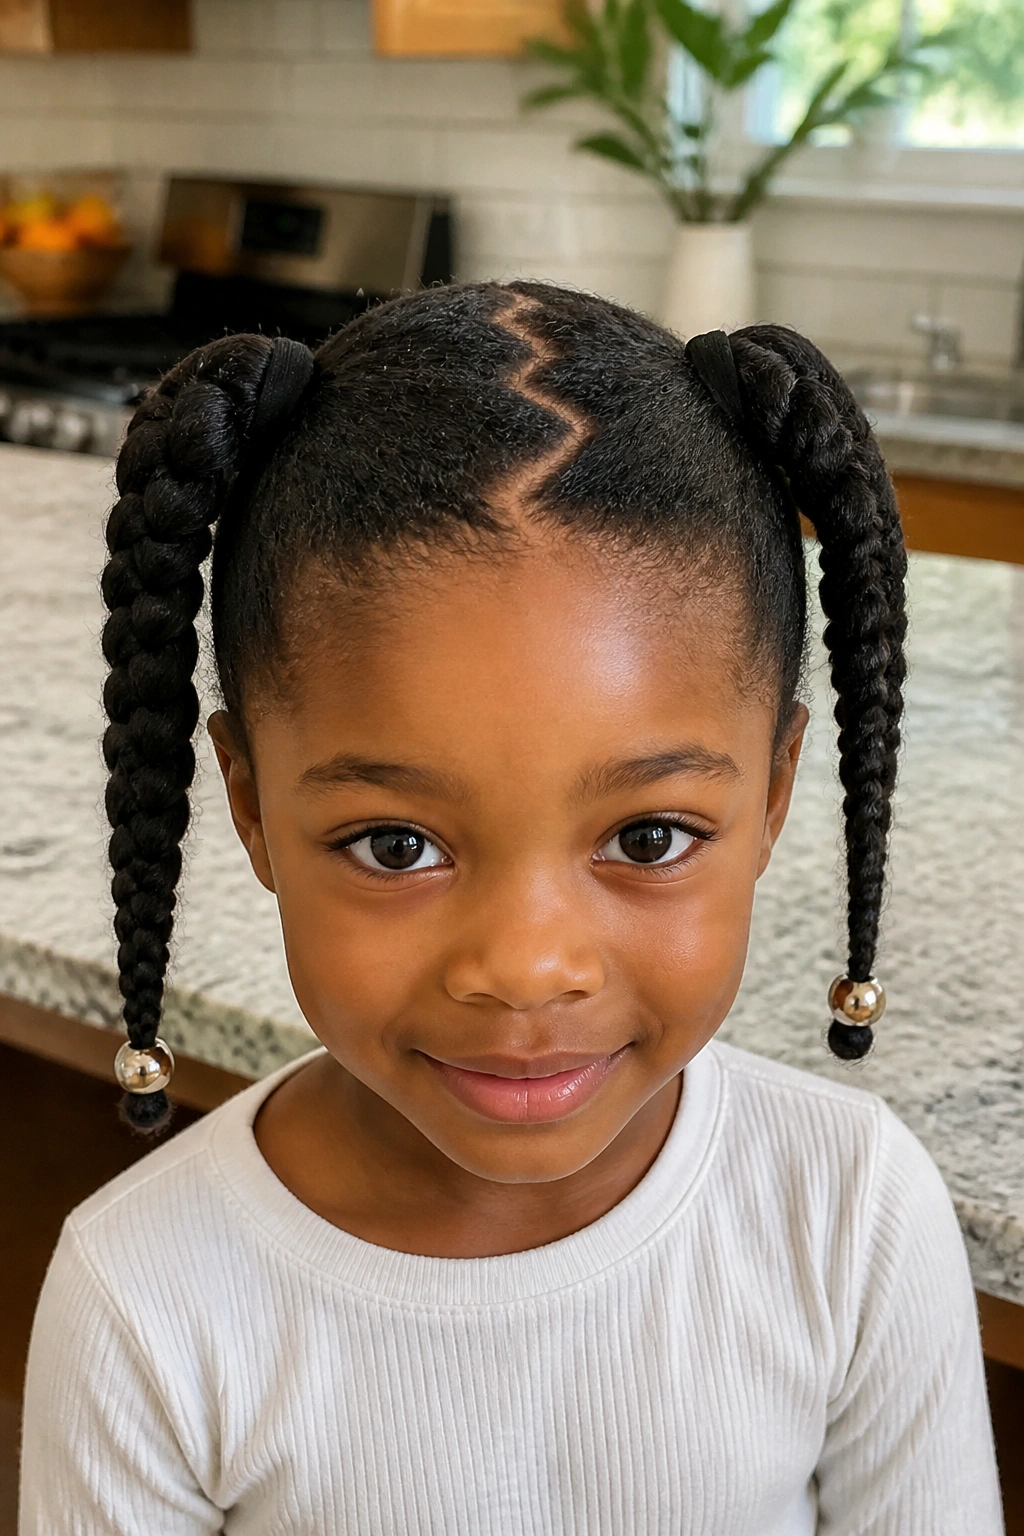
Is there anything more classic than two pigtails? For 4C hair, this style is a staple. But to give it a bit of “flair,” we replace the straight middle part with a bold zig-zag. This small change transforms the look from “nursery school” to “style icon.”
Why the Zig-Zag Middle Part?
A straight part on 4C hair can sometimes look a bit “stiff.” The zig-zag adds movement and interest. It also helps to disguise any areas where the hair might be slightly thinner, as the zig-zag creates a visual “fullness” along the part line.
How to Execute This Perfectly
- Use a heavy-duty styling gel to get the hair smooth before you start the two main braids.
- Braid the hair tightly at the start to ensure the zig-zag stays visible.
- Add “feed-in” hair if you want the pigtails to be long and dramatic.
- H3: The Finish
- Add two large “bauble” ties at the ends for a nostalgic look.
- Or, leave the ends curly and fluffy to show off the 4C texture.
- A bit of gold wire wrapped around one of the pigtails can add a “boho” vibe.
16. Braided Mohawk with Cornrowed Sides
For a child with a lot of personality, the braided mohawk (often called a “Fro-hawk” or “Braid-hawk”) is a winner. The sides are cornrowed upward toward the center of the head, and the middle section is either braided into a tall ridge or left out as a series of “puffs.”
This style is a narrative of confidence. It’s bold, it’s edgy, and it’s surprisingly protective. Because the hair is all directed toward the center, the ends are tucked away or gathered into a “pomp” that is easy to moisturize.
The Mechanism of the Mohawk
- The cornrows on the side should be very neat and close together. This creates a “faded” look without actually cutting any hair.
- The center section can be done in “Bantu knots” or “braided buns.”
- Bullets for Success:
- Keep the side cornrows thin to emphasize the height of the center.
- Use a firm-hold gel for the sides but keep the center section soft.
- This style is great for showing off earrings or face-framing accessories. Insight: This is one of the best styles for 4C hair because it embraces the hair’s natural tendency to grow “up and out” rather than just “down.”
17. Bantu Knots with Braided Bases
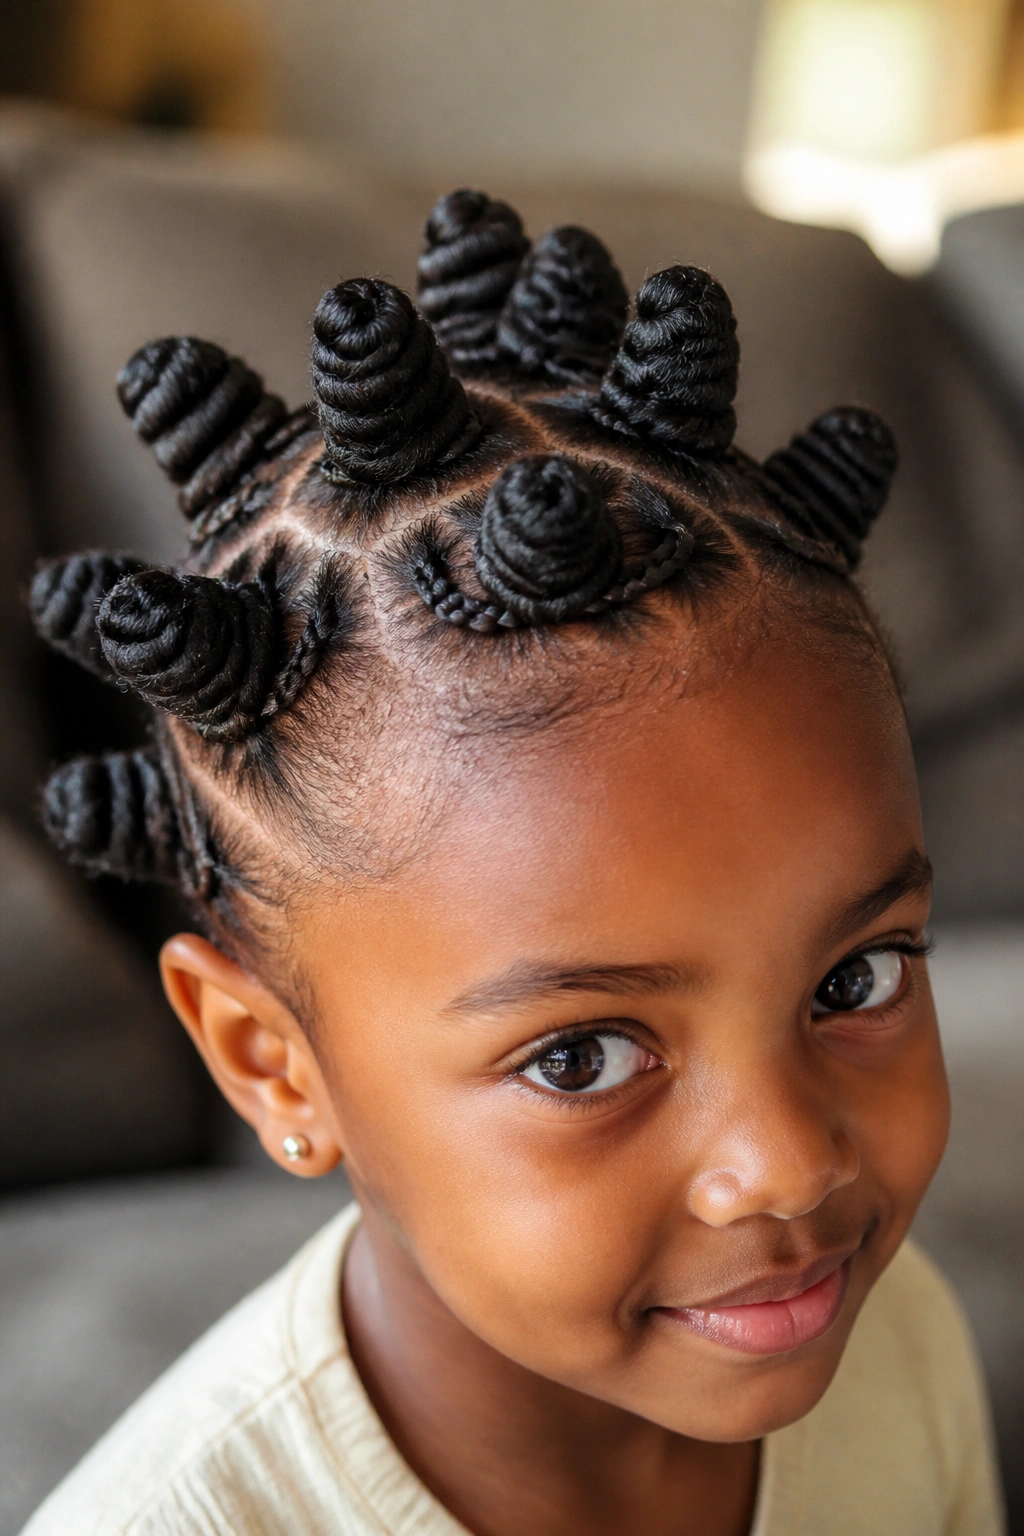
Bantu knots are a traditional African hairstyle that has stood the test of time. For 4C hair, they are a powerful statement. By braiding the hair first and then wrapping the braid into a knot, you get a “structured” Bantu knot that stays secure much longer than a twist-based one.
This is pure 4C magic. The knots look like little crowns across the head. You can do as few as four or as many as twenty. The braided base is the key; it prevents the knot from unravelling when the child is sleeping or playing.
I recommend Bantu knots for “transition” weeks—when you want the hair protected but also want to be able to take it down in a few days for a “knot-out” (curly style). To make them look extra special, use a bit of “shimmer spray” or add a tiny jewel to the center of each knot. It’s a look that celebrates the “sculptural” quality of 4C hair.
18. Half-Up Half-Down Cornrows and Curls
Can’t decide between braids and showing off the natural puff? Do both. This style features cornrows on the top half of the head, leading into a ponytail or a headband, while the back half is left as a voluminous 4C afro or defined curls.
Comparison: All-Braided vs. Half-Down
- Visual Impact: The half-down look is much more “voluminous” and showcases the child’s natural texture more than a full head of braids.
- Complexity: Medium. You only have to braid half the head, which is a time-saver!
- Maintenance: Higher. You have to manage the “loose” hair in the back, which means daily moisturizing and detangling.
- Recommendation: This is a great “Friday” style—braid it for the weekend, and then you can transition the back into a bun for school on Monday.
19. Braided Halo with Floral Accessories
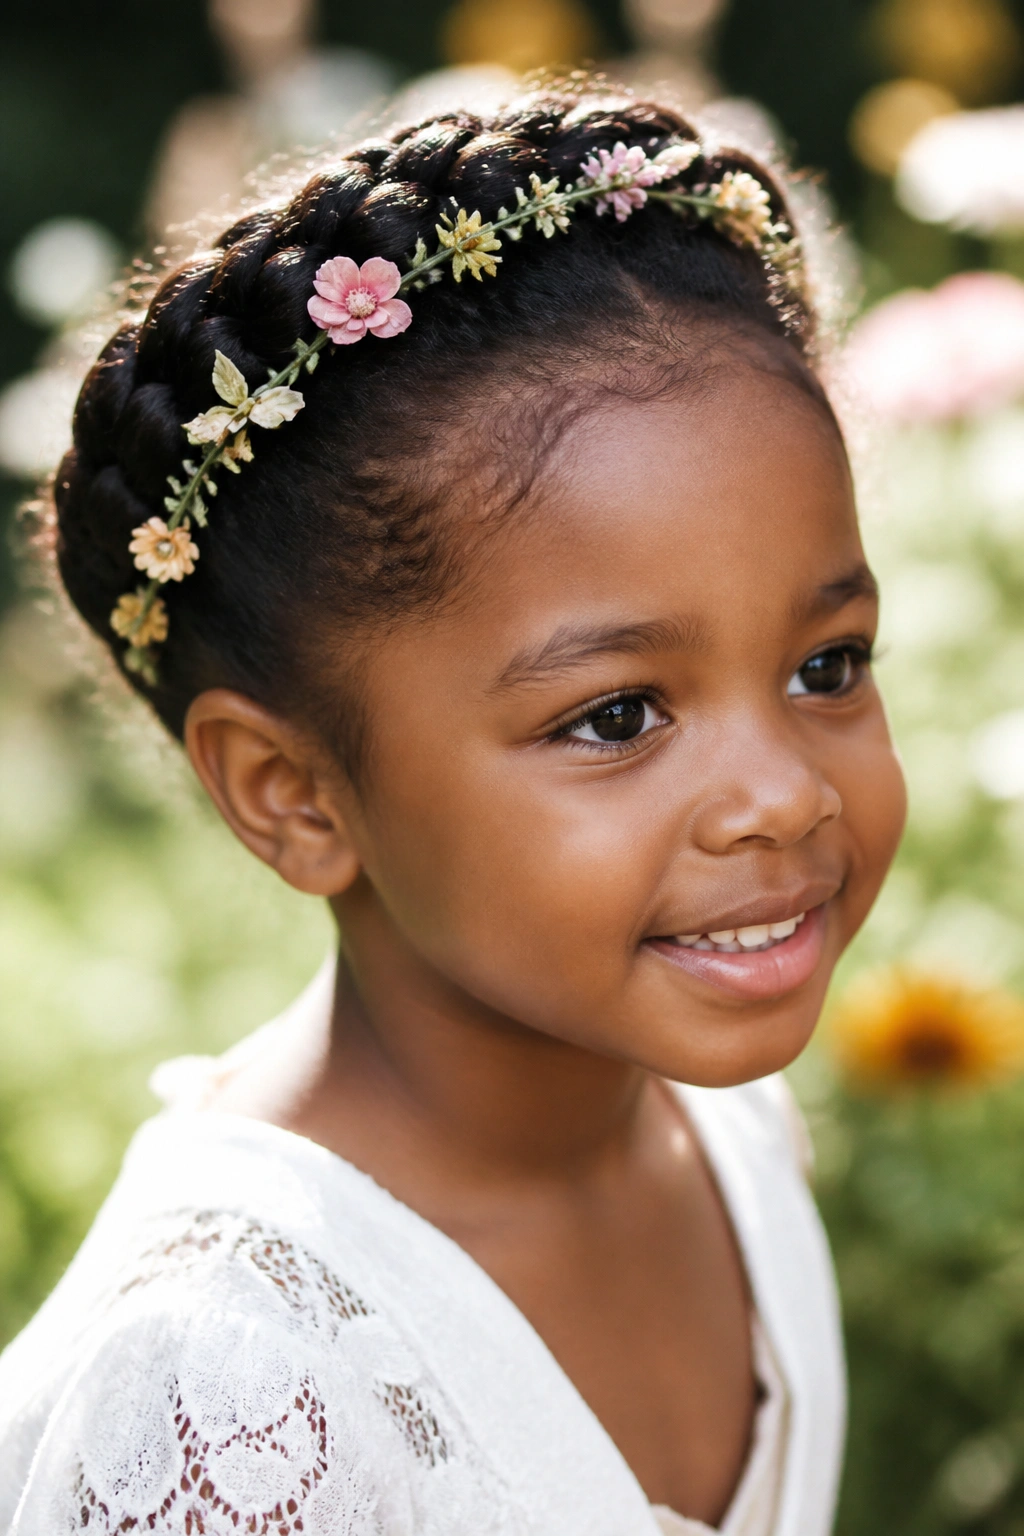
The halo braid (or crown braid) is a single or double braid that wraps all the way around the head. It’s the ultimate “angelic” look. For children, adding small silk flowers or “butterfly” clips along the braid makes it look like a woodland crown.
The Circle Technique
The trick with a halo braid on 4C hair is to keep the braid “on the edge” of the hairline without pulling the edges too tight. You are essentially doing one long French braid in a circle.
- The Grip: Start at the nape and work your way around.
- The Thickness: Use extensions if the natural hair isn’t long enough to make the full circle.
- The Accents: Tuck the ends of the braid under the start so it looks like a seamless loop. Pro tip: This is the best style for “toddler” 4C hair that might be a bit shorter in some areas, as the “wrap-around” hides a lot of length variations.
20. Dutch Braids for Active Kids
Dutch braids (often called “reverse French braids”) are where the hair is braided under rather than over. This makes the braid sit on top of the hair, looking like a 3D ridge. For active kids—the gymnasts, the dancers, the soccer players—Dutch braids are the most secure.
These braids aren’t going anywhere. Because the hair is tucked under, the “weave” is incredibly tight and resistant to frizz. On 4C hair, the Dutch braid looks like a thick rope, showcasing the strength of the hair.
I suggest doing two large Dutch braids (pigtail style). It’s quick, it’s clean, and it looks just as good on day seven as it did on day one. If the child has a lot of “flyaways” due to the 4C texture, use a bit of mousse after braiding and tie the head down with a silk scarf for 10 minutes to “set” everything in place.
21. Tribal Braids with Face-Framing Charms
Tribal braids usually feature a mix of techniques—cornrows in the front, box braids in the back, and often “side-hanging” braids. Adding charms, like small silver “Ankhs” or colorful plastic shapes, gives the style an ancestral, cultural feel.
Why Tribal Styles Resonate
For 4C kids, this style is a bridge to heritage. It’s a way to feel connected to a broader history while looking incredibly cool. The mix of textures (flat cornrows vs. hanging braids) provides a lot of visual “rhythm.”
How to use accessories safely:
- Never put charms or beads too close to the scalp; they can pull.
- Use “snap-on” beads for younger kids to avoid the “rubber band” breakage.
- If using rings, make sure they are “seamless” so they don’t snag the 4C coils.
- Insight: Tribal braids are a “growth” style—they look even better as they age and the natural 4C texture begins to “fuzz” slightly at the roots, giving it a very authentic look.
22. Snake Braids with S-Curve Patterns

Snake braids are a variation of cornrows that curve back and forth in an “S” shape. It’s a very fluid, “flowy” style that breaks up the rigid lines of traditional braiding.
Snake braids on 4C hair look like ripples in water. The density of the hair means the “S” curve is very pronounced and deep. It’s a hypnotic look that people always ask about.
The Mechanism of the “S”
- You have to lead the hair with your leading finger. As you reach the “turn,” you shift your body position.
- Bullets for the “S” curve:
- Don’t make the curves too tight, or the scalp will show too much in the corners.
- Use a “shine jam” to keep the curves looking glossy.
- This is a great style for kids with “thick” 4C hair, as the curves help to distribute the volume.
23. Micro Braids with Tucked-In Ends

Micro braids (tiny, thin braids) were historically popular and have remained a favorite for those who want a “loose hair” look without the maintenance of an afro. For kids, however, we do “mini” rather than “micro” to save time and hair health.
Micro-style braids are pure prose. They allow the hair to move and swing like loose hair. When you tuck the ends in (using a crochet needle or by folding them), you create a “bob” look that is very sophisticated.
The key here is “tension awareness.” Tiny braids can be the enemy of the 4C hairline if done too tight. I only recommend these for children with very healthy, strong hair. But if done correctly, they can last for six weeks, making them the ultimate “long-haul” protective style.
24. Butterfly Braids with Soft Fluffy Edges
Butterfly braids are a “distressed” version of feed-in braids. As you braid, you pull out small loops of hair to create a “wing” effect. It’s a very soft, romantic look.
Comparison: Neat vs. Butterfly
- Look: Neat braids are all about precision; Butterfly braids are all about “beautiful messiness.”
- Texture: 4C hair is the only hair type that can do butterfly braids perfectly. The “kink” in the hair keeps the loops from sliding back into the braid.
- Best for: Kids who want a “big” look. These braids are chunky and wide.
- Recommendation: Use a “water wave” extension hair to get that extra fluffy butterfly look. It blends seamlessly with 4C texture.
25. Candy-Cane Braids with Two-Tone Extension Hair
Candy-cane braids involve using two different colors of hair (usually the natural color and a fun pop like pink or blue) and “twisting” them together as you braid. This creates a “spiral” effect that looks just like a candy cane.
This is the “fun” style. Kids love picking out their own colors. On 4C hair, the colors look vibrant and distinct.
- Structure A Opening: Start with a bright color at the nape and work it through to the ends.
- H3: Color Blending
- Use a “pre-mixed” hair for a subtle look.
- Or, use two solid blocks of color for a bold “candy” look.
- Bullets for Color:
- Always check that the colored hair is “itch-free” or pre-washed in apple cider vinegar.
- Keep the color at the “ends” if you are worried about school dress codes. Pro tip: Use a color that complements the child’s skin tone—warm golds and deep reds look stunning on 4C complexions.
26. Vertical Cornrows with a Beaded Fringe
Instead of braiding front-to-back, vertical cornrows go from one side of the head to the other, or from the crown down toward the ears. Finishing these with a “fringe” of beads over the forehead or ears creates a very traditional, “Cleopatra” inspired look.
The click-clack of the beads is the soundtrack to childhood. This style is very “audible.” On 4C hair, the vertical rows provide a unique “lift” to the face.
I find that vertical rows are actually easier to do on 4C hair because you aren’t fighting the natural “swirl” of the hair at the crown. You are working with the natural fall of the hair. Just make sure the beads are secured with a “double knot” or a small rubber band so they don’t go flying during recess!
27. Flat Twists into a Low Braided Bun
If you want the look of cornrows but are still learning how to braid, flat twists are your savior. You “twist” the hair against the scalp using two strands instead of three. Bringing those twists into a low, braided bun at the nape is the height of elegance.
Why Flat Twists are a 4C Staple
Flat twists are often gentler than cornrows. They don’t require the same “under-over” tension. For 4C hair, they look incredibly thick and “juicy.”
The Execution
- Part the hair vertically.
- Twist the hair tightly against the scalp, picking up more hair as you go.
- Secure the ends into a bun.
- H3: The “Bun” Finish
- Use a “donut” sponge for a perfect round shape.
- Or, braid the loose ends of the twists and wrap them around each other. Insight: This is the perfect “Monday morning” style. It’s quick, it’s professional, and it keeps the hair completely tucked away.
Scalp Care and Longevity Secrets
Once the braids are in, the work isn’t over. Kid braids on Type 4C natural hair require a bit of “mid-wear” maintenance to ensure the hair stays healthy and the style stays fresh. The most common mistake I see is “setting and forgetting.” You must still treat the scalp like a garden.
Every two to three days, use a “no-rinse” foam cleanser or a cotton ball dipped in witch hazel to clean the parts. This removes the “white bits” (buildup) that can accumulate from gels and environmental dust. Follow this with a lightweight oil—peppermint or tea tree are great for itchy scalps. If the child is scratching, the style will frizz much faster.
At night, a satin bonnet is non-negotiable. If the child hates the bonnet, try a satin pillowcase or a “buff” (a fabric tube that stays on better). This prevents the cotton sheets from sucking the moisture out of the 4C hair and prevents the friction that causes “fuzziness.” A well-maintained set of braids can last four weeks, but the health of the hair underneath is always the priority. When it’s time for takedown, do it slowly, use plenty of detangler, and give the hair a good week of “rest” before the next style.
The Bottom Line

Choosing the right braided style for a child with Type 4C hair is about more than just aesthetics. It is an exercise in hair health, time management, and confidence-building. Whether you opt for the intricate “Fishbone” rows or the quick and playful “Bubble Braids,” the goal is to make the child feel proud of their natural texture. 4C hair is not a “problem to be solved”—it is a versatile, strong, and beautiful medium that allows for some of the most creative hairstyles in the world.
By focusing on moisture, being mindful of tension, and choosing styles that suit the child’s lifestyle, you turn the braiding ritual into a positive experience. Remember that every child’s hair journey is unique. What works for one 4C head might need a slight adjustment for another. Stay patient, keep the spray bottle handy, and don’t be afraid to add those extra beads or gold cuffs. After all, these are the years where hair becomes a part of their identity—make it a beautiful one.