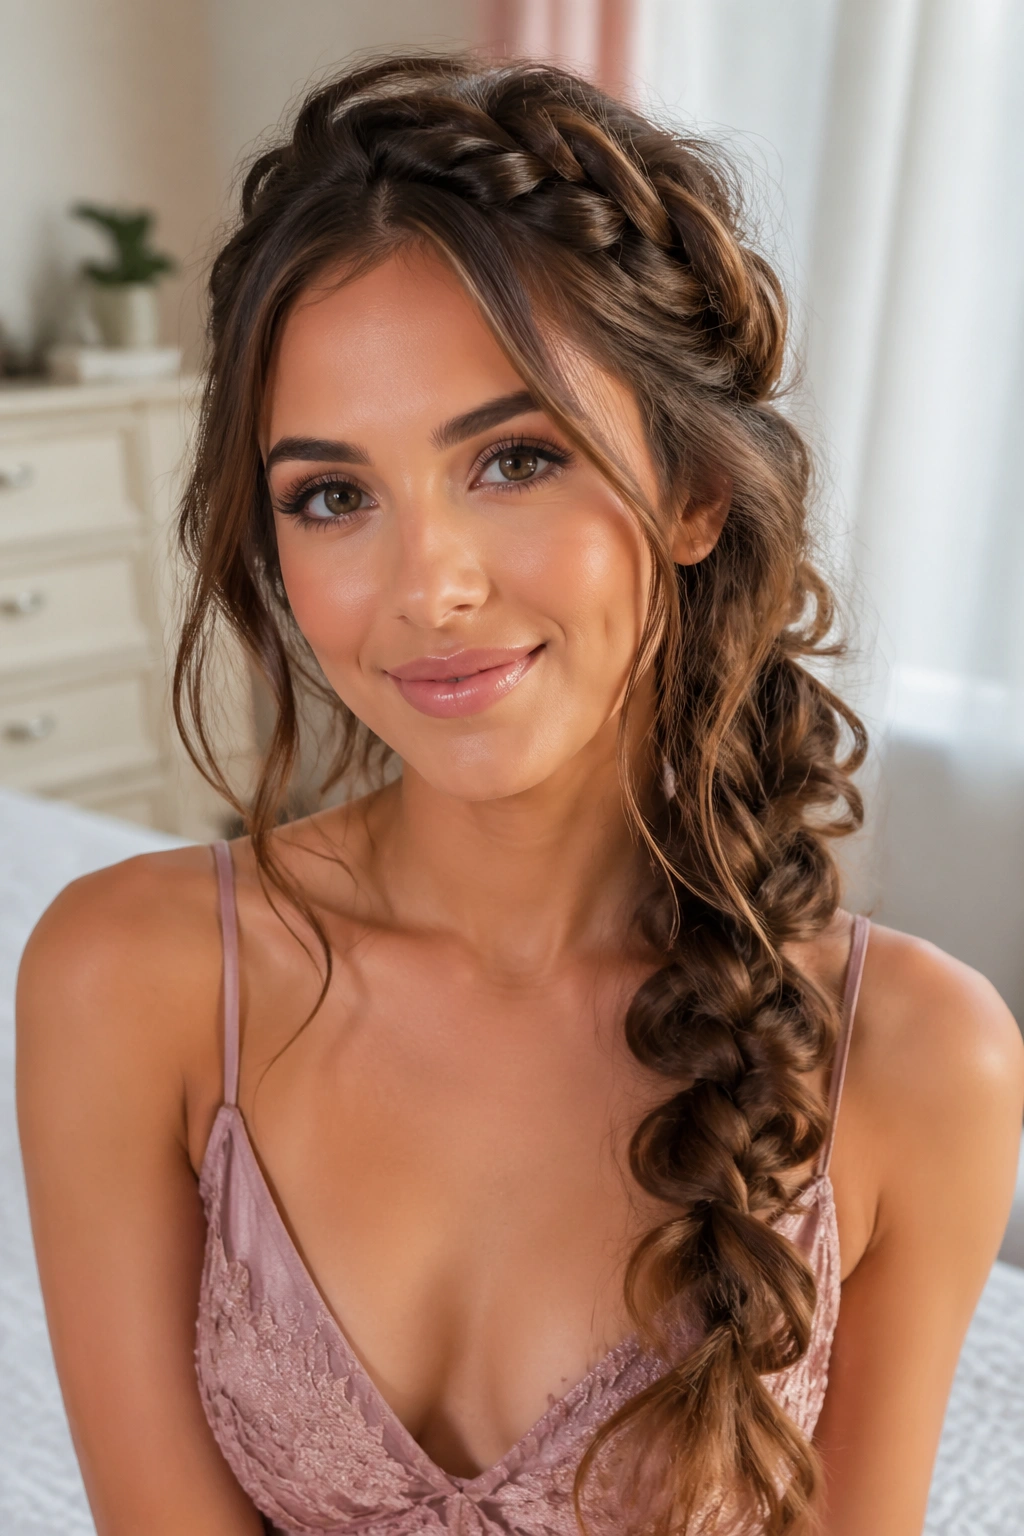
Prom hair has a cruel habit of looking polished for twenty minutes and then slumping into sad frizz by the time the first photos start. That is exactly why dragon braids for prom work so well: they give you structure, height, and enough detail to look intentional from the front, the side, and the back.
A dragon braid sits somewhere between a Dutch braid, a pull-through braid, and a sculpted updo. The raised ridge catches the eye, the shape stays readable under flash, and the style usually holds up better than loose curls when you’re hugging people, dancing, and tugging on a clutch all night.
The part most people miss is grip. Formal braided styles don’t fall apart because they’re “hard” — they fall apart because the hair was too slippery, too freshly washed, or pinned with too few anchors. A little mousse, a bit of texture spray, and smart tension at the roots matter more than fancy products ever will. Second-day hair usually behaves better. Clean hair can be stubborn.
Some versions feel sleek and sharp. Others lean soft, romantic, and a little bit dreamy. The right choice depends on your dress neckline, your earrings, your hair length, and how much you want to fuss with your hair once you walk into the venue. Start with the cleanest classic, then move toward the bolder ones if you want more drama.
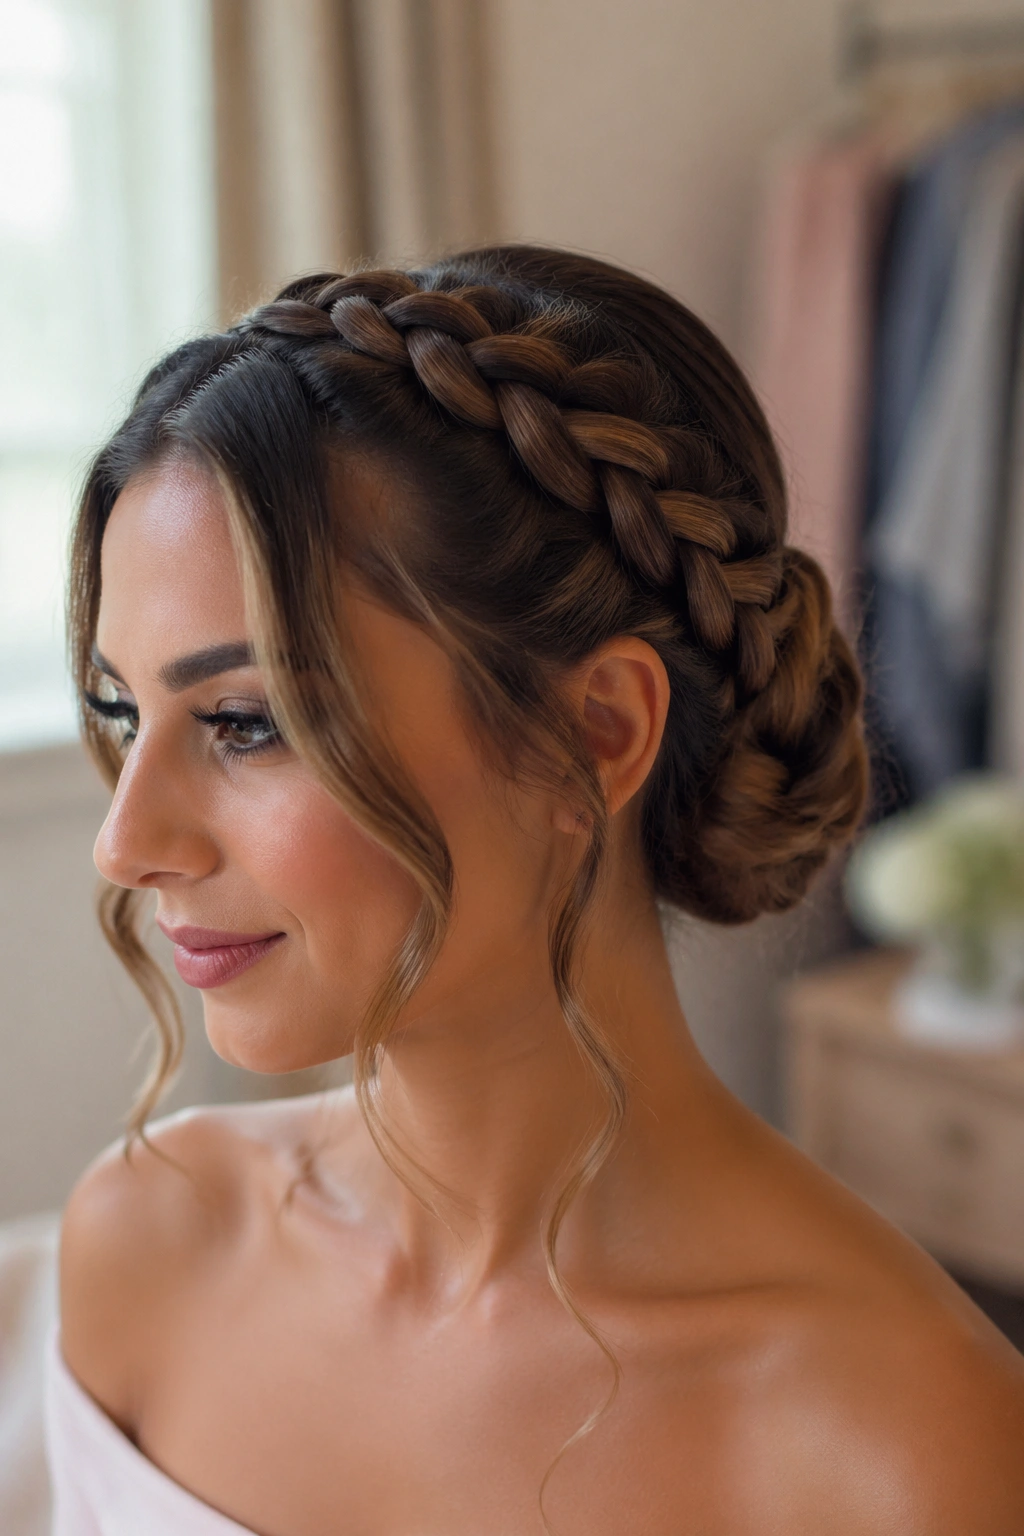
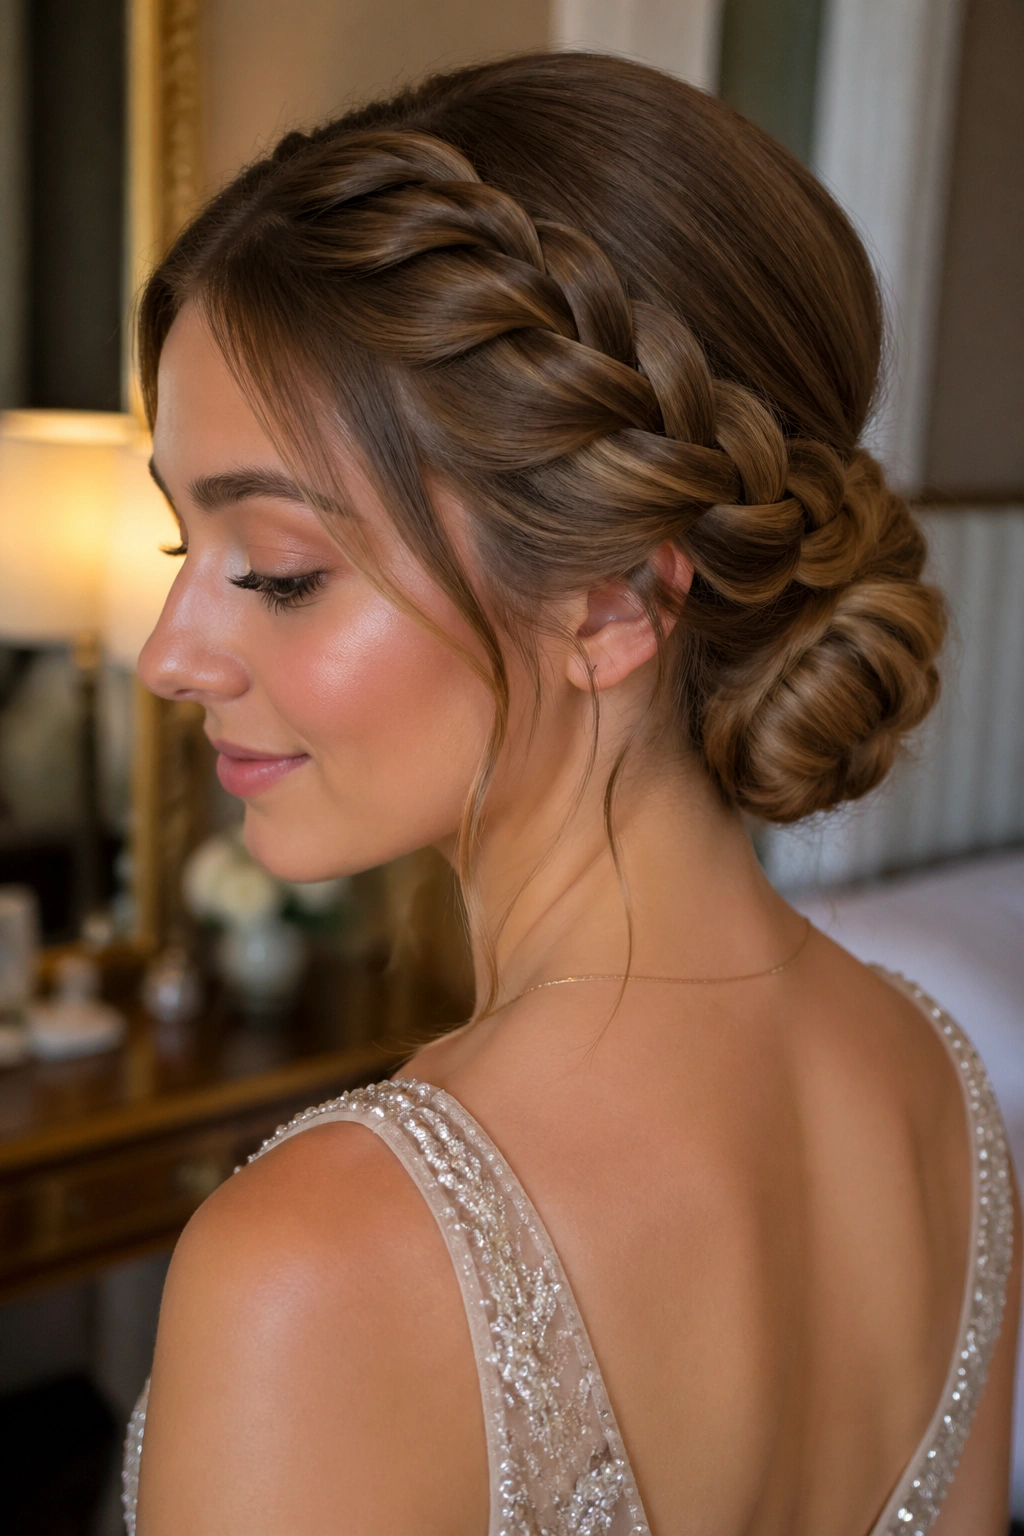
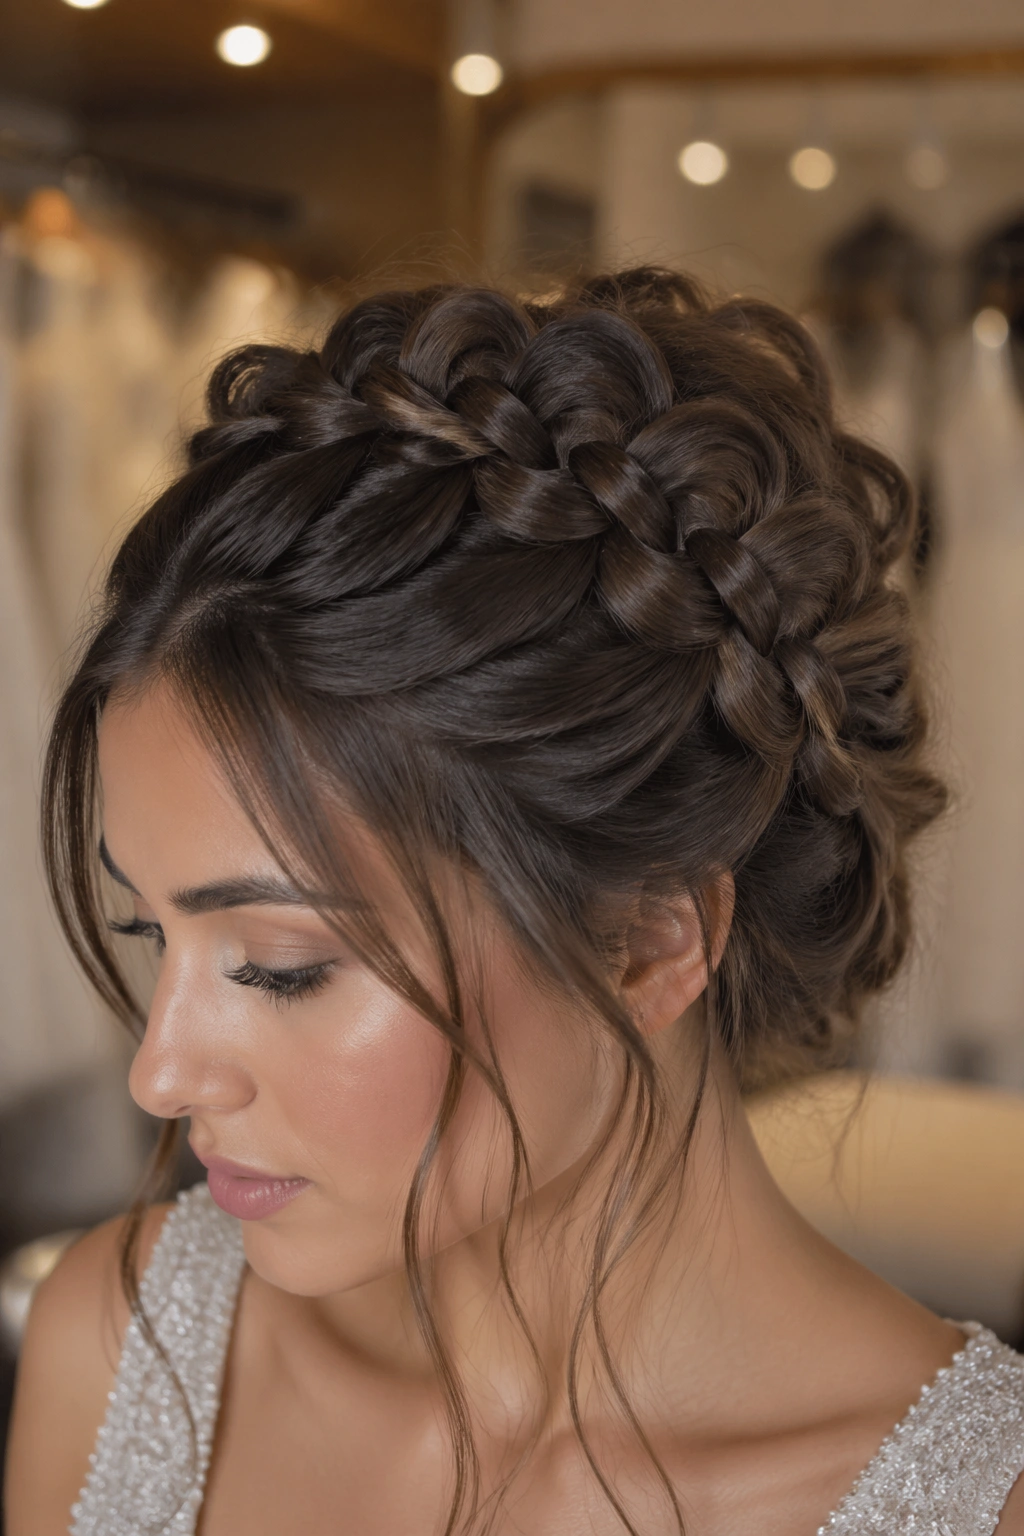
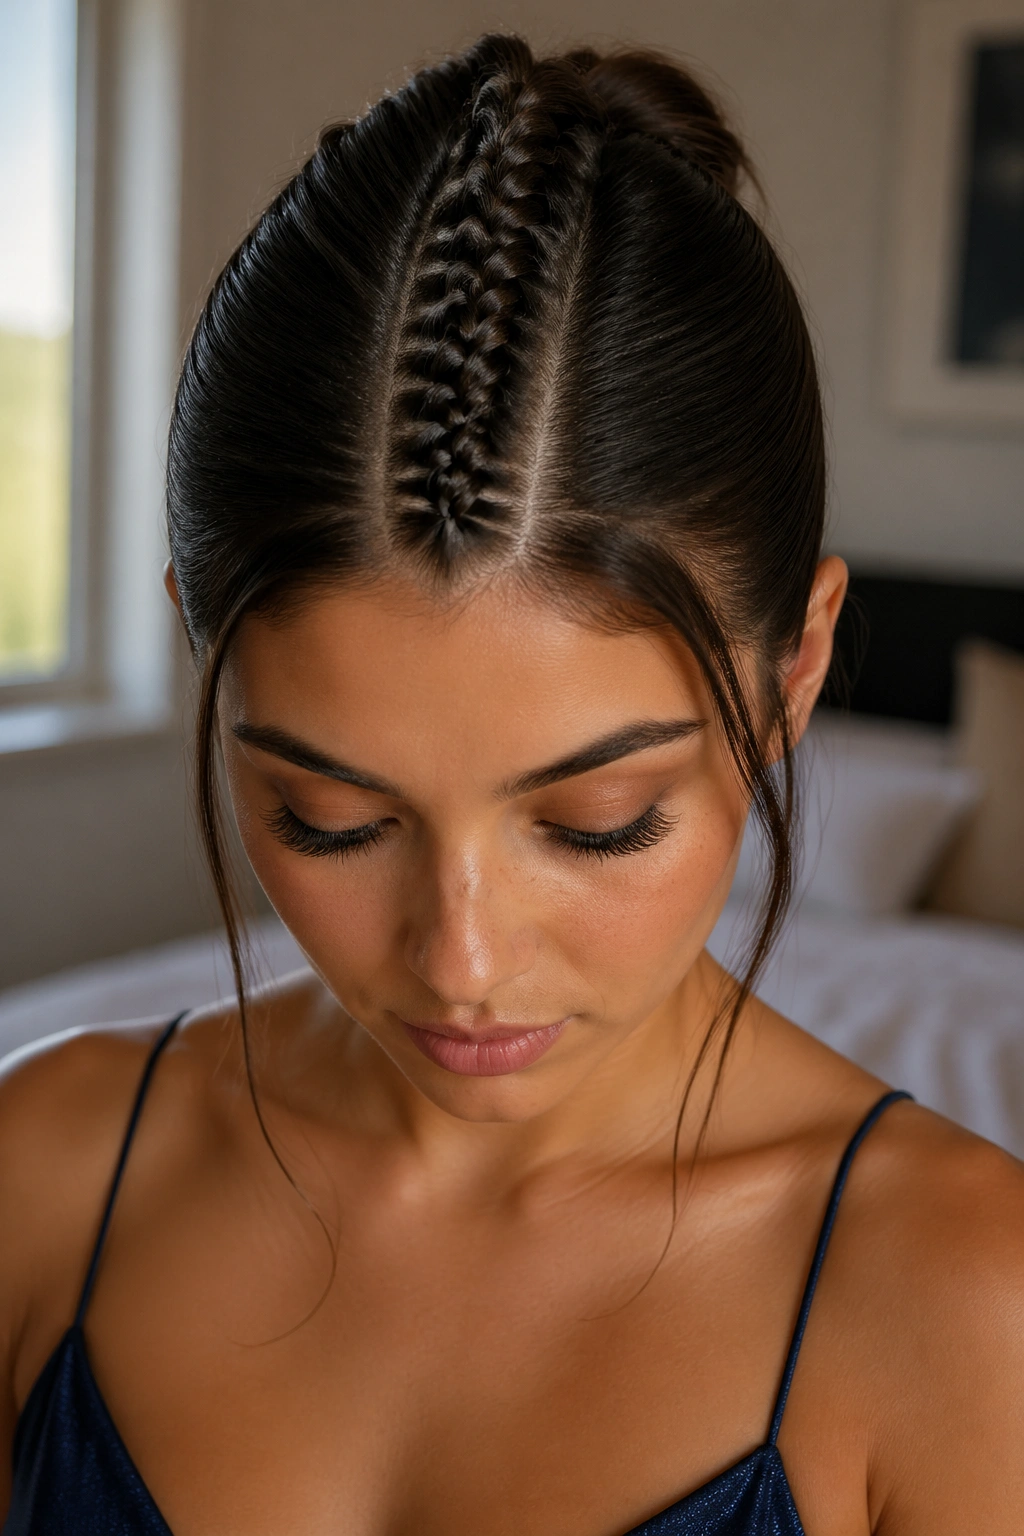
1. Sleek Center-Part Dragon Braid
Clean lines matter here.
A straight center part gives this braid a formal edge right away, especially if your dress has symmetry — think square necklines, strapless bodices, or a gown with a crisp bodice seam. Keep the roots smooth with a light styling cream, then braid close to the scalp so the ridge stays even from top to bottom.
Why it reads polished
The center part acts like a frame, and the braid becomes the feature instead of competing with the rest of the hair. That matters for prom photos, because the style still looks neat when you turn your head or sit down under bright lights.
- Use a rat-tail comb to make the part exact.
- Smooth the top inch with a pea-sized amount of cream.
- Secure the braid with a clear elastic, then hide it with a small strand of hair.
- Finish with a light mist of flexible hairspray, not a stiff helmet.
Best for: straight, stretched, or lightly waved hair that needs a sharp finish.
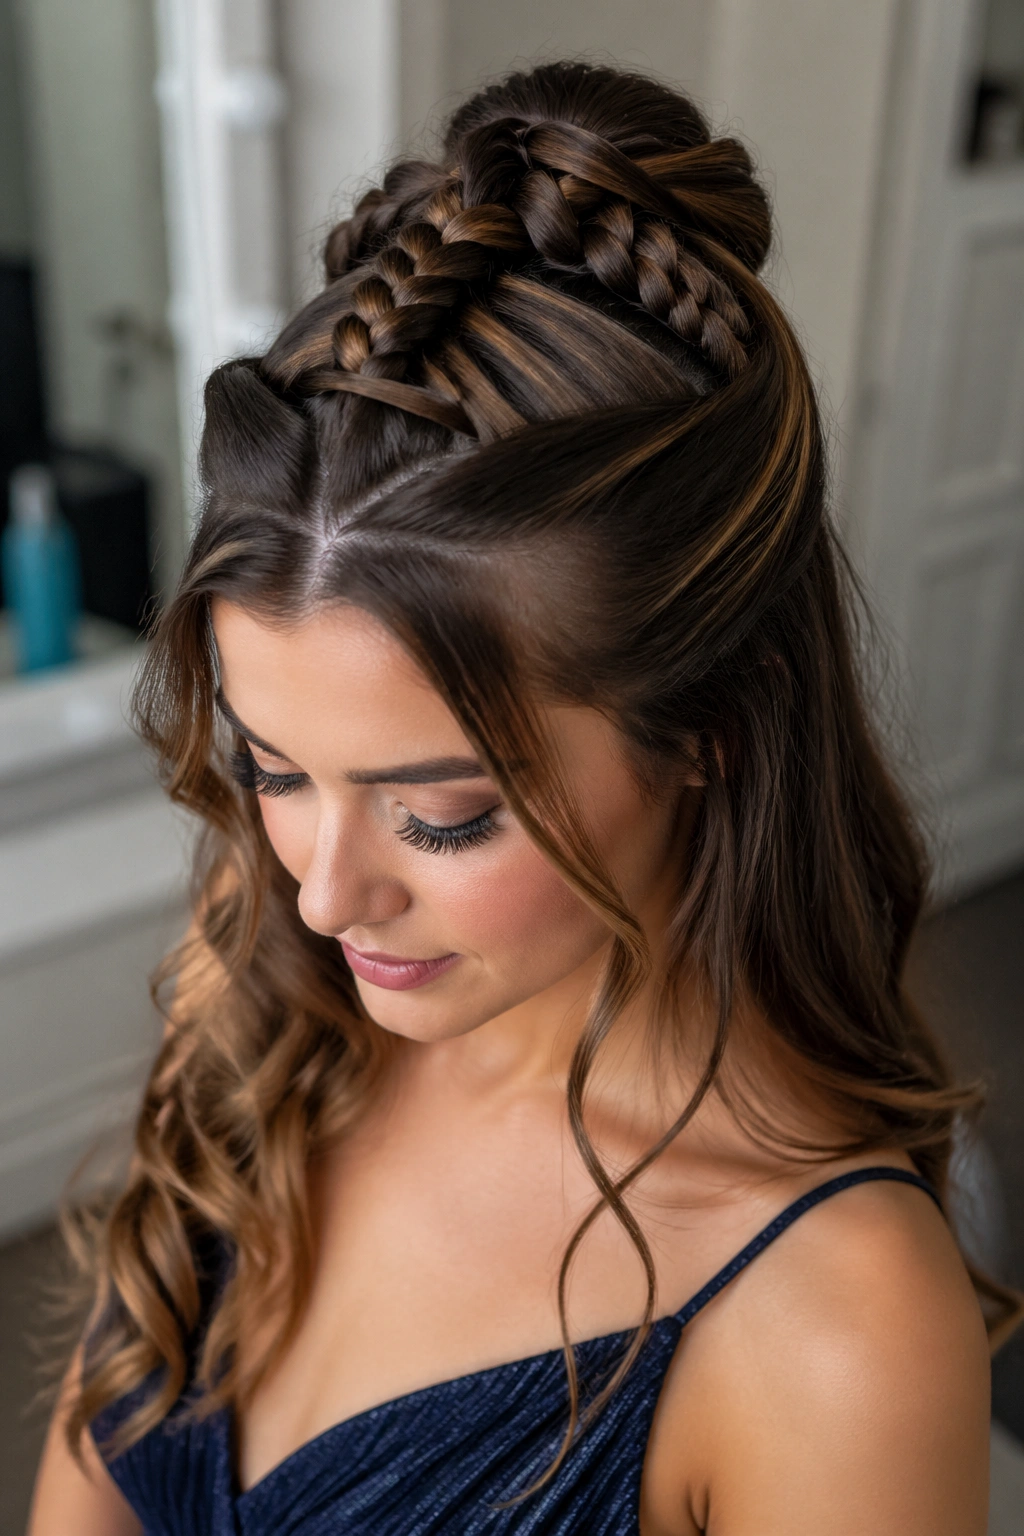
2. Half-Up Dragon Braid with Loose Waves
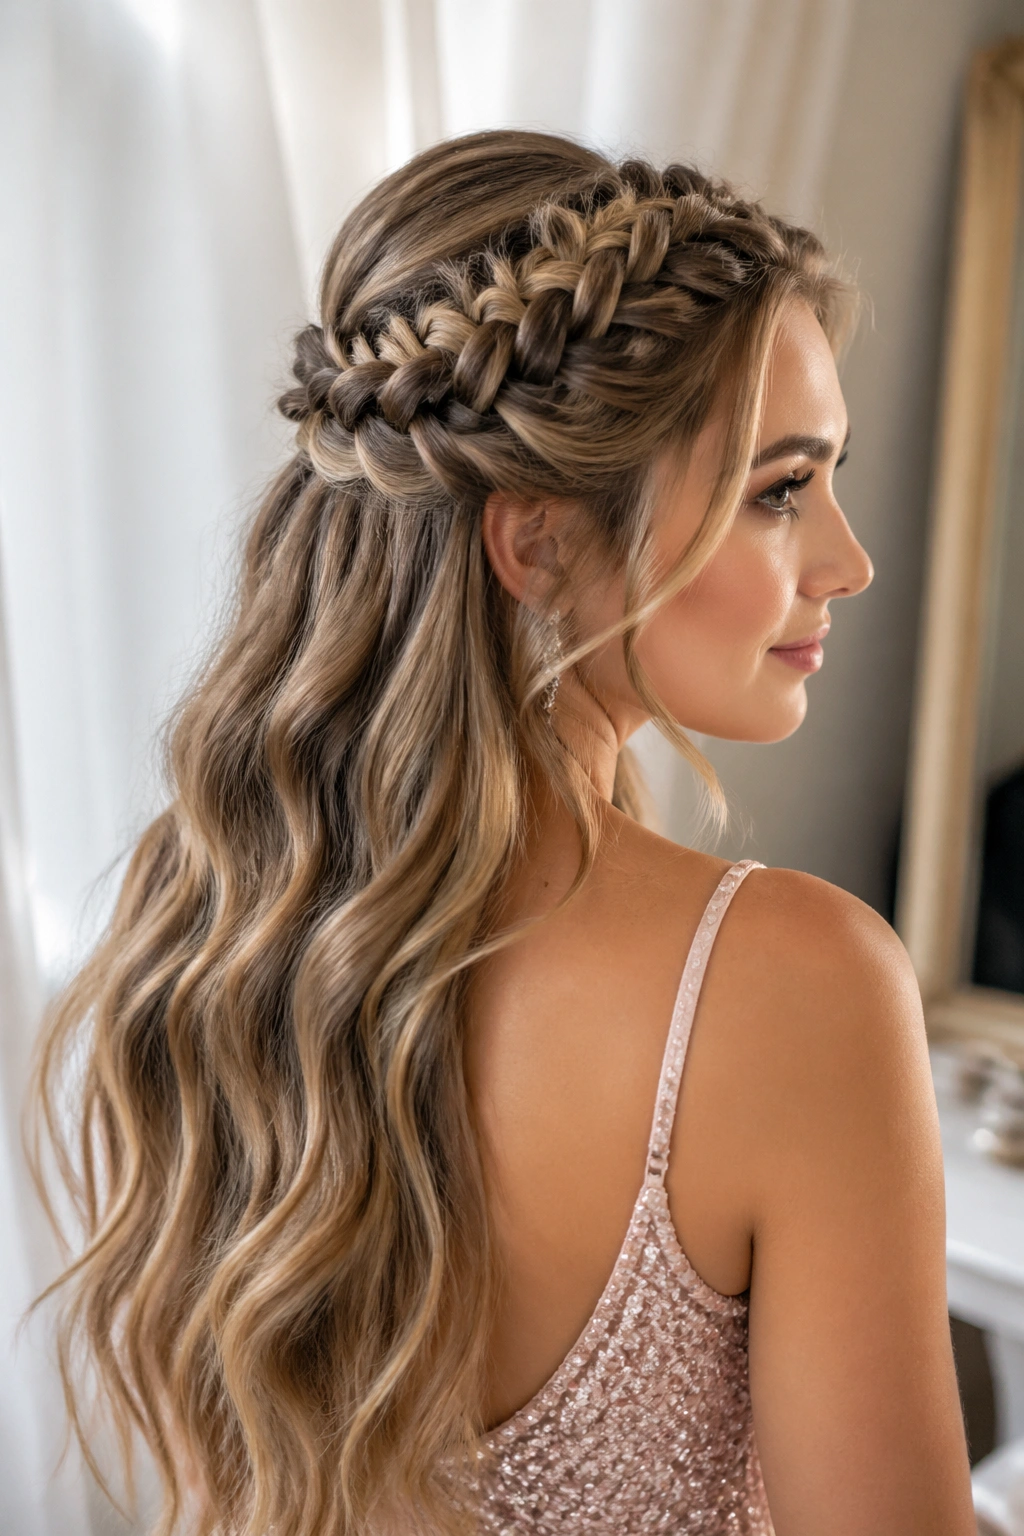
This one softens the whole look fast.
A half-up dragon braid keeps the crown tidy while leaving the rest of the hair moving and loose, which is a smart choice if you want something pretty without looking overdone. Curl the bottom half with a 1-inch iron, then let the braid sit across the top like a decorative band.
The contrast is what makes it work. The braid gives shape; the waves keep it from feeling severe. That mix looks especially good with off-the-shoulder dresses, soft satin, or anything with a little shimmer in the fabric.
A few face-framing strands help, but keep them intentional. Curl them away from the face so they bend outward instead of sticking to the cheeks. If your hair is layered, pinch the shorter pieces with a tiny bit of pomade so they stay in the braid instead of slipping out.
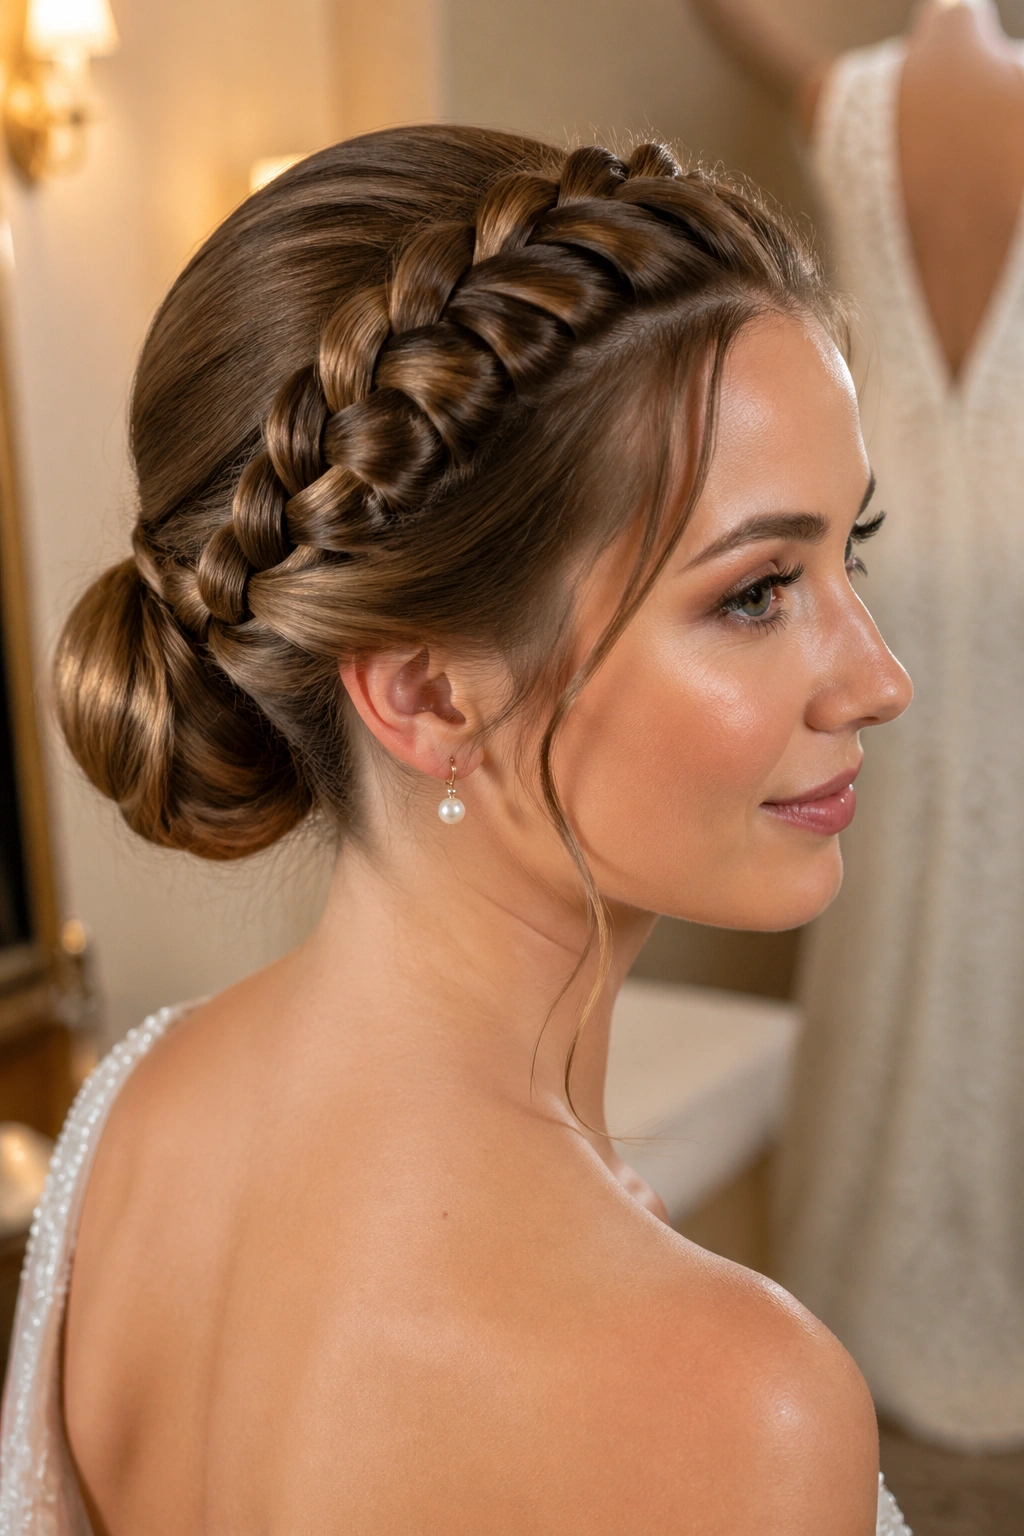
3. Low Dragon Braid Bun
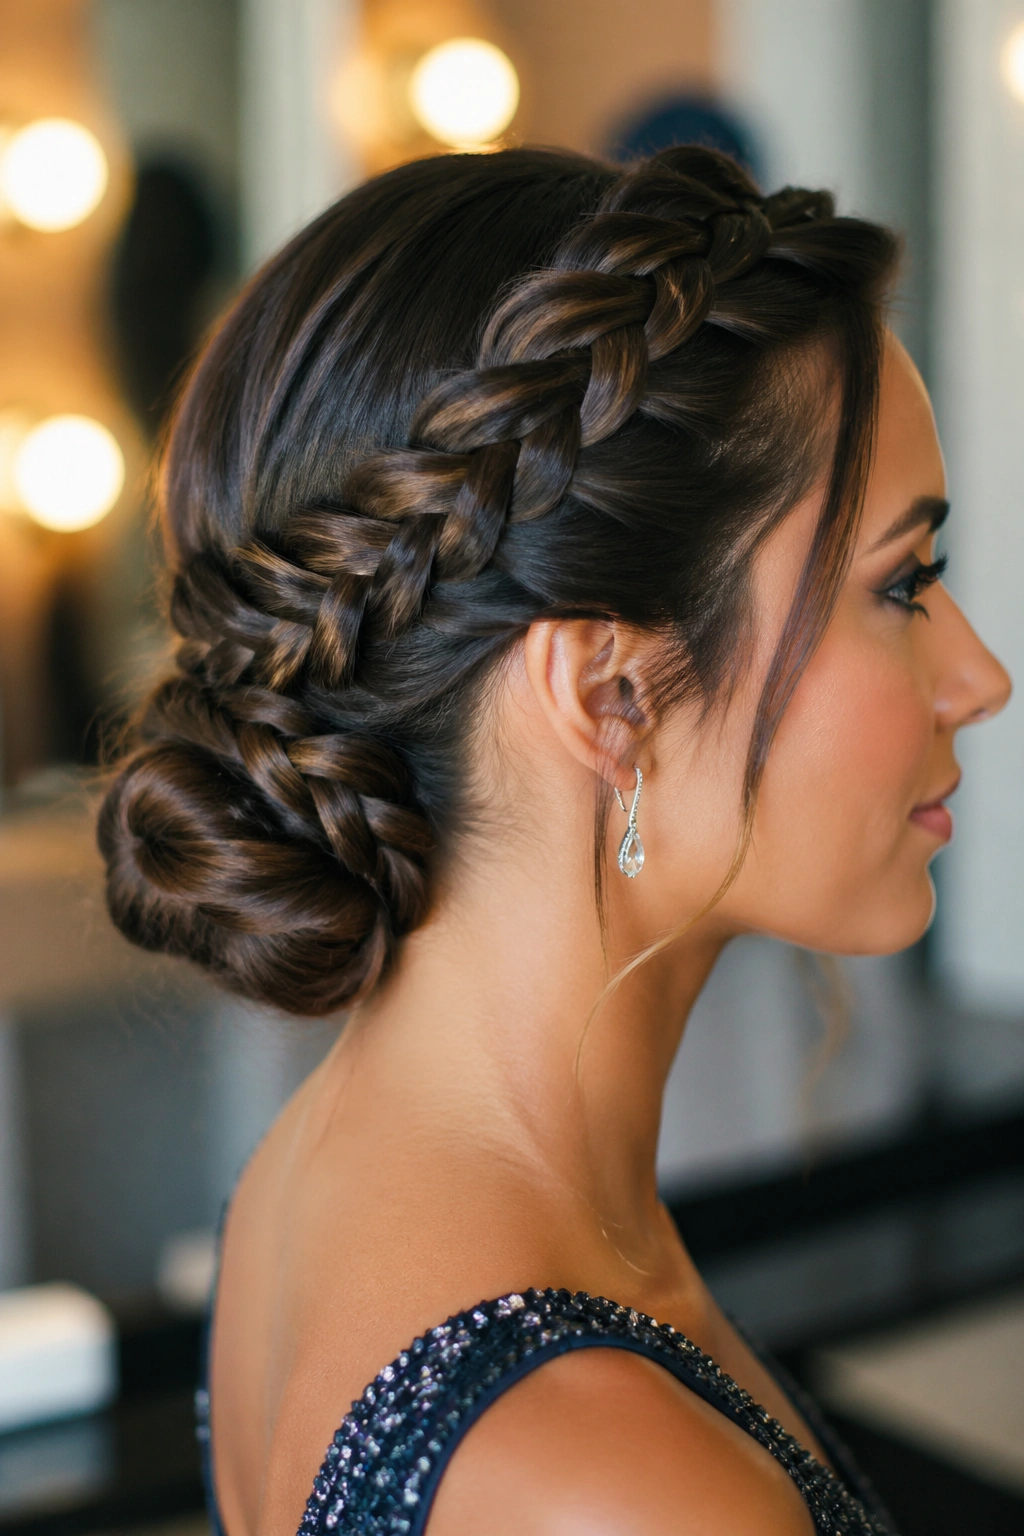
If you want the safest formal option, this is it.
A low dragon braid bun gives you the best of both worlds: visible braid detail and a shape that stays put while you move. It works especially well with high necklines, open backs, and heavy earrings, because the hair stays low and doesn’t crowd the shoulders.
The braid can start at the temple or the crown, then feed into a bun at the nape. Keep the bun tight enough to hold, but not so tight that it pulls the braid flat. The bun should look anchored, not squashed.
How to keep it from slipping:
- Cross bobby pins in an X pattern at the base.
- Pin into the bun, not just along the surface.
- Spray the finished shape, then press flyaways with clean fingertips.
- If your hair is silky, rough up the nape first with dry shampoo.
This one is boring in the best way. Reliable. Comfortable. Hard to ruin.
4. Side-Swept Dragon Braid
A side-swept braid changes the whole mood.
Compared with a centered style, a side-swept dragon braid feels softer and a little more glamorous, mostly because it leaves one side of the face and neckline more open. That makes it a strong match for one-shoulder dresses, asymmetric necklines, or gowns with one heavily embellished side.
The braid should begin with a deep side part and travel diagonally, so it lands over one shoulder instead of straight down the back. That curve matters. It gives the eye a path to follow, which is why this style often photographs with more movement than a straight-back braid.
If your hair is thick, leave the braid a touch looser so it doesn’t sit like a rope. If it’s fine, build the root with a little teasing before braiding. Either way, tuck the ends under the shoulder line so the shape looks finished rather than accidental.
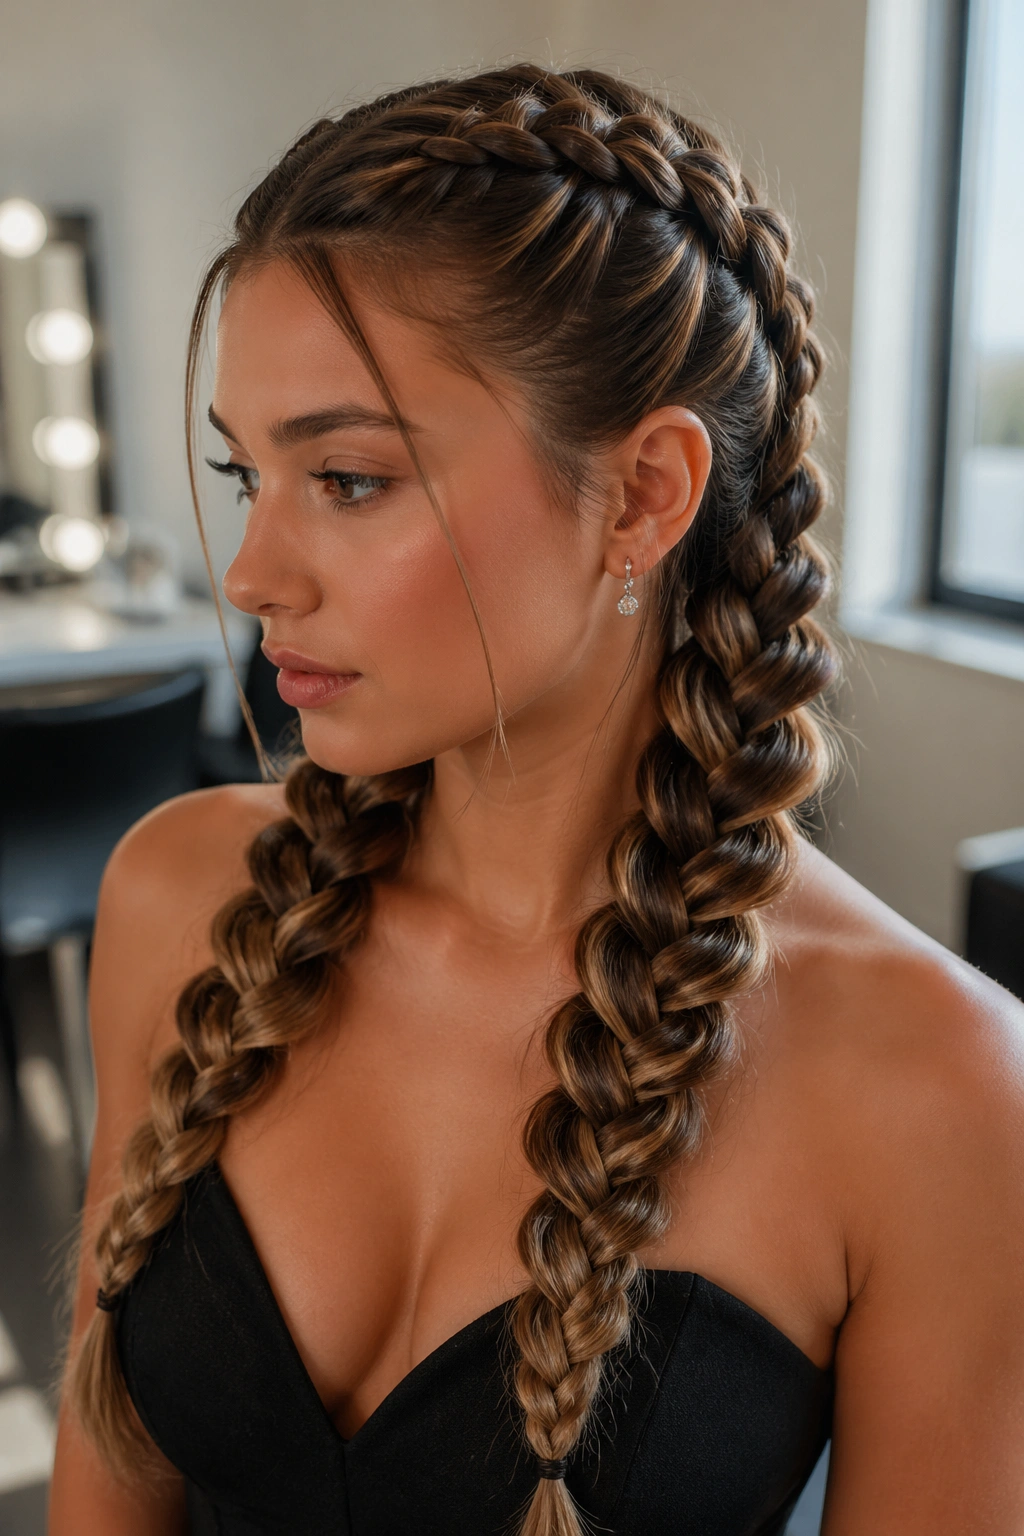
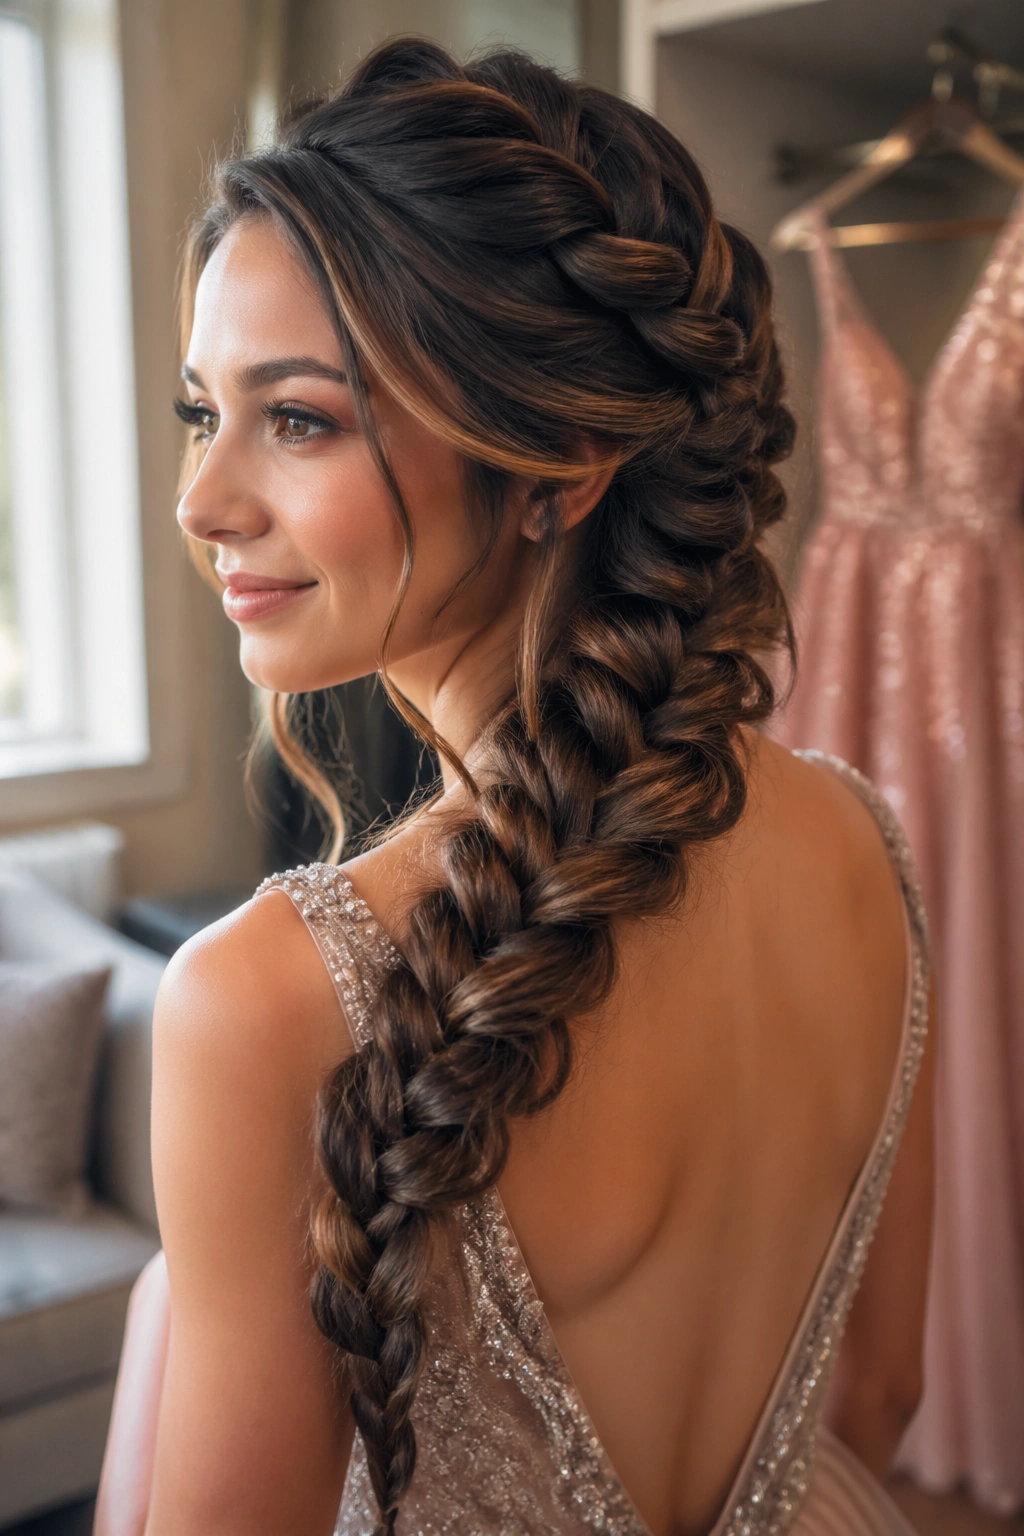
5. Double Dragon Braids
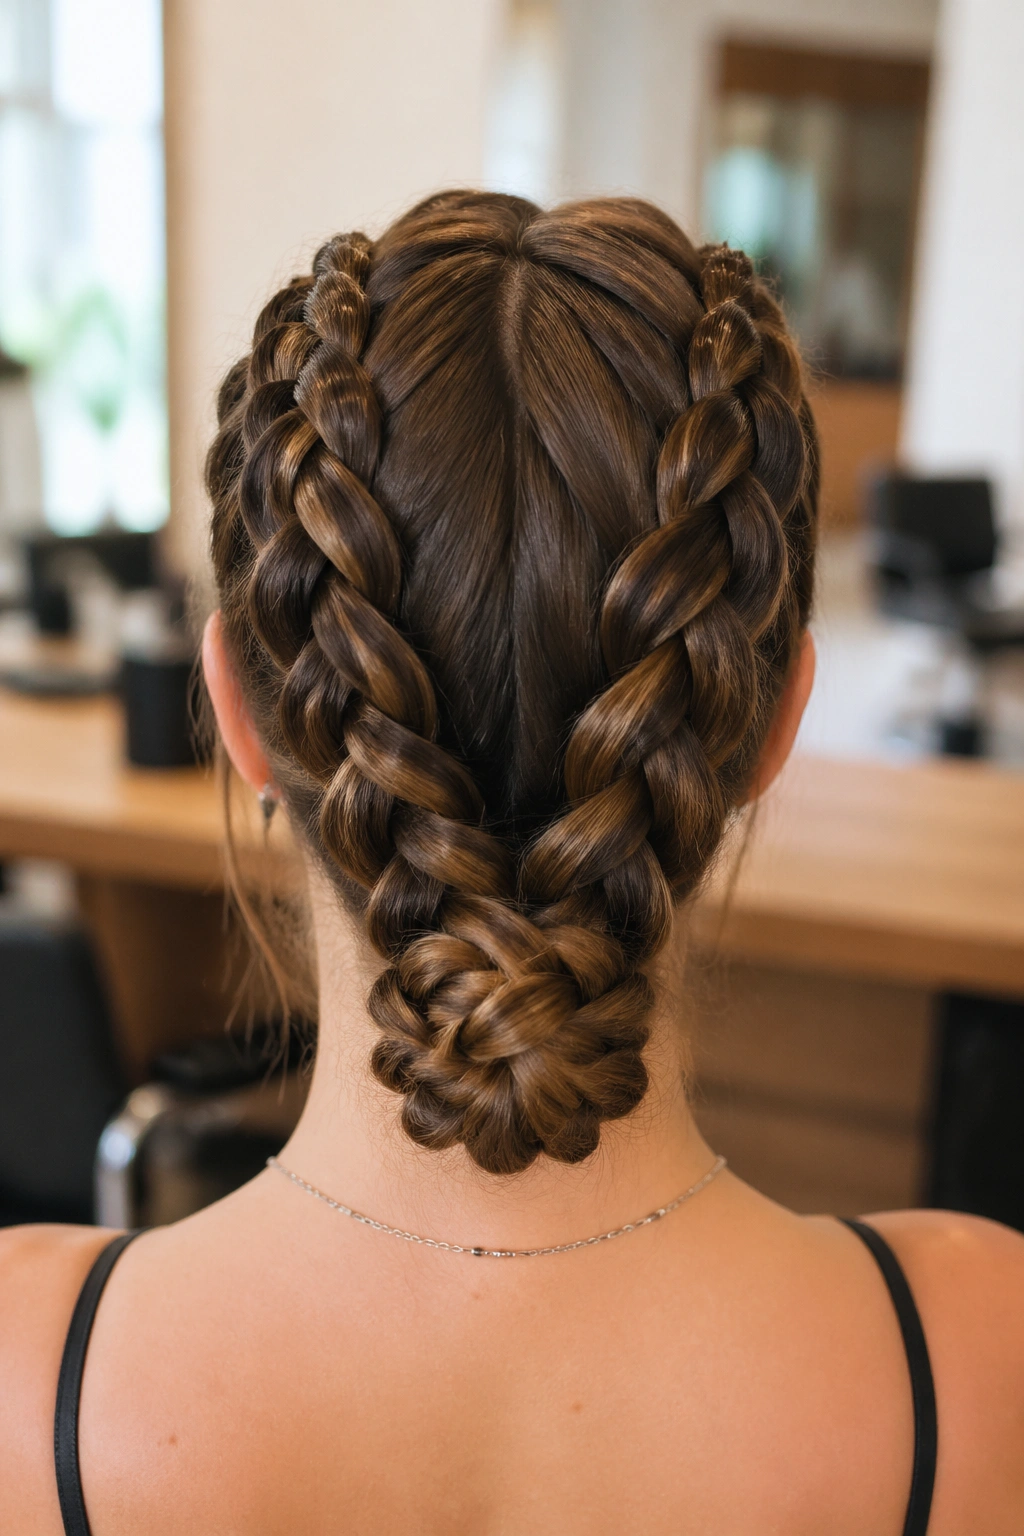
Two braids can look tougher than one.
That sounds obvious, but it changes the whole feel of the style. Double dragon braids bring symmetry, which is useful if your dress already has strong lines or if you want the hair to feel structured without going into a full updo. They also keep the weight spread out, which helps if your hair is long and heavy.
This style works in more than one direction. You can wear two mirrored braids down the back, or braid each side and join them into a low knot. The first version feels youthful and clean. The second reads more formal.
Where this style shines
- It shows off color placement, especially highlights and ribbons of lighter tone.
- It suits medium-length hair if the braid starts higher on the head.
- It’s a solid option for thick hair that gets too bulky in a single braid.
- It can be tightened at the crown without making the ends feel too severe.
If you want the look to feel prom-ready instead of sporty, add a small metallic pin where the braids meet. One pin. Not eight.
6. Waterfall Dragon Braid
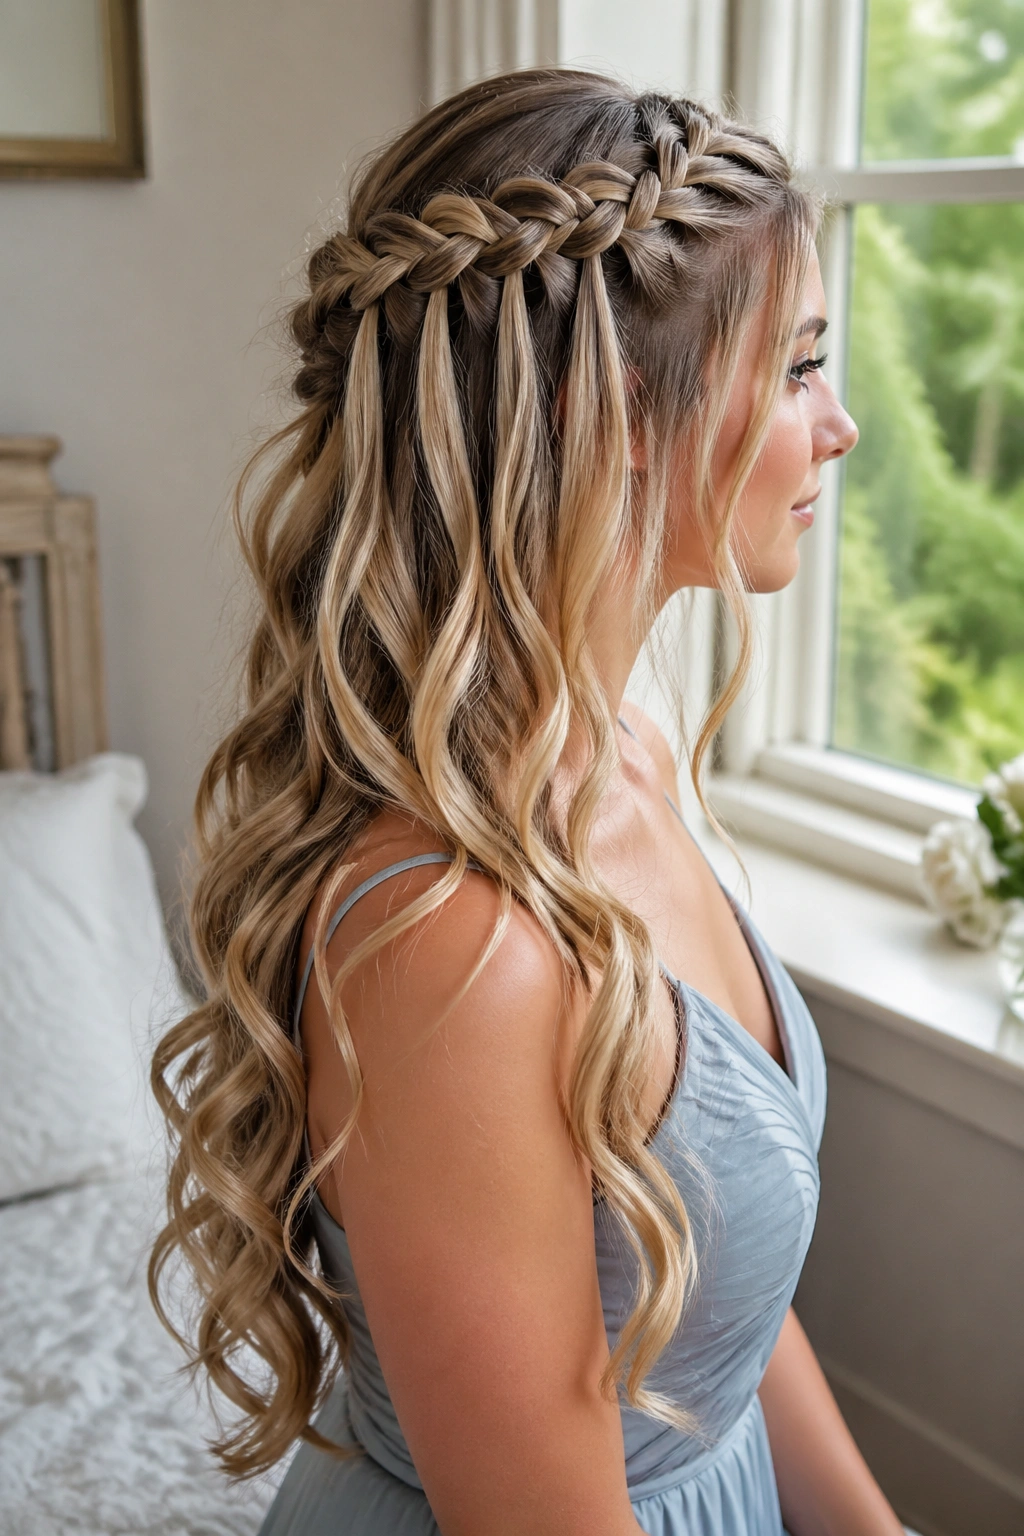
Why does this look so soft?
Because the braid gives you structure while the loose sections keep moving. A waterfall dragon braid works especially well when you want your hair to look intricate from a distance but not heavy up close. The cascading pieces soften the face, and the braid line adds enough shape to keep it from drifting into plain loose hair.
This style loves layered hair. The shorter pieces can drop out on purpose, and the whole thing still reads as designed. Curl the hanging sections before braiding so the fall looks deliberate instead of flat. Straight ends make the style feel unfinished.
How to keep the cascade neat
If your hair is slippery, mist the mid-lengths with texture spray before you start. Pick the loose strands carefully so the spacing stays even. Too many drops and the braid loses its rhythm. Too few and it starts to look stiff.
A thin braid along the crown with soft ends is one of those styles that looks expensive without trying too hard. That is the whole point.
7. Crown Dragon Braid
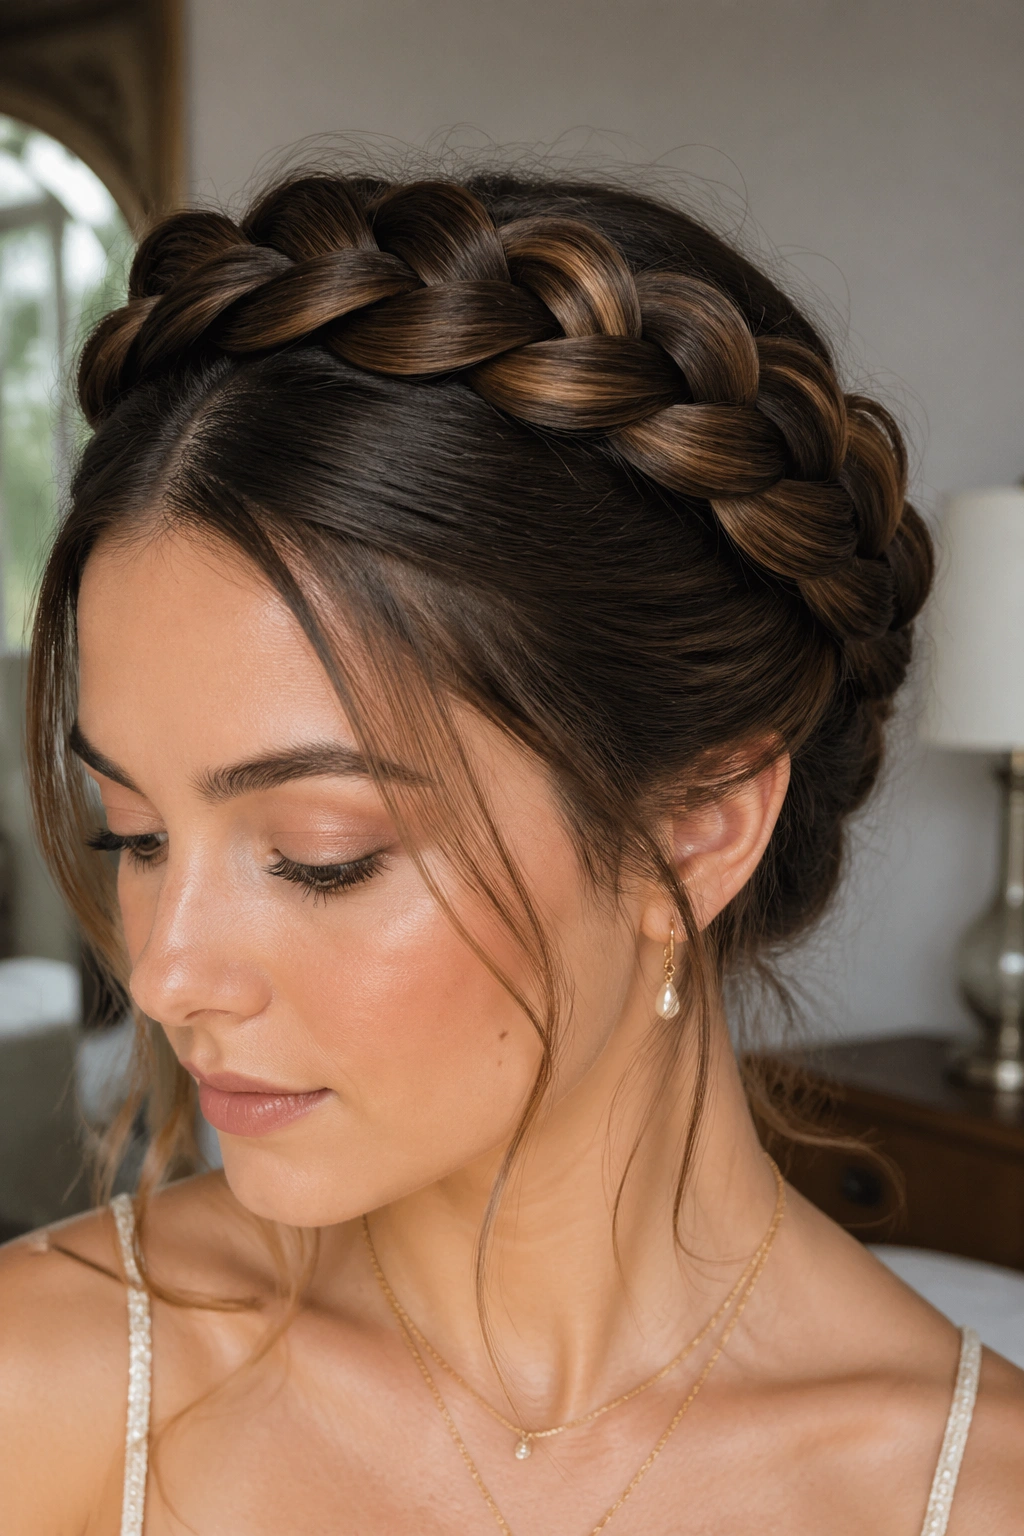
A crown braid turns the head into the accessory.
That sounds dramatic, but it is true. A crown dragon braid wraps around the head and creates a halo effect that works beautifully with simple gowns, minimal jewelry, and makeup that leans clean rather than heavy. It draws attention upward, which is useful if you want the face to stay open.
The braid should sit slightly above the hairline, not pressed down onto the forehead. Keep the width consistent so the circle looks balanced. If the braid gets too thin in one section, the whole shape starts to droop visually even if it is pinned well.
To finish it, hide the end under the starting point and pin it with two bobby pins crossed like an X. That tiny detail matters. Loose ends near the nape always look like an afterthought.
This is one of the few formal braid styles that can feel regal without looking fussy.
8. Bubble-Dragon Hybrid

Sharp braid texture meets playful shape.
A bubble-Dragon hybrid starts with a dragon braid at the top, then shifts into bubble ponytail sections farther down. The result feels modern and a little unexpected, which makes it a smart pick for gowns with clean fabric or strong details like beading, cutouts, or metallic thread.
The spacing is the real trick. Clear elastics should sit about 1½ to 2 inches apart, depending on your hair length. After each elastic, gently pull the section wide enough to form a rounded “bubble” without flattening the braid above it. Don’t yank. The shape should look inflated, not messy.
Quick details to get right
- Use clear elastics or ones that match your hair color.
- Wrap one small strand around each elastic if you want a cleaner finish.
- Keep the crown smooth so the bubble sections carry the visual weight.
- Add a thin ribbon only if the dress is simple.
This style gives you drama without forcing the whole head into a rigid updo.
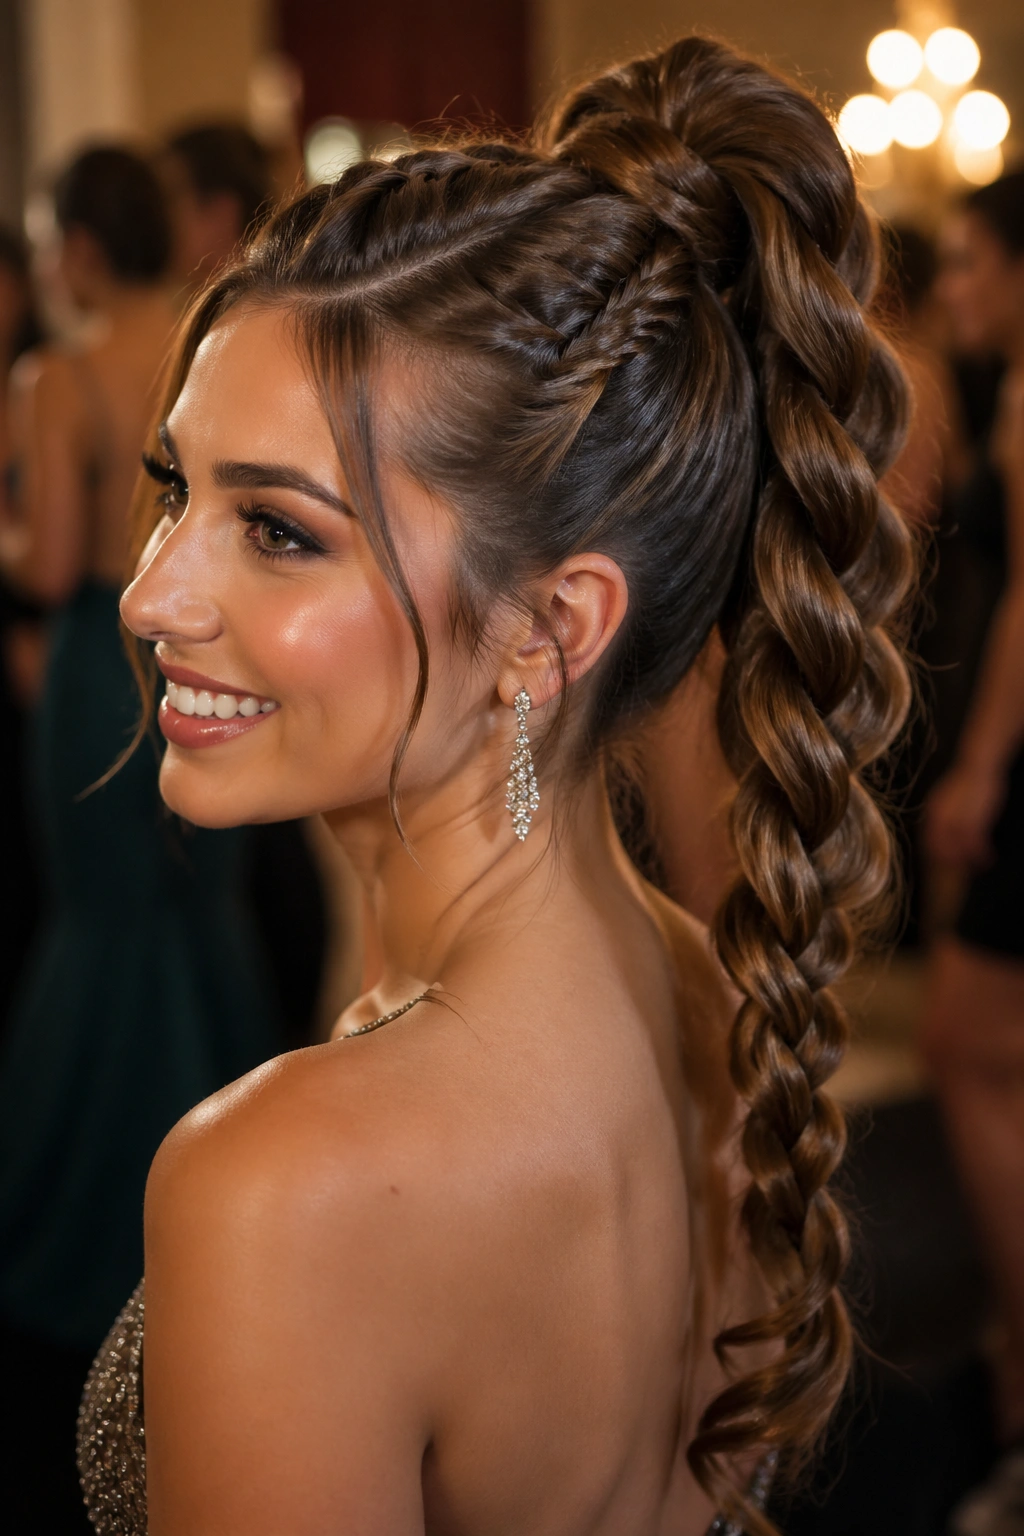
9. Curved Dragon Braid Ponytail
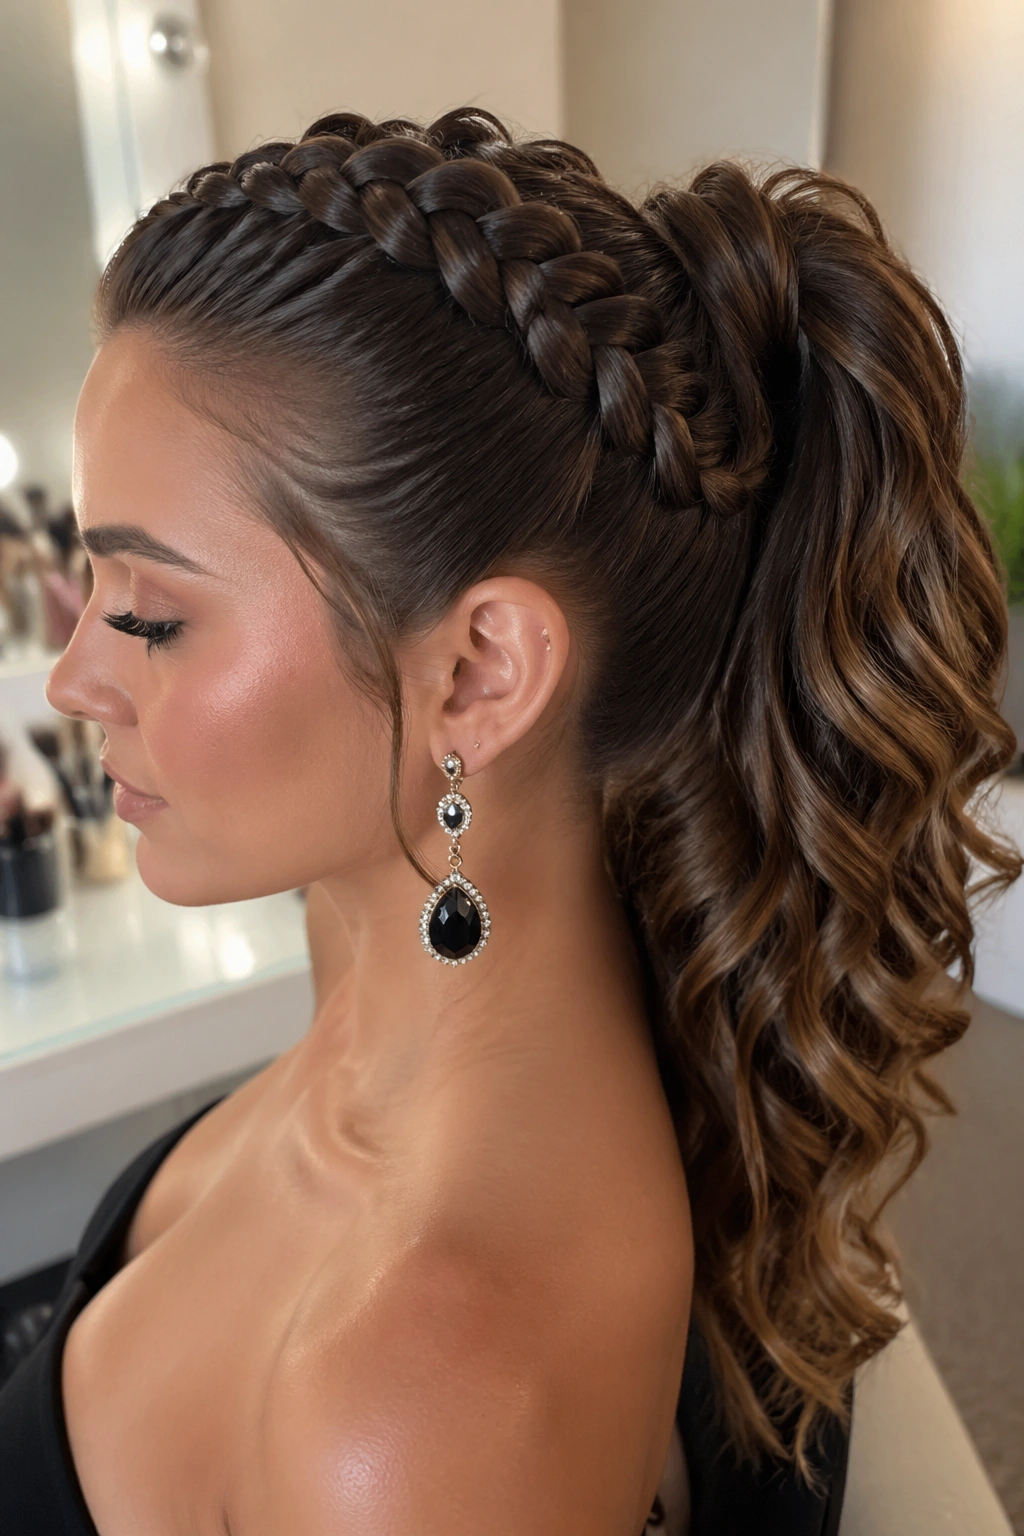
The curve is the whole story.
A curved dragon braid ponytail starts near the temple, sweeps around the head, and lands in a ponytail rather than a bun. That arc creates movement even before you turn your head, which is why this style feels lively without becoming casual.
The shape is especially flattering if you want to lift the eye line. A braid that curves upward near the crown creates height, then drops into the ponytail for a long line down the back. It’s a good choice for strapless dresses and high-slit gowns, where a little motion in the hair balances the outfit.
Use a strong elastic at the ponytail base, then hide it with a wrapped strand. If your hair has layers, pin the shorter pieces into the braid first rather than trying to force them into the tail. That keeps the curve clean.
It’s a formal style with a bit of energy. Useful combination.
10. Braided Mohawk Dragon Braid
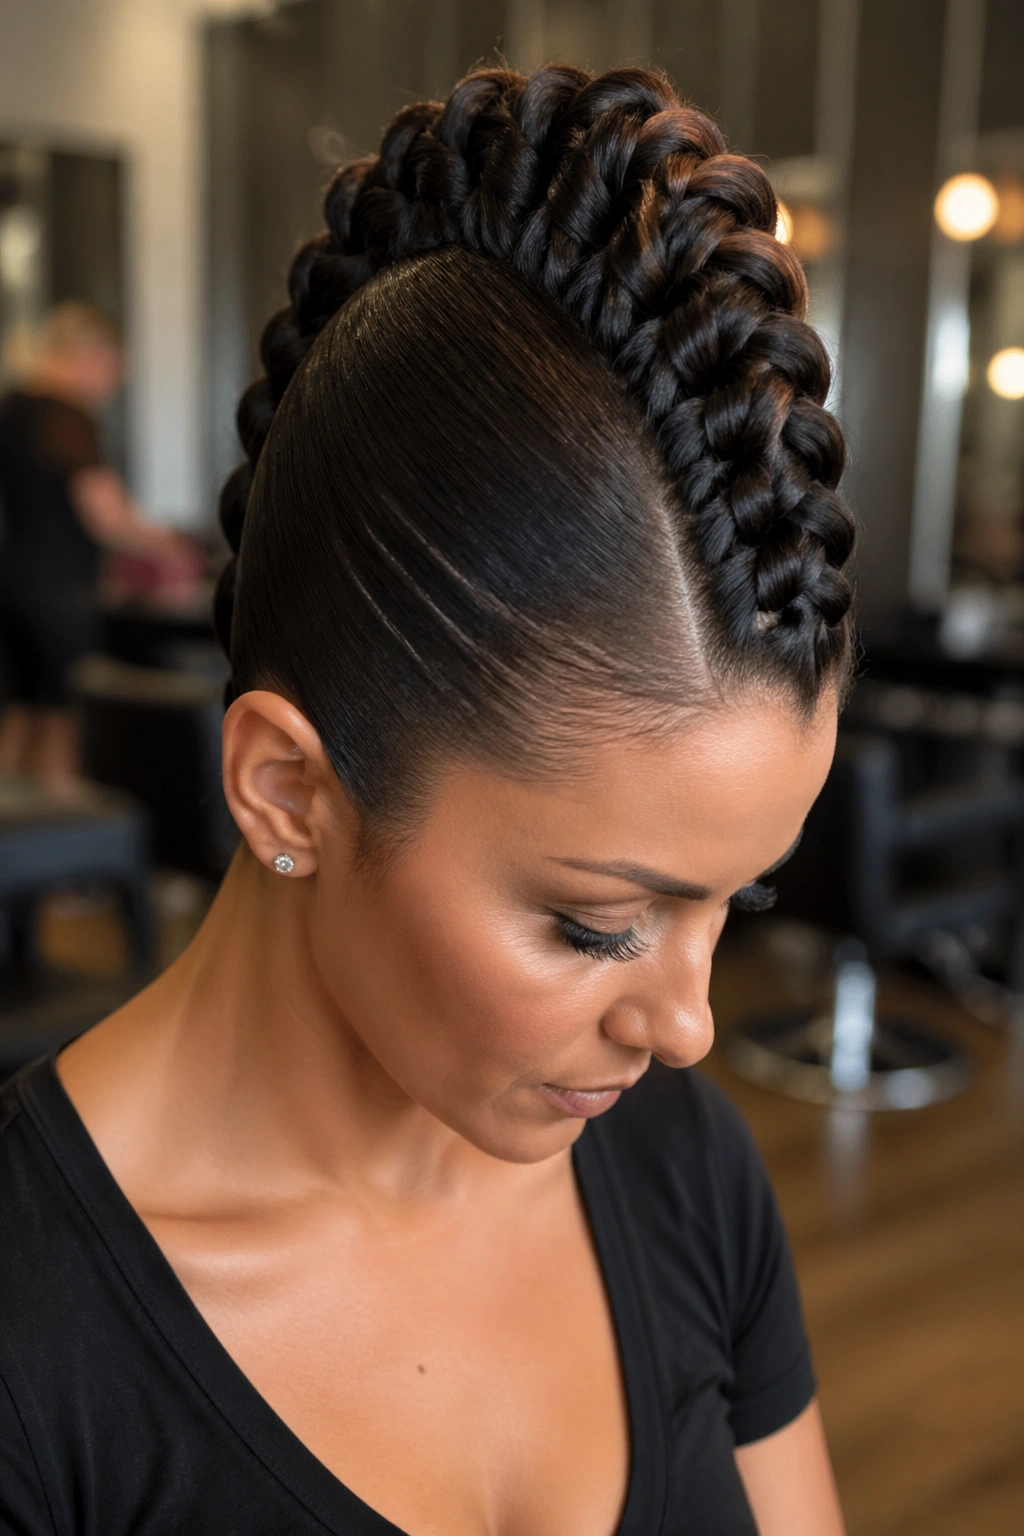
Not every prom hairstyle has to be soft.
A braided mohawk dragon braid makes a clear statement: center ridge, sleek sides, and a strong line from forehead to nape. It works best when the dress already has some attitude — structured satin, a sharp neckline, or a bold open back that deserves a stronger hair shape.
The sides should be smoothed down with gel or pomade, not drowned in product. A thin, controlled shine at the temples looks elegant. Greasy roots do not. The middle section can be textured a little more so the braid has grip and depth.
This style is a good match for strong eye makeup or a lip color that holds the attention. It can also flatter long faces because the width at the crown balances the length. If your hair is very fine, tease the center section lightly before braiding so the ridge has lift.
It is not shy. That’s the appeal.
11. Dragon Braid with Face-Framing Pieces
A little softness changes the mood fast.
Dragon braids can look severe when every strand is pulled back, so leaving a few face-framing pieces out keeps the style approachable and less rigid. The key is to make those pieces look intentional. Two thin strands near the temples are enough; more than that can start to weaken the shape.
Curl the front pieces away from the face so they open up the cheekbones. A ¾-inch or 1-inch iron gives a bend that feels polished, not ringlet-heavy. If your hair is layered, pin the shortest sections back under the braid before releasing the front pieces. That keeps the style from looking fuzzy at the sides.
What to leave out
- Thin temple pieces for a softer outline.
- One slightly longer strand near the jaw if you want movement.
- Nothing too thick near the ears, which can make the braid feel unfinished.
This version is a good middle ground for people who want formal hair but still want to look like themselves when they smile in pictures.
12. Ribbon-Woven Dragon Braid
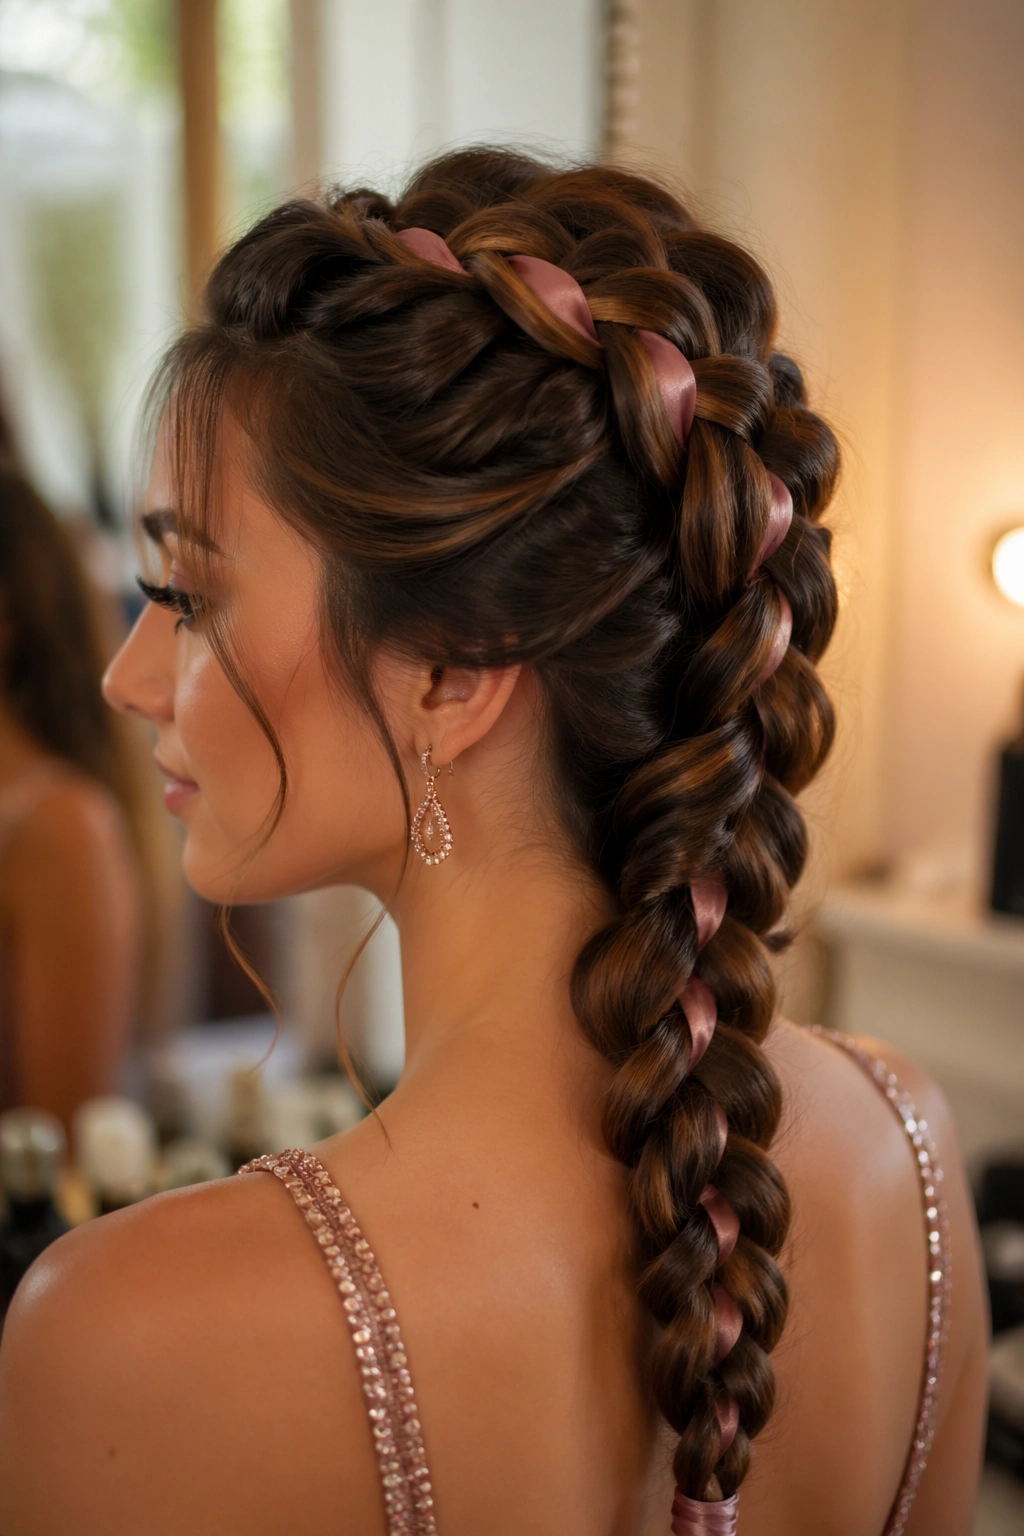
Ribbon changes the entire read of the braid.
A ribbon-woven dragon braid can go sweet, dramatic, or old-Hollywood depending on the material you choose. Satin gives a glossy finish. Velvet feels deeper and richer. A narrow metallic ribbon brings a little shine without turning the braid into costume hair.
Pick a width between ¼ inch and ½ inch so the ribbon can weave through the sections without adding bulk. Secure it at the crown or the starting point with a clear elastic, then carry it through the braid as you go. If the braid is tight, the ribbon stays visible in little flashes rather than covering the whole thing.
This style works best when the ribbon color echoes something else in the outfit — shoes, clutch, trim, or even a stone in the earrings. That small echo makes the styling feel deliberate.
If your dress already has heavy embellishment, keep the ribbon narrow and quiet. The braid should support the outfit, not compete with the beading.
13. Pearl-Pinned Dragon Braid Updo
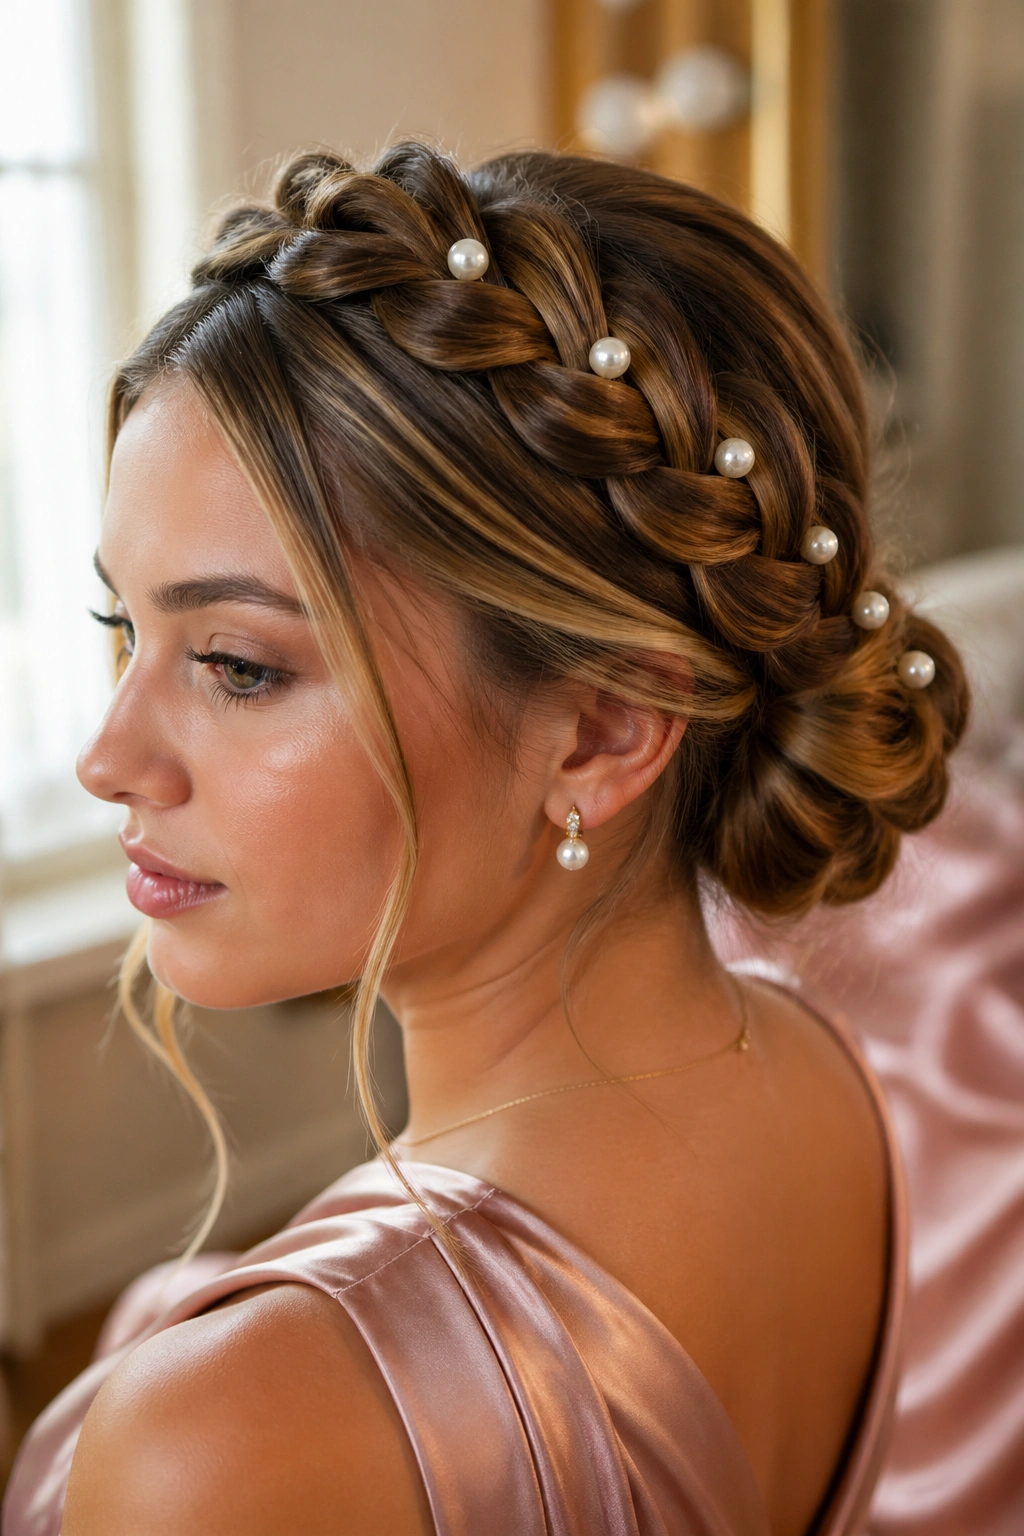
Pearls sit naturally on a braid like this.
A pearl-pinned dragon braid updo feels formal in a classic way, especially with satin, silk, or lace. Instead of covering the braid with accessories, place a few pearl pins where the braid turns, bends, or folds. That gives the eye places to stop without making the whole style busy.
Small pins usually look cleaner than large ornaments. Think clusters of three or five, spaced apart rather than lined up in a row. Put them into sections that already feel secure so the weight doesn’t drag the braid downward. If the hair is fine, anchor each pin through a hidden crossed bobby pin first.
Where the pearls work best
- At the point where the braid enters a bun.
- Along the curve of a crown braid.
- Near the base of a low side braid.
- Scattered lightly through the outer ridge of the braid.
This is the style for someone who likes the dress to feel elegant and the hair to feel finished, not decorated to death.
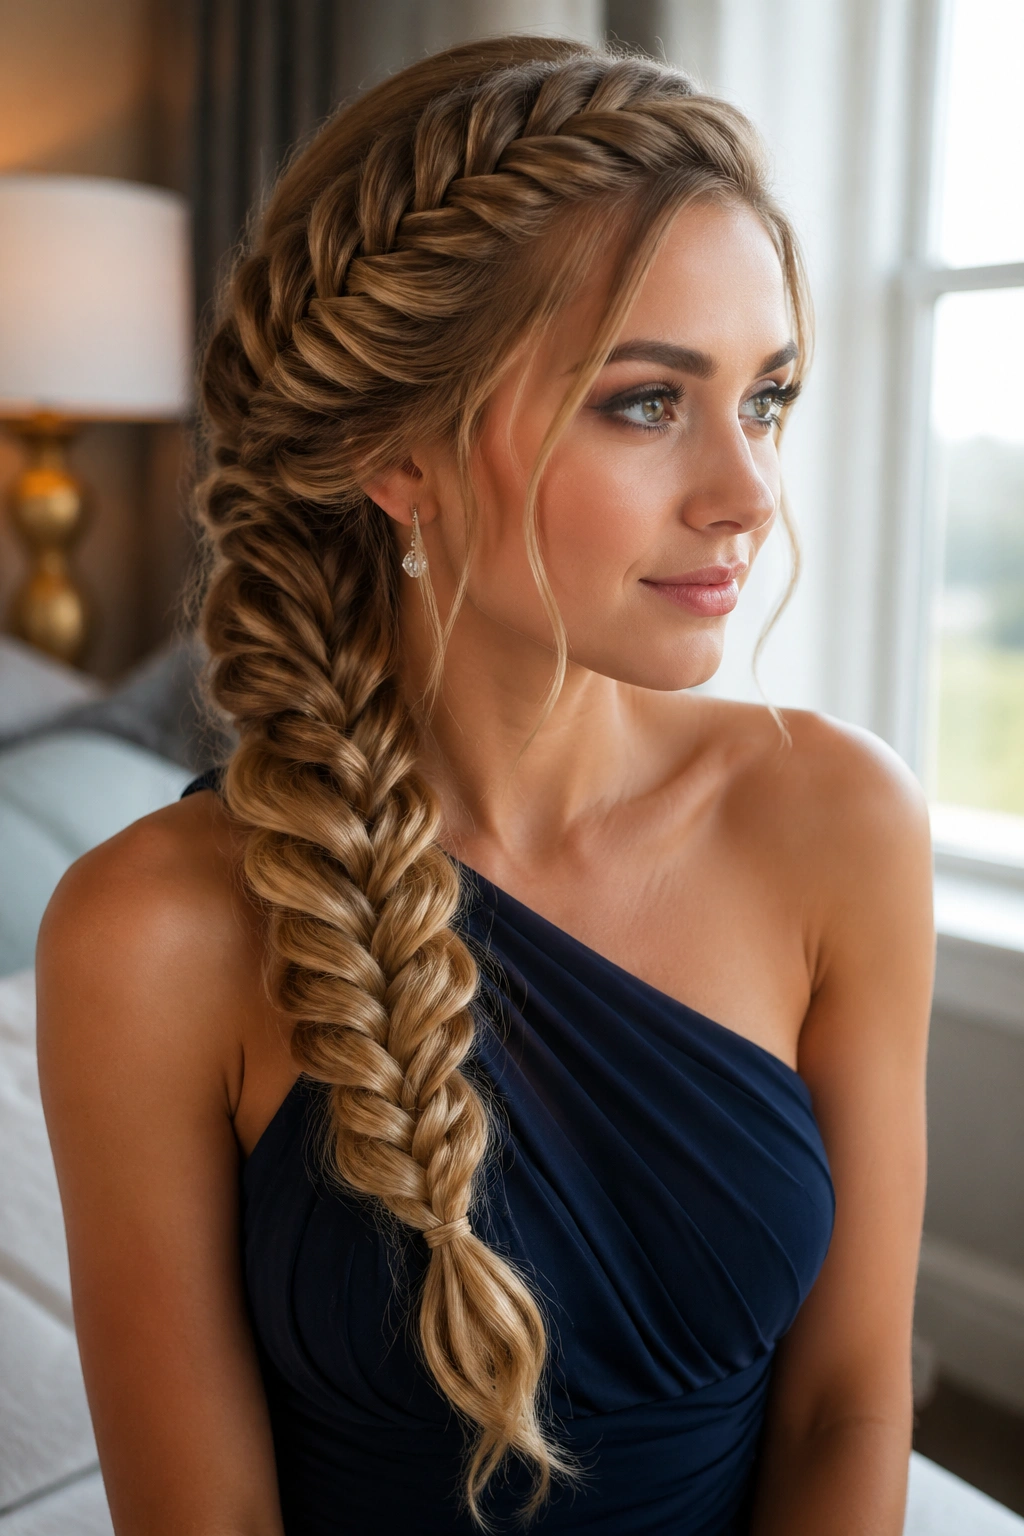
14. Fishtail-to-Dragon Combo
Two braid patterns in one style sounds extra.
It is. That’s the point.
A fishtail-to-dragon combo starts with the tiny woven look of a fishtail braid and shifts into the stronger, raised structure of a dragon braid farther down the length. The change in texture makes the braid more interesting up close, especially on long hair or hair with color variation. Highlights show every little switch in the weave.
The best part is that it avoids one common problem: a full dragon braid can sometimes feel heavy on very long hair. Starting with a fishtail keeps the top lighter and more delicate before the braid turns bigger near the ends. That creates a nice visual rhythm.
This style is good when you want detail without looking overbuilt. It also works well with dresses that have a lot going on at the top, because the braid adds texture without needing extra accessories. If your hair is all one length, this combo helps break up the line in a way that feels intentional.
15. Low-Twist Dragon Braid Chignon
Quiet, neat, and a little old-school.
A low-twist dragon braid chignon is what you choose when you want the hair to sit low and polished, with all the focus on your face, jewelry, and dress. The braid can travel along the side of the head or straight down the back before folding into a tucked chignon at the nape.
The trick is keeping the twist compact. A loose chignon can drift into casual territory fast, especially if the braid ends are bulky. Smooth the hair at the nape first, then pin the twist in stages instead of trying to secure it all at once. Two pins at the base, two at the sides, then one through the center usually holds better than a single heavy pin.
This style is especially good with minimal, clean dresses. It leaves the shoulders open and gives the neckline room to breathe. If you’re wearing a statement necklace, this is one of the few braid styles that won’t fight it.
16. Crisscross Dragon Braid Half-Up
Why does crisscrossing help so much?
Because it adds depth before the braid even starts. A crisscross dragon braid half-up uses overlapping sections at the crown, then feeds those sections into a raised braid. The result has more visual detail than a simple half-up braid, which is useful if your hair is one flat color or has subtle highlights that need a little movement.
The key is to keep each crossover clean. Pull one section over the other, secure it if needed with a tiny elastic, then continue into the braid. If the crossing gets sloppy, the whole style starts to look tangled. That’s the line between deliberate and messy.
How to keep the crossover neat
- Work with 1-inch sections so the pattern stays readable.
- Smooth each section before crossing it.
- Pin the first overlap if your hair slips easily.
- Stop the crossing at the crown; don’t drag it too far down.
This is a good choice for layered hair that needs structure near the top and softness below.
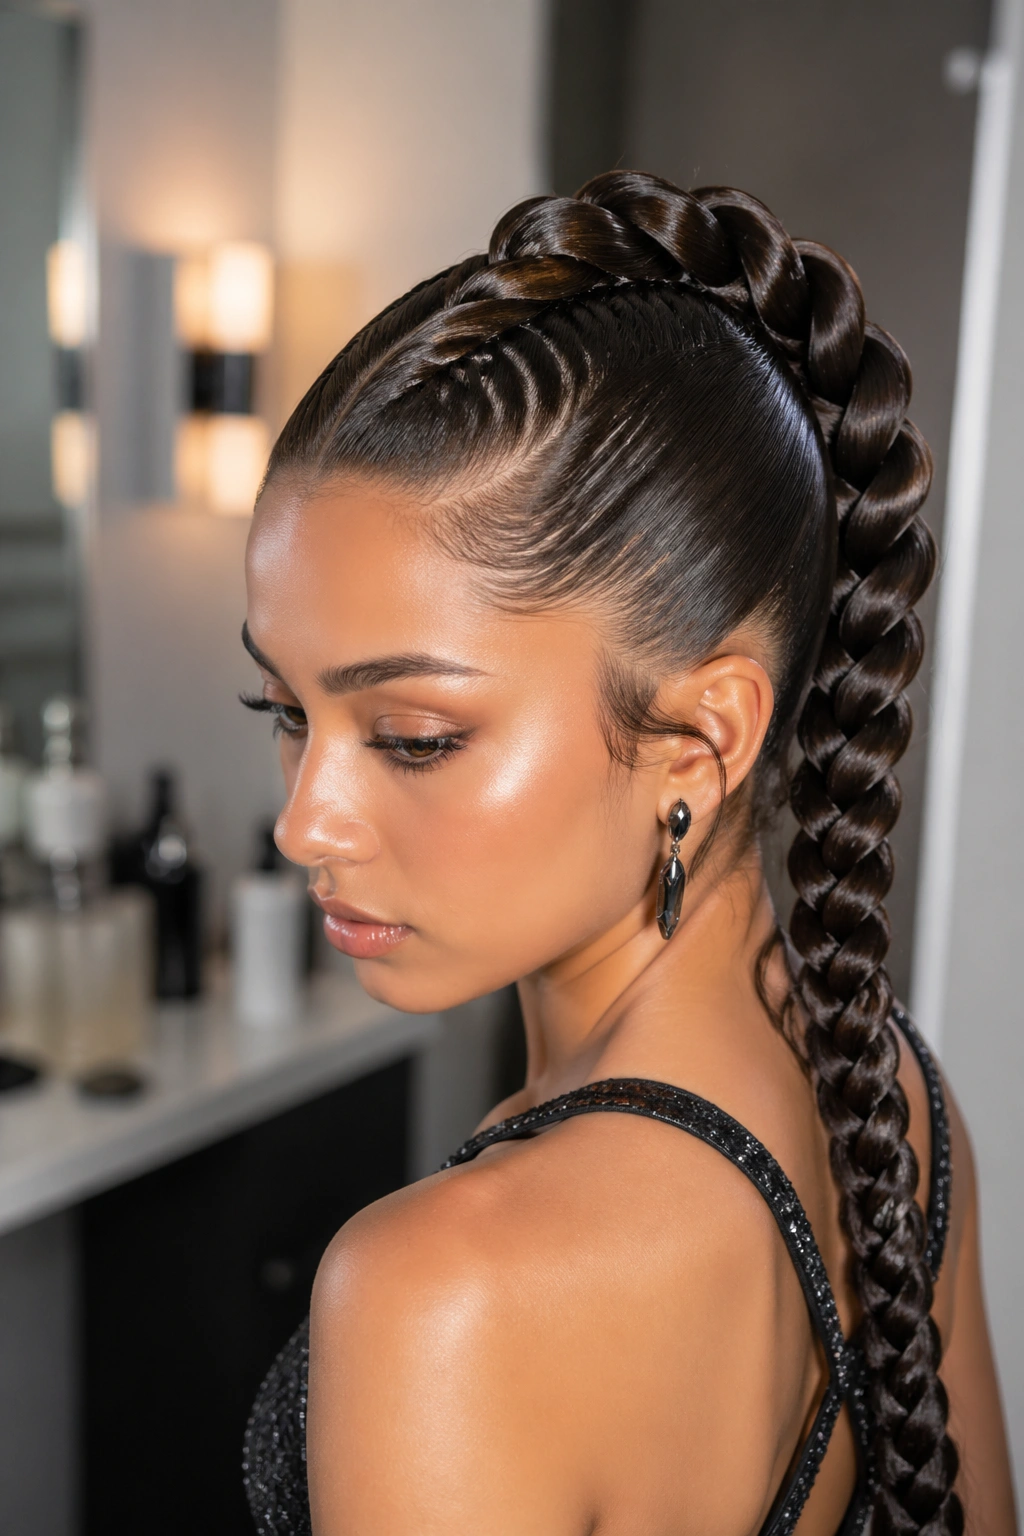
17. High Pony Dragon Braid
A high pony wakes up the whole face.
A high pony dragon braid is one of the most dance-friendly formal styles on this list. It lifts the hair off the neck, shows the jawline, and keeps the braid swinging instead of sitting still. If your dress has a strapless top or a dramatic open back, this style lets the hair feel lively without losing polish.
The ponytail should sit high enough to create lift, but not so high that the base feels strained. Wrap the elastic with a strand of hair and pin the end underneath the ponytail. That one move makes the whole look feel finished instead of gym-like.
If you want extra height, tease the crown before gathering the hair. Keep the teasing hidden under the smooth outer layer. The braid itself can stay tight at the top and looser toward the end, which gives the style a more sculpted tail shape. Curled ends help too.
This is the practical choice for someone who wants to move without thinking about their hair.
18. Sleek Wet-Look Dragon Braid
Gloss changes the personality of the braid.
A sleek wet-look dragon braid feels modern and sharp because the shine is concentrated at the roots and along the braid’s ridge. It works especially well with minimalist dresses, sculpted makeup, and strong earrings. The braid becomes more architectural than romantic.
Use a light gel or styling cream on damp hair, then comb everything into the desired part before braiding. A boar-bristle brush helps smooth the surface without leaving it flat. The goal is not crunch. The goal is controlled shine that still feels touchable.
The biggest mistake is using too much product on the ends. That weighs the braid down and makes it clump. Keep the heaviest product near the crown and hairline, then taper it out as you move downward.
This style can look expensive fast, but only if the braid itself is precise. Sloppy sections will show under the shine.
19. Volume-Heavy Pancaked Dragon Braid
Fine hair finally gets to look big.
A pancaked dragon braid is built by gently pulling the outer edges of each braid section after the braid is secured. That widens the braid and makes it look fuller, which is a gift if your hair is thin or if you want the braid to match a full skirt or dramatic gown.
Start with a braid that is tight enough to hold. Then work from the bottom upward, easing the edges out with your fingertips. Don’t tug in the middle of a section first; that can create little holes. A tail comb can help lift the outer loops without wrecking the pattern.
What to watch for
- Stop before the braid starts to collapse.
- Use texture spray before braiding if the hair is too silky.
- Clip-in extensions can help if the braid needs length and not just width.
- A little asymmetry is fine; mirror-perfect width is not necessary.
This is one of those styles that looks soft from far away and surprisingly detailed up close.
20. Curly-End Dragon Braid
Straight ends are fine. Curly ends feel more romantic.
A dragon braid with curled ends keeps the top controlled and formal while letting the bottom soften into movement. That combination works well if your dress has lace, tulle, or a lighter fabric that benefits from a little motion in the hair. It also flatters layered hair because the ends don’t just hang there.
Curl the last 4 to 6 inches of hair with a 1-inch iron or medium rollers after the braid is finished. Let the curl cool fully before touching it. Warm curls fall flat the second you start poking at them, and nobody needs that disappointment before pictures.
This style is especially good when you want the braid to feel finished but not severe. The curls make the end of the braid look intentional, almost like a decorative flourish. Add a tiny spray of shine mist, but keep it light. Too much and the curls lose their shape.
21. Braided Crown into Bun
This one feels regal without trying too hard.
A braided crown into bun style starts with a braid that wraps partway around the head, then disappears into a tucked bun at the back. It has the clean profile of an updo and the interest of a braided front, which is a strong combination when your dress already has detail at the bodice or sleeves.
The crown section should sit snugly enough to stay in place but not so tight that it dents the hairline. Once it reaches the back, fold the remaining length into a low bun and pin it from underneath. The bun should look smooth at the edges and slightly padded at the center.
This style gives your neck room, keeps the back clean, and leaves space for earrings to do their job. If your gown has an open back, it’s especially smart. The braid creates interest up top while the bun keeps the shape contained.
A few tiny pins near the bun base can secure it without changing the look.
22. Asymmetrical Dragon Braid
Symmetry is overrated when the dress has attitude.
An asymmetrical dragon braid starts off-center and sweeps more heavily to one side, which creates a sharper, fashion-forward line. It works best when the gown already has asymmetry built in — one shoulder, diagonal ruching, a side slit, or an embellished strap that deserves a little visual echo.
The braid should feel deliberate, not lopsided by accident. Keep one side tighter and cleaner, then let the braid travel across the head at a strong angle. The contrast gives it energy. If both sides are equally busy, the style loses its point.
Best way to style it
- Keep the part off-center by at least 1½ inches.
- Smooth the lighter side with gel or cream.
- Let the braid land above one shoulder.
- Add one accessory only, placed on the heavier side.
This is a good choice if you want something a little editorial without drifting into costume territory.
23. Messy Romance Dragon Braid
A little softness goes a long way.
A messy romance dragon braid still needs structure at the roots, but the ends and outer edges are loosened just enough to feel airy. The key is controlled mess, not random pieces falling everywhere. You want the braid to look touched, not forgotten.
Texture spray helps here, especially if the hair is fine or too silky to hold shape. After braiding, gently pull a few outer loops wider and let a couple of thin strands escape around the temples. Keep the crown tidy, though. If the top gets fuzzy, the whole style starts to look unfinished.
This style works well with dresses that have softer fabric — chiffon, tulle, lace, anything with movement. It also suits blush makeup, soft shimmer, or jewelry that’s delicate rather than heavy. Think romantic, not precious.
The nicest thing about this version is that it forgives a little imperfection. That can be a relief on a long formal day.
24. Braided Ponytail with Wrapped Base

Sometimes the cleanest choice is the easiest one.
A dragon braid that feeds into a ponytail with a wrapped base gives you a polished look without asking for a full updo. It’s practical, secure, and fast enough to do if your schedule is packed. The wrapped base hides the elastic, which keeps the ponytail from looking too casual.
This style is especially useful if your dress has a detailed back or if you want the braid to start the outfit and then let the length drop freely. The ponytail can stay straight for a sleek effect, or it can be curled at the ends for more softness.
Compared with a full bun, this look moves more when you walk. Compared with loose hair, it stays in place far better. That middle ground is why a lot of people end up loving it once they try it.
If your hair is layered, pin the shorter pieces into the base before wrapping the strand around it. That keeps the ponytail from splitting apart halfway through the evening.
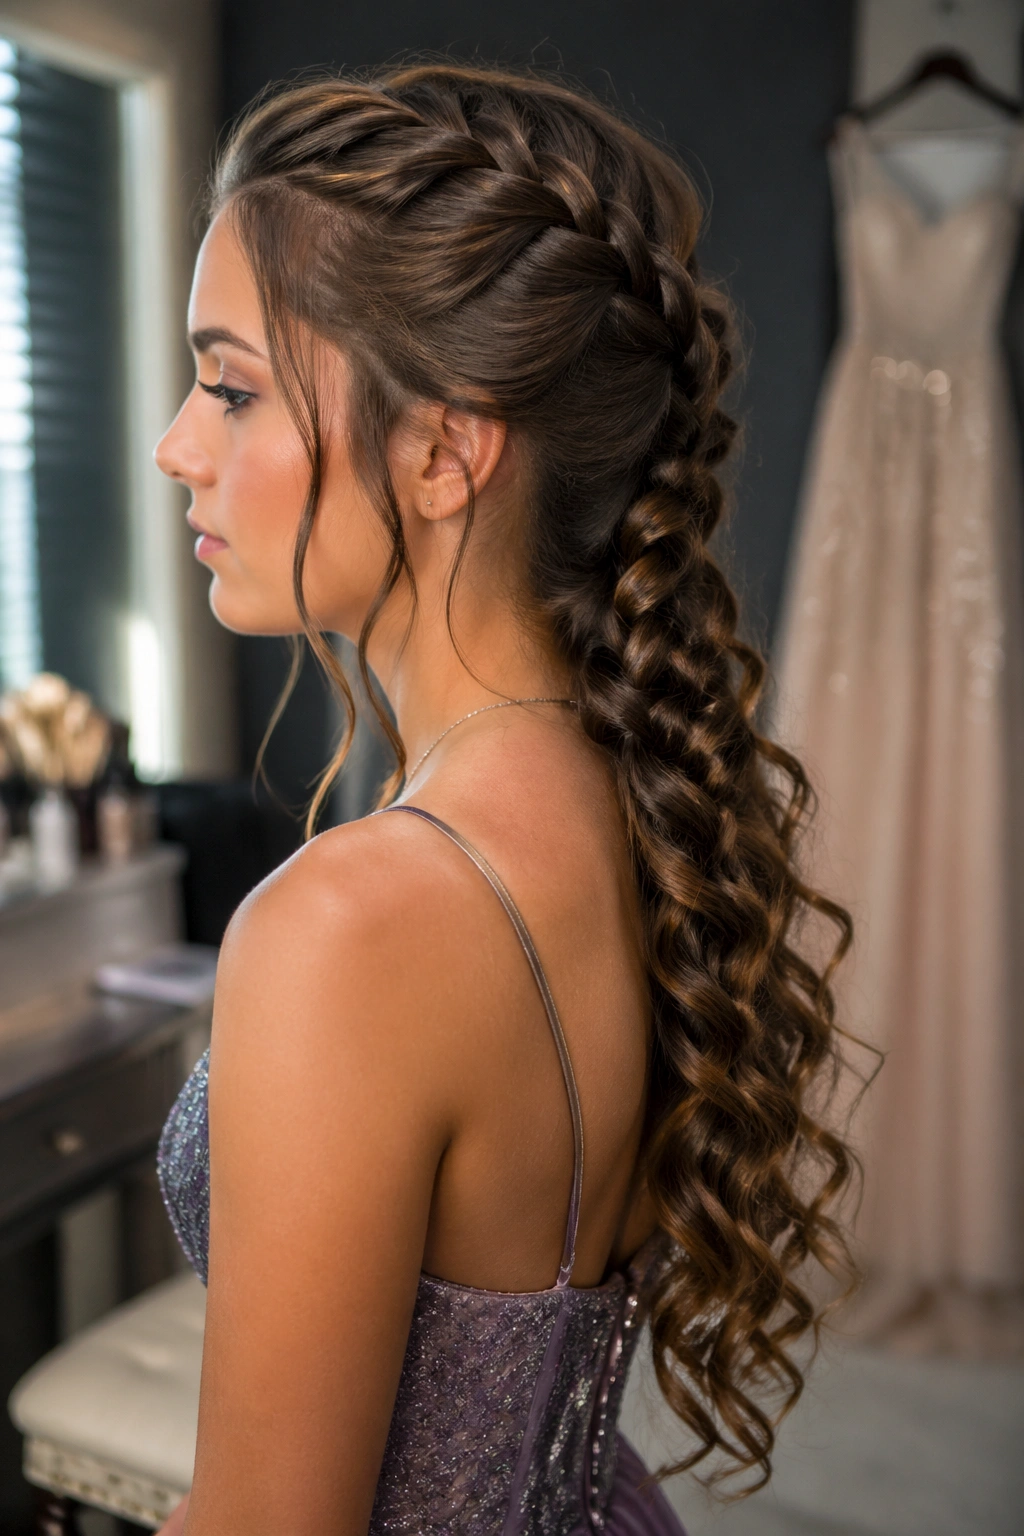
25. Statement Long Dragon Braid
Sometimes you want the hair to own the back of the dress.
A statement long dragon braid runs full length down the back, often with clip-in extensions, extra shine, or a few carefully placed accessories. This is the style that turns when you walk past people. It works best with open backs, simple necklines, and dresses that can handle a little visual competition from the hair.
The braid should stay strong near the top and get softer as it drops down. If you’re using extensions, blend them before the braid starts so the texture matches at the crown. A mismatch shows up fast in photos. If you want more drama, gently widen the braid after it’s secured, then add one or two ornaments — not a handful.
This is the style I’d pick for someone who wants hair that looks expensive, stays visible, and doesn’t disappear into the dress. It’s also a nice choice if you like long hair but still want it controlled enough to dance in. Choose the version that fits your neckline and your patience level, because both matter more than people admit.