Half-up pancake braids are the kind of birthday style that looks carefully chosen even when the morning has been a scramble of juice boxes, tiny shoes, and one missing sock. They sit in that sweet spot between neat and soft. Hair stays off the face, but the whole look still feels playful, which matters when the guest of honor is two feet tall and allergic to sitting still.
The pancake part matters more than people think. You do not just braid and walk away; you gently tug the outer edges of the braid so it gets wider, airier, and easier to see on small heads with fine hair. On toddler hair, that extra width helps the braid read clearly in photos and keeps it from looking like a skinny rope disappearing into a sea of flyaways.
Toddler hair is its own little puzzle. It is slippery, uneven, often full of baby wisps, and usually cut for function before anyone thinks about a party style. That is why half-up pancake braids work so well for birthdays: they control the front and crown without making the child feel pinned in place, and they leave enough softness around the face that the style still feels like a kid, not a miniature formal updo.
A spray bottle, a rat-tail comb, a detangling brush, and several clear elastics are the tools I reach for most often. A small ribbon or bow can help, too, but only if it does not start wrestling with the braid. The trick is choosing a style that matches the child’s hair length, texture, and patience level, because the braid that stays comfortable is the one that makes it through cake, photos, and the second round of running in circles.
1. Classic Half-Up Pancake Crown with a Tiny Bow
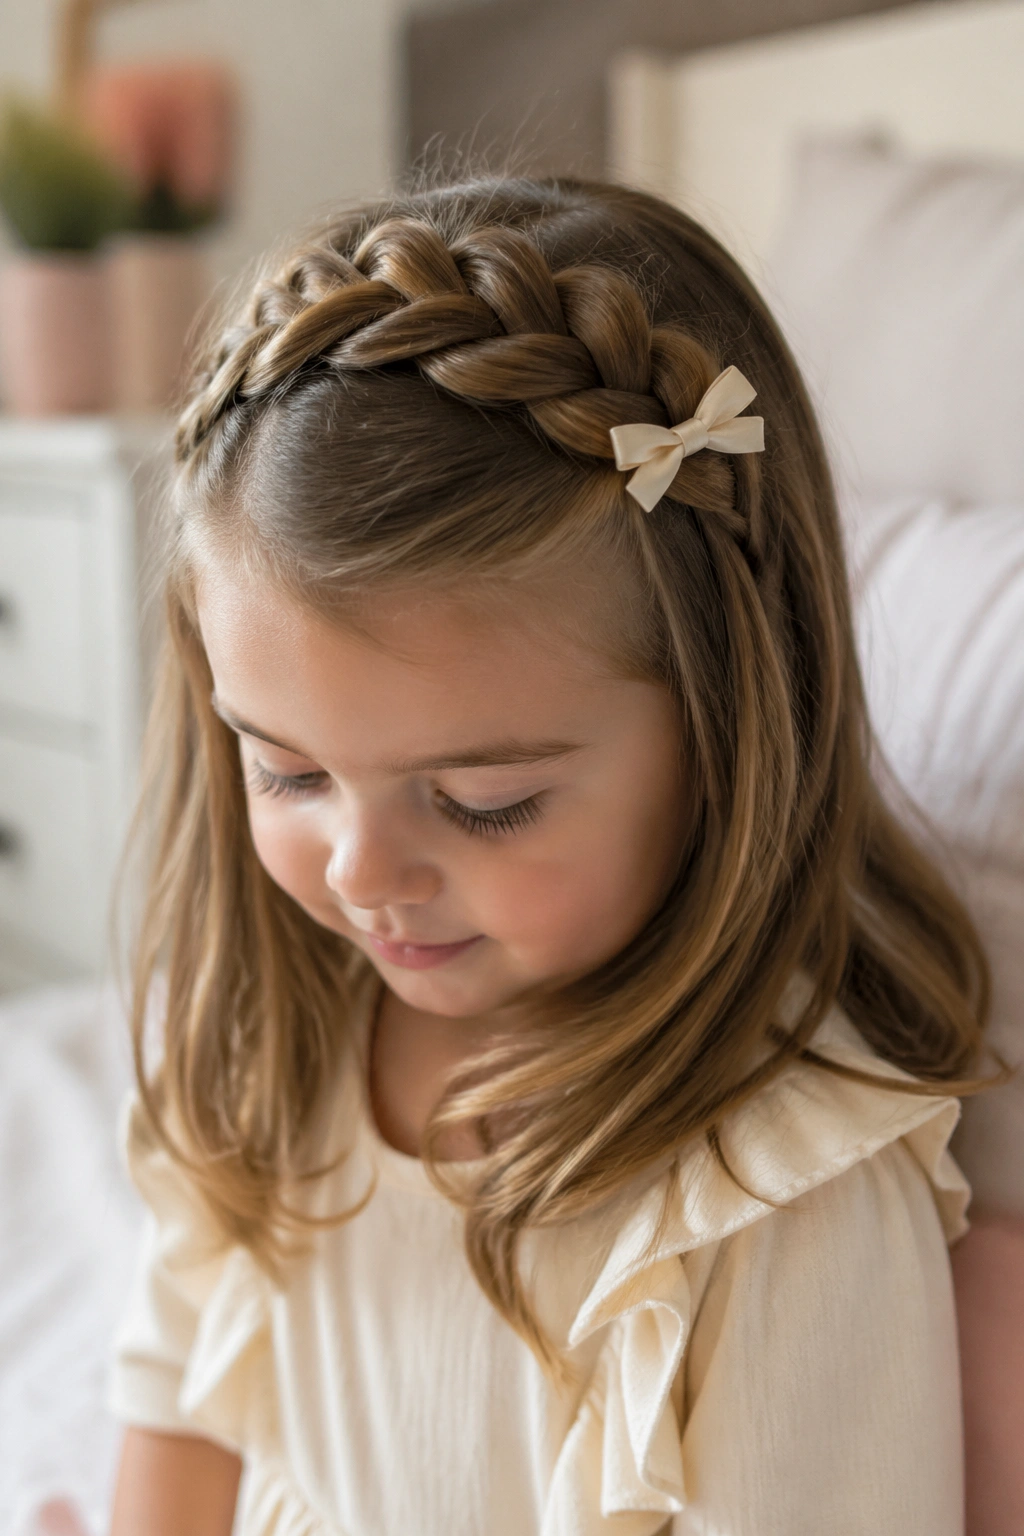
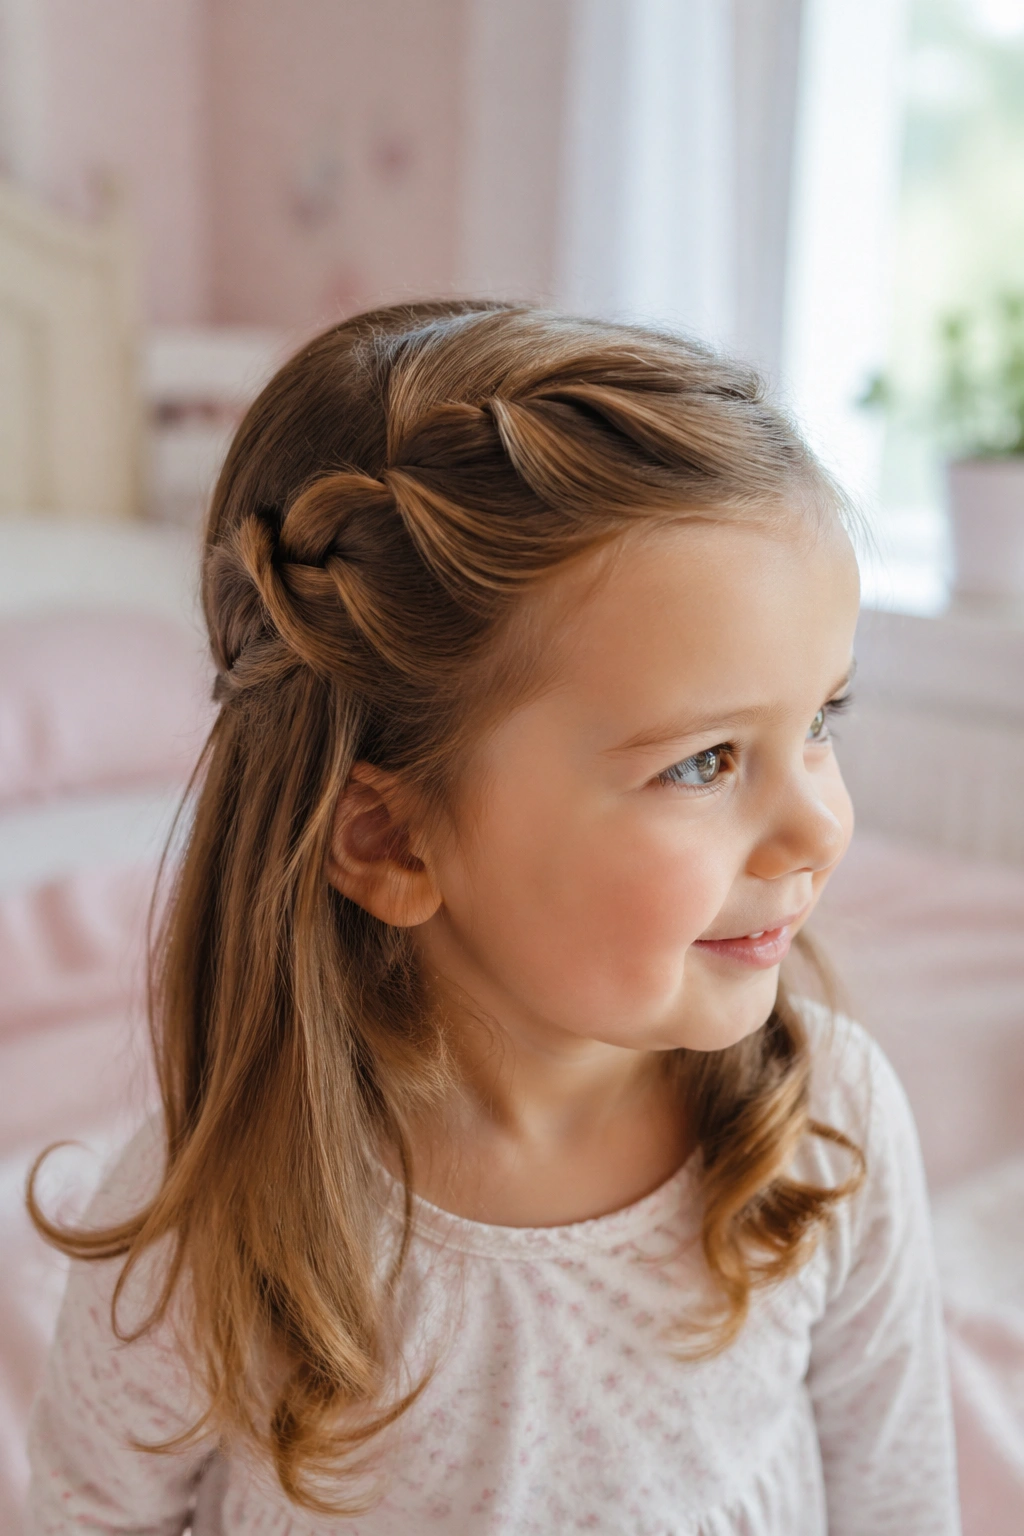
A classic crown braid is the one I reach for when I want the hair off the face and I do not want to spend ten minutes fixing flyaways. Start near one temple, braid a small section across the top of the head, and stop where the opposite side gives you enough hair to tuck into a clear elastic or pin. It looks polished, but not stiff.
Pancaking this style is what changes it from school-day braid to party hair. Pull only the outer edges of each loop, a little at a time, until the braid looks soft and wide; if you tug the middle too, the braid turns fuzzy fast. On toddler hair, that soft widening makes a surprising difference because the braid does not vanish against the scalp.
Tension is the whole game.
Why It Sits Nicely on Small Heads
A crown braid hugs the head in a way that feels secure without piling weight on the back. That matters on toddlers, because heavy braids can slide, tilt, or start bothering them halfway through a birthday party. A half-up version also leaves enough hair down to keep the whole style from feeling overdone.
I like a tiny bow or a single flower clip right where the braid ends. One accessory is enough. Anything more starts to fight the braid instead of finishing it.
- Works best on fine to medium hair that reaches at least to the shoulders.
- Usually takes 5 to 8 minutes once the hair is detangled.
- Needs 2 clear elastics and a light mist of water or leave-in spray.
- Looks best when the outer loops are widened and the center stays snug.
Pro tip: Pancake the braid with your fingertips, not your whole hand. Smaller pulls give you control, and control is what keeps toddler braids from turning frizzy.
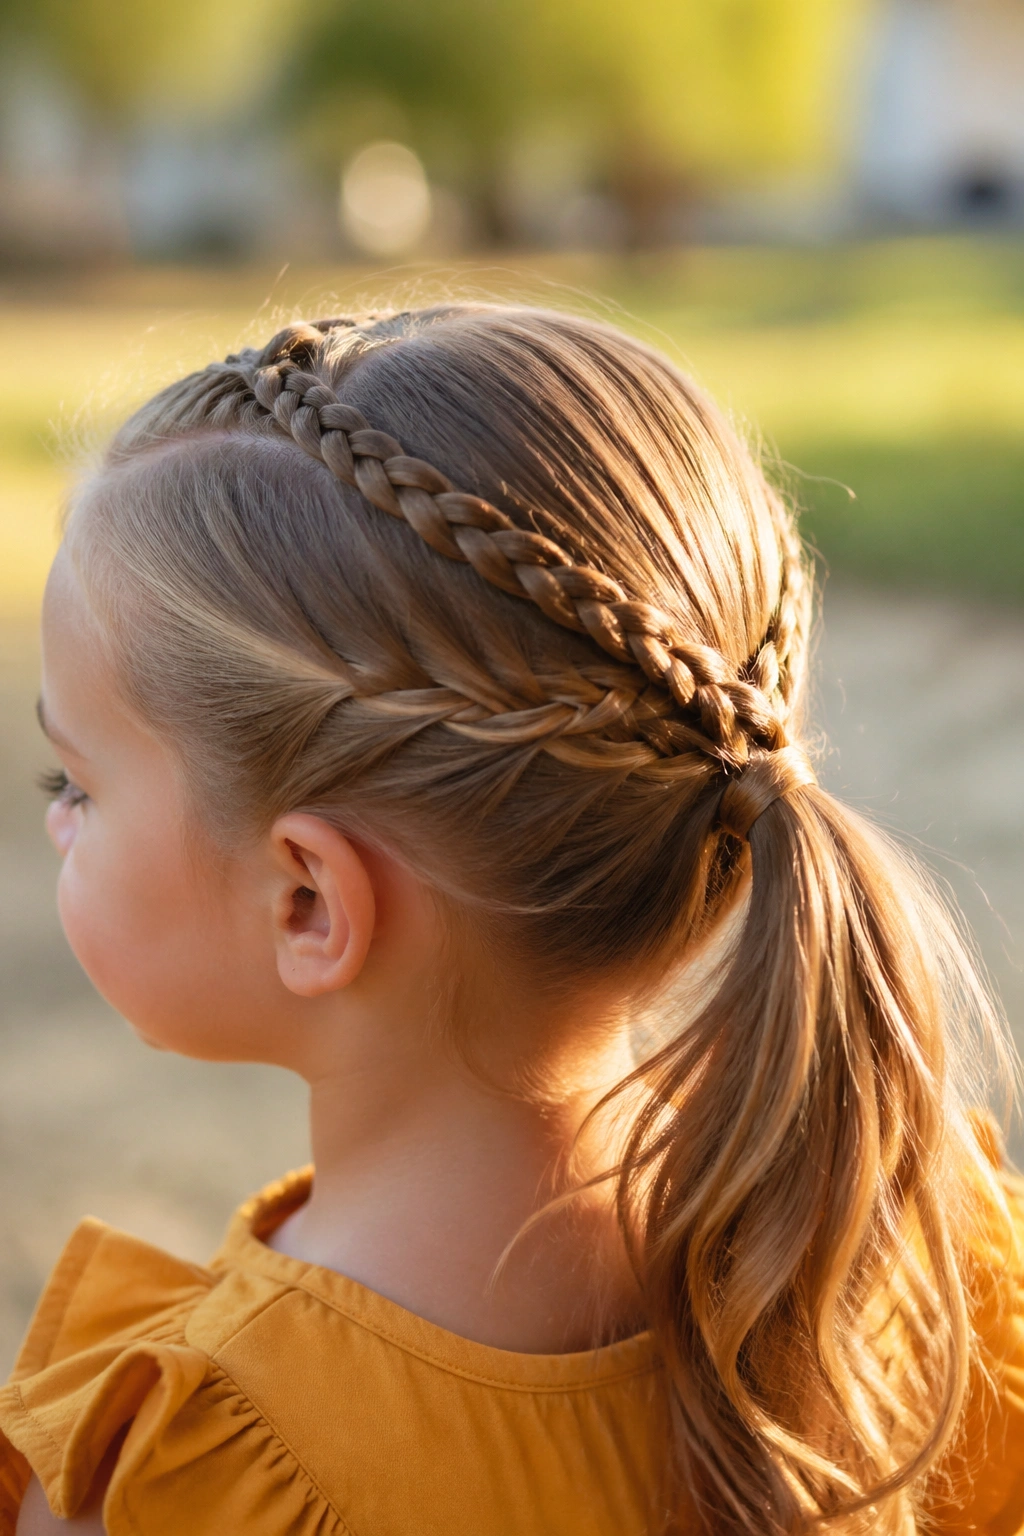
2. Twin Side Half-Up Pancake Braids Crossing at the Back
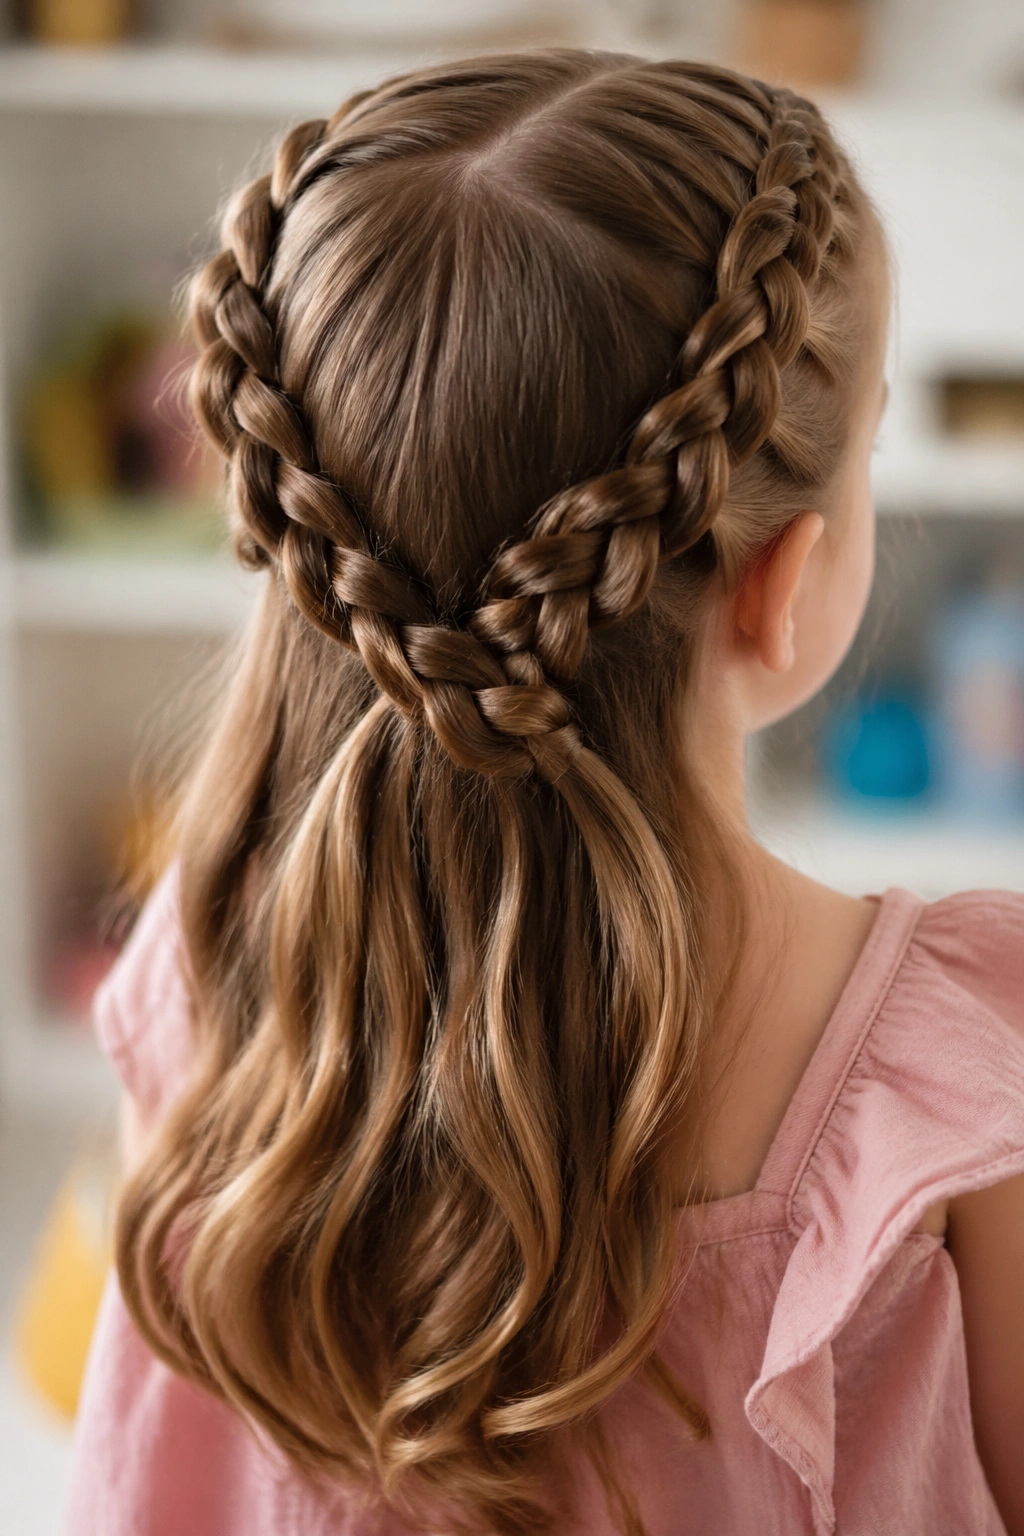
Two braids are not the same as one bigger braid. This style gives you symmetry without forcing the hair into a single path, which is handy when one temple has a cowlick or one side is a little shorter than the other. Each side starts near the front, gets braided back, and crosses softly at the back before being tied together.
I like this version for birthday mornings when the child keeps touching one side of her head. Two braids spread the hold out, so the style feels lighter than a thick crown braid. That can make a difference if your toddler hates anything that feels tight at the top.
The look is tidy, but not fussy. The crossing point at the back gives you one clean spot to hide a clear elastic, and the loose ends can stay wavy, curled, or lightly brushed out depending on the hair texture.
If I had to pick one style for a child who is likely to lean on the chair, burrow into a pillow, or fall asleep in the car on the way home, this would be high on the list. It keeps its shape without asking for much from the rest of the hair.
3. Heart-Shaped Half-Up Pancake Braid for Party Photos
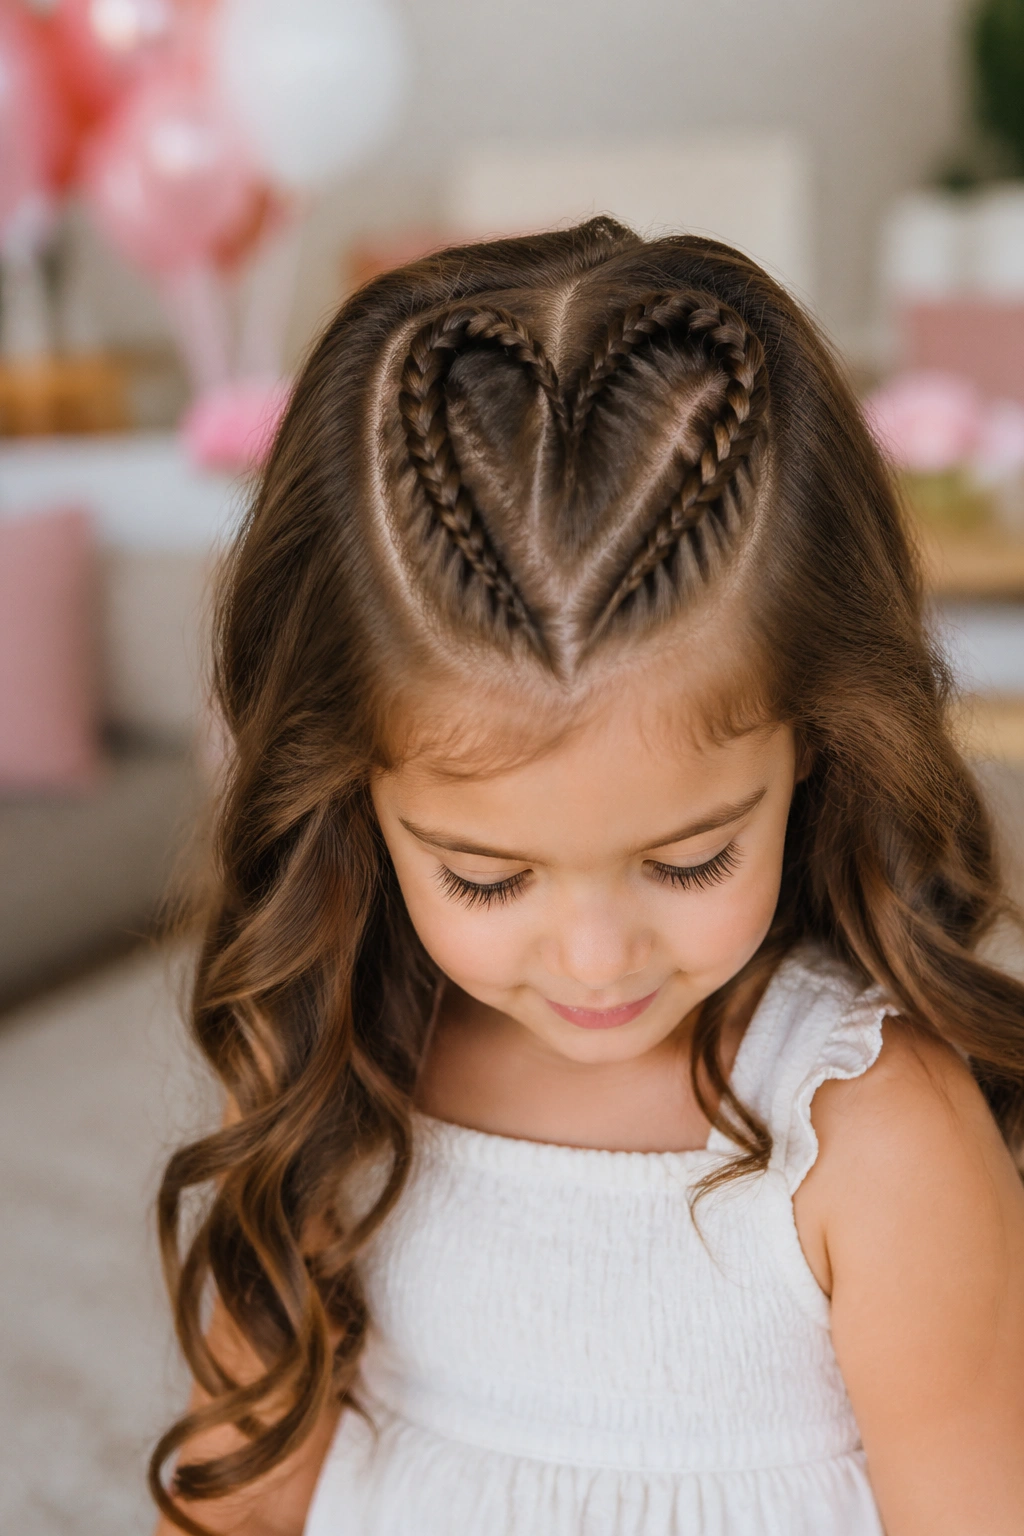
Why do heart braids look so sweet on birthdays? Because the shape is readable even when the hair is fine and the child is moving around. A heart at the crown feels playful without being loud, and half-up keeps it from turning into a stiff costume piece. On toddlers, that matters more than perfection.
The trick is to build the heart small enough that it actually shows. Two slim braids or twists curve inward from each side, meet near the center, and then get anchored so the outline of the heart stays visible. If the loops are too large, the shape turns vague and the whole thing starts looking like a regular braid with a funny bend in it.
How to Keep the Heart Shape Visible
Start with sections about 1/2 inch to 3/4 inch wide at the temples. Keep the curves shallow and neat, then pancake the outer edges just enough to round the heart without flattening the shape. A tiny clear elastic at the meeting point helps, and a bow can hide the tie if you want a cleaner finish.
- Best on shoulder-length hair or longer.
- Use 2 small elastics and one tiny finishing clip.
- Keep the heart low enough to read from the front.
- Avoid making the top point too narrow, or it disappears.
I would not make the heart huge on a small head. It can start to look crowded fast. A modest heart is easier to control, easier to keep neat, and much kinder to a toddler who wants to move on to cake.
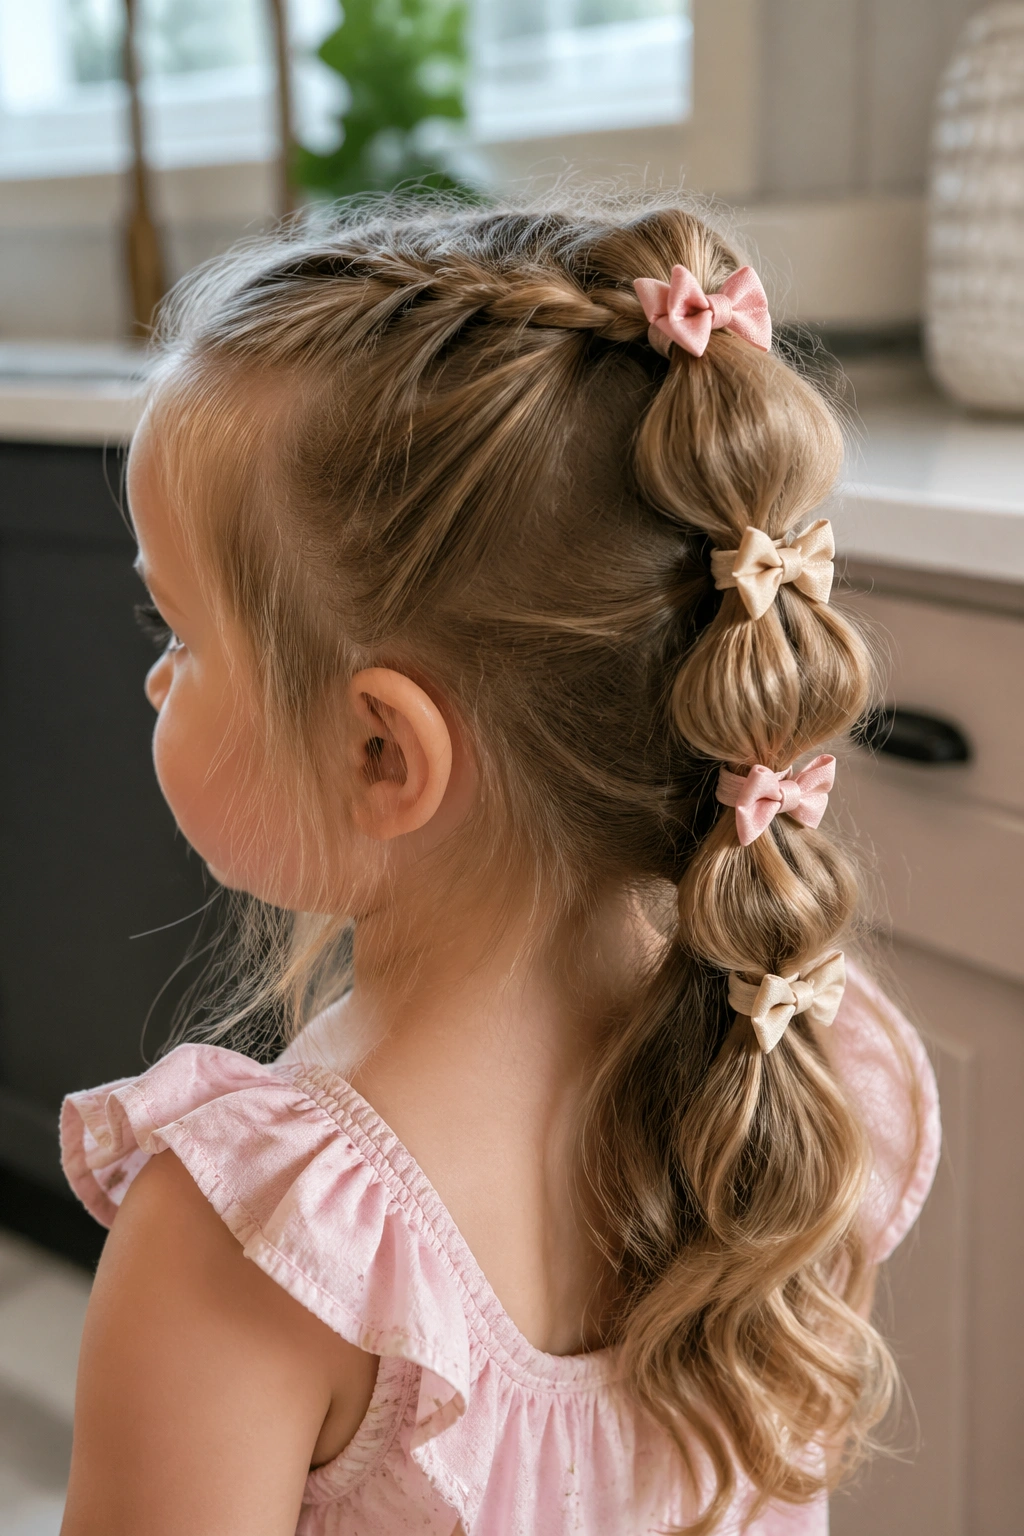
4. Pull-Through Half-Up Pancake Braid with Bubble Ends
Some toddler hair refuses to stay in a regular braid. It slips, sheds pins, and feels extra smooth right after detangling. A pull-through braid handles that problem better because it uses stacked ponytails instead of a woven pattern, so the style stays fuller and less dependent on tiny sections holding perfectly.
The birthday version works especially well half-up. You gather the top section into a small ponytail, split it, pull the next section through, and repeat until the braid reaches the back. After each bubble forms, you pancake the sides gently so the shape opens up and looks soft rather than rigid. That widening is what makes the style feel like a braid instead of a row of clipped lumps.
I like this one for hair that falls flat by noon. The bubbles keep their shape in a way that a classic braid sometimes does not, especially on fine hair. And because the style is built from elastics, you can adjust the size of each bubble to suit the child’s hair thickness.
A few details matter here:
- Use 4 to 6 mini elastics, depending on hair length.
- Keep each section about 1 inch to 1 1/2 inches thick.
- Pancake the bubble edges after each elastic goes in.
- Finish with a bow, clip, or ribbon at the last tie.
The final look is playful without being chaotic. That is a good birthday balance.
5. Waterfall Half-Up Pancake Braid That Feels Soft and Loose

Waterfall braids have a little motion built into them, and that is what makes them work so well on a toddler’s head. One strand drops through each crossing, which leaves little arches across the top and loose lengths below. The result is airy, almost ribbon-like, without asking the whole head to be tightly pulled back.
On toddler hair, that looseness is the charm. It softens layered cuts and makes face-framing pieces look intentional instead of half-finished. A waterfall braid also gives you a nice place to show off hair that has a bit of wave or curl in the lower half, because the top is controlled and the rest can move.
It does need enough length to show the falling strands. If the hair is too short, the pattern starts to blur, and then the braid loses the thing that makes it interesting in the first place.
I would choose this style for a child who will sit for a few minutes, then run off to the play area, then come back for cake. It tolerates a little chaos better than you might expect, but it still looks lovelier when the front pieces are brushed smooth and the braid is kept close to the head.
A light mist of water or a tiny bit of leave-in detangler helps the strands lie flat at the root. Skip anything heavy. Fine toddler hair gets weighed down fast.
6. Side-Swept Half-Up Pancake Braid with a Ribbon Weave
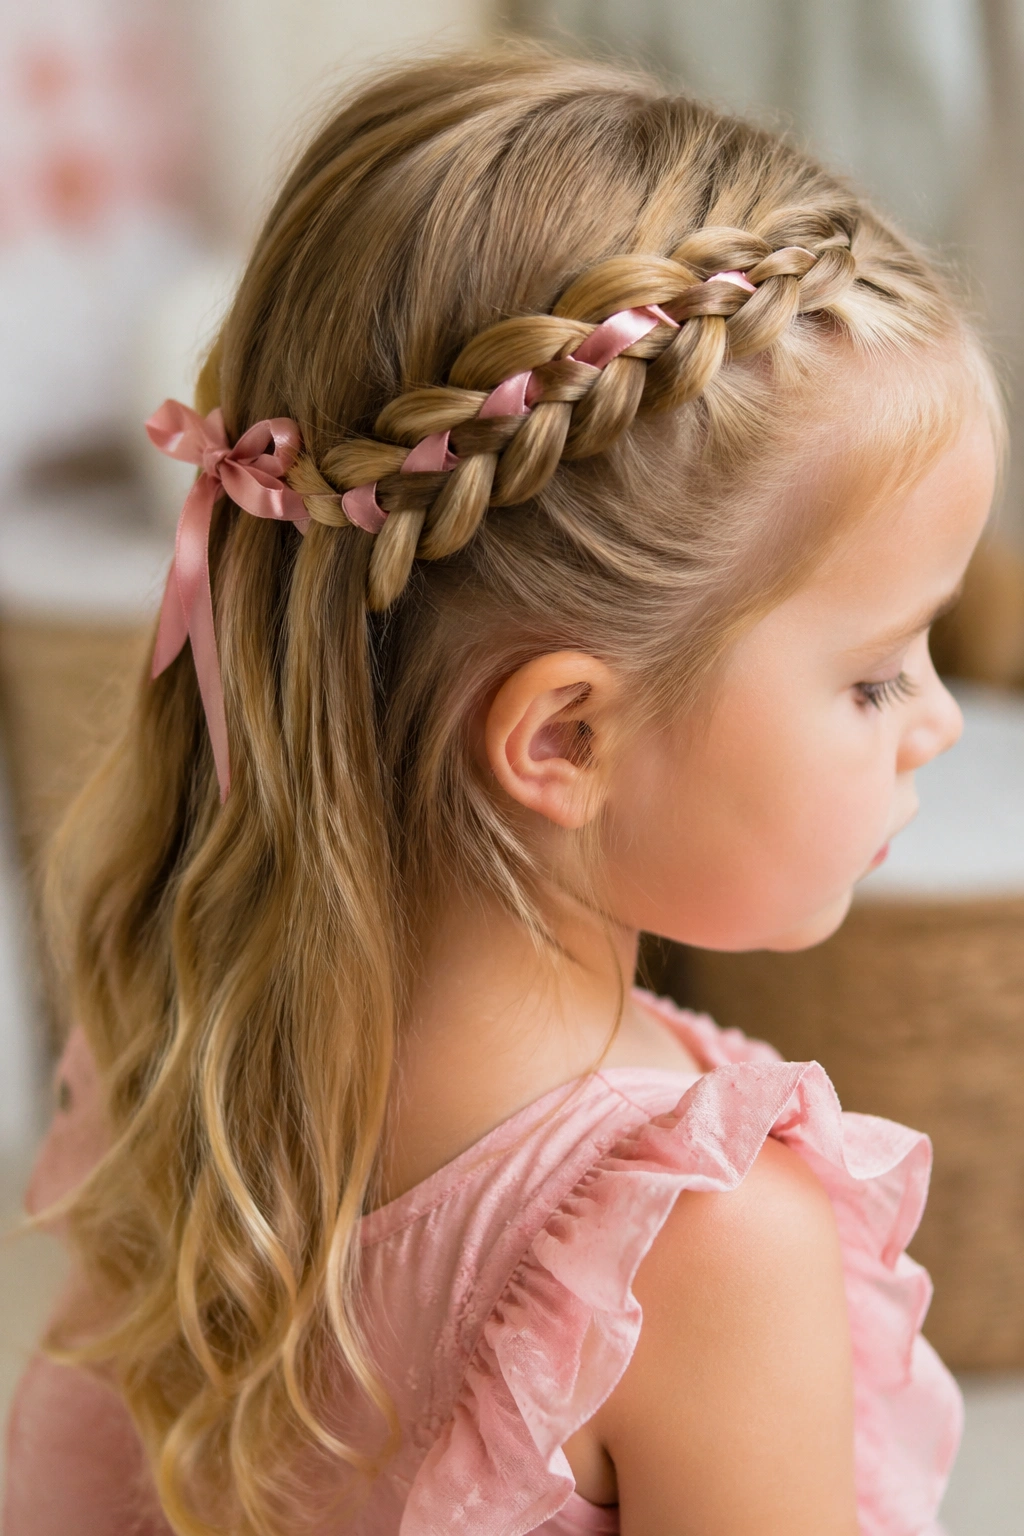
A narrow ribbon can do more for thin toddler hair than another bobby pin ever will. It gives the braid a visible line, helps fill out short sections, and makes the style look finished even when the hair itself is fine or a little uneven at the ends. Keep the ribbon narrow — about 1/4 inch is usually enough.
I like satin for smoothness and grosgrain for grip. Satin slides through the braid more easily, which is nice if you are weaving by hand, while grosgrain holds its position a little better and does not wrinkle as fast. If the birthday outfit has one clear color, matching the ribbon to that shade keeps the whole thing coherent without turning it into a costume.
Keep the braid low. That is the part people miss. A side-swept braid that begins too high can fight the part and make the front feel pulled back in an awkward way, but one that starts just above the temple sits softly and follows the shape of the head.
The ribbon should be a detail, not the whole show. One weave through the outer section and a small tie at the end is enough. If the ribbon starts bunching or bowing out, it is too wide for the braid.
7. Lace Braid Half-Up with a Small Rosette Clip
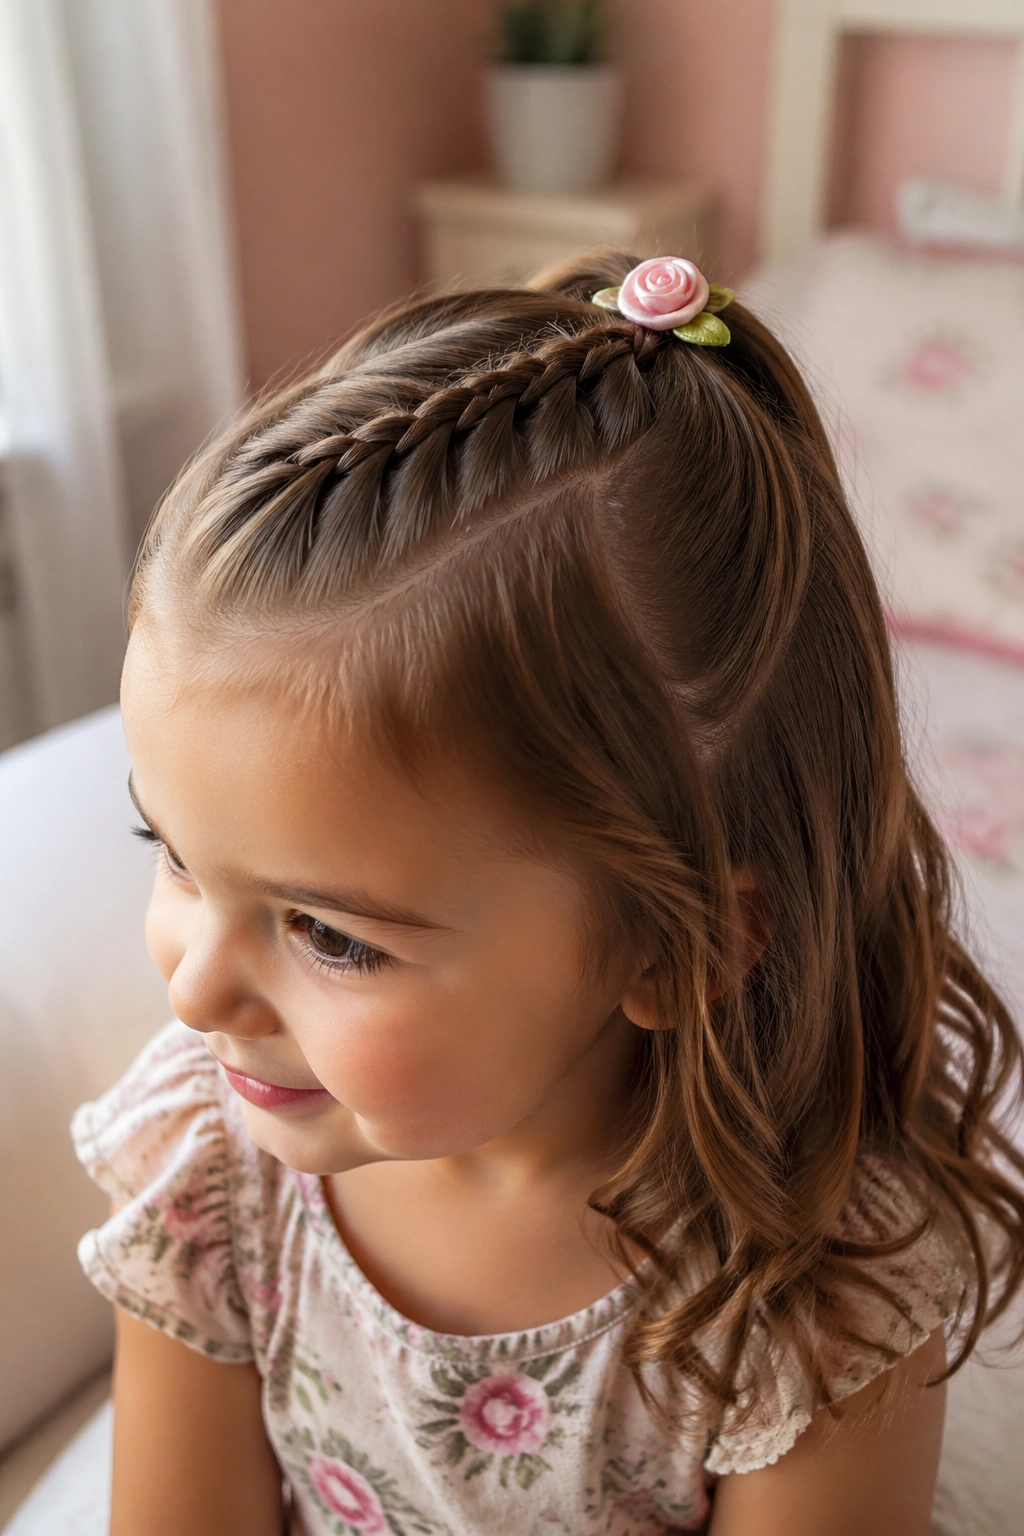
Can a lace braid stay tidy through a toddler birthday? Yes, if you anchor the front section properly and stop trying to make it perfect. A lace braid only adds hair from one side as it moves back, which keeps the other edge cleaner and gives the braid a neat, slanted look across the head. It is a nice choice when the front hair is shorter or the bangs need to be pulled back.
How to Keep the Braid from Slipping
Start with a small section near the front hairline and keep the added hair pieces narrow, about 1/2 inch at a time. Work close to the scalp at the front, then ease off a little as you move back so the braid does not flatten too much. When you reach the crown, tie it off with a clear elastic and cover that spot with a rosette clip or satin flower.
- Good for side-swept bangs and wispy front layers.
- Holds well with a light mist of water before braiding.
- Looks cleanest when the added sections are even.
- Avoid oversized flower clips; they crowd the braid.
The rosette is the part I like most. It hides the elastic, but it also gives the braid a little softness right where the eye lands first. Tiny clip, small braid, tidy finish. That combination works on birthday hair almost every time.
8. Mini Double Dutch Half-Up Pigtails for Shorter Hair
For shorter hair, two mini Dutch braids beat one long braid almost every time. The reason is simple: you do not need as much length for each side, and the braid sits close to the scalp where the shorter layers are easier to control. The style ends in a pair of little half-up pigtails, which look lively without turning the hair into a heavy crown.
This is the one I reach for on shoulder-length bobs, layered cuts, and toddler hair that has grown out unevenly. The Dutch pattern lifts the braid slightly off the scalp, so the shape reads clearly even when the hair is fine. Pancaking the outer edges gives each braid a soft, rounded look instead of a flat ridge.
It also gives you breathing room if the child has a sensitive scalp. The braids can start a little farther back, the part can be flexible, and the ends do not need to be tightly polished to look cute. That matters on birthdays, when comfort usually wins over symmetry.
I would keep the ends simple. A pair of tiny clear elastics or small bows is enough. If the hair is too short for full pigtails, let the ends stick out a little and call it done. The style still reads clearly, and toddlers do not care whether the last half-inch is textbook neat.
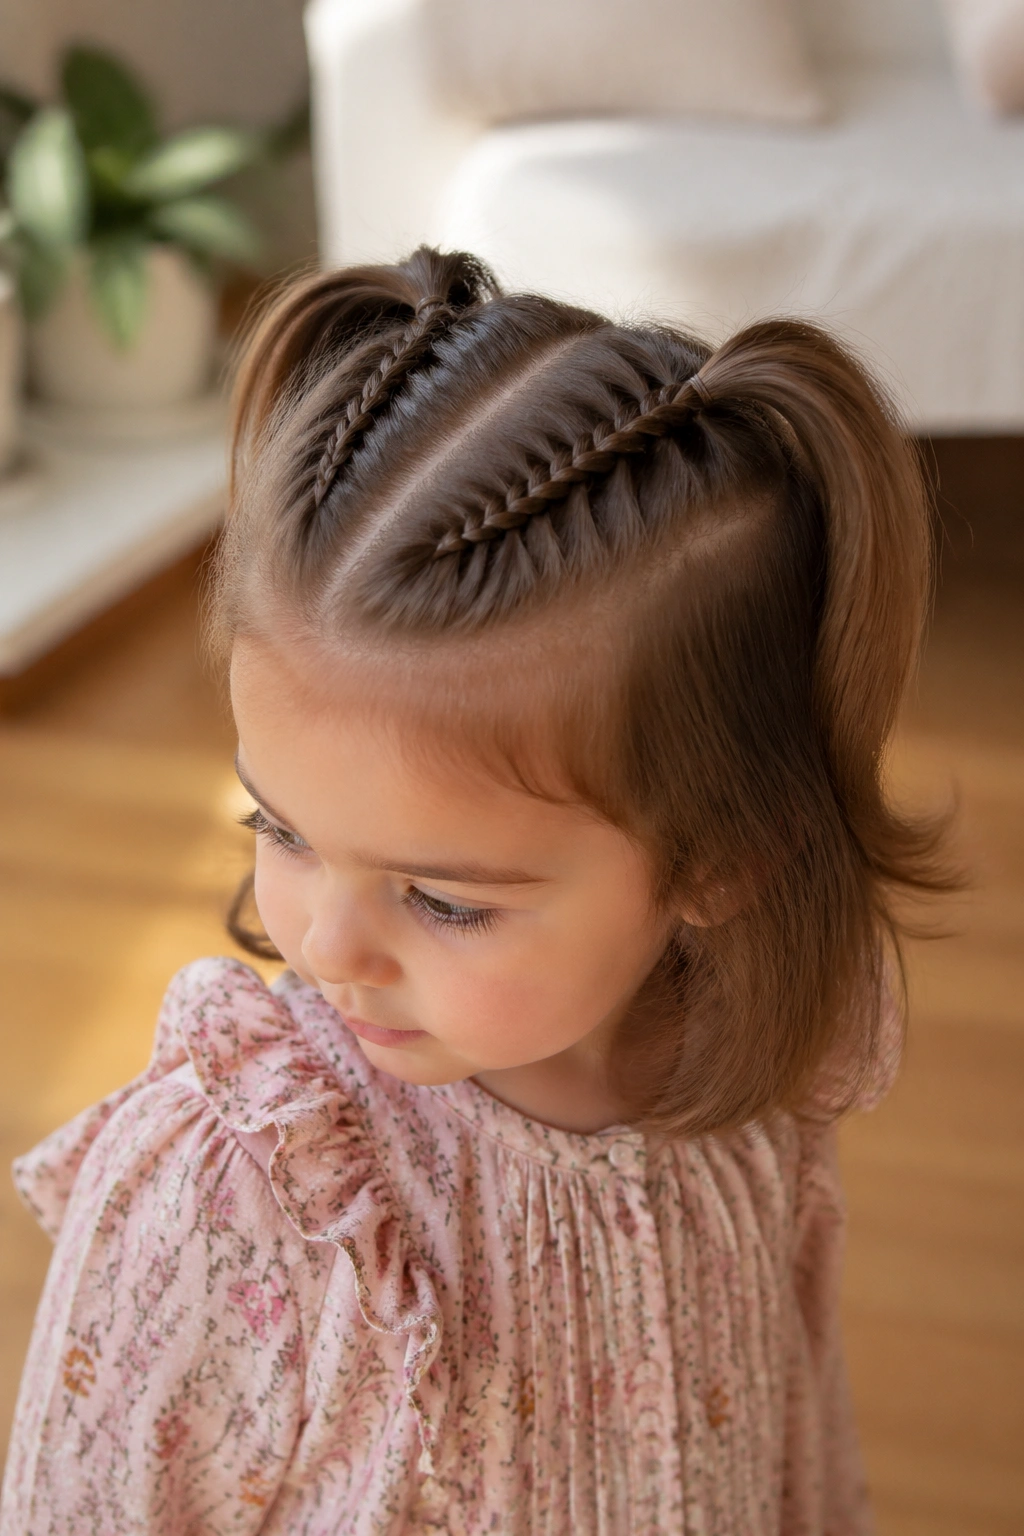
9. Zigzag-Part Half-Up Pancake Braid with a Clean Front Line
A straight center part can look too severe on a tiny head. A zigzag part softens that line and makes the braid feel a little more playful before you even start weaving. It is a small change, but on toddler birthdays, small changes are often what keep the style from feeling too grown-up.
Use the pointed end of a rat-tail comb and make a gentle zigzag from the front hairline back toward the crown. The teeth do not need to be sharp or dramatic. Two or three clean breaks are enough to break up the flatness and add a bit of movement. From there, you can build a half-up pancake braid from one side or carry the zigzag into a pair of connected braids.
What to Watch For
- Keep the zigzag wide enough to see, but not so wide that the parts look messy.
- Mist the hair lightly first so the comb does not snag.
- Start braiding right after the part is made, before the sections shift around.
- Pancake the braid only after the base is secure.
The fun of this style is in the front line. It gives the hair a little structure, which helps the rest of the braid feel deliberate. I like it when the birthday outfit is simple and you want the hair to do a little more of the talking.
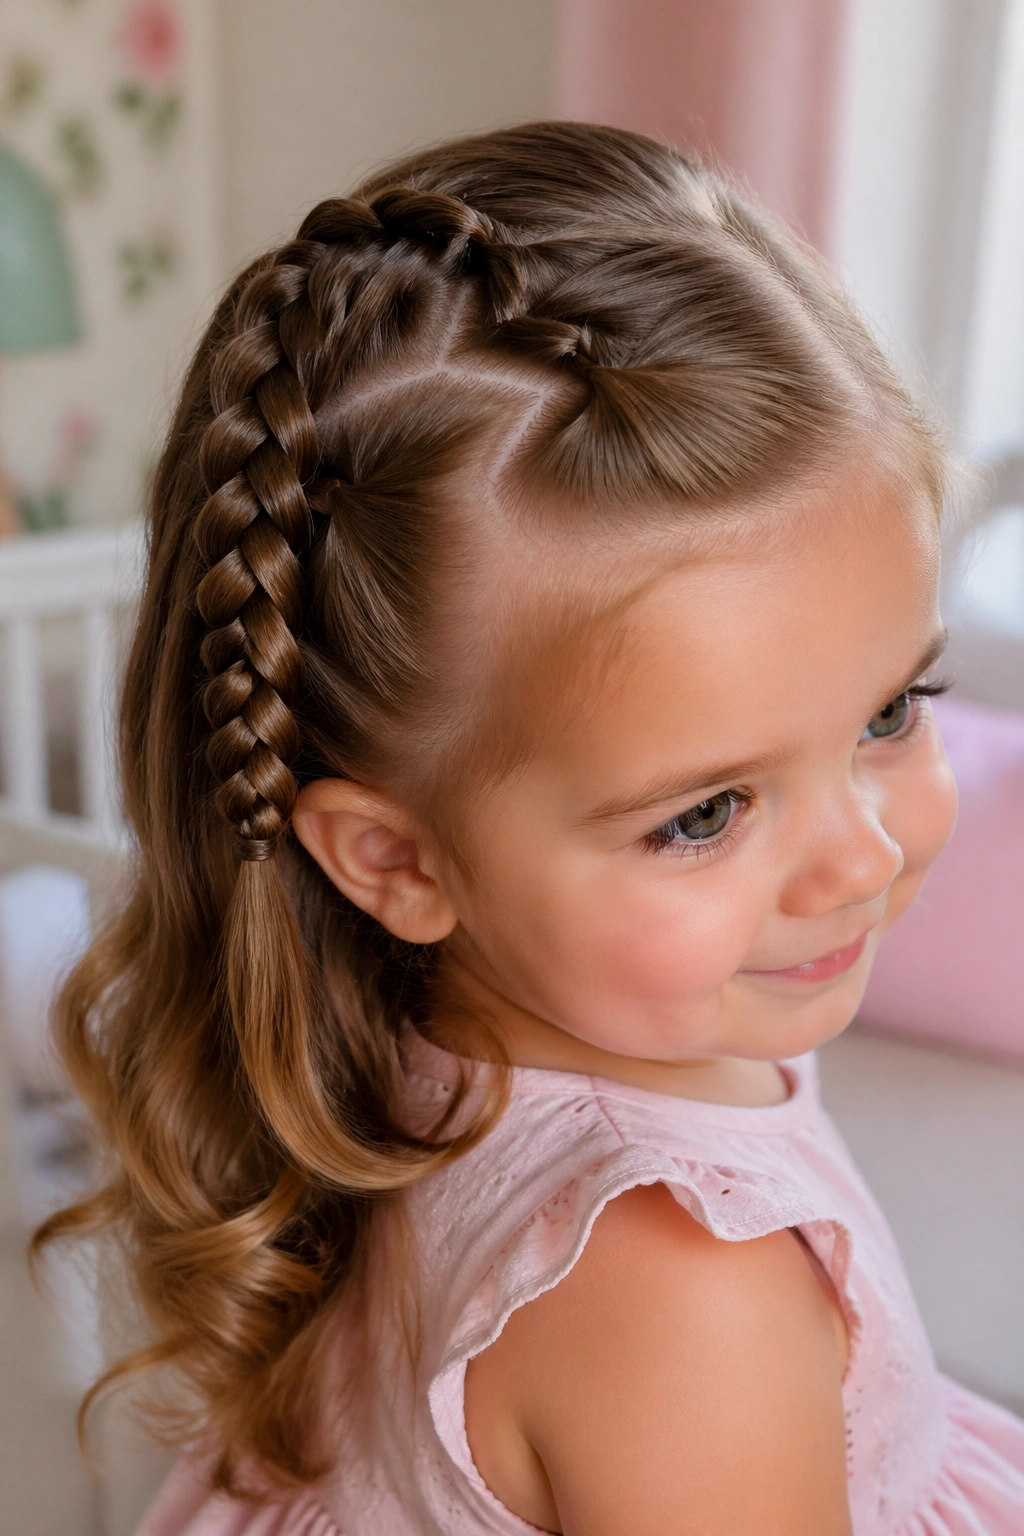
10. Crisscross Twin Braids Tucked into a Half Pony
If you want more hold than a loose braid, crisscrossing two thin braids behind the head gives you that extra grip. It is a tidy little trick for toddlers who tug at their hair or lean back in car seats, because the cross-back helps anchor everything before you tie it into one half pony. The style feels secure without looking harsh.
Start with a braid on each side, keep them slim, and bring them toward the center back. Cross one over the other, then gather the joined ends into a single elastic. Once that pony is in place, pancake the braids just enough to make the crisscross pattern visible. You do not need a lot of pull here; the shape itself does the work.
I like this one because it hides a little unevenness. Shorter layers on one side? A fine front section? The crossing point helps disguise the difference and makes the finished style look more intentional. That is useful on birthday mornings when the haircut is not quite at the ideal stage.
A tiny satin scrunchie or a soft ribbon tie can finish it, but keep the accessory low-profile. The braid pattern is the main event. Anything too big will just sit on top of the style and make the back feel crowded.
11. Halo Half-Up Pancake Braid with Flower Pins
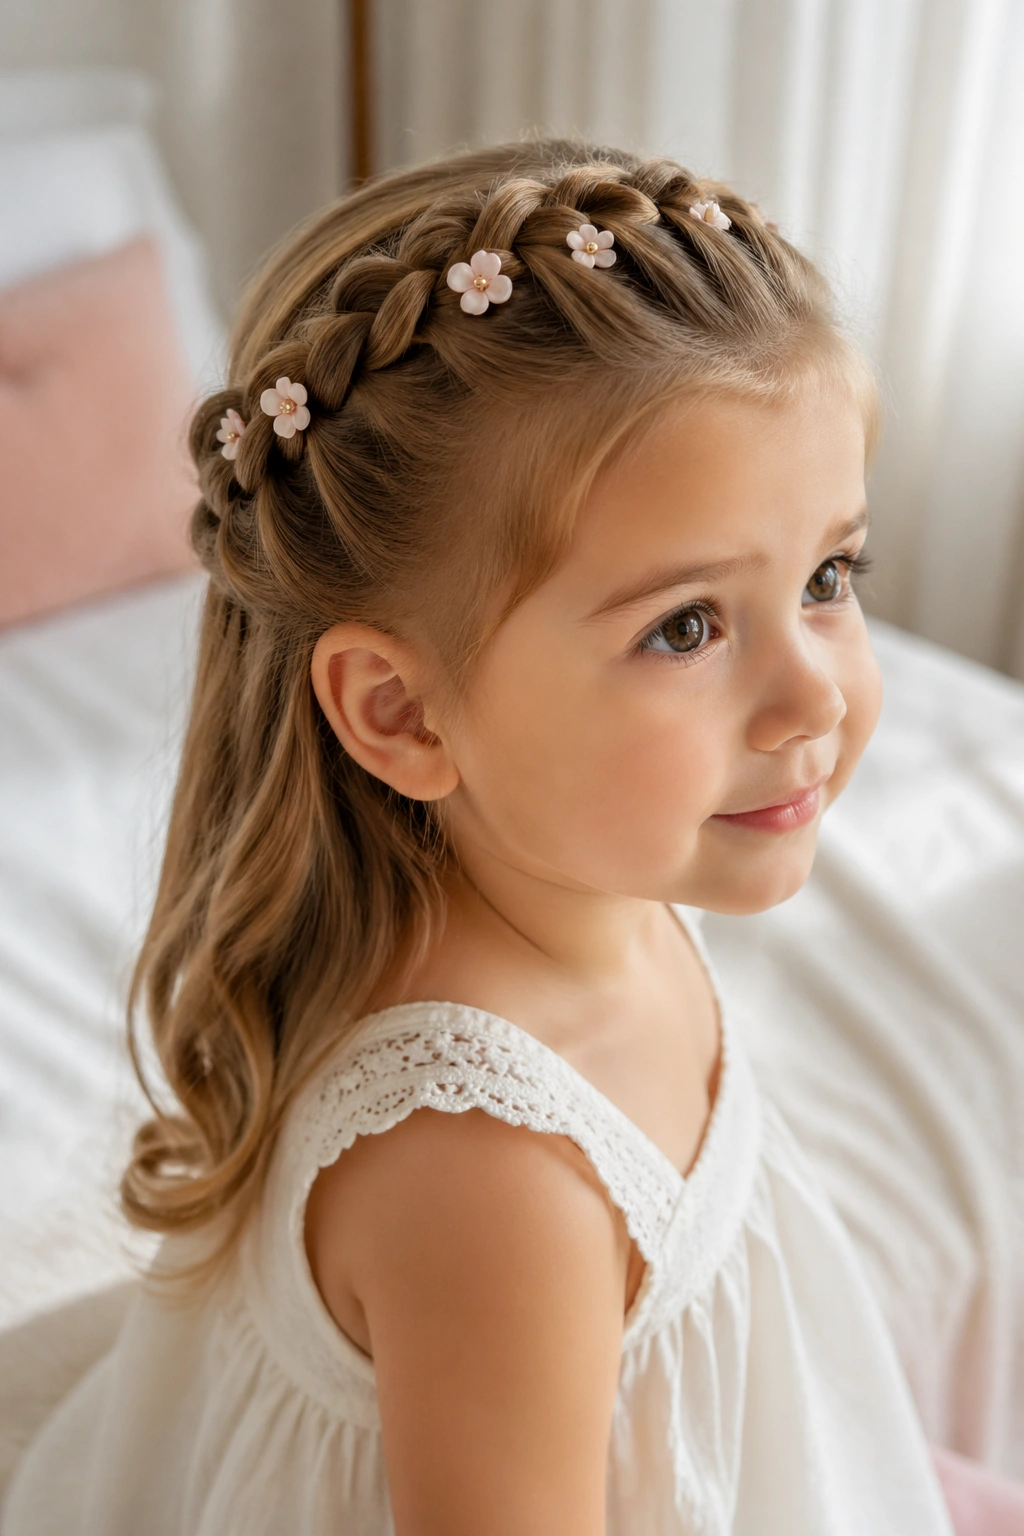
A few tiny flower pins can change the whole mood of a halo braid. They do not need to cover the head. In fact, the braid looks better when the flowers are spaced out and used like small punctuation marks instead of a full border. That keeps the style airy, which suits toddler birthdays much better than a dense row of decorations.
Build the halo braid from one side of the front hairline, curve it around the head, and leave the lower hair loose. Once the braid is secured, pancake the outer edges until the shape widens softly. Then place one or two flower pins where the eye naturally lands — near the end of the braid, or just above the ear if you want the front to stay cleaner.
Where the Pins Should Sit
The placement matters more than the style of flower. Pins near the crown can read too busy on a small head, while pins near the braid end act like a gentle finish line. If the child has curls or waves in the loose hair, keep the flowers slightly to one side so the braid and the texture do not fight for attention.
Skip the giant clip. A few small flowers are enough. The braid already gives you shape, and the flowers are there to soften it, not compete with it.
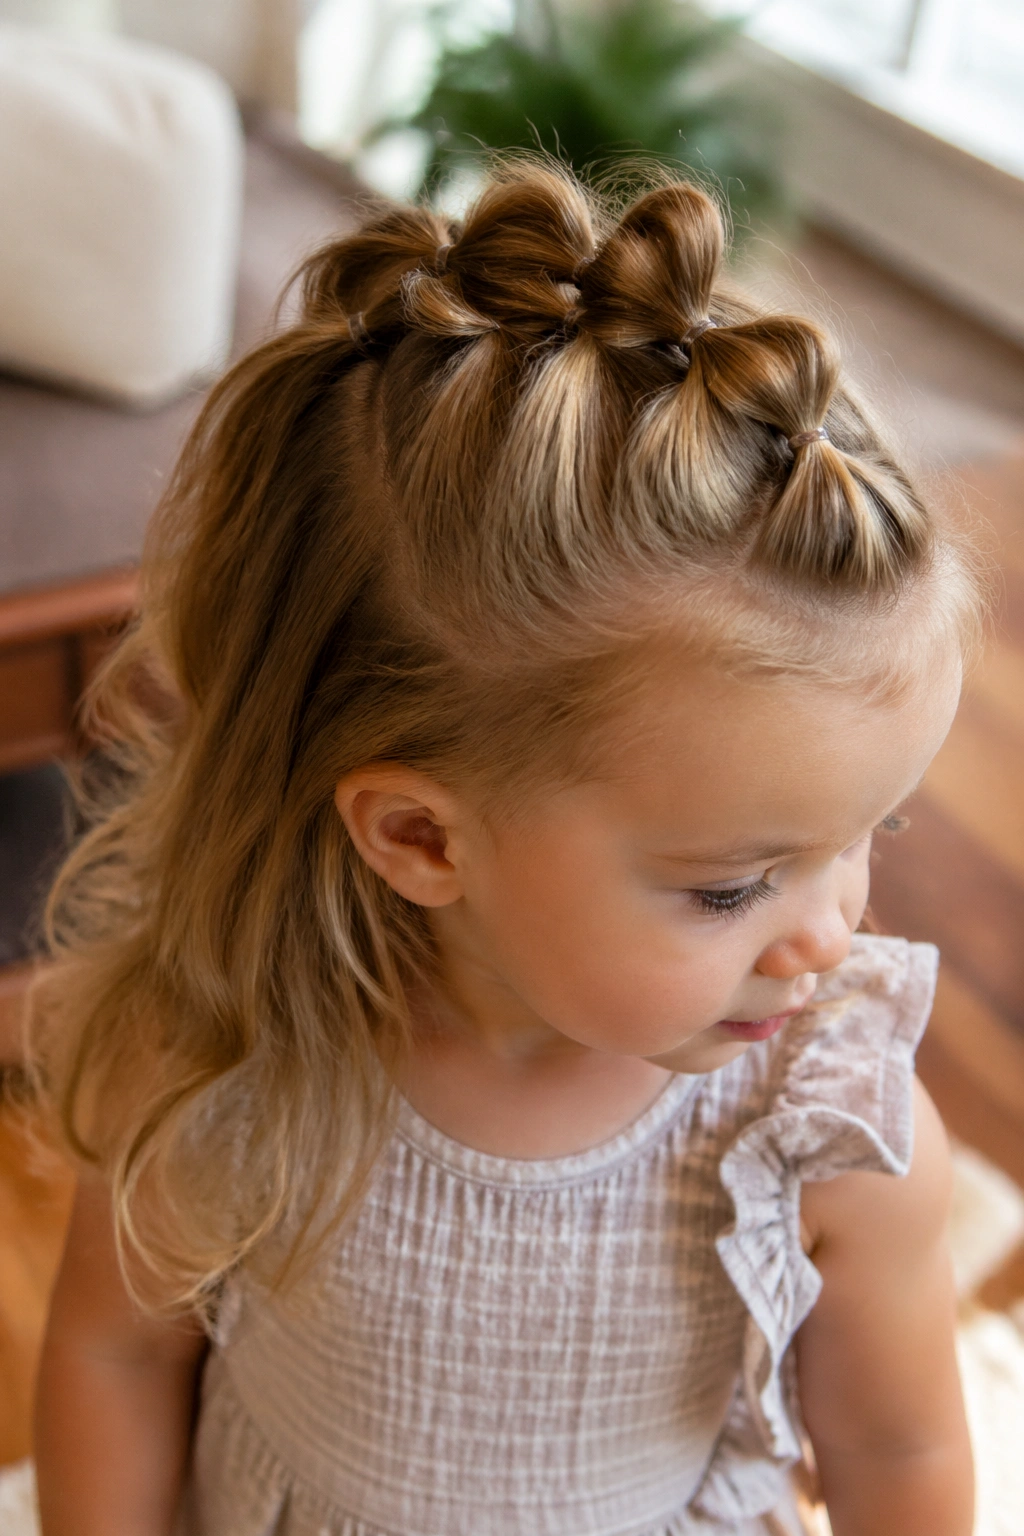
12. Bubble Half-Up Pancake Braid with Bow Stacks
This is the style I would pick for a child who will not sit still. Bubble sections go in faster than a full woven braid, and the look still feels deliberate because the widened pieces give you that rounded, pancaked shape. It is playful, easy to control, and forgiving if the hair is a little uneven at the ends.
Start with a half-up ponytail, add another elastic a short distance down, and split the hair between the bands to create the bubble. After each bubble forms, widen the sides with your fingertips until it looks soft instead of tight. Repeat the pattern down the back, then tuck tiny bows over one or two of the elastics if you want a birthday finish that reads clearly from across the room.
A few things help this style stay neat:
- Use 4 to 6 clear elastics, depending on hair length.
- Keep the bubbles about 1 inch apart on fine hair.
- Pancake each bubble separately before moving to the next one.
- Place the first bow near the top so the style looks finished from the front.
The best part is how low-pressure it feels. Bubble braid hair can be brushed out later without much trouble, which is a gift if the party runs long and bedtime comes fast.
13. Soft Side-Sweep Half-Up Pancake Braid for Busy Mornings
When the cake is cooling and the outfit is already on, this is the braid I reach for. A soft side sweep does not ask for perfect parting or a perfectly even braid, which is a relief on birthday mornings when the clock is already loud. It takes one section from the front, sweeps it toward the back, and leaves the rest of the hair soft around the shoulders.
The braid itself can be as small as you need. Start at the temple, braid across the side, and secure it low enough that the child can still tip her head back comfortably. Pancake the outer loops just enough to give the braid shape, then stop. If you widen it too much, the style can lose the clean line that makes the side sweep look intentional.
I like this one because it works with almost any texture. Straight hair gets a gentle curve. Wavy hair keeps its movement. Curls can stay loose underneath, which makes the whole style feel relaxed and birthday-ready without needing a dozen extra pins. It also plays nicely with a headband if the outfit calls for one.
A birthday braid does not need to be elaborate to feel special. It only needs to stay comfortable long enough for candles, a sticky hug, and one last run back toward the cake table.