The best updo hairstyles for medium length hair work because they use the hair you actually have, not the hair you wish would magically appear. Medium hair sits in a strange little sweet spot: long enough to twist, braid, and pin, but not so long that every style feels heavy or droopy by noon.
That middle length can be a blessing. It can also be fussy. If your cut grazes the shoulders, the ends tend to kick out at odd angles, layers escape faster than you expect, and a bun that looked neat in the mirror can start sagging once you move around. A few extra bobby pins help, sure, but the real difference comes from choosing a shape that suits the length instead of fighting it.
Dry shampoo, texture spray, and a couple of clear elastics do more work here than most people give them credit for. So does knowing when to leave a few pieces soft around the face and when to pin everything in tight. The styles below lean into that reality instead of pretending medium hair behaves like waist-length hair.
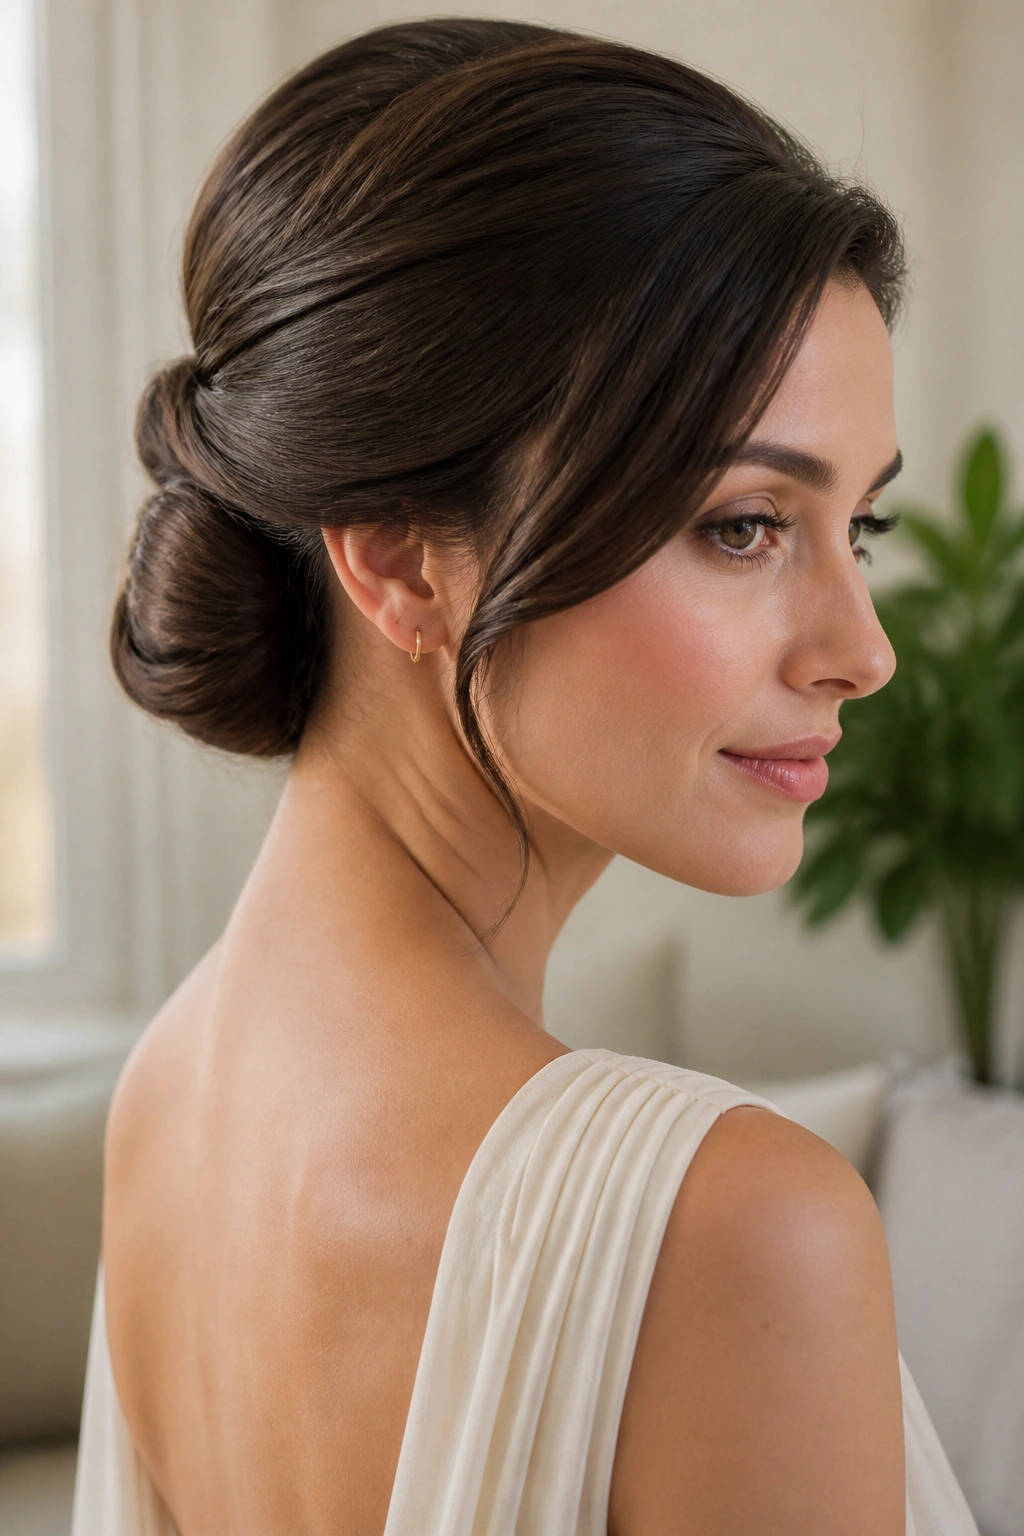
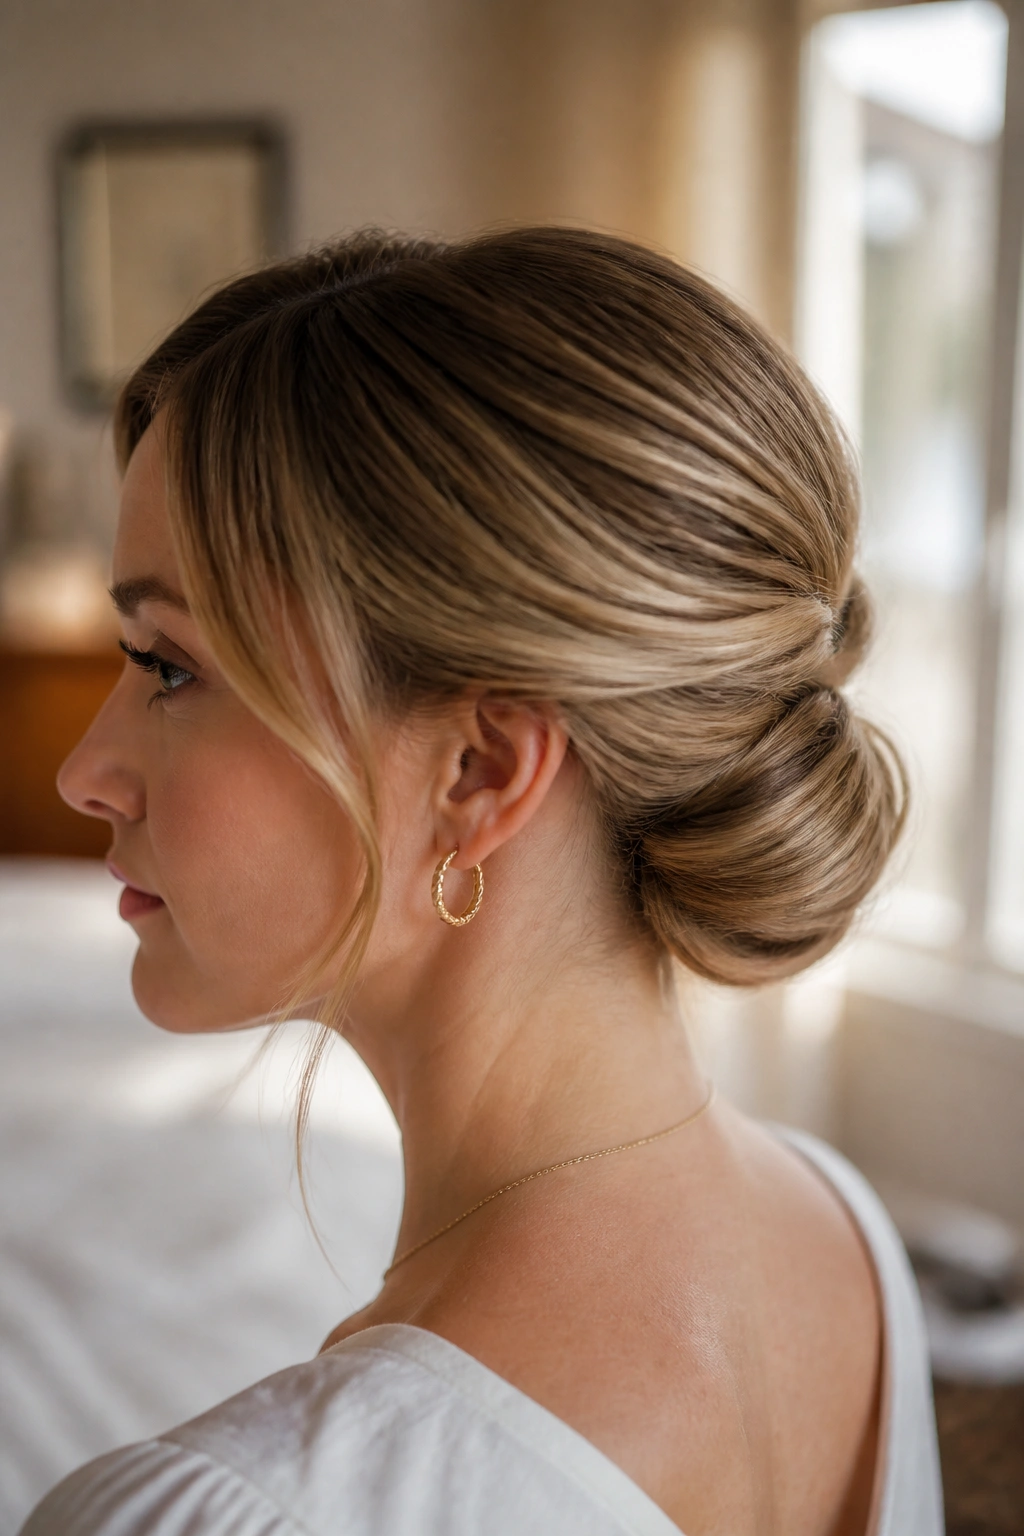
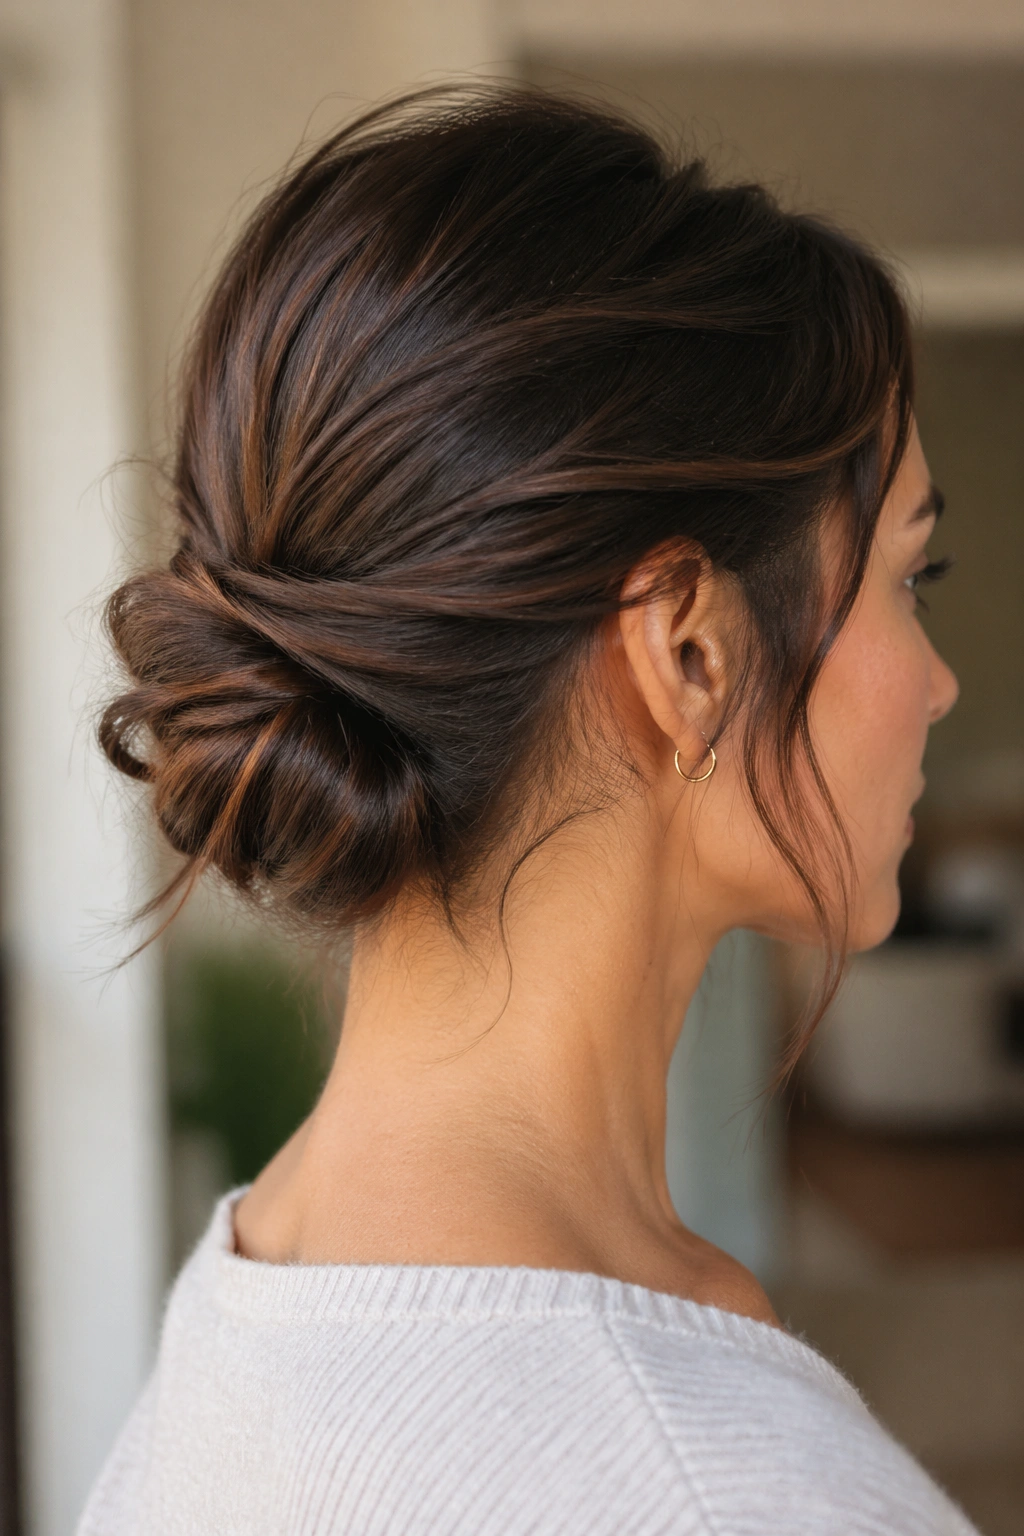
1. Low Knot at the Nape
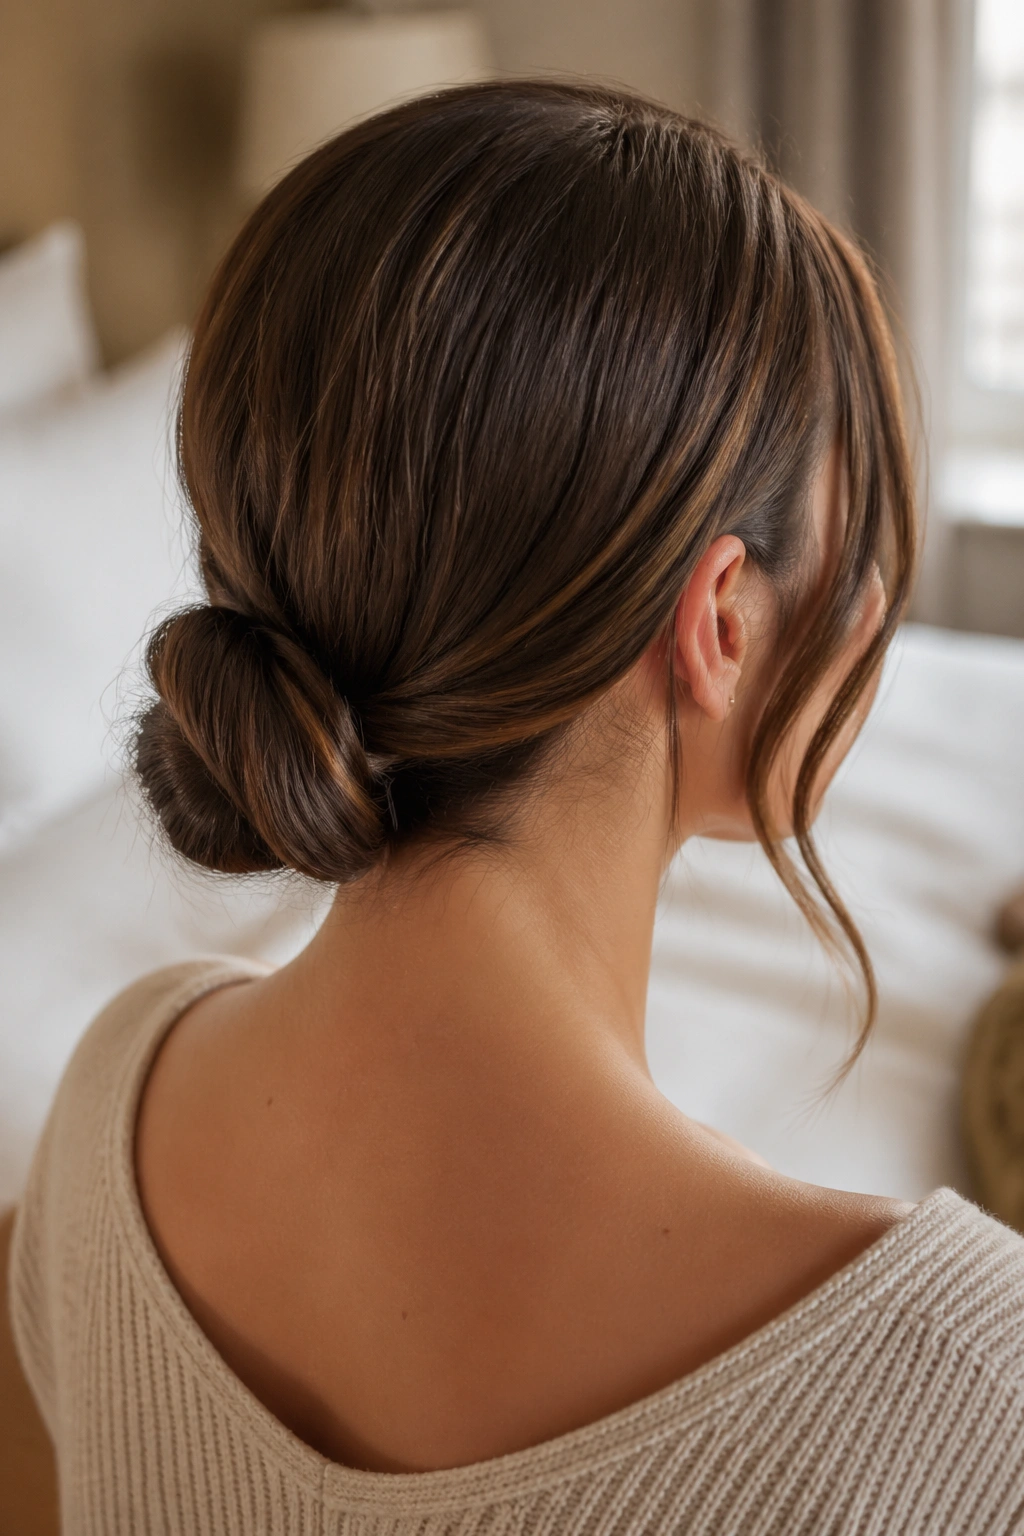
A low knot is the simplest updo that still looks finished. It works so well on medium hair because the length is enough to coil once or twice, but not so much that the knot becomes bulky and lopsided. Clean, compact, and easy to wear.
Pull the hair to the nape, twist it until the ends start to curl under naturally, then wrap that tail into a small knot. Lock it with 4 to 6 bobby pins crossed in an X shape. If your layers slide out, mist the pins with hairspray before you insert them; they grip better than dry pins.
Why it stays put
- Day-old hair gives the knot a little grip.
- A low knot sits better on medium hair than a high one, which tends to pull apart.
- A few loose pieces around the ears make it look softer, not sloppy.
My favorite version is slightly off-center. Dead center can look severe fast.
2. Half-Up Twist with Hidden Pins
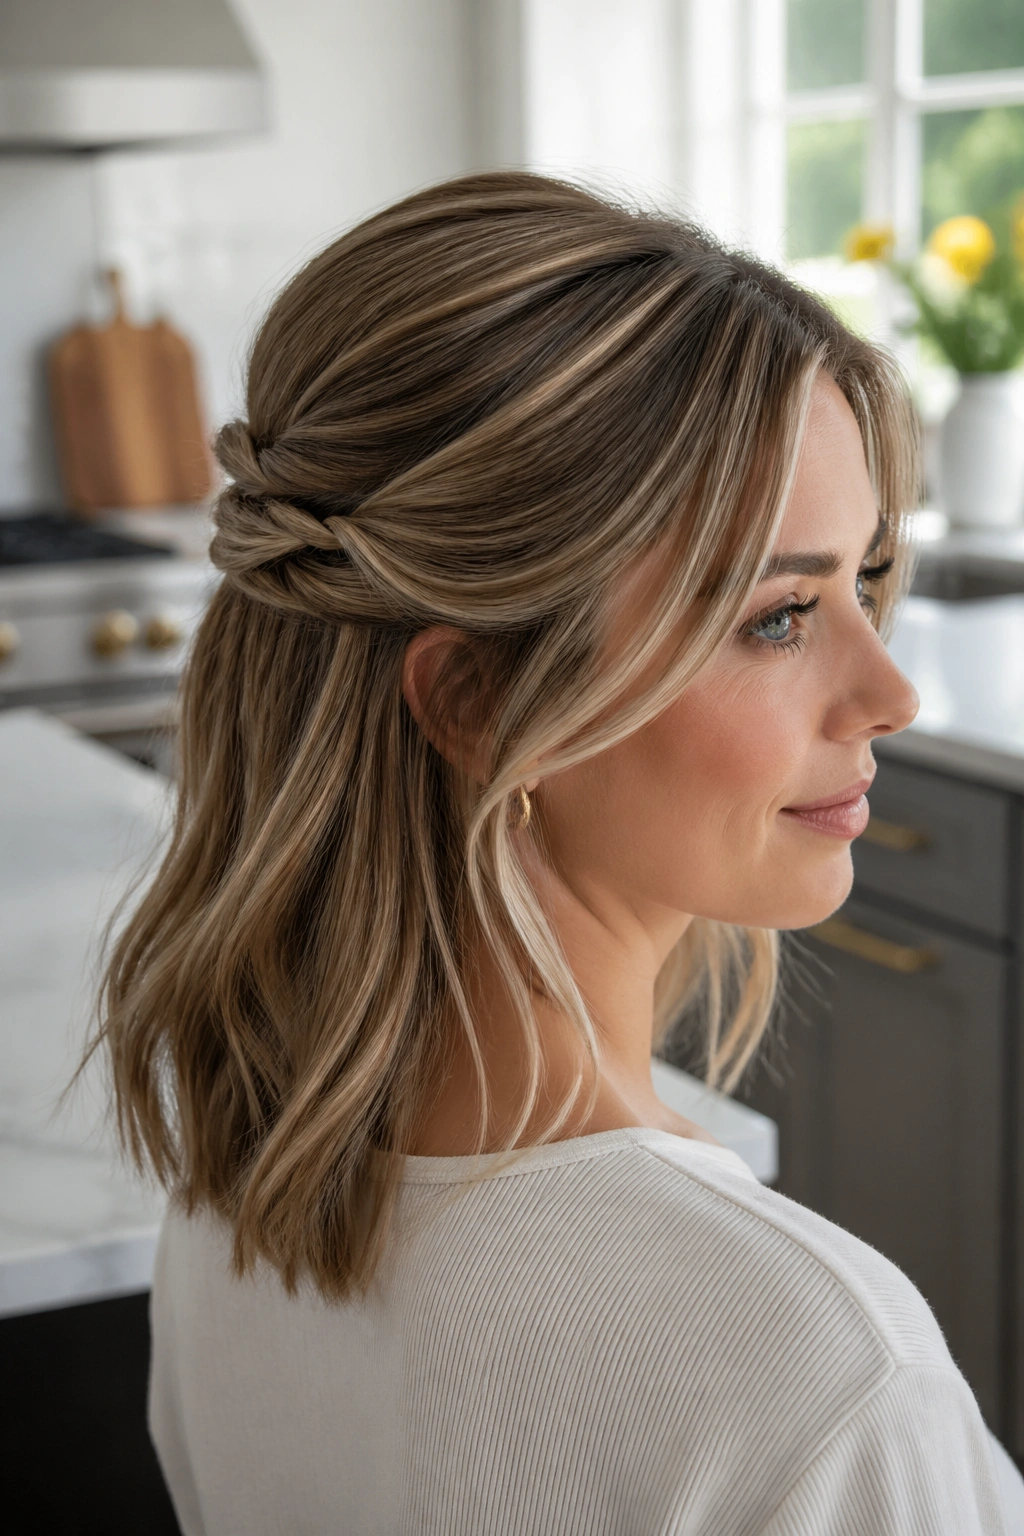
This is the fastest updo that still looks intentional. Half-up twists are a gift for medium-length hair because they use the top layers for shape and leave the bottom half to carry the style. You get lift at the crown without needing a full head of pins.
Take a section from each temple, twist each one back toward the crown, then cross them and pin them underneath the top layer of hair. A pea-sized amount of smoothing cream on the front sections keeps frizz down without making the hair flat. If your hair is fine, a little texture spray at the roots gives the pins something to hold.
It’s a clean choice for work, dinner, or any day when you want your hair off your face but don’t want the whole thing swept up. And if your ends are a little uneven, no problem. The lower half stays down and hides that stuff for you.
One small thing. Tuck the pins in horizontally, not straight up. They disappear better.
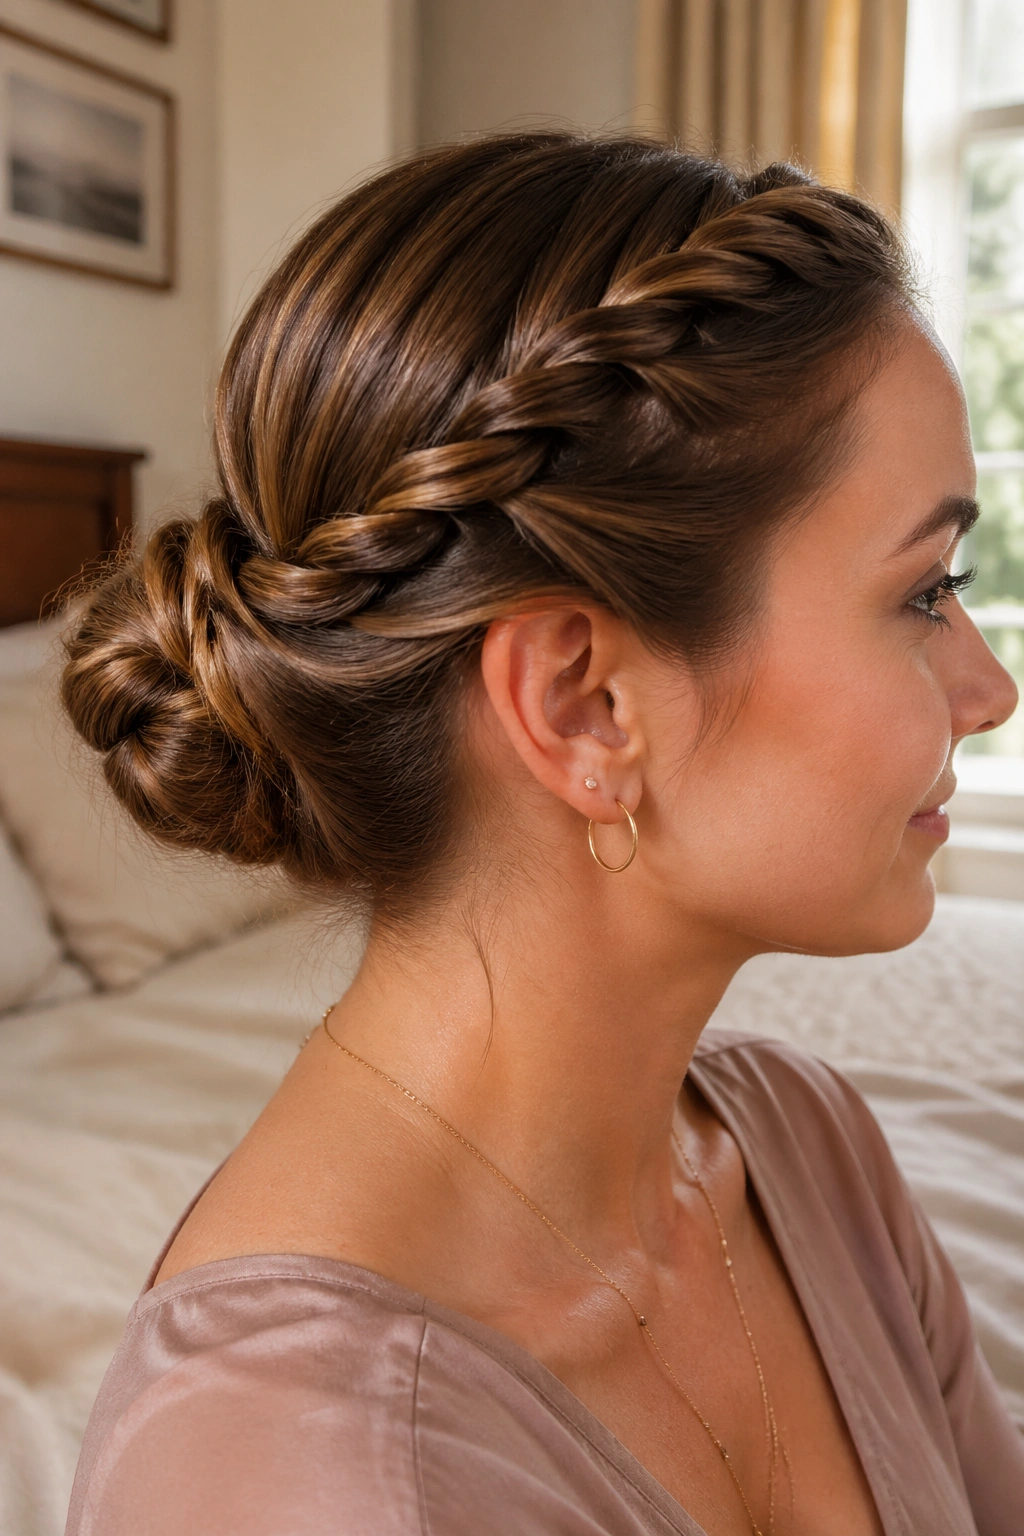
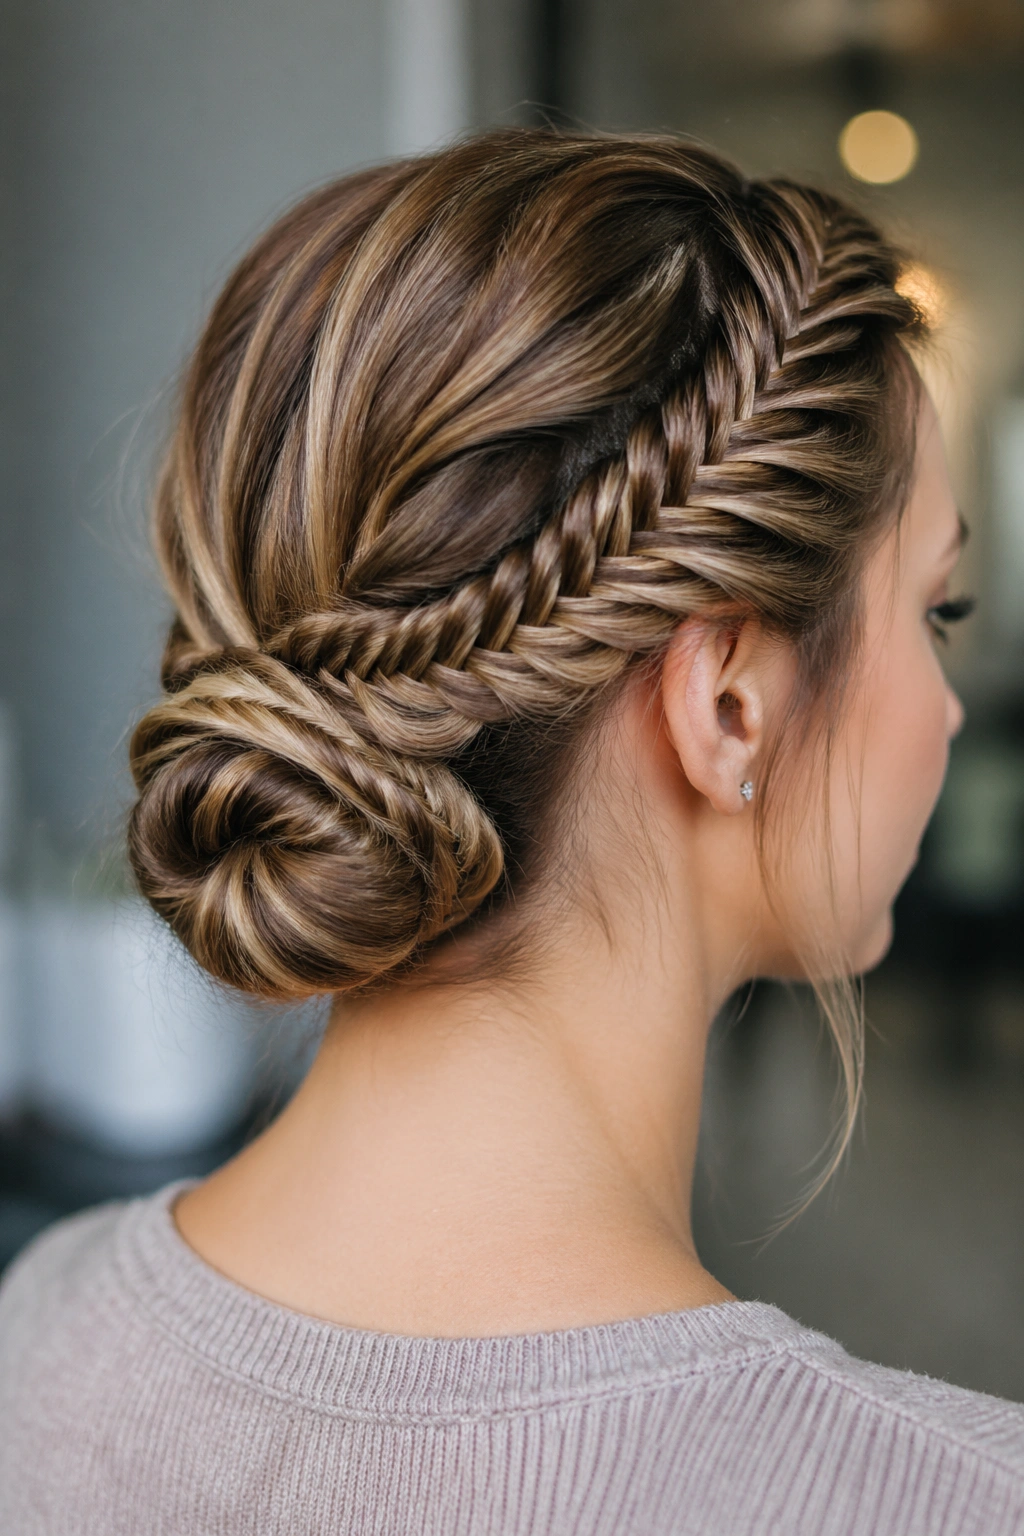
3. Braided Crown Updo for Medium Length Hair
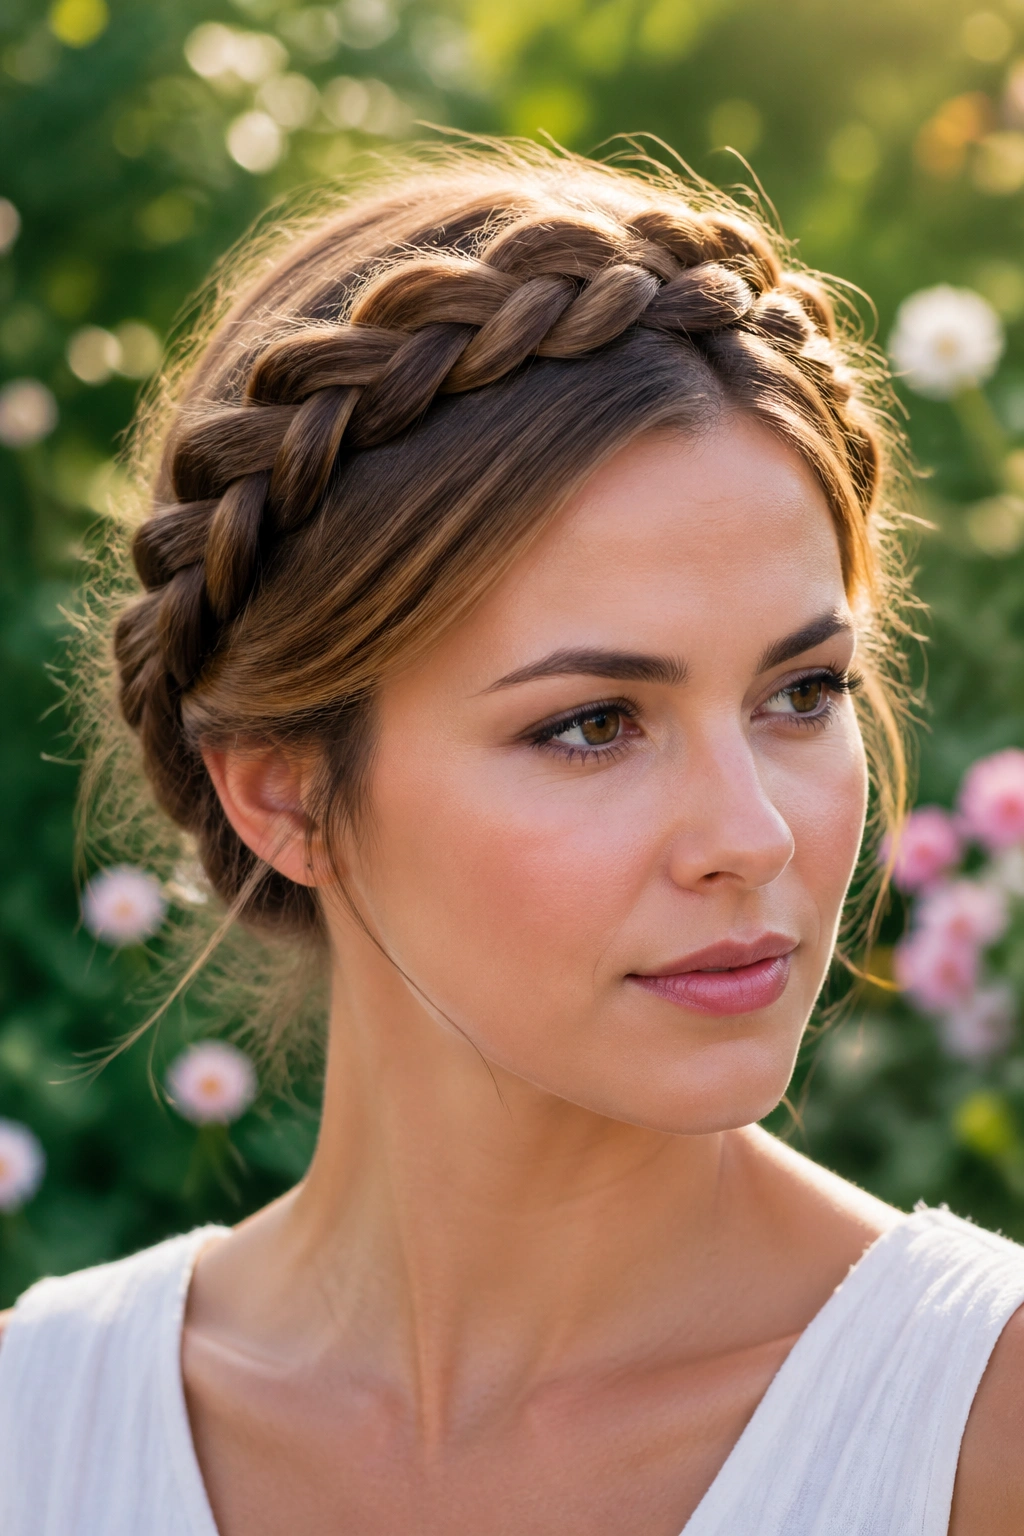
Why does a crown braid hold so well on medium hair? Because the braid has enough length to wrap without dragging itself down. On very long hair, a crown braid can feel heavy and slide. On medium hair, it usually sits closer to the head and keeps its shape longer.
Start a braid above one ear, work it around the head like a headband, then continue until you reach the opposite side. Hide the tail under the braid and pin it flat. A regular three-strand braid gives a neat finish, while a Dutch braid sits up a bit more and makes the crown look fuller.
How to keep it snug
- Braid close to the hairline so the shape frames the face.
- Use 2 to 3 pins every few inches along the back curve.
- If the hair is slippery, rough it up first with dry shampoo or a light texturizing powder.
This style can lean romantic or polished depending on how neat you make the braid. Both versions work.
4. French Twist with Loose Ends
If you’ve ever tried a French twist on shoulder-length hair and ended up with a tiny shell and a mess at the bottom, you already know the problem. Medium hair can do a French twist, but it needs a little help from texture and a little mercy from the person doing it.
Backcomb the crown lightly, smooth the outer layer, then gather the hair low at the back and twist it upward against the head. Tuck the ends inside the roll and secure the seam with 5 to 7 bobby pins placed vertically. The trick is to keep the roll tight enough to hold but not so tight that it looks like a helmet.
- Best on hair with some grit.
- Better with a side part than a harsh center part.
- Sharper with straight ends, softer with a loose bend.
A French twist feels dressy in a way a bun never quite does. It also loves earrings, which is probably why it keeps showing up at weddings and formal dinners.
5. Messy Chignon

A messy chignon only looks easy when it has a shape underneath the looseness. That’s the part most people skip. On medium-length hair, the style works because the hair is long enough to twist into a low bun but short enough that the bun stays compact instead of ballooning out.
Start with a low ponytail, but don’t pull it tight like you’re bracing for a workout. Leave a little slack at the crown. Twist the tail loosely, wrap it around the base, and pin the ends under with 3 to 5 pins. Pull a few strands at the temples and maybe one thin piece near the nape. Not too many. A mess that looks deliberate is not the same thing as a mess that happens because the style is falling apart.
A quarter-sized amount of mousse at the roots helps if your hair is freshly washed. So does a quick spray of dry shampoo before you twist. Fine hair tends to collapse if it’s too clean and too soft.
I like this one for evenings because it looks relaxed without losing structure.
6. Double Mini Buns

Unlike one heavy bun, two smaller buns spread the weight out and make medium hair feel easier to manage. That’s the whole reason this style works. It also gives shorter layers more places to hide, which is a small mercy if your haircut is choppy.
Part the hair down the middle, make two low pigtails, then twist each one into a small bun behind the ears or closer to the nape. Secure each bun with a thin elastic first, then pin the edges down so the shape stays tidy. If the buns feel tiny, gently loosen the outer coils with your fingers. That gives them a little more body.
Best uses for this style
- Casual weekends.
- Concerts and outdoor events.
- Days when you want something playful but not childish.
Medium hair does best here when the buns stay tight and compact. If they start to drift upward, they can look like they’re trying too hard.
7. Side-Swept Gibson Roll
This old-fashioned shape looks more complicated than it is. A Gibson roll is basically a folded tuck that sits low and curves softly at the back, and medium-length hair is a nice fit because the ends are long enough to roll but short enough to stay close to the head.
Sweep the hair to one side first. Then roll it inward from the lower edge, tucking as you go, until it forms a rounded tube along the nape. The side sweep gives it a little drama; the tucked roll keeps it neat. A few hidden pins along the seam will keep the curve from unfolding.
It’s a good choice when you want something that feels polished without looking stiff. A smoothing cream or light serum helps the top layer lie flat, but don’t go heavy. Too much slip and the roll starts to sag.
This is one of those styles that looks best when the neckline of your outfit is doing some of the work.
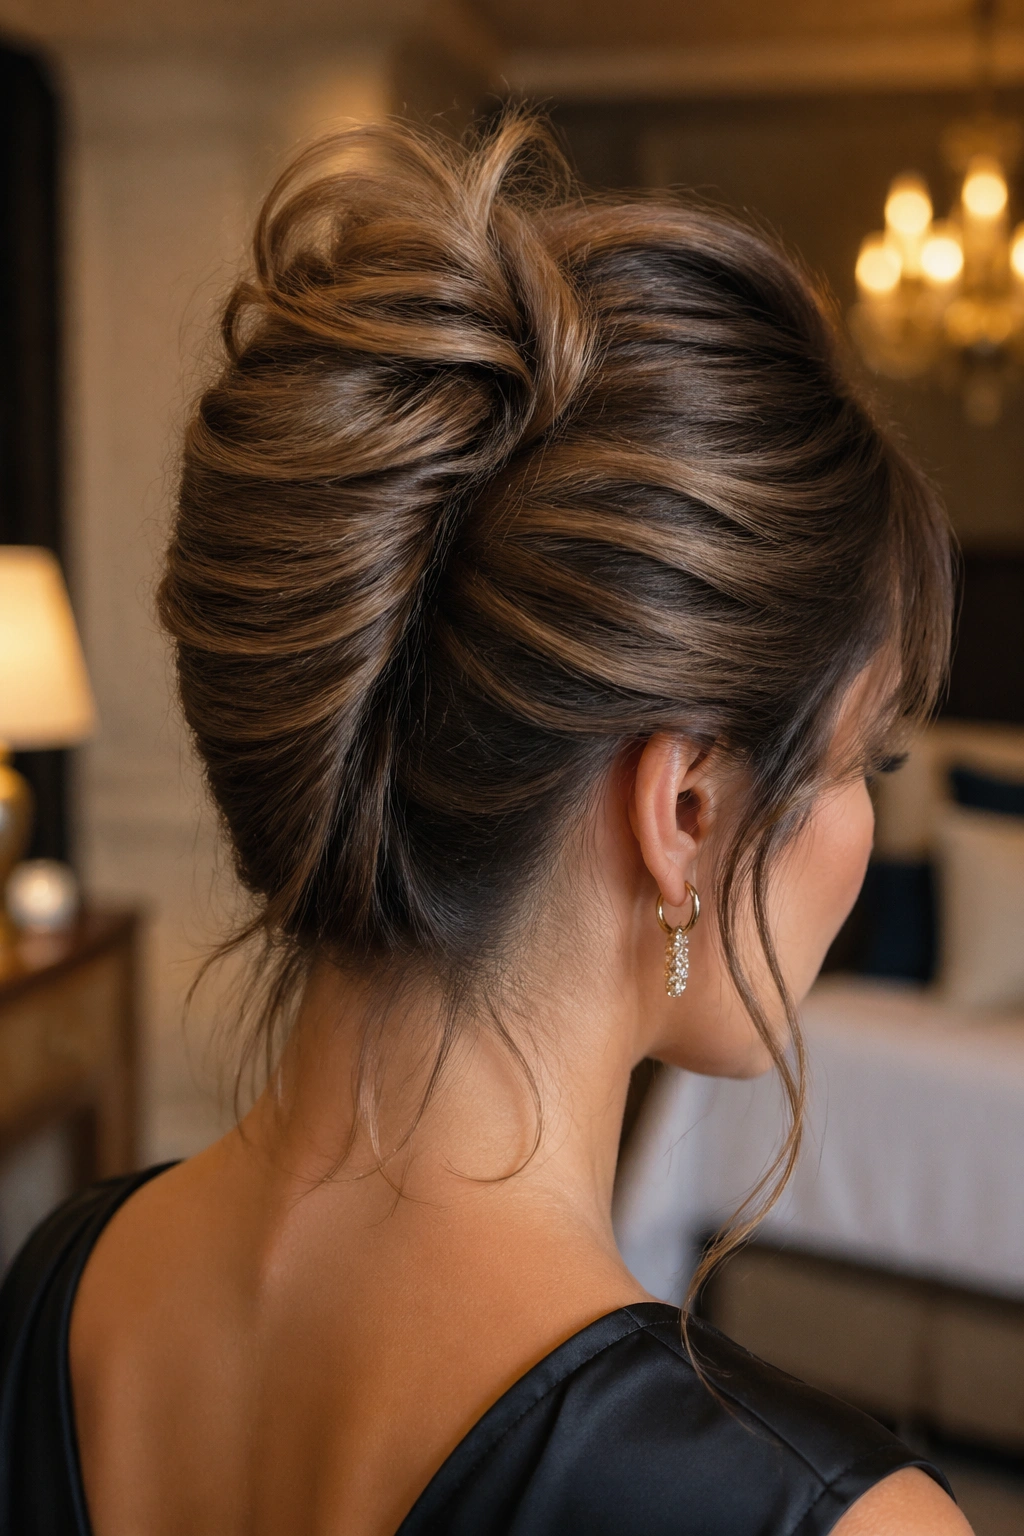
8. Twisted Mohawk for Medium Length Hair
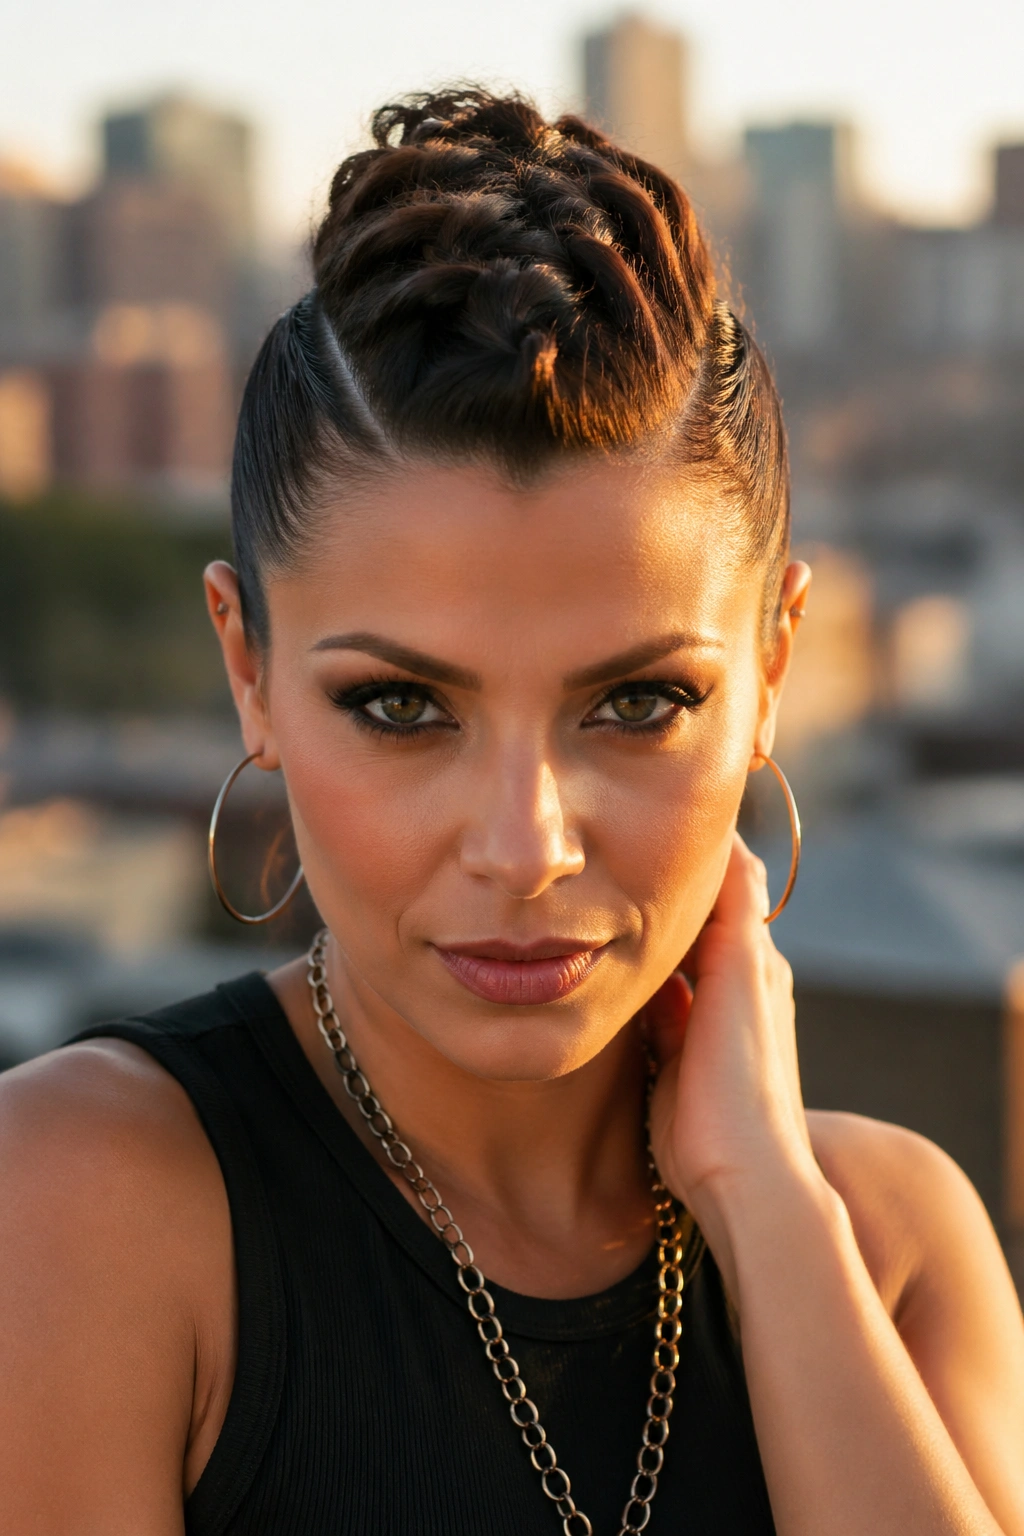
If your hair falls flat at the crown, this style fixes that fast. The twisted mohawk builds height through the center of the head and keeps the sides sleek, which gives medium-length hair a shape that feels sharper than a simple bun.
Section off a strip from the forehead to the nape. Clip the side sections away, then tease the roots of the center strip lightly or twist each piece back one by one for lift. Pin the sides flat against the head and let the middle rise above them. You do not need a giant amount of height; even 1 to 2 inches of lift changes the whole look.
What makes it work
- The center section creates the volume.
- The pinned sides keep the style controlled.
- Medium hair has enough length to hold the shape without dragging it down.
A twisted mohawk feels bold but still wearable. That’s a rare combination. Use it when you want the hair to be part of the outfit, not just background noise.
9. Wrapped Low Pony Into a Bun
Sometimes you need your hair off your neck and you do not want a fussy style that takes 20 minutes. A wrapped low pony into a bun is the answer. It’s plain in the best way.
Make a low ponytail at the nape and leave it a little loose. Split the tail in two sections, wrap them around the base, and tuck the ends under the bun. A pair of crossed pins underneath the roll will keep the bun from shifting. If the ponytail is too tight, the bun ends up skinny and a little severe, so leave some slack from the start.
This one works on straight, wavy, and curly hair. On curly hair, skip the brushing and just smooth the top with your hands and a touch of cream. On straight hair, a spritz of texturizer before wrapping keeps the bun from slipping apart.
It’s one of those styles that looks casual from a distance and more polished up close.
10. Braided Halo with Low Bun
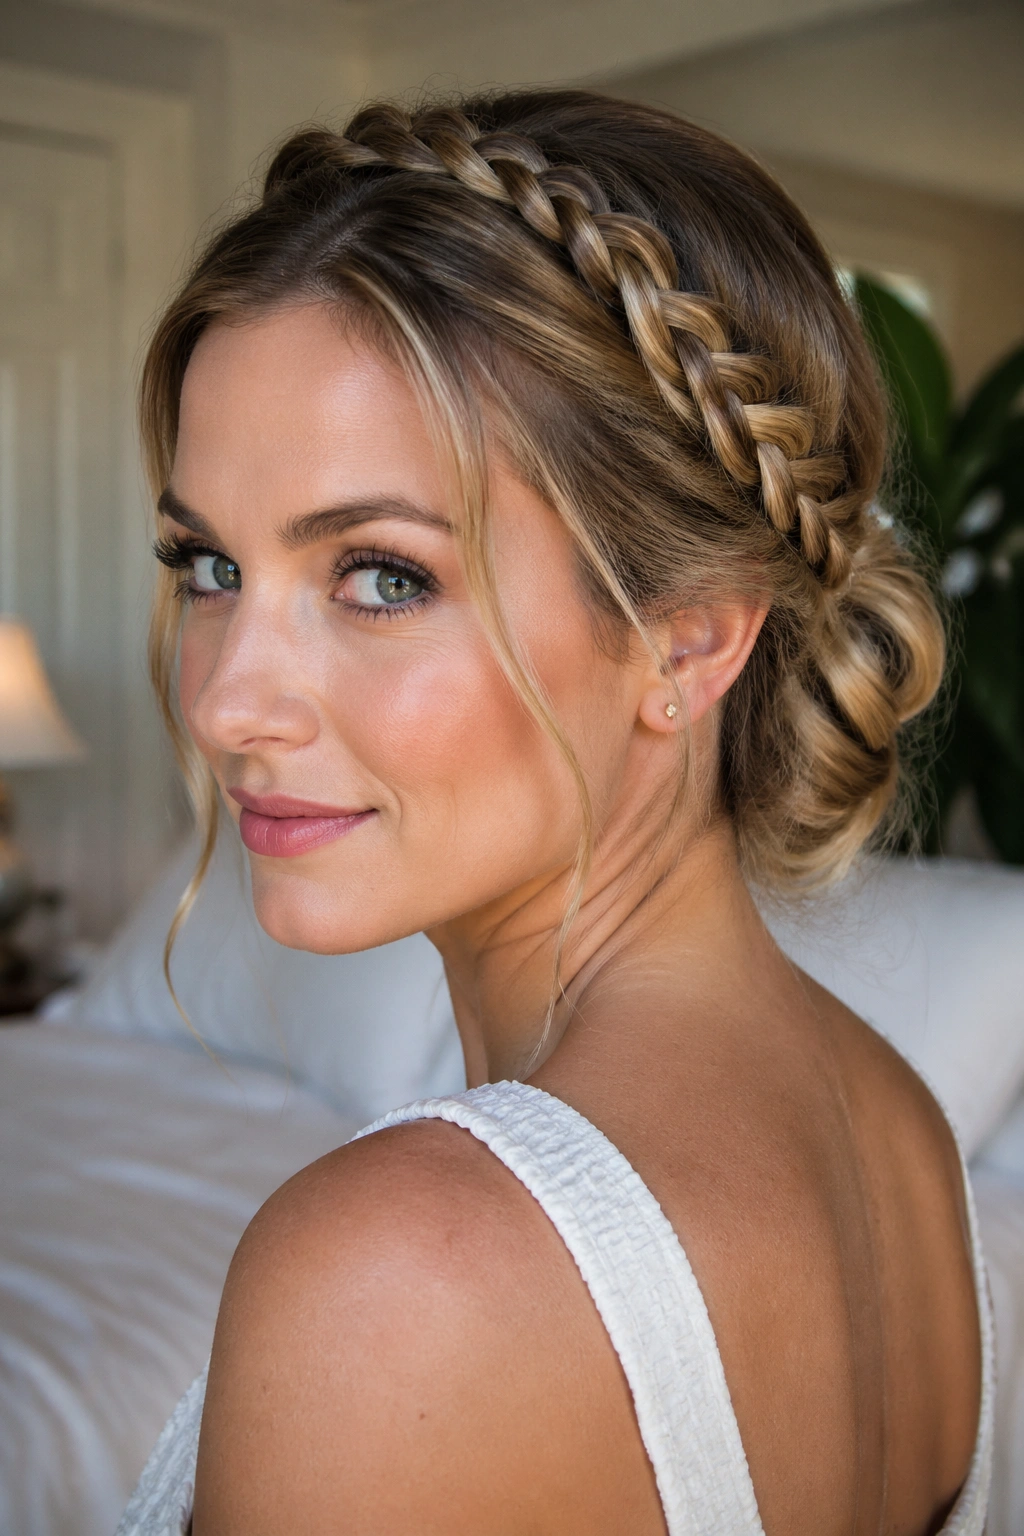
Why do two small braids change the whole mood of an updo? Because they give medium hair a frame. Instead of one big shape sitting in the middle of the head, you get texture around the face and a softer finish at the back.
Braid a small section from each temple or just behind each ear, then bring both braids around toward the back like a halo. Pin them across the crown, and gather the remaining hair into a low bun underneath. If the braid feels too flat, gently widen each segment with your fingers after it’s secured. That little bit of loosening makes the style look fuller without making it messy.
How to make the halo fuller
- Start the braids close to the hairline.
- Use small clear elastics so the ends disappear.
- Fan out the braid edges before pinning.
This is one of the more graceful updos for medium length hair. It does a lot without looking busy.
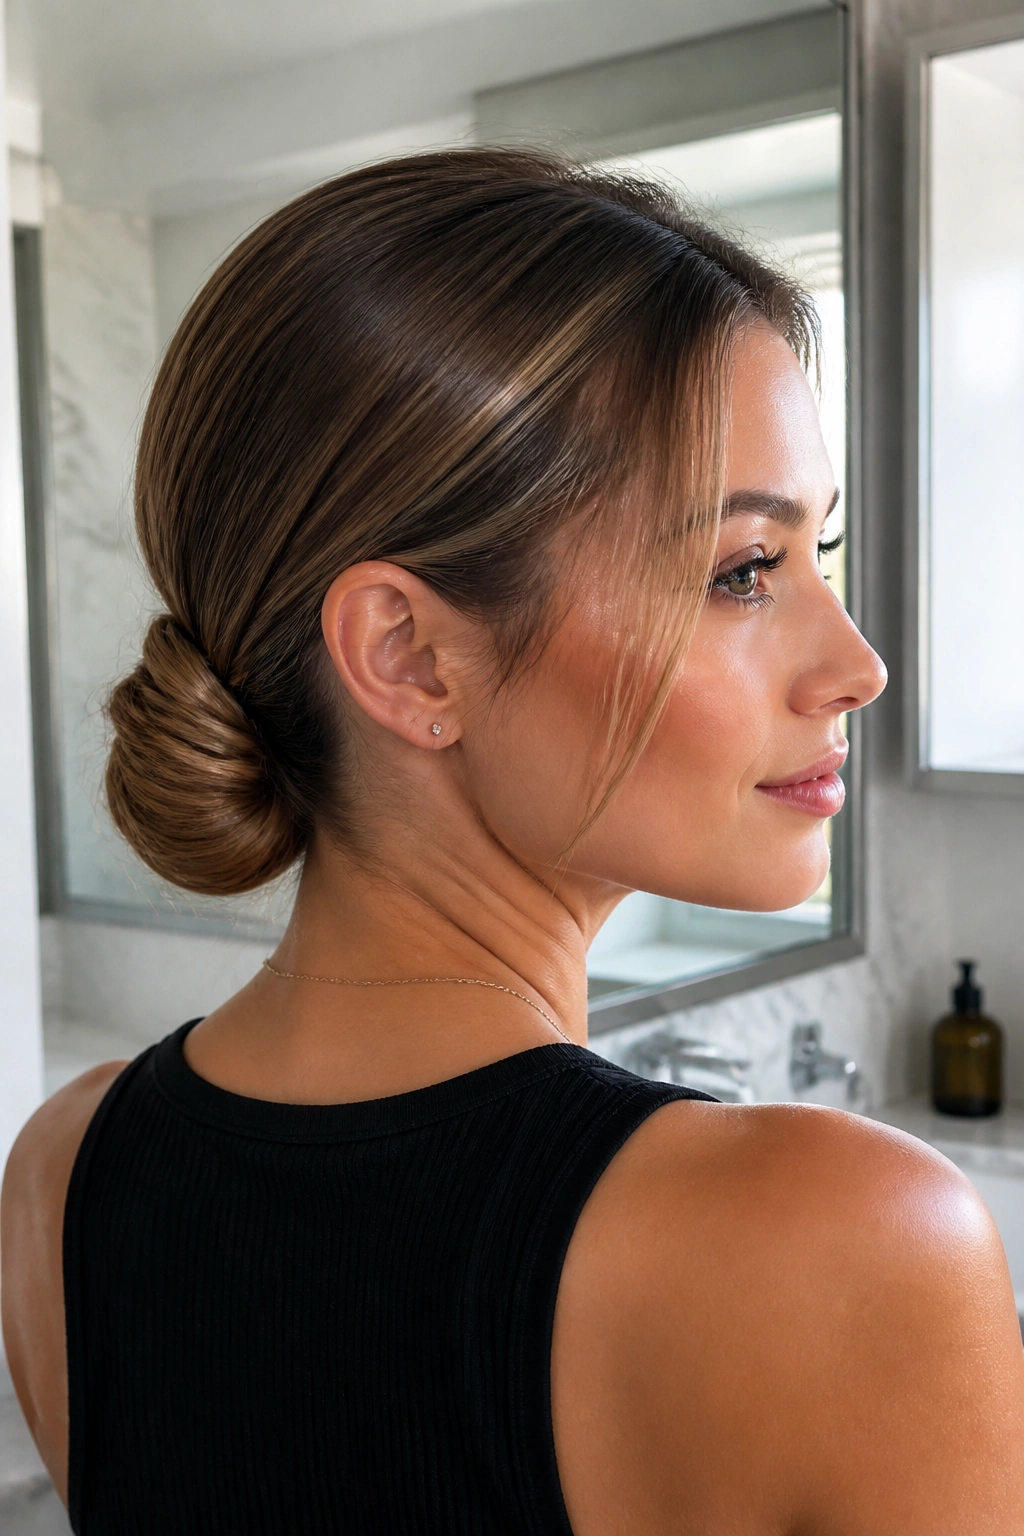
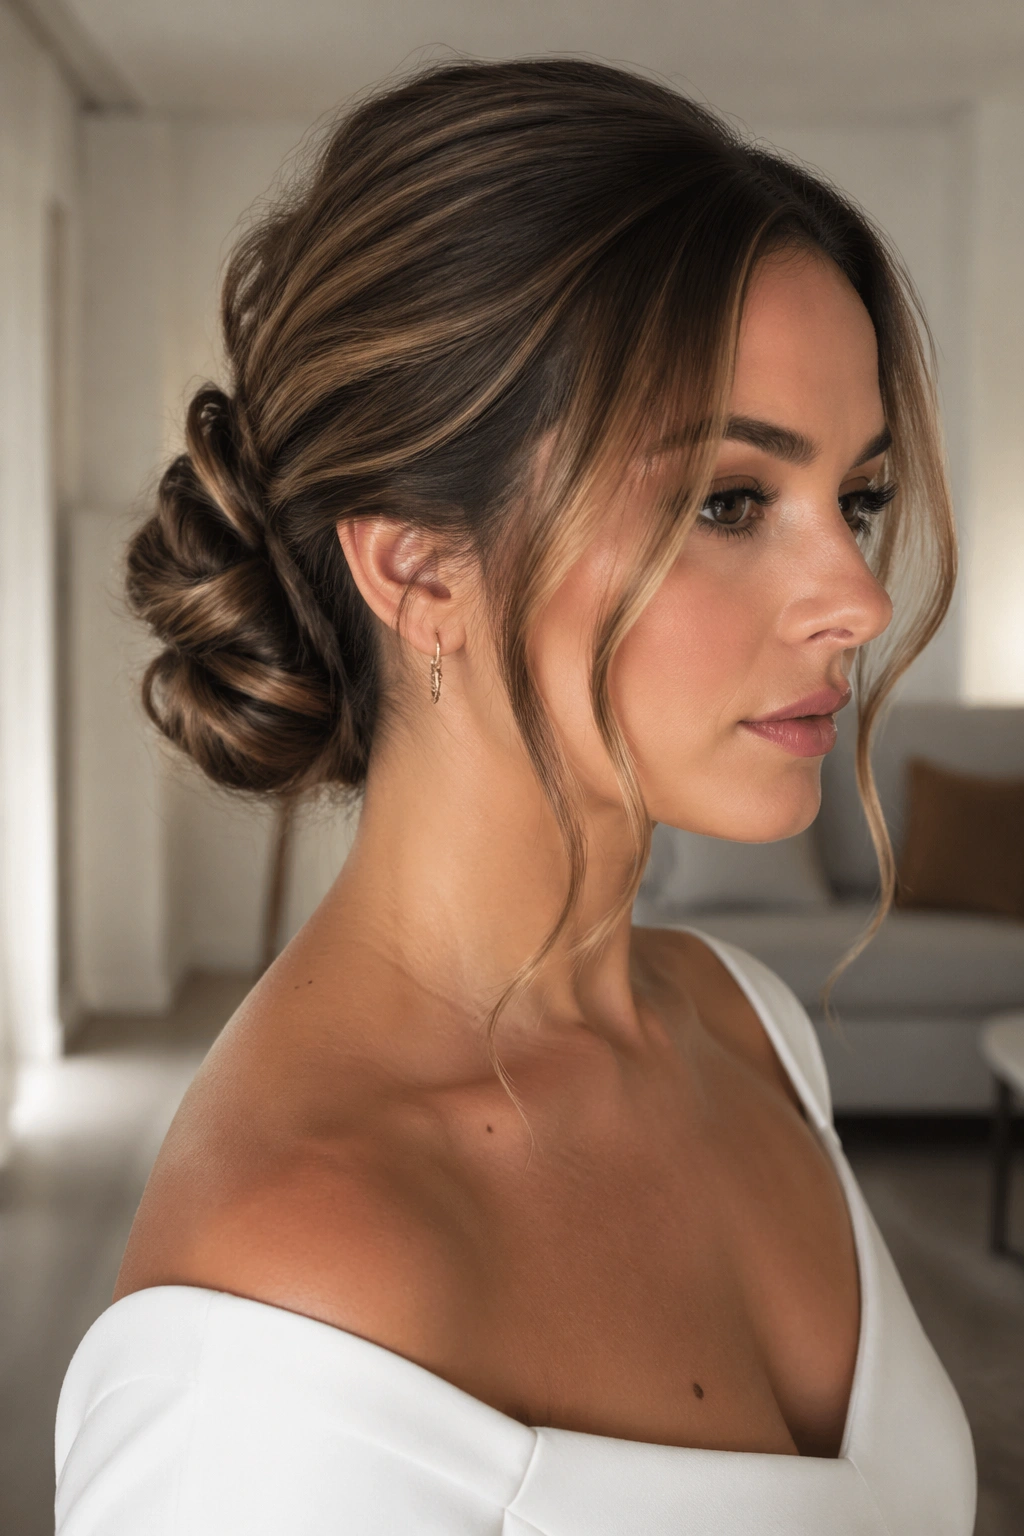
11. Rolled Tuck Updo
A rolled tuck is what happens when you want the polish of an updo without a bulky bun sitting at the back of your head. Medium-length hair is useful here because the ends are long enough to tuck under cleanly, but not so long that the roll becomes thick and heavy.
Pull the hair into a low ponytail without securing it too hard, then lift the tail upward and roll it inward toward the nape. Tuck the ends into the fold and pin the roll in place with 2 to 4 long bobby pins. The pins should follow the curve of the head, not stand straight out. If they stick out, they’ll show.
This style works especially well on layered cuts that don’t sit neatly in a bun. The roll hides uneven ends and gives them one job: stay inside the shape. A touch of smoothing cream on the top layer keeps the finish clean, but the hair still needs a little grip underneath.
It’s a quiet style. That’s the point.
12. Sleek Side Bun
A side bun changes the whole line of the face in a way a centered bun does not. It shifts the weight to one side, which looks good with asymmetrical necklines, one-shoulder tops, and earrings that deserve a little space.
Create a deep side part, smooth the hair low behind one ear, and gather it into a bun that sits two fingers behind the jawline. Not lower. Too low and it looks droopy. Too high and the shape loses the side sweep that makes it interesting. Use a small amount of serum or cream on the top layer, then pin the bun tightly so it holds its angle.
This style is neat, but not boring. The side placement gives medium hair a sense of movement without making it fussy. It’s also one of the better choices if you want your face open and your neckline clear.
I’d reach for this one when the outfit has strong lines and the hair needs to stay out of the way.
13. Knotted Updo with Face-Framing Pieces
One knot on medium hair can look a little small. Two knots fix that problem. The shape gains body, and the face-framing pieces keep the whole thing from feeling too hard.
Split the hair into two sections at the back, tie one loose knot over the other, then pin the ends flat underneath. Leave out 1 to 2-inch tendrils near the cheekbones and around the ears. If your layers are short, let a few pieces escape at the nape too. That is not a mistake. It softens the shape and stops the knot from looking like it belongs in a dance recital photo.
Key details that matter
- Use a small elastic under the first knot if the hair is slippery.
- Keep the knots low so they read as one shape.
- Curl the face pieces lightly if you want a softer edge.
This is a good middle ground between formal and relaxed. It has shape, but it does not feel stiff.
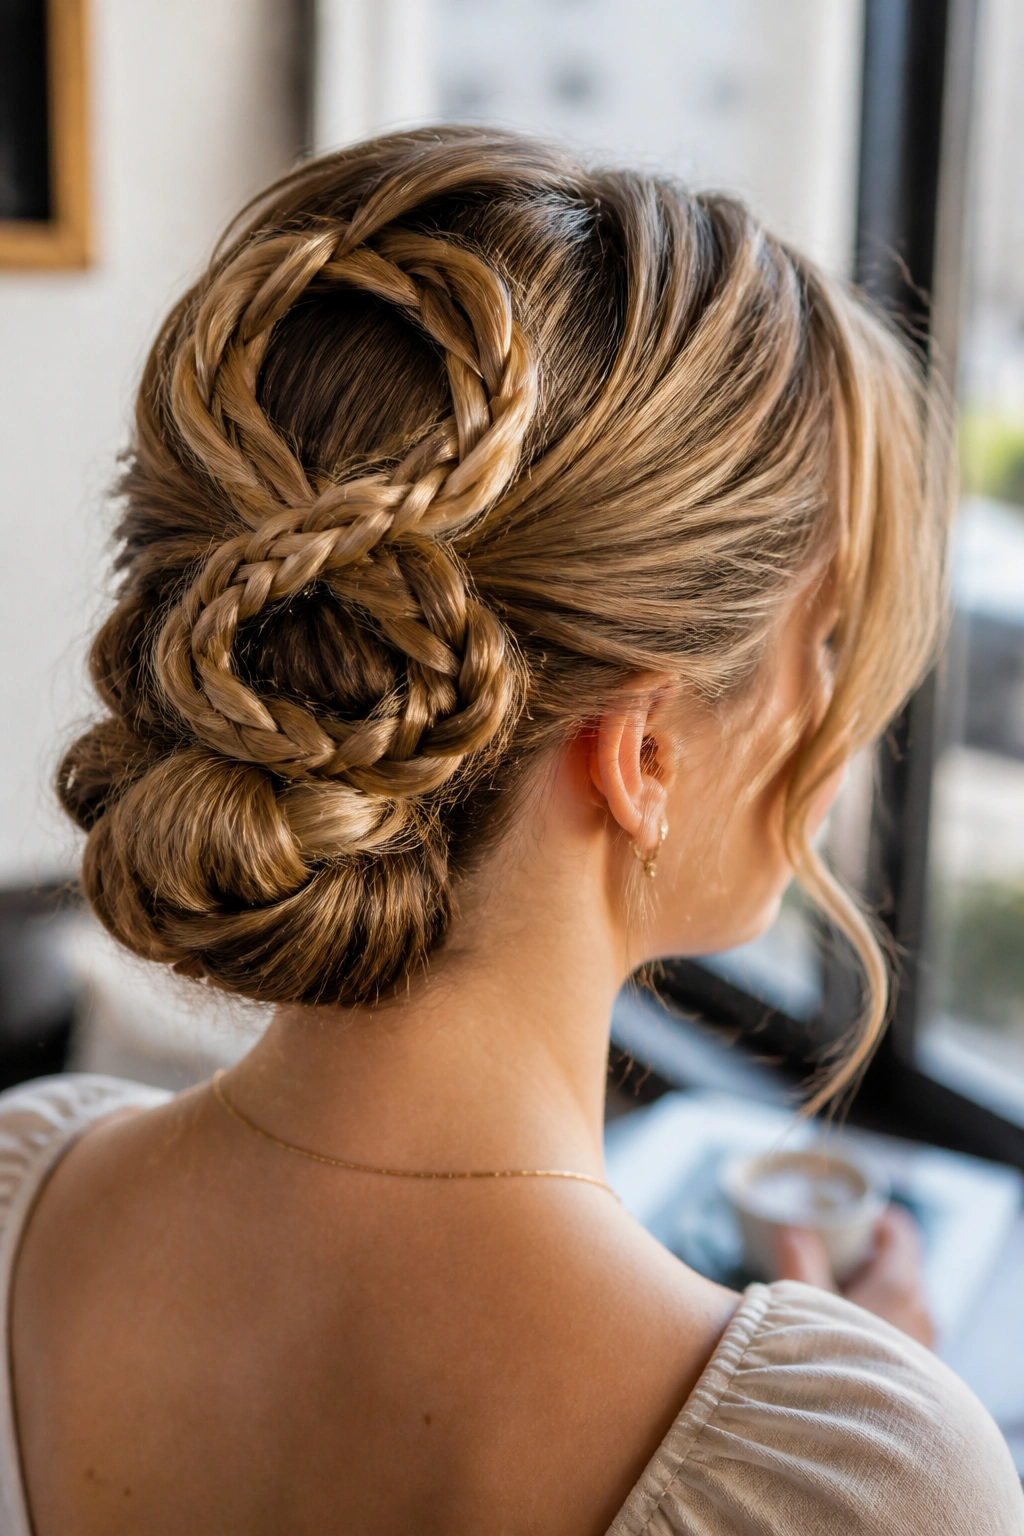
14. Rope-Twist Crown Bun for Medium Length Hair
Rope twists are underrated. They hold better than a loose braid on some hair types, and on medium-length hair they build a clean line across the head without needing extra length to look full.
Take a section from one side of the head, split it into two pieces, twist both pieces in the same direction, then wrap them around each other in the opposite direction. That’s the rope twist. Bring it across the crown, pin it, then repeat on the other side. Gather the ends into a bun at the back and tuck them in tightly. The twist should feel firm in your fingers. If it feels soft and stretchy, it will unravel.
Why rope twists are useful
- They grip well on thick hair.
- They are easier to control than wide braids.
- They give medium hair a neat, wrapped look without extra bulk.
A little pomade on the ends helps if your hair frays at the tips. Just a little. Too much and the twist goes slick.
15. Fishtail Braided Bun
A fishtail braid gives you detail that a standard braid can’t match. On medium-length hair, that detail matters because the braid sits close to the head and the pattern stays visible instead of disappearing into length.
Pull the hair into a low or mid-height fishtail braid, keep the weave tight, then coil the braid into a bun. Pin the bun from the underside first, then add one or two pins on top where the braid curves around. If your hair is thick, the bun will feel fuller and more secure. If it’s fine, spray a little texturizer into the braid before you coil it.
This one works well when the hair has highlights or lighter ends, because the braid pattern shows the color changes as it wraps. That’s a nice bonus, but the real win is that the style stays compact and tidy.
It looks more detailed than it is. I like that in a hairstyle.
16. Pin-Curl Faux Updo

You can fake a formal updo without building a giant bun. Pin-curl styles are proof. They work especially well on medium-length hair because the length is enough to roll into small loops, but not so much that the curls get heavy and fall out before they cool.
Curl sections about 1 inch wide with a small curling iron or rollers, let each section cool, then pin the curls flat against the head in a loose cluster. Once everything is set, remove the clips or pins and arrange the curls into a soft tucked shape. A light setting spray before the curls cool helps them remember the shape longer.
This is a strong option for fine hair that refuses to hold a big bun. The smaller curls give the illusion of a more built-out style without asking the hair to do impossible things. It also feels a bit vintage, which is fun without being costume-y.
Do not rush the cooling time. Warm curls fall apart fast.
17. Claw-Clip Updo with Smooth Tuck
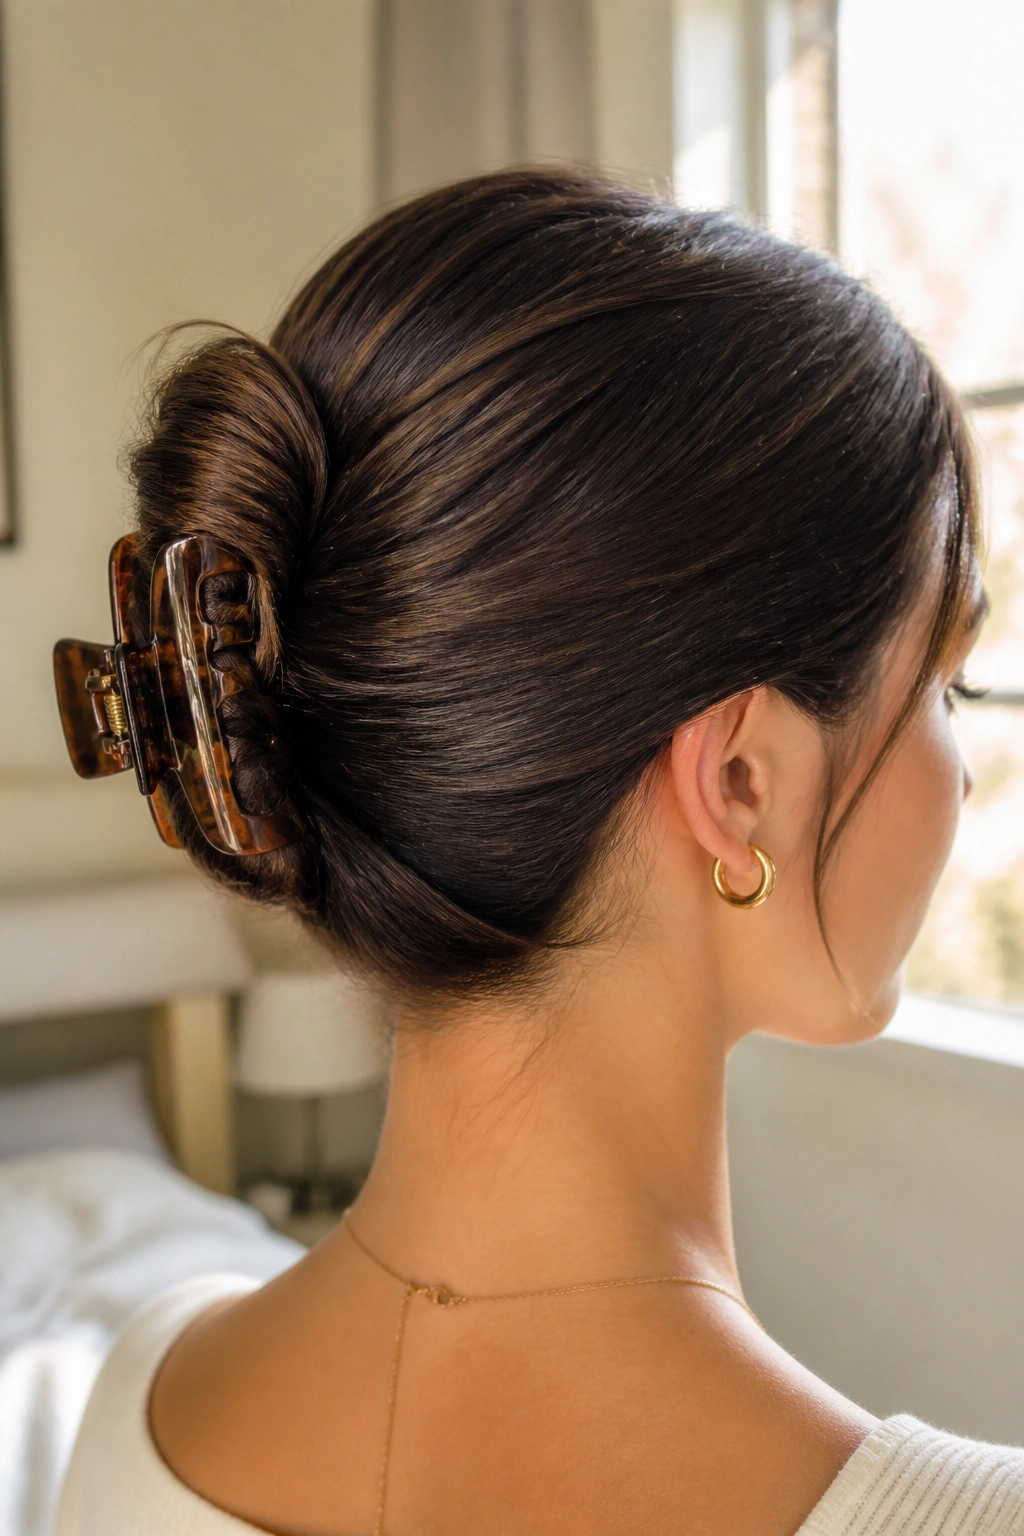
Is a clip really an updo? If the ends are hidden and the shape stays in place, I’d say yes. A claw-clip updo is one of the most practical styles for medium hair, and the right clip size makes all the difference.
Gather the hair as if you’re making a low twist, fold the ends upward, and secure the twist with a 3- to 4-inch claw clip. Small clips don’t hold enough hair. Oversized ones can slide around on finer textures. The best clip is the one that grips without digging into your scalp.
What to look for in the clip
- Rounded teeth that grab without pulling.
- A spring that opens smoothly.
- A shape wide enough to catch the twist in one bite.
This style is good for travel, errands, and days when you need your hair up fast but still want it to look deliberate. Leave the top smooth and let the clip do the visual work. That’s enough.
18. Infinity Braid Bun
If regular braids feel a little plain, the infinity braid gives you more shape without needing more length. Medium hair suits it because the braid stays compact and the loops are easier to place where you want them.
Braid the hair in an infinity pattern or weave one side over and under the center as you work downward, then gather the tail into a bun or tuck it beneath the braid. The braid itself does most of the decorative work. The bun just holds the base in place. If your hair is layered, use a dab of styling cream on the ends before braiding so the shorter pieces don’t poke out.
This style looks especially good when the hair has some texture. Very slippery hair can make the loops relax too much, so a little grit helps. If you want the braid to show more, gently pull the outer edges once it’s secured.
It’s a smart pick when you want something detailed but not fussy.
19. Soft Romantic Updo with Loose Tendrils
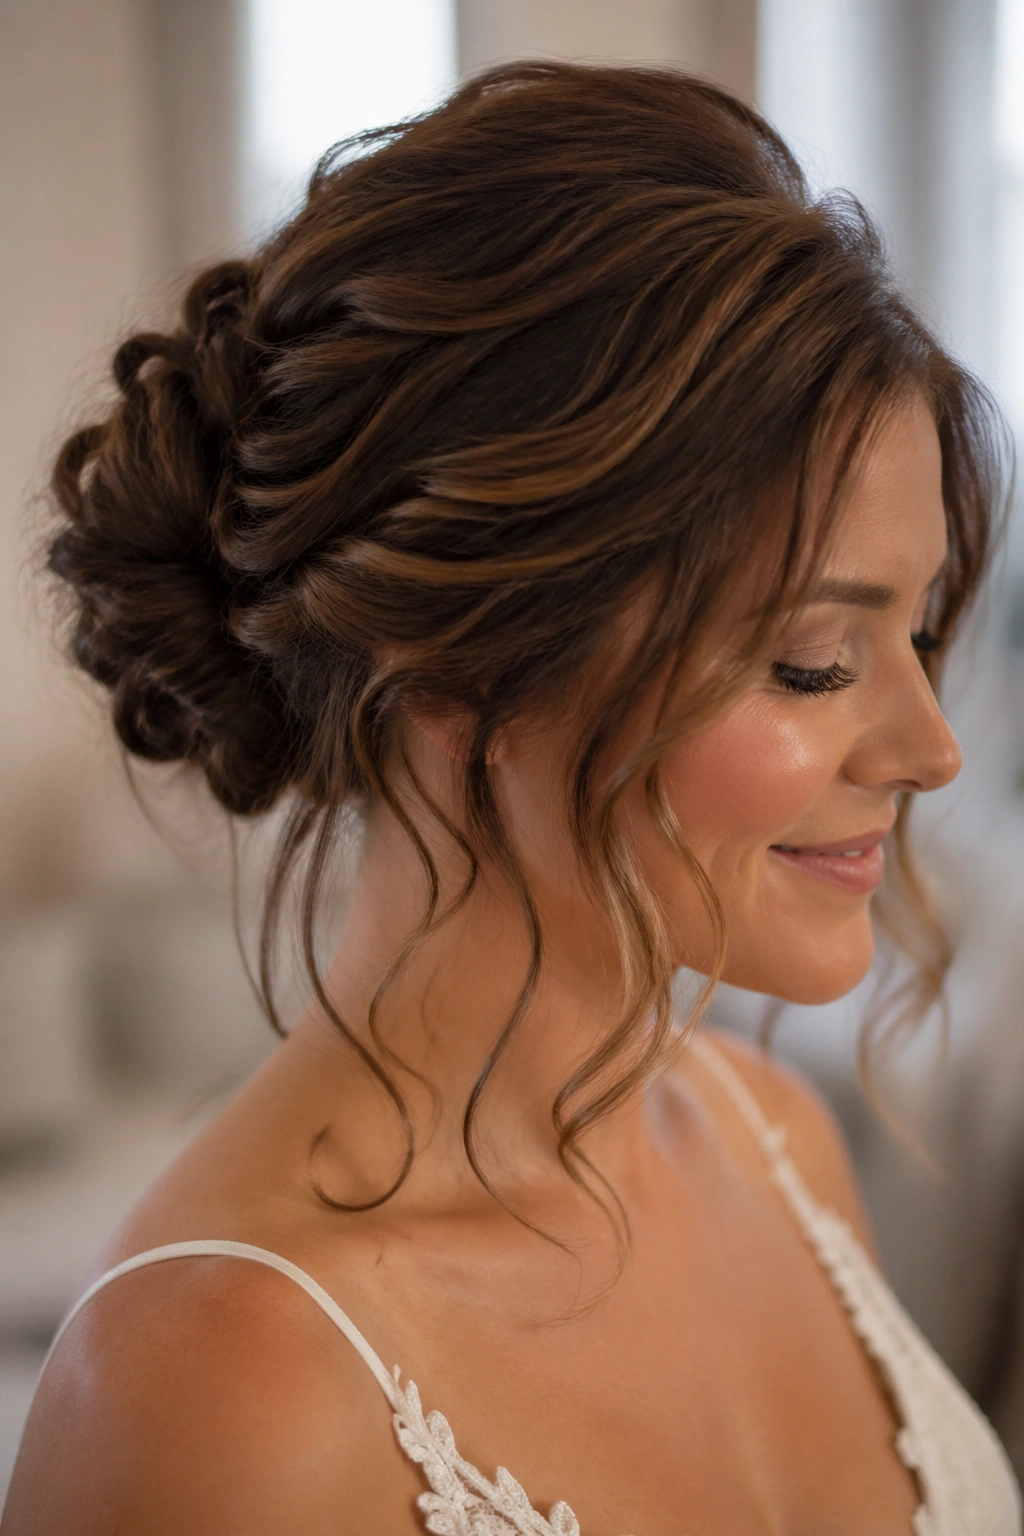
A soft romantic updo should move when you turn your head. That movement is the whole point. On medium-length hair, the style is flattering because the shorter layers around the face naturally soften the shape instead of fighting it.
Build a low twist or bun first, then pull out a few thin tendrils around the temples, ears, and nape. Curl those pieces with a 0.5-inch curling iron or a small wand so they bend instead of hanging straight. Keep the rest of the hair pinned loosely enough that the shape doesn’t look severe. A matte hairspray works better than a shiny one here; the finish should look touchable, not sticky.
This is a wedding-friendly style, sure, but it also works for dinners, graduations, and any occasion where you want to look dressed up without looking formal in the stiff sense. The soft pieces around the face do a lot of the work, so don’t overdo them.
A few tendrils. Not a curtain.
20. Everyday Low Twist That Looks Deliberate
This is the style I’d choose on a busy day when I still want my hair to look like I thought about it. An everyday low twist is quiet, neat, and friendly to medium-length hair because it hides awkward ends instead of exposing them.
Gather the hair low at the back, twist it once or twice, fold the tail upward, and pin it into a compact shape. If your ends are blunt, tuck them under tightly. If your layers are uneven, let the twist stay a little airy at the sides and secure the loose pieces where they naturally fall. The goal is not perfection. The goal is control.
Keep 2 spare bobby pins in your bag. Seriously. One pin falls out, and the whole shape can lean sideways by lunch. A tiny comb helps too if you want to smooth the crown after you take off a coat or hat.
That small routine is enough. Some mornings, that’s exactly the kind of hair decision that makes sense.