Five minutes really is enough.
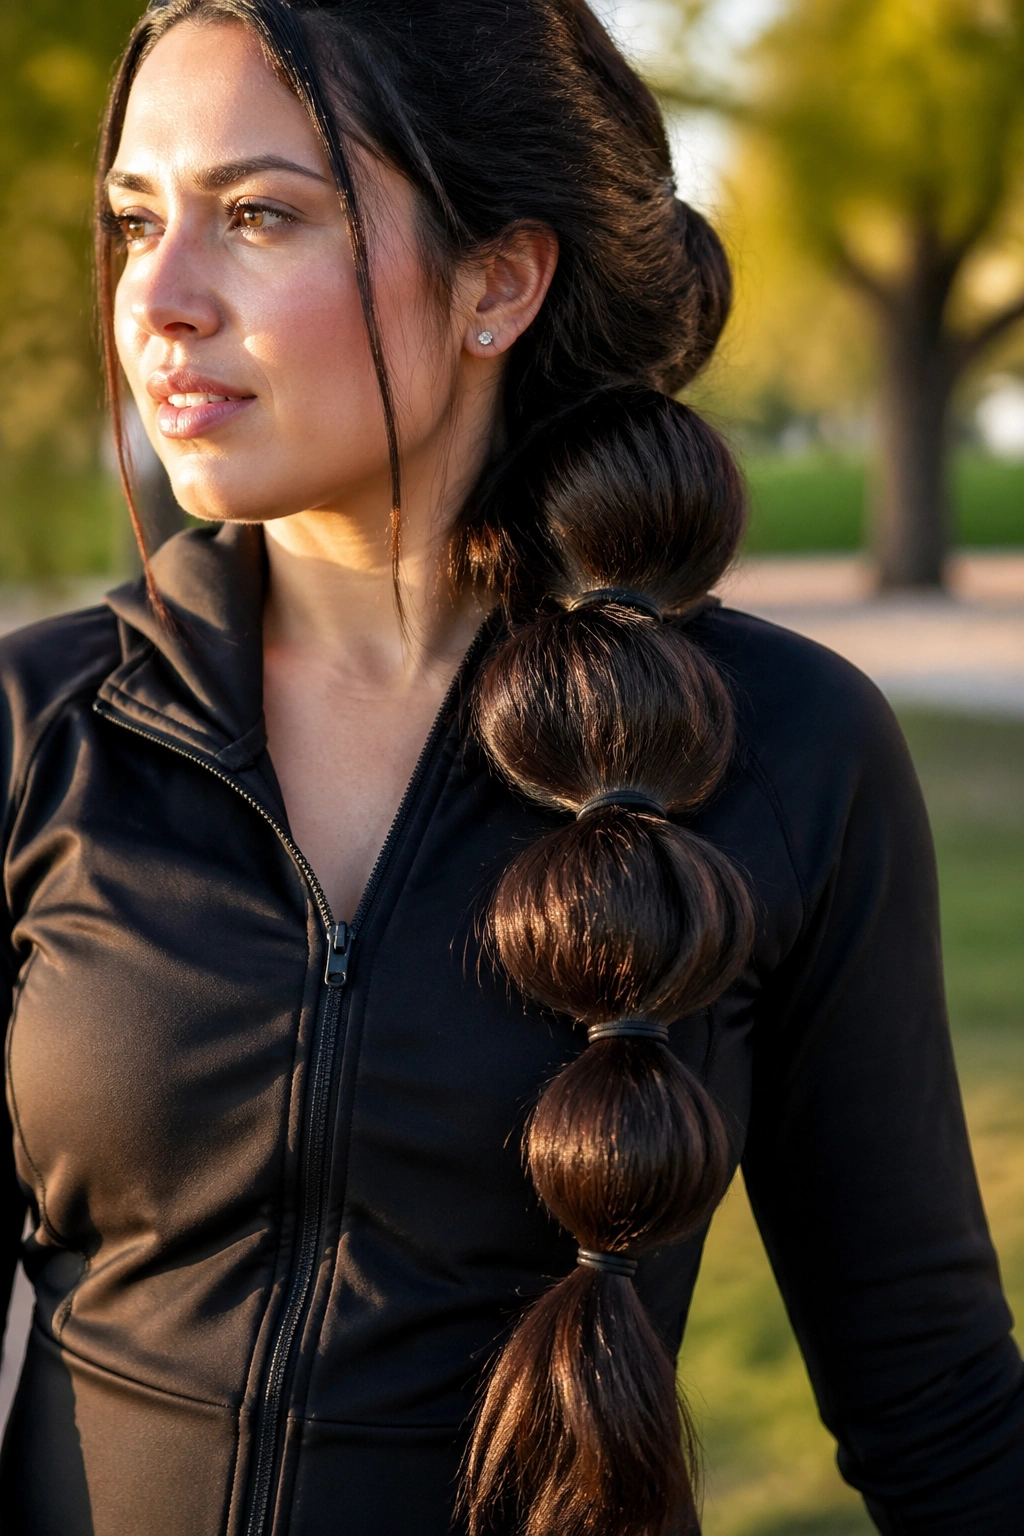
Bubble braids are one of those rare hairstyles that make slightly messy hair look deliberate, and they do it without asking for real braiding skill. A brush, a few clear elastics, and a steady hand are usually enough. If your hair is already detangled and your supplies are within reach, the style moves fast.
The trick is not complicated. Even spacing and even tugging matter more than fancy technique. On long hair, I usually think in 1½- to 2-inch gaps between elastics; on shorter lengths, closer spacing keeps the bubbles from looking loose and floppy. Fine hair likes dry shampoo or texturizing spray. Curly hair often looks better with less brushing and a lighter hand.
I also like bubble braids because they forgive a bad hair day. Day-old roots hold shape better than freshly washed silkiness, and a little frizz rarely ruins the look. If anything, the style often reads better with some life in it.
Some versions here are polished enough for dinner. Some are playful enough for a school run, a workout, or a day when you want your hair off your face and still not boring. Pick the one that matches your mood, grab the nearest elastics, and move.
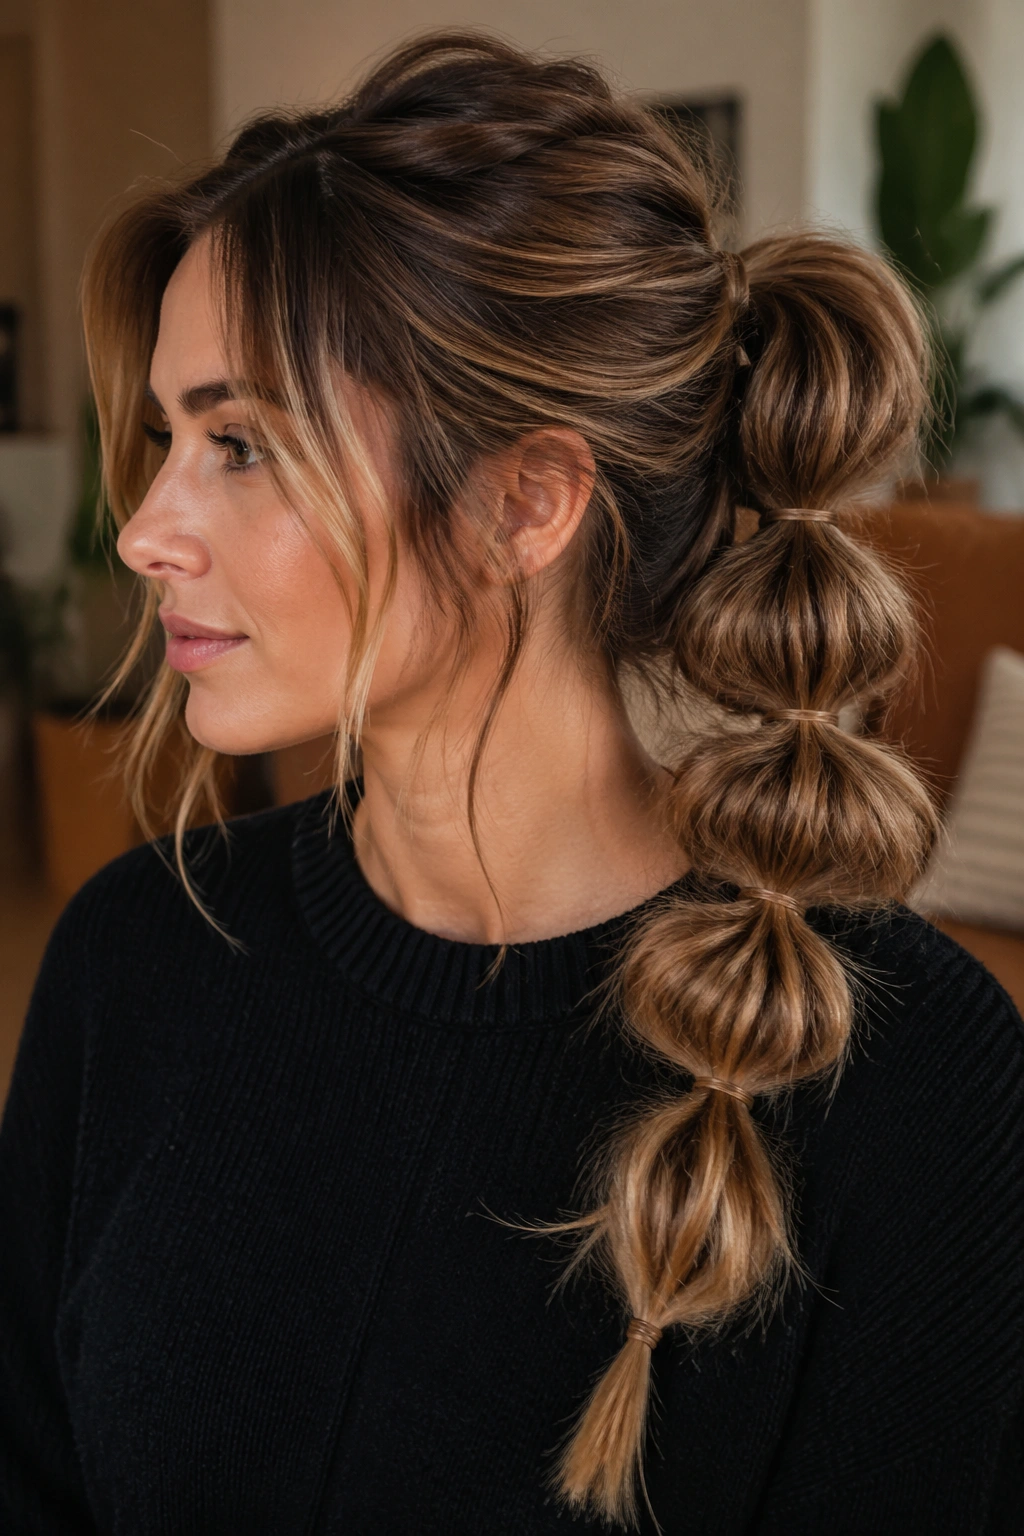
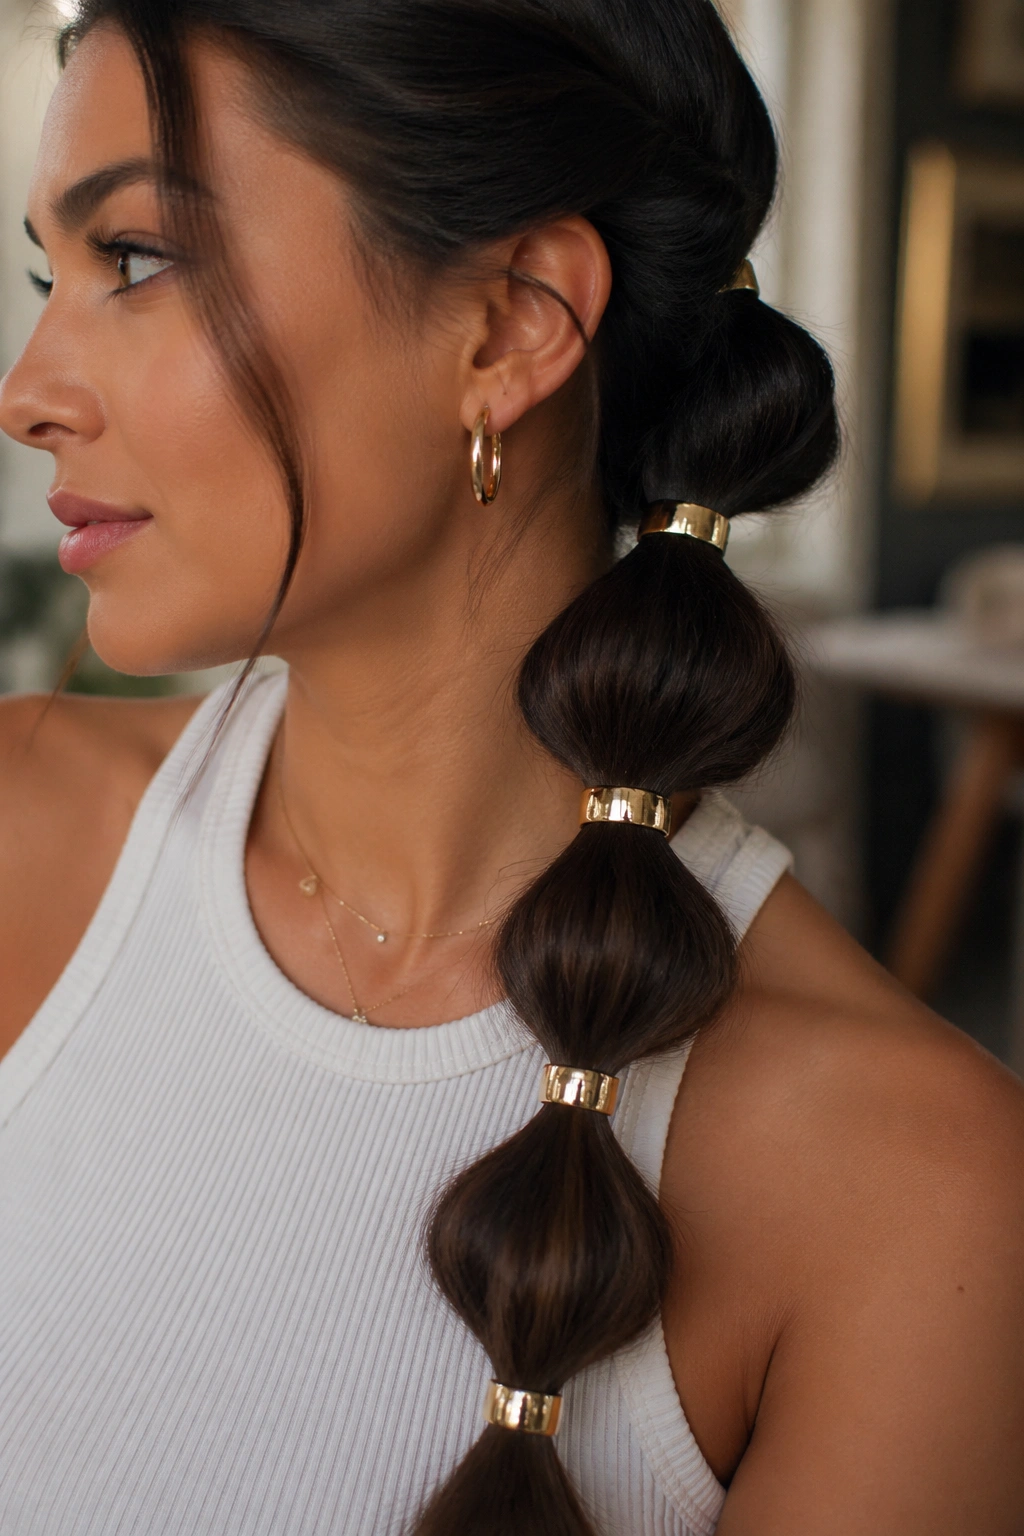
1. High Bubble Ponytail
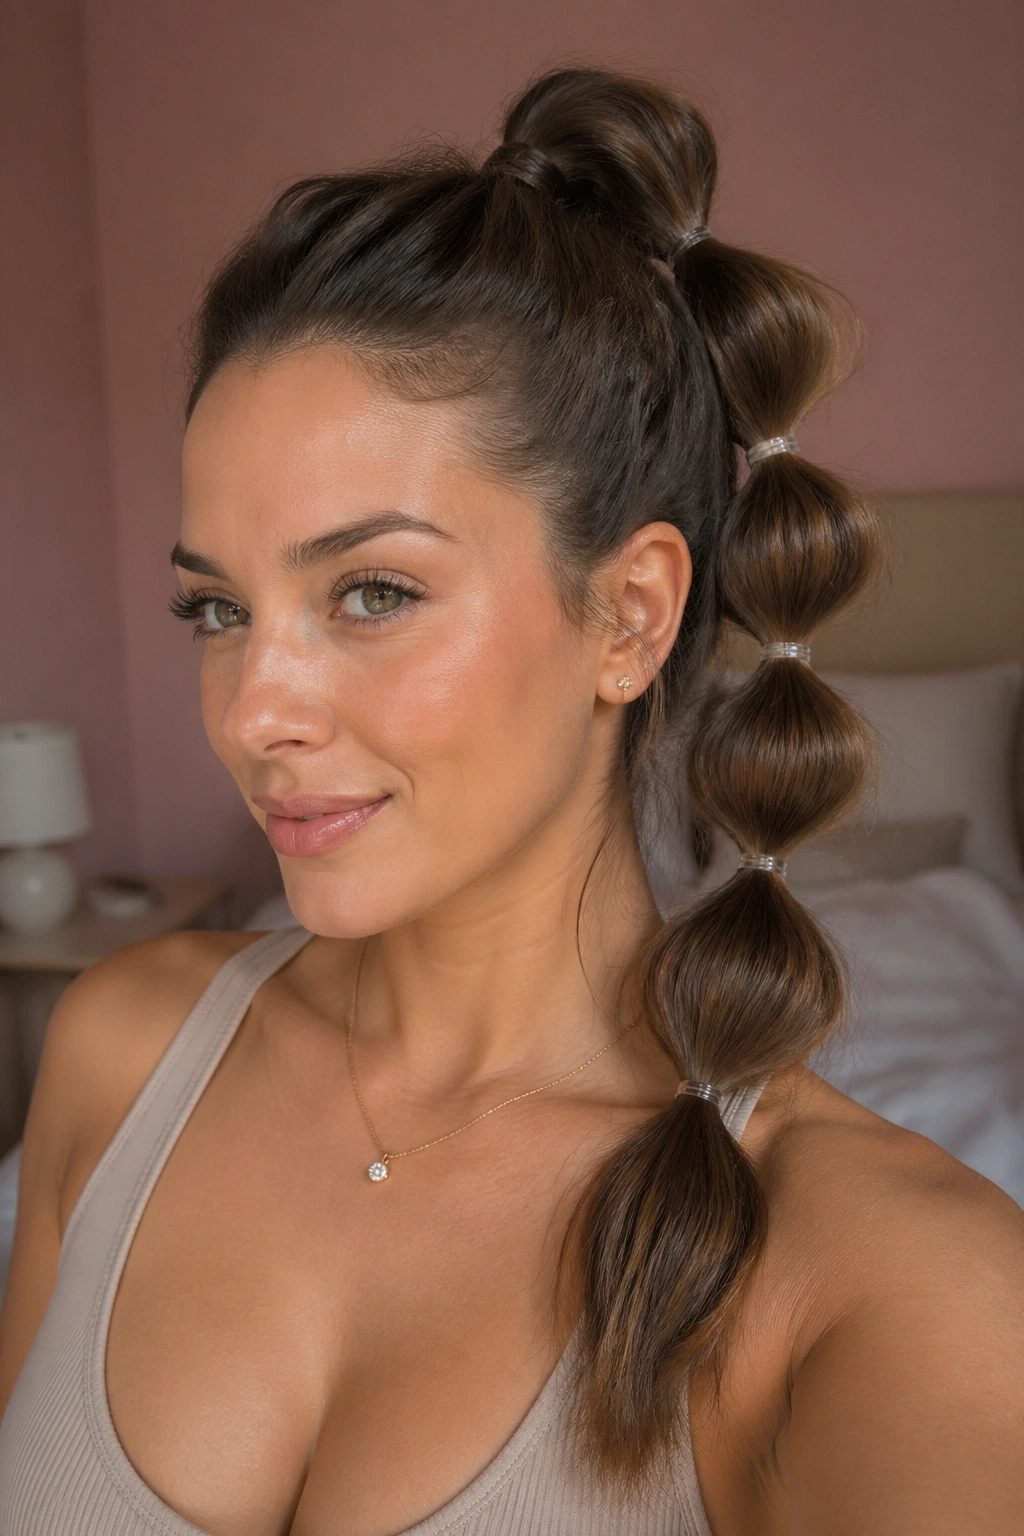
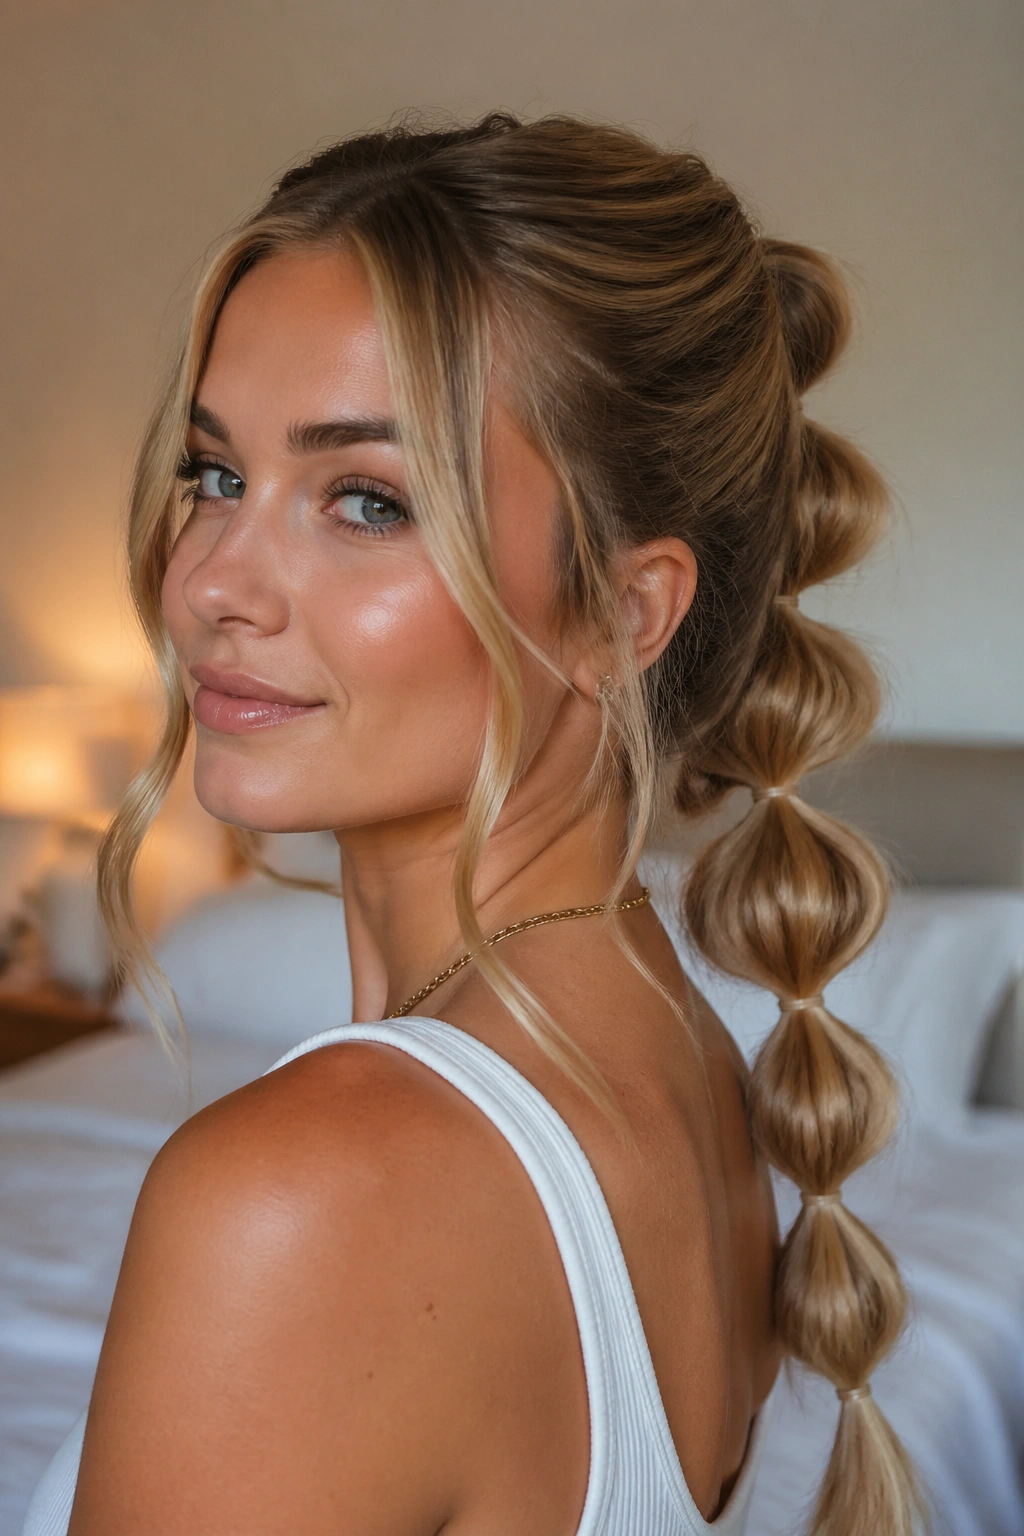
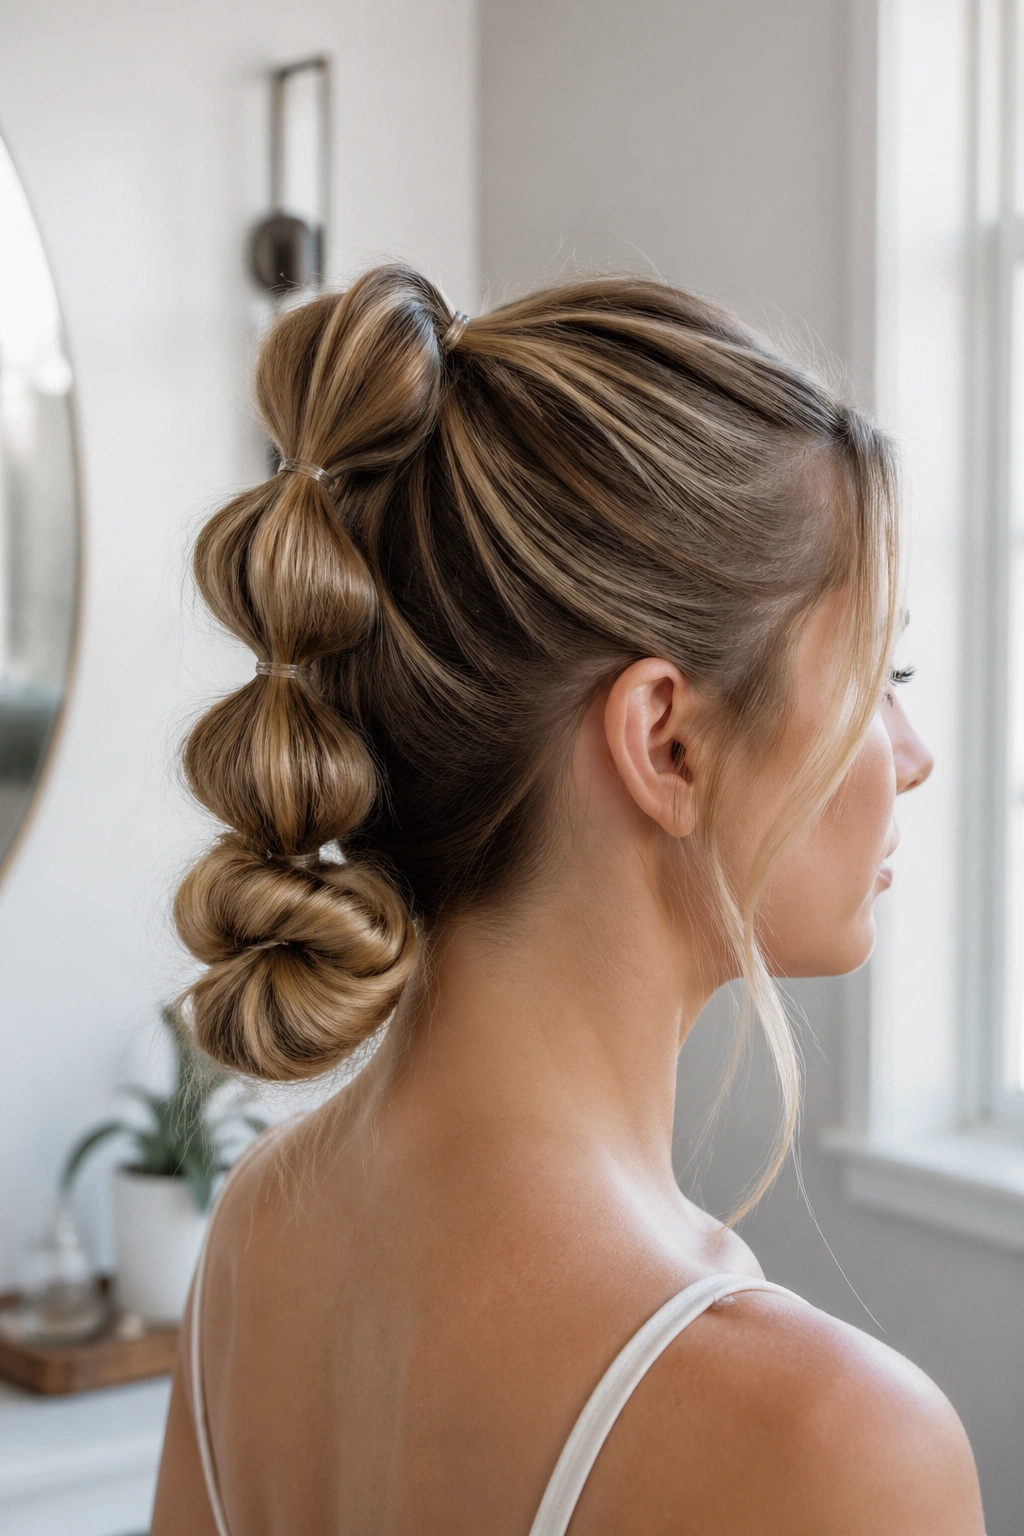
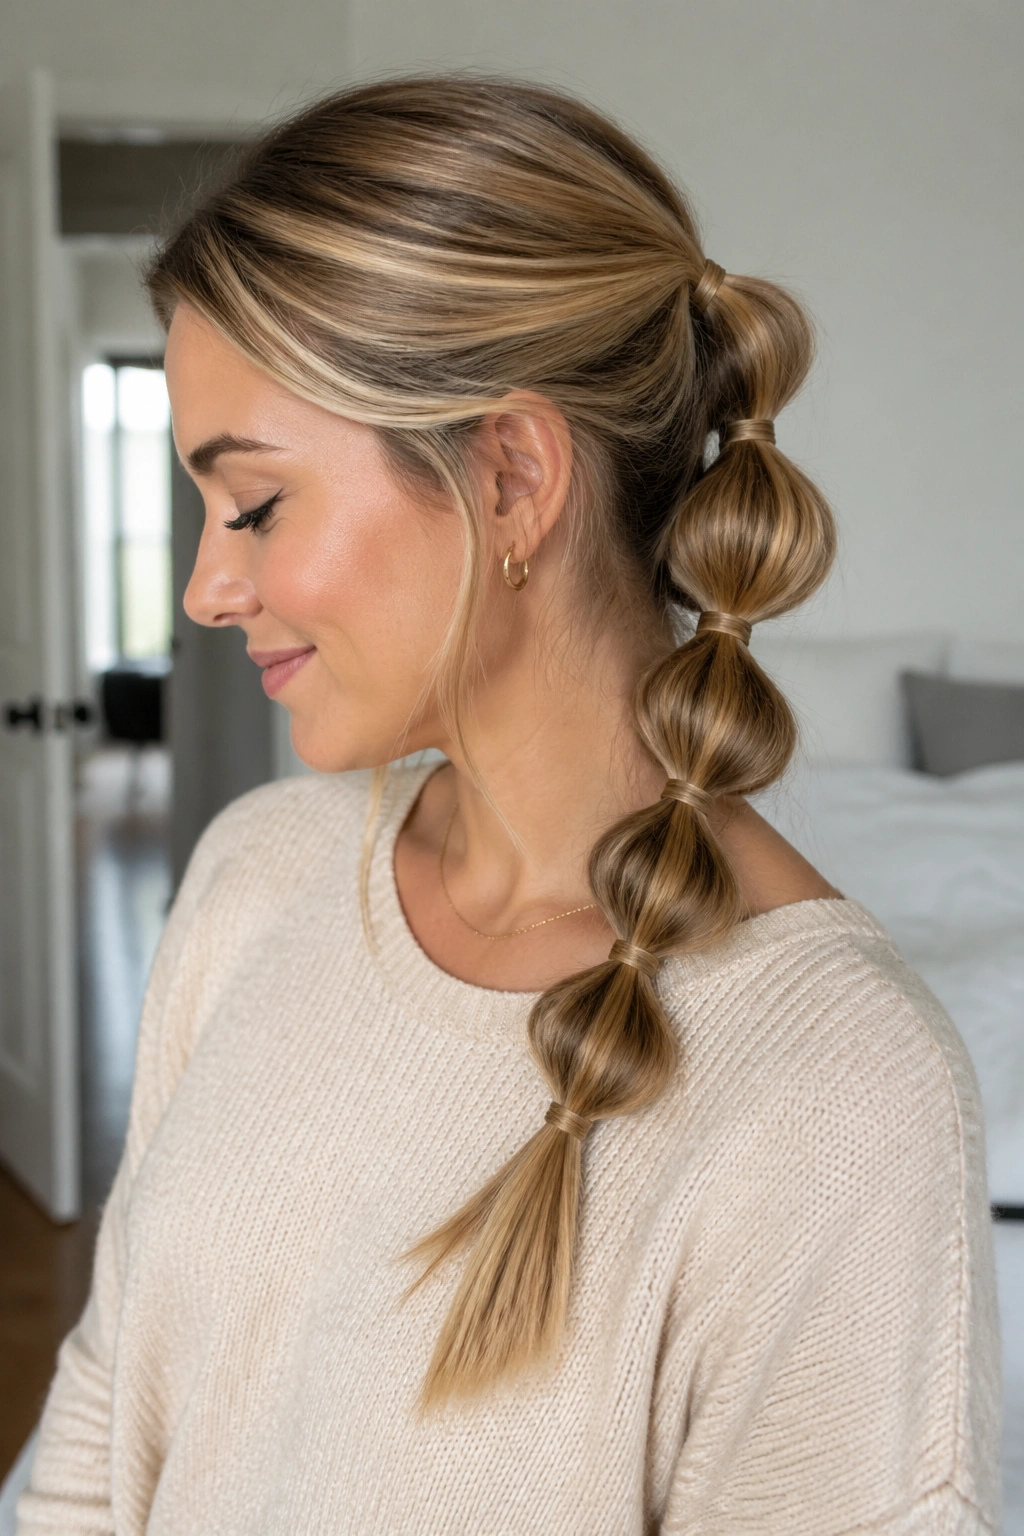
A high bubble ponytail is the classic for a reason. It sits up at the crown, gives instant lift, and makes the rest of your hair look longer and fuller without asking for much effort. If your roots are a little flat, this version does a lot of visual work for you.
Why the Shape Reads So Well
The higher placement pulls the eye upward, which is why this one feels lively even when the rest of your outfit is plain. It also gives you room to make 4 or 5 bubbles without the tail collapsing into one sad loop. On long hair, that matters.
A rattail comb helps, but fingers work if you are rushing. Tie the first elastic tight, then place the next bands about 1½ to 2 inches apart. After each elastic, tug the section outward from both sides so the bubble stays round instead of lopsided.
- Best with: second-day hair, ponytail-length layers, and a little dry shampoo
- Use: 4 to 6 small clear elastics
- Finish with: a light mist of hairspray at the crown
- Skip heavy oils near the roots; they make the style slide
Pro tip: tip your head forward for the first elastic. The base sits cleaner, and the crown gets instant lift.
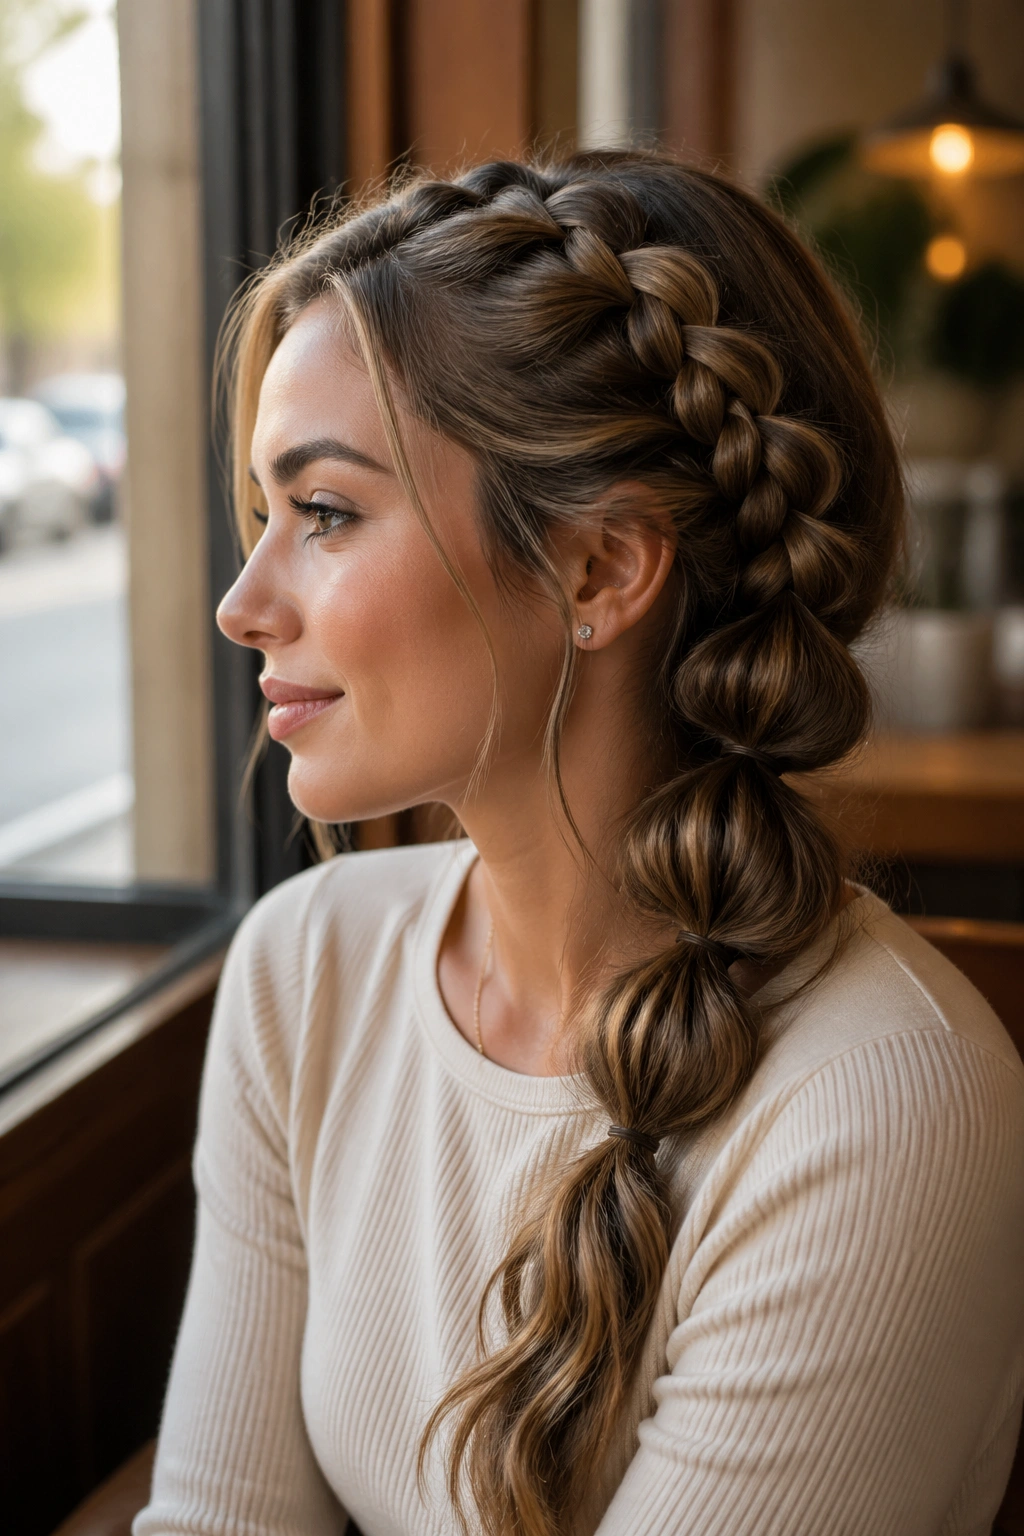
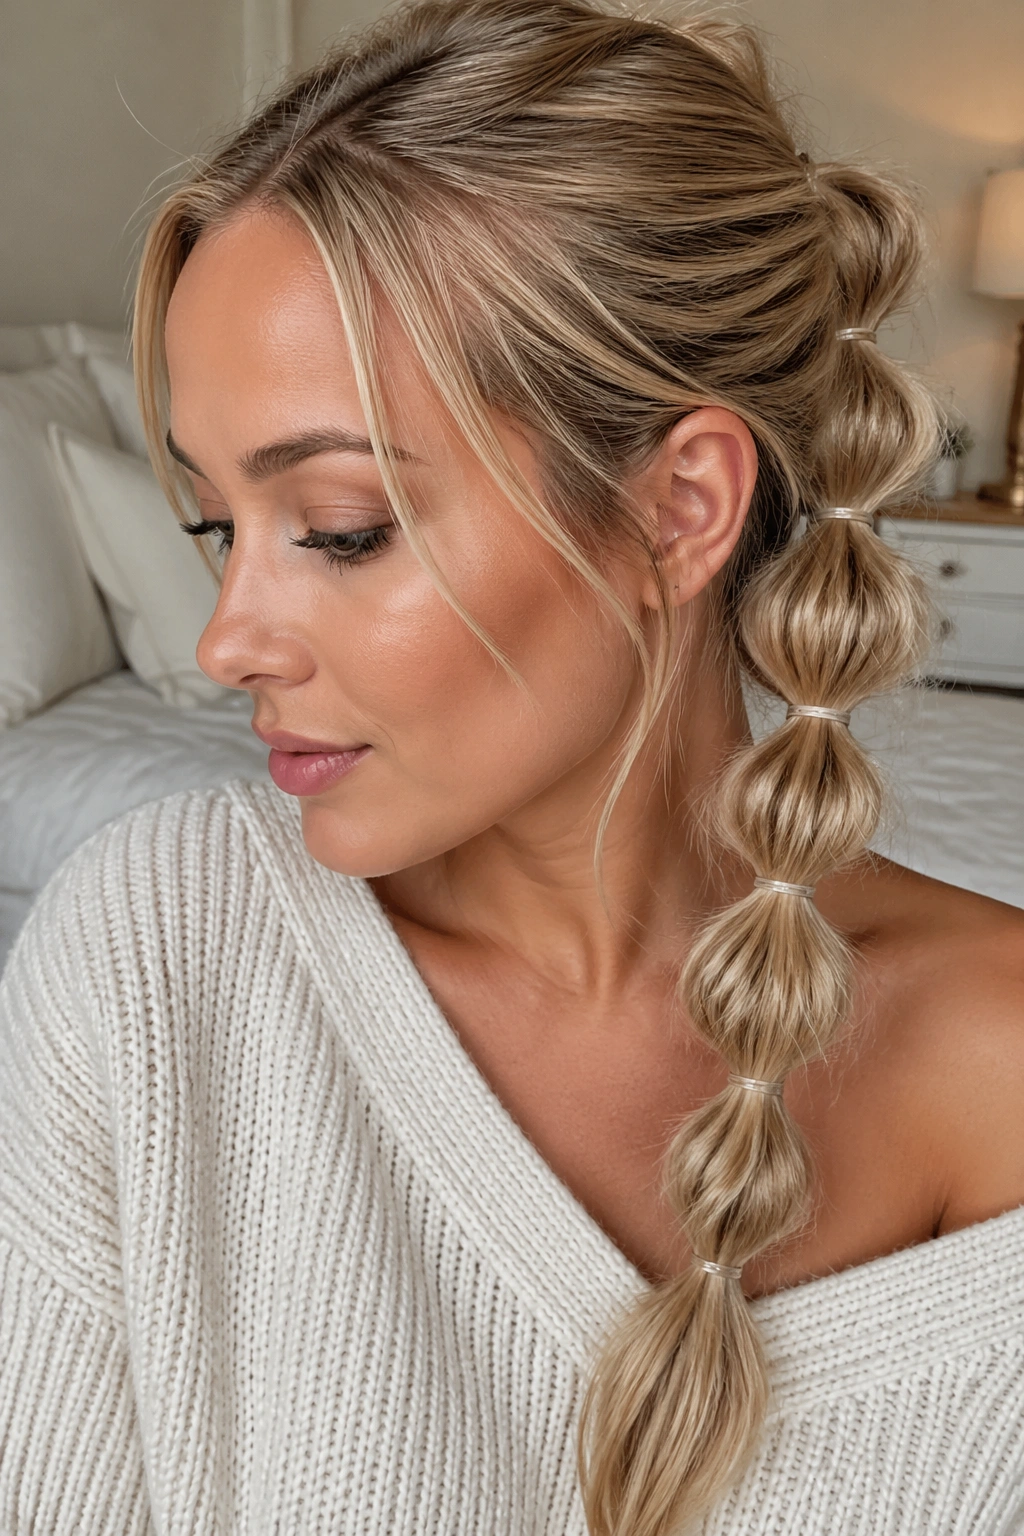
2. Low Bubble Braid at the Nape
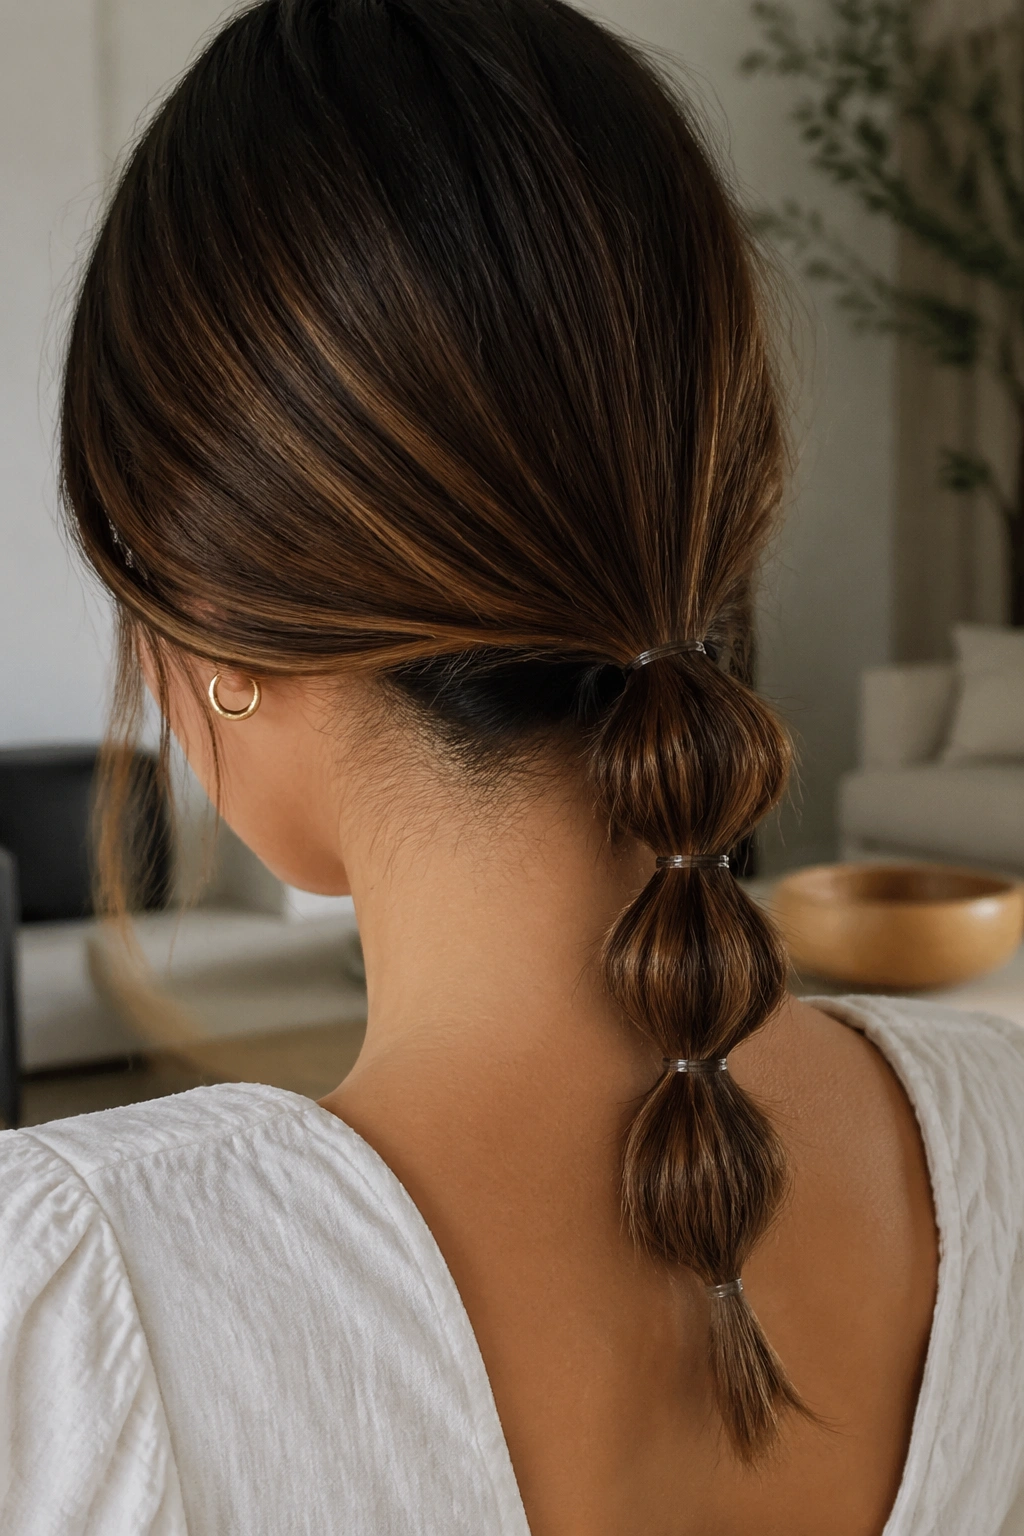
Low bubble braids look calmer than the high version, and that calmness is exactly why they work so well. The style hugs the nape, keeps flyaways under control, and feels cleaner when your hair has a bit of texture around the hairline.
This is the one I reach for when I want hair off my neck without making a big deal out of it. It works especially well on medium to long hair because the bubbles sit close enough together to feel intentional. You only need 3 or 4 elastics if the tail is not very long.
Smooth the top with a little cream or serum before you tie the ponytail. Then place the elastics evenly down the length, tugging each bubble a bit less aggressively than you would on a high style. The lower placement already does most of the styling for you.
If you want it to look more finished, wrap a tiny strand of hair around the base elastic and pin it underneath. Small move. Big difference.
3. Half-Up Bubble Braid
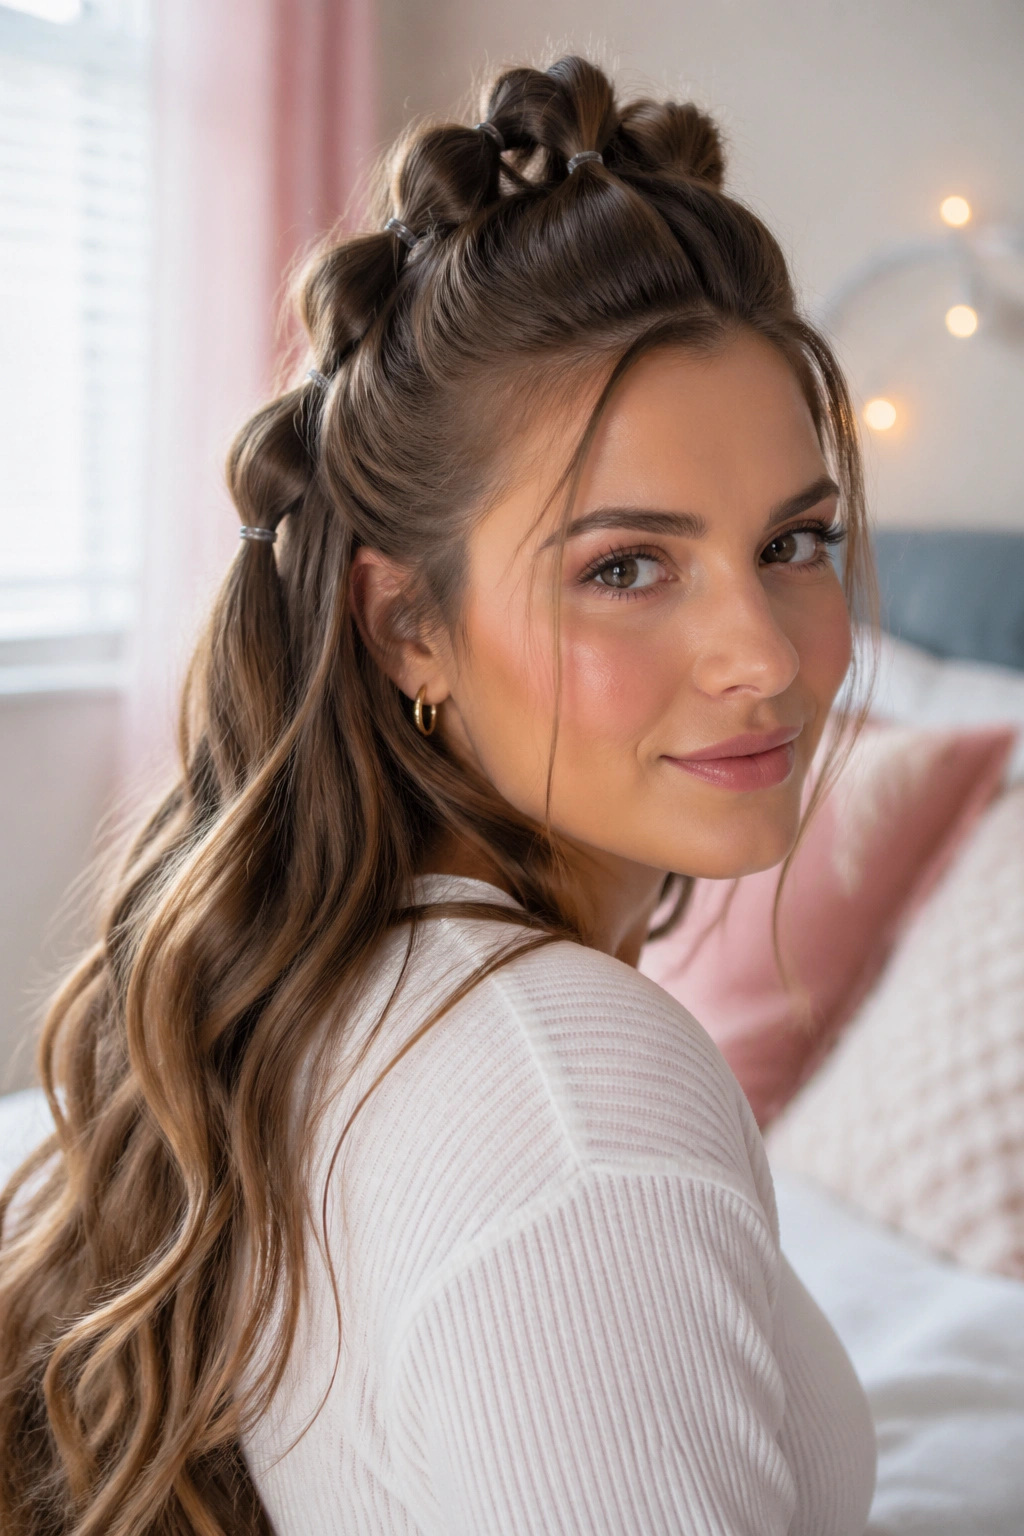
Why does the half-up bubble braid look more dressed up than the time it takes to make it? Because it gives you the best part of two hairstyles at once: shape at the top and movement at the bottom. The face opens up, but the rest of the hair still falls softly.
This version is especially good when you want your hair out of the way but do not want a full ponytail. It works on straight hair, waves, and layered cuts, and it is forgiving if the bottom half of your hair is doing its own thing. That bottom section becomes part of the look instead of something you need to control.
Where to Place the Section Line
Take the top section from about the temples back to the crown, not all the way down the head. That keeps the style light and prevents it from swallowing too much hair. Tie the half-up ponytail, then add 2 or 3 bubbles only.
- Keep the first elastic just below the crown.
- Leave curtain bangs or shorter pieces out if you want softness.
- Tug the bubbles evenly, then stop. Over-pulling makes the top look bulky.
- Add a curling iron touch-up to the front pieces if you want a more polished finish
This one looks simple, and that is the point.
4. Twin Bubble Pigtails
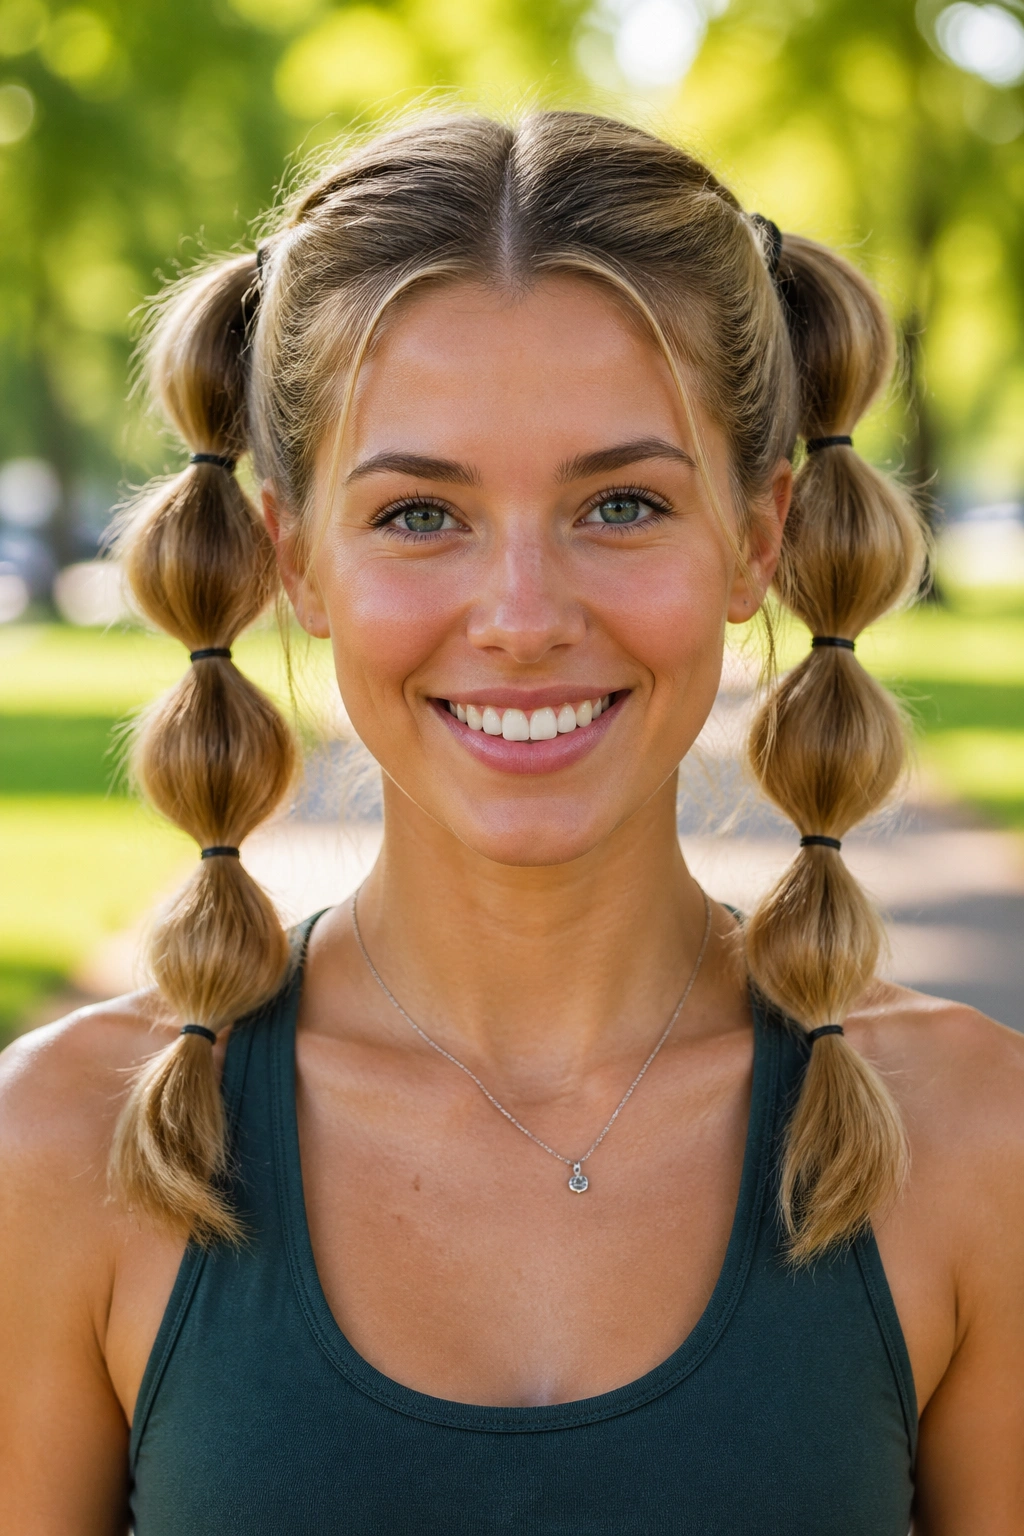
Two tails sound like more work. They aren’t.
Twin bubble pigtails are fast because each section is shorter, easier to control, and less likely to slip while you are working. They also feel playful in a way a single ponytail never quite does. If you have thick hair, this is one of the easiest ways to keep the style from getting heavy.
Start with a clean center part. That part matters more than people think, because a crooked part makes the whole style feel off before you even get to the elastics. Tie each side at the same height, then build 2 or 3 bubbles per tail depending on length.
- Match the elastic spacing on both sides
- Tug the bubbles after both ponytails are tied
- Use mini scrunchies if you want a softer, less strict look
- Keep the first elastic snug so the tails do not droop by midday
If one pigtail turns out a little fuller than the other, do not tear it out and start over. Tighten the smaller side by a quarter inch and pinch the bigger side once more. That usually solves it.
5. Side Bubble Braid
Side bubble braids have a little swagger. The off-center placement makes the whole style feel less obvious, and that can be a good thing when you want your hair to look styled without looking overworked.
I like this version with a deep side part and one shoulder left open. It gives the bubbles a place to fall naturally, which is useful if your hair is layered or has a blunt cut that needs movement. The style also works well with earrings, since the hair sits to one side instead of covering both ears.
The bubbles can get slightly larger as they move away from your face. That small shift keeps the front soft and the tail from feeling too stiff. If your hair is thick, use wider gaps; if it is fine, keep the spacing tighter so the bubbles hold shape.
Easy. Faster than it looks. A side bubble braid usually takes less time than deciding where to put a center part.
6. Ribbon-Tied Bubble Braid
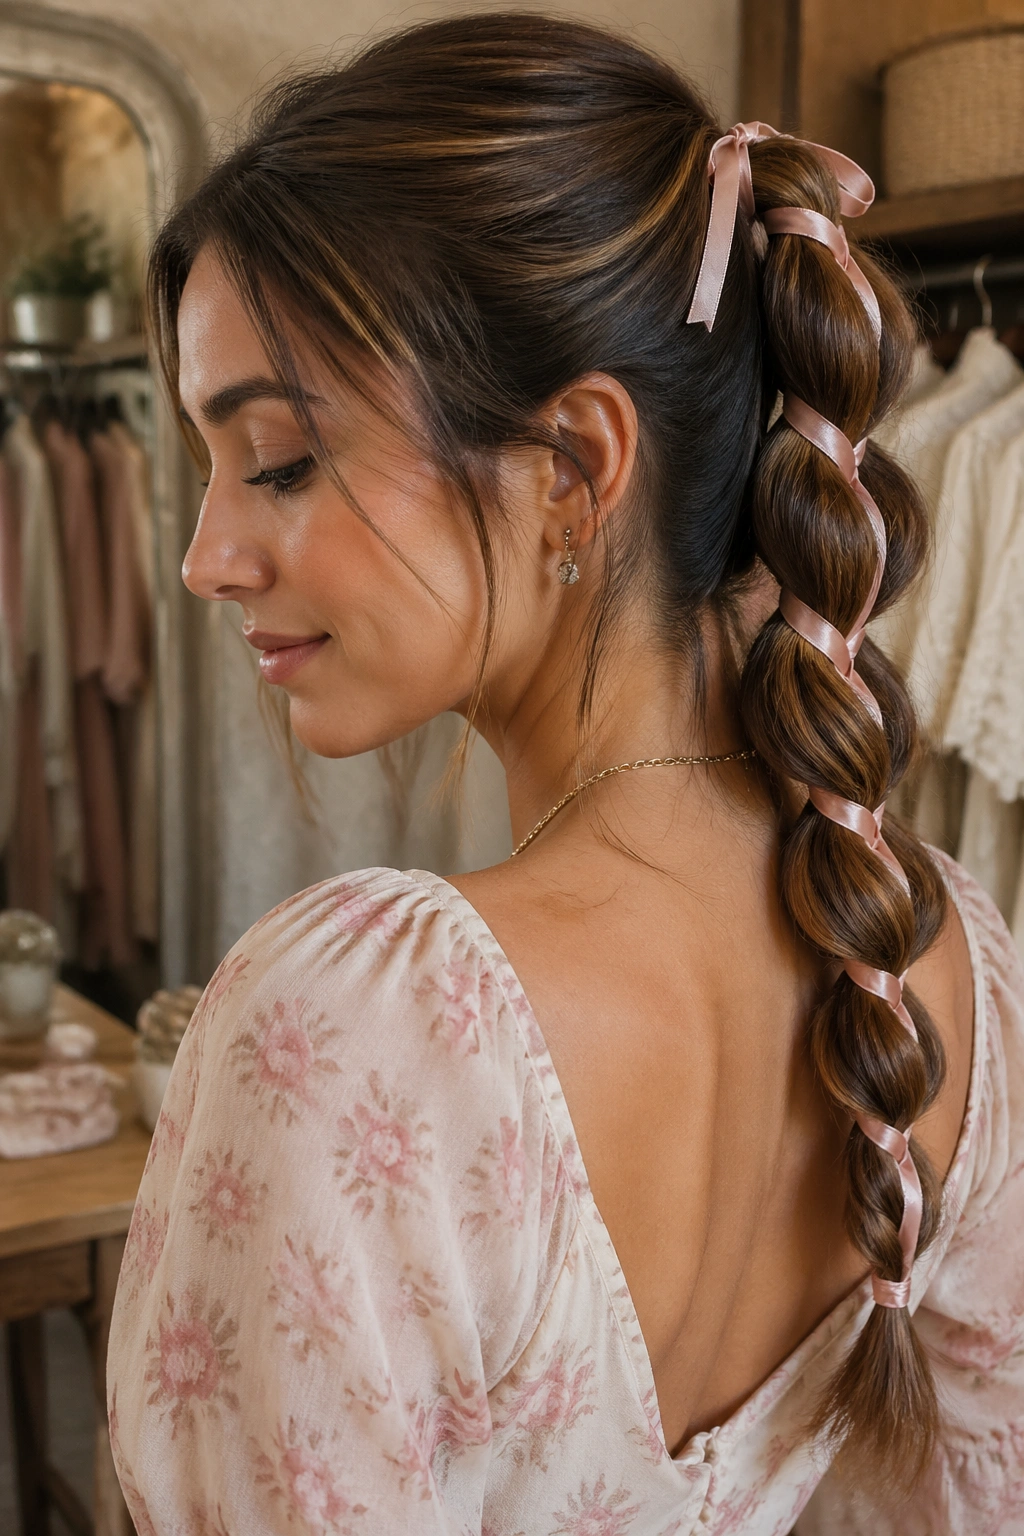
A ribbon changes the whole mood. Unlike a plain clear elastic, it gives the bubbles a finished edge and lets you bring in color without changing the basic style. That makes it a neat option when you want the braid to feel a little more dressed up.
A 1/4-inch satin or grosgrain ribbon works well because it is narrow enough to stay tidy. You can tie it around each elastic, or use it only at the base and the final few bubbles if you want less fuss. Thicker ribbon gets bulky fast, especially on fine hair.
This version is best when you want the braid to match a top, shoes, or a bag strap without trying too hard. It is also one of the faster decorative options, since the ribbon does most of the visual work. The rest is the same old bubble braid routine.
Use one color if you want calm. Use two only if you already know what you are doing. Mixed ribbons can look clever or chaotic, and there is not much between the two.
7. Sleek Bubble Braid with Gel

If your hair frizzes the moment you touch it, start with gel.
A sleek bubble braid depends on the crown looking smooth before you ever reach for the second elastic. That means a pea-sized amount of styling gel or smoothing cream, brushed back with care, then secured tightly at the base. Once the top is clean, the bubbles can do their thing without fighting stray hairs around your face.
How to Keep the Crown Clean
A boar-bristle brush or edge brush helps flatten flyaways fast. Use it along the hairline and at the temples, then tie the ponytail while the product is still fresh and pliable. If you wait too long, the top sets in odd ridges.
- Use a snag-free elastic for the first tie
- Keep the tail smooth before adding the next band
- Avoid heavy product on the ends; it can make the bubbles droop
- Finish with a light mist of hairspray only where the short hairs pop out
The first elastic does most of the visual heavy lifting here. Make that base neat, and the rest will follow.
8. Messy Textured Bubble Braid
Perfection is the wrong goal here. A slightly undone bubble braid often looks better on wavy hair than a stiff one ever will.
This version starts with texture, not control. Dry shampoo, a little grit spray, or even just day-old hair gives the bubbles something to hold onto. If your hair is freshly washed, rough it up a bit at the roots before you start. You do not want slick strands sliding out the second you tug at a section.
The bubbles themselves should not match each other exactly. Pinch one a little wider near the top, leave the next a touch smaller, and let the tail taper naturally. That unevenness reads relaxed instead of messy-messy.
I like this one when I am not interested in fighting my hair. It works with wavy lengths, soft layers, and hair that never sits perfectly flat anyway. Honestly, that is most hair.
9. Bubble Braid for Curly Hair
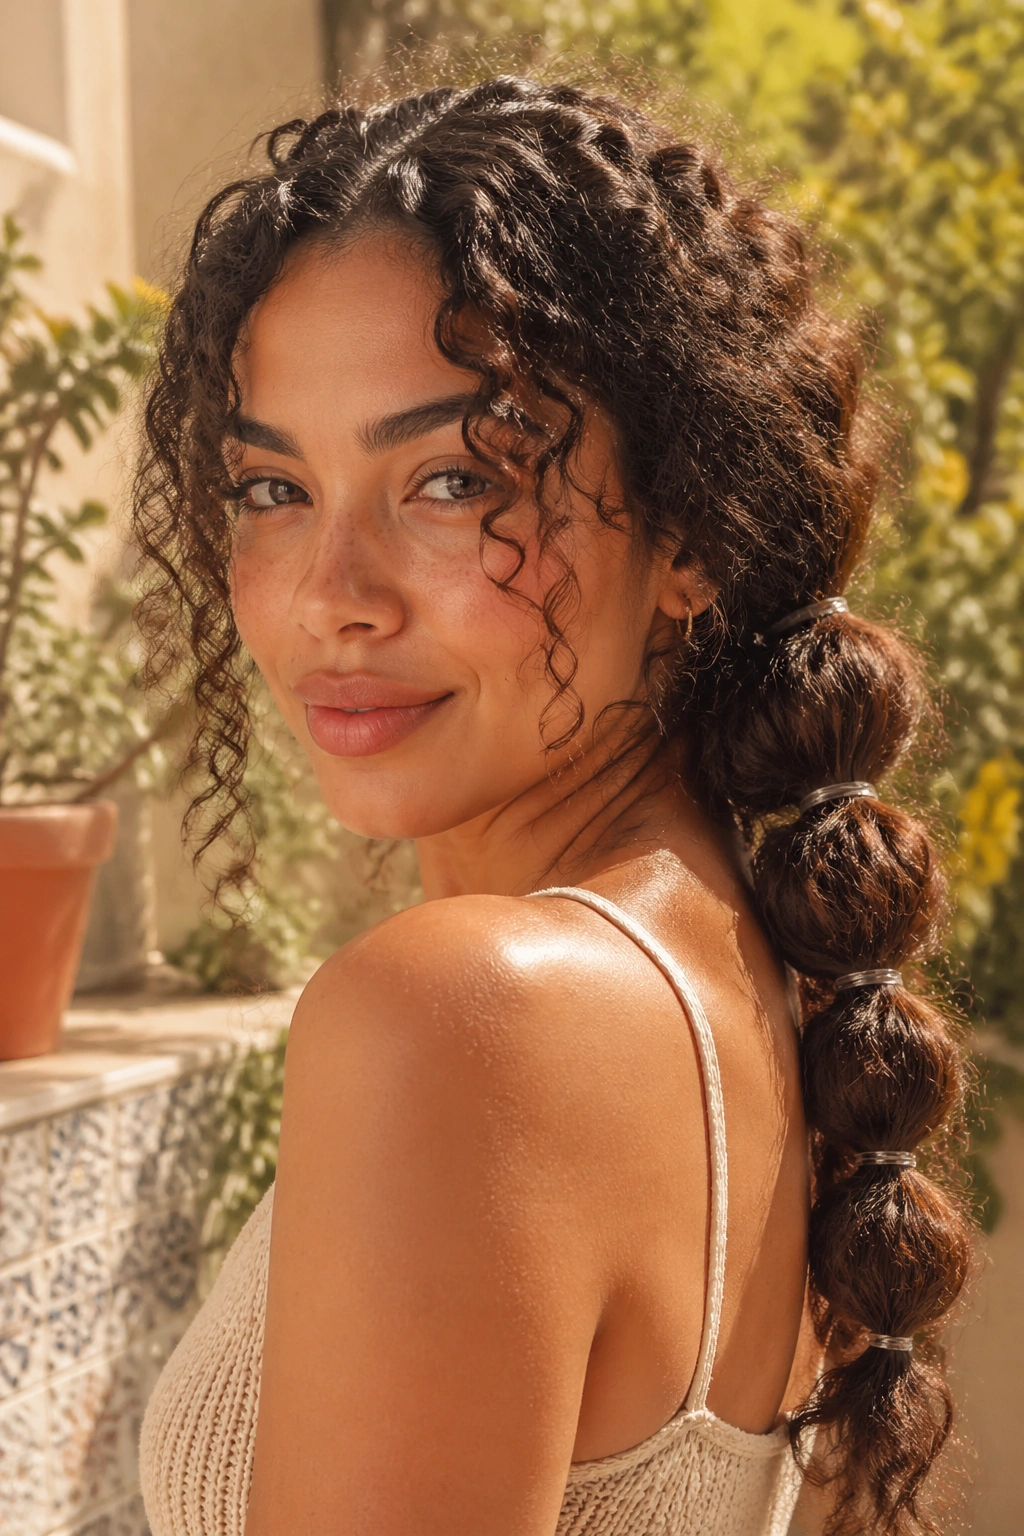
Can bubble braids handle curls? Yes, and they often look better on curls than on pin-straight hair because the texture gives each bubble more body.
The key is not to brush your curls into submission. Use your fingers or a wide-tooth comb, keep the curl clumps together, and work in a little leave-in conditioner if your hair tends to frizz. Once the ponytail is set, you can add one elastic at a time and gently puff the bubbles without pulling the curls apart.
How to Keep Curls Defined
A curl-friendly bubble braid should feel soft, not crunchy. If the hair is damp, let it dry enough that the elastics grip before you start, or the style can slide. If the curls are dry and bouncy, even better.
- Start with detangled curls and a light leave-in
- Use looser elastics than you would on straight hair
- Keep the bubbles round, not stretched flat
- Leave a few front curls out if they frame your face well
One more thing: stop tugging once the curl pattern starts to separate. That is the line between shape and frizz.
10. Mini Bubble Braid for Short Hair
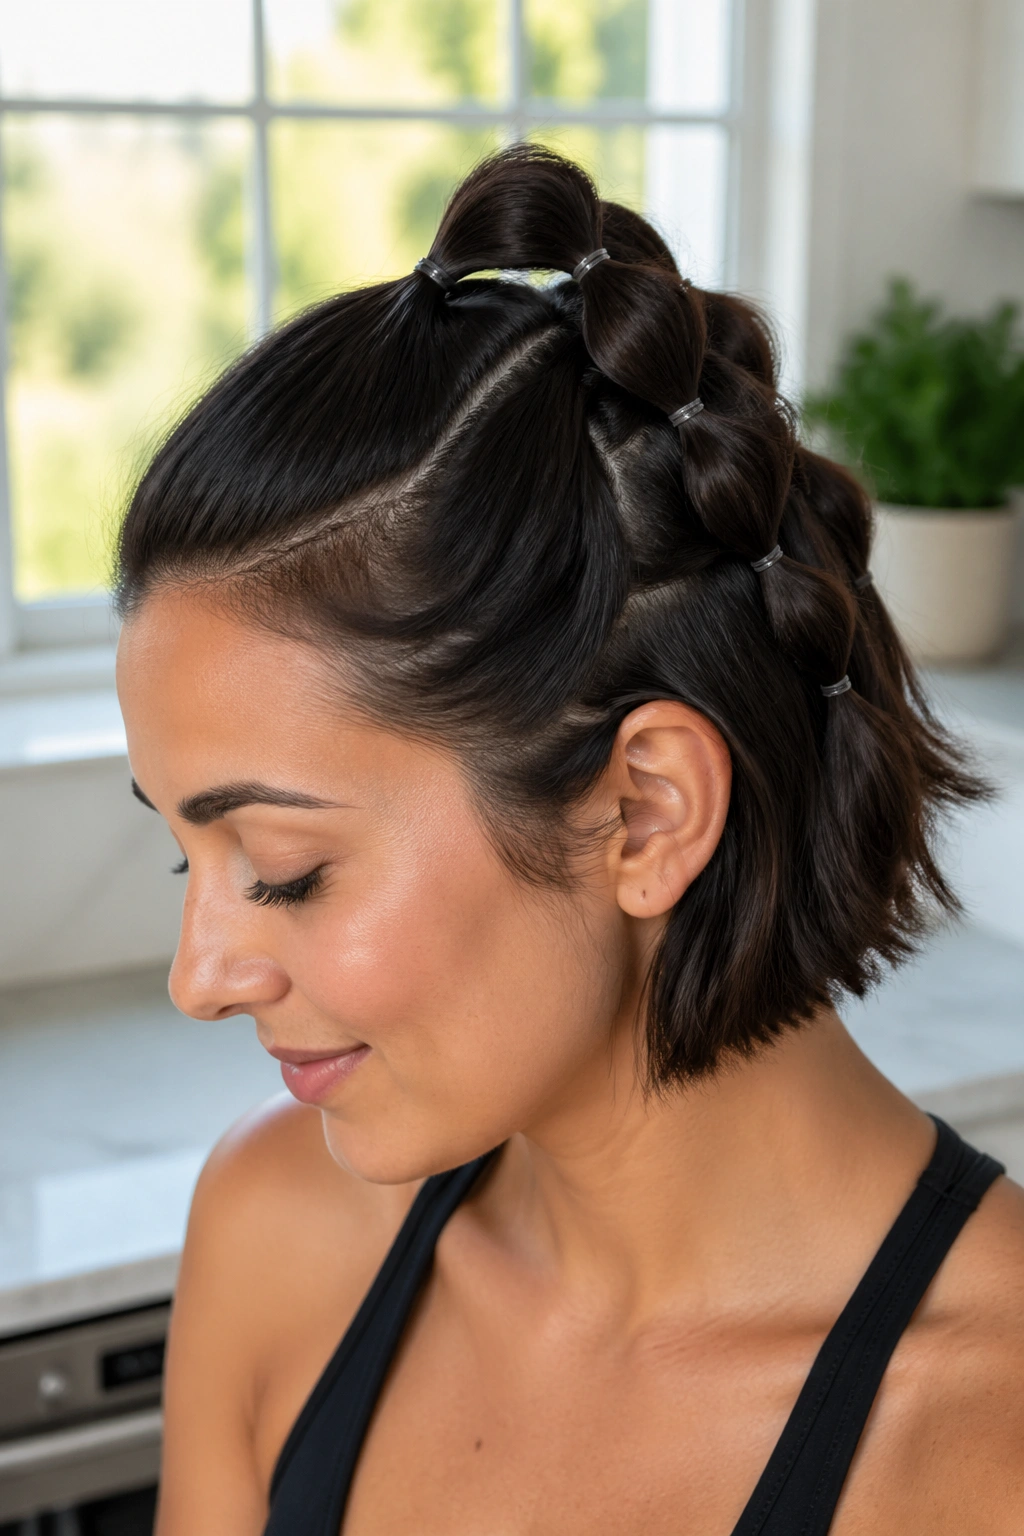
Short hair does not rule this style out.
A bob, lob, or shoulder-grazing cut can still do a bubble braid if you keep the sections small and accept that you may only get 3 or 4 bubbles. That is fine. In fact, on short hair, trying to force too many bubbles usually makes the tail look thin and awkward.
The trick is to start the ponytail a bit higher than you would on long hair so the remaining length has room to form shape. Use mini clear elastics about 1 inch apart, then tug only a little. Short hair does not need much puff to register as a bubble.
- Use two bobby pins under the base if the first elastic slips
- Keep the end tucked or curled under slightly
- Add dry shampoo for grip before you start
- Stop before the last inch looks flimsy
A short bubble braid should look deliberate, not apologetic. That is the whole game.
11. Thick-Hair Bubble Braid with Wider Sections
Thick hair needs a slightly different plan.
Heavy hair can flatten tiny bubbles in half an hour, so the sections need to breathe. Give each elastic a wider gap, usually 2 to 3 inches, and do not yank the bubbles too hard. Strong shape comes from structure here, not from over-pulling the hair until your scalp complains.
One thing I like about this version is that it lets thick hair look organized without feeling squeezed. The tail gets enough space to move, and the bubbles stay round instead of turning into tight knots. If your ponytail is waist-length, you may end up with 5 or 6 bubbles, which is plenty.
Heavy hair punishes tiny elastics.
Use bands with decent stretch and a bit of grip. If the first elastic feels too loose, double it at the base rather than cranking the ponytail tighter. That small adjustment saves you from a headache and keeps the style from sagging by lunchtime.
12. Fine-Hair Bubble Braid with Puffy Sections
Fine hair wants help from texture.
Unlike the thick-hair version, this one benefits from a little prep before the first elastic. A puff of dry shampoo at the roots, a quick mist of texturizing spray, and a tiny tease with a comb at each interval can make the bubbles hold their shape instead of deflating. You are not building volume out of nowhere. You are giving the hair something to cling to.
The bubbles should stay smaller and cleaner than they would on thick hair. If you tug too aggressively, fine strands can separate and expose the elastic underneath. Instead, fan the outer edges of each section with your fingertips and stop before the hair starts to look wispy.
What Keeps Fine Hair from Collapsing
The answer is grip. Clear elastics are fine, but they should be snug, and a second elastic at the same spot can help if your hair is slippery. If the hair is freshly washed, that extra grip matters even more.
A fine-hair bubble braid looks best when it feels airy, not puffy in a forced way. Light touch. Small sections. Clean lines.
13. Bubble Braid with Face-Framing Pieces
Face-framing pieces soften the whole look. They keep a bubble braid from feeling too severe, which matters if you are wearing a strong part or a high ponytail that pulls the hair back hard.
I usually leave out two slim sections near the front, somewhere between 1/2 inch and 1 inch wide, depending on the haircut. If the pieces are too thick, they overwhelm the braid. Too thin, and they disappear. The sweet spot is enough to move around your cheekbones without getting in your way.
What Makes the Front Pieces Work
A little shape at the front changes the whole balance of the hairstyle. The bubbles can stay simple, but the face-framing strands make the style feel softer and more personal. If you like curtain bangs, let them do their thing and keep the rest sleek.
- Leave the front pieces out before tying the ponytail
- Curl them away from the face if you want a neater finish
- Keep the bubble spacing slightly looser so the style does not feel overbuilt
- Use a tiny bit of serum on the ends if they fray
Best tip: if your haircut already has layers around the face, do not over-style those pieces. Let the cut help you.
14. Bubble Braid Bun Hybrid
The neatest bubble braid might be the one that ends in a bun.
This hybrid starts like a regular bubble ponytail, but the tail gets wrapped into a bun at the end instead of hanging down. That gives you the texture of the bubbles and the tidy finish of a bun, which is useful when the weather is warm or your day involves too much chair time.
Fast. Surprisingly tidy.
Build 3 bubbles down the ponytail, then coil the remaining length around the base and pin it in place with two bobby pins crossed like an X. If the bun feels too smooth, pull one bubble a little wider before pinning. That extra bit of texture keeps the style from looking too flat.
A tiny strand of hair wrapped over the pins makes the whole thing look cleaner. It takes less than a minute and hides the boring part of the work.
15. Bubble Braid with Mini Scrunchies
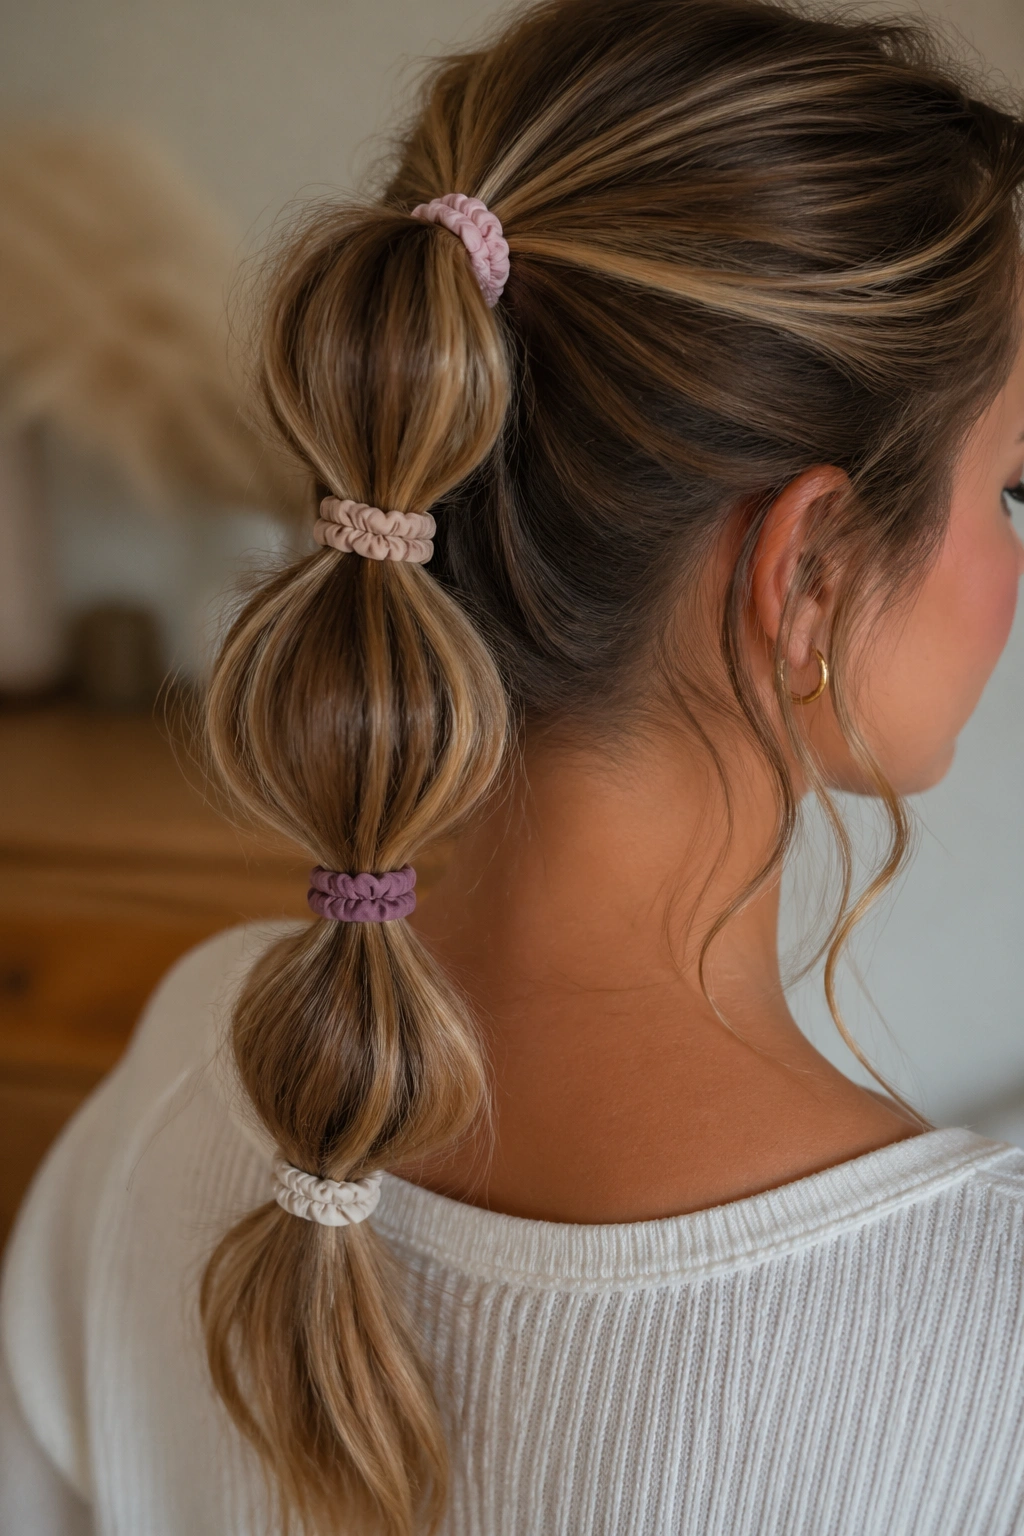
Why use mini scrunchies instead of plain elastics? Because the scrunchies become part of the look instead of hiding inside it.
This version is cute in a very direct way. The scrunchies add texture, color, and a softer outline around each section, which means you do not need much else. Slim velvet, cotton, or satin mini scrunchies work best. Big ones can swallow the bubbles whole.
How to Keep It from Getting Bulky
The trick is to keep the section sizes consistent and the scrunchies small. If the hair is very fine, avoid plush fabric that adds too much puff around the tie. If the hair is thick, choose firmer bands so the scrunchies do not slide.
- Use 1-inch mini scrunchies
- Keep the bubbles about 2 inches apart
- Match the scrunchie color to your outfit or shoes
- Limit the style to 3 or 4 scrunchies so it stays neat
This is the version for days when you want the style to feel a little playful without needing extra pins or tools.
16. Sporty Bubble Braid for Workouts
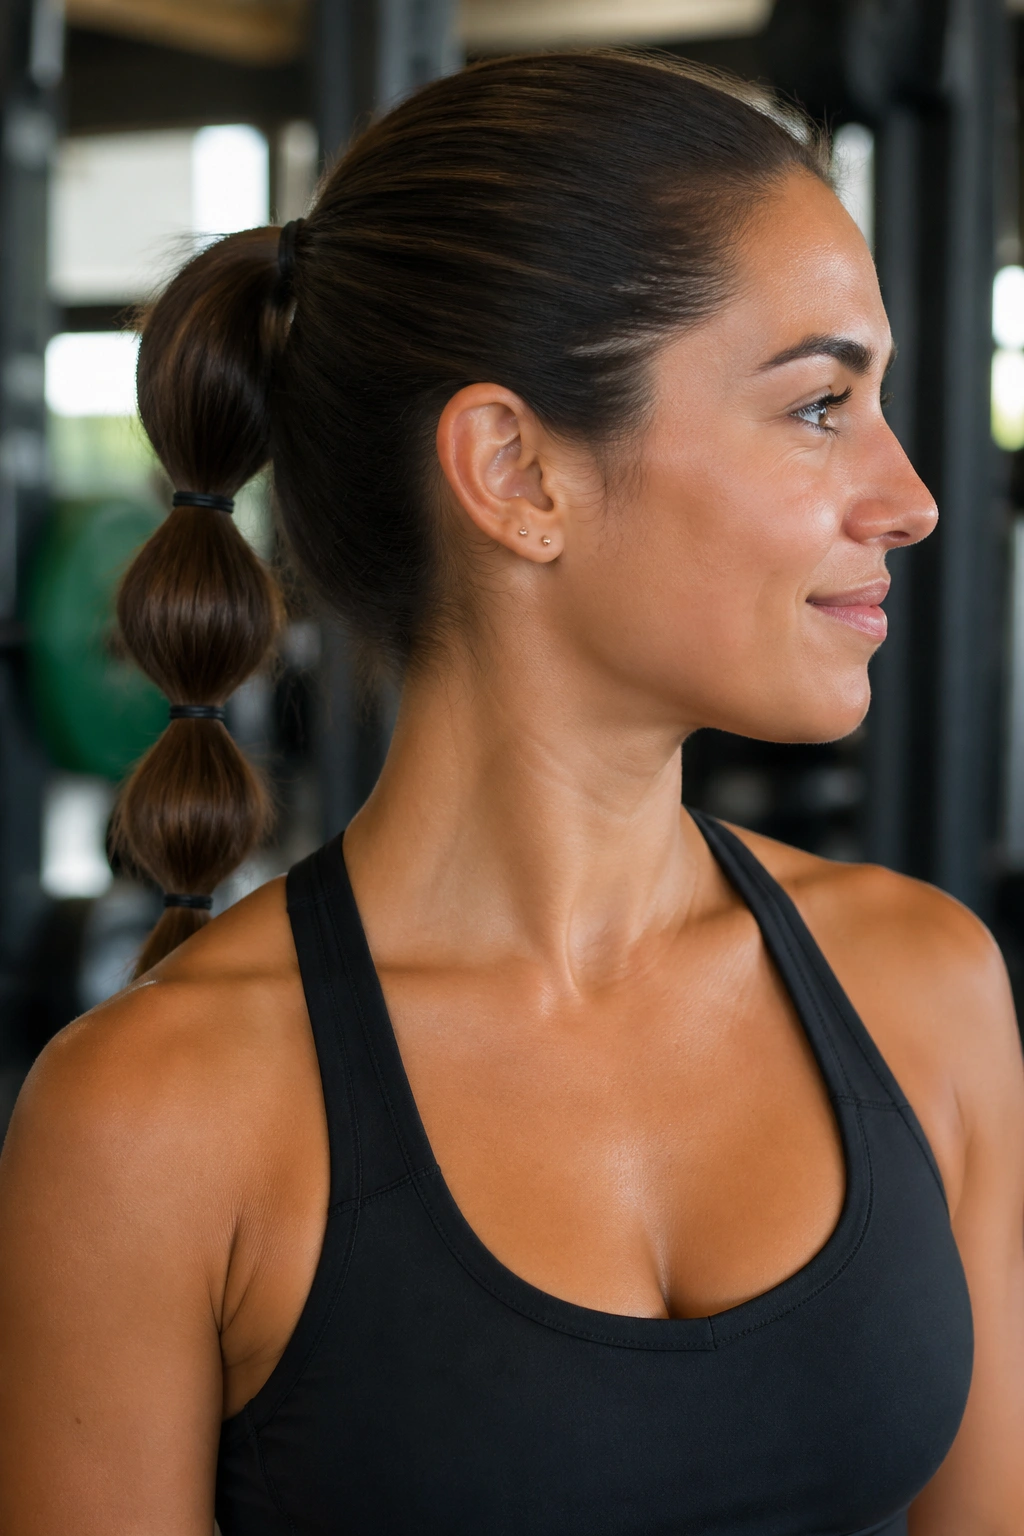
A gym version should stay put before it looks cute.
That means a low or mid ponytail, snug elastics, and not much drama. You want the hair secured so it does not bounce into your face when you run, lift, or ride. A sporty bubble braid does that well because the sections stay separated without creating the weight of a full braid.
Use snag-free elastics if your hair tangles easily, and keep the bubbles small enough that they do not swing around. Three bubbles are usually enough for a workout version. More than that can start to feel decorative instead of useful.
- Tie the base tightly enough to hold, not so tight that it hurts
- Smooth the hairline with a little gel or a sweat-resistant cream
- Skip heavy accessories; they move too much
- Add a headband if you want the front layers off your face
Function first. Cute second. That order saves you from messing with your hair mid-set.
17. Wrapped-Elastic Bubble Braid
Wrapped elastics clean up the whole style.
Instead of leaving the hair ties visible, you use a thin strand of hair from the tail to cover each one. It takes a little more time than clear bands, but the result looks tidier and more finished. Once you know the motion, it moves quickly. The first time feels fiddly. The second time is easier. The third time is muscle memory.
Take a 1/4-inch strand from the underside of each section, twist it tight, and wrap it around the elastic until the band disappears. Pin the end underneath the bubble with a bobby pin. If the hair is slippery, a tiny bit of hairspray on the wrapped strand helps it hold.
I like this version when the outfit is simple and the hair needs to look cleaner than a standard ponytail. It is also nice for interviews, dinners, or any day when you do not want obvious elastics showing through the style. Small work. Neat payoff.
18. Bubble Braid with Hair Cuffs
Hair cuffs do one thing well: they make the bubbles look sharper.
Unlike ribbons or scrunchies, cuffs add a little metal structure without changing the whole shape of the style. They work especially well when the rest of the look is plain — a black top, a white shirt, a simple dress. The cuffs do the visual lifting, so you do not need extra tricks.
This version is at its best with 3 or 4 bubbles and a few cuffs spaced through the tail. Place them just below the elastic instead of right on top of it; that keeps them from wobbling. Gold reads warmer, silver feels cooler, and both look better when they match the rest of your jewelry.
If your hair is fine, use lighter cuffs so they do not slide. If your hair is thick, a slightly heavier cuff can sit more securely. The style is simple. That is why the details matter.
19. Scarf-Wrapped Bubble Braid
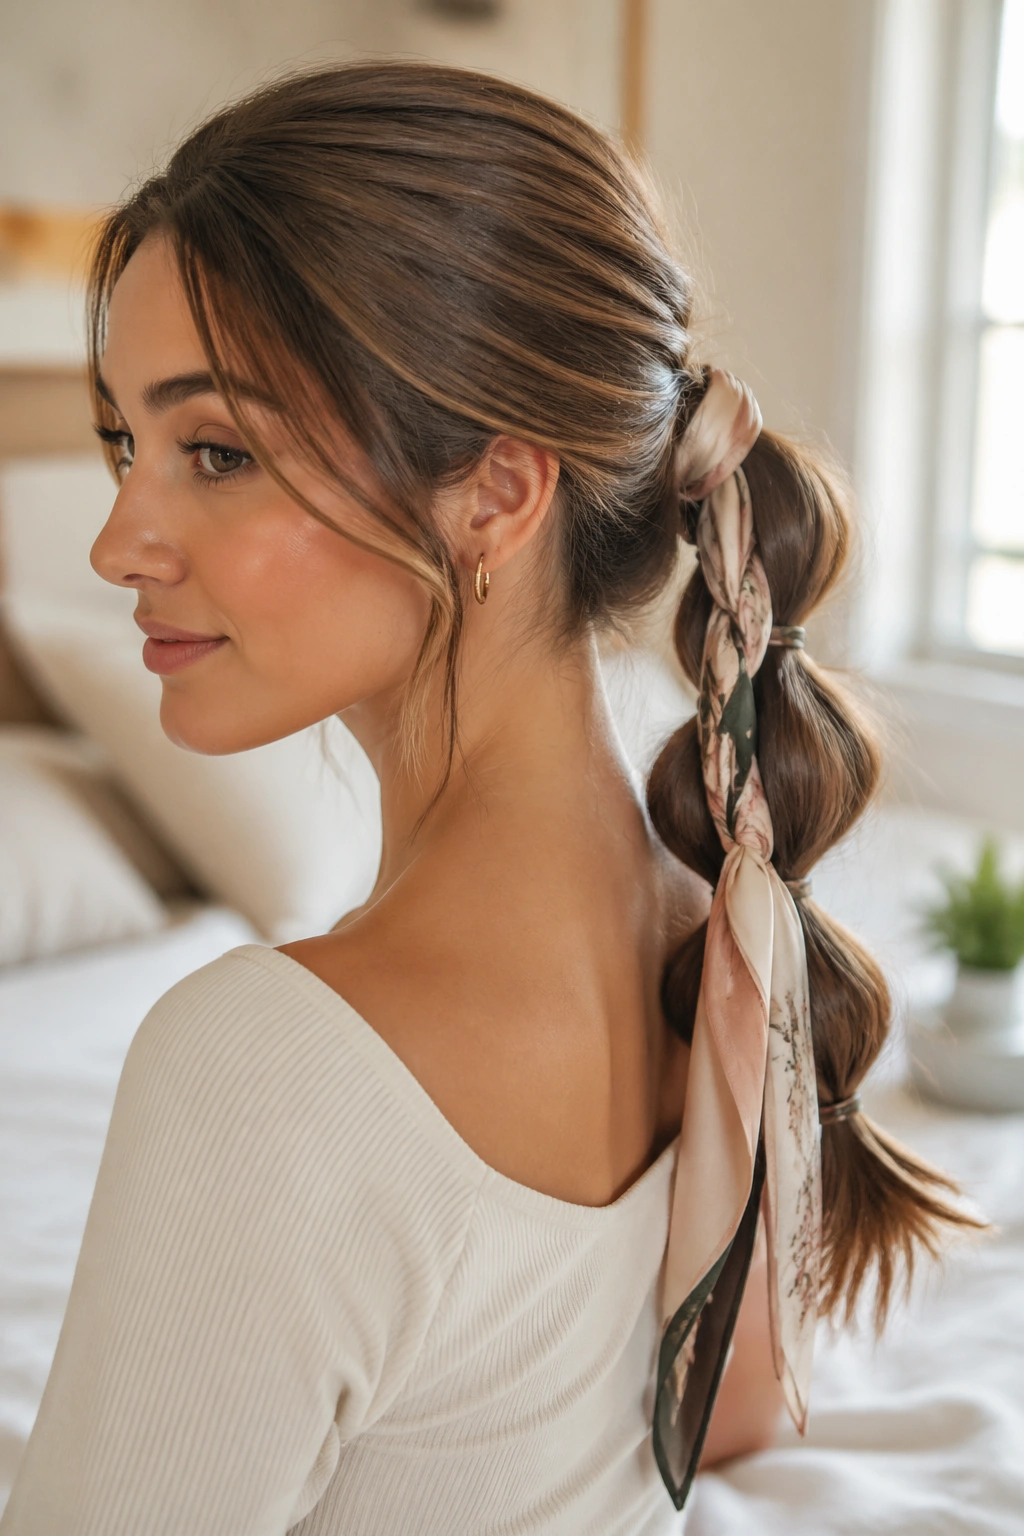
A scarf is the fastest way to make a bubble braid feel finished.
This version works especially well when you want something that looks styled but not stiff. Tie a lightweight silk or satin scarf at the base of the ponytail, then weave it loosely between the bubbles or let it trail down one side. A square scarf folded into a strip works too, as long as it is not bulky. Thick fabric fights the shape.
How to Use the Scarf Without Overdoing It
Keep the scarf narrow enough to move with the braid. If it is too wide, it starts to look like the scarf is wearing you. A 1- to 2-inch strip is usually enough. Tie it securely at the base, then let the ends hang or knot them near the last bubble for a neat finish.
- Choose a light fabric that drapes well
- Keep the bubbles simple so the scarf stays the focal point
- Use one strong color or print, not three
- Avoid heavy winter scarves; they flatten the tail
If you want one decorated bubble braid that still feels fast, this is the one I would pick. It works with denim, dresses, and plain tees, and it does not need much more than a brush, a few elastics, and a scarf you already own.